
По умолчанию, все операционные системы семейства Windows автоматически получают и обновляют корневые сертификаты с сайта Microsoft. Компания MSFT в рамках программы корневых сертификатов Microsoft Trusted Root Certificate Program, ведет и публикует в своем онлайн хранилище сертификаты для клиентов и устройств Windows. Если проверяемый сертификат в своей цепочке сертификации относится к корневому CA, который участвует в этой программе, Windows автоматически скачает с узла Microsoft Update и добавит такой корневой сертификат в доверенные на вашем компьютере.
Windows запрашивает обновление списка корневых сертификатов (certificate trust lists — CTL) один раз в неделю. Если в Windows отсутствует прямой доступ к каталогу Windows Update, то система не сможет обновить корневые сертификаты, соответственно у пользователя могут быть проблемы с открытием сайтов (SSL сертификаты которых подписаны недоверенными CA, см. статью об ошибке в Chrome Этот сайт не может обеспечить безопасное соединение), либо с установкой запуском подписанных приложений или скриптов.
В этой статье попробуем разобраться, как в Windows вручную обновить список корневых сертификатов в TrustedRootCA в изолированных сетях, или компьютерах/серверах без прямого подключения к Интернету.
Содержание:
- Управление корневыми сертификатами в Windows 10 и 11
- Включить/отключить автоматическое обновление корневых сертификатов в Windows
- Ручное обновление корневых сертификатов в Windows 10 и 11
- Список корневых сертификатов в формате STL
- Обновление корневых сертификатов в Windows с помощью GPO в изолированных средах
- Обновление корневых сертификатов в Windows 7
- Утилита rootsupd.exe для обновления сертификатов в Windows XP
Примечание. Если ваши компьютеры выходят в Интернет через прокси-сервер, для автоматического обновления корневых сертификатов Microsoft рекомендует открыть прямой доступ (bypass) к веб-узлам Microsoft. Но это не всегда возможно/применимо.
Управление корневыми сертификатами в Windows 10 и 11
Как посмотреть список корневых сертификатов на устройстве Windows?
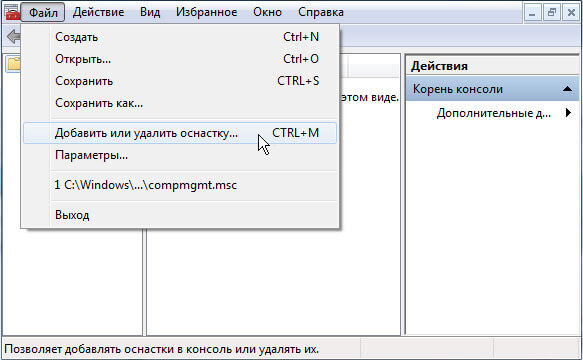
- Чтобы открыть хранилище корневых сертификатов компьютера в Windows /Windows Server, запустите консоль
mmc.exe
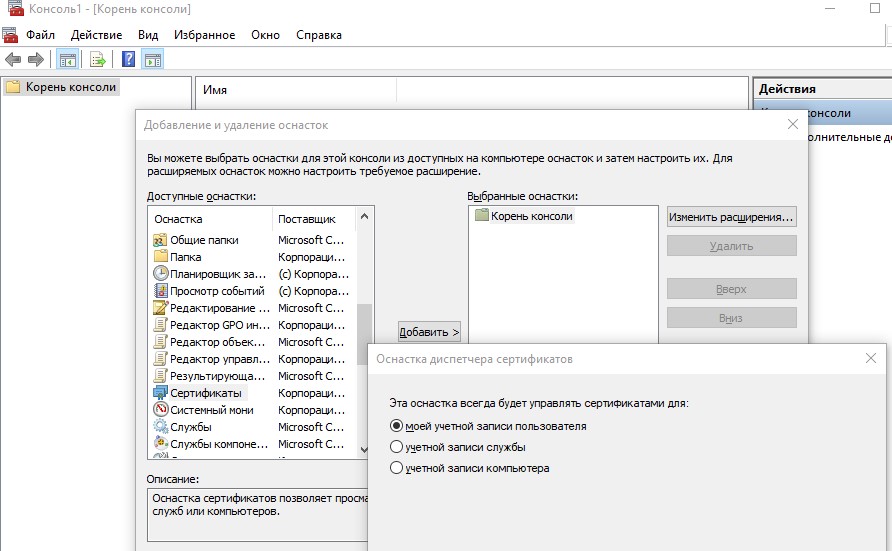
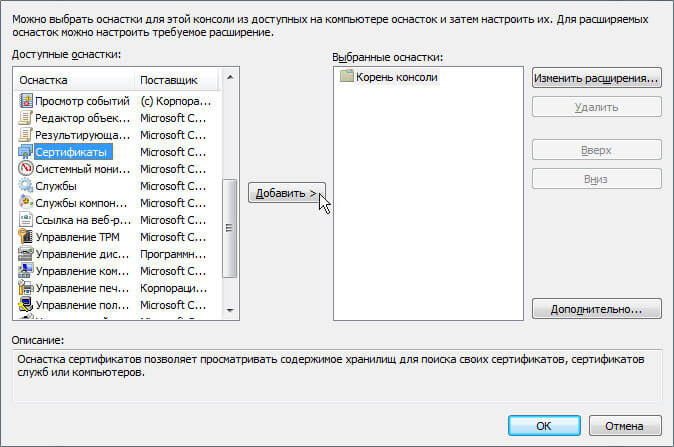
; - Нажмите Файл (File) -> Добавить или удалить оснастку (Add/Remove Snap-in), в списке оснасток выберите Сертификаты (Certificates) -> Добавить (Add);
- В диалоговом окне выберите что вы хотите управлять сертификатами учетной записи компьютера (Computer account);

- Далее -> Ok -> Ok;
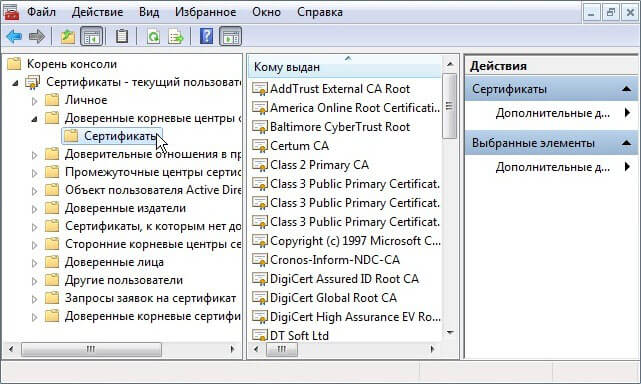
- Разверните Certificates (Сертификаты) -> Trusted Root Certification Authorities Store (Доверенные корневые сертификаты). В этом списке содержится список доверенных корневых сертификатов вашего компьютера.
Вы можете вывести список доверенных корневых сертификатов на вашем компьютере со сроками их действия с помощью PowerShell:
Get-Childitem cert:\LocalMachine\root |format-list
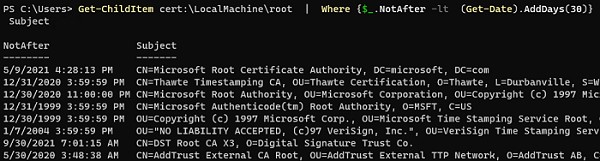
Можно вывести список истекших сертификатов, или которые истекут в ближайшие 30 дней:
Get-ChildItem cert:\LocalMachine\root| Where {$_.NotAfter -lt (Get-Date).AddDays(30)} |select NotAfter, Subject
В целях безопасности рекомендует периодически проверять хранилище доверенных сертификатов на наличие поддельных сертификатов с помощью утилиты Sigcheck. Утилита позволяет сравнить список сертификатов, установленных на компьютере со списком корневых сертификатов на сайте Microsoft (можно скачать офлайн файл с актуальными сертификатами authrootstl.cab).
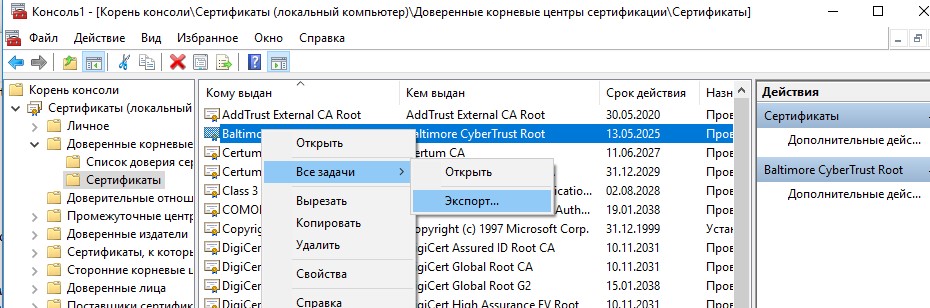
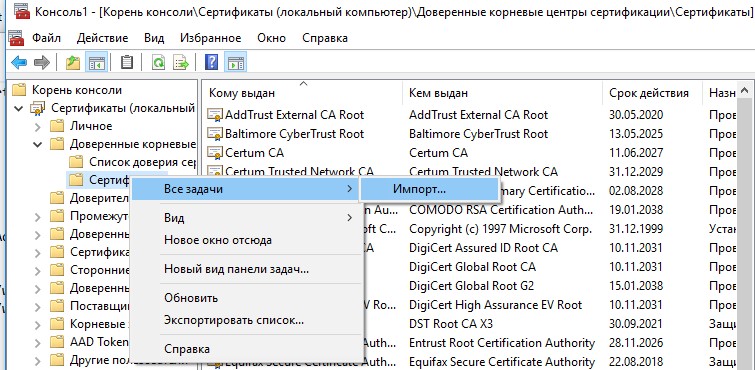
Вы можете вручную перенести файл корневого сертификата с одного компьютера на другой с помощью функцию Экспорта/Импорта.
- Вы можете экспортировать любой сертификат .CER в файл, щелкнув по нему и выбрав “Все задачи” -> “Экспорт”;

- Затем с помощью команды Импорт можно импортировать этот сертификат на другом компьютере.


Включить/отключить автоматическое обновление корневых сертификатов в Windows
Как мы уже упомянули, Windows по умолчанию сама обновляет корневые сертификаты. Вы можете включить или отключить обновление сертификатов в Windows через GPO или реестр.
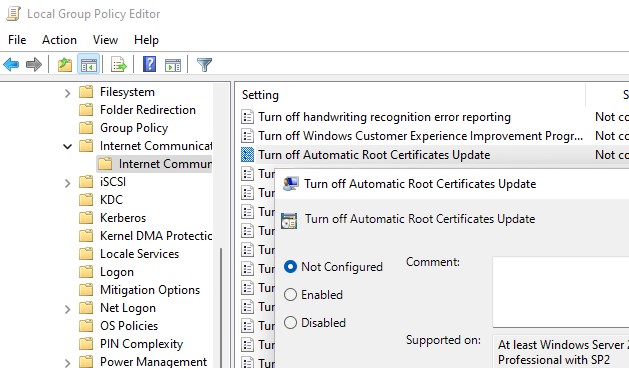
Откройте локальный редактор групповой политики (gpedit.msc) и перейдите в раздел Computer Configuration -> Administrative Templates -> System -> Internet Communication Management -> Internet Communication.
Параметр Turn off Automatic Root Certificates Update в этом разделе позволяет отключить автоматическое обновление корневых сертификатов через сайт Windows Update. По умолчанию это политика не настроена и Windows всегда пытается автоматически обновлять корневые сертификаты.
Если эта политика не настроена, а сертификаты не обновляются автоматически, проверьте не включен ли вручную параметр реестра, отвечающий за эту настройку. Проверьте значение параметра реестра с помощью PowerShell:
Get-ItemProperty -Path 'HKLM:\Software\Policies\Microsoft\SystemCertificates\AuthRoot' -Name DisableRootAutoUpdate
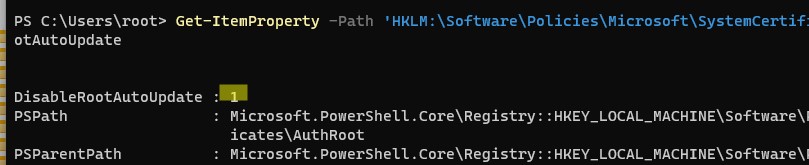
Если команда вернет, что значение ключа
DisableRootAutoUpdate=1
, значит на вашем компьютере отключено обновление корневых сертификатов. Чтобы включить его, измените значение параметра на 0.
Ручное обновление корневых сертификатов в Windows 10 и 11
Утилита управления и работы с сертификатами Certutil (появилась в Windows 10, для Windows 7 доступна в виде отдельного обновления), позволяет скачать с узлов Windows Update и сохранить в SST файл актуальный список корневых сертификатов.
Для генерации SST файла, на компьютере Windows 10/11 с доступом в Интернет, выполните с правами администратора команду:
certutil.exe -generateSSTFromWU c:\PS\roots.sst
Updated SST file.
CertUtil: -generateSSTFromWU command completed successfully.

В результате в целевом каталоге появится файл SST, содержащий актуальный список сертификатов. Дважды щелкните по нему для открытия. Данный файл представляет собой контейнер, содержащий доверенные корневые сертификаты.
В указанном каталоге появится файл SST, содержащий актуальный список сертификатов. Данный файл представляет собой контейнер, содержащий доверенные корневые сертификаты. Дважды щелкните по нему.
В открывшейся
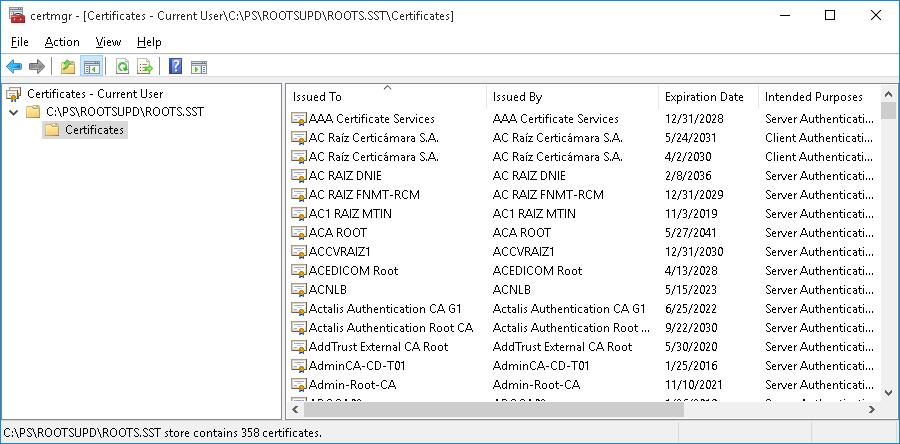
mmc
консоли вы можете экспортировать любой из полученных сертификатов. В моем случае, список сертификатов содержал 436 элементов. Естественно, экспортировать сертификаты и устанавливать по одному не рационально.
Для установки всех сертификатов из SST файла и добавления их в список корневых сертификатов компьютера можно воспользоваться командами PowerShell:
$sstStore = ( Get-ChildItem -Path C:\ps\rootsupd\roots.sst )
$sstStore | Import-Certificate -CertStoreLocation Cert:\LocalMachine\Root
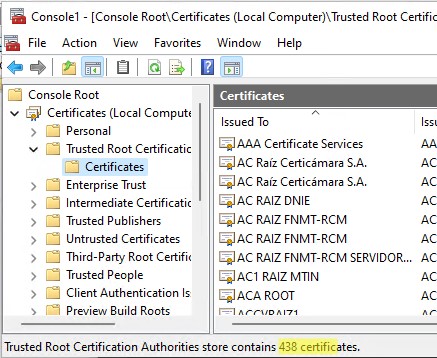
Запустите оснастку certmgr.msc и убедитесь, что все сертификаты были добавлены в хранилище Trusted Root Certification Authority. В нашем примере на Windows 11 количество корневых сертификатов увеличилось с 34 до 438.
Чистая копия Windows после установки содержит в корневом хранилище лишь небольшое количество сертификатов. Если компьютер подключен к интернету, остальные корневые сертификаты будут устанавливаться автоматически (по требованию), если ваше устройство попытается получить доступ к HTTPS сайту/SSL сертификату, в чей цепочке доверия есть отпечаток из CTL Microsoft. Поэтому как правило, нет необходимости добавлять в свое локальное хранилище сразу все сертификаты, доверенные Microsoft.
Список корневых сертификатов в формате STL
Есть еще один способ получения списка сертификатов с сайта Microsoft. Для этого нужно скачать файл http://ctldl.windowsupdate.com/msdownload/update/v3/static/trustedr/en/authrootstl.cab (обновляется дважды в месяц).С помощью любого архиватора (или проводника Windows) распакуйте содержимое архива authrootstl.cab. Он содержит один файл authroot.stl.

Файл authroot.stl представляет собой контейнер со списком отпечатков (thumbprint) доверенных сертификатов Microsoft в формате Certification Trust List.
Данный файл можно установить в системе с помощью утилиты certutil:
certutil -enterprise -f -v -AddStore "Root" "C:\PS\authroot.stl"

Root "Trusted Root Certification Authorities"
CTL 0 added to store.
CertUtil: -addstore command completed successfully.
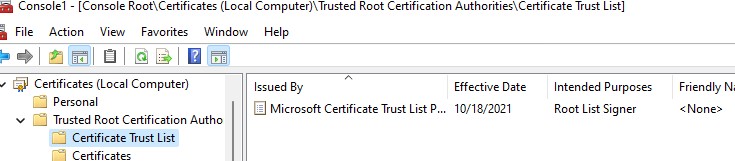
Также вы можете импортировать сертификаты из консоли управления сертификатами (Trust Root CertificationAuthorities –>Certificates -> All Tasks > Import). Укажите путь к вашему STL файлу сертификатами.
После выполнения команды, в консоли управления сертификатами (
certmgr.msc
) в контейнере Trusted Root Certification Authorities (Доверенные корневые сертификаты) появится новый раздел с именем Certificate Trust List (Список доверия сертификатов).
Аналогичным образом можно скачать и установить список с отозванными сертификатами, которые были исключены из программы Root Certificate Program. для этого, скачайте файл disallowedcertstl.cab (http://ctldl.windowsupdate.com/msdownload/update/v3/static/trustedr/en/disallowedcertstl.cab), распакуйте его и добавьте в раздел Untrusted Certificates командой:
certutil -enterprise -f -v -AddStore disallowed "C:\PS\disallowedcert.stl "
Обновление корневых сертификатов в Windows с помощью GPO в изолированных средах
Если у вас возникла задача регулярного обновления корневых сертификатов в изолированном от Интернета домене Active Directory, есть несколько более сложная схема обновления локальных хранилищ сертификатов на компьютерах домена с помощью групповых политик. В изолированных сетях Windows вы можете настроить обновление корневых сертификатов на компьютерах пользователей несколькими способами.
Первый способ предполагает, что вы регулярно вручную скачиваете и копируете в вашу изолированную сеть файл с корневыми сертификатами, полученный так:
certutil.exe –generateSSTFromWU roots.sst
Затем сертификаты из данного файла можно установить через SCCM или PowerShell логон скрипт в GPO:
$sstStore = ( Get-ChildItem -Path \\dc01\SYSVOL\winitpro.ru\rootcert\roots.sst )
$sstStore | Import-Certificate -CertStoreLocation Cert:\LocalMachine\Root
Второй способ предполагает получение актуальных корневых сертификатов с помощью команды:
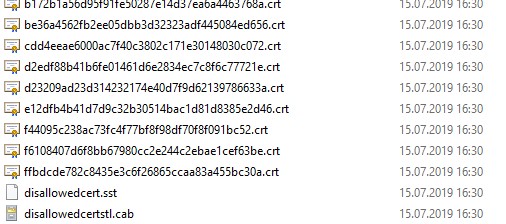
Certutil -syncWithWU -f \\dc01\SYSVOL\winitpro.ru\rootcert\
В указанном сетевом каталоге появится ряд файлов корневых сертификатов (CRT) и в том числе файлы (authrootstl.cab, disallowedcertstl.cab, disallowedcert.sst, thumbprint.crt).
Затем с помощью GPP нужно изменить значение параметра реестра RootDirURL в ветке HKLM\Software\Microsoft\SystemCertificates\AuthRoot\AutoUpdate. Этот параметр должен указывать на сетевую папку, из которой клиентам нужно получать новые корневые сертификаты. Перейдите в секцию редактора GPO Computer Configuration -> Preferences -> Windows Settings -> Registry. И создайте новый параметр реестра со значениями:
Action: Update
Hive: HKLM
Key path: Software\Microsoft\SystemCertificates\AuthRoot\AutoUpdate
Value name: RootDirURL
Type: REG_SZ
Value data: file://\\dc01\SYSVOL\winitpro.ru\rootcert\
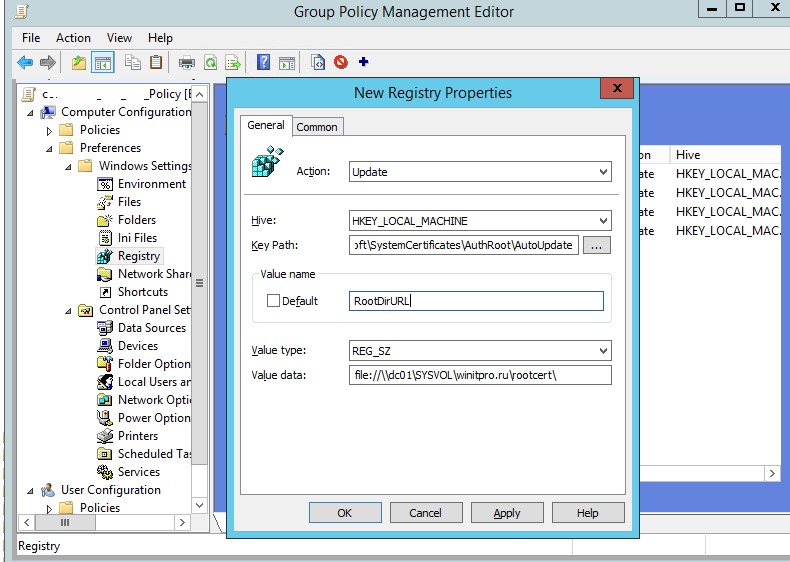
Осталось назначить эту политику на компьютеры и после обновления настроек GPO на клиенте проверить появление новых корневых сертификатов в хранилище.
Политика Turn off Automatic Root Certificates Update в разделе Computer Configuration -> Administrative Templates -> System -> Internet Communication Management -> Internet Communication settings должна быть выключена или не настроена.
Обновление корневых сертификатов в Windows 7
Несмотря на то, что Windows 7 уже снята с поддержки, есть много пользователей и компаний, в которых она еще используется.
После установки чистой Windows 7 из образа вы может столкнуться, что многие современные программы и инструменты на ней не работают из-за того, что они подписаны с помощью новых сертификатов. В частности, были жалобы, что в Windows 7 64 без обновления сертификатов не удается установить .Net Framework 4.8. или
vs_Community.exe с ошибкой:
installer manifest failed signature validation
Чтобы обновить корневые сертификаты в Windows 7, нужно скачать и установить MSU обновление: KB2813430.
После этого вы можете использовать утилиту certutil для генерации SST файла с сертификатами (на этом или на другом компьютере):
certutil.exe -generateSSTFromWU c:\ps\roots.sst
Теперь можно импортировать сертификаты в доверенные:
MMC -> add snap-in -> certificates -> computer account > local computer. Перейдите в раздел Trusted root certification authority, выберите All Tasks -> Import, найдите ваш SST файл (в типе файлов выберите Microsoft Serialized Certificate Store — *.sst) -> Open -> Place all certificates in the following store -> Trusted Root Certification Authorities
Утилита rootsupd.exe для обновления сертификатов в Windows XP
В Windows XP для обновления корневых сертификатов использовалась утилита rootsupd.exe. В этой утилита содержится список корневых и отозванных сертификатов, зашитых в которой регулярно обновлялся. Сама утилита распространялась в виде отдельного обновления KB931125 (Update for Root Certificates).
- Скачайте утилиту rootsupd.exe, перейдя по ссылке (по состоянию на 15.07.2019 ссылка не работает, возможно в Microsoft решили убрать ее из общего доступа. На данный момент вы можете скачать утилиту с сайта kaspersky.com — http://media.kaspersky.com/utilities/CorporateUtilities/rootsupd.zip);
- Для установки корневых сертификатов Windows, достаточно запустить файл rootsupd.exe. Но мы попробуем более внимательно рассмотреть его содержимое, распаковав его с помощью команды:
rootsupd.exe /c /t:C:\PS\rootsupd
- Сертификаты содержатся в SST файлах: authroots.sst, delroot.sst и т.п. Для удаления/установки сертификатов можно воспользоваться командами:
updroots.exe authroots.sst
updroots.exe -d delroots.sst
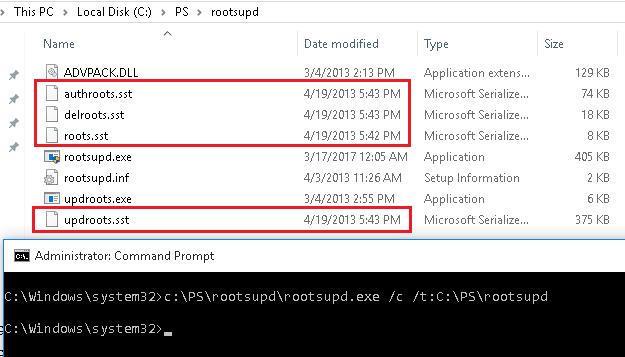
Но, как вы видите, дата создания этих файлов 4 апреля 2013 (почти за год до окончания официальной поддержки Windows XP). Таким образом, с этого времени утилита не обновлялась и не может быть использована для установки актуальных сертификатов. Однако нам чуть позже понадобится файл updroots.exe.
Была информация, что утилиту updroots.exe нежелательно использовать в современных билдах Windows 10 1803+, т.к. она может сломать корневой сертификат Microsoft Root Certificate Authority.
В этой статье мы рассмотрели несколько способов обновления корневых сертификатов на компьютерах Windows, изолированных от Интернета.
Обновление сертификатов (для всех версий Windows)
Шаг 1. Удаление старых сертификатов из контейнера cacer.p7b
В проводнике наберите в адресной строке адрес: «mmc.exe» (без кавычек) и нажмите Enter.
Откроется окно консоли управления Microsoft.
В основном меню консоли, выберите «Файл» — «Добавить или удалить оснастку». Будет открыто окно «Добавление и удаление оснасток».
В левом списке выберите пункт «Сертификаты» и нажмите на кнопку «Добавить». Будет открыто окно «Оснастка диспетчера сертификатов».

Нажмите на кнопку «Готово». Окно «Оснастка диспетчера сертификатов» будет закрыто, Вы вернетесь в окно консоли управления Microsoft.
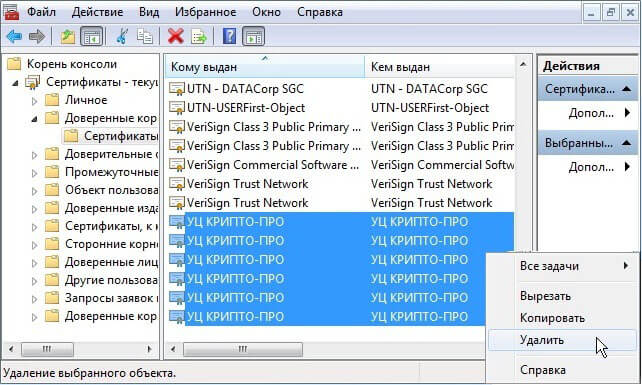
В левом списке раскройте дерево «Сертификаты — текущий пользователь». Раскройте пункт «Доверенные корневые центры сертификации». Выберите пункт «Сертификаты». В центральной части будут отображены сертификаты выбранного раздела.
В списке сертификатов (центральная часть) найдите сертификаты, выданные УЦ КРИПТО-ПРО (6 сертификатов). Выделите найденные сертификаты и нажмите правую кнопку мыши. В контекстном меню выберите пункт «Удалить».
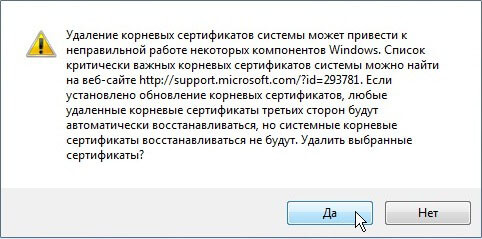
Будет открыто окно предупреждения. Сертификаты КРИПТО-ПРО не являются ключевыми и могут быть удалены без последствий. Нажмите «Да».
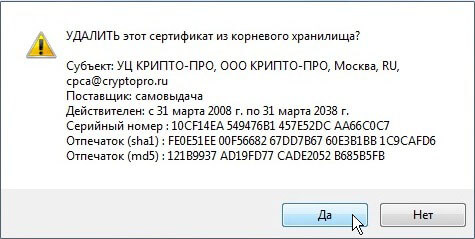
Перед удалением каждого из сертификатов контейнера будет выводиться окно подтверждения на удаление. Во всех окнах следует нажать кнопку «Да»
Шаг 2. Удаление старого сертификата безопасности для веб-узла сroInform.ru
В левом списке раскройте дерево «Сертификаты — текущий пользователь». Раскройте пункт «Другие пользователи». Выберите пункт «Сертификаты».
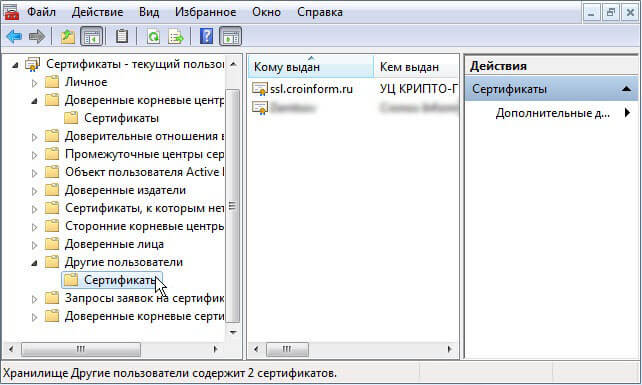
Нажмите правой кнопкой мыши на сертификате ssl.croinform.cer. В контекстном меню выберите пункт «Удалить».
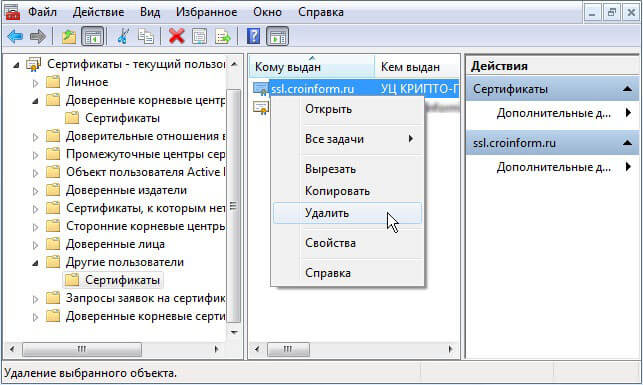
Появится окно предупреждения. Нажмите «Да». Сертификат ssl.croinform.cer будет удален.
Обратите внимание:
После удаления необходимо установить новые версии сертификатов. Для установки сертификатов, воспользуйтесь инструкцией для Вашей операционной системы:
Renewing SSL certificates is an essential task to ensure the secure communication of your website or application. In this tutorial, we will explore the steps to renew an SSL certificate on a Windows Server 2012 machine.
Step 1: Open the Internet Information Services (IIS) Manager. You can access it from the Start menu by searching for «IIS Manager.«
Step 2: In the IIS Manager, expand the server name and click on the «Server Certificates» option.
Step 3: Locate the expired SSL certificate that needs to be renewed, and select it. Right-click on the certificate and choose the «Renew…» option from the context menu.
Step 4: A new window will appear, guiding you through the certificate renewal process. Follow the instructions and provide the required information, such as the certificate signing request (CSR), if prompted.
Step 5: Once the renewal process is complete, you will receive the renewed SSL certificate. Save it to a secure location on your server.
Step 6: Go back to the IIS Manager and click on the «Server Certificates» option again. This time, choose the «Complete Certificate Request…» option.
Step 7: In the Complete Certificate Request window, browse and select the renewed SSL certificate file. Provide a friendly name for the certificate, and click on the «OK» button to complete the process.
| Pros | Cons |
|---|---|
| 1. Renewing SSL certificates ensures continuous secure communication. | 1. The process may vary slightly depending on the certificate provider. |
| 2. Avoid potential security risks and warnings associated with expired certificates. | 2. Renewal might incur additional costs depending on the certificate provider. |
| 3. Sustains trust and credibility for your website or application. | 3. Failure to renew SSL certificates can result in service interruptions. |
Renewing SSL certificates is a fundamental task for maintaining secure communication channels. By following the steps outlined in this tutorial, you can easily renew your SSL certificate on a Windows Server 2012 machine. Remember to keep track of certificate expiration dates and perform timely renewals to ensure the continued safety and trustworthiness of your online presence.
Video Tutorial: How do I renew an SSL certificate in Windows Server?
Can you renew an expired SSL certificate?
Yes, it is possible to renew an expired SSL certificate. When an SSL certificate reaches its expiration date, it becomes invalid and stops providing secure connections for your website. To renew an expired SSL certificate, follow these steps:
1. Check the expiration date: Determine the exact expiration date of your SSL certificate. This information can be found in your SSL provider’s account or by checking the SSL details on your website.
2. Contact your SSL certificate provider: Reach out to your SSL certificate provider and inform them about the expiration. Most providers send renewal reminders in advance, but if you missed those notifications, they can guide you through the renewal process.
3. Generate a renewal CSR (Certificate Signing Request): Depending on your SSL certificate provider, you may need to generate a renewal CSR. A CSR is an encrypted message that contains your website’s details, which will be used to issue the renewed SSL certificate.
4. Update your website’s configuration: Once you have obtained the renewed SSL certificate from your provider, you need to update your website’s configuration to replace the expired certificate. This involves installing the renewed certificate on your web server and configuring it correctly.
5. Test the renewed certificate: After updating the SSL certificate, it is crucial to test its functionality to ensure that secure connections are being properly established. Use online SSL checker tools or browser-based checks to validate the renewed certificate.
6. Update other systems: Apart from your web server, make sure to update any other systems or services that utilize the SSL certificate, such as load balancers, CDN settings, or email servers.
7. Set up proper certificate management: To avoid future SSL certificate expirations, consider implementing a proper certificate management process. This can involve setting up certificate expiration reminders, automating renewal procedures, and maintaining an organized inventory of your certificates with their expiry dates.
By following these steps and keeping your SSL certificates up to date, you can ensure that your website maintains secure and encrypted connections for your users.
How do I renew an expired certificate?
Renewing an expired certificate involves a few steps to ensure the certificate is up to date and secure. Here’s a step-by-step guide on how to renew an expired certificate:
1. Identify the expired certificate: Start by identifying the specific certificate that has expired. This is important as you need to know which certificate you’ll be renewing.
2. Generate a Certificate Signing Request (CSR): A CSR is a file containing information about the entity requesting the certificate renewal. This file needs to be submitted to the Certificate Authority (CA) for verification and issuance of a new certificate.
3. Contact the Certificate Authority: Reach out to the CA from where you initially obtained the certificate. This could be an external CA or an internal CA, depending on your organization’s setup. Inform them about the certificate renewal request and follow their procedures for renewing the certificate.
4. Complete the renewal process: The CA will provide instructions on how to complete the renewal process. This may involve submitting the CSR, verifying your identity, and paying any renewal fees if applicable.
5. Install the renewed certificate: Once the CA has processed the renewal request, they will issue a renewed certificate. Follow their instructions to install the renewed certificate on the appropriate server or device. This could involve replacing the expired certificate with the new one or adding the renewed certificate as a new entity.
6. Test the renewed certificate: After the installation, it’s crucial to test the renewed certificate to ensure everything is functioning correctly. Verify that the renewed certificate is being recognized by the intended services and check for any potential errors or issues.
7. Update associated systems: If the renewed certificate is used to secure web applications, APIs, or other systems, make sure to update any relevant configurations, such as updating the certificate in load balancers, reverse proxies, or web servers.
By following these steps, you should be able to successfully renew an expired certificate. However, it’s important to note that the exact process may vary depending on the specific certificate authority and the type of certificate you’re renewing. It’s always recommended to refer to the documentation provided by the certificate authority for accurate and up-to-date instructions.
How to check SSL certificate expiration date in Windows Server 2012 R2?
In Windows Server 2012 R2, you can check the SSL certificate expiration date using the following steps:
1. Open the Internet Information Services (IIS) Manager by clicking the Start button, navigating to Administrative Tools, and selecting Internet Information Services (IIS) Manager.
2. In the IIS Manager, expand the server’s name in the Connections pane on the left side.
3. Expand the Sites folder, then select the website for which you want to check the SSL certificate expiration date.
4. Double-click on the «SSL Settings» icon in the middle pane.
5. In the «SSL Settings» window, under the «Server Certificate» section, click on the «View…» button.
6. This will open the Certificate window. In the «Details» tab, scroll down to the «Valid to» field. The date listed in this field represents the expiration date of the SSL certificate.
Please note that these steps assume that the SSL certificate is already installed on the Windows Server and associated with the respective website in IIS. Additionally, this method applies specifically to Windows Server 2012 R2, and the steps might vary slightly in other versions of Windows Server.
How do I renew my expired server certificate?
To renew an expired server certificate, you will need to follow a few steps:
1. Identify the expiring certificate: Check your server configuration or certificate management system to identify the specific certificate that has expired. Note down the expiration date and gather any necessary information related to the certificate, such as the private key and certificate signing request (CSR).
2. Generate a new certificate signing request (CSR): A CSR is required to obtain a new certificate from a trusted certificate authority (CA). Use a tool or your web server’s documentation to generate a new CSR that matches the requirements of the CA.
3. Submit the CSR to a certificate authority: Choose a reputable certificate authority and submit your CSR for approval. Provide any additional information or documentation required by the CA to complete the verification process.
4. Complete the verification process: The CA will typically perform some form of verification to ensure you have the right to use the requested domain name. This may involve email verification, DNS records verification, or other methods specified by the CA.
5. Obtain the renewed certificate: Once the verification process is complete, the CA will issue a renewed certificate. Download or obtain the renewed certificate in the appropriate format for your server.
6. Install the renewed certificate: Replace the expired certificate on your server with the renewed certificate. This typically involves updating the SSL/TLS configuration of your server software, such as Apache or Nginx, to use the new certificate files.
7. Test the renewed certificate: After installing the renewed certificate, perform thorough testing to ensure it is installed correctly and working as expected. Test various aspects such as SSL/TLS handshake, secure connections, and any specific features or applications reliant on the certificate.
8. Update dependent services: If your renewed certificate is used by other services or applications, such as load balancers, proxies, or email servers, make sure to update those configurations to use the new certificate as well.
9. Monitor for future expiration: Set up reminders or alerts to monitor the expiration date of your renewed certificate. Implement a proactive renewal process to avoid service interruptions due to expired certificates in the future.
Remember that this answer is provided based on general knowledge and best practices for certificate renewal. The specific steps and requirements might vary depending on the certificate authority and the server software you are using. Always refer to official documentation and guidelines provided by your CA and server vendor.
How do I manually renew my SSL certificate?
Renewing an SSL certificate manually involves a few steps. Here’s a professional point of view on how to manually renew an SSL certificate:
1. Check the expiration date: Before renewing the SSL certificate manually, verify the expiration date of your current certificate. This information is essential to ensure timely renewal to avoid any disruption in your website’s security.
2. Generate a certificate signing request (CSR): If you already have a CSR, you can skip this step. Otherwise, generate a new CSR using a tool provided by your web server or hosting provider. The CSR contains your website’s public key and must match the private key associated with the SSL certificate.
3. Contact your certificate authority (CA): Reach out to your certificate authority to initiate the renewal process. Provide them with the CSR you generated or your existing certificate details. They will guide you through their specific renewal process, which may involve submitting the CSR and verifying your domain ownership.
4. Complete domain validation: Depending on the CA, you might need to complete domain validation to prove that you own and control the domain associated with the SSL certificate. This can be done through various methods like email validation, DNS record verification, or uploading a specific file to your website.
5. Receive and install the renewed certificate: Once domain ownership is validated, the CA will issue a renewed SSL certificate. You will receive the renewed certificate from the CA, typically in the form of a file. Install the new certificate onto your web server using the provided instructions or the web server control panel.
6. Test and verify the installation: After installing the renewed certificate, perform thorough testing to ensure the SSL certificate is applied correctly. Verify if your website loads over HTTPS without any warnings or errors. Additionally, check the certificate details to confirm its validity period and other relevant information.
7. Update SSL configurations: Finally, review and update any SSL configurations on your web server or hosting environment, ensuring that the renewed certificate is properly associated with the correct domains and virtual hosts. Check for any hard-coded certificate references or configurations that may need adjustment.
Remember, renewing SSL certificates is typically an annual process, so it’s vital to keep track of expiration dates and plan ahead to avoid any disruptions in your website’s security.
How to check SSL version in Windows Server 2012?
To check the SSL version in Windows Server 2012, follow these steps:
1. Open the Internet Information Services (IIS) Manager by clicking on the Start menu, typing «IIS» in the search box, and selecting the «Internet Information Services (IIS) Manager» from the results.
2. In the IIS Manager, expand your server name in the Connections pane on the left, and then expand the «Sites» folder.
3. Locate the website for which you want to check the SSL version and select it.
4. In the website’s Home pane, double-click on the «Bindings» option.
5. In the Site Bindings dialog box, you will see a list of bindings for the selected website. Look for the binding with the SSL certificate you want to check and select it. Click on the «Edit» button.
6. In the Edit Site Binding dialog box, you should see the SSL certificate selected, along with the SSL version being used. The SSL version will be specified in the «SSL certificate» section. It will mention either TLS or SSL followed by a version number (e.g., TLS 1.2).
7. Take note of the SSL version displayed, and click «Cancel» to exit the dialog boxes.
By following these steps, you should be able to check the SSL version used on a specific website in Windows Server 2012.
The below content is superseded — for information on updating your certificates please see:
- Token signing and decryption
- SSL certificate
Active Directory Federation Services (AD FS) heavily leverages X.509 certificates to allow the solution to function securely. As with all of the other certificates that you deploy within your enterprise, there must be a process to manage and renew certificates prior to them expiring. If a certificate expires this can be summarised quite simply as not good!
The Office 365 Portal will provide notifications to indicate that one or more of your AD FS certificates will expire shortly. This may be the SSL certificate, service communication certificate, token decryption or token signing certificates. If one of these are about to expire, you will get the alert as shown below in the Office 365 Portal.

Clicking the link in the alert will take you to: Renewing Federation Certificates for Office 365 and Azure AD. That will walk you through renewing the token decryption and token signing certificates. This blog post discusses renewing the SSL certificate and service communications certificate.
In the AD FS management console, the certificate expiration dates are highlighted.

The PowerShell commands to get the same information on the AD FS servers are: Get-AdfsCertificate and Get-AdfsSslCertificate
On the Web Application Proxy (WAP) servers we can use Get-WebApplicationProxySslCertificate. More on the PowerShell cmdlets later.
What’s The Worst That Can Happen If I Don’t Do This?
If you do not follow your process to renew AD FS certificates, or see the additional prompt in the Office 365 Portal, then expect the wheels to fall off the bus.
Users will be unable to access Office 365 services in most cases. The below are some images that you will most likely NOT want to see in production. The below SSL and service communication certificate has expired. The below images were taken after the 8th of February 2016.
If we then browse to the AD FS metadata page, IE is not happy either.

Clicking to continue on, we can then review the certificate.

Telling users that the above is situation is fine to proceed, is unacceptable and irresponsible on our part. All that we are doing is teaching people that it is OK to click here to either see the dancing pigs, or re-confirm your online banking credentials. Not good.
This is why it is critical that we proactively renew certificates so we provide a secure environment to users, and promote correct behaviours.
That’s enough doom and gloom, time to get back to ensuring this does not happen!
If we review Certificate Requirements for Federation Servers on TechNet, there are multiple certificate types that come into play. To list them out:
- Token-decryption certificate
- Token-signing certificate
- Secure Sockets Layer (SSL) certificate
- Service communication certificate
By default the token signing and token decryption certificates are self signed and will automatically manage themselves in the default configuration. As long as Office 365 is able to retrieve the AD FS metadata, then Office 365 automatically updates with no additional scripts or manual intervention. Note – this assumes that you are current on Windows updates, else the certificates do not roll over properly. Blog post on that later.
The last two are separate but are often blended together. By default, the service communication certificate uses the same certificate as the Secure Sockets Layer (SSL) certificate. Federation servers use a server authentication certificate, also known as a service communication for Windows Communication Foundation (WCF) Message Security.
Regarding the SSL certificate, Federation servers use an SSL certificate to secure Web services traffic for SSL communication with Web clients and with federation server proxies.
Because of this, we have two PowerShell commands to manage the SSL certificate and service communication certificate. The commands are Set-AdfsSslCertificate and Set-AdfsCertificate. They are very similar, and appear to be the same but are not.
If we look at them this way the difference is more apparent.
Set-AdfsSslCertificate
Set-AdfsCertificate
Keep in mind that there are two separate commands and we will come back to them later in the post.
Note that the GUI is not used in this post as it is not able to perform all of the changes we require to update the certificates in Windows Server 2012 R2 AD FS.
A high level overview of the steps we will perform are:
- Obtain new certificate
- Install new certificate on all AD FS servers
- Install new certificate on all WAP servers
- Set SSL certificate on all AD FS servers
- Set Service Communication certificate
- Set SSL certificate on all WAP servers
- Verify and test
Obtain New Certificate
This section is not only about requesting a new certificate, but also about ensuring that it is correctly installed and then preparing for the subsequent steps.
There are a few ways in which you can request a SSL/TLS certificate. Some Exchange people use the Exchange toolset to do this, though you may not be able to do so. In such cases we can use this process How To Request Certificate Without Using IIS or Exchange to manually generate the certificate request and process it directly on an AD FS 2012 R2 server. Please see the aforementioned blog post on the details, and how to edit the template. The certificate used here only has a subject name, there are no SAN entries. Your use case may also involve Device Registration, and have an additional name on the certificate.
We will generate the new certificate with the same name as before: adfs.tailspintoys.ca
Certreq.exe is used to generate the pending certificate request, which is called newcert.req.

The pending request (newcert.req) was then submitted and processed by the issuing CA. Follow the steps in your vendor’s documentation to complete this process. The signed response from the CA has been copied back to the same AD FS server and is the file called adfs_tailspintoys_ca.cer.
Certreq.exe is then used to mate the pending request with the signed CA response.

Part of my standard certificate drills are to then immediately check to ensure the following are OK:
-
Certificate subject name is correct – ensure there are no typos!
-
Certificate Subject Alternative Names (SAN) are correct – SAN names might not apply in your environment.
-
Valid from
-
Valid to
-
Certificate has private key
-
Certificate chains correctly
-
Any intermediate CA certificates that were required to be updated
The last point is important. With the move to SHA2 certificates, there is a good chance that a different intermediate issuing CA is going to be used. What is the best thing to do? Read the documentation from your CA provider, and follow the installation instructions that come with your certificate. Some vendors have a tool that does all this for you, others require you to manually install updated certs. Either will work, you must ensure that the requisite steps are performed.
We need to know the new certificate’s thumbprint so that we can specify it in later steps. To determine the thumbprint, one option is to list the certificates in the local machine store using PowerShell:
Get-ChildItem –Path Cert:LocalMachine\my
The above is the bare minimum to type, and will show all the certs in the local machine’s store. If you have several, the following command may be more beneficial:
Get-ChildItem -Path Cert:LocalMachine\my | Select-Object FriendlyName, Thumbprint, Subject, NotBefore, NotAfter
The thumbprint can also be obtained by looking at the certificate’s properties in the certificate MMC. Note the highlighted line below:
In this case the thumbprint is B4E3C4EC85B50BAD7CF5F8093EA546CF7F84674A – yours will be different.
Now we have our shiny new certificate. This needs to be exported out, and deployed to the other servers. To export the certificate, we can use the certificate MMC, just be sure to chose the option to export out the private key. Hint – if the file type is not .PFX then you have not chosen to export the private key. A strong password was set during the export operation, as we want to provide as much protection as possible.
Alternatively you can export out using Export-PfxCertificate.
Install New Certificate on All AD FS Servers
The certificate needs to be deployed onto the remaining AD FS servers. As with the export there are different ways to accomplish this. For example:
- Double click the .PFX file and import using wizard
- Open certificate manager, and import to the local computer’s personal store
- Use Import-PFX
As with the initial install, ensure the following are OK:
-
Valid from
-
Valid to
-
Certificate has private key
-
Certificate chains correctly
-
Any intermediate CA certificates that were required to be updated were updated
Install New Certificate on All WAP Servers
The same process to copy over and install the certificate needs to be followed on all WAP servers.
Set SSL certificate on all AD FS servers
Now that the new certificate has been deployed, onto all of the AD FS servers we can then enable it as the SSL certificate using PowerShell
Set-AdfsSslCertificate –Thumbprint XXXXXXXX
In our example this will be:
Set-AdfsSslCertificate –Thumbprint B4E3C4EC85B50BAD7CF5F8093EA546CF7F84674A
This step must be performed on all AD FS servers.
The AD FS service account[s] also require access to the new certificate’s key. If we look at the certificate’s private key permissions after running the previous command, note the ACLs that are present:
Manually adding those permissions was not required in this lab. In TechNet’s Obtain and Configure an SSL Certificate for AD FS article it states:
The following message will inform you that you need to set the private key permissions correctly on the new certificate: “Ensure that the private key for the chosen certificate is accessible to the service account for this Federation Service on each server in the farm.” Update the permissions on the SSL and the service communication certificates to allow Read access for the AD FS service and DRS services. You have to complete the following procedure on all federation servers in your farm.
We can look at the HTTPS.sys binding using netsh http show sslcert
Do NOT make modifications using netsh in AD FS 2012 R2. It is mentioned as a read only verification step here.
Set Service Communication certificate
This is where we come back to the two cmdlets referenced at the start of this post. In the previous section we ran the Set-AdfsSslCertificate cmdlet. Now we must also run the Set-ADFSCertificate to complete the process. Execute the Set-ADFSCertificate command only on the Primary ADFS node. If you are not sure which is primary, run Get-AdfsSyncProperties. Note this command is not to be executed on every AD FS server. It is to be executed once. Stating to execute the Set-ADFSCertificate on the primary is a simple statement and covers all cases.
We have to instruct AD FS to use the new certificate for the service communications cert. This is done using PowerShell:
Set-AdfsCertificate -CertificateType Service-Communications –Thumbprint XXXXXXX
In our example:
Set-AdfsCertificate -CertificateType Service-Communications –Thumbprint B4E3C4EC85B50BAD7CF5F8093EA546CF7F84674A

As prompted, restart the Active Directory Federation Services service (adfssrv) on all AD FS servers in the farm.
Set SSL certificate on all WAP servers
To enable the SSL certificate on the WAP servers, we need to run Set-WebApplicationProxySslCertificate on each server. Remember that the new certificate was previously deployed to all WAP servers. In this stage we are simply enabling it.
Set-WebApplicationProxySslCertificate -Thumbprint XXXX
In our example:
Set-WebApplicationProxySslCertificate -Thumbprint B4E3C4EC85B50BAD7CF5F8093EA546CF7F84674A

Verify and Test
At this point we need to test and ensure that AD FS is able to authentication and sign in clients internally and externally.
Cleanup –Optional
Once you have verified that all aspects of AD FS are functioning, you may want to go back and archive the old SSL certificates from the servers to keep the certificate stores clean.
Automating AD FS Service Certificate Change
If you wish to automate or script changing the SSL/TLS certificates, then you are in luck! Pierre Audonnet has published the below script to the TechNet scripting gallery to help with automating this change.

Bootnote
For reference TechNet has the following verbiage on the certificate cmdlets for AD FS servers.
The Set-AdfsSslCertificate cmdlet sets an SSL certificate for HTTPS bindings for Active Directory Federation Services (AD FS) and, if configured, the device registration service. The subject name of the specified certificate must match the federation service name. Use this cmdlet to change the SSL certificate associated with the AD FS service. You must run this cmdlet on each AD FS server in the AD FS farm
The Set-AdfsCertificate cmdlet sets the properties of an existing certificate that Active Directory Federation Services (AD FS) uses to sign, decrypt, or secure communications..
All of the AD FS Cmdlets in Windows PowerShell are listed here.
Cheers,
Rhoderick
Root Certificates are embedded within our operating system all around. These are also known as Trusted Root Certificates, created by the Certificate Authority (CA), accrediting that a website or software is who they claim they are. It is more like a digital certificate of authentication
By default, Windows 11 updates its root certificate over the internet through Windows Update at least once a week through a Trusted Root Certificate List (CTL). However, if your device is not connected to the internet, certificates will likely expire over time, thus causing certain scripts and applications to not function properly, or experience problems while browsing the internet.
Let us help you avoid this problem by showing you how to update your system’s Root Certificates.
Before we begin, let us guide you on how to see and manage the Root Certificates on Windows 11 and find out which certificates are expired or about to expire.
Table of Contents
View trusted root certificates using the Certificate MMC
Windows comes with various Management Consoles that are used for managing different aspects of the operating system. One of these consoles is the Certificate Management Console.
This is a convenient way to view and manage Root Certificates if you prefer the Graphical User Interface (GUI). Otherwise, you can also obtain the relevant information through Windows PowerShell, which we have discussed in the next section.
Follow the steps below to launch the Certificate Management Console:
- Start by typing in mmc.exe in Run to launch Microsoft Management Console.
- From the top menu, click File and then click Add/remove snap-in.

- From the pop-up window, select Certificates under “Available Snap-ins” and then click Add.
- In the next window, select Computer account and click Next.
- Leave the default setting on the next page and click Finish.
- Back in the Add/Remove Snap-in window, click OK.
- Now, on the console, navigate to the following using the left pane:
Certificates (Local Computer) >> Trusted Root Certification Authorities >> Certificates


Here, you can view all the active and expired Root Certificates on your machine in the middle pane. It also states CA under the “Issued by” column, as well as the expiry date in another column.
View trusted root certificates using Windows PowerShell
Another way to obtain the information on the Root Certificates is through PowerShell. Run the following command in Windows PowerShell with administrative privileges to obtain the details:
Get-Childitem cert:\LocalMachine\root |format-list
As you may notice, this command provides the details on all Root Certificates, which may be a bit overwhelming for some. If you want the details on the expired certificates, use the following command:
Get-ChildItem cert:\LocalMachine\root | Where {$_.NotAfter -lt (Get-Date).AddDays(40)}
Now that you know how to manage the Root Certificates, let us update them.
Update root certificates from a remote computer
One way to update the Root Certificate(s) is to copy a valid certificate from another computer that is already installed, and then re-install it on your device. The process is simple as Windows is already equipped to export and import Root Certificates. However, to do this, make sure that both the source and the destination operating systems are the same.
We have divided this method into “Exporting a Root Certificate” and “Importing a Root Certificate” for your convenience.
Export Root Certificates
You need to begin by identifying the certificate that you need to update. Once done, follow the steps below to export the certificate:
- Open the Certificate Management Console on the source computer (as discussed earlier in this post).
- From there, right-click on the certificate that you want to move to another device, expand All Tasks from the context menu, and then click Export.
- The Certificate Export Wizard will now be open. On the welcome screen, click Next.
- Click Next on the next screen while leaving the default settings.
- On the next screen, click Browse and save the .cer file with a name of your choice, then click Next.
- On the final screen, confirm the settings and click Finish. Then click Ok on the confirmation dialog box.


You will now see the exported .cer file at the destination you chose in step 5. Copy this file onto a USB flash drive and plug it into the target system for the Root Certificate to be installed.
Import Root Certificates
Now paste the .cer file from the flash drive to anywhere with the OS and follow the steps below to import it.
- Open the Certificate Management Console on the source computer and navigate to the Certificates folder from the left pane.
- Right-click Certificates, expand All Tasks, and click Import from the context menu.
- On the welcome screen of Certificate Import Wizard, click Next.
- Click Browse on the next screen and select the .cer file which has been exported from another computer, then click Next.
- Now select “Automatically select the certificate store based on the type of certificate” and click Next.
- On the final screen of the wizard, click Finish.


The certificate will now be updated on your computer which you can see through the Certificate Management Console.
Another way to install this exported certificate is directly through the .cer file. Double-click the .cer file to launch it. From the certificate, click Install Certificate.

The Certificate Import Wizard will now be launched. From there, select Local Machine as the Store Location and then click Next.

The remaining steps for importing the certificate are the same as we had discussed above.
From an SST File
Serialized Certificate Store Format (SST) files are certificates created directly from a CA. An SST file contains certificates used to authenticate the identities of websites, apps, and programs.
The SST file can be downloaded on demand from Microsoft using Windows Update so you may have all the latest certificates at once.
Let us show you how to download the file, and then discuss different methods to install it.
Download Latest Root Certificates for Windows
Downloading the latest SST file with the latest Root Certificates is easy. Begin by creating a new folder using File Explorer where the SST file will be stored. Then, launch the Command prompt with administrative privileges and navigate to the empty folder you have created using the command below.
cd /d "PathToFolder"This is where the SST file will be downloaded. Replace PathToFolder with the complete path of the empty folder, as in the example below.

Now run the following command to download the latest certificates in an SST file:
certutil.exe -generateSSTFromWU roots.sst
You will now find that the SST file has been downloaded. This file contains all the latest Root Certificates. You can now install them all at once, or one-by-one (only the ones that are required).
Install All Certificates using SST File
Once you open the downloaded roots.sst file, you will see that it holds many certificates. In our case, it holds 436 files. These can all be installed instantly using Windows PowerShell. Here is how:
- Open PowerShell with administrative privileges.
- Now run the following command while replacing CertPath with the complete path to the downloaded SST file:
$sstStore = ( Get-ChildItem -Path <em>CertPath</em>\roots.sst) - Next, paste the following command to import all the certificates on your PC:
$sstStore | Import-Certificate -CertStoreLocation Cert:\LocalMachine\Root

You will now find that the certificates have been imported to your machine from the downloaded SST file. You can verify this through the Certificate Management Console.
Install Individual Root Certificates using SST File
Another method to install the Root Certificates from an SST file is one-by-one. This may take a while, but the method can only be used when you wish to install specific certificates.
To do so, run the SST file by double-clicking on it. It will open in an identical console to MMC. From there, you can export a certificate and then import it on the local machine using the method we have already discussed above.
Alternatively, you can also double-click on the certificate and install it directly.

From an STL File
Serialized Certificate Trust List (STL) files also contain Root Certificates, but the file formatting is different than an SST file. Microsoft maintains an STL file you can download to obtain the latest Root Certificates for your Windows. The STL is updated twice a month.
Download Latest STL File
Once downloaded, extract its content using a third-party compression/decompression tool. The extracted folder should now contain only one STL file. You may then proceed to import the file using Command Line Interface (CLI).
Launch the Command Prompt with administrative privileges and navigate to the extracted folder using the Change Directory command:
cd /d "PathToExtracted"Replace PathToExtracted with the complete path to the extracted folder, as in the following example:

Now paste the following command to import the certificates within the STL file.
certutil -addstore -f root authroot.stl
You can now confirm that the latest certificates have been installed using the Certificate Management Console.
Final Thoughts
Although it may not seem like it, a Root Certificate is essential for your daily work on a PC, as it is making authorization handshakes and trust with other components in the background while you continue with your work.
However, once a certificate has expired, it can be safely deleted, as it is no longer valid. That said, we recommend that you install a new, valid certificate in its place before removing the old one.