
Applies ToWindows 11 Windows 10 Windows 8.1
Back up the registry manually
-
Select Start , type regedit.exe in the search box, and then press Enter. If you are prompted for an administrator password or for confirmation, type the password or provide confirmation.
-
In Registry Editor, locate and click the registry key or subkey that you want to back up.
-
Select File > Export.
-
In the Export Registry File dialog box, select the location to which you want to save the backup copy, and then type a name for the backup file in the File name field.
-
Select Save.
Restore a manual back up
-
Select Start , type regedit.exe, and then press Enter. If you are prompted for an administrator password or for confirmation, type the password or provide confirmation.
-
In Registry Editor, click File > Import.
-
In the Import Registry File dialog box, select the location to which you saved the backup copy, select the backup file, and then click Open.
Need more help?
Want more options?
Explore subscription benefits, browse training courses, learn how to secure your device, and more.
Все способы:
- Восстановление реестра в Виндовс 10
- Способ 1: Восстановление из резервной копии
- Способ 2: Замена файлов реестра
- Способ 3: Восстановление системы
- Заключение
- Вопросы и ответы: 1
Некоторые пользователи, особенно при наработке опыта взаимодействия с ПК, изменяют различные параметры системного реестра Windows. Зачастую такие действия приводят к ошибкам, сбоям и даже неработоспособности ОС. В этой статье мы разберем способы восстановления реестра после неудачных экспериментов.
Восстановление реестра в Виндовс 10
Начнем с того, что реестр это один из важнейших компонентов системы и без крайней надобности и опыта редактировать его не следует. В том случае, если после изменений начались неприятности, можно попытаться восстановить файлы, в которых «лежат» ключи. Делается это как из работающей «винды», так и в среде восстановления. Далее мы рассмотрим все возможные варианты.
Способ 1: Восстановление из резервной копии
Этот способ подразумевает наличие файла, содержащего экспортированные данные всего реестра или отдельного раздела. Если вы не озаботились его созданием перед редактированием, переходите к следующему параграфу.
Весь процесс выглядит следующим образом:
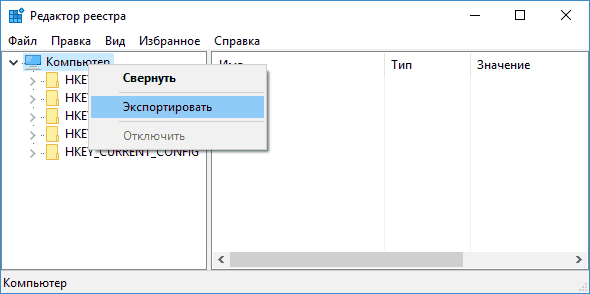
- Открываем редактор реестра.
Подробнее: Способы открыть Редактор реестра в Windows 10
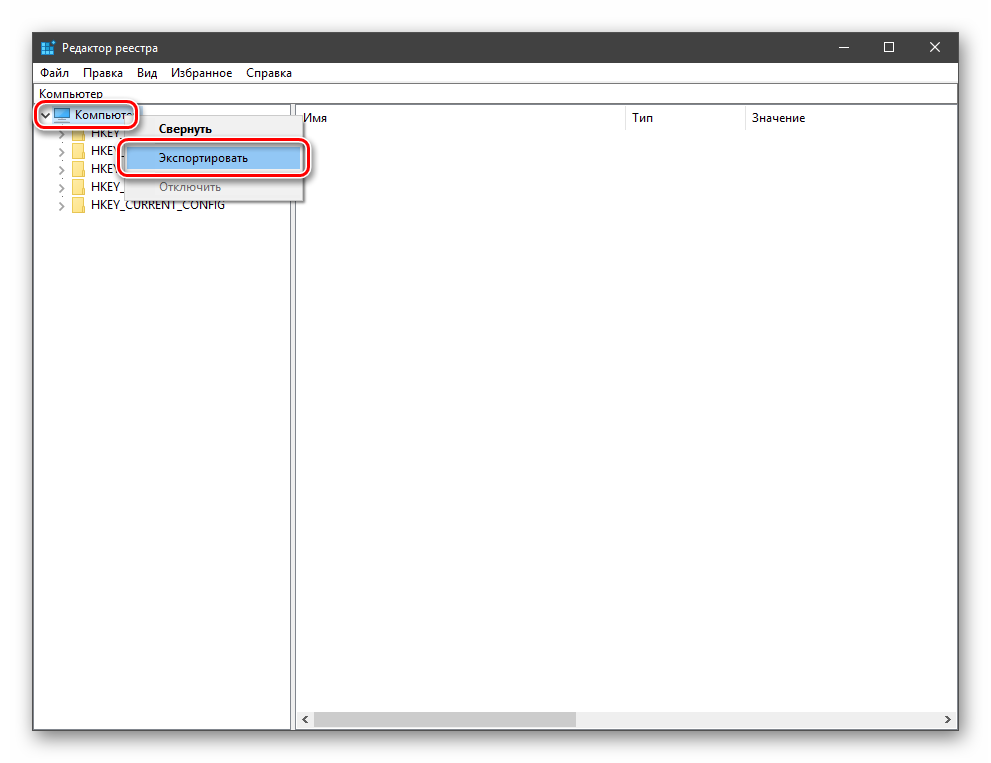
- Выделяем корневой раздел «Компьютер», жмем ПКМ и выбираем пункт «Экспорт».

- Даем имя файлу, выбираем место его расположения и нажимаем «Сохранить».


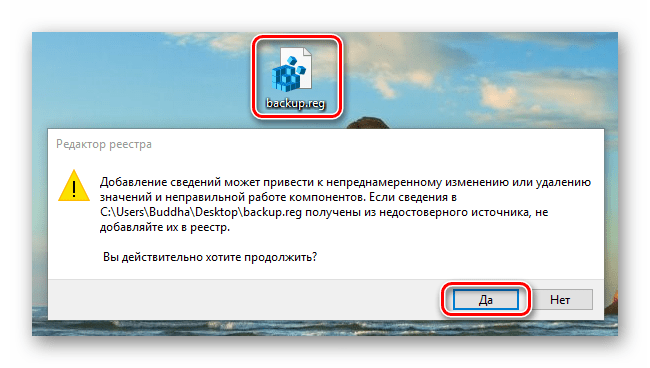
То же самое можно проделать с любой папкой в редакторе, в которой вы изменяете ключи. Восстановление производится двойным кликом по созданному файлу с подтверждением намерения.
Способ 2: Замена файлов реестра
Система сама может сделать резервные копии важных файлов перед какими-либо автоматическими операциями, например, обновлениями. Хранятся они по следующему адресу:
C:\Windows\System32\config\RegBack

Действующие файлы «лежат» в папке уровнем выше, то есть
C:\Windows\System32\config
Для того чтобы выполнить восстановление, необходимо скопировать бэкапы из первой директории во вторую. Не спешите радоваться, так как обычным способом этого сделать нельзя, потому как все эти документы заблокированы выполняющимися программами и системными процессами. Здесь поможет только «Командная строка», причем запущенная в среде восстановления (RE). Далее опишем два варианта: если «винда» загружается и если войти в учетную запись не представляется возможным.
Система стартует
- Открываем меню «Пуск» и кликаем по шестеренке («Параметры»).

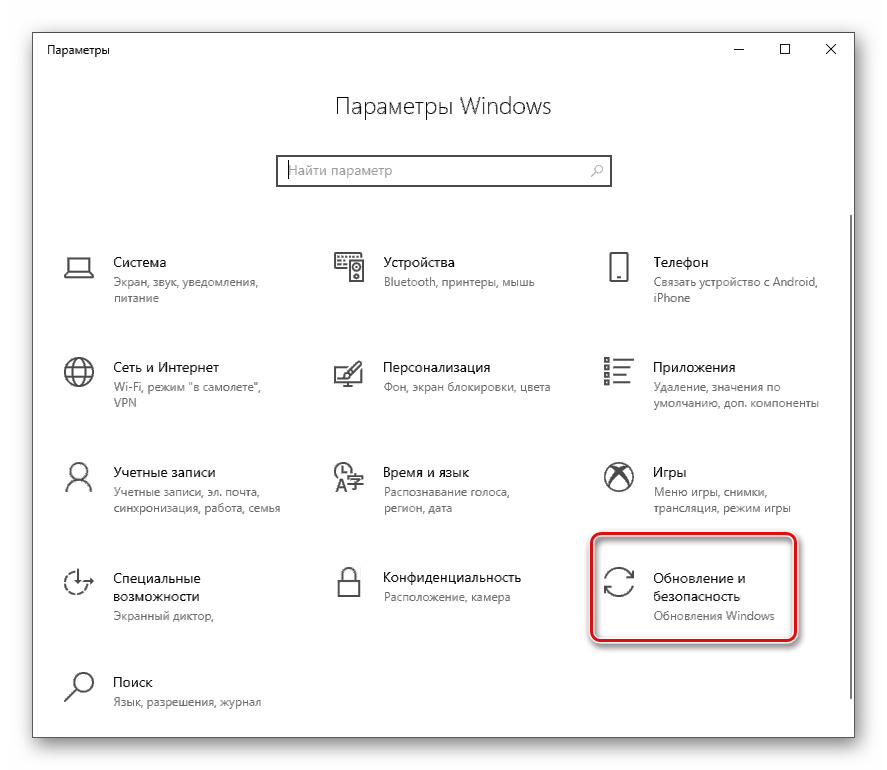
- Идем в раздел «Обновление и безопасность».

- На вкладке «Восстановление» ищем «Особые варианты загрузки» и жмем «Перезагрузить сейчас».
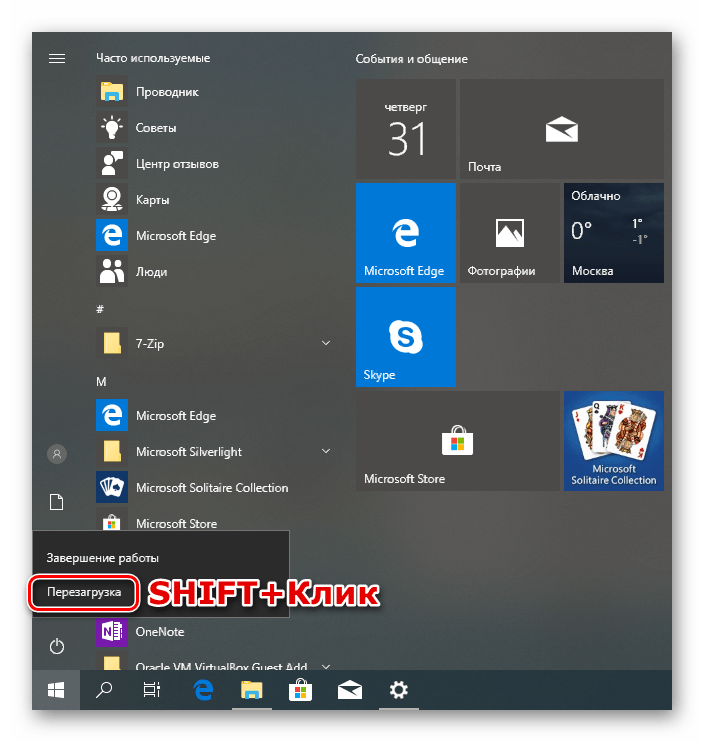
Если «Параметры» не открываются из меню «Пуск» (такое бывает при повреждении реестра), вызвать их можно сочетанием клавиш Windows+I. Перезагрузку с нужными параметрами также можно выполнить, нажав соответствующую кнопку с зажатой клавишей SHIFT.

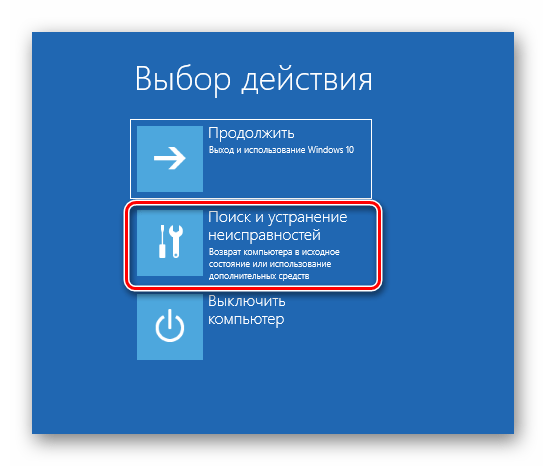
- После перезагрузки идем в раздел поиска и устранения неисправностей.

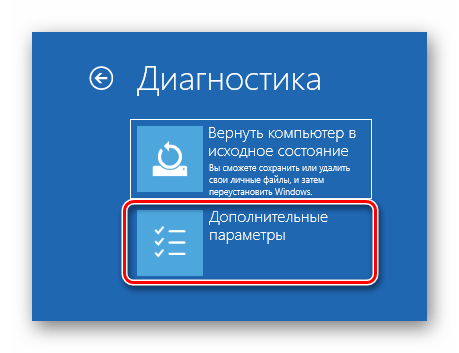
- Переходим к дополнительным параметрам.

- Вызываем «Командную строку».

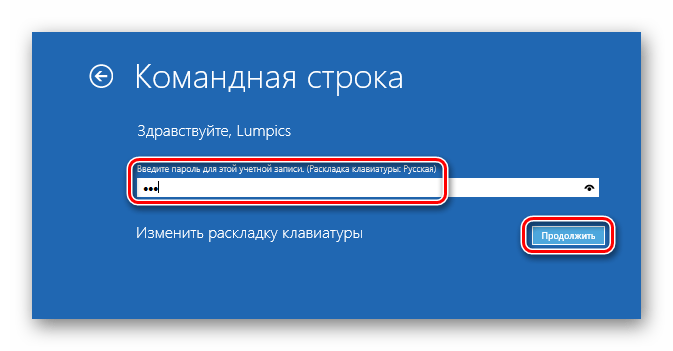
- Система еще раз перезагрузится, после чего предложит выбрать учетную запись. Ищем свою (лучше ту, которая имеет права администратора).

- Вводим пароль для входа и нажимаем «Продолжить».

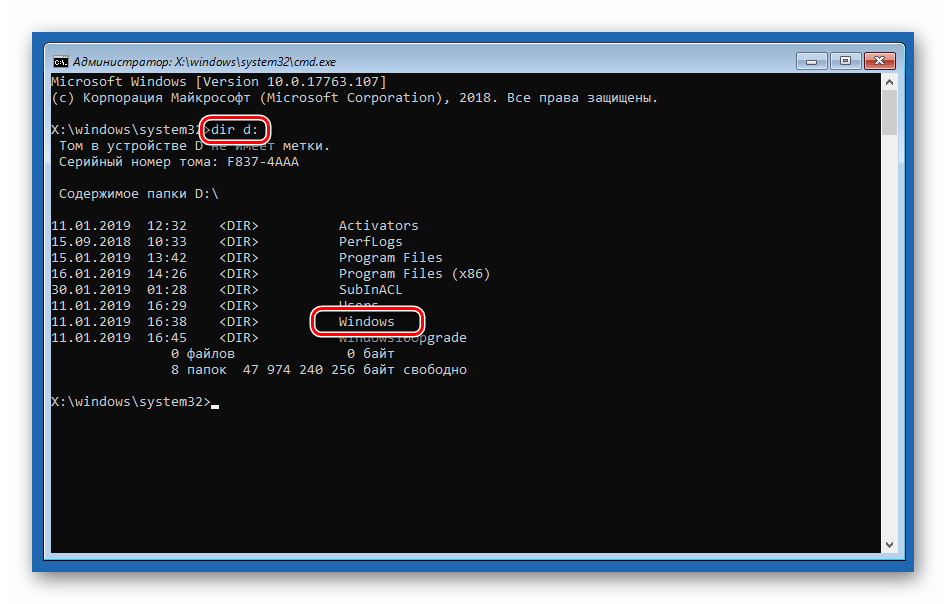
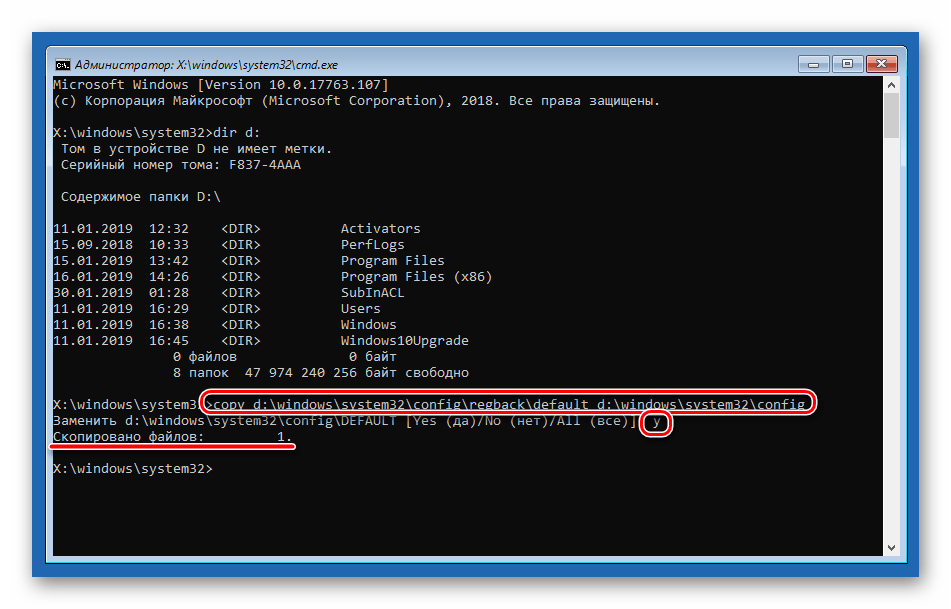
- Далее нам нужно скопировать файлы из одной директории в другую. Сначала проверяем, на диске с какой буквой находится папка «Windows». Обычно в среде восстановления системный раздел имеет букву «D». Проверить это можно командой
dir d:
Если папки нет, то пробуем другие буквы, например, «dir c:» и так далее.
- Вводим следующую команду.
copy d:\windows\system32\config\regback\default d:\windows\system32\configНажимаем ENTER. Подтверждаем копирование, введя на клавиатуре «Y» и снова нажав ENTER.

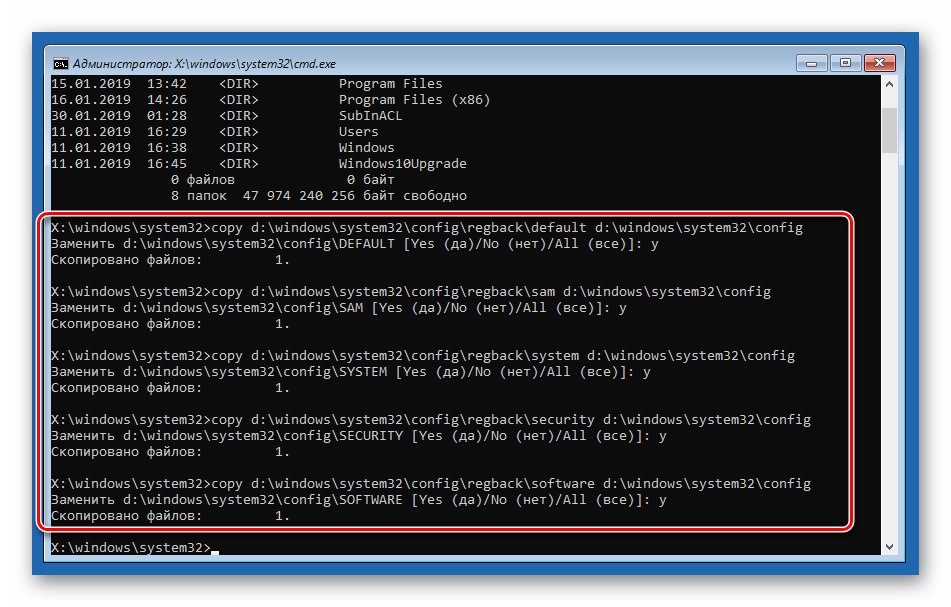
Этим действием мы скопировали файл с названием «default» в папку «config». Тем же способом нужно перенести еще четыре документа
sam

software

security

system
Совет: чтобы каждый раз не вводить команду вручную, можно просто два раза нажать стрелку «Вверх» на клавиатуре (пока не появится нужная строка) и просто заменить название файла.

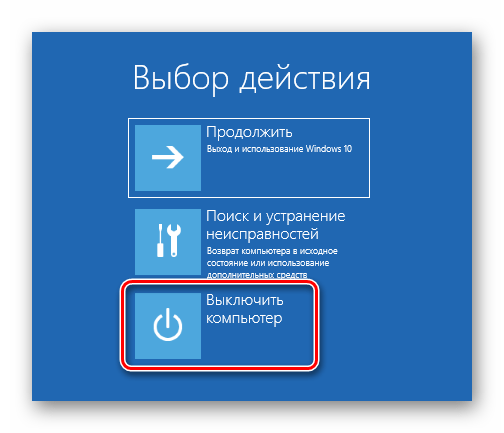
- Закрываем «Командную строку», как обычное окно и выключаем компьютер. Естественно, потом включаем снова.


Система не стартует
Если Виндовс запустить невозможно, добраться до среды восстановления проще: при сбое загрузки она откроется автоматически. Нужно только нажать «Дополнительные параметры» на первом экране, а затем произвести действия, начиная с пункта 4 предыдущего варианта.

Бывают ситуации, когда среда RE недоступна. В этом случае придется воспользоваться установочным (загрузочным) носителем с Windows 10 на борту.
Подробнее:
Руководство по созданию загрузочной флешки с Windows 10
Настраиваем BIOS для загрузки с флешки
При запуске с носителя после выбора языка вместо установки выбираем восстановление.

Что делать дальше, вы уже знаете.
Способ 3: Восстановление системы
Если по каким-то причинам восстановить непосредственно реестр не получается, придется прибегнуть к еще одному средству – откату системы. Сделать это можно разными способами и с разными результатами. Первый вариант – воспользоваться точками восстановления, второй – привести Виндовс в исходное состояние, а третий – вернуть заводские настройки.

Подробнее:
Откат к точке восстановления в Windows 10
Восстанавливаем ОС Windows 10 к исходному состоянию
Возвращаем Windows 10 к заводскому состоянию
Заключение
Приведенные выше способы сработают только тогда, когда на ваших дисках присутствуют соответствующие файлы – резервные копии и (или) точки. Если таковых не имеется, придется переустанавливать «винду».
Подробнее: Как установить Виндовс 10 с флешки или с диска
Напоследок дадим пару советов. Всегда, перед тем, как редактировать ключи (или удалять, или создавать новые), экспортируйте копию ветки или всего системного реестра, а также создайте точку восстановления (нужно сделать и то и другое). И еще: если не уверены в своих действиях, лучше совсем не открывайте редактор.
Наша группа в TelegramПолезные советы и помощь
Если по той или иной причине в Windows 10 возникли проблемы с записями в реестре или с самими файлами реестра, система располагает простым и обычно работающим способом выполнить восстановление реестра из автоматически создаваемой резервной копии. См. также: Все материалы про восстановление Windows 10.
В этой инструкции подробно о том, как восстановить реестр из резервной копии в Windows 10, а также о других вариантах решения проблем с файлами реестра при их возникновении, если обычный способ не работает. И заодно информация о том, как создать собственную копию реестра без сторонних программ.
Как восстановить реестр Windows 10 из резервной копии
Резервная копия реестра Windows 10 автоматически сохраняется системой в папке C:\ Windows \ System32\ config\ RegBack\
Сами же файлы реестра находятся в C:\ Windows \ System32\ config\ (файлы DEFAULT, SAM, SOFTWARE, SECURITY и SYSTEM). Важно: не используйте способ в версиях 1803, 1903 и новее, если не включали сохранение копии реестра — к сожалению, начиная с Windows 10 версии 1803 файлы реестра по умолчанию не сохраняются автоматически в указанной папке (но там могут находиться пустые файлы, заменять которыми реестр не нужно). Но вы можете включить их сохранение на будущее (см. Как включить создание резервной копии реестра в папке RegBack).
Соответственно, для восстановления реестра, достаточно скопировать файлы из папки RegBack (там они обычно обновляются после обновлений системы, затрагивающих реестр) в папку System32\ Config.

Сделать это можно и простыми средствами системы, при условии, что она запускается, но чаще это не так, и приходится использовать другие пути: обычно, производить копирование файлов с помощью командной строки в среде восстановления Windows 10 или загрузившись с дистрибутива с системой.
Далее будет предполагаться, что Windows 10 не загружается и мы выполняем шаги для восстановления реестра, которые будут выглядеть следующим образом.
- Если вы можете попасть на экран блокировки, то на нем нажмите по кнопке питания, изображенной справа внизу, а затем, удерживая Shift, нажмите «Перезагрузка». Загрузится среда восстановления, выберите «Поиск и устранение неисправностей» — «Дополнительные параметры» — «Командная строка».
- Если экран блокировки недоступен или вы не знаете пароля учетной записи (который придется ввести в первом варианте), то загрузитесь с загрузочной флешки Windows 10 (или диска) и на первом экране установки нажмите клавиши Shift+F10 (или Shift+Fn+F10 на некоторых ноутбуках), откроется командная строка.
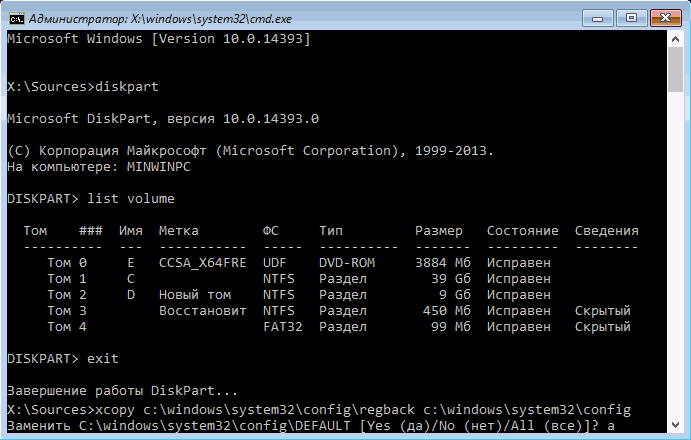
- В среде восстановления (и командной строке при установке Windows 10) буква системного диска может отличаться от C. Чтобы выяснить, какая буква диска назначена системному разделу, введите по порядку команды diskpart, затем — list volume, и exit (в результатах выполнения второй команды отметьте для себя, какую букву имеет системный раздел). Далее, для восстановления реестра используйте следующую команду
- Xcopy c:\windows\system32\config\regback c:\windows\system32\config (и подтвердите замену файлов, введя латинскую A).

По завершении выполнения команды, все файлы реестра будут заменены своими резервными копиями: вы можете закрыть командную строку и перезагрузить компьютер, чтобы проверить, была ли восстановлена работоспособность Windows 10.
Дополнительные способы восстановления реестра
Если описываемый способ не работает, а какого-то стороннего ПО для создания резервных копий использовано не было, то из возможных решений остаются лишь:
- Использование точек восстановления Windows 10 (они содержат в себе и резервную копию реестра, но по умолчанию они у многих отключены).
- Сброс Windows 10 к начальному состоянию (в том числе и с сохранением данных).
Помимо прочего, на будущее вы можете создать собственную резервную копию реестра. Для этого достаточно выполнить следующие простые шаги (нижеописанный способ — не самый лучший и есть дополнительные, см. Как создать резервную копию реестра Windows):
- Запустите редактор реестра (нажмите Win+R, введите regedit).
- В редакторе реестра, в левой панели выберите «Компьютер», кликните по нему правой кнопкой мыши и выберите пункт меню «Экспортировать».

- Укажите место сохранения файла.
Сохраненный файл с расширением .reg и будет вашей резервной копией реестра. Чтобы внести данные из него в реестр (точнее, объединить с текущим содержимым), достаточно просто дважды кликнуть по нему (к сожалению, скорее всего, часть данных не смогут быть внесены). Однако, более разумным и эффективным способом, наверное, является включение создания точек восстановления Windows 10, которые будут содержать, в том числе, и работающий вариант реестра.
The Windows registry is a database that contains important information about your computer — users, preferences, applications, attached devices and much more. The Windows operating system constantly refers to the registry; for example, to open a program, install new software or change your hardware, Windows must check the values of certain registry keys.
Once you’ve been running the Windows OS for some time — installing and uninstalling programs or swapping in different keyboards and mice — you end up with hundreds or thousands of registry entries that are completely useless. Each one uses very little hard drive space, but the operating system still has to run through all of them, which slows it down over time. By cleaning the registry, you can get rid of those unwanted entries and make your system run faster.
Sometimes, however, it is necessary to fix registry issues instead of just performing cleanup. For example, if you have ever encountered a piece of malware, you know that it can completely mess up your registry and disrupt your work.
You can change the values of registry keys manually using the built-in Windows Registry editor (regedit). But you need to know what you’re doing with this utility or you risk doing serious damage. This article explores how to fix registry issues in Windows 10/11.
Common Windows 10/11 Registry Errors Requiring Windows Registry Repair
First, let’s explore the most common issues with the Windows 10/11 registry and which ones are worth worrying about.
- Orphaned entries. Orphaned entries are small fragments of registry entries that can be left behind when you uninstall software. Registry cleaner software will often claim these are an immediate issue, but in reality, they just use up a few kilobytes of free space on your disk.
- Duplicate keys. Duplicate keys can be made when you reinstall, upgrade or update software on your machine, including the operating system. Registry cleaner software may state that your programs will be confused by the duplicate entries, slowing machine performance, but that is not true.
- Fragmented registry. The registry can become fragmented when software is uninstalled, upgraded or updated. Missing and orphaned files can cause errors.
- System shutdown errors. Each time your Windows 10/11 computer shuts down properly, a copy of the registry is saved to system memory. But if your computer is turned off or crashes without going through the normal shutdown routine, you could experience issues in the future. However, this is unlikely.
- Malware. Many types of malware modify the registry. In particular, by changing the values of startup keys, malware can ensure it is activated each time you restart the machine. Changes to the registry by malware require immediate attention.
- Accumulated junk, temporary files and system files. A registry disk cleanup removes these files to free up space and can potentially repair registry issues, so it’s worth doing on a regular basis.
Important: Back Up the Windows Registry!
Before beginning any registry errors fix, be sure you know what you are doing — and always start by making a registry backup. That way, you can revert to the old version if something goes wrong.
There are several methods for backing up your Windows registry:
- Using regedit
- Using the command prompt
- Using third-party software
How to Uncover and Repair Windows Registry Issues
To uncover issues with your registry that might be affecting your computer, perform a Windows registry scan using the Windows Registry Checker tool. The process will provide detailed data on all the registry errors discovered and how to fix registry errors.
There are several different ways to repair the Windows 10/11registry. Common ways for how to repair Windows 10 registry entries include the following:
- Use automatic repair — Automatic repair will kick in when it experiences an unexpected error that results in your system shutting down. You don’t have to initiate this repair option.
- Restore the Windows registry from Safe Mode — Use this method if you can’t start Windows in normal mode.
- Restore the registry from the command prompt — Reboot in advanced startup mode to restore the registry from its “secret” backup through the command prompt. You can access the command prompt from Safe Mode as well.
- Fix Windows registry errors with System restore — You can use System restore to roll back your system to a time when you didn’t have registry errors. But remember you will lose any changes and new files made since the backup was created.
- Fix broken registry items with System File Checker (SFC) — If you run your antivirus software or other file checker tool and discover you have broken registry items, you can use this method to repair them and get them working correctly again.
- Restore your computer with Reset this PC — Reset this PC is used to repair damaged Windows installations. It can help remove bloatware, which is unneeded software that is pre-installed with Windows. Using it is also a way to permanently remove most types of malware. Using Reset this PC restores Windows to the factory-default settings.
- Repair the registry with the DISM command — If you have problems with images on your computer, use the DISM command to service them.
- Reinstall Windows from scratch — If you can’t get Windows to load without errors or can’t open Safe Mode, reinstalling Windows from scratch may help correct registry issues.
- Use third-party backup and recovery tools — You have the option of using third-party tools to back up and restore your registry. The section below offers some options. It’s wise to choose only Microsoft-approved tools.
Third-Party Software Designed for Cleaning and Fixing Registries
Common registry issues Windows 10 users deal with can be frustrating and lead to a slowcomputer. It’s possible to use apps to clean and repair your Windows registry following a Windows registry scan.
Here are a few registry cleaner and registry repair tools you may want to check out:
- CCleaner
- Auslogics Registry Cleaner
- Wise Registry Cleaner
- Argente Utilities
- Glarysoft Registry Repair
- RegSofts Free Window Registry Repair
Editing Your Windows Registry for a Quick Windows 10 Registry Fix
Another option for dealing with a corrupt registry is to edit it directly. Log in as an administrator and then follow these steps for a quick Windows registry fix:
- Press the Ctrl and F keys simultaneously to open the Find dialog. Type the name of the key you want to edit.
- Click Find Next until you locate the key you want. Double-click it.
- Edit the key’s value.
- Click OK to save your changes. Some edits require a Windows restart to take effect.
Alternatively, you can edit the registry with PowerShell.
Cleaning the Windows 10/11 Registry Using the Registry Editor
Most people find that they’re able to clean their registry with automatic functions or third-party programs. However, you can perform registry cleanup manually using the Windows Registry editor.
It’s worth repeating: Before you begin, make sure you create a registry backup. Making mistakes in the registry can lead to the system becoming corrupted.
Then take the followingsteps:
- Click the Start button and then select Run...
- Type regedit in the text box and select Registry editor from the results.
- Delete the keys from applications that have already been uninstalled:
3a. Expand the HKEY_CURRENT_USER section and then expand the Software section.
3b. Look for keys based on the name or vendor of the uninstalled applications and delete them.
4. Remove any duplicate keys that the uninstalled applications might have left behind:
4a. Press Ctrl+F to open the Find dialog box.
4b. Enter the name of the uninstalled application and click OK to search. Each matching key or value will be highlighted.
4c. Remove the highlighted key.
4d. Press F3 to find the next match and delete it. Repeat this step until you have reviewed all highlighted items.
5. Remove unwanted start-up items from the registry:
5a. Navigate to the following location:
My ComputerHKEY_LOCAL_MACHINESOFTWAREMicrosoftWindowsCurrent Version
5b. Click Run to list shortcuts to all the executable files that run at startup.
5c. Delete any applications that you don’t want to run at Windows startup. Do an online search to investigate any that are unfamiliar.
5d. Repeat the same task for the following key paths as well:
• HKLMSOFTWAREWow6432NodeMicrosoftWindows CurrentVersionRun

• HKLMSOFTWAREMicrosoftActive SetupInstalled Components

• HKLMSOFTWAREWow6432NodeMicrosoftActive SetupInstalled Components
Conclusion: When and How to Fix Windows Registry Issues
Editing your registry is not likely to improve system speed or PC performance. However, you should make regular backups so you can restore if the installation of a program or device causes issues the computer can’t process.
It is also important to track changes to your registry. In particular, malware often changes registry startup keys so it will start automatically after each reboot. You can learn more in this guide about detecting modifications to startup items in the Windows registry.
How Netwrix Can Help
Netwrix Auditor for Windows Server empowers you with comprehensive visibility and tools you need to safeguard your crucial infrastructure. You can:
- Detect and respond to threats: You can monitor all security and configuration changes across your Windows Servers, including changes to the registry. The solution even provides video recording of user activity to help with investigations.
- Streamline compliance: Simplify audit preparation with built-in reports aligned with PCI DSS, HIPAA, SOX and many other mandates. Use the interactive search to swiftly answer questions from auditors, demonstrating your commitment to compliance.
- Enhance efficiency: Elevate your IT team’s productivity through automated change control and reporting on OS versions, antivirus status, file shares and more.
Dirk Schrader is a Resident CISO (EMEA) and VP of Security Research at Netwrix. A 25-year veteran in IT security with certifications as CISSP (ISC²) and CISM (ISACA), he works to advance cyber resilience as a modern approach to tackling cyber threats. Dirk has worked on cybersecurity projects around the globe, starting in technical and support roles at the beginning of his career and then moving into sales, marketing and product management positions at both large multinational corporations and small startups. He has published numerous articles about the need to address change and vulnerability management to achieve cyber resilience.

Every single file and application on Windows can go corrupt at some point in time. The native applications aren’t exempt from this either. Lately, many users have been reporting that their Windows Registry Editor has become corrupt and is prompting a wild number of problems. To those unaware, the Registry Editor is a database that stores configuration settings of all installed applications. Each time a new application is installed, its properties such as size, version, storage location are embedded into the Windows Registry. The Editor can be used to configure and troubleshoot applications. To know more about the Registry Editor, check out – What is the Windows Registry & How it Works?
Since the Registry Editor stores configuration and internal settings for everything on our computer, it is advised to be extremely cautious when making any changes to it. If one isn’t careful, the editor may be rendered corrupt and cause some serious damage. Therefore, one must always backup their registry before making any modifications. Apart from inaccurate manual changes, a malicious application or virus and any sudden shutdown or system crash can also corrupt the registry. An extremely corrupt registry will prevent your computer from booting on altogether (the boot will be restricted to the blue screen of death) and if the corruption isn’t severe, you may encounter the blue screen error every now and then. Frequent Blue Screen errors will further deteriorate your computer’s condition so fixing a corrupt registry editor as soon as possible is very important.
In this article, we have explained various methods to fix a corrupt registry in Windows 10 along with the steps to back up the registry editor before making any changes to it.

Table of Contents
Depending on whether the corruption is severe and if the computer is able to boot on, the exact solution will vary for everyone. The easiest way to repair a corrupt registry is to let Windows take control and perform an Automatic Repair. If you are able to boot on your computer, perform scans to fix any corrupt system files, and clean the registry using third-party applications. Finally, you will need to reset your PC, go back to previous Windows versions, or use a bootable Windows 10 drive to fix the registry if nothing works.
Method 1: Use Automatic Repair
Fortunately, Windows has built-in tools to fix any issues that may prevent the computer from booting on altogether. These tools are part of the Windows Recovery Environment (RE) and can be customized further (add extra tools, different languages, drivers, etc.). There are three different methods via which users can access these diagnostic tools and repair disk and system files.
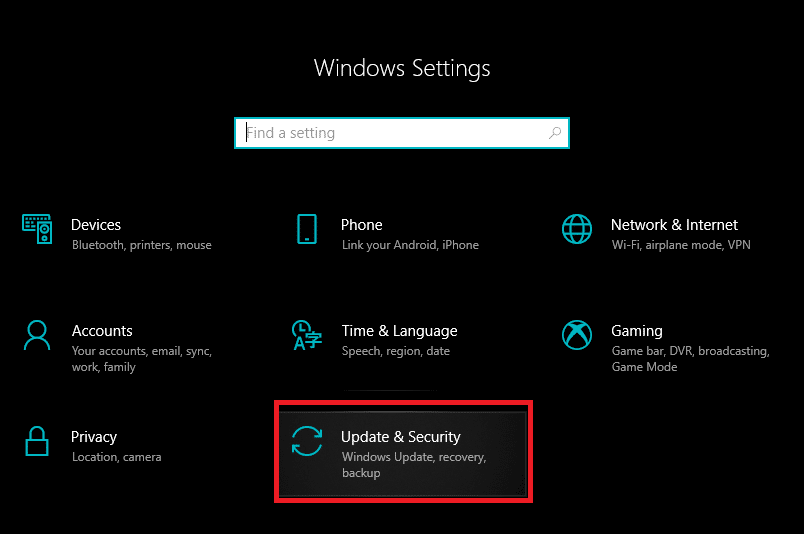
1. Press the Windows key to activate the Start menu and click on the cogwheel/gear icon above the power icon to open Windows Settings.
2. Click on Update & Security.
3. Using the left navigation menu, move to the Recovery settings page then under Advanced startup section click on the Restart now button.

4. The computer will now Restart and on the Advanced boot screen, you will be presented with three different options, namely, Continue (to Windows), Troubleshoot (to use advanced system tools), and Turn off your PC.

5. Click on Troubleshoot to continue.
Note: If the corrupt registry is preventing your computer from booting on, long-press the power button at the arrival of any error and hold it until the PC turns off (Force Shut Down). Power on the computer again and force shut it down again. Repeat this step until the boot screen reads ‘Preparing Automatic Repair’.
6. On the following screen, click on Advanced Options.

7. Finally, click on the Startup or Automatic Repair option to fix your corrupt Registry in Windows 10.

Method 2: Run an SFC & DISM Scan
For some lucky users, the computer will boot on in spite of a corrupt registry, if you are one of them, perform system file scans as soon as possible. The System File Checker (SFC) tool is a command-line tool that verifies the integrity of all system files and replaces any corrupt or missing file with a cached copy of it. Similarly, use the Deployment Image Servicing and Management tool (DISM) to service Windows images and fix any corrupt files that the SFC scan may miss or fail to repair.
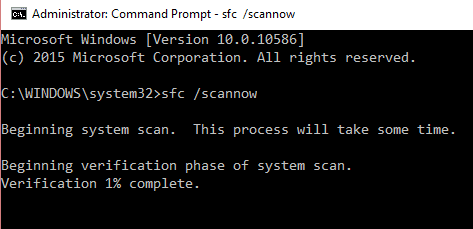
1. Open Run command box by pressing Windows key + R then type cmd and press Ctrl + Shift + Enter to open Command Prompt with Administrative privileges. Click Yes on the ensuing User Account Control pop-up to grant the required permissions.

2. Carefully type the below command and press Enter to execute it:
sfc /scannow
3. Once the SFC scan has verified the integrity of all system files, execute the following command:
DISM /Online /Cleanup-Image /RestoreHealth

Method 3: Use a Bootable Windows disc
Another way users can repair their Windows installation is by booting from a bootable USB drive. If you do not have a Windows 10 bootable drive or disc handy, prepare the same by following the guide at How to Create Windows 10 Bootable USB Flash Drive.
1. Power off your computer and connect the bootable drive.
2. Boot on the computer from the drive. On the start-up screen, you will be asked to press a specific key to boot from the drive, comply with the instruction.
3. On the Windows Setup page, click on Repair your computer.

4. Your computer will now boot on to the Advanced Recovery menu. Select Advanced Options followed by Troubleshoot.
5. On the next screen, click on Startup or Automatic Repair. Select a user account to continue from and enter the password when prompted.
6. Windows will start auto-diagnosis and repair the corrupt registry.
Method 4: Reset your Computer
If none of the above methods helped you to fix the corrupt registry, your only option is to reset the computer. Users have the option to Reset the computer but keep the files (all third-party applications will be uninstalled and the drive in which Windows is installed will be cleared so move all your personal files to another drive) or Reset and remove everything. First try resetting while keeping the files, if that doesn’t work, reset and remove everything to fix the corrupt Registry in Windows 10:
1. Press Windows key + I to launch the Settings application and click on Update & Security.
2. Switch to the Recovery page and click on the Get Started button under Reset This PC.

3. In the following window, choose ‘Keep my files’, as obvious, this option won’t get rid of your personal files although all the third-party apps will be deleted and the settings will be reset to default.

4. Now follow all the on-screen instructions to complete resetting.
Also Read: Fix The Registry editor has stopped working
Method 5: Restore a System Backup
Another way to reset the registry is to revert back to a previous Windows version during which the registry was completely healthy and didn’t prompt any issues. Although, this only works for users who had the System Restore feature enabled beforehand.
1. Type control or control panel in the start search bar and press enter to open the application.
2. Click on Recovery. Adjust the icon size from the top-right corner to make looking for the required item easier.

3. Under Advanced recovery tools, click on the Open System Restore hyperlink.

4. In the System Restore window, click on the Next button to continue.

5. Have a look at the Date & Time information of the various restore points and try to recollect when the corrupt registry issue first appeared (Tick the box next to Show more restore points to view all of them). Select a restore point before that time and click on Scan for affected programs.

6. In the next window, you will be informed about the applications and drivers that will be replaced with their previous versions. Click on Finish to restore your computer to its state at the selected restore point.

Apart from the discussed methods, you can install a third-party registry cleaner such as Restore Advanced system repair or RegSofts – Registry Cleaner and use it to scan for any corrupted or missing key entries in the editor. These applications fix the registry by restoring the corrupted keys to their default state.
How to Backup the Registry Editor?
Henceforth, before making any changes to the Registry Editor, consider backing it up or you will again be risking your computer.
1. Type regedit in the Run command box and hit Enter to open the Registry Editor. Click on Yes in the ensuing User Account Control pop-up.

2. Right-click on Computer in the left pane and select Export.

3. Select an appropriate location to export the registry (preferably save it in an external storage media such as a pen drive or on a cloud server). To make it easier to identify the backup date, include it in the file name itself (For example Registrybackup17Nov).
4. Click on Save to finish exporting.

5. If the Registry gets corrupted in the future again, simply connect the storage media containing the backup or download the file from the cloud and import it. To import: Open Registry Editor and click on File. Select Import… from the ensuing menu, locate the registry backup file, and click on Open.

To prevent any further issues with the Registry Editor, properly uninstall applications (remove their residual files) and perform periodic antivirus & antimalware scans.
Recommended:
- Where is the BSOD log file located in Windows 10?
- 5 Ways to Stop Automatic Updates on Windows 10
- How to Use the Fn Key Lock in Windows 10
- Fix Site Can’t Be Reached, Server IP Could Not Be Found
We hope this article was helpful and you were able to easily fix Corrupted Registry on Windows 10. If you still any queries or suggestions then feel free to reach out using the comment section below.