
В этой статье мы рассмотрим, как обновить версию Windows PowerShell до актуальной 5.1 и установить (обновить) PowerShell Core 7.3. В предыдущей статье мы рассказывали, что на данный момент есть две ветки PowerShell:
- старая версия Windows PowerShell (максимальная версия 5.1, которая более не развивается);
- новая платформа PowerShell Core (сейчас доступна версия 7.3).
Несмотря на то, что нумерация версий PowerShell продолжается с 5.1 (6.0, 6.1, 7.0 и т.д.), это две разные платформы. Соответственно мы отдельно рассмотрим как обновить Windows PowerShell и PowerShell Core.
PowerShell Core 7.x максимально совместима с Windows PowerShell. Это означает, что вы можете запускать свои старые скрипты и командлеты в PowerShell Core.
Содержание:
- Обновление Windows PowerShell до 5.1
- Установка/обновление PowerShell Core 7.x
- Установка/обновление PowerShell Core на удаленных комьютерах
- Обновление PowerShell через Windows Update или WSUS
Обновление Windows PowerShell до 5.1
Во всех версиях, начиная с Windows 10 и Windows Server 2016, Windows PowerShell 5.1 уже установлен по-умолчанию.
В предыдущих версиях (Windows 7/8.1 и Windows 2008 R2/2012) обновление до PowerShell 5.1 нужно выполнять вручную. Например, в Windows Server 2012 R2 (Windows 8.1) установлен PowerShell 4.0.
Попробуем обновить версию Windows PowerShell в Windows Server 2012 R2 до версии 5.1.
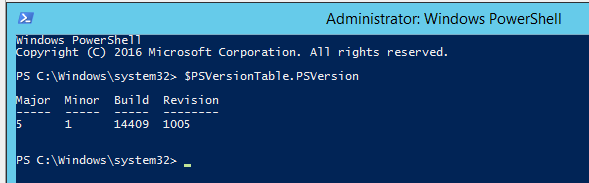
Сначала проверьте текущую версию PowerShell (на скриншоте видно, что это PowerShell 4.0):
$PSVersionTable.PSVersion

Чтобы обновить вашу версию PowerShell до 5.1, нужно установить пакет Windows Management Framework (WMF) 5.1, который в свою очередь требует наличия .NET Framework 4.5.2 (или более поздней версии). Убедитесь, что у вас установлена версий .NET 4.5.2 или выше командой:
(Get-ItemProperty ‘HKLM:\SOFTWARE\Microsoft\NET Framework Setup\NDP\v4\Full’ -Name Release).Release

В моем случае код 378675 говорит о том, что установлена версия .NET 4.5.1. Поэтому мне нужно скачать и установить более новую .NET Framework 4.8 (ссылка на офлайн установщик https://go.microsoft.com/fwlink/?linkid=2088631 —
ndp48-x86-x64-allos-enu.exe
).
Установите .NET 4.8 (потребуется перезагрузка).

Если установить WMF 5.1, но не установить .NET 4.5.2 (или более новый), часть функций PowerShell не будет работать.
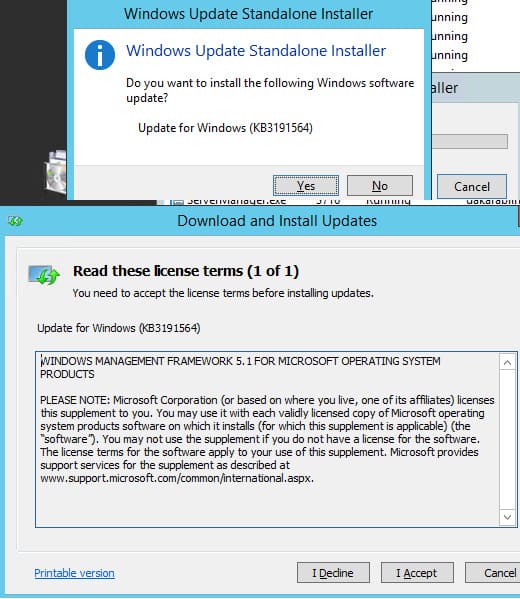
Скачайте WMF 5.1 для Windows Server 2012 R2 —
Win8.1AndW2K12R2-KB3191564-x64.msu
(https://go.microsoft.com/fwlink/?linkid=839516).
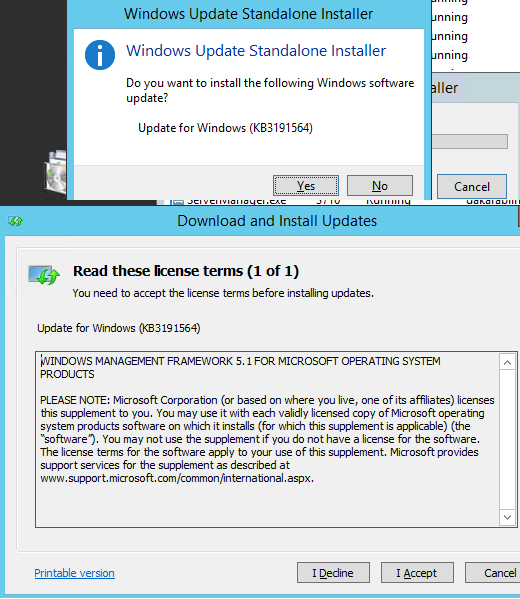
Установите MSU файл Windows Management Framework 5.1.
После перезагрузки сервера, запустите консоль powershell.exe и убедитесь, что версия была обновлена до PowerShell 5.1.
Если у вас остались снятые с поддержки Windows Server 2008 R2 и Windows 7, вы можете обновить на них версию PowerShell с 2.0 до 5.1 аналогичным способом. Сначала устанавливается .Net Framework 4.5.2 (или выше) и затем WMF 5.1 (ссылки загрузки будут другими, чем для Windows Server 2012 R2).
Установка/обновление PowerShell Core 7.x
PowerShell Core является кроссплатформенной и находится в стадии активной разработки (в отличии от Windows PoweShell 5.1). По сути, PowerShell Core это новая платформа, которая устанавливается в операционной системе вместе с классическим Windows PowerShell. Т.е. нельзя обновить PowerShell 5.1 до PowerShell Core 7.1. PowerShell 7 устанавливается на компьютере отдельно от Windows PowerShell 5.1 (side by side).
На данный момент доступны версии PowerShell Core 6.x и 7.x. Рекомендуется всегда устанавливать последнюю версиях PowerShell (сейчас это 7.3), если вам не требуется особая совместимость с legacy скриптами.
Вы можете обновить (установить) версию PowerShell Core в Windows 10 и 11 несколькими способами:
- С помощью MSI установщика PowerShell Core, который можно скачать на GitHub
- С помощью менеджера пакетов WinGet
- С помощью магазина приложений Microsoft
Далее мы рассмотрим все эти способы на примере обновления PowerShell Core до 7.3 в Windows 10 22H2
Обновить PowerShell Core с помощью MSI установщика
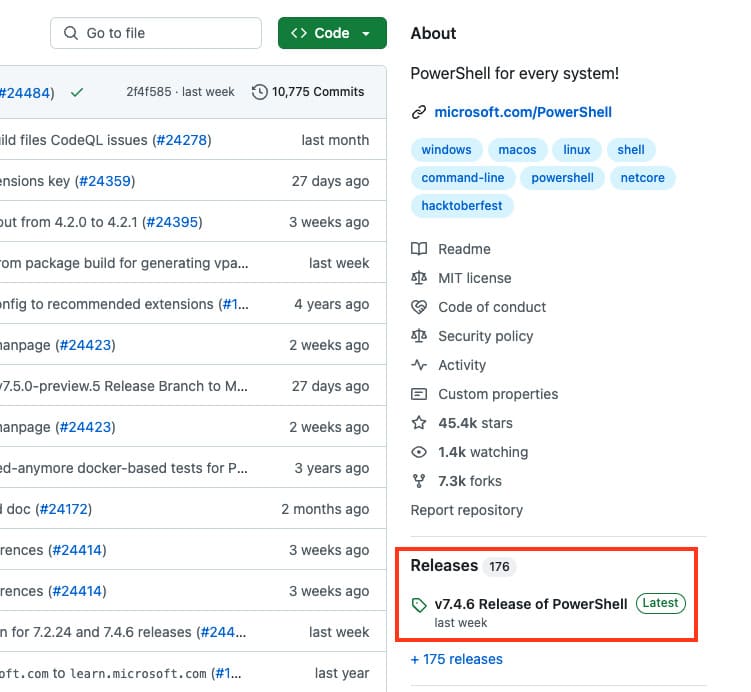
Если вы хотите установить PowerShell Core с помощью MSI пакета, перейдите на старицу проекта https://github.com/PowerShell/PowerShell и скачайте установочный пакет для вашей версии ОС. На момент написания статьи последняя версия v7.3.3 Release of PowerShell от 24 февраля 2023 (например, PowerShell-7.3.3-win-x64.msi или PowerShell-7.3.3-win-x86.msi). Для продуктивной среды используйте Stable или LTS релизы.
Скачайте msi файл и установите его.
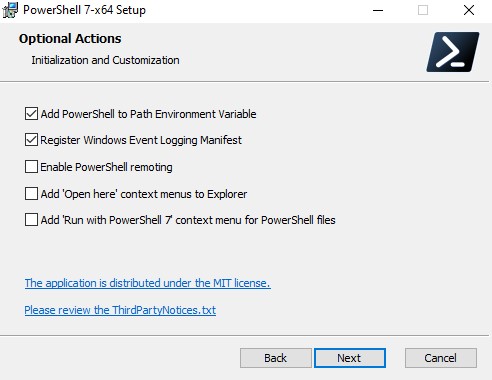
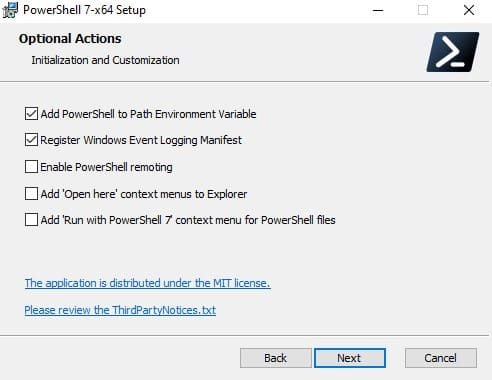
Доступны следующие опции установки:
- Add PowerShell to Path Environment Variable
- Register Windows Event Logging Manifest (для событий PowerShell будет создан отдельный журнал Event Viewer
%SystemRoot%\System32\Winevt\Logs\PowerShellCore%4Operational.evtx
) - Enable PowerShell Remoting (включает и настраивает WinRM для PowerShell Remoting)
- Add ‘Open here’ context menu to Explorer
- Add ‘Run with PowerShell 7’ context menu for PowerShell files
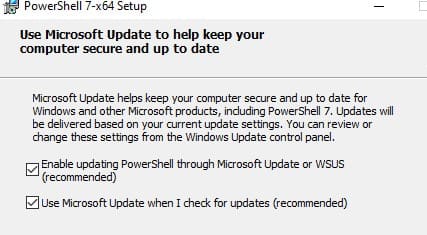
Далее вы можете включить автоматическое обновление PowerShell Core через WIndows Update/WSUS (рассмотрено ниже).
Для установки PowerShell Core из MSI пакета средствами SCCM/MDT/скриптами в тихом режиме можно использовать команду установки со следующими параметрами:
- ADD_EXPLORER_CONTEXT_MENU_OPENPOWERSHELL
- ADD_FILE_CONTEXT_MENU_RUNPOWERSHELL
- ENABLE_PSREMOTING
- REGISTER_MANIFEST
- ADD_PATH
- DISABLE_TELEMETRY
- USE_MU – использовать Microsoft Update для получения обновлений PSCore
- ENABLE_MU – разрешить обновление PowerShell Core через Windows Update
Например, команда установки может выглядеть так:
msiexec.exe /package PowerShell-7.3.3-win-x64.msi /quiet ADD_EXPLORER_CONTEXT_MENU_OPENPOWERSHELL=1 ENABLE_PSREMOTING=1 REGISTER_MANIFEST=1 ADD_PATH=1 ENABLE_MU=1 ADD_PATH=1
Вы можете обновить PowerShell непосредственно из консоли. Чтобы установить или обновиться до последней версии PoSh Core, выполните команду:
iex "& { $(irm https://aka.ms/install-powershell.ps1) } -UseMSI"
Данная команда загружает установочный MSI файл PowerShell 7.3 с GitHub и запускает установку через MSI Installer.

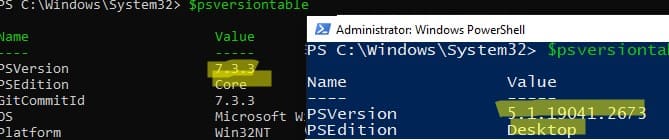
После окончания установки открывается окно PowerShell Core (pwsh.exe), проверьте версию PowerShell и убедитесь, что теперь это PoSh 7.3.3.
Используем менеджер пакетов WinGet для установки/обновления PowerShell Core
Если у вас установлен пакетный менеджер WinGet, вы можете установить или обновить версию PowerShell до актуальной командой:
winget install --id Microsoft.Powershell --source winget
Либо можно установить конкретную версию PowerShell Core:
winget install --id=Microsoft.PowerShell -v "7.1.2" -e
При использовании менеджера пакетов Chocolatey, используйте команды (для 5.1):
choco install powershell -y
choco upgrade powershell -y
Для обновления PowerShell 7.x:
choco upgrade pwsh -y
Обратите внимание на каталоги различных версий PowerShell:
- Windows PowerShell 5.1:
$env:WINDIR\System32\WindowsPowerShell\v1.0 - PowerShell Core 6.x:
$env:ProgramFiles\PowerShell\6 - PowerShell 7.x:
$env:ProgramFiles\PowerShell\7
Если на компьютере был установлен PowerShell 6.x, то при установке PowerShell 7.3 каталог
$env:ProgramFiles\PowerShell\6
автоматически удаляется.
Обратите внимание, что имя исполняемого файла среды PowerShell изменился. Теперь это
c:\Program Files\PowerShell\7\pwsh.exe
. У него собственная иконка в меню Start.
- Для запуска Windows PowerShell, основанного на .NET Framework используется команда
powershell.exe - Для запуска PowerShell Core, основанного на .NET Core, нужно использовать команду
pwsh.exe

Т.е. теперь на этом компьютере есть две версии: Windows PowerShell 5.1 и PowerShell Core 7.3.

Чтобы узнать версию PowerShell можно проверять версию файла pwsh.exe:
(Get-Command 'C:\Program Files\PowerShell\7\pwsh.exe').Version
Так можно проверить версию файла на удаленном компьютере:
Invoke-Command -Computername computer1 -Scriptblock {(Get-Command 'C:\Program Files\PowerShell\7\pwsh.exe').Version}
Чтобы запустить предыдущую версию PowerShell (например 4), используйте команду:
C:\Windows\System32\WindowsPowerShell\v1.0\powershell.exe -Version 4
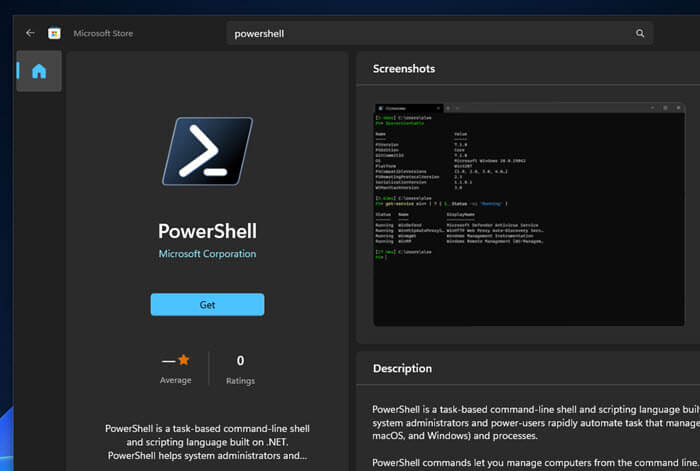
Установка PowerShell Core через Microsoft Store
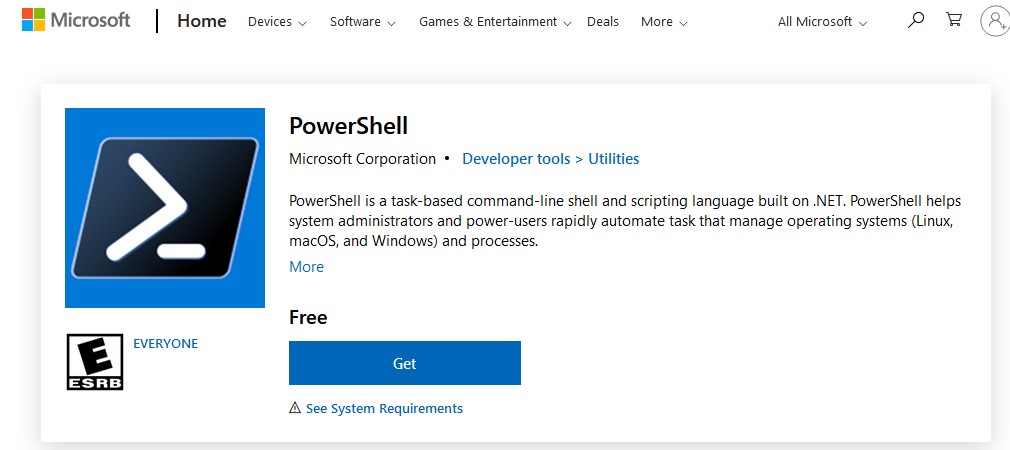
В Windows 10 и 11вы можете установить или обновить PowerShell через магазин приложений Microsoft Store. Приложение PowerShell можно найти в магазине вручную, или воспользуйтесь этой ссылкой.
Также вы можете установить магазинную версию PowerShell через WinGet:
winget search powershell --source msstore
winget install --id 9MZ1SNWT0N5D
Преимущество установки PowerShell Core через Microsoft Store в том, что магазин прилжений будет автоматически контролировать установленную версию PowerShell и автоматически устанавливать обновления по мере их появления.
Вы можете проверить, установлена ли у вас Store версия PowerShell Coreс помощью команды:
Get-AppPackage Microsoft.PowerShell
В этом примере пакет Microsoft.PowerShell_7.3.3.0_x64__8wekyb3d8bbwe установлен.
Но есть и недостатки, связанные с тем, что такой PowerShell будет запускаться в песочнице.
Установка/обновление PowerShell Core на удаленных комьютерах
Рассмотрим два сценария установки или обновления версии PowerShell Core на множестве компьютерах.
Обновление PowerShell Core с помощью GPO
В домене Active Directory вы можете централизованно установить и обновить PowerShell Core с помощью групповой политики. Воспользуйтесь возможностями установки программ с помощью MSI пакетов в GPO.
- Скачайте установочный MSI файл PowerShell и скопируйте его в каталог SYSVOL на контроллере домена;
- Откройте консоль управления доменными GPO (
gpmc.msc
), создайте новую GPO и назначьте ее на OU с компьютерами и серверами; - Перейдите в раздел GPO Computer Configuration –> Software Settings, создайте новый пакет и укажите для него путь к установочному MSI файлу PowerShell в SYSVOL;

Для более тонкого нацеливания политики на клиентов можно использовать WMI фильтры GPO.
- Для обновления групповых политик установки ПО нужно перезагрузить компьютеры. Во время загрузки на всех компьютерах будет установлена новая версия PowerShell.

Обновление PowerShell на удаленных компьютерах из командной строки
Вы можете обновлять PowerShell на удаленных компьютерах из командной строки.
- Первый способ позволяет удаленно обновить PowerShell на компьютере с помощью MSI установщика в сетевом каталоге:
Invoke-Command -ComputerName dc01 -ScriptBlock {Start-Process msiexec.exe -ArgumentList '/package "\\srv1\share\PowerShell-7.3.3-win-x64.msi" /quiet ADD_EXPLORER_CONTEXT_MENU_OPENPOWERSHELL=1 ENABLE_PSREMOTING=1 REGISTER_MANIFEST=1' -Wait} - Следующий скрипт позволит выбрать все активные компьютеры с Windows 10 из домена Active Directory и запустить на каждом из них загрузку и установку PowerShell Core:
$creds = $(Get-Credential)
$computers = Get-ADComputer -Filter 'operatingsystem -like "*Windows 10*" -and enabled -eq "true"'
ForEach ($computer in $computers) {
Invoke-Command -ComputerName $computer -Credential $creds {iex "& { $(irm https://aka.ms/install-powershell.ps1) } -UseMSI -Quiet"}
}
Будьте внимательными при использовании команд PowerShell Remoting при подключении к удаленным компьютерам (Enter-PSSession, Invoke-Command). Если вам нужно подключиться к точке управления PowerShell 7 нужно использовать команду:
Enter-PSSession -ComputerName dc01 -ConfigurationName "powershell.7"
Иначе вы подключитесь к точке PowerShell Remoting 5.1.
Обновление PowerShell в Linux дистрибутивах чаще проще всего выполняется через нативный менеджер пакетов.
Обновление PowerShell через Windows Update или WSUS
До версии PowerShell Core 7.2 не поддерживалось автоматическое обновление pwsh.exe. После выхода нового релиза в консоли появилось уведомление:
A new PowerShell stable release is available. Upgrade now, or check out the release page at: https://aka.ms/PowerShell-Release?tag=v7.1.3
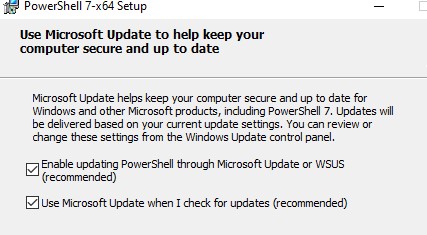
Начиная с версии 7.2, PowerShell Core поддерживает автоматическое обновление через Windows Update ( Microsoft Update, Windows Update for Business, внутренний WSUS сервер или SCCM). Для этого при установке MSI пакета нужно включить соответствующие опции.
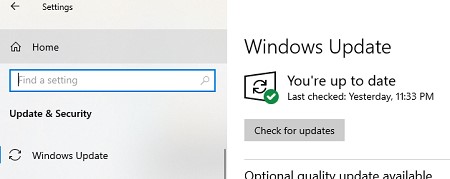
Проверьте, что в панели управления Settings -> Update and Security -> Windows Update -> Advanced Options теперь включена опция Receive updates for other Microsoft products when you update Windows.

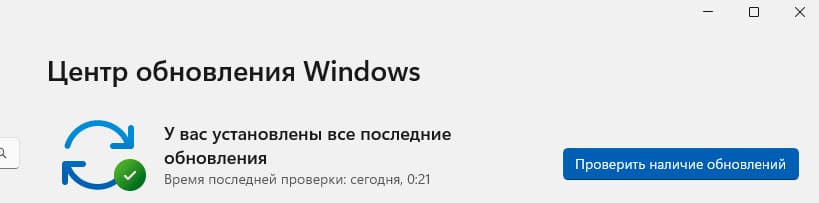
Теперь, когда вы нажимаете кнопку Check for Updates или запускаете сканирование обновлений через модуль PSWindowsUpdate, вы также будете получать обновления для PowerShell Core.
В этой статье расскажем, как обновить Windows PowerShell до актуальной версии 5.1 и установить (обновить) PowerShell Core 7.3. На данный момент существуют две ветки PowerShell:
— Старая версия Windows PowerShell (максимальная версия 5.1, которая больше не развивается).
— Новая платформа PowerShell Core (доступна версия 7.3).
Несмотря на то, что нумерация версий PowerShell продолжается с 5.1 (6.0, 6.1, 7.0 и т.д.), это две разные платформы.
Мы рассмотрим, как обновить Windows PowerShell и PowerShell Core.
PowerShell Core 7.x совместима с Windows PowerShell, что означает, что вы можете запускать старые скрипты и командлеты в PowerShell Core.
Приобрести оригинальные ключи активации Windows всегда можно у нас в каталоге от 1099 ₽
Обновление Windows PowerShell до 5.1
Во всех версиях, начиная с Windows 10 и Windows Server 2016, Windows PowerShell 5.1 уже установлен по умолчанию.
В более ранних версиях (Windows 7/8.1 и Windows Server 2008 R2/2012) обновление до PowerShell 5.1 выполняется вручную. Например, в Windows Server 2012 R2 (Windows 8.1) установлена PowerShell 4.0.
Попробуем обновить версию PowerShell в Windows Server 2012 R2 до 5.1.
1. Проверьте текущую версию PowerShell:
$PSVersionTable.PSVersion

2. Для обновления PowerShell до версии 5.1 установите Windows Management Framework (WMF) 5.1, который требует .NET Framework 4.5.2 или выше. Чтобы убедиться, что у вас установлена нужная версия .NET, выполните команду:
(Get-ItemProperty 'HKLM:\SOFTWARE\Microsoft\NET Framework Setup\NDP\v4\Full' -Name Release).Release

3. Если у вас устаревшая версия .NET (например, 4.5.1), скачайте и установите NET Framework 4.8
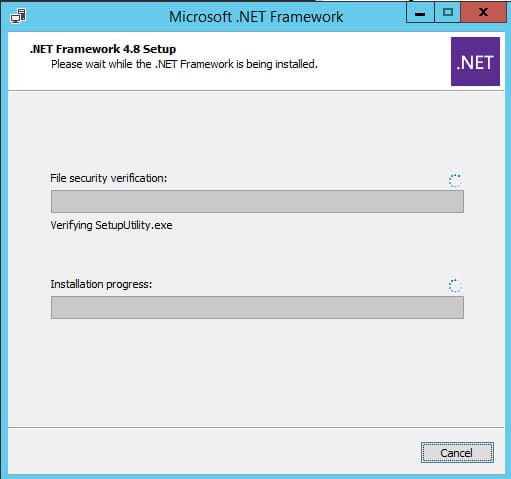
4. После установки .NET 4.8 (потребуется перезагрузка) скачайте WMF 5.1 для Windows Server 2012 R2
5. Установите MSU файл Windows Management Framework 5.1.
6. Перезагрузите сервер, затем запустите консоль powershell.exe и убедитесь, что версия обновлена до PowerShell 5.1:
$PSVersionTable.PSVersion

Если у вас Windows Server 2008 R2 или Windows 7, вы также можете обновить PowerShell до 5.1 аналогичным способом: сначала установите .NET Framework 4.5.2 или выше, а затем установите WMF 5.1.
Установка/обновление PowerShell Core 7.x
PowerShell Core — это кроссплатформенная среда, которая активно развивается в отличие от Windows PowerShell 5.1. Она устанавливается отдельно от Windows PowerShell, поэтому обновление Windows PowerShell 5.1 до PowerShell Core невозможно.
На данный момент доступны версии PowerShell Core 6.x и 7.x. Рекомендуется использовать последнюю версию PowerShell Core (сейчас это 7.3), если вам не требуется особая совместимость с устаревшими скриптами.
Существует несколько способов обновления или установки PowerShell Core в Windows 10 и 11:
— С помощью MSI установщика PowerShell Core (скачивается на GitHub).
— С помощью менеджера пакетов WinGet.
— Через Microsoft Store.
Обновление PowerShell Core с помощью MSI установщика
1. Перейдите на страницу проекта PowerShell на GitHub и скачайте последнюю версию установочного пакета MSI.
2. Установите MSI файл. Во время установки доступны следующие опции:
— Add PowerShell to Path Environment Variable — добавляет PowerShell в переменные окружения.
— Register Windows Event Logging Manifest — регистрирует журнал событий для PowerShell.
— Enable PowerShell Remoting — включает удалённое управление через WinRM.
— Add ‘Open here’ context menu to Explorer — добавляет пункт в контекстное меню Проводника.
— Add ‘Run with PowerShell 7’ context menu for PowerShell files — добавляет пункт для запуска скриптов через PowerShell 7.
3. Для автоматического обновления PowerShell Core через Windows Update или WSUS активируйте соответствующие опции.
Обновление PowerShell Core через WinGet
1. Если у вас установлен WinGet, вы можете установить или обновить PowerShell до актуальной версии командой:
winget install --id Microsoft.Powershell --source winget
2. Если нужно установить конкретную версию PowerShell Core, используйте:
winget install --id=Microsoft.PowerShell -v "7.1.2" -e
Для установки PowerShell Core из MSI пакета средствами SCCM/MDT/скриптами в тихом режиме можно использовать команду установки со следующими параметрами:
ADD_EXPLORER_CONTEXT_MENU_OPENPOWERSHELL
ADD_FILE_CONTEXT_MENU_RUNPOWERSHELL
ENABLE_PSREMOTING
REGISTER_MANIFEST
ADD_PATH
DISABLE_TELEMETRY
USE_MU – использовать Microsoft Update для получения обновлений PSCore
ENABLE_MU – разрешить обновление PowerShell Core через Windows UpdateНапример, команда установки может выглядеть так:
msiexec.exe /package PowerShell-7.3.3-win-x64.msi /quiet ADD_EXPLORER_CONTEXT_MENU_OPENPOWERSHELL=1 ENABLE_PSREMOTING=1 REGISTER_MANIFEST=1 ADD_PATH=1 ENABLE_MU=1 ADD_PATH=1
Вы можете обновить PowerShell прямо из консоли. Для этого выполните следующую команду, которая загрузит и установит последнюю версию PowerShell Core с использованием MSI установщика:
iex "& { $(irm https://aka.ms/install-powershell.ps1) } -UseMSI"
Эта команда загружает установочный MSI файл PowerShell 7.3 с GitHub и автоматически запускает установку через MSI Installer.

После завершения установки откроется окно PowerShell Core (pwsh.exe). Проверьте текущую версию PowerShell, чтобы убедиться, что теперь установлена последняя версия 7.3.3:
$PSVersionTable.PSVersion
Использование WinGet для установки или обновления PowerShell Core
Если у вас установлен пакетный менеджер WinGet, вы можете установить или обновить PowerShell до актуальной версии с помощью следующей команды:
winget install --id Microsoft.Powershell --source winget
Если нужно установить конкретную версию PowerShell Core, выполните команду:
winget install --id=Microsoft.PowerShell -v "7.1.2" -e
Использование Chocolatey для установки или обновления PowerShell
Если вы используете менеджер пакетов Chocolatey, для установки или обновления PowerShell 5.1 используйте следующие команды:
choco install powershell -y
choco upgrade powershell -y
Для обновления PowerShell 7.x:
choco upgrade pwsh -y
Важные каталоги PowerShell
Обратите внимание на местоположение файлов различных версий PowerShell:
— Windows PowerShell 5.1: $env:WINDIR\System32\WindowsPowerShell\v1.0
— PowerShell Core 6.x: $env:ProgramFiles\PowerShell\6
— PowerShell 7.x: $env:ProgramFiles\PowerShell\7
При установке PowerShell 7.3, если на компьютере уже была установлена версия 6.x, каталог $env:ProgramFiles\PowerShell\6 автоматически удаляется.
Также обратите внимание, что исполняемый файл PowerShell Core теперь называется pwsh.exe и находится в каталоге c:\Program Files\PowerShell\7\pwsh.exe. У него есть собственная иконка в меню Пуск.
— Для запуска Windows PowerShell (на базе .NET Framework) используйте команду:
powershell.exe
— Для запуска PowerShell Core (на базе .NET Core) используйте команду:
pwsh.exe
Использование двух версий PowerShell
Теперь на вашем компьютере могут быть установлены обе версии PowerShell: Windows PowerShell 5.1 и PowerShell Core 7.3
Чтобы проверить версию PowerShell Core, вы можете выполнить следующую команду:
(Get-Command 'C:\Program Files\PowerShell\7\pwsh.exe').Version
Также можно проверить версию PowerShell на удалённом компьютере:
Invoke-Command -ComputerName computer1 -Scriptblock {(Get-Command 'C:\Program Files\PowerShell\7\pwsh.exe').Version}
Запуск предыдущих версий PowerShell
Если вам нужно запустить предыдущую версию PowerShell, например PowerShell 4, используйте следующую команду:
C:\Windows\System32\WindowsPowerShell\v1.0\powershell.exe -Version 4
Обновление PowerShell Core через Microsoft Store
В Windows 10 и 11 вы можете установить PowerShell через Microsoft Store. Приложение PowerShell можно найти вручную, или установить через WinGet:
winget search powershell --source msstore
winget install --id 9MZ1SNWT0N5D
Преимущество этого способа заключается в том, что Microsoft Store будет автоматически следить за обновлениями и устанавливать их по мере появления.
Вы можете проверить, установлена ли у вас Store версия PowerShell Coreс помощью команды:
Get-AppPackage Microsoft.PowerShell
В этом примере пакет Microsoft.PowerShell_7.3.3.0_x64__8wekyb3d8bbwe установлен.
Но есть и недостатки, связанные с тем, что такой PowerShell будет запускаться в песочнице.

Установка/обновление PowerShell Core на удалённых компьютерах
Обновление PowerShell Core с помощью GPO
В домене Active Directory вы можете централизованно установить или обновить PowerShell Core с помощью групповой политики (GPO):
1. Скачайте MSI файл PowerShell и скопируйте его в каталог SYSVOL на контроллере домена.
2. Откройте консоль управления GPO (gpmc.msc), создайте новую политику и назначьте её на OU с компьютерами.
3. В разделе Computer Configuration -> Software Settings создайте новый пакет и укажите путь к MSI файлу PowerShell в каталоге SYSVOL.
4. Для обновления групповых политик установки ПО нужно перезагрузить компьютеры. Во время загрузки на всех компьютерах будет установлена новая версия PowerShell.

Обновление PowerShell на удалённых компьютерах из командной строки
Вы можете обновлять PowerShell на удалённых компьютерах через консоль. Пример команды для установки PowerShell с помощью MSI установщика:
Invoke-Command -ComputerName dc01 -ScriptBlock {Start-Process msiexec.exe -ArgumentList '/package "\\srv1\share\PowerShell-7.3.3-win-x64.msi" /quiet ADD_EXPLORER_CONTEXT_MENU_OPENPOWERSHELL=1 ENABLE_PSREMOTING=1 REGISTER_MANIFEST=1' -Wait}
Следующий скрипт позволит выбрать все активные компьютеры с Windows 10 из домена Active Directory и запустить на каждом из них загрузку и установку PowerShell Core:
$creds = $(Get-Credential)

$computers = Get-ADComputer -Filter 'operatingsystem -like "*Windows 10*" -and enabled -eq "true"'

ForEach ($computer in $computers) {

Invoke-Command -ComputerName $computer -Credential $creds {iex "& { $(irm https://aka.ms/install-powershell.ps1) } -UseMSI -Quiet"}

}
Для использование командлета GetADComputer на компьютере должен быть установлен модуль AD PowerShell.
Будьте внимательными при использовании команд PowerShell Remoting при подключении к удаленным компьютерам (Enter-PSSession, Invoke-Command). Если вам нужно подключиться к точке управления PowerShell 7 нужно использовать команду:
Enter-PSSession -ComputerName dc01 -ConfigurationName "powershell.7"Иначе вы подключитесь к точке PowerShell Remoting 5.1.
Обновление PowerShell через Windows Update или WSUS
Начиная с версии 7.2, PowerShell Core поддерживает автоматическое обновление через Windows Update. Для этого включите опции автоматического обновления при установке MSI пакета.
Первая опция разрешает автоматическое обновление PowerShell через любой канал (включает параметр UseMU =1 в ветке HKEY_LOCAL_MACHINE\SOFTWARE\Microsoft\PowerShellCore)
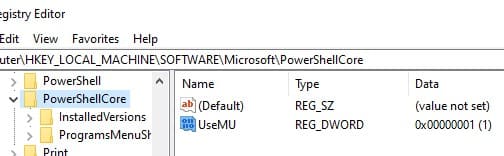
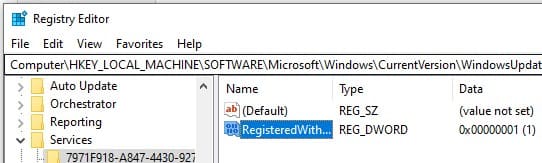
Второй чекбокс – разрешает получать обновления для всего ПО Microsoft, не только для Windows. Если опция отключена, вы не будете получать обновления PowerShell с Microsoft Update, но можете получать их с вашего WSUS/SCCM (параметр реестра registeredwithAU=1 в HKLM\SOFTWARE\Microsoft\Windows\CurrentVersion\WindowsUpdate\Services\7971F918-A847-4430-9279-4A52D1EFE18D)
Для проверки наличия обновлений откройте Настройки > Обновление и безопасность > Windows Update > Дополнительные параметры и убедитесь, что активирована опция Получать обновления для других продуктов Microsoft.
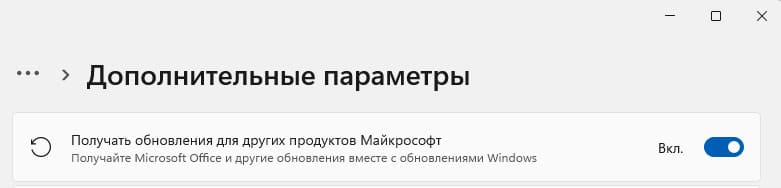
Теперь при проверке обновлений через Windows Update или через модуль PSWindowsUpdate, вы будете получать обновления для PowerShell Core.
Таким образом, вы можете выбрать удобный для вас способ обновления Windows PowerShell и PowerShell Core, будь то использование MSI пакета, WinGet, Microsoft Store, или групповых политик.
Keeping your PowerShell version up-to-date makes sure that you can use the latest features and cmdlets in your scripts. But how do you update PowerShell?
There are two versions of PowerShell at the moment, Windows PowerShell 5.1 and PowerShell Core (7.x). Most modules are switching over to PowerShell 7, but 5.1 is still mainly used. Luckily we can use those two versions next to each other.
In this article
In this article, I will explain how you can update both versions of PowerShell, and how to install/upgrade to PowerShell 7. If you are unsure which version you are currently using, then check this article on how to view your PowerShell version.
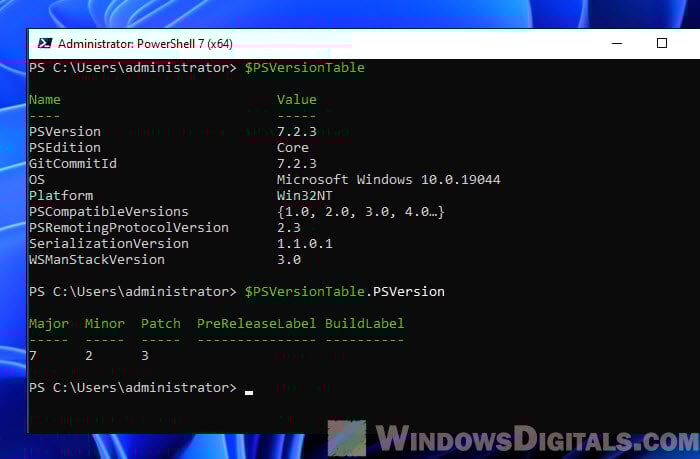
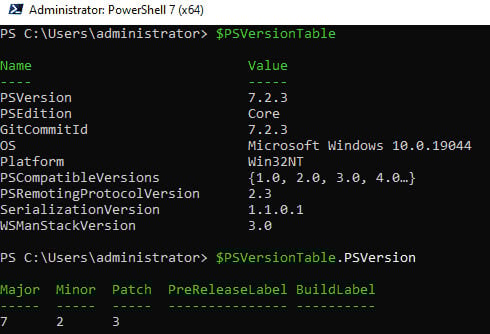
PowerShell 5.1 is still the most commonly used and installed PowerShell version at the moment. If you open the Terminal or PowerShell on a Windows 10/11 computer or Windows Server 2016 and newer and type in $PSVersionTable then you will see that version 5.1 (1) is installed.
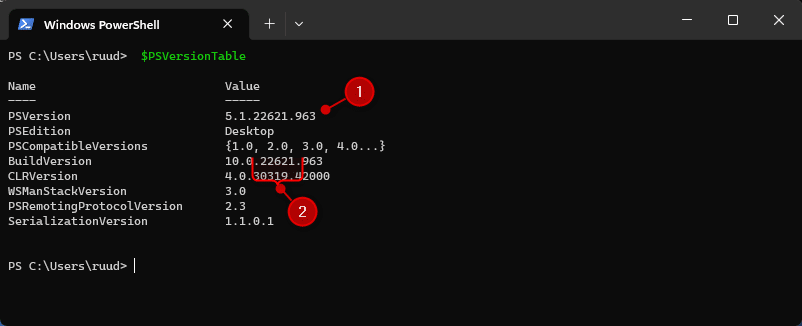
The version number exists out of 4 parts:
| Major | Minor | Build | Revision |
|---|---|---|---|
| 5 | 1 | 22621 | 963 |
If you check the PowerShell version on another machine, then you might have noticed that the build and revision numbers are different. Now you might think, how can I update PowerShell so the build numbers match?
The problem here is that PowerShell 5.1 is part of the Windows Management Framework 5.1 and is updated automatically with your Windows Updates. As we can see in the screenshot above, the build and revision numbers match the Build Version of the OS (2).
Good to know is that PowerShell 5.x isn’t developed anymore. The latest version is 5.1 and there won’t be any updates for it anymore. PowerShell Core 7.x is the successor of PowerShell 5.1.
Update from older PowerShell versions
On older operating systems, like Windows Server 2012 R2, you can still find PowerShell 4 installed. PowerShell 3 and 4 can be updated to PowerShell 5.1. To do this we will need to install the Windows Management Framework 5.1, which you can download here at Microsoft. The following operating systems are supported:
- Windows Server 2012 R2
- Windows Server 2012
- Windows Server 2008 R2 SP1
- Windows 8.1
- Windows 7 SP1
Make sure that you select the correct version of your OS and that have installed .Net Framework 4.5 or higher.
After the installation, you will need to reboot the computer to use the new PowerShell version.
Upgrade PowerShell
PowerShell Core 7, commonly referred to as PowerShell 7, is a completely new version of PowerShell. One of the biggest differences is that it not only can be used on Windows but also on macOS or Linux for example. This means that we cannot upgrade PowerShell 5.1 to 7, but instead, we can install PowerShell 7 next to version 5.1.
This way you can use both versions simultaneously on a single computer, which is a good thing. Because not all modules and cmdlets are available in PowerShell 7. So before you can fully switch over to the new version, you will need to do a lot of testing to make sure that all your script keep working.
To install PowerShell 7 we have a couple of options:
- WinGet – The built-in package manager in Windows 10 and 11
- MSI Installer – Best option for Windows Servers
- Microsoft Store
- Dev Home – Currently in preview, but allows you to easily install all required packages on your dev machine. Read more about Dev Home in this article.
Using WinGet to Install PowerShell 7
WinGet is a built-in command line tool in Windows that allows you to install packages on your Windows 10 or 11 computer. The advantage of WinGet is that you only need to run a single command to install a package.
At the moment there are two versions available of PowerShell 7, the stable version and a preview version. I recommend installing the stable version in production environments. To view the available versions you can run the following command:
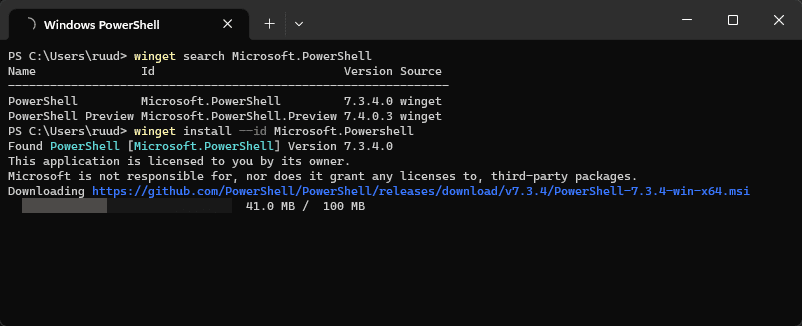
winget search Microsoft.PowerShell

# Result
Name               Id                           Version Source
---------------------------------------------------------------
PowerShell         Microsoft.PowerShell         7.3.4.0 winget
PowerShell Preview Microsoft.PowerShell.Preview 7.4.0.3 winget
To install PowerShell 7 run the following command:
winget install --id Microsoft.Powershell --source winget
Winget will download the package after which the MSI installer will start:
Using the MSI
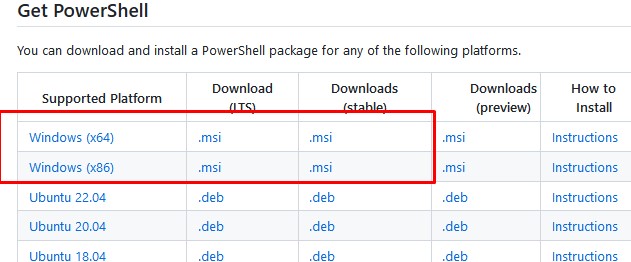
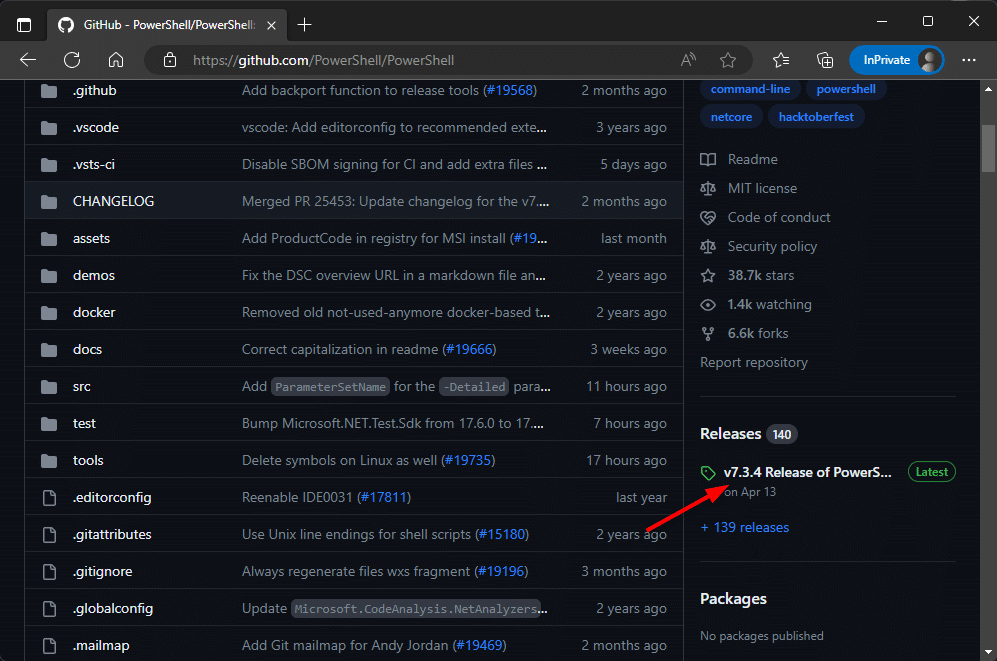
The Windows Package Manager (Winget) downloads the latest MSI file automatically. If you can’t or don’t want to use WinGet, then you can also download the MSI file manually from the PowerShell GitHub page. Another (easier) option is to use the download link here in the Microsoft documentation.
- Open the PowerShell GitHub Page
- Click on the latest Release version in the right sidebar
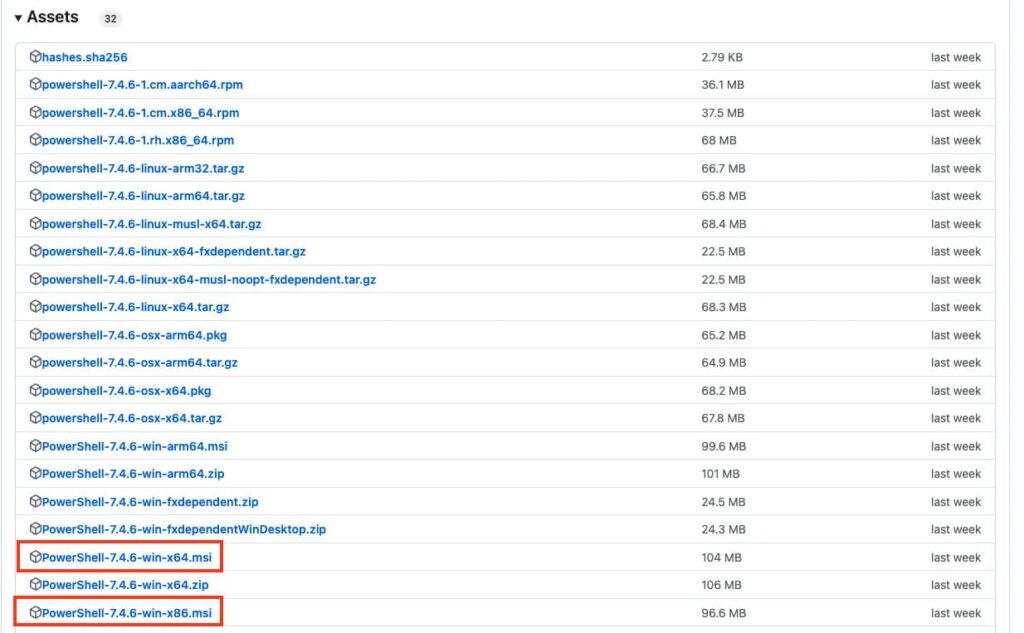
- Scroll all the way down on the release page
- Download the latest PowerShell-7.x.x-win-x64.msi file
Open the MSI after it’s downloaded. We have a couple of options that we can enable. I recommend installing all options from the installer:
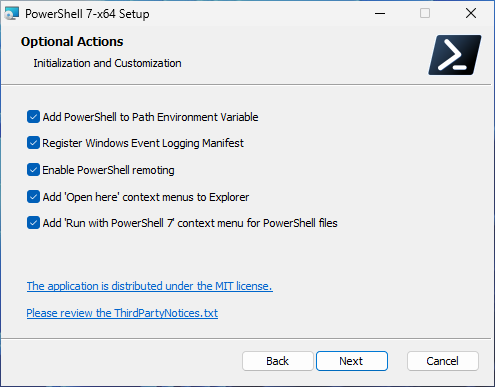
On the next page, leave both updating options enabled. This way you will always have the latest stable version of PowerShell 7 installed on your computer.
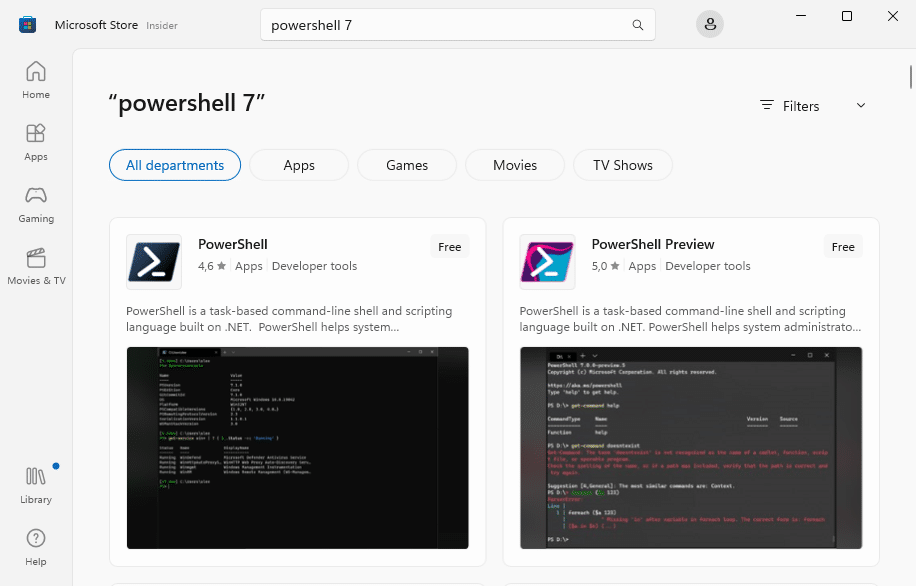
Install with Microsoft Store
Personally, I don’t use the Microsoft Store much, but it’s possible to install PowerShell through the store. Simply open the Store and search for PowerShell 7. Make sure you select PowerShell and not the PowerShell Preview version and click on Get.
Using PowerShell 7
PowerShell 7 is a different app/console than PowerShell 5.1. If you open Terminal or PowerShell from the start menu and run the command $PSVersionTable, then you will see that the version number is still 5.1. This is normal because you are actually using PowerShell 5.1 at that moment.
To use PowerShell 7, you have two options:
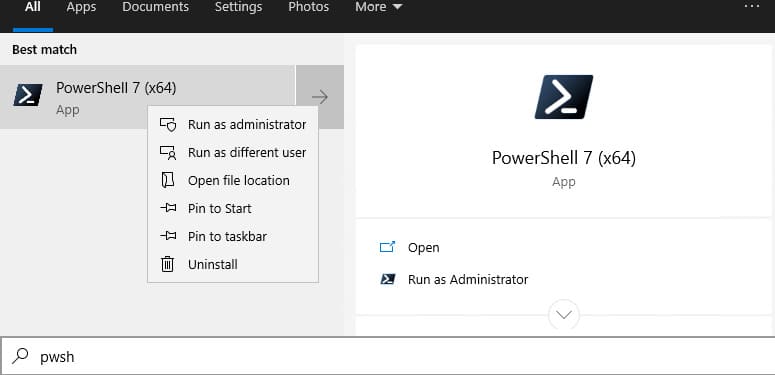
- Open it from the Start Menu
- Open it through Terminal > New Tab
To open it from the start menu, just search for the PowerShell 7 app. This will open the new version in the terminal app.
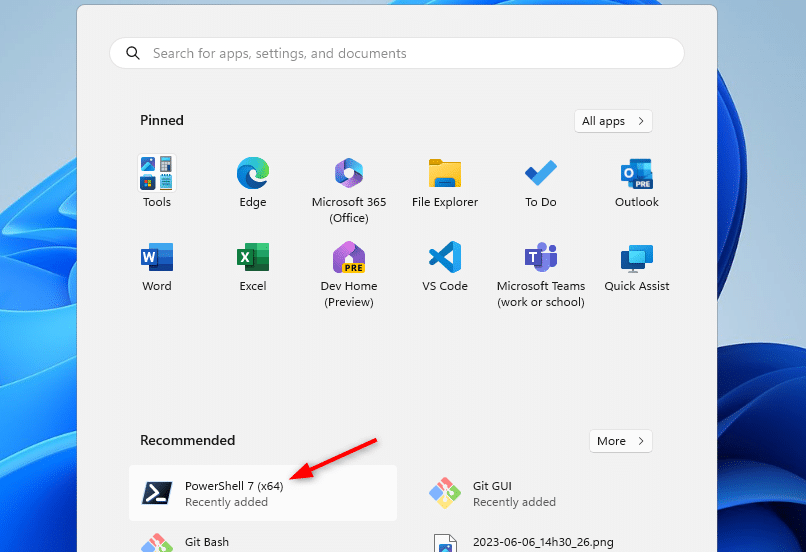
Another option is to use the built-in Windows Terminal. If you click on the drop-down arrow (1) next to the new tab icon, then you can select PowerShell, which is PowerShell 7. We can also change the default PowerShell version in Terminal to PowerShell 7.
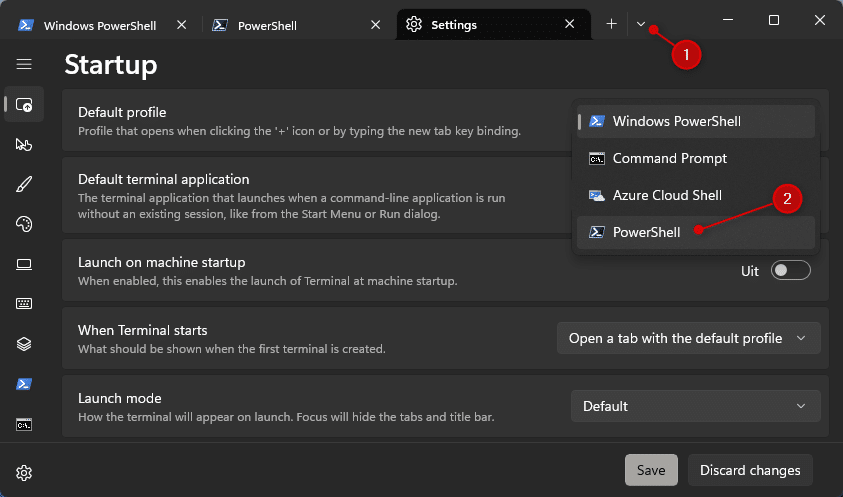
Click on the drop-down arrow (1), choose Settings, and change the default profile (2) to PowerShell.
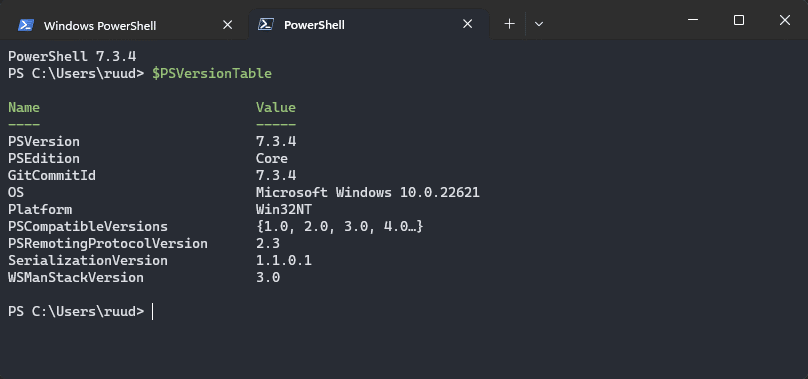
If you run the command $PSVersionTable in the new PowerShell console, then you will see that the PSVersion is set to 7.x.x and the PSEdition is Core:
Update PowerShell 7 Command
PowerShell Core 7 is being actively developed at the moment. A new release comes out pretty much every month. Now PowerShell 7 should update with your Windows Updates if you have version 7.2 or higher. But we can also manually update PowerShell with a single command to the latest version. For this, we will be using the command-line tool WinGet.
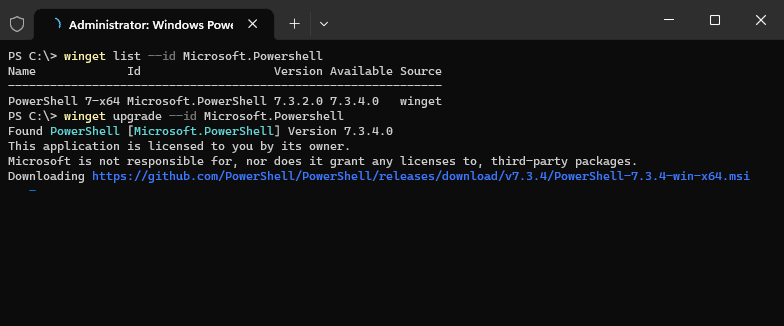
To view which version you have currently installed you can use the WinGet List command below:
winget list --id Microsoft.Powershell

# Result
Name             Id                   Version Available Source
--------------------------------------------------------------
PowerShell 7-x64 Microsoft.PowerShell 7.3.2.0 7.3.4.0   winget
As you see in the results above, PowerShell version 7.3.2 is currently installed. Also, the latest available version is listed, which is at the moment of writing, version 7.3.4. To update PowerShell we can use the upgrade parameter in Winget:
winget upgrade --id Microsoft.Powershell
After the upgrade is complete you will need to reload the console to use the new version.
Wrapping Up
Keeping PowerShell 7 up-to-date is important to make sure that your scripts work on all device. However, PowerShell 5.1, won’t receive any updates anymore, but is still mainly used. Personally I try to write most of my new scripts in PowerShell 7 when possible. This will make them future prove.
I hope this articled helped you with updating PowerShell. If you have any questions or tips, just drop a comment below.
PowerShell 7 is a pretty common tool for developers or admins to manage things on Windows computers, and keeping it updated is always an important job. This guide will show you how to install or update PowerShell 7 using only the command line.
What actually is PowerShell 7? PowerShell 7 comes after PowerShell Core 6.x and Windows PowerShell 5.1. It brings certain improvements and fills the gap between Windows PowerShell and PowerShell Core, and adds more features to the shell and scripting language.
Install PowerShell 7 using “winget”
To install PowerShell 7 on your system using the command line, you have a couple of options. One easy way is to use the Windows Package Manager (winget), a cmdlet that helps you find, install, upgrade, and set up apps on your Windows 11 or 10 system.
- Open a command prompt or PowerShell window as an admin.
- Type the following command and press Enter:
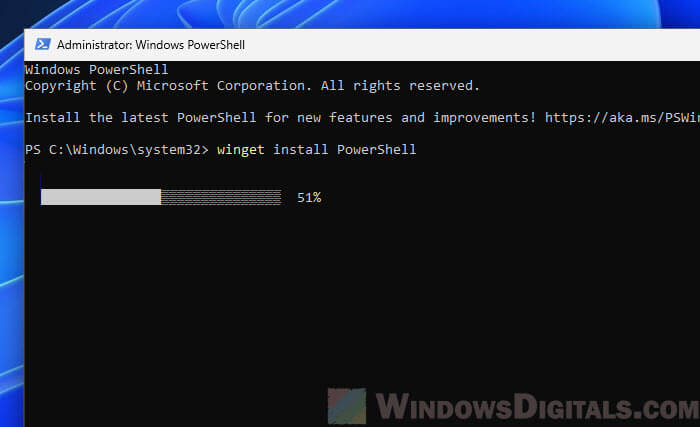
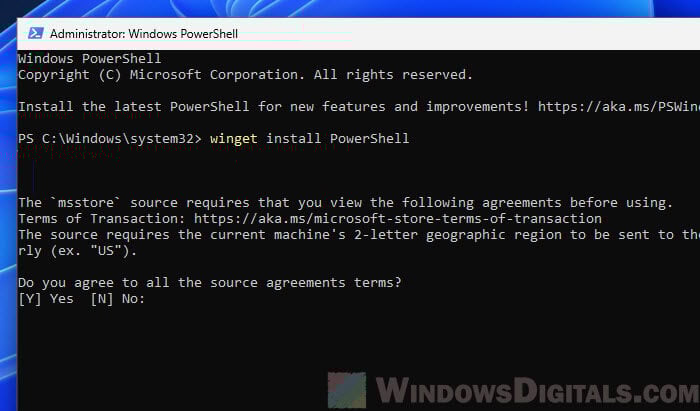
winget install PowerShell

- It will ask you to agree to the terms before installing. Press Y to continue.

- The winget tool will take care of the rest, downloading and installing the latest version of PowerShell 7.
Note that if the winget command doesn’t work, make sure you have the Windows Package Manager installed. It should already be pre-installed on Windows 10 version 1809 and later, and on Windows 11. If you don’t have it, you can download it from the Microsoft Store or from the GitHub releases page of the Windows Package Manager CLI (https://github.com/microsoft/winget-cli). Or, you can just try the next method instead.
Related resource: Install Active Directory Users and Computers via PowerShell
Install or update PowerShell 7 using a simple script
If you can’t use winget or if you prefer a different method, there’s a quite useful script from Microsoft that you can use to install or update PowerShell 7. This method is good for automating updates or making sure everything is consistent across many machines. To use this script, run the following command in a PowerShell window.
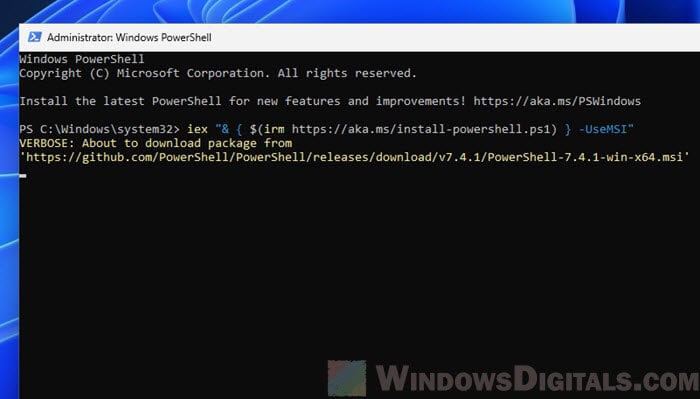
iex "& { $(irm https://aka.ms/install-powershell.ps1) } -UseMSI"
What the script actually does
The command line might look complicated, but it’s actually pretty straightforward when you break it down.
iex: Short forInvoke-Expression, this cmdlet runs commands or expressions passed to it as a string. Here, it runs the installation script.irm: This stands forInvoke-RestMethod, a cmdlet that sends a web request and gets the response. It’s used here to download the PowerShell installation script from the link (https://aka.ms/install-powershell.ps1).& { ... }: This is a script block, a set of commands or expressions that run together. The&operator runs the script block.-UseMSI: This tells the installation script to use the MSI (Microsoft Installer) package. MSI is standard for Windows apps and offers a familiar setup experience, including silent installs, custom install locations, and more.
When you run this command, it does these things:
- Downloads the PowerShell installation script from the given link.
- Runs the script, which looks for the newest version of PowerShell.
- If there’s a newer version, the script downloads and starts the MSI installer.
- The MSI installer then updates PowerShell to the latest version, keeping your settings and configurations.
This method is very helpful for automated scripts or when you’re managing many machines, as it can be added to deployment scripts or scheduled tasks to keep PowerShell up to date.
Get PowerShell 7 from Microsoft Store instead
Another easy way to install or update PowerShell 7 is through the Microsoft Store. After installing it from the Store, PowerShell 7 will update automatically in the background, just like other store apps do.
- Go to the Start menu and open the Microsoft Store.
- Use the Search feature and type “PowerShell”.
- Find “PowerShell” in the results and click on the app.
- Click the “Get” or “Install” button and follow the steps.

Check the installation
After you’ve installed or updated PowerShell 7, you might want to double-check its version again to see if the updates were really applied.
- Open a new PowerShell window.
- Type
$PSVersionTable.PSVersionand press Enter. - The version number shown should match the latest version of PowerShell 7 you just installed or updated.

Some common issues
If you update PowerShell 7 using the command line as we talked about, you might sometimes come across the following common issues.
- If the
wingetcommand doesn’t work, check that you have the latest version of the Windows Package Manager. - If the script method doesn’t work, make sure your PowerShell session can run scripts with the
Set-ExecutionPolicycmdlet. - When using the Microsoft Store, make sure you’re logged into your Microsoft account and that the Store app is updated.
PowerShell is like that cool Swiss Army knife you always carry around but rarely use to its full potential. It’s a command-line shell and scripting language that can help you manage your Windows system, automate tasks, and even impress your tech-savvy friends at parties. But just like any tool, to keep PowerShell at its sharpest, you need to keep it updated. Fortunately, updating PowerShell by command isn’t as complicated as performing a magic trick. It’s straightforward, and I’m here to guide you through it.
So, if your current version of PowerShell is starting to feel a little outdated and you’re tired of it not having the latest features or bug fixes, let’s walk through how to update it like a pro—using nothing but a few commands and a bit of PowerShell magic.
Why Update PowerShell?
Before we dive into the nitty-gritty, you might be asking yourself: Why bother updating PowerShell at all? Well, it’s simple. New versions of PowerShell come with improvements—faster performance, additional features, security patches, and bug fixes. And let’s be honest, who wouldn’t want a faster, more secure experience, especially when you’re working with system commands that control your entire machine?
Plus, the newer PowerShell Core (or PowerShell 7 and beyond) works across multiple platforms—yes, even Linux and macOS! So if you’re a multi-platform wizard, having the latest version helps you manage everything seamlessly.
Step-by-Step Guide: How to Update PowerShell Using Commands
Now, let’s get to the part you came here for: how to update PowerShell using commands. Whether you’re upgrading from PowerShell 5.1 or an older version of PowerShell Core, this guide will cover all the essential steps.
Step 1: Check Your Current PowerShell Version
First, let’s check which version of PowerShell you’re currently using. Open your PowerShell window (you can search for it in the Start menu or type powershell in the Run box) and run this command:
$PSVersionTable.PSVersion
This command will return your current PowerShell version, like 5.1 or 7.x.x. If you’re still on Windows PowerShell 5.1 (the built-in version that comes with Windows), then it’s definitely time to upgrade to the newer PowerShell Core (aka PowerShell 7).
| Command | What It Does |
|---|---|
$PSVersionTable.PSVersion |
Displays your current PowerShell version. |
Step 2: Installing PowerShell 7.x
If you’re running an older version of PowerShell and want to jump to the latest and greatest PowerShell 7, you can do this easily through the terminal.
For Windows: Using Winget (Windows Package Manager)
The quickest way to update PowerShell on Windows is by using the Windows Package Manager (winget). If you don’t have winget installed yet, you might want to check if it’s available on your system or install it from the Microsoft Store.
Once you have winget ready, open PowerShell as Administrator and run this command:
winget install --id Microsoft.Powershell --source winget
This command tells the system to grab the latest PowerShell version from the official repository and install it.
| Command | What It Does |
|---|---|
winget install --id Microsoft.Powershell --source winget |
Installs or updates PowerShell to the latest version. |
For Windows: Using MSI Package
Another method is downloading the MSI package directly from the official PowerShell GitHub page. But we’re sticking to command-line methods here because downloading and double-clicking feels like cheating, doesn’t it?
Step 3: Install PowerShell from the Command Line (For Linux or macOS)
If you’re on Linux or macOS, PowerShell installation commands differ slightly based on the distribution you’re using. Here’s a quick breakdown:
For Ubuntu or Debian-based Linux:
You can install the latest version of PowerShell with the following commands:
sudo apt-get update
sudo apt-get install -y wget apt-transport-https software-properties-common
wget -q "https://packages.microsoft.com/config/ubuntu/20.04/packages-microsoft-prod.deb"
sudo dpkg -i packages-microsoft-prod.deb
sudo apt-get update
sudo apt-get install -y powershell
After the installation, simply type pwsh to launch the new version of PowerShell.
For macOS:
macOS users can use Homebrew to install PowerShell. Open your terminal and type:
brew install --cask powershell
Once installed, run PowerShell by typing pwsh in your terminal.
| Platform | Command to Install PowerShell |
|---|---|
| Ubuntu/Debian | sudo apt-get install -y powershell |
| macOS | brew install --cask powershell |
Step 4: Verify the New Installation
After you’ve installed or updated PowerShell, you’ll want to verify that the installation worked correctly. Close and reopen your terminal, then type the following command again to check the version:
$PSVersionTable.PSVersion
You should now see something like 7.x.x, indicating that you’re on the latest version of PowerShell. If everything checks out, congratulations—you’re all set!
Bonus: Updating PowerShell Modules (Because Why Not?)
While you’re updating PowerShell itself, it’s also a good idea to update the modules you’re using. Modules are like the cool accessories for your PowerShell toolbelt, adding extra functionality.
You can update all your installed modules with a single command:
Update-Module
Or if you want to update specific modules (like Azure, for example):
Update-Module -Name Az
This will ensure all the features and capabilities of your modules are running smoothly.
| Command | What It Does |
|---|---|
Update-Module |
Updates all installed PowerShell modules. |
Update-Module -Name [ModuleName] |
Updates a specific module (replace [ModuleName] with the actual name). |
Final Thoughts: Keep PowerShell—and Your Superpowers—Updated
Keeping PowerShell up to date is like making sure your secret lair is always equipped with the latest gadgets. You get access to new features, security improvements, and bug fixes that make your day-to-day scripting faster and more reliable. With a few simple commands, you’ve learned how to update PowerShell on Windows, Linux, and macOS, so you can keep your systems running smoothly no matter what platform you’re working on.
And hey, you’re now that person who knows how to keep their PowerShell sharp—no more old versions holding you back from automating all the things!
Now, go ahead and flex those updated PowerShell skills and watch your scripts run like never before. Just remember: with great PowerShell, comes great responsibility… or, at least, faster scripting!