
Updating OpenSSL on Windows 10 is a straightforward process that ensures your security protocols are up-to-date. First, check your current version and uninstall it if necessary. Then, download the latest version from the official OpenSSL website, extract the files, and install the application on your system. Finally, confirm the update by checking the version again. By following these steps, you can maintain a secure and efficient system.
In this section, we’ll walk through the steps to update OpenSSL on Windows 10. This process involves uninstalling the old version, downloading the new one, and confirming the update.
Step 1: Check Current OpenSSL Version
First, determine which version of OpenSSL is currently installed on your computer.
Open a command prompt window and type “openssl version”. This command will display the installed version number. Knowing your current version helps you decide if an update is necessary.
Step 2: Uninstall Old Version (If Necessary)
If your OpenSSL version is outdated, uninstall it from your system.
Go to the Control Panel, navigate to Programs, and locate OpenSSL. Click uninstall to remove it. This step ensures that no old files interfere with the new installation.
Step 3: Download New Version
Visit the official OpenSSL website to download the latest version.
Make sure you choose the correct version for Windows. Download the installer to your preferred location. This step is crucial for obtaining the most secure and updated version.
Step 4: Install OpenSSL
Run the downloaded installer to install the new version on your system.
Follow the on-screen instructions to complete the installation. Ensure you select the right options for your system needs. Installing correctly will enable all the new features and security patches.
Step 5: Verify Installation
Finally, confirm the successful installation of the updated OpenSSL version.
Open a command prompt window and type “openssl version” again. Ensure the displayed version matches the one you downloaded. Verification guarantees that you have the latest version running.
Once you’ve completed these steps, OpenSSL on your Windows 10 system will be updated. You can rest easy knowing your security protocols are current and robust.
Tips for Updating OpenSSL on Windows 10
- Back Up Your Data: Before starting the update process, back up important data in case of unexpected errors.
- Use Official Sources: Only download OpenSSL from the official website to avoid malicious software.
- Stay Informed: Regularly check for OpenSSL updates to keep your system secure.
- Follow Instructions: Carefully follow the installation instructions to prevent errors.
- Restart Your System: After installation, restart your computer to ensure changes take effect.
Frequently Asked Questions
What is OpenSSL?
OpenSSL is a software library that provides secure communication over networks.
Why should I update OpenSSL?
Updating ensures you have the latest security fixes and improvements.
Can I update OpenSSL without uninstalling the old version?
It’s recommended to uninstall the old version to avoid conflicts.
Is it safe to download OpenSSL from the internet?
Only download OpenSSL from the official website to ensure safety.
How often should I update OpenSSL?
Check for updates regularly, ideally monthly, to maintain security.
Summary
- Check current OpenSSL version.
- Uninstall old version if necessary.
- Download the new version.
- Install OpenSSL.
- Verify installation.
Conclusion
Updating OpenSSL on Windows 10 is not just about staying current; it’s about safeguarding your system from potential vulnerabilities. By routinely checking for updates, uninstalling outdated versions, and installing the latest release, you ensure that your data is protected with the most robust security measures available. This process might seem a bit technical, but with a little patience and attention to detail, anyone can do it.
As you navigate through the digital world, OpenSSL acts like a knight in shining armor, guarding your fortress against intruders. So, take the time to understand these steps and apply them whenever necessary. The peace of mind that comes with knowing your system is secure is worth the effort.
And remember, technology evolves, and keeping your software updated is key to staying one step ahead of potential threats. If you’ve found this guide helpful, consider sharing it with others who might benefit. After all, a safer internet starts with informed individuals.
Matt Jacobs has been working as an IT consultant for small businesses since receiving his Master’s degree in 2003. While he still does some consulting work, his primary focus now is on creating technology support content for SupportYourTech.com.
His work can be found on many websites and focuses on topics such as Microsoft Office, Apple devices, Android devices, Photoshop, and more.
If you’re looking to update OpenSSL on Windows 10, you’ve come to the right place. This process involves downloading the latest version of OpenSSL, uninstalling the old one, and then installing the new version. It’s pretty simple and straightforward if you follow the steps correctly. Let’s dive right in.
Updating OpenSSL on your Windows 10 machine ensures you have the latest security patches and features. This step-by-step guide will walk you through the process to ensure a smooth update.
Step 1: Download the latest OpenSSL
First, head over to the official OpenSSL website and download the latest version.
To do this, open your web browser and navigate to the OpenSSL download page. Make sure to choose the correct Windows version compatible with your system architecture (32-bit or 64-bit).
Step 2: Uninstall the old version of OpenSSL
Next, remove the current version of OpenSSL from your system.
Go to ‘Control Panel’, click on ‘Programs and Features’, find OpenSSL in the list, right-click on it, and select ‘Uninstall’. Follow the prompts to complete the uninstallation process.
Step 3: Install the new version of OpenSSL
Now it’s time to install the new version you downloaded earlier.
Run the installer file you downloaded. Follow the on-screen instructions, making sure to choose the correct installation paths and options that suit your needs.
Step 4: Update system environment variables
After the installation, update your system’s environment variables to point to the new OpenSSL installation.
Go to ‘Control Panel’, click on ‘System’, then ‘Advanced system settings’. Under the ‘Advanced’ tab, click on ‘Environment Variables’ and update the ‘Path’ variable to include the new OpenSSL directory.
Step 5: Verify the installation
Finally, ensure the new OpenSSL version is properly installed and configured.
Open a Command Prompt and type openssl version. This command should return the version number of the newly installed OpenSSL.
After you complete these steps, your Windows 10 system will have the latest version of OpenSSL installed, offering improved security and performance.
Tips for Updating OpenSSL Windows 10
- Always back up your system before making significant changes like updating software.
- Double-check the architecture (32-bit or 64-bit) of your Windows installation to download the correct version of OpenSSL.
- Make sure you have administrative privileges on your Windows account to install and uninstall software.
- Keep a copy of the old OpenSSL installer as a backup in case you need to revert to the previous version.
- Run the Command Prompt as an Administrator to ensure all commands work correctly, especially when modifying system variables.
Frequently Asked Questions
What is OpenSSL?
OpenSSL is a robust, full-featured open-source toolkit for implementing the Secure Sockets Layer (SSL) and Transport Layer Security (TLS) protocols.
Why do I need to update OpenSSL?
Updating OpenSSL ensures you have the latest security patches and features, protecting your data and system from vulnerabilities.
How do I know if my OpenSSL update was successful?
After completing the update, open Command Prompt and type openssl version. It should display the version of the newly installed OpenSSL.
Can I update OpenSSL without uninstalling the old version?
It’s generally recommended to uninstall the old version to avoid conflicts and ensure a clean installation.
What should I do if I encounter issues during the update?
Check forums, the official OpenSSL documentation, or seek help from IT professionals to troubleshoot and resolve any issues.
Summary
- Download the latest OpenSSL.
- Uninstall the old version.
- Install the new version.
- Update system environment variables.
- Verify the installation.
Conclusion
Updating OpenSSL on Windows 10 might seem daunting at first, but with these steps, it’s a breeze. Keeping OpenSSL up-to-date is crucial for maintaining the security and functionality of your applications. Always ensure you’re downloading from the official site to avoid any malicious software.
By following this guide, you not only ensure a smooth update process but also keep your system in top-notch condition. If you run into any issues, don’t hesitate to consult the resources available online or seek professional help. Remember, a secure system is a happy system! So, go ahead and update OpenSSL on your Windows 10 machine today.
Kermit Matthews is a freelance writer based in Philadelphia, Pennsylvania with more than a decade of experience writing technology guides. He has a Bachelor’s and Master’s degree in Computer Science and has spent much of his professional career in IT management.
He specializes in writing content about iPhones, Android devices, Microsoft Office, and many other popular applications and devices.
Read his full bio here.
In the age of cyber warfare, being paranoid is the only reasonable attitude and that means, among other things, being paranoid about software updates.
Take for example OpenSSL. This open source cryptography library that implements the Transport Layer Security (TLS) and Secure Sockets Layer (SSL) protocols is designed to “secure communications over computer networks against eavesdropping”, but guess what: it has been riddled with bugs since its inception. This may be unavoidable, to a certain degree — after all, we are speaking about software. Even so, the inherent flaws of OpenSSL should not be an excuse for not keeping the version you use as bullet-proof as possible. Let’s not forget that your car is most likely hackable by a 15 year old and yet you still (presumably) lock the doors.
While you can’t do much about the yet-to-be-identified bugs, you can at least protect your systems from those bugs that have been already patched up and widely documented.
Too bad the official OpenSSL website offers Linux sources only.
While Linux distributions routinely come loaded with OpenSSL, this is not the case for Windows… or shall we say “Windows distributions”. (Didn’t Microsoft want to “Linuxify” its flaggship OS? Never mind.) If you want to run it, you need a Windows binary, and unless you are willing to compile it yourself, you have to to rely on someone else.
Here is how you can set up OpenSSL on Windows without having to deal with the code.
Step 1. Get hold of the binaries
Finding Windows binaries of OpenSSL is not an easy task, but don’t get discouraged. They do exist. To download them, navigate to:
https://slproweb.com/products/Win32OpenSSL.html
Don’t be fooled by the Win32 string in the URL nor by the navigation pointing you to a seemingly ancient download page from way back in 2004 (from the “Products” tab through the “Win32 OpenSSL link”). Scroll down the page to the section “Download Win32 OpenSSL”, ignoring the confusing string. Now you need to pick the right binary from the list. For each version, there are two basic types: the full installer and the light installer.
Download the one named “Win64 OpenSSL v1.1.0f” (or a higher-numbered version once it becomes available) to get the full installer.
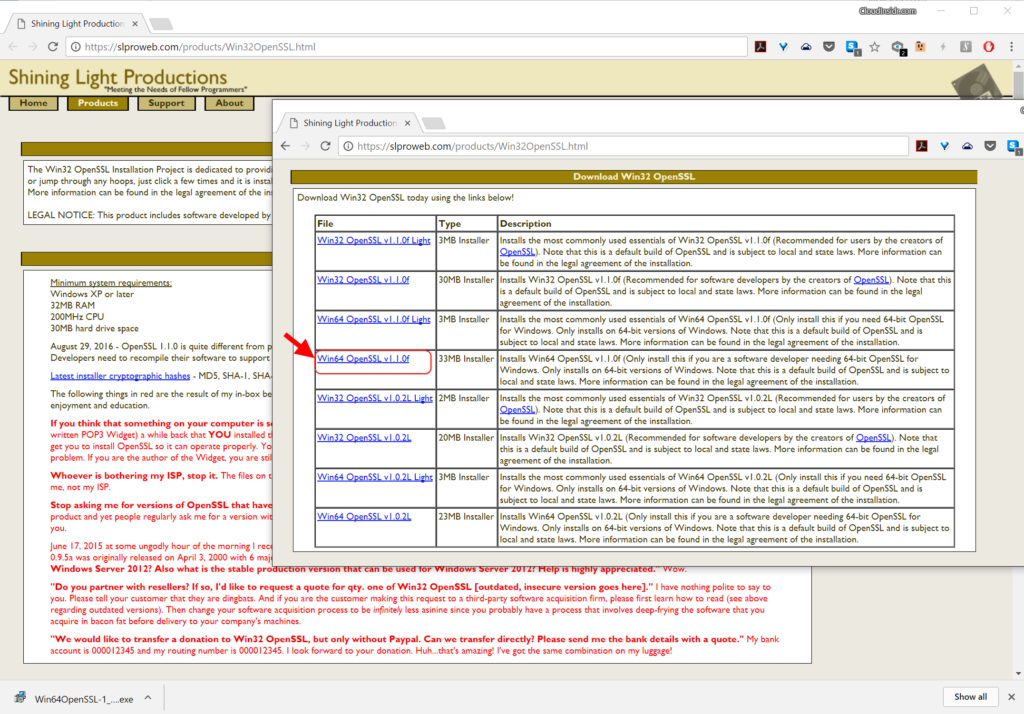
The current version as of this writing (OpenSSL 1.1.0h) is very different from previous releases. It is not the same thing at all so pay attention to the release numbers! The worst thing you can do is use an old version that has documented bugs that anyone could exploit following a howto!
Step 2. Run the installer
We recommend installing OpenSSL outside of your Windows system directory.
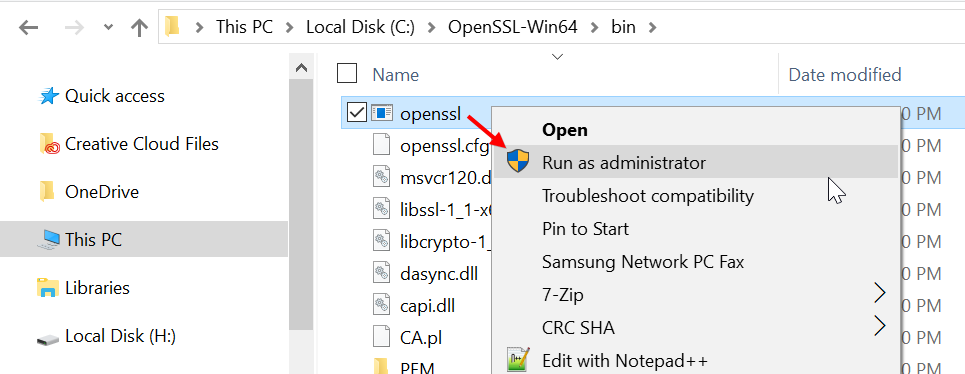
Step 3. Start the OpenSSL binary
To invoke OpenSSL, you can simply right-click on it in the Windows Explorer at its install location, for example in:
C:\OpenSSL-Win64\bin\
then choose “Run as Administrator”.
It will open a cmd window with the OpenSSL command prompt. Here is what to expect.

Now you are ready to start creating your OpenSSL keys. (Speaking of which: users of the remote access utility PuTTY can export an OpenSSH key from PuTTYgen.) When using OpenSSL on Windows in this way, you simply omit the openssl command you see at the prompt. For example, to generate your key pair using OpenSSL on Windows, you may enter:
openssl req -newkey rsa:2048 -nodes -keyout key.pem -x509 -days 365 -out certificate.pem
and follow the onscreen instructions as usual. To review the certificate:
openssl x509 -text -noout -in certificate.pem
and so forth.
OpenSSL is used to secure communication over computer network against for protection. This open source cryptography library that implements the Transport Layer Security (TLS) and Secure Sockets Layer (SSL) protocols is designed to secure communications over computer networks against eavesdropping. It is used by majority of HTTPS websites and Internet Servers.
To update OpenSSL Windows 10 the most easiest and convenient method will be to take a complete backup of your save files and completely uninstalling OpenSSL then downloading the latest version and installing it.
Uninstall OpenSSL on Windows 10
Step 1: On Desktop Right click on OpenSSL icon and select Open File Location.
Step 2: Look for file name uninst000, Uninstall or Uninstaller and double click on it.
Step 3: Follow the uninstall wizard and reboot your computer.
Step 4: On your computer open the same directory and delete everything if anything is left.
Step 5: Click on Start icon and type regedit in the search bar.
Step 6: Open Registry Editor and find the registry key or entries that contains the program’s name.
HKEY_CURRENT_USER\Software\(OpenSSL or the publisher’s name)\
HKEY_LOCAL+MACHINE\SOFTWARE\(OpenSSL or the publisher’s name)\
Step 7: Make a backup of them for emergency purpose and delete those files from your computer.
Reboot your computer to complete the procedure.
Install OpenSSL on Windows 10
Step 1: Open Internet Browser on your computer.
Step 2: Search for OpenSSL on the search bar and open the official website.
Step 3: Choose the latest version that is compatible on your computer and download the files (download will be free as it is a open source software)

Step 4: Run the EXE or MSI with default configuration and follow the installation procedure to complete the set-up wait patiently as it will take some time.
Set Environment Variable
Step 1: Click Start icon and search for Environment Variables.
Step 2: In System Properties click on Environment Variables.
Step 3: A Window will open with User Variables and System Variables. In the user variables section, select Path and click Edit.
Step 4: Click on browse and to where openssl.exe is at and select that folder then click OK.
General location will be This PC > Windows (C:) > Power Files > OpenSSL – Win64 > bin
Step 5: Click OK on this screen and in subsequent screens.
Open Command Prompt by typing cmd in RUN dialogue box.
Type “openssl version” on CLI to ensure that you have updated your OpenSSL version on Windows 10.
In Windows explorer navigate to the install location for example C:\OpenSSL-Win64\bin\ and run the openssl with administrator privileges.
If the OpenSSL open in a command prompt window then you have successfully installed the latest version.
To update OpenSSL Windows 10 we have provided you with every methods and detailed instruction on those methods. In theory it look difficult but it is rather easy when you start the process.