
Updating the .NET Framework on Windows 10 is a straightforward process that involves a few simple steps. First, you need to check which version is currently installed on your computer. Next, you visit the official Microsoft website to find the latest .NET Framework version. Download the installer, run it, and follow the on-screen instructions. Finally, restart your computer to complete the installation. This guide will walk you through each step.
Updating the .NET Framework on your Windows 10 computer will ensure you have the latest features and security updates. Follow these steps to update your .NET Framework easily.
Step 1: Check the Current .NET Framework Version
First, open «Control Panel» and go to «Programs and Features» to find your current .NET Framework version.
Checking your current version helps you know if an update is necessary. Open Control Panel, select «Programs and Features,» and look for «.NET Framework» in the list.
Step 2: Visit the Official Microsoft Website
Next, go to the official Microsoft .NET download page to find the latest version available.
Visit the Microsoft website to find the newest .NET Framework version. The official site ensures you download a legitimate and safe installer.
Step 3: Download the Installer
Click on the download link for the latest .NET Framework version and save the file to your computer.
Downloading the installer is straightforward. Make sure to save the file in an easily accessible location on your computer.
Step 4: Run the Installer
After downloading, double-click the installer file and follow the on-screen instructions to install the .NET Framework.
Running the installer will launch a setup wizard. Follow the prompts to complete the installation process, which might take a few minutes.
Step 5: Restart Your Computer
Finally, restart your computer to complete the installation of the .NET Framework.
Restarting your computer ensures that all changes take effect. Once your computer reboots, the new .NET Framework version will be fully installed.
After completing these steps, your .NET Framework will be up-to-date, providing you with improved performance and security.
Tips for Updating .NET Framework on Windows 10
- Always check your current .NET Framework version before updating to avoid unnecessary steps.
- Ensure you have a stable internet connection to avoid download interruptions.
- Close all running applications before starting the installation to prevent conflicts.
- Keep your Windows operating system updated to support the latest .NET Framework versions.
- Create a system restore point before updating, just in case something goes wrong.
Frequently Asked Questions about Updating .NET Framework on Windows 10
Is it necessary to update the .NET Framework?
Yes, updating ensures you have the latest features, security updates, and bug fixes.
How can I check my current .NET Framework version?
Open «Control Panel,» go to «Programs and Features,» and look for «.NET Framework» in the list.
Can I install multiple versions of .NET Framework on my computer?
Yes, multiple versions can coexist, as some applications may require specific versions to run.
Do I need to uninstall the old .NET Framework version before updating?
No, the installer will handle the update process and overwrite the old version if necessary.
What should I do if the installation fails?
Ensure your Windows is updated, check for any error messages, and try running the installer again.
Summary
- Check the current .NET Framework version.
- Visit the official Microsoft website.
- Download the installer.
- Run the installer.
- Restart your computer.
Conclusion
Updating the .NET Framework on Windows 10 is a crucial step in maintaining your system’s security and performance. By ensuring you have the latest version, you can run newer applications smoothly and take advantage of all the latest features Microsoft has to offer. Whether you’re an everyday user or a developer, keeping your .NET Framework updated is as essential as keeping your car’s oil changed. It’s a small task that can prevent significant headaches down the road.
If you found this guide helpful, consider exploring more about system maintenance. Keeping your software up-to-date is one of the easiest ways to ensure your computer remains secure and efficient. Don’t overlook the importance of these updates—your future self will thank you. Happy updating!
Matt Jacobs has been working as an IT consultant for small businesses since receiving his Master’s degree in 2003. While he still does some consulting work, his primary focus now is on creating technology support content for SupportYourTech.com.
His work can be found on many websites and focuses on topics such as Microsoft Office, Apple devices, Android devices, Photoshop, and more.
Updating your .NET Framework on Windows 10 is essential for running the latest software and applications smoothly. It’s a straightforward process that involves checking your current version, downloading the latest .NET Framework from Microsoft’s website, and installing it. Follow these easy steps to ensure your system is up-to-date and performing at its best.
In this guide, we’ll walk through the precise steps required to update the .NET Framework on a Windows 10 computer. By the end, you’ll be running the latest version, ensuring compatibility with the newest software and security enhancements.
Step 1: Check Your Current Version
First, find out which version of the .NET Framework you already have installed.
You can do this by opening the Control Panel, navigating to Programs and Features, and looking at the list of installed programs. Scroll down to see what version is listed.
Step 2: Visit Microsoft’s .NET Framework Download Page
Next, go to Microsoft’s official .NET Framework download page.
Open your browser and search for «.NET Framework download». Choose the official Microsoft link to avoid any security risks and make sure you’re getting the latest version.
Step 3: Download the Latest Version
Once you’re on the download page, find the latest version of the .NET Framework and click the download button.
Make sure to save the installer file somewhere you can easily find it, like your desktop or a dedicated downloads folder.
Step 4: Run the Installer
Locate the downloaded file and double-click it to start the installation process.
Follow the on-screen instructions. The installer will guide you through the process, which typically involves accepting the license agreement and clicking ‘Install’.
Step 5: Restart Your Computer
After the installation is complete, restart your computer to apply the changes.
This step is crucial as it ensures that all updates are properly integrated into your system.
Once you’ve completed these steps, your .NET Framework will be updated to the latest version, enhancing your system’s performance and security.
Tips for Updating .NET Framework Windows 10
- Always back up your data before making any major system changes.
- Ensure you have a stable internet connection to avoid interruptions during the download.
- If you encounter issues, check for any pending Windows updates; sometimes these can affect the .NET Framework installation.
- Consider using a trusted third-party tool to check for outdated software on your PC.
- Keep your system’s drivers updated to ensure compatibility with the new .NET Framework version.
Frequently Asked Questions
What is .NET Framework?
.NET Framework is a software development framework created by Microsoft that provides a controlled environment for developing and running applications.
Why do I need to update .NET Framework?
Updating ensures that your system is compatible with the latest applications and includes critical security updates.
Can I uninstall older versions of .NET Framework?
It’s generally safe to uninstall older versions, but some applications may still require them. Always check before removing an older version.
How long does the installation take?
The installation time varies but generally takes around 10-15 minutes, depending on your system’s performance.
What if the installation fails?
If the installation fails, ensure that your Windows system is fully updated, and try running the installer again. Checking the Microsoft support forums can also be helpful.
Summary
- Check your current version.
- Visit Microsoft’s .NET Framework download page.
- Download the latest version.
- Run the installer.
- Restart your computer.
Conclusion
Updating the .NET Framework on Windows 10 is a crucial step in maintaining your computer’s health. With each update, Microsoft includes vital improvements that keep your system secure and running efficiently. By following the steps outlined in this guide, you can easily ensure that your .NET Framework is up-to-date.
Don’t forget to check for updates regularly. Staying proactive about updates helps prevent compatibility issues and potential security vulnerabilities. If you’re intrigued and want more detailed tutorials, exploring Microsoft’s official documentation can also be enlightening. Happy updating!
Kermit Matthews is a freelance writer based in Philadelphia, Pennsylvania with more than a decade of experience writing technology guides. He has a Bachelor’s and Master’s degree in Computer Science and has spent much of his professional career in IT management.
He specializes in writing content about iPhones, Android devices, Microsoft Office, and many other popular applications and devices.
Read his full bio here.
Certain apps and games won’t run on your PC if an up-to-date version of the .NET Framework is missing. To update it, see the methods from this post 👇
Do you want to update .NET Framework for a better gaming experience and application compatibility on Windows 11 or 10? This article will guide you on it.
Microsoft developed the .NET Framework, which allows game and application developers to build their desired products conveniently. It contains an extensive class library that provides many functionalities to modern games and apps.
⚡ Professional web design, custom development, and free hosting — all at SKUDOS.DIGITAL. Transform your online presence today!
We often may need to have specific versions of this framework on our computer to deal with compatibility issues with particular games and apps.
Learn the methods to troubleshoot games crashing problems on PC if you are interested.
Are .NET Framework updates necessary?
Yes, indeed. As a Windows user, you should always keep this framework up to date. Most of the apps or games you have installed may be using .NET Framework. Every update of this item brings bug fixes, security, and performance improvements, as well as stability. In some cases, new features and better compatibility are added.
Certain modern apps and games will not run on your PC if the up-to-date version of this framework is missing. As a result, you should update it like other components on your PC.
Do I need to install all .NET Framework?
Initially, you won’t have to install any specific version of the .NET Framework separately. The latest Microsoft Windows 11 and 10 come with the necessary components by default. If any version is required for specific software, you will know it when you launch that item for the first time.
However, it’s good to have .NET Framework 3.5 and 4.8, as these are necessary for most of the programs you use on your PC.
How to update .NET Framework on Windows 11 and 10?
Before you go through the updating procedures, it’s better to do a few optional things. These are:
- Ensure that your PC is connected to a stable internet connection.
- Also, update your GPU driver using PC HelpSoft or any other way you prefer.
After completing these suggested steps, you can update .NET Framework. There are two major ways to do it. These are:
- Using Windows Update [Recommended]
- Update .NET Framework manually
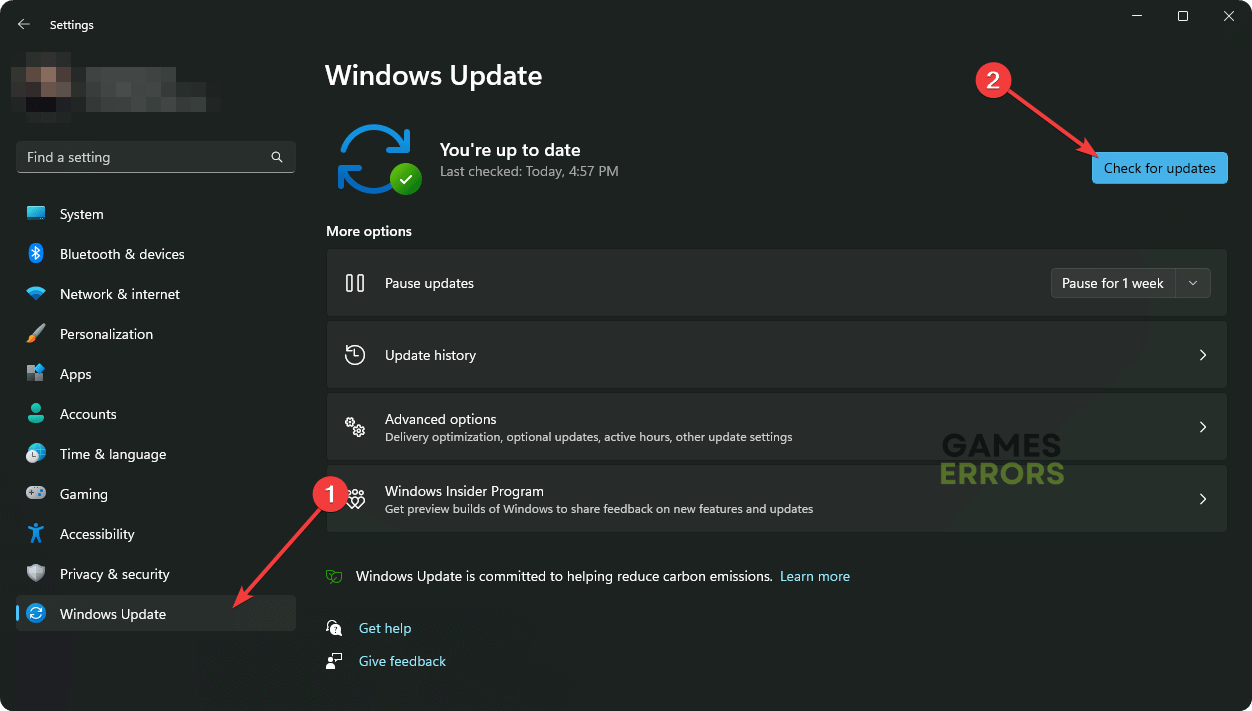
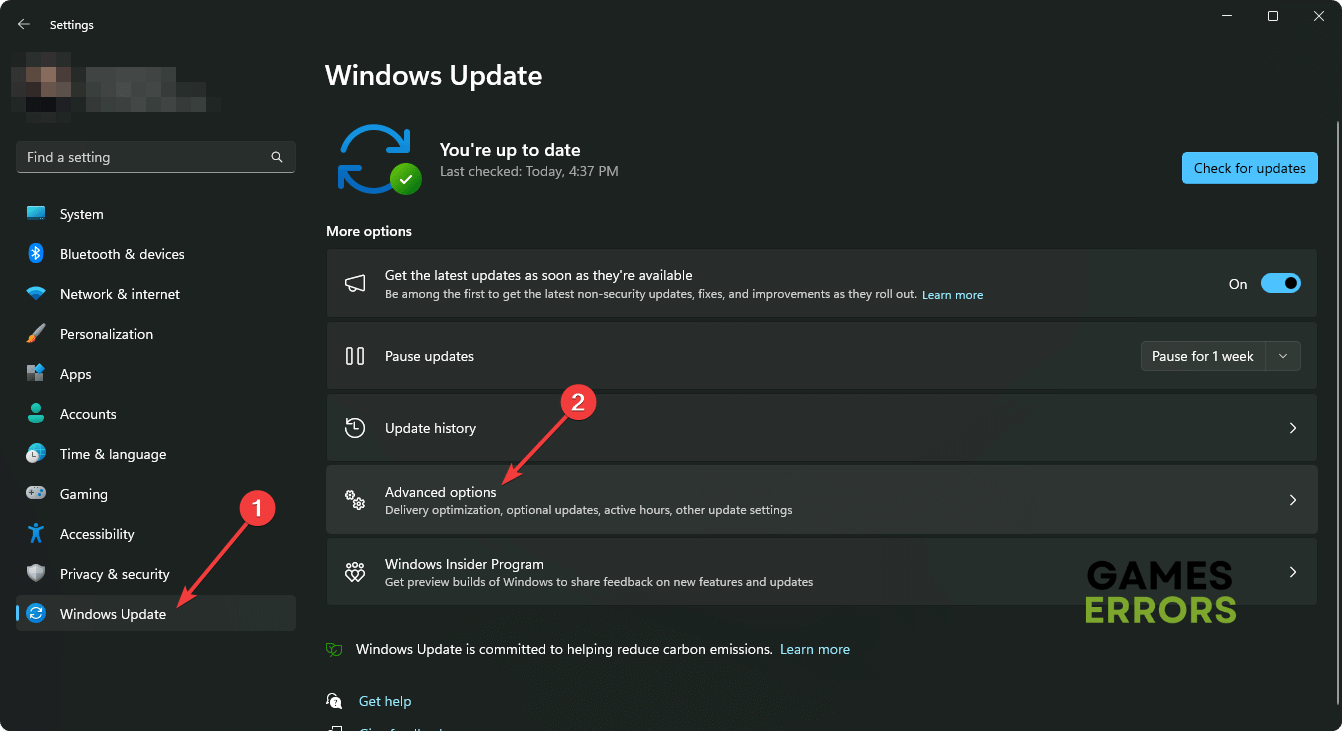
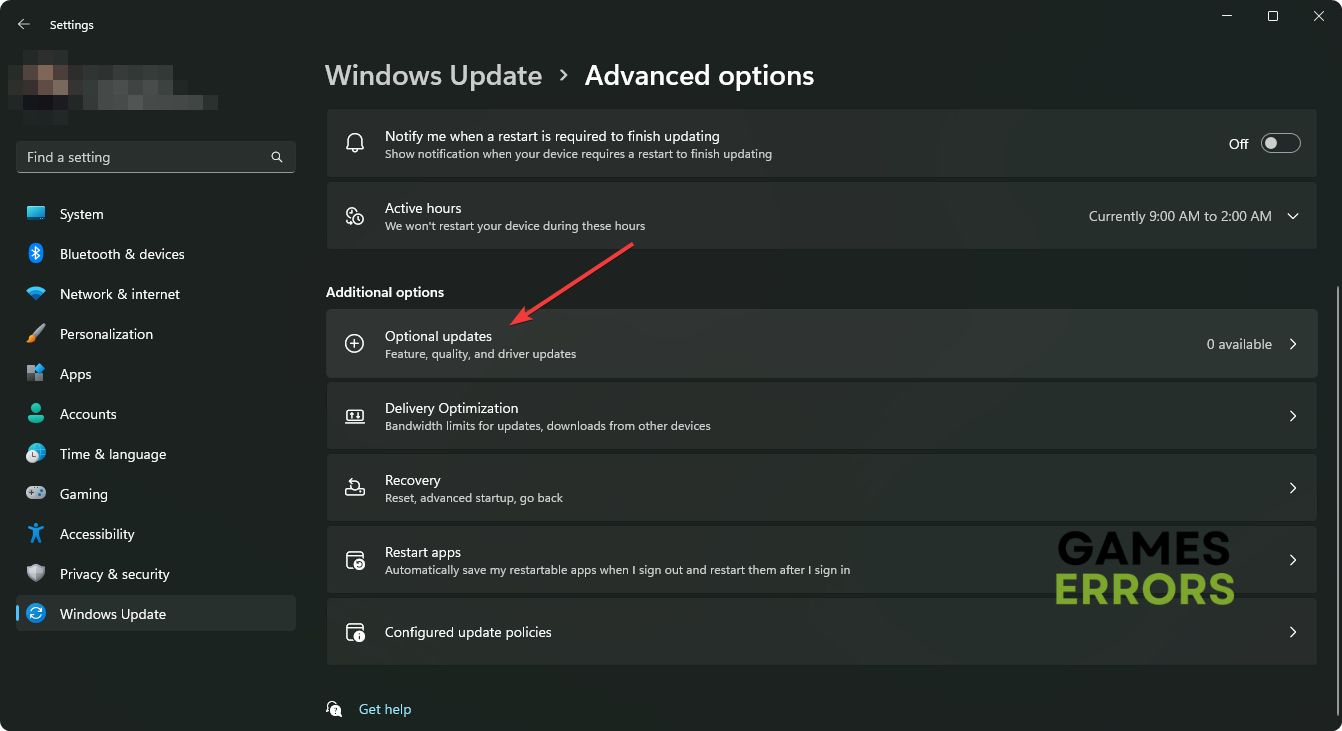
1. Using Windows Update [Recommended]
Time needed: 4 minutes
The best way to update .NET Framework on Microsoft Windows 11 and 10 is by checking the Windows Update, particularly the Optional ones.
- Press Win + I on the keyboard to open Windows 11 Settings.

- Navigate to the Windows Update and then click on Check for Updates and install any available update.

- You also can go to Advanced Options under the Windows Update tab.

- Then, click on Optional Updates.
- Install any available updates related to the .NET Framework.
- At last, restart your PC.
Now, you can try to run the game or application that requires an updated version of this framework and verify if everything is OK.
2. Update .NET Framework manually
If the previous method doesn’t work or you don’t prefer that, you can get the latest update of this component manually. To do it, go through the following steps:
- Visit the .NET Framework download site.
- Locate the version you want to download.
- Download it on your PC.

- Then, install it and restart Windows.

While downloading the .NET Framework, make sure you are choosing the right one. Otherwise, you may end up installing an unnecessary version of this component.
Is it OK to uninstall Microsoft .NET Framework?
No. You should not uninstall any .NET Framework unless you have installed any unwanted version accidentally. If you remove this component from your computer, certain apps or games will crash or show errors while launching.
If necessary, learn how to solve games won’t launch on PC.
This article has explained why you should update .NET Framework and how to do it properly. Not only this framework but all other libraries and components should also be up to date to have better performance, stability, and security. Do you have a question on this topic? Feel free to write it down in the comment box.
Привет, друзья. В этой публикации будем говорить о том, как переустановить NET Framework в операционных системах Windows 7, 8.1 и 10. Microsoft .Net Framework — это программная платформа, необходимая для функционирования многих сторонних программ. Если её файлы повреждены или отсутствуют, соответственно, у использующих её в работе программ и игр будут сбои. Столкнувшись с таковыми, перед нами может стать вопрос переустановки платформы. Если она является отдельно установленной программой, здесь всё просто – деинсталлируем и устанавливаем по новой. Но если мы говорим об интегрированной в Windows .NET Framework, т.е. являющейся системным компонентом, её переустановка являет собой специфический процесс отключения компонента, загрузки системных обновлений, затем снова включения компонента. Давайте рассмотрим оба варианта переустановки .NET Framework. И также упомянем средство устранения проблем с установкой и обновлением платформы – .NET Framework Repair Tool.
Как переустановить NET Framework в Windows
{banner_google1}
Переустановка неинтегрированной .NET Framework
Итак, друзья, программная платформа .NET Framework, она интегрирована в Windows, но у каждой версии Windows есть своя граничная версия интегрированной платформы:
-
Для Windows 7 — .NET Framework 3.5,
-
Для Windows 8.1 — .NET Framework 4.5.2,
-
Для Windows 10 по версию 1511 включительно — .NET Framework 4.6.2,
-
Для актуальной версии Windows 10 — .NET Framework 4.8.
4.8 – это новейшая на сегодняшний день версия NET Framework, она не может быть отдельно установлена в версии Windows 10 1507 и 1511, но может быть отдельно установлена в Windows 7 и 8.1. Равно как и другие версии NET Framework, которые новее версии интегрированной платформы, могут быть отдельно установлены в Windows 7 и 8.1. И вот, друзья, если вам нужно переустановить неинтегрированную, отдельно установленную NET Framework, а она, соответственно, у вас должна быть установлена как обычная программа, просто удалите её.
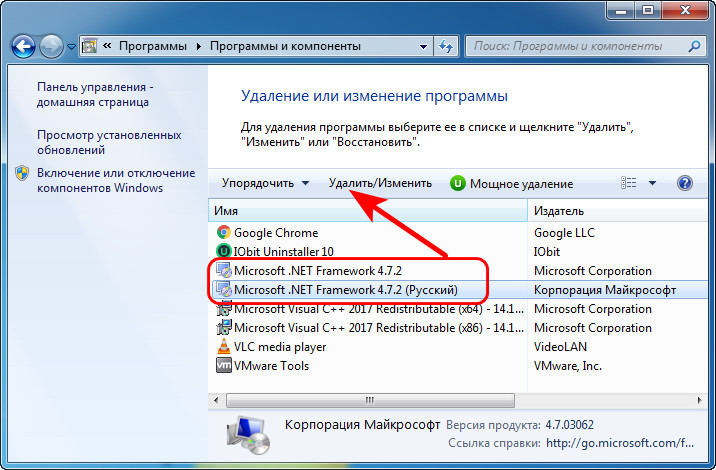
И установите по новой, скачав инсталлятор нужной вам версии с сайта Microsoft.
Переустановка системного компонента NET Framework в Windows 10
Давайте рассмотрим, как переустанавливается .NET Framework, будучи интегрированным системным компонентом в Windows 10. Но, друзья, прежде переустановки платформы рекомендую просто установить системные обновления. Так, в актуальной Windows 10 платформа .NET Framework обновляется автоматически, и если вы приостановили, заблокировали установку обновлений в «Десятке», либо они у вас сами не устанавливаются из-за каких-то сбоев, у вас, соответственно, могут быть проблемы с софтом и играми, которые требуют в своей работе современные версии .NET Framework. И ещё, друзья: дабы иметь на борту Windows 10 всегда актуальную версию .NET Framework, ваша операционная система должна не только получать текущие обновления, но быть обновлённой до более-менее актуальной версии. Так, например, последняя .NET Framework 4.8 входит в состав Windows 10 только начиная с версии 1903.
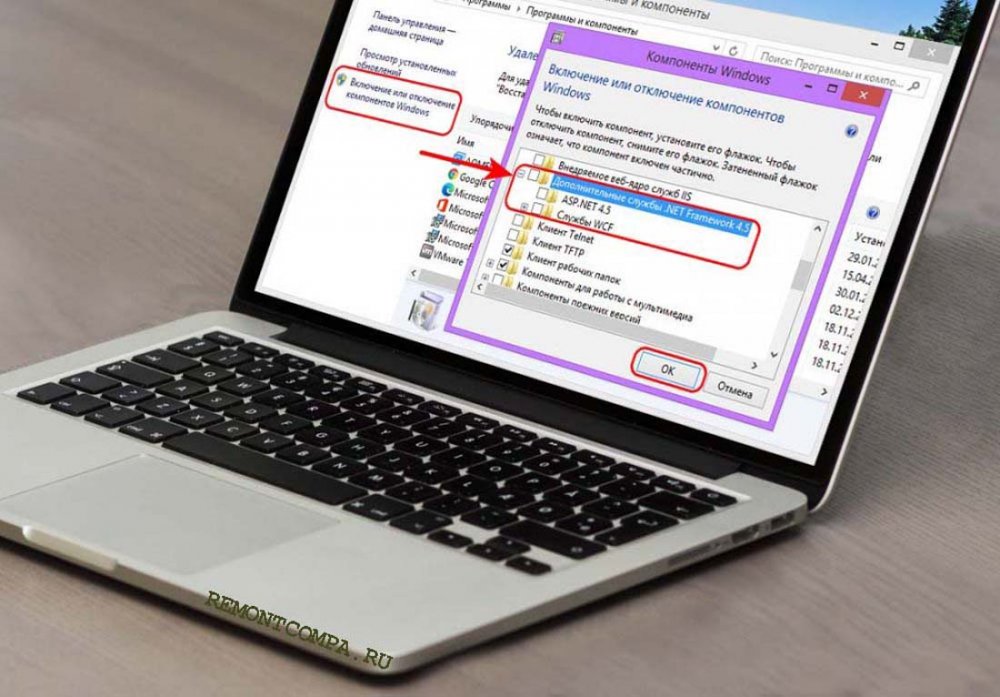
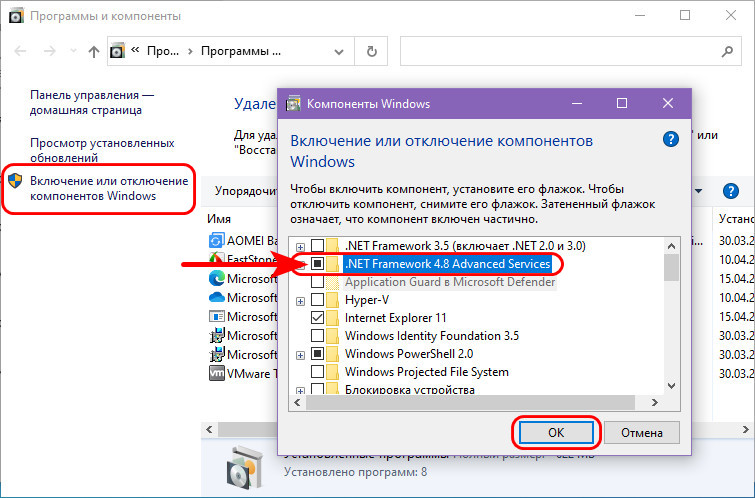
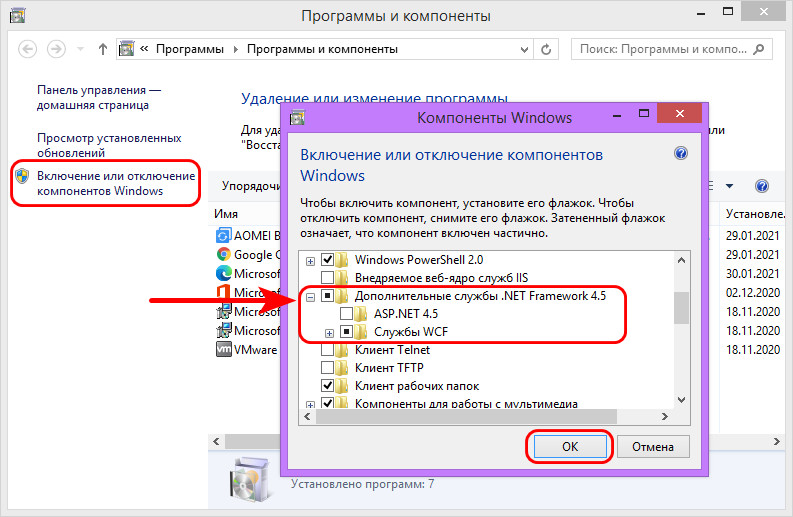
Чтобы переустановить интегрированную в «Десятке» .NET Framework, в системном приложении «Параметры» идём по пути «Приложения > Приложения и возможности». В сопутствующих параметрах кликаем «Программы и компоненты».
Кликаем «Включение и отключение компонентов Windows». Снимаем галочку с компонента .NET Framework, но, будьте внимательны, не старой версии 3.5, а 4.х. Жмём «Ок».
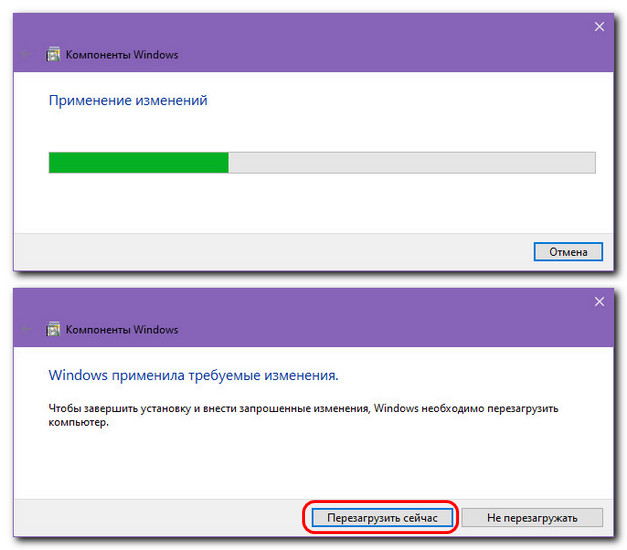
Ожидаем, пока Windows применит изменения.
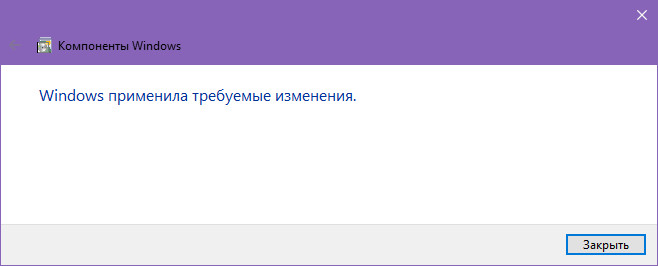
{banner_google1}
Далее в системном приложении «Параметры» идём в центр обновления и запускаем проверку обновлений.
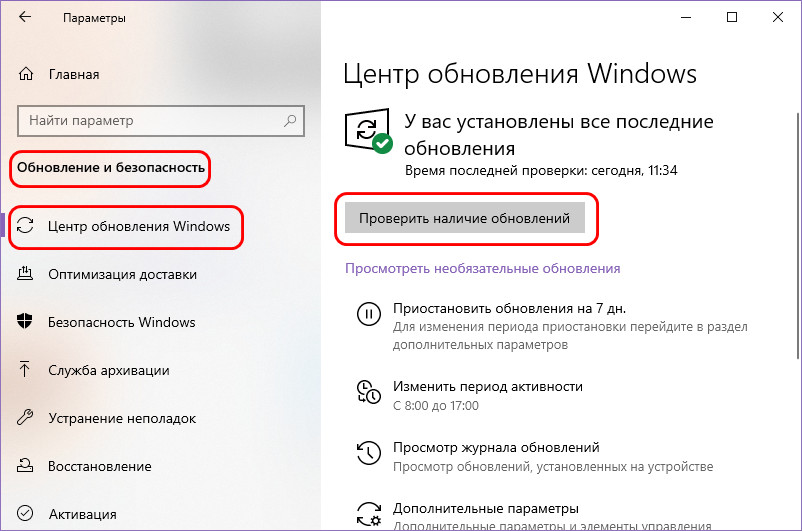
В числе доступных обновлений центра должны быть платформы .NET Framework — старая 3.5 и новая 4.х.
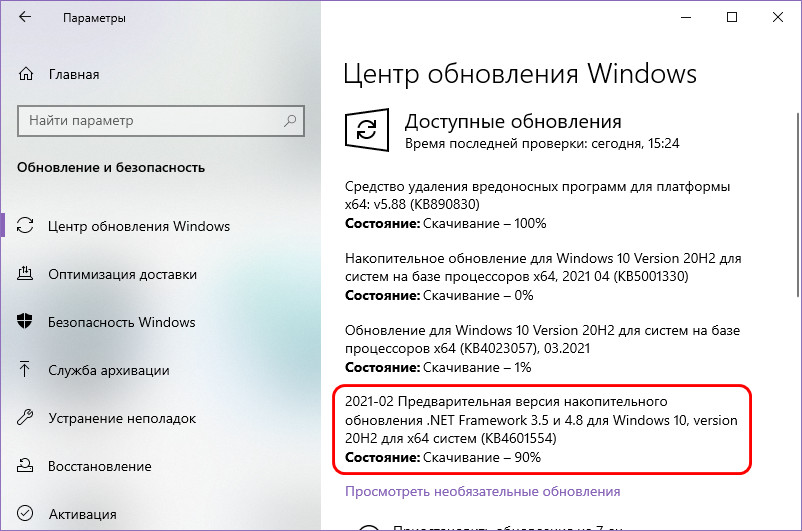
Дожидаемся установки обновлений, но пока систему не перезагружаем.
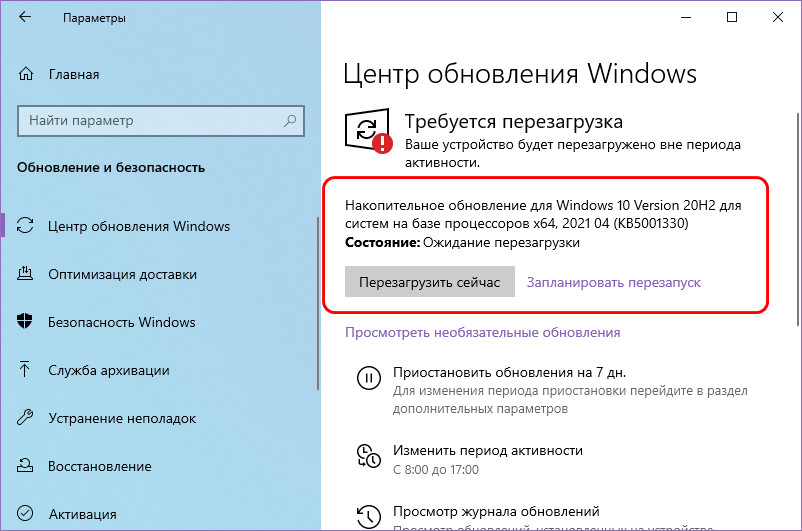
Вновь включаем компонент .NET Framework, который мы отключили.
И после применения изменений перезагружаемся.
Вот, собственно, и всё.
Переустановка системного компонента .NET Framework в Windows 7 и 8.1
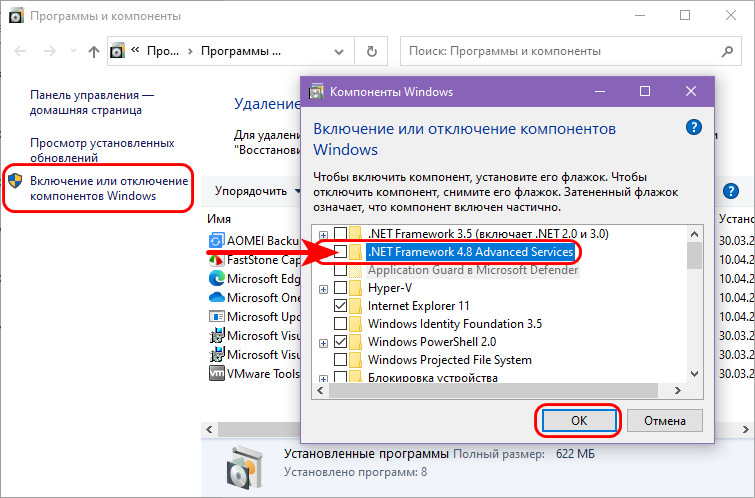
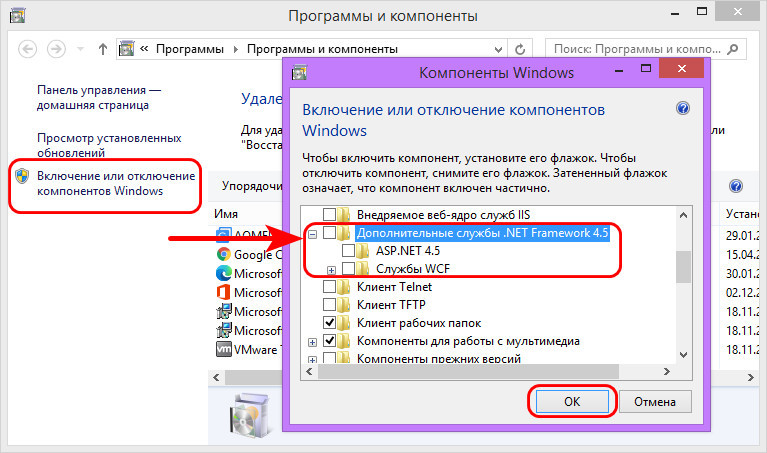
А как переустановить .NET Framework в Windows 7 и 8.1? Повторюсь, друзья, в эти версии Windows можно установить более новые версии .NET Framework по типу обычных программ, о чём мы говорили в первом пункте статьи. Но если вам принципиально нужно переустановить интегрированную в Windows 7 и 8.1 платформу, то делается это точно так же, как в Windows 10, только с использованием классического системного функционала в панели управления. Идём сначала по пути «Программы > Программы и компоненты». Снимаем галочки составляющих .NET Framework и отключаем платформу.
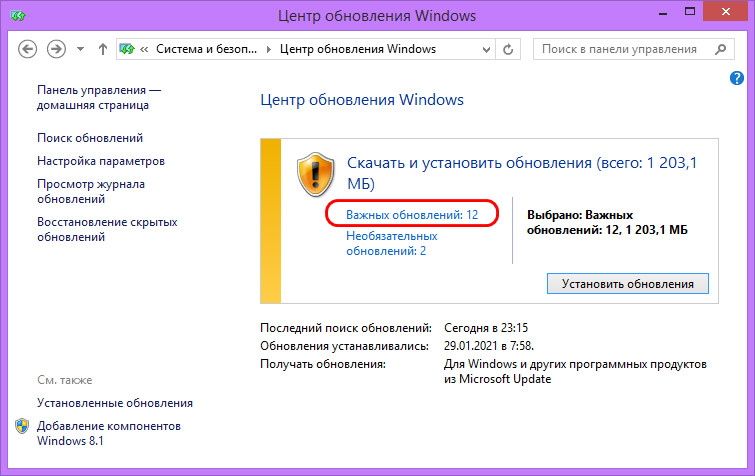
Далее в панели управления идём в центр обновления по пути «Система и безопасность > Центр обновления Windows». Запускам проверку обновлений.
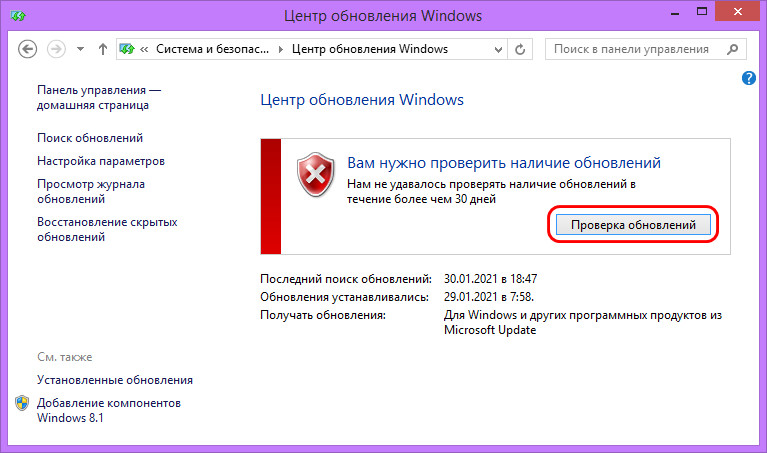
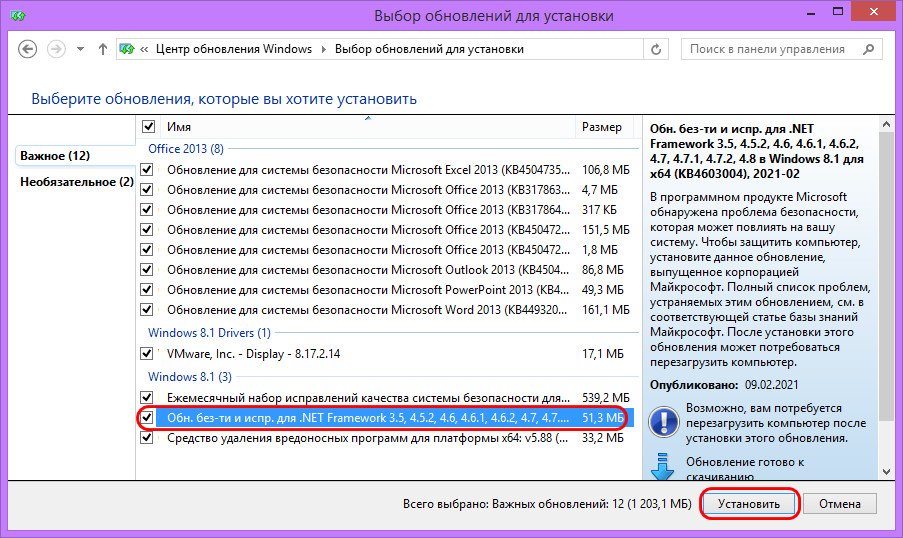
Дожидаемся завершения проверки, смотрим важные обновления.
{banner_google1}
В числе последних должны быть обновления для платформы .NET Framework. Устанавливаем обновления.
Включаем платформу по новой.
Перезагружаем компьютер.
Средство устранения проблем с .NET Framework
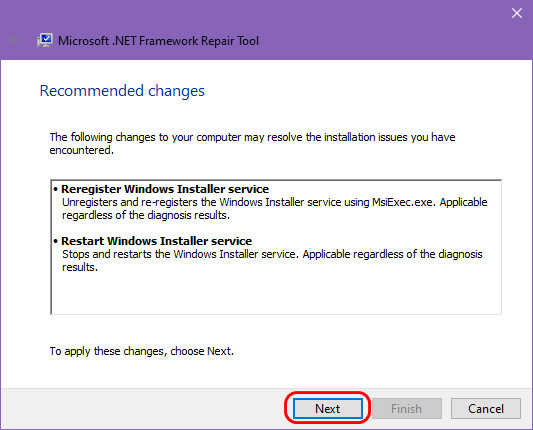
Ну и, друзья, наконец, если у вас будут возникать ошибки в процессе переустановки .NET Framework любым из способов, можете попробовать использовать средство устранения проблем с этой платформой — .NET Framework Repair Tool. Это созданная компанией Microsoft утилита, призвана устранить проблемы с установкой и обновлением .NET Framework. Качаем .NET Framework Repair Tool на сайте Microsoft. Запускаем, принимаем лицензионное соглашение.
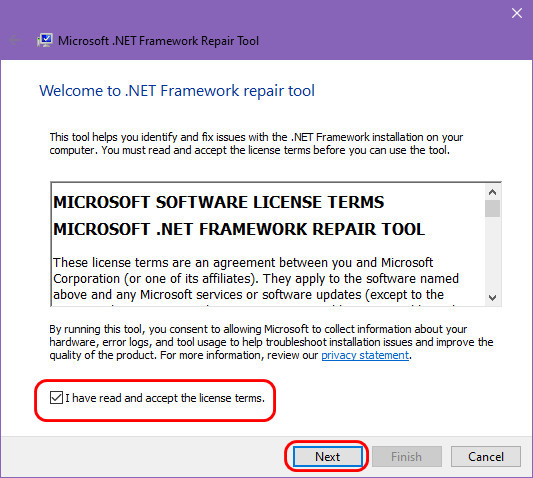
Средство проведёт диагностику возможных проблем с .NET Framework и предложит решения. В любом случае нам будут предложены решения в виде перерегистрации и перезагрузки службы установщика Windows. Идём далее.
Жмём «Finish», перезагружаем компьютер.
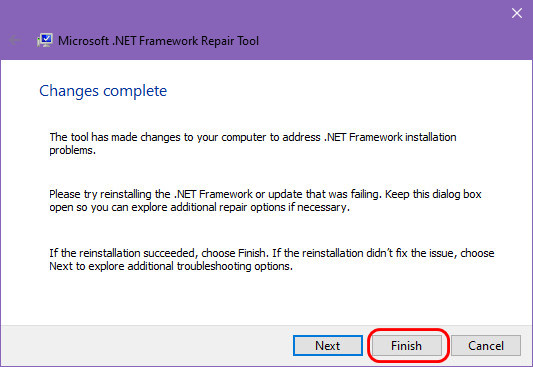
И пробуем опять установить .NET Framework.
Друзья, возможно, вам пригодятся другие мануалы нашего сайта по решению проблем с прочими компонентами Windows, обеспечивающими работу программ и игр:
- Как обновить DirectX на Windows 10;
- Как обновить DirectX на Windows 7;
- Как удалить DirectX;
- Как переустановить Microsoft Visual C++;
- Как установить .NET Framework 3.5 в Windows 10.