
Git has played quite an essential role in speeding up the coding process by providing a modern version control system. With every new version of Git, its developer community continuously provides enhanced functionality, bug fixes, and improved performance. Therefore, whether you are a user of Linux, MacOS or Windows always ensure your Git is up to date to get the latest improvements and functionalities. Although updating any application in Windows 11, 10, or the previous version is not a difficult task, still if you are new to programming and don’t know how to upgrade Git on your Windows machine then here is the tutorial.
There are a few ways to upgrade Git on Windows to the latest version and here are three common methods:
Method 1: Using the Git command line
For sure you would already have Git installed on your Windows 11 or 10 system which is why you are looking for a way to upgrade it to the latest version. If yes, then you can do that without downloading any external program because the Git command line offers a way to do that.
- Right Click on the Windows 10 or 11 Start button
- Select Windows PowerShell (Admin) or Terminal (admin) whatever is available.
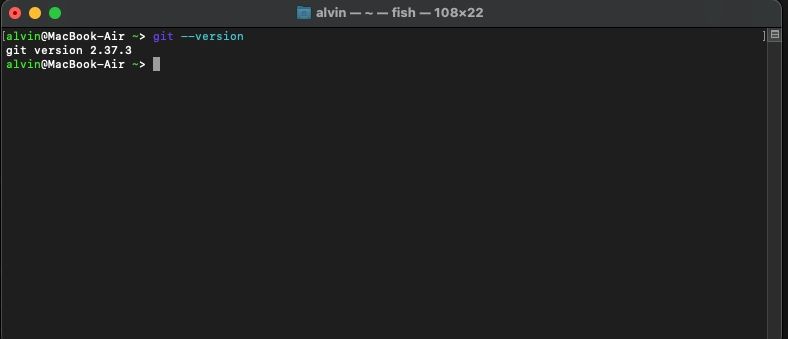
- Check the current Git version by typing – git –version
- Now, to update it on Windows, use another command that is – git update-git-for-windows
- If there is any update available then the system will ask for your permission to install it.

Method 2: Using Winget
Another way to upgrade Git on Windows 11 or 10 is by using the system’s default package manager called “Winget“. It is available on the all latest versions of Windows 10/11. To use it to upgrade Git follow the given steps:
- Right-click on the Start menu and choose “Command Prompt (Admin)” or “PowerShell (Admin).”
- Run the Winget Upgrade Command: winget upgrade git
- Verify the updated Git version: git –version

Method 3: Using Git for Windows Installer
This is a regular method in which we manually visit the Git website to download its latest installer for Windows.
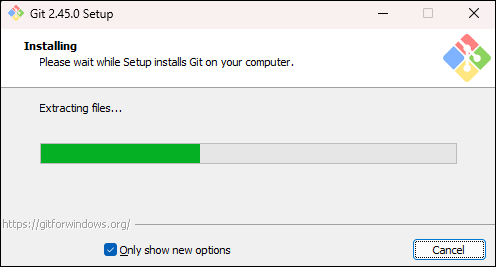
- Once the download is complete, run the installer executable (.exe) file.
- Follow the Installation Wizard which will guide you through the setup process.
- Ensure that you select the options you need during the installation. Typically, the default settings are suitable for most users.
- Complete the installation process by clicking “Next”.
- Open a new Command Prompt or Git Bash window and run: git –version
- The command should display the latest Git version.
Other Articles:
- 4 Ways to find which process is using TCP or UDP port on Windows 10 or 11
- How to Install and Use Github Copilot in JetBrains IntelliJ idea
- How to Clone Git repository from GitHub in Visual Studio Code?
- How to Enable GitHub Copilot in Visual Studio Code
It’s important to keep Git up-to-date in order to access the latest features, improvements, and security patches. This article will guide you through the process of updating Git across different platforms, and includes general Git commands applicable for updating Git on various systems.
Updating Git is important for four main reasons:
- Enhance security by patching vulnerabilities.
- Introduce new features and improvements to make your workflow more efficient.
- Fix bugs that might be affecting your current projects.
- Ensure compatibility with repositories using newer Git features.
Checking your Git version
Before updating Git, you should check your current version to determine if an update is necessary.
In order to check the version, run:
You’ll see an output similar to:
To verify you have the latest version, cross reference this version with the latest version listed in the official Git documentation.
Updating Git on Windows
Git bash update
Git Bash, part of Git for Windows, provides a Bash emulation used to run Git from the command line. To update Git Bash (and Git for Windows by extension), follow these steps:
- Git for Windows Check for Updates:
Open Git Bash and type:
git update-git-for-windows
If an update is available, this command will prompt you to confirm the download and installation.
- Manual update:
If the automatic update command does not work, visit the Git for Windows website to download and install the latest version manually. This process will overwrite your current version with the latest one, ensuring you’re up to date.
Updating Git on macOS
- Using Homebrew:
If you installed Git via Homebrew, updating is straightforward. First, update Homebrew itself, then upgrade Git:
brew update
brew upgrade git
This will update both Homebrew and your current git installation.
For best results, close and reopen your terminal after upgrading.
- Git installer:
For a manual update, download the latest Git installer from the official Git website and follow the installation instructions.
Updating Git on Linux
The method to update Git on Linux depends on your distribution and what package manager you’re using. Here are the commands for the most common distributions:
- Ubuntu/Debian:
sudo apt-get update
sudo apt-get upgrade git
- Fedora:
- CentOS:
Verifying the update
After updating, verify the installation by checking your Git version again:
The output should reflect the new version of Git you just installed.
For more information on keeping Git up to date, see the official Git documentation.
Sign in to your MUO account

Git is a popular open-source version control system that you use in your day-to-day workflow as a developer. Like all other software, you need to ensure you’re always using the latest version.
Find out how to check the Git version running on your machine and how to update Git if you’re not running the latest update.
How to Check Your Git Version
After installing Git on your Mac, Windows, or Linux machine, you rarely consider upgrading it. This is because it never notifies you when new updates are available. However, as you probably already know, updating your software and apps is essential, and you should do it as soon as new updates are available. It helps fix bugs, improve performance, and add new features.
To check your Git version on Linux, Mac, and Windows, follow these steps:
- Open your terminal (Linux, macOS), command prompt (Windows), or another command-line interface of your choice.
- Type git —version and hit Enter to run the command.
When you run this command it will display your current Git version.
How to Update Git
Once you know your current Git version, the next step is to ensure it is the latest one. You don’t have to look up what’s the newest version, though. If you already have the latest version installed, the update process will tell you.
Let’s show you how to update your Git on all three platforms, starting with Linux.
Update Git on Linux
Linux offers the easiest way to update Git because you don’t have to update it separately from other software. Every time you update Linux, the process will automatically update Git and other installed packages.
If you want, you can still update Git individually, but the command you’ll need to use will depend on your package manager.
Update Git on macOS
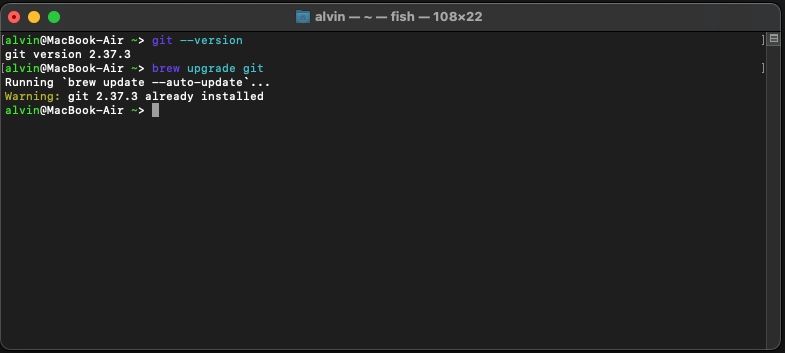
If you installed Git on your Mac using Homebrew, the brew command is all you need:
brew upgrade git
The command will give a warning if you already have the latest version of git.
Although macOS ships with a version of Git installed, the company is typically a little slow in shipping updates. That’s why you should use Homebrew if you want the very latest version. It’s free and open-source and makes the whole process easier. Plus, it ships updates more often.
Alternatively, grab the latest installer from Git’s official website and install it. It will automatically update your Git version.
Update Git on Windows
Updating Git on Windows depends on the version you’re running. If you’re using Git version 2.14.1 or older, you must uninstall Git first. After that, download and install Git on your Windows machine again.
If you’re running anything from 2.14.2 to 2.16.1, run git update on your command prompt. For version 2.16.1 and latest, use git update-git-for-windows instead.
Easily Update Git on Your Computer
Whether you’re using Git on Linux, macOS, or Windows, there’s no excuse not to run the latest version. Make sure you know how to update your software and you’ll always enjoy the latest features. That goes double for software you install on a server, that others may use too.
Home » KB » SysAdmin » How to Update Git on Linux, Windows and Mac
Git is a version control system that allows multiple developers to work on the same project while tracking changes and revisions. Keeping Git up to date brings you the latest features, security, and usability improvements.
In this tutorial, you will learn how to update to the latest version of Git on Linux, Windows, and macOS.

Prerequisites
- A system running Linux, Windows, or macOS.
- Git installed (see how to install Git on Ubuntu, macOS, or Windows).
- Access to the terminal window (Linux, macOS) or command prompt (Windows).
- An account with root privileges.
How to Update Git on Linux
Updating Git on Linux is a simple process done using the appropriate package manager for your distribution. The Git commands are the same across distributions, and only the package manager is different.
For Ubuntu and other Debian-based Linux distros, use the apt package manager, and when working with RHEL-based distros, use a package manager such as yum or dnf. In this tutorial, we will use Ubuntu.
Follow the steps below:
1. Run the apt command below to update the system package repository information:
sudo apt update2. Update Git by running:
sudo apt install git
In the example above, the latest Git version is already installed so the system makes no changes.
3. To verify the installation has completed successfully, check the Git version:
git --version
Another way to update Git on Linux is to install it from scratch using the original source code. Check out our guide to installing Git on Ubuntu for details.
How to Update Git on Windows
Git provides a simple, automated way of updating on Windows by running a single command.
Note: If you are using an old Git version (2.14.1 or below), the only way to update Git is to uninstall it from your system and install the latest version. Check out our guide for installing Git on Windows for more details.
Follow the steps below to update Git on Windows:
1. Open the Command Prompt or Windows PowerShell and run the following command to update Git:
git update-git-for-windows
The command automatically downloads the latest Git version and starts the installer, which completes the process:
2. After the process completes, you have the latest Git version. Check the version with the following command:
git --versionHow to Update Git on Mac
To update Git on macOS, follow the steps below:
1. Updating Git is the easiest with Homebrew, a macOS package manager. To install Homebrew, run the following command:
/usr/bin/ruby -e "$(curl -fsSL https://raw.githubusercontent.com/Homebrew/install/master/install)"If you already have Homebrew, update it to ensure you get the latest Git version:
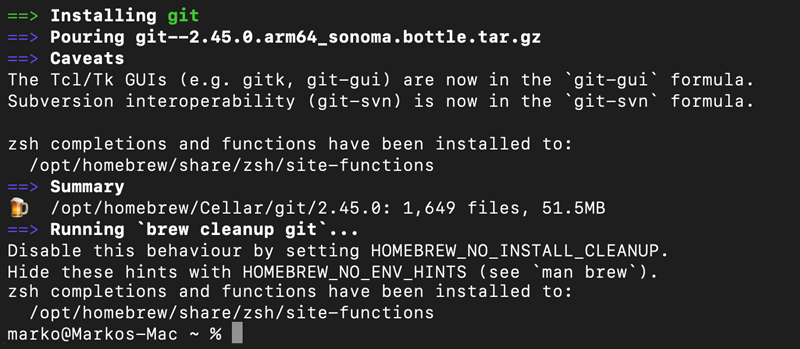
brew update2. Install the latest Git version by running:
brew install gitThe command installs the latest Git version available for your system.
Wait for the installation to finish, then open a new terminal window.
3. Check the Git version with:
git --versionIf the command output shows the latest Git version without apple in the version details, you have completed the update process.

However, if you still see the apple version, the system has retained the previous Git version and is still using it by default. In that case, move on to the next step.
4. Run the command below to manually set the path to the Homebrew Git installation instead of the Apple one:
export PATH=/usr/local/bin:$PATH5. Check the Git version again to verify it has been updated to the latest one:
git --versionConclusion
After following this tutorial, you should have an updated version of Git installed on your Linux, Windows, or macOS system. This process ensures access to the newest features, bug fixes, and security patches, enhancing overall efficiency and reducing potential vulnerabilities in version control workflows.
Next, take a look at our Git commands cheat sheet for a comprehensive primer on working with Git. If you come across a Git merge conflict, see how to resolve merge conflicts in Git.
Was this article helpful?
YesNo
Git, a full version control system, is necessary for effectively maintaining your codebase. One can always obtain the newest features, bug fixes, and security updates by updating Git. Whether you’re a new or a seasoned developer, this blog will walk you through the process of updating Git. For functions on the same project with numerous developers and tracking changes, Git helps with latest version with a more secure environment.
The integrity and dependability of your version control process depend. It depends on keeping your Git installation updated. Many developers can work on the same project simultaneously using the version control system known as Git. Git updates provide access to the newest features and usability enhancements, as well as the latest version. Are you looking for a budget-friendly virtual server environment? check out various economical VPS hosting options for Linux virtualization powered by KVM technology, which could be perfect.
Requirement
- A computer running macOS, Windows, or Linux
- A Git version that is installed
- Access to the command prompt (Windows) or terminal window (Linux, macOS)
- A user account with administrative rights
How Do I Check What Git Version I’m Using?
Use the following command to verify the Git version that is currently in use:
git --version
On all operating systems, this command is functional. This illustration employs Windows:

Git Update Procedure
Depending on the operating system you’re running, we’ve listed various solutions below for you to update your Git version. Go straight to the section that applies to your machine.
Updating Git in Linux
Using Ubuntu, this example Demonstrates How to update Git and get git latest version.
Step 1: Update System Packages
Start by using the following Command to Update the System Packages:
sudo apt-get update
Step 2: Update Git after Updating System Packages
Git can be Updated Using:
sudo apt-get install git
Step 3: Confirmation of the Installation
To confirm the Installation, Enter Y and Press Enter when prompted.

Step 4: Verifying Git Version
Check the Git version once more to make sure the installation was successful:
git --version

Installing Git from the ground up using the source code is an additional method for updating it on Linux. For more information, see our guide to installing Git on Ubuntu.
Windows Git Update
Depending on the Git version that you are using at the time, there are many ways to upgrade Git on Windows.
Step 1: Remove the Older Version of Git
Remove Git from your System if it is older than Version 2.14.1.
Step 2: Reinstall the most Recent Version.
Then Reinstall the most recent version. For additional information, read carefully before installing Git on Windows.
Step 3: Update Git for Versions Given
Use the following command on your command line for versions 2.14.2 to 2.16.1.
git update
Step 4: Update Git with Versions 2.16.1 and thereafter.
git update-git-for-windows

When using the most recent Git version, the output shown above occurs.
Git updates for Mac
Using the official installer is the most straightforward way to update Git on a Mac. Go to the Git website and download the installation file. To upgrade Git to the most recent version, run the installation and follow the install wizard’s instructions.
Step 1: First Install Homebrew
Git updates can also be made with Homebrew. Install Homebrew if you don’t already have it by using:
/usr/bin/ruby -e "$(curl -fsSL https://raw.githubusercontent.com/Homebrew/install/master/install)"
Step 2: Update Homebrew
To Ensure you have the most recent installation packages, update Homebrew:
brew update
Step 3: Install Latest Version
Using Homebrew, Install the most recent version of Git:
brew install git
Step 4: Upgrade Git via Homebrew
Update to the most recent version if you’ve already installed Git via Homebrew by doing the following:
brew upgrade git
Step 5: Confirm the Update by checking the Current Git Version:
git --version
Final Thought on Updating Git
Keeping up with the times is essential in the quick-paced world of software development. You may easily update Git to make use of all of its capabilities. Stay up to date with the most recent developments by following the instructions provided in this guide. To compile c and C++ programs into source code, support multiple languages, and as such many concessions you should learn to install GCC compiler on Ubuntu.
Git updates regularly not only improve your version control abilities but also guarantee safe and efficient team collaboration. After setting up Git, you might find yourself needing to manage untracked files efficiently, and exploring additional techniques can enhance your workflow significantly.
You can customize your website with an authentic and efficient forex trading server that offers high-achievement optimal speed VPS hosting in India. So don’t wait, update Git right away to simplify your development workflow. You ought to have a completely updated copy of Git installed on a Linux, Windows, or macOS computer after completing this lesson. Check out our Git Commands Cheat Sheet for a thorough introduction to using Git. If you encounter a Git merge dispute, be sure to read our article on how to handle it.
Frequently Asked Questions (FAQ)
1. Why should I update Git to the latest version?
It is an important task to update Git to the current version which comes with the latest features and securities. If one facing any issues in an old version it definitely can overcome them in the latest version once you update it. An updated version will fix the bugs from the previous and so one should try to update Git to the latest version.
2. How can I check my current Git version?
When you decide on the updation on the git version first you need to check your current version and check that with the following command:
git --version
With the above command, you can understand and get displayed on the current version of Git.