
Windows
To grab the newest version of FFmpeg, head to BtbN’s Windows FFmpeg builds and grab the one that ends with «-win64-gpl.zip».
Find your AppData\Roaming directory
Once downloaded, hit «⊞ Win + R» (aka «Run») and type in «%APPDATA%» and hit «OK». This will bring you to a folder named «C:\Users{your username}\AppData\Roaming» (replace «{your username}» with whatever appears for you). If a folder called FFmpeg does not exist, create it here. If there is already folders inside of this folder, delete them.
Extract the contents of the zip folder
In another window, double click on the zip folder to open it. There should be a single folder named something like «ffmpeg-N-numbers-gibberish-win64-gpl», click into that folder and you should then see a «bin» and a «doc» folder. Copy them to «C:\Users{your username}\AppData\Roaming\FFmpeg.»
Set the PATH variable (optional)
FastFlix will automatically look here for FFmpeg. But if you want to easily be able to access it from the command line at any point, you will need to add the folder «»C:\Users{your username}\AppData\Roaming\FFmpeg\bin» (notice the «\bin» on the end) to the PATH.
View the AddictiveTips Tutorial or ComputerHope Tutorial for guidance on setting PATH.
Linux / Mac
To get HDR10+ support or all the possible encoders, you will most likely have to compile it yourself (godspeed), for a 80% solution, you can download Linux static builds or MacOS static builds. Once downloaded, extract them to a folder in your home directory of your choice, and add them to the FastFlix config file.
Let’s begin with saying that I absolutely love using FFMPEG. It’s a great all in one tool for general purposes in video. Because people make various videos I sometimes need to make bulk and quick actions to maybe convert the video in question. However I personally love using the nightly builds of FFMPEG and that is something of a hassle of wanting to keep up with all the time so I do what I do and create a Powershell script to update or install FFMPEG. I tried to make the script as easy as possible to use for others that might not have the absolute knowledge in Powershell.
Inportant note. I would like to add that the installation directory of ffmpeg that will be used in this update script will remove all files in the ffmpeg folder for it to update. Just a quick note before going on. In the future this will be made better.
Let’s start with an example. Let’s say that you want to just install or update FFMPEG using the latest sources and don’t care about any other options. Then you can just use the code below. This will fetch the latest nightly from their official website and download it. After that it will extract the files and put them on the default location C:\ffmpeg\.
./Update-FFMPEG.ps1
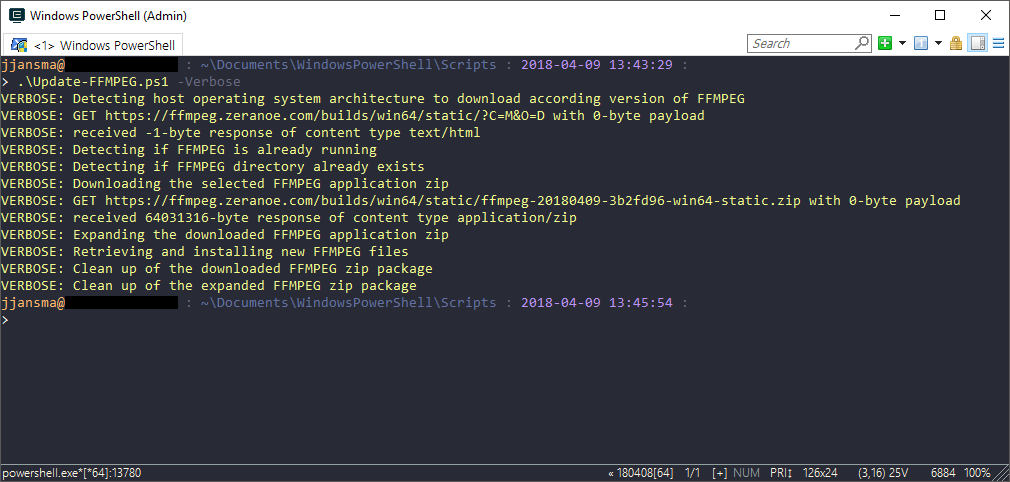
If you want more information about what goes on behind the scenes in the script then I made it so that you could use the -Verbose parameter. This is a standard Powershell parameter to maybe debug or see what the script does. Under here an example of running the script with default settings and verbose to show more information.
./Update-FFMPEG.ps1 -Verbose
But you could of course use various other switches that are programmed in to vary what you want the script to do. An example could be that you would rather want a different installation location and/or maybe switch to stable channel instead of the nightly builds. Again an example can be found under here. Notice that I can combine the parameters used or use them without the other. You could just as well just use the FFMPEGPath parameter if your FFMPEG installation is somewhere else.
./Update-FFMPEG.ps1 -Channel Stable -FFMPEGPath "C:\different\location\"
The last example is that you can use the script as well to add the downloaded binary to the environment variables. This was you can just use the word FFMPEG in the command line instead of specifying the full location. In the example below I will use the default parameters and just add the AddEnvironmentPath parameter switch to it.
./Update-FFMPEG.ps1 -AddEnvironmentVariable
Of course this is a script that uses the help system of Powershell if you in anyway need more information regarding the script you can always use the example under here to access the help system. With more examples that you could use and more switches that you could use.
Get-Help ./Update-FFMPEG.ps1
If you are interested you can of course download the script under here. At this moment I am not releasing it on GitHub as I would like to make a full FFMPEG powershell module that can rotate or compress or any other action you might to use FFMPEG for.
Download the script here
Ultimate Guide: FFMPEG Download, Install & Update on Windows
Table of Contents
- Introduction
- Automatic Installation with Chocolatey
- Installing Chocolatey
- Installing FFmpeg with Chocolatey
- Updating and Uninstalling FFmpeg with Chocolatey
- Manual Installation from FFmpeg Download Page
- Downloading FFmpeg from btbn
- Downloading FFmpeg from guyan.dev
- Opening and Installing FFmpeg with 7-Zip
- Setting Up FFmpeg for System-wide Access
- Conclusion
Introduction
In this guide, we will explore different methods to install FFmpeg on Windows operating system. FFmpeg is a popular and powerful multimedia framework that allows users to Record, convert, and stream audio and video files. While manually installing FFmpeg can be a complex process, we will make it easier for You by introducing an automatic installer called Chocolatey, as well as providing instructions for manual installation. By following the steps outlined in this guide, you will be able to successfully install FFmpeg on your Windows PC and start utilizing its extensive features.
Automatic Installation with Chocolatey
Installing Chocolatey
To begin the automatic installation process, we will first install Chocolatey, a Package manager for Windows that simplifies the installation of various software. Here’s how to get started:
- Open a web browser and head to the link provided in the description below to download Chocolatey.
- Scroll down to the «Installed Chocolatey for individual use» section and copy the command provided.
- Press the Windows key, Type «Powershell,» and open PowerShell as an administrator.
- Right-click in the PowerShell window to paste the previously copied command and hit Enter.
- Wait for the installation process to complete. You should see a success message indicating that Chocolatey has been installed.
Installing FFmpeg with Chocolatey
Now that Chocolatey is installed, we can proceed to install FFmpeg using it. Here’s how:
- Open a command prompt window by pressing the Windows key and typing «Command Prompt.»
- In the command prompt, type «choco install ffmpeg» and press Enter.
- Chocolatey will start downloading and installing FFmpeg for you. This process may take a few seconds, depending on your internet connection speed.
- Once the installation is complete, you can test if FFmpeg has been successfully installed by typing «ffmpeg» in the command prompt and pressing Enter. You should see a response indicating the successful installation of FFmpeg with various features.
Updating and Uninstalling FFmpeg with Chocolatey
To update FFmpeg to the latest version or uninstall it using Chocolatey, follow these steps:
- Open a new command prompt window.
- To update FFmpeg, run the command «choco upgrade ffmpeg» and hit Enter. If an update is available, it will be installed automatically. If FFmpeg is already up to date, this command won’t initiate any changes.
- To uninstall FFmpeg, run the command «choco uninstall ffmpeg» and hit Enter. This will completely remove FFmpeg from your PC.
Manual Installation from FFmpeg Download Page
If you prefer not to use Chocolatey, you can also install FFmpeg manually from the official FFmpeg download page. Here’s how you can do it:
Downloading FFmpeg from btbn
- Visit the FFmpeg download page and find the Windows section.
- Hover over the «Windows» option to see two download links: guan.dev and btbn. Both options are similar, but we will focus on downloading from btbn for this guide.
- Scroll down the btbn page and choose between the «Essentials» and «Full» versions. The «Full» version contains more codecs and features, so it is recommended for most users.
- Click on the «gpl.zip» link to start the download. Make sure you have 7-Zip installed on your system to open this file.
Downloading FFmpeg from guyan.dev
- Alternatively, you can download the «full» 7z file from the guyan.dev page. These files are the latest Git Master builds, but they may be less stable compared to the release builds.
- Scroll down the page and find the «full» 7z file link. Click on it to start the download. Again, make sure you have 7-Zip installed to extract the files.
Opening and Installing FFmpeg with 7-Zip
After downloading FFmpeg from either btbn or guyan.dev, follow these steps to install it using 7-Zip:
- If you haven’t already, download and install 7-Zip from the official Website.
- Open the downloaded zip file with 7-Zip. Inside, you will find a folder named «ffmpeg» and a «bin» folder.
- Create a new folder to hold the FFmpeg files. For example, you can create a folder named «btbn» or «guyan» depending on the download source.
- Move the folders and files from the 7-Zip window into the newly created folder.
- To test if FFmpeg is working, open a command prompt window within the FFmpeg folder. Type «ffmpeg» and hit Enter. You should see a response indicating that FFmpeg is properly installed.
Setting Up FFmpeg for System-wide Access
To ensure that you can use FFmpeg from anywhere on your PC, it’s important to set up the system-wide access. Follow these steps:
- Copy the path to the FFmpeg folder. This path will typically be the location where you moved the FFmpeg folder in the previous step.
- Press the Windows key, type «path,» and select «Edit the system environment variables.»
- In the System Properties window, click on the «Environment Variables» button.
- Under the «User variables» section, find the «Path» variable and select it. Click the «Edit» button.
- Click the «New» button and paste the FFmpeg folder path that you copied earlier. Click «OK» to save the changes.
- If you want to set up FFmpeg for all users on your PC, click the «Path» variable under the «System variables» section instead and follow the same steps.
- Restart any opened terminals or command prompt windows to Apply the changes. You should now be able to use FFmpeg from any directory on your PC by typing «ffmpeg» in the command prompt.
Conclusion
In conclusion, installing FFmpeg on Windows can be done automatically using Chocolatey or manually from the FFmpeg download page. Chocolatey provides a convenient way to install and update FFmpeg, while the manual installation process gives you more control over the version and build you choose. By following the steps provided in this guide, you should be able to successfully install FFmpeg on your Windows PC and start leveraging its powerful multimedia capabilities.
Building ffmpeg from source on Windows is a royal pain.
For those who came in late, ffmpeg is the best reason for a video nerd to learn the command line.
For every question: “is it possible to automatically do x to some video?”, or “I have 10,000 video files in format y, I want to convert them to format z, is that possible in my lifetime?”, the answer is usually: yes, you can do it with ffmpeg.
The up side is that you get to learn the command line. The down side is that since ffmpeg is distributed as source code you need to build it. And building it on windows is a royal pain. Just making sure you’ve got the build environment working properly is a full time job, and if you’re paid to be a video nerd you don’t want to be mucking around with minGW and Cygwin and so on. That’s a whole pile of tedium that you don’t need. Fortunately there’s someone who does it for you, for nothing — the wonderful Zeranoe. Aren’t humans the best people?
Machines will do our work for us…
So I was downloading and linking the latest update and making sure it all went into the right place and got to thinking that checking for updates is the kind of task best left to a machine, and given that I’ve been gaining in PowerShell powers for a while I thought it might be a job I could tackle.So below is a function called updateFFMPEG. This script checks for new builds, downloads them, unzips them, and makes a hardlink to the executables — ffmpeg, ffprobe, ffplay — in C:\Program Files\ffmpeg. If you add this folder to your PATH environment variable you can call ffmpeg from the Powershell prompt without having to specify the path to it every time.
The script checks to see if it has been run today, and only checks for new builds if it hasn’t. You could change this to every month if your connection speed is slow, or hour if you’re crazy, by editing the date format string on the second line. Since it’s powershell, you have to save it as a “.ps1” file. You knew that, didn’t you?
function msg($msg)
{
  $Host.UI.RawUI.CursorPosition = New-Object System.Management.Automation.Host.Coordinates 0 , 3
  $Host.UI.Write( "                                                                                                     ")
  $Host.UI.RawUI.CursorPosition = New-Object System.Management.Automation.Host.Coordinates 0 , 3
  Write-Host -Fore Magenta "Updating FFMPEG"
  $Host.UI.RawUI.CursorPosition = New-Object System.Management.Automation.Host.Coordinates 0 , 4
  $Host.UI.Write( "                                                                                                     ")
  $Host.UI.RawUI.CursorPosition = New-Object System.Management.Automation.Host.Coordinates 0 , 4
  Write-Host -Fore Red $msg
}

function update-FFMPEG {
  # change this to -Format MM-yyy for once a month,
  # or HH-dd-MM-yyyy for once an hour
  $theDate = (Get-Date -Format dd-MM-yyyy)
  # this will be the ffmpeg executable directory:
  $ffmpegDir = 'C:\Program Files\ffmpeg\'
  mkdir $ffmpegDir -ErrorAction SilentlyContinue;
  #I like to put all my command line shit in here
  $commandLineDir = 'C:\usr\local\bin\'
  mkdir $commandLineDir -ErrorAction SilentlyContinue;
  # Zeranoe's latest build:
  $proxy = 'http://proxymv:3128'
  $URL = "https://ffmpeg.zeranoe.com/builds/win64/static/ffmpeg-latest-win64-static.7z"
  echo "Updating FFMPEG"
  # check to see if it has been updated today
  if (test-Path ($ffmpegDir + "last_update-" + $theDate)){
    Write-Host "already updated ffmpeg today" -f "Green"
  } else {
    rm ($ffmpegDir + "last_update-*") -ErrorAction SilentlyContinue
    New-Item ($ffmpegDir + "last_update-" + $theDate) -type file 2>&1 1>$null
    echo( "Checking online for new FFMPEG version")
    $downloadPath = ($ffmpegDir + 'latest.7z')

    # check to see if ImageMagick has been installed
    $IMVersion = (ls 'C:\Program Files\ImageMagick*\ffmpeg.exe')

    # delete any old downloads
    echo( "deleting old downloads")
    rm $downloadPath -ErrorAction SilentlyContinue
    # look in the ffmpeg directory for latest current versions
    $f=(ls $ffmpegDir -filter "ffmpeg-*"| ?{ $_.PSIsContainer }| sort lastWriteTime)
    if ($f.length -gt 0) {
      # there are current versions locally
      # get the last write time of the latest version
      $D = (get-date $f[-1].LastWriteTime -format "yyyyMMdd HH:mm:ss")
      echo( "last version was $D")
      # download a newer version if it exists (--time-cond)
      #curl.exe -x $proxy --time-cond $D $URL -o $downloadPath #2>&1 1>$null
      Invoke-WebRequest $URL -OutFile $downloadPath
    } else {
      # no current versions
      echo( "downloading for the first time")
      #curl.exe -x $proxy  $URL -o $downloadPath
      Invoke-WebRequest $URL -OutFile $downloadPath
    }
    if (test-Path $downloadPath){
      # there was a new version available
      echo( "New build of FFMPEG found, installing")
      # unpack it to the ffmpeg program dir
      #(silently, remove "2>&1 1>$null" if you want to know what it's doing)
      &"7z.exe" x -y -o"$ffmpegDir" $downloadPath # 2>&1 1>$null
      # delete the old links
      ls $ffmpegDir -file -filter "ff*.exe"|%{rm $_.fullname}
      if (test-path $commandLineDir -ErrorAction SilentlyContinue){
        ls $commandLineDir -file -filter "ff*.exe"|%{rm $_.fullname}
      }
      # update the latest version
      $f=(ls $ffmpegDir -directory -filter "ffmpeg-*"|sort lastWriteTime)
      # make new symlinks, er hardlinks, whateverr
      ls ($f[-1].fullname + "\bin")|%{
        New-Hardlink ($ffmpegDir + $_.name) $_.FullName
        if (test-path $commandLineDir -ErrorAction SilentlyContinue){
          New-Hardlink ($commandLineDir + $_.name) $_.FullName
        }
      }
      # Imagemagick brings its own version of ffmpeg,
      # which ends up on the PATH, so replace it with a hardlink to this one
      #-------if you don't want this cut here ------
      if ($IMVersion.length -gt 0) {
        echo ( "replacing the Image Magick version of FFMPEG")
        if (Test-Path ($IMVersion.fullname + ".dist")) {
          rm $IMVersion #already made a backup
        } else {
          mv $IMVersion ($IMVersion.fullname + ".dist")
        }
        New-Hardlink $IMVersion.fullname ($ffmpegDir + "ffmpeg.exe")`
        -ErrorAction SilentlyContinue
      }
      #-------to here-------------------------
      rm $downloadPath 2>&1 1>$null
      #-------Update Path variable
            $p=(("C:\usr\local\bin;" + (ls Env:\Path).value).split(";"))
      Set-Content -path Env:\Path -value (($p|Get-Unique) -join ";")

    } else {
      echo( "Current build of FFMPEG is up to date.")
    }
  }
}
Because it writes to c:\program files you’ll need to open a powershell prompt as administrator to run it, then type the command
Update-FFMPEG
I used to have it in my profile file, but it was a bit of overkill.
You might notice the ImageMagick palaver in the code. I added it because ImageMagick installs its own version of ffmpeg, and if ImageMagick is in the $Path then that version could get used instead. So this swaps the new build for ImageMagick’s version. You can safely cut this section out of the code if you don’t have ImageMagick, or if you don’t want some random script from the internet faffing about wi’ it.
Oh, and it relies on 7z.exe being in your PATH. You can download 7z here, and for easily editing the PATH environment variable I recommend Rapid Environment Editor.
Today, I updated ffmpeg on several machines on the company’s line. There is no technical content, so I simply record it and make a running account~ Haha
Software package acquisition method
Official website:https://ffmpeg.org/download.html
github:https://github.com/FFmpeg/FFmpeg/releases
Version confirmation before update
Confirm version information before upgrading ==> 2.4
[root@thatsit FFmpeg-n3.1.2]# ffmpeg -version|grep version
ffmpeg version 2.4 Copyright (c) 2000-2014 the FFmpeg developers
[root@thatsit FFmpeg-n3.1.2]#
Update operation
Take the update to 3.1.2 as an example below
1. Install the new version of ffmpeg
wget https://github.com/FFmpeg/FFmpeg/archive/n3.1.2.tar.gz
tar xf n3.1.2.tar.gz
cd FFmpeg-n3.1.2
./configure --prefix=/usr/local/ffmpeg_3.1.2/ --enable-gpl --enable-shared --enable-libmp3lame --enable-libvorbis --enable-pthreads --disable-ffserver --enable-nonfree --enable-libx264 --enable-libfdk_aac --enable-decoder=png --enable-encoder=png --enable-libopencv
make
make install
The directory structure after installation is as follows:
[[email protected] ~]# tree -L 1 /usr/local/ffmpeg_3.1.2/
/usr/local/ffmpeg_3.1.2/
├── bin
├── include
├── lib
└── share

4 directories, 0 files
[[email protected] ~]#
2. Adjust the dynamic link library
[root@thatsit ~]# tail -1 /etc/ld.so.conf
/usr/local/ffmpeg_3.1.2/lib
[root@thatsit ~]#
If the program cannot find the dynamic link library, it will report an error message similar to the following:
[root@thatsit bin]# ffprobe
ffprobe: error while loading shared libraries: libavdevice.so.57: cannot open shared object file: No such file or directory
[root@thatsit bin]#
3. Delete the previous soft link and recreate the soft link
[root@thatsit FFmpeg-n3.1.2]# which ffmpeg
/usr/local/bin/ffmpeg
[root@thatsit FFmpeg-n3.1.2]# cd /usr/local/bin/
[root@thatsit bin]# ll|grep ff
lrwxrwxrwx 1 root root 28 Oct 22 2015 ffmpeg -> /usr/local/ffmpeg/bin/ffmpeg
[root@thatsit bin]# rm -f ffmpeg
[root@thatsit bin]# ln -s /usr/local/ffmpeg_3.1.2/bin/ffmpeg .
[root@thatsit bin]# ln -s /usr/local/ffmpeg_3.1.2/bin/ffprobe .
[root@thatsit bin]# ll|grep ff
lrwxrwxrwx 1 root root 34 Mar 1 23:17 ffmpeg -> /usr/local/ffmpeg_3.1.2/bin/ffmpeg
lrwxrwxrwx 1 root root 35 Mar 1 23:17 ffprobe -> /usr/local/ffmpeg_3.1.2/bin/ffprobe
[root@thatsit bin]#
Version verification
[root@thatsit ~]# ffmpeg -version|grep version
ffmpeg version 3.1.2 Copyright (c) 2000-2016 the FFmpeg developers
[root@thatsit ~]#
ps: You can use ffmpeg -version or directly use the ffmpeg command to view the detailed information of ffmpeg
ffmpeg -version
[root@thatsit bin]# ffmpeg -version
ffmpeg version 3.1.2 Copyright (c) 2000-2016 the FFmpeg developers
built with gcc 4.4.7 (GCC) 20120313 (Red Hat 4.4.7-11)
configuration: --prefix=/usr/local/ffmpeg_3.1.2/ --enable-gpl --enable-shared --enable-libmp3lame --enable-libvorbis --enable-pthreads --disable-ffserver --enable-nonfree --enable-libx264 --enable-libfdk_aac --enable-decoder=png --enable-encoder=png --enable-libopencv
libavutil 55. 28.100 / 55. 28.100
libavcodec 57. 48.101 / 57. 48.101
libavformat 57. 41.100 / 57. 41.100
libavdevice 57. 0.101 / 57. 0.101
libavfilter 6. 47.100 / 6. 47.100
libswscale 4. 1.100 / 4. 1.100
libswresample 2. 1.100 / 2. 1.100
libpostproc 54. 0.100 / 54. 0.100
[root@thatsit bin]#
ffmpeg
[[email protected] bin]# ffmpeg
ffmpeg version 3.1.2 Copyright (c) 2000-2016 the FFmpeg developers
built with gcc 4.4.7 (GCC) 20120313 (Red Hat 4.4.7-11)
configuration: --prefix=/usr/local/ffmpeg_3.1.2/ --enable-gpl --enable-shared --enable-libmp3lame --enable-libvorbis --enable-pthreads --disable-ffserver --enable-nonfree --enable-libx264 --enable-libfdk_aac --enable-decoder=png --enable-encoder=png --enable-libopencv
libavutil 55. 28.100 / 55. 28.100
libavcodec 57. 48.101 / 57. 48.101
libavformat 57. 41.100 / 57. 41.100
libavdevice 57. 0.101 / 57. 0.101
libavfilter 6. 47.100 / 6. 47.100
libswscale 4. 1.100 / 4. 1.100
libswresample 2. 1.100 / 2. 1.100
libpostproc 54. 0.100 / 54. 0.100
Hyper fast Audio and Video encoder
usage: ffmpeg [options] [[infile options] -i infile]... {[outfile options] outfile}...

Use -h to get full help or, even better, run 'man ffmpeg'
[[email protected] bin]#
==== done ====
Good night.