
![How To Update CPU Drivers? [Windows 10 & 11]](https://www.ingameloop.com/wp-content/uploads/How-to-Update-CPU-Drivers.jpg)
A computer’s central processing unit is undoubtedly the most crucial part of your computer that ensures all of your programs and applications run smoothly. In order to utilize CPUs’ peak performance, it’s critical to keep CPU drivers up to date for all the various components to communicate effectively with one another. CPU drivers are some sort of programs or pieces of software that enable a user to change or alter the CPU behavior of a computer in a variety of ways. Just like other drivers for other purposes, these drivers enhance the processor’s performance.
For your information, you might need to update your chipset drivers even before updating the CPU drivers to keep everything flowing correctly. That’s because your operating system detects your motherboard via the chipset driver. It’s crucial to install the correct version of them since they are so essential to the operation of your computer; otherwise, the entire system could crash. Other than that, if you’re interested in how to update CPU drivers, this post can help you out. You must read this post until the end so you can grab all the required knowledge to update drivers.
Key Takeaways
- Updating CPU drivers can improve performance, stability and security of your computer.
- CPU drivers are usually updated automatically by Windows Update, but you can also check for updates manually or use a third-party tool.
- To update CPU drivers manually, you need to find out the model and manufacturer of your CPU, then visit their website and download the latest driver package.
- To install the downloaded driver package, you need to run the executable file or extract the zip file and follow the instructions on the screen.
- To use a third-party tool, you need to download and install a reliable software that can scan your system and update your CPU drivers automatically.
What are the precautions before updating CPU drivers?
Updating CPU drivers isn’t a difficult task. You can follow a few simple steps without leaving your home. But still, there are a few precautions that you have to take to ensure system stability. Those safety steps include:
- Check compatibility: Before heading into the method, make sure that your computer’s hardware is compatible with the most recent windows upgrades so you can update CPU drivers.
- Generate backup file: Make sure to generate a backup file of your most crucial system files and operating system before updating CPU drivers. In this way, you can reverse the changes if some unwanted thing happens while updating the drivers.
Undoubtedly, using the most recent CPU drivers is essential for getting your CPU to run at its peak. So, we’ll examine how somebody can upgrade the latest drivers for better performance.
How to update CPU drivers?
We have explained various detailed methods to install Windows updates so that you can get a better idea. Read the below sections.
1. Check for Windows updates
Windows offers a useful function through Windows Update that automatically detects any required driver updates, downloads them, and install them on your computer. The latest CPU drivers and any other pending PC software upgrades will be installed with this option. Windows typically checks for updates regularly with this option enabled by default, but you may also command it to do so immediately.
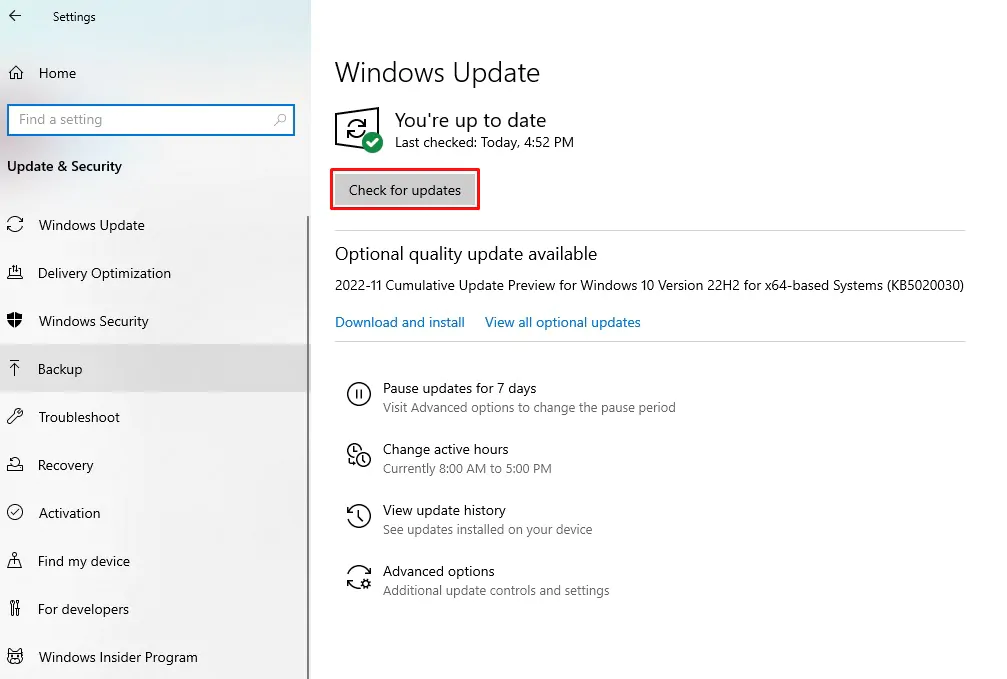
To update Windows is given as follows:
- Step 1: Press the Windows key + 1 to access settings > open settings.
- Step 2: Go to Update & Security > Windows Update menu option.
- Step 3: Locate and click the “Check for Updates” button > allow Windows to automatically install any required driver updates.
Check if the most recent drivers are installed using the device management driver details choices and restart your computer for the changes to occur.
2. Update via device manager
The device manager panel’s manual update feature is the first way to update your CPU drivers. You can use the driver updater to manually choose an existing file from your hard drive when using the device manager, or you can choose for it to search the web for the most recent drivers automatically. This procedure applies to AMD and Intel alike.
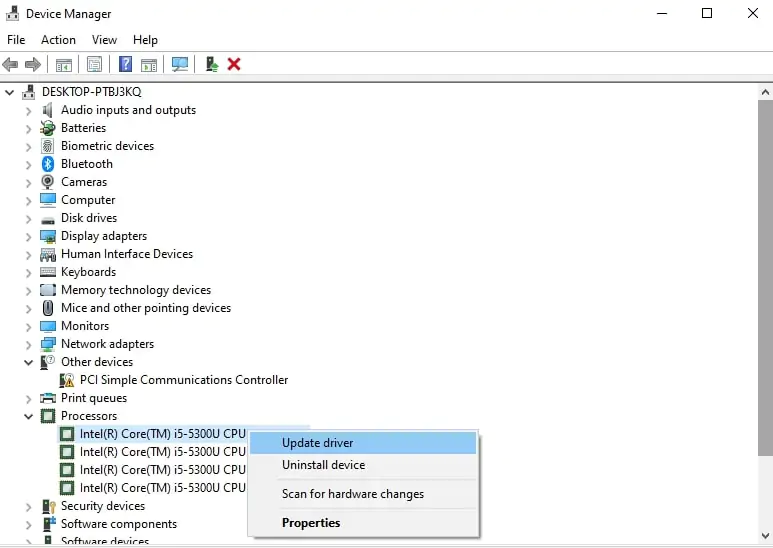
The exact steps are as follows:
- Step 1: Press the Windows key + X > Device Manager > Processors tab.
- Step 2: Right-click on CPU and update the driver > Install any pending drivers.
Note: wait for the process to finish.
Note: Windows will look up the most recent internet driver with Automatic driver search and archives to see if your driver has updated versions. Windows will inform you that you are using the most recent driver version if you already have the most recent driver installed.
3. Manually updating drivers
To manually update CPU drivers, you must first visit the manufacturer’s website and do a driver search. Here are the methods for manually updating your CPU drivers:
Update Intel CPU driver software
The methods below should be followed if you want to install specific Intel Drivers without this tool manually:
- Step 1: Go to Intel’s official website > find the proper CPU driver.
- Step 2: Select Support > Download Center > Processors > download the correct driver
Note: You may have to enter the processor’s name in the search bar to look for its driver.
- Step 3: Download the driver file > unzip it > open it > run the “.exe” file inside of it.
AMD driver updates
The Windows built-in driver updater occasionally has difficulties locating the most recent driver for your system. Therefore, the easiest option to manually update your AMD drivers is to visit AMD’s official website and find your specific CPU driver there to avoid this potential problem.
- Step 1: Go to AMD’s official website > Drivers and Support from the top menu.
- Step 2: Visit the Processors option > select your current Ryzen processor with precise generation.
- Step 3: Choose your CPU model from the drop-down menu > click the Submit button.
Note: The option to download Windows 10 or 11 drivers will be shown to you. Then click Install after clicking the large Plus sign next to the appropriate Windows version on the left.
- Step 4: Download the driver file > unzip it > open it > run the “.exe” file inside of it.
4. Using commercial software
Using the device’s commercial systems is another approach to updating your CPU drivers. We can quickly update the drivers, whether for the CPU or the GPU, using the INTEL DSA. However, we will talk about the updated CPU drivers below:
Intel DSA usage
The quickest and most dependable way to receive the most recent drivers issued is to update your software using the manufacturer’s program. This software will download and install the most recent Intel CPU drivers automatically.
These are the exact actions to take.
- Step 1: Visit Intel’s official website > Support from the top menu.
- Step 2:Select Auto-update your Drivers from the menu bar.

- Step 3: To obtain the paid Intel Driver Assistance Help, click “Download Now“.
- Step 4: Simply run the program as administrator after the download is finished, and the updater will install the most recent Intel CPU drivers for you.
Does upgrading BIOS update CPU drivers?
A pre-installed set of CPU drivers is included with every BIOS upgrade. However, the required CPU driver might not be supported by your current BIOS version. Therefore, even though changing your BIOS has a built-in CPU driver, there is no guarantee that it will be the most recent. Consequently, it is preferable to manually update the CPU drivers or install commercial CPU update software in place of depending on a BIOS update to have the most recent CPU drivers available.
Conclusion
Undoubtedly, the processor is the brain of the computer and should be updated with the latest drivers to utilize its true computing power. Updated CPU drivers help you avoid numerous device conflicts and guarantee that your computer runs all operations smoothly and quickly. You must know how to upgrade the CPU drivers to improve CPU usage and performance. In this CPU driver guide, we discussed the many approaches to searching for and installing your systems’ most recent driver updates.
As we previously indicated, updating or changing the drivers on your own can be hazardous. Finding the appropriate version for your operating system and the particular device is essential. Moreover, it’s crucial to install the correct version of them since they are so necessary to the operation of your computer; otherwise, the entire system could crash. We advise using an automatic driver updater to handle this to avoid losing anything. You must know all these facts before updating drivers.
Frequently Asked Questions
Do CPU drivers need to be updated?
Yes, CPU drivers must be up-to-date to get the most out of the CPU and utilize its true performance potential. Moreover, updating CPU drivers is also crucial since outdated drivers may put a burden on and increase CPU usage.
Does updating CPU drivers increase performance?
Yes, updating CPU drivers boosts performance. All bugs, issues, or buggy software pieces are removed by updating the new drivers’ versions. The overall CPU speed gets a sudden boost that improves the overall efficiency.
What does updating a CPU do?
Updating your CPU drivers boosts the clock speed, reduces latencies, and enhances processing power. This way, you can enjoy smooth gameplay without compromising resolution, efficiency, and more.
EDITOR
Arslan Ashraf is a dedicated tech writer with a rich background in Computer Science and five years of experience in the field. While pursuing his Bachelor’s degree from Virtual University, he has honed his expertise in CPUs and CPU Coolers. His ability to simplify complex technological concepts has made him a valuable resource for a wide audience.
Keeping both our hardware and software up to date is essential for everything to go smoothly, and also to keep everything secure.
Don’t think that updates are just meaningless MB downloaded with no purpose whatsoever. In fact, updates contain important fixes, improvements, or security patches.
It’s even more important to have our software up to date when we are talking about the Windows OS, as the system can become vulnerable if not constantly updated.
And, speaking of updates, see how to easily update your drivers on your Windows 10 device, so you can be prepared when the time comes.
But wait, maybe you’ve already switched to Windows 11 and left the old operating system behind. In that case, see how to update drivers on Windows 11.
Just in case you also need this information, the article on how to check and update BIOS on Windows 11 is waiting for you to peruse through it.
We are about to show you a few methods that you can use in order to update your central processing unit (CPU) on your Windows 10 or Windows 11 PC.
it really doesn’t matter, as the steps are pretty much the same for both versions of the popular Microsoft-designed operating system.
Why should I constantly update my drivers?
Well, let’s just say that a hardware component for your PC would be pretty much useless without its software counterpart.
Thus, updating your device’s drivers can actually resolve problems, improve performance, and increase the stability of your computer.
Yes, we did say improve performance, which should be the sole interest you have when mentioning the PC’s CPU.
For better health and longer usage, we strongly recommend you install updates for the system’s software every time they become available.
Malicious third parties are always looking for a way inside our lives, so keeping everything updated makes it less likely that you will become a victim of cybercriminals.
Usually, a CPU is integrated with a graphics card (GPU), making these updates even more meaningful than first anticipated.
CPUs that come without a native GPU, don’t have drivers. Software support for that kind of CPU is included in its motherboard’s BIOS.
So, it goes without saying that, in order to upgrade the CPU driver, you will therefore need to update your BIOS.
How can I update my CPU drivers?
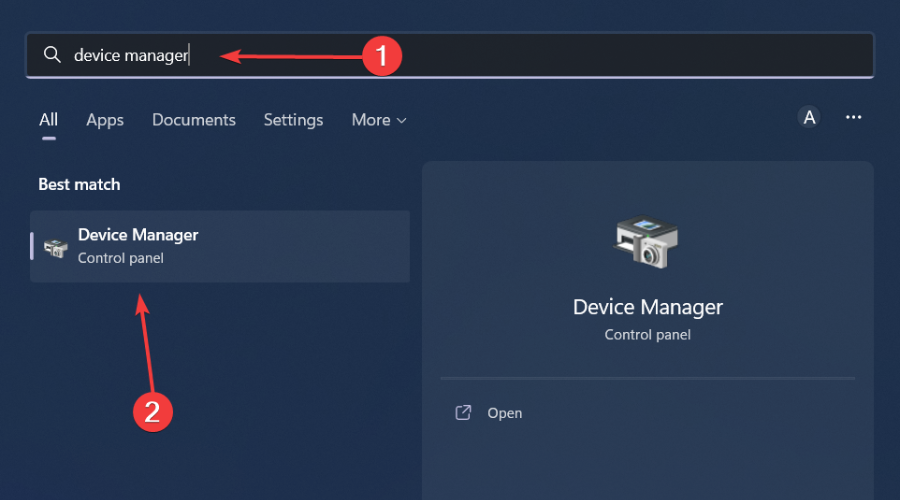
1. Use the Device Manager
-
1. Press the Windows key on your keyboard to bring up the Windows search box.
-
2. Type device manager in the search box and click on the first result to open the app.

-
3. Scroll down to the Processors section.
-
4. Expand Processors, right-click the one you are using, and select Update driver.
-
5. Choose Search automatically for drivers.

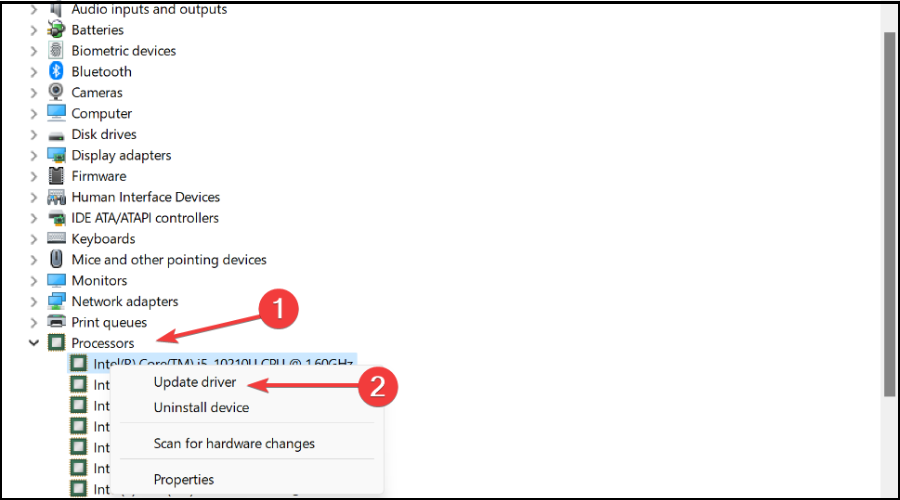
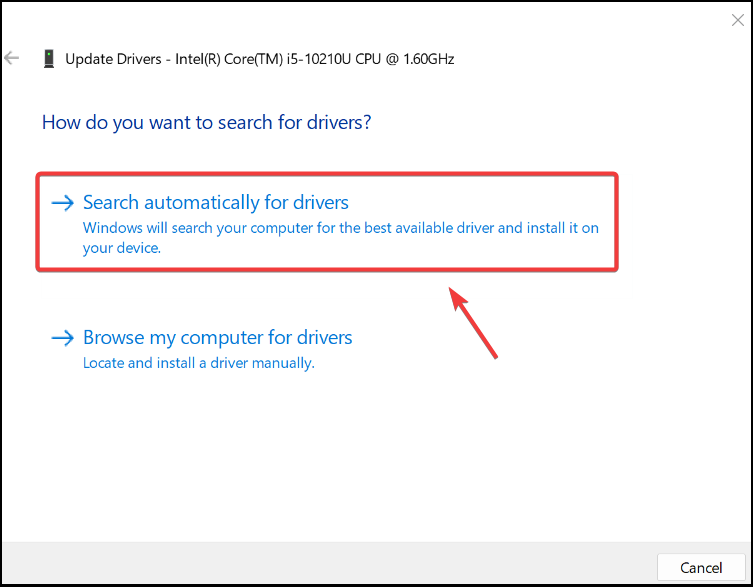
The first method you should try out when you’re looking to update your CPU drivers on a Windows 10/11 PC is to update them with Device Manager.
Device Manager is a built-in app on your device that allows you to install and update your devices’ drivers in a few clicks.
2. Use specialized software
It should go without saying that whatever choose to do on your PC can be done without crashes, lags, or freezes by keeping all drivers up to date and error-free.
Sometimes, manual checks are hard to perform, that’s why we recommend using an automated assistant that will scan for fresh driver versions daily.
So, if you are not in the mood to use any other of the solutions we are presenting to you in this guide, stop right here, download the specialized software and let it do the work for you.
Even though updating your CPU driver is an easy task, it’s understandable that you want to deal with it, so that’s why we recommend using an automated tool.
Most common Windows errors and bugs can result from faulty or incompatible drivers. An outdated system can lead to lags, system issues, or even BSoDs.
You can prevent these problems by using an automatic tool that will search and install the correct drivers on your computer with just a few clicks. That’s why we recommend you use Outbyte Driver Updater.
Here’s how to do it:
- Download and install the Outbyte Driver Updater app.
- Launch the software.
- Wait for the app to detect all incompatible drivers.

- Afterward, it will show you a list of the drivers found to select the ones to Update or Ignore.
- Click on Update & Apply Selected to download and install the newest versions.
- Restart your PC to ensure the applied changes.

Outbyte Driver Updater
Use this software and solve all driver-related issues from your PC.
Disclaimer: You may need to upgrade the app from the free version to perform specific actions.
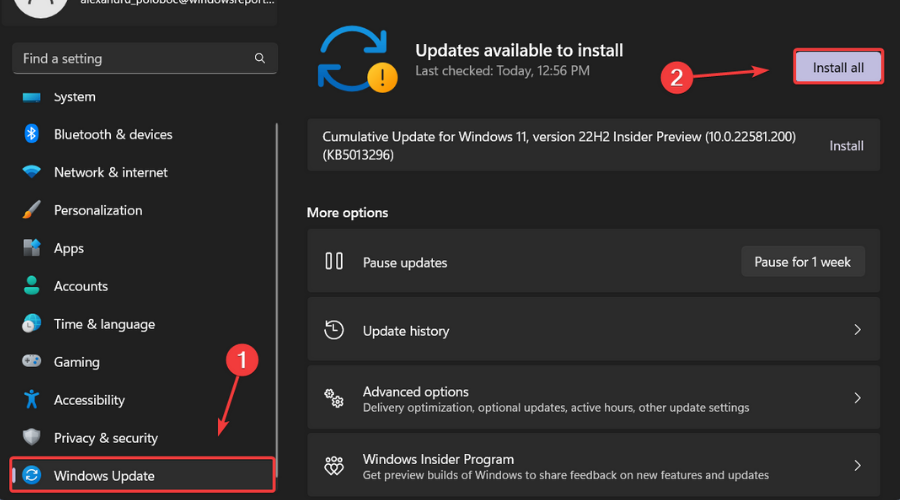
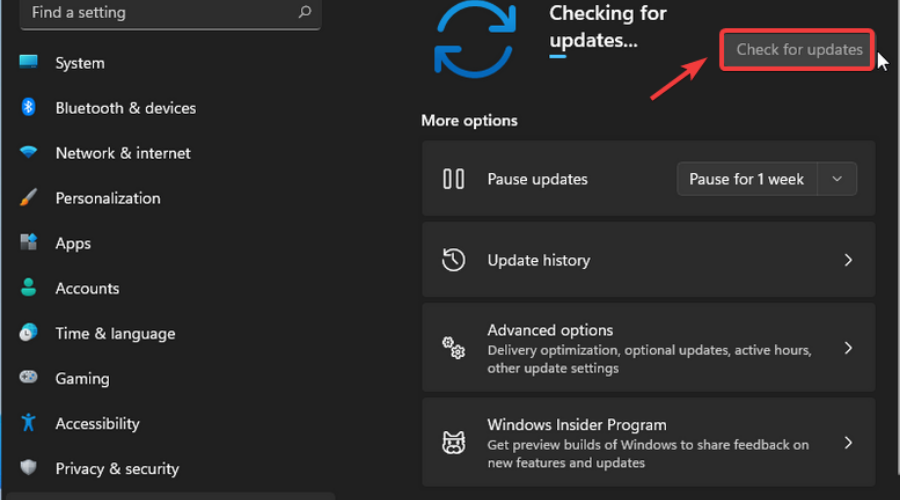
3. Use the Windows Update tool
- Press Windows + I to access Settings.
- Select the Windows updates tab and click Install all.
- If no updates are queued for installation, press the Check for updates button.
4. Download the driver from the manufacturer’s site
Some users don’t even rely on the Device Manager or the Windows Update tool to update the driver that their CPU uses.
In fact, those people choose to cut the middle man and go directly to the supplier, just like in the good old days.
What does that mean? It means that they go directly to the website of the CPU’s manufacturer, which can be Intel, AMD, or others, and download the diver directly from the source.
After downloading on your device, simply double-click the executable you downloaded and it will take you through the setup.
- How to Delete Windows 11 Saved Passwords
- How to Download DirectX 12 Agility SDK [Installation Guide]
- How to Open PPTX File in Windows 11? Use These 4 Ways
- How to Install Windows 7 Icons on Windows 11
5. Re-install CPU software
- Search for Device Manager and open the app.
- Expand Processors, right-click on the one you are using, then select Uninstall driver.
- Restart your PC.
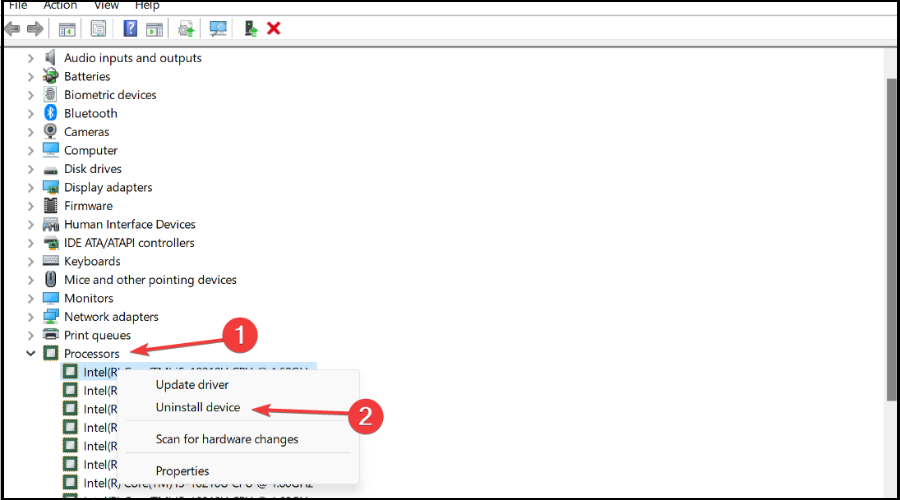
Usually, after restarting your PC, Windows will try to install the latest CPU software including CPU driver software, so don’t worry.
If, however, the system doesn’t automatically do it, use the Device Manager and it will automatically find the one for you.
6. Manually install using CD/USB stick
Sometimes, when we purchase a new processor, it comes with a CD, or USB stick that contains the setup file and necessary drivers.
Simply put the CD in your PC, or insert the USB stick, and run the executable you find on it. Go through the setup and that’s all there is to it.
However, the CD/USB stick only contains the stater driver pack, so your system will need to download the latest drivers off the internet. Just use one of the methods above.
7. Update Motherboard BIOS
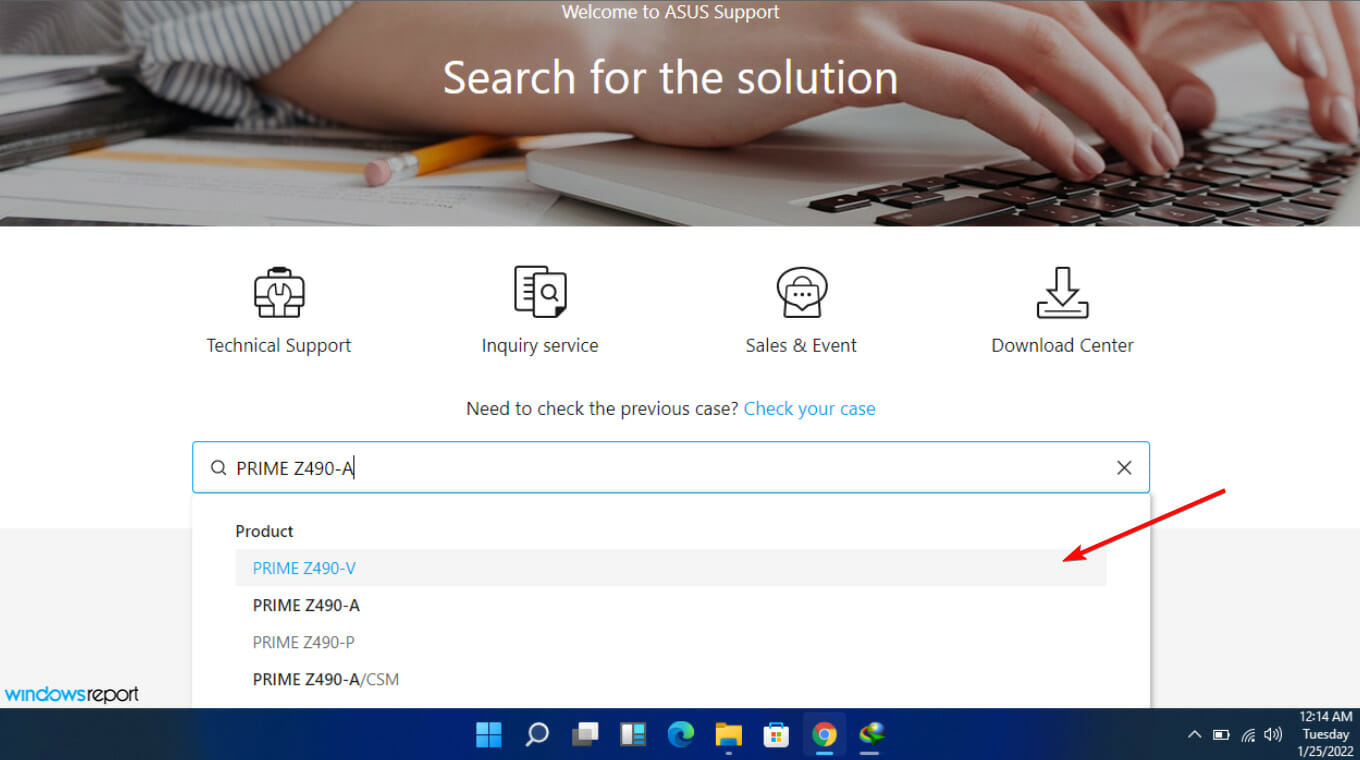
1. Visit the Asus Download Center, type in your motherboard’s model, and choose it when you see it in the drop-do list.
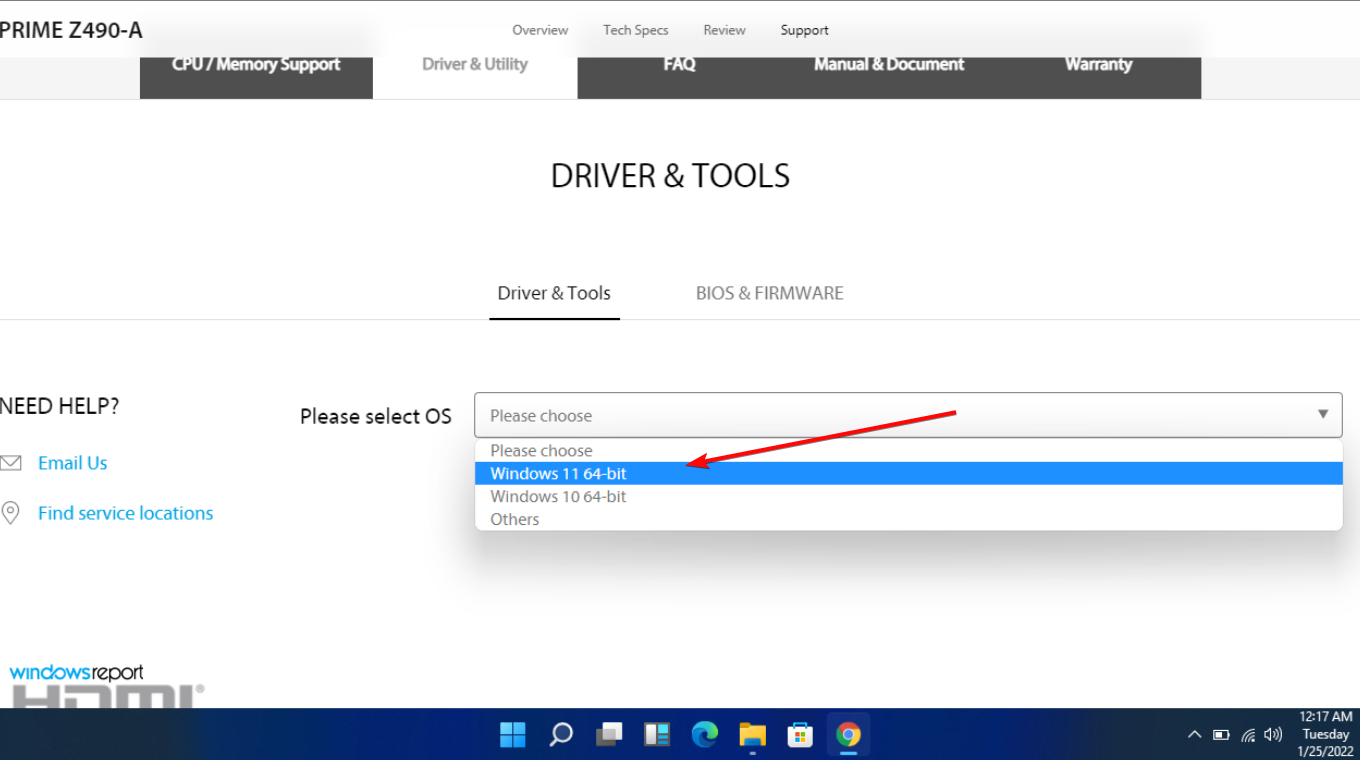
2. Select Driver & Utility and then Driver & Tools.

3. Choose your OS (we chose Windows 11 in this case).
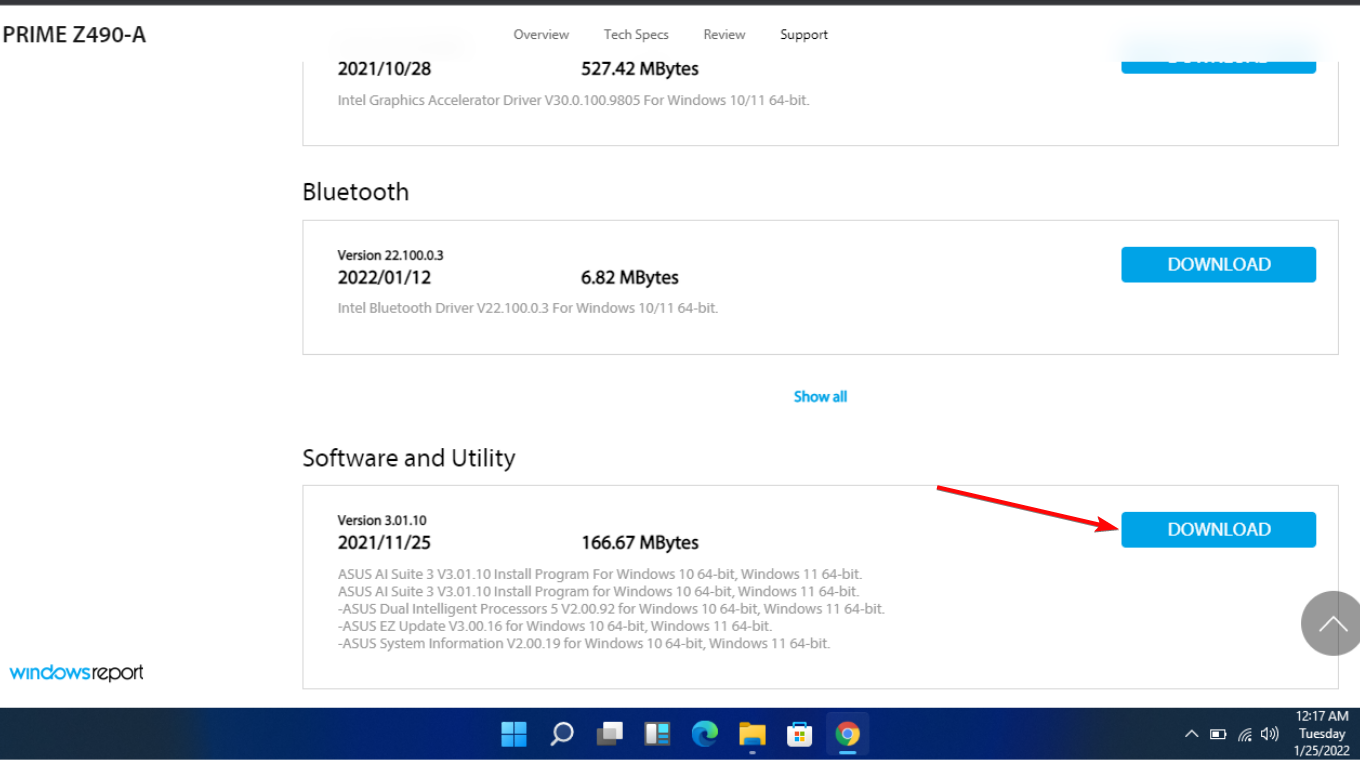
4. Under Software and Utility, look for ASUS AI Suite 3, and select Download.
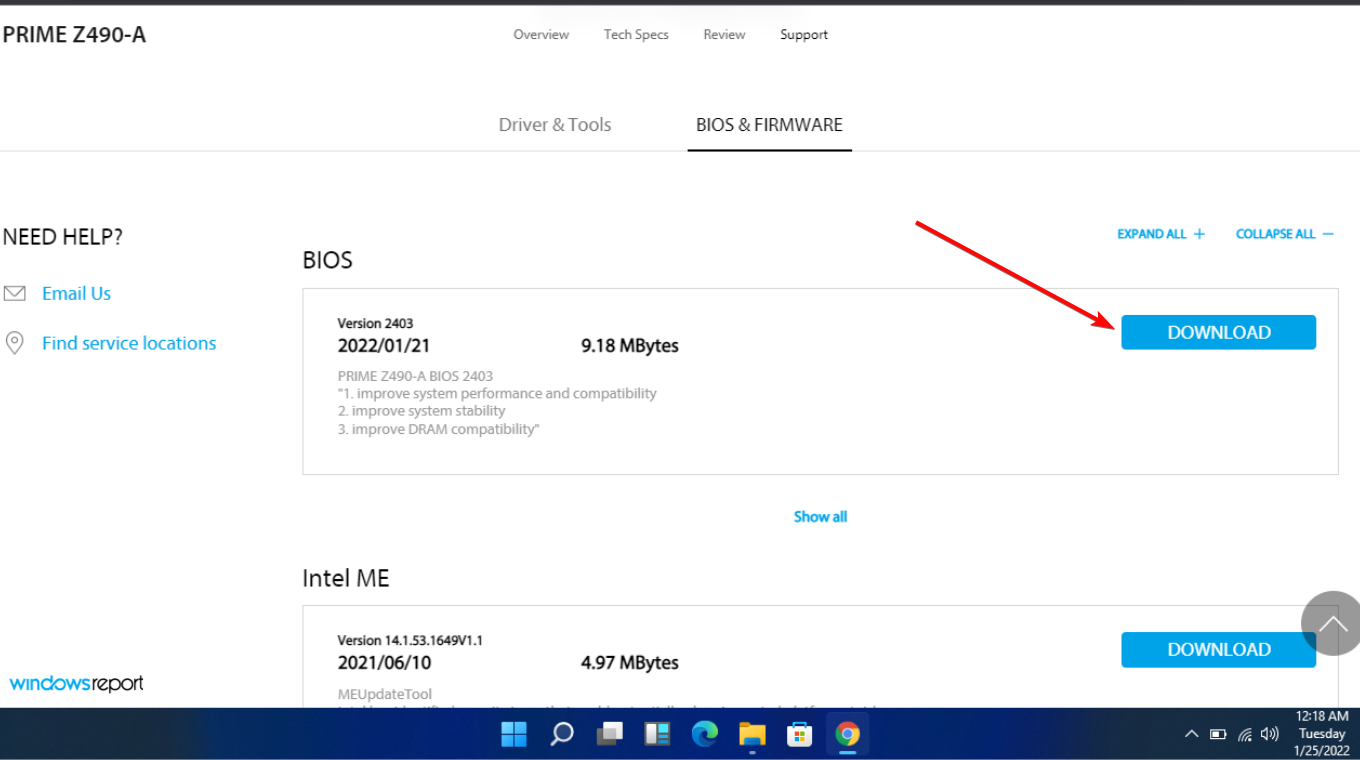
5. Scroll back to the top and click the BIOS & FIRMWARE tab.
6. Up next, scroll to the BIOS section and select Download.
7. Extract the ZIP file containing ASUS AI Suite 3, then open AsusSetup.exe and install the program. When finished, reboot your computer.
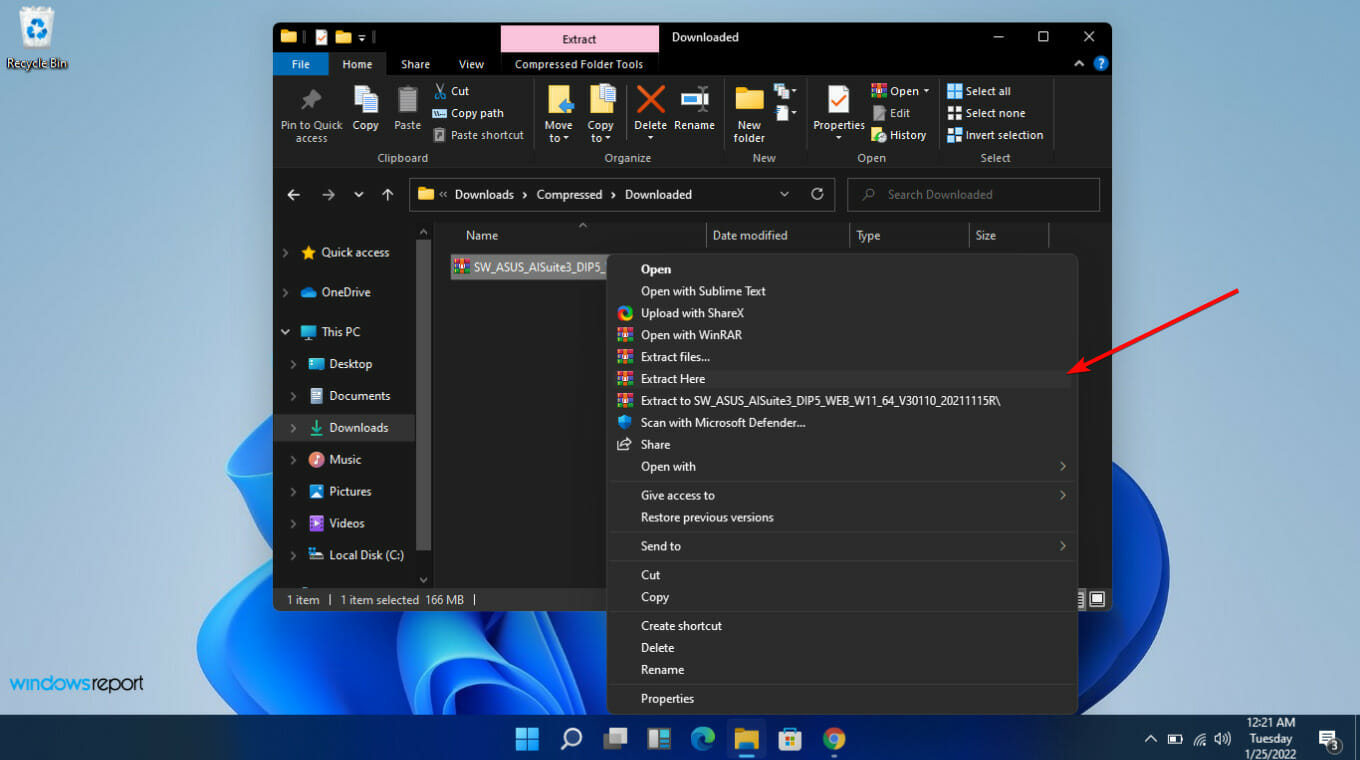
8. Extract the ZIP file that contains the BIOS folder.
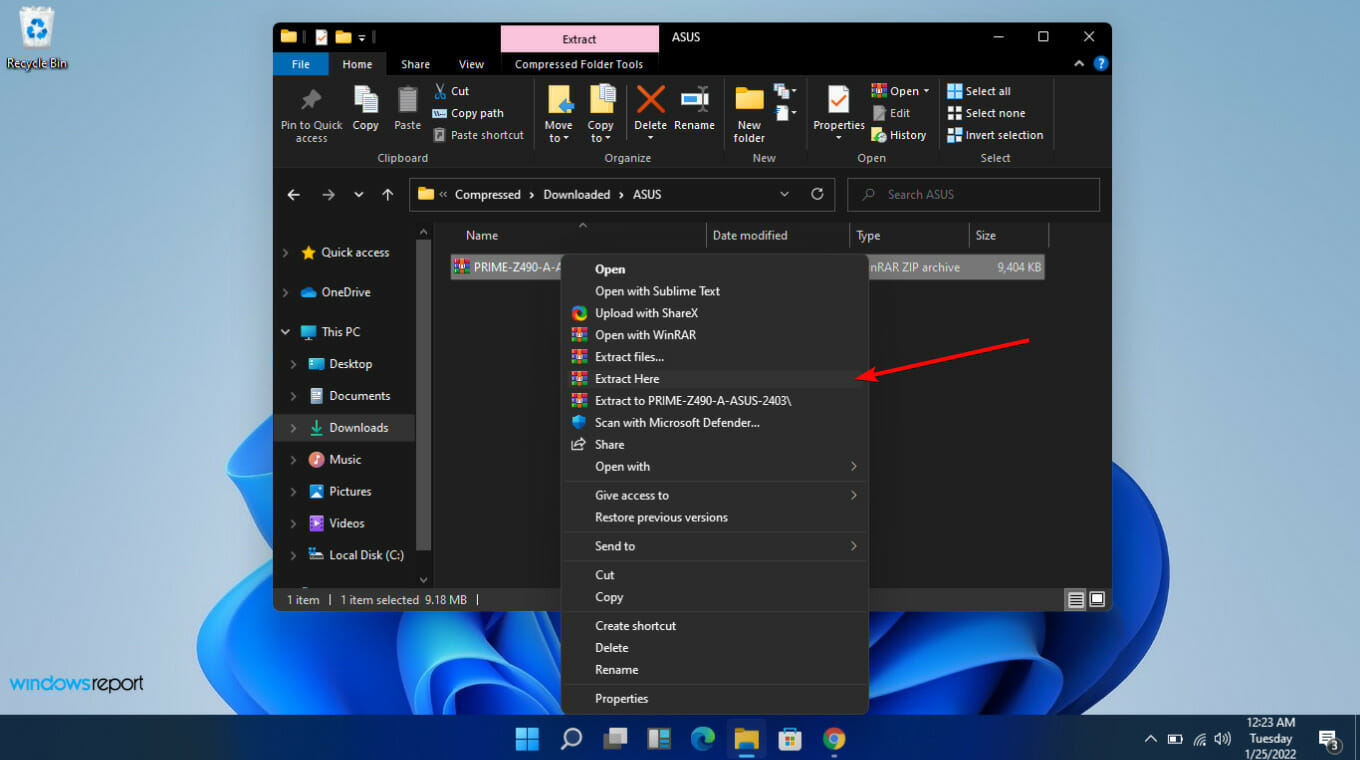
9. Open Asus AI Suite 3 and select the Menu icon (the three horizontal lines) on the left side.
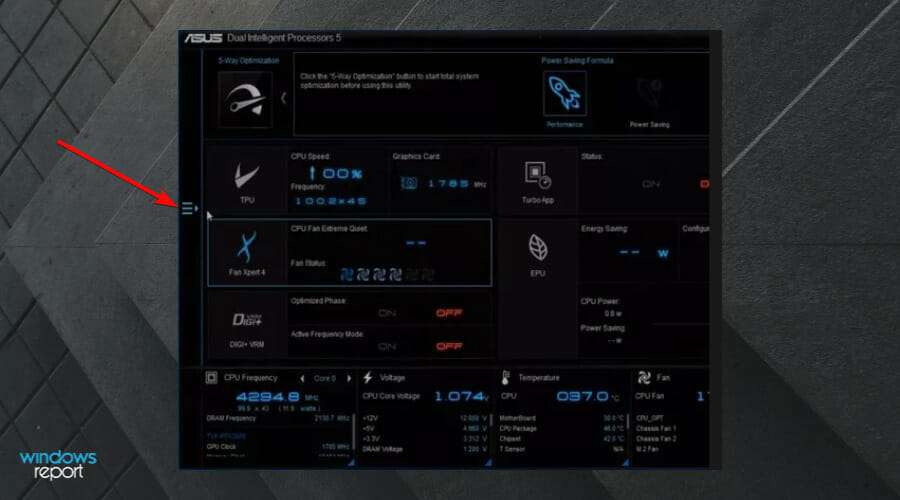
10. Select EZ update.
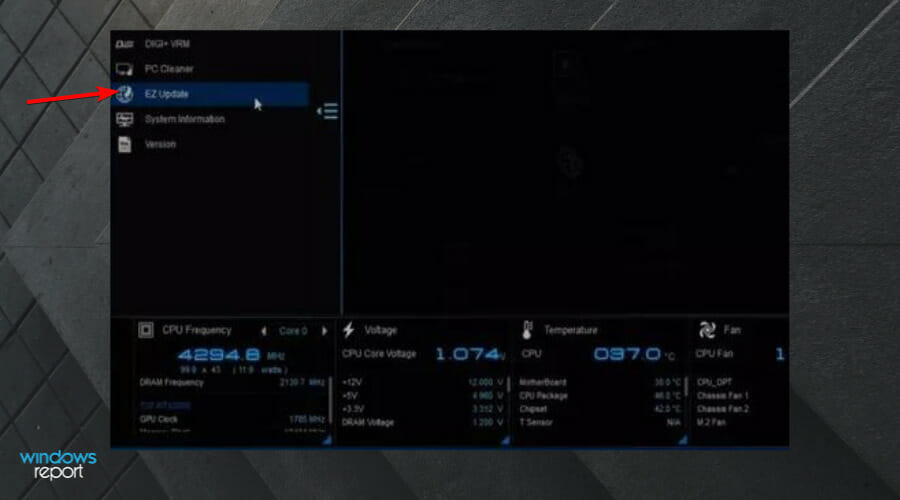
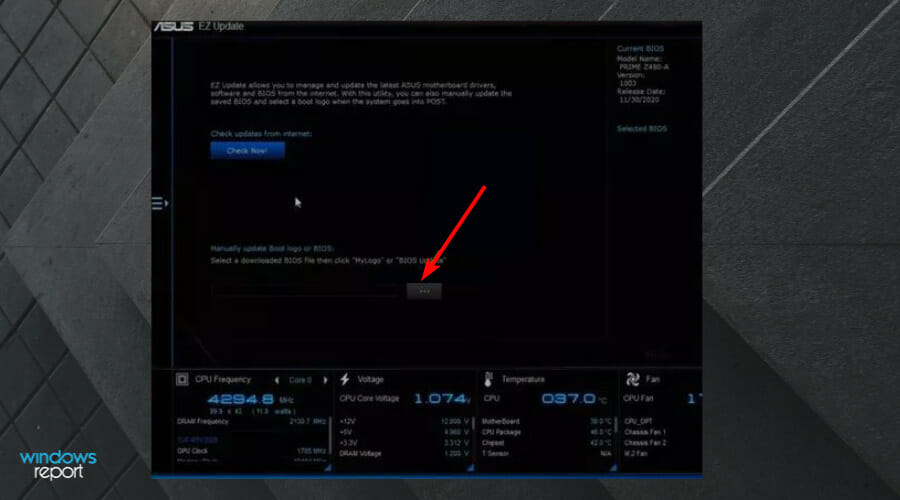
11. Under Manually update boot logo or BIOS, select the Ellipses (…), and choose the same BIOS file you had extracted earlier.
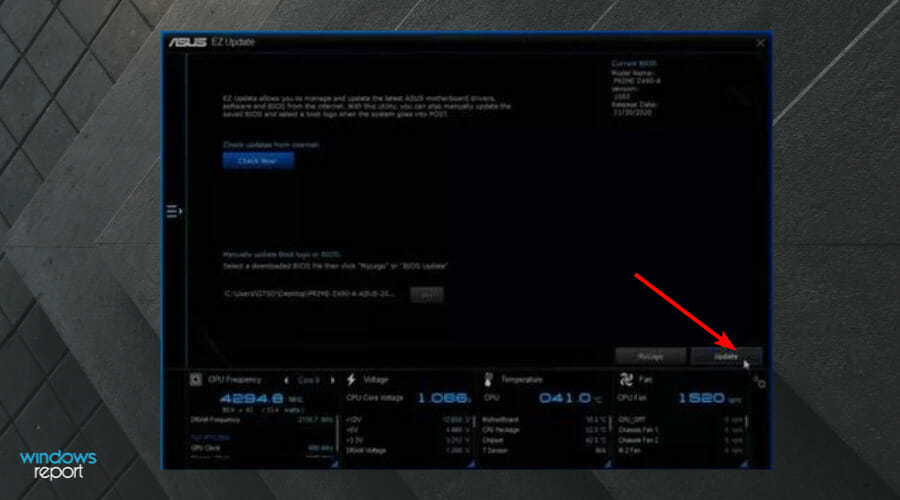
12. Choose Update in the lower-right corner.
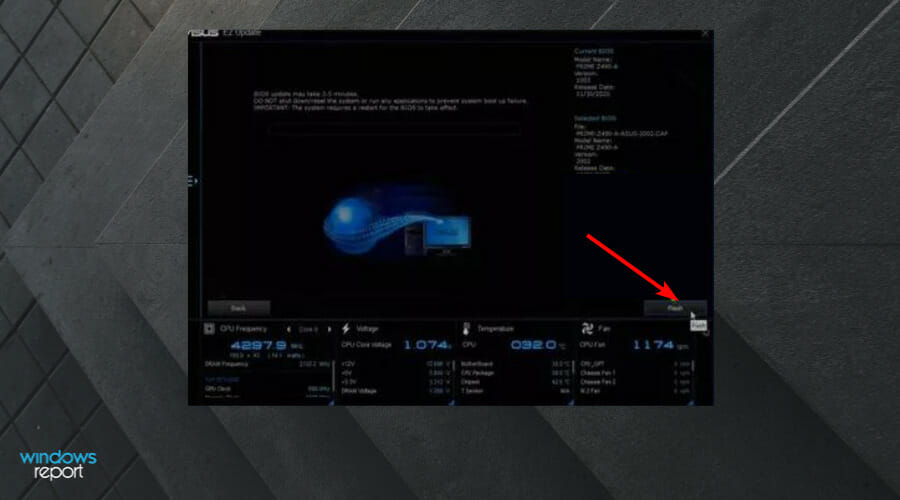
13. Select Flash.
14. Choose OK. Reboot your computer once the process is done.
If you have a different laptop brand, don’t hesitate to check the dedicated article above on how to update your BIOS.
All the methods described in this article are valid for Windows 10 and Windows 11, so simply follow the same steps regardless of OS version.
When should I update my CPU drivers?
As a general rule, you should keep your PC and its components updated at all times. Regular driver updates also bring security measures and should ultimately help you avoid any problems.
Windows automatically checks your device for new software updates. This happens frequently, to ensure that you won’t miss out on any security updates.
Has this guide been helpful to you in your quest to update your CPU? Let us know in the dedicated comments section located below.
The CPU processes almost all of the data in your computer.
Updating CPU drivers is an important part of ensuring that your computer’s hardware is compatible with the latest Windows updates. Additionally, updates will typically fix any bugs or errors that have been identified since the release of the previous CPU driver. Windows 7 will not only automatically detect the model of your CPU, but will also download and install the newest drivers for your CPU once you begin the update process.
Step 1
Open the Start Menu, right-click «Computer» and then select «Properties» to open the System menu.
Step 2
Click «Device Manager,» which is located on the left toolbar of the System window.
Step 3
Click the arrow to the left of «Processors» from within the Device Manager window.
Step 4
Right-click on your processor and click «Update Driver Software» to begin the updating process. To complete the update you may be required to restart your computer.
Современные Windows 10 и 8.1 как правило обновляют драйверы автоматически, в том числе и для оборудования Intel, однако драйверы, получаемые из Центра обновления Windows не всегда последние (особенно для Intel HD Graphics) и не всегда именно те, что нужны (иногда — просто «совместимые» по мнению Майкрософт).
В этой инструкции подробно об обновлении драйверов Intel (чипсета, видеокарты и др) с помощью официальной утилиты, как скачать любые драйверы Intel вручную и дополнительная информация, касающаяся драйверов Intel HD Graphics.
Примечание: рассматриваемая далее утилита Intel для обновления драйверов предназначена в первую очередь для материнских плат ПК с чипсетами Intel (но не обязательно ее производства). Обновления драйверов для ноутбуков она также находит, но не все.
Программа обновления драйверов Intel
Официальный сайт Intel предлагает собственную утилиту для автоматического обновления драйверов оборудования до их последних версий и её использование предпочтительнее, чем собственная система обновления, встроенная в Windows 10, 8 и 7, и тем более чем какой-либо сторонний драйвер-пак.
Загрузить программу для автоматического обновления драйверов можно со страницы http://www.intel.ru/content/www/ru/ru/support/detect.html. После короткого процесса установки на компьютер или ноутбук, программа будет готова для обновления драйверов.
Сам процесс обновления состоит из следующих простых шагов.
- Нажать кнопку «Начать поиск»

- Подождать, пока он будет выполняться/
- В списке найденных обновлений выбрать те драйверы, которые следует скачать и установить вместо имеющихся в наличии (будут найдены только совместимые и более новые драйверы).
- Установить драйверы после загрузки автоматически или вручную из папки загрузок.

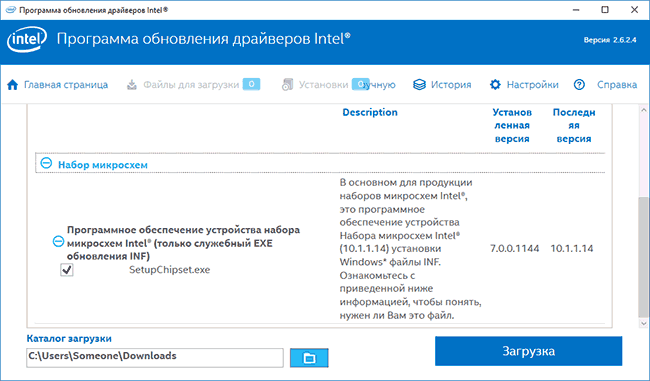
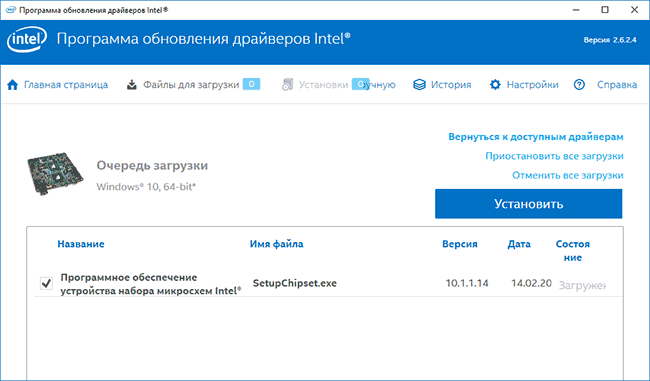
На этом весь процесс будет завершен, а драйверы обновлены. При желании, в результате поиска драйверов, на вкладке «Более ранние версии драйверов» вы можете скачать драйвер Intel в предыдущей версии, если последний работает нестабильно.
Как скачать нужные драйверы Intel вручную
Помимо автоматического поиска и установки драйверов оборудования, программа обновления драйверов позволяет выполнить поиск необходимых драйверов вручную в соответствующем разделе.

В списке присутствуют драйверы для всех распространенных материнских плат с чипсетом Intel, компьютеров Intel NUC и Compute Stick для различных версий Windows.
Об обновлении драйверов Intel HD Graphics
В некоторых случаях драйверы Intel HD Graphics могут отказываться устанавливаться вместо уже имеющихся драйверов, в этом случае есть два пути:
- Сначала полностью удалить имеющиеся драйверы Intel HD Graphics (см. Как удалить драйверы видеокарты) и только после этого производить установку.
- Если пункт 1 не помог, а у вас ноутбук, загляните на официальный сайт производителя ноутбука на страницу поддержки вашей модели — возможно, там найдется обновленный и полностью совместимый драйвер интегрированной видеокарты.
Также в контексте драйверов Intel HD Graphics может быть полезной инструкция: Как обновить драйверы видеокарты для максимальной производительности в играх.
На этом завершаю эту короткую, возможно, полезную для кого-то из пользователей инструкцию, надеюсь, всё оборудование Intel на вашем компьютере работает исправно.
Applies ToWindows 11 Windows 10
Обновления драйверов для большинства аппаратных устройств Windows автоматически загружаются и устанавливаются через клиентский компонент Центра обновления Windows. клиентский компонент Центра обновления Windows обновляет драйверы для различного оборудования, включая сетевые адаптеры, принтеры, сканеры и видеоадаптеры. Драйверы, обновляемые с помощью клиентский компонент Центра обновления Windows, обычно являются последними и актуальными.
Однако драйверы также можно обновить с помощью диспетчер устройств. Драйверы, обновленные с помощью диспетчер устройств, можно выполнить автоматически или вручную. При необходимости драйверы также можно переустановить с помощью диспетчер устройств. Чтобы обновить или переустановить драйвер с помощью диспетчер устройств в Windows, выберите нужную задачу из следующего списка:
-
Щелкните правой кнопкой мыши меню Пуск и выберите диспетчер устройств.
-
В открывавшемся окне диспетчер устройств щелкните стрелку рядом с нужной категорией устройства, чтобы развернуть категорию. Если щелкнуть стрелку рядом с категорией, категория будет развернута. Например, чтобы обновить драйвер принтера, щелкните стрелку рядом с полем Принтеры .
-
Несколько устройств могут быть перечислены в выбранной категории после ее развертывания. Определите, на каком из устройств требуется обновить драйверы.
-
Щелкните правой кнопкой мыши нужное устройство и выберите Обновить драйвер.
-
В открывщемся окне Обновление драйверов выберите Автоматический поиск обновленного программного обеспечения драйверов. Windows продолжает поиск обновленных драйверов. Если он находит какие-либо, он устанавливает обновленные драйверы.
-
Если Windows не находит обновленные драйверы, можно выполнить поиск обновленных драйверов из клиентский компонент Центра обновления Windows, выбрав параметр Поиск обновленных драйверов в обновлении Windows. После этого следуйте инструкциям в статье Автоматическое получение рекомендуемых драйверов и обновлений для оборудования.
-
Нажмите кнопку Закрыть , чтобы закрыть окно Обновление драйверов .
Этот метод основан на загрузке драйверов с веб-сайта изготовителя устройств.
-
Скачайте драйверы для нужного устройства с сайта изготовителя устройства. Обязательно скачайте правильные драйверы, соответствующие версии и архитектуре Windows. После скачивания при необходимости распакуйте скачанные драйверы. Запишите расположение драйверов на устройстве с Windows.
-
Щелкните правой кнопкой мыши меню Пуск и выберите диспетчер устройств.
-
В открывавшемся окне диспетчер устройств щелкните стрелку рядом с нужной категорией устройства, чтобы развернуть категорию. Если щелкнуть стрелку рядом с категорией, категория будет развернута. Например, чтобы обновить драйвер принтера, щелкните стрелку рядом с полем Принтеры .
-
Несколько устройств могут быть перечислены в выбранной категории после ее развертывания. Определите, на каком из устройств требуется обновить драйверы.
-
Щелкните правой кнопкой мыши нужное устройство и выберите Обновить драйвер.
-
В открывавшемся окне Обновление драйверов выберите Обзор моего компьютера для поиска драйверов.
-
В окне Обзор драйверов на компьютере нажмите кнопку Обзор…
-
В окне Обзор папки перейдите к расположению, куда были загружены драйверы, а затем нажмите кнопку ОК .
-
В окне Обзор драйверов на компьютере убедитесь, что указан правильный путь к драйверам, а затем нажмите кнопку Далее .
-
Windows продолжает установку драйверов, если обнаруживает, что драйверы являются обновленными версиями драйверов. Если обновленные драйверы уже установлены, отображается сообщение «Лучшие драйверы для устройства уже установлены «.
-
Нажмите кнопку Закрыть , чтобы закрыть окно Обновление драйверов .
-
Сохраните все работы и закройте все приложения.
-
Щелкните правой кнопкой мыши меню Пуск и выберите диспетчер устройств.
-
В открывавшемся окне диспетчер устройств щелкните стрелку рядом с нужной категорией устройства, чтобы развернуть категорию. Если щелкнуть стрелку рядом с категорией, категория будет развернута. Например, чтобы переустановить драйвер видеоадаптера, щелкните стрелку рядом с элементом Видеоадаптеры.
-
Несколько устройств могут быть перечислены в выбранной категории после ее развертывания. Определите, какое из устройств требуется переустановить драйвер.
-
Щелкните правой кнопкой мыши нужное устройство и выберите Удалить устройство.
-
В открывавшемся окне Удаление устройства подтвердите удаление устройства, нажав кнопку Удалить .
-
Перезапустите устройство Windows, щелкнув правой кнопкой мыши меню Пуск , а затем выбрав Завершить работу или выйти > Перезапустить.
-
После перезапуска устройства Windows Windows пытается переустановить драйвер для устройства. Если драйвер не переустанавливает, см. один из следующих разделов этой статьи:
-
Обновите драйвер устройства автоматически.
-
Обновите драйвер устройства вручную.
Примечание: Некоторые устройства, например принтеры, может потребоваться переустановить вручную. Дополнительные сведения см. в статье Установка принтера в Windows.
-
Нужна дополнительная помощь?
Нужны дополнительные параметры?
Изучите преимущества подписки, просмотрите учебные курсы, узнайте, как защитить свое устройство и т. д.