
| Как обновить микрокод BIOS системной платы | |||||||||
| О процедуре обновления BIOS… | |||||||||
| К процедуре обновления BIOS нужно относиться с особой осторожностью. Если текущая версия BIOS работает стабильно и без критических ошибок, рекомендуем вам сохранить ее резервную копию. При обновлении BIOS следует учитывать, что вы берете на себя всю ответственность за возможный выход из строя вашей системы. В случае неудачного обновления BIOS, пожалуйста, обращайтесь к поставщику или дистрибьютору/реселлеру для дальнейшего решения проблемы. | |||||||||
| Подготовительные процедуры… | |||||||||
|
|||||||||
| Три способа обновления микрокода BIOS… | |||||||||
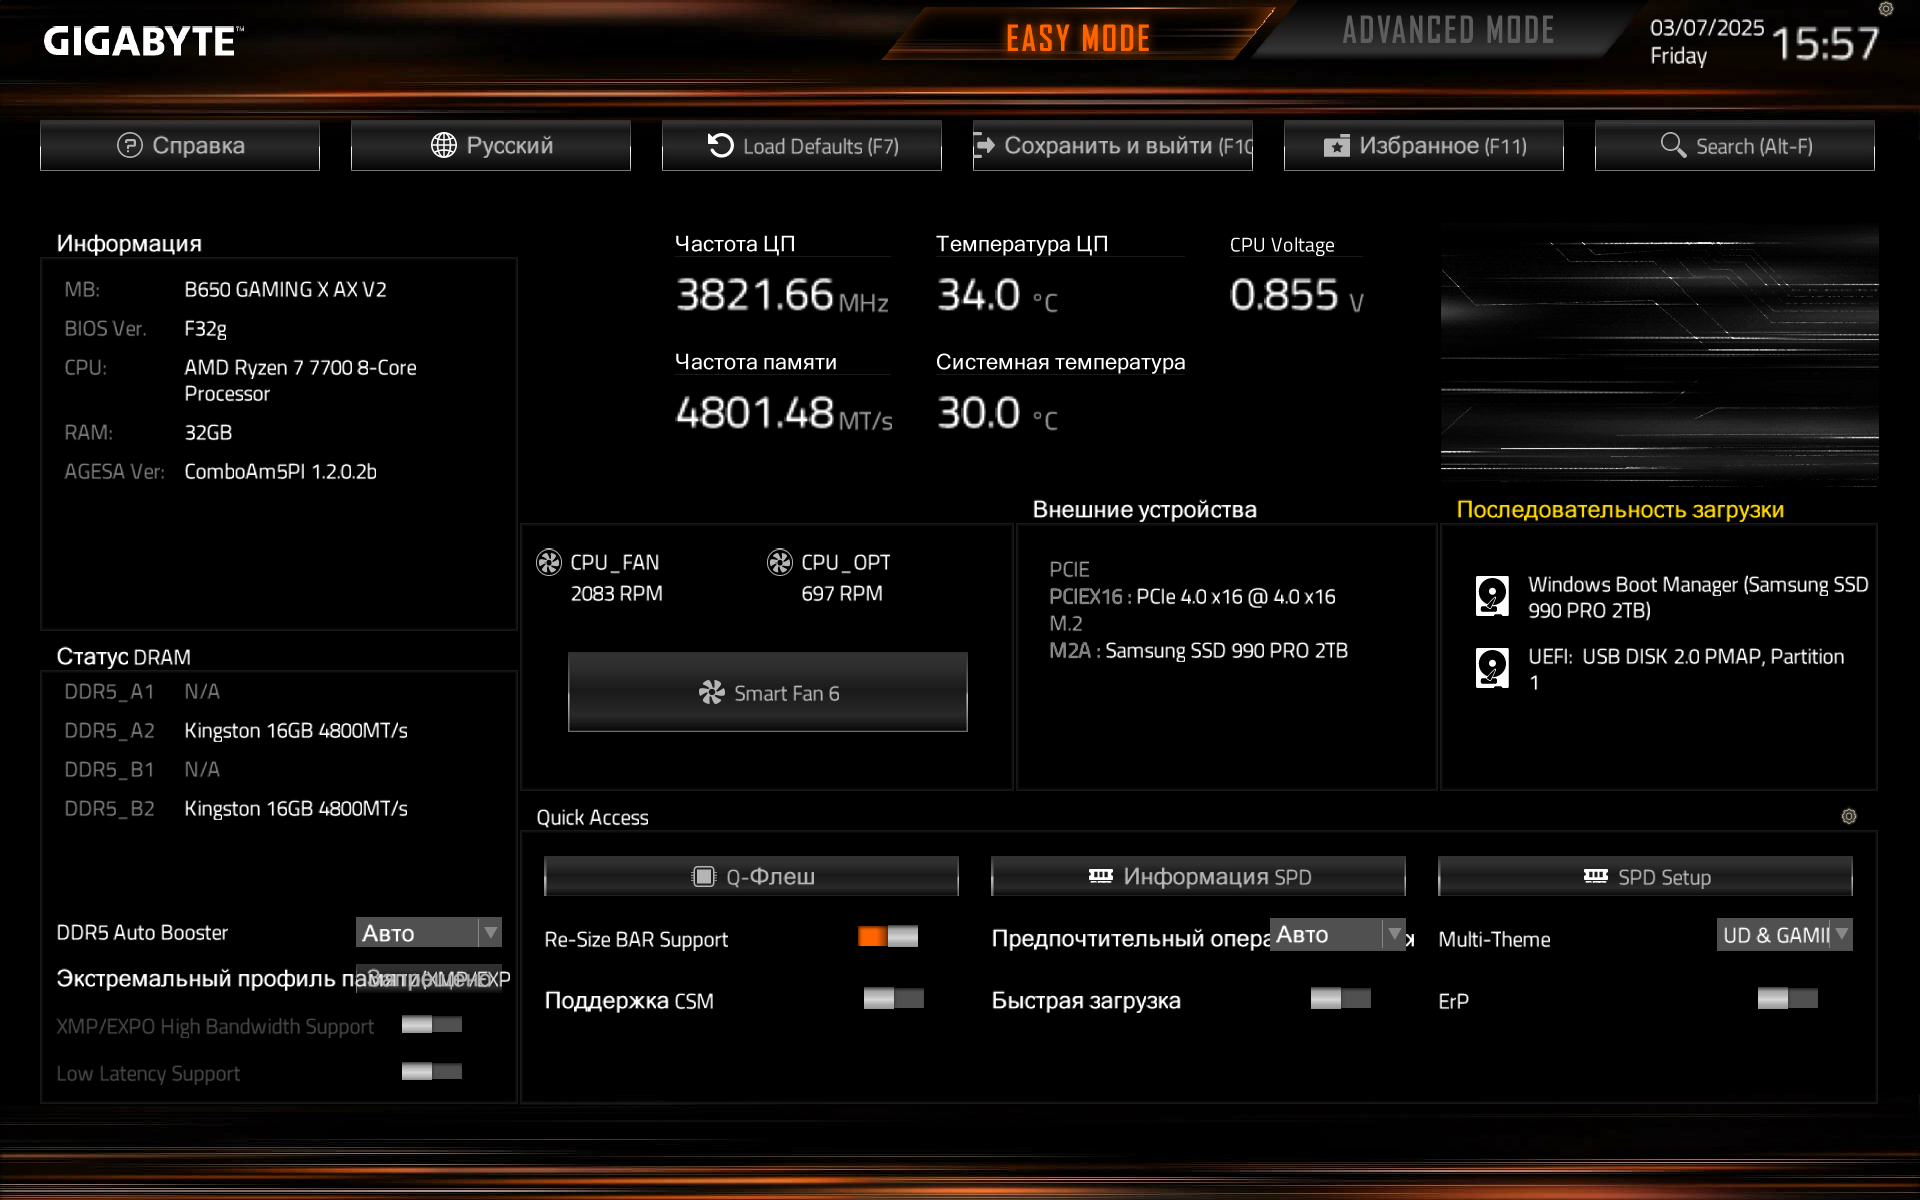
| Утилиты для обновления BIOS доступны для загрузки на официальном сайте GIGABYTE. Ниже представлено краткое описание способов обновления микрокода BIOS. | |||||||||
| 1 : | |||||||||
| Фирменная утилита Q-Flash встроена непосредственно в BIOS, при этом сама процедура перепрограммирования микрокода достаточно проста и не требует от пользователя каких-либо специальных знаний. В том случае, если материнская плата не поддерживает технологию Q-Flash, рекомендуем воспользоваться утилитой @BIOS или обновить в среде DOS. | |||||||||
|
|||||||||
| 2 : | |||||||||
| Утилита для обновления BIOS в среде Windows. | |||||||||
|
|||||||||
| 3 : Обновление BIOS в среде DOS | |||||||||
|
|||||||||
| Руководство пользователя PDF | |||||||||
| Для просмотра данных PDF-файлов вам понадобится программа Acrobat Reader. | |||||||||
Server Motherboard
Server motherboards for demanding applications come in form factors: EEB/E-ATX/ATX/microATX/mini-ITX.
Workstation Motherboard
Professionals that work in AI, animation, and data science rely on solid, scalable, and performant workstation boards.
Rack Server
Innovation and performance are in these optimal rack servers to be deployed in data centers with demanding applications.
GPU Server
Scalable parallel computing GPU dense servers that are built for high performance.
High Density Server
Compute, Storage, and Networking are possible in high density, multi-node servers at lower TCO and greater efficiency.
Direct Liquid Cooling
Ensure peak performance in all configurations. Adopt direct-to-chip liquid cooling for the rising AI/HPC era.
Immersion Cooling
Address rising server heat with submerged cooling. Embrace next-gen liquid cooling for improved TCO and PUE.
Data Center — OCP
Based on OCP Open Rack Standards, barebone racks and nodes for datacenters.
x86
Tried and true x86 architecture based servers with support for the latest Intel and AMD processors.
ARM Server
Arm architecture servers will compete in Cloud to Edge as they tackle compute-bound workloads.
AI Platform
Processing power, large amounts of data, fast networking, and accelerators all bundle into a scale out ready HPC and/or AI server solution.
Visual Computing
Systems that do visual applications from computer graphics to computer animation rely on visual computing servers.
High-Performance Computing Server
Processing power, large amounts of data, fast networking, and accelerators all bundle into a scale out ready HPC and/or AI server solution.
Hyper-Converged Server
Software defined cluster of nodes can be dedicated for compute, storage, networking, or virtualization.
Storage Server
Capacity, reliability, and storage flexibility are built into these storage servers for enterprise and datacenters.
Network Server
Securely manage the use of files and applications for office environments while storing large amounts of data.
Edge Server
Real time data processing at the source is required for edge computing with reduced latency for Internet of Things (IoT) and 5G networks as they use cloud.
e-Mobility
Telematics and Edge computing platform for Electric vehicle, Autonomous driving, ADAS, ITS, and V2X applications
Readers help support Windows Report. We may get a commission if you buy through our links.
Read our disclosure page to find out how can you help Windows Report sustain the editorial team. Read more
Fixing any motherboard-related issues require you to make sure that you are running the latest version of the BIOS. Updating the BIOS of a Gigabyte motherboard can be a complex task and you should follow proper steps to accomplish it.
In this guide, we will share with you all the different ways via which you can easily update Gigabyte BIOS on your PC. Let us check out the methods.
How to check the BIOS version you currently have?
- Open the Start menu by pressing the Win key.
- Type System Information and open the top result.

- Locate BIOS Version/Date section on the right side.

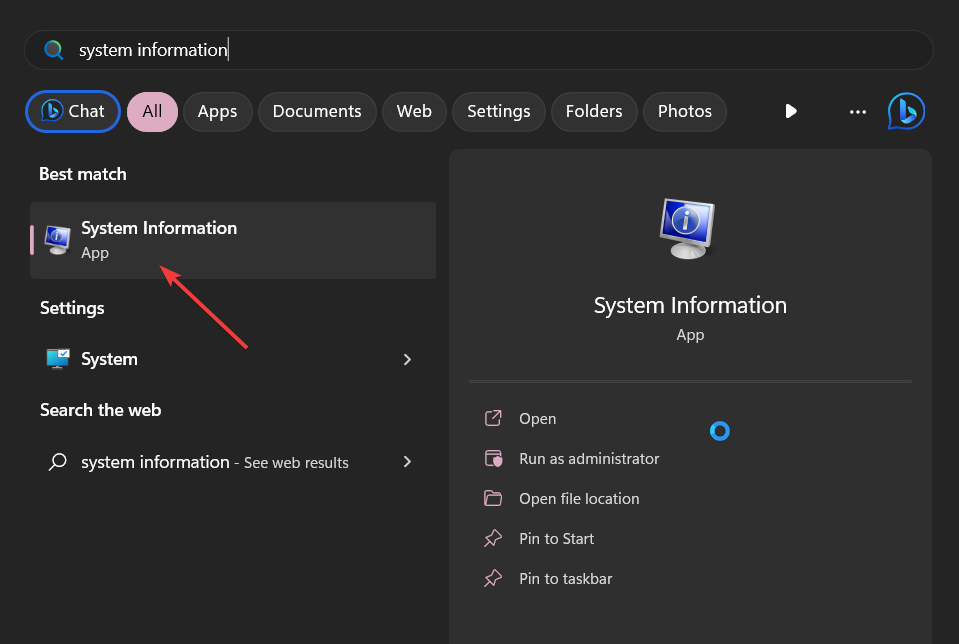

Note down the version of the BIOS you are running. This will let you decide whether you are running the latest version or not.
How can I update Gigabyte BIOS?
1. Use the Gigabyte App Center
- Download the Gigabyte app center.
- Install the App Center on your PC and launch the program.
- Click on the downward arrow in the top-right corner.

- Click on @BIOS.

- Switch to the Update from Server tab.

- Choose the closest server.
- The App Center will automatically detect your motherboard details and provide you with the latest BIOS update.
- Click on the file and select Next.
- Follow the on-screen prompts and install the BIOS update.


Updating the Gigabyte motherboard BIOS using the App Center is probably the easiest way. It simply needs you to perform some clicks and you are all set.
Apart from updating BIOS, you can also use the Gigabyte App Center to update the drivers as well. You can manually update the BIOS using the App Center as well. For that, you need to download the BIOS update file onto a USB drive and then select it within the App Center.
2. Use Gigabyte Q-Flash
2.1 Format the USB drive to FAT32
- Insert the USB flash drive to your PC.
- Press Win + E to open the File Explorer.
- Right-click on your USB drive and click on Format.

- Choose FAT32 from the File system dropdown menu.
- Click on the Start button.

2.2 Download the Gigabyte BIOS update
- Visit the official Gigabyte motherboard support page.
- You can search for the BIOS file based on your processor, chipset, or even your computer’s model name.
- Select BIOS for your computer model.

- Under the BIOS section, download the latest available update.
- Once the download is complete, extract the contents onto your FAT32 formatted USB drive.


2.3 Update the BIOS
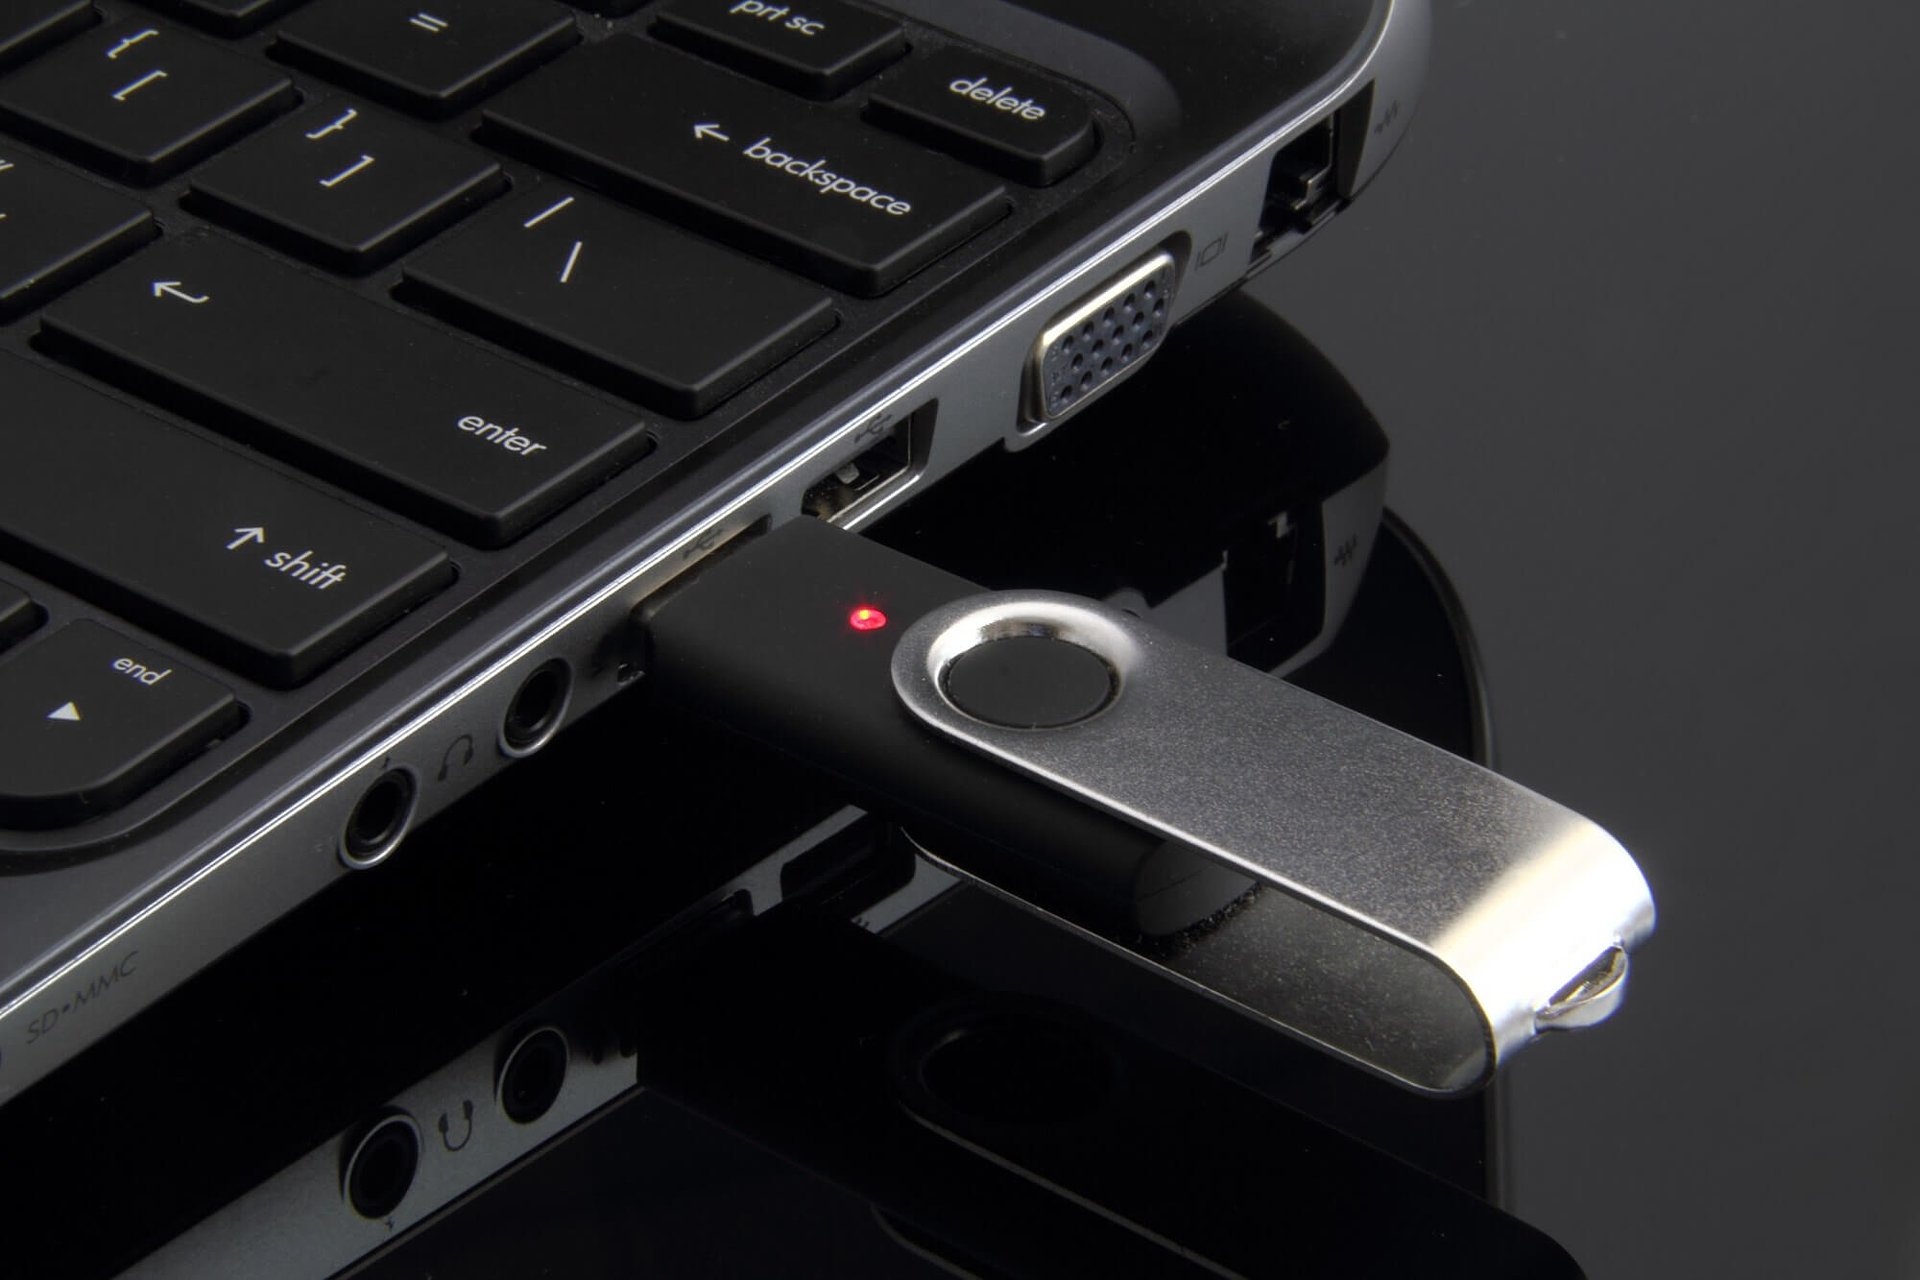
- Insert the USB drive containing the Gigabyte BIOS update file into any USB port on your PC.
- Restart your PC and when it is booting up enter the BIOS menu by pressing the Del key.

- Select Q-Flash menu.

- Choose Update BIOS option.

- Locate the BIOS update file and select it.

- Start the BIOS update process.
- Once the BIOS is updated, switch to the Save & Exit tab, and select Load optimized defaults.


This process of the Q-Flash method may look a bit complex, but in reality, it isn’t. All you need to do is follow the steps mentioned above carefully and you will be done with the Gigabyte BIOS update process without any issues.
Make sure that the USB drive onto which you have copied the BIOS update file is in FAT32 format.
- Microsoft Office Lens: A Powerful Tool for Capturing and Organizing Information
- Swap Left/Right Speaker in Realtek Audio Console [How to]
- How to Get DirectX 12 End-User Runtime and Fix Installation Issues
3. Use the Q-Flash+ update method
- Copy the BIOS update file downloaded from the Gigabyte official website to the FAT32 formatted USB drive.
- Insert the USB drive into the white USB port on your motherboard.

- Turn on the motherboard.
- The LED light next to the USB will flicker indicating the BIOS update is in progress.

- Once the update is complete, the LED will stop blinking.
- Start your PC and wait for the BIOS update process to complete.


This is another one of the Gigabyte exclusive ways of updating the BIOS. However, there are some other manufacturers that offer the same process of updating the BIOS. You should check with your manufacturer about that.
That is it from us in this guide. You can check out our guide that gives you a proper explanation of what is BIOS and everything that you need to know about BIOS.
We have also listed 3 different ways to access the BIOS menu on your computer that will be beneficial to update the BIOS. In case you come across any issues, you can read our guide to fixing the BIOS corruption issue on a Windows PC.
Feel free to let us know in the comments below, which one of the above methods you used to update the Gigabyte BIOS.
Sagar Naresh
Sagar is a web developer and technology journalist. Currently associated with WindowsReport and SamMobile. When not writing, he is either at the gym sweating it out or playing country music on his guitar.
He is an avid traveler and has been to 15 countries, going to more places soon. TRAVEL and WORK is his mantra for a peaceful life.
Содержание
- Предупреждение об использовании
- Предварительная подготовка носителя
- Обновление на материнской плате «GIGABYTE» #1
- Обновление на материнской плате «GIGABYTE» #2
- Другие руководства
Предупреждение об использовании
Внимание! Данное руководство может содержать советы, при выполнении которых устройство может быть повреждено в различном роде на уровне неисправной работы микропрограмм «BIOS».
Ни в коем случае не выключайте устройство в процессе обновления версии «BIOS». Если устройство является ноутбуком, то подключите его к сети при помощи оригинального адаптера и кабеля питания.
Компания «EXBO» не несёт ответственности за действия пользователя в соответствии с пунктом 1.7 правил центра поддержки и призывает пользователей быть внимательными при обновлении «BIOS».
Предварительная подготовка носителя
1. Вставьте в специальный порт устройство «USB-флэш-накопитель» объёмом минимум 1 гигабайт.
2. Откройте «Проводник» операционной системы «Windows». Далее откройте раздел «Этот компьютер».
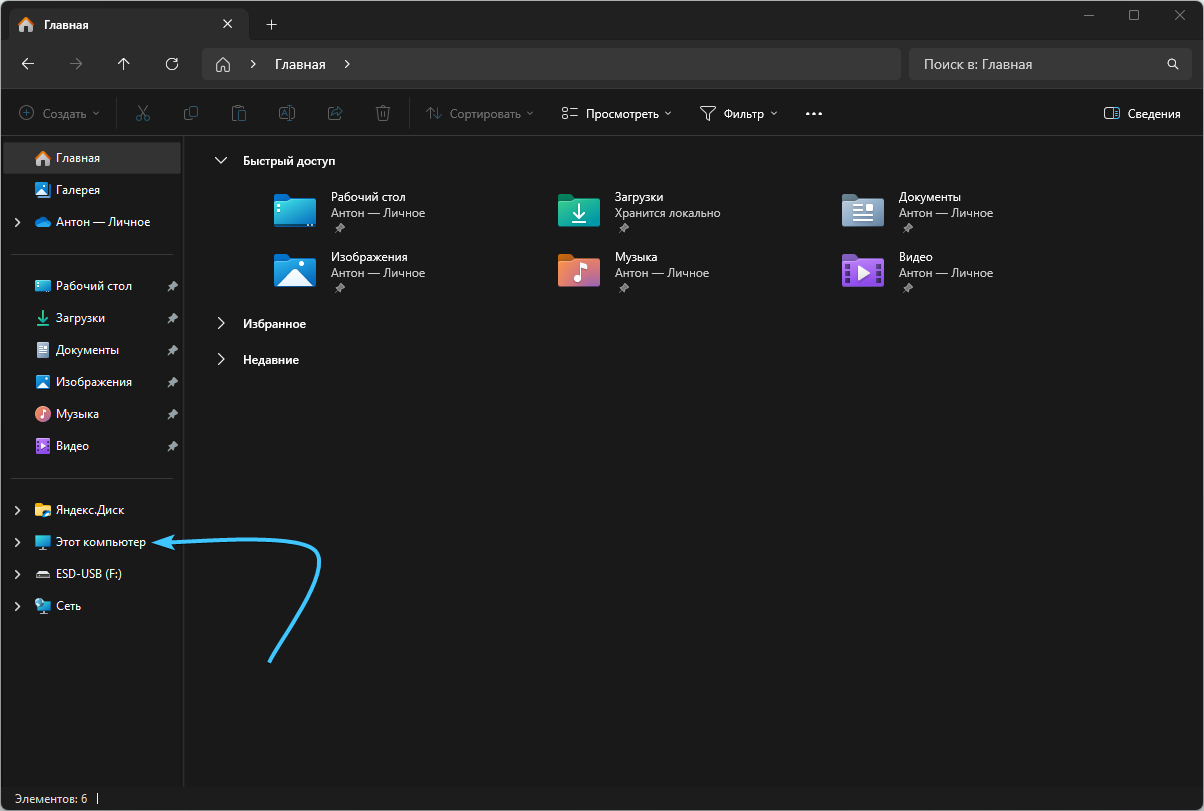
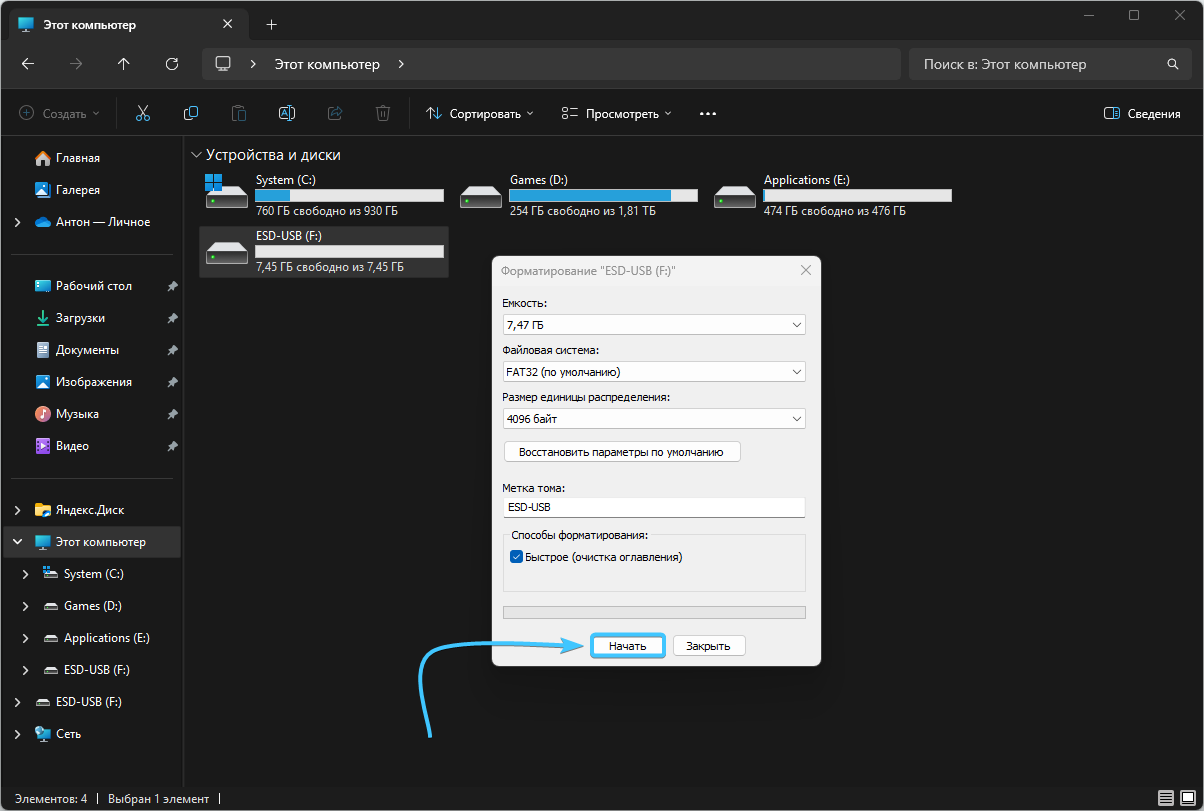
3. Отыщите накопитель и нажмите по нему правой кнопкой мыши. Нажмите кнопку «Форматировать».
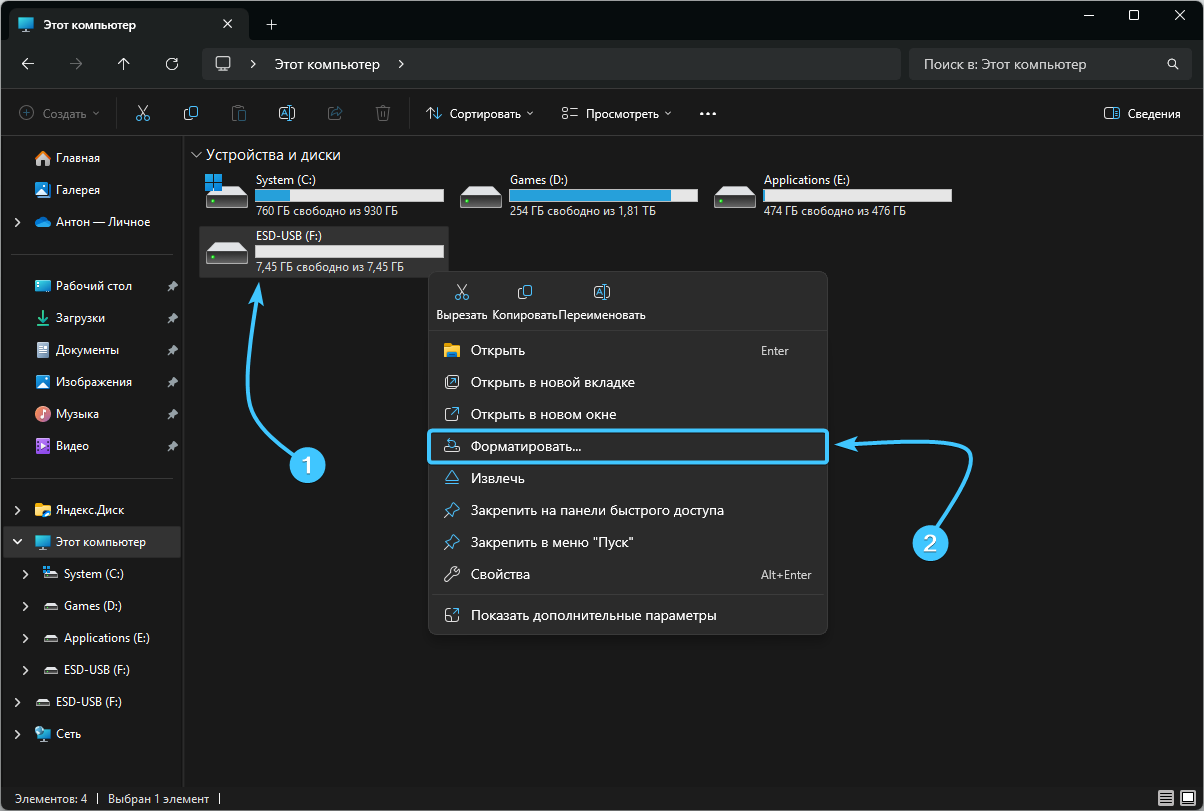
4. Появится новое окно. Какие-либо параметры менять не нужно. Просто нажмите кнопку «Начать».
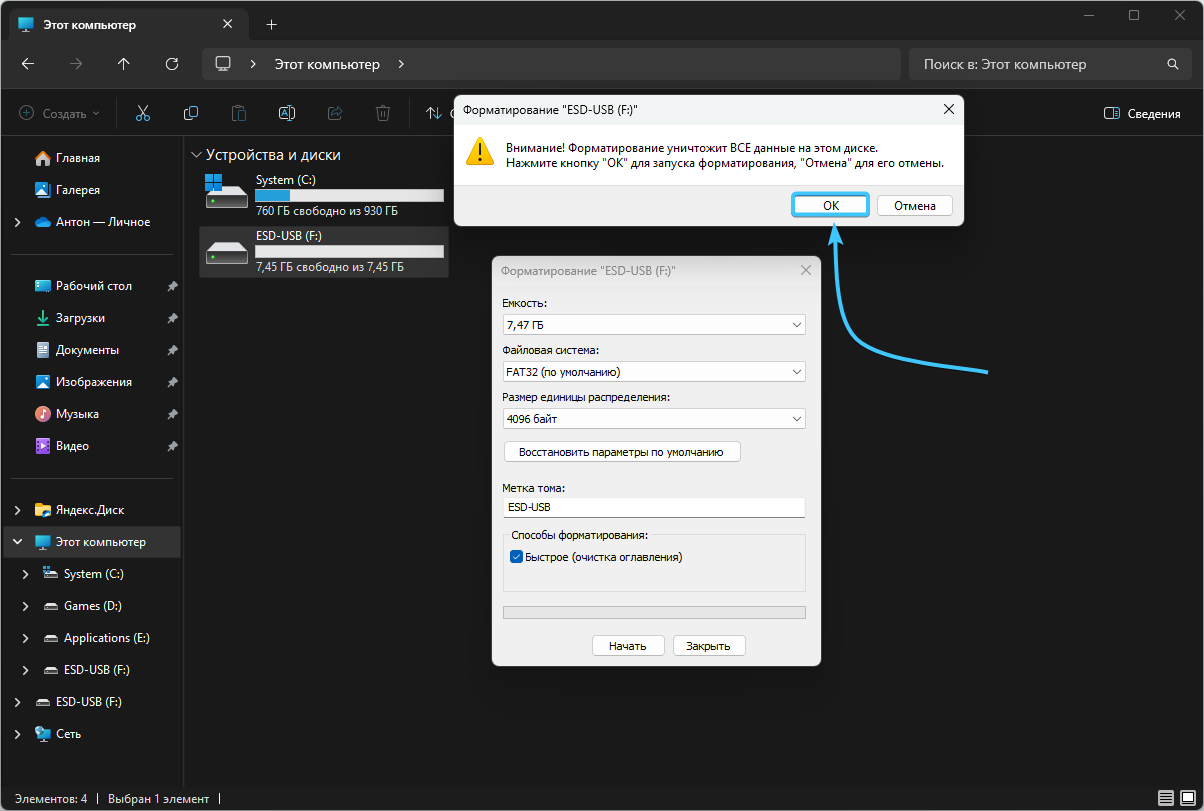
5. В появившемся окне нажмите кнопку «ОК» и дождитесь завершения процесса форматирования.
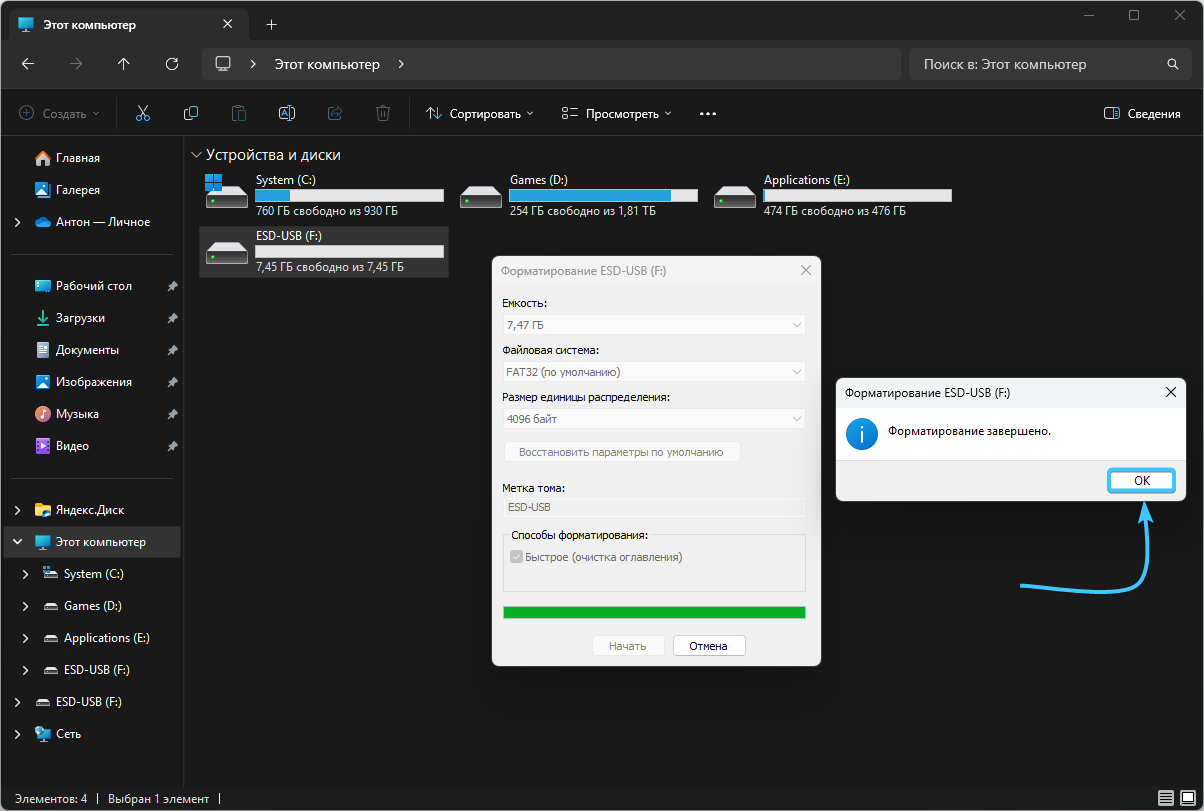
6. Появится уведомление о завершении процесса форматирования. Нажмите кнопку «ОК».
Обновление на материнской плате «GIGABYTE» #1
1. Определите модель материнской платы или же ноутбука. Откройте официальный сайт устройства.
2. Откройте категорию, связанную с поддержкой. Далее раздел, связанный с версиями «BIOS».
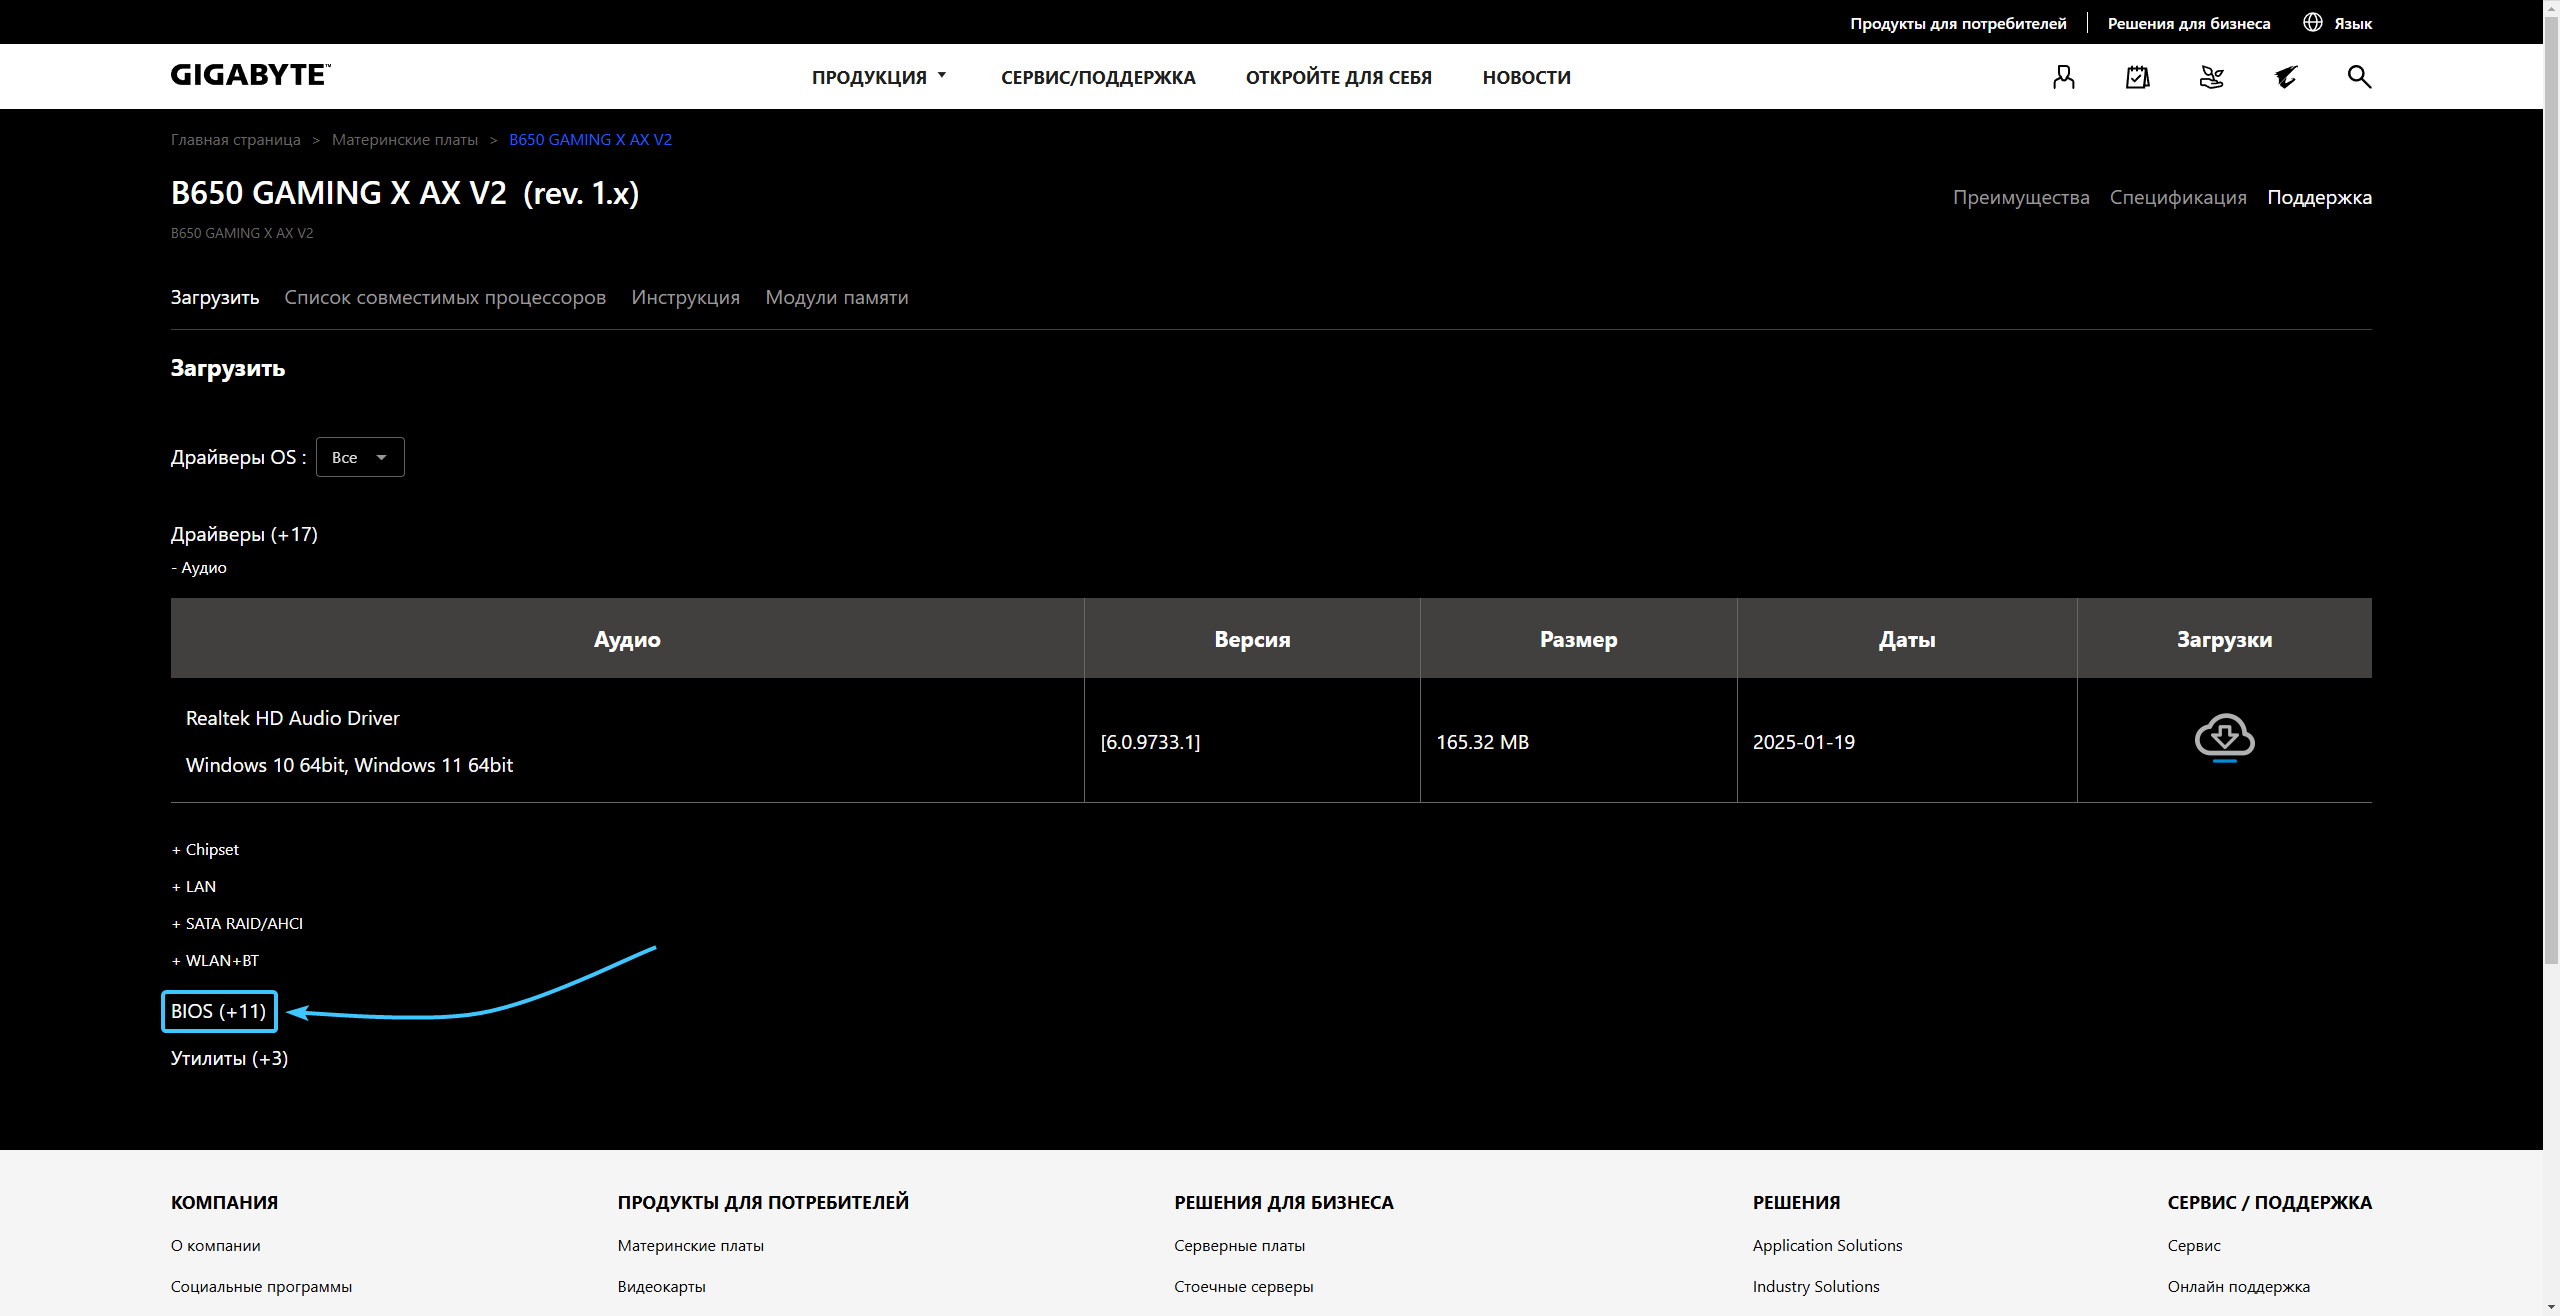
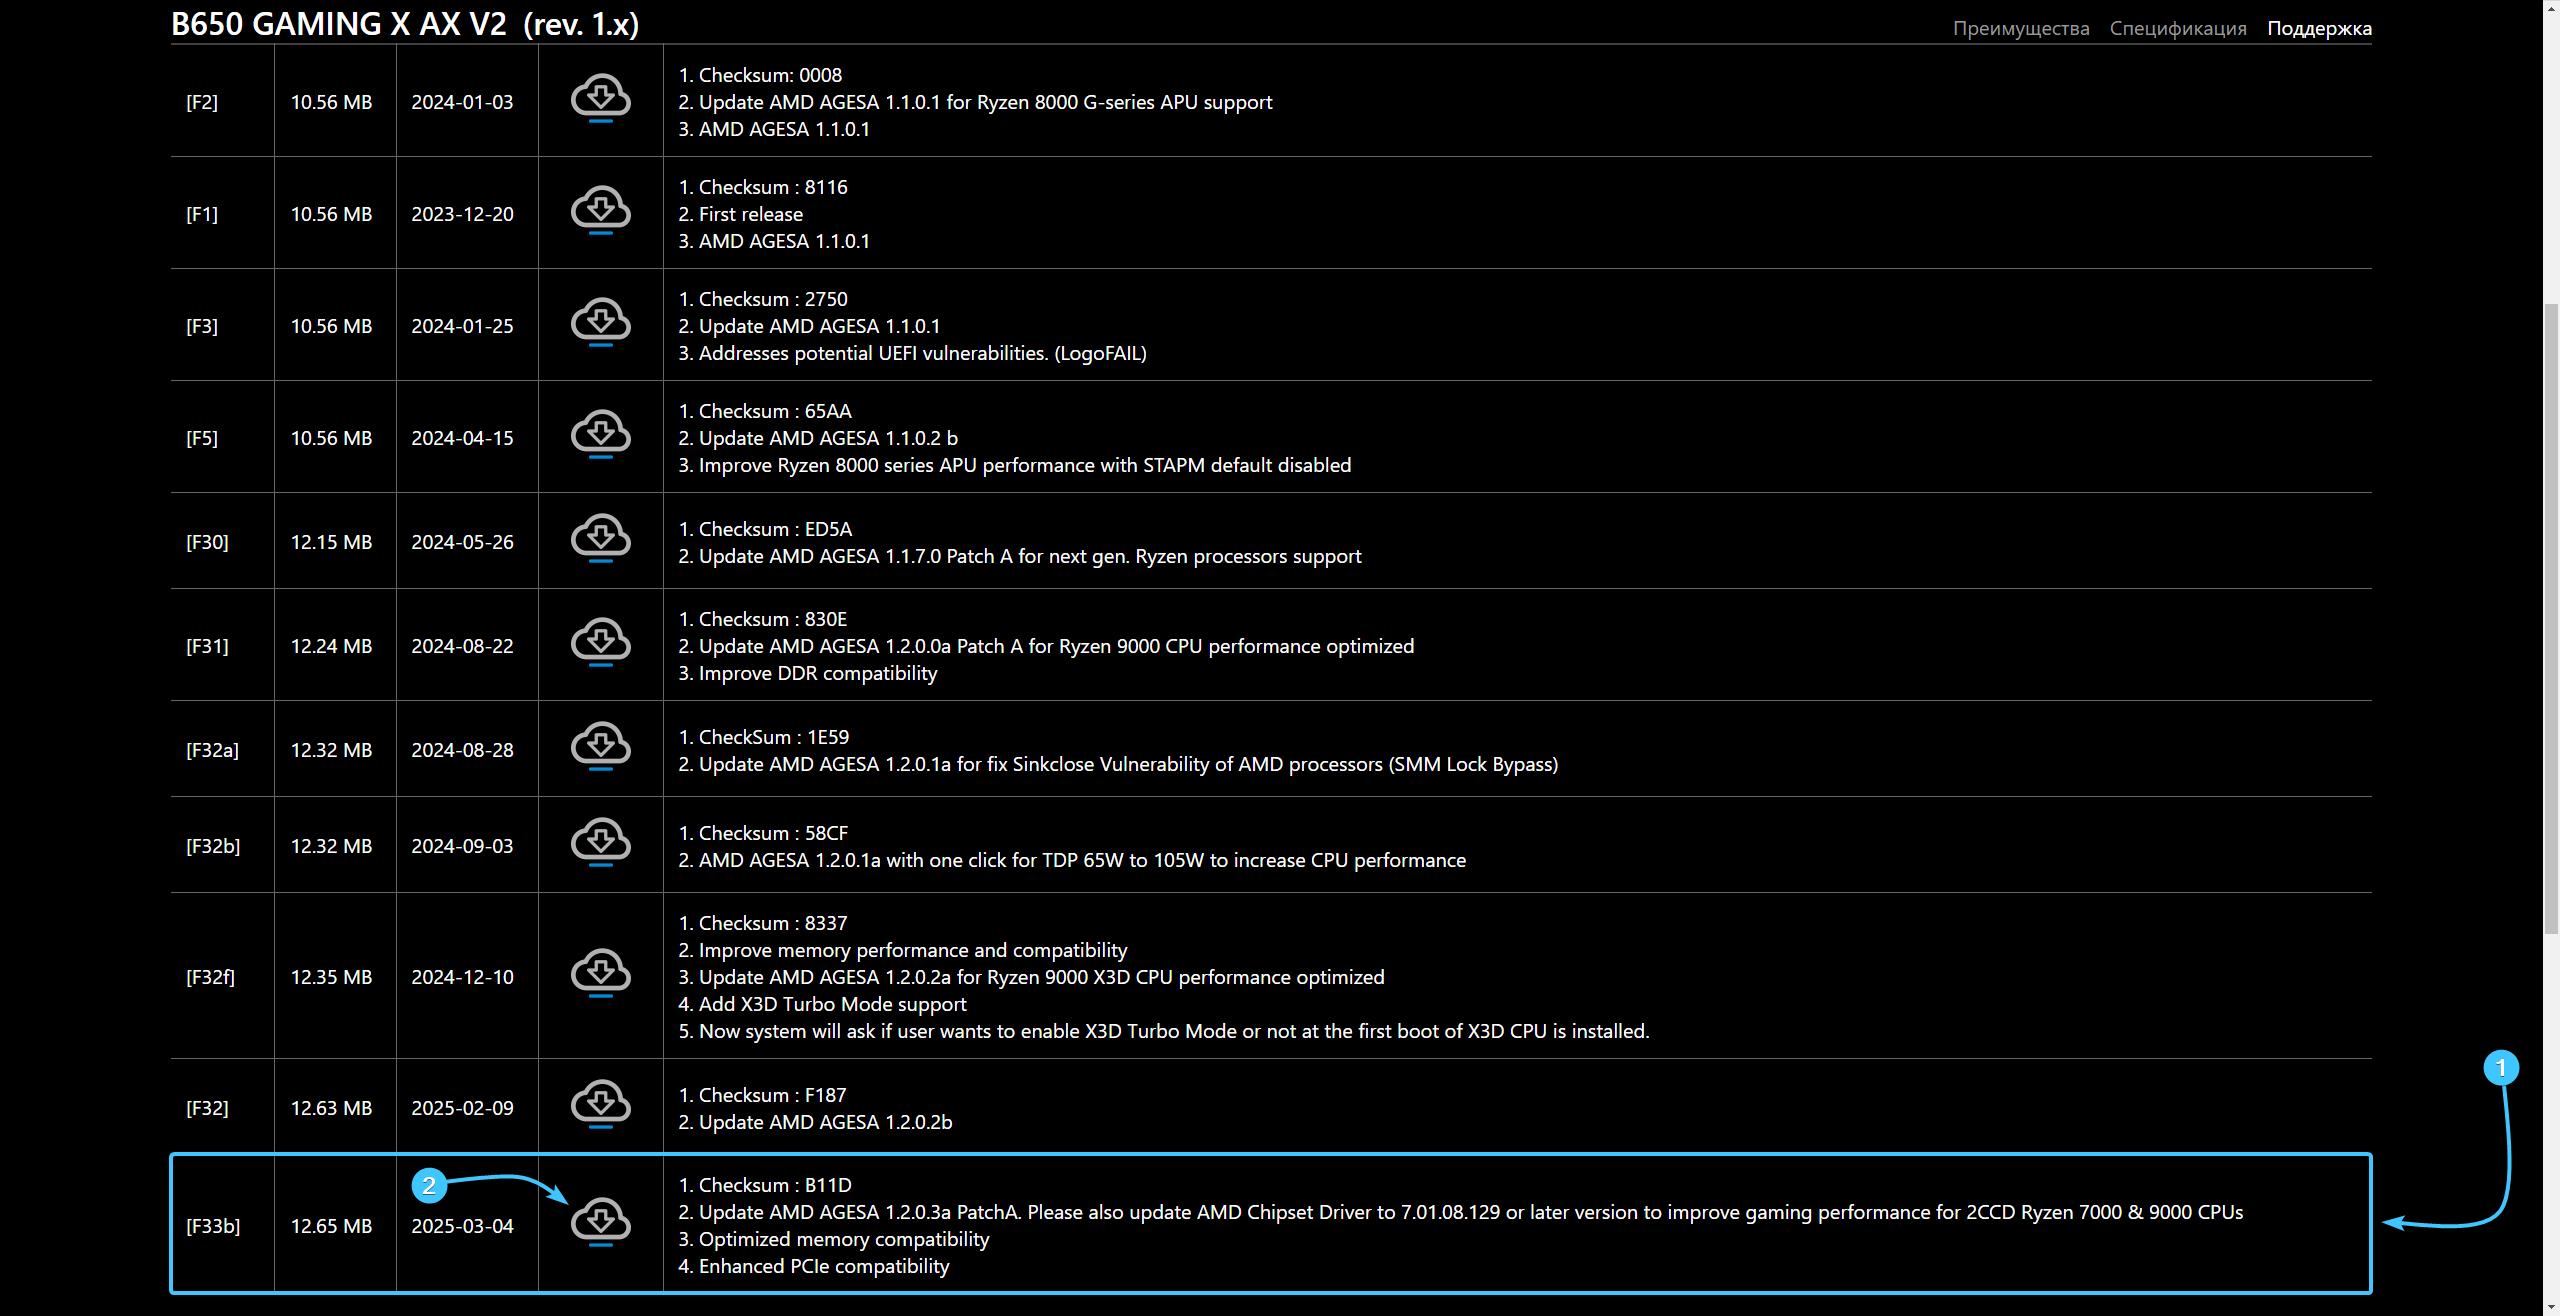
3. Находясь в данном разделе, отыщите (1) и скачайте (2) последнюю версию «BIOS» для устройства.
4. Откройте архив с «BIOS» (1) и перенесите файлы на рабочий стол или другое удобное место (2).
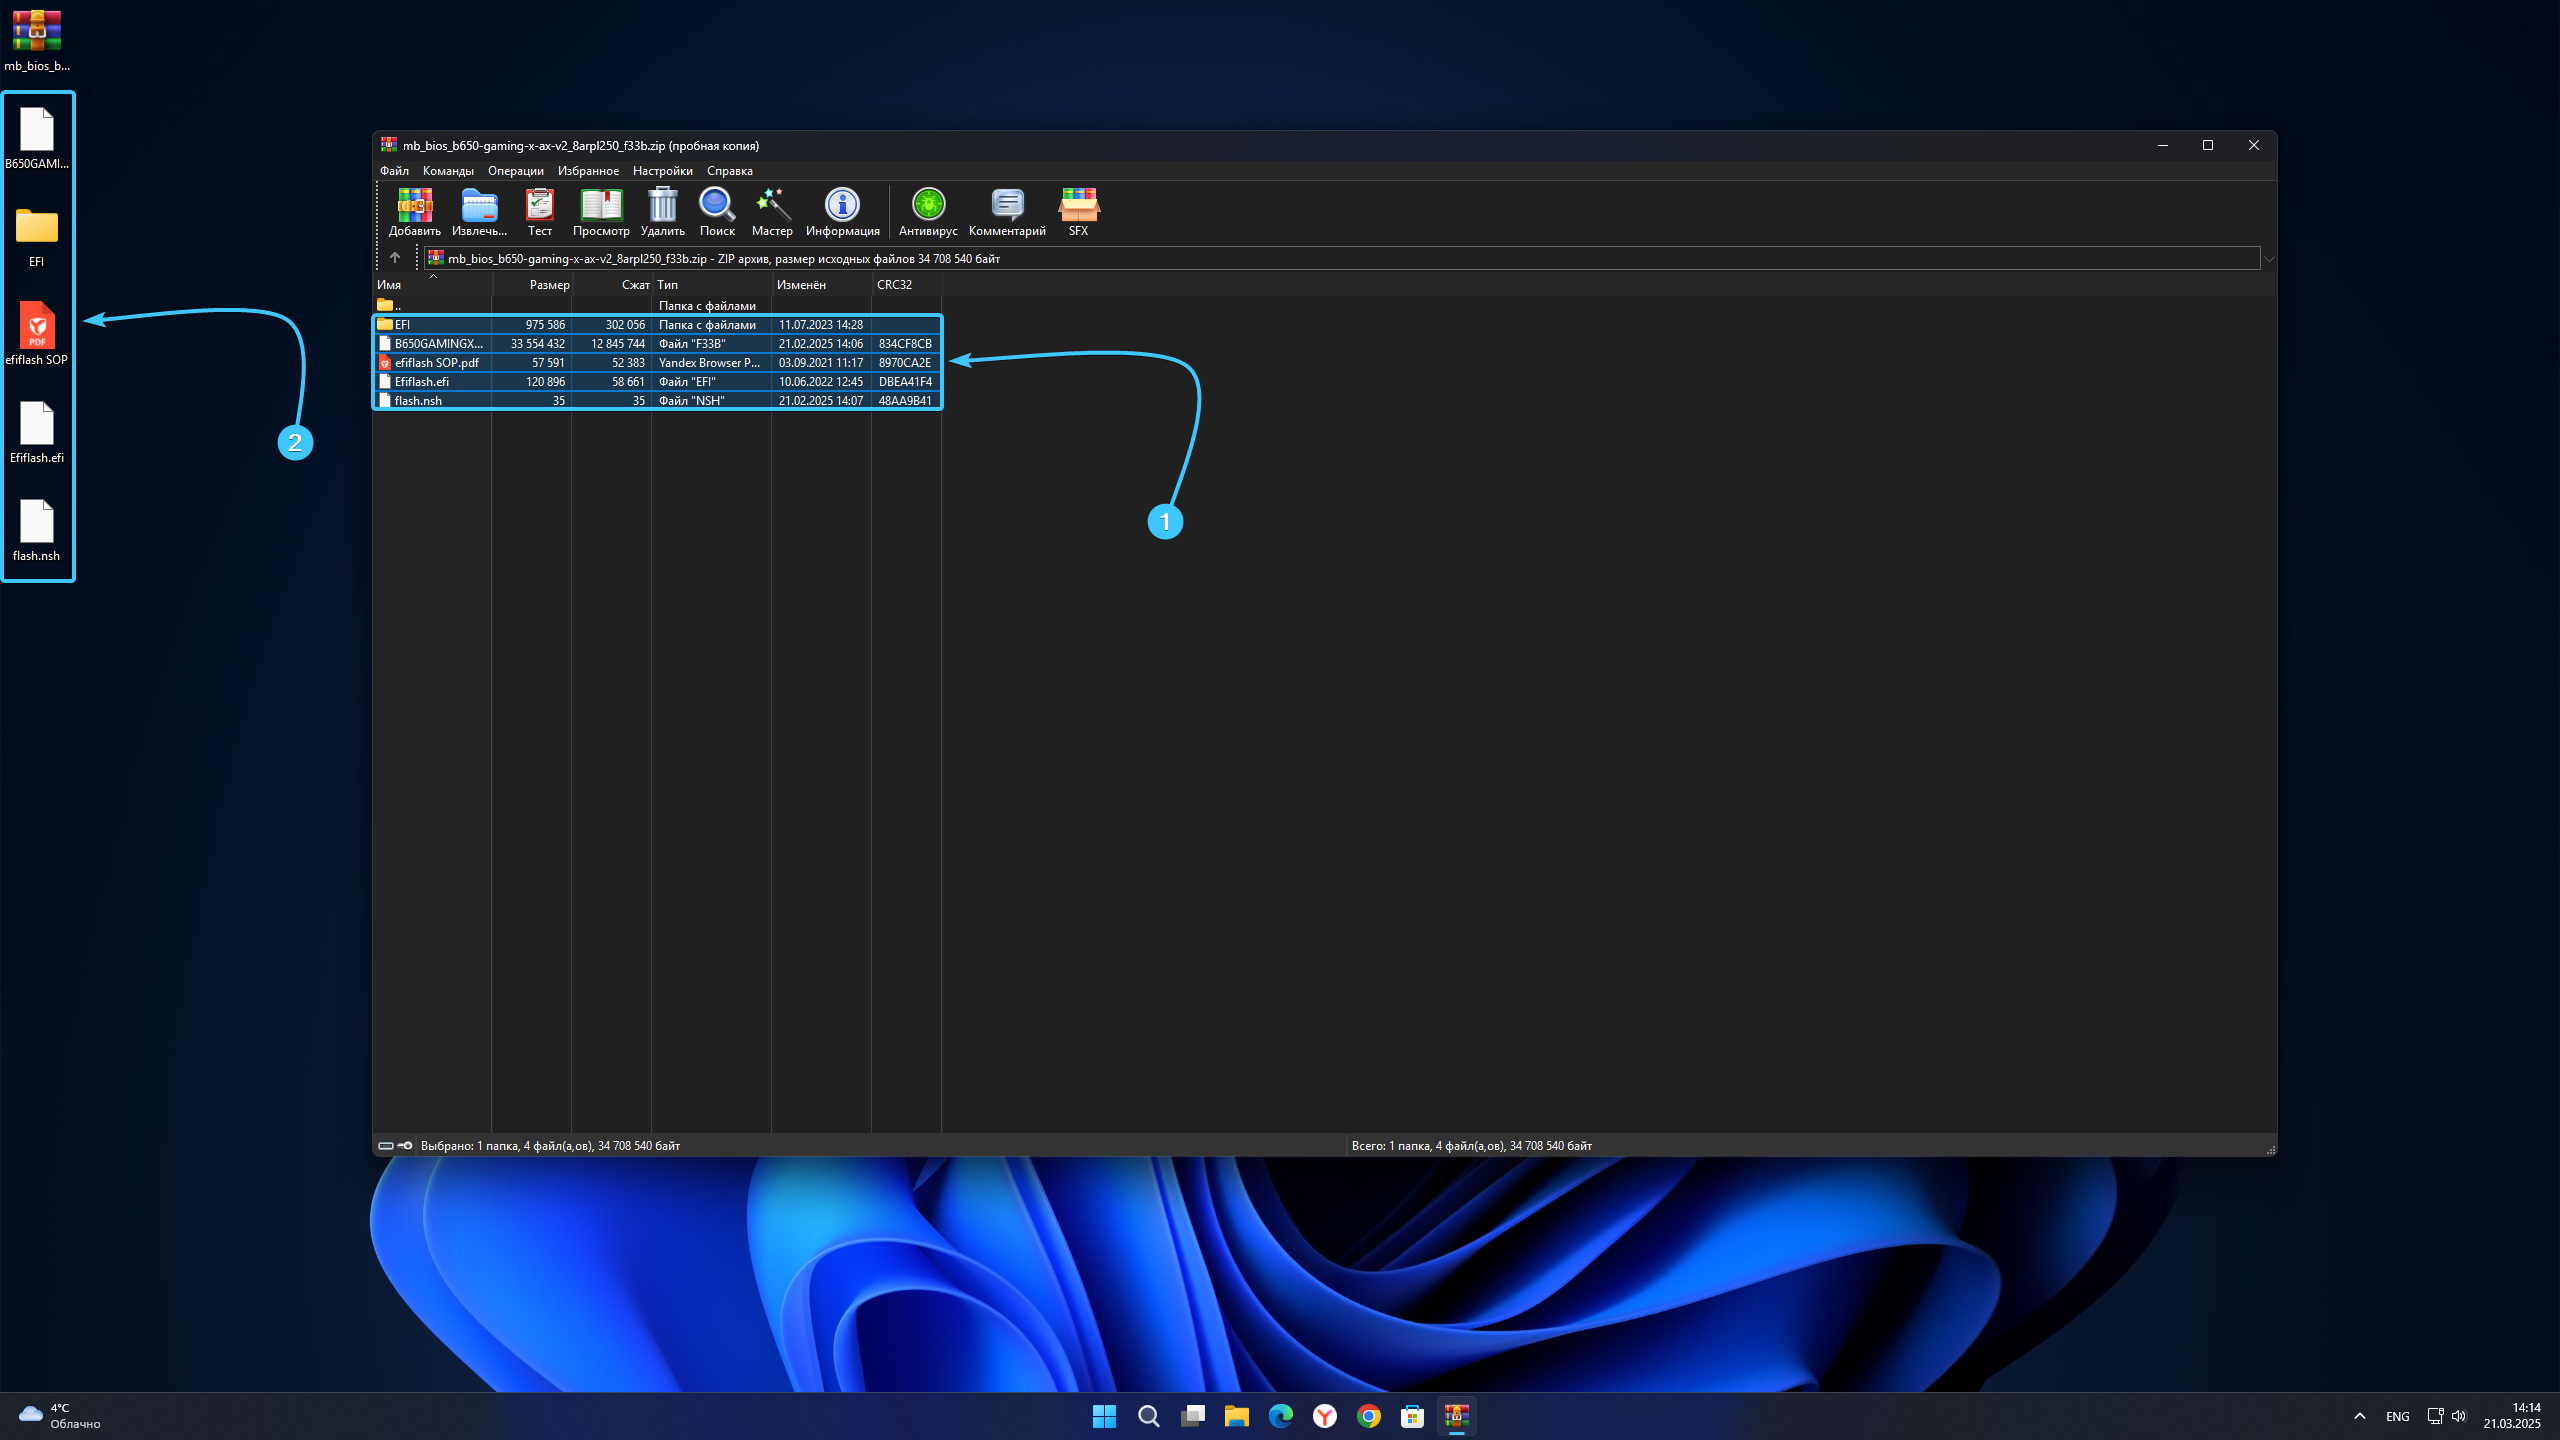
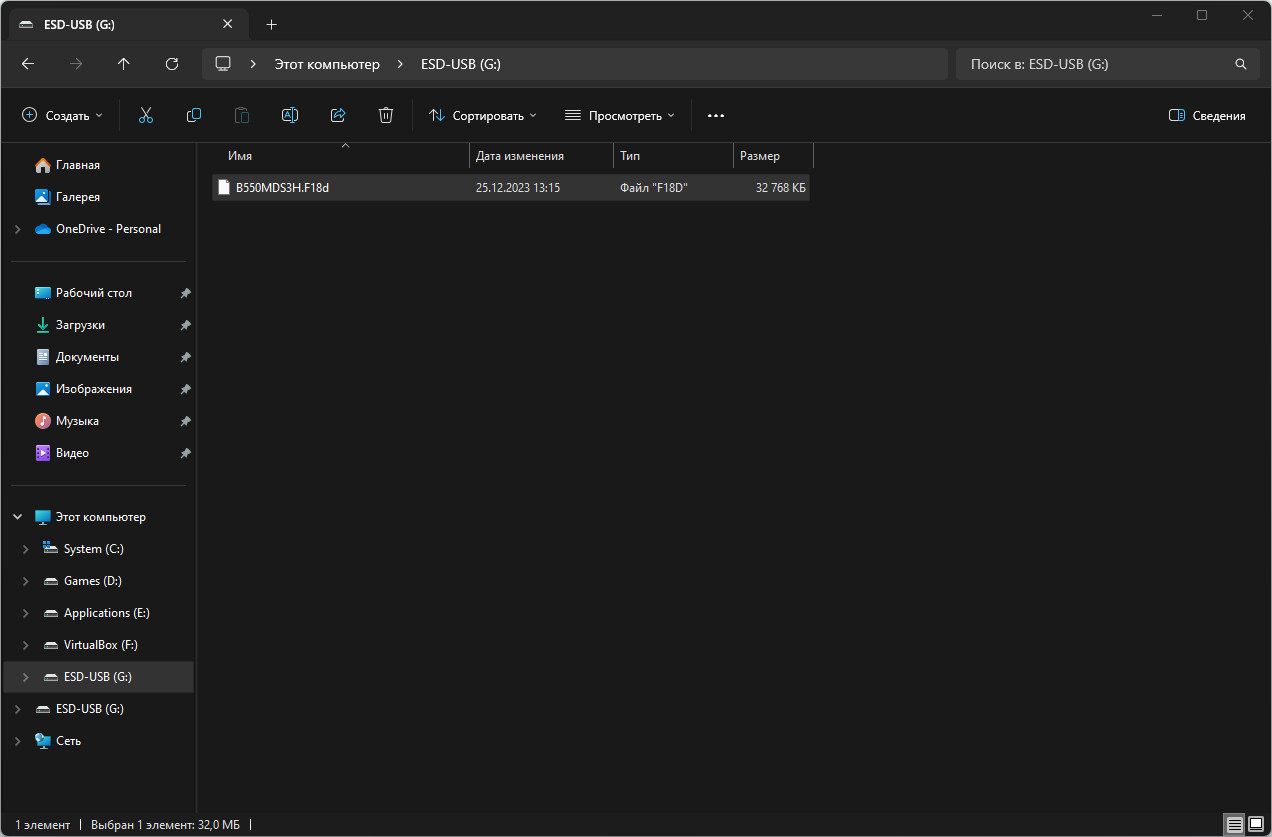
5. Перенесите все файлы «BIOS» на предварительно подготовленный установочный носитель.
6. Перезагрузите устройство. При загрузке нажимайте соответствующую клавишу для открытия «BIOS».
7. В списке снизу нажмите кнопку «Q-Flash». В появившемся уведомлении нажмите кнопку «Да».
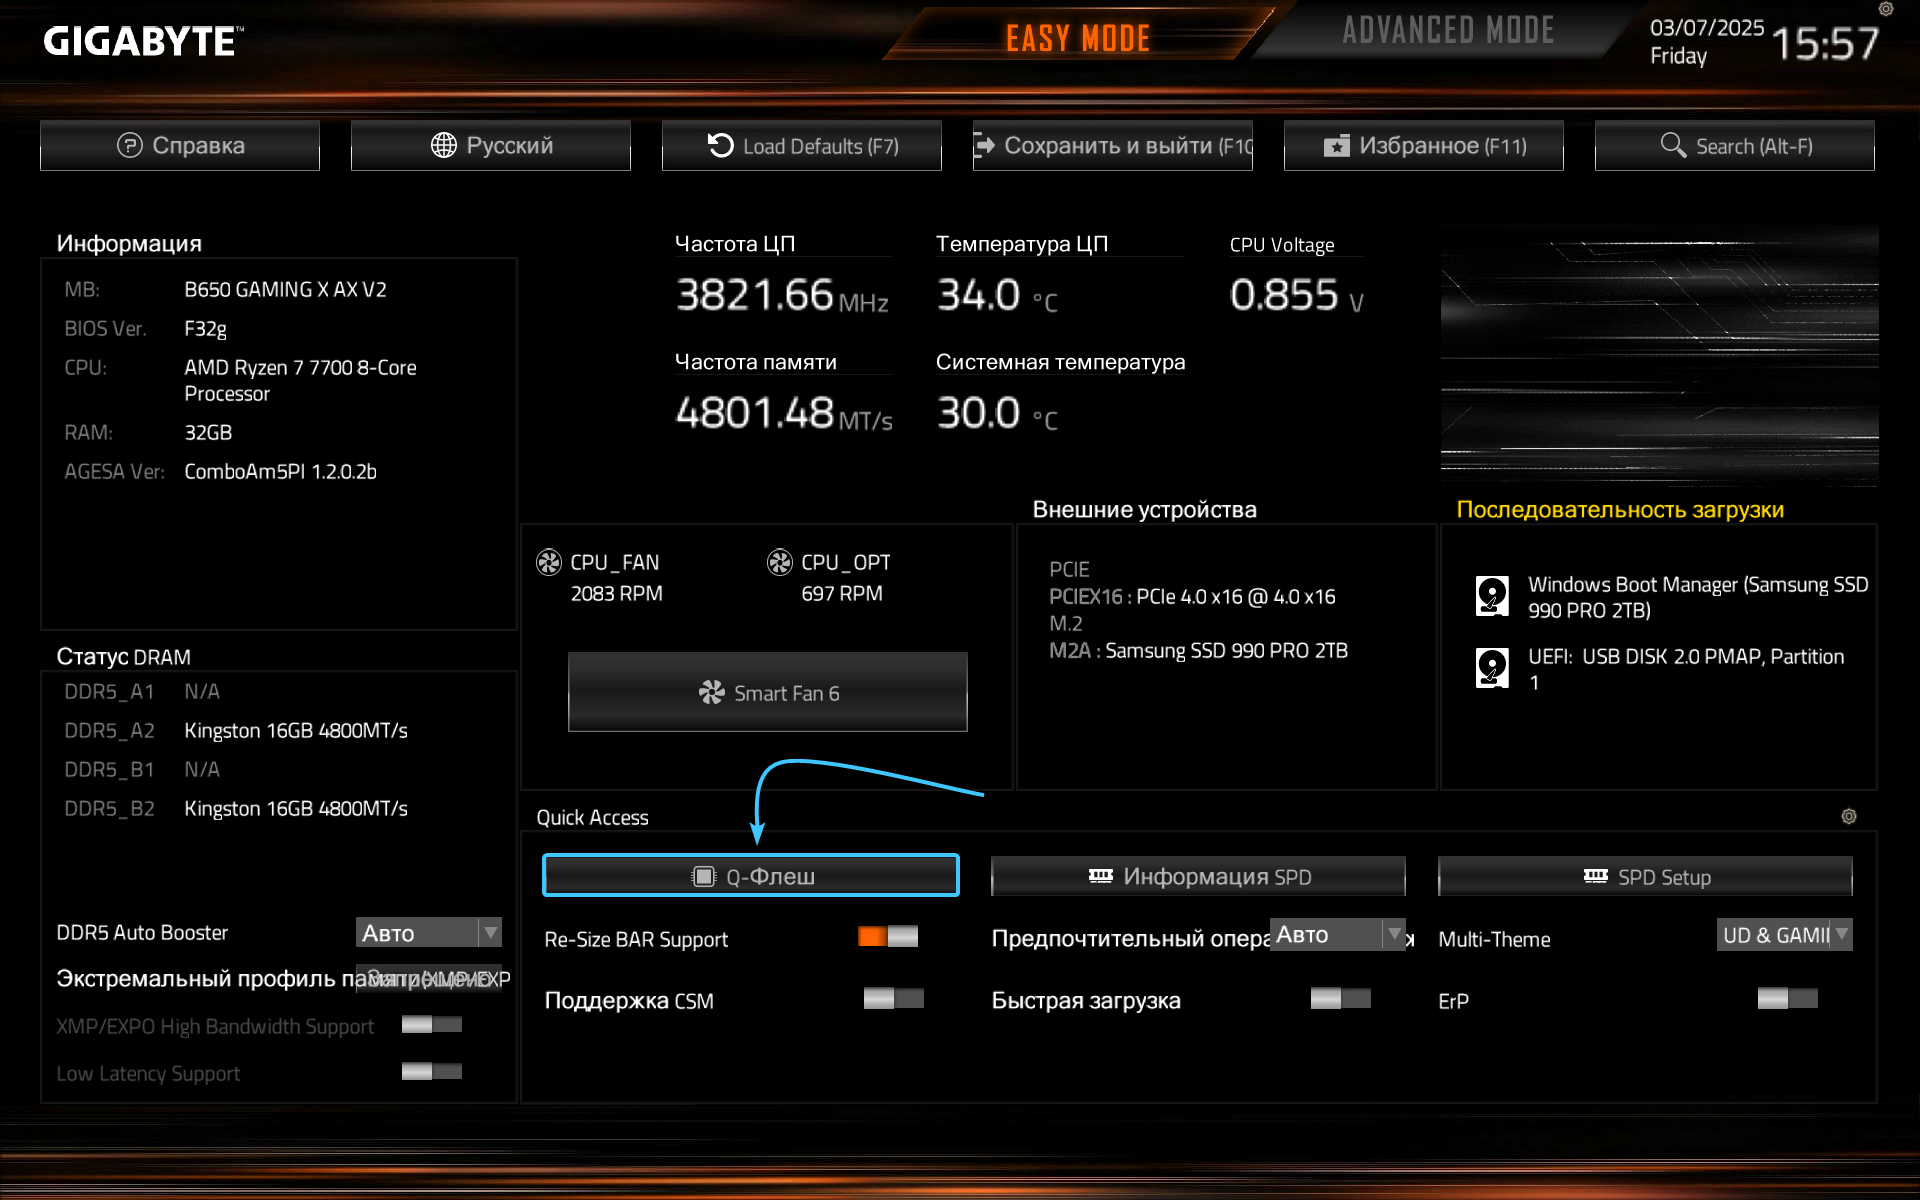
8. Откроется компонент «Q-Flash». Нажмите на вариант «Update BIOS» для перехода на другой этап.
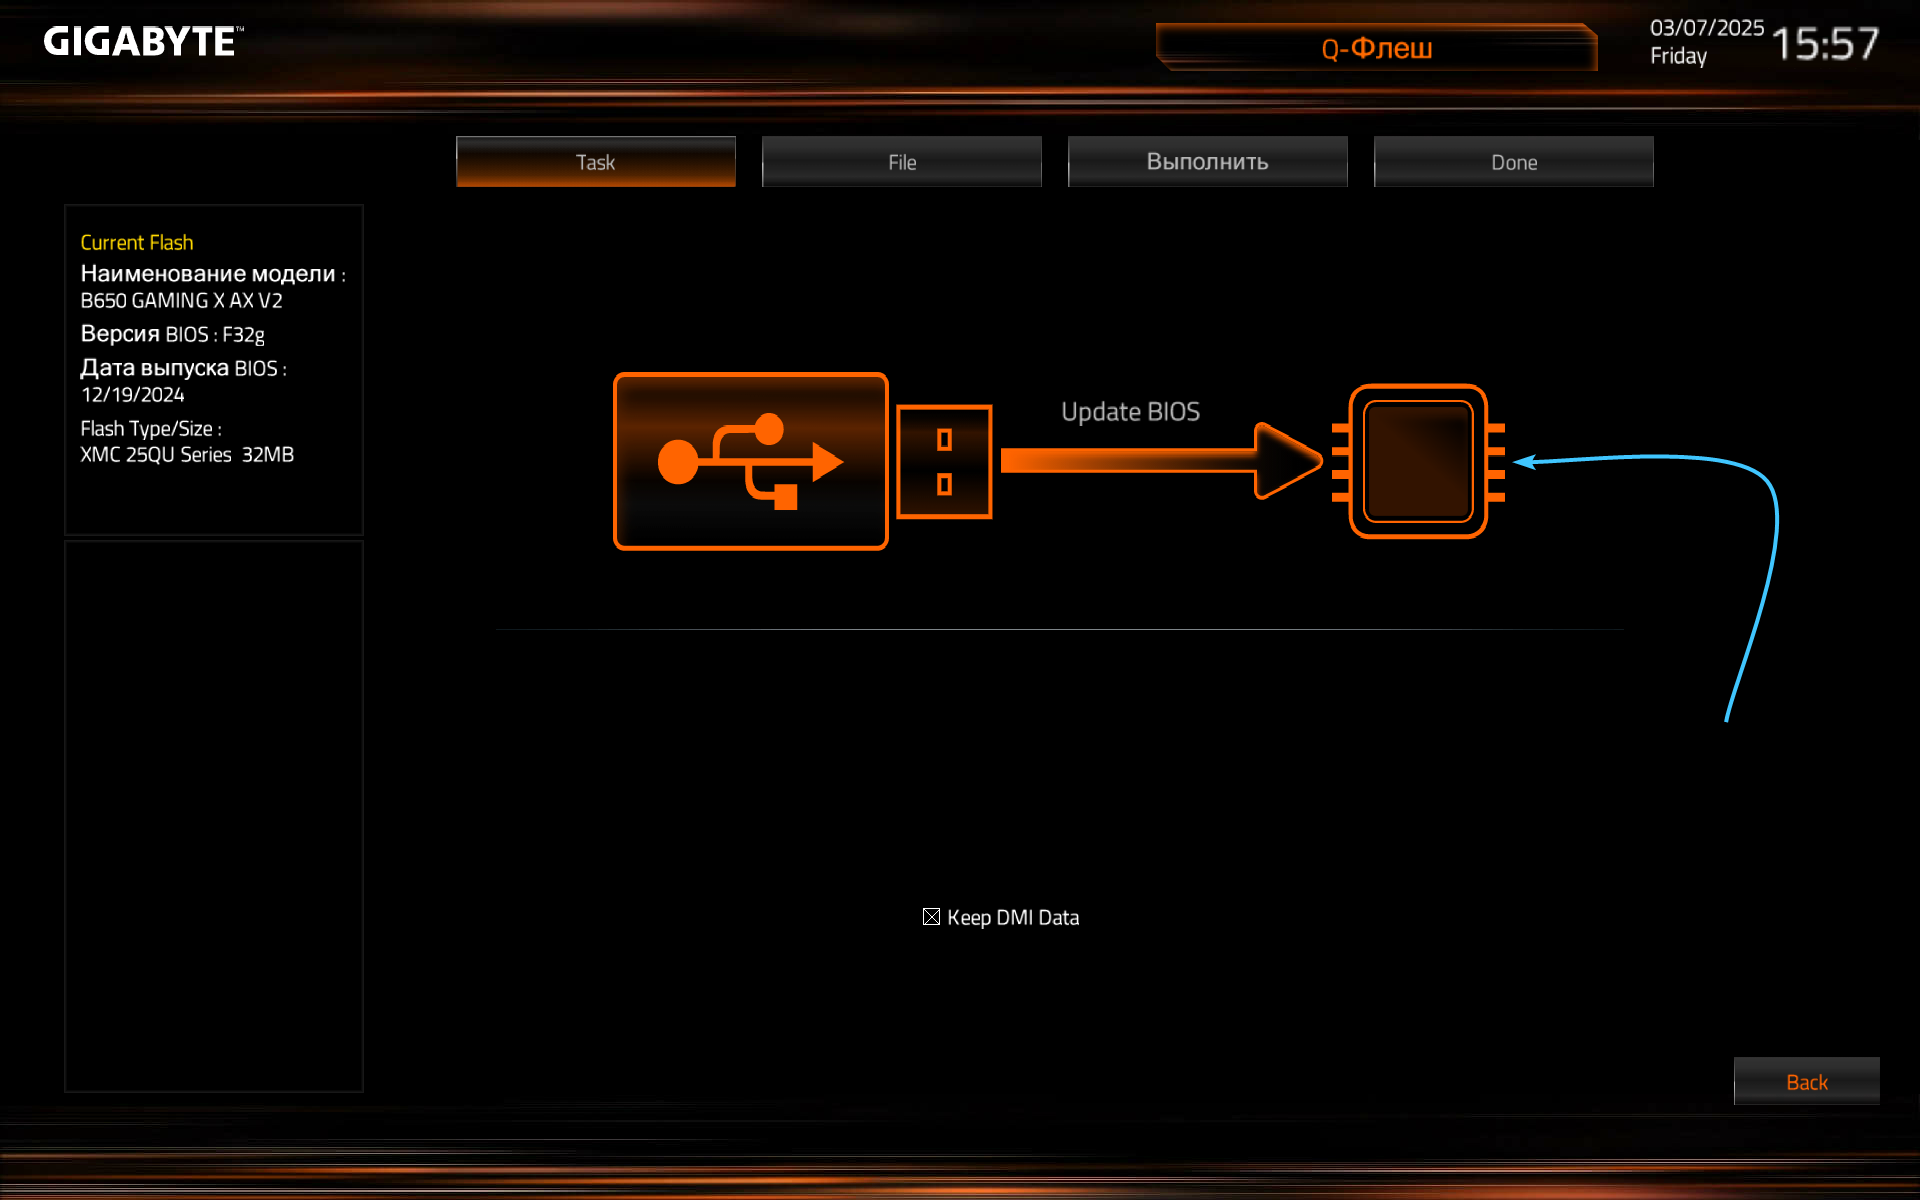
9. Выберите носитель с файлом (1). Справа нажмите на сам файл (2), после чего нажмите на стрелочку (3).
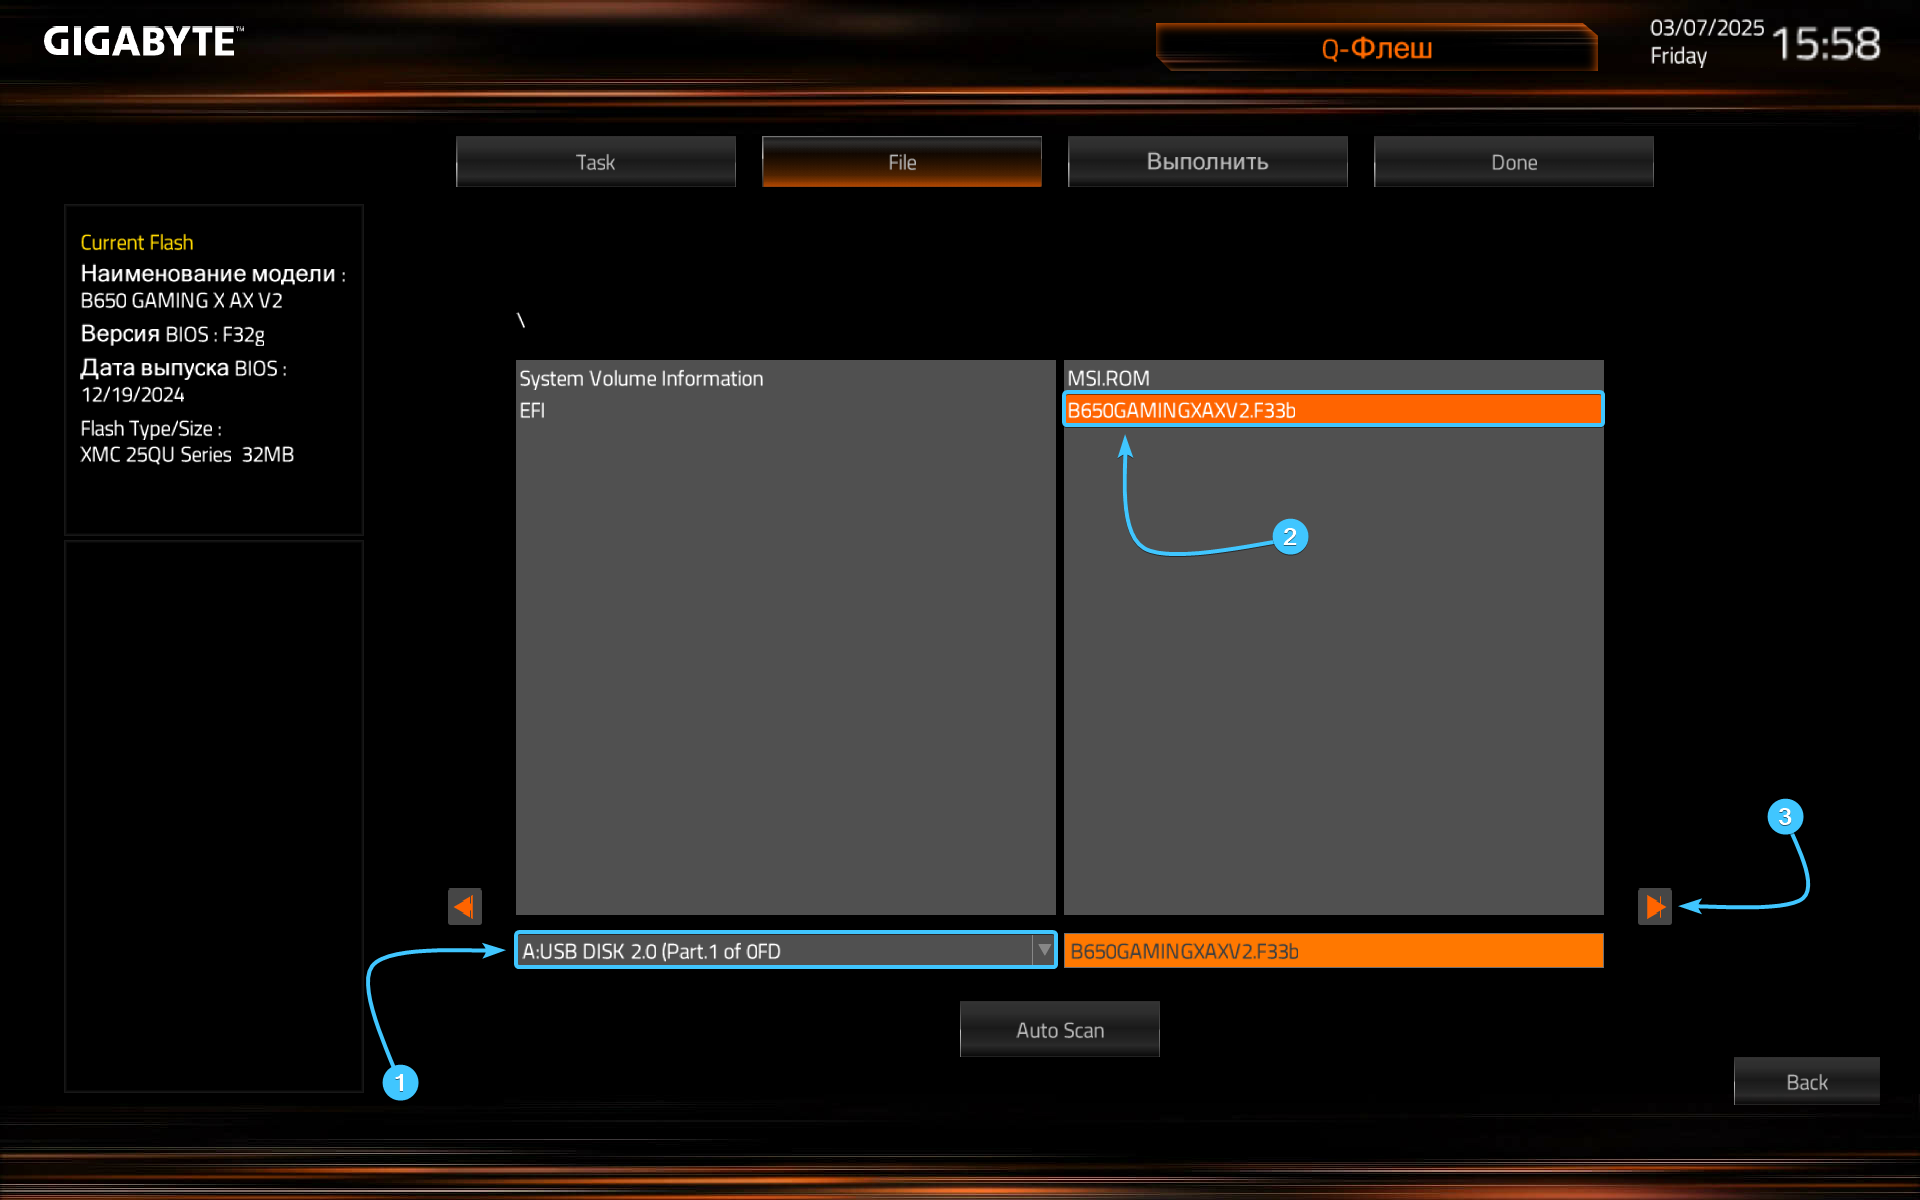
10. Появится предупреждение об обновлении «BIOS». Нажмите кнопку «Yes» для продолжения.

11. Начнётся процесс верификации файла новой версии «BIOS». Дождитесь его полного завершения.
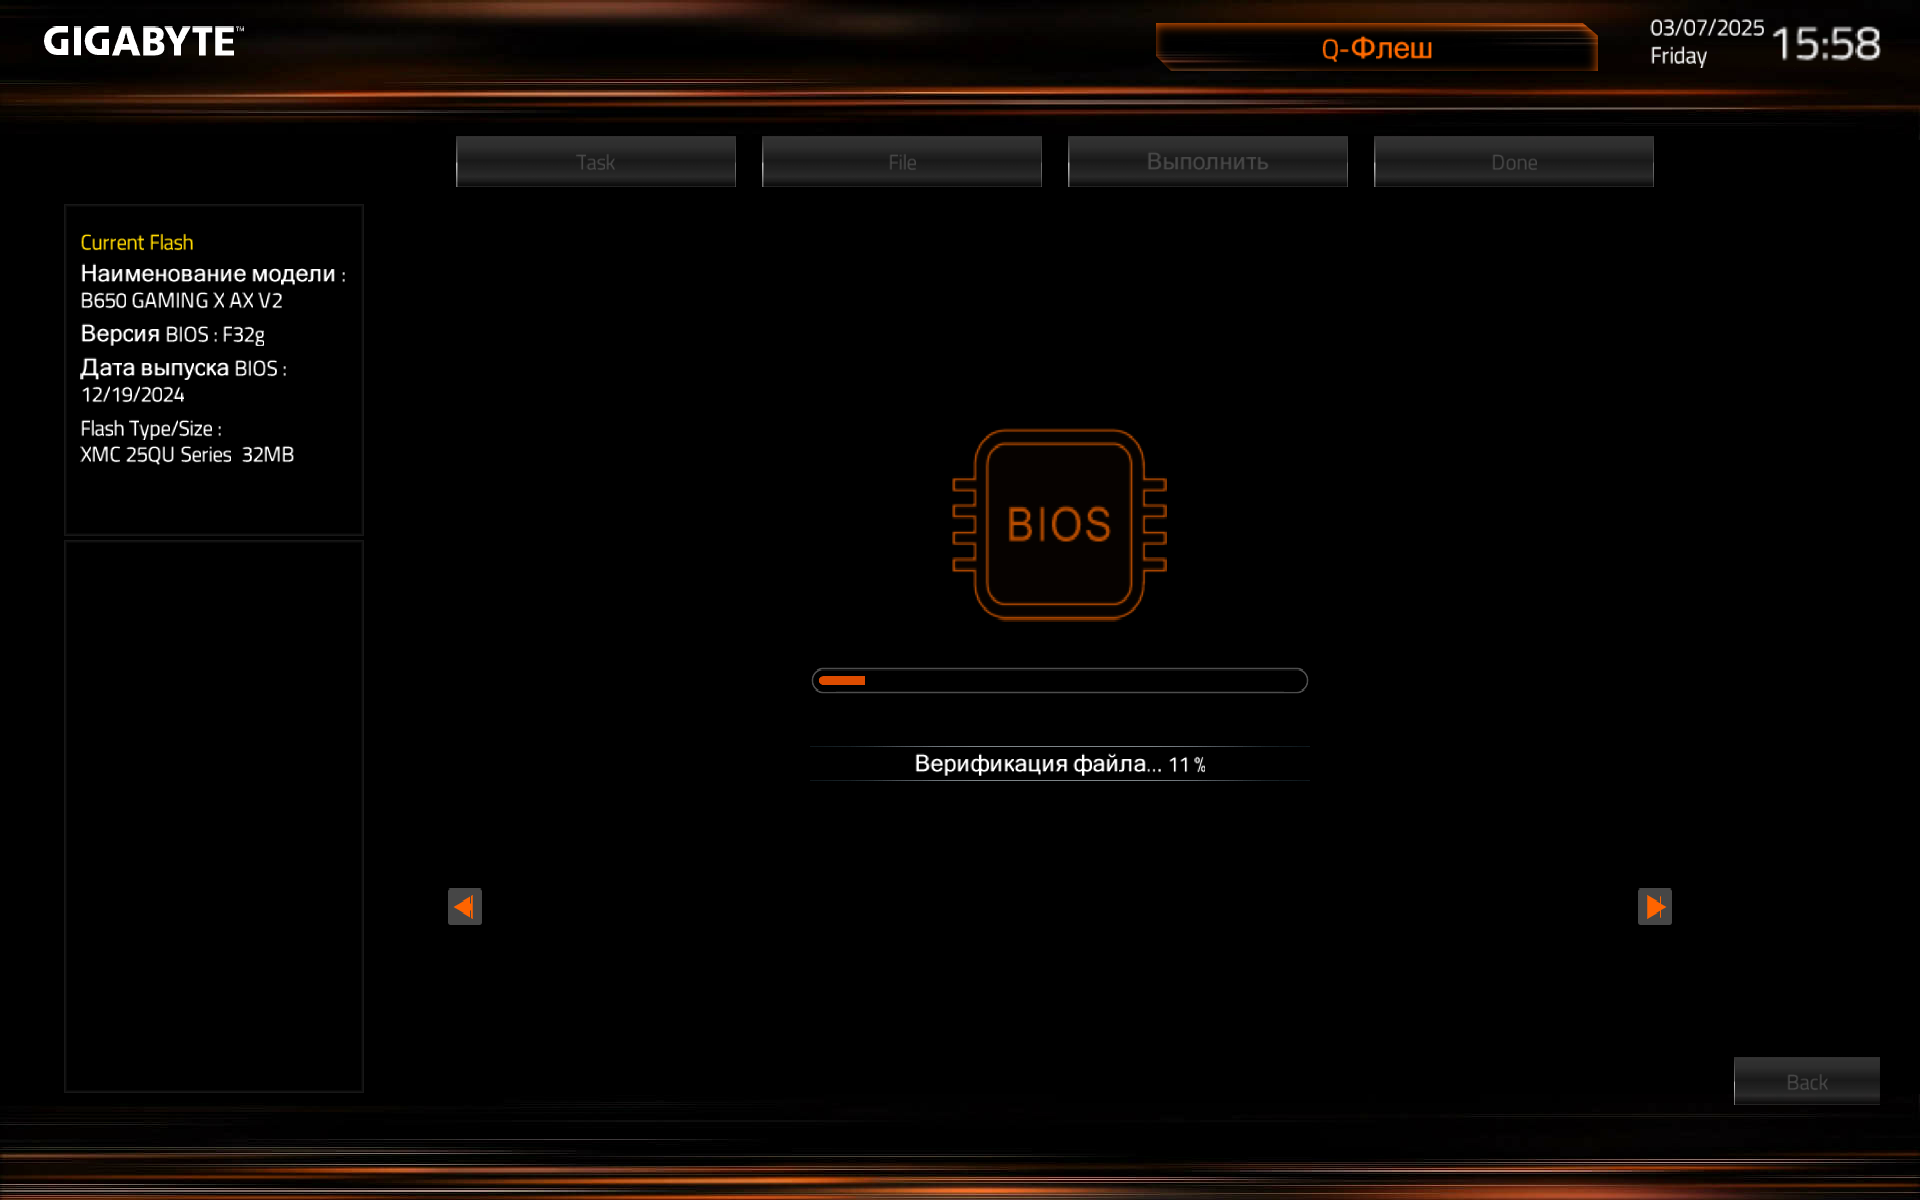
12. Дождитесь завершения процесса обновления «BIOS». После этого запустите операционную систему.

Обновление на материнской плате «GIGABYTE» #2
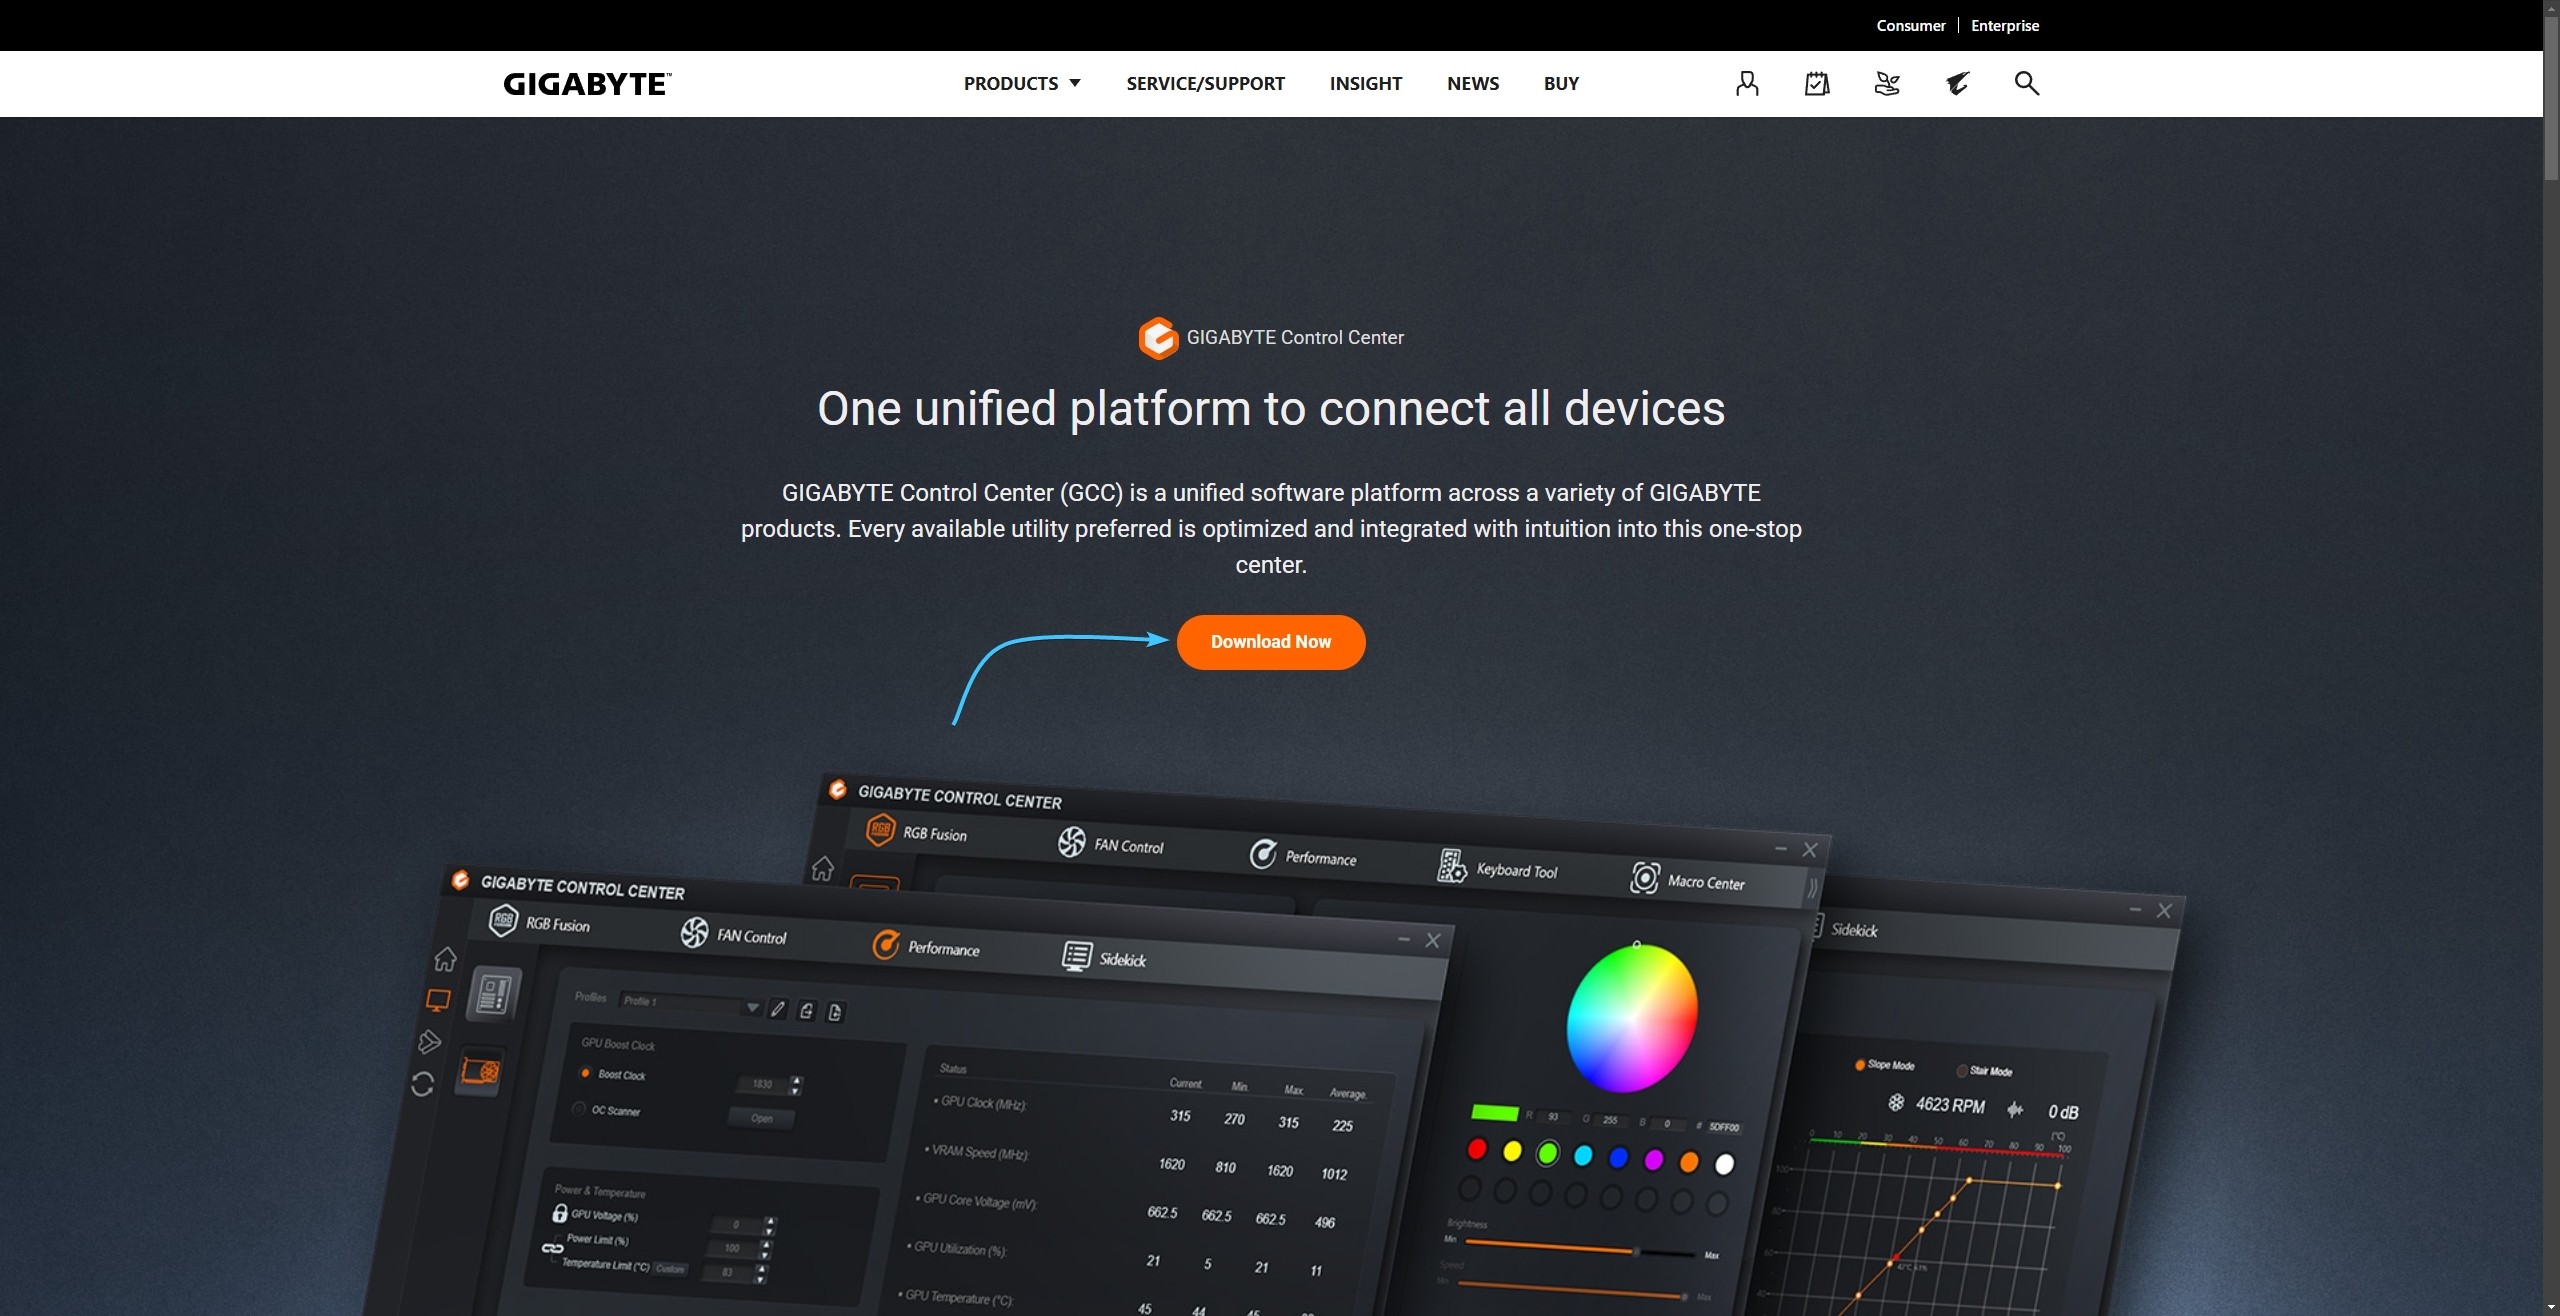
1. Перейдите на официальный сайт «GIGABYTE Control Center» и нажмите кнопку «Download Now».
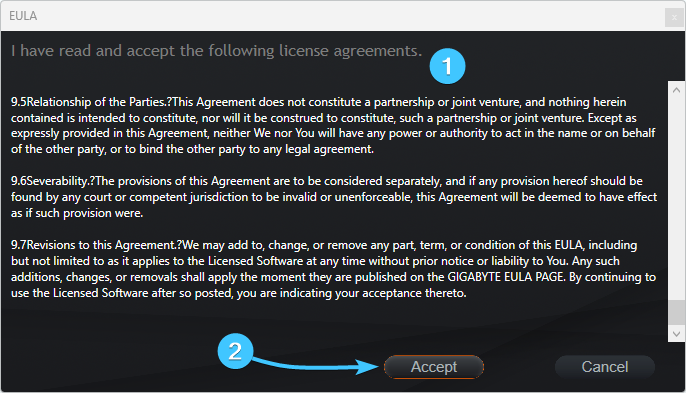
2. Установите приложение на устройство. Ознакомьтесь с соглашением (1) и нажмите кнопку «Accept» (2).
3. Появится интерфейс «GIGABYTE Control Center». Слева откройте раздел с изображением двух стрелок.
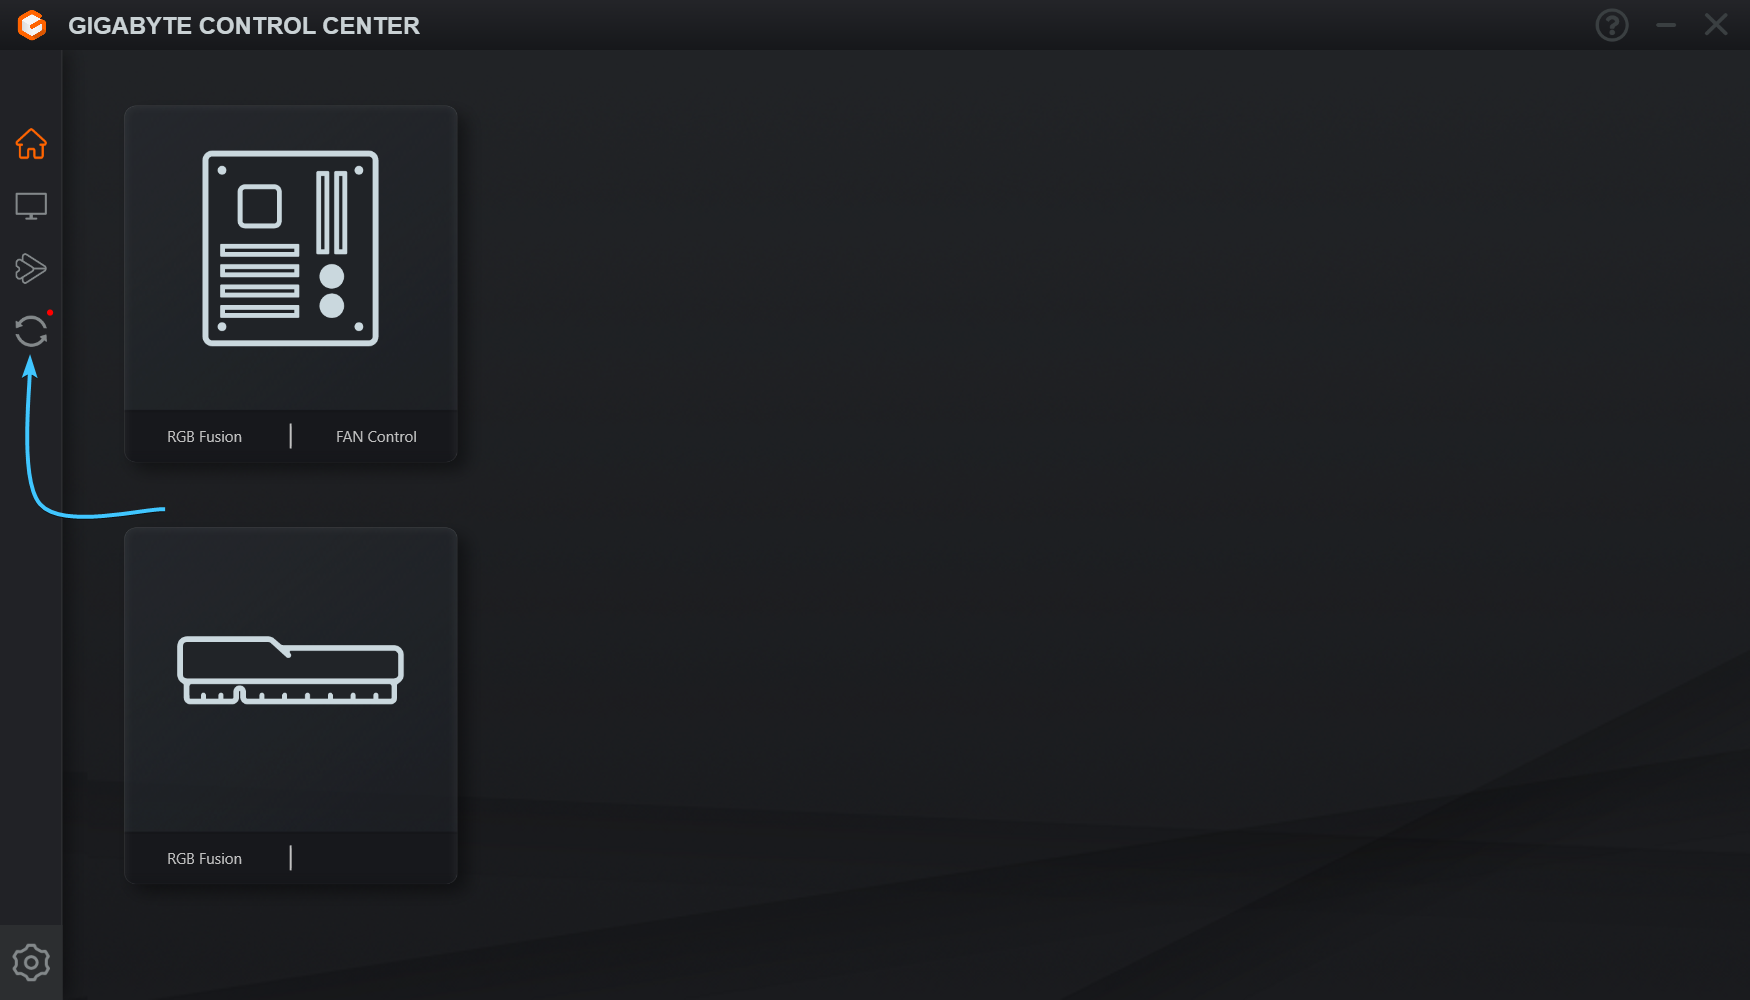
4. В данном разделе откройте вкладку «MB BIOS», которая располагается в верху интерфейса.
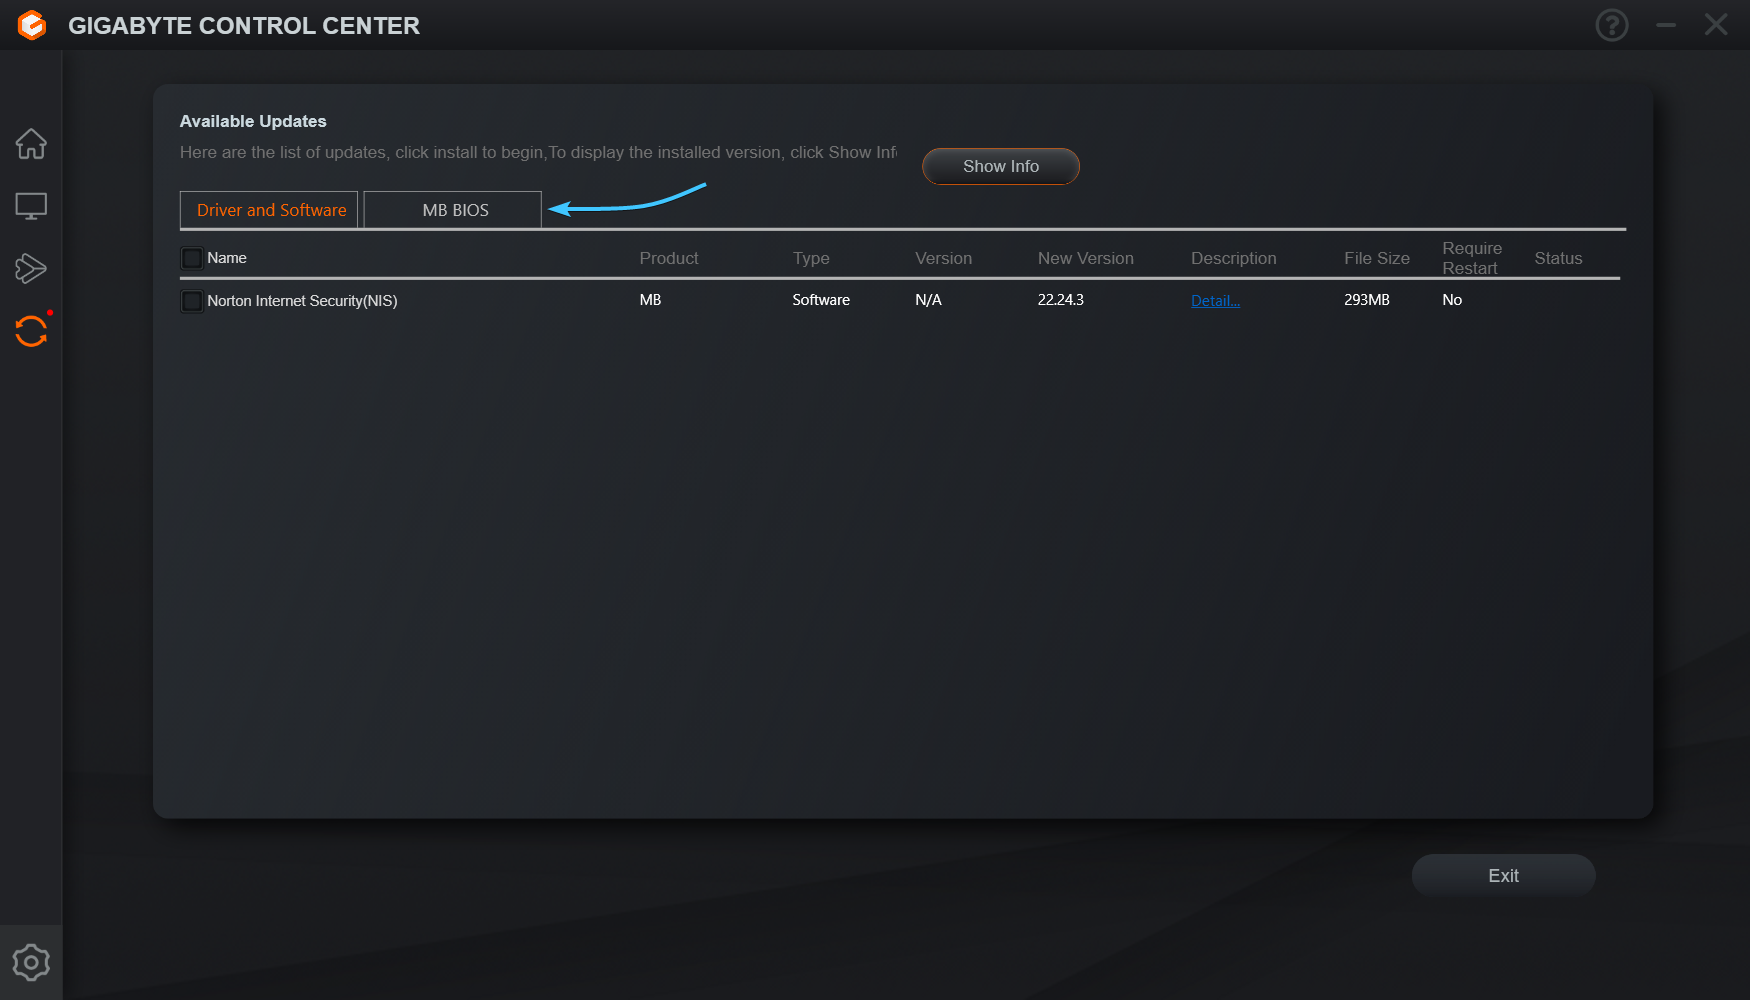
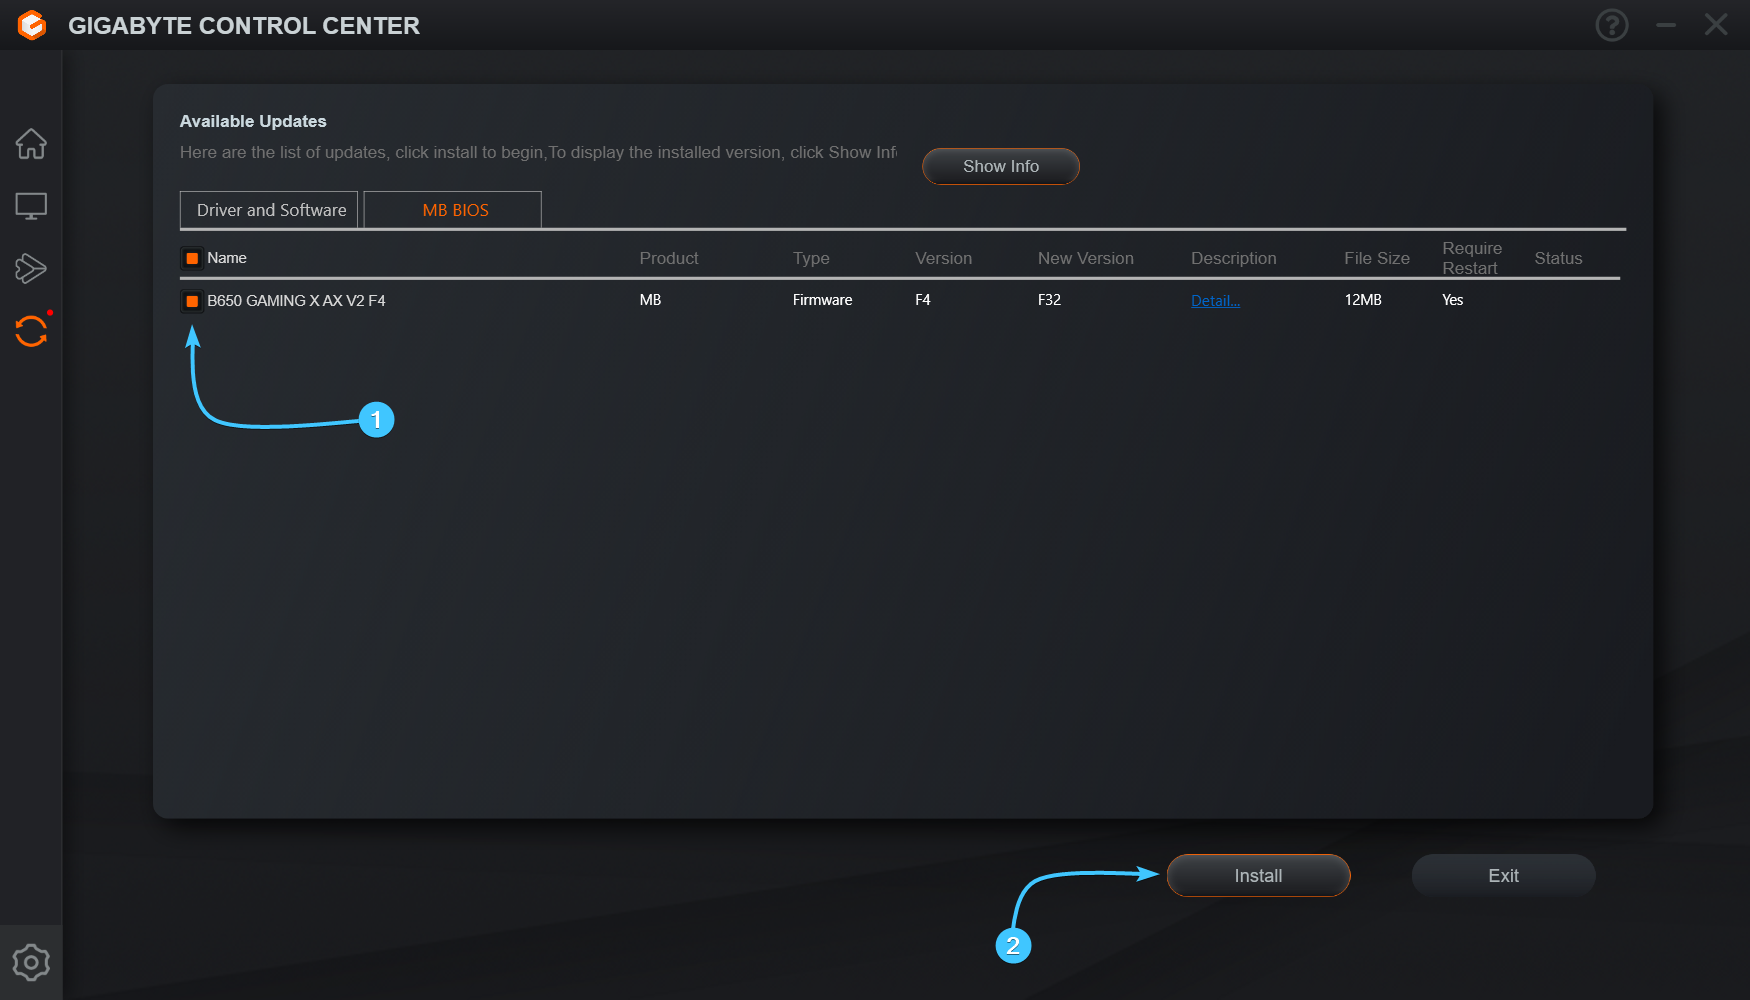
5. В списке выберите версию «BIOS» (1) и нажмите кнопку «Install» (2) для продолжения установки.
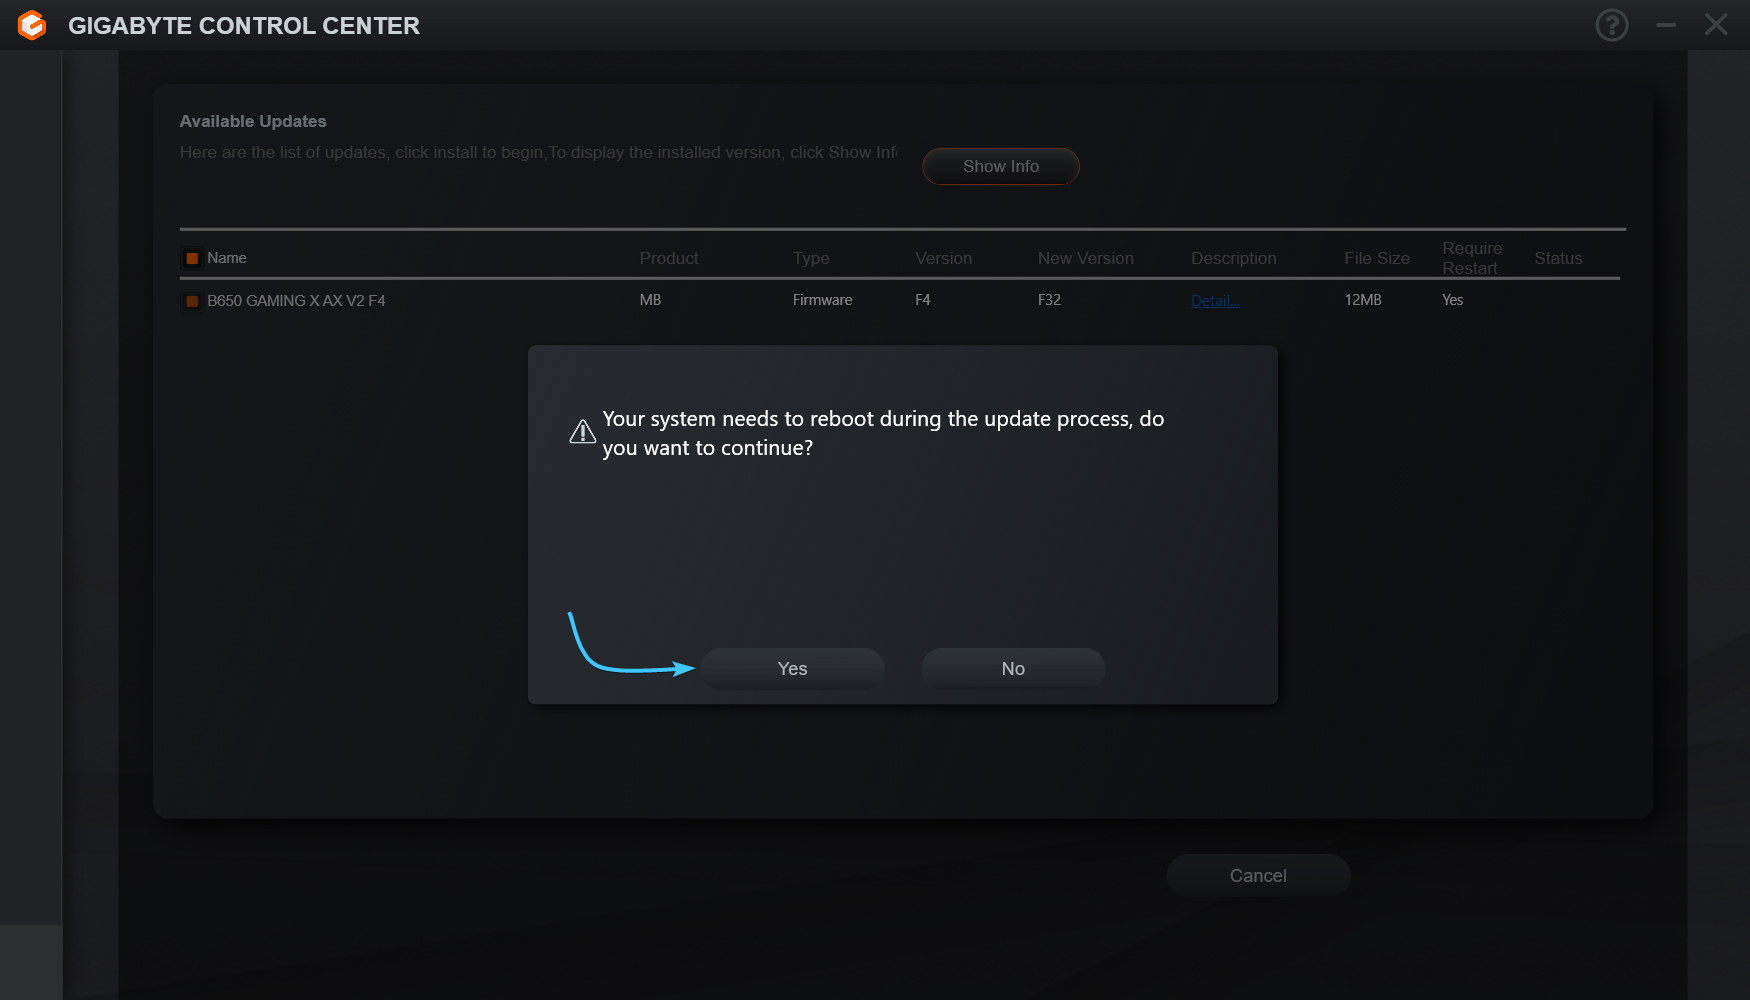
6. Появится окно подтверждения о том, что устройство будет перезагружено. Нажмите кнопку «Yes».
7. Начнётся скачивание и установка версии «BIOS», дождитесь завершения. Устройство перезагрузится.
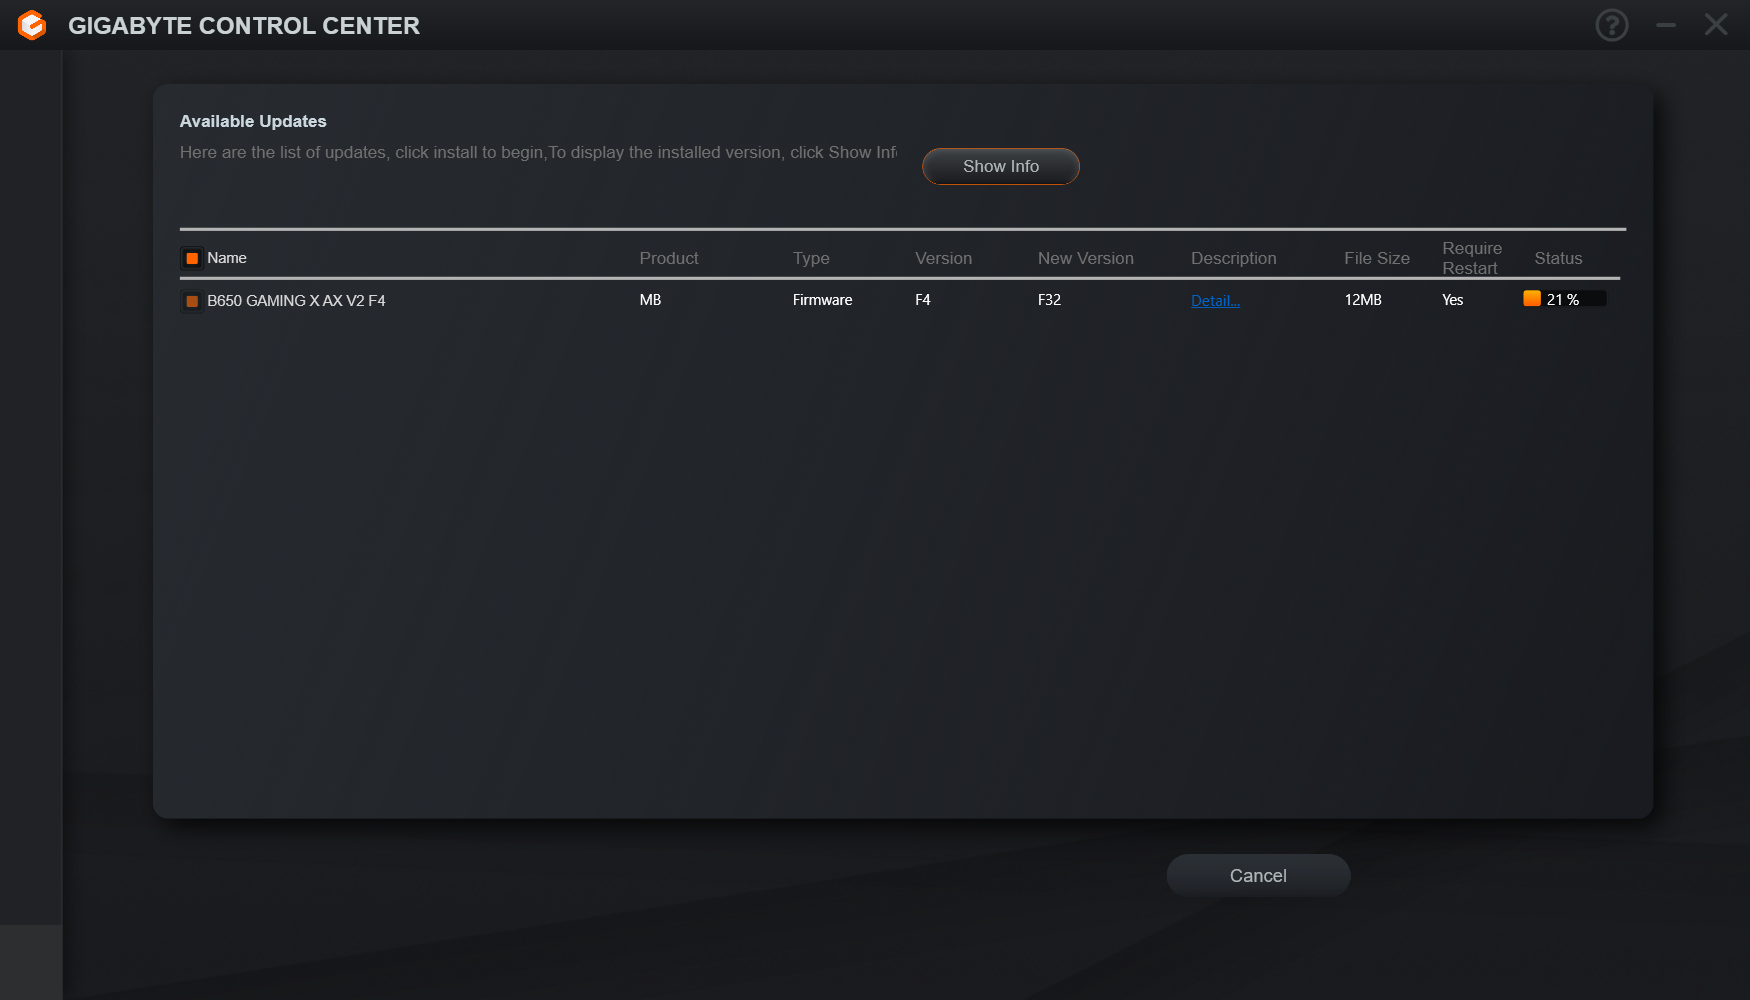
8. Дождитесь завершения процесса обновления «BIOS». После этого запустите операционную систему.
Другие руководства
- Открытие «BIOS» через «Windows»;
- Обновление «BIOS» на «ASUS»;
- Активация «XMP» на «ASUS»;
- Обновление «BIOS» на «MSI»;
- Активация «XMP» на «MSI»;
- Активация «XMP» на «GIGABYTE»;
- Обновление «BIOS» на «ASRock»;
- Активация «XMP» на «ASRock»;
- Клавиши для открытия «BIOS»;
- Приоритет носителя на «ASUS»;
- Приоритет носителя на «MSI»;
- Приоритет носителя на «GIGABYTE»;
- Приоритет носителя на «ASRock»;
- Сброс «BIOS» на «ASUS»;
- Сброс «BIOS» на «MSI»;
- Сброс «BIOS» на «GIGABYTE»;
- Сброс «BIOS» на «ASRock».