
719473
Сегодня мне в комментариях подсказали один интересный способ, которым можно решить некоторые проблемы с работой Wi-Fi в Windows 10. А проблем там достаточно. На странице с инструкциями по Windows 10, можно найти уже более 10 статей с разными советами и решениями. Так вот, сегодня я покажу как обновить драйвер Wi-Fi адаптера в Windows 10 через диспетчер устройств. Мы рассмотрим именно обновление драйвера, когда система ищет драйвер на компьютере, или в интернете (если он подключен).
Этот способ должен помочь решить проблему с ошибкой «Не удается подключиться к этой сети», когда не получается включить Wi-Fi на ноутбуке (не активный переключатель), когда подключение «Ограничено» и т. д.
В любом случае, если у вас не работает Wi-Fi в Windows 10, то советы из этой статьи нужно обязательно попробовать. Эта запись, дополнение к статье Решение проблем с драйвером беспроводного Wi-Fi адаптера в Windows 10, в которой я писал о замене драйвера из списка уставленных, и о том, как его удалить и откатить.
Как обновить драйвер беспроводного адаптера в Windows 10?
Самый лучший способ, это конечно же скачать драйвер с официального сайта, для нашей модели и для Windows 10, и установить его заново. Но, как правило, такой драйвер есть не для всех ноутбуков (адаптеров). Поэтому, попробуем другой способ.
Желательно, что бы ноутбук был подключен к интернету. Да, я знаю что Wi-Fi не работает. Поэтому, если есть возможность, подключите интернет по сетевому кабелю. На время.
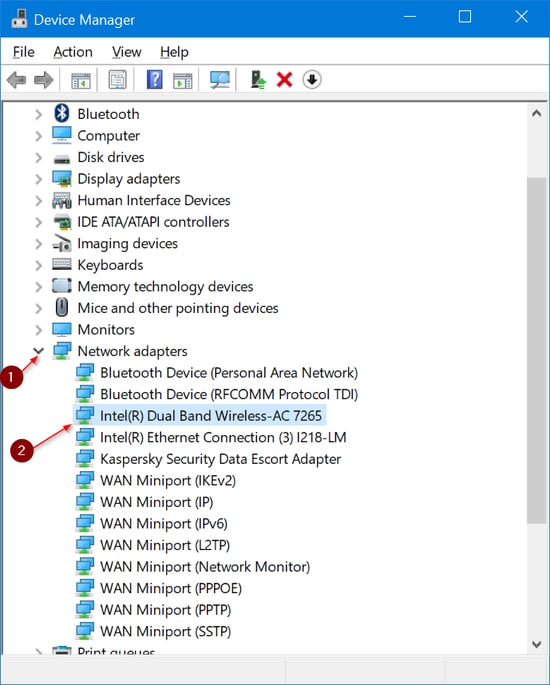
Дальше нужно открыть диспетчер устройств. Для этого, нажмите правой кнопкой мыши на меню пуск, и выберите «Диспетчер устройств». Или, найдите его через поиск и откройте.

Открываем вкладку «Сетевые адаптеры», находим адаптер в названии которого есть «Wi-Fi», или «Wireless», нажимаем на него правой кнопкой мыши, и выбираем «Обновить драйверы». Кстати, возле самого адаптера может быть желтый восклицательный знак. Это говорит о том, что он работает неправильно.
Если у вас вообще нет такого адаптера, то скорее всего, система не смогла подобрать драйвер. Нужно искать и устанавливать его вручную (смотрите в конце этой статьи).

Выбираем пункт «Автоматический поиск обновленных драйверов».

Пойдет поиск, и если драйвер будет найден, то вы увидите процесс его установки.

И сообщение об успешной установке.

Поиск драйвера Wi-Fi адаптера по названию
Если на сайте производителя вашего ноутбука, или адаптера вы не можете найти драйвера для вашей модели и десятой версии Windows, но адаптер есть в диспетчере устройств, то можно попробовать найти его по названию самого адаптера.
У меня получилось. На сайте ASUS, для моего ноутбука ASUS K56CM нет драйверов для Windows 10. Но, я нашел их по названию адаптера. Что бы не переписывать название в поиск вручную, его можно скопировать.
Нажимаем на адаптер правой кнопкой мыши и выбираем «Свойства». Затем, переходим на вкладку «Сведения». Нажимаем правой кнопкой мыши на название, и выбираем «Скопировать».
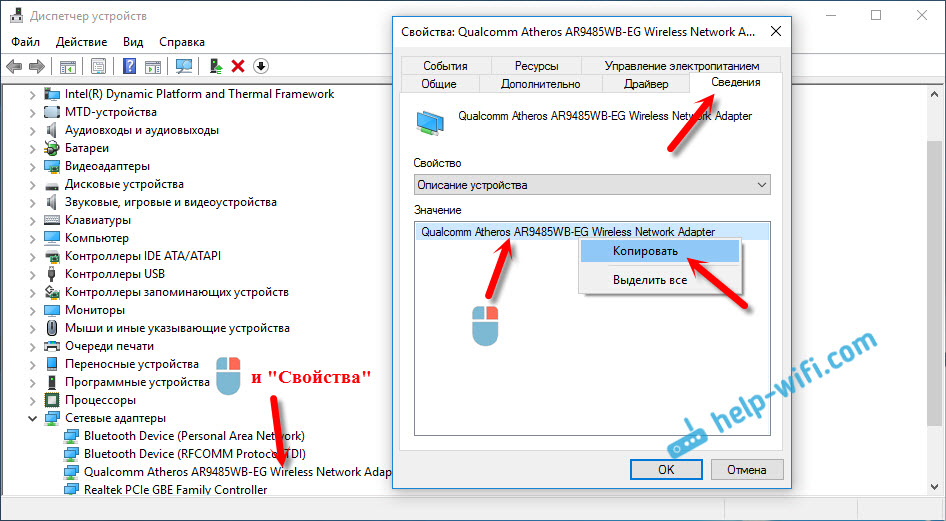
Ищем по названию в Яндексе, или Google.
Установка драйвера через диспетчер устройств (если нет .exe файла)
Возможно, вы скачаете драйвер в архиве (rar, или zip), где не будет установщика (файла с расширением .exe, после запуска которого пойдет установка). Что бы его установить, нужно извлечь содержимое архива, снова открыть диспетчер устройств, на вкладке «Сетевые адаптеры» нажать правой кнопкой на наш адаптер и выбрать «Обновить драйверы» (писал об этом выше).
Если адаптера у вас нет (драйвер еще не установлен), то он будет как «Неизвестное устройство» с желтым значком. Нажимаем на него. Если их несколько, то используем «метод тыка» (проверяем каждый).

Выбираем пункт «Выполнить поиск драйверов на этом компьютере».
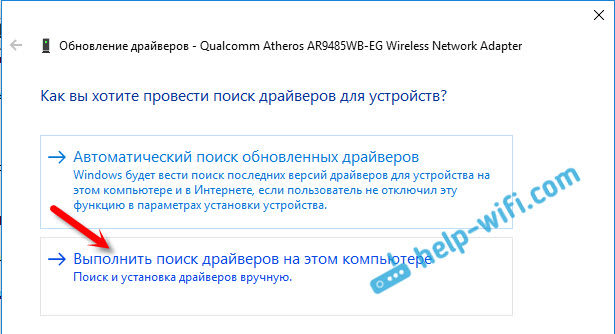
Нажав на кнопку «Обзор», выбираем папку, в которую мы извлекли скачанные драйвера. Нажимаем на кнопку «Далее».

Если повезет, то система установит драйвер, и Wi-Fi у вас будет работать.
Best Ways to update Wi-Fi Driver Windows 11/10/8.1/8/7
We are so accustomed to Wi-Fi being easily available that we rarely think about maintaining Wi-Fi drivers. We only pay attention to Wi-Fi drivers when we encounter network issues.
You may be facing issues with the Wi-Fi connection, which has led you to search for a solution to this post. You might have tried disconnecting and reconnecting your Wi-Fi multiple times, but that won’t work if the issue is in the core.
When it comes to the core, the Wi-Fi drivers make an impact on its performance. However, things get dicey when sometimes the Wi-Fi drivers become outdated or stop working due to corruption. If you, too, are facing a similar issue, do not worry as we have got you covered.
This guide will discuss how to Update and reinstall Wi-Fi Drivers.
So, without further delay, let us come to the point and learn.
How To Update Wi-Fi Driver Windows 11/10/8.1/8/7
There are 3 best ways. You can use any at your convenience.
1. Manually updating driver via Device Manage
2. Downloading the Wi-Fi driver for Windows 10 from manufacturer’s website
3. Updating Wi-Fi driver using Advanced Driver Updater
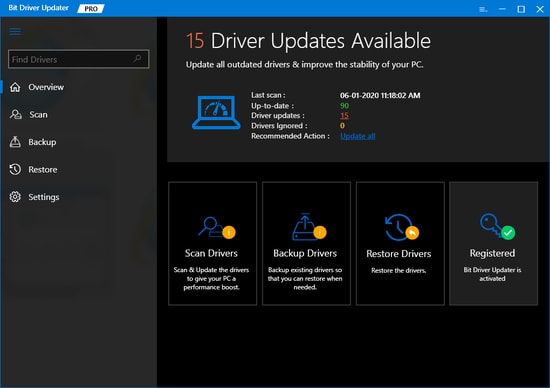
However, if you don’t have the patience to update drivers manually and are looking for a quick fix, we suggest updating the Wi-Fi driver automatically, using Advanced Driver Updater.
As the name suggests, this driver updating tool comes with an advanced scan engine to detect and update drivers accurately. Also, to use this professional driver updater, you don’t need to collect any system or device information. Once you install and run Advanced Driver Updater, the tool automatically identifies outdated drivers. Furthermore, using it, you can take a backup of old drivers and restore them if something goes wrong.
You can download it by clicking on the button below.
1. Manually updating driver via Device Manager
Using the Device Manager you can update the wireless driver on Windows 10. To use it follow these steps:
1. Press Windows + X > Device Manager.
2. Look for network adapters. Double click it to expand and see the wireless network adapter.
3. Right-click > Update driver.

4. Select, Search automatically for drivers.
5. Wait for the process to finish. If a Wi-Fi Driver update is available, it will be installed automatically. However, if you get the message, “The best drivers for your device are already installed,” click Search for updated drivers on Windows update.

6. Click Check for updates to download and install the latest version of Windows. However, if you are already running the latest version of Windows, click View optional updates.

7. Double-click Driver Updates and see if an update for the Wi-Fi driver or network adapter is available. Select it and click Download and install.

8. Restart the system. This way you can update the wireless driver on your Windows 10.
Tip : In addition to updating the driver using the steps explained in the post, you can also try reinstalling the Wi-Fi driver. To reinstall the driver, in the Windows search bar, type Device Manager. Select the best search result. Look for network adapters > expand it > right-click wireless adapter > Uninstall device.

You will now get a pop-up window. Click Uninstall and follow the on-screen instructions. Once done, restart the PC and check the Wi-Fi adapter. should be working flawlessly.
2. Downloading Wi-Fi driver for Windows 10 from the Manufacturer’s Website
Wireless adapter driver updates can also be downloaded from the manufacturer’s website To do so, you have the information about the operating system on which you want to update the driver and device details.
To determine the wireless driver, you are running press Windows + R to open the Run window. Type cmd > ok.
Type netsh wlan show drivers > Enter.
Doing so will show a black window with all the details about the Wi-Fi adapter.

Once you have all the information follow the steps to download and update the wireless driver on Windows 10 from the manufacturer’s site.
1. Visit the manufacturer’s website Depending on the wireless adapter you are using
2. Search for the product model number.
3. Afterward, head to the download page or the support page.
4. Download the latest Wi-Fi driver update for your wireless adapter. Make sure you download the drives based on your Windows version
5. Double-click the .exe file and follow the on-screen instructions to install the driver update. However, if a zip file is downloaded, extract it and then run the .exe file.
6. This will help update the driver on Windows 10
3. Updating Wi-Fi driver using Advanced Driver Updater
If the above two steps to download the driver on Windows 10 seem like a lot of work, don’t worry. We have an easy way out. Use Advanced Driver Updater to automatically detect outdated drivers and update the drivers in Windows 10.
To update the Wi-Fi driver using Advanced Driver Updater follow the steps below:
1. Download and install Advanced Driver Updater.
2. Run the best driver updater for Windows.

3. Click Start Scan Now and wait for the scan to finish.

4. Once done you will see a list displaying outdated drivers.

5. Look for the Wi-Fi driver/ network driver and click the Update driver next to it.
Note : Registered users can update all outdated drivers in one click, while trial version users must update each driver individually. If you want to save time, use the Pro version of Advanced Driver Updater. Furthermore, this best driver updater also offers a 60-day money-back guarantee.
6. After updating the drivers remember to restart the system. This helps apply the changes and no longer face network issues.
Advanced Driver Updater Review – Is it Safe to Use Best Driver Updating Utility
Pro Tip – How to Update Wi-Fi Drivers Without Internet
If you cannot use the internet on your PC, you can manually download the files on another computer and then copy them to your PC. What you need to do is find out the network adapter manufacturer and version that you currently use. After knowing the manufacturer, you can visit the support website on another computer and download the latest installer. Use a USB drive to transfer the installer from that PC to yours and run it to install the drive.
You may find the Wi-Fi adapter information using the following path – Start→Device Manager→Network Adapter→Properties→ Driver Tab.

Conclusion –
We hope the above steps explain how to reinstall and update the Wi-Fi driver. If you still have any questions, do leave a comment. We will be happy to help.
Also, if you encounter any problems using Advanced Driver Updater, send an email to support@systweak.com. The trained technical team will assist you with the problem.
A slow Wifi can be quite a problematic thing to deal with in this fast paced world that relies heavily upon a fast Wifi connection. Slow speed of Wifi can be largely attributed to an outdated and faulty Wifi driver.
Wondering how to update Wifi drivers on Windows 10? You can look at the methods to update Wifi drivers explained in this blog to fix Wifi driver-related problems on your Windows computer and use your Wifi without any hassles.
Topmost Method to Update Wifi Drivers:
We can always utilize the best solution to update Wifi drivers and that is by using a driver updater tool to work on your behalf.
Among a lot of utility tools available, if you wish to know which is the most convenient and useful tool to update Wifi drivers, then we would recommend you to use the Bit Driver Updater tool. This tool can be obtained by pressing the download button below and then let it find and install the most recent version of Wireless Wifi driver along with drivers of the PC.
How To Update Wifi Drivers Easily?
Want to find out how to update Wifi drivers on your Windows PC? Below mentioned are easy ways to update Wifi drivers on Windows 10, 8, 7.
1. Update Wireless Wifi driver with Windows Update service
Windows Update is a free service by Microsoft to fetch recent updates for the Windows OS and other Microsoft applications of your computer. Using the Windows Update service users can also update their hardware device drivers conveniently.
If you are thinking how to update Wifi drivers with the Windows Update service, then follow the below steps to get the latest updates for the Wifi drivers.
Step 1. You can go to the Windows Update service by searching for the Windows Settings application in the search box of the Start menu. Click on the Settings icon.
Step 2. When the Settings app window opens, click on the Update & Security option.
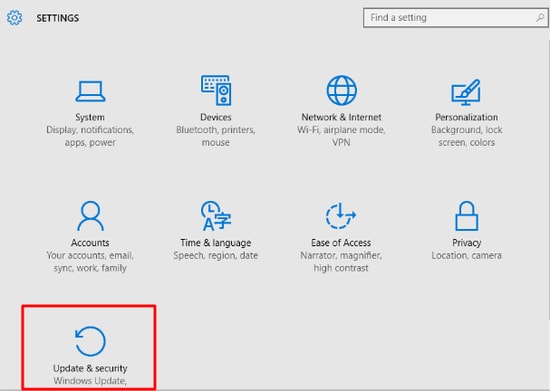
Step 3. Finally, in the left panel, you will see the Windows Update option that you need to click.
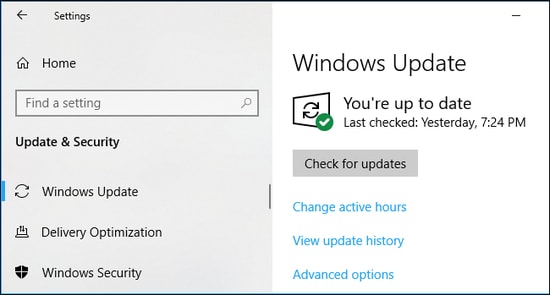
Step 4. In the main screen, hit the Check for Updates button to make Windows begin the process of checking, downloading, and installing the updates for Wifi drivers.
2. Update Wireless Wifi driver with Device Manager
Wondering how to update Wifi drivers by employing the Device Manager tool. Here are the steps to do so:
Step 1. Launch the Device Manager tool by searching for it in the Windows search box.
Step 2. Find and double click on the Network adapters to expand the device section.
Step 3. Right click on the Wifi driver name to open the dropdown menu and then select the Update driver option.

Step 4. Ultimately, you have to choose the option of “Search automatically for updated driver software” that appears in the consecutive prompt.
Step 5. Wait for sometime till the process finishes and then restart your Windows computer.
3. Use Bit Driver Updater to update Wifi drivers
Updating Wifi drivers is an extremely easy task with the help of the Bit Driver Updater tool. As you already know, when you update Wifi drivers, it helps you to fix “Wifi not working” issues and plenty of other problems like slow Wifi, interrupted connectivity issues, etc.
Commendable features of Bit Driver Updater:
- Fast scanning ability.
- One-click update button.
- Round the clock technical assistance.
- Offers a large driver database.
- Supports driver backup & update feature.
You can follow below steps to work with the Bit Driver Updater:
Step 1. You have to download, install and then launch the Bit Driver Updater tool on your Windows system.
Step 2. Then, use the Scan feature to identify the device drivers that need fixing like the Wifi drivers, other network drivers, etc.
Step 3. Further, you can click on the Update button to install the latest updates of the defective drivers.
Step 4. Reboot the Windows system to let the installation complete.
Read Also: Top Methods to Fix the WiFi Connection Problem in Windows 10
4. Download the Wifi Driver From the Official Website of the Manufacturer
Another great way that you can use to get the latest version of the Wifi drivers is to download it from the manufacturer’s website. Whether it is Dell, HP, TP-lInk, D-link, or any other manufacturer. Every manufacturer provides a support page for their users. With the help of this support page, you can download the required firmware or drivers quite easily.
All you need to do is take the help of Google to search for the manufacturer’s support page. Visit that page on your browser. Look or search for the device you are using. Then under the product support description, you should look for the required Wifi driver and download it. If you do not know about the manufacturer of your Wifi device, you can take the help of Command Prompt.
Just run the Command Prompt and enter the command followed by the Enter key.
netsh wlan show drivers

Under the Vendor name, you can find the manufacturer very easily.
Read Also: Download Realtek Wifi Driver for Windows 10, 8, 7 PC
Windows 10 update Wifi driver
We have arrived at the concluding point of this article where we have addressed the most user-friendly methods to update Wifi drivers.
If you still have any doubts on how to update Wifi driver with the methods elaborated above, then feel free to share your concerns with us in the comments box below.
WiFi drivers are software that enables communication between the operating system and network adapters. Using an outdated or corrupted wireless driver may result in deteriorated system performance. Hence, it is necessary to keep your WiFi drivers up-to-date so that your WiFi doesn’t act up. You can replace the older WiFi drivers with their latest versions to ensure healthy wireless connectivity. In this article, I will be mentioning some methods to update WiFi drivers in Windows 10.
Table of Contents
Solution 1: Search Online and Download Latest Wireless Adapter Driver
The first thing that you can do is download the latest wireless network adapter drivers yourself. It would help if you preferred to download the WiFi driver update from the official device manufacturer’s website on your Windows 10 PC.
Step 1: Open Command Prompt. For this, press Win + R. Run box will open; type cmd and press Enter key.
Step 2: In Command prompt window, type netsh wlan show drivers
Step 3: Press Enter key. Now, you will view driver details, including name, date, version, vendor, provider, type, etc.
Step 4: Now, copy your driver’s name from CMD, then go to Google Search, paste the copied name into the search box, and hit Enter button.

Step 5: You will be able to view different results. Click on the link from where you want to download your WiFi driver.
Step 6: Download the wireless network adapter driver’s latest build by clicking on the respective button.

Step 7: After downloading the WiFi driver on your PC, unzip the folder and run the installer file. You will be guided through the driver installation. Follow the onscreen instructions and complete the installation process.
Step 8: When the driver update is complete, restart your computer to apply changes made by the updates.
Recommended read: How to Fix WiFi Issues After Windows 10 Update
Solution 2: Go to Device Manager to Update WiFi Driver
You can also update the wireless adapter driver through Device Manager. Here are the steps:
Step 1: Press Windows + Q key to open up the Search box and type Device Manager.

Step 2: Open Device Manager and scroll down to the Network Adapter section.
Step 3: Now, you need to click on Network Adapter to expand the list of network adapters, then navigate to your wireless adapter.
Step 4: Right-click on the WiFi driver and select the Update Driver option from the context menu.
Step 5: Next, you can let Windows search automatically for updated driver software and install it on your PC. Or, you can manually provide the driver location and then install it on your Windows 10 PC.

Step 6: Make sure to restart your Windows 10 PC to ensure that the wireless adapter driver software is updated.
Solution 3: Use a Driver Update Software
You can also use third-party software to update the wireless network driver automatically. A driver updater program searches for all outdated drivers present on your PC and lets you automatically update network drivers. This eases out the whole task of updating the Wi-Fi driver software in Windows 10.
Several free driver updater software is available online. Let us check out a couple of them.
Snappy Driver Installer Origin (SDIO)
Snappy Driver Installer Origin is a software program designed to scan for outdated drivers present on your computer and update them accordingly. It can also find the missing drivers that you need to install on your PC. This software is available for free and can be downloaded on different Windows versions, including Windows 10. It is provided in a travel-friendly “portable package,” so it works without any installation. Now, have a look at the driver update steps below.
How to update driver in Windows 10 using Driver Updater “Snappy Driver Installer Origin”:
Step 1: Unzip the downloaded folder and run SDIO.exe file.
Step 2: It will scan your PC for missing and outdated drivers and then show a list of all of them.
Step 3: Now, open the Update panel by clicking the Updates are an available option.
Step 4: Select the WiFi drivers that you want to update and then click on the Ok button. You can also click on the Network Only button to update all network drivers at once.
It will take some time to update WiFi drivers, depending upon your internet speed.

Driver Easy
Driver Easy is also a free driver updater software that automatically searches for outdated WiFi and other drivers and allows you to update them in a few clicks. This software has both Free and PRO (paid) versions. The paid version has more functionalities, but the free version does the work of updating network drivers. It is compatible with Windows 10 and other versions of the Windows operating system.
How to update WiFi driver using Driver Easy:
Step 1: Download and run the Driver Easy installer file and follow on-screen instructions to install this driver updater program on your Windows 10 PC. Launch Driver Easy by going to the Start menu.
Step 2: Click on the Scan button to let it recognize outdated drivers on your computer. It will take 2-3 minutes to complete the scan.
Step 3: After some time, it will list all the outdated drivers and all the updated drivers. From the list, check the WiFi driver that you need to upgrade in Windows.
Step 4: Next, click the Update button present besides the driver name.
Step 5: On the next screen, you will be prompted to either automatically or manually create restore points. Automatic restore points can be made in the PRO version only. If you want to continue using the Free version, choose the Manually Create option and then click the Continue button.
Step 6: It will now download the WiFi driver update. The download will take some time, depending on the internet speed.
Step 7: When the download is finished, you can install a Wi-Fi driver update on your PC by following your screen’s instructions.

Conclusion
Outdated WiFi drivers can affect the performance of your network and system. It can slow down your network, causing multiple connectivity issues. So, always keep your WiFi drivers updated. You can download and install the latest version of your network driver online from the manufacturer’s website. Also, Windows Device Manager and third-party driver updater can be used to update WiFi drivers.
Recommended for You:
How to Check WiFi Data Usage in Windows 7
How to Reset WiFi in Windows 10
How to Create a WiFi Hotspot on Windows 10
How to Enable 5ghz WiFi on Windows 10
Updating your WiFi driver in Windows 10 is essential for maintaining a fast and stable internet connection. All you need to do is open your Device Manager, locate your WiFi adapter, and update the driver either automatically or manually. Let’s walk you through the steps to make sure your WiFi is running at its best.
In this tutorial, you’ll learn how to update your WiFi driver in Windows 10, ensuring your internet connection remains strong and reliable. Follow these steps to keep your WiFi running smoothly.
Step 1: Open Device Manager
First, you need to access the Device Manager by right-clicking the Start button and selecting “Device Manager.”
Device Manager is a built-in tool in Windows that lets you manage your computer’s hardware. It’s the go-to place for updating drivers.
Step 2: Locate Network Adapters
Next, expand the “Network adapters” section to see a list of all network-related devices.
The “Network adapters” section lists all the devices that manage your computer’s connections. Your WiFi adapter will be here.
Step 3: Select Your WiFi Adapter
Right-click on your WiFi adapter (it usually has “Wireless” or “WiFi” in the name) and select “Update driver.”
This step brings up the driver update options. You can choose to search for updates automatically or manually.
Step 4: Automatic Update
Choose “Search automatically for updated driver software” to let Windows find and install the latest driver for you.
This method is ideal for most users since it simplifies the process. Windows will search its online database for the newest driver.
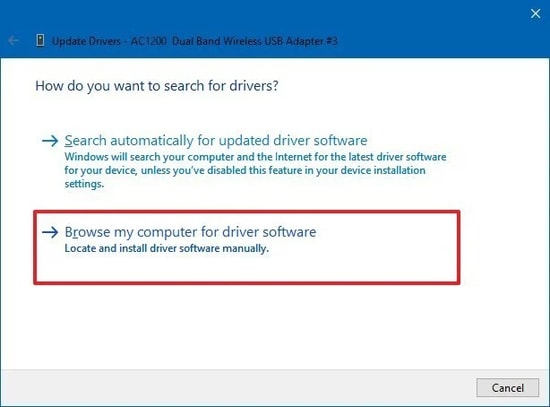
Step 5: Manual Update
Alternatively, you can choose “Browse my computer for driver software” and select a driver file you’ve downloaded from the manufacturer’s website.
This method gives you more control but requires you to download the correct driver from the hardware manufacturer’s website first.
Step 6: Restart Your Computer
After the driver update process is complete, restart your computer to apply the changes.
Restarting ensures that the new driver is properly installed and fully functional.
After completing these steps, your WiFi driver should be up-to-date. You should notice an improvement in your internet stability and speed.
Tips for Updating WiFi Driver in Windows 10
- Always create a restore point before updating drivers to avoid any issues.
- Make sure your computer is plugged in or has enough battery during the update process.
- If the automatic update doesn’t work, check the manufacturer’s website for the latest driver.
- Note the current driver version before updating, so you can revert if needed.
- Keep your operating system updated to ensure compatibility with the latest drivers.
Frequently Asked Questions
Why should I update my WiFi driver?
Updating your WiFi driver can fix connectivity issues, improve speed, and add new features.
How do I know if my WiFi driver needs an update?
If you’re experiencing slow or intermittent internet, your WiFi driver might need an update.
Can I roll back to the previous driver if something goes wrong?
Yes, you can roll back to the previous driver in the Device Manager if the new driver causes issues.
Do I need an internet connection to update my WiFi driver?
For an automatic update, yes. For a manual update, you can download the driver on another device and transfer it.
What happens if I don’t update my WiFi driver?
You might experience poor internet performance and could miss out on security updates.
Summary of How to Update WiFi Driver in Windows 10
- Open Device Manager.
- Locate Network Adapters.
- Select your WiFi Adapter.
- Choose Automatic Update.
- Choose Manual Update (if needed).
- Restart your computer.
Conclusion
Updating your WiFi driver in Windows 10 is a straightforward task that can significantly improve your internet experience. By following the steps outlined in this guide, you can ensure your WiFi connection remains stable and fast. Keeping your drivers up-to-date is like giving your computer a tune-up—it keeps everything running smoothly.
If you encounter any issues, don’t hesitate to revisit this guide or consult the FAQ section for additional help. Keeping your WiFi driver updated is a small but crucial part of maintaining your computer. For further reading, consider exploring other ways to optimize your Windows 10 performance. Now that you know how to update your WiFi driver, why not take the next step in optimizing your system?
Matthew Burleigh has been writing tech tutorials since 2008. His writing has appeared on dozens of different websites and been read over 50 million times.
After receiving his Bachelor’s and Master’s degrees in Computer Science he spent several years working in IT management for small businesses. However, he now works full time writing content online and creating websites.
His main writing topics include iPhones, Microsoft Office, Google Apps, Android, and Photoshop, but he has also written about many other tech topics as well.
Read his full bio here.