
Технология NIC Teaming (или Load Balancing/Failover – LBFO, или NIC bonding) позволяет объединить несколько физических сетевых адаптеров (NIC) в одну логическую сетевую карту. В этой статье мы рассмотрим, как настроить NIC Teaming в Windows Server 2019/2016/2012R2 и в десктопых версиях Windows 10 и 11.
Содержание:
- Настройка NIC Teaming в Windows Server 2019
- Используем PowerShell для настройки NIC Teaming в Windows Server
- Создаем группу сетевых адаптеров NIC Teaming в Windows 10 и 11
Для чего может понадобится объединять сетевые адаптеры в группу NIC Teaming?
- Увеличение пропускной способности. Например, объединив две сетевые 1 Гб сетевые карты в одну группу NIC Teaming, вы получите общую полосу пропускания на логическом адаптере 2 Гбит/с;
- Управление балансировкой нагрузки на сетевые карты – можно управлять распределением трафика между NIC сервера;
- Отказоустойчивость – при выходе из строя любой из сетевых карт, добавленных в группу NIC teaming, остальные подхватывают ее функции, и связь с сервером не прерывается. Для критически важных серверов этот механизм может защитить от простоя сервиса во время выхода из строя сетевого коммутатора или Ethernet порта на нем, сетевого кабеля (которым ваш хост подключен к коммутатору). Для реализации такой возможности, достаточно подключить сетевые карты в разные физические коммутаторы.
В Windows Server 2012R2/2016/2019/2022 технология NIC Teaming не совместима с Single-root I/O virtualization (SR-IOV), TCP Chimney и Remote Direct Memory Access (RDMA).
Настройка NIC Teaming в Windows Server 2019
Вы можете настроить NIC Teaming в Windows Server начиная с версии 2012. Рассмотрим, как объединить несколько сетевых адаптеров в Windows Server 2019 в одну группу NIC Teaming. Режим NIC Teaming по умолчанию отключен в Windows Server.
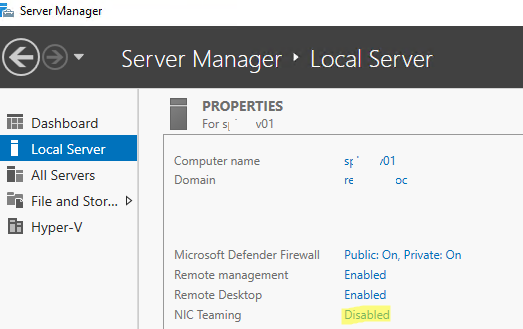
Чтобы включить его, откройте консоль Server Manager, выберите локальный сервер (Local Server) и в его свойствах выберите пункт “NIC Teaming: Disabled“.
В появившемся окне в левой нижней панели выберите пункт Tasks -> New Team (Создать группу).
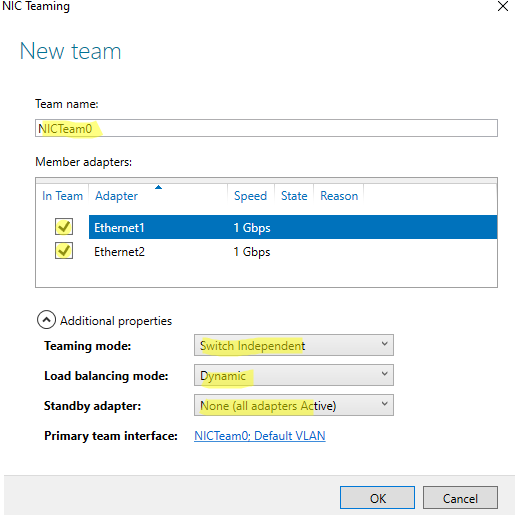
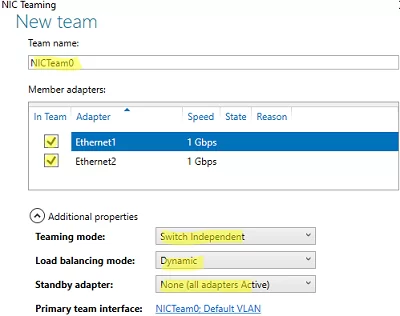
Далее нужно указать имя группы (Team Name) и выбрать сетевые адаптеры, которые будут входить в эту группу.
В Windows Server 2019 в одну NIC Teaming групп можно объединить до 32 физических сетевых адаптеров, главное, чтобы они работали на одной скорости.
Ниже можно настроить специальные параметры группы. От данных параметров зависит правила и эффективность NIC Teaming. Рассмотрим эти настройки подробнее.
Режим поддержки групп (Teaming Mode). Данный параметр определяет способ взаимодействия группы с сетевым оборудованием (коммутатором)
- Static Teaming (IEEE 802.3ad)— статический режим работы с зависимостью от сетевого оборудования. Все адаптеры группы должны быть подключены к одному коммутатору, Ethernet порты которого настроены на использование статической агрегации каналов (требуется настройка на коммутаторе);
- Switch Independent (режим по-умолчанию) – группа работает независимо от коммутатора, для реализации не нужно дополнительно настраивать сетевое оборудование. В этом режиме разные сетевые адаптеры группы можно подключить к разным коммутаторам для повышения отказоустойчивости (защита от сбоев в коммутаторах);
- LACP (Link Aggregation Control Protocol, LACP, IEEE 802.1ax) – режим также зависит от сетевого оборудования. Нужно включить и настроить на коммутаторе динамическую агрегацию каналов по протоколу LACP.
Режим балансировки нагрузки (Load Balancing mode) – задает как распределяется сетевой трафик по NIC в группе.
- Address Hash — для каждого из адаптеров вычисляется специальный хэш (на основании MAC или IP-адресов отправителя и получателя) и привязывается определенному физическому адаптеру. Весь трафик от данного отправителя будет идти через этот NIC;
- Hyper-V Port — режим можно использовать для сервера с ролью Hyper-V. Позволяет привязать конкретный адаптер группу NIC teaming к конкретному порту на виртуальном коммутаторе Hyper-V;
- Dynamic – опция по умолчанию, совмещает оба типа балансировки нагрузки.
Один из адаптеров в группе можно назначить резервным (Standby adapter). В обычном режиме работы данная NIC не используется для передачи трафика. При неполадке на любом другом адаптере в группе NIC Teaming, он тут-же занимает его место. В общем случае и без данной функции при выходе из строя любой сетевой карты, не будет простоя сервиса, т.к. ее нагрузка автоматически распределится между оставшимися картами в группе.
Выберите нужные параметры, нажмите ОК и новая группа Nic Teaming будет создана.
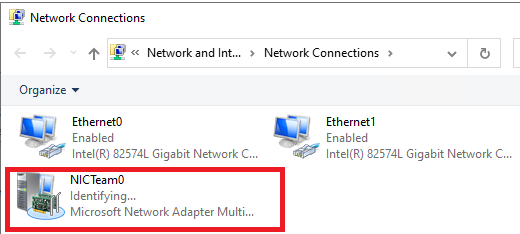
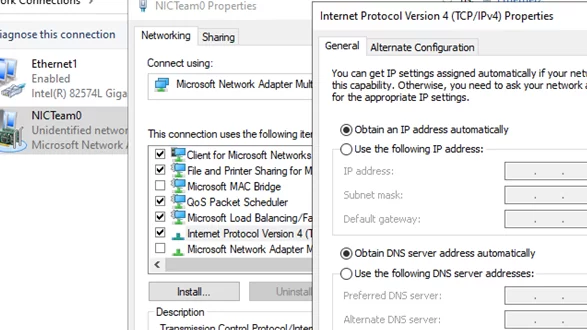
Откройте список сетевых подключения в панели управления Windows. Убедитесь, что в Windows Server появился новый сетевой адаптер Microsoft Network Adapter Multiplexor Driver (его иконка немного отличается). Это и есть виртуальный адаптер группы NIC Teaming.
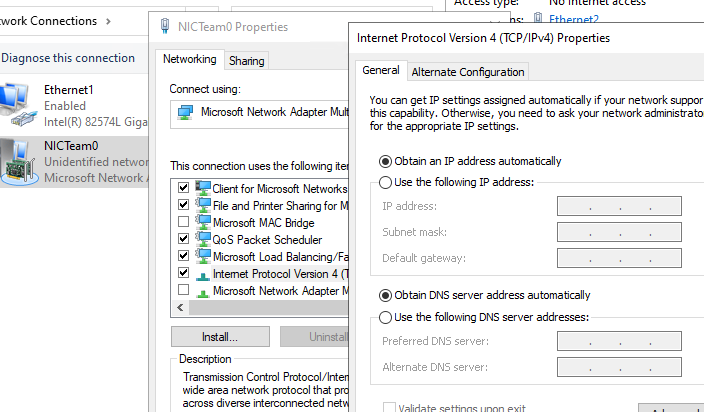
Дальнейшая настройка параметров сетевой карты (протоколы, IPv4/v6 адрес) осуществляется теперь в свойствах этого адаптера.
У всех остальных сетевых адаптеров, которые вы добавили в группу NIC Teaming уже не будет собственных IP адресов.
При удалении группы NIC Teaming предыдущие настройки сетевых адаптеров восстанавливаются.
В дальнейшем вы можете добавить или удалить сетевые адаптеры в группу NIC Teaming.
Вы можете использовать группу NIC Teaming для настройки нескольких VLAN интерфейсов в Windows Server. Для этого можно даже создать группу NIC Teaming из одного сетевого адаптера.
Используем PowerShell для настройки NIC Teaming в Windows Server
Вы можете создавать и управлять группами NIC Teaming не только из графического интерфейса Windows, но и с помощью PowerShell. Вы можете использовать PowerShell для настройки NIC Teaming в Windows Server Core
В Windows Server для управления MIC Teaming есть встроенный модуль NetLbfo. Выведите список сетевых адаптеров на сервере:
Get-NetAdapter

Создайте новую группу с Team0 из адаптеров с именами Ethernet1 и Ethernet3. Выберите режим работы NIC Teaming: Switch Independent с динамической балансировкой.
New-NetLbfoTeam -Name Team0 -TeamMembers Ethernet1,Ethernet3 -TeamingMode SwitchIndependent -LoadBalancingAlgorithm Dynamic
Доступные параметры:
- TeamingMode:
Static
,
SwitchIndependent
,
Lacp - LoadBalansingAlgorithm:
TransportPorts
,
IPAddresses
,
MacAddresses
,
HyperVPort
,
Dynamic
Информацию о группах NIC Teaming на сервере можно вывести с помощью команды:
Get-NetLbfoTeam
Name : Team0
Members : {Ethernet3, Ethernet1}
TeamNics : Team0
TeamingMode : SwitchIndependent
LoadBalancingAlgorithm : Dynamic
Status : Up
Можно настроить IP адрес интерфейса NIC Teaming с помощью PowerShell:
New-NetIPAddress -InterfaceAlias team0 -IPAddress 192.168.13.100 -PrefixLength 24 -DefaultGateway 192.168.13.1
Set-DnsClientServerAddress -InterfaceAlias team0 -ServerAddresses 192.168.13.10
Выполните команду
Get-NetAdapter
. Обратите внимание, что LinkSpeed сетевого адаптера группу NIC Teaming — 2 Гбит/с.

Чтобы изменить настройки группы NIC Teaming используется командлет Set-NetLbfoTeam:
Set-NetLbfoTeam -Name team0 -TeamingMode LACP
Если выполнить эту команду в ВМ, появится ошибка
Set-NetLbfoTeam : 'SwitchIndependent' is the only TeamingMode value supported in a Virtual Machine
Чтобы через NIC Teaming добавить отдельный VLAN интерфейс, используйте команду:
Add-NetLbfoTeamNIC -Team Team0 -VlanID 10
Удалить группу NIC Team можно командой:
Remove-NetLbfoTeam -Name Team0
Создаем группу сетевых адаптеров NIC Teaming в Windows 10 и 11
Вы можете использовать NIC Teaming для объединения сетевых карт не только в Windows Server, но и в клиентских версиях Windows 10 и 11. Главное, чтобы производитель вашей сетевой карты поддерживал для нее режим Link aggregation / NIC teaming/ LBFO.
Например, NIC Teaming работает из коробки с драйверами картами Realtek PCIe GbE Family Controller ( 10.35.510.2019) или Intel(R) 82574L Gigabit Network Connection.
Чтобы собрать группу NIC Teaming в Windows 10 (в этом примере это Windows 10 20H2), откройте консоль PowerShell и выведите список сетевых адаптеров:
Get-NetAdapter
Соберем группу NIC Team из адаптеров Ethernet0 и Ethernet1.
New-NetSwitchTeam -Name "MyNICTeam" -TeamMembers "Ethernet0","Ethernet1"

Проверьте, что в системе появился новый интерфейс NIC Teaming.
Get-NetSwitchTeam
Не забудьте задать для него сетевые настройки. Теперь у вас появился новый интерфейс с пропускной способностью 2 Гбит/с.

Для удаления созданной группы NIC Team, также нужно использовать PowerShell:
Remove-NetSwitchTeam -Name "MyNICTeam"
MicrosoftPowershellWindows 10
Muhammad FaizanDecember 24, 2019 — Last Updated: March 19, 2024
23 35,167 2 minutes read
Muhammad Faizan
Hi, My name is Muhammad Faizan and i have spent last 15 years working as System Administrator mainly with Microsoft Technologies. I am MCSE, MCTP, MCITP, certified professional. I love scripting and Powershell is the scripting language i am in love with.
-
Website
-
Facebook
Related Articles
When you are working in a small home or office networks, the exchange of data and sharing of information amongst all the machines on those networks becomes quite a tedious task. Bridge Connection is a significant solution for these circumstances.
In Windows 10, bridging an internet connection is done so that you can connect two or more networks and make it workable for the machines under those networks to exchange data with one and all. For example, let us consider you have two networks – in one, the machines A, B, and C are connected with cables whereas, in the other one, machines D, E, and F are operating on wireless. So, by building a bridge connection you make it possible for all the five machines A, B, C, D, and E to work on the same network channel. So let us now head towards the steps and see How to Setup Bridge Connections on Windows 10 to attach the PCs functioning on multiple unassociated home or office networks for inter-exchanging information.
How to Setup Bridge Connections on Windows 10
- First of all, on the right end of the taskbar look for the Network symbol and move on with a right click on it and thereon opt for Network and Sharing Center.
- In the next window, pick up the link that is described as Change adapter options in right flank.
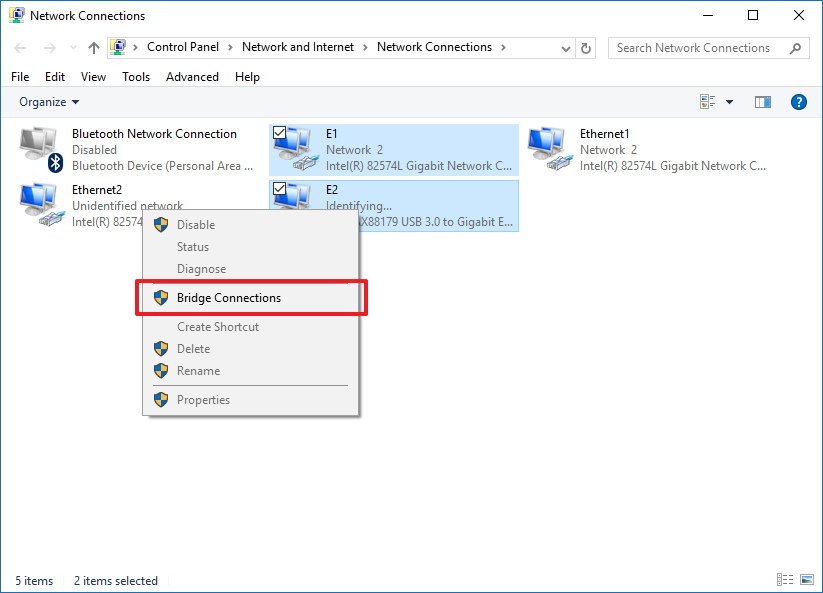
- In the emerged window, press and hold the Ctrl key and hit those two or more networks simultaneously that you would wish to Setup in the Bridge connections.
- Perform a right click on either of the networks and hit Bridge Connections option.
- A pop up will inform about the progress in the bridge connections.
- Bridge connection will thus be set up.
There are many other users who confront yellow warning signal with a note that is written as “To create a network bridge, you must select at least two LAN or High-Speed Internet connections that are not being used by Internet Connection Sharing”. Pursue the below steps to get a proper connection –
- Be in the window where you can see all the adapters (see the below screenshot), do a right-click on the wireless adapter and from the arrived contextual menu, select Properties.
- Shift yourself to the Sharing tab and untick the first square cell that is expressed as “Allow other network users to connect through this computer’s Internet Connection” and thereupon click Ok button.
- Attempt the steps mentioned above and the bridge connection will be done.
Microsoft clearly stated that the bridge between internet and network connection should never be attempted as it will generate an unsafe link between the internet and your network and anyone can get through your network which is definitely not a great thing in terms of security.
Network Bridge is a feature that has been part of Windows for a long time. A bridge allows you to connect two or more network segments together allowing devices to join the network when it’s not possible to connect them directly to a router or switch.
For example, on an Xbox 360 without a wireless adapter, an Xbox One that no longer connects to Wi-Fi, or when a computer is far away from the router, you can use Network Bridge to share your computer’s connection (e.g., Ethernet or Wireless) with these devices to allow access the network. Once devices connect using a bridge, they will appear as if they were physically connected to the router.
In this Windows 10 guide, we’ll walk you through the steps to properly set up a bridge connection on your desktop or laptop to allow other devices to join your local network and to access the internet.
Before you begin
Before you start setting up a bridge connection on Windows 10, you will need at least two network adapters. One that is connected to the internet and a second adapter that will be used to connect another computer.
Additionally, as a result of setting up a bridge on Windows 10 (or on previous versions of the operating system), the primary network adapter on the host computer will lose internet connectivity.
To regain access to the internet, you will need to set a static IP address to your computer manually. The first thing you want to do is to save to a text file the current IP address information assigned by the DHCP server on your local network.
To get the IP address information from your computer follow these steps:
All the latest news, reviews, and guides for Windows and Xbox diehards.
- Use the Windows key + X keyboard shortcut to open the Power User menu and select Command Prompt.
- Type the following command and press Enter:
ipconfig /all - Make note of the IP address configuration of the network adapter connected to the internet. You need to record the following information: IPV4, subnet mask, default gateway, and DNS servers addresses.
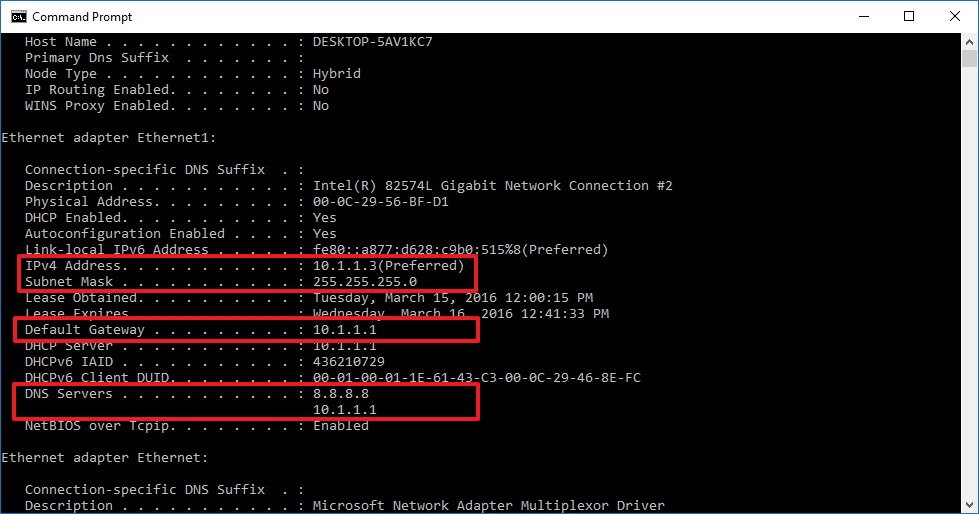
Note: You can use an IP address dynamically assigned by the DHCP server as static only as a temporary solution. On best practice you should assign an IP address in the range that doesn’t belong to the DHCP address pool on your router. For more information on how to find the DHCP server configuration make sure to check your router’s manufacturer support website.
How to create a Network Bridge on Windows 10
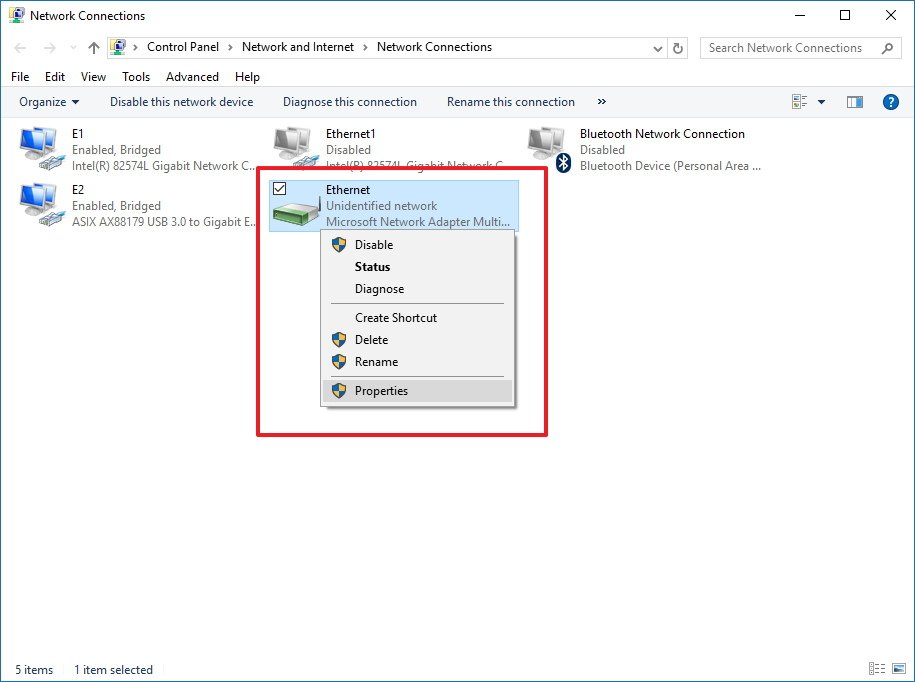
- Use the Windows key + X to open the Power User menu and select Network Connections.
- Select both, the network adapter that connects to the internet and the adapter you want to use in the bridge connection.
- Right-click the selection and click Bridge Connections.
At this point, the device connected to the bridge port should have access to the network and internet with the IP address information coming from the router, but the computer hosting the bridge won’t be able to access the internet unless you have a third network adapter that is also connected to the network or a static IP address .
How to regain internet access after setting up a bridge connection
To regain access to the internet from the host computer do the following:
- Use the Windows key + X to open the Power User menu and select Network Connections.
- Right-click the bridge adapter and select Properties.
- Select the network adapter that connects to the internet.
- Select Internet Protocol Version 4 (TCP/IPv4).
- Click Properties.
- Select the Use the following IP address option.
- Use the IP address information you collected at the beginning of this guide to assign a static IP address like is shown in the screenshot below.
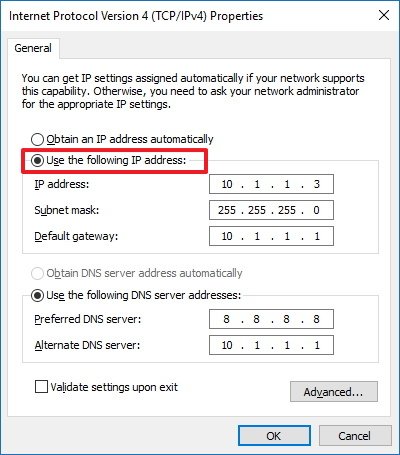
- Click OK.
- Click Close to complete the task.
How to add more network adapters to a bridge connection
You’re not limited only to offer bridge connectivity to a single network adapter. At any time, you can add multiple adapters.
- Right-click the network adapter and select Add to Bridge.
- Connect a game console or another computer and the device will automatically acquire the network settings from the local router.

How to remove a bridge connection from your computer
When you no longer need a bridge connection, select one or all the participating network adapters, and select Remove from Bridge.
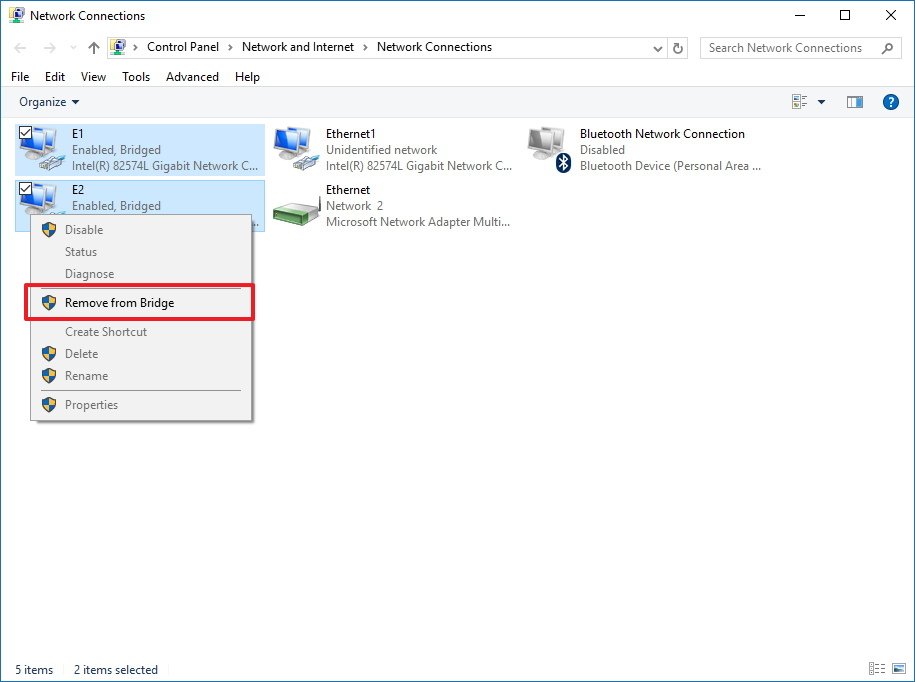
At this point, the bridge adapter should disappear from Network Connections, but if it doesn’t, simply reboot your computer.
The last thing left to do is to remove the IP address static settings and let your PC once again get this information automatically from the router.
- Right-click the network adapter and select Properties.
- Select Internet Protocol Version 4 (TCP/IPv4).
- Click Properties.
- Select the Obtain an IP address automatically option.
- Select the Obtain DNS server address automatically option.
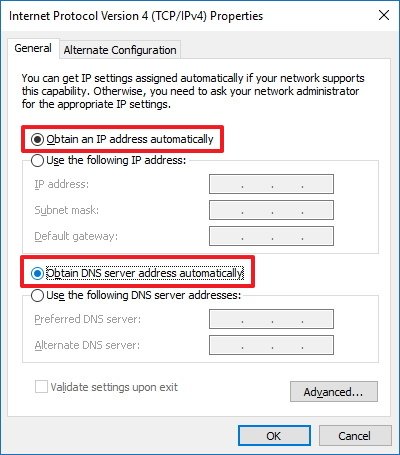
- Click OK.
- Click Close to complete the task.
Network Bridge or Internet Connection Sharing?
It’s important to note that Network Bridge is very similar to the Internet Connection Sharing (ICS) feature, but they’re not the same.
When you use Internet Connection Sharing (ICS), you will convert your computer into a router, which uses a built-in DHCP server to assign IP addresses to computers participating in ICS. It also offers Network Address Translation (NAT) that allows multiple devices to connect to the network using the ICS host as the middle man.
On the other hand, Network Bridge doesn’t turn the host computer into a router and you won’t get Network Address Translation. It only provides a medium (bridge) in which other devices can connect directly to the network and obtain the same IP address scheme every other computer connected to the network is using.
Which feature you should use? The answer to the question is: «depends». Both features offer similar benefits. If your local network already includes a router connected to the internet and you want a seamless network integration where all devices share the same network addressing scheme, then you should consider using Network Bridge.
If you need a router-like feature, and you want to keep the network segments separated while taking advantage of the security benefits of Network Address Translation, then you’ll be better suited using Internet Connection Sharing.
In theory, a bridge connection is more efficient, because the host is only a pass-through, and all the routing process will occur in the local router and not on the host computer.
Remember that Network Bridge and Internet Connection Sharing have been designed only for home and small office networks, and for scenarios, where a wireless connection can’t be established, or a cable run to the main router or switch is not possible. These features are not recommended as networking solutions for businesses. In addition, there can only be one Network Bridge or one Internet Connection Sharing per-computer.
Windows 10 resources
For more tips, coverage, and answers on Windows 10, you can visit the following resources:
- Windows 10 on Windows Central – All you need to know
- Windows 10 help, tips, and tricks
- Windows 10 forums on Windows Central
Mauro Huculak has been a Windows How-To Expert contributor for WindowsCentral.com for nearly a decade and has over 15 years of experience writing comprehensive guides. He also has an IT background and has achieved different professional certifications from Microsoft, Cisco, VMware, and CompTIA. He has been recognized as a Microsoft MVP for many years.
NIC Teaming (or Load Balancing/Failover – LBFO, or NIC bonding) allows joining multiple physical network adapters (NICs) into a single logical network card. In this article, we’ll show how to configure NIC Teaming on Windows Server 2019/2016/2012R2 and on Windows 10/11 desktop computers.
Contents:
- Configuring a NIC Teaming on Windows Server 2019
- How to Create NIC Teaming on Windows Server with PowerShell?
- How to Enable NIC Teaming on Windows 10 and 11?
Why may you need to combine multiple network adapters into a NIC Team?
- Increase throughput. For example, by joining two 1GB network cards into a NIC Team, you will get a 2Gbit/s bandwidth on a logical adapter;
- Manage network card load balancing. You can balance the network traffic across active NICs.
- Fault tolerance. If any of your network cards in a NIC Team fails, the rest cards take their functions and the connection with the server is not interrupted. For critical servers, the mechanism protects a service against downtime if a network switch or an Ethernet port on it fails, or if a network cable (connecting your host and switch) is damaged. To implement this feature, it is enough to connect network cards to different physical switches.
In Windows Server 2022/2019/2016/2012R2, NIC Teaming is not compatible with Single-Root I/O Virtualization (SR-IOV), TCP Chimney, and Remote Direct Memory Access (RDMA).
Configuring a NIC Teaming on Windows Server 2019
You can configure NIC Teaming on Windows Server 2012 or newer. Let’s see how to combine multiple network adapters into a NIC Team interface on Windows Server 2019. NIC Teaming is disabled by default on Windows Server.
To enable it, open the Server Manager, select Local Server, and click NIC Teaming: Disabled in its properties.

In the next window, select Tasks -> New Team in the left bottom pane.
Then enter a Team name and select the network adapters you want to add to the group.
In Windows Server 2019, you can add up to 32 physical network adapters to a NIC Team. The only requirement is the same connection speed on the team adapters.
You can select special team options. The options set NIC Teaming rules and performance. Let’s take a closer look at these settings.
Teaming Mode. The option sets how the group interacts with the network switches:
- Static Teaming (IEEE 802.3ad) is a static operation mode depending on your network hardware. All team adapters must be connected to the same switch, which Ethernet ports are configured to use static channel aggregation (additional switch configuration is required);
- Switch Independent (a default mode) — the NIC Team works independently of the switch; no additional configuration of network hardware is needed. If this mode is on, you can connect different network adapters to different switches to improve fault tolerance (protection against switch failure);
- LACP (Link Aggregation Control Protocol, LACP, IEEE 802.1ax) is the mode that depends on your network hardware as well. You need to enable and configure the dynamic link aggregation using the LACP on your switch.
Load Balancing mode sets how network traffic is distributed between NICs in the team.
- Address Hash — a special hash is assigned to each physical adapter (based on sender and recipient MAC or IP addresses). All traffic from a specific sender will go through this NIC;
- Hyper-V Port — you can use this mode on a server with the Hyper-V role. It allows you to bind an adapter from your NIC Team to a specific port on a Hyper-V virtual switch;
- Dynamic is a default option combining both load balancing types.
You can make one of the adapters in the group a Standby adapter. In a normal operation mode, this NIC is not used to process traffic. If any other adapter in your NIC Team fails, it will be replaced by a standby one. Actually, if this function is not enabled, there will be no service downtime when any network adapter fails, since its load will be automatically distributed among other cards in the group.
Select the settings you need, click OK and a new NIC Team will be created.
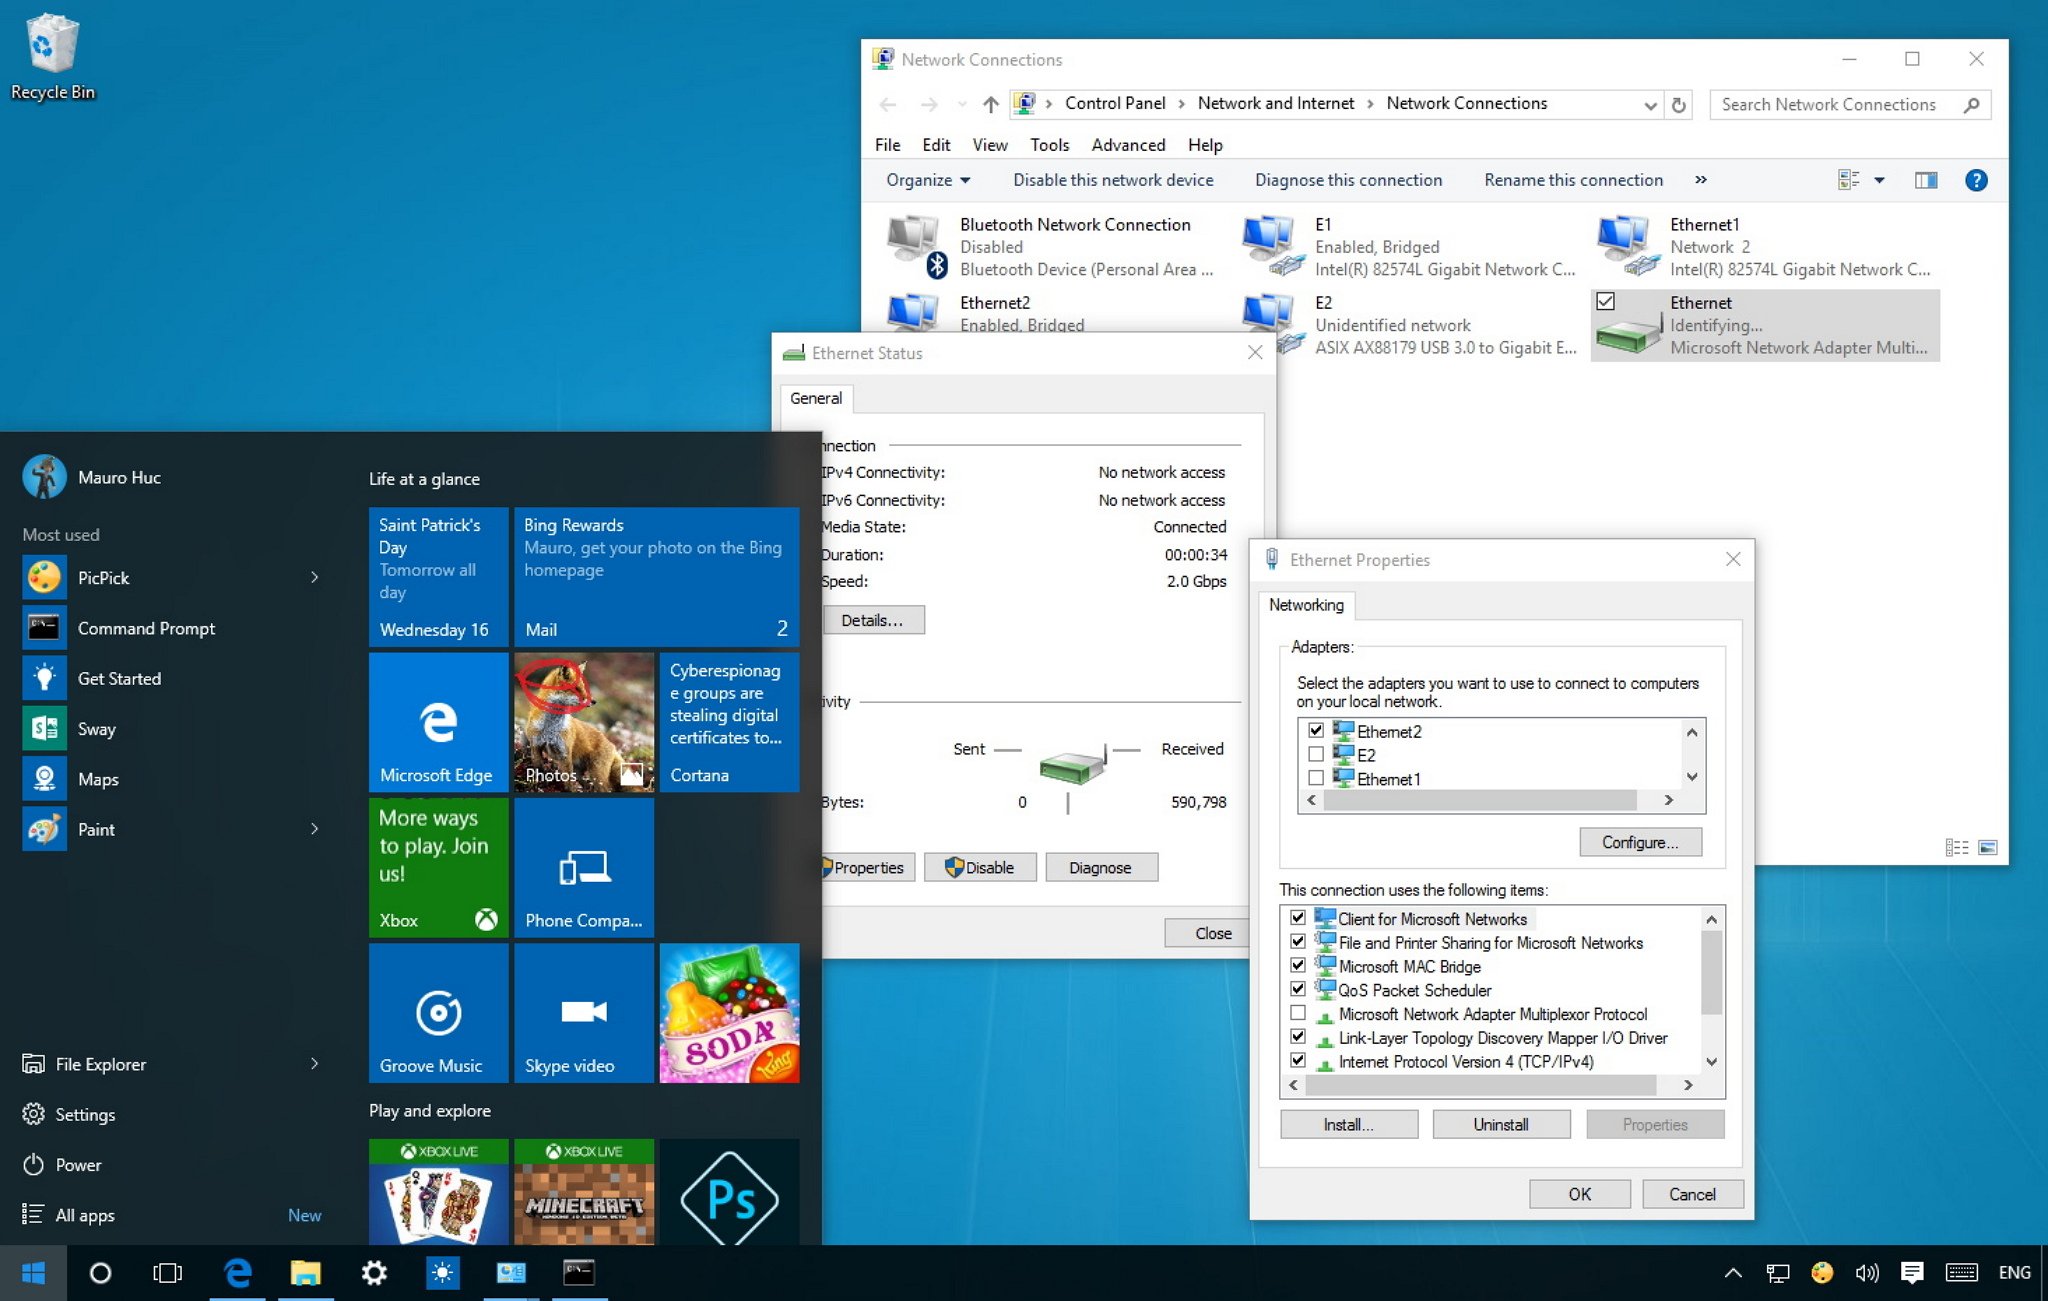
Open the list of network connections in the Control Panel. Make sure that a new device labeled Microsoft Network Adapter Multiplexor Driver (it has a different icon) has appeared. This is the NIC Teaming virtual adapter.
Further configuration of the network card (protocols, IPv4/v6 address) is performed in the properties of the NICTeam adapter.
Network adapters that you add to a NIC group will no longer have their own IP addresses.
If you remove a NIC Team, the previous network adapter settings will be restored.
Later you can add or remove network adapters to your NIC Team.
You can use the NIC Teaming to configure multiple VLAN interfaces on Windows Server. To do it, you can even create a NIC Teaming group from a single network adapter.
How to Create NIC Teaming on Windows Server with PowerShell?
You can create and manage NIC Teams both through the Windows graphical interface and PowerShell. PowerShell can be used to set up NIC Teaming on Windows Server Core.
You can use the built-in NetLbfo module on Windows Server to manage NIC Teaming. Display a list of network adapters on your server:
Get-NetAdapter

Create a new Team0 from the adapters named Ethernet1 and Ethernet3. Select NIC Teaming mode: Switch Independent with dynamic load balancing.
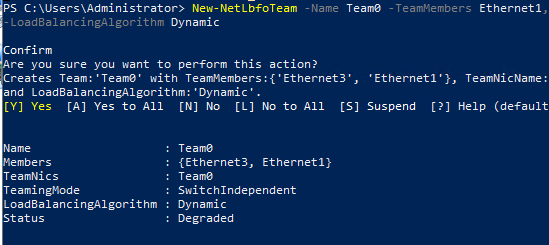
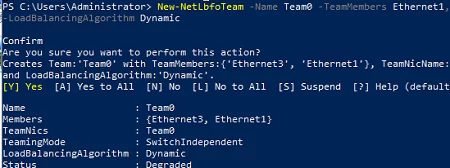
New-NetLbfoTeam -Name Team0 -TeamMembers Ethernet1,Ethernet3 -TeamingMode SwitchIndependent -LoadBalancingAlgorithm Dynamic
Available options:
- TeamingMode: Static SwitchIndependent, Lacp
- LoadBalansingAlgorithm: TransportPorts, IPAddresses, MacAddresses, HyperVPort, Dynamic
To get information about NIC Teams on a server, use the command below:
Get-NetLbfoTeam
Name : Team0
Members : {Ethernet3, Ethernet1}
TeamNics : Team0
TeamingMode : SwitchIndependent
LoadBalancingAlgorithm : Dynamic
Status : Up
You can use PowerShell to configure an IP address of your NIC Teaming interface and other network settings:
New-NetIPAddress -InterfaceAlias team0 -IPAddress 192.168.13.100 -PrefixLength 24 -DefaultGateway 192.168.13.1
 Set-DnsClientServerAddress -InterfaceAlias team0 -ServerAddresses 192.168.13.10
Run the Get-NetAdapter command. Note that the LinkSpeed of the NIC Teaming network adapter is 2 Gbit/s.

To change the NIC Teaming group settings, use the NetLbfoTeam cmdlet:
Set-NetLbfoTeam -Name Team0 -TeamingMode LACP
If you run this command in a VM, the following error appears:
Set-NetLbfoTeam : 'SwitchIndependent' is the only TeamingMode value supported in a Virtual Machine
To add an additional VLAN interface via NIC Teaming, run the command below:
Add-NetLbfoTeamNIC -Team Team0 -VlanID 44
You can remove a NIC Team using this command:
Remove-NetLbfoTeam -Name Team0
How to Enable NIC Teaming on Windows 10 and 11?
You can use NIC Teaming to combine network adapters both in Windows Server and in desktop versions of Windows 10 and 11. The main thing is that your network card must support Link aggregation, NIC teaming, or LBFO.
For example, NIC Teaming works out of the box with Realtek PCIe GbE Family Controller (10.35.510.2019) or Intel(R) 82574L Gigabit Network Adapter.
To create a NIC Team on Windows 10 (in this example, it is Windows 10 20H2), open your PowerShell console and list network adapters:
Get-NetAdapter
Let’s create a NIC Team of Ethernet0 and Ethernet1 adapters.
New-NetSwitchTeam -Name "MyNICTeam" -TeamMembers "Ethernet0","Ethernet1"

Make sure that a new NIC Teaming interface has appeared on the computer:
Get-NetSwitchTeam
Don’t forget to set its network settings. Now you have got a new 2 Gbit/s interface.

To remove a NIC Team, use PowerShell:
Remove-NetSwitchTeam -Name "MyNICTeam"