
Все способы:
- Способ 1: Штатные «Параметры»
- Способ 2: «Панель управления NVIDIA»
- Способ 3: Сторонний софт
- NirCmd
- Monitor Profile Switcher
- Вопросы и ответы: 0
Способ 1: Штатные «Параметры»
Выбрать основной монитор на компьютере с Windows 10 можно через раздел с настройками экрана штатных «Параметров», но для этого второе устройство уже должно быть подключено к ПК или ноутбуку, где будут производиться настройки:
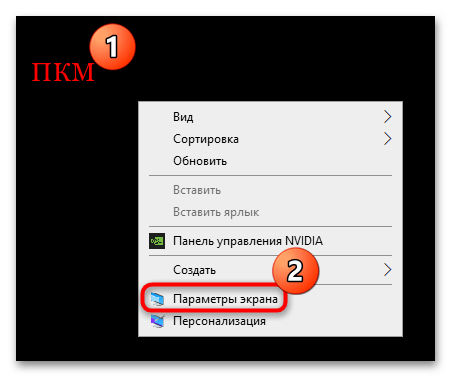
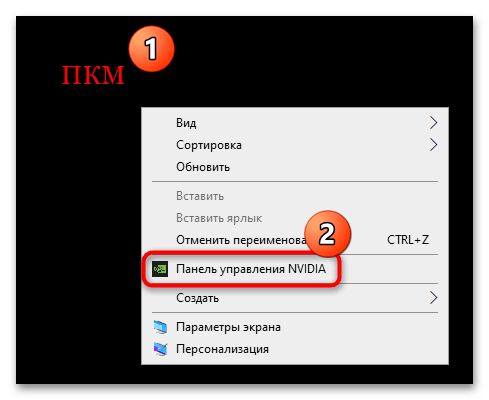
- Кликните правой кнопкой мыши по свободной области на рабочем столе и из контекстного меню выберите пункт «Параметры экрана».

Или при помощи меню «Пуск» вызовите системное приложение «Параметры».
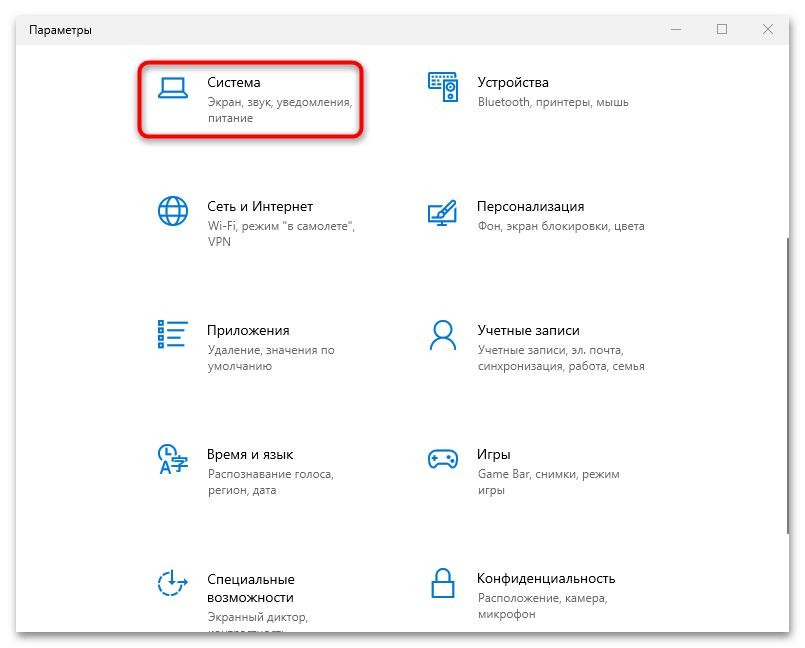
В появившемся окне вам нужен раздел «Система».
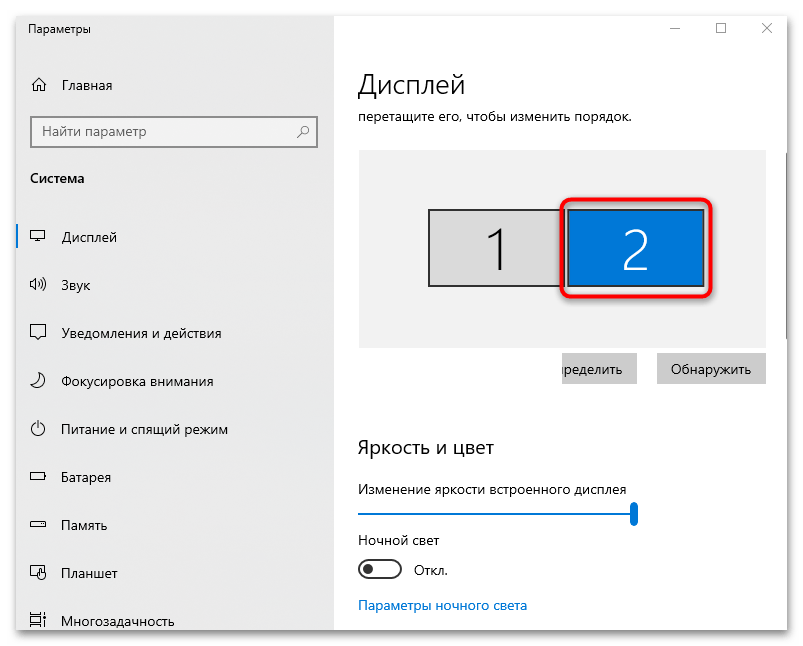
- Тут вы увидите экраны, подключенные к компьютеру. Выделите тот, который надо сделать основным.
- Затем пролистайте окно чуть ниже и отметьте опцию «Сделать основным дисплеем».
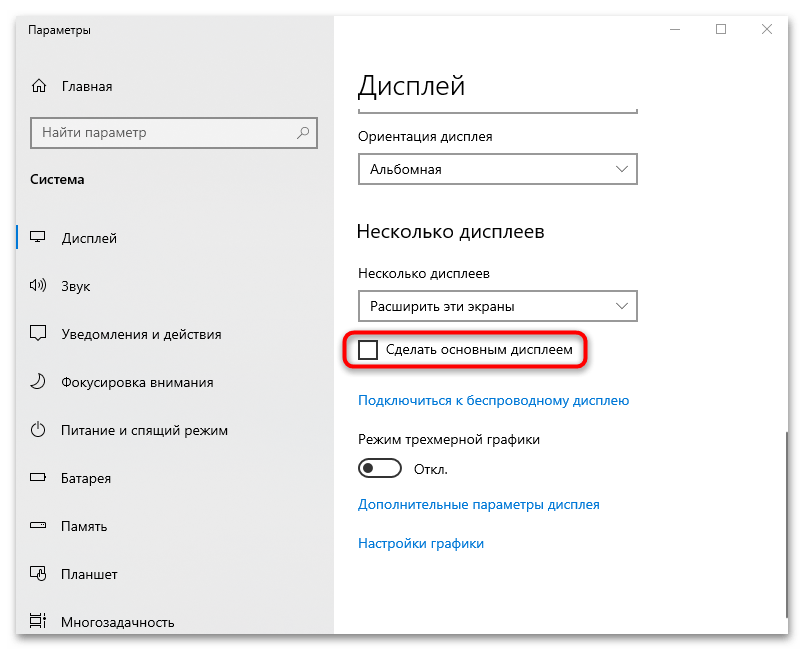
На этом настройки завершены – новые параметры применять мгновенно и автоматически, после чего выбранный дисплей станет основным.
Сделать экран основным можно и с помощью настроек проецирования. Этот вариант подойдет, если нужно использовать только один монитор, например подключенный к ноутбуку, и чтобы дисплей лэптопа при этом не работал. В этом случае достаточно одновременно нажать на клавиши «Win + P», после чего выбрать «Только второй экран».
Читайте также: Как переключаться между мониторами в Windows 10
Способ 2: «Панель управления NVIDIA»
Если в компьютере или ноутбуке установлена видеокарта NVIDIA, можно выбрать основной монитор с помощью фирменного программного обеспечения производителя – «Панель управления NVIDIA».
- Запустите программу «Панель управления NVIDIA», используя строку системного поиска. Также ее можно открыть через контекстное меню рабочего стола, кликнув правой кнопкой по свободной области и выбрав соответствующий пункт.
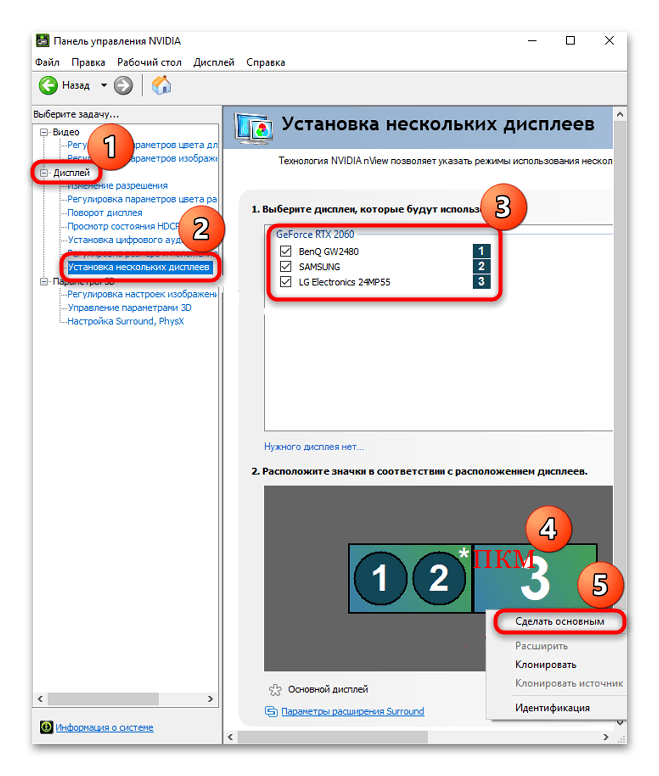
- Разверните меню «Дисплей», расположенное на панели слева, затем нажмите на строку «Установка нескольких дисплеев». В центральной части окна можно выбрать, какие подключенные экраны будут использоваться, отметив их, а также расположить их в нужном порядке. Чтобы сделать один из дисплеев основным, кликните по нему правой кнопкой мыши и выберите пункт «Сделать основным» в появившемся меню. Нажмите на «Применить», чтобы новые настройки мгновенно вступили в силу.
Если в работе «Панели управления NVIDIA» есть проблемы, ознакомьтесь с нашими материалами на эти темы – в них рассмотрены наиболее распространенные ошибки и пути их исправления.
Подробнее:
Решение проблемы с отсутствием вкладки «Дисплей» в Панели управления NVIDIA
Возвращаем пропавшую панель управления NVIDIA в Windows 10
Неполадки в работе Панели управления Nvidia
Способ 3: Сторонний софт
Чтобы не менять каждый раз настройки вручную или в тех случаях, когда «Панели управления NVIDIA» нет, а возможности «Параметров» по каким-то причинам ограничены, можно воспользоваться сторонним программным обеспечением. Несколько примеров мы разберем более детально.
NirCmd
Утилита NirCmd – это небольшой инструмент, распространяющийся на бесплатной основе. С его помощью можно выполнять различные команды, которые предназначены для штатной консоли Windows, в том числе использовать запрос для смены основного монитора.
Скачать NirCmd с официального сайта
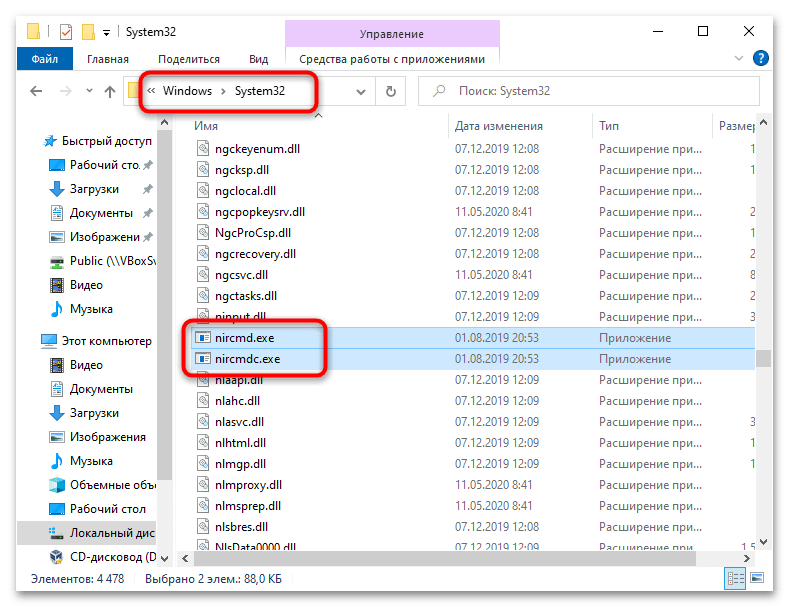
- Скачайте и распакуйте утилиту в директорию
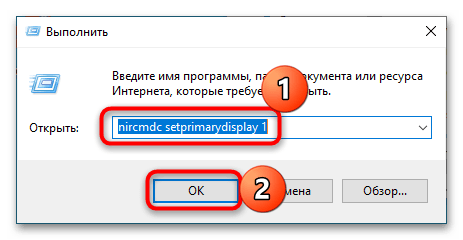
C:\Windows\System32. - Запустите исполняемый файл утилиты либо вызовите диалоговое окно «Выполнить», одновременно нажав на клавиши «Win + R», затем введите команду
nircmdc setprimarydisplay 1, где под цифрой подразумевается номер экрана, который нужно сделать основным. Выполните запрос, нажав на клавишу «Enter» или кнопку «ОК».
После этого все настройки будут применены сразу – а необходимости запускать фирменный софт NVIDIA или «Параметры» не будет нужды.
Вы также можете создать ярлык, чтобы быстро менять настройки. Для этого кликните ПКМ по пустому месту рабочего стола, наведите курсор на «Создать» и щелкните по «Ярлык». В поле «Укажите расположение объекта» вставьте команду, указанную чуть выше, в следующем окне задайте любое имя и подтвердите создание кнопкой «Готово».
Monitor Profile Switcher
Еще один вариант – это программа Monitor Profile Switcher. Она также полностью бесплатная, но предназначена для управления мониторами, причем тут есть возможность создавать собственные профили с пользовательскими настройками для дисплеев и быстро переключаться между ними.
Следует отметить, что конфигурации основаны на системных настройках – в любом случае придется воспользоваться одним из вышеописанных способов, чтобы выбрать основной монитор, но сохранить его в программе для быстрого переключения.
Скачать Monitor Profile Switcher с официального сайта
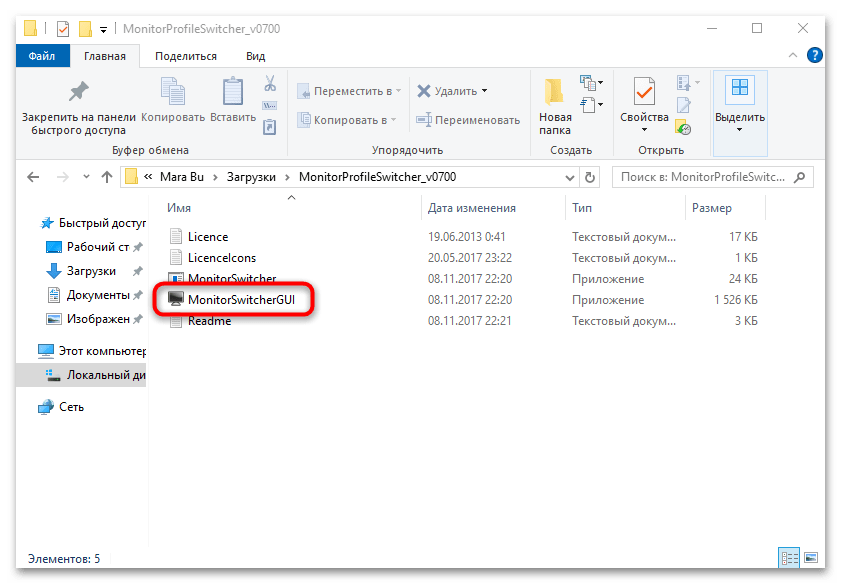
- Перейдите по ссылке выше и скачайте ZIP-файл с программой, после чего распакуйте его и запустите исполняемый файл «MonitorSwitcherGUI».
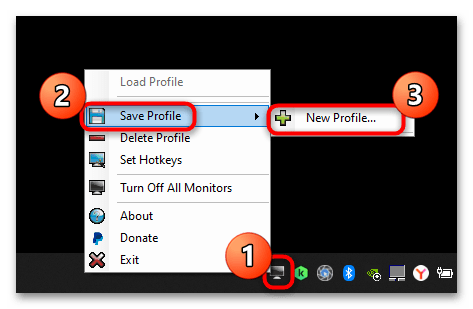
- В трее Windows 10 появится иконка программы. Кликните по ней левой кнопкой мыши, наведите курсор на пункт «Save Profile» и выберите «New Profile» — будущий профиль сохранит текущие системные настройки.
- В новом окне задайте ему имя.
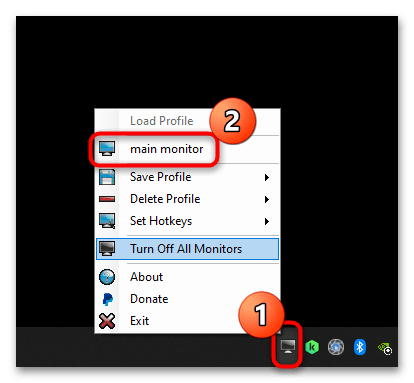
- Далее останется вызвать меню софта, нажав на иконку в трее, и выбрать нужный профиль из меню.
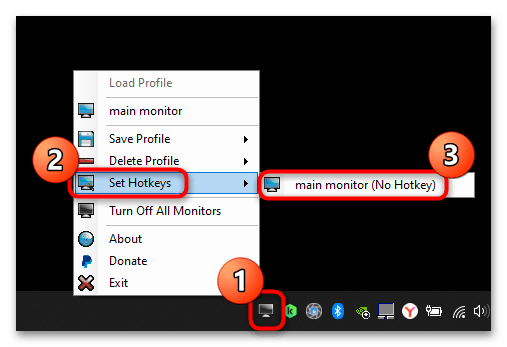
Помимо этого, через Monitor Profile Switcher можно настроить горячие клавиши для быстрого переключения между профилями – пункт «Set Hotkeys» в контекстном меню.
Если вы часто планируете переключаться между экранами, делая основным то один, то другой, можно добавить программу в автозагрузку, чтобы каждый раз не запускать софт вручную.
Подробнее: Добавление приложений в автозагрузку в Виндовс 10
Наша группа в TelegramПолезные советы и помощь
Steps to Switch Primary and Secondary Monitors in Windows
Published
5 min read
How to Change Primary and Secondary Monitor on Windows 11/10
The experience of using multiple monitors can greatly enhance productivity, especially for tasks requiring extensive screen real estate, such as video editing, gaming, programming, or multitasking between applications. Windows 10 and Windows 11 both have robust features that allow you to easily customize your display settings, including how multiple monitors are used. This guide will take you through the steps of changing your primary and secondary monitors, ensuring that you make the most out of your dual or multiple setup.
Understanding Primary and Secondary Monitors
Before diving into the configuration process, let’s clarify the roles of primary and secondary monitors.
-
Primary Monitor: This is the main display that Windows recognizes. It typically houses the taskbar and desktop icons. Any new window or application you open will generally appear on the primary monitor first.
-
Secondary Monitor: This is the additional screen that expands your workspace. You can use it to extend your desktop, mirror your primary display, or use it independently.
With a clear understanding of these roles, let’s discuss how to configure and change them in Windows 10 and Windows 11.
Changing Primary and Secondary Monitors in Windows 10
Step 1: Connect Your Monitors
Before making any changes, ensure that your monitors are correctly connected to your computer. You may use HDMI, DisplayPort, DVI, or VGA cables, depending on your monitors’ compatibility and what your graphics card allows.
Step 2: Access Display Settings
-
Right-click on the Desktop: On an empty space on your desktop, right-click to open the context menu.
-
Select Display Settings: From this menu, click on «Display settings.» This will open the Display section of the Settings app where you can manage multiple monitors.
Step 3: Identify Your Monitors
In the Display settings window, you’ll see all connected monitors represented as rectangles. Click on the «Identify» button, and numbers (1, 2, etc.) will appear on each monitor to help you determine which is which.
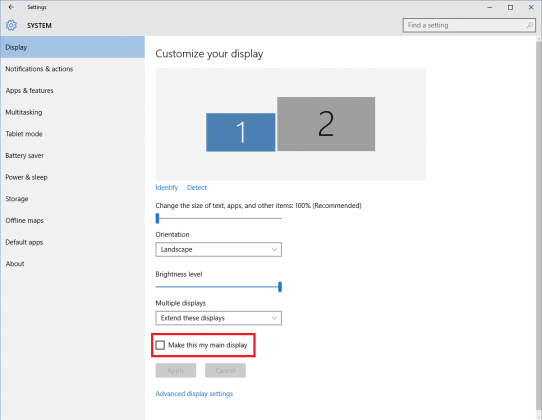
Step 4: Set the Primary Monitor
-
Select the Desired Monitor: Click on the rectangle representing the monitor you wish to set as your primary display.
-
Make It Primary: Scroll down to find the checkbox labeled «Make this my main display.» Check this box. If you have multiple monitors, remember that adjustments will shift the taskbar and desktop icons to the chosen primary monitor.
-
Apply Changes: Once you’ve set the primary display, click on the «Apply» button at the bottom. Windows will apply the changes and may prompt you to confirm whether you want to keep the new setting.
Step 5: Arrange Your Monitors
-
Drag and Drop: If needed, you can rearrange the display order by dragging and dropping the monitor rectangles to match the physical arrangement of your monitors on your desk.
-
Orientation Settings: Here, you can also adjust the orientation of each monitor if one of them needs to be rotated (portrait vs. landscape).
Finalizing Changes
After successfully changing your primary monitor, you can customize more settings such as scaling, resolution, and orientation for each individual monitor by selecting them and adjusting their settings.
Changing Primary and Secondary Monitors in Windows 11
Windows 11 has a refreshed interface but maintains a similar procedure for managing display settings. Here’s how to change your primary and secondary monitors in Windows 11.
Step 1: Connect Your Monitors
Before initiating any changes, ensure that all monitors are properly connected to your PC. Utilize compatible cables like HDMI or DP, ensuring all connections are secure.
Step 2: Access Display Settings
-
Right-click on the Desktop: In a blank area of your desktop, perform a right click.
-
Select Display Settings: From the pop-up menu, choose «Display settings». This opens up the display configuration interface.
Step 3: Identify Your Monitors
-
View Connected Displays: Similar to Windows 10, the settings will display rectangles for each monitor, labeled with their corresponding numbers.
-
Identify Monitors: Click the «Identify» button to see which number corresponds to each monitor, as this provides visual clarity for further steps.
Step 4: Set the Primary Monitor
-
Select the Preferred Monitor: Click on the rectangle that you want to designate as the primary monitor.
-
Set as Primary: Look for the option labeled «Use this display as your main display.» Enable this toggle switch. Your taskbar and main desktop icons will move to the selected monitor.
-
Confirm Changes: Click on the «Keep changes» prompt if requested.
Step 5: Rearranging Monitors
-
Rearranging Layout: Just as in Windows 10, you can drag and drop the displayed rectangles to match the physical configuration of your monitors.
-
Adjust Additional Settings: Select each monitor to adjust resolution, scale, and orientation as per your requirements.
Tips for Using Multiple Monitors in Windows 10/11
Once you’ve configured your primary and secondary monitors, consider these tips for an optimized multi-monitor experience:
-
Use Keyboard Shortcuts: Familiarize yourself with keyboard shortcuts for window management (e.g., Win + Shift + Left/Right Arrow) to move applications between screens quickly.
-
Taskbar Settings: You can customize how the taskbar behaves on multiple monitors by right-clicking the taskbar and navigating to Taskbar settings. Here, you can choose whether to display taskbars on all monitors and how buttons are combined.
-
Virtual Desktops: Leverage virtual desktops to organize your workspace even further. You can create distinct desktops for different projects and switch between them seamlessly.
-
Screen Splits: Use applications that allow you to split your screens efficiently, enhancing organization and reducing clutter.
-
Calibration: Make sure to calibrate your monitors for consistent color reproduction, especially if you’re doing graphic design or video editing. You can find the calibration tool in the display settings.
Troubleshooting Common Issues
While Windows 10 and 11 offer robust support for multiple monitors, issues can arise. Here are common problems and their solutions:
-
Monitor Not Detected: If your secondary monitor isn’t recognized, reconnect the cables, check power supply, or update graphics drivers through Device Manager.
-
Screen Flickering: This might indicate resolution mismatch or frequency settings being incompatible. Ensure both monitors are set to compatible resolutions.
-
Scaling Issues: Sometimes, fonts and icons may appear too large or too small. Adjust scaling in the Display settings for each monitor until you find a comfortable setting.
-
Taskbar Display Problems: If the taskbar is not displaying correctly, right-click on it, navigate to Taskbar settings, and adjust multiple display settings according to your preferences.
Conclusion
Changing your primary and secondary monitors in Windows 10 and Windows 11 is a straightforward process that can significantly enhance your productivity and comfort. By following the outlined steps, you can customize your monitor setup, making it more suitable for your workflow. With the right arrangement, multi-monitor systems can foster creativity and efficiency, whether for professional use or gaming.
Take your time to experiment with different settings and find what configuration works best for you. With these tips and troubleshooting advice, your multi-monitor experience in Windows should be seamless, productive, and enjoyable.
Having a dual monitor setup is always a productivity boost. Thankfully, the Windows operating system natively allows users to manage primary and secondary monitors without having to use third-party software.
When the first display device is connected to a Windows 11/10 PC, it automatically becomes the primary display monitor. This means it will host your desktop, as well as all other windows that you have open. When more monitors are connected, they are then detected as the secondary monitor, tertiary, etc.
This article guides you through multiple ways to change the primary monitor on your Windows PC, and also how to align them according to your actual setup. For example, if your dial-monitor setup is placed on top of each other, you can adjust them so. This will allow you to move your mouse cursor and windows up and down (instead of sideways) to move between the two displays.
Table of Contents
Changing your primary display will allow you to select which display device hosts your main content. If you have 3 displays connected and are aligned in a horizontal series, you can set your middle screen to be the primary display.
Change Primary Monitor in Windows 11
Follow these steps to change your primary monitor if you are using Windows 11:
-
Navigate to the following: This will open the Display Settings menu. (Press the Windows key + I buttons to open Settings directly).
Settings app >> System >> Display
-
Click the Identify button, which displays a number on each screen to identify which screen is primary, secondary, etc.

Identify screens -
Now click on the screen number you want to make primary.
Select screen -
Now expand “Multiple displays” and then check the box next to “Make this my main display.”
Make it the primary display


The selected monitor will now be your primary display. When the “Make this my main display” option is grayed out – this means the selected monitor is already your primary one.

If you have a dedicated NVidia graphics card, you can also change the primary monitor in Windows 11 or Windows 10 using the NVidia Control Panel.
Change Primary Monitor in Windows 10
If you are using Windows 10, then follow these steps to change your primary monitor:
-
Navigate to the following:
Settings app >> System >> Display
-
Now select the monitor that you want to make primary, then scroll down and check the box next to “Make this my main display” under Multiple displays.

Change primary display in Windows 10

Similar to Windows 11, the option will then be grayed out and the selected monitor will become your primary display.
The methods we have discussed up until now are the Windows native methods that allow you to change your primary monitor. However, if you are a fan of the Windows command line, then the following methods might be your cup of tea.
How to Change Primary Monitor from Command Prompt in Windows
To change your primary monitor using Command Prompt, you must use third-party command-line tools.
Using NirSoft NirCmd
NirCmd is a command-line tool that allows you to perform multiple tasks directly from the Command Prompt, which otherwise is not possible. Here are the steps to change your primary display using this tool:
-
To start with, download the NirCmd tool from the given link and then extract its contents into a separate folder.
-
Now open Command Prompt with administrative privileges and then navigate to the extracted folder directory using this cmdlet. Replace PathToFolder with the complete path to the extract NirCmd folder.
cd /d PathToFolder
Change directory -
Now use the following cmdlet to change your primary monitor while replacing Integer with the display identifier of the monitor you want to set as your primary display.
nircmd.exe setprimarydisplay IntegerNote: The Integer used in the command line will not be the same as the one you see on your displays when you identify the monitors. This is because while using the command line, the monitor indexes (identifiers) are changed.
In our case, the Integer “10” sets the secondary monitor as the primary, and the Integer “9” sets the first monitor as primary. You may have to adapt the hit-and-trial method to check which monitor is configured as primary.

Change primary monitor using NirCmd


When the correct identifier is used, you will notice that your display kind of zooms out and then zooms back in, signifying a change in the display settings. However, you must confirm which monitor has been configured as the primary display.
Using NirSoft MultiMonitorTool
MultiMonitorTool is another command-line tool used to manage your display settings. Follow these steps to use the MultiMonitorTool to change your primary monitor:
-
Start by downloading MultiMonitorTool and then extract its content into a separate folder.
-
Now open Command Prompt with administrative privileges and then navigate to the extracted folder directory using this cmdlet. Replace PathToFolder with the complete path to extract MultiMonitorTool folder.
cd /d PathToFolder
Change directory -
Now use the following cmdlet to change your primary monitor while replacing Integer with the display identifier of the monitor you want to set as your primary display.
MultiMonitorTool.exe /SetPrimary IntegerNote: Similar to NirCmd, you will have to perform the hit-and-trial method while changing the Integer value to identify the correct index for the monitor you wish to set as the primary display.
Change primary monitor using MultiMonitorTool


This will now change your primary display as you can see that the screen zooms out and then zooms back in, which signifies a change in your display settings. However, you will still need to confirm that the correct monitor has been configured as your primary display.
How to Change Display Orientation in Windows
Display orientation is the way your monitors are aligned. If you have only two monitors connected, they could be side-by-side, or in the top-and-bottom orientation. If more than two monitors are connected, they can be aligned in any way!
Furthermore, as it happens with many of us, it could be possible that you drag the mouse cursor from the left end of your screen onto the second monitor, which is placed on its right side.
You can manage your screen’s orientation with respect to one another so your computer knows in which direction the other displays are correctly configured.
-
To change the orientation of the displays, navigate to the following:
Settings app >> System >> Display
-
Here, hold down your screen and then drag it into a different position that is identical to your real monitor setup.
Drag and drop the screens to adjust the orientation -
Once the settings are done, click Apply to save the changes.
Apply settings


You can now move across your multiple displays in the direction in which they are aligned.
If you encounter any errors while setting up your primary monitor and have any tips for us, you can always ask us in the comments section below.
Frequently Asked Questions
How to shift a window from one monitor to the other?
If a window opens on the wrong monitor when you have multiple displays connected, you can simply switch it to the right one using the Windows Key + Shift + Left/Right Arrow Key shortcut keys to shift it to the previous or next display device.
How to fix the new window opens on the wrong monitor?
To open a window on the correct monitor, you must set it as the primary display device. To do so, go to Settings app >> System >> Display, select the monitor you want to set as the primary display, then check the box next to “Make this my main display.”
How do I check which monitors are primary and secondary?
You can display the number on the screen to identify which monitor is primary, secondary, and so on. For the primary monitor, it will display “1,” for the secondary, it will display “2,” and so on.
To identify your displays, navigate to Settings app >> System >> Display then click Identify. This will show the indexes on your screen for almost 2 seconds.
Сегодня большое количество пользователей используют в работе более одного монитора либо на постоянной основе, либо подключая ноутбук к внешнему экрану при необходимости. При этом по умолчанию в Windows многие программы запускаются на мониторе, выбранном в качестве основного, что не всегда удобно и её требуется запустить на втором, третьем или каком-либо ещё экране.
В этой инструкции подробно о способах задать конкретный монитор для запуска нужных вам программ в Windows 11 или Windows 10.
Системные средства
Средства Windows 11/10 в текущей версии не позволяют полноценно реализовать то, о чем идет речь в статье. Ваши возможности ограничиваются следующими вариантами:
- Перетаскивать окно мышью за заголовок на нужный экран.
- Перемещать окно на другие мониторы с помощью комбинации клавиш Shift + Windows + стрелка влево или вправо.
- Открыть параметры экрана и выбрать другой экран в качестве основного: нажать по экрану и установить отметку «Сделать основным дисплеем». После этого все вновь запускаемые программы будут открываться на нём.

- Перетащить окно на нужный экран, нажать клавиши Win+Shift+Enter пока окно активно и не развернуто на весь экран, закрыть программу (полностью, если она прячется в области уведомлений — закрыть её и там) и снова запустить её. При следующих запусках оно будет открываться на выбранном мониторе (по отзывам работает у многих, но не у всех).

Как видите, возможностей не слишком много. К счастью, некоторые программы запоминают своё прежнее расположение, но не всегда.
Если требуется запуск разных приложений на разных экранах может потребоваться прибегнуть к использованию сторонних программ, позволяющих реализовать такую функциональность в Windows.
Microsoft PowerToys
Microsoft PowerToys — бесплатный набор системных инструментов для Windows 11/10, скачать который можно из Microsoft Store или с GitHub.
Одна из функций PowerToys позволяет реализовать задуманное:
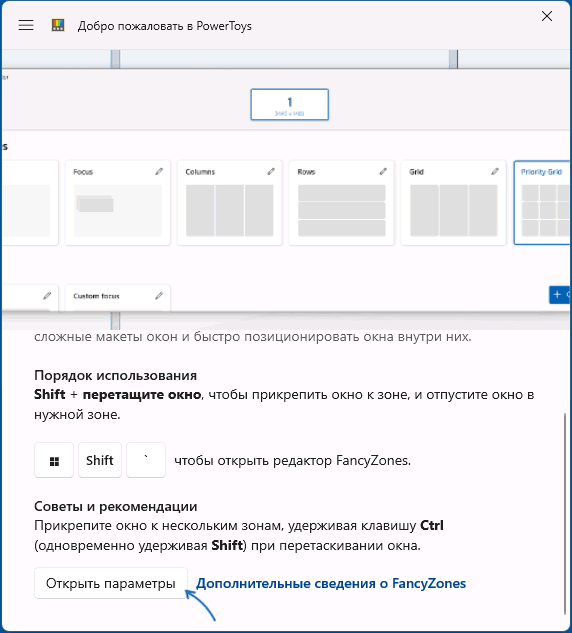
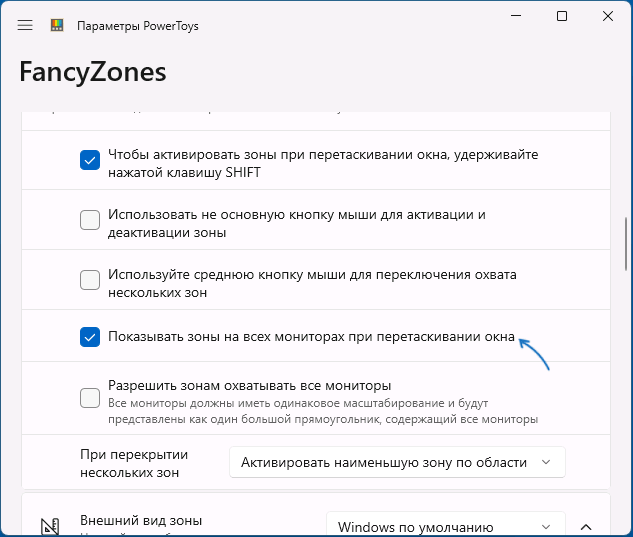
- В PowerToys включите функцию «FancyZones» и откройте параметры функции.

- При необходимости запустите редактор макета и настройте макеты закрепления окон FancyZones на каждом мониторе.
- Включите опцию «Показывать зоны на всех мониторах при перетаскивании окна».

- Включите опцию «Перемещать создаваемые окна в последнюю известную зону».
- Закройте окно настроек PowerToys, запустите нужную программу и перетащите её в нужную зону, удерживая клавишу Shift.
- При следующих запусках программы она будет запускаться в той же зоне, где была закреплена в последний раз.

Учитывайте, что при этом потребуется разрешить автоматический запуск PowerToys и работу приложения в фоновом режиме.
TVGameLauncher
TVGameLauncher — утилита специально предназначенная для настройки запуска игр (но подойдет и для других программ) на мониторе или ТВ по выбору, но подойдет и для запуска обычных программ на одном из двух мониторов.
Использование проще, чем PowerToys:
- Скачайте программу с этого сайта и распакуйте архив в удобное расположение.
- Запустите программу, в верхней панели определите, какой из мониторов будет считаться «ТВ» (здесь выбираем монитор, не являющийся основным), а какой — обычным монитором. Снимите отметку «Enabled» в той же области.

- Ниже в окне программы вы увидите две области: для запуска на ТВ (втором мониторе) и создания ярлыка для такого запуска на рабочем столе — перетащите ярлык или исполняемый файл нужной программы на правую область: на рабочем столе будет создан ярлык для запуска этой программы на мониторе, который в TVGameLauncher был определен вами как «ТВ».

В результате при запуске программы с помощью созданного ярлыка она будет запускаться не на основном мониторе. Учитывайте, что ярлык не будет работать, если удалить TVGameLauncher с компьютера.
Другие варианты
В завершение несколько дополнительных вариантов запуска программ или игр на нужном мониторе:
Возможно, у вас есть собственные решения рассмотренной задачи? Будет отлично, если вы сможете поделиться ими в комментариях ниже.
-
Home
-
News
- 2 Ways – How to Change Main Display Windows 10
By Tina |
Last Updated
How to change main display Windows 10? How to change primary monitor? This post from MiniTool introduces 2 ways to change primary monitor Windows 10. Besides, you can visit MiniTool to find more Windows tips and solutions.
Having two or more monitors allows you to have better productivity and improve the ease of use. Multiple monitor support is a godsend for users since they can have more than one monitors connected to their computers.
When you connected more than one monitors to your computer, Windows set the first connected one as the primary one by default and the left is the secondary, the tertiary, etc.
But sometimes you need to change the primary and the secondary monitor in order to achieve the desired results. The primary display is the default monitor Windows displays everything on it, so it is the reason that setting primary display is an important thing.
So, do you know how to change main display Windows 10? In this post, we will show you how to change which monitor is primary in 2 different ways.
How to Change Main Display Windows 10 in 2 Ways
Change Primary Monitor Windows 10 via Settings
In order to change primary monitor Windows 10, you can do that through Windows Settings.
Now, here is the tutorial.
- Right-click on the blank area on the desktop and then choose Display settings.
- In the Settings window, go to the Display tab, and you will see the Multiple Displays. Click on the Detect button if the external monitor is not detected automatically.
- Then you will see virtual workspace at the top for Select and rearrange displays and screens with number 1 and 2 in that.
- Select the monitor you want to set it as main display.
- At last, check the option Make this my main display.
When all steps are finished, you have successfully changed primary monitor Windows 10.
Change Primary Monitor Windows 10 via NVIDIA Control Panel
In order to change primary monitor Windows 10, you can also do that through NVIDIA Control Panel.
Now, we will show you how to change which monitor is primary.
- Open NVIDIA Control Panel settings.
- In the pop-up window, choose Set up multiple displays under Display section.
- Then right-click on the display number you want to set it as the primary display and choose Make primary.
- Then click Apply to continue.
- At last, confirm the changes and click Yes to continue.
When all steps are finished, you have successfully changed primary monitor Windows 10.
Changing primary and secondary monitor is quite simple to do on Windows 10. If you want to change primary monitor Windows 10, try these solutions. In addition, these solutions are also suitable for multiple displays setup.
Final Words
As for how to change main display Windows 10, this post has introduced 2 useful ways. If you do not know how to change primary monitor Windows 10, you can try these solutions. If you have any different opinions of main display setup, you can share it in the comment zone.
About The Author
Position: Columnist
Tina is a technology enthusiast and joined MiniTool in 2018. As an editor of MiniTool, she is keeping on sharing computer tips and providing reliable solutions, especially specializing in Windows and files backup and restore. Besides, she is expanding her knowledge and skills in data recovery, disk space optimizations, etc. On her spare time, Tina likes to watch movies, go shopping or chat with friends and enjoy her life.