
Last Updated :
08 Apr, 2024
Windows 11 doesn’t have a feature to change the actions of keys or shortcuts, but using tools like Microsoft PowerToys allows users to customize their keyboard shortcuts, making work more efficient and productive. Keyboard shortcuts are key combinations that execute specific actions.
In this article, we will show you how to customize keyboard shortcuts
Table of Content
- Customize Keyboard Shortcuts in Windows 11 Using PowerToys
- Remap keys on Windows 11
- Remap Shortcuts On Windows 11
Customize Keyboard Shortcuts in Windows 11 Using PowerToys
PowerToys is a suite of utilities created specifically for power users to enrich Windows functionality. It comes with a Keyboard Manager tool that lets users reconfigure keys and customize keyboard shortcuts.
1. Remap keys on Windows 11
To remap keys in Windows 11, follow these steps:
Step 1: Press Win + S then on the search bar type «Microsoft Store» then open it
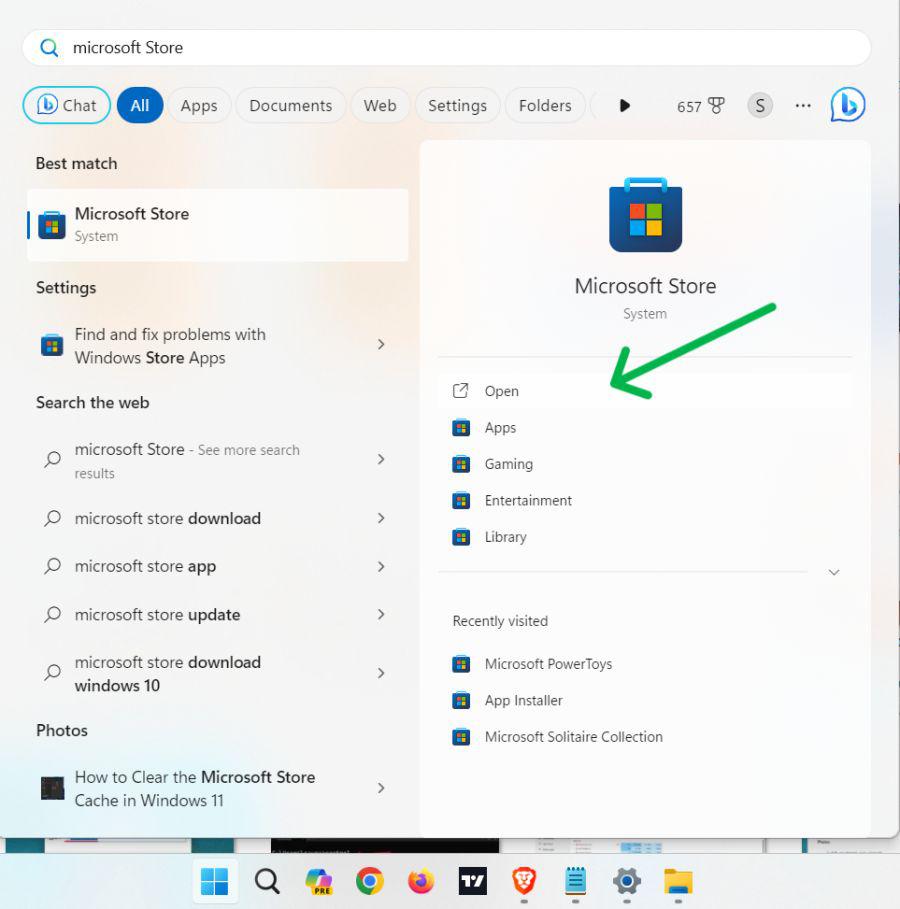
Step 2: On the Microsoft Store search bar type «Microsoft PowerToys«
Step 3: In right side pane click on «Install» button
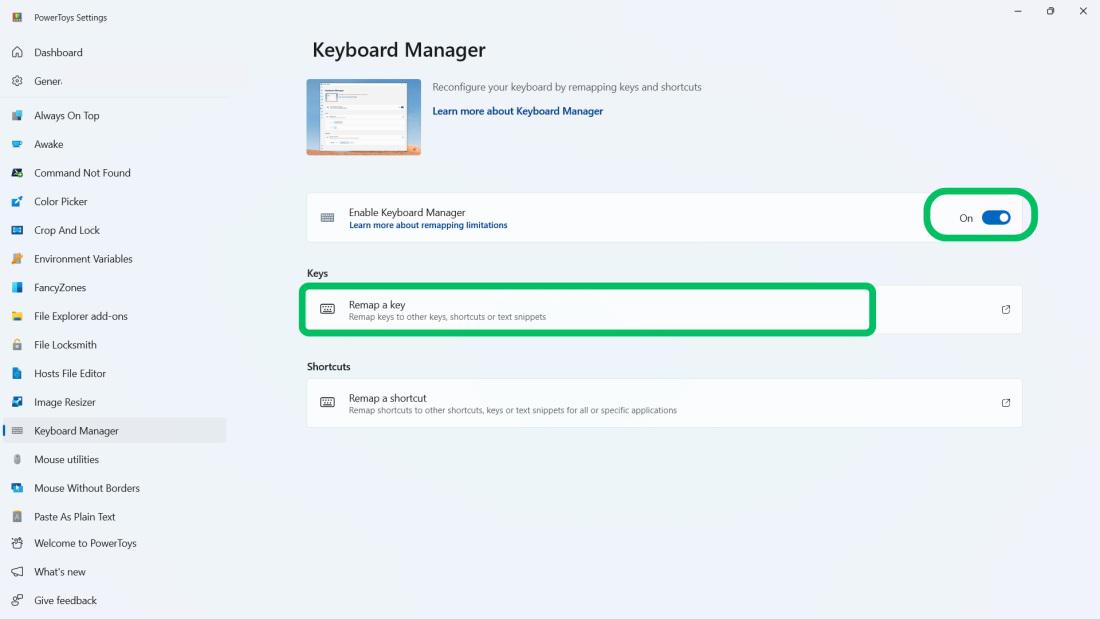
Step 4: Open Microsoft PowerToys and click on Keyboard Manager in the sidebar.
Step 5: Toggle on the “Enable Keyboard Manager”
Step 6: In under Key section, Click on «Remap a key» option
Step 7: Click on the «+ Add key remapping » button
Step 8: In the «Keyboard Manager» section of PowerToys, select the key you want to remap in the «Select» settings. Then, choose the key you want to map it to in the «Send to» setting.
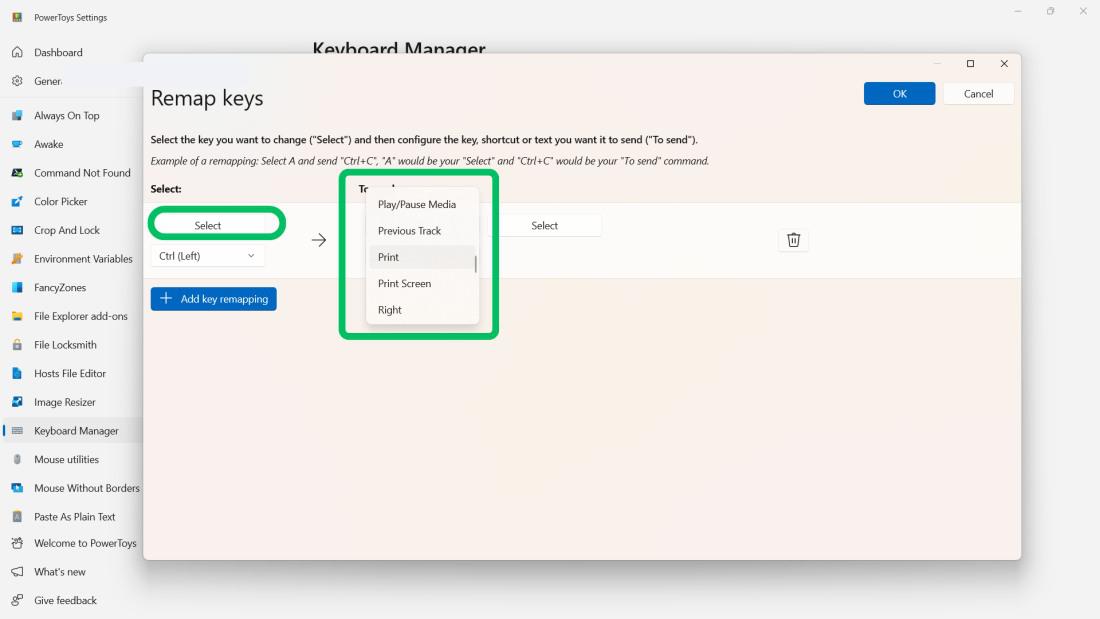
Step 9: Click on «Ok» button to save changes
2. Remap Shortcuts On Windows 11
Step 1: Open Powertoys then navigate to Keyboard Manager
Step 2: Click on the “Remap a Shortcuts” option.
Step 3: Click on the «+ Add key remapping » button
Step 4: In select dropdown menu you can select any shortcut key. then from «Send to» dropdown select remap shortcut. You can select specific shortcut for specific application by targeting apps.

Conclusion
In Conclusion, Using PowerToys, you can quickly adjust your keyboard shortcuts on Windows 11 and make work more comfortable and enjoyable. You can also use other options in PowerToys that include Color Picker, FancyZones, Image Resizer and so on. PowerToys is a free and open-source tool that can be downloaded Microsoft store. So This was all about How you can customize Keyboard Shortcuts in Windows 11.
Все способы:
- Вариант 1: Смена сочетания клавиш переключения языка
- Вариант 2: Настройки используемых программ
- Вариант 3: Использование программы настройки клавиатуры
- Вариант 4: Скачивание сторонних программ
- Вопросы и ответы: 0
Обратим ваше внимание на то, что изменить большинство стандартных горячих клавиш в операционных системах Windows не получится. Практически все они имеют двойное назначение и связаны с другими программами. Например, вы можете выполнить функцию копирования, вставки, вырезания или выделения как в Виндовс 11, так и во всех текстовых или графических редакторах. Поэтому далее мы затронем тему добавления новых сочетаний на уже знакомые действия и настройку сторонних программ.
Вариант 1: Смена сочетания клавиш переключения языка
Смена горячей клавиши для переключения языка — единственная доступная настройка, связанная с сочетаниями в Windows 11. Однако и в этом случае пользователь довольно ограничен в выборе, поскольку может выбрать только один из трех доступных вариантов переключения. Впрочем, если именно эту горячую клавишу вы хотели бы изменить, рекомендуем прочитать тематическую статью на нашем сайте, кликнув по расположенному далее заголовку.
Подробнее: Смена сочетания клавиш переключения языка в Windows 11

Вариант 2: Настройки используемых программ
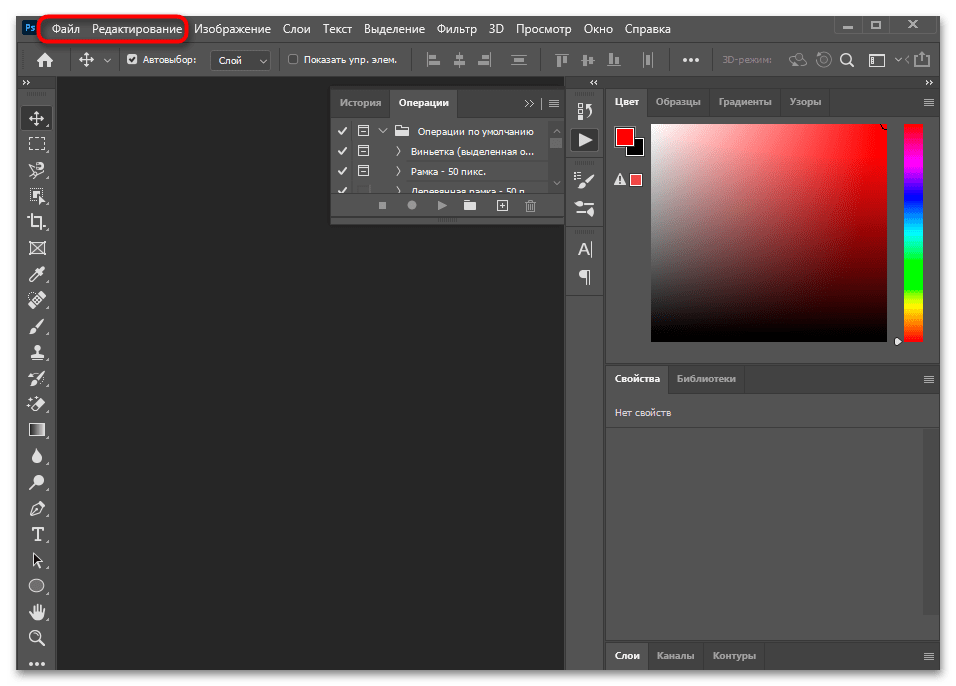
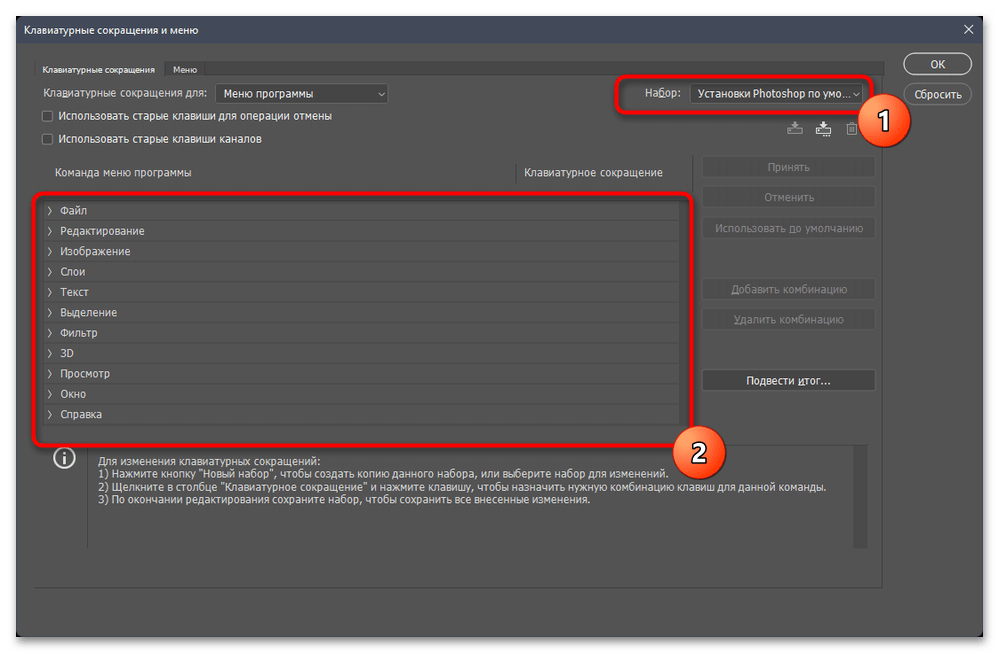
Многофункциональные программы, к которым относятся текстовые, графические редакторы, средства для работы с 3D, анимацией и различные профессиональные решения, некоторые браузеры, поддерживают большое количество горячих клавиш для ускорения взаимодействия с софтом. Практически всегда пользователь может переключить профиль, самостоятельно изменить сочетание или добавить новое. Рассмотрим этот процесс на примере Adobe Photoshop, а вы, прочитав инструкцию, найдете аналогичные параметры в тех программах, с которыми работаете.
- В зависимости от программы откройте меню «Файл» или «Редактирование» либо перейдите к настройкам другим способом.
- В появившемся меню наведите курсор на «Настройки».
- Отыщите в списке параметр, отвечающий за горячие клавиши, или раскройте список со всеми параметрами.
- В случае с Adobe Photoshop и другими программами от данного разработчика пункт с названием «Клавиатурные сокращения» находится прямо в меню «Редактирование».
- Перейдя в раздел с сочетаниями клавиш, вы можете выбрать один из наборов. Многие профессиональные программы позволяют переключаться между наборами с настройками других программ, что удобно при переходе между разным ПО. Список всех команд вы видите ниже в группах.
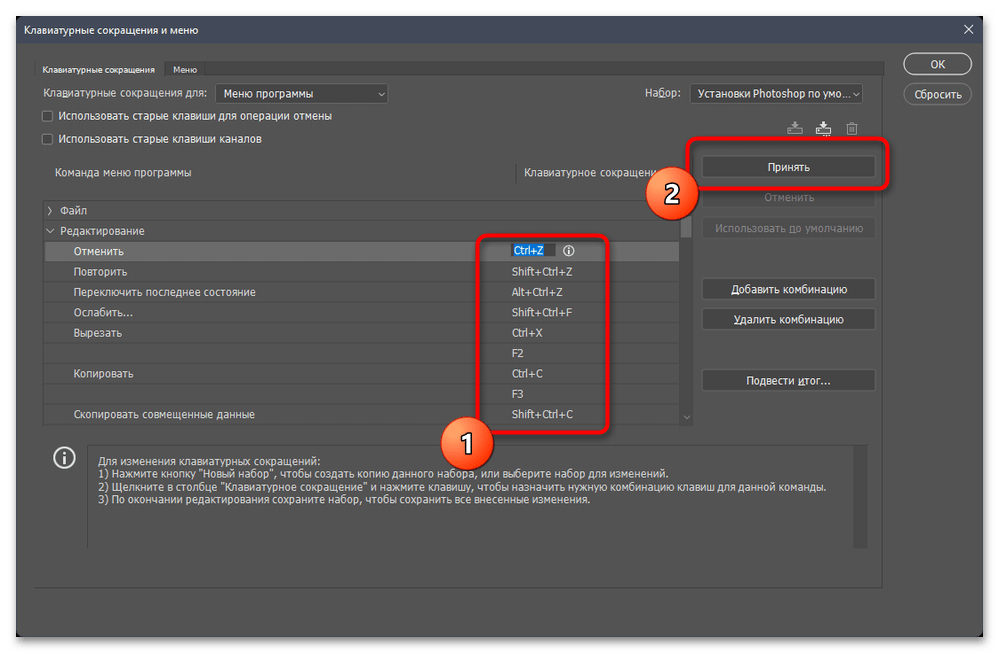
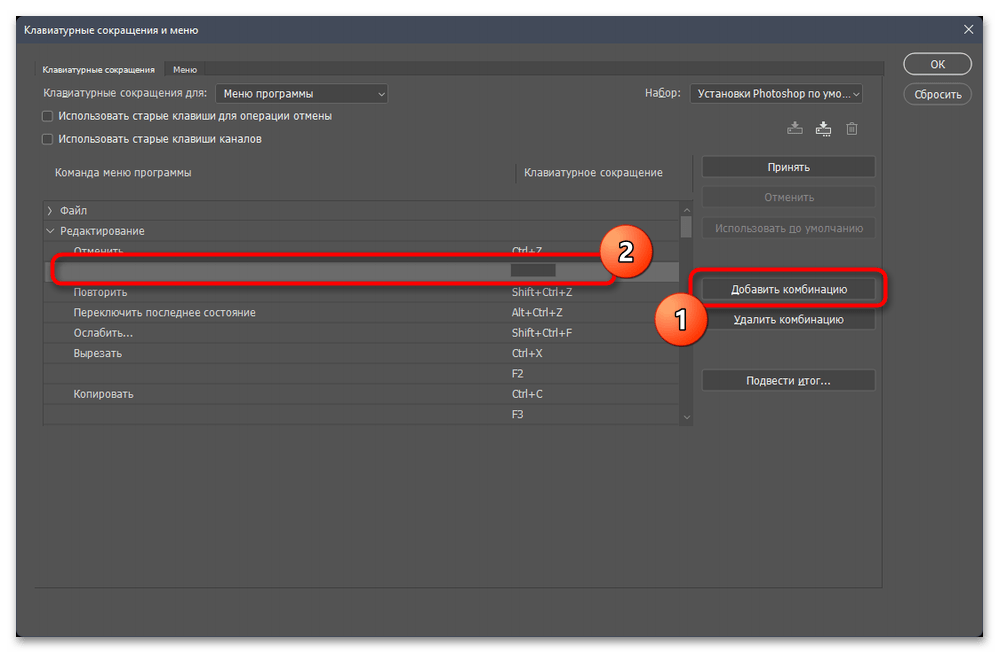
- Разверните одну из групп и обратите внимание на установленные сочетания. Любое из них можно выбрать, выделив левой кнопкой мыши, изменить на свое и нажать «Принять», чтобы сохранить настройки.
- Вместе с этим часто можно к действию добавить еще одно сочетание, если вы предполагаете, что будете использовать и другую комбинацию для вызова.
Отметим, что в поиске на нашем сайте вы можете ввести запрос «Горячие клавиши + название программы», чтобы получить материал по теме и разобраться с тем, какие сочетания установлены в конкретном ПО. Дополнительно в таких статьях часто есть короткая инструкция о том, как изменить комбинации в выбранной программе.
Вариант 3: Использование программы настройки клавиатуры
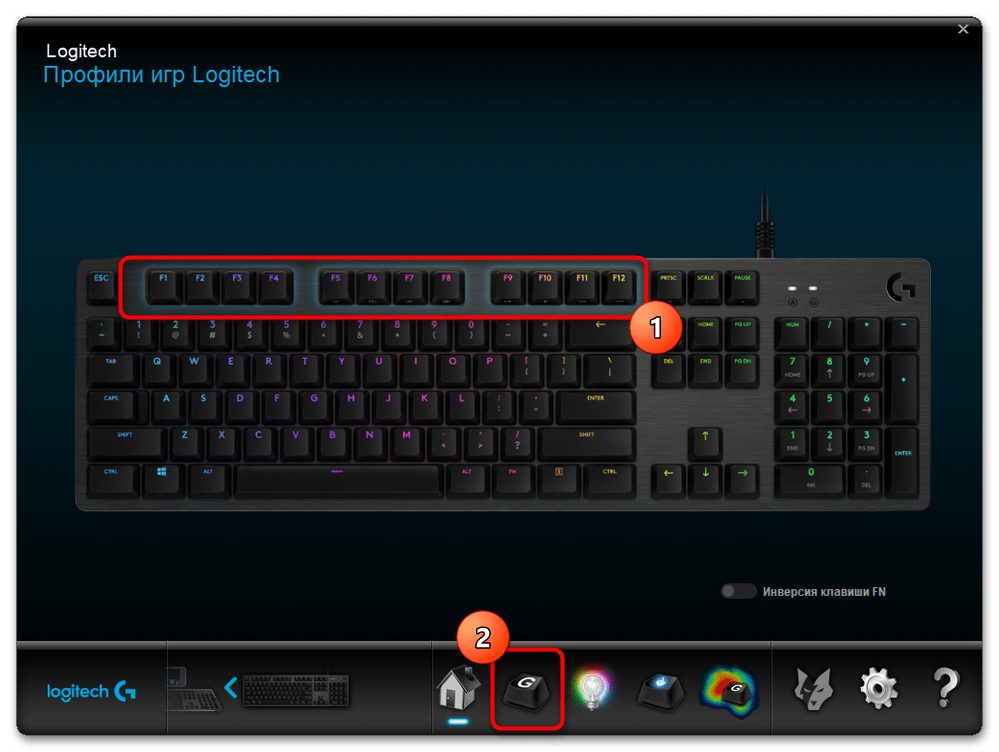
Сейчас практически все известные производители механических и мембранных клавиатур выпускают фирменное программное обеспечение для настройки устройства. В некоторых моделях есть специальный раздел для работы с макросами и назначениями на клавиши. Ограничения зависят исключительно от ПО самой клавиатуры, поскольку вам могут разрешить менять как клавиши на цифровом блоке, так и только функциональный ряд. Давайте на примере программы от Logitech разберемся с тем, как при помощи назначений можно установить подходящие для себя функции.
- Скачайте программу для работы с клавиатурой с официального сайта ее производителя, после этого запустите через значок на панели задач или отыщите исполняемый файл через меню «Пуск».
- В самой программе можете нажать по клавише для ее изменения или перейти к разделу с сочетаниями, выбрав соответствующую кнопку в меню.
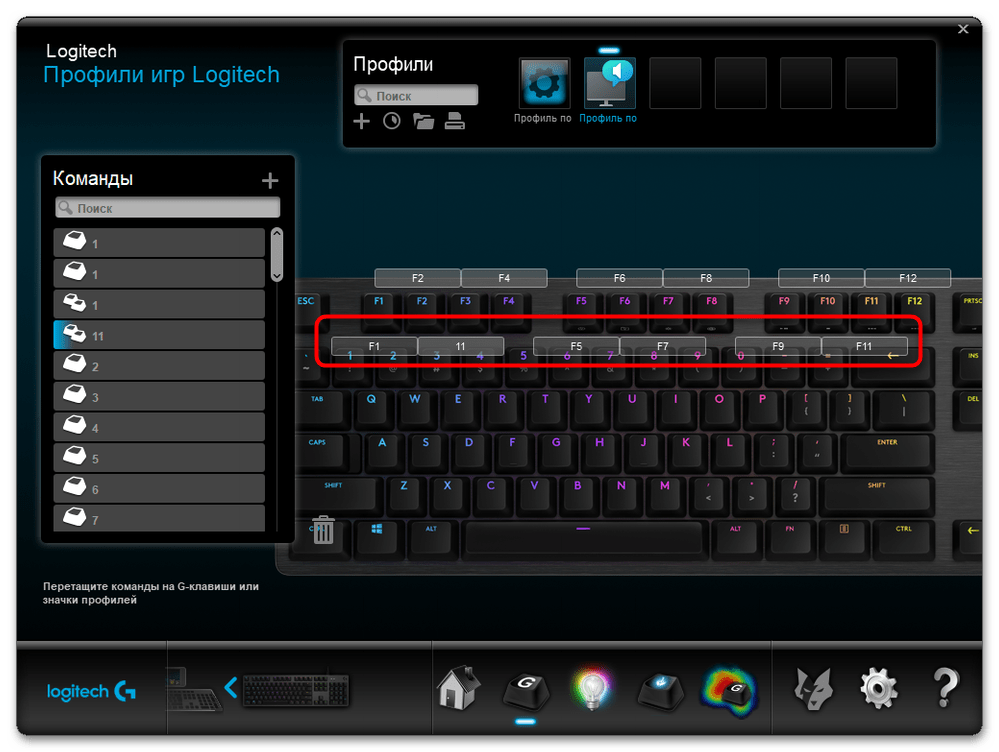
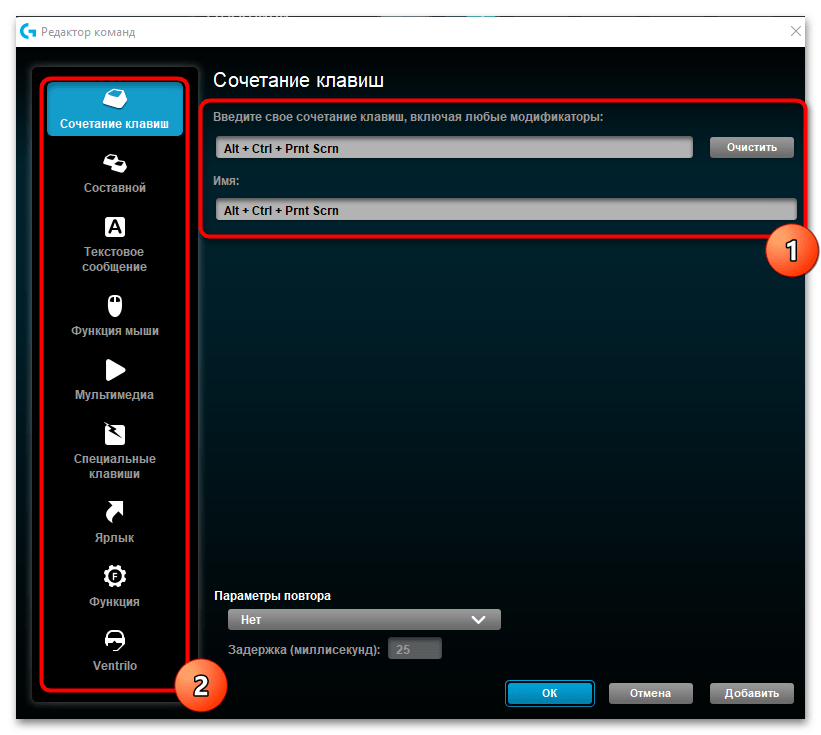
- Вы увидите, что каждая клавиша, назначение которой можно изменить, имеет свою подпись или особое свечение. Кликните дважды по такой клавише, чтобы перейти к ее настройкам.
- По умолчанию предлагается назначить на выбранную клавишу сочетание, но вы можете переключиться между другими вариантами настройками, ознакомившись с ними на панели слева.
- Поддерживается назначение специальных клавиш, например: закрытие окна, масштабирование, стандартные команды редактирования (копирование, вставка, отмена действий).
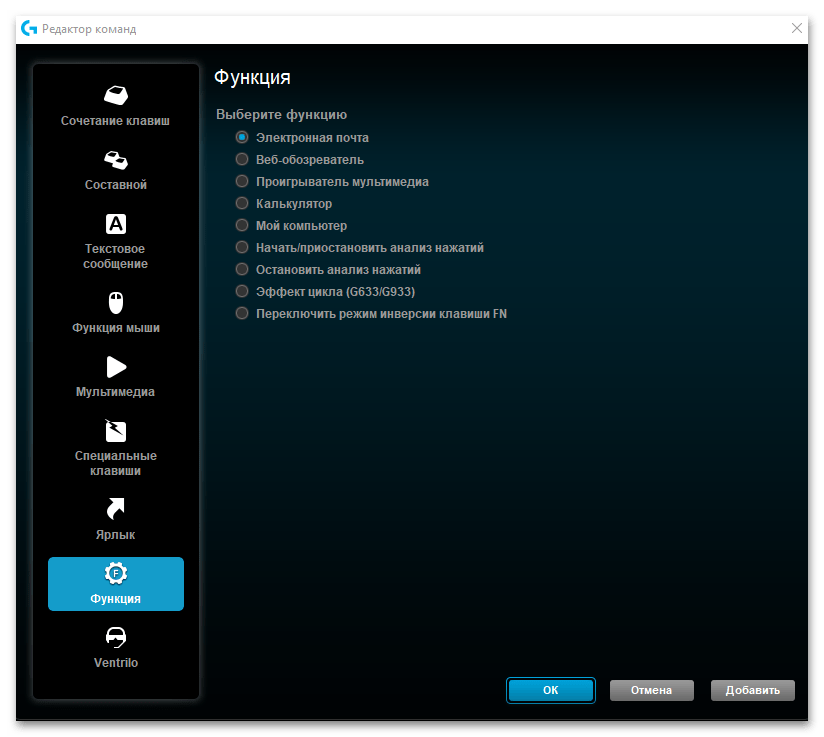
- Количество настроек зависит непосредственно от самой программы работы с клавиатурой. В том же средстве от Logitech на функциональные клавиши можно назначить вызов стандартных программ, куда относится браузер, проигрыватель и другие приложения.

Вариант 4: Скачивание сторонних программ
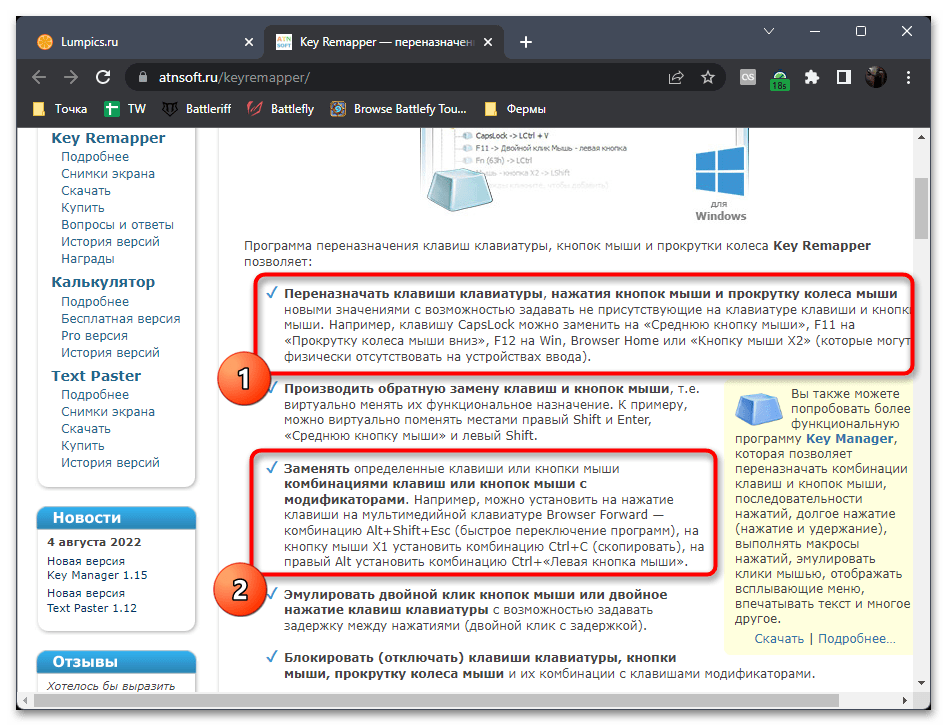
Существуют специальные программы, предназначенные для переназначения любых клавиш на клавиатуре. Их помощью вы можете создавать новые сочетания или назначать стандартные на конкретные клавиши. Одним из самых удобных средств такого назначения является Key Remapper, поэтому в следующей инструкции мы и поговорим о бесплатной версии данного ПО, чтобы у вас сложилась целостная картинка работы с ПО такого рода.
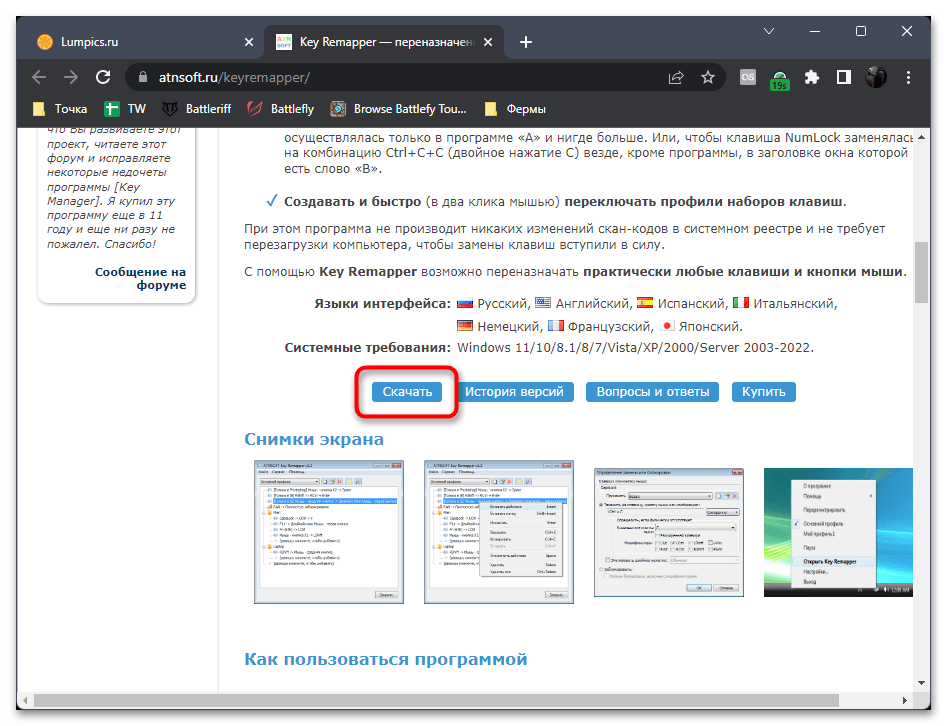
Скачать Key Remapper с официального сайта
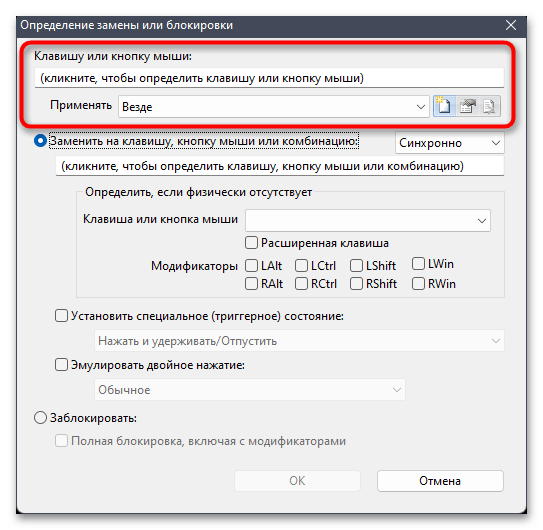
- При выборе программы сначала советуем прочитать ее функциональные возможности, чтобы убедиться в том, что она подходит конкретно для вас. Софт должен уметь переназначать клавиши клавиатуры и заменять их на комбинации.
- После выбора найдите кнопку скачивания и запустите загрузку инсталлятора.
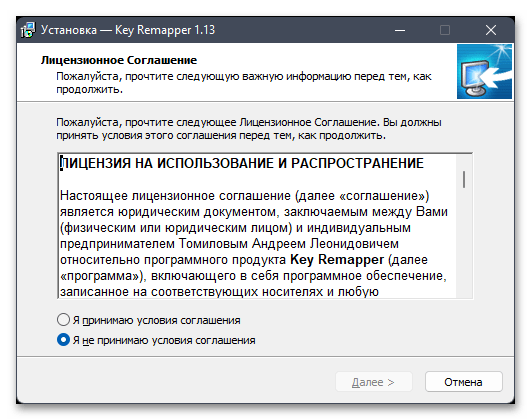
- Установите программу точно так же, как это происходит и со всеми другими приложениями.
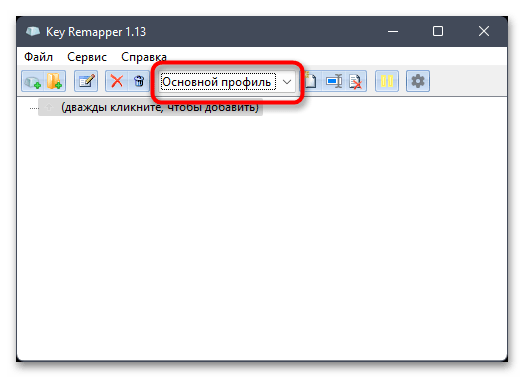
- В Key Remapper поддерживается создание нескольких профилей, что будет удобно при работе в разных программах или играх, когда одна клавиша должна отвечать за разные действия.
- Далее можете приступить к созданию своего первого назначения, щелкнув дважды по строке ниже.
- Выберите клавишу на клавиатуре или кнопку мыши, на которую хотите установить действие. Применение настройки можно настроить, указав конкретные приложения или оставив значение «Везде».
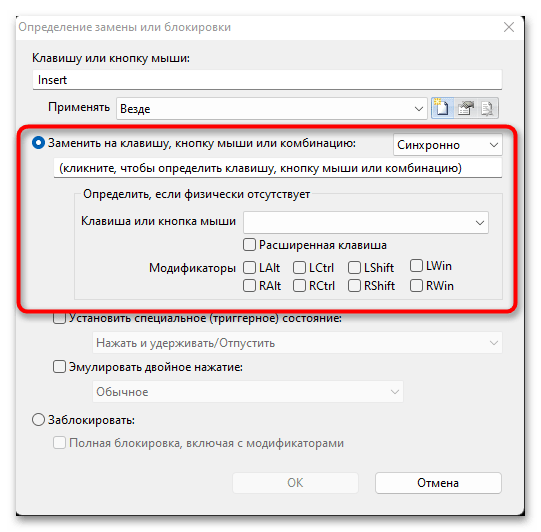
- Теперь установите, на какую клавишу или комбинацию заменить. При назначении сочетания обязательно поставьте галочку возле одного из модификаторов, который используется в вашей комбинации.
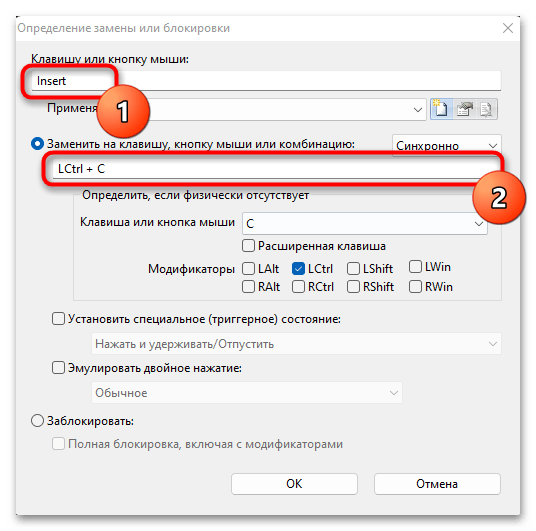
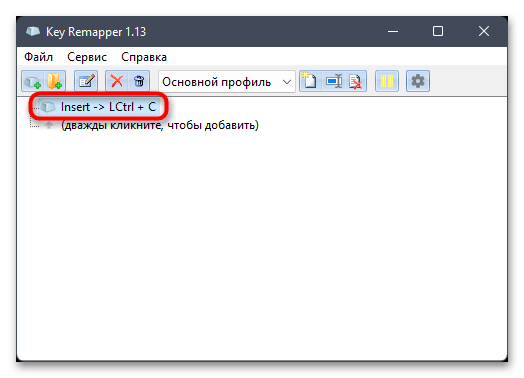
- На следующем скриншоте вы видите, как мы выбрали клавишу Insert и назначили на нее сочетание копирования. Теперь при нажатии на Insert будет срабатывать комбинация Ctrl + C и выполнится копирование выделенного текста, файла или другого объекта в Windows 11 или любой программе.
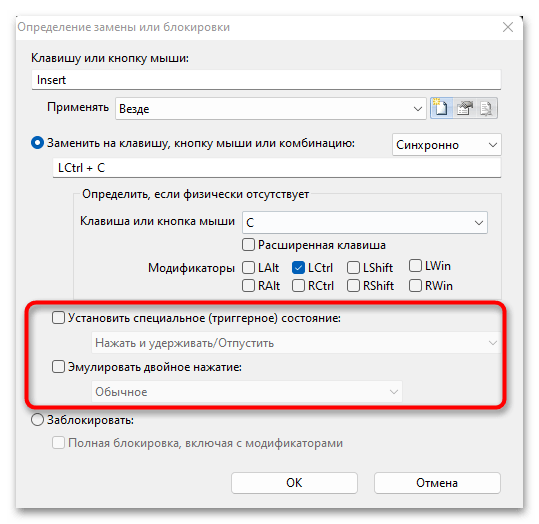
- Если действие должно отличаться от стандартного нажатия, активируйте пункт «Установить специальное (триггерное) состояние» и выберите действие, при котором клавиша будет срабатывать. Вместе с этим можно эмулировать двойное нажатие, если это требуется.
- После сохранения изменений вы увидите, как новая замена появилась в списке. Приступайте к дальнейшему созданию комбинаций и замен, добиваясь активации требуемых функций при помощи клавиатуры.
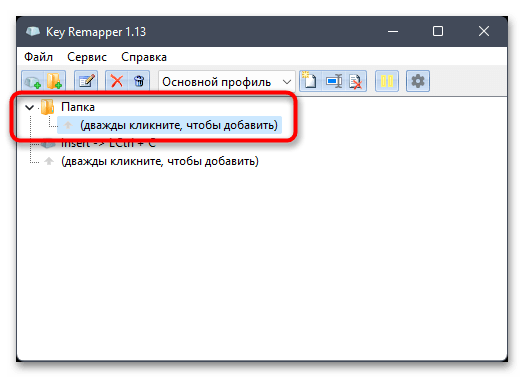
- Если понадобится, создайте папку и установите для нее удобное название. В каталог можно поместить разные сочетания и по необходимости скрыть его, чтобы список не был таким большим.

Наша группа в TelegramПолезные советы и помощь
Applies ToMicrosoft accessories
You can reassign some keys to access different commands, shortcuts, or Microsoft Mouse and Keyboard Center features to better fit your work style.
Note: The options listed in this wizard vary depending on the key selected. For example, since you cannot reassign the Windows key, the only option available is to disable it.
To reassign a key
-
Download and install the Microsoft Mouse and Keyboard Center.
-
Connect the keyboard that you want to configure.
-
Select the Start button, and then select Microsoft Mouse and Keyboard Center.
-
From the displayed list of key names, select the key that you want to reassign.
-
In the command list of the key that you want to reassign, select a command.
Need more help?
Want more options?
Explore subscription benefits, browse training courses, learn how to secure your device, and more.
Changing keyboard shortcuts in Windows 11 allows you to customize your workflow, making tasks more efficient and suited to your personal preferences. Whether you want to remap keys or create new shortcuts, this guide will take you through the process step-by-step, ensuring that you understand each part clearly.
The following steps will show you how to change keyboard shortcuts in Windows 11, from opening the settings menu to customizing your keys.
Step 1: Open Settings
First, press the Windows key + I to open the Settings menu.
This will bring up the Settings window, where you can access various system options. If you prefer, you can also click the Start menu and select the gear icon to get to the Settings.
Step 2: Navigate to Accessibility
Next, in the Settings menu, select “Accessibility” from the left sidebar.
In the Accessibility menu, you will find a variety of options to customize how you interact with your computer. This includes settings for vision, hearing, and interaction.
Step 3: Find Keyboard Settings
Under the Accessibility menu, click on “Keyboard.”
Here, you can see all the options related to keyboard customization. This includes sticky keys, filter keys, and keyboard shortcuts.
Step 4: Enable Keyboard Shortcut Customization
Scroll down to find the “Keyboard shortcuts” section and toggle the switch to enable customization.
Once enabled, you can start altering existing shortcuts or create new ones to fit your needs.
Step 5: Remap Keys
Click on “Remap a key” to open the key remapping tool, where you can select which key you want to change and what function it should perform.
In this tool, you will see two drop-down menus: one for selecting the key you want to change and the other for assigning the new function. This allows for a high degree of customization.
Step 6: Save and Apply Changes
After making your desired changes, click “Save” and then “Apply” to ensure that your new shortcuts are active.
Changes take effect immediately, so you can test them out right away to see if they work as expected.
When you complete these steps, your keyboard shortcuts will be updated according to your preferences. You should notice a difference right away, as tasks that used to take multiple steps can now be completed with a simple key press.
Tips for Changing Keyboard Shortcuts in Windows 11
- Test each new shortcut immediately to make sure it works as intended.
- Keep a list of the shortcuts you create so that you don’t forget them later.
- Be cautious when remapping essential keys like Ctrl, Alt, or Shift, as these are often used in multiple shortcuts.
- If something goes wrong, you can always reset to the default settings.
- Use combinations that are easy to remember and don’t conflict with existing shortcuts.
Frequently Asked Questions
Can I change any key on my keyboard?
Yes, you can change almost any key on your keyboard using Windows 11’s settings or third-party software. However, be cautious with essential keys.
What if I want to reset my changes?
You can easily reset your changes by going back to the keyboard settings and selecting the reset option.
Do I need third-party software for advanced remapping?
For more advanced remapping options, third-party software like SharpKeys or AutoHotKey might be necessary.
Will changing shortcuts affect other users on my computer?
No, changes to keyboard shortcuts are specific to your user profile and won’t affect other users on the same device.
Are there default shortcuts I should avoid changing?
Yes, avoid changing widely-used shortcuts such as Ctrl+C for copy and Ctrl+V for paste, as these are standard across many applications.
Summary
- Open Settings
- Navigate to Accessibility
- Find Keyboard Settings
- Enable Keyboard Shortcut Customization
- Remap Keys
- Save and Apply Changes
Conclusion
Changing keyboard shortcuts in Windows 11 is a great way to tailor your computer experience to fit your needs. It’s like rearranging furniture in your room—you make it suit your lifestyle better. With just a few clicks, you can improve your productivity and make everyday tasks simpler. Remember, the key is to experiment and find what works best for you. Don’t be afraid to try different configurations until you find the perfect setup. For those interested in delving deeper, there are plenty of online resources and communities dedicated to keyboard customization. Happy customizing!
Matthew Burleigh has been writing tech tutorials since 2008. His writing has appeared on dozens of different websites and been read over 50 million times.
After receiving his Bachelor’s and Master’s degrees in Computer Science he spent several years working in IT management for small businesses. However, he now works full time writing content online and creating websites.
His main writing topics include iPhones, Microsoft Office, Google Apps, Android, and Photoshop, but he has also written about many other tech topics as well.
Read his full bio here.
Windows 11 includes numerous keyboard shortcuts right out of the box. However, the operating system doesn’t include any options for creating custom hotkeys that open software, documents, and folders. You can still add hotkeys to desktop shortcuts, but adding a plethora of shortcuts to the desktop isn’t exactly an ideal way to set up your system.
As a result, it’s better to check out some of the third-party keyboard shortcut software packages for Windows 11. WinHotKey and HotkeyP are among those apps that enable you to set up keyboard shortcuts for your favorite software, documents, and folders. This is how you can set up custom hotkeys with WinHotKey and HotkeyP.
How to Download and Install WinHotKey
WinHotKey is a freely available app for setting up new keyboard shortcuts. That software is compatible with most Windows desktop platforms as well. It has a quick and easy setup and takes up very little drive storage space. You can download and install WinHotKey as follows.
- Open WinHotKey’s Softpedia page in a web browser.
- Select the Download Now option.
- Click the Softpedia Secure Download (US) option and download the file.
-
Double-click the WinHotKey setup wizard to open its window.

- Select the Next option.
- Click the I accept the agreement radio button, and press the Next button again.
-
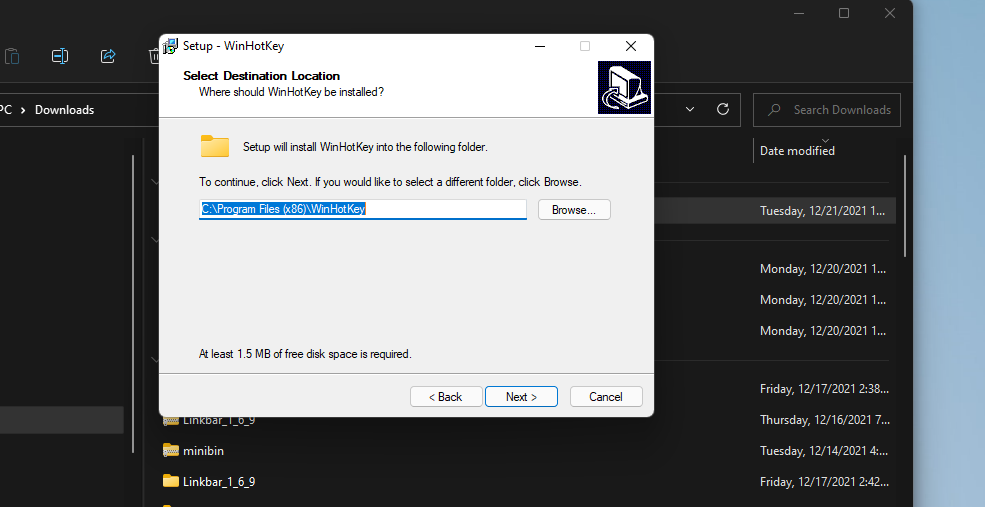
Press the Browse button to choose an installation folder.

- Select the Next option to install the software.
- After installing, select the option to set up a WinHotKey desktop shortcut. Then you can click that shortcut to launch the software.

How to Set Up Software Hotkeys
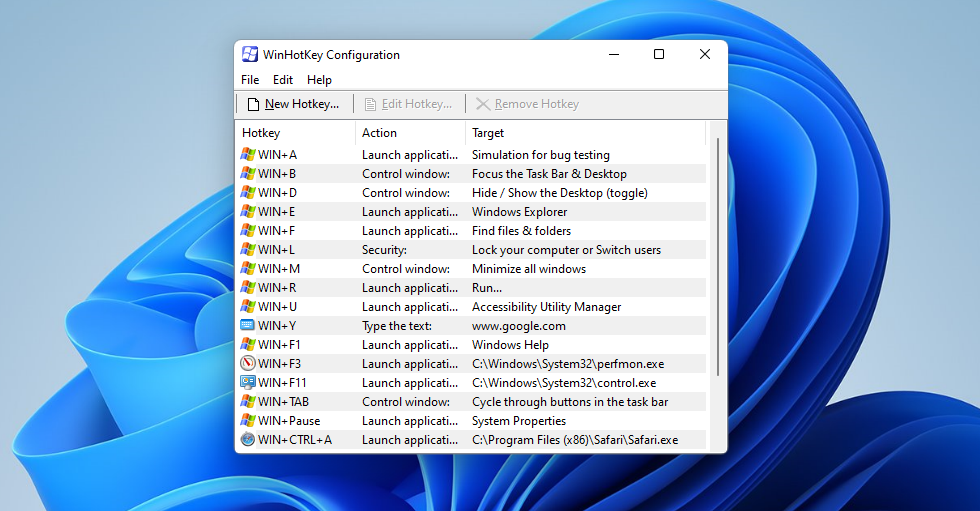
The WinHotKey Configuration includes a list of default Windows hotkeys. However, you can’t edit those default keyboard shortcuts in any way. What you can do is add new custom hotkeys for opening software to that list. You can set up new custom keyboard shortcuts for launching software like this.
-
Press the New Hotkey button at the top left of the WinHotKey Configuration window.

- Type an optional description for the hotkey in the text box on the General tab if you wish.
- Select the Launch an application option on the drop-down menu.
-
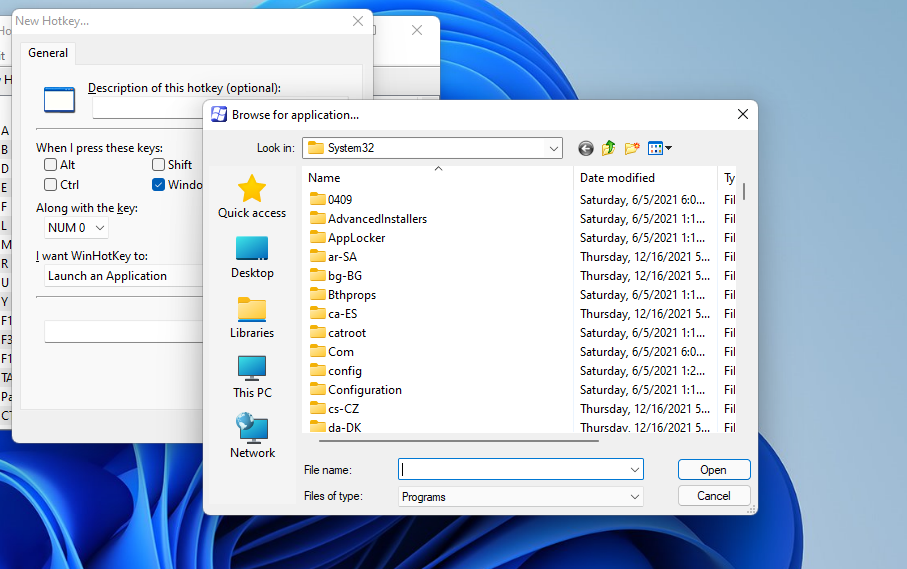
Press the Browse button to bring up a new application window.

- Select an app for the hotkey to launch.
- Click the OK button.
-
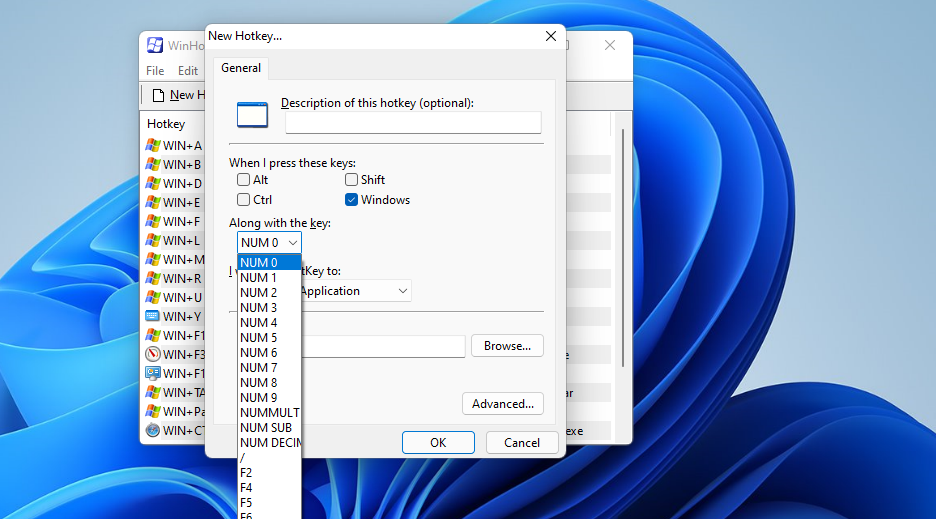
Now select a keyboard key for the shortcut on the Along with the key drop-down menu.

- You can also select additional keys for the hotkey by clicking the Alt, Shift, and Ctrl checkboxes. The Windows checkbox is selected by default, but you can deselect that option.
-
To further configure the keyboard shortcut, click the Advanced button. You can enter additional parameters and change how the software window opens on the Launch: Advanced window.

- Click the OK button to exit the Launch: Advanced window.
- Then press the OK button on the New Hotkey window to add the keyboard shortcut.

Thereafter, the WinHotKey Configuration window will include your custom hotkey.
Now you can press your new hotkey to open whatever software you selected for it. You can change that keyboard shortcut by selecting it and clicking Edit Hotkey. To delete one, select it and click Remove Hotkey.
You can set up hotkeys for launching Windows programs as well as third-party software. The C: > Windows > System32 folder path includes many of the built-in accessories. These are some of the Windows features you can set up hotkeys for with WinHotKey:
- Control Panel: control.exe
- Task Manager: Taskmgr.exe
- Calculator: calc.exe
- Command Prompt: cmd
- Notepad: notepad.exe
- Performance Monitor: perfmon.exe
- Registry Editor: regedit.exe
- Event Viewer: eventvwr
- Services Windows: services.msc
- Optimize Drives: dfrgui
How to Set Up Folder, Document, and Window Control Hotkeys
Aside from software shortcuts, you can establish hotkeys for opening folders and document files much the same. Instead of selecting Launch an Application on the New Hotkey window, select either the Open a Folder or Open a Document option. Then click Browse to select a document’s or folder’s path, configure a key combination, and press the OK button.
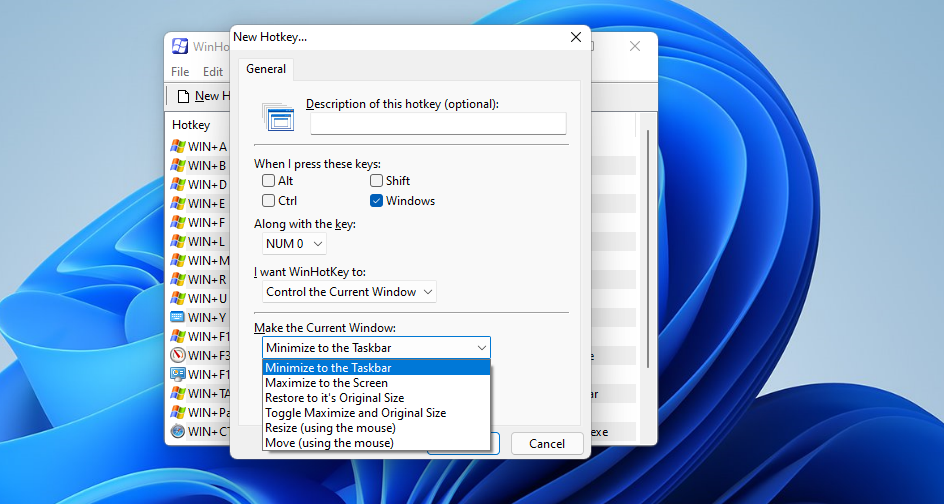
WinHotKey also enables you to set up hotkeys for six different window control actions. To set up such a keyboard shortcut, select the Control the Current Window option on the New Hotkey window. Then you can select minimize, maximize, restore, toggle, resize, and move window control options for the keyboard shortcut.
How to Create Custom Keyboard Shortcuts With HotkeyP
HotkeyP is a decent alternative third-party app to WinHotKey for creating custom Windows keyboard shortcuts. Like WinHotKey, it’s a freely available and lightweight app for utilizing on most Windows platforms. It enables you to set up custom keyboard shortcuts for opening user files and folders, running programs, and activating many functions. This is how you can download and run HotkeyP:
- Bring up the HotkeyP Softpedia page.
- Click HotkeyP’s Free Download button.
-
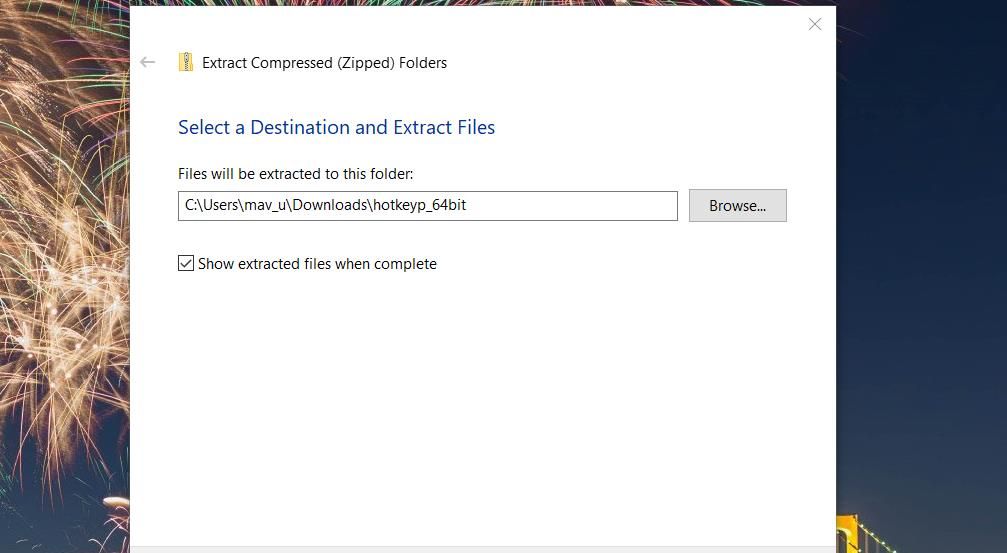
Select External Mirror – X64 to download the ZIP file. A Sourceforce page will open from which HotkeyP will automatically download.

- Double-click HotkeyP.exe file inside the extracted hotkeyp_64bit directory.
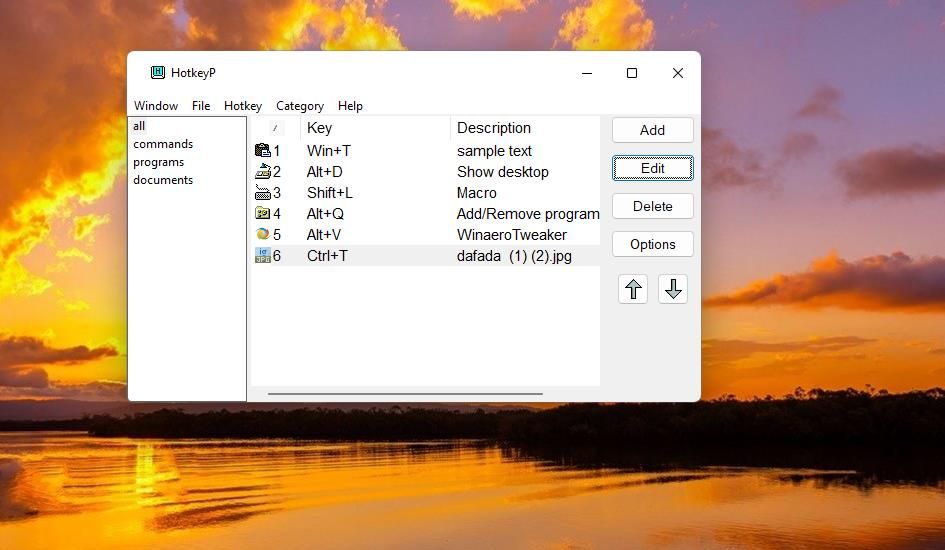
Now you’ll see an empty HotkeyP window. You can fill that window by adding some new custom hotkeys. First, try setting up a hotkey that opens software on your PC like this:
-
Click the Add button.

- Press the … (ellipses) button for the Command box.
- Select a program’s EXE (application) file for the hotkey to open.
- Then click inside the empty box beside those checkboxes and press a key on your keyboard to include it within the hotkey.
-
Next, select one of the Ctrl, Shift, Alt, and Win checkboxes to set a modifier key for the hotkey.

- Select OK to add the new custom hotkey.
- Now you’ll see the new hotkey you’ve created included within the all and programs categories on the HotkeyP window. Press the new hotkey you just set up to launch the selected program.
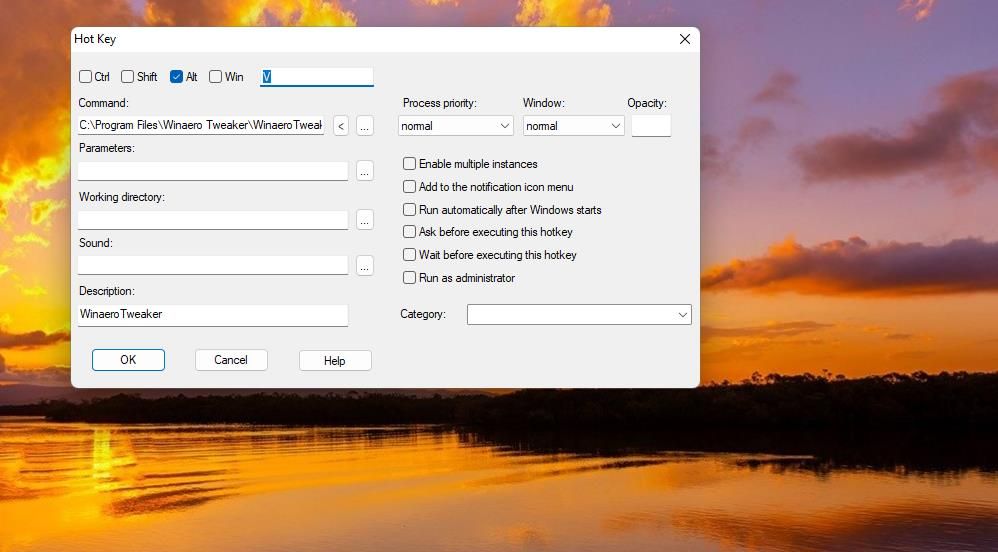
There are extra options you can select to configure how the hotkey launches the program. For example, select Run as administrator to set the program to open with elevated privileges. Or set the software to run at a higher priority by selecting a high or above normal option on the Process priority drop-down menu.
You can set up custom hotkeys that open user files and folders much the same. To do so, click the … button in the Hot Key window and select a user file or folder instead of an app. Set the keyboard shortcut with the other settings.
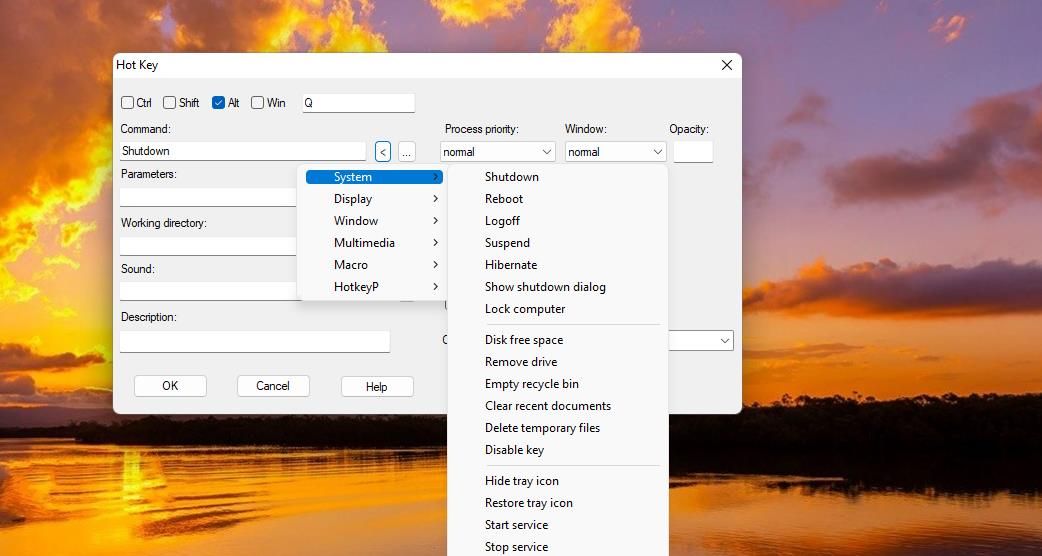
To set up some system, multimedia, window, and display hotkeys with HotkeyP, click the < button on the Hot Key window. Move your cursor over the Windows, Display, Multimedia, or System submenu. Select a function (or action) to assign to the hotkey. For example, you can set up a hotkey that shuts down Windows by selecting Shutdown on the System menu.
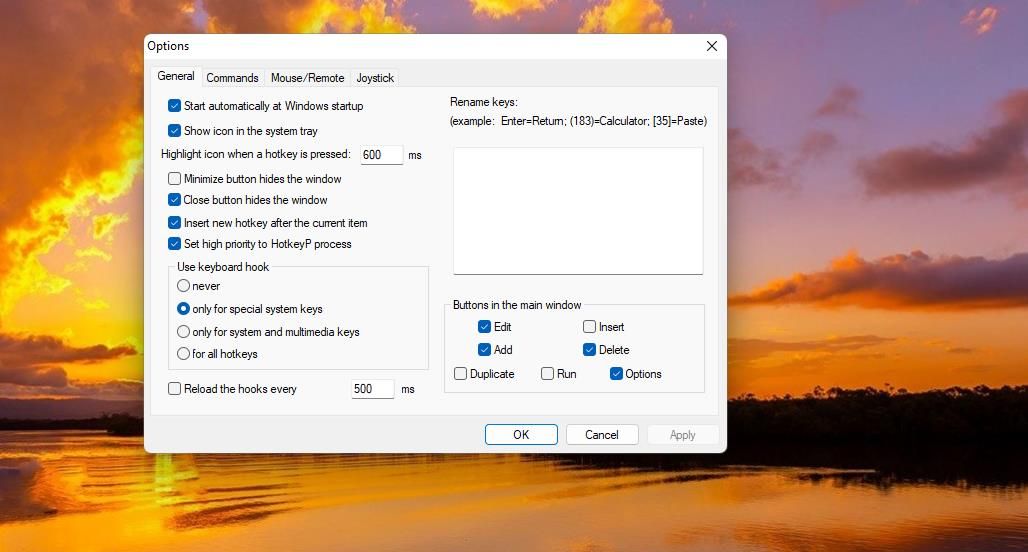
You can change general software settings for HotkeyP by clicking the Options button. That will bring up an Options window that includes numerous miscellaneous software. Make sure the Start automatically at Windows startup checkbox is selected on the General tab. Then HotKeyP will automatically start in the background.
Set Up All the Windows Software HotKeys You Need With WinHotKey
So, you won’t need Windows 11 desktop, Start menu, and taskbar shortcuts anymore when you’ve got WinHotKey or HotKey P. They’re easy-to-utilize programs with which you can set up a wide variety of software, folders, and document keyboard shortcuts without cluttering the Windows desktop. Their only notable shortcoming is that you can’t set up website hotkeys with them, but they’re still very handy apps nonetheless.