
With HDR in Windows 11, you get the most of out your high dynamic range (HDR) TV or PC display. When you connect your HDR10-capable TV or display to a Windows PC that supports HDR and wide color gamut (WCG), you’ll get a brighter, more vibrant, and more detailed picture compared to a standard dynamic range (SDR) display.
The Microsoft Store contains a growing number of HDR apps and games. To find HDR games, visit the Microsoft Store online. To watch HDR movies and videos from online providers, you might need to change a few settings to get set up. To play HDR games and use HDR apps, your PC and display must meet certain hardware requirements. For detailed info, see Display requirements for HDR video.
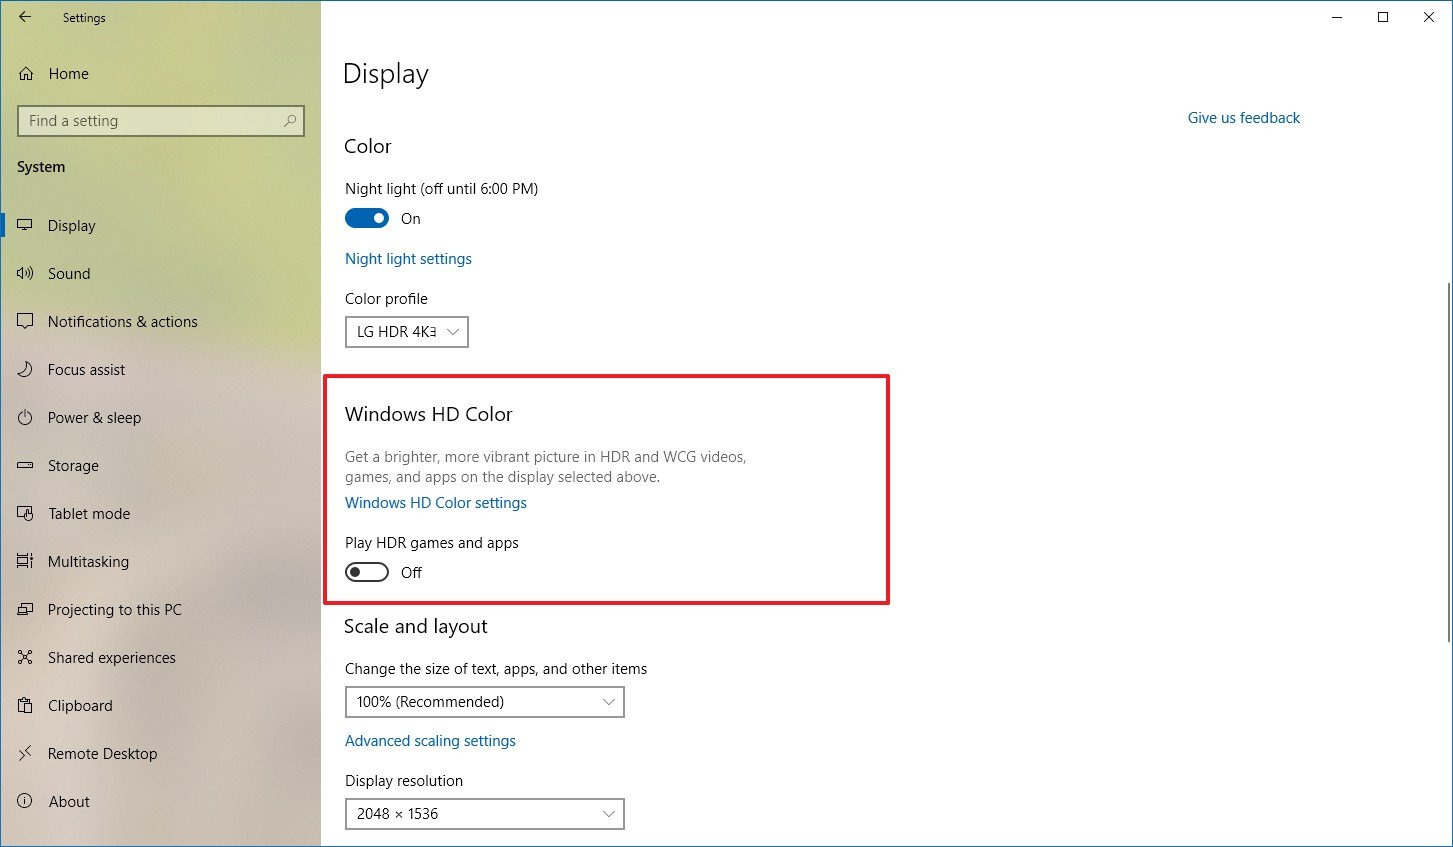
If your PC and display support HDR, turn it on to get started.
-
Select the Start button, then enter settings. Select Settings > System > Display .
-
If you have multiple displays connected to your PC, choose the HDR-capable display at the top.
-
Turn on the option to Use HDR.
Power options for HDR-capable displays
Playing HDR content while running your laptop on battery can reduce battery life. Therefore, your PC manufacturer might have turned HDR off by default for when you’re running on battery.
If HDR is turned on when your laptop is plugged in, HDR will be turned off to help save battery power when you unplug it. If you plug in your laptop again, HDR will be turned on again automatically.
Note: The display may appear black temporarily when HDR turns on or off after you plug in or unplug your laptop.
-
Select the Start button, then enter settings. Select Settings > System > Display .
-
Select an HDR-capable display at the top of the screen.
-
Select HDR.
-
Select the Use HDR section to expand it, then deselect the Turn off HDR with my PC is running on battery check box or the Turn off HDR video streaming when my PC is running on battery check box.
If HDR was already turned on when your laptop is plugged in, HDR will now stay on if you unplug it and run on battery power.
Fixing common problems
Many HDR displays today are designed primarily for watching movies and videos in HDR mode. As a result, you might need to do some things to get the best results when using your HDR display in Windows. If you’re buying a new HDR display, we recommend looking for displays that are certified for HDR. These displays are designed and tested for a wide range of things you might do with HDR on a PC—including playing HDR games and using HDR apps.
If you’re having problems displaying HDR content from your PC, here are things you can try to fix them. Select any item, and it’ll open to display more information:
-
Make sure your display or TV has HDR turned on. The way you get to the on-screen menu on your HDR TV, or display varies by make and model. Check out the documentation for your display or TV by visiting the manufacturer’s website.
-
Go to Settings > System > Display and make sure Use HDR is turned on.
-
Make sure your Windows PC has the required hardware to display HDR and find out if your display supports HDR10. Here’s how to do that:
-
Press the Windows logo key + R, type dxdiag, and then select OK.
-
Select Yes at the prompt.
-
In the DirectX Diagnostic Tool, on the System tab, look in the System Information area.
-
To save the information to a file, select Save All Information, and then name and save the text file.
-
Open the text file and look at the value for Advanced Color. This provides info about your display’s HDR configuration and the status of it. Look for these values:
-
AdvancedColorSupported. This indicates that your installed display driver and display support HDR10.
-
AdvancedColorEnabled. This indicates that HDR is currently turned on for your display.
-
-
Look at the value for Monitor Capabilities. This provides more detailed info about the display’s capabilities.
-
If the value is HDR Supported, that indicates that your display supports HDR10. You might see additional values in parentheses.
-
BT2020RGB or BT2020YCC. One of these color spaces must appear for the display to be considered as an HDR10-capable display.
-
Eotf2084Supported. This value must appear for the display to be considered as an HDR-capable display.
-
-
If the value is HDR Not Supported, that indicates that the display is missing one or more requirements for HDR10.
-
-
On HDR-capable laptops, the default power settings will turn off HDR when running on battery power. To have HDR turn on, do one of the following:
-
Plug in your laptop (recommended).
-
Allow HDR video streaming when your PC is running on battery.
Note that allowing HDR when running on battery power will reduce battery life.
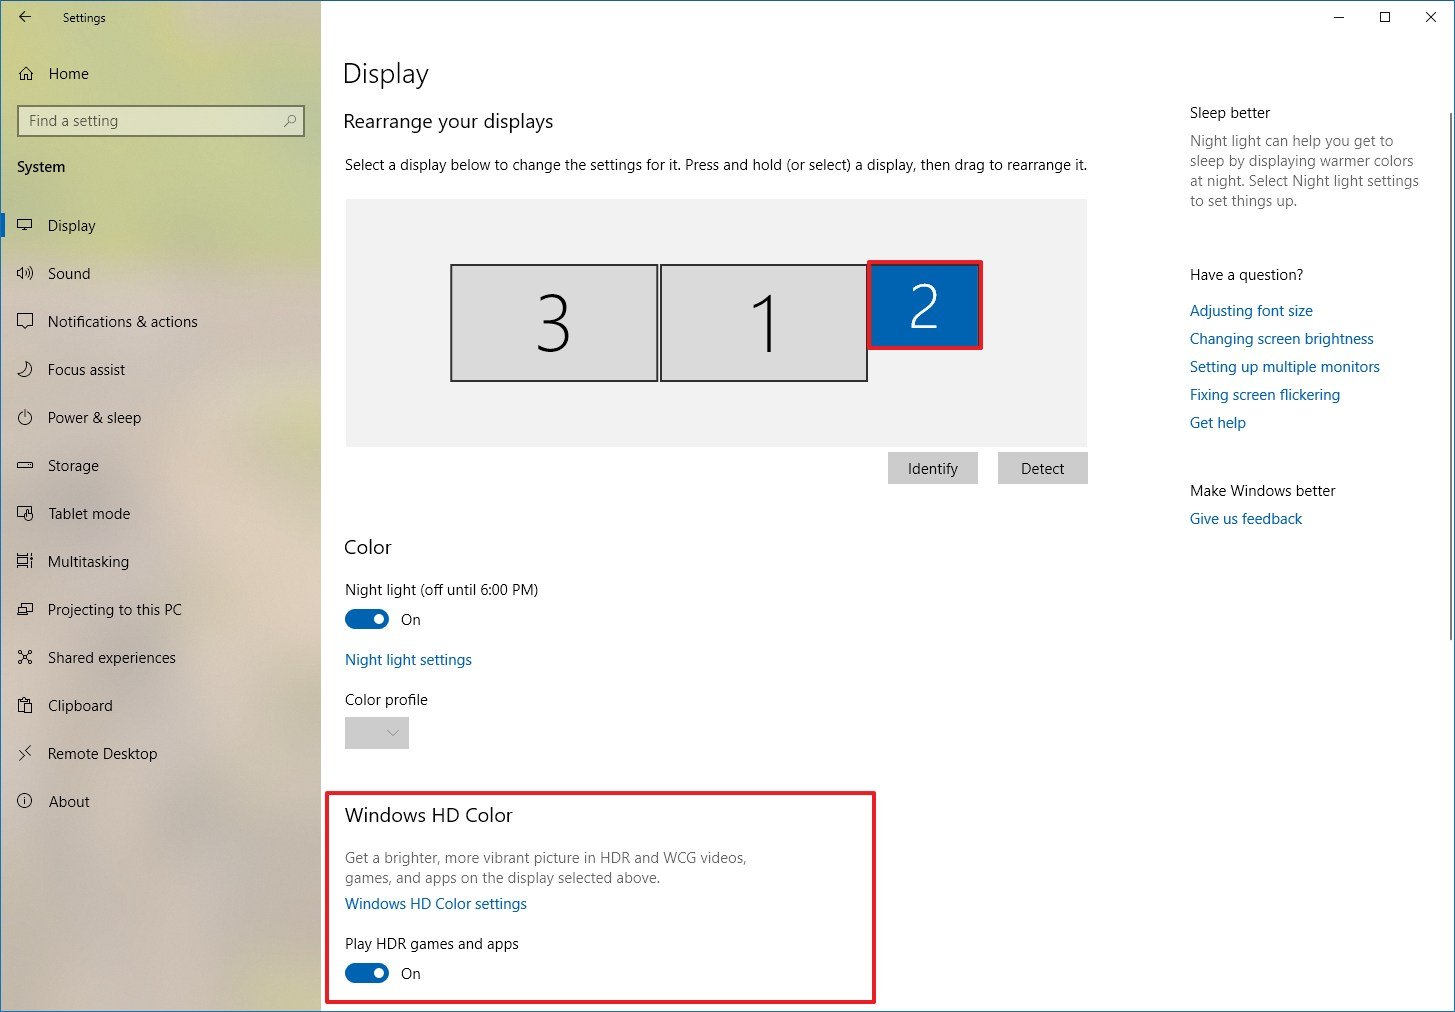
When you first connect an external display to a laptop, Windows will duplicate your desktop on both displays by default. However, HDR isn’t supported in this configuration. To view HDR content on the external HDR monitor or TV, extend your desktop across both displays:
-
Select the Start button, then enter settings. Select Settings > System > Display.
-
Near the top of the screen, select Extend these displays.
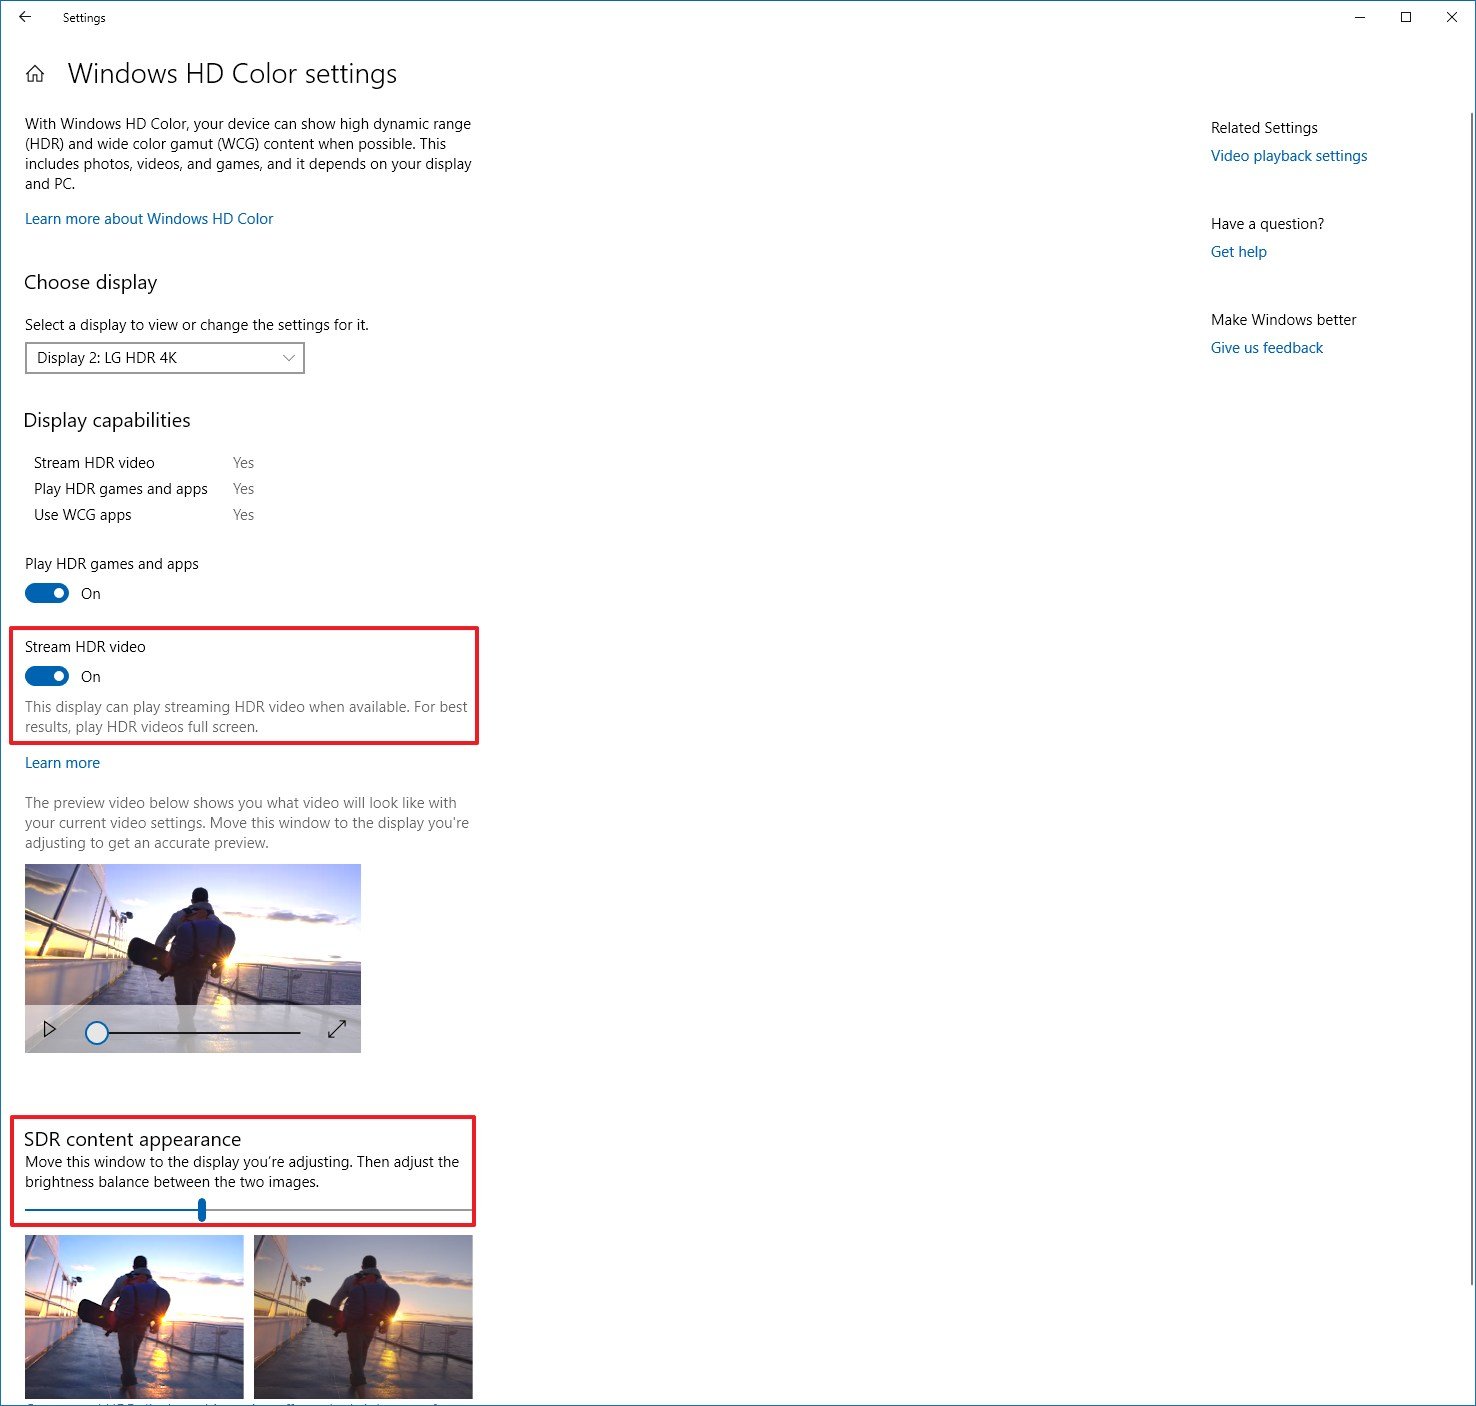
You might need to adjust the relative brightness of SDR and HDR content for your HDR-capable display. This is because a display interprets an HDR and SDR signal differently, and the results will vary by make and model.
-
Select the Start button, then enter settings. Select Settings > System > Display.
-
If you have multiple displays connected to your PC, select the HDR-capable display near the top of the screen, and then move the Settings app window to the HDR display that you’re adjusting
-
On the Display settings screen, select Use HDR.
-
Under SDR content brightness or HDR content brightness, drag the slider to get the right balance for brightness between HDR and SDR content.
Notes:
-
When you change the SDR content brightness setting for an external HDR display or HDR content brightness setting for a built-in HDR display, the effect it has on SDR content depends on whether it’s an external or built-in HDR-capable display:
-
On an external HDR display, this setting will change the brightness of SDR content relative to HDR content.
-
On a built-in HDR display, the brightness of SDR content is controlled by a separate brightness setting, or it might be controlled automatically. (For more info, see Change screen brightness in Windows.) Since the brightness of SDR content is already set, the HDR content brightness setting will change the brightness of HDR content relative to the brightness of SDR content.
-
-
For built-in HDR displays, such as on HDR-capable laptops, both the brightness setting and HDR content brightness setting will affect the appearance of HDR content.
-
Brightness setting. When viewing HDR content in a bright area, you might need to increase the brightness setting to see the display. However, this will reduce both the effective dynamic range for HDR content in apps and the overall contrast because the darker pixels will appear brighter. To improve the appearance of HDR content, view HDR content in a darker area and use a fairly low brightness setting. If the brightness is set to a very low level, that will increase the overall contrast between the brightest and darkest parts of the content. However, there will be less details in the darker parts of the content. For example, if you have a scene in a movie that shows a dimly lit room at night, you might see less details in that scene.
-
SDR content brightness or HDR content brightness setting. For most times, using the default SDR or HDR content brightness setting or one close to it should work well. You could set the SDR or HDR content brightness setting higher to help improve the overall contrast between the brightest and darkest parts of the content. However, this would reduce the details in the darker parts of the content, such as a scene in a dark room at night.
-
Some SDR apps appear darker on an HDR display compared to other SDR apps shown on the same display. This can happen with apps that don’t work with the SDR content brightness or HDR content brightness setting. Here are some things to try to fix this:
-
If you have multiple displays set up with both SDR and HDR displays, move the app to the SDR display.
-
If you’re using an external HDR display, move the SDR content brightness slider to a lower setting. This will make the brighter SDR content appear darker, so all the SDR content appears at a similar brightness level. Afterwards, use the on-screen menu on your HDR TV or display to increase the brightness to the level you want.
Note: If you adjust the SDR or HDR content brightness setting but the brightness of SDR content in some apps doesn’t change, try restarting the app.
-
If you’re using a laptop with an HDR-capable built-in display, move the HDR content brightness slider to a lower setting. This will make the app that appears too dark brighter, so all SDR apps have a similar brightness level.
Note: If you change the SDR content brightness or HDR content brightness setting but the brightness of some apps doesn’t change, or if the SDR content appears too bright and desaturated, try restarting the app.
-
Make sure you have the latest graphics drivers (WDDM) installed. To get the latest drivers, go to Windows Update in Settings, or check your PC manufacturer’s website.
-
If you’re using an HDMI connection and your display supports HDR over a DisplayPort connection, use DisplayPort instead to connect your PC and display.
-
If HDMI is your only option, use that, and then do one of the following:
Reduce the refresh rate
-
In Settings, select System > Display > Advanced display.
-
In Advanced display settings, for Choose a refresh rate, select 30 Hz (if it’s available).
— OR —
Reduce the resolution
-
In Settings, Select System > Display > Advanced display, and then select Display adapter properties.
-
On the Adapter tab, select List All Modes.
-
In List All Modes, select the setting that includes 1920 by 1080, 60 Hertz, then select OK.
On HDR-capable laptops, the default power settings will turn off HDR when running on battery power. This can cause under-saturated colors after restarting your PC. To avoid this, plug in your laptop before restarting it, or change the power settings to keep HDR on when running on battery.
When night light is turned on, the coloring on your display might have a red tint and content might not be readable on it. This depends on the strength that’s set for night light. Here is how you can work around this problem.
Workaround:
-
Go to Settings > System > Display > Night light.
-
In Night light settings, do one of the following:
-
If night light is on, drag the Strength slider to the left to reduce the red-tinted coloring on your display.
-
Select Turn off now to turn off night light.
-
For more info about night light, see Set your display for night time in Windows.
Many HDR-capable displays support a wider color gamut than sRGB. When HDR is turned on, the HDR display should correctly reproduce the sRGB colors used in desktop apps. However, some HDR-capable displays don’t do this correctly. When shopping for an HDR-capable display, look for displays that are certified for HDR and read reviews that discuss color accuracy.
We are closely monitoring HDR-related customer feedback and are aware of the reports of new monitors that support both VESA DisplayHDR and DolbyVision but are apparently delivering differing color reproduction experiences, which is not expected. DolbyVision can be considered to provide a superset of the certification guarantees provided by DisplayHDR, and that is the primary reason why Windows will automatically choose DolbyVision when it is available.
HDR10 content on Windows should be displayed accurately independent of whether the PC monitor is configured in a certified DisplayHDR or DolbyVision mode. In both monitor modes, tone mapping occurs on the GPU, using color information retrieved from the monitor, prior to compositing the final desktop image which may combine the content of multiple application windows rendered in different color spaces. Windows uses the GPU to apply this tone mapping using the associated content specific metadata. This tone mapping is always done on the source content prior to composition and no additional content-based tone mapping is expected from the monitor in either DisplayHDR or DolbyVision mode. This is true whether the content is displayed in a maximized window or not. Note that on non-Windows platforms, tone mapping may be implemented differently and may rely on the monitor to perform content-based tone mapping.
We are aware of monitors that may limit max brightness to around 450 nits in both DolbyVision and DisplayHDR modes, but on some cases, there may exist a configuration option available via the monitor’s on-screen display (OSD) menu to enable a non-certified HDR10 mode that unlocks max brightness levels up to 1000 nits.
На современных игровых консолях и телевизорах HDR работает буквально по нажатию кнопки. Стоит зайти на стриминговый сервис или запустить совместимую игру и все заработает. С компьютерами же все немного сложнее.
Какой дисплей нужен для HDR
Какие видеокарты поддерживают HDR
Какой кабель нужен
Какой контент можно воспроизводить
Как включить HDR в Windows 10
Какой дисплей нужен для HDR
Какие видеокарты поддерживают HDR
Какой кабель нужен
Какой контент можно воспроизводить
Как включить HDR в Windows 10
Какой дисплей нужен для HDR
Стоит уяснить, что во многих моделях телевизоров и мониторов поддержка HDR номинальная. Важно смотреть на характеристики, в частности — максимальную яркость. Чем выше пиковая яркость, тем лучше для отображения HDR-контента.

В характеристиках мониторов можно найти сертификацию DisplayHDR 400, DisplayHDR 600 и т. п. Это означает пиковую яркость, достижимую на данном дисплее. Яркость измеряется в нитах или канделах на квадратный метр (Кд/м2). DisplayHDR 400 означает, что пиковая яркость составляет 400 нит или 400 Кд/м2. Яркость мониторов без сертификации DisplayHDR может быть еще ниже. Поддержка HDR есть у моделей с 250−300 нит. Этого, разумеется, недостаточно. На сайте displayhdr.org можно найти список сертифицированной продукции. С другой стороны, это вовсе не означает, что монитор без такой сертификации однозначно плохой.

Для телевизоров значения яркости можно смотреть в характеристиках товара, но ее не всегда указывают. Ищите спецификации на сайте производителя или на специализированных ресурсах вроде displayspecifications.com. Есть также и своя сертификация Ultra HD Premium, согласно которой, яркость для HDR должна составлять 1000 нит и более, а уровень черного 0,05 нит и менее.
Какие видеокарты поддерживают HDR
Видеокарты NVIDIA 9-й серии поддерживают вывод HDR по интерфейсу HDMI, начиная с 10-й серии — по HDMI и DisplayPort. Связано это с тем, что поддержка HDR появилась в DisplayPort только с версии 1.4, а в видеокартах 9-й серии используется DisplayPort 1.2.

Что касается видеокарт AMD, то поддержка HDR была представлена с 300-й серией (R9 380 и т. д.). Соответственно все более поздние видеокарты Radeon также поддерживают HDR.
Какой кабель нужен
В зависимости от того, к чему вы будете подключать ноутбук или системник, зависит и выбор кабеля. На телевизорах это HDMI, на мониторах чаще DisplayPort, но HDMI тоже не редкость. Также может понадобиться переходник с DisplayPort на HDMI, если разъемов не хватает.
В любом случае нужно определить версию портов на вашем оборудовании. Как входа на телевизоре, так и выхода на видеокарте или ноутбуке. На видеокартах, поддерживающих HDR, это HDMI 1.4, 2.0 или 2.1. В случае DisplayPort это версия 1.4. Разница будет в максимальной частоте обновления:
- HDMI 1.4 — 4K@30 Гц,
- HDMI 2.0 — 4K@60 Гц,
- HDMI 2.1 — 4K@120 Гц,
- DP 1.4 — 4K@144 Гц.
При этом для HDR пропускной способности кабеля (в зависимости от версии, разрешения и частоты обновления) может не хватать. Поэтому формат цвета можно установить только YCbCr 422 или YCbCr 420, что для игр или фильмов не критично. Но в формате монитора мелкий текст будет нечетким. Если же будет использоваться 1440p или 1080p, то режимы работы будут другие. Так, например, по HDMI 2.0 можно передавать сигнал 1080p@120 Гц.
Стоит отметить, что кабель HDMI версии не имеет, роль играет в основном пропускная способность. То есть качественный кабель, купленный в эпоху HDMI 1.4, вполне может выдавать видео 4К@60 Гц. А вот если у вашей видеокарты выход только HDMI 1.4, то вывод видео будет ограничен 30 Гц. Поэтому если кабель уже есть в наличии, то нужно проверить, будет ли он нормально передавать сигнал в нужном вам формате и с HDR.
Для удобства на многих площадках версия для кабеля HDMI все же указывается. Не на самом устройстве, а в каталоге. В этом случае сверяйтесь с характеристиками и заявленными форматами передачи изображения. Также смотрите на сертификацию Premium High Speed для 2.0 или Ultra High Speed для 2.1. В случае DisplayPort все аналогично — нужно смотреть в первую очередь на поддержку нужного вам формата передачи видео. Также своя сертификация есть и для DisplayPort.
Какой контент можно воспроизводить
В первую очередь HDR нужен для просмотра фильмов и запуска игр с поддержкой расширенного динамического диапазона.
Фильмы в формате HDR можно воспроизводить, например, с помощью плеера VLC версии 3.0.0 Vetinari и выше. Так как VLC имеет встроенные кодеки, дополнительно устанавливать ничего не придется. В случае других плееров, например PotPlayer или MPC, нужно установить рендер MadVR. Также можно смотреть потоковое видео, например, YouTube и Netflix. Для онлайн-кинотеатров, скорее всего, придется установить платный кодек HEVC Video Extensions из Microsoft Store.
Что касается игр, то HDR включается в настройках, если игра это поддерживает. Список игр с поддержкой HDR можно найти на сайте pcgamingwiki.com или, например, у куратора HDR Games в Steam. В последнем случае удобно отслеживать новые релизы. В некоторых играх HDR нужно предварительно включить в Windows, в других — это происходит автоматически. Стоит отметить, что HDR не всегда работает корректно. Так, в играх серии Resident Evil невозможно включить HDR, если используется несколько мониторов.
Как включить HDR в Windows 10
В настройках телевизора должна быть активирована функция Deep Color. У разных производителей она может называться по-разному: расширенный формат сигнала HDMI, HDMI UHD Color и т. п.
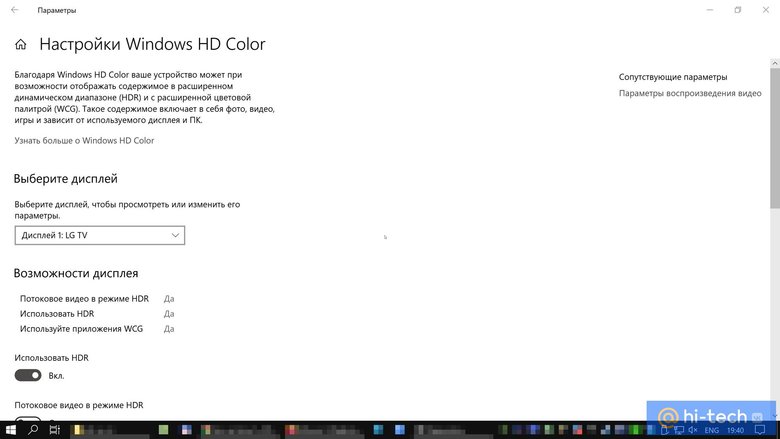
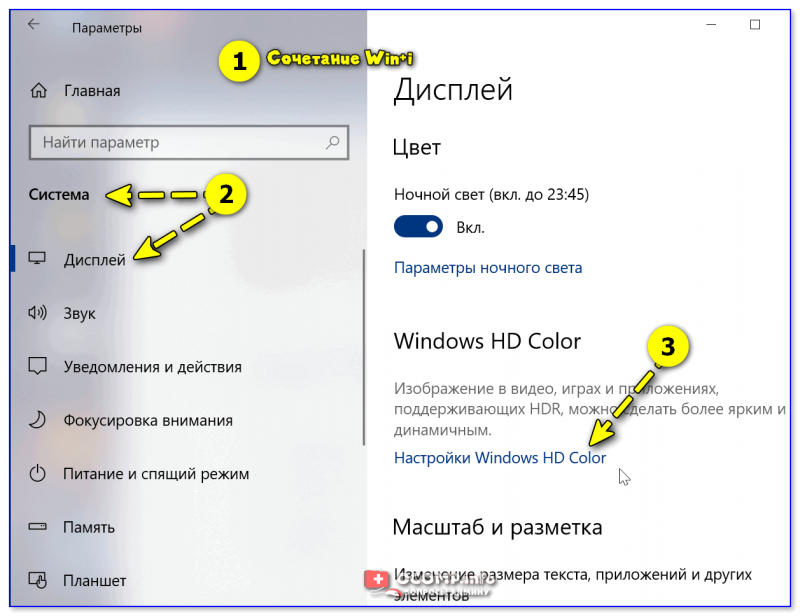
В Windows 10 нажмите Win + I, чтобы открыть параметры, и перейдите в пункт «Система», далее «Дисплей». Найдите строку Windows HD Color. Активируйте переключатель «Использовать HDR». Также кликните на ссылку «Параметры Windows HD Color» и активируйте «Потоковое видео в режиме HDR».
Обратите внимание, что система должна быть обновлена. Поддержка HDR появилась только в осеннем обновлении 2017 года.
- Почему нет звука на телевизоре через HDMI
- Как подключить ноутбук к телевизору?
(Image credit: Windows Central)
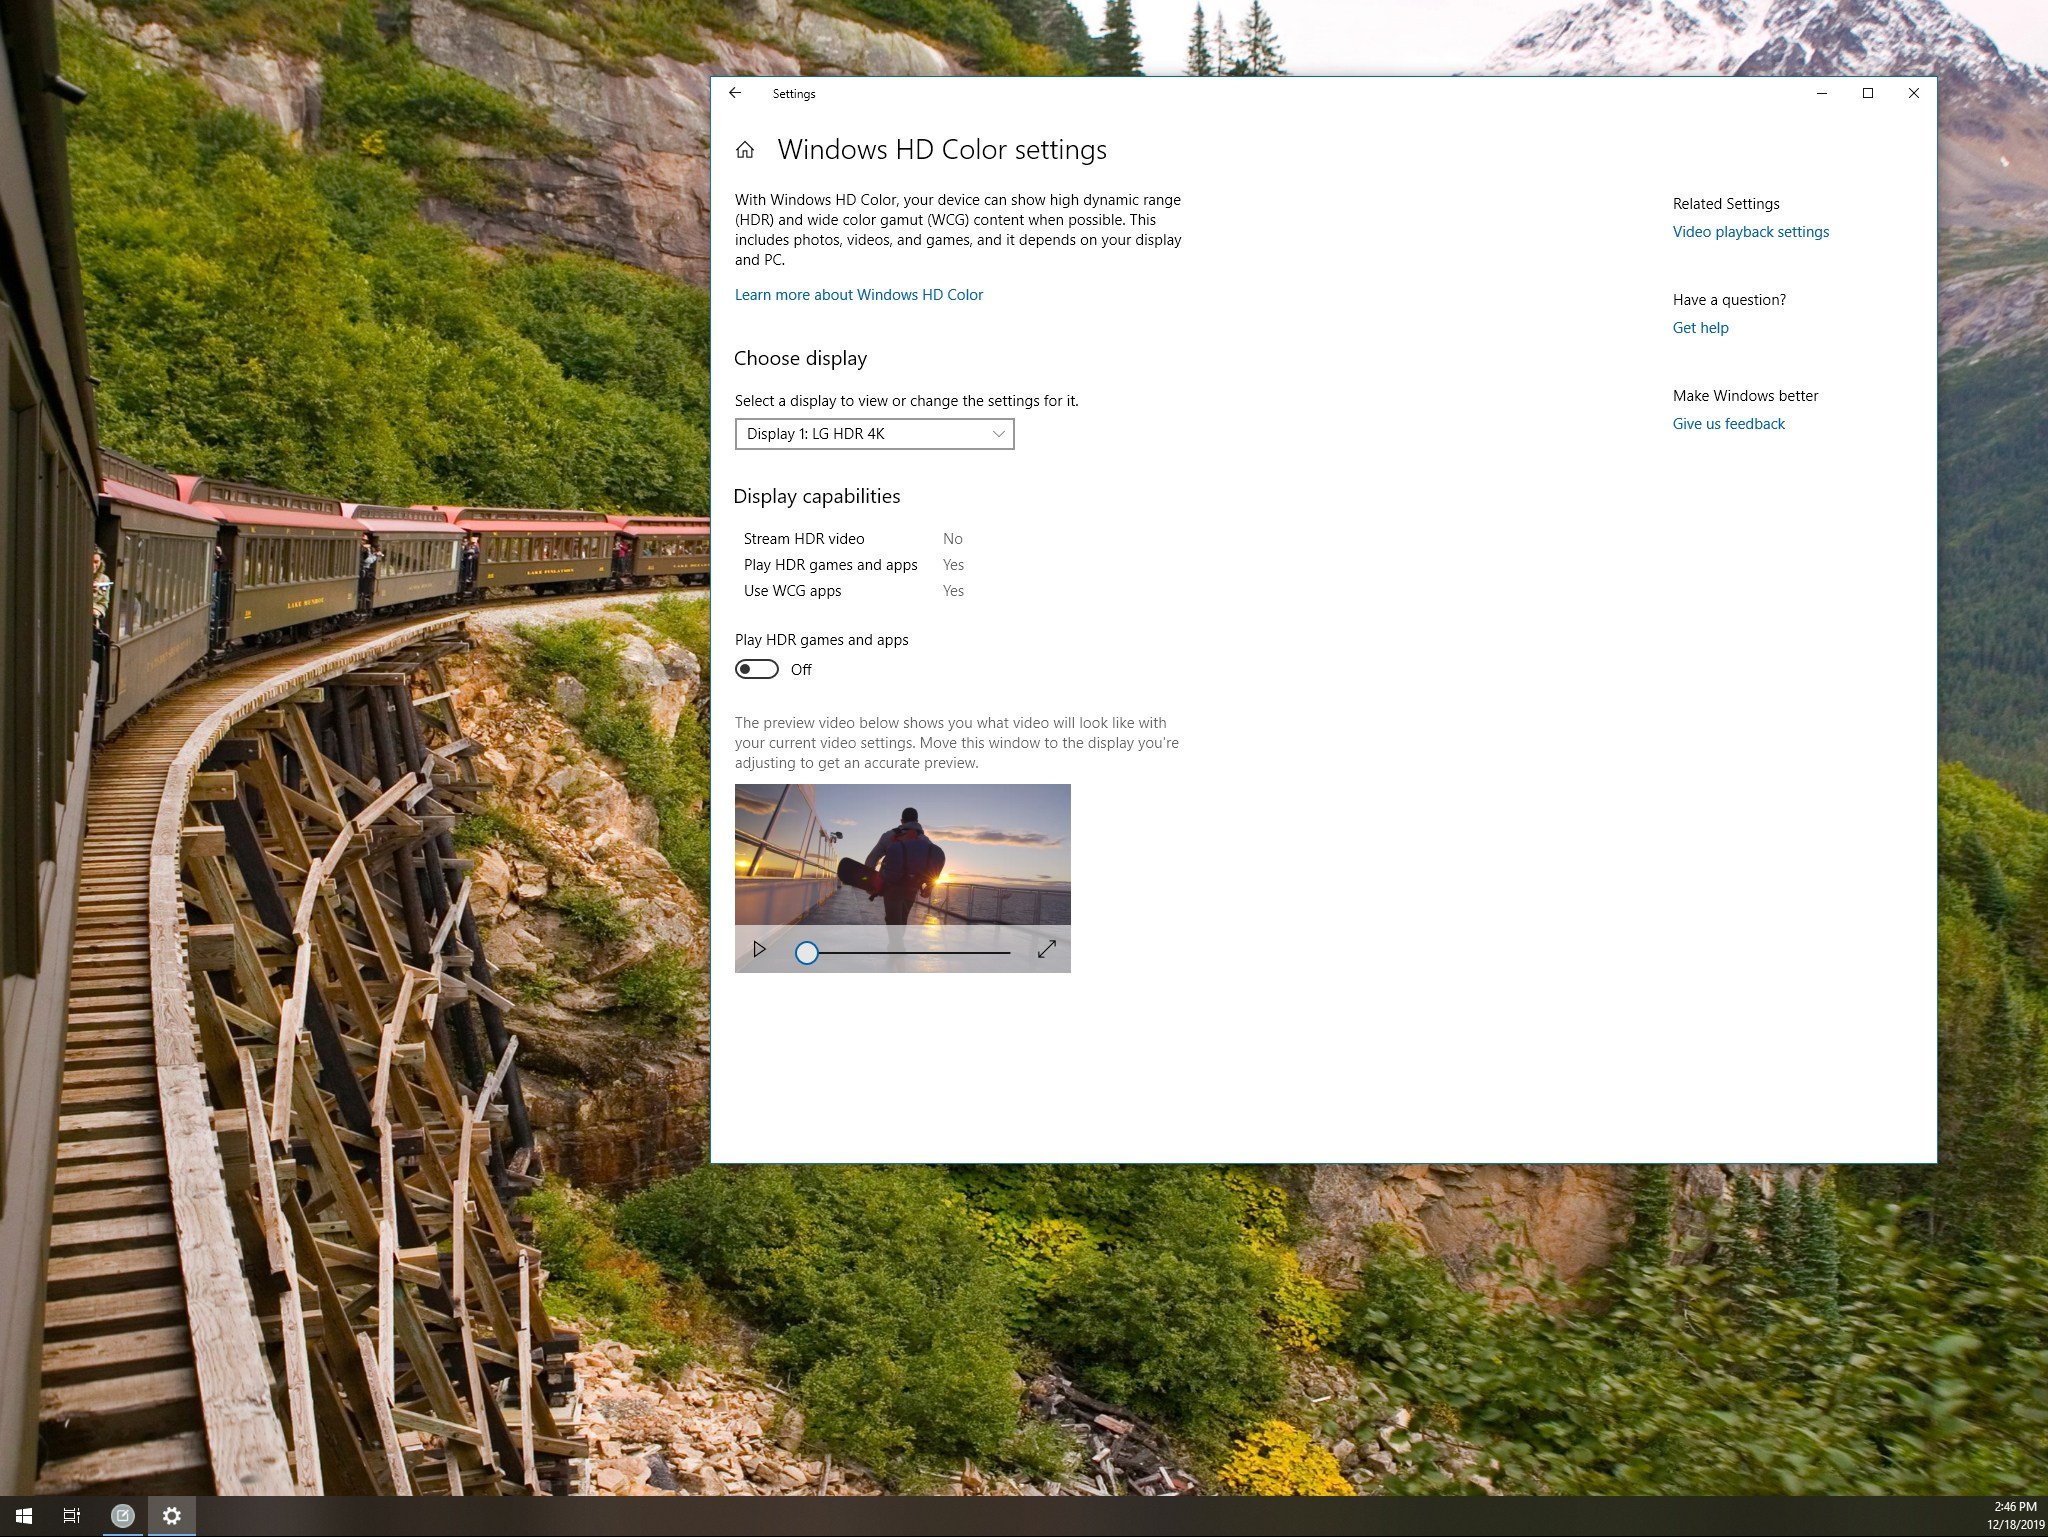
On Windows 10, Windows HD Color is a feature that allows you to play high dynamic range (HDR) content on an HDR10 compatible display connected to your computer, whether this is a built-in screen on a laptop, external monitor, or TV.
Unlike traditional content (or standard-dynamic range «SDR»), HDR is a feature that offers brighter, more vibrant, and a more extensive range of color details for a punchier image quality. That high image quality is something you would usually want when watching movies, shows, or playing games.
Although you’ll often hear more about the term HDR (HDR10, Dolby Vision, HDR10+, etc.) on TVs, nowadays more devices are capable of this feature, and with the Windows HD Color settings, you can enjoy supported content on Windows 10. You just need to make sure that your computer meets the minimum requirements.
In this Windows 10 guide, we’ll walk you through the steps to configure a display to use HDR playback for apps and games.
- How to confirm HDR support on Windows 10
- How to enable HDR settings on Windows 10
How to confirm HDR support on Windows 10
If you’re planning to play videos and apps on HDR, there are specific hardware and display minimum requirements your laptop or desktop must meet before you can enable the feature.
Requirements for built-in displays
These are the minimum requirements to enable and play content in HDR on laptops running Windows 10:
- Windows 10 version 1803 (April 2018 Update) or higher.
- Processors like Intel 7th Generation or better to use required codecs for 10-bit video decoding.
- Integrated or discrete graphics with PlayReady support to play protected content.
- Display with a 1920 x 1080 pixels (1080p) resolution or better.
- Display with the brightness of 300 nits or better.
Requirements for external displays
These are the minimum requirements to enable and play content in HDR with an external monitor connected to a Windows 10 device:
All the latest news, reviews, and guides for Windows and Xbox diehards.
- HDR display with HDR10 support.
- DisplayPort 1.4 or HDMI 2.0 or higher.
- DisplayHDR certification (recommended, but not required).
- Integrated or discrete graphics with PlayReady 3.0 support to play protected content. For example, Intel UHD Graphics 600 series or higher, Nvidia GeForce 1000 series or higher, or AMD Radeon RX 400 series or higher.
- HEVC or VP9 codecs to decode 10-bit video.
- WDDM 2.4 or higher driver installed on Windows 10.
Checking device information
If you’re not sure about the version of Windows 10 or processor installed on your device, use these steps:
- Open Settings.
- Click on System.
- Click on About.
- Under the «Device specifications» section, determine the type of processor.
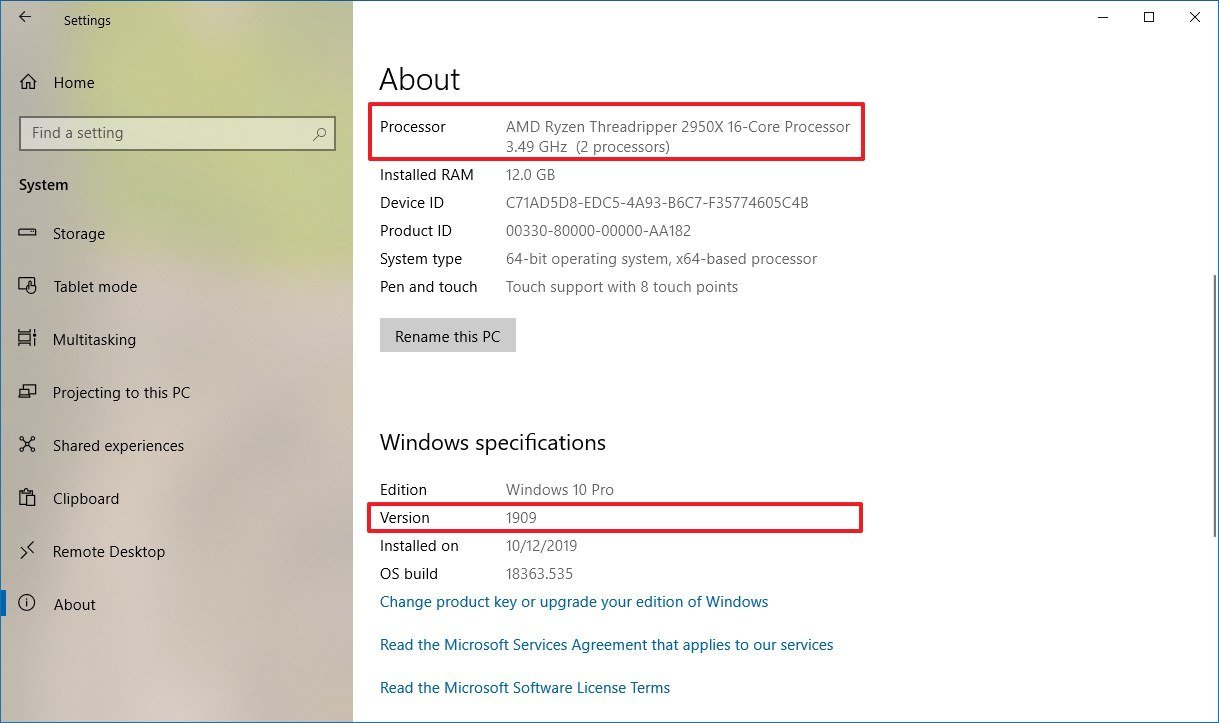
- Under the «Windows specifications» section, confirm the version number of Windows 10.
Once you complete the steps, you can proceed with the steps to determine if the Windows HD Color settings are available in your installation.
Determining HDR support
To confirm that you can play content on HDR, use these steps:
- Open Settings.
- Click on System.
- Click on Display.
- Under the «Windows HD Color» section, confirm the Pay HDR games and apps setting is available.
After you complete the steps, if the «Pay HDR games and apps» setting is available, then you can watch supported videos in HDR.
How to enable HDR settings on Windows 10
To enable HDR on Windows 10, use these steps:
- Open Settings.
- Click on System.
- Click on Display.
- Under the Rearrange your displays, select the monitor you want to enable HDR (if applicable).
- Under the «Windows HD Color» section, turn of the Pay HDR games and apps toggle switch.
- (Optional) Click the Windows HDR Color settings option.
- Turn of the Stream HDR video toggle switch if you want to play streaming videos in HDR (for example, from Netflix).
- Under the Battery options section, clear the Don’t allow HDR games and apps on battery option (if applicable).
- Use the «SDR content appearance» slider to adjust the brightness for standard dynamic range (SDR) content on an HDR-compatible display. (This setting doesn’t affect content in HDR.)Quick note: These settings are only available when HDR is enabled on your installation.
After you complete the steps, supported videos will be able to play videos and apps in HDR for a more vibrant, brighter, and detailed picture experience.
Mauro Huculak has been a Windows How-To Expert contributor for WindowsCentral.com for nearly a decade and has over 15 years of experience writing comprehensive guides. He also has an IT background and has achieved different professional certifications from Microsoft, Cisco, VMware, and CompTIA. He has been recognized as a Microsoft MVP for many years.
Содержание статьи:
- HDR в Windows
- Вопросы и ответы: 3
Доброго времени всем!
Я думаю не ошибусь, если предположу, что большинство пользователей не отказались бы «улучшить» свое изображение на экране: скажем, сделать его более сочнее, живее, а цвета реалистичнее! Так?… ☝
Благо Microsoft в новой версии Windows 10 дает такую возможность (при усл., конечно, что у вас современное оборудование). Речь идет о вкл. режима HDR…
Что это?
HDR расшифровывается как High Dynamic Range (высокий динамический диапазон). Отличается от стандартного режима SDR более качественной картинкой (см. парочку примеров ниже 👇). Разумеется, далеко не всегда этот режим работает по умолчанию, и поэтому неплохо бы проверить и вкл. его — посмотреть, как измениться изображение, станет лучше/хуже?…
Собственно, как это сделать и будет «показано» ниже…
*
HDR в Windows
👉 ШАГ 1
Итак, для начала парочка примеров (получилось не очень качественно, но всё же разница в картинке видна невооруженным глазом). Думаю, смысл попробовать «поиграться» с HDR есть.

Разница в картинке SDR VS HDR (природа, горы, ландшафт)
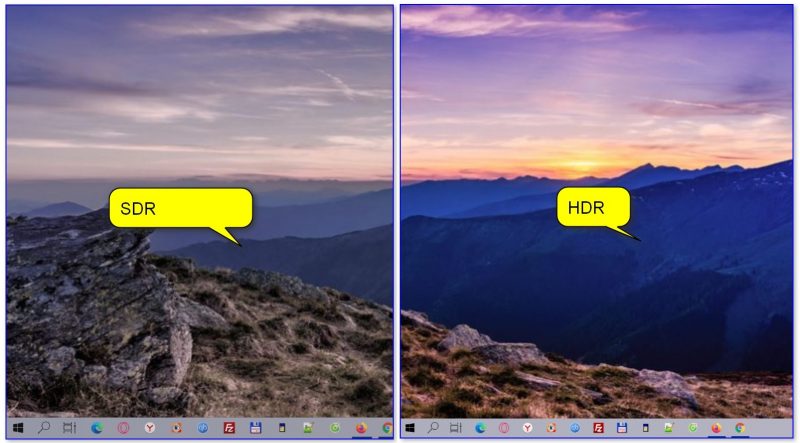
Разница в картинке (еще один пример): SDR VS HDR
*
👉 ШАГ 2
Само собой режим HDR можно задействовать лишь на определенном оборудовании — приведу ниже краткую выжимку с требованиями:
- интерфейс подключения: DisplayPort 1.4+ или HDMI 2.0 (более подробно о интерфейсах тут);
- разрешение экрана: не ниже 1920 на 1080;
- яркость монитора: 300+ нит;
- поддержка монитором PlayReady 3.0 и 10-битное декодирования;
- наличие обновленного видеодрайвера (+ драйвер на дисплей: WDDM 2.4);
- устройство должно работать от сети питания — режим HDR весьма затратная «штука»… (это требование актуально для ноутбуков!).
*
Если говорить в целом, то современный домашний ПК/ноутбук (от 2019г.+) все эти требования «проходит» — т.е. ничего сверхъестественного среди условий выше нет… 👌
*
👉 ШАГ 3
Теперь о том, как задействовать этот режим:
- сначала необходимо открыть параметры Windows 10 (через меню ПУСК или сочетание клавиш Win+i);
- затем открыть раздел «Система —> Дисплей»;
- далее нажать по ссылке «Настройки Windows HD Color». См. пример ниже. 👇
Параметры Windows 10 — дисплей
После перед вами должно появиться окно с возможностями для текущего дисплея (свойства). 👇
Кстати, если у вас 2 (и более) дисплея — сначала необходимо будет выбрать нужный, а затем перевести два ползунка в режим вкл.:
- Использовать HDR;
- Потоковое видео в режиме HDR.
Сразу же после этого можно будет задать яркость HDR-дисплея, сдвинув ползунок баланса вправо/влево…
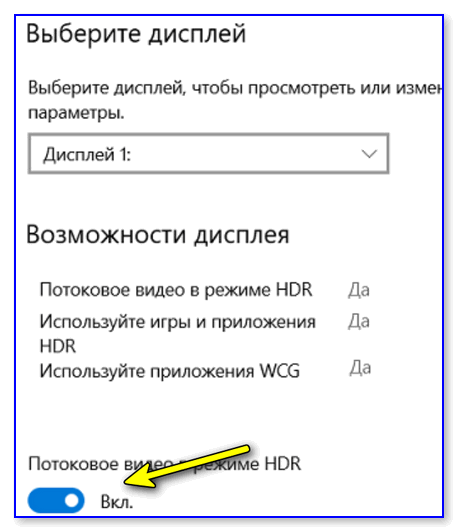
Потоковое видео в режиме HDR — вкл.
Ну и останется только сравнить «картинку»: стало лучше..?
***
👉 Примечание: не могу не отметить, что режим HDR пока работает «криво» (по крайней мере на моих ПК). Во-первых, не всегда его удается задействовать; во-вторых, изменение в качестве изображения могут быть минимальны (едва заметны).
Впрочем, «попытка — не пытка»… К тому же, Microsoft собирается дорабатывать этот режим и сделать его еще более интересным (Auto-HDR и пр.). Посмотрим… 😉
*
На сим пока всё… Дополнения по теме — приветствуются!
Удачи!
👋
Просмотр HDR с компьютера на телевизоре
Чтобы воспроизводить HDR с компьютера на телевизоре, прежде всего на компьютере должна быть установленная операционная система Windows 10.
-
 Просмотров: 16435")
Notebook to LG TV.jpg (90.58 КБ) Просмотров: 16435
С помощью Windows HD Color в Windows 10 можно добиться оптимальных результатов при использовании режима HDR на телевизоре или мониторе компьютера. При подключении телевизора LG с поддержкой HDR10 к компьютеру с Windows 10, который поддерживает режимы HDR и WCG, можно получить более яркое, насыщенное и детализированное изображение по сравнению с дисплеем в стандартном динамическом диапазоне (SDR).
Для просмотра фильмов и видео в режиме HDR в Интернете может понадобиться изменить некоторые параметры. Чтобы играть в HDR-игры и пользоваться HDR-приложениями, компьютер и дисплей должны отвечать определенным аппаратным требованиям. Подробные сведения см. тут Требования к дисплею для режима HDR в Windows 10.
Если вы убедились, что компьютер и телевизор поддерживают режим HDR, включите ПК, чтобы начать работу.
- Нажмите кнопку Пуск и выберите Параметры -> Система -> Экран .
- Если к вашему компьютеру подключено несколько экранов, выберите экран с поддержкой HDR и установите соответствующий порядок отображения.
- Выберите Параметры Windows HD Color.
- В разделе Возможности экрана проверьте, установлен ли флажок Да рядом с параметром Воспроизводить игры и приложения с поддержкой HDR.
- Включите параметр Воспроизводить игры и приложения с поддержкой HDR.
-
Windows HD Color Settings.jpg (88.86 КБ) Просмотров: 16435
Устранение распространенных проблем просмотра HDR с компьютера на телевизоре
Многие современные HDR-дисплеи предназначены в основном для просмотра фильмов и видео в режиме HDR. Поэтому иногда нужно выполнить некоторые действия, чтобы добиться максимального результата при использовании дисплея HDR в Windows 10.
Если у вас возникли проблемы с отображением содержимого в формате HDR на компьютере, вы можете попытаться устранить их с помощью приведенных здесь инструкций.
| Проблема | Варианты решения |
| Телевизор не отображает содержимое в формате HDR |
|
| Содержимое и приложения в стандартном динамическом диапазоне (SDR) выглядят слишком яркими или слишком темными на дисплее с поддержкой HDR. | Может потребоваться настроить относительный уровень яркости содержимого в режимах SDR и HDR для вашего дисплея с поддержкой HDR. Это связано с тем, что дисплей по-разному интерпретирует сигналы HDR и SDR, и эти результаты будут отличаться в зависимости от производителя и модели дисплея.
Примечания
|
| Цвет выводится неправильно (например, цветные полосы вокруг вертикальных штрихов при отображении черного текста на белом фоне) |
|
| В разделе Возможности экрана флажок Да установлен рядом с параметром Воспроизводить игры и приложения с поддержкой HDR, но переключатель Воспроизводить игры и приложения с поддержкой HDR невозможно включить или выключить | На ноутбуках с поддержкой HDR параметры управления питанием по умолчанию отключают HDR при питании от батареи. Чтобы включить HDR, выполните одно из следующих действий.
|
«