
Используйте удаленный рабочий стол на устройстве с Windows, Android или iOS, чтобы подключиться к компьютеру с Windows издалека. Вот как настроить компьютер для разрешения удаленных подключений, а затем подключиться к настроенному компьютеру.
Примечание: В то время как сервер удаленного рабочего стола (например, компьютер, к которому вы подключаетесь) должен работать под управлением версии Windows Pro, клиентский компьютер (устройство, с которым вы подключаетесь) может работать под управлением любой версии Windows (Pro или Home). или даже другой операционной системы.
-
Включите удаленные подключения на компьютере, к которому требуется подключиться.
-
Убедитесь, что у вас есть выпуск Windows Pro. Чтобы проверить это, выберитеПуск и откройте Параметры . Затем в разделе Система , выберите О системе и в разделе Характеристики Windows найдите Выпуск. Сведения о том, как получить выпуск Windows Pro, см. в разделе Обновление Windows Домашняя до Windows Pro.
-
Когда будете готовы, нажмитеПуск и откройтеПараметры . Затем в разделе Система выберите Удаленный рабочий стол, установите для параметра Удаленный рабочий стол значение Включить, затем выберитеПодтвердить.
-
Запишите имя этого компьютера в поле Имя компьютера. Оно понадобится позже.
-
-
Используйте удаленный рабочий стол для подключения к настроенному компьютеру.
-
На локальном компьютере с Windows: В поле поиска на панели задач введите Подключение к удаленному рабочему столу и выберите Подключение к удаленному рабочему столу. В окне «Подключение к удаленному рабочему столу» введите имя компьютера, к которому необходимо подключиться (из шага 1), а затем нажмите кнопку Подключиться.
-
На устройстве macOS или iOS: Откройте Windows App (доступно бесплатно в Microsoft Store и Apple App Store) и добавьте имя компьютера, к которому требуется подключиться (из шага 1). Выберите имя удаленного компьютера, которое вы добавили, и дождитесь завершения подключения.
-
На устройстве Android: Откройте приложение «Удаленный рабочий стол » (доступное бесплатно в Магазине Google Play) и добавьте имя компьютера, к которому вы хотите подключиться (из шага 1). Выберите имя удаленного компьютера, которое вы добавили, и дождитесь завершения подключения.
-
Включить удаленный рабочий стол
Нужна дополнительная помощь?
Нужны дополнительные параметры?
Изучите преимущества подписки, просмотрите учебные курсы, узнайте, как защитить свое устройство и т. д.
Внимание! Подключение к удаленному рабочему столу невозможно с учетной записью без пароля.
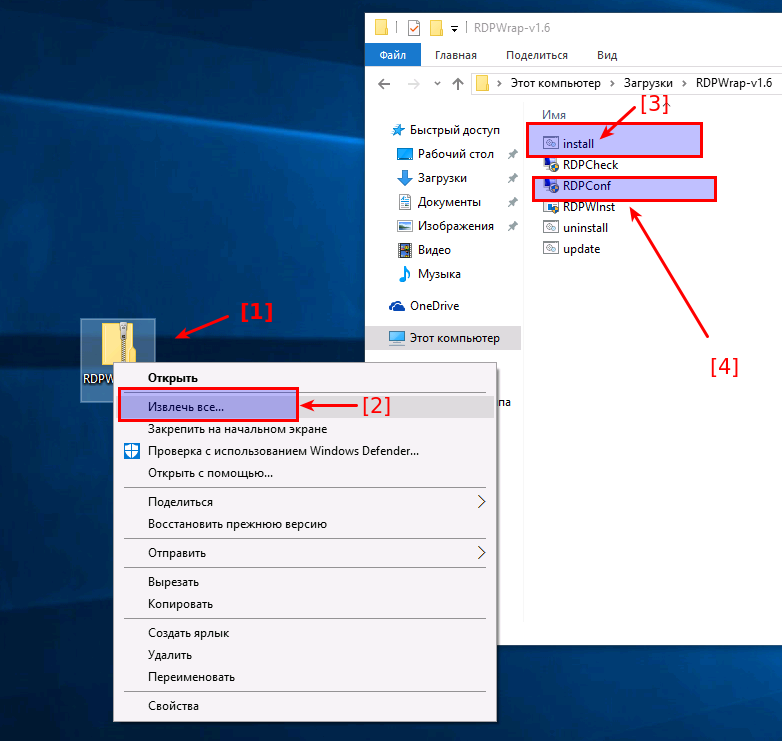
Section 1. Установка Сервер удаленного рабочего стола на Windows 10 / 8.1 Home / Starter!
Загрузите бесплатную RDPWrap из: https://github.com/stascorp/rdpwrap/releases/tag/v1.6.2
Или скачайте архив: RDPWrap-v1.6.2
Распакуйте архив RDPWrap-v1.6.2.zip и запустите от имени администратора файл install.bat
А теперь проверьте настройки удаленного рабочего стола.
Важный:
При проблемах с портами-слушателями запустите update.bat (режим администратора)! (… см. Изображение-2 Arrow-3)
Или после некоторого автоматического обновления Windows (10,7,8.1)!
| (Image-1) Установка удаленного рабочего стола на Windows-10 Home! |
|
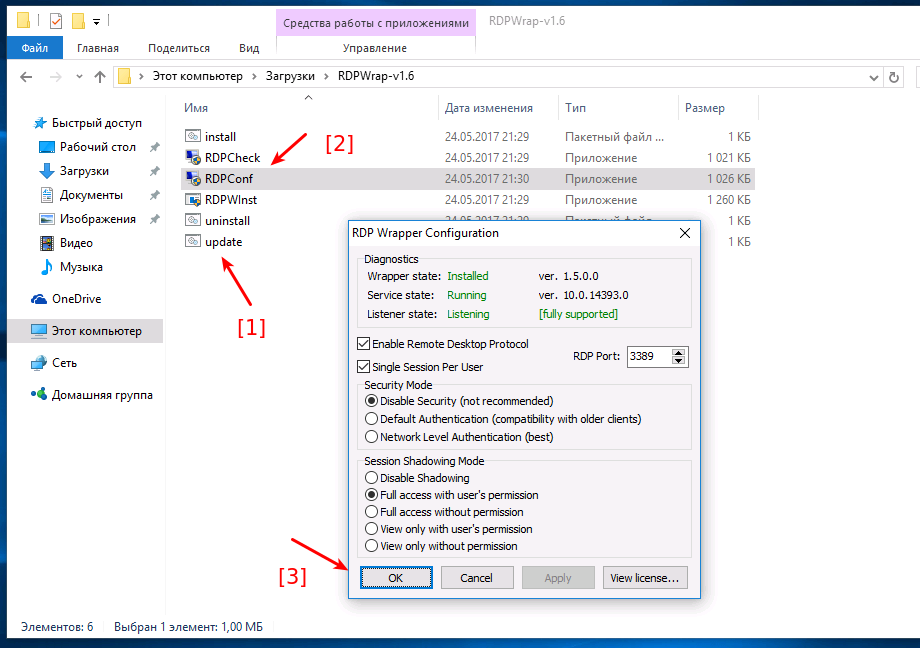
Section 2. Настройки установленного удаленного рабочего стола!
Запустите RDPConf.exe, чтобы увидеть или изменить настройки сервера удаленного рабочего стола!
Если в поле Listener state написано NO Listen, значит запустите update.sh
| (Image-2) Настройка удаленного рабочего стола Windows-10 Home! |
|
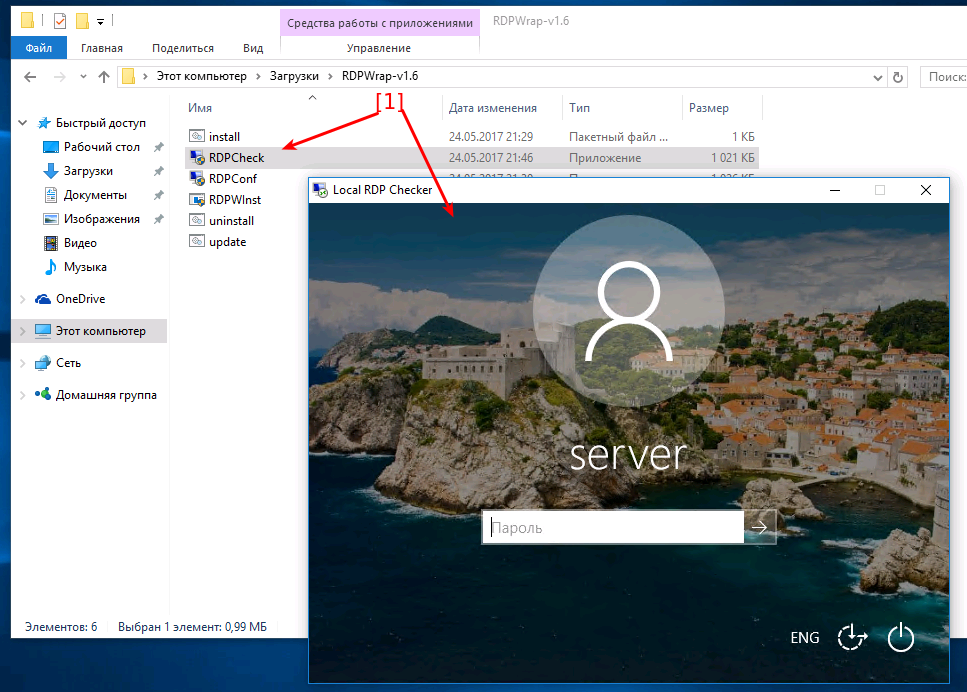
Section 3. Тестирование подключения к удаленному рабочему столу!
Проверьте подключение через RDPchek.exe
| (Image-3) Проверьте удаленный рабочий стол на Windows-10 Home! |
|
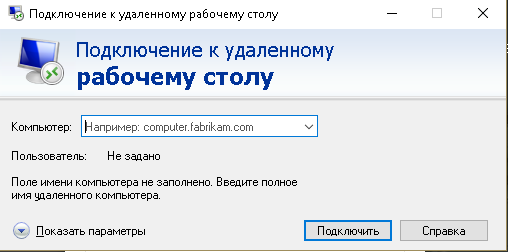
Section 4. Подключение к удаленному рабочему столу с Windows-7!
Запустите подключение к удаленному рабочему столу с помощью Run-Dialog Windows-Logo + R и mstsc и подключитесь к Windows Home Server Remote Desktop Server 🙂
| (Image-4) Тестирование подключения к удаленному рабочему столу с Windows-7! |
|
Это решение для Win-10 Pro: включить удаленный рабочий стол в Windows-10 Pro!
Это решение для включения удаленного рабочего стола Windows is Suitable for Windows 10 Pro, Windows 10 Enterprise, Windows 10 Home, Windows 8.1, Windows 8.1 Enterprise, Windows 8.1 Pro, Windows 8, Windows 8 Enterprise, Windows 8 Pro, Windows 7 Enterprise, Windows 7 Home Basic, Windows 7 Home Premium, Windows 7 Professional, Windows 7 Starter, Windows 7 Ultimate, Windows Vista Enterprise 64-bit edition, Windows Vista Ultimate 64-bit edition, Windows Vista Business, Windows Vista Business 64-bit edition, Windows Vista Enterprise, Windows Vista Ultimate
There is no Remote Desktop feature in Windows 11 and 10 Home edition. Since it is for home usage, Microsoft removed some features from Windows Home, like the Group Policy Editor (gpedit.msc) and remote desktop (RDP). These features are only available in the Pro and Enterprise editions.
Technology firms tend to reserve a few features for their premium offerings. The Microsoft Windows operating system is no exception. Windows 11 Pro has more features than the Windows Home edition, but the latter is also a costlier choice. The Home version has enough features for everyday users.
Remote Desktop is used for two reasons:
- Connect and control remote computers Desktop on your computer.
- Connect and control your computer from other computers over the network (or the Internet).
Upgrading to Windows 10 Pro just to use a specific functionality is not wise when so many remote desktop apps are available on Microsoft Store. Nevertheless, nobody can rule out the sophistication of the native Windows tools.
If you go to Settings app >> System >> Remote Desktop, you will see the following error message if you are using Windows Home edition:
“Your Home edition of Windows 1X doesn’t support Remote Desktop”

Table of Contents
Difference between Microsoft Remote Desktop Server and Client
Before we move forward, you must understand that Windows has a Remote Desktop Server and a Remote Desktop Client. Remote Desktop Client is still present in the Home edition, which you can open using the mstsc cmdlet. This means you can still connect to other devices from a PC with Windows Home. However, the Remote Desktop Server has been removed, which means other devices cannot connect to your Windows Home computer.
Microsoft disabled the Remote Desktop Server on Windows 11/10 Home but did not remove it entirely. As a workaround, you can still enable the premium feature reserved for Windows Pro users to allow remote connections.
Trust me! You don’t have to be a computer geek to make Windows Remote Desktop tool work on your Windows Home PC. All you need to do is to download a file and install it on your computer.
Please go through the steps involved to set up Remote Desktop on a PC with Windows Home Edition. This method works for Windows 10 Home and Windows 11 Home Editions.
Enable Remote Desktop on Windows 11 and Windows 10 Home Editions
The following steps will allow remote access to your Windows 11 and Windows 10 Home computer remotely through the network:
-
Download Thinstuff Remote Desktop Host by clicking on the link.
Note: You will have to allow the downloaded .exe file through your web browser’s security, as it is considered malicious, otherwise it will be blocked. -
Once downloaded, execute the file and go through with the installation wizard to install the tool on your Windows Home computer.
-
Once installed, restart the computer to finalize the installation.
-
After your system reboots, run the Thinstuff Remote Desktop Host application. A shortcut to the app should be available on your desktop.

Thinstuff Remote Desktop Host -
Congrats! If you have enabled RDP or remote desktop protocol, the Windows Remote Desktop Server is now available on your Windows Home PC. You can now connect to this PC remotely from another computer on your network, using any Remote Desktop application of your choosing.

Here are a few things to note before you invite someone to remotely connect with your PC:
-
You can only connect to this PC remotely if the Thinstuff Remote Desktop Host is running. The tool does not start automatically, but you can manually add it to the automatic startup list.
-
If you have not purchased a license for Thinstuff Remote Desktop Host, then you will see a message, such as in the following image, when connected to the PC remotely. This message cannot be dismissed before 10 seconds.
W11Home message -
Make sure your Windows firewall allows remote connections on TCP and UDP port 3389, which will be used by the RDP server as the default port.
-
Although this method isn’t illegal, you will still be in breach of Microsoft Windows EULA (End User Licensing Agreement). Therefore, you should avoid using it in a commercial setup.
-
Only give remote access to your PC to people you trust or those bound by a contractual or legal obligation.
-
Use the same credentials for a Remote Desktop Connection that you use to log into your system.

Windows Remote Desktop Alternatives
While these steps are reasonable for most computer users, many people are not comfortable with the idea of patching their OS to add or remove features. At iTechtics, we suggest going for an inbuilt tool whenever possible over a third-party alternative.
Nevertheless, there are tons of remote desktop applications available for Windows 11 and 10. You can use that application to establish remote connections to and from your PC without any workarounds. These applications also offer mobile and tablet apps. I will start with my personal favorite and the most popular one—TeamViewer.
Third-party apps also reduce the risks involved in enabling the RDP port over the network. The native RDP app from Microsoft is vulnerable to all sorts of security threats, especially when you allow access to your computer over the internet.
-
TeamViewer
Apart from the Windows-native MSTSC app, Microsoft also provides a UWP Microsoft Remote Desktop app which can be downloaded from Microsoft Store. It gives the user m
TeamViewer is one of the most versatile remote desktop applications available for the Windows operating system and all major mobile and desktop platforms. The best part is the application is free for personal and non-commercial use and allows instant remote connection between two computers, provided both the computers have the application installed and configured to connect.
You do not need a default port to connect to the computer remotely.
-
Anydesk
A potential competitor to TeamViewer, Anydesk is also free for personal usage and is compatible with every device you can think of, which also includes Raspberry Pi in addition to the usual mobile and desktop platforms.
-
Chrome Remote Desktop
For those who live and breathe in their Chrome browser or use a Chromebook, there is no better option than Chrome Remote Desktop. A Chrome extension developed by Google itself, Chrome Remote Desktop mirrors your Chrome browser on any authorized PC, Tablet, or mobile phone.
-
Microsoft Remote Desktop for Android
Remote Desktop for Android can be downloaded from the Google Play Store on any Android device and can be used to connect to another device that supports the Remote Desktop Protocol.
-
Microsoft Remote Desktop App
Apart from the Windows-native MSTSC app, Microsoft also provides a UWP Microsoft Remote Desktop app, which can be downloaded from Microsoft Store. It gives the user more controls with a convenient UI over the built-in Remote Desktop client application in Windows.
Conclusion
The idea of using a pro feature on the Home version of Windows without paying for an upgrade, while a fascinating idea, is a workaround. It might or might not work for you.
If you’re a business that relies on Remote Desktop tool for business processes, the workaround isn’t exactly a cost saver for you. I recommend you upgrade to Windows Pro edition or buy a license to one of the aforementioned tools. For everybody else, I recommend giving this technique, to enable the RDP server on Windows Home, a try before going for an alternative.
That said, a third-party tool known as “RDP Wrapper Library” used to work as an alternative tool to enable RDP on Windows Home edition. However, the tool has not been updated since 2017 and no longer works on either Windows 10, or the Windows 11 operating system. Therefore, it can be concluded that the RDP Wrapper Library has become obsolete.
Поддержка RDP — протокола удаленного рабочего стола присутствует в Windows начиная с версии XP, однако далеко не все знают, как пользоваться (и даже о наличии) Microsoft Remote Desktop для удаленного подключения к компьютеру с Windows 10, 8 или Windows 7, в том числе и не используя никаких сторонних программ.
В этой инструкции описывается, как использовать удаленный рабочий стол Microsoft с компьютера на Windows, Mac OS X, а также с мобильных устройств Android, iPhone и iPad. Хотя процесс мало чем отличается для всех этих устройств, за исключением того, что в первом случае все необходимое является частью операционной системы. См. также: Лучшие программы для удаленного доступа к компьютеру.
Примечание: подключение возможно только к компьютерам с редакцией Windows не ниже Pro (при этом подключаться можно и с домашней версии), но в Windows 10 появилась новая очень простая для начинающих пользователей возможность удаленного подключения к рабочему столу, которая подойдет в тех ситуациях, когда она требуется однократно и необходимо подключение через Интернет, см. Удаленное подключение к компьютеру с помощью приложения Быстрая помощь в Windows 10.
Перед использованием удаленного рабочего стола
Удаленный рабочий стол по протоколу RDP по умолчанию предполагает, что вы будете подключаться к одному компьютеру с другого устройства, находящегося в той же локальной сети (В домашних условиях это обычно означает подключенного к тому же роутеру. Есть способы подключения и по Интернету, о чем поговорим в завершении статьи).
Для подключения требуется знать IP адрес компьютера в локальной сети или имя компьютера (второй вариант работает только в случае, если включено сетевое обнаружение), а с учетом того, что в большинстве домашних конфигураций IP-адрес постоянно меняется, прежде чем начать, рекомендую назначить статический IP адрес (только в локальной сети, к вашему провайдеру Интернета этот статический IP не имеет отношения) для компьютера, к которому будет выполняться подключение.
Могу предложить два способа сделать это. Простой: зайдите в панель управления — Центр управления сетями и общим доступом (или правый клик по значку соединения в области уведомлений — Центр управления сетями и общим доступом. В Windows 10 1709 пункт отсутствуют в контекстном меню: открываются параметры сети в новом интерфейсе, внизу которых есть ссылка для открытия Центра управления сетями и общим доступом, подробнее: Как открыть Центр управления сетями и общим доступом в Windows 10). В разделе просмотра активных сетей, кликните по подключению по локальной сети (Ethernet) или Wi-Fi и нажмите кнопку «Сведения» в следующем окне.
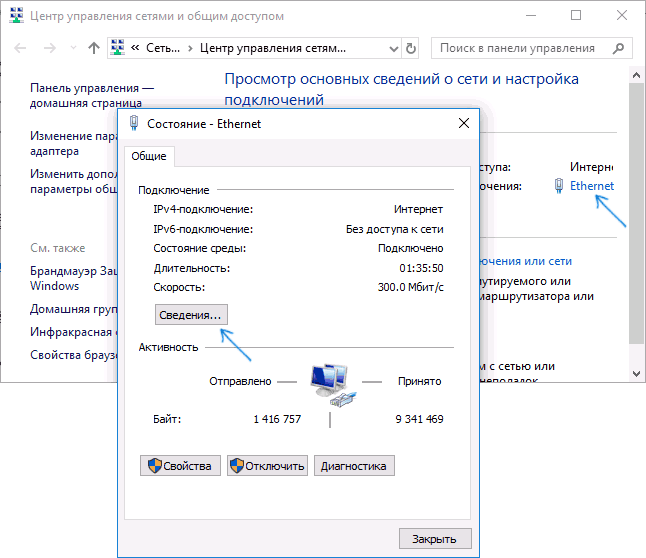
Из этого окна вам потребуется информация об IP-адресе, шлюзе по умолчанию и DNS серверах.
Закройте окно сведений о подключении, и нажмите «Свойства» в окне состояния. В списке используемых подключением компонентов выберите Протокол Интернета версии 4, нажмите кнопку «Свойства», после чего введите параметры, полученные ранее в окно конфигурации и нажмите «Ок», затем еще раз.
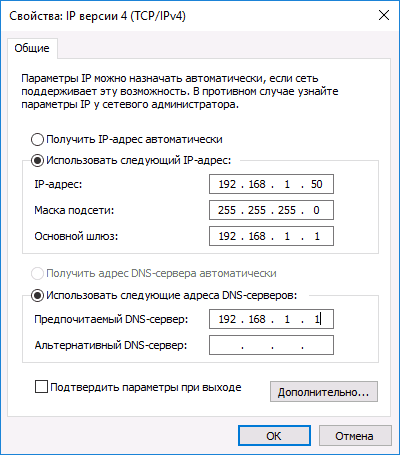
Готово, теперь у вашего компьютера статический IP адрес, который и потребуется для подключения к удаленному рабочему столу. Второй способ назначить статический IP адрес — использовать настройки сервера DHCP вашего роутера. Как правило, там имеется возможность привязки конкретного IP по MAC-адресу. В детали вдаваться не буду, но, если вы умеете самостоятельно настроить роутер, с этим тоже справитесь.
Разрешение подключения к удаленному рабочему столу Windows
Еще один пункт, который следует выполнить — включить возможность подключений RDP на компьютере, к которому вы будете подключаться. В Windows 10 начиная с версии 1709 разрешить удаленное подключение можно в Параметры — Система — Удаленный рабочий стол.
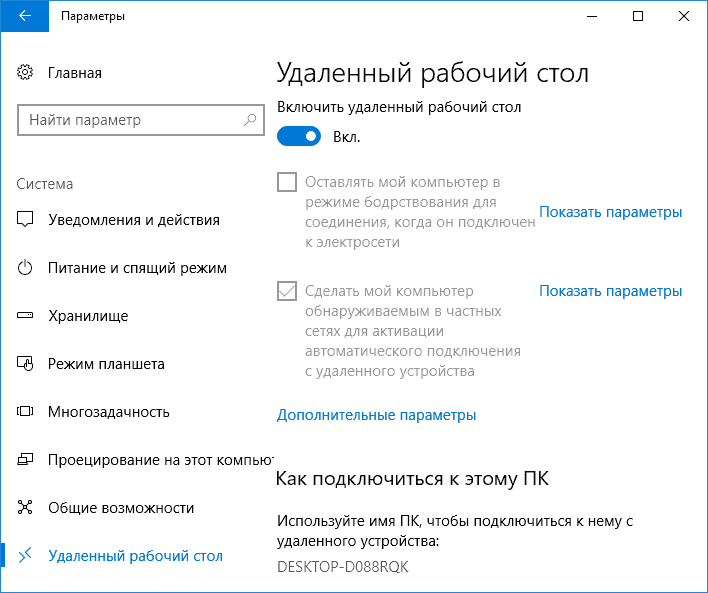
Там же, после включения удаленного рабочего стола отобразится имя компьютера, по которому можно подключиться (вместо IP-адреса), однако для использования подключения по имени вы должны изменить профиль сети на «Частная» вместо «Общедоступная» (см. Как изменить частную сеть на общедоступную и наоборот в Windows 10).
В предыдущих версиях Windows зайдите в панель управления и выберите пункт «Система», а затем в списке слева — «Настройка удаленного доступа». В окне параметров включите «Разрешить подключения удаленного помощника к этому компьютеру» и «Разрешить удаленные подключения к этому компьютеру».
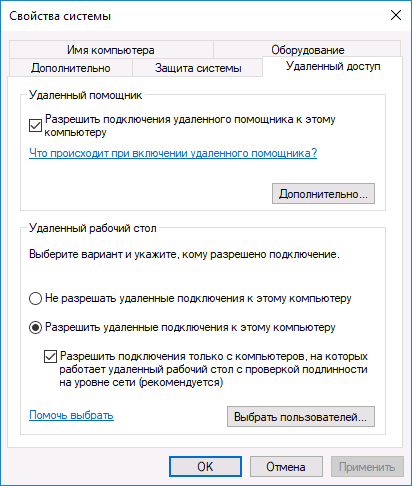
При необходимости, укажите пользователей Windows, которым нужно предоставить доступ, можно создать отдельного пользователя для подключений удаленного рабочего стола (по умолчанию, доступ предоставляется тому аккаунту, под которым вы вошли и всем администраторам системы). Все готово, для того чтобы начать.
Подключение к удаленному рабочему столу в Windows
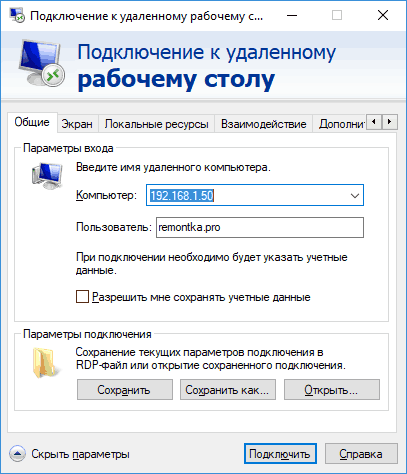
Для того, чтобы подключиться к удаленному рабочему столу, вам не требуется устанавливать дополнительные программы. Просто начните вводить в поле поиска (в меню пуск в Windows 7, в панели задач в Windows 10 или на начальном экране Windows 8 и 8.1) «подключение к удаленному рабочему столу», для того чтобы запустить утилиту для подключения. Или нажмите клавиши Win+R, введите mstsc и нажмите Enter.
По умолчанию, вы увидите только окно, в которое следует ввести IP-адрес или имя компьютера, к которому нужно подключиться — вы можете ввести его, нажать «Подключить», ввести имя пользователя и пароль на запрос данных аккаунта (имя и пароль пользователя удаленного компьютера), после чего увидите экран удаленного компьютера.

Можно также настроить параметры изображения, сохранения конфигурации подключения, передачи звука — для этого нажмите «Показать параметры» в окне подключения.
Если все было сделано правильно, то через короткое время вы увидите экран удаленного компьютера в окне подключения удаленного рабочего стола.
Microsoft Remote Desktop в Mac OS X
Для подключения к компьютеру Windows на Mac, вам потребуется скачать приложение Удаленный рабочий стол (Microsoft Remote Desktop) из App Store. Запустив приложение, нажмите кнопку со знаком «Плюс», чтобы добавить удаленный компьютер — дайте ему имя (любое), введите IP-адрес (в поле «PC Name»), имя пользователя и пароль для подключения.
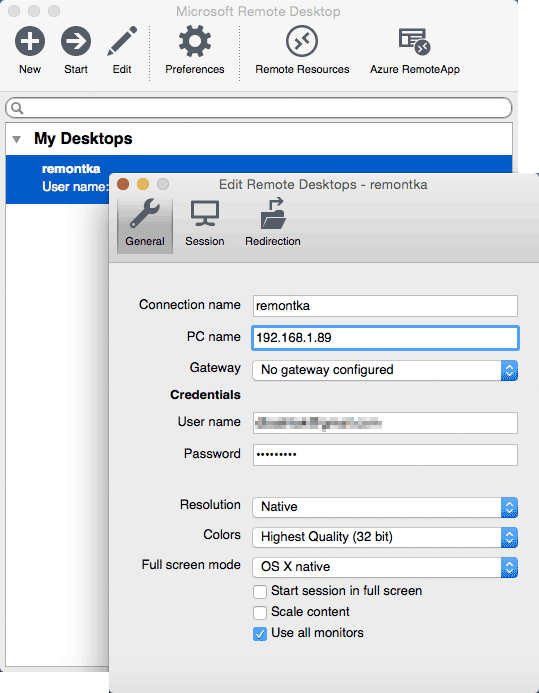
При необходимости, установите параметры экрана и другие детали. После этого, закройте окно настроек и дважды кликните по имени удаленного рабочего стола в списке для подключения. Если все было сделано правильно, вы увидите рабочий стол Windows в окне или на полный экран (зависит от настроек) на вашем Mac.
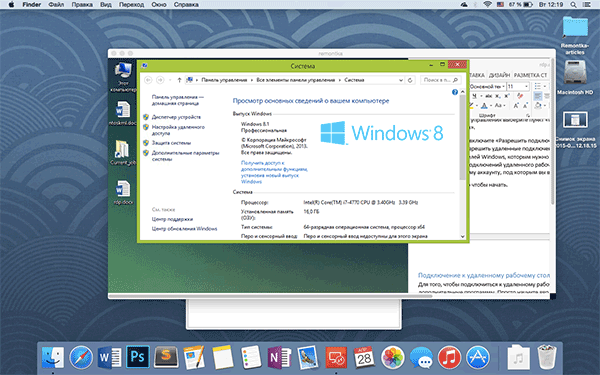
Лично я использую RDP как раз в Apple OS X. На своем MacBook Air я не держу виртуальных машин с Windows и не устанавливаю ее в отдельный раздел — в первом случае система будет тормозить, во втором я значительно сокращу время работы от аккумулятора (плюс неудобство перезагрузок). Поэтому я просто подключаюсь через Microsoft Remote Desktop к своему крутому настольному ПК, если мне требуется Windows.
Android и iOS
Подключение к удаленному рабочему столу Microsoft почти ничем не отличается для телефонов и планшетов Android, устройств iPhone и iPad. Итак, установите приложение Microsoft Remote Desktop для Android или «Удаленный рабочий стол (Майкрософт)» для iOS и запустите его.
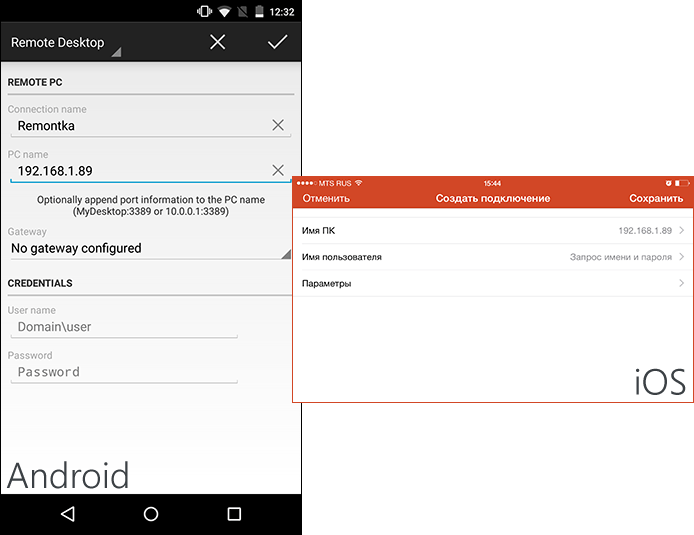
На главном экране нажмите «Добавить» (в версии для iOS далее выберите «Добавить ПК или сервер») и введите параметры подключения — так же, как и в предыдущем варианте это имя подключения (на ваше усмотрение, только в Android), IP-адрес компьютера, логин и пароль для входа в Windows. При необходимости задайте другие параметры.
Готово, можно подключаться и удаленно управлять компьютером с вашего мобильного устройства.
RDP через Интернет
На официальном сайте Microsoft присутствует инструкция о том, как разрешить подключения удаленного рабочего стола через Интернет (только на английском). Заключается она в пробросе на роутере порта 3389 на IP адрес вашего компьютера, а затем — подключение к публичному адресу вашего роутера с указанием данного порта.
На мой взгляд, это не самый оптимальный вариант и безопасней, а может и проще — создать VPN подключение (средствами роутера или Windows) и подключаться по VPN к компьютеру, после чего использовать удаленный рабочий стол так, как если бы вы находились в той же локальной сети (правда, проброс портов все равно потребуется).
The remote desktop access tool allows you to control other computers via a remote connection and vice versa. However, if you are using Windows 11/10 Home, you won’t really use this feature. Remote Desktop is only available to the Windows 11/10 Pro and Enterprise edition. So the question is, how to enable Remote Desktop in Windows 11/10 Home?
By default, you won’t be able to enable Remote desktop in Windows 11/10 Home. But you can always upgrade your Windows 11/10 Home to Pro or Enterprise edition. However, it is not a wise decision as you will have to purchase a Windows 11/10 Pro or Enterprise license.
But upgrading Windows to use single software isn’t really a wise idea. Instead, you can try using this software called RDP Wrapper Library.
So let’s go ahead and learn about what this RDP Wrapper Library is and how you can enable remote desktop in Windows 11/10 Home.

What is RDP Wrapper Library?
RDP Wrapper Library is an open-source application that helps in enabling Remote Desktop Host support and concurrent RDP sessions on reduced functionality systems like Windows 11/10 Home for home-usage.
It works by adding a layer between the service control manager and terminal services. As a result, the termsrv.dll file remains untouched. Plus, it is capable of surviving against Windows updates. So it will not get deleted from your system even if you upgrade your system.
The following steps will guide you on how to download the RDP Wrapper library and use it for accessing the Remote Desktop Access tool on Windows 11/10 home:
- At first, download RDP Wrapper Library from its Github page. The current version as of now is v1.6.2 and should download the .zip file for uninterrupted installation.
- Once downloaded, unzip the file into a folder.
- Now, double click on the install.bat file and let it get executed, and it will enable RDP or Remote Desktop Protocol on your Windows 11/10 Home.

- Next, to view or change the configuration parameters, you have to run the RDPConf file.

- After that, you can test RDP access to your machine or create a localhost RDP connection test by launching the RDPCheck file.
Enable Remote Desktop Settings
The above steps will only add the RDP functionality to your Windows 11/10 Home. However, you will still need to follow a few more steps before using Remote Desktop on your system. So go ahead and complete the below steps:
- Press Win Key + R to launch the RUN dialog.
- Type down systempropertiesremote and press the Enter key.
- Over here, make sure you have placed a tick next to Allow Remote Assistance connections to this computer.
- Now come down to the bottom area and select the Allow remote connections to this computer. Also, do place a tick next to the Allow connections only from computers running Remote Desktop with Network Level Authentication option.
- Lastly, ensure that your Windows firewall allows TCP and UDP port 3389, and you are all set to use Remote Desktop on Windows 11/10 home.
So that was the answer to how to enable remote desktop in Windows 11/10 Home question. If the above steps didn’t work for you, you could always consider using third-party remote desktop access tools like AnyDesk or TeamViewer.
Nayan is a crypto and gadget enthusiast who likes to cover topics related to Tech, Startups, Crypto, Gaming, Windows, and other interesting areas. But when he is not working, you can find him playing games or watch random videos on YouTube.