
Are you worried about losing your important files and data in Windows 10? Fear not, as we have the perfect solution for you. In this guide, we will walk you through the process of configuring Shadow Copy in Windows 10, ensuring your data remains safe and easily recoverable. Whether you’re a tech novice or an experienced user, this step-by-step tutorial has got you covered.
Getting Started with Shadow Copy
Understanding Shadow Copy
Shadow Copy, also known as Volume Snapshot Service (VSS), is a built-in Windows feature that allows you to create snapshots or backups of your files and volumes. These snapshots capture your files at specific points in time, making it easy to recover previous versions or restore files that may have been accidentally deleted.
Checking Compatibility
Before we dive into configuring Shadow Copy, it’s essential to ensure your version of Windows 10 supports this feature. Typically, all Windows 10 editions come with Shadow Copy, so compatibility won’t be an issue.
Enabling Shadow Copy
To enable Shadow Copy, follow these steps:
- Step 1: Open Services
Press Win + R, type services.msc, and press Enter. This opens the Services window.
- Step 2: Locate Volume Shadow Copy
Scroll through the list of services and find “Volume Shadow Copy.” Double-click on it to open its properties.
- Step 3: Set Startup Type
In the Properties window, under the “General” tab, locate the “Startup type” dropdown menu. Choose “Automatic” and click “Apply.”
- Step 4: Start the Service
After setting the startup type, click the “Start” button to initiate the service. Click “OK” to save your changes.
Creating Shadow Copies
Scheduling Shadow Copies
Now that Shadow Copy is enabled, let’s set up scheduled snapshots:
- Step 1: Open Control Panel;
Press Win + X and select “Control Panel”.
- Step 2: Open File History;
In the Control Panel, search for “File History” and click on it.
- Step 3: Configure File History;
Click “Configure File History settings” on the left side of the window. Here, you can set the frequency and duration for your shadow copies.
Manually Creating Shadow Copies
Sometimes, you may want to create a shadow copy on-demand:
- Step 1: Open File Explorer;
Launch File Explorer by pressing Win + E.
- Step 2: Right-Click on a Folder or Drive;
Right-click on the folder or drive you want to create a shadow copy for.
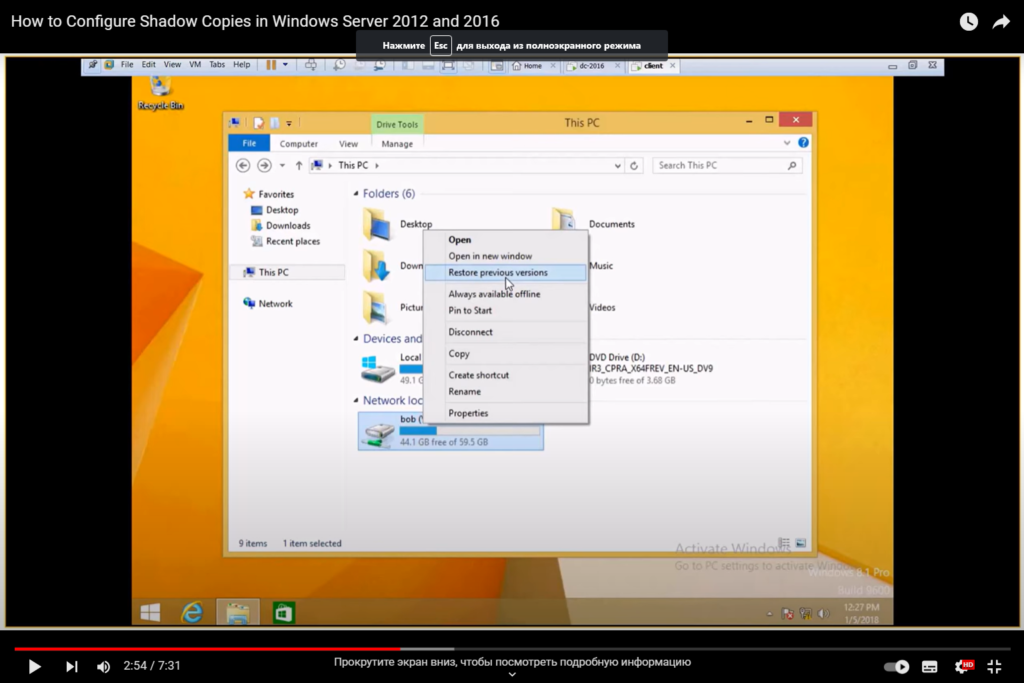
- Step 3: Access “Restore Previous Versions”;
From the context menu, select “Restore previous versions.” This will display a list of available shadow copies for that folder or drive.
- Step 4: Choose a Version to Restore;
Select the version you want to restore and click “Restore” to recover your files.
Shadow Copy Best Practices
Configuring Storage Space
Managing storage space for shadow copies is crucial to ensure efficient backup management. Here are some tips:
- Allocate an appropriate amount of disk space for shadow copies;
- Regularly monitor and adjust storage allocations based on your backup needs;
- Consider using an external drive or network storage for shadow copy storage to free up space on your system drive.
Backup Frequency
The frequency of shadow copies depends on your needs. Consider the following:
- Critical files may require more frequent snapshots;
- For less critical data, less frequent backups may suffice.
Conclusion
Configuring Shadow Copy in Windows 10 is a proactive step towards safeguarding your valuable data. With the ability to create snapshots and restore previous versions effortlessly, you’ll never have to worry about data loss again. Follow our comprehensive guide to ensure your data’s safety and enjoy peace of mind.
FAQs
What is the purpose of Shadow Copy in Windows 10?
Shadow Copy allows you to create backups or snapshots of your files and volumes, making it easy to recover previous versions or restore deleted files.
Is Shadow Copy available in all editions of Windows 10?
Yes, Shadow Copy is included in all editions of Windows 10, so you can configure it regardless of which version you have.
Can I schedule automatic shadow copies in Windows 10?
Absolutely! You can schedule regular snapshots of your files and volumes to ensure data protection.
What is the recommended storage space allocation for shadow copies?
The recommended storage space allocation depends on your backup needs. Allocate more space for critical data and adjust as necessary.
Can I use an external drive for storing shadow copies?
Yes, you can use an external drive or network storage for shadow copy storage, which can help free up space on your system drive.
Вы здесь: Главная / Статьи о PC / Безопасность / Как включить и настроить теневое копирование файлов в Windows 10, 8.1, 8, 7
Товарищи, добрый день. По совету товарища, решил написать несколько статей о повышении безопасности для работы компьютера и файлов, хранящихся на нём. Это, относительно, простая и небольшая статья, будет просто частью одной очень большой общей статье о том, что нужно делать и понимать, чтобы не попасться на развод каких-либо мошенников и плохих людей. Не знаю, через сколько я её напишу, так как она должна быть реально огромная, но повышать компьютерную грамотность надо.
Так, что такое теневое копирование файлов? Это система Windows, которая в автоматическом режиме создает резервные копии файлов при создании точки восстановления системы (обычно при выключении и запуске компьютера). Данную функцию обязательно включать, если вы постоянно работаете с каким-либо важным документами и хотя при восстановлении предыдущих версий документов потеряется часть данных, зачастую это лучше, чем потерять файл полностью. Кстати, эта функция по сути, является единственным способом хоть как-то защититься от вирусов-шифраторов (о них тоже будет позже). Перейдем к включению данной функции.
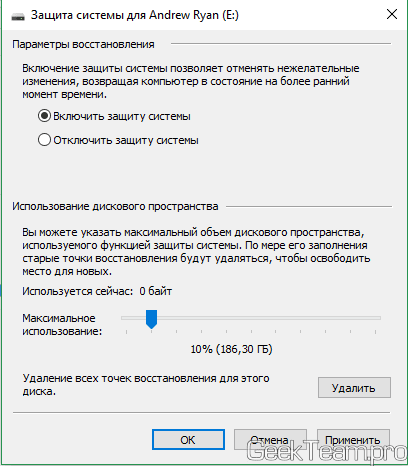
Жмём сочетание клавиш Win+Pause/Break и в левом боковом меню открывшегося окна, жмём по ссылке «Защита системы«.

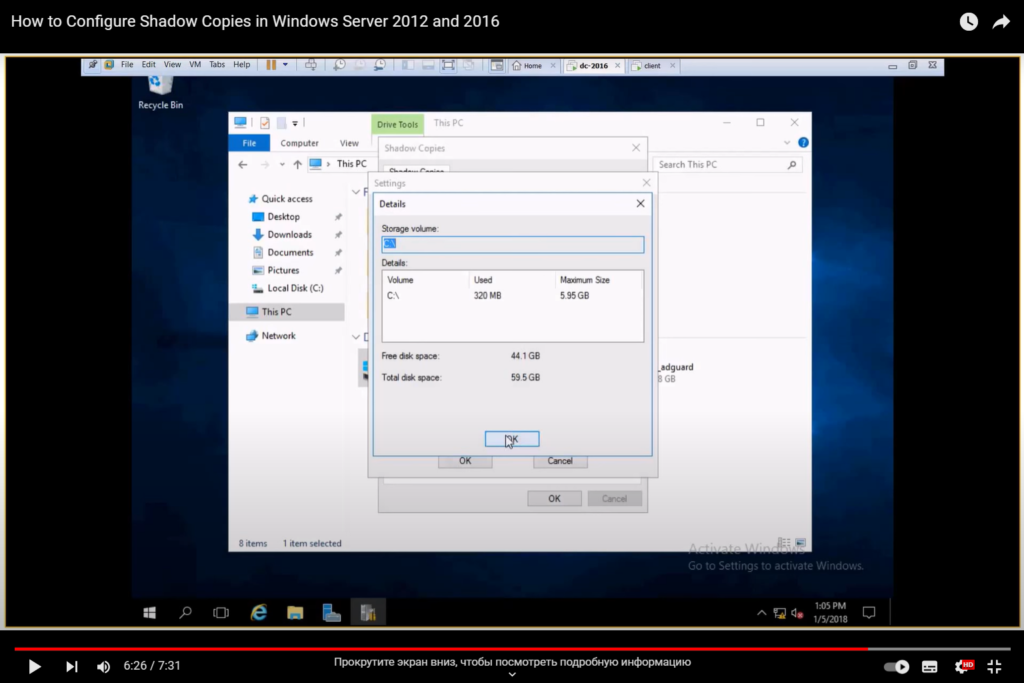
Откроется окно свойства системы на вкладке «Защита системы». В Windows 7 интерфейс попроще (можно выбрать только галочками жесткие диски, файлы с которых будут сохраняться), в современных операционных системах доступны некоторые настройки. Выбираем жесткий диск, файлы которого будут сохраняться и жмём кнопку «Настроить«.
, в современных операционных системах доступны некоторые настройки. Выбираем жесткий диск, файлы которого будут сохраняться и жмём кнопку \"Настроить\".")
Переставляем вверху точку на «Включить защиту системы» и двигаем ползунок «Использование дискового пространства» на значение…. Которое граничит на значении вашей жадности и здравого смысла. Потому что, значение которое здесь будет указано всегда будет занято файлами точек восстановления. То есть, на жестком диск будет занят и вы не сможете записать на него большое количество фильмов, музыки, фото или что вы там ещё закачиваете. Но, если вы работаете с большим количеством важных документов, все-таки рекомендую выбрать 50-100Гб, если у вас очень много любимых фотографий, то желательно выбрать 2-3 объема папки с фото (к слову, если у вас несколько жестких дисков, можно двинуть ползунок на них тоже, так как все эти Гб будут использоваться с одной целью).
Идеальный вариант — это купить ещё один жесткий диск и использовать весь его объем для файлов теневого копирования. Да это дорого, особенно по нынешним ценам, но если у вас важные документы, они могут быть дороже 10к за новый жесткий диск, то почему нет. Тем более, напомню о вирусах — шифраторах:)
В общем, побороли жадность, выбрали объем и нажали ОК.
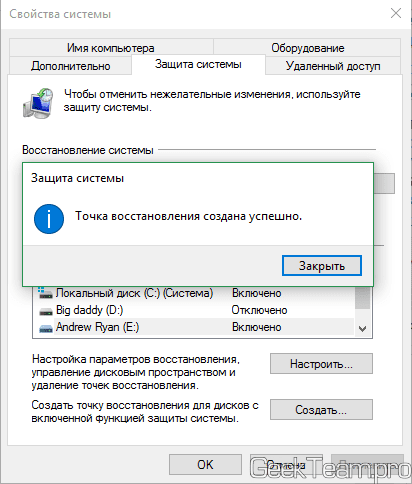
Нас вернет в окно «Свойства системы», жмём кнопку «Создать» для создания новой точки восстановления.

Указываем какое-нибудь имя и жмём ОК.

Контрольная точка создается довольно быстро и система выдаст окно о готовности, через несколько секунд.
Для демонстрации работы теневого копирования, я перед созданием точки восстановления поместил некий файл-конфиг в корень диска Е, после создания добавил в него пару строк, сохранил и снова создал точку. Теперь открыв «Свойства файла» и перейдя на вкладку «Предыдущие версии» мы можем восстановить или открыть одну из них.

Вроде всё. Надеюсь эта статья оказалась вам полезной, обязательно нажмите одну из кнопок ниже, чтобы рассказать о ней друзьям. Также подпишитесь на обновления сайта, введя свой e-mail в поле справа или подписавшись на группу во Вконтакте и канал YouTube.
Спасибо за внимание
Материал сайта geekteam.pro
Shadow Copy Windows 10/11 can help you back up your data and protect it from loss. You must be curious about what it is and how to enable/disable Shadow Copy in Windows 10/11. Read this stepwise article from MiniTool to follow a comprehensive tutorial on how this tool works and an all-around way for backup.
Shadow Copy is a technology available in Windows 11/10/8/7 that can create backup copies or snapshots of computer volumes/files on a local disk, external hard drive, or network drive, whether you are in use or not. It is implemented as a Windows service called the Volume Shadow Copy service, also known as Volume Snapshots Service or VSS.
Shadow Copy requires the NTFS or ReFS file system to create and restore shadow copies. Any Windows component using this technology can create Shadow Copies on local or external volumes (creating a Windows backup or system restore point, for example).
In addition, you can use the Shadow Copy feature to restore lost files. In Windows 10/11, you can choose to use Windows Previous Versions, which are copies of files and folders and sometimes serve as Shadow Copies. With it, you can first look through your old Shadow Copies and restore your lost files.
At the same time, Shadow Copy can also be able to restore the system. As long as a system point is created, you will have a valid Shadow Copy. When the Windows 10/11 system does not work normally, you can restore Windows 10/11 to the previous normal state with a system restore point.
To learn more information about Shadow Copy, you can click on Shadow Copy from Wiki.
From the above information, now you may understand Shadow Copy is such a handy tool. Therefore, it’s necessary for you to know how to use it. Follow the next part to learn more details.
How to Configure a Shadow Copy in Windows 10/11
If you want to set up a Shadow Copy, first you should enable Shadow Copy in Windows 10/11. This process is very easy. Meanwhile, if you need to delete Shadow Copies, all these operations are straightforward with several simple steps as well. The Shadow Copy feature ensures the continuity of data backup and restorability. Read this part carefully, it will show you how to enable Shadow Copy in Windows 10/11 with the following methods.
1. Enable Volume Shadow Copy Service Using System Restore Points
Setting restore points is an optional way to enable Shadow Copy in Windows 10/11. Here’s how to do it.
Step 1: Input Create a restore point into the search box of Windows and choose it.
Step 2: Choose a drive from the Available Drives menu and then click on the Configure button.
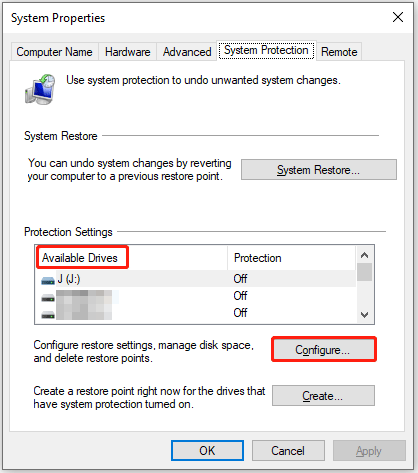
Step 3: Check the option for Turn on system protection, click the Apply button to enable the setting, and then click OK.
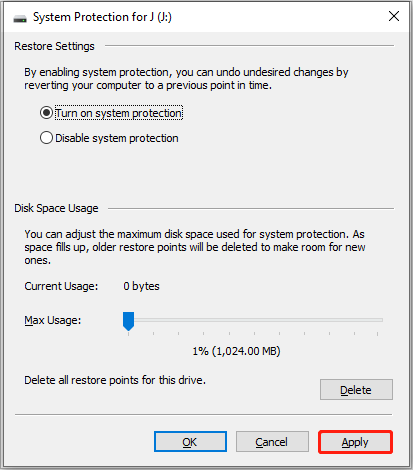
Step 4: Click the Create option to create a restore point to turn on the volume Shadow Copy service. Then you can type a description to help you identify the restore point in the pop-up window.
2. Use Task Scheduler to Turn on Shadow Copy Windows 10/11
Utilizing Task Scheduler is a more accurate way to turn on Shadow Copy Windows 10/11. With it, you can set up a specific time to create a Shadow Copy.
Here’s how to enable Shadow Copy in Windows 10/11 using Task Scheduler.
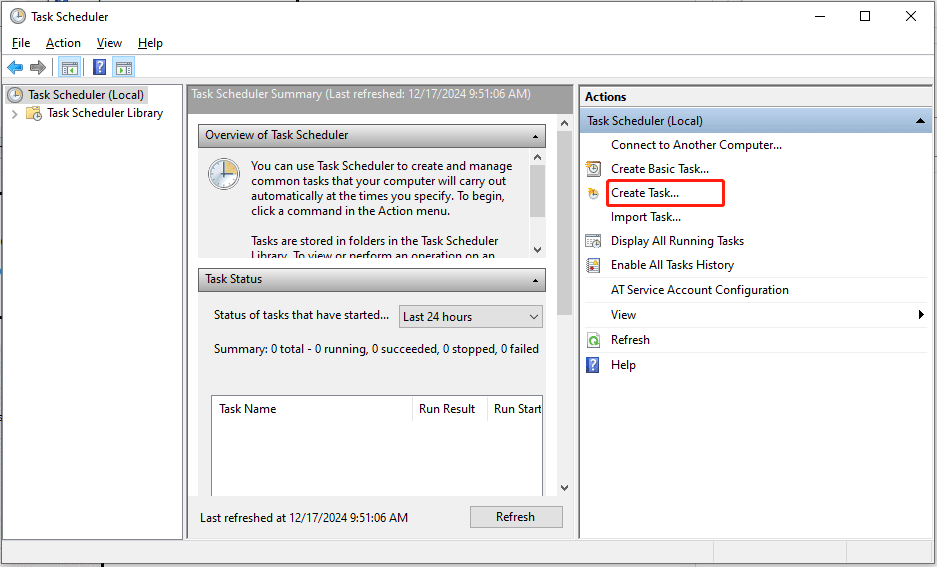
Step 1: Locate the search bar, go ahead by typing Task Scheduler, and click on it to enter its interface.
Step 2: Choose Create Task… from the right panel and name this task under the General section.
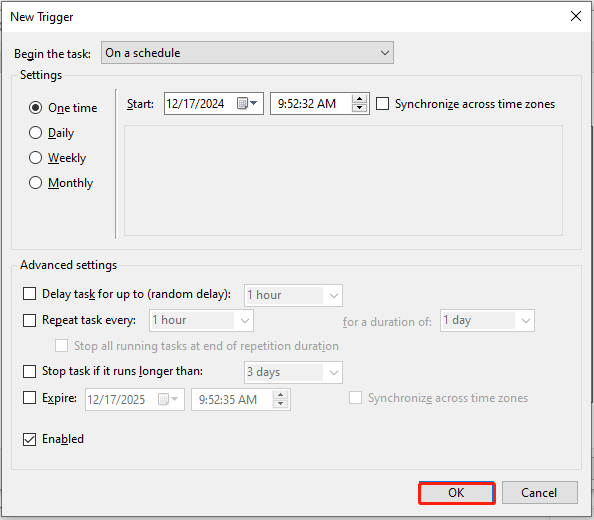
Step 3: Click Trigger and then click the New… button to create a new trigger. Now in the popup window, you can make settings as per your needs. When done, click OK to go on.
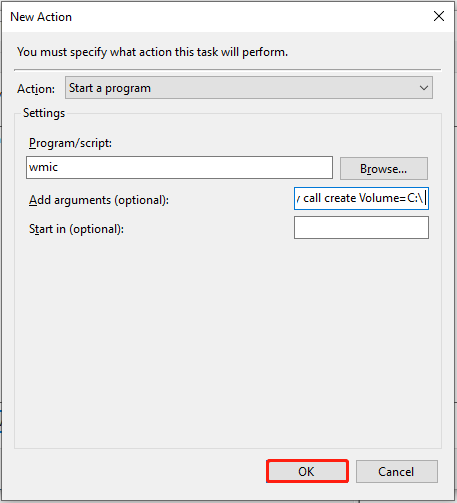
Step 4: Click the Actions button and choose New… to specify what actions this task will perform.
Step 5: Next type wmic under the Program/script: section and then input shadowcopy call create Volume=C:\ at the right side of the Add arguments (optional): section. Click OK to back to the Actions interface and then click OK to finish the settings.
Disable Shadow Copy in Windows 10/11 for System Restore
In case you would not like to use Shadow Copy Windows 10/11, you can follow the introductions below to turn off it. Here’s how to do it.
Step 1: Type Control Panel in the search bar of Windows and click it to enter its interface.
Step 2: Select System and Security, locate the System option, and click it. Alternatively, you can select System with the way View by Small icons.
Step 3: Choose Advanced system settings to continue.
Step 4: Enter the System Properties section and select System Protection.
Step 5: Choose the drive that you have turned on system protection and click Configure… to go on.
Step 6: Check the option of Disable system protection and click on Apply.
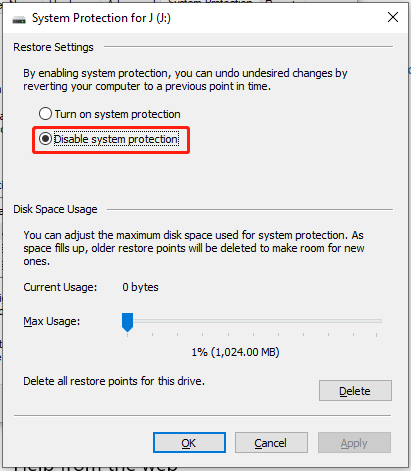
Step 7: You will receive a warning message. Read it carefully and click Yes. After that, click the OK button to exit this window.
Now you have disabled Shadow Copy in Windows 10/11 successfully. Besides, if you encounter some issues when using the Volume Shadow Copy Service, refer to this post for solutions: Quick Fix Volume Shadow Copy Service Errors (for Windows 10/8/7).
Tips:
Although Volume Shadow Copy Service enables you to create a snapshot of a computer file or volume, it cannot replace backup. So, you can create a backup using Backup and Restore (Windows 7) which can help you ensure your system and data are safe.
Backup Files Using Volume Shadow Copy Windows 10/11
After enabling Volume Shadow Copy, run the built-in tools such as Backup and Restore to backup files. But if you want to know more details about it, you can follow the steps below to check.
Step 1: Type Control Panel in the search box on Windows 10/11 and click it. View all the items by Category, choose the System and Security option, and click Backup and Restore (Window 7).
Step 2: Locate Set up backup and tap on it.
Step 3: Select where you want to have your backup saved and click Next.
Step 4: Select Let Windows choose. Orcheck Let me choose tochoosethe items that you want to include in the backup. Check the checkbox – Include a system image of drives if necessary and click Next to continue.
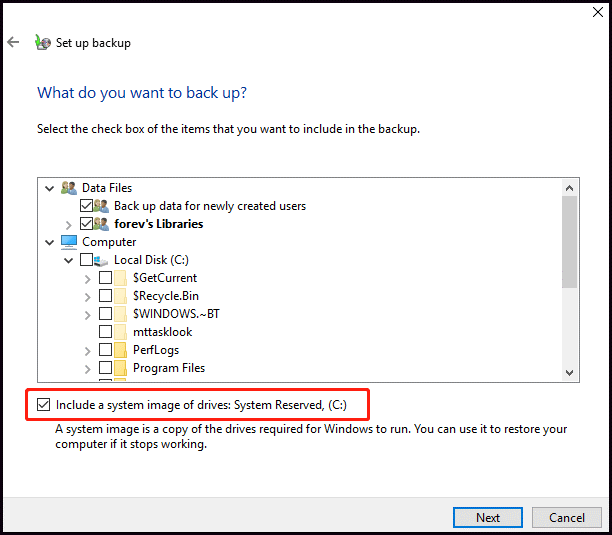
Step 5: Review your backup settings and confirm the same. Finally, click Save settings and run backup.
How to Use Shadow Copies to Restore Files
Under the condition of having shadow copies available on the drive, you can easily use the Previous Versions feature to restore deleted files and earlier specific copies from the snapshot of Shadow Copy. Take certain files that were saved on the Desktop as an example. Here’s how to restore shadow copies.
Step 1: Locate the Desktop folder in the File Explorer. Right-click it and choose Properties.
Step 2: Select the Previous Versions tab, click the right version you want to restore, and click the Restore option.
Tips:
If the files are not listed in the folder menu, you can look for their parent folder and restore it to the previous version. Or perhaps you forgot the location of the lost files, you can also download and install the Shadow Explorer for free. It can help find your shadow copies conveniently.
Versatile Backup Software for Windows 10/11
When it comes to data backup, MiniTool ShadowMaker cannot be ignored. MiniTool ShadowMaker is a professional backup software that helps you do this work to protect your system and data. With this tool, you are allowed to back up files, folders, partitions, and disks as well as the operating system.
The copy of the backup enables you to restore data if a disaster occurs, while also providing the capability to create bootable media. When your computer fails to boot correctly, you can restore your system to the previous state via the created media.
MiniTool ShadowMaker TrialClick to Download100%Clean & Safe
Take backing up Windows 10/11 system as an example.
Step 1: Launch MiniTool Shadowmaker and choose the Backup section.
Step 2: Choose the SOURCE module. There are two source types you can select including Disk and Partition and Folders and Files. Select one you need to back up and click OK to continue.
Step 3: Click the DESTINATION module and choose the destination path where you want to save the image files. Click the OK button.
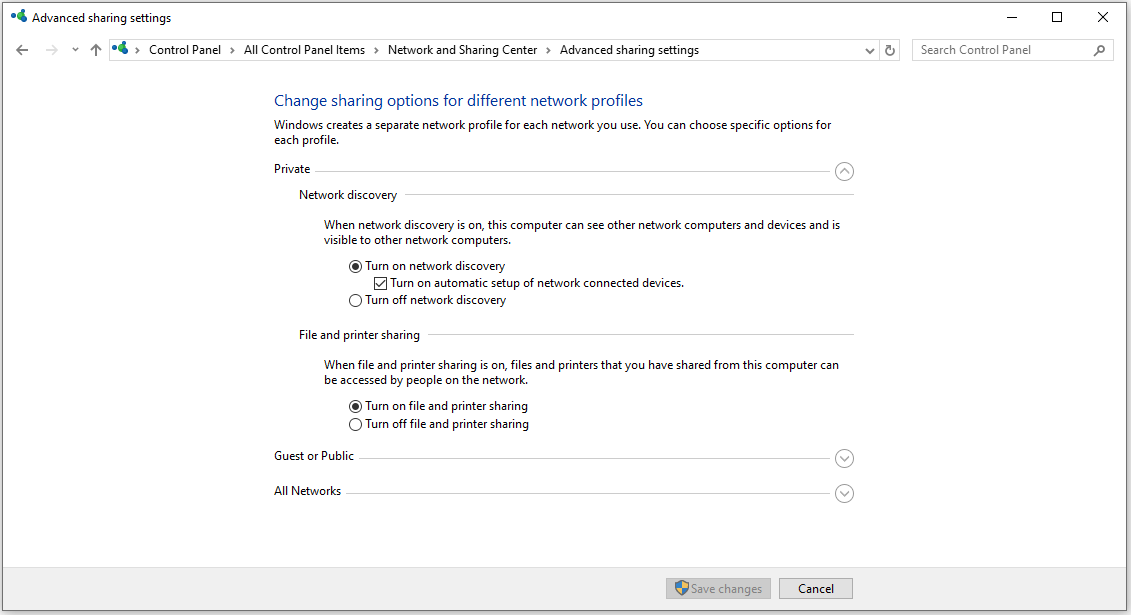
MiniTool ShadowMaker lets you back up your items to multiple places (User, Computer, Libraries, Shared). Among these places, Shared allows you to back up your files to the shared folder via a network path. You need to:
Turn on the network discovery and file sharing.
- Go to Control Panel > Network and Sharing Center > Change advanced sharing settings.
- Turn on network discovery and file sharing under Private, Guest or Public, and All Networks.
Create the shared folder
- Create a shared folder called smelly cat, and create a subfolder called cats (examples).
- Right-click the shared folder and click Properties.
- Choose Sharing and click Share. Then, choose Everyone from the pull-down menu and click Add, choose Read/Write under Permission Level, and click Share.
- Return to the Sharing tab. Click Advanced Sharing… and check the Share this folder in the same window, tap on the Permission button, and check the Allow box next to the Full Control option.
- After creation, go back to the Sharing section and note down the network path.
Choose a network path
Go to the Shared tab and click the Add button.
Type the network path, user name, and password, and click OK.
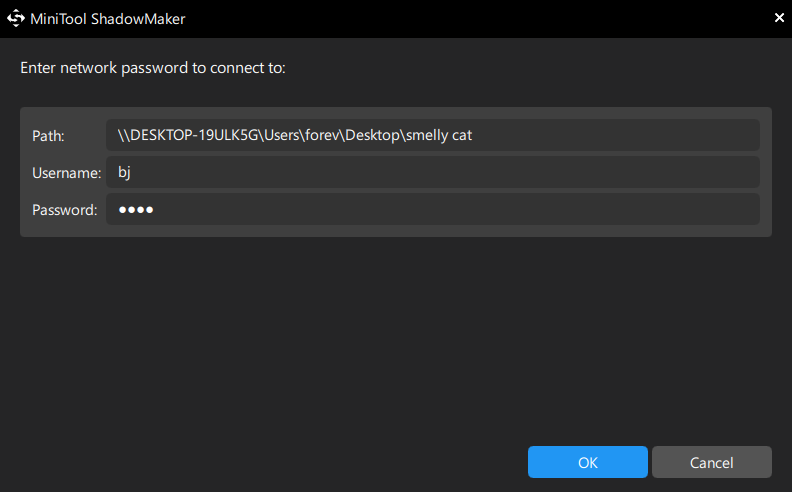
Open the shared folder (smelly cat) and choose the subfolder (cats) as the destination.
Step 4: Before backing up, you can go to Options > Backup options to customize some specific settings according to your needs. Go to the Backup Scheme section to set up the backup type or manage disk space occupied by the backup image files. Make a schedule to automatically back up the item in Schedule Settings.
Tips:
If you need more clarification on it, you can refer to Backup Settings.
Step 5: Click Back Up Now to perform the backup process immediately. Or you can choose Back Up Later to delay the operation. It will finish based on your schedule or restart in the Manage window.
Bottom Line
In conclusion, this article does not just show you much introduction about what Shadow Copy Windows 10/11 is but also shares the methods on how to create a Shadow Copy in Windows 10/11. Meanwhile, it also introduces you to how to perform backups to keep your system and data safe with MiniTool ShadowMaker.
If you have any questions about MiniTool ShadowMaker, please contact us via the email [email protected].
Shadow Copy Windows 10/11 FAQ
Where are shadow copies stored?
Shadow copies are stored locally and found in the System Volume Information folder which is hidden so you need to make it visible.
Is it OK to delete shadow copies?
Yes, it’s safe. This is because your system is working properly and there is no need to retain those specific snapshots that have been created.
Home » Shadow Copies in Windows 10 and 11
What are Shadow Copies?
Shadow copies are basically snapshots of a drive in your computer. For example you can configure shadow copies to be made every day at 9am, 12pm and 4pm.
If you deleted a file or made modifications to an existing file throughout the day, you are able to restore that file from a shadow copy.
For example you accidentally deleted a file you were working on at 2pm, you simply open the shadow copy of the dive taken at 12pm. The downside is that you lose everything you worked on the file since 12pm (so essentially the last two hours in this example) but at least you have the original file back, even if it’s a slightly older version.
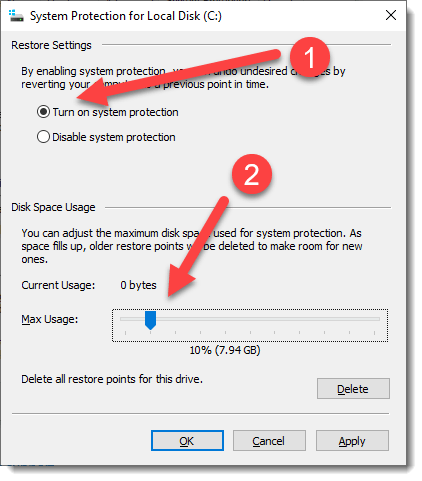
Enable Shadow Copies
To enable shadow copies do the following. This will allocate a certain amount of disk space on your drive(s). We set it to 10%, that means on a 1TB drive 100GB storage space will be allocated to save versions of your deleted and altered files.
Once that allocated quota is reached, older shadow copies will be overwritten by newer copies.
1. Open the Start Menu. Click on Settings
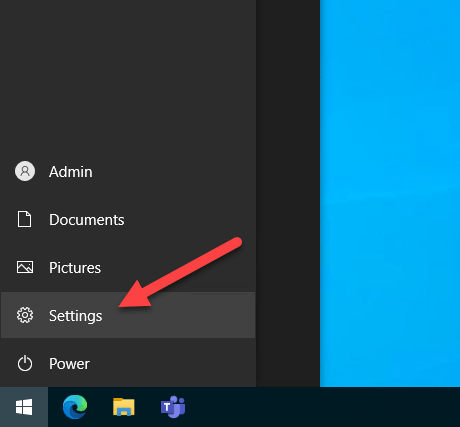
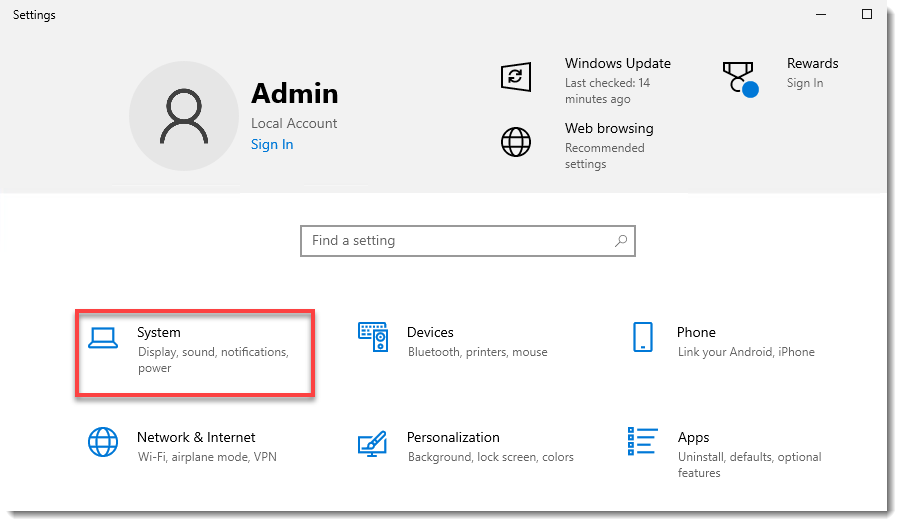
2. Select System
3. Scroll down in the left side menu until you reach About. Locate the System protection option there.
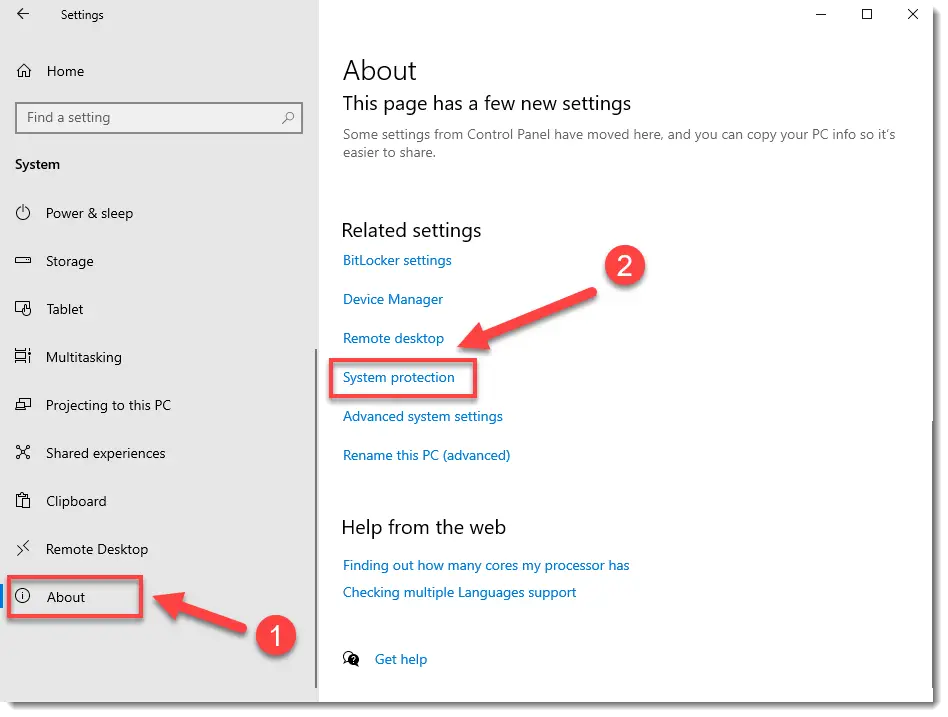
4. All of the volumes in your computer are listed here. In our case we only have our C: drive, and protection (shadow copies) are turned off.
Click on Configure …
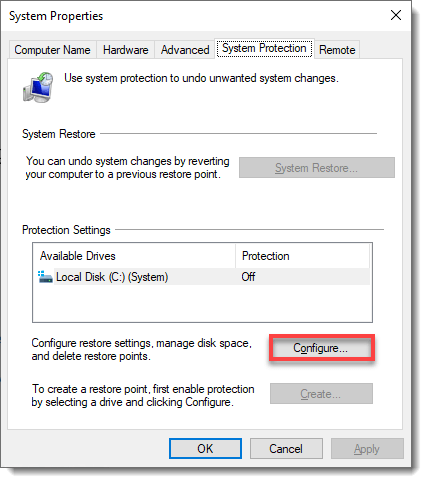
5. Turn on system protection and use the slider below to set the allocated disk space for the copies.
Create Shadow Copy Schedule
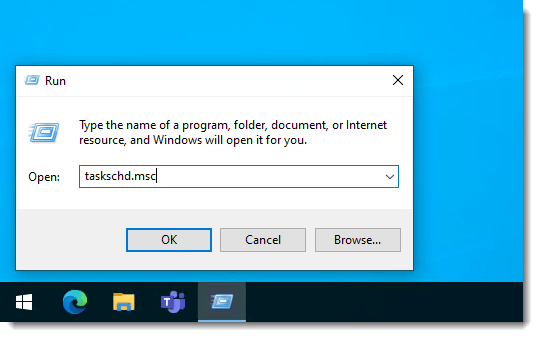
At this point shadow copies are enabled but they are still not created. In Windows 10 and 11 we need to create scheduled tasks manually so shadow copies are taken in regular intervals automatically without our intervention.
1. Open the Run text box: [Win key] + R. Alternatively right-click on the Start menu and select Run.
Type in taskschd.msc and hit Enter.
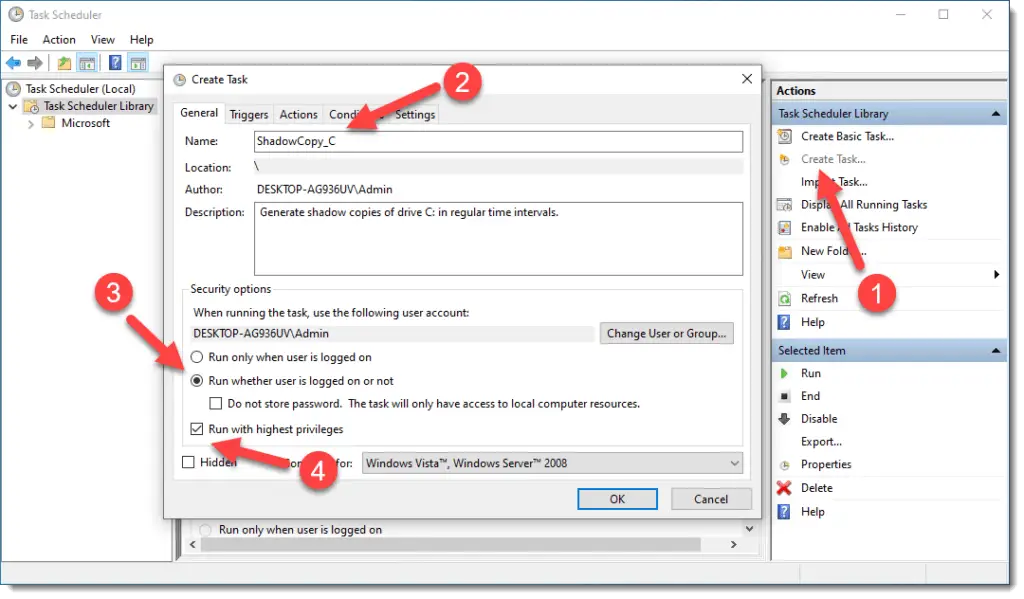
2. Click on Create Task.
Name: ShadowCopy_C
Select Run whether user is logged on or not (this makes sure you get no annoying popups when the task is run)
Check the box: Run with highest privileges.
On the top jump to the Triggers tab.
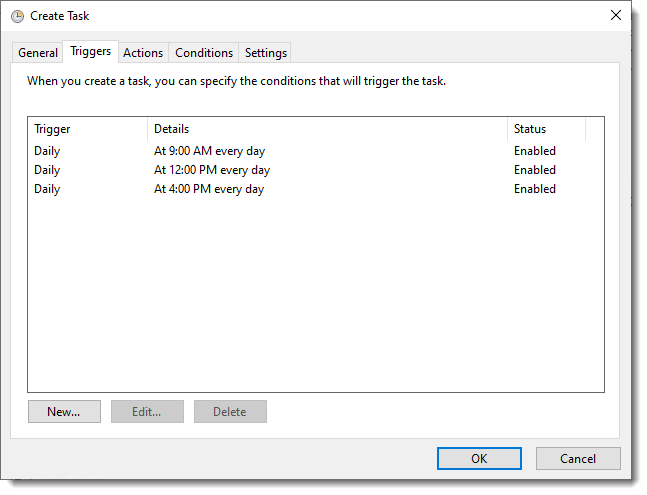
3. Click on New and add a daily schedule for 9am, 12pm and 4pm.
4. On the Actions tab select New, and add the following:
Action: Start a program
Program: wmic
Add arguments: shadowcopy call create Volume=C:\

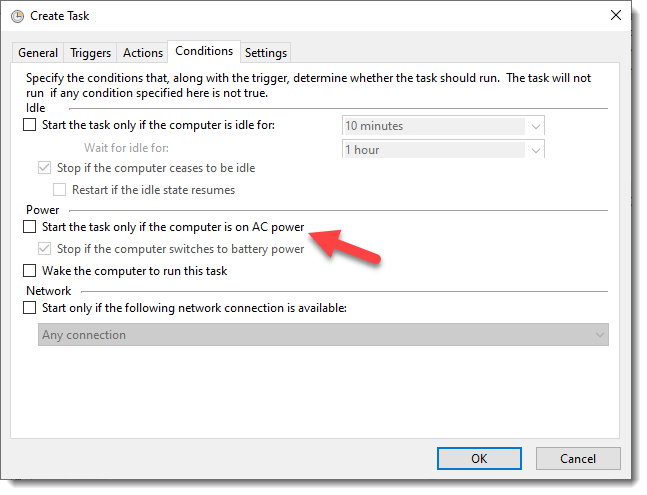
5. If you use a laptop make sure you uncheck the Start the task only on AP power option on the Conditions tab.
Test
You can test the task by running it manually. Right-click on the task and hit Run
Now if you open File Explorer, right-click on a folder or file, under the Previous versions tab you should see a copy appear.
Reader Interactions
Опубликовано:
Что такое теневые копии простыми словами.
Открываем консоль Управление дисками
Для этого кликаем правой кнопкой по Пуск и выбираем пункт Управление дисками:
В более ранних версиях Windows нажимаем Пуск — Администрирование — Управление компьютером:

В открывшемся окне раскрываем Запоминающие устройства — Управление дисками:
Включаем теневые копии
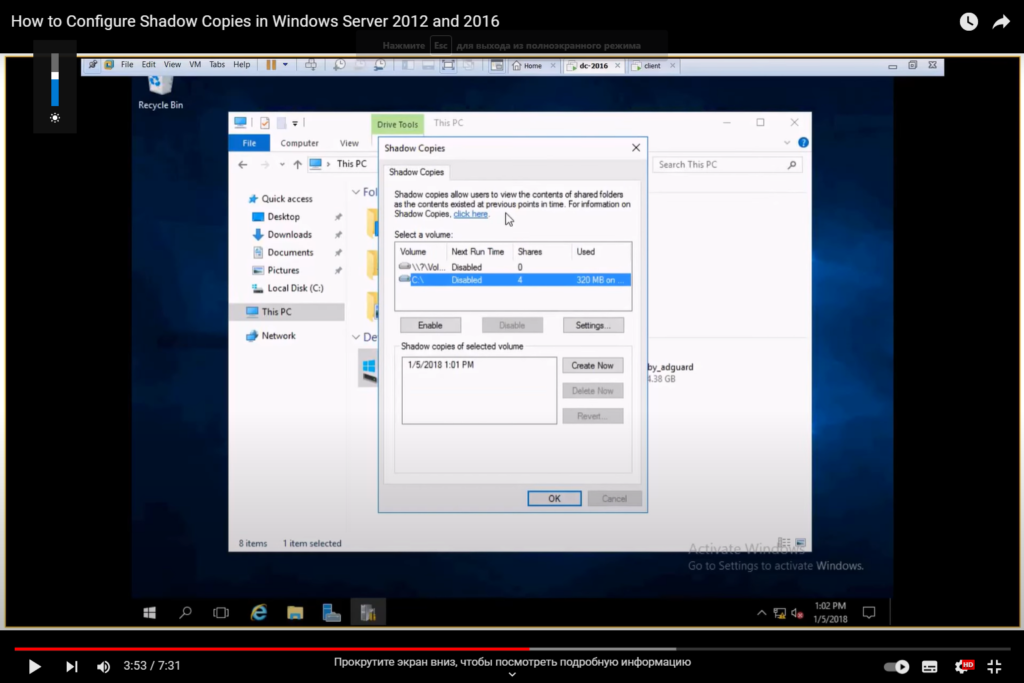
В списке дисков находим нужный и кликаем по нему правой кнопкой мыши. Выбираем Свойства.

В появившемся окне переходим на вкладку Теневые копии и нажимаем кнопку Включить:
Если появится предупреждение, прочитайте его и нажмите Да. Пройдет несколько секунд и появится первая теневая копия.
Настраиваем расписание теневых копий
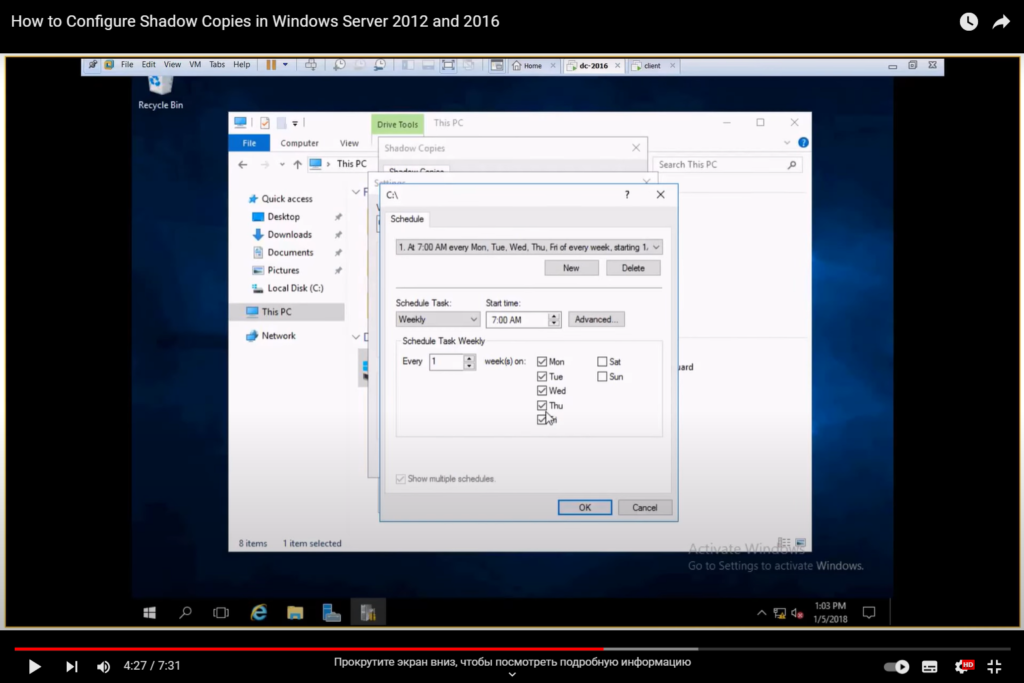
В этом же окне нажимаем Параметры:
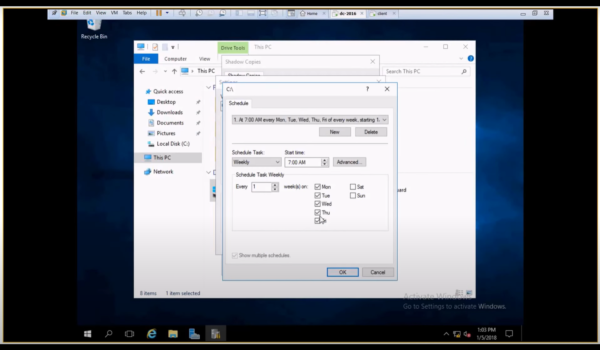
В открывшемся окне кликаем по Расписание:
Составляем новое расписание или оставляем имеющееся:
Нажимаем OK 3 раза.
Как пользоваться созданными копиями
Теневые копии создаются только для измененных файлов и по заданному расписанию.
Чтобы восстановить предыдущую версию файла, кликаем по нему правой кнопкой мыши и выбираем Свойства. В открывшемся окне переходим на вкладку Предыдущие версии и находим список всех версий файла:
* если список окажется пустым, значит либо файл не менялся с момента создания, либо еще не отрабатывало задание по созданию теневой копии.
Чтобы восстановить старую версию файла, перетащите файл из списка на рабочий стол, проверьте его корректность и замените основной файл на восстановленный или задайте ему новое имя.
Была ли полезна вам эта инструкция?
Да Нет