
Stereo Mix is a lesser-known, yet incredibly powerful feature embedded within the Windows operating system that allows you to record internal audio seamlessly. This feature is especially useful for content creators, educators, and anyone looking to capture system sounds, gameplay audio, or audio from online sources without the need for external recording devices. You can use Stereo Mix to record a podcast, capture the audio of a live stream, or simply save a piece of music playing on your computer.
Navigating through the settings to enable and effectively use Stereo Mix can be a bit tricky, particularly for those who are new to audio recording on Windows 11 or Windows 10.
This tutorial provides you with a comprehensive step-by-step guide to enable Stereo Mix on your Windows system. You’ll learn not only how to set up Stereo Mix but also how to leverage its capabilities to record crisp, clear audio directly from your computer.
How to Enable Stereo Mix in Windows 10
Stereo Mix is a hidden feature in Windows 10 that needs to be enabled manually.
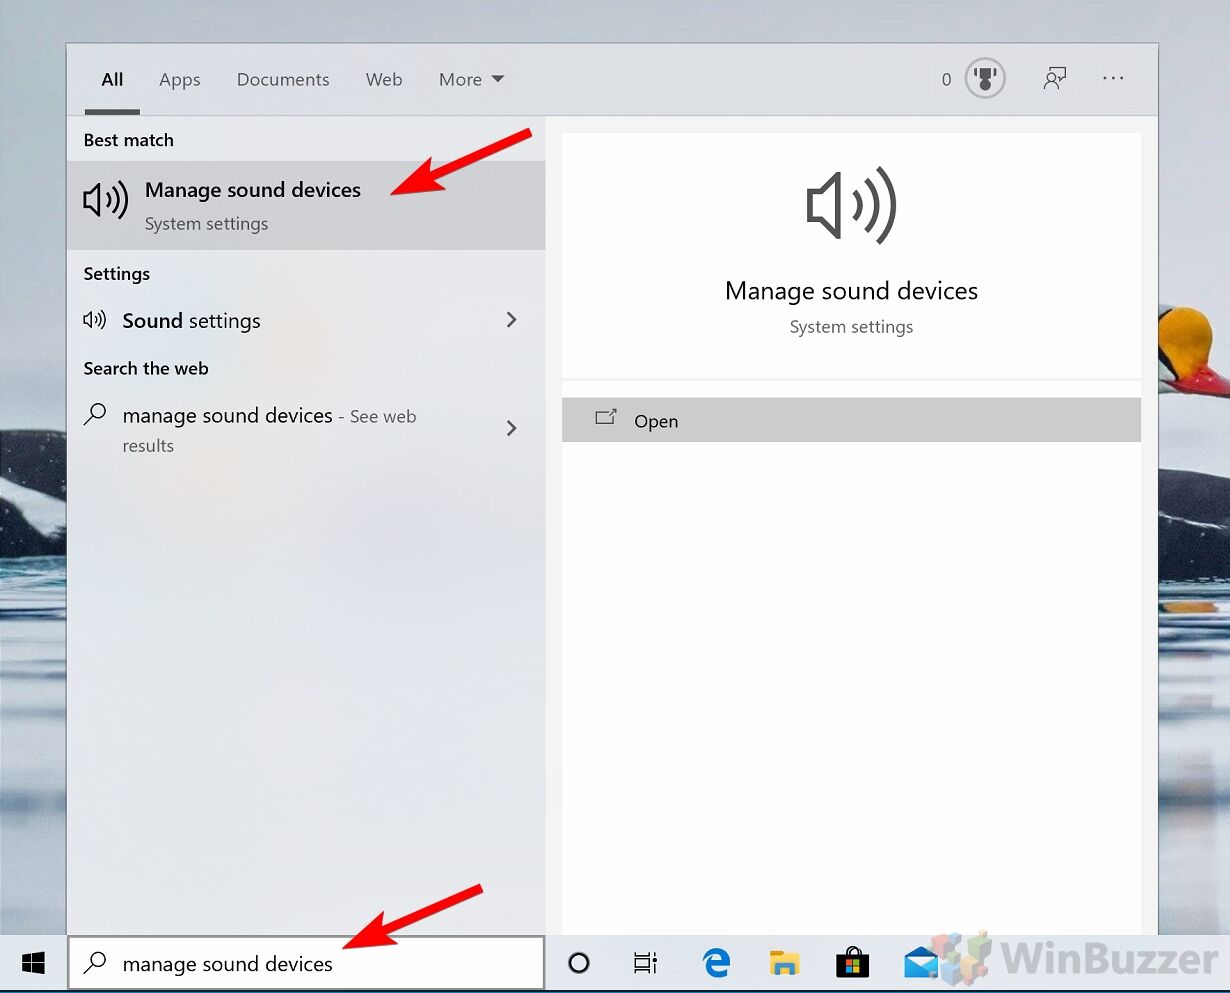
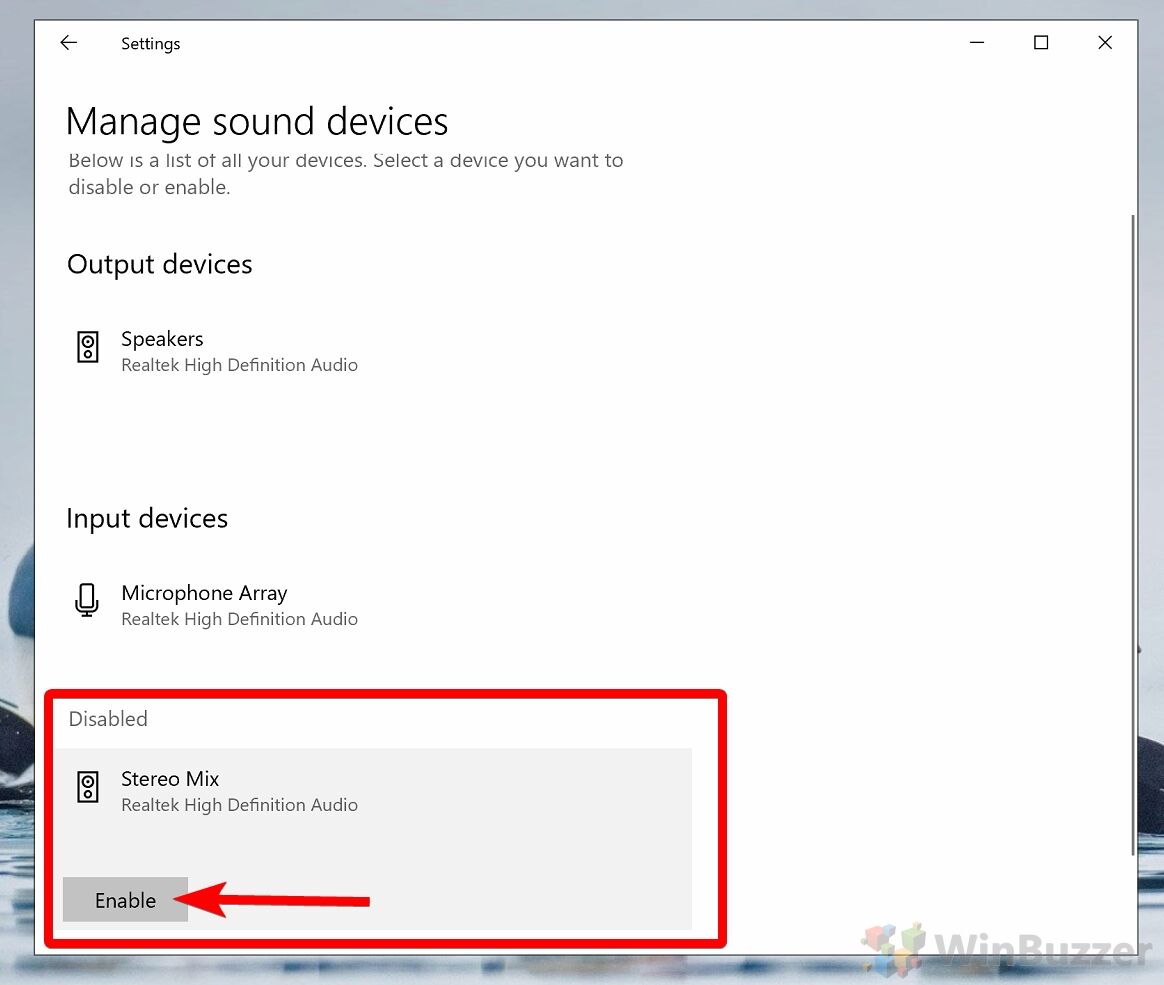
- Open “Input devices” in Windows 10 settings
The fastest way to see available “Input devices” in Windows 10 is by searching and opening “Manage sound devices”.

- Enable Stereo Mix in “Managed sound devices”
In “Manage sound devices” you will find a disabled “Stereo Mix” entry in “Input devices”. Just click on “Stereo Mix” to show the “Enable”-button. Then you can enable “Stereo Mix” with a simple click.

How to Enable Stereo Mix in Windows 11
The process in Windows 11 is similar but with slight differences in accessing sound settings.
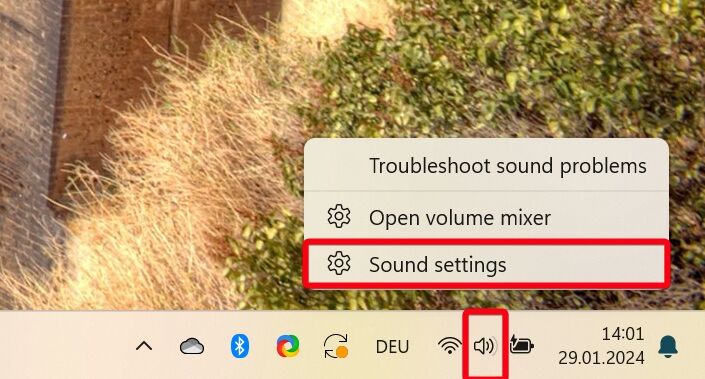
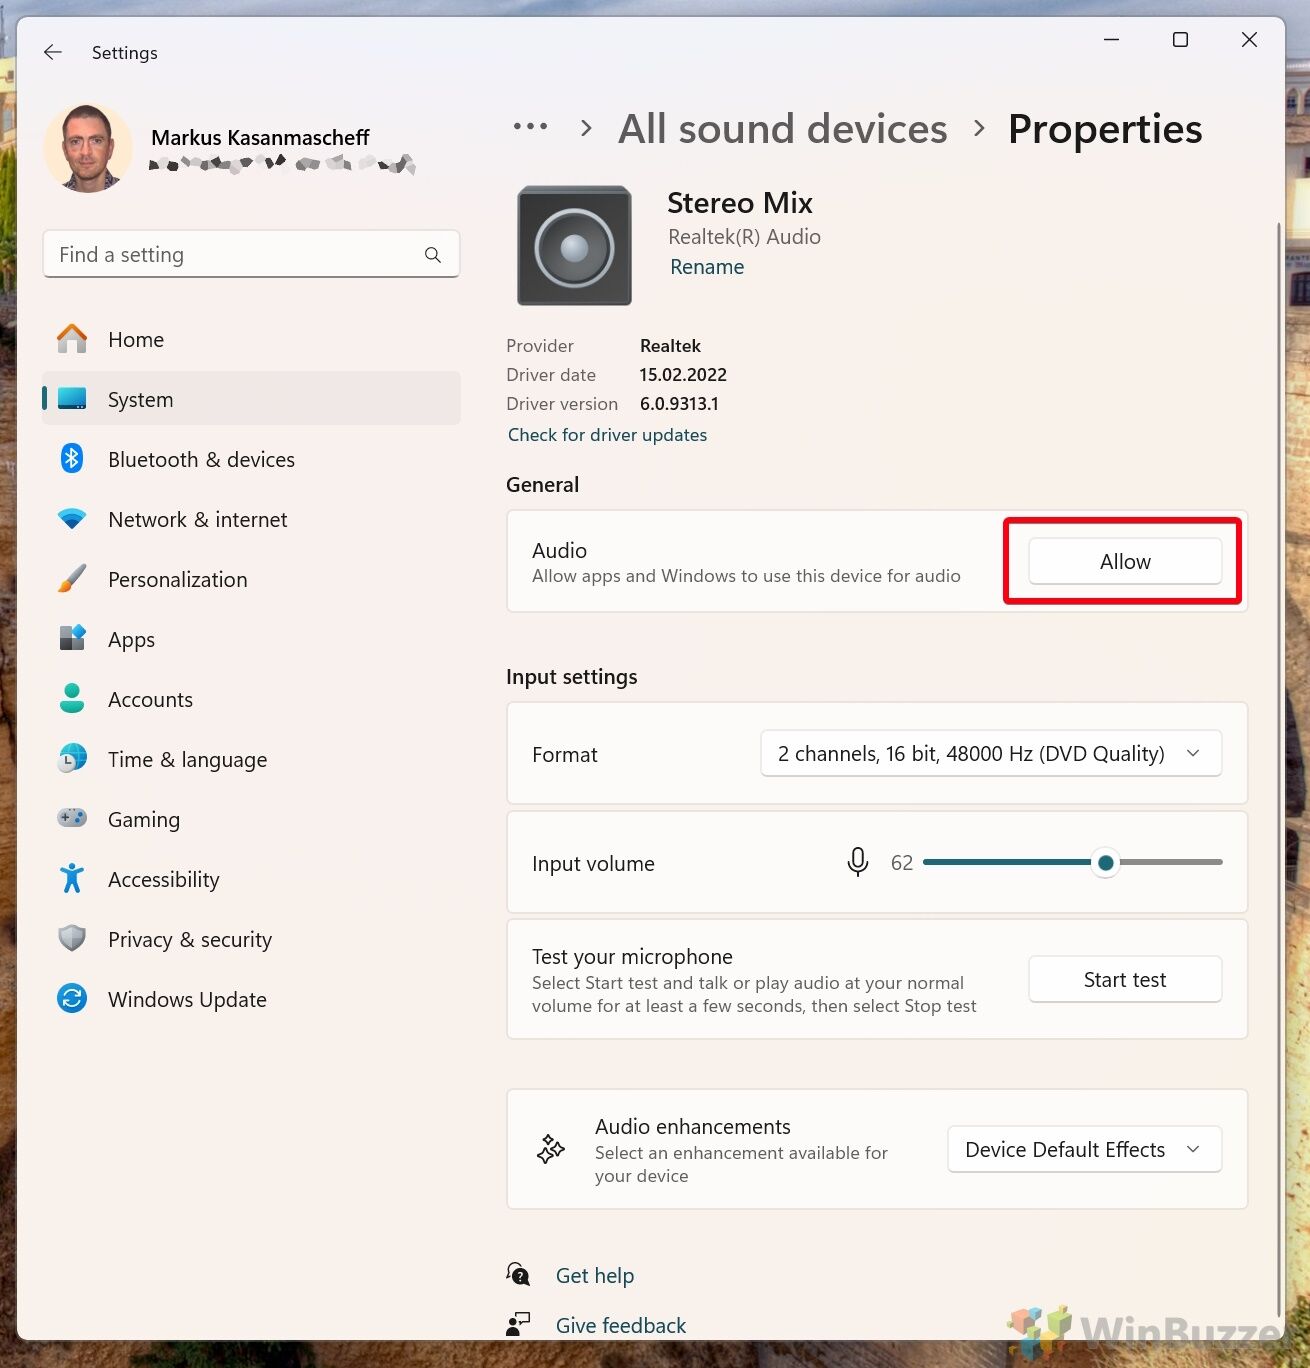
- Access Sound OptionsRight-click the speaker icon on the taskbar and select “Sound settings“.

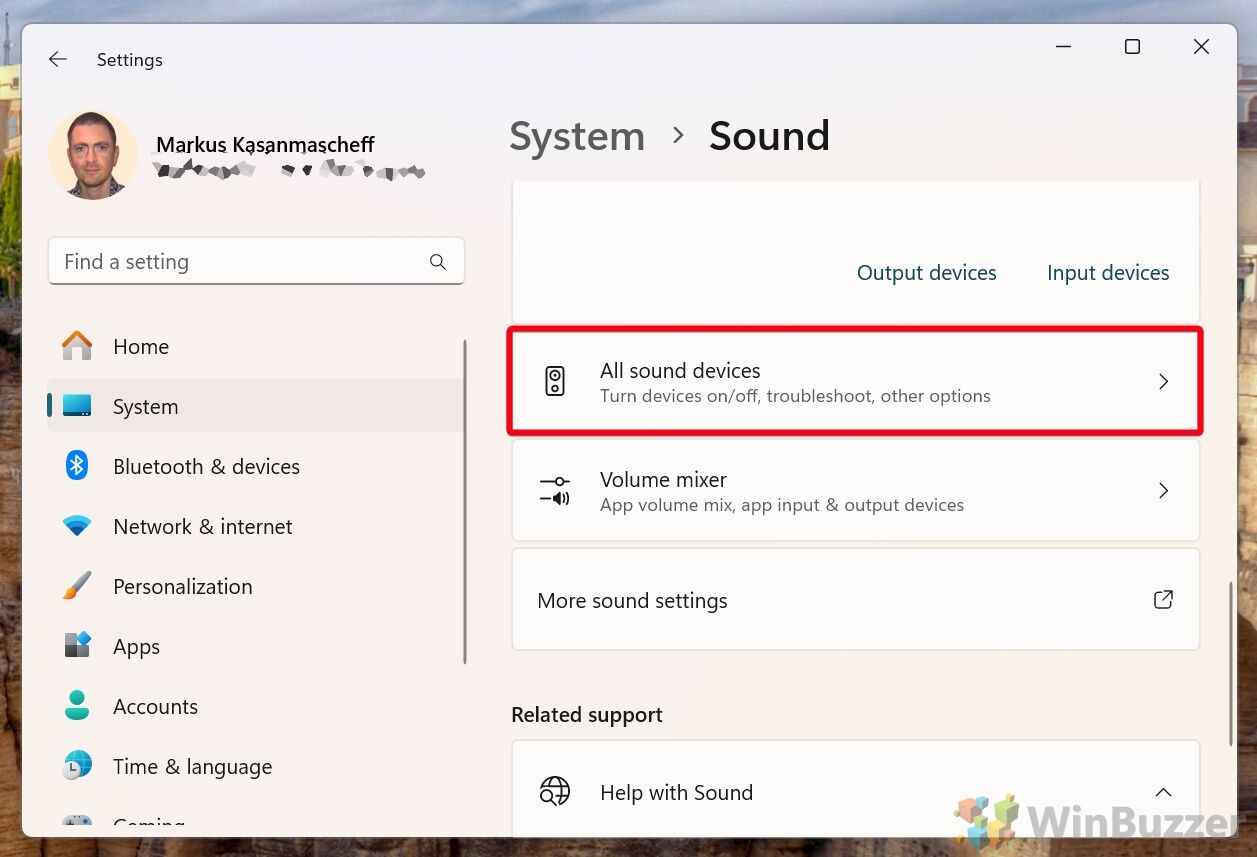
- Select “All sound devices”

- Scroll down to “Advanced” and click on “More sound settings”

- Click “Allow” to Enable Stereo Mix Device

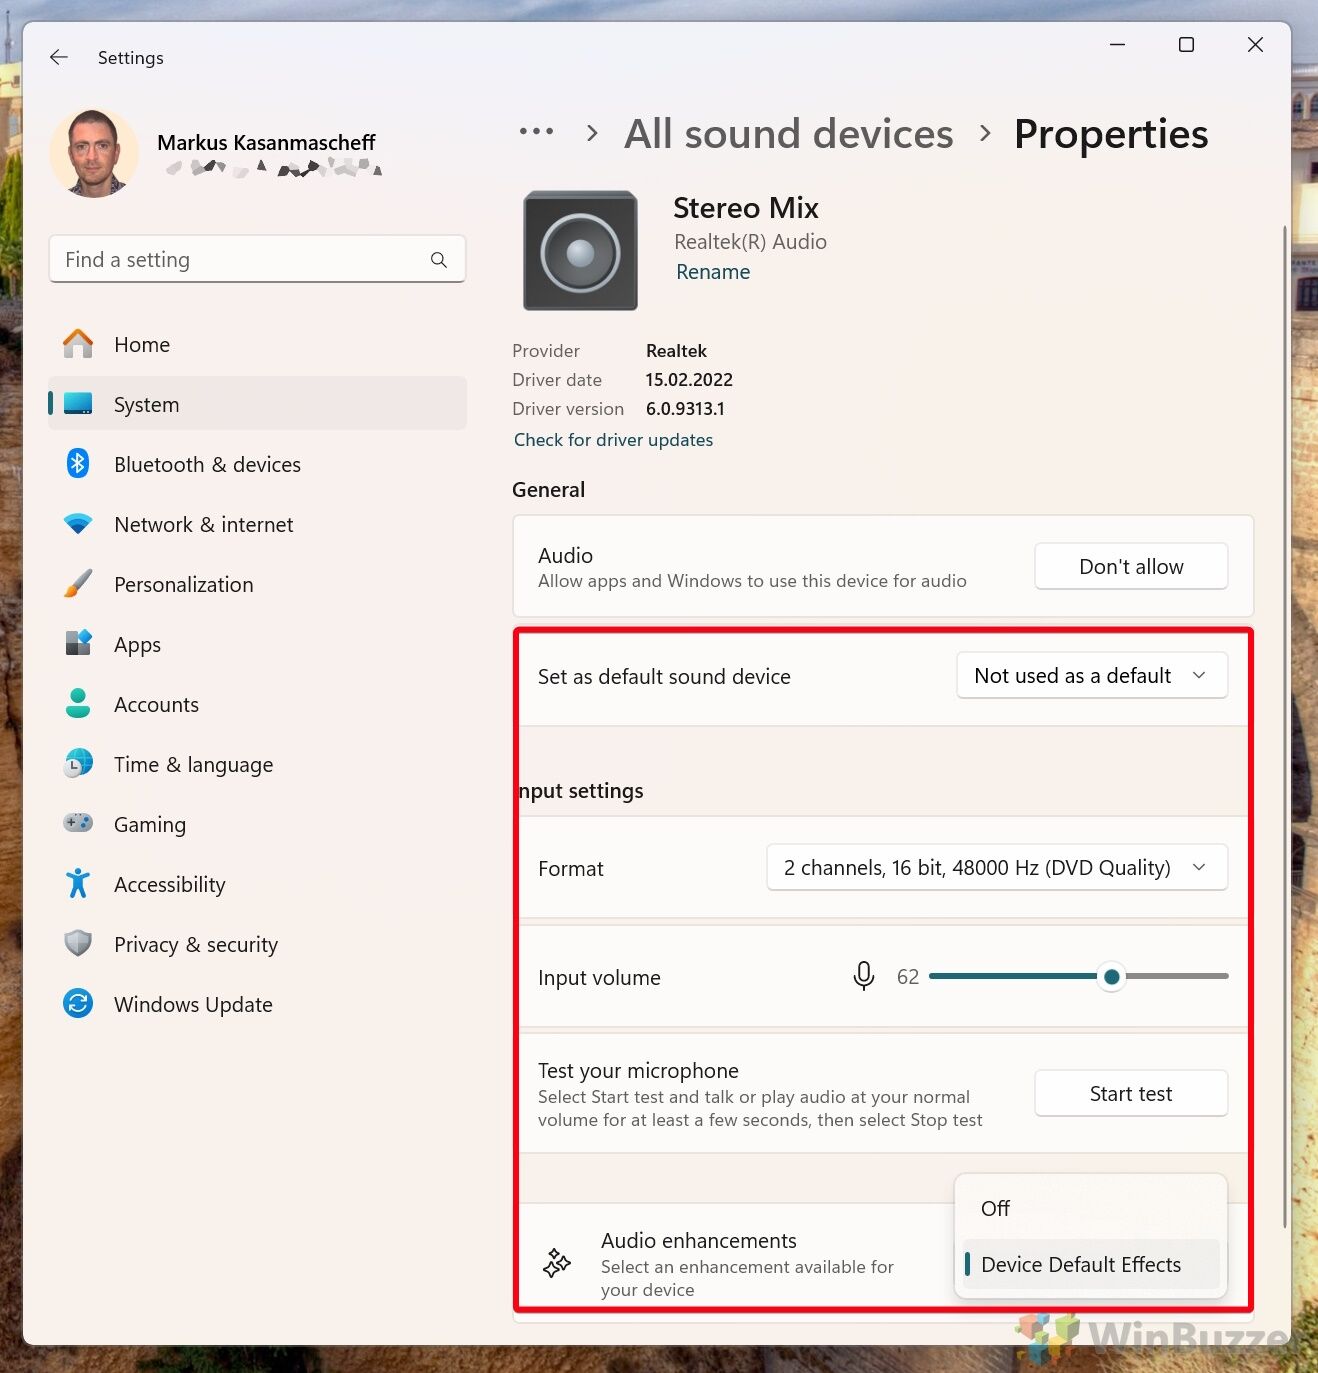
- Optional: Set Stereo Mix OptionsYou can set Stereo Mix as the “default sound device“, choose the “format/quality” via bitrate and mono instead of stereo if needed (1 channel), adjust the “Stereo Mix input volume” and enable or disable the available “Audio enhancements” available for your audio chipset.


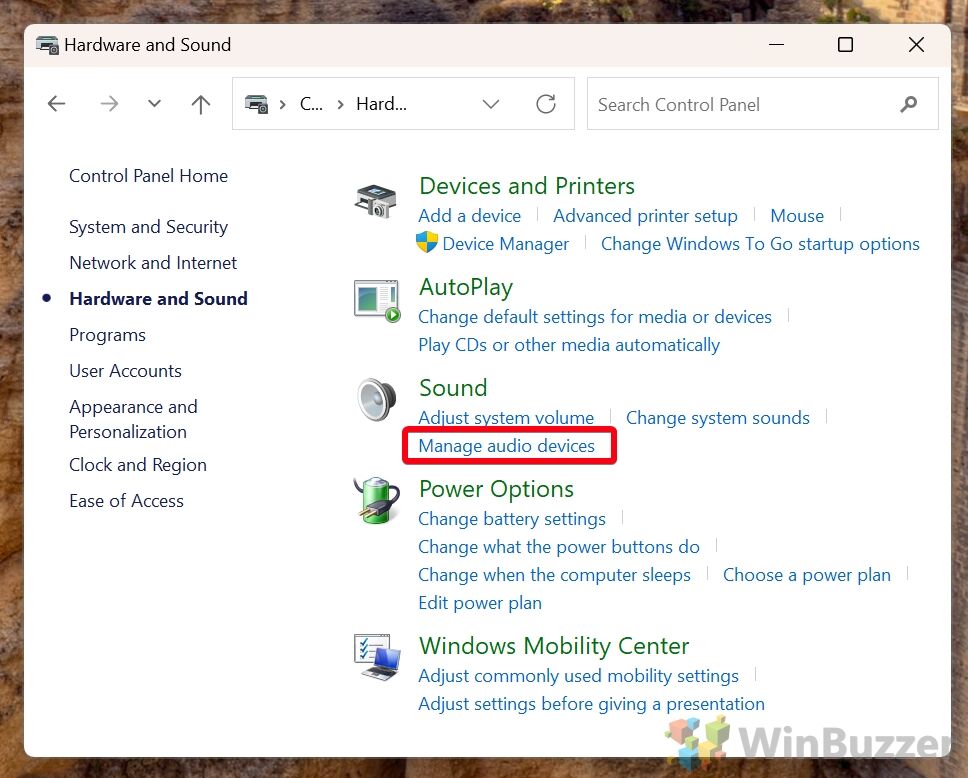
How to Enable Stereo Mix via Control Panel in Windows 10 and Windows 11 for Advanced Options
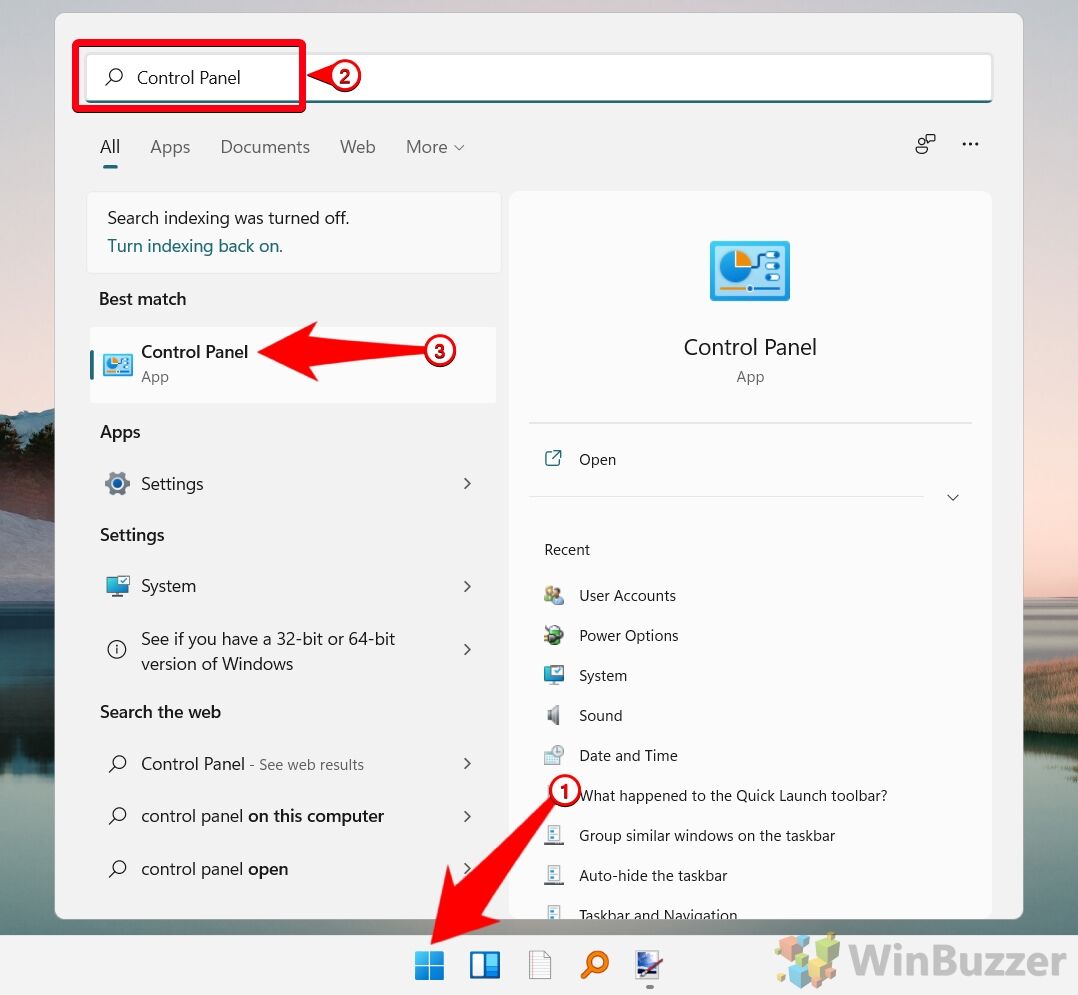
For users who prefer the traditional Control Panel interface or if the Windows Settings approach does not reveal the Stereo Mix option, here’s how you can enable Stereo Mix there. In addition to what you can choose in Windows Settings, Control Panel allows to enable “Exclusive Mode” for Stereo Mix (see below).
-
Open Control PanelPress
Windowsto open search, typeControl Paneland press Enter.
-
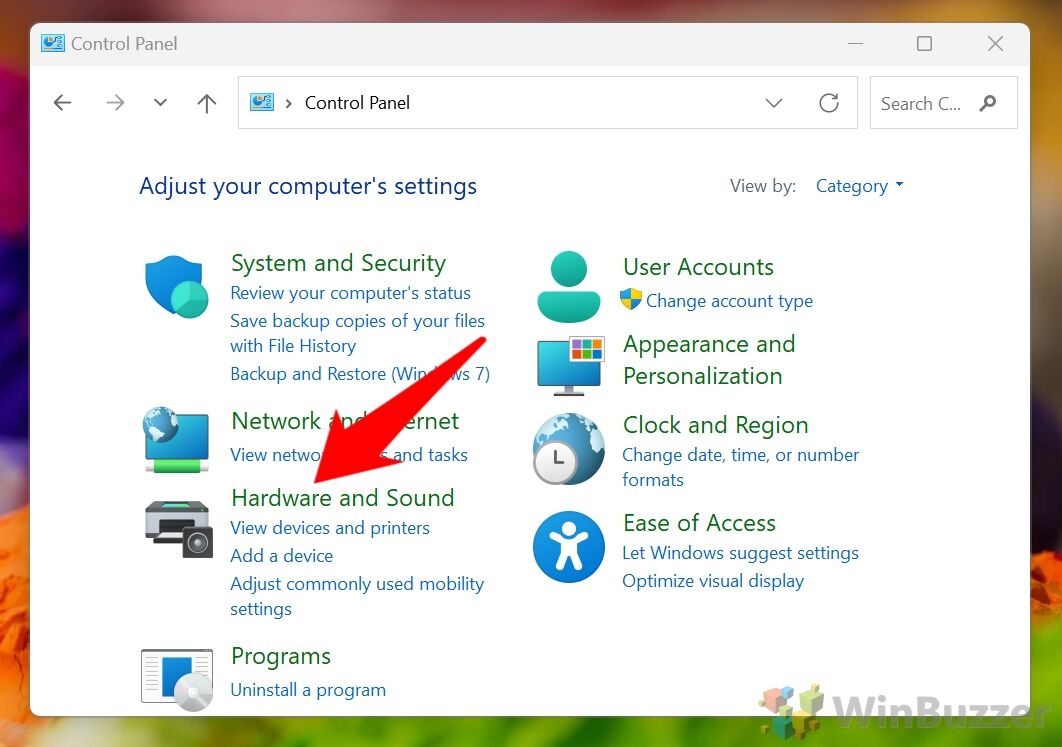
Open “Hardware and Sound”

-
Select “Manage audio devices”

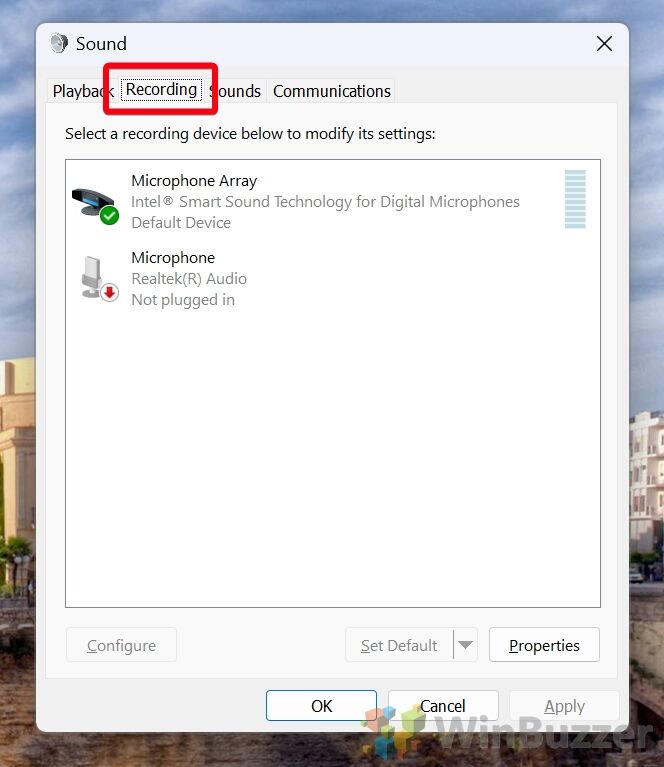
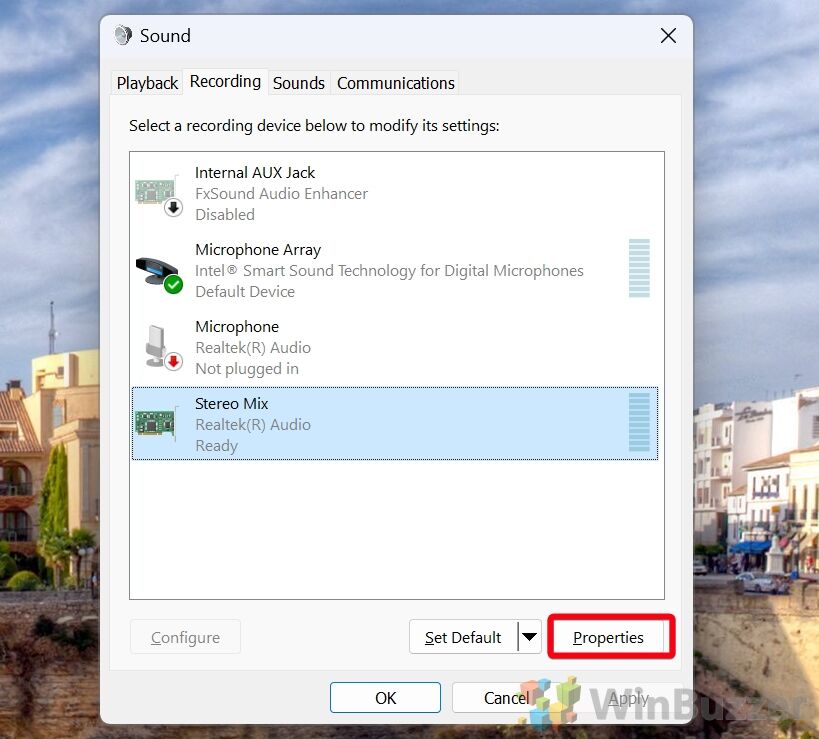
- Switch to “Recording”

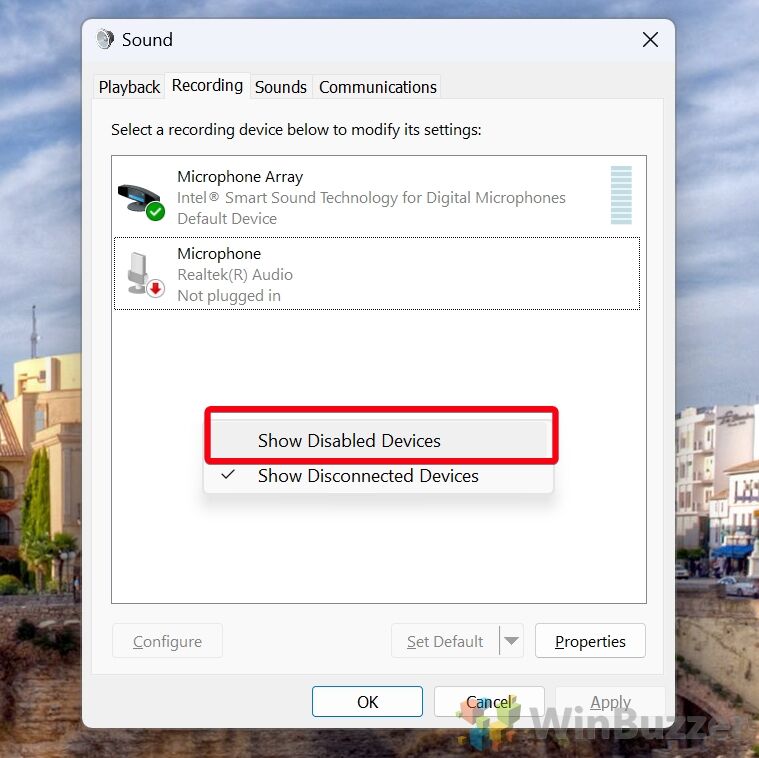
- Right-click into the white space and select “Show Disabled Devices”

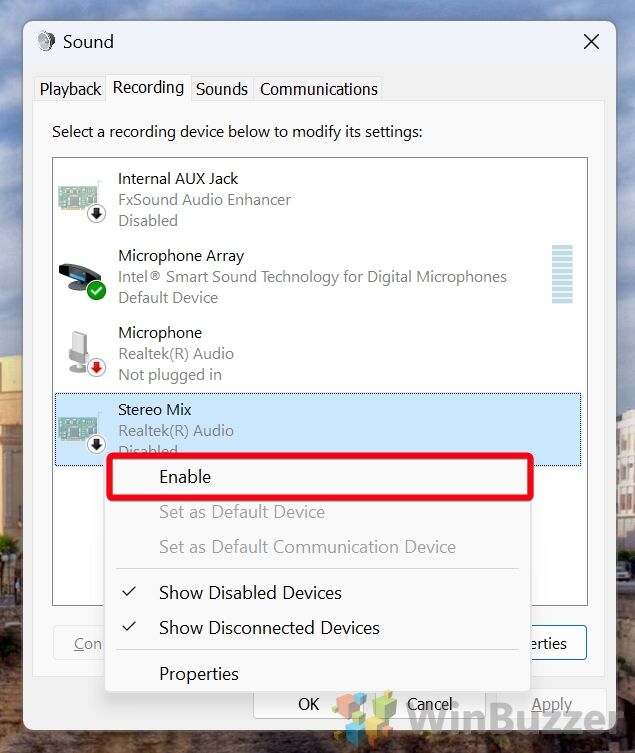
- Enable Stereo Mix via right-click

- Optional: Open Stereo Mix PropertiesThere you can set Stereo Mix as the “default sound device“, choose the “format/quality” via bitrate and mono instead of stereo if needed (1 channel), adjust the “Stereo Mix input volume” and enable or disable the available “Audio enhancements” available for your audio chipset.

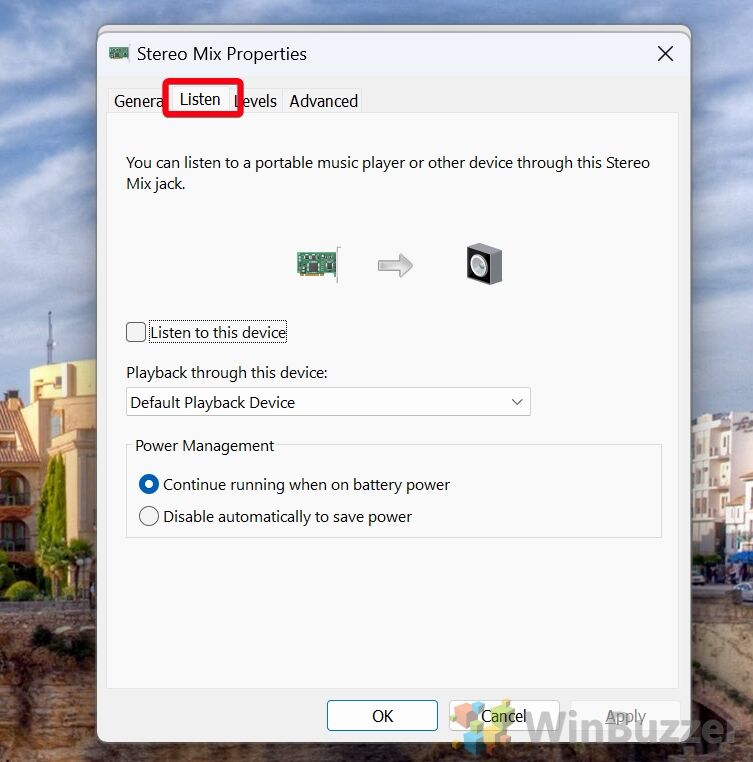
- Enable “Listen to this device” for Stereo Mix if desiredSelecting “Listen to this device” for Stereo Mix in the sound settings allows you to hear the audio that is being channeled through the Stereo Mix in real-time. Essentially, it routes the audio being played on your system (which Stereo Mix is set to capture) directly to your speakers or headphones, enabling you to monitor exactly what Stereo Mix is recording.

- Adjust Stereo Mix volume in “Levels”

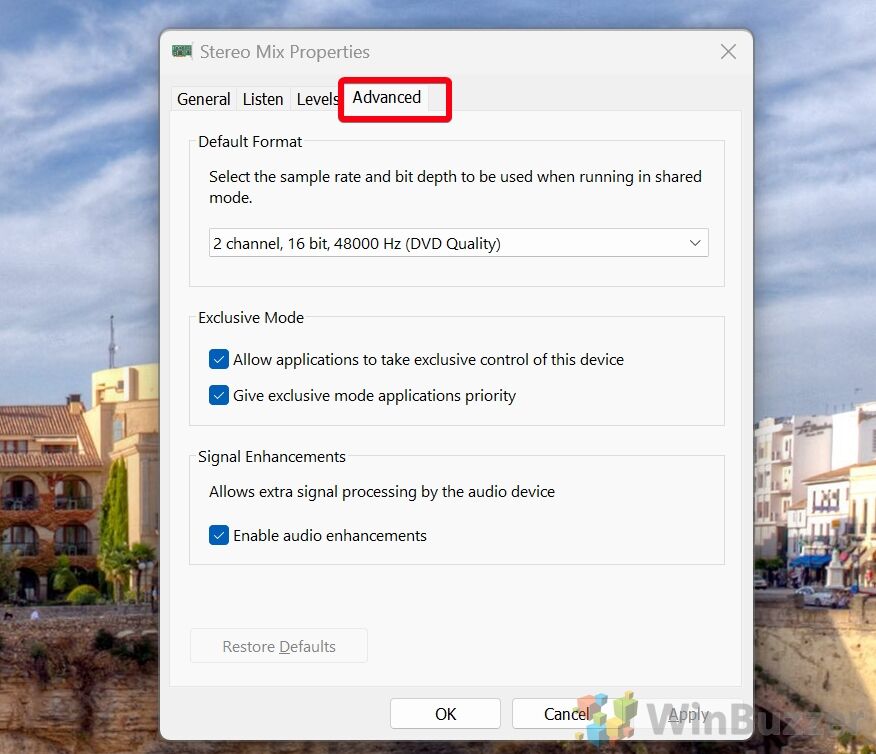
- Choose other audio device settings in “Advanced”In addition to what you can choose in Windows Settings, Control Panel allows to enable “Exclusive Mode” for Stereo Mix:
Allow applications to take exclusive control of this device: When this option is enabled, applications can request exclusive access to Stereo Mix. This means an application can take over the device and change its settings (like format and levels) without considering other applications’ needs. This can be useful for recording or streaming software that requires specific audio settings to function correctly. However, it might also lead to conflicts if multiple applications try to access the device simultaneously or if you want to use the device for more than one application at a time.
Give exclusive mode applications priority: This option works in conjunction with the first one. When both are enabled, applications that request exclusive control while another application is using Stereo Mix in shared mode can force the current application to release control. This ensures that high-priority applications (like professional recording software) can always access the device with the settings they need, even if another application is already using it.


B) Enabling Stereo Mix
-
Go to the Recording Tab: In the Sound dialog, switch to the “Recording” tab to see a list of available recording devices.
-
Reveal Hidden Devices: Right-click in an empty area within the tab and select “Show Disabled Devices”. This action should make the Stereo Mix option visible if it was hidden.
-
Enable Stereo Mix: Find “Stereo Mix” in the list, right-click on it, and choose “Enable”. You might also want to set it as the default device by right-clicking on it again and selecting “Set as Default Device”.
How to Record Windows System Audio using Stereo Mix in Audio Apps like Audacity
With Stereo Mix enabled on your Windows 10 or Windows 11 system, you can capture system audio directly through Audacity, a widely-used, free audio recording and editing software, or any other audio recording app. Here, we use Audacity as an example, but you can use this method in other recording software with slight variations.
Setting “Stereo Mix” as the Input Device in Audacity
-
Open Audacity
Launch Audacity. If it’s not installed, download it from the official website. Ensure you have the latest version for optimal compatibility with Windows 10 or Windows 11. -
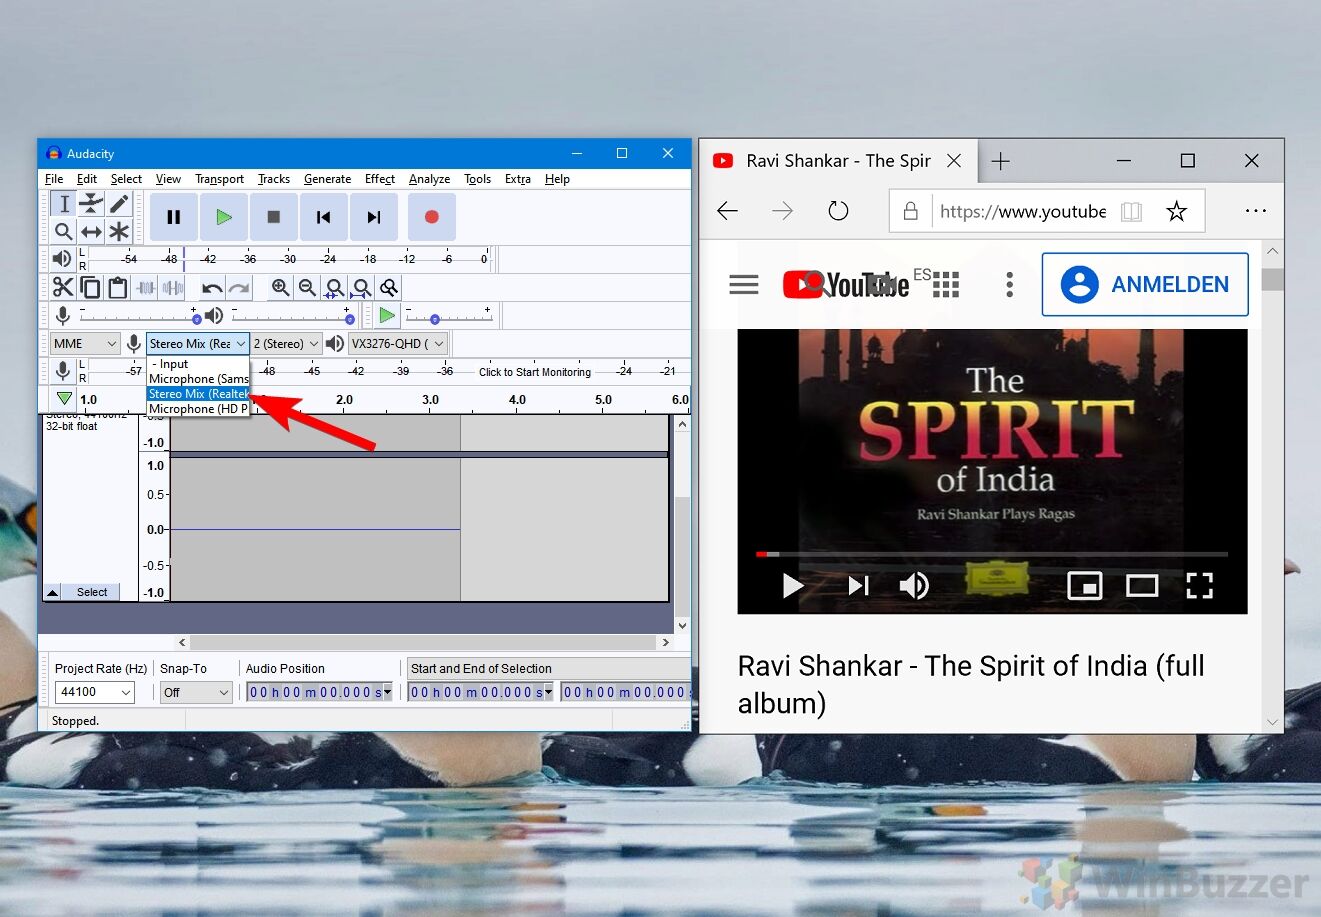
Select Stereo Mix
Find the microphone icon in the upper toolbar of Audacity. Click the dropdown menu next to it and choose “Stereo Mix” from the list. This action directs Audacity to use your system’s audio output as the recording source, instead of an external microphone.
-
Adjust Recording Levels
Play the audio you wish to record and observe Audacity’s level meters. Use the recording level slider, located next to the microphone icon, to adjust the input volume. Aim for a level that avoids distortion but is loud enough to capture clearly. -
Start Recording
Press the red “Record” button in Audacity to begin recording the audio playing on your system. Everything you hear through your speakers or headphones will be recorded. -
Stop and Save
Click the yellow “Stop” button when you’re done. Audacity allows you to edit the audio if necessary. To save your work, navigate to “File” > “Export” and select your preferred audio format.
Additional Tips for Using Stereo Mix with Other Recording Software
- The process of selecting “Stereo Mix” as the recording source should be similar in most audio recording applications. Look for an option to choose the input device or source and select “Stereo Mix” from there.
- If “Stereo Mix” does not appear as an option in your recording software, revisit your sound settings to ensure it’s enabled and set as the default device.
- Regularly update your recording software to maintain compatibility with your operating system and to access the latest features and fixes.
FAQ – Frequently Asked Questions about Stereo Mix
Can I use Stereo Mix to record online meetings or webinars?
Yes, you can use Stereo Mix to record the audio from online meetings or webinars. Ensure Stereo Mix is enabled and set as the default recording device, then use recording software to capture the audio.
Why can’t I find Stereo Mix on my Windows PC?
If Stereo Mix is not visible, it might be disabled or hidden, Enable it using one of the methods for Windows 11 or Windows 10.
How can I improve the audio quality of my Stereo Mix recordings?
To improve audio quality, ensure Stereo Mix is set to the highest quality format in its properties. Also, adjust the recording levels to avoid distortion and ensure your system’s sound settings are optimized for high-quality playback.
Is it possible to record only specific applications with Stereo Mix?
Stereo Mix grabs/records all system audio, so it’s not possible to isolate a specific application directly. However, you can close or mute other applications in Windows “Volume Mixer” to record only the desired one, or use software that supports application-specific audio recording.
How do I prevent echo or feedback when using Stereo Mix?
To prevent echo or feedback, especially when “Listen to this device” is enabled, use headphones instead of speakers. Also, adjust the Stereo Mix and speaker volumes to minimize feedback loops.
Can Stereo Mix capture audio from streaming services without quality loss?
Stereo Mix can record audio from streaming services, capturing what is played through your system. However, the recording quality can be affected by the original stream’s quality, your system’s audio settings, and the recording format you choose.
How to troubleshoot Stereo Mix if it’s not working?
If Stereo Mix isn’t working, check if it’s enabled and set as the default device. Ensure your audio drivers are up to date. If issues persist, try disabling exclusive mode in the device properties or check for conflicts with other audio software.
Can I use Stereo Mix to record audio on a virtual machine?
Recording audio with Stereo Mix on a virtual machine depends on the VM software’s ability to emulate or pass through the host’s audio devices. Check your VM settings for audio configuration options.
How to balance audio levels when recording with Stereo Mix?
Adjust the volume of your playback devices and the Stereo Mix recording level to balance audio levels. Use the recording software’s level meters as a guide to avoid clipping and ensure clear audio capture.
Is there a way to automate recordings with Stereo Mix?
Automating recordings with Stereo Mix would require third-party scheduling software that can start and stop your recording software at predetermined times, as Stereo Mix itself does not have scheduling features.
Can Stereo Mix be used with Bluetooth headphones?
Yes, Stereo Mix can work with Bluetooth headphones. Ensure your headphones are set as the default playback device, and Stereo Mix is the default recording device. Be aware of potential latency or quality issues with Bluetooth connections.
How do I edit audio recorded with Stereo Mix?
Use audio editing software like Audacity to edit Stereo Mix recordings. You can trim, normalize, apply effects, and adjust levels post-recording to enhance the audio.
Why is my Stereo Mix recording very quiet or silent?
If recordings are quiet or silent, check the Stereo Mix levels in Sound settings and increase if necessary. Also, ensure the audio you’re trying to record is playing at an adequate volume and that no mute settings are enabled.
Can Stereo Mix record system sounds even when using headphones?
Yes, Stereo Mix can record all system audio, including sounds played through headphones, as it captures the audio stream before it reaches the output device.
How to exclude microphone noise when recording with Stereo Mix?
To exclude microphone noise, ensure the microphone is muted or not set as the default recording device when using Stereo Mix. Use noise reduction features in your recording software to clean up the audio post-recording.
Last Updated on November 7, 2024 10:48 pm CET
Как записать звук с компьютера
В этой инструкции — несколько способов записать звук, воспроизводимый на компьютере с помощью этого же компьютера. Если вы уже встречали способ записи звука с помощью «Стерео микшер» (Stereo Mix), но он не подошел, так как такое устройство отсутствует, я предложу и дополнительные варианты.
Не знаю точно, для чего это может понадобиться (ведь почти любую музыку можно скачать, если речь о ней), но пользователи интересуются вопросом о том, как поставить на запись то, что слышишь в колонках или наушниках. Хотя некоторые ситуации предположить можно — например, необходимость записи голосового общения с кем-либо, звук в игре и тому подобные вещи. Способы, описанные ниже, подойдут для Windows 10, 8 и Windows 7.
Используем стерео микшер для записи звука с компьютера
Стандартный способ записи звука с компьютера — использование специального «устройства» записи вашей звуковой карты — «Стерео микшер» или «Stereo Mix», которое по умолчанию обычно бывает отключено.
Чтобы включить стерео микшер, кликните правой кнопкой мыши по значку динамика в панели уведомлений Windows и выберите пункт меню «Записывающие устройства».
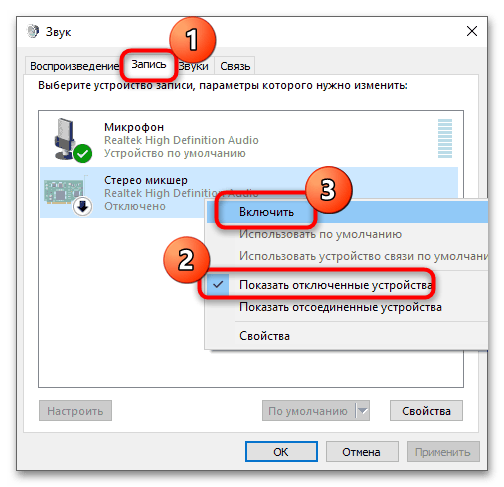
С большой вероятностью, в списке устройств записи звука вы обнаружите только микрофон (или пару микрофонов). Кликните в пустом месте списка правой кнопкой мыши и нажмите «Показать отключенные устройства».

Если в результате этого в списке появится стерео микшер (если ничего подобного там нет, читаем далее и, возможно, используем второй способ), то точно также кликните правой кнопкой по нему и выберите пункт «Включить», а после того, как устройство будет включено — «Использовать по умолчанию».

Теперь, любая программа для записи звука, использующая системные настройки Windows, будет записывать все звуки вашего компьютера. Это может быть стандартная программа «Звукозапись» в Windows (или Voice Recorder в Windows 10), а также любая сторонняя программа, одна из которых будет рассмотрена в следующем примере.
Кстати, установив стерео микшер в качестве устройства записи по умолчанию, вы можете использовать приложение Shazam для Windows 10 и 8 (из магазина приложений Windows), чтобы определить воспроизводимую на компьютере песню по звуку.

Примечание: для некоторых не самых стандартных звуковых карт (Realtek) вместо «Стерео микшер» может присутствовать другое устройство для записи звука с компьютера, например, у меня на Sound Blaster это «What U Hear».
Запись с компьютера без стерео микшера
На некоторых ноутбуках и звуковых платах устройство «Стерео микшер» либо отсутствует (вернее, не реализовано в драйверах) либо по какой-то причине его использование заблокировано производителем устройства. В этом случае все равно имеется способ записать воспроизводимый компьютером звук.
Поможет в этом бесплатная программа Audacity (с помощью которой, кстати, удобно записывать звук и в случаях, когда стерео микшер присутствует).
Среди источников звука для записи Audacity поддерживает специальный цифровой интерфейс Windows WASAPI. Причем при его использовании, запись происходит без преобразования аналогового сигнала в цифровой, как в случае со стерео микшером.

Чтобы записать звук с компьютера с помощью Audacity, в качестве источника сигнала выберите Windows WASAPI, а во втором поле — источник звука (микрофон, звуковая плата, hdmi). В моем тесте, несмотря на то, что программа на русском, список устройств отображался в виде иероглифов, пришлось пробовать наугад, второе устройство оказалось нужным. Обратите внимание, что если и вы столкнетесь с такой же проблемой, то при выставлении записи «вслепую» с микрофона, звук все равно будет записываться, но некачественно и со слабым уровнем. Т.е. если качество записи низкое, попробуйте следующее устройство в списке.
Скачать программу Audacity вы можете бесплатно с официального сайта www.audacityteam.org
Ещё один сравнительно простой и удобный вариант записи при отсутствии стерео-микшера — использование драйвера Virtual Audio Cable.
Записываем звук с компьютера с помощью средств NVidia
В свое время я писал о способе записи экрана компьютера со звуком в NVidia ShadowPlay (только для владельцев видеокарт NVidia). Программа позволяет записывать не только видео из игр, но и просто видео с рабочего стола со звуковым сопровождением.
При этом также может вестись запись звука «в игре», что в случае включения записи с рабочего стола, записывает все звуки, воспроизводимые на компьютере, а также «в игре и с микрофона», что позволяет записать сразу и воспроизводимый на компьютере звук и то, что произносится в микрофон, — т.е., например, можно записать полностью разговор в Skype.

Как именно происходит запись технически я не осведомлен, но работает в том числе и там, где нет «Стерео микшера». Итоговый файл получается в видео-формате, но из него легко извлечь звук в виде отдельного файла, почти все бесплатные видео конвертеры могут конвертировать видео в mp3 или другие звуковые файлы.
Подробнее: об использовании NVidia ShadowPlay для записи экрана со звуком.
На этом завершаю статью, а если что-то осталось непонятным, спрашивайте. Заодно, было бы интересно узнать: а для чего вам требуется запись звука с компьютера?
548482
Этот вопрос с одновременным выводом звука на колонки, или динамики ноутбука и на динамики телевизора подключенного по HDMI уже не раз обсуждали в комментариях к статье почему нет звука через HDMI на телевизоре, при подключении ноутбука (ПК) на Windows 7 и Windows 10. И там же в комментариях, Влад подсказал решение, как в Windows настроить одновременный вывод звука на динамики или колонки и на телевизор. Я проверил, но у меня почему-то не получилось. Сегодня решил еще раз все проверить, и как оказалось, все отлично работает. Достаточно настроить стерео микшер в Windows и звук выводится на два источника. В Windows 10 стерео микшер у меня заработал без проблем. В настройках устройств воспроизведения в Windows 7 я его почему-то не нашел. Возможно, нужно обновить драйвера. Сделаю инструкцию на примере Windows 10, а как разберусь с семеркой, то дополню статью. Там настройки практически одинаковые, так что если у Windows 7 и есть этот стерео микшер – настроите все без проблем.
Этим способом можно сделать так, чтобы звук воспроизводился одновременно из динамиков ноутбука, или подключенных к ноутбуку или компьютеру колонок и из динамиков телевизора, который подключен через HDMI-кабель. Так же можно настроить одновременный вывод звука на динамики и Bluetooth-наушники, или Bluetooth-колонку. Проверил – все отлично работает. Я так понял, что можно выводить максимум на два разных устройства.
Единственный минус, который я заметил у себя, так это то, что звук который выводится через стерео микшер немного отстает. Я выводил на монитор (подключен по HDMI) со встроенными динамиками. Есть небольшая рассинхронизация звука между разными источниками вывода. Возможно, это такая проблема только на моем оборудовании, так как железо у меня не самое новое и мощное. А вообще, эта фишка интересно работает. Так же пробовал выводить звук одновременно на динамики ноутбука и на Bluetooth-наушники. Можно, например, подключить Bluetooth-колонку, вывести на нее звук и поставить ее где-то за спиной. Получится объемный звук.
Перед настройкой нужно подключить к компьютеру этот второй источник вывода звука и убедится, что он работает (звук выводится, если установить это устройство по умолчанию). Будь то телевизор, или Bluetooth наушники/колонка. Думаю, эти инструкции вам пригодятся:
- Как подключить телевизор к компьютеру через HDMI
- Как подключить ноутбук к телевизору через HDMI
- Как подключить Bluetooth колонку к ноутбуку или компьютеру
- Как подключить Bluetooth наушники к компьютеру или ноутбуку на Windows 10
Подключили, проверили все ли работает, и только после этого можно переходить к настройке.
Стерео микшер в Windows 10: вывод звука на два устройства одновременно
Открываем параметры звука (нажав на соответствующую иконку в трее правой кнопкой мыши) и переходим в панель управления звуком.

В окне «Звук» проверяем, чтобы устройство «Динамики» было в статусе «Устройство по умолчанию». Если это не так, то нажмите на них правой кнопкой мыши и выберите «Использовать по умолчанию». Так же обратите внимание, что у меня там отображается подключенный по HDMI телевизор (в моем случае это монитор со встроенными динамиками, это не важно) и он в статусе «Готов».
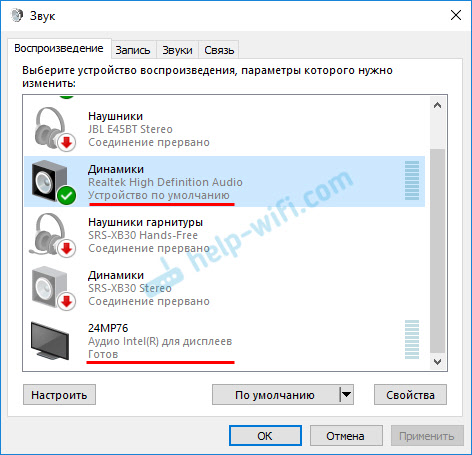
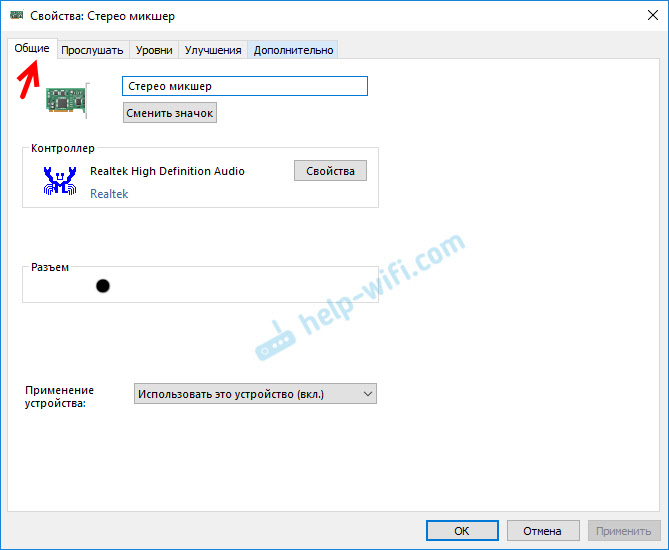
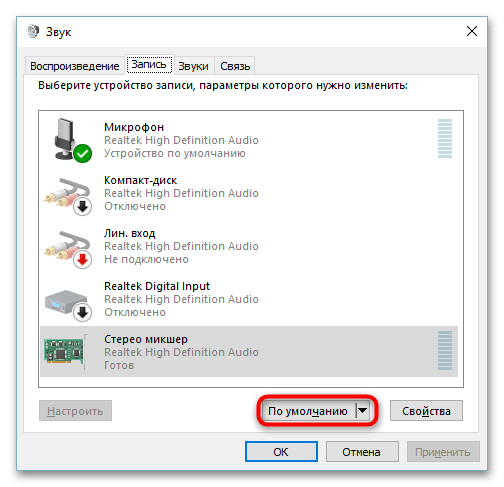
Переходим на вкладку «Запись». Там должен быть «Стерео микшер». Если он тусклый и возле него написано «Отключено», то нажмите на него правой кнопкой мыши и выберите «Включить». Так же, если он не используется по умолчанию (возле него нет соответствующей надписи), то нажмите правой кнопкой мыши и выберите «Использовать по умолчанию». После чего нажмите еще раз и откройте «Свойства».

В новом окне, открыв вкладку «Прослушать», убедитесь, что возле пункта «Прослушивать с данного устройства» стоит галочка. Из меню выберите устройство, на которое нужно вывести звук с компьютера. Значит динамики у нас используются по умолчанию, и нужно выбрать второе устройство. В моем случае это телевизор (имя устройства у вас будет другое). Так же это могут быть Bluetooth-наушники, колонка, возможно еще какое-то устройство.

После нажатия на кнопку «Применить», звук начал воспроизводится одновременно из колонок (динамиков ноутбука) и телевизора. Проверьте уровень громкости на телевизоре, или наушниках (колонке).
Чтобы отключить звук из второго источника, достаточно выключить стерео микшер, или отключит устройство. Настройки сохраняются. Когда мы регулируем звук в настройках Windows, то он одновременно регулируется на обеих устройствах (в моем случае на колонках и динамиках телевизора).
Дополнительные настройки стерео микшера
Там в настройках стерео микшера есть еще несколько вкладок с дополнительными настройками. Давайте посмотрим, что там можно настроить и нужно ли это делать. Скажу сразу, что ничего интересного и полезного я там не нашел.
На вкладке «Общие» находится информация о самом устройстве. Можно открыть свойства контроллера (обычно это Realtek High Definition Audio), сменить имя или иконку, или выключить/включить стерео микшер.
Открыв вкладку «Уровни», можно изменить громкость на устройстве, на которое выводится звук через стерео микшер. Так же можно отключить звук и изменить баланс.

На вкладке «Улучшения» по идеи должны быть какие-то настройки для улучшения звука. Но у себя я их не обнаружил. Только одна галочка «Отключение всех звуковых эффектов», которая ни на что не влияет (в моем случае).

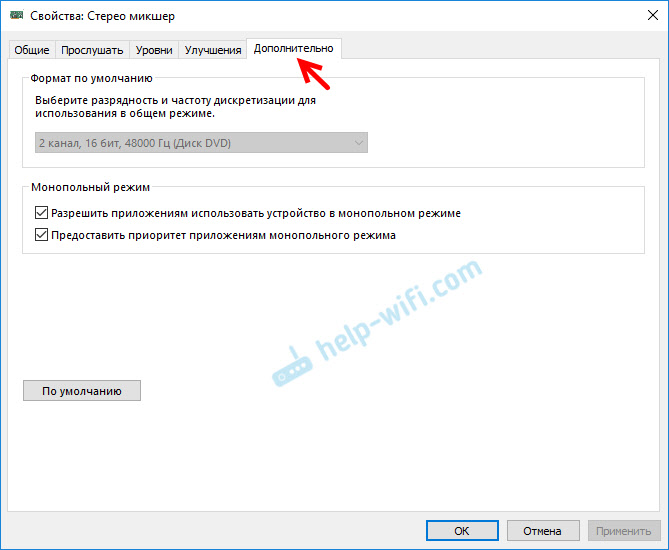
Ну и вкладка «Дополнительно», на которой можно настроить разрядность и частоту дискретизации (эти настройки у меня не активны) и настроить монопольный режим. Эти настройки лучше не трогать. Хотя в моем случае, они ни на что не влияли. По крайней мере я ничего не заметил.
Вот собственно и все настройки.
Надеюсь, вы смогли настроить этот стерео микшер в Windows 10 и вывести звук на два устройства одновременно. Напишите в комментариях, для каких задач вы используете эту схему, на какие устройства выводите звук, и как все это у вас работает. Нет рассинхронизации звука? Ну и задавайте вопросы, не стесняйтесь 🙂
Все способы:
- Способ 1: Настройки окна «Звук»
- Способ 2: Устранение неполадок
- Способ 3: Обновление драйверов
- Способ 4: Проверка целостности системных файлов
- Вопросы и ответы: 0
Способ 1: Настройки окна «Звук»
Отсутствие или недоступность микшера звука может быть обусловлено его отключением, поэтому для начала нужно проверить статус устройства в настройках звука.
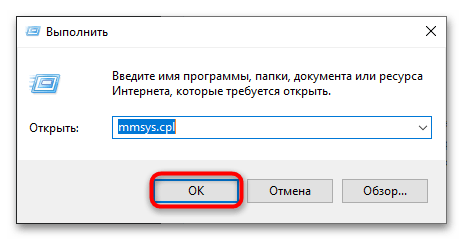
- Откройте оснастку «Звук» командой
mmsys.cpl, введя ее в диалоговом окошке «Выполнить», вызванном нажатием клавиш Win + R. - Переключитесь на вкладку «Запись», кликните правой кнопкой мыши по пустому пространству окна «Звук» и активируйте опцию «Показать отключенные устройства».
- Если микшер появится в списке устройств, во-первых, включите его, во-вторых, назначьте его устройством по умолчанию в том же контекстном меню.
Способ 2: Устранение неполадок
Если исчезновение микшера громкости было вызвано сбоем, попробовать устранить проблему можно штатными средствами самой операционной системы.
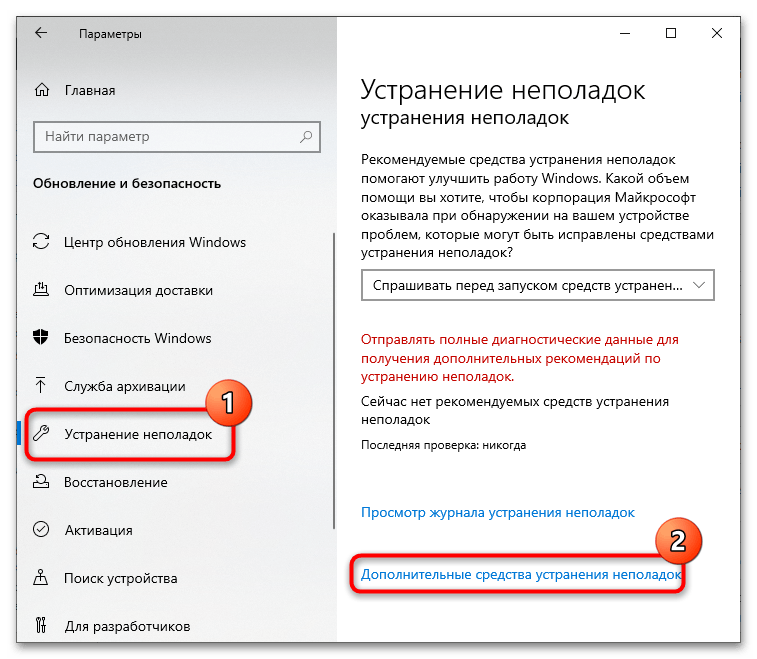
- Запустите приложение «Параметры», перейдите в раздел «Обновление и безопасность» → «Устранение неполадок» и нажмите ссылку «Дополнительные средства устранения неполадок».
- В следующем окне выберите пункт «Воспроизведение звука» и запустите утилиту диагностики.
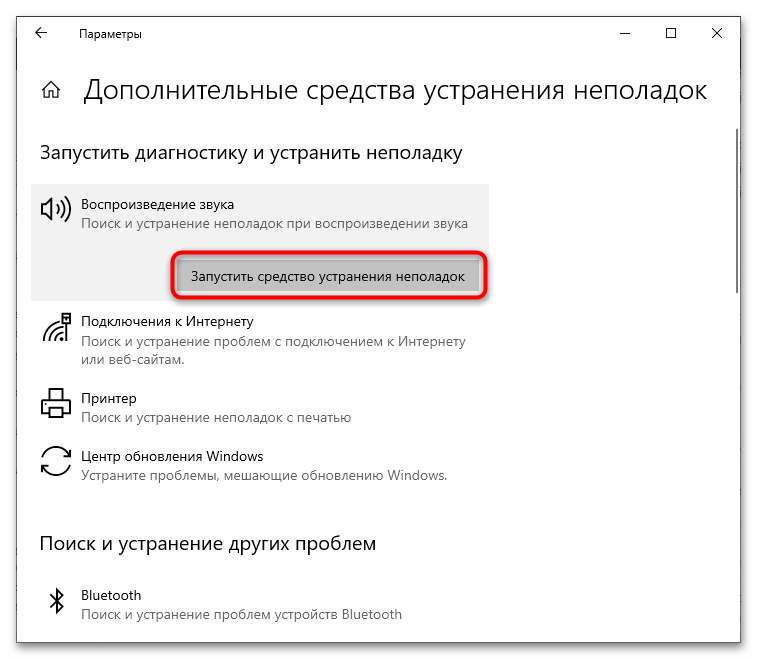
В случае обнаружения препятствующих нормальной работе микшера проблем, будет предпринята попытка их устранения.
Способ 3: Обновление драйверов
Отсутствие микшера громкости не обязательно связано с настройками или неполадками, микшер будет недоступен в случае отсутствия соответствующего драйвера аудиокарты. Проверить, имеется ли в системе подходящий драйвер, можно следующим образом. Вызовите нажатием Win + R диалоговое окошко «Выполнить», введите в него команду sndvol и нажмите клавишу ввода.
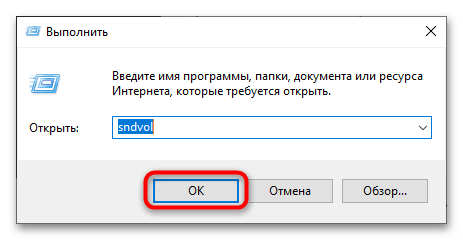
Если в открывшемся окошке будет указано «Аудиоустройства не установлены», значит, подходящий драйвер отсутствует в системе.

В этом случае необходимо скачать драйвер с сайта производителя материнской платы или аудиокарты и установить его. Самый простой способ найти такой драйвер – воспользоваться специальными программами для скачивания и установки актуальных драйверов.
Подробнее:
Определение необходимых для звуковой карты драйверов
Программы для обновления драйверов
Способ 4: Проверка целостности системных файлов
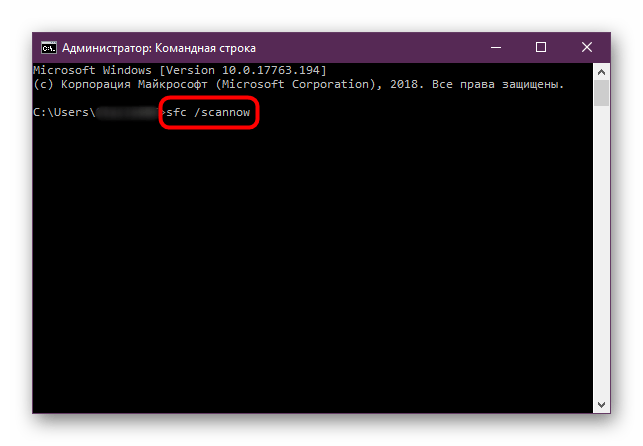
Чтобы удостовериться, что в самой операционной системе нет неполадок, вызывающих исчезновение тех или иных функций, следует проверить наиболее важные файлы на целостность. Запускается эта процедура при помощи консоли и определенных команд, а выполняются проверка и восстановление автоматически. Узнать более развернуто, как просканировать Windows и при необходимости восстановить поврежденные файлы, можете из статьи по ссылке ниже.
Подробнее: Использование и восстановление проверки целостности системных файлов в Windows 10
Наша группа в TelegramПолезные советы и помощь
Windows OS gets constantly updated with new features while some of the existing ones that are seldom being used by the users are either entirely removed or hidden deep inside the OS. One such feature is the Stereo Mix. It is a virtual audio device that can be used to record the sound currently being played out of the computer speakers. The feature, although handy, cannot be found on all Windows 10 systems nowadays. Some lucky users can continue using this built-in recording tool, while others will need to download a specialized third-party application for this purpose.
We have explained two different ways to enable Stereo Mix on Windows 10 in this article along with some troubleshooting tips if any issues arise. Also, a couple of alternative ways to record the computer’s audio output if the Stereo mix feature is not available.

Table of Contents
Many users reported that the Stereo mix feature suddenly disappeared from their computer after updating to a particular Windows version. A few were also under the misconception that Microsoft took the feature away from them, although Stereo mix was never entirely removed from Windows 10 but only disabled by default. It could also have been one of the many third-party applications you have installed that automatically disabled the Stereo Mix device. Nevertheless, follow the below steps to enable Stereo Mix.
1. Locate the Speaker icon on your Taskbar (if you do not see the speaker icon, first click on the upward-facing ‘Show hidden icons’ arrow), right-click on it, and select Recording Devices. If the Recording Devices option is missing, click on Sounds instead.

2. Move to the Recording tab of the ensuing Sound window. Here, right-click on Stereo Mix and select Enable.

3. If the Stereo Mix recording device isn’t listed (being displayed), right-click on the blank space and tick Show Disabled Devices & Show Disconnected Devices options.

4. Click on Apply to save the new modifications and then close the window by clicking on OK.
You can also enable Stereo Mix from the Windows Settings application:
1. Use the hotkey combination of Windows key + I to launch Settings and click on System.

2. Switch to the Sound settings page from the left-hand panel and click on Manage Sound Devices on the right.

3. Under the Input devices label, you will see Stereo Mix as Disabled. Click on the Enable button.

That’s it, you can now use the feature to record your computer’s audio output.
Also Read: No Sound in Windows 10 PC [SOLVED]
How to Use Stereo Mix & Troubleshooting Tips
Using the Stereo mix feature is as easy as enabling it. Launch your preferred recording application, select Stereo Mix as the input device instead of your Microphone, and hit the record button. If you are unable to select Stereo Mix as the recording device in the application, first unplug your Microphone and then make Stereo Mix the default device for your computer by following the below steps-
1. Open the Sound window once again and move to the Recording tab (See step 1 of the previous method.)
2. First, deselect the Microphone as the default device, and then right-click on Stereo Mix and select Set as Default Device from the ensuing context menu.

This will successfully enable the Stereo Mix on Windows 10. In case you are unable to view Stereo Mix as a device in your recording application or the feature doesn’t seem to work as advertised, try the below troubleshooting methods.
Method 1: Ensure Microphone is available for Access
One of the reasons why you may fail to enable Stereo Mix is if applications do not have access to the Microphone. Users often disable third-party applications from accessing the Microphone for privacy concerns and the solution is to simply allow all (or selected) applications to use the Microphone from the Windows Settings.
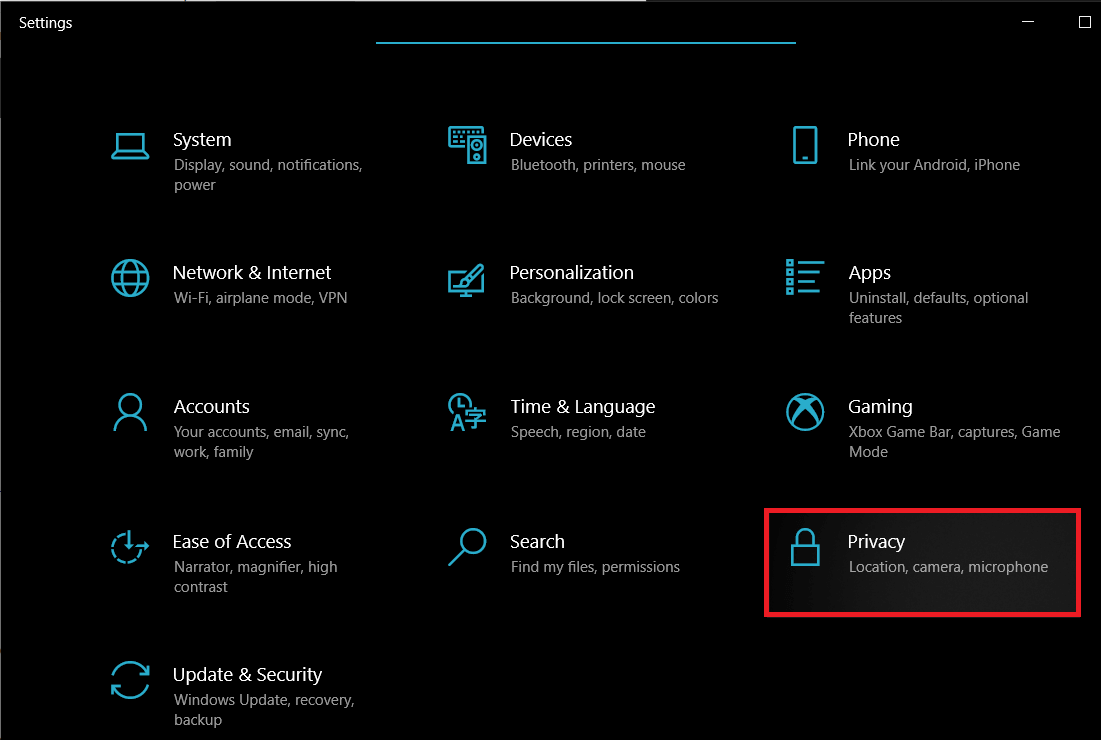
1. Use the hotkey combination of Windows key + I to launch Windows Settings then click on Privacy settings.
2. Scroll down the left navigation menu and click on Microphone under App permissions.

3. On the right panel, check if the device is allowed to access the Microphone. If not, click on the Change button and toggle the following switch to on.
Also Read: What to Do When Your Laptop Suddenly Has No Sound?
Method 2: Update or Downgrade Audio drivers
Since Stereo Mix is a driver-specific feature, your computer needs to have the appropriate audio drivers installed. It could be as easy as updating to the latest driver version or reverting back to a previous version that supported the Stereo mix. Follow the below guide to update audio drivers. If updating doesn’t resolve the issue, perform a Google search for your sound card and check which driver version of it supports Stereo mix.
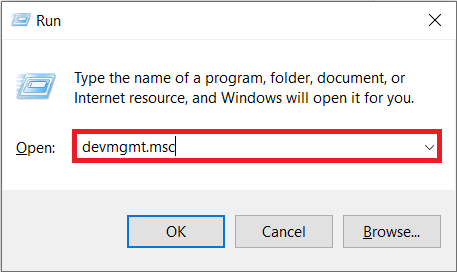
1. Press Windows Key+ R to launch the Run command box, type devmgmt.msc, and click on OK to open the Device Manager application.
2. Expand Sound, video and game controllers by clicking on the tiny arrow to its left.
3. Now, right-click on your sound card and select Update driver from the ensuing menu.

4. On the next screen, select Search Automatically for drivers.

Alternatives to Stereo Mix
There are a number of third-party applications available on the world wide web that can be used to record the computer’s audio output. Audacity is one of the most popular recorders for Windows with over 100M downloads. Modern systems that lack Stereo mix contain WASAPI (Windows Audio Session API) instead which captures audio digitally and thus, eliminates the need of converting the data to analog for playback (In layman’s terms, the recorded audio file will be of better quality). Simply download Audacity, choose WASAPI as the audio host, and set your headphones or speakers as the loopback device. Click on the Record button to start.

Few other good alternatives to Stereo mix are VoiceMeeter and Adobe Audition. Another very easy way to record the computer’s audio output is to use an aux cable (a cable with 3.5 mm jack on both ends.) Plug one end into the Microphone port (output) and the other into the mic port (input). Now you can use any basic recording application to record the audio.
Recommended:
- How to Repair or Fix Corrupted Hard Drive Using CMD?
- Fix Computer Sound Too Low on Windows 10
- How To View Clipboard History On Windows 10
- Fix Site Can’t Be Reached, Server IP Could Not Be Found
We hope this guide was helpful and you were able to enable the Stereo Mix device on Windows 10 and record your computer’s audio output using the feature. For any more help regarding this topic, get in touch with us in the comments below.