
20692
Не редко бывают ситуации, когда необходимо установить статический IP-адрес в свойствах беспроводного, или проводного подключения. В этой статье я подробно покажу, как вручную прописать IP-адрес в настройках Windows 11 для Wi-Fi или Ethernet (LAN) подключения.
В большинстве случаев Windows 11 автоматически получает IP-адрес от роутера, модема, или от оборудования интернет-провайдера. На стороне точки доступа включен DHCP-сервер, который автоматически выдает адреса, а на компьютере установлено автоматическое получение IP-адреса. Это очень удобно, не нужно ничего настраивать вручну. Просто подключаем компьютер к роутеру или к провайдеру и интернет сразу работает. Когда может пригодиться установка статического IP-адреса? Например, когда у вас подключение напрямую к провайдеру и он использует статический IP. Тогда вам нужно в настройках сетевого подключения прописать внешний IP-адрес, который выдает провайдер. Если подключение через роутер, то вручную задать адрес нужно тогда, когда по какой-то причине на роутере нужно отключить DHCP-сервер, или вы хотите закрепить конкретный IP-адрес за своим компьютером. Так же это может пригодиться при настройке локальной сети или сетевого принтера. Если вам нужно указать/сменить DNS, то смотрите эту статью: как изменить DNS-серверы в Windows 11.
Где находятся настройки TCP/IP в Windows 11?
Есть несколько способов, которыми можно добраться до настроек TCP/IP. Мы рассмотрим самый простой (по моему мнению) вариант. Покажу, где находятся эти настройки, а дальше разберемся, как изменить параметры IP отдельно для каждого адаптера. Для «Беспроводная сеть» (Wi-Fi) и Ethernet в зависимости от вашего подключения.
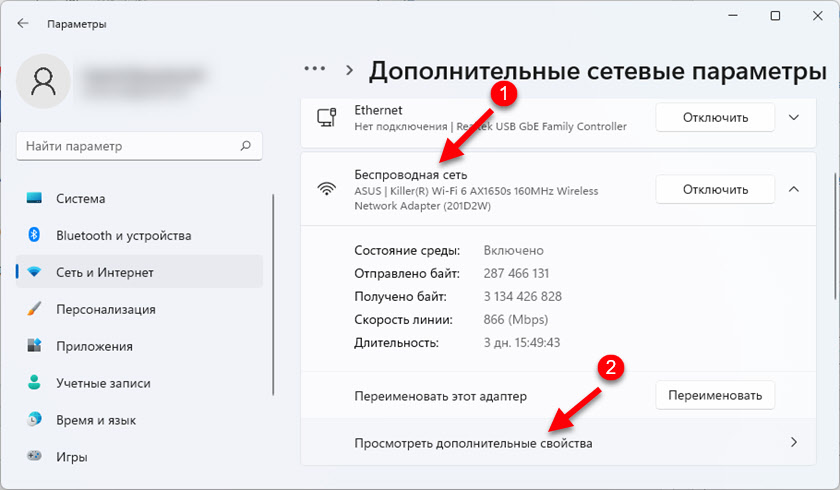
Откройте параметры. Можно нажать на меню Пуск правой кнопкой мыши и выбрать «Параметры», или открыть их другим удобным для вас способом. Перейдите в раздел «Сеть и интернет» и выберите пункт «Дополнительные сетевые параметры».

Там будут отображаться сетевые адаптеры, которые есть на нашем ПК или ноутбуке. Там же можно открыть свойства необходимого адаптера и изменить назначение IP.
Как установить статический IP-адрес в Windows 11?
В основном эти параметры меняют для беспроводного, или проводного подключения.
- Если вам необходимо установить параметры TCP/IP для Wi-Fi подключения, то необходимо нажать на адаптер «Беспроводная сеть» и выбрать «Посмотреть дополнительные свойства».

- Если подключение по сетевому кабелю, то необходимо нажать на адаптер «Ethernet» и выбрать «Посмотреть дополнительные свойства».


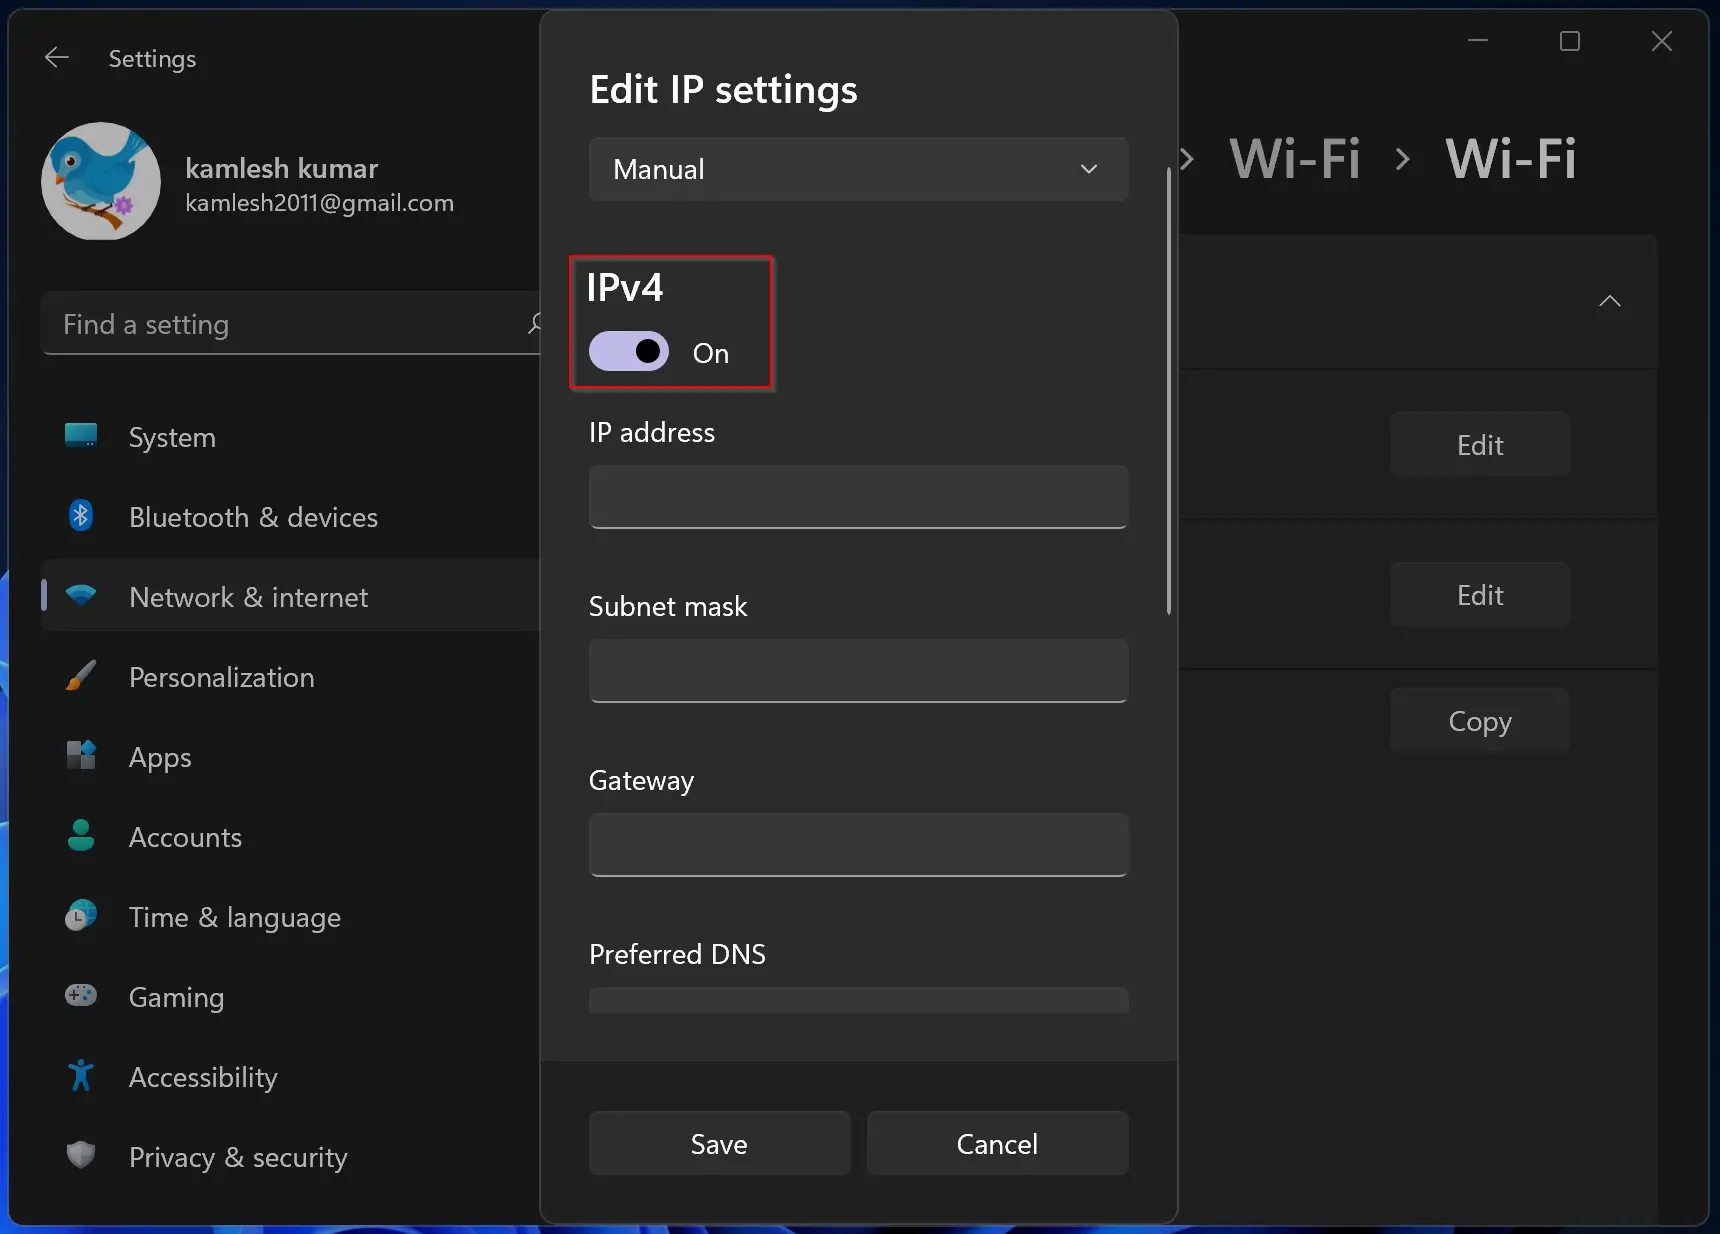
После выбора адаптера, напротив пункта «Назначение IP» нажмите на кнопку «Редактировать». Появится еще одно небольшое окно «Изменение параметров IP». Там выбираем «Вручную» и включаем IPv4. Если необходимо, можно так же прописать адреса IPv6. Дальше нужно прописать такие адреса:
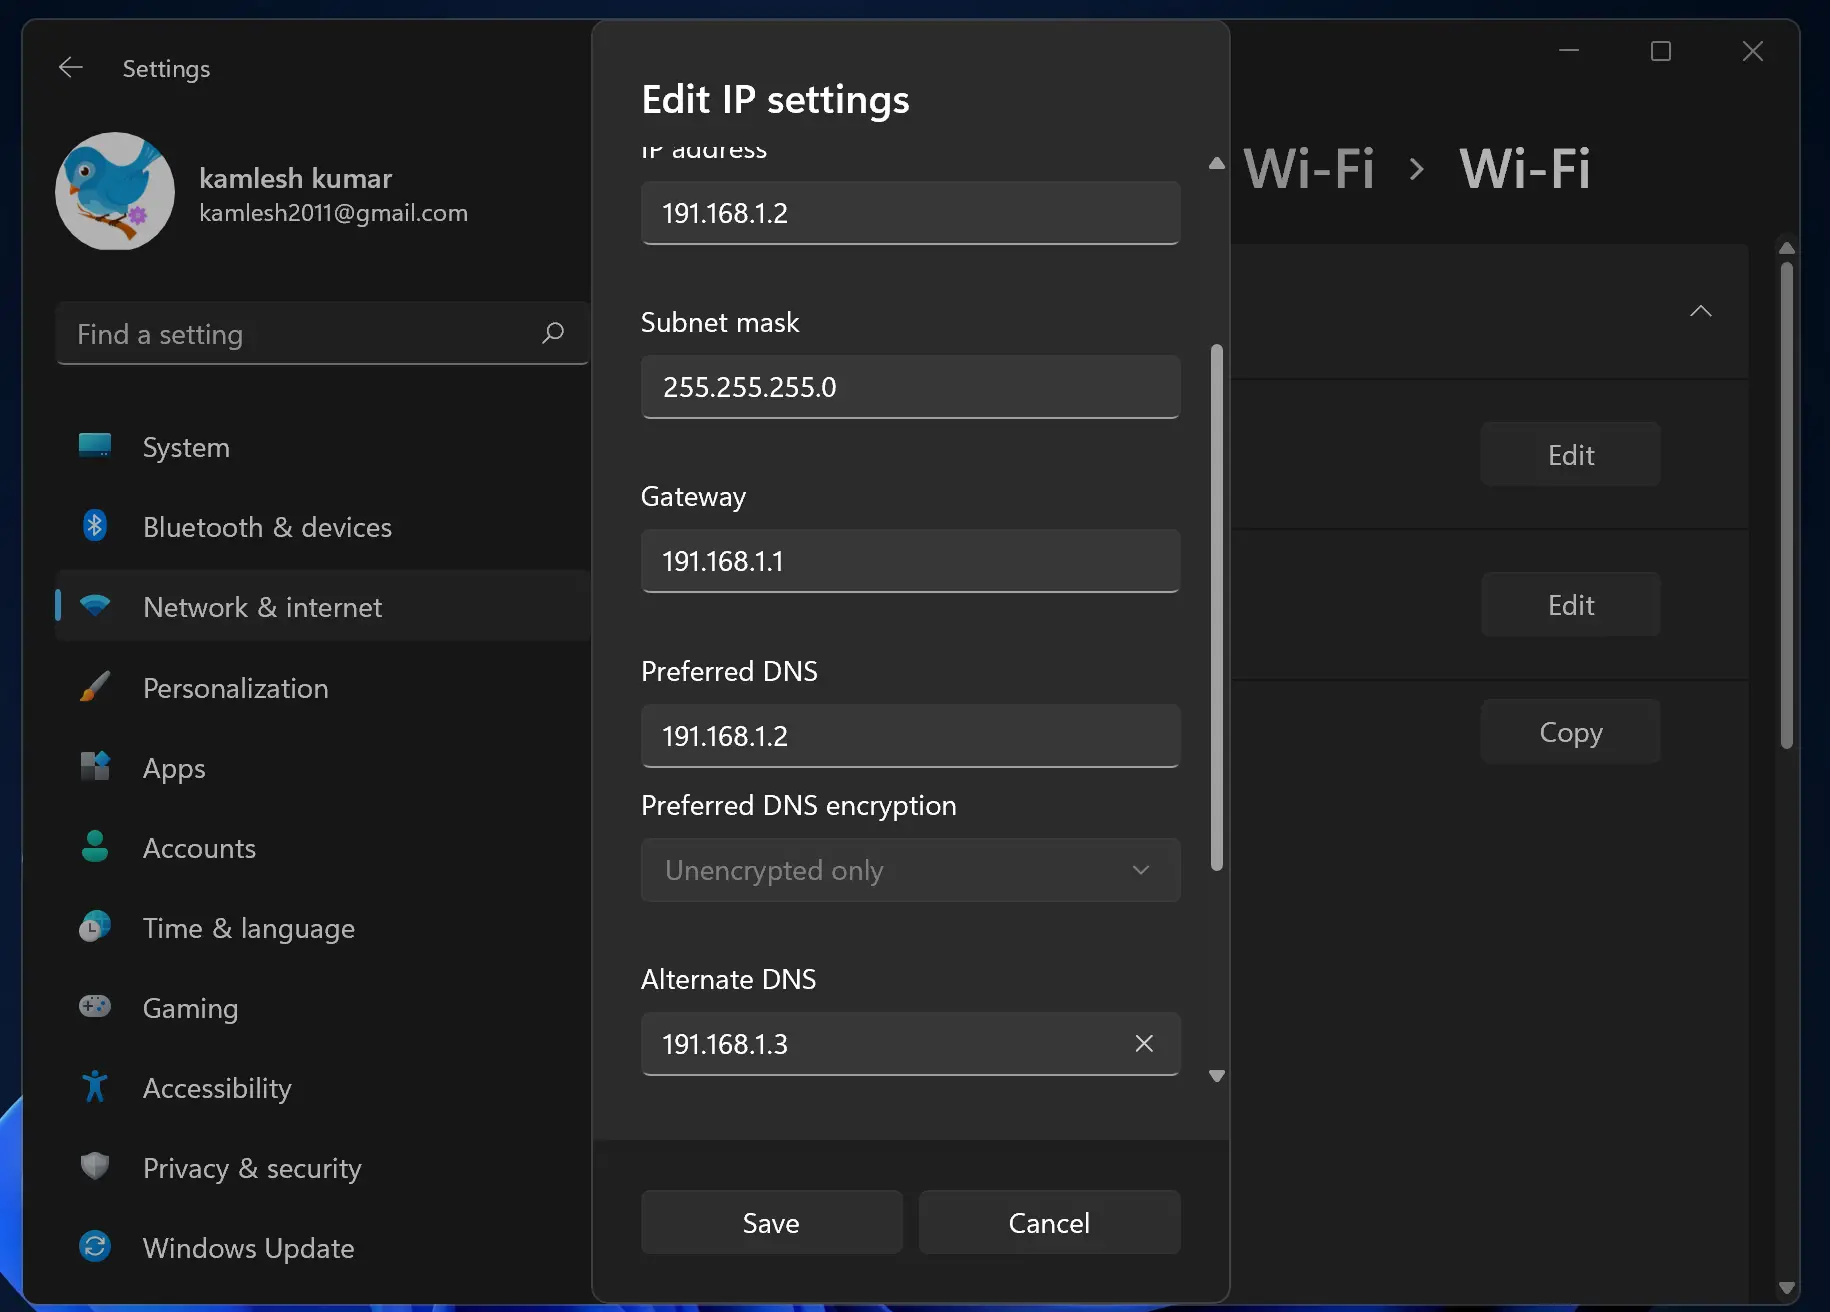
- IP-адрес – внешний адрес, который вам выдал провайдер, или локальный адрес вашей сети (роутера). Например 192.168.1.120
- Маска подсети. Здесь прописываем 255.255.255.0
- Шлюз – уточняем у провайдера, а если у вас подключение через роутер, то это IP-адрес роутера (как узнать IP-адрес роутера). Например 192.168.1.1
- И если необходимо, можете еще прописать DNS. Я рекомендую DNS от Google: 8.8.8.8 / 8.8.4.4
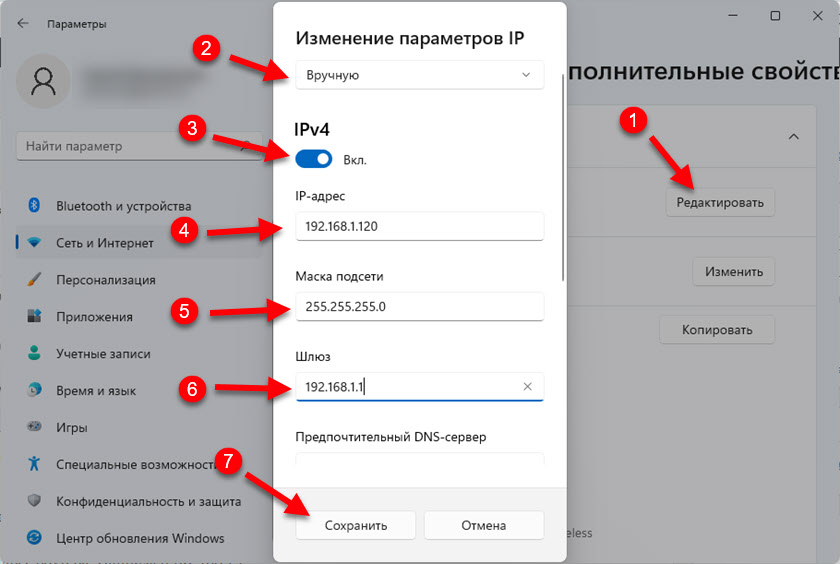
Не забудьте нажать на кнопку «Сохранить» для сохранения параметров.
Если после этих настроек у вас появляться какие-то проблемы с подключением, то верните настройки обратно на «Автоматически (DHCP)». А если это не поможет – сделайте сброс сети.
UPDATED 7/21/2023: On Windows 11, a static IP address is a network configuration that never changes, making it the preferred option to share files, a printer on a local network, or configure port forwarding.
Usually, when a computer connects to the network, it receives a dynamic IP address assigned by the local Dynamic Host Configuration Protocol (DHCP) server. The only problem is that this configuration can change at any time, as soon as you restart the computer or after the settings expire, and this can cause services like port forwarding and remote desktop to stop working. A static network configuration always maintains the same settings, making it ideal for hosting services that other users can access through the network.
This guide will teach you how to set a static IP (version 4) address on Windows 11.
- Assign static IP address on Windows 11 from Command Prompt
- Assign static IP address on Windows 11 from PowerShell
- Assign static IP address on Windows 11 from Settings
- Assign static IP address on Windows 11 from Control Panel
Assign static IP address on Windows 11 from Command Prompt
To set a static IP address on Windows 11 with Command Prompt, use these steps:
-
Open Start on Windows 11.
-
Search for Command Prompt, right-click the top result, and select the Run as administrator option.
-
Type the following command to see your current networking configuration and press Enter:
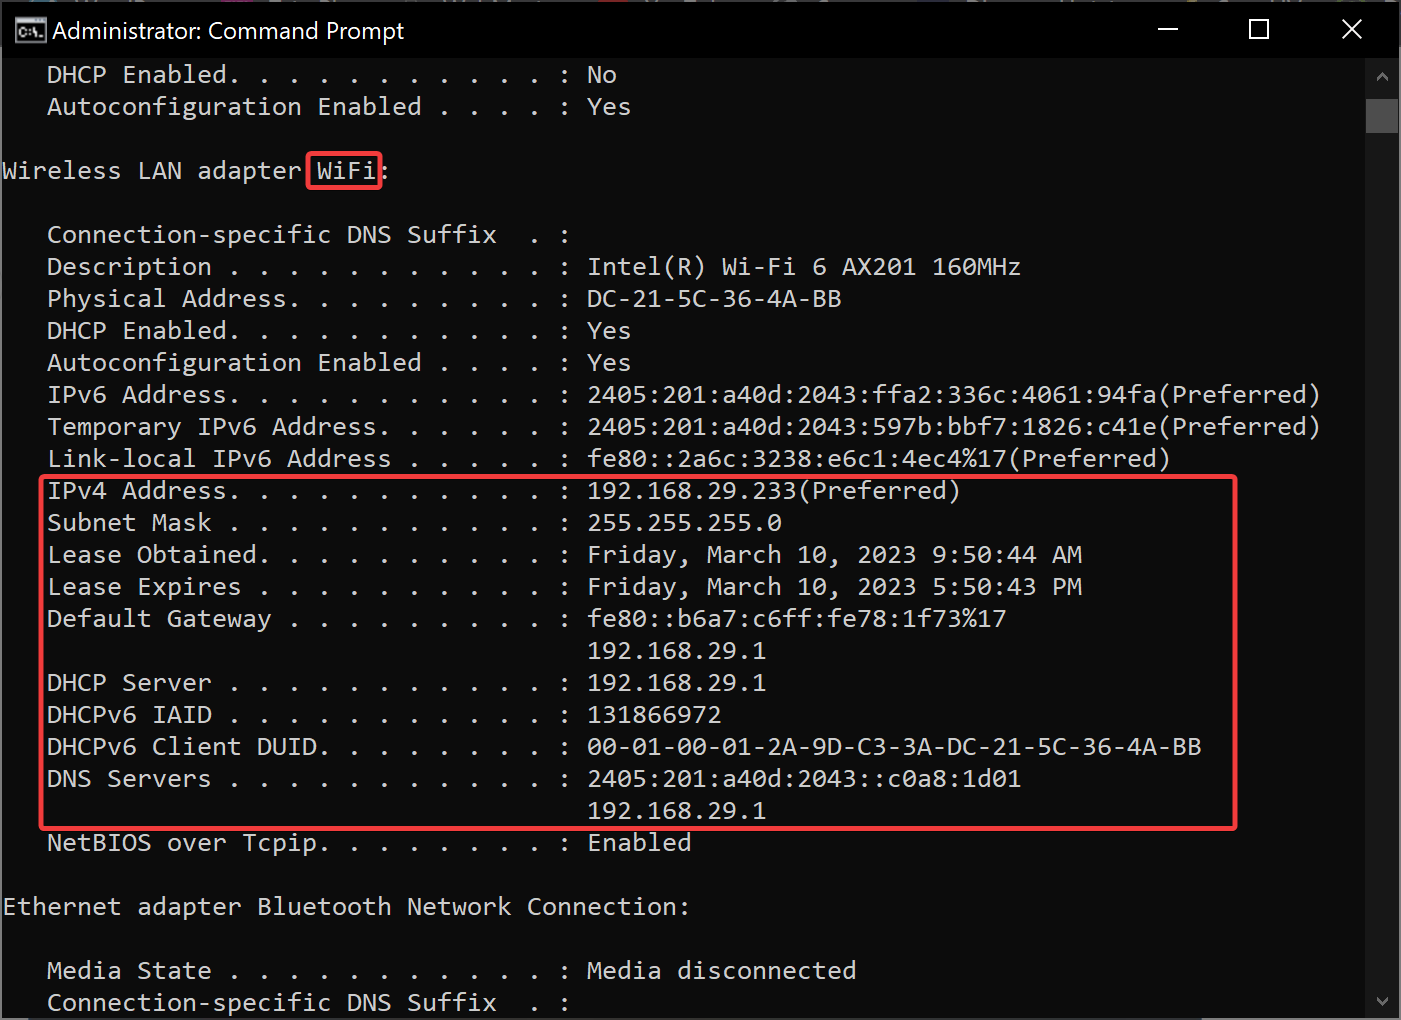
ipconfig /all
-
Under the network adapter, note the name of the adapter as well as the following information in these fields:
- IPv4
- Subnet mask
- Default Gateway
- DNS Servers

-
Type the following command to assign a static IP address on Windows 11 and press Enter:
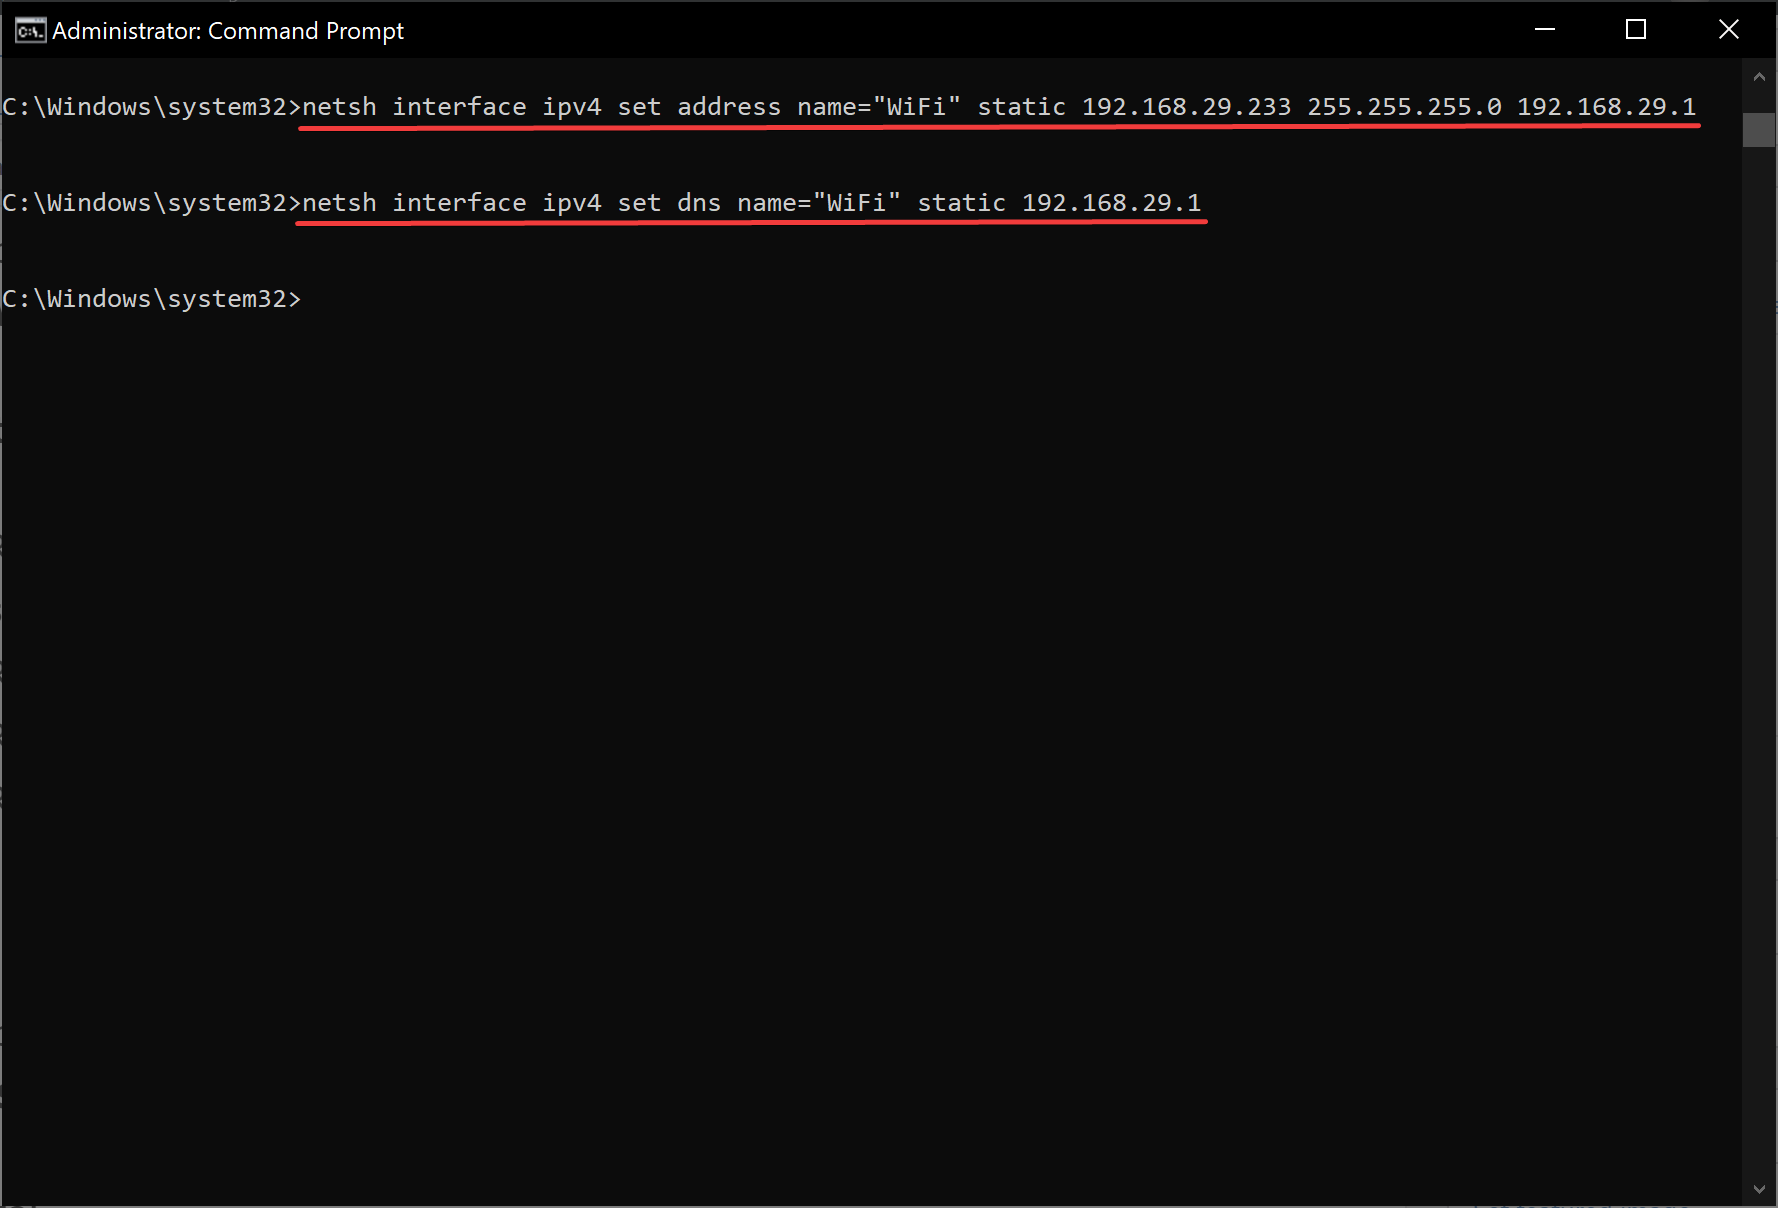
netsh interface ip set address name="Ethernet0" static 10.1.4.119 255.255.255.0 10.1.4.1
In the above command, replace “Ethernet0” with the name of your network adapter. Change “10.1.4.119 255.255.255.0 10.1.4.1” with the device IP address, subnet mask, and default gateway address corresponding to the local area network.
-
Type the following command to set a DNS server address and press Enter:
netsh interface ip set dns name="Ethernet0" static 10.1.4.1
In the command, make sure to change “Ethernet0” with your adapter’s name and “10.1.4.1” with the DNS server address of the network.
-
Type the following command to set an alternate DNS server address and press Enter:
netsh interface ip add dns name="Ethernet0" 8.8.8.8 index=2
In the command, change “Ethernet0” with the adapter’s name and “8.8.8.8” with an alternate DNS server address.


After completing the steps, you can use the ping command (for example ping google.com) to see if the configuration works correctly.
Assign static IP address on Windows 11 from PowerShell
You can use PowerShell with the “NetTCPIP” module to manage networking settings, including changing the IP address settings to a static configuration.
To set a static IP address with PowerShell, use these steps:
-
Open Start.
-
Search for PowerShell, right-click the result, and select the Run as administrator option.
-
Type the following command to view your current network configuration and press Enter:
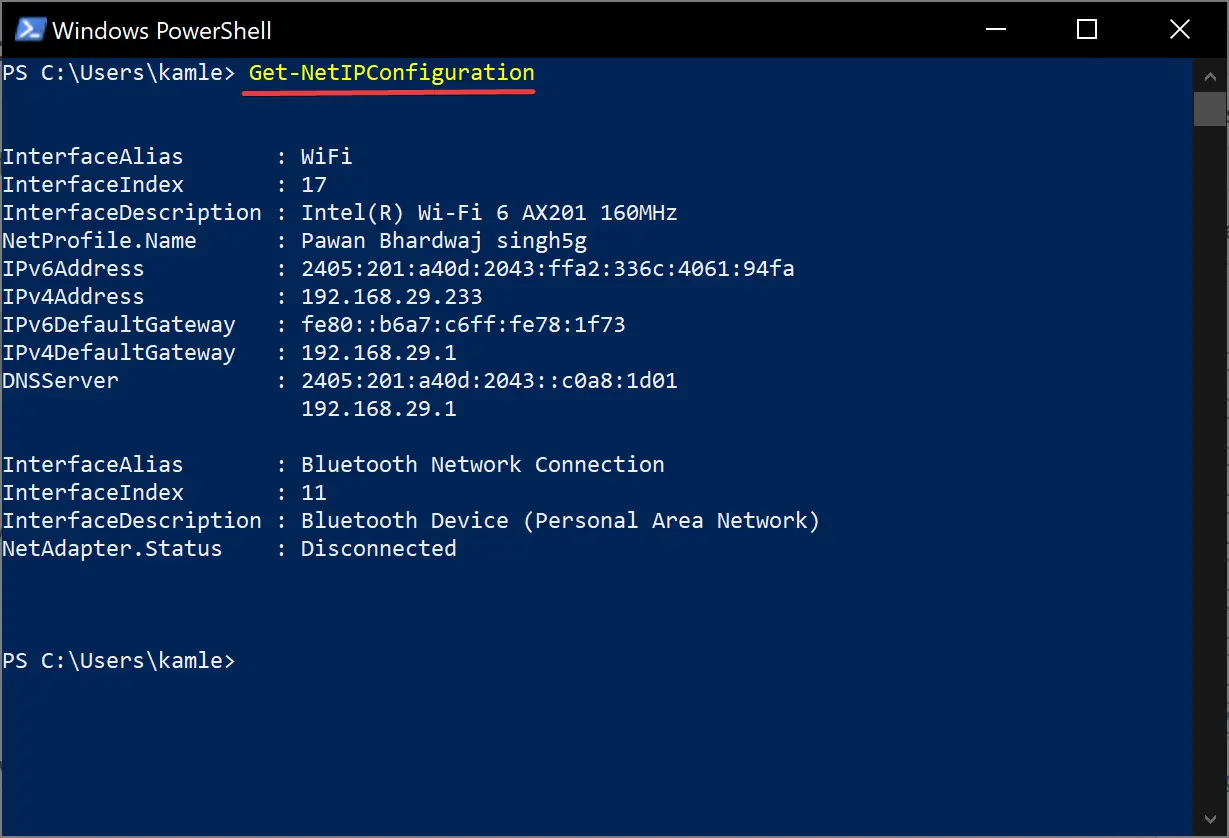
Get-NetIPConfiguration
-
Confirm the following network information:
- InterfaceIndex
- IPv4Address
- IPv4DefaultGateway
- DNSServer
-
Type the following command to set a static IP address and press Enter:
New-NetIPAddress -InterfaceIndex 10 -IPAddress 10.1.4.119 -PrefixLength 24 -DefaultGateway 10.1.4.1

In the command, replace the “InterfaceIndex” number (10) with the corresponding number of your adapter. Change “IPAddress” with the static IP address you want to assign to your device. Change “PrefixLength” (subnet mask) with the correct bit number if necessary. Typically, on a home network, the setting is “24.” Also, change the “DefaultGateway” option with the default gateway address of the network.
-
Type the following command to assign a DNS server address and press Enter:
Set-DnsClientServerAddress -InterfaceIndex 10 -ServerAddresses 10.1.4.1

If you need to set a secondary DNS server address, use a comma to use the same command with another address. For example:
Set-DnsClientServerAddress -InterfaceIndex 10 -ServerAddresses 10.1.4.1, 8.8.8.8
In the command, replace the “InterfaceIndex” number (10) with your network adapter’s corresponding number. Also, change “ServerAddresses” with the DNS IP address.


Once you complete the steps, the new network configuration will apply to the computer.
Regardless of your chosen method, always assign a TCP/IP address in the network range and outside of the DHCP server scope to allow proper connectivity and avoid configuration conflicts. The reason is that multiple computers sharing the same address will cause problems, preventing them from connecting to the internet.
Assign static IP address on Windows 11 from Settings
On Windows 11, you can set a static IP address configuration from the Settings app for wireless and wired adapters.
Set static IP address on Wi-Fi adapter
To assign a static IP address configuration to a Wi-Fi adapter, use these steps:
-
Open Settings on Windows 11.
-
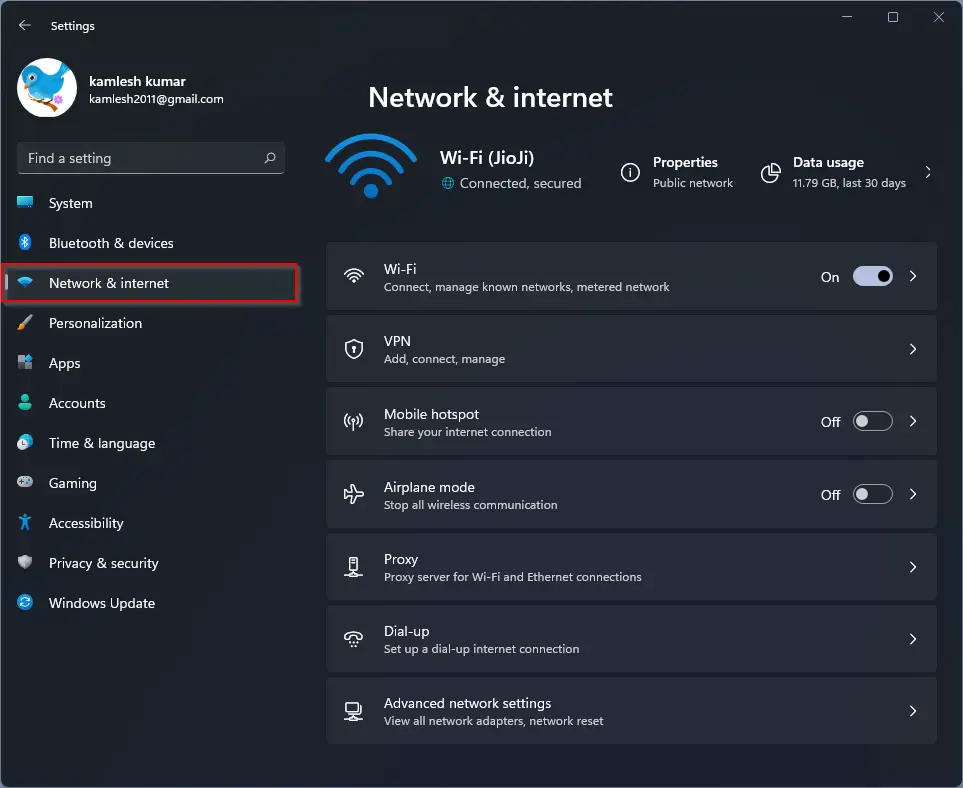
Click on Network & Internet.
-
Click the Wi-Fi tab.

-
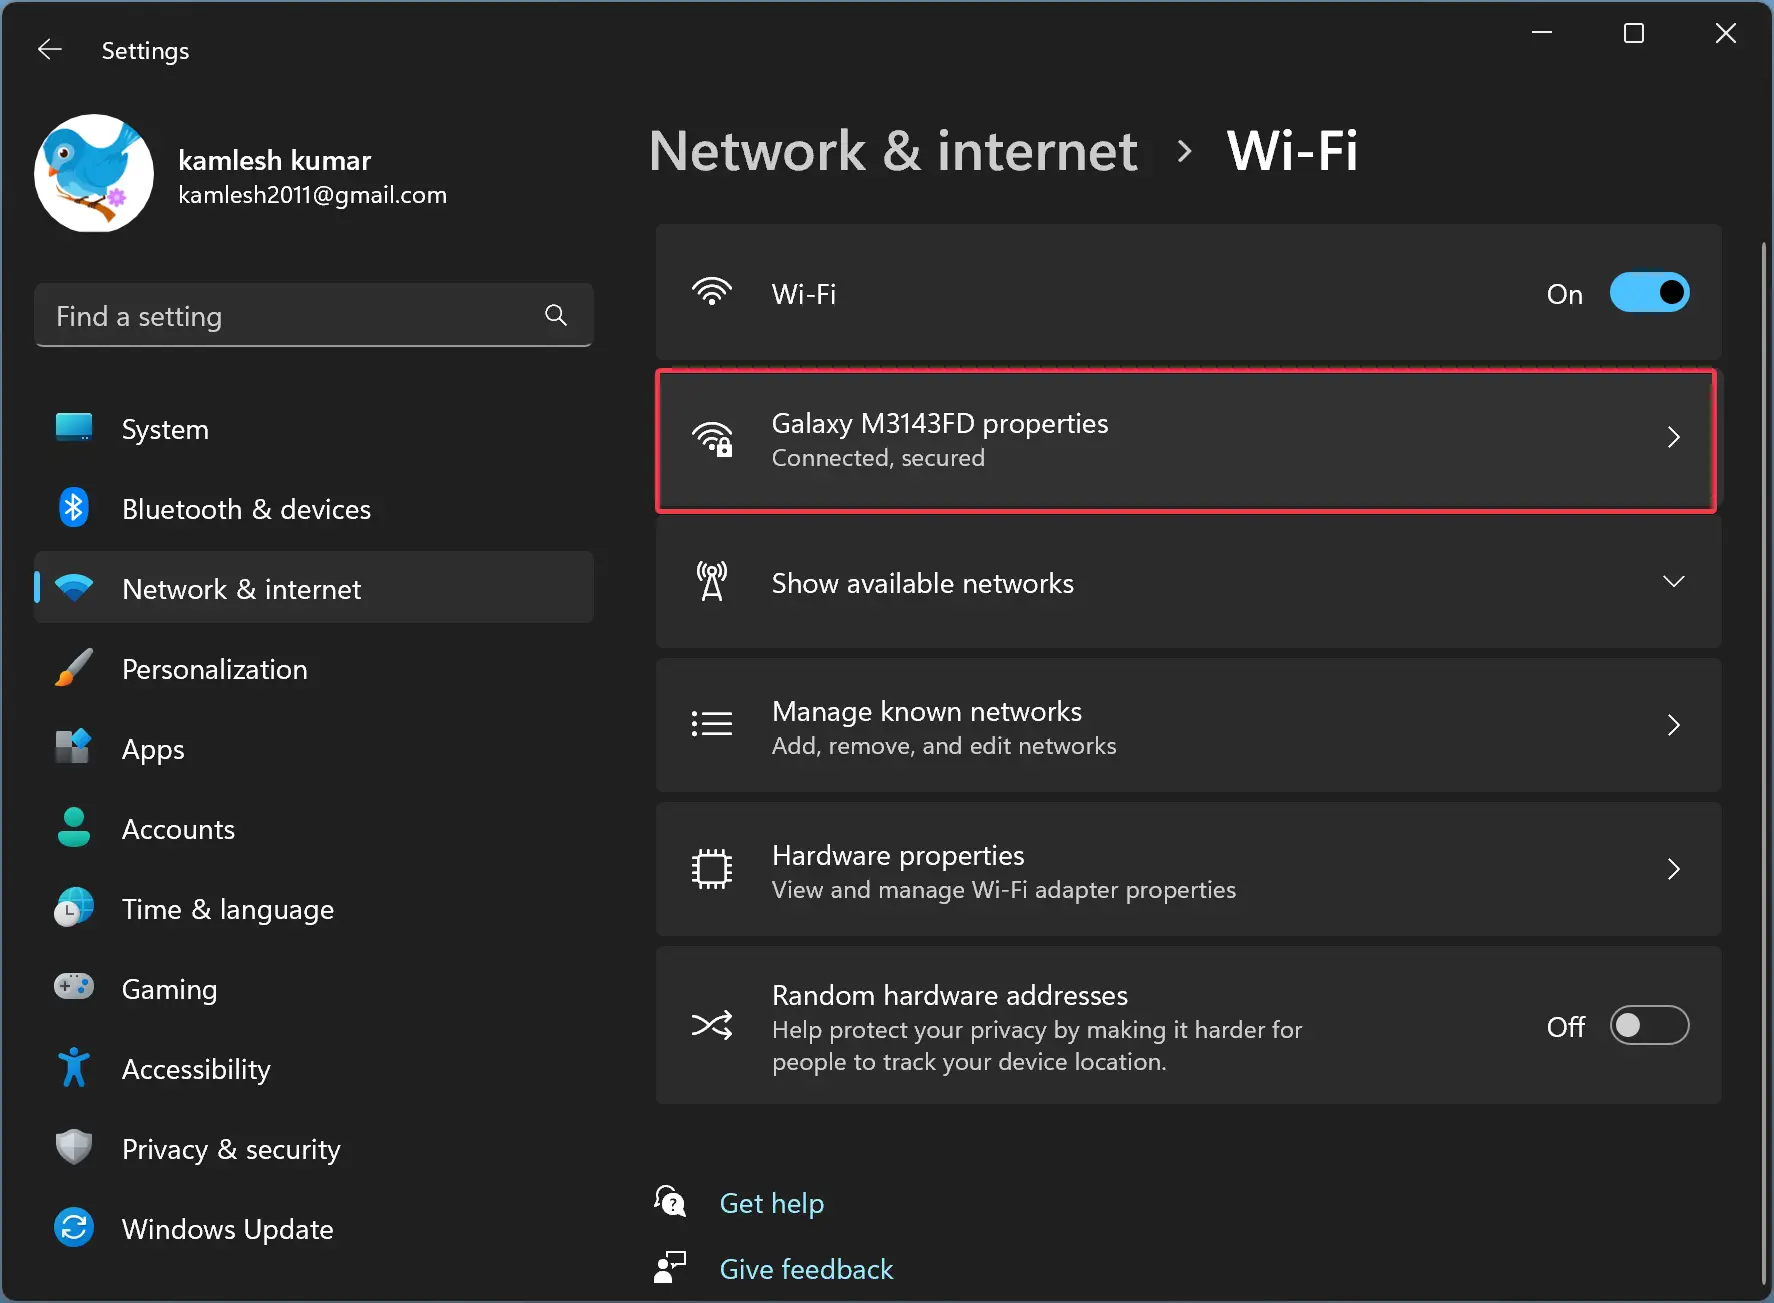
Select the current network connection.
-
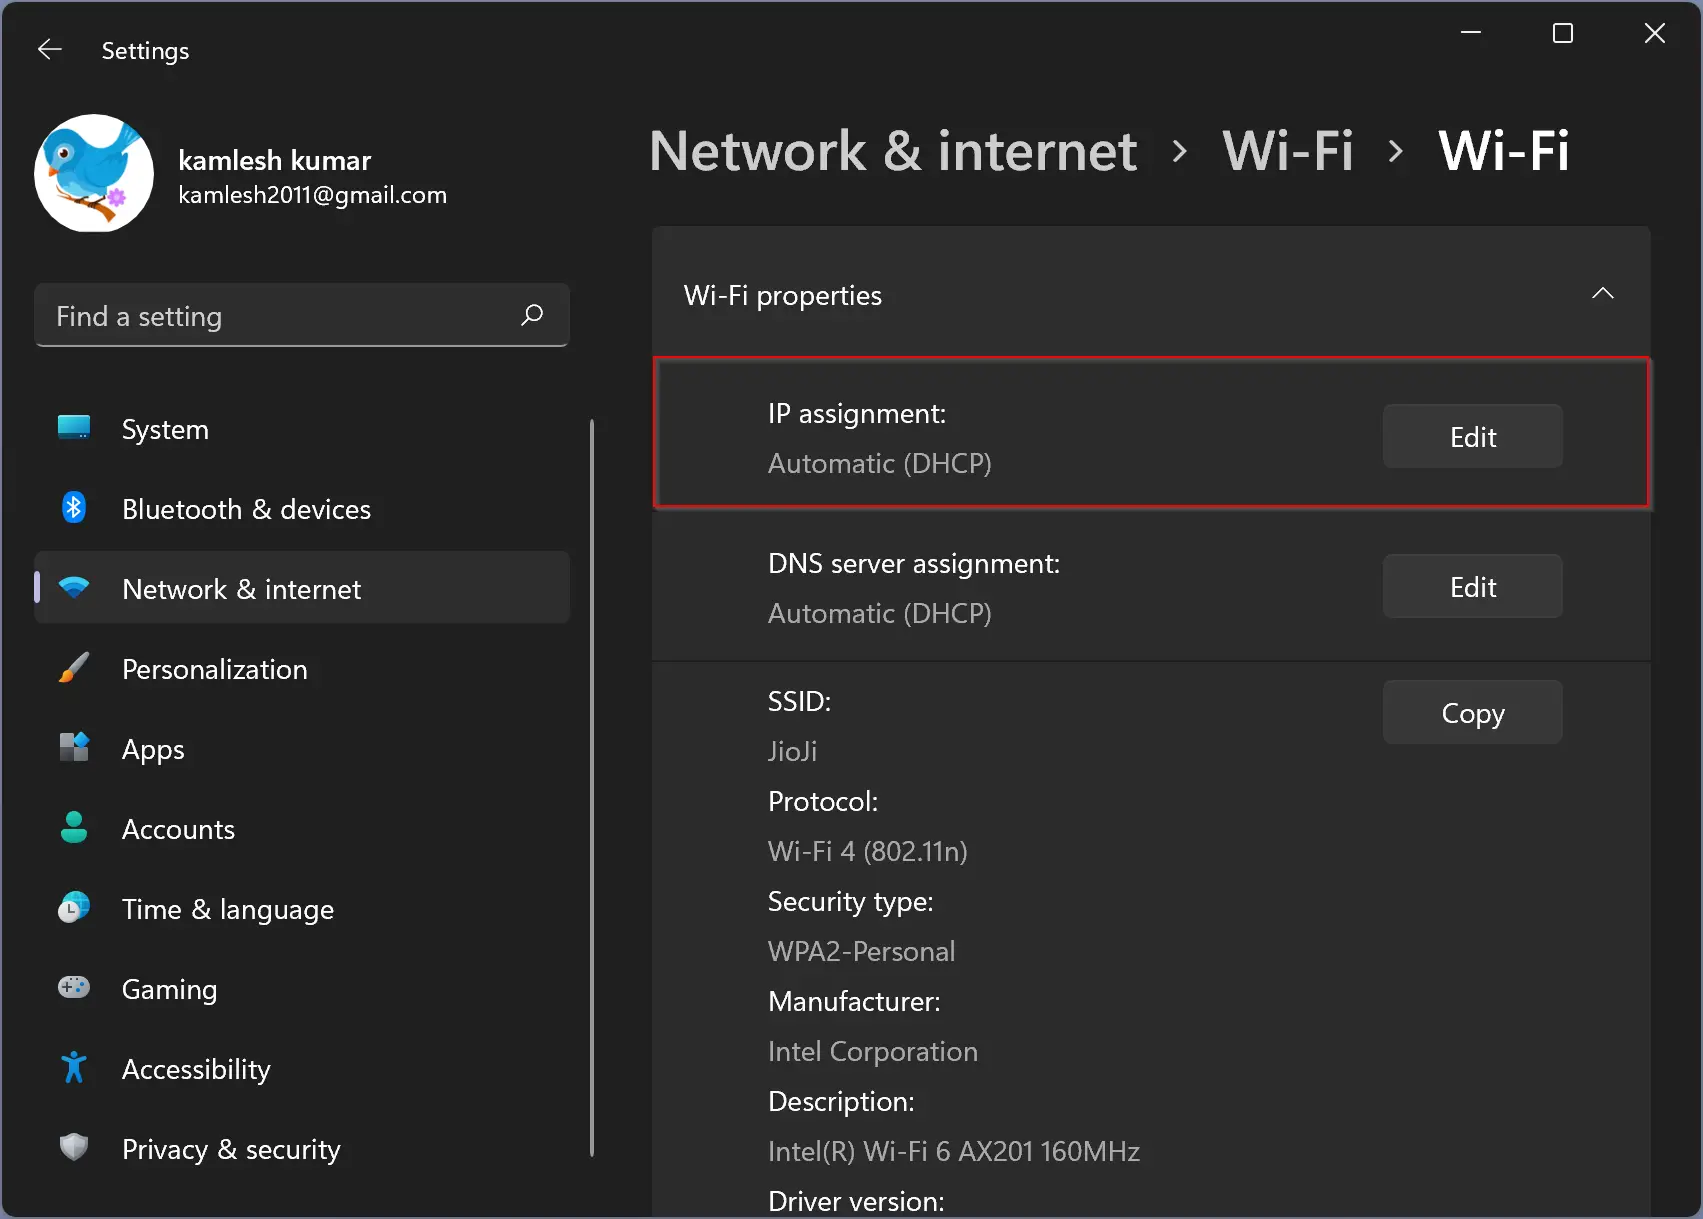
Under the “IP settings” section, click the Edit button.

-
Select the Manual option.

-
Turn on the IPv4 toggle switch.
-
Set a static IP address for Windows 11 – for example, 10.1.4.119.

-
Specify a Subnet mask – for example, 255.255.255.0.
-
Specify a Default Gateway address.
-
Specify a Preferred DNS address (required).
-
(Optional) Specify an “Alternate DNS” address.
-
Use the “DNS over HTTPS” drop-down menu and select the Off option for the preferred and alternate addresses, but you can enable DoH with these options:
- Off: Transmits all DNS traffic without encryption.
- On (automatic template): Sends all DNS traffic with encryption.
- On (manual template): Allows you to specify a specific template. It is only required if the DNS service doesn’t work automatically or has a template that works as expected.
-
Turn off the “Fallback to plaintext” toggle switch (if you enable DoH).
Quick tip: If you enable this feature, the system will encrypt DNS traffic, but it allows queries to be sent without encryption.
-
Click the Save button.


Once you complete the steps, the static network configuration will apply to the computer. You can test the new settings by opening the web browser and loading a website.
Set static IP address on Ethernet adapter
To assign a static IP address to an Ethernet (wired) adapter on Windows 11, use these steps:
-
Open Settings.
-
Click on Network & Internet.
-
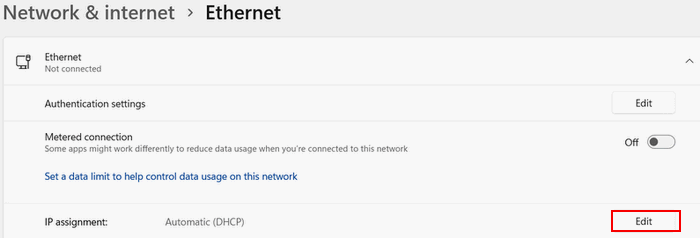
Click the Ethernet tab.

-
Under the “IP settings” section, click the Edit button.
-
Select the Manual option.
-
Turn on the IPv4 toggle switch.
-
Set a static IP address for Windows 11 – for example, 10.1.4.119.
-
Specify a Subnet mask – for example, 255.255.255.0.
-
Specify a Default Gateway address.
-
Specify a Preferred DNS address (required).
-
(Optional) Specify an “Alternate DNS” address.
-
Use the “DNS over HTTPS” drop-down menu and select the Off option for the preferred and alternate addresses, but you can enable DoH with these options:
- Off: Transmits all DNS traffic without encryption.
- On (automatic template): Sends all DNS traffic with encryption.
- On (manual template): Allows you to specify a specific template. It is only required if the DNS service doesn’t work automatically or has a template that works as expected.
-
Turn off the “Fallback to plaintext” toggle switch (if you enable DoH).
-
Click the Save button.


After you complete the steps, you can test your settings using your web browser to open a website.
Assign static IP address on Windows 11 from Control Panel
On Windows 11, you can still use Control Panel to change the IP settings for Ethernet or Wi-Fi adapters.
To assign a static IP configuration through the Control Panel, use these steps:
-
Open Control Panel.
-
Click on Network and Internet.
-
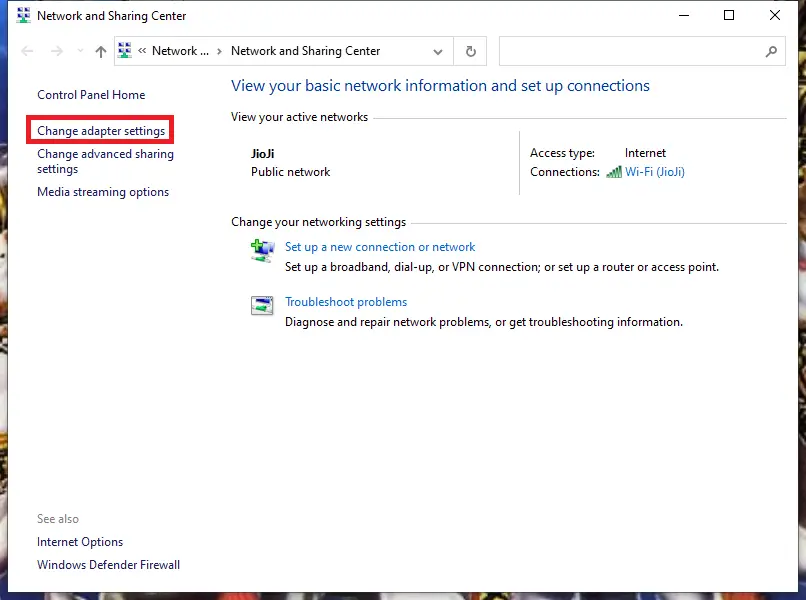
Click on Network and Sharing Center.
-
Click the Change adapter settings option on the left navigation pane.

-
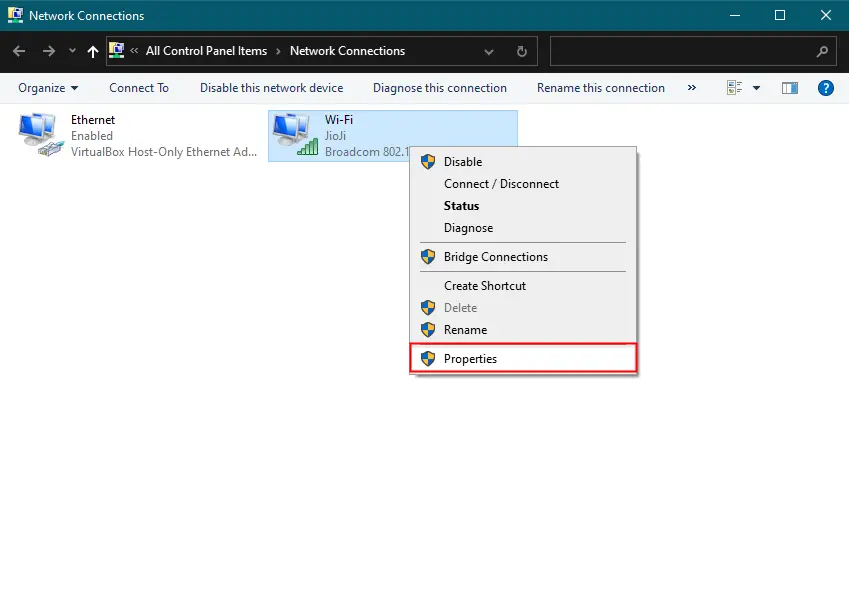
Right-click the network adapter and select the Properties option.
-
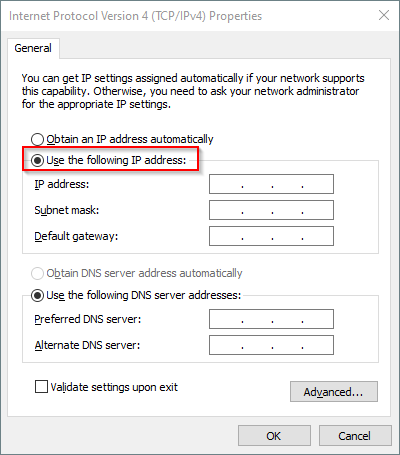
Select the “Internet Protocol Version 4 (TCP/IPv4)” option.
-
Click the Properties button.
-
Select the “Use the following IP address” option.
-
Assign the static IP address – for example, 10.1.4.119.

-
Specify a Subnet mask. Typically, on a home network, the subnet mask is 255.255.255.0.
-
Specify a Default gateway address – for example, 10.1.4.1 (Usually, your router’s address).
-
Under the “Use the following DNS server addresses set Preferred DNS server” section, set the “Preferred DNS server address,” which is usually your router’s IP address or server IP address providing DNS resolutions (for example, 10.1.4.1).
-
(Optional) Specify an “Alternative DNS server,” which the computer will use if it cannot reach the preferred DNS server.
-
Click the OK button.
-
Click the Close button again.


Once you complete the steps, you can open the web browser and load a website to see if the configuration works.
If you want to revert the changes, you can use these instructions to remove the static settings to configure a dynamic IP address on Windows 11.
Setting a static IP address on Windows 11 is a straightforward process that can enhance your network stability and security. To set a static IP, you’ll navigate through the network settings, adjust your IP configuration, and apply your changes. Let’s dive into the specifics and guide you step-by-step.
In this section, we’ll cover how to configure your Windows 11 computer to use a static IP address. This setup ensures your device always uses the same IP, which can be crucial for network devices like printers or servers.
Step 1: Open Network & Internet Settings
First, open the Network & Internet settings by clicking on the network icon in the taskbar and selecting “Network & Internet settings.”
Navigating to the Network & Internet settings will allow you to access advanced network options. This is where all the magic happens for configuring your IP.
Step 2: Access Ethernet or Wi-Fi Settings
Next, select either “Ethernet” or “Wi-Fi” based on your connection type.
Choosing the correct network type is essential because the static IP settings need to be applied to the specific network adapter you’re using.
Step 3: Modify Adapter Options
Click on “Change adapter options” to proceed to the network connections page.
This page lists all the network adapters on your computer. Here, you can select the adapter you want to configure.
Step 4: Open Properties
Right-click on your network adapter and select “Properties.”
The Properties window is where you’ll input the static IP details. It’s critical to be in the right window to avoid changing unrelated settings.
Step 5: Configure IP Settings
Select “Internet Protocol Version 4 (TCP/IPv4)” and click on “Properties.”
This step brings up the window where you can manually enter your static IP address, subnet mask, default gateway, and DNS servers.
Step 6: Enter Static IP Details
Check “Use the following IP address” and fill in the IP address, subnet mask, and default gateway. Then, input your preferred DNS servers.
Make sure to use an IP address within your network’s range and avoid conflicts with other devices on the same network. Using correct DNS settings ensures you can resolve domain names properly.
Step 7: Save Changes
Click “OK” to save your changes and close all windows.
Saving your settings will apply the new configuration immediately. Close and re-open your network connections to verify the new settings are active.
Upon completing these steps, your device will consistently use the specified static IP address, enhancing network reliability for certain tasks or devices.
Tips for Setting a Static IP on Windows 11
- Double-check the IP range of your network to avoid IP conflicts.
- Write down your original settings before making changes.
- Use a subnet mask of 255.255.255.0 for most local networks.
- Configure your router to assign static IPs within a certain range.
- Restart your computer to ensure the new settings take effect.
Frequently Asked Questions
Why would I need a static IP address?
A static IP address ensures consistent and reliable access to networked devices like printers, servers, or for remote access setups.
What is the difference between a static and dynamic IP?
Static IPs remain the same over time, while dynamic IPs can change periodically, assigned by the network’s DHCP server.
Can I set a static IP for both wired and wireless connections?
Yes, you can configure static IPs for both Ethernet and Wi-Fi connections individually.
What should I do if I encounter IP conflicts?
IP conflicts occur when two devices share the same IP. Ensure the IP you assign isn’t used by another device on your network.
How do I find my current IP, subnet mask, and gateway?
You can find this information by typing ‘ipconfig’ in the Command Prompt, providing you details of your current network configuration.
Summary
- Open Network & Internet settings.
- Access Ethernet or Wi-Fi settings.
- Modify adapter options.
- Open properties of your network adapter.
- Configure IP settings.
- Enter static IP details.
- Save changes.
Conclusion
Setting a static IP on Windows 11 is a breeze with the right steps. By following this guide, you can ensure your device has a consistent IP address, crucial for network stability and reliability. Whether you’re setting up a home network or managing a small business, a static IP can streamline your network management. Now that you know how to set a static IP, explore other network settings to optimize your setup further. Happy networking!
Matthew Burleigh has been writing tech tutorials since 2008. His writing has appeared on dozens of different websites and been read over 50 million times.
After receiving his Bachelor’s and Master’s degrees in Computer Science he spent several years working in IT management for small businesses. However, he now works full time writing content online and creating websites.
His main writing topics include iPhones, Microsoft Office, Google Apps, Android, and Photoshop, but he has also written about many other tech topics as well.
Read his full bio here.
-
Home
-
News
- How To Set Up A Static IP Address To A Windows 11 Computer
By Sarah |
Last Updated
A static IP address is needed sometimes. But the question is that many Windows users don’t know how to set up a static IP on their computers. Noticing this, MiniTool decided to introduce static IP address to you and shows you the detailed steps on how to assign a static IP address to a Windows 11/10 computer. Please read with care.
This page will focus on how to set up a static IP on Windows 11 (or Windows 10) PC. Before going through the steps to set a static IP address Windows 11, I’d like to discuss what a static IP address is and the differences between static IP address and dynamic IP address. After that, I’ll tell you when you need to assign a static IP address and how to use a static IP address.
What Is Laptop MAC Address? How To Find & Change It On Windows 10?
Tip: Backing up your computer regularly is very important especially when valuable data are saved on it. Please use the built-in tool or get a reliable tool for backup. Besides, you’d better prepare a powerful data recovery tool in case that your needed files & folders are lost suddenly.
MiniTool Power Data Recovery TrialClick to Download100%Clean & Safe
What Is Static IP Address
What does IP address mean? An IP (Internet Protocol) address is a unique number assigned to every device on a network; it identifies the computers connected to the internet and used by network devices to communicate with other devices.
What is a static IP address? To be specific, a static IP address is a permanent (32 bit) number assigned to a computer via ISP (Internet service provider). All in all, the static IP address is known as fixed IP address or dedicated IP address that is relative to the dynamic IP address.
Static vs Dynamic IP Addresses
What is a dynamic IP address? Dynamic means change; Dynamic addresses are assigned by the DHCP (Dynamic Host Configuration Protocol) servers and they are changed from time to time.
What are the main differences between static IP address and dynamic IP address? The static IP address doesn’t change while the dynamic IP address changes over time.
In the following content, I’ll tell you why you need to use a static IP address. Then, I’ll show you how to set a static IP address.
Why Should You Use Static IP Address
What are the reasons for setting up a static IP address on your Windows 11 or Windows 10 computer?
- The external devices, websites, or services need to remember your IP address.
- You host a web server or other internet server.
- You need to forward ports to a specific device.
- It’s necessary to run a print server.
- There’s a file server in your network.
- The networked printer or remote access program (like VPN) is used.
If you assign a static IP address to computer, it will use the same IP address when connecting to network.
Advantages of setting up a static IP address:
- Great DNS support
- Reliable communication
- Convenient remote access
- Easy server hosting discovery
- Improved geo-location services
How to Set up a Static IP Address
How to assign a static IP address to a device? Let’s take Windows 11 computer as an example. As for how to set a static IP address on Windows 10 PC, the steps are basically the same.
There are 3 common ways to set up a static IP on Windows 11/10.
Set up a Static IP Address from Settings
- Press Windows + I to open the Settings app.
- Go to the Network & internet option in the left pane.
- Select the Ethernet or WiFi connection you’re using.
- Locate the IP assignment section and click Edit.
- The Edit network IP settings window will appear.
- Select Manual from the drop-down menu.
- Turn on IPv4 and set a static IP address.
- Set the Subnet prefix length to 24 and Gateway to 10.1.2.1.
- Configure the Preferred DNS address or enter the Alternate DNS address if you have any.
- Click Save.
Assign a Static IP Address via Command Prompt
- Run Command Prompt as administrator.
- Type ipconfig /all and press Enter.
- Go to your Network Adapter to find information: IPv4 address, Subnet mask, Default Gateway, and DNS servers.
- Type netsh interface ip set address name=”*” static ip_address subnet_mask default_gateway and press Enter. (* stands for the network name and you should type the correct static IP address, Subnet mask and default gateway.)
- Please run the netsh interface ip set dns name=”DNS name” static dns_server command if you want to assign a static DNS server address.
Read this if you don’t know how to run a program as administrator in Windows 11:
Set a Static IP Address using PowerShell
- Open Windows Powershell as administrator.
- Type Get-NetIPConfiguration and press Enter.
- Information to note down: InterfaceIndex, IPv4Address, IPv4DefaultGateway, and DNSServer.
- Type New-NetIPAddress -InterfaceIndex value -IPAddress value -PrefixLength value -DefaultGateway value and press Enter.
- Type Set-DnsClientServerAddress -InterfaceIndex value -ServerAddresses value and press Enter if you’d like to assign a DNS server address.
That’s all about how to set up a static IP.
How To Enable DHCP Or Change TCP/IP Settings In Windows 11/10?
About The Author
Position: Columnist
Sarah has been working as an editor at MiniTool since she graduated from university. Sarah aims at helping users with their computer problems such as disk errors and data loss. She feels a sense of accomplishment to see that users get their issues fixed relying on her articles. Besides, she likes to make friends and listen to music after work.
In a networked environment, every device is given a unique identifier known as an IP (Internet Protocol) address, which allows devices to communicate with one another over the network. By default, most computers connected to a network obtain their IP addresses dynamically from a DHCP (Dynamic Host Configuration Protocol) server. However, there may be situations where a Windows 11 computer needs a static IP address, such as when hosting a server or accessing specific network resources. This guide provides a comprehensive walkthrough to help you set a static IP address on Windows 11.
Setting a static IP address on Windows 11 has several benefits, including ensuring that your device has a consistent and predictable IP address, which can be advantageous for network administration and troubleshooting. It can also help you avoid conflicts with other devices on the network and simplify the configuration of network-related settings for specific applications.
To set a static IP address on Windows 11, you’ll need to navigate to the Network and Internet settings and configure the network adapter properties. The process can vary depending on your network configuration, so it’s essential to have all the necessary information about your network settings before beginning.
This guide provides a step-by-step tutorial on how to set a static IP address on Windows 11 and includes some useful tips and tricks to help you troubleshoot common issues that may arise during the process. Whether you’re a network administrator or simply looking to optimize your device’s network settings, this guide will provide the necessary guidance to configure a static IP address on Windows 11 with ease.
Configuring a static IP address on Windows 11 through the Settings app is a simple and straightforward process. Follow the steps below to set a static IP address:-
Step 1. Click on the Start button and select Settings. Alternatively, press the Windows + I hotkey to open Windows 11 Settings on your PC.
Step 2. Then, click on Network & Internet in the left sidebar.
Step 3. On the right, click on Ethernet or Wi-Fi (depending on your connection).
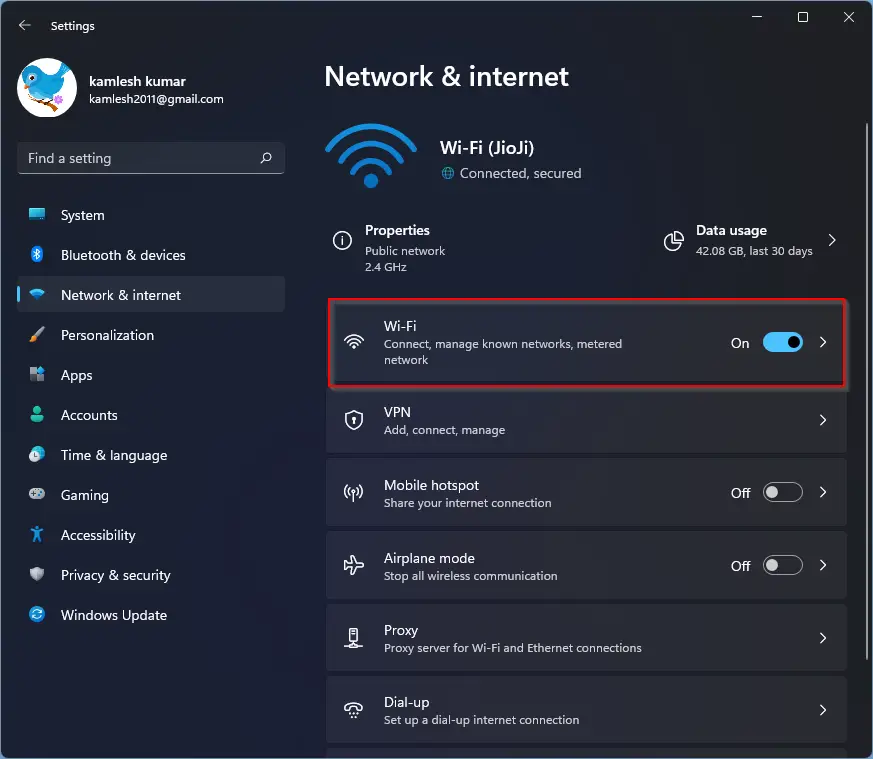
Step 4. Click on the network connection you want to set a static IP address.
Step 5. Then, scroll down and click the Edit button beside the IP assignment option.
Step 6. On the pop-up window, using the drop-down menu, select the Manual option.
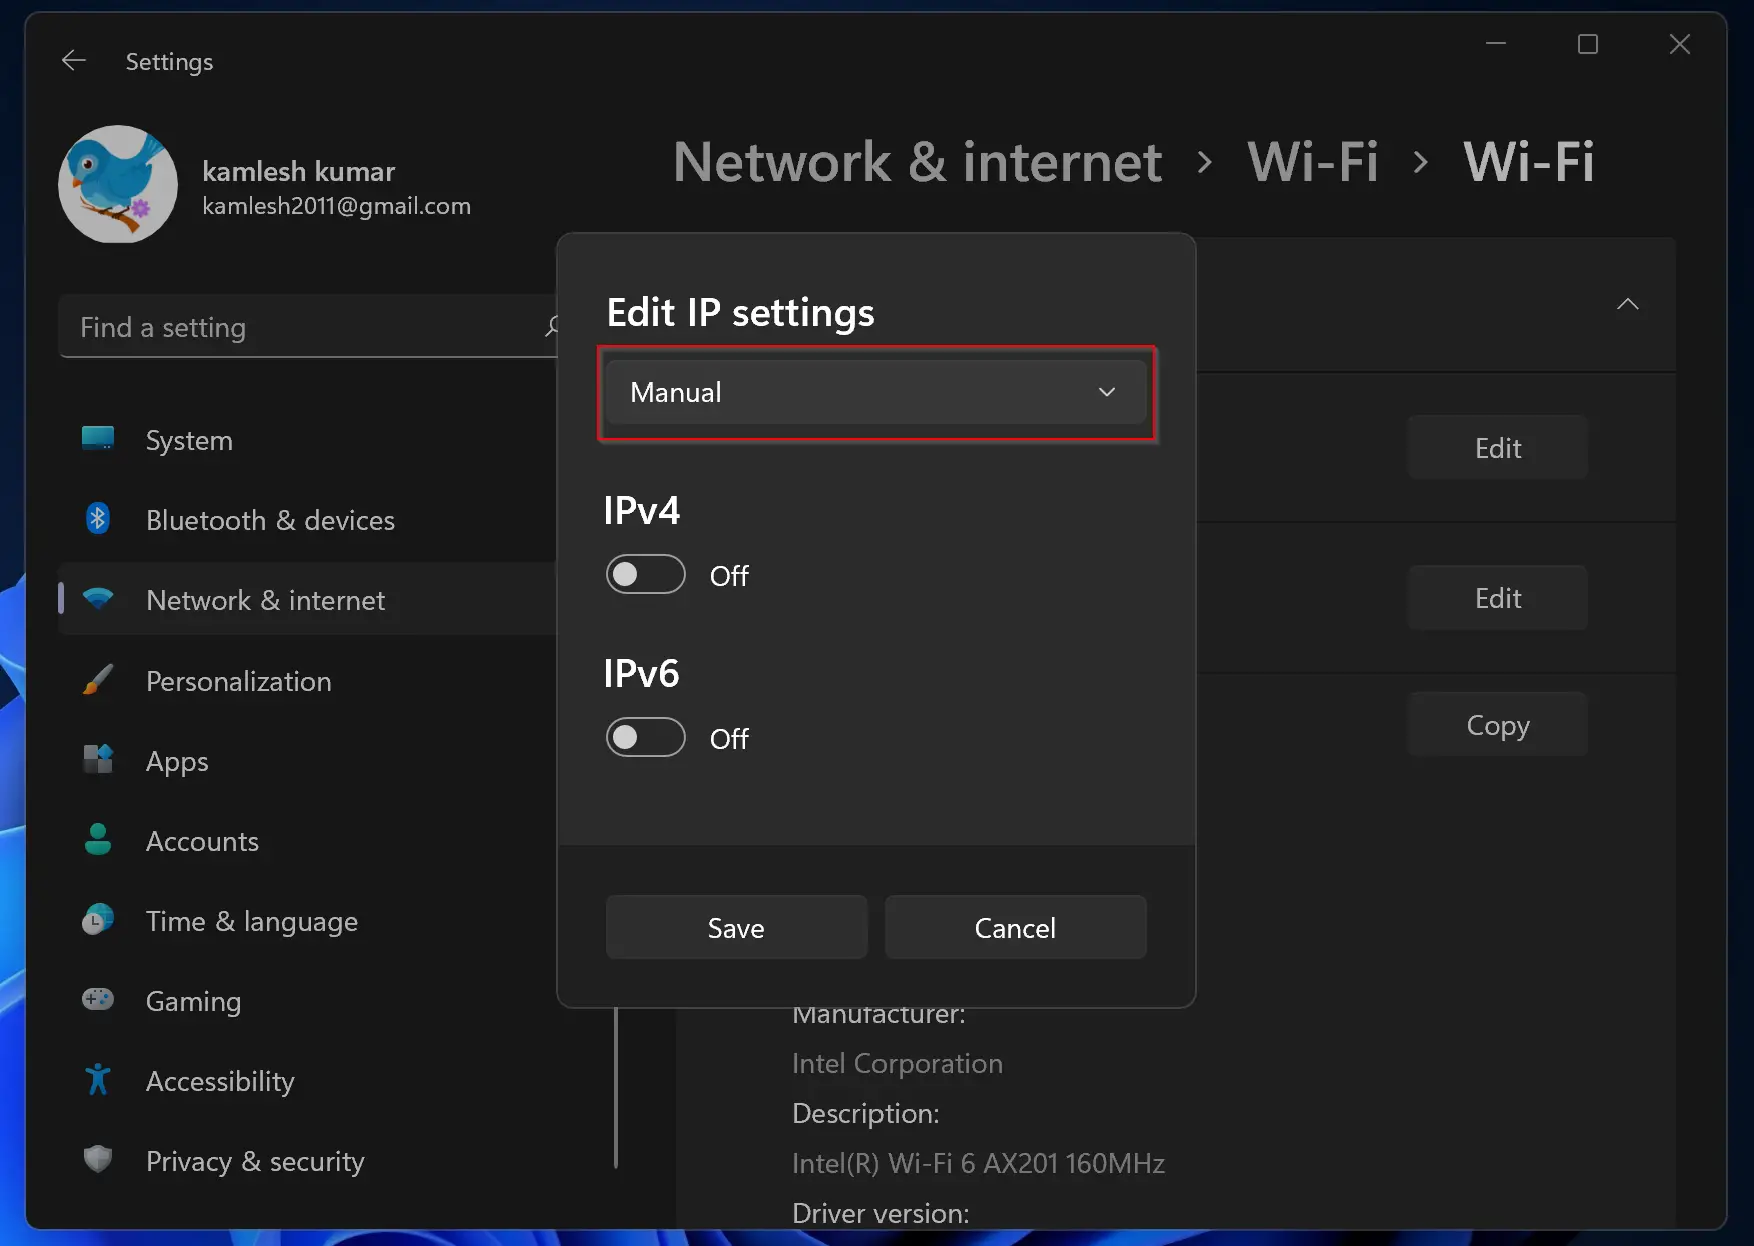
Step 7. Turn on the “IPv4” toggle switch.
Step 8. Enter the IP address, subnet mask, and default gateway information in the appropriate fields.
Step 9. If needed, enter the preferred and alternate DNS server information in the appropriate fields.
Step 10. Click on the Save button to apply the changes.
After completing these steps, your Windows 11 device will have a static IP address that you can use to connect to your network. It’s important to remember to verify that the IP address you have entered does not conflict with any other devices on your network and that the subnet mask and default gateway information are accurate.
How to Set a Static IP Address on Windows 11 from Control Panel?
Configuring a static IP address on Windows 11 through the Control Panel is an effective and straightforward process. Follow the steps below to set a static IP address:-
Step 1. Click on the Start button and type “Control Panel.”
Step 2. Then, click on the Control Panel app to open it.
Step 3. Next, click on Network and Internet.
Step 4. Then, click on Network and Sharing Center.

Step 5. Click on Change adapter settings in the left-hand menu.
Step 6. Right-click on the network connection you want to set a static IP address and select the Properties option in the menu.
Step 7. After that, click on Internet Protocol Version 4 (TCP/IPv4) and select Properties.
Step 8. Select the option for “Use the following IP address.”
Step 9. Enter the IP address, subnet mask, and default gateway information in the appropriate fields.
Step 10. If needed, enter the preferred and alternate DNS server information in the appropriate fields.
Step 11. Click on the OK button to apply the changes.
After completing these steps, your Windows 11 device will have a static IP address that you can use to connect to your network. It’s crucial to avoid entering an IP address that conflicts with other devices on your network and make sure that the subnet mask and default gateway information are accurate.
How to Set a Static IP Address on Windows 11 through Command Prompt?
Configuring a static IP address on Windows 11 through the Command Prompt is a fast and efficient process. Follow the steps below to set a static IP address:-
Step 1. Click the Start button and type “command prompt” or “cmd.”
Step 2. Right-click on the Command Prompt entry and select the Run as administrator option.
Step 3. Now, type “ipconfig /all” and press Enter to view your current IP address and other information if you are already using a DHCP address.
Step 4. Here, note down the name of the adapter as well as the following information:-
- IPv4,
- Subnet mask,
- Default Gateway,
- DNS Servers.
Step 5. Next, type “netsh interface ipv4 set address name=”Connection Name” static IPAddress SubnetMask DefaultGateway” and press Enter.
Note:-
- Replace “Connection Name” with the name of the network connection you want to set a static IP address for.
- Replace “IPAddress” with the IP address you want to assign to your device.
- Replace “SubnetMask” with the subnet mask for your network.
- Replace “DefaultGateway” with the default gateway address for your network.
Step 6. Type “netsh interface ipv4 set dns name=”Connection Name” static DNSAddress” and press Enter.
Note:-
- Replace “Connection Name” with the name of the network connection you want to set a static IP address for.
- Replace “DNSAddress” with the preferred DNS server address for your network.
After completing these steps, your Windows 11 device will have a static IP address that you can use to connect to your network. It’s crucial to avoid entering an IP address that conflicts with other devices on your network and make sure that the subnet mask, default gateway, and DNS server information are accurate.
How to Set a Static IP Address on Windows 11 from PowerShell?
Configuring a static IP address on Windows 11 using PowerShell is a simple process. Follow the steps below to set a static IP address:-
Step 1. First, click the Start button and type “PowerShell.”
Step 2. Next, right-click on the Windows PowerShell entry and select Run as administrator.
Step 3. Then, type “Get-NetIPConfiguration” and press Enter to view a list of your network adapters.
After running the above command, note down the following details:-
- InterfaceIndex,
- IPv4Address,
- IPv4DefaultGateway,
- DNSServer.
Step 4. Now, type “New-NetIPAddress -InterfaceIndex InterfaceIndex -IPAddress IPAddress -PrefixLength PrefixLength -DefaultGateway DefaultGateway” and press Enter.
Note:-
- Replace “InterfaceIndex” with the index number of the network adapter you want to set a static IP address for (listed in step 3).
- Replace “IPAddress” with the IP address you want to assign to your device.
- Replace “PrefixLength” with the subnet mask with the correct bit number if necessary. Typically on a home network, the setting is 24.
- Replace “DefaultGateway” with the default gateway address for your network.
Step 5. Type “Set-DnsClientServerAddress -InterfaceIndex InterfaceIndex -ServerAddresses DNSAddress” and press Enter.
Note:-
- Replace “InterfaceIndex” with the index number of the network adapter you want to set a static IP address for (listed in step 3).
- Replace “DNSAddress” with the preferred DNS server address for your network.
Step 6. Press Enter to apply the changes.
Once you have successfully followed the above steps to set a static IP address on your Windows 11 device using PowerShell, you can connect to your network using the assigned IP address. However, it is important to avoid conflicts with other devices on your network by ensuring that the entered IP address is unique. Additionally, make sure that the subnet mask, default gateway, and DNS server information are correct to ensure proper network connectivity.