
Порой у пользователей Windows возникает потребность в смене региона. Например, для доступа к контенту, который не продается в вашей стране. О том, как сменить регион в Windows, вы узнаете из нашего гайда.
Зачем менять регион на ПК?
Есть несколько причин, по которым пользователь может задуматься о смене региона в Windows на ПК. Рассмотрим основные:
- Некоторые программы, веб-сайты или онлайн-сервисы недоступны в определенных странах;
- Регион влияет на формат даты, времени, чисел и валюты. Кому-то это может пригодиться;
- Некоторые обновления Windows или приложений выходят раньше в определенных странах;
- Смена региона позволяет установить соответствующий язык интерфейса по умолчанию. Это может быть полезно при смене дислокации.
Также добавим, что зачастую геймеры меняют регион в Windows ради подписки Game Pass. Некоторые игры недоступны на территории РФ. Например, проекты EA.
Плюсы и минусы смены региона
Изменение региона на ПК не всегда является плюсом. Рассмотрим как положительные, так и отрицательные стороны этого действия.
Как поменять регион на ПК
Рассмотрим три самых популярных способа поменять регион во всех актуальных версиях Windows.
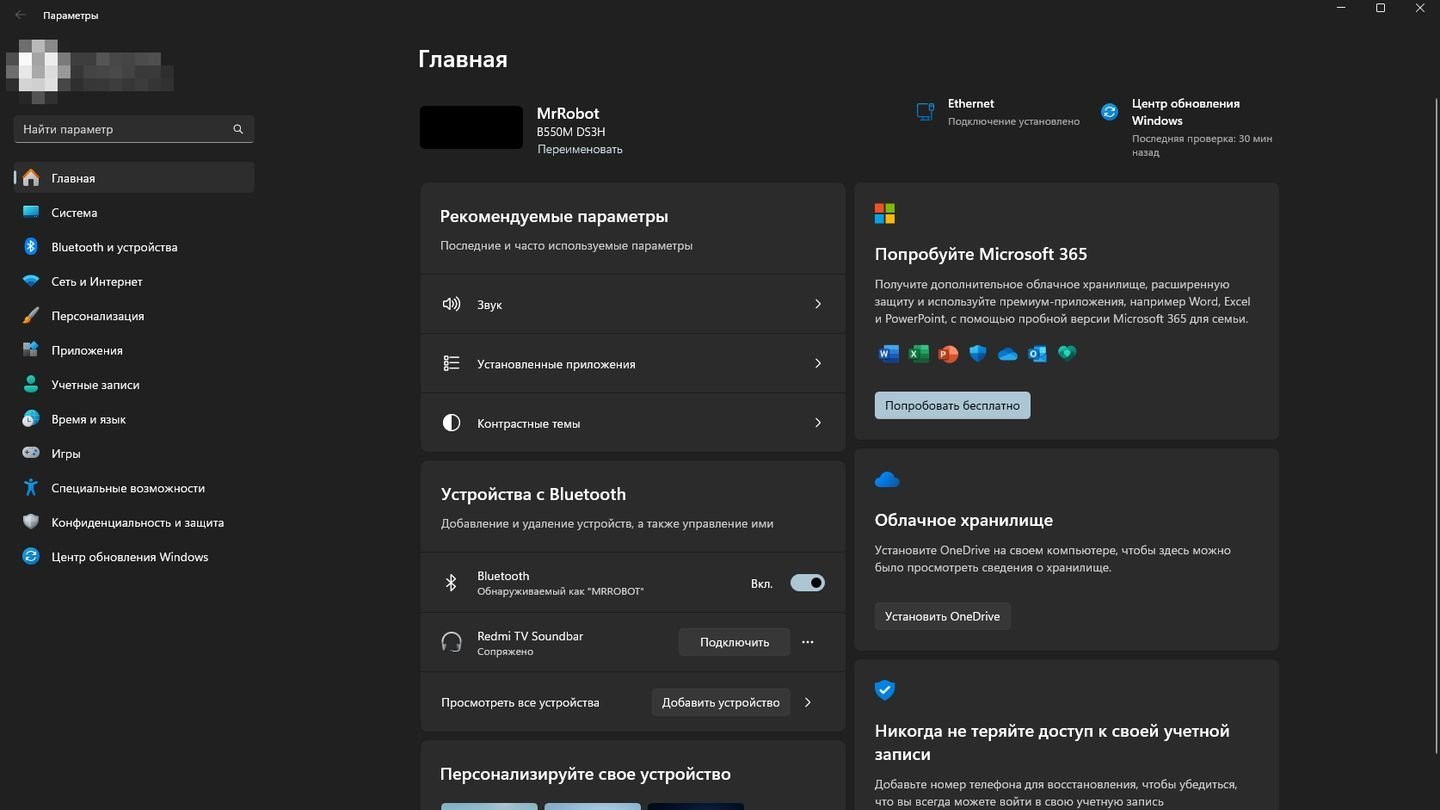
Смена региона через настройки Windows
Самый простой способ изменить регион — через интерфейс Windows.
Источник: CQ / Настройки Windows 11
- Нажмите сочетание клавиш Win + I, чтобы открыть меню настроек;
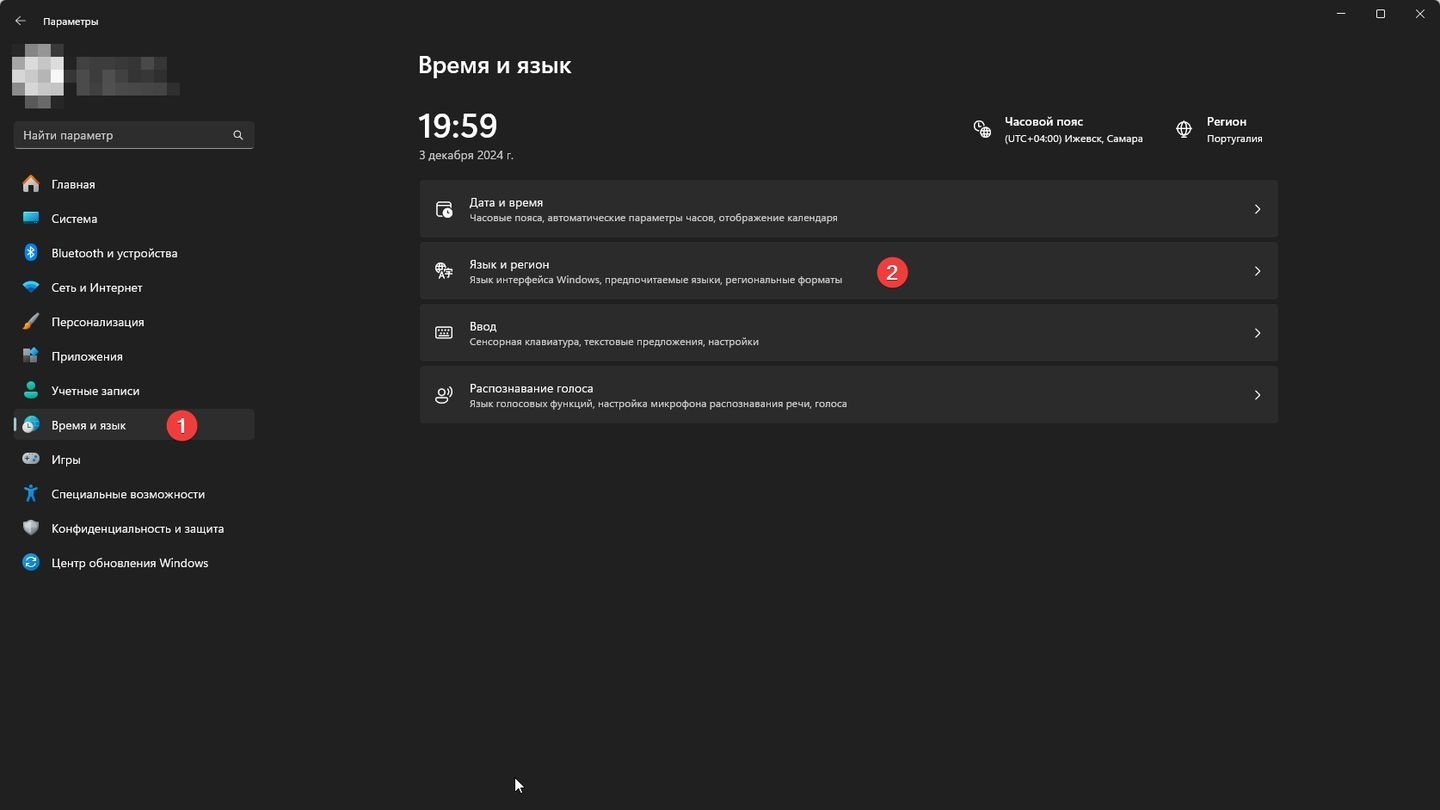
Источник: CQ / Windows 11
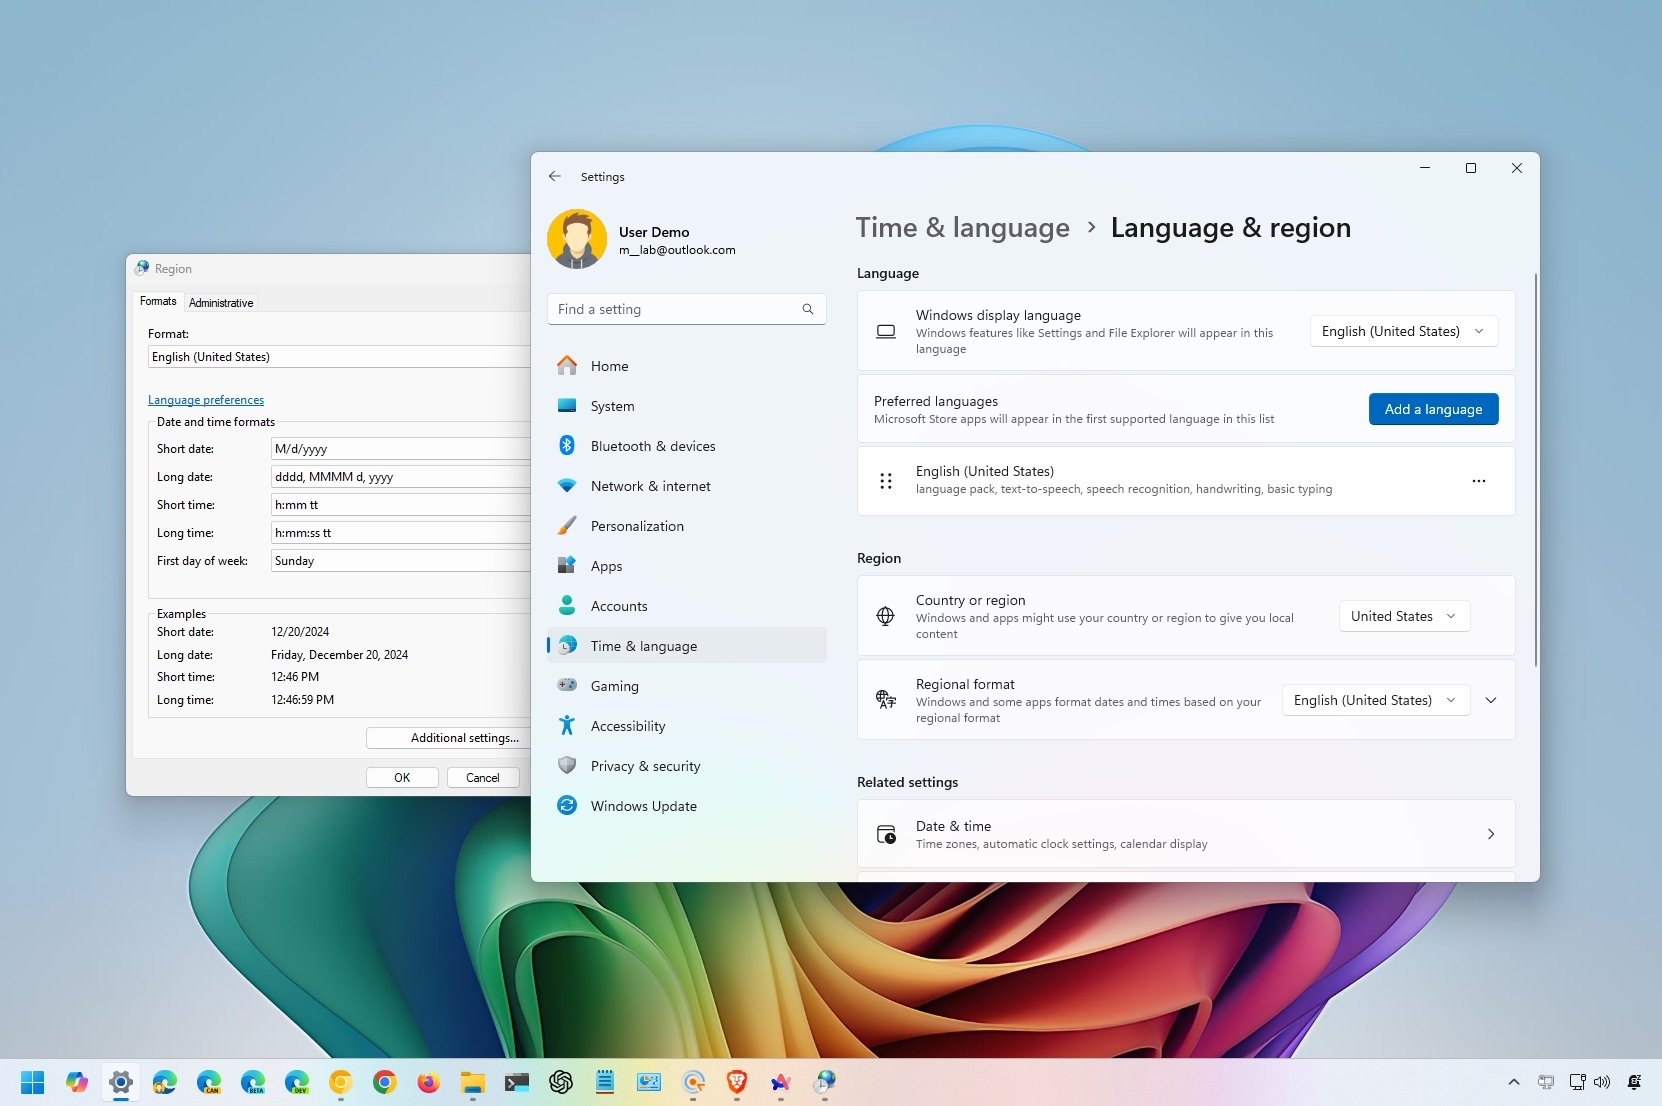
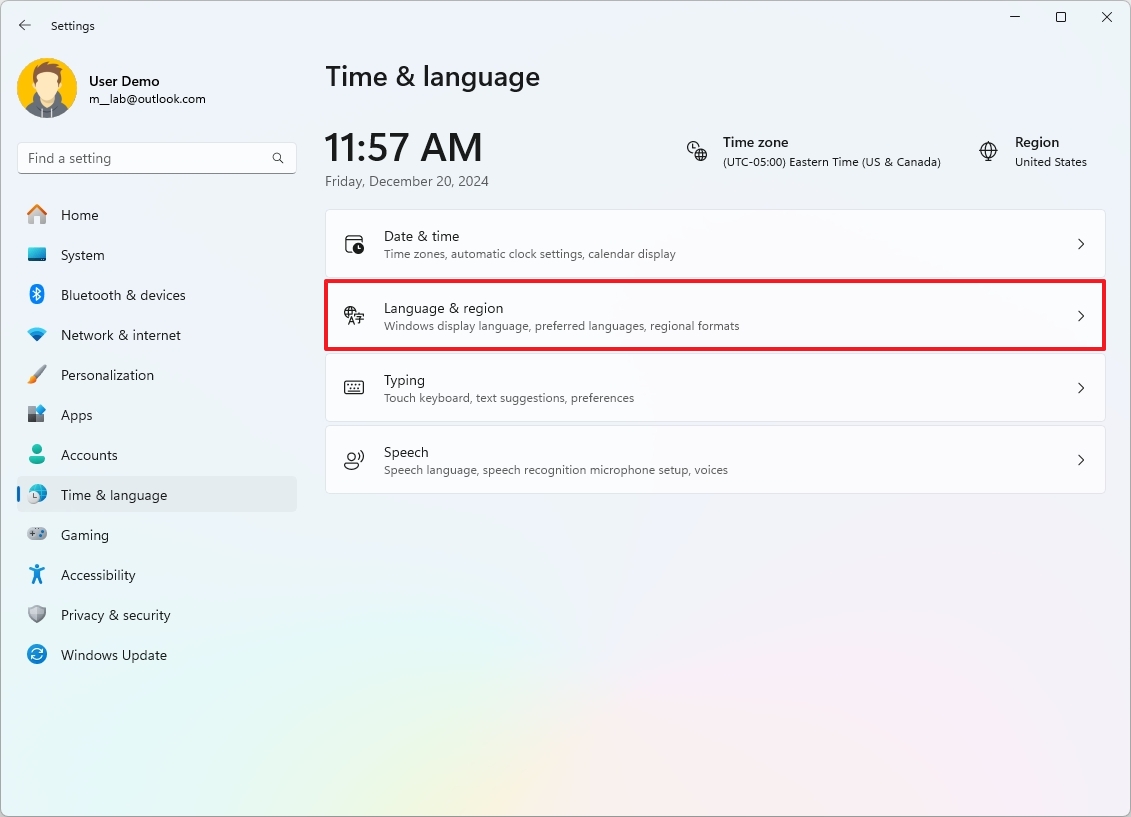
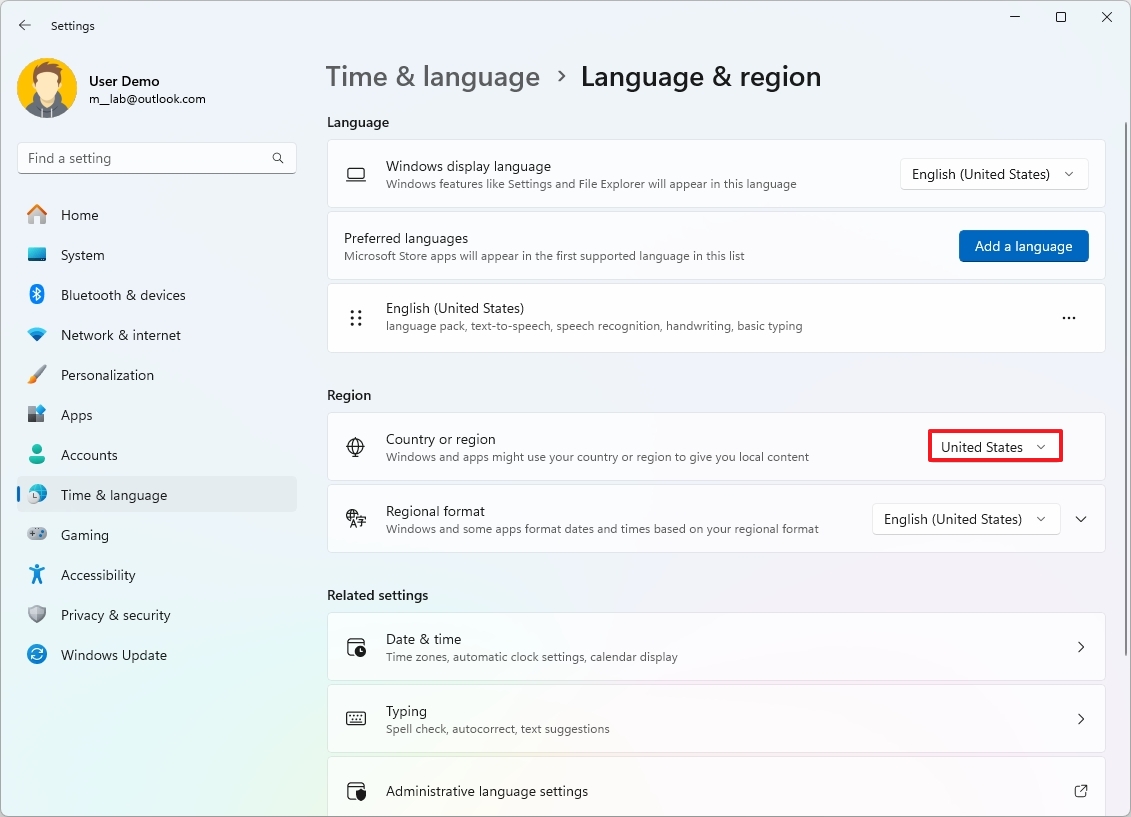
- Перейдите в раздел «Время и язык», выберите «Регион»;
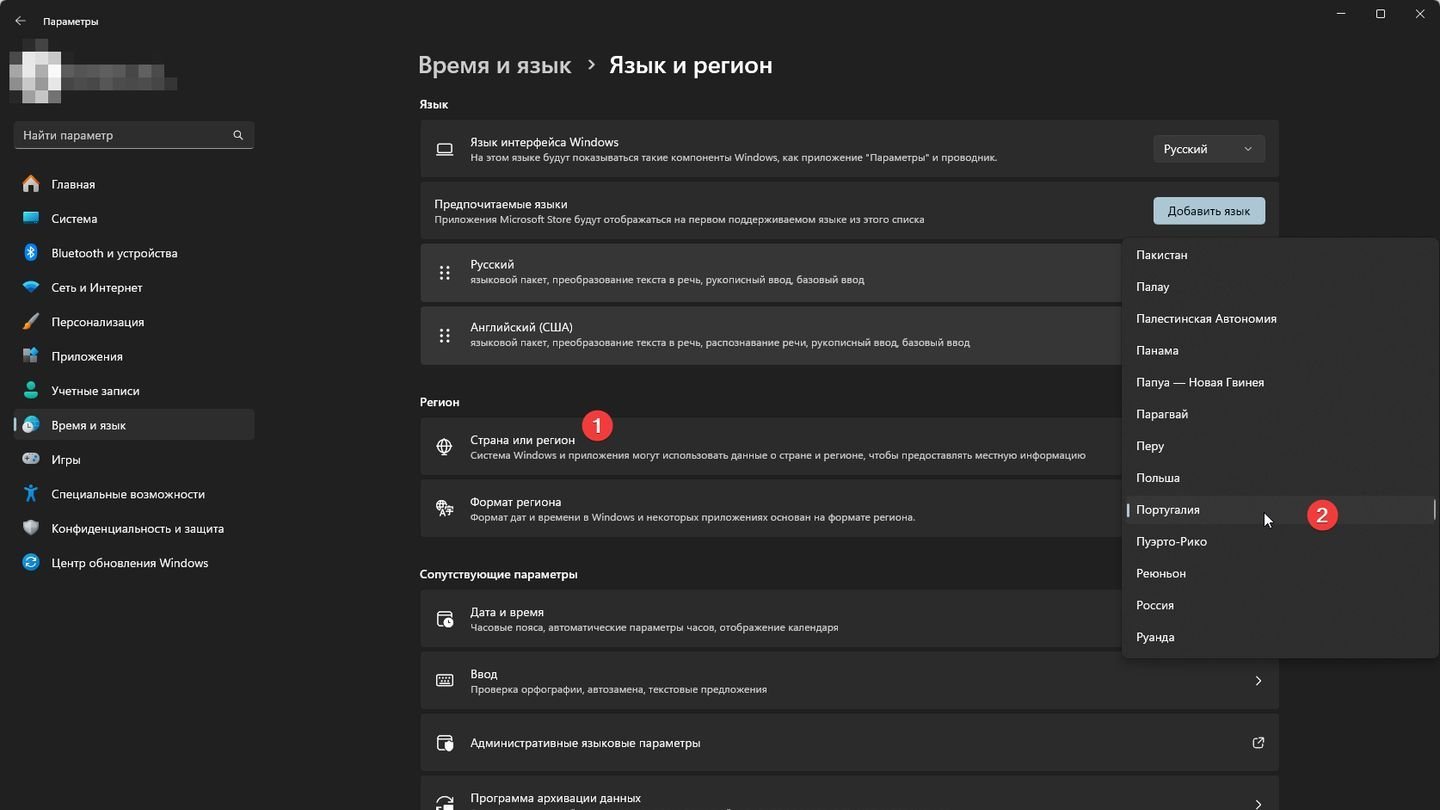
Источник: CQ / Windows 11
- В разделе «Страна или регион» выберите из выпадающего списка нужное местоположение.
Изменения вступят в силу сразу после применения.
Смена региона через редактор реестра
Этот способ требует осторожности, так как неправильное изменение реестра может привести к нестабильной работе системы. В некоторых случаях — к ее неработоспособности.
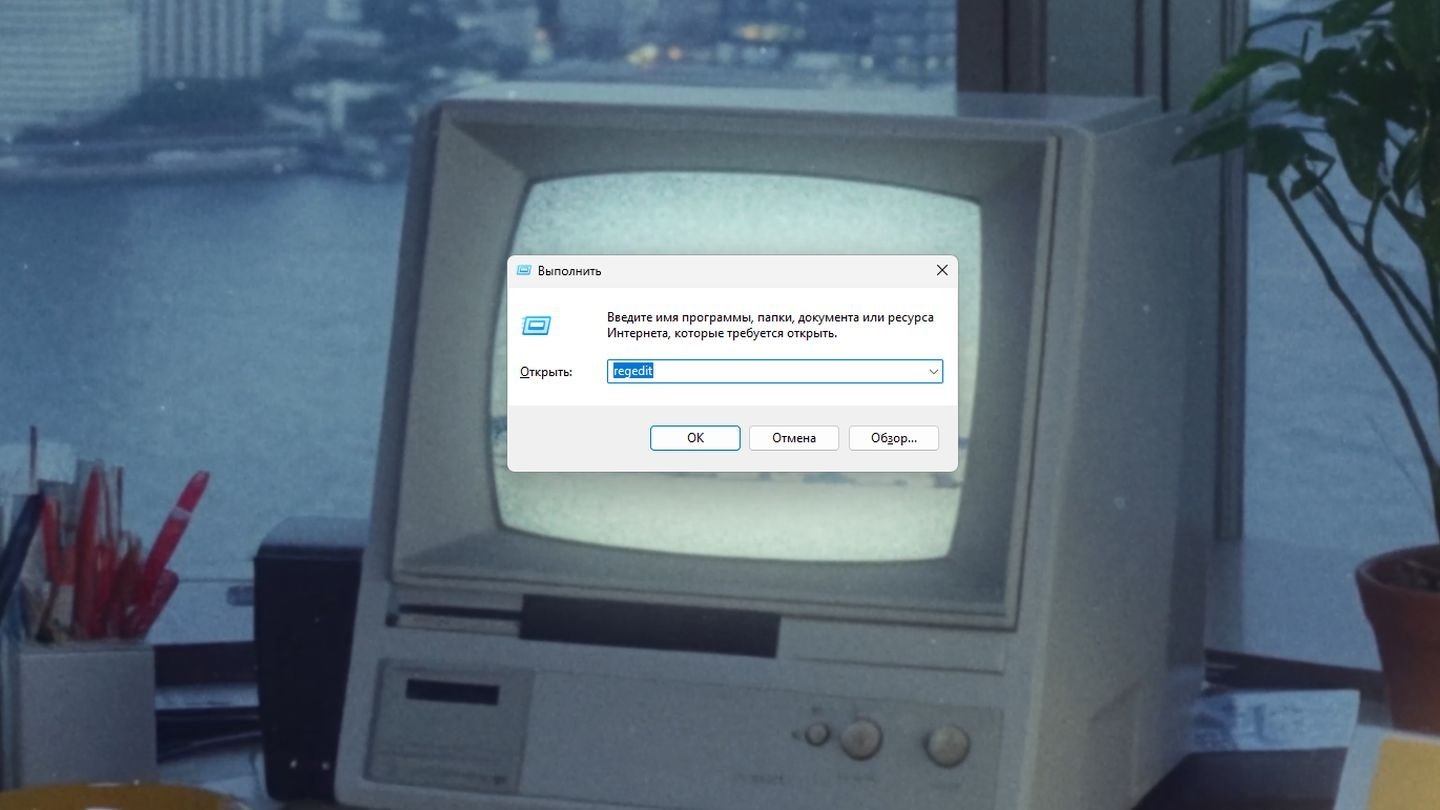
Источник: CQ / Windows 11
- Нажмите Win + R, введите regedit и нажмите Enter, чтобы открыть редактор реестра;
Источник: CQ / Windows 11
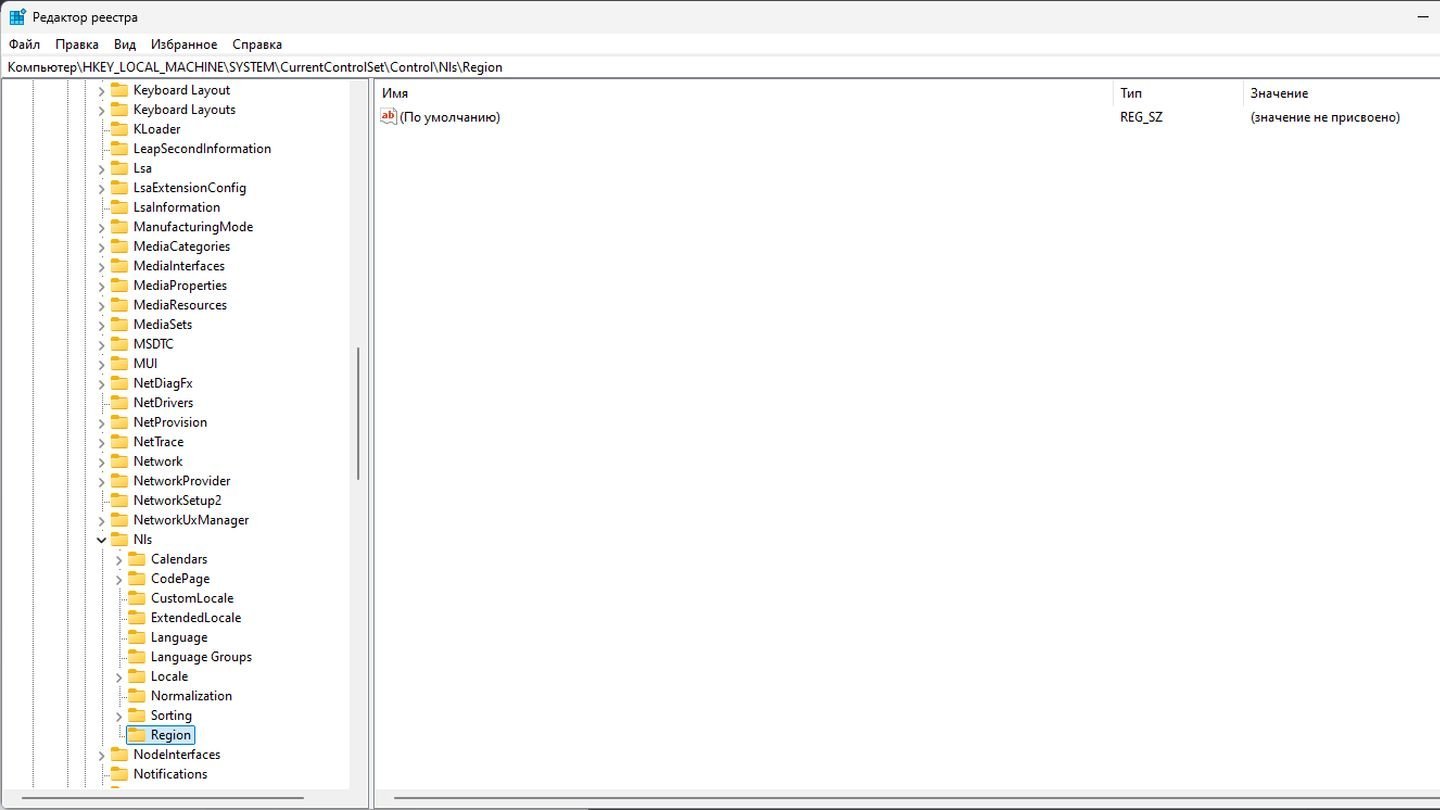
- Перейдите к ключу по пути: HKEY_LOCAL_MACHINE\SYSTEM\CurrentControlSet\Control\Nls\Region;
Источник: CQ / Windows 11
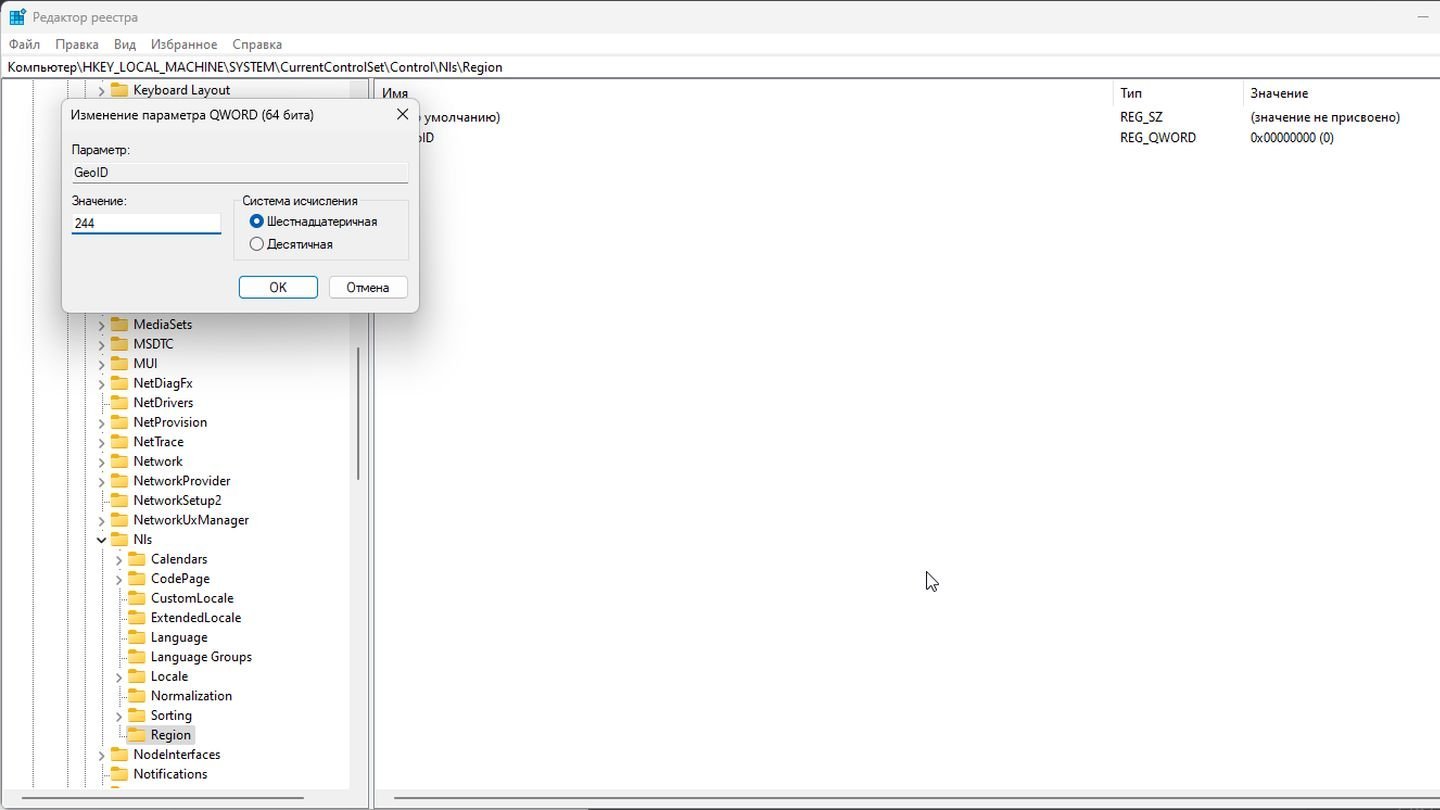
- Найдите параметр GeoID и дважды щелкните по нему;
- Введите код региона (например, 244 для США, 7 для России). Список кодов можно найти на сайте Microsoft.
Закройте редактор реестра и перезагрузите компьютер для применения изменений.
Смена региона через «Терминал»
Вариант для тех, кто предпочитает пользоваться командной строкой.

Источник: CQ / Windows 11
- Нажмите Win + X и выберите «Терминал (администратор)»;
Источник: CQ / Windows 11
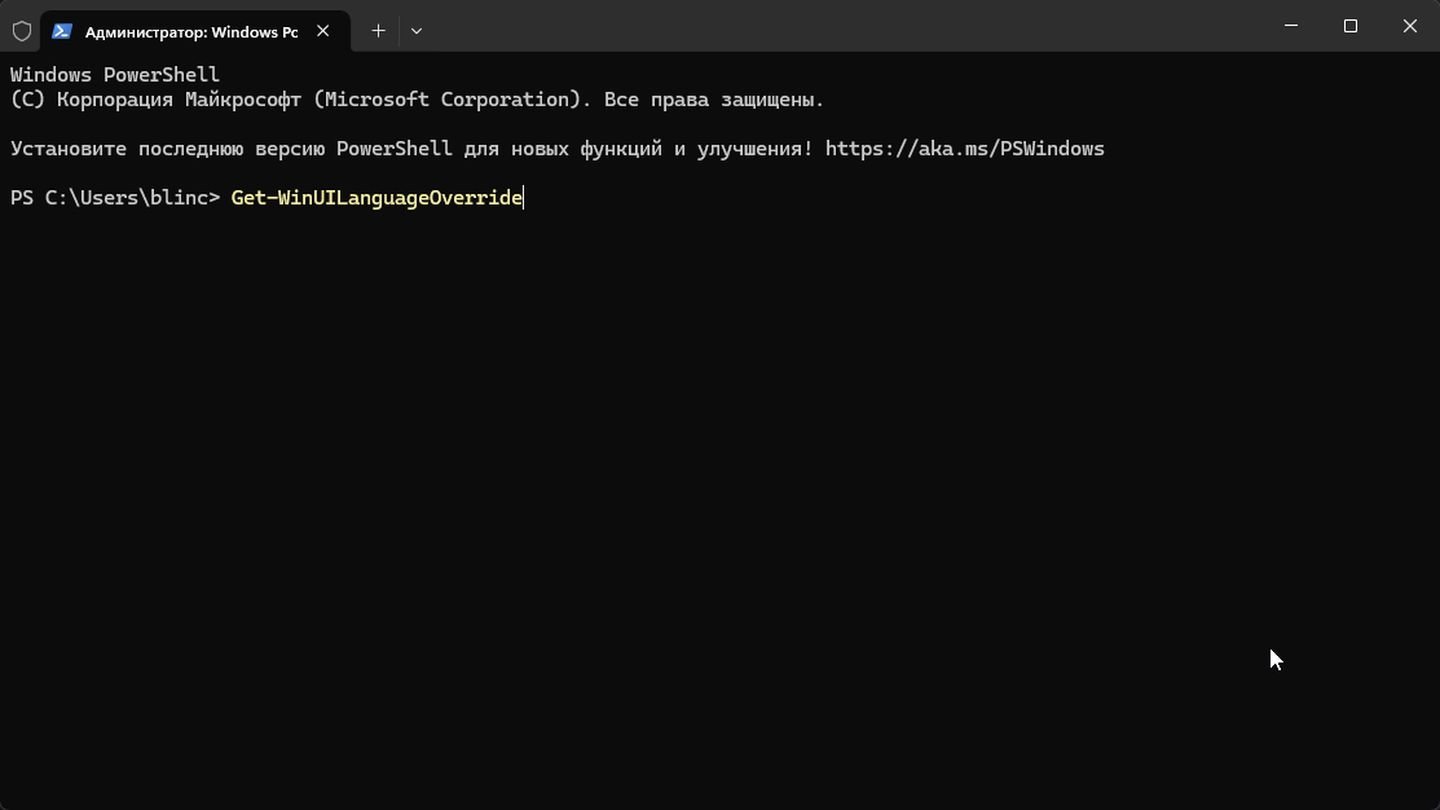
- Проверьте текущий регион через команду Get-WinUILanguageOverride;
Источник: CQ / Windows 11
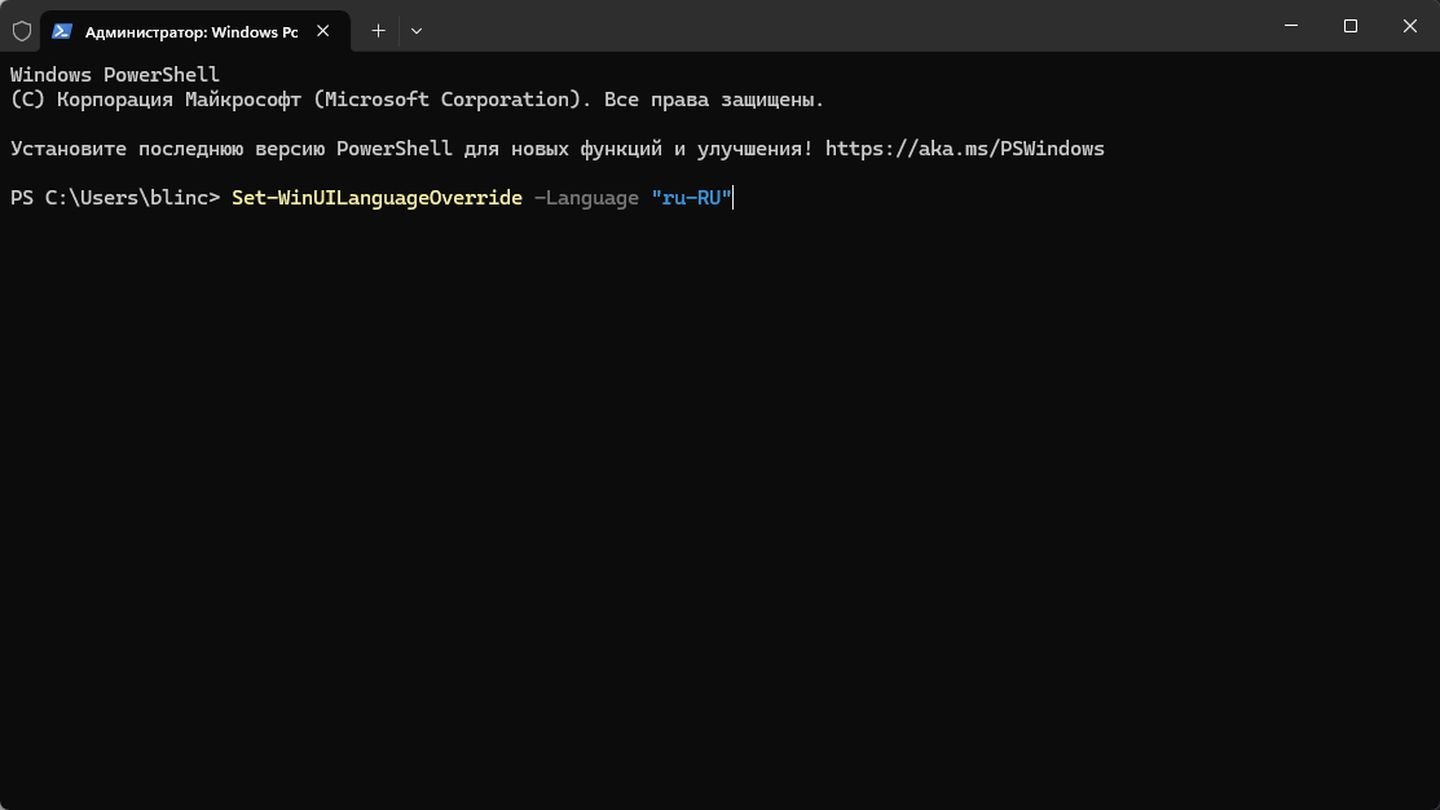
- Установите новый регион: Set-WinUILanguageOverride -Language «ru-RU». Здесь ru-RU — это код языка и региона (например, en-US для США).
После перезагрузки изменения вступят в силу.
Заглавное фото: WinFuture.de
Читайте также:
- Как удалить Windows 11
- Как удалить администратора в Windows 10
- Как настроить и отключить контроль учетных записей в Windows 10
- Как удалить Internet Explorer в Windows
- Как включить и настроить родительский контроль в Windows 10
On Windows 11, the region settings make it easy to ensure that the system and apps can show content based on your location. For example, the Microsoft Store uses the region information to display the apps, games, and videos available in your territory.
In addition, you can adjust regional format settings to show date, time, numbers, or currency in a different format across the desktop and apps.
Whether you made a mistake during the initial setup, want to try a Microsoft Store app or feature only available in another region, or need to show the date, time, numbers, or currency in a different format, Windows 11 provides an easy way to change region settings with the Settings app.
In this how-to guide, I’ll walk you through the steps to personalize your computer’s region settings.
Recent updates
These instructions has been updated to ensure accuracy and reflect changes to the process in the operating system.
How to change region settings on Windows 11
To change the system region settings on Windows 11, use these steps:
- Open Settings.
- Click on Time & language.
- Click the Language & region page on the right side.
- Under the «Region» section, choose the new location in the «Country or region» setting – for example, United States.
- (Optional) Select the regional format to use on Windows 11 in the «Regional format» settings.
- Quick tip: Usually, the «Recommended» option offers the optional configuration.
Once you complete the steps, the system will apply the new region settings affecting the operating system and apps, including the Microsoft Store.
Sometimes, when a software company (or Microsoft itself) announces a new application limited to a specific region, users can change region settings to make the app available for download through the Microsoft Store.
All the latest news, reviews, and guides for Windows and Xbox diehards.
How to change regional format settings on Windows 11
To change the regional format settings, use these steps:
- Open Settings.
- Click on Time & language.
- Click the Language & region page on the right side.
- Select the Regional format setting.
- Click the Change formats button.

- Select when your week starts in the «First day of week» setting.
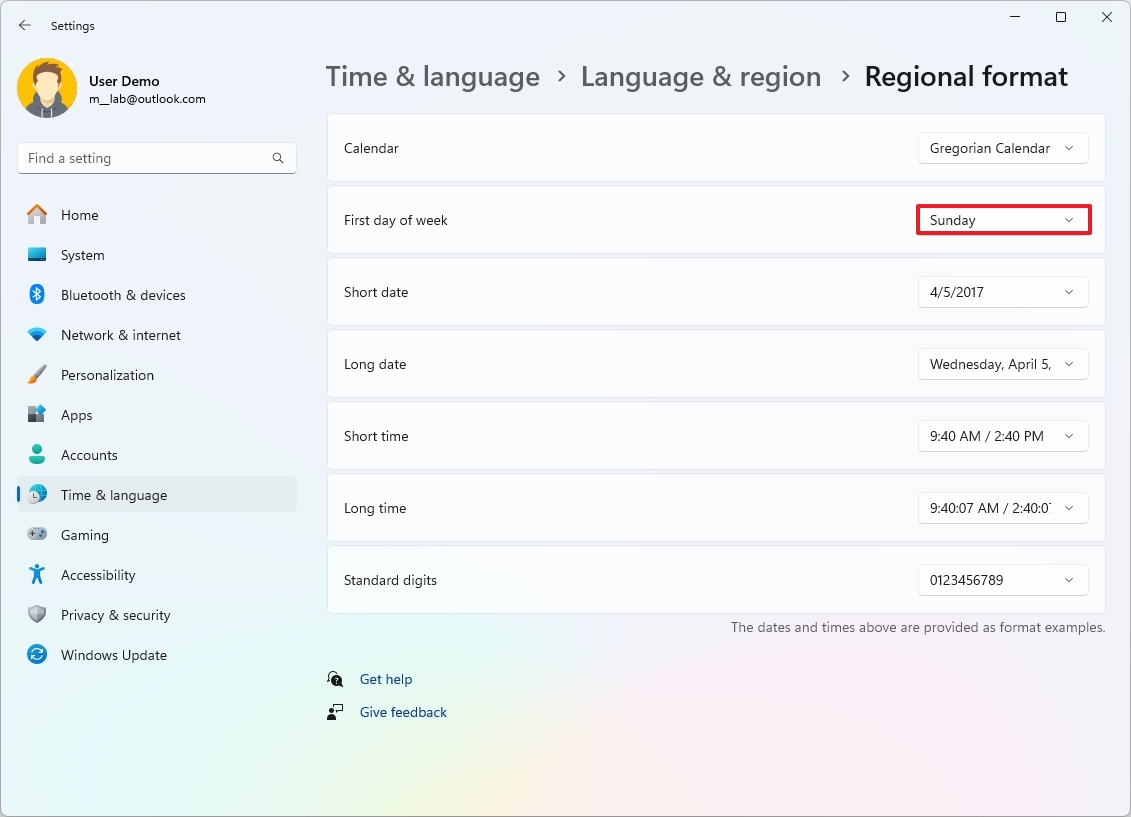
- Choose the date format in the «Short date» setting.
- Choose the date format in the «Long date» setting.
- Select the time format in the «Short time» setting.
- Select the time format in the «Long date» setting.
After you complete the steps, the updated format settings will be reflected across the desktop and apps.
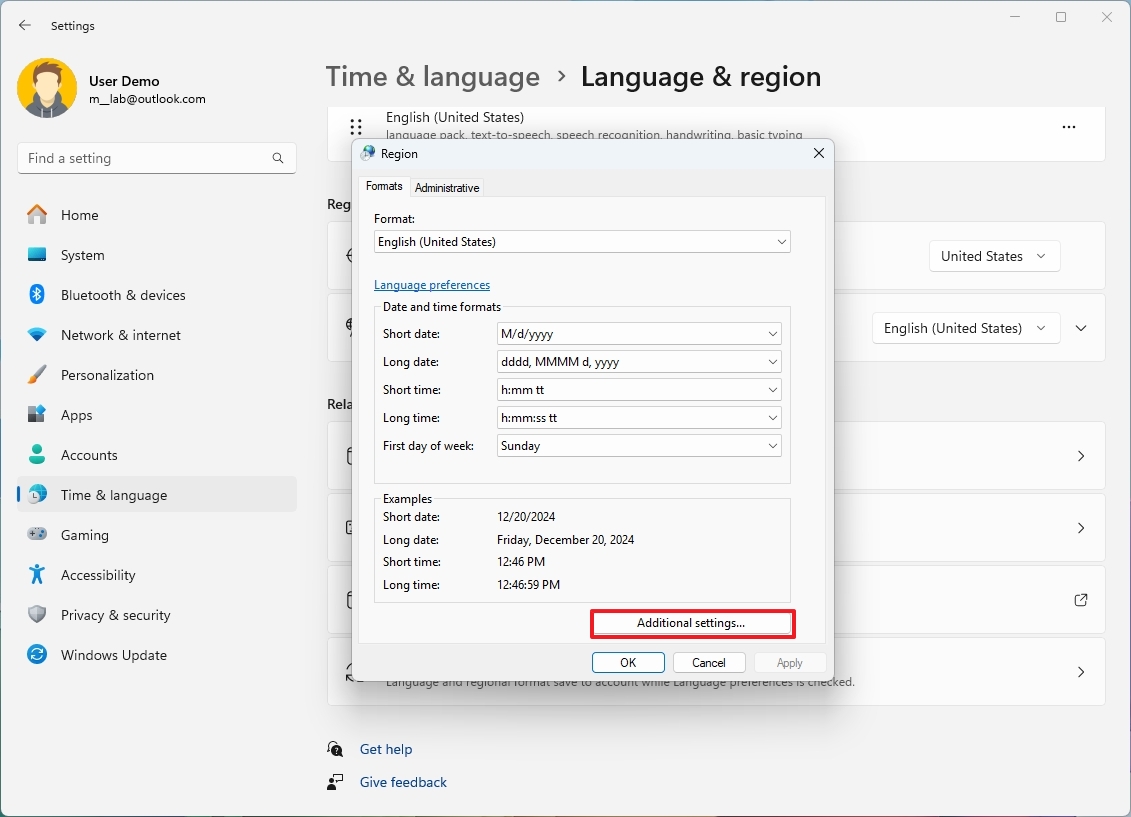
How to change advanced region settings on Windows 11
To customize how numbers, currency, time, and date should appear on Windows 11, use these steps:
- Open Settings.
- Click on Time & language.
- Click the Language & region page on the right side.
- Click the «Administrative language settings» option under the «Related settings» section.

- Click the Formats tab.
- Click the Additional settings button.
- Click the Numbers tab.
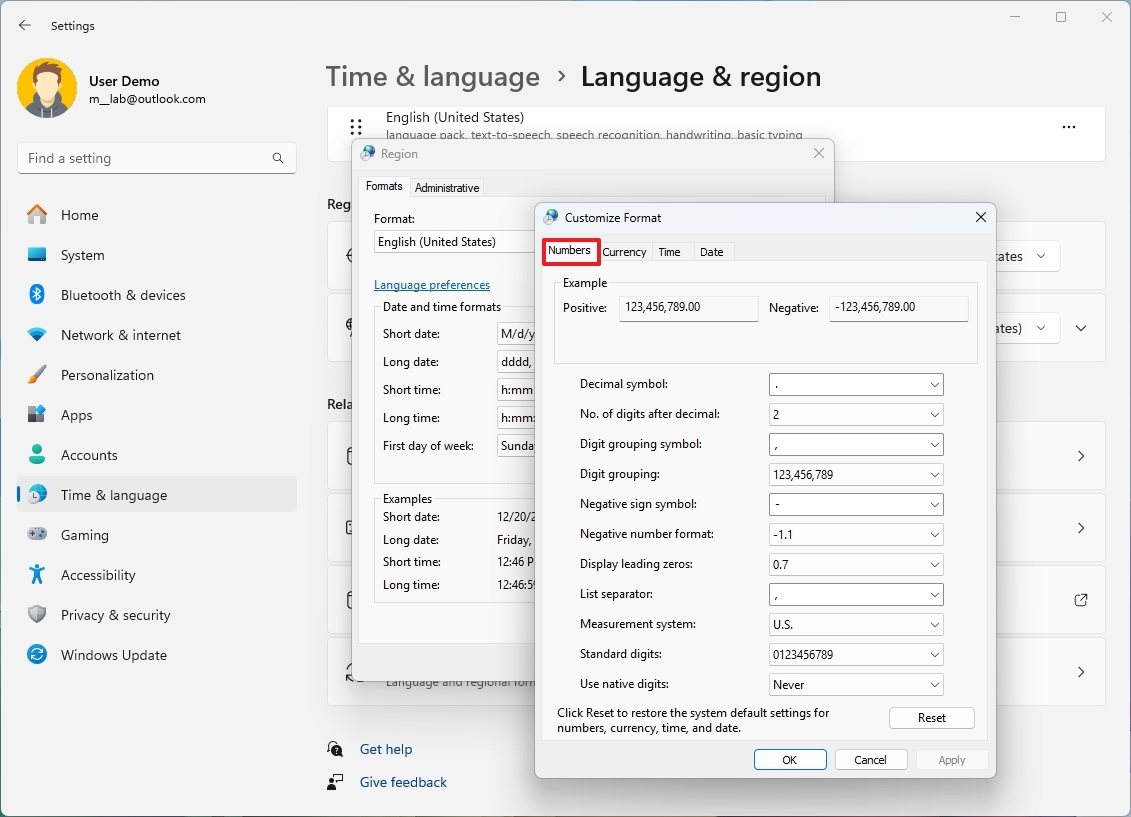
- Customize the regional formats for numbers and symbols.
- Click the Currency tab.
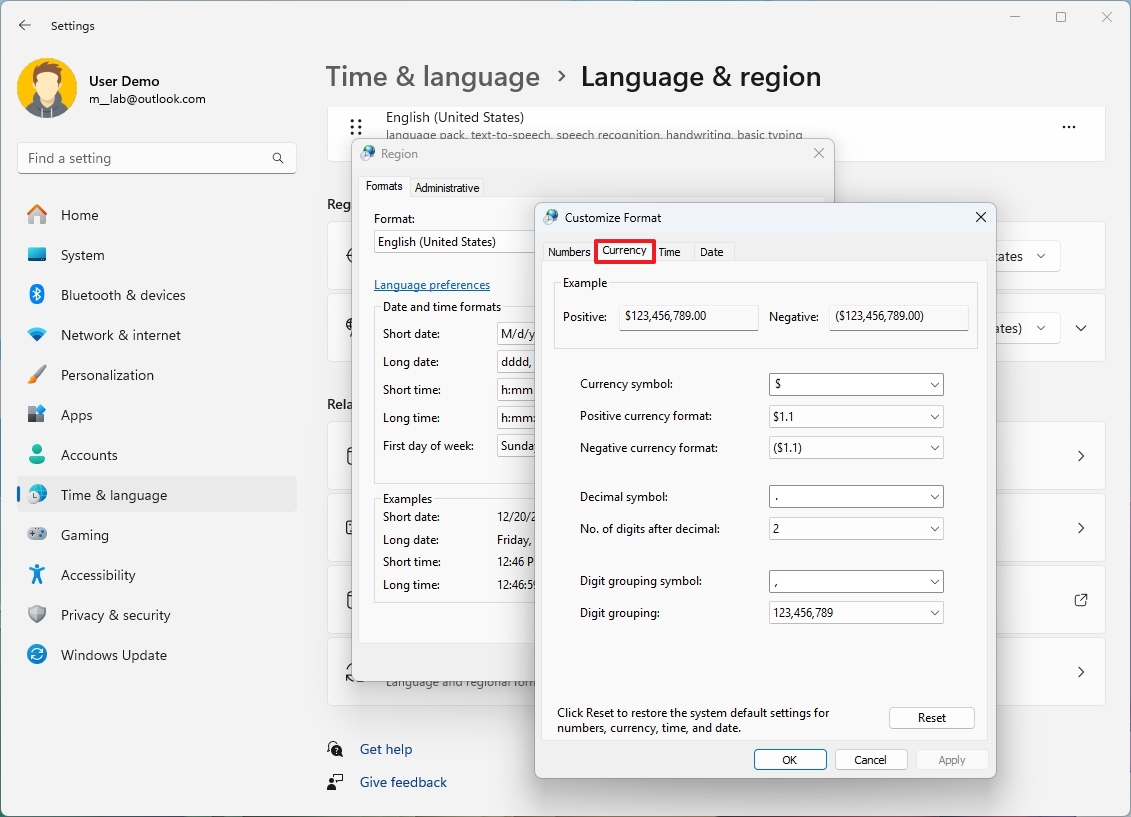
- Customize the currency formats on Windows 11.
- Click the Time tab.
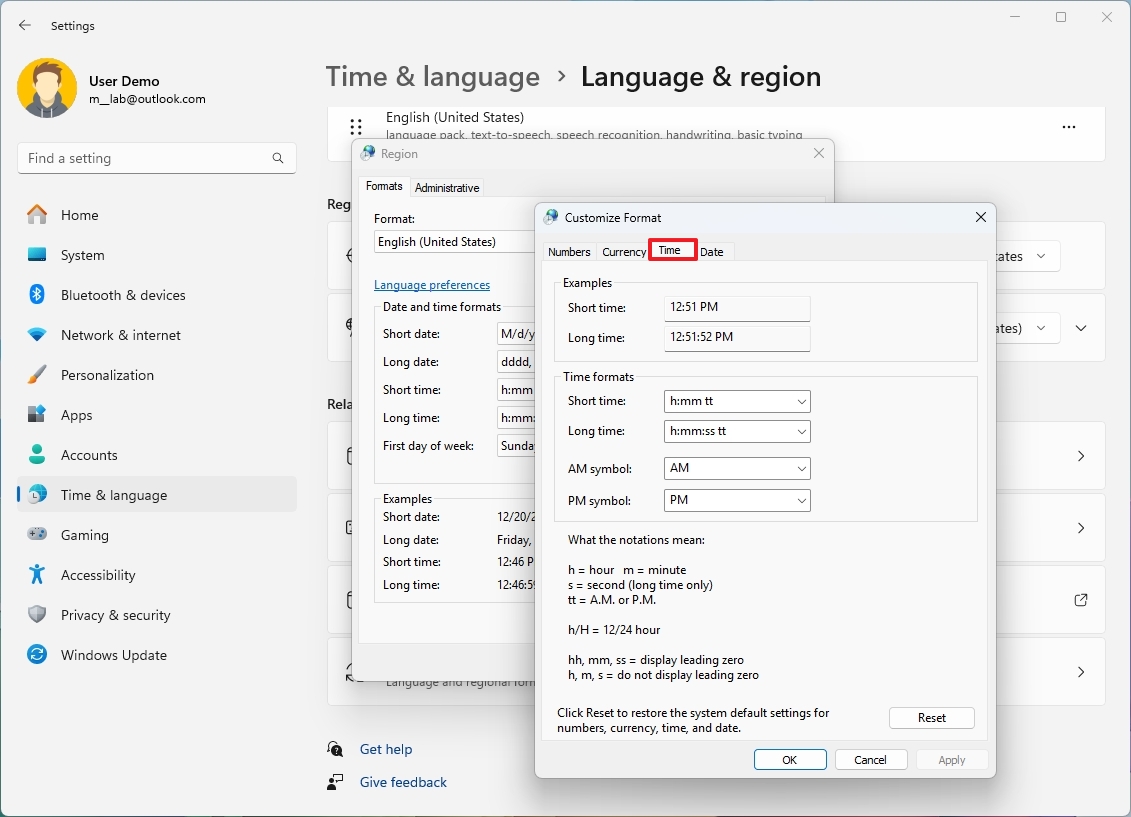
- Customize the time format more granularly.
- Click the Date tab.
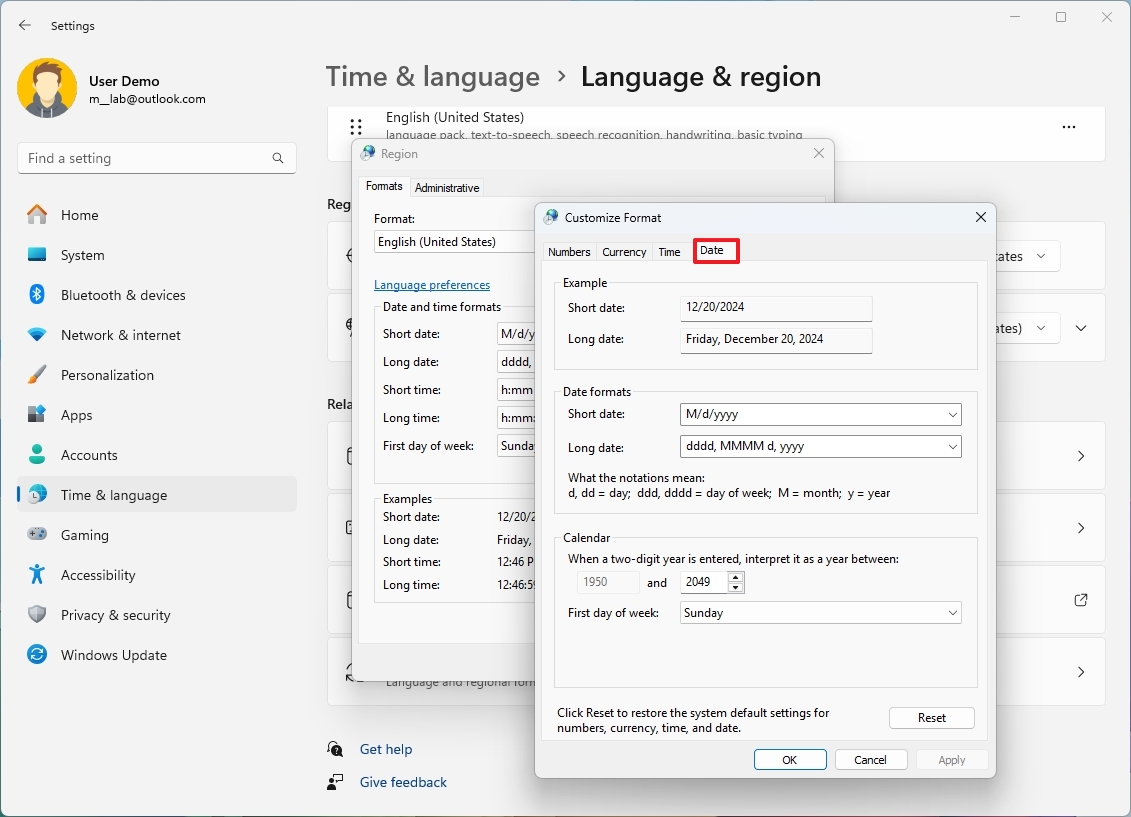
- Customize the date format more granularly.
Once you complete the steps, the new format for numbers, currency, time, and date will be reflected across the desktop and apps.
More resources
For more in-depth insights, troubleshooting tips, and the latest updates on Windows 11 and 10, be sure to explore these resources:
- Windows 11 on Windows Central — All you need to know
- Windows 10 on Windows Central — All you need to know
Mauro Huculak has been a Windows How-To Expert contributor for WindowsCentral.com for nearly a decade and has over 15 years of experience writing comprehensive guides. He also has an IT background and has achieved different professional certifications from Microsoft, Cisco, VMware, and CompTIA. He has been recognized as a Microsoft MVP for many years.
How to Change Country or Region in Windows 10: The Country or Region (Home) location in Windows 10 is important because it allows the Windows Store to display apps and their prices for the selected location or country. The country or region location is referred to as Geographic location (GeoID) in Windows 10. For some reason, if you want to change your default country or region in Windows 10 then it’s entirely possible using Settings app.

Also, when you install Windows 10, you are asked to select a region or country based on where you are located but don’t worry this can easily be changed once you boot to Windows 10. The main problem only occurs with Windows Store because for example if you live in India and you selected the United States as your country then the apps in Windows store will be available for purchase in dollars ($) and payment gateway will be available for the selected country.
So if you are facing a problem with Windows 10 Store or app prices are in a different currency or if you want to install an app which is not available for your country or region then you can easily change your location based on your requirements. Anyway, without wasting any time let’s see How to Change Country or Region in Windows 10 with the help of the below-listed tutorial.
Table of Contents
Make sure to create a restore point just in case something goes wrong.
Method 1: Change Country or Region in Windows 10 Settings
1.Press Windows Key + I to open Settings then click on Time & language.
2.From the left-hand menu make sure to select “Region & language“.
3.Now in the right-hand side menu under the “Country or region” drop-down select your country (ex: India).

4.Close Settings then reboot your PC to save changes.
Method 2: Change Country or Region in Control Panel
1.Type control in Windows Search then click on Control Panel from the search results.
2.Make sure you are in “Category” View then click on Clock, Language, and Region.

3.Now click on “Region” and switch to Location tab.

4.From the “Home location” drop-down select your desired country (ex: India) and click Apply followed by OK.

5.Close everything then restart your PC to save changes.
This is How to Change Country or Region in Windows 10 but if the settings are greyed out then follow the next method.
Method 3: Change Country or Region in Registry Editor
1.Press Windows Key + R then type regedit and hit Enter.
2.Navigate to the following registry location:
HKEY_CURRENT_USER\Control Panel\International\Geo

3.Make sure to select Geo then in right window pane double-click on “Nation” string to modify its value.
4.Now under “Value data” field use the following value (Geographical location identifier) according to your preferred country and click OK:
Go here to access the list: Table of Geographical Locations

5.Close everything then Reboot your PC.
Recommended:
- Add Copy To Folder and Move To Folder in the Context Menu in Windows 10
- Enable or Disable Cortana on Windows 10 Lock Screen
- How to Enable or Disable Cortana in Windows 10
- Show Control Panel in WinX Menu in Windows 10
That’s it you have successfully learned How to Change Country or Region in Windows 10 but if you still have any queries regarding this tutorial then feel free to ask them in the comment’s section.

This tutorial will show you how to change your country or region for your account in Windows 11.
The country or region home location in Windows, referred to as geographic location (GeoID), indicates the country or region you are in.
Windows 11, Microsoft Store, and apps might use your country or region to give local content.
Stuff you get in one region might be region restrictive and not work in another region. This can include Xbox Live Gold, apps, games, movies, and the balance in your Microsoft account.
If you change your location by moving to or visiting some other country, you might need to change your country or region home location in Windows.
Your country or region location setting is saved to the Name and Nation string values in the registry key below.
HKEY_CURRENT_USER\Control Panel\International\Geo
Contents
- Option One: Change Your Country or Region in Settings
- Option Two: See Your Current Country or Region using Command
- Option Three: Change Your Country or Region using Command
Option One
Change Your Country or Region in Settings
1 Open Settings (Win+I).
2 Click/tap on Time & language on the left side, and click/tap on Language & region on the right side. (see screenshot below)

3 Select your location (ex: «United States») in the Country or region drop menu. (see screenshot below)

4 You can now close Settings if you like.
Option Two
See Your Current Country or Region using Command
1 Open Windows Terminal, and select either Windows PowerShell or Command Prompt.
2 Copy and paste the PowerShell Get-WinHomeLocation command into Windows Terminal, and press Enter. (see screenshot below)
3 You can now close Windows Terminal if you like.

Option Three
Change Your Country or Region using Command
1 Open Windows Terminal, and select either Windows PowerShell or Command Prompt.
2 Type the command below into Windows Terminal, and press Enter. (see screenshot below)
PowerShell Set-WinHomeLocation -GeoID <GeoID number>
3 You can now close Windows Terminal if you like.

That’s it,
Shawn Brink
Related Tutorials
- Enable or Disable Changing Country or Region GeoID in Windows 11
- Change Regional Format in Windows 11
- Copy Language and Region Settings to Welcome Screen and New Users in Windows 11
- Change Country or Region for Copilot app in Windows 11
В соцсетях рассказали о полезном лайфхаке, которым вам стоит воспользоваться. Достаточно изменить одну настройку — Windows будет быстрее и чище.
Редактор новостей Hi-Tech Mail
Надоело бесконечное ожидание установки Windows? Или вам не нравится то обилие приложений, которое предустановлено на ОС? Выход есть!
Решение проблемы кроется в настройках, которые предлагает Windows изменить перед установкой ОС на компьютер. Обычно пользователи выбирают настройки по умолчанию, а зря.
Оказывается, нужно выбрать правильный регион перед тем, как «накатить» Windows. Эксперт из Twitter заявляет, что нужно выбрать «English (World)» в пункте формата времени и чисел. Если вы из России, то пункт «Россия» смените на «Мир».

Далее продолжайте настройку так, как привыкли. В процессе установки могут возникнуть ошибки — просто нажимайте «Пропустить» или «Повторить попытку». Сообщается, что таким образом Windows установится быстрее обычного, а в меню «Пуск» не будет кучи виджетов и сторонних приложений — только чистое меню со штатными программами.
Согласно ThioJoe (YouTube-блоге, эксперт в ОС), этот способ помогает абсолютно всем, однако раньше о нем мало кто знал. Один раз нажав на «English (World)» вместо «Russia», вы больше не будете бороться с ненужным «мусором» после установки Windows.
Стоит уточнить, что данный метод работает только с Windows 10 и 11. Дело в том, что в Windows 7 и более ранних версиях ОС Microsoft не так загромождала «операционку» приложениями от сторонних разработчиков. В современных версиях Windows это стало реальной проблемой, но теперь вы знаете, что делать.
Это тоже интересно:
- Как узнать износ батареи ноутбука с помощью секретного кода
- В России скупают компьютеры без ОС: что происходит
- Вещь дня: в сети продают кошелек в виде папки Windows