
-
Проверка параметров физического подключения
-
Способы настройки наушников
-
Обновление драйвера
-
Настройка диспетчера Realtek
Новая операционная система от Microsoft хороша. По сравнению с предыдущими версиями, Windows 10 работает быстрее и стабильнее. К хорошему быстро привыкаешь, поэтому на новые проблемы с данной ОС пользователи реагируют болезненно. Одна из таких неприятностей – отсутствие звука в наушниках после установки или обновления операционной системы. Обычно причина кроется в повреждении или несовместимости драйверов, поэтому грешить на разработчиков новой ОС не стоит. Рассмотрим, как настроить наушники на компьютере с Windows 10 и вернуть музыку в динамики гарнитуры.
Проверка параметров физического подключения
Иногда для ликвидации проблемы не предпринимаются особые действия. Стоит проверить первостепенные причины неполадки – возможно, решение лежит на поверхности.
- Проверьте гарнитуру. Бывает, что звука нет по причине перелома провода наушников. Подключите аудиоустройство к телефону или планшету и проверьте, играет ли музыка. Если гарнитура рабочая – идем дальше.
- Проверьте подключение входов/выходов звуковой карты: мог отойти контакт.
- Попробуйте подключить аудиоразъем к передней и задней панели системного блока. Если спереди звука нет, а сзади есть – проверьте тип подключения аудиоразъема: Windows 10 не поддерживает стандарт подключения АС’97. Нужно использовать HD Audio.
- Подумайте, вы распаковывали драйвера для материнской платы? Если нет, то обязательно установите.
Внимание! После инсталляции ПО для чипсета переустановите аудиодрайвер.
Итак, это основные действия и рекомендации для первичной диагностики. Если ничего не помогло, переходим к следующему шагу.
Способы настройки наушников
Существует два метода настройки наушников.
Обновление драйвера
Это основной способ. 90% всех проблем с воспроизводимостью звука связаны с проблемным пакетом драйверов.
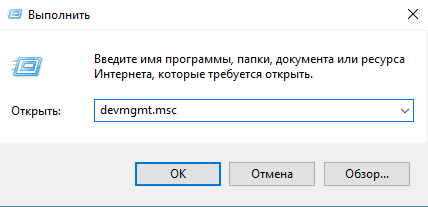
- Нажмите Win+R и введите команду
devmgmt.mscв соответствующее поле. Подтвердите действие клавишей Enter.
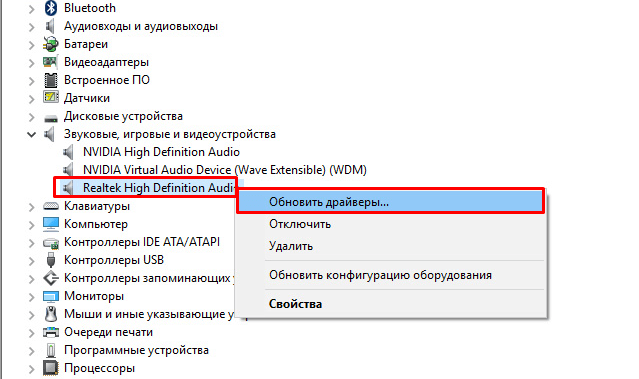
- В «Диспетчере задач» находим звуковую карту, кликаем на ней ПКМ и нажимаем «Обновить драйвер».

Внимание! Windows может установить универсальный аудиодрайвер, который может не подойти. Поэтому перейдите на официальный сайт разработчика и скачайте последнюю версию совместимого драйвера.
- В появившемся окне выберите вариант «Выполнить поиск драйверов на этом компьютере» и проложите путь к загруженному файлу.

- Перезагрузите систему.

Настройка диспетчера Realtek
Если обновления драйверов не помогли, переходим ко второму способу.
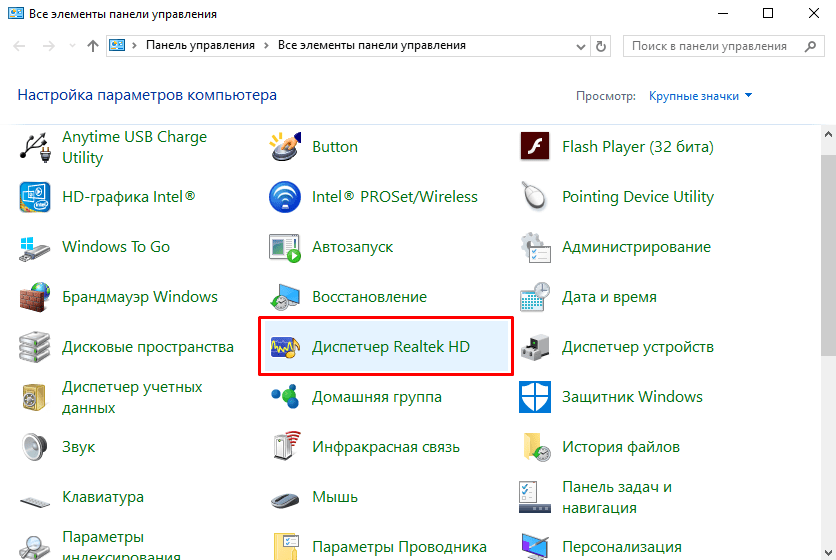
- Откройте «Панель управления» и выберите «Диспетчер Realtek HD» (может быть Dolby Digital или Sound Booster).

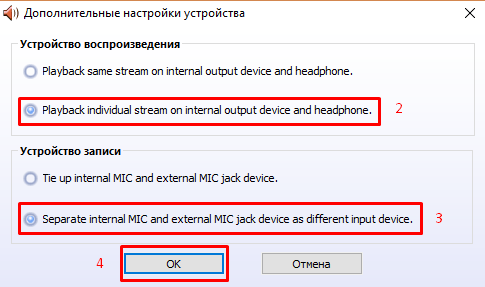
- В появившемся окне нажмите «Дополнительные настройки устройства».

- Выберите «Разделить все выходные гнезда в качестве независимых входных устройств». Подтверждаем клавишей OK.

- Отключите определение гнёзд передней панели.
После выполнения всех вышеперечисленных рекомендаций звук может не появиться по двум причинам:
- Отсутствие кодеков для воспроизведения музыкальных файлов высокого качества. Скачать их вы можете здесь.
- Физическое повреждение разъемов или звуковой карты. В данном случае необходимо обратиться в сервисный центр.
Вот и все. Теперь вы знаете, как настроить наушники в Windows 10 и диагностировать причины возникновения проблемы.
Способ 1: Параметры звука
Наиболее простым и удобным способом регулировки баланса звука в Windows 10 является использование одного из компонентов «Панели управления», также доступного и в обновленных «Параметрах». При этом вызвать его можно и напрямую, что мы и сделаем далее.
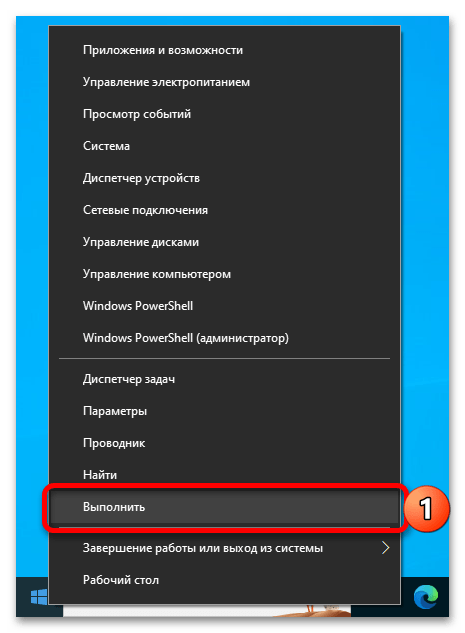
- Откройте окно «Выполнить». Это можно сделать через поиск, контекстное меню кнопки «Пуск» или с помощью клавиш «Win+R».

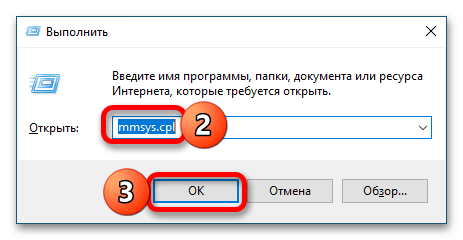
Введите указанную ниже команду и нажмите «ОК» или «Enter».
mmsys.cpl
Читайте также:
Как открыть окно «Выполнить» в Виндовс 10
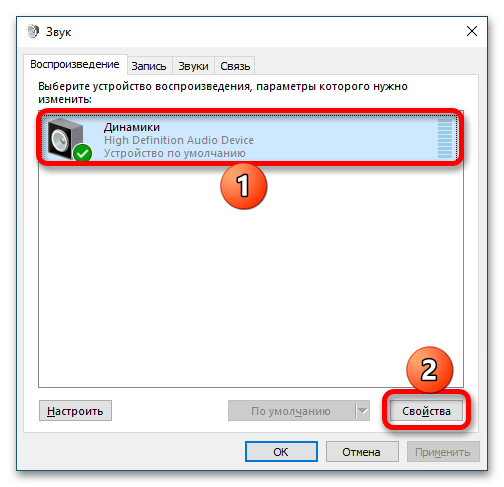
Полезные команды для оснастки «Выполнить» в Виндовс 10 - Выделите устройство, через которое воспроизводится звук (чаще всего это «Динамики» или «Наушники»; активное можно определить не только по зеленой галочке, но и по индикатору уровня громкости справа во время воспроизведения) и кликните по кнопке «Свойства».
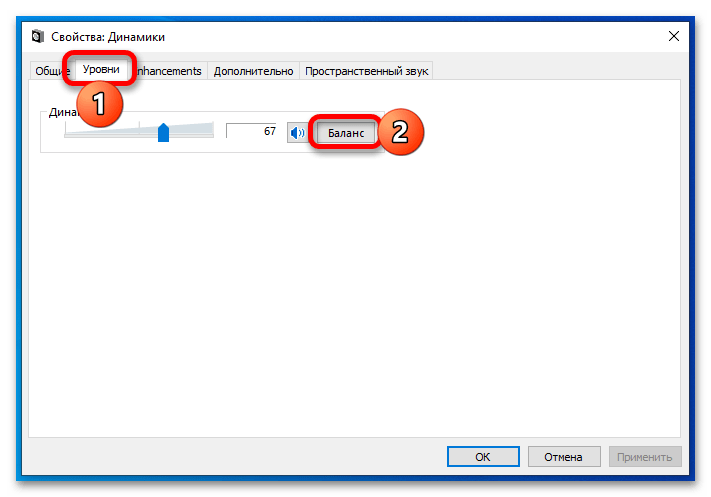
- Перейдите во вкладку «Уровни» открывшегося окна и нажмите на кнопку «Баланс».
- Отрегулируйте уровень громкости для левого и правого канала (а также остальных, если используется аудиосистема 2:1, 5:1, 7:1 или другого типа), после чего кликните «ОК» для сохранения внесенных изменений.
- Далее воспользуйтесь кнопками «Применить» и «ОК»,

после чего закройте более ненужные окна.

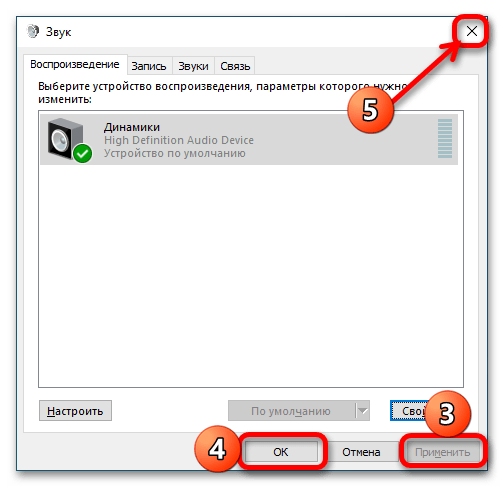
Баланс звука в колонках или наушниках будет изменен в соответствии с заданными вами параметрами. Если потребуется, аналогичным образом настройте другое подключенное к компьютеру аудиоустройство.
Способ 2: Диспетчер Realtek HD
На большинстве компьютеров и ноутбуков с Windows, помимо стандартного средства управления звуком, присутствует также «Диспетчер Realtek HD», предоставляющий более широкие возможности для настройки аудио, включая интересующий нас баланс.
Примечание: Если «Диспетчер Realtek HD» отсутствует в системе, выполните его установку, воспользовавшись для этого представленной по ссылке ниже инструкцией.
Подробнее: Как установить «Диспетчер Realtek HD» в Windows 10
Скачать Диспетчер Realtek HD
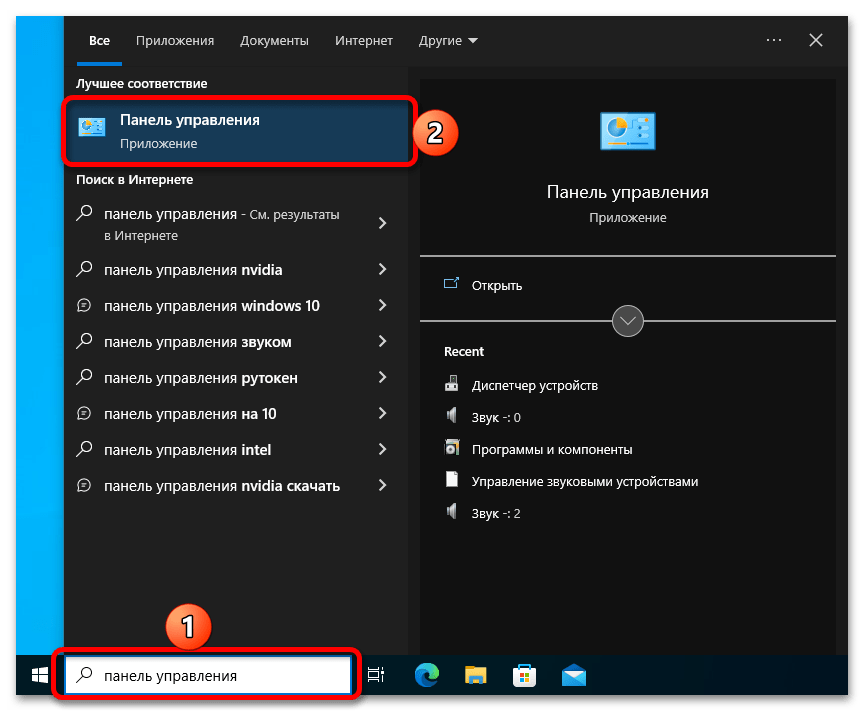
- Откройте «Панель управления». Проще всего это сделать, указав соответствующий запрос в системном поиске.

Читайте также: Как открыть «Панель управления» в Виндовс 10
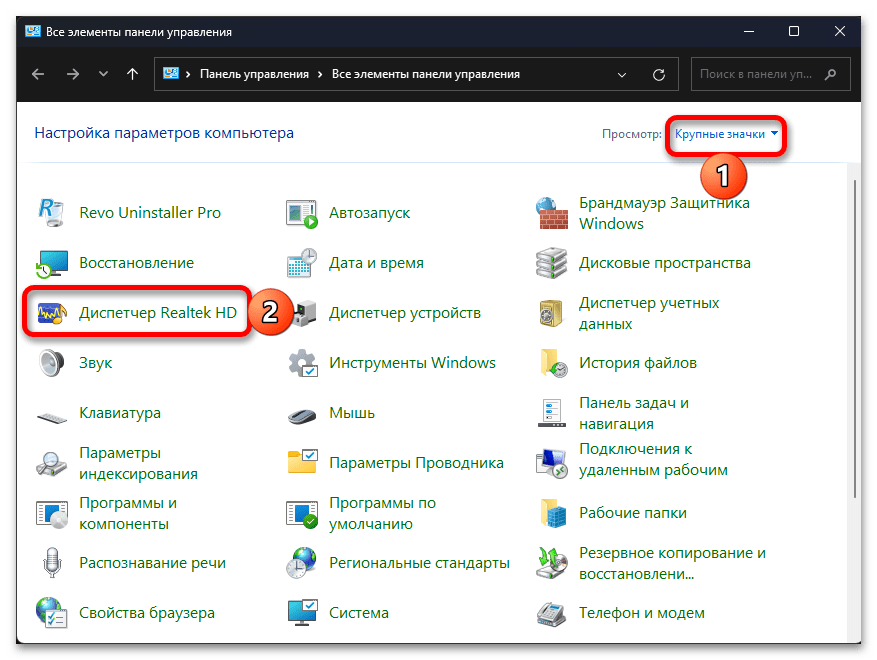
- Измените режим просмотра на «Крупные значки» и кликните по пункту «Диспетчер Realtek HD».
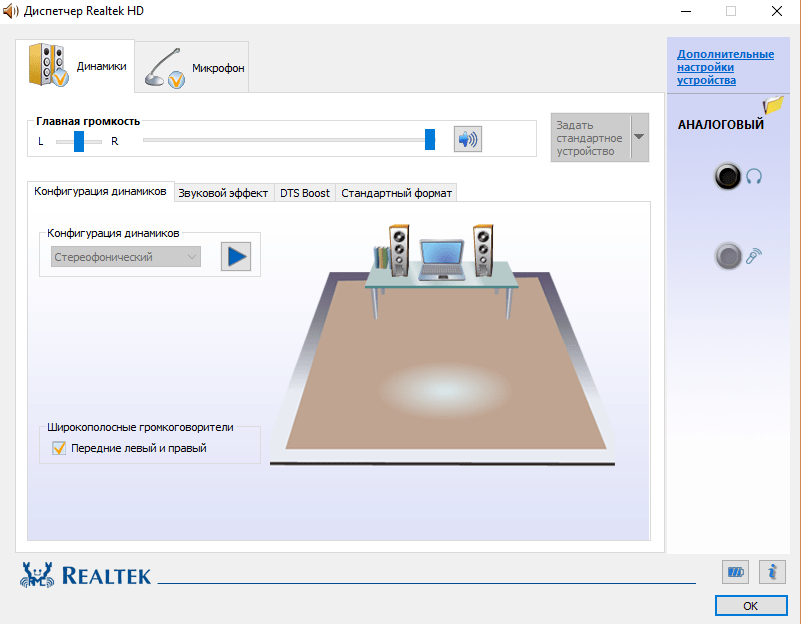
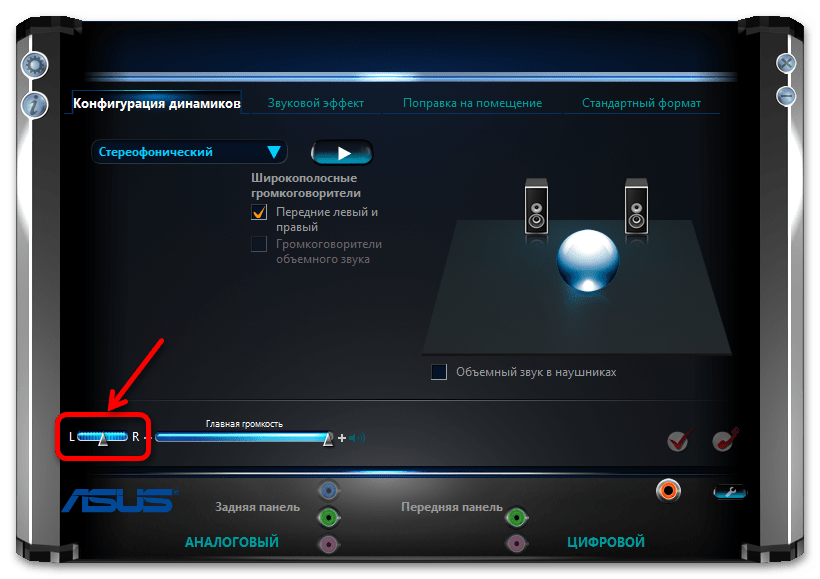
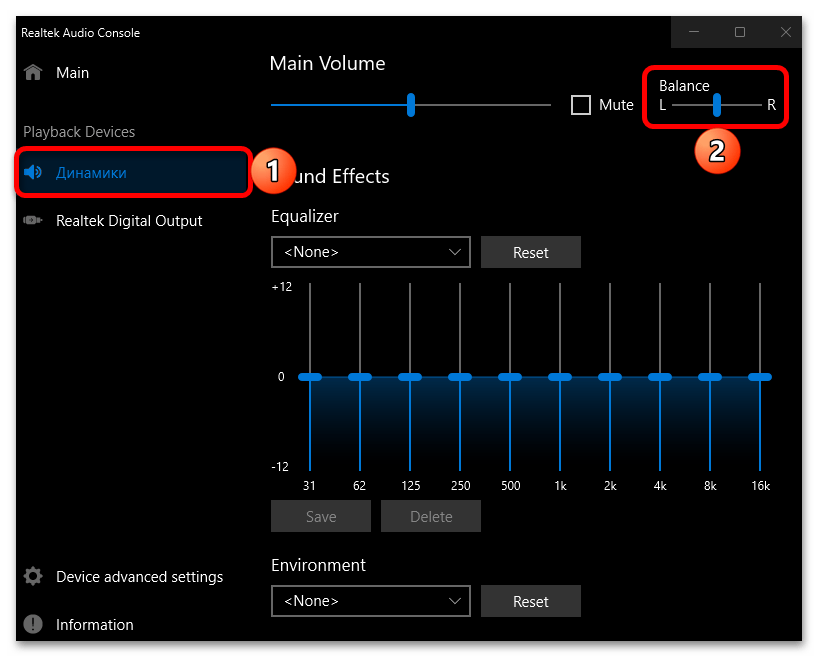
- В запустившемся интерфейсе приложения прежде всего убедитесь, что выбрано то устройство воспроизведения звука, баланс для которого требуется настроить. Внесите необходимые изменения, переместив бегунок между каналами «L» и «R» в соответствии с вашими требованиями.

Обратите внимание! У приложения «Диспетчер Realtek HD» есть несколько версий, в том числе адаптированных производителями материнских плат и ноутбуков. Их интерфейс и доступная функциональность могут довольно сильно отличаться, но элемент управления балансом звука обычно можно найти по соответствующим обозначениями вроде «L» и «R», «Баланс», «Balance», также он всегда располагается рядом с бегунком, отвечающим за уровень громкости.
- Если баланс звука необходимо настроить для более чем одного устройства воспроизведения (например, не только динамиков, но и наушников), сделайте это, предварительно выбрав его в выпадающим списке или отдельной вкладке (зависит от версии «Диспетчера»).
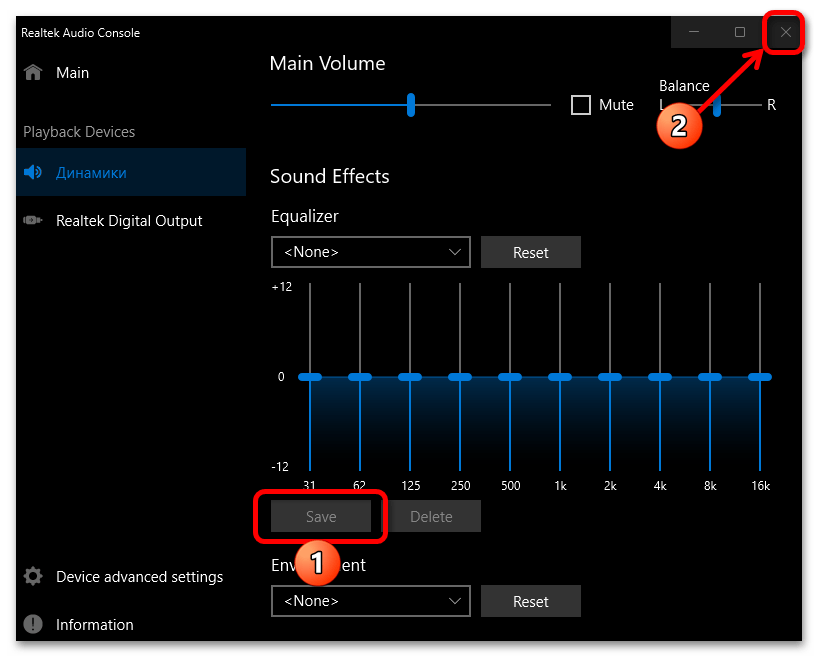
- Сохраните внесенные изменения и закройте программу.

Наша группа в TelegramПолезные советы и помощь
-
Home
-
News
- Realtek Equalizer Windows 10 for Realtek HD Sound
By Alisa |
Last Updated
The Realtek equalizer Windows 10 controls the Realtek HD sound. This post from MiniTool Software teaches you how to how to open Realtek equalizer in Windows 10 and adjust Realtek audio equalizer settings, how to fix Realtek equalizer missing or not working issues, etc.
What is Realtek equalizer in Windows 10 and how to open and adjust its settings or troubleshoot its issues? Check the answers in this post.
Realtek Equalizer Windows 10
What is Realtek equalizer?
Realtek sound card features a graphic equalizer to let users freely adjust the computer sound. You can go to Realtek equalizer settings window to make proper adjustments for Windows 10 audio.
Realtek equalizer comes along with Realtek sound card in your Windows 10 computer and should work only if the Realtek High Definition Audio driver has been installed.
How to Open Windows 10 Realtek Equalizer
You can open Realtek equalizer in Windows 10 and adjust its settings if you like. Generally, you can access the default Realtek equalizer from Sound settings.
- Right-click Sound icon at the bottom-right corner of Windows taskbar and select Sounds.
- Under Playback tab, right-click Speakers and select Properties.
- Click Enhancements tab and click Equalizer. Click the drop-down icon next to Setting to choose an audio equalizer option.
- You can also click the three-dot icon next to Setting to open Graphic EQ to adjust its settings.
Fix Realtek Equalizer Windows 10 Missing or Not Working
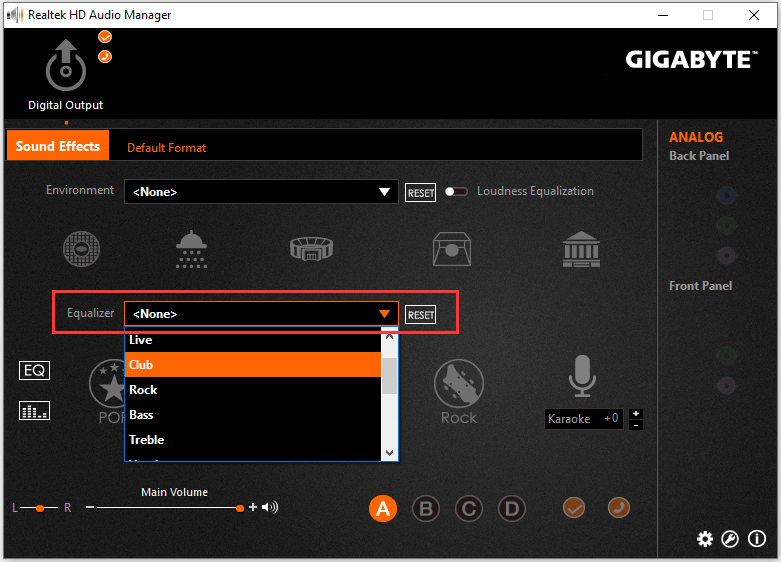
Fix 1. Open Realtek Audio Manager to access Realtek equalizer. You can press Windows + R, type C:\Program Files\Realtek\Audio\HDA\ in Run box, and press Enter. Then double-click RtkNGUI64 file to open Realtek HD Audio Manager. Then you can click Equalizer to choose a preferred equalizer setting for Realtek audio. Here you can also click Change to Graphic EQ icon under EQ to activate Realtek sound card equalizer in Windows 10.
Tip: If your computer doesn’t have Realtek HD Audio Manager, you can check how to get Realtek HD Audio Manager download for Windows 10.
Fix 2. If the Realtek equalizer is disappeared from your Windows 10 computer, you can go to Realtek official website to download and install the latest Realtek High Definition Audio driver to make Realtek equalizer work.
Fix 3. Update Realtek High Definition Audio driver. Press Windows + X and select Device Manager to open Device Manager in Windows 10. Expand Sound, video and game controllers. Right-click Realtek High Definition Audio and click Update driver.
Fix Realtek No Enhancements Tab
Some users may find that there is no Enhancements tab in the Speakers Properties window. You can follow the steps to fix Enhancements tab missing issue.
- Press Windows + X and select Device Manager.
- Expand “Sound, video and game controllers” category.
- Right-click Realtek High Definition Audio and select Disable device
- Right-click Realtek High Definition Audio again and select Update driver.
- Click Browse my computer for driver software and select High definition audio device to install the High Definition Audio Device driver.
This should replace the Realtek Audio driver and install the default High Definition Audio Device driver in Windows 10, and get back the Enhancements tab in the Speakers Properties window.
8 Best Free Equalizer for Windows 10 for Better Sound
If you are looking for a top third-party sound equalizer for Windows 10, here we list the top 8 free Windows 10 audio equalizers for you. They are Equalizer APO, Realtime Equalizer, Viper4Windows, FXSound, Boom3D, Graphic Equalizer Studio, Breakaway Audio Enhancer, and EqualizerPro.
About The Author
Position: Columnist
Alisa is a professional English editor with 4-year experience. She loves writing and focuses on sharing detailed solutions and thoughts for computer problems, data recovery & backup, digital gadgets, tech news, etc. Through her articles, users can always easily get related problems solved and find what they want. In spare time, she likes basketball, badminton, tennis, cycling, running, and singing. She is very funny and energetic in life, and always brings friends lots of laughs.
No sound after updating Windows! Don’t be upset; follow the best fixes listed below & troubleshoot Realtek HD audio manager problems.
For Windows users, encountering audio issues is not new. After each Windows update, some or the other user faces audio-related issues. This leaves users with no sound; if you can relate to it and are looking for ways to fix the Realtek audio driver problem, you are right.
Quick Tip- When manually downloading the latest Realtek audio driver from the official website, ensure your operating system’s correct name and version is selected. Realtek high-definition audio comes preinstalled on Windows 11 and 10, but this doesn’t mean Realtek audio is not working issue cannot be encountered. If you are facing the issue, here are the best ways to fix sound and not working issues.
Common Realtek Audio Issues
- Missing Audio Manager Icon
- Conflicts with preinstalled Microsoft Drivers
- Windows 11, 10, no audio devices are installed
- The audio service is not responding
- No sound
Besides, there are other sound problems that Windows users face. This troubleshooting guide will cover all this and the best ways to fix these issues.
Download and Install Advanced Driver Updater.
Why is there a Realtek High Definition Audio on My PC?
The Realtek HD Definition Audio is the popular sound driver for Windows. It helps choose the audio configuration for the speaker system, and the software also allows adjusting the volume for individual speakers.
However, due to certain reasons, you may face issues with Realtek High Definition Audio.
6 Common Reasons That Cause Realtek Audio Problems
1. Outdated Realtek audio driver.
2. There is a conflict between installed Microsoft and Realtek audio drivers.
3. Audio service is either not running or responding.
4. Misconfigured audio settings.
5. Incorrect output device for audio is selected.
6. Disable audio service.
How to Fix Realtek Audio Issues in Windows 11, 10
Whether you face audio problem issues after installing the latest Windows update or uninstalling a driver, try these 8 ways to troubleshoot the issue.
Basic Troubleshooting
You should always check the device and cable connections before updating the drivers and trying other technical fixes.
- Check the output audio device whether working or not.
- Ensure the output device is receiving power.
- Correct output should be selected on Windows 11 and 10.
- Use the volume controls to ensure the sound is not muted.
- Disconnect and reconnect the output device, and also use the alternate port to ensure the connection is proper.
After following these steps, try the following methods if the audio is still not there.
1. Update Realtek High-Definition Audio on Windows 11 and 10
Common sound problems on Windows are outdated, corrupt, or missing drivers. To fix this issue, downloading and installing the latest driver is recommended. This can be done either manually or automatically.
To download and update the latest driver manually, visit the sound card manufacturer and look for the right driver download. Before this, you must collect information about the operating system’s version, your motherboard’s model, or the sound card. Once you have, only then can you download the correct driver.
Update Audio Drivers using Manufacturer website –
- Search for the audio driver’s manufacturer website on a browser. Click on it.
- Enter your device’s serial number.
- Click the ‘Detect’ button for automatic identification.
- Select your product manually from the list.
- Browse products for general information or resources.
- Download the audio driver on your computer.
Update Audio Drivers using Device Manager –
Another way to update drivers on your computer is to use the Device Manger.
- Open Device Manager.
- Right click on the device, in this case, audio device.
- Select ‘Update Driver’.
- Choose “ Search automatically for updated driver software”.
- Now follow the on-screen instructions to complete the update.
Suppose this sounds like too much work, or you don’t have the technical expertise to collect all this information. In that case, you can try Advanced Driver Updater, a third-party driver updating utility.
This tool lets you download and install compatible drivers without collecting system or device information. Not only this, but Advanced Driver Updaters also keep a backup of old drivers for security reasons. It is easier to use as you have to click Start Scan Now, wait for the scanning to finish, and update the driver.
Also Read: Advanced Driver Updater Review
Here are the detailed steps on how to use Advanced Driver Updater
1. Download and install Advanced Driver Updater

2. Run the professional tool and click Start Scan Now to perform the scanning for outdated Realtek sound drivers.

3. Wait for the scanning to finish.

4. After that, click the Update driver option and update the driver.
Note : If you are using a trial version of the product, you will have to update each driver by clicking the Update driver option. However, if you want to update all drivers in a go, you need to upgrade to the Pro version as it offers an Update All feature. Not only this, but the excellent driver updating utility also comes with a money-back guarantee.
Read more at the official website
5. After updating the driver, restart the system to apply changes.
Now try to play a video or song; the Realtek sound not working issues should not be fixed.
See This- How To Update And Download Realtek 802.11 N WLAN Adapter Driver- Windows 11, 10
Method 2. Disable Audio Enhancement
Changes made to Audio Enhancements might conflict with sound on Windows 11 and 10. Therefore, it is recommended to disable audio enhancement. To do so, follow the steps below:
1. Right-click the Volume icon present in System Tray.
2. Select Open Sound settings > Device properties > Additional device properties.
3. This will open a new window; click the Enhancements tab and uncheck the box next to Disable all enhancements > Apply > Ok

This should troubleshoot Realtek audio problems on your PC.
3. Enable/ Restart Windows Audio Service
Ensure Windows Audio service is enabled to fix high-definition audio devices not working. To do so, follow the steps below:
1. Press Windows + R to open the Run window
2. Type services.msc > Ok
3. Look for Windows Audio service > right-click > Properties

4. Click the down arrow next to Startup type and select Automatic > Start > Apply > Ok
Note: If the service is already running and set to Automatic, you need to restart it. To do so, look for Windows Audio service > right-click > Restart.

Now try to play the sound; this should fix Realtek audio speakers’ not working issues.
Also, Read- How To Update Realtek Bluetooth Driver – Windows 11,10
Method 4. Disable Microsoft UAA Bus Driver
Usually, when two high-definition audio drivers run on the system, a conflict occurs. Therefore, to fix the issues with Realtek audio speakers not working, we must disable Microsoft UAA Bus Driver. To do so, follow the steps below:
1. In the Windows search bar, type Device Manager
2. Look for System Devices > double click to expand it
3. Select Microsoft UAA Bus Driver for High Definition Audio.
Note: If it is not on the list, it is already disabled. This means you can skip this step and move to the next one.
4. If you see it > right-click > Disable device.
5. Restart the system to apply changes; now, try to play the sound. Realtek audio driver issues should be fixed.
Method 5. Use a Generic high-definition Audio Device Driver
You can fix Realtek audio driver issues by switching to a generic driver. To learn how to do that, follow the steps below:
1. In the Windows search bar, type Device Manager
2. Search for Audio inputs and outputs
3. Double-click to expand all the audio drivers
4. Right-click the Realtek audio device > select Update driver from the list
5. Next, select Browse my computer for driver software

6. After that, choose Let me pick from a list of available drivers on my computer

7. Select High Definition Audio driver from the list > Next > follow on-screen instructions.
This will load the default sound driver, and the problem with the Realtek audio driver will be solved.
Check This- How to Download Realtek Ethernet Controller Driver
Method 6. Change Default Sound Format
By altering the default sound format, you can fix high-definition audio devices not working. To do so, follow the steps below:
1. Right-click the sound icon present in the system tray.
2. Select Open Sound settings
3. In the new window that opens, click Device Properties.

4. Click the Additional device properties option

5. This will open a new pop-up window here; click the Advanced tab
6. Next, click the down arrow and select the following depending on the speaker configuration:
24bit/44100 Hz
24bit/192000Hz
7. Click Apply > Ok to save changes.
This should fix Realtek audio speakers not working problems. If this doesn’t work, let’s move to the next step.
Method 7. Reinstall Sound Driver
1. Type Device Manager in the Windows search bar
2. Look for audio inputs and outputs. Double-click to expand it.
3. Right-click the sound driver > select Uninstall device from the context menu

4. Once done, click the computer icon with lens (Scan for hardware changes)

5. Now, restart the system. Windows will automatically install the default driver.
This should fix the issue, and the speaker Realtek audio not working problem should be resolved.
Method 8. Select the Correct Output Device
When an incorrect output device is selected, you might face Realtek audio driver problems. We need to switch to the correct output device to fix it. To do so, follow the steps below:
1. Right-click the volume icon present in System Tray.

2. Select Open Sound settings from the context menu.
3. Set Speakers or Headphones as the output device

Now, check your system, the Realtek audio speakers are not working, and the problem should be resolved. If you still face the issue, try updating Windows. If you are using an older version, there are chances that you are facing the issue due to some bug. Updating Windows will help resolve it. Press Windows + I to open Windows Settings > Click Windows Update > Check for updates > Download & Install and restart the PC.
See Also-How to Fix Microsoft Teredo Tunneling Adapter Missing
Frequently Asked Questions
Q1. How do I fix Realtek’s no sound?
To fix Realtek’s no sound issue, set the speakers as default. To do so, follow these steps:
1. Press Windows + R and open the Run window.
2. Type mmsys.cpl > press enter.
3. Click the Playback tab > right-click Speakers > Set as Default Device > Apply > Ok.
4. Exit the Sound Settings window and reboot the PC.
Now check you should not face an audio issue.
If this doesn’t help, automatically update the Realtek Audio driver using Advanced Driver Updater.
Q2. How do I repair and fix Realtek audio driver Windows 10?
To repair and fix Realtek Audio Driver try the following fixes:
1. Check cables, volume, speaker, and headphone connections
2. Update Realtek High-Definition Audio.
3. Disable Audio Enhancement.
4. Enable/Restart Windows Audio Service.
5. Disable Microsoft UAA Bus Driver.
6. Use a Generic High-Definition Audio Device Driver.
7. Change Default Sound Format.
8. Reinstall Sound Driver.
9. Select Correct Output Device.
10. Run the Audio Troubleshooter.
Q3. How do I get my sound back on Windows 10?
Use a generic driver to get the sound back and fix Realtek audio driver issues.
1. Right-click the Windows Start icon,> select Device Manager
2. Go to Audio inputs and outputs> double-click on it.
3. Right-click the Realtek audio device > select Update driver from the list
5. Choose the second option, “Browse my computer for driver software.”
6. Select, “Let me pick from a list of available drivers on my computer.”
7. Select High Definition Audio driver from the list > and follow on-screen instructions.
Q4. Why is there no sound on my Windows 10?
There are chances that the audio device is muted, has been disabled, or the driver is outdated. To fix the problem, unmute the audio device, enable it and update the driver through Device Manager or Advanced Driver Updater.
Q5. How do I fix a corrupted Realtek driver?
The easiest way to fix a corrupted Realtek driver is to reinstall and update the driver. You can do it manually through Device Manager or use Advanced Driver Updater, a driver updating tool, to update corrupt and problematic drivers.
Q6. How do I fix my Realtek audio?
To fix issues with Realtek audio, you can try the following techniques:
1. Update Realtek driver
2. Disable Audio-Enhancement
3. Restart Windows Audio Service
4. Disable Microsoft UAA Bus Driver
5. Modify Default Sound Format
Fix – Realtek Audio Driver Problems
You can quickly troubleshoot Realtek audio problems on your system using these fixes. Alongside these fixes, we suggest checking whether the speakers are correctly connected. Also, ensure that the speaker is not muted. This will help resolve Realtek speakers not working.
We hope using these steps, you can fix the problem with sound. To keep drivers updated and avoid facing such issues in the future, use Advanced Driver Updater, the best driver updater to update outdated drivers in a go. We’d love to hear from you; please share your feedback in the comments section. If you have any product-related queries, contact the support team.
Recommended :
12 Best (Free & Paid) Driver Updater Software To Fix Driver Issues on Windows
How to Download & Update Realtek PCIe GbE Family Controller Driver
How To Download & Update Realtek Audio Driver on Windows 11/10
Доброго времени суток!
Realtek HD — это, наверное, один из самых популярных аудио-драйверов, позволяющий тонко настраивать уровень и качество звука в Windows. Чтобы открыть его параметры — необходимо запустить диспетчер Realtek, ссылка на который должна быть либо в трее (рядом с часами), либо в панели управления* ОС Windows.
* К слову сказать, ссылка на диспетчер управления аудио-драйвером (в панели управления, либо в трее) — должна быть для любого звукового драйвера, если, конечно, у вас установлена его полная версия!
Но, в последнее время (из-за того, что Windows 10 «ставит» драйвера самостоятельно) — ссылки на диспетчер управления звуком Realtek нет! А впрочем, могут быть «виноваты» и сбойные версии ПО…
Собственно, ниже разберу последовательно, что и как сделать, чтобы заветная ссылка (ярлык, иконка) появилась…
В помощь!
Значок громкости не реагирует или вообще пропал… Что делать — https://ocomp.info/propal-znachok-gromkosti.html
*
Что делать, если нет значка Realtek HD
❶
«Ручная» проверка
И так, если в панели управления и в трее нет диспетчера Realtek (а вы помните, что вы его устанавливали) — попробуйте зайти на диск «C:\», и в папке «Program Files» найти каталог «Realtek». Если такой каталог есть: скорее всего в нем должен быть файл «RtkNGUI64.exe» — попробуйте запустить его, кликнув на нем ЛКМ (прим.: это и есть диспетчер).
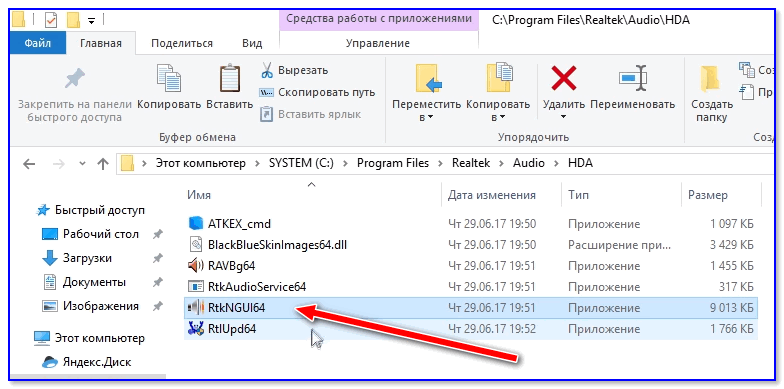
Пробуем вручную запустить диспетчер
Если диспетчер запустится, и вы сможете приступить к настройке звука — просто создайте ярлык для этой программы (кликнув на ней ПКМ), чтобы не искать ее каждый раз.
❷
Удаление «старой» версии драйвера
Далее, какая бы не была у вас версия драйвера, рекомендую ее полностью удалить. Это можно сделать из панели управления Windows. См. скриншот ниже.
Примечание: кстати, последняя версия драйвера Realtek 2.82 — сбойная. У меня на ПК при ее установке не появляется значок на диспетчер управления звуком!

Удаляем старый драйвер
Если драйвер попросит перезагрузить ПК — соглашайтесь!
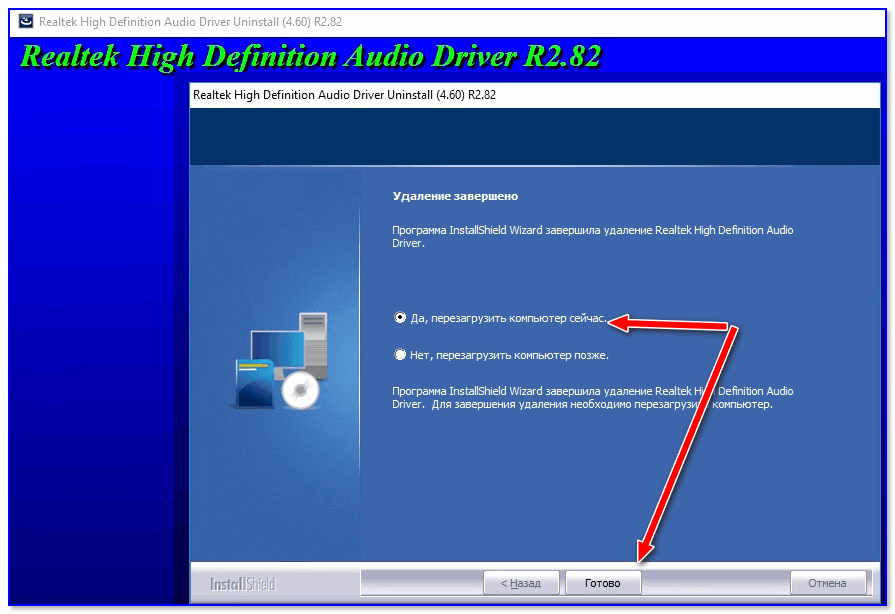
Готов
❸
Загрузка новой версии драйвера
Если у вас ПК
Протестировав несколько версий драйвера от Realtek — оказалось, что «сбойная» из них только одна, последняя 2.82 (и то, только на некоторых машинах!). Проверив несколько более старых версий аудио-драйверов, удалось определить, что 2.81 — вполне корректно-работающий выпуск. Ссылки на них привел ниже.
- Realtek HD 2.82 (ссылка на офиц. сайт). Сначала можно попробовать ее, если не заработает — удалите драйвер (см. шаг 1, 2 выше), и установите 2.81 версию.
- ⭐Realtek HD 2.81 ✔ (ссылка на techspot.com). Корректно-работающая версия аудио-драйвера. Рекомендую!
Если у вас ноутбук
В этом случае рекомендую определить его точную модель, а затем на официальном сайте производителя найти для него аудио-драйвера. Загружать посоветовал бы сразу несколько версий (особенно тот пакет, который весит* больше остальных).
- *В моем случае их несколько: что интересно, если установить просто последнюю версию от 22 мая — то ссылка на диспетчер управления звуком не появится!
- Если же установить сначала самый первый выпуск (весит больше остальных), а затем до-обновить его самой последней версией — то все будет корректно работать!
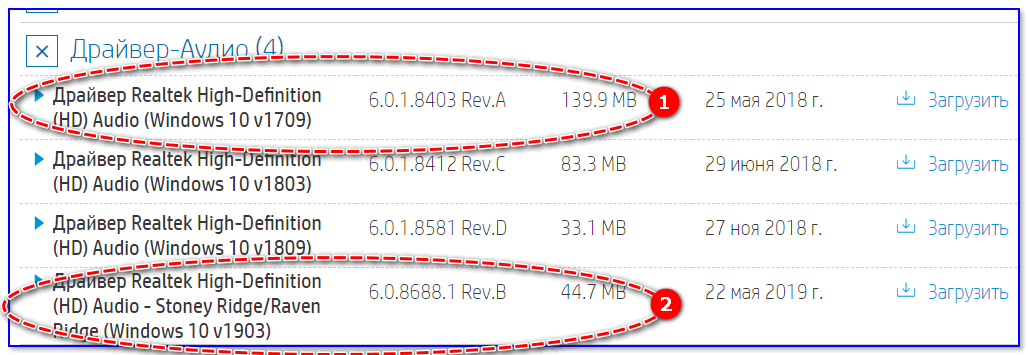
Драйвер аудио для ноутбука HP
❹
Установка новой версии аудио-драйвера
Непосредственно сама установка аудио-драйвера не представляет ничего сложного — достаточно запустить исполняемый файл и дождаться завершения работы мастера. После, перезагрузить ПК/ноутбук.
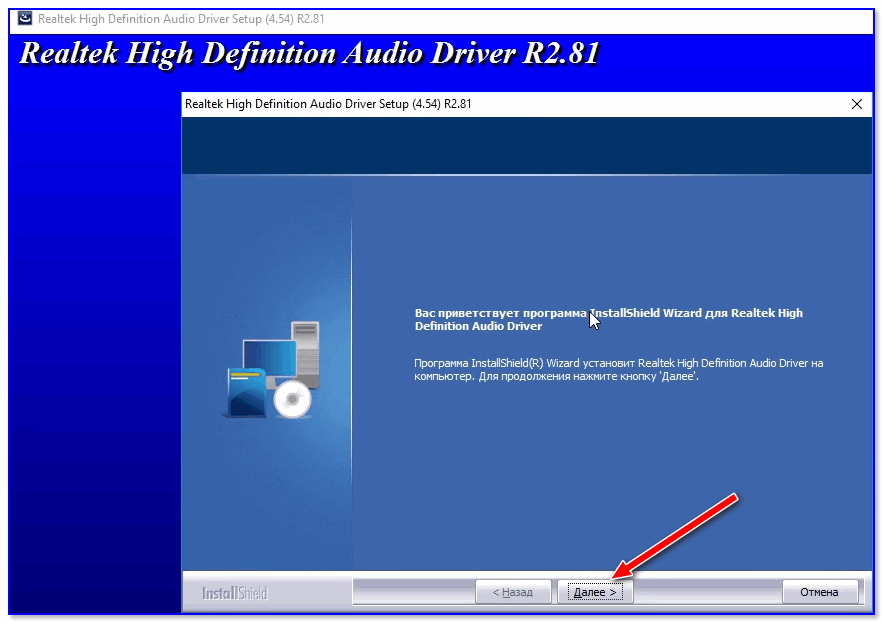
Установка другой версии Realtek HD 2.81
После перезагрузки, рекомендую сразу открыть панель управления, перевести режим отображения в «Крупные значки» и посмотреть, появилась ли ссылка на диспетчер Realtek (в моем случае, после установки версии 2.81 — все заработало!).
Примечание: если в панели управления значка не появилось — то откройте настройки драйвера, запустив файл RtkNGUI64.exe/RAVCpl64.exe из папки C:\Program Files\Realtek\Audio\HDA (как это мы делали в ШАГЕ 1).
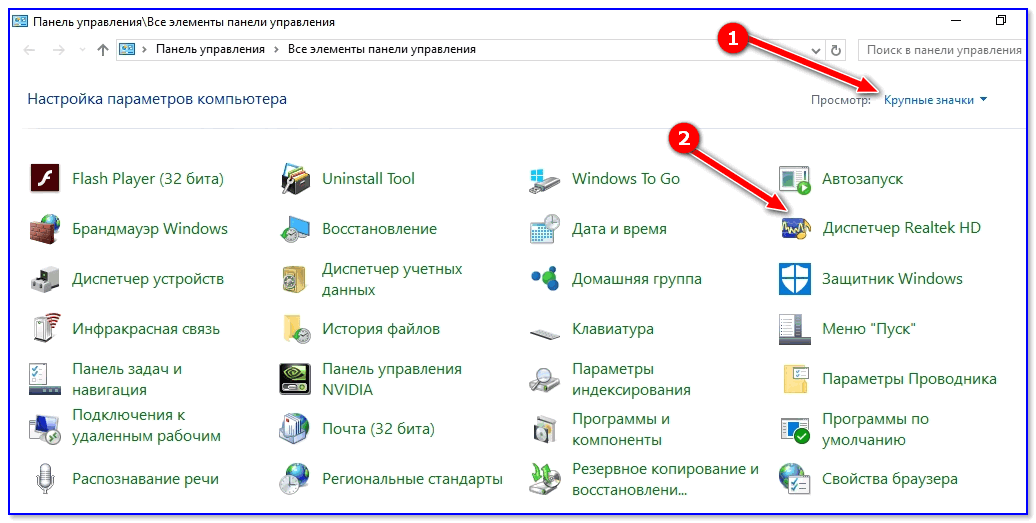
Диспетчер Realtek HD появился!
Собственно, далее можно приступить к точечной настройке звука (задача решена?!).
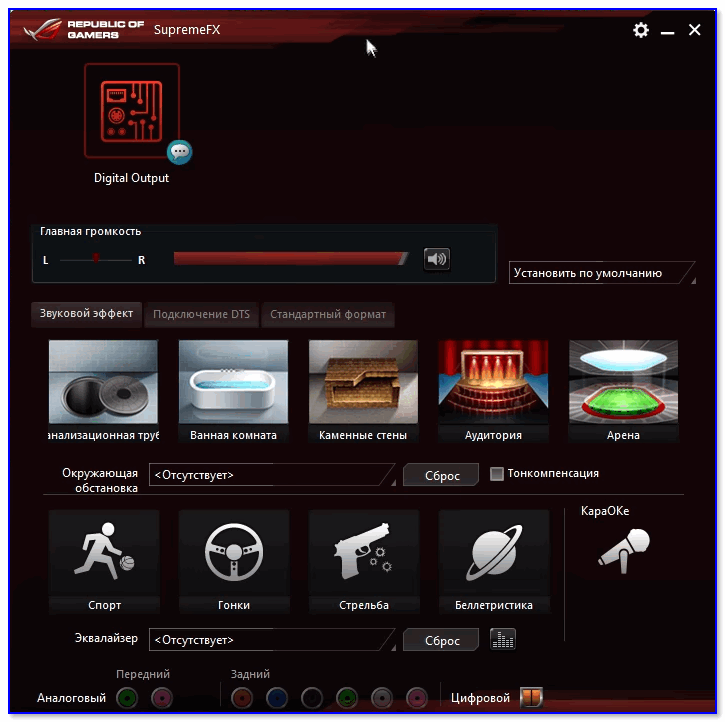
Точечная настройка звука — Realtek HD
*
PS (обновл. от 04.2022)
В последних версиях Windows 10/11 консоль для управления Realtek также появилась в магазине Microsoft Store* (📌ссылка на нее). После ее установки — в меню ПУСК и в ПОИСКЕ Windows появится ссылка на панель Realtek (в которой и будут все основные параметры звука). См. пример ниже.
📌 В помощь!
Как открыть магазин приложений Microsoft Store (и, если его нет, то установить) — см. инструкцию
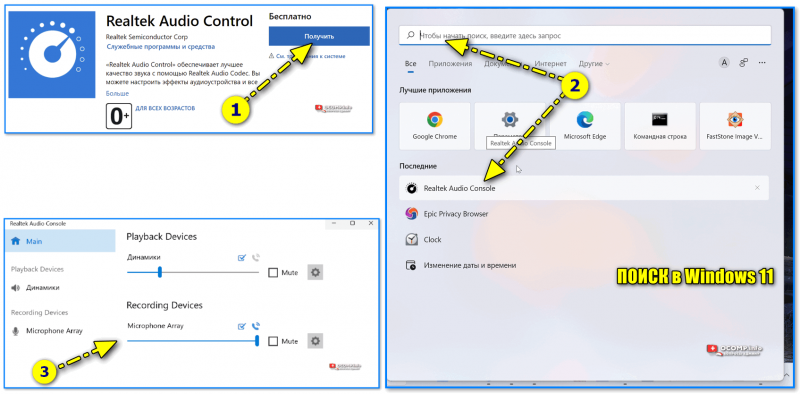
Realtek Audio Console — контрольная панель от Realtek
*
На сим сегодня всё… Дополнения по теме — лишними не будут!
Удачи!
👋
Первая публикация: 28.10.2019
Корректировка: 04.2022