
Публичное облако на базе VMware с управлением через vCloud Director
Чтобы разрешить тот или иной порт в брандмауэре Windows Server:
- В меню «Пуск» выберите «Служебные — Windows» — «Панель управления»

- Далее выберите «Система и безопасность» — «Брандмауэр защитника Windows».
- В меню слева выберите пункт «Дополнительные параметры».
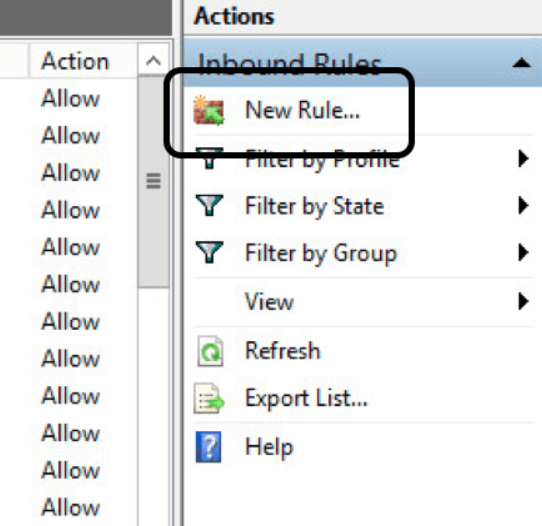
- В меню слева кликните «Правила для входящих подключений» и в блоке «Действия» справа кликните «Создать правило…».
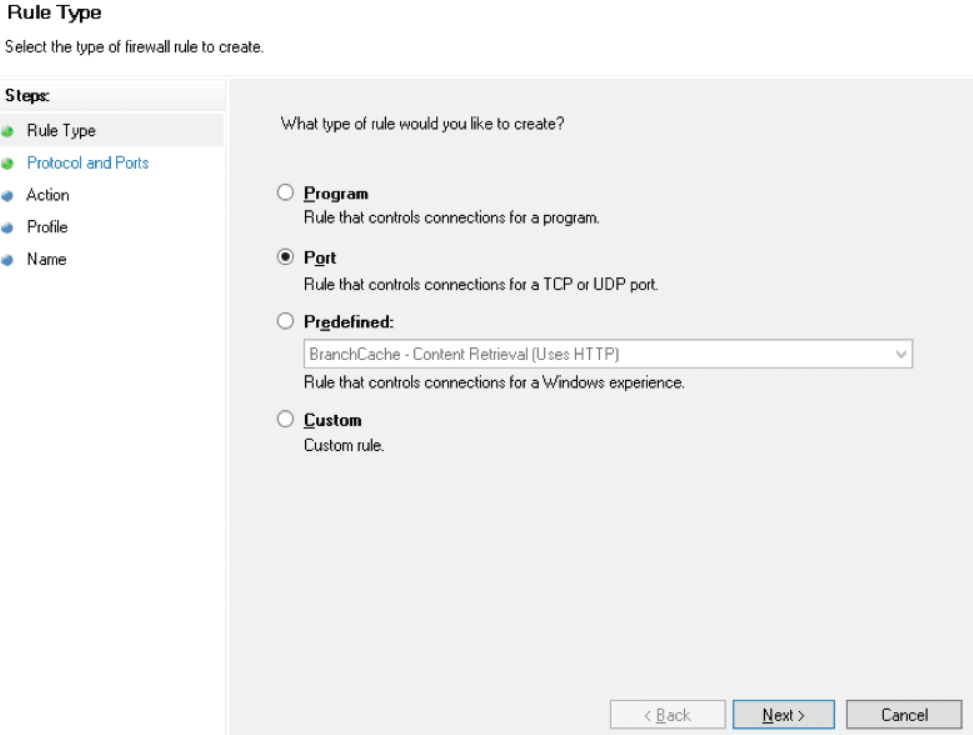
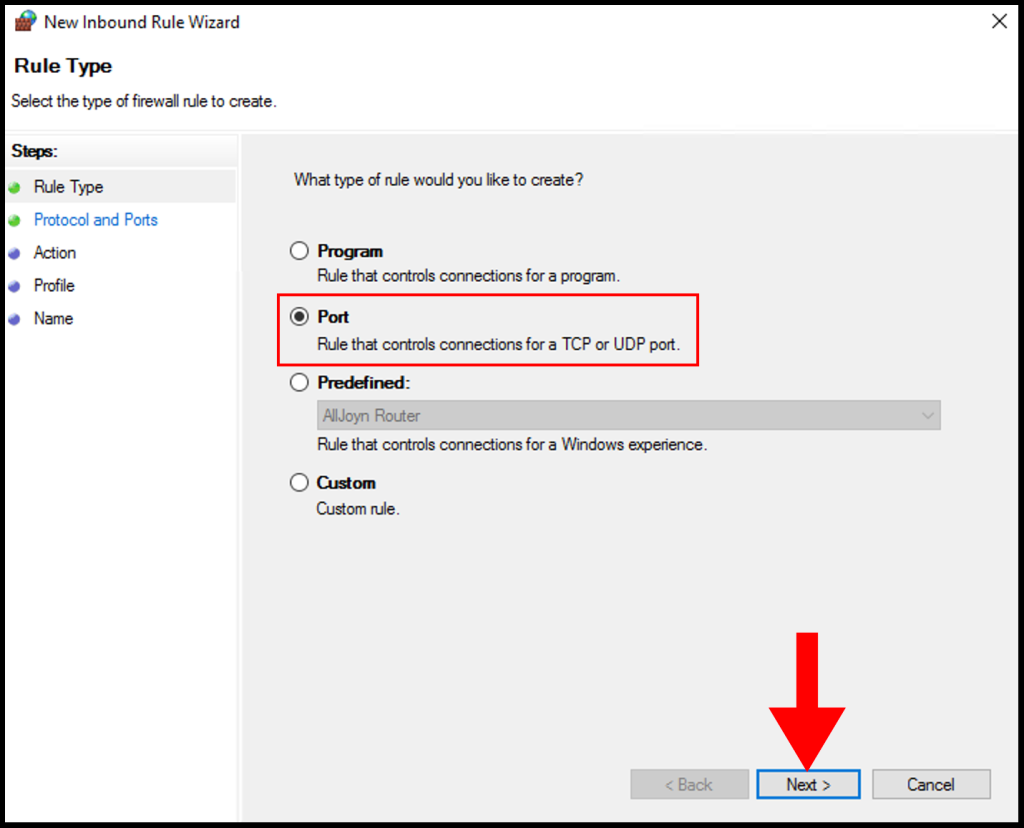
- Выберите «Для порта» и кликните «Далее».
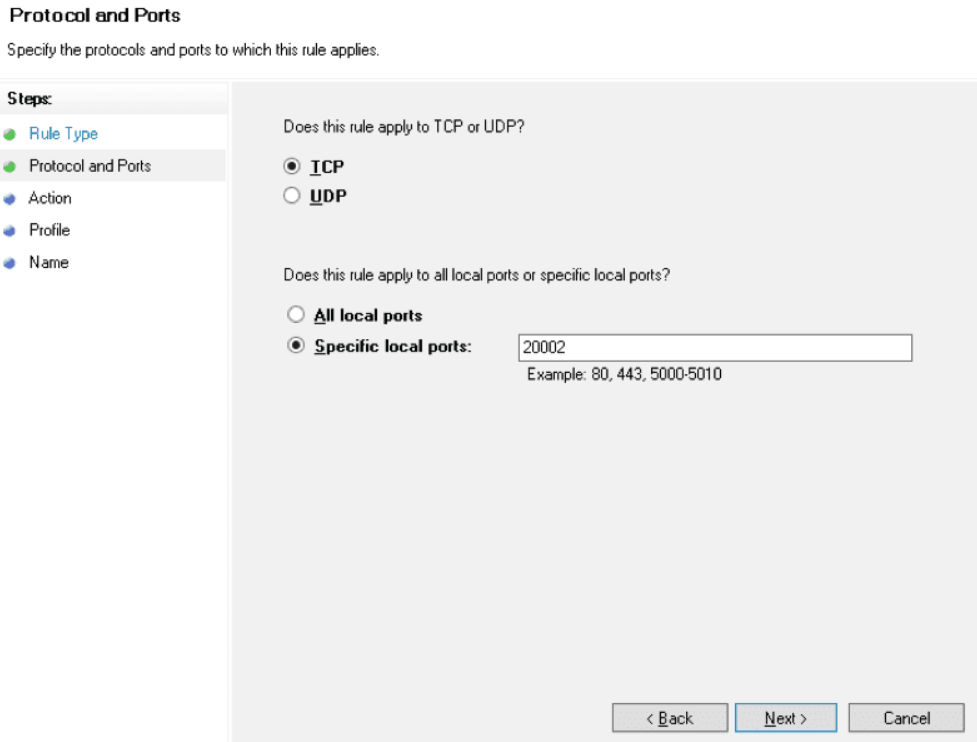
- Укажите нужный протокол и порт (порты). Здесь можно ввести:
-
- один конкретный порт;
- несколько портов через запятую (1540,1541);
- диапазон портов через дефис (1560-1591);
- Нажмите «Далее», затем снова «Далее».
- Выберите, для каких профилей применять созданное правило, и снова нажмите «Далее».
- Введите имя и описание правила и кликните «Готово».
Была ли статья полезна?
Ваша оценка очень важна
All recent versions of Windows include the Windows Firewall utility. A firewall includes options for opening and closing ports, as well as allowing and disabling specific programs and services.
Computer resources can be protected from unauthorized access by firewalls on networks and servers. Incoming or even outgoing traffic is checked for by the firewall systems and in accordance with the rules configured, decisions are made about them.
Windows Firewall cannot access the port if it isn’t explicitly allowed. TCP/IP ports are reserved for applications whenever they want to access the network, which means anyone else cannot use them.

Also Read: How to Change RDP Port in Windows Server?
In Windows Server 2008/2012 R2/2016 and Windows Server 2019, there are three ways to open ports.
- MMC
- The command line (netsh)
- PowerShell commands (For 2012R2 and 2016 only)
So, you can open ports on Windows Server by following the instructions in the following article.
Open Ports via MMC
- Here first of all you have to log in using an admin account.
- Then you have to click on:
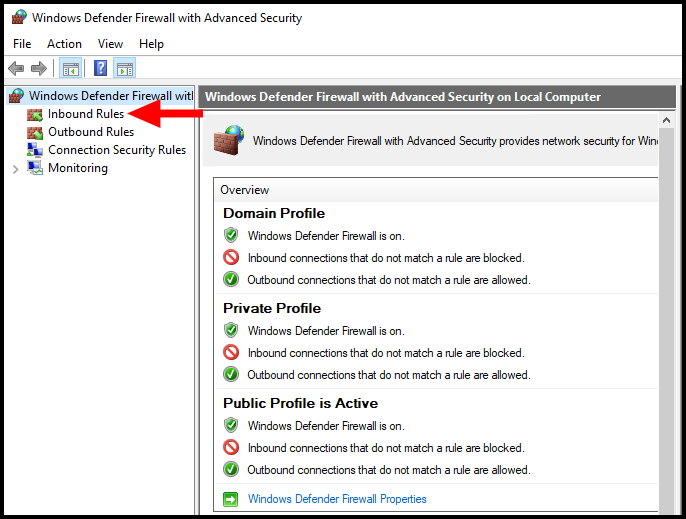
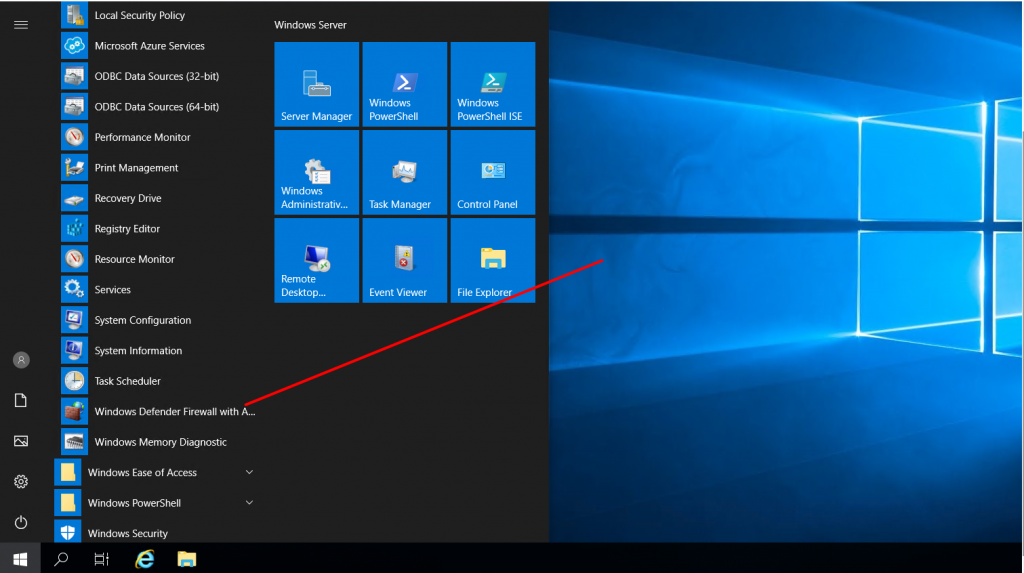
Start > Administrative Tools > Windows Firewall with Advanced Security
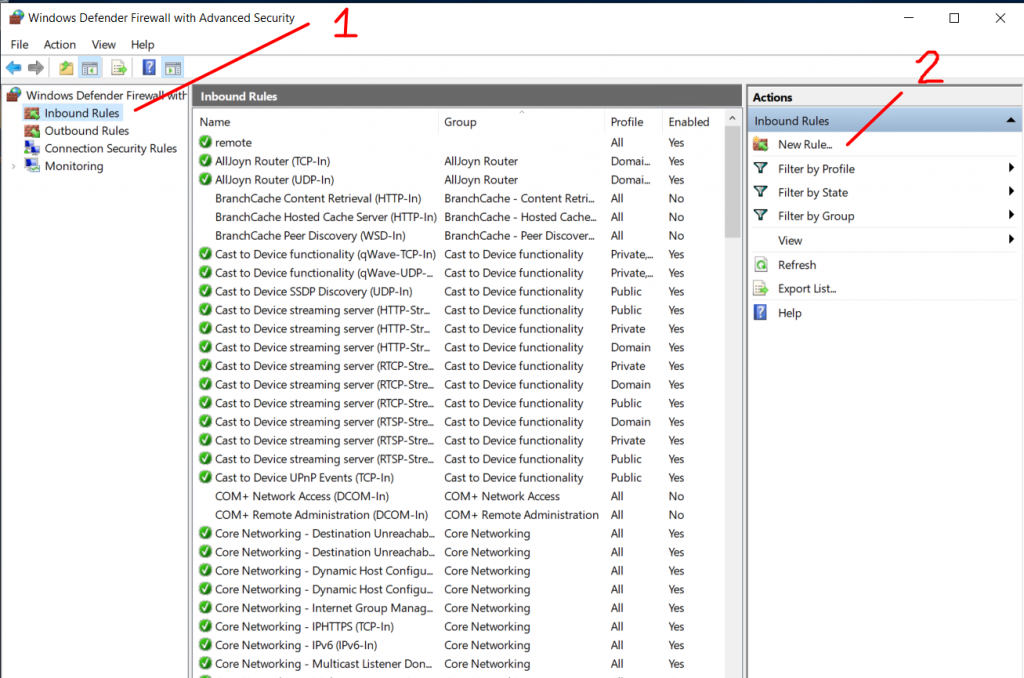
- Now you have to click on the Inbound Rules on the left of the MMC.
- Then click on the New Rule on the Right of the MMC.
- Now here you will get five steps to open a port and accept incoming connections:-
- Rule Type
- Protocol and Ports
- Action
- Profile
- Name
- Suppose for example the servers with Parallels RAS Publishing Agents will need to open TCP port 20002.
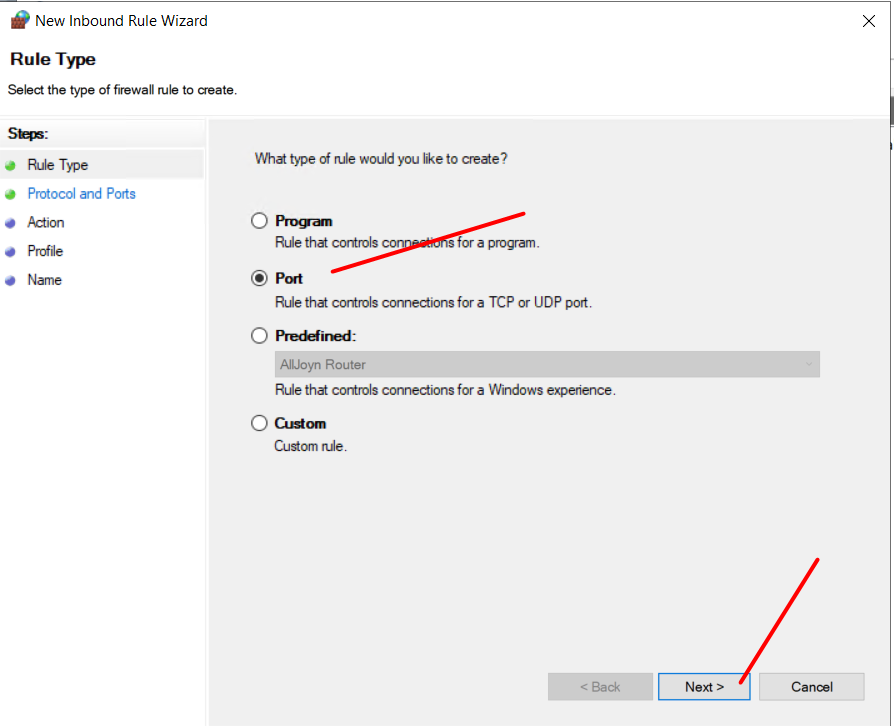
- Now under the Rule Type section, you have to select “Port” and then click on the “Next” button.
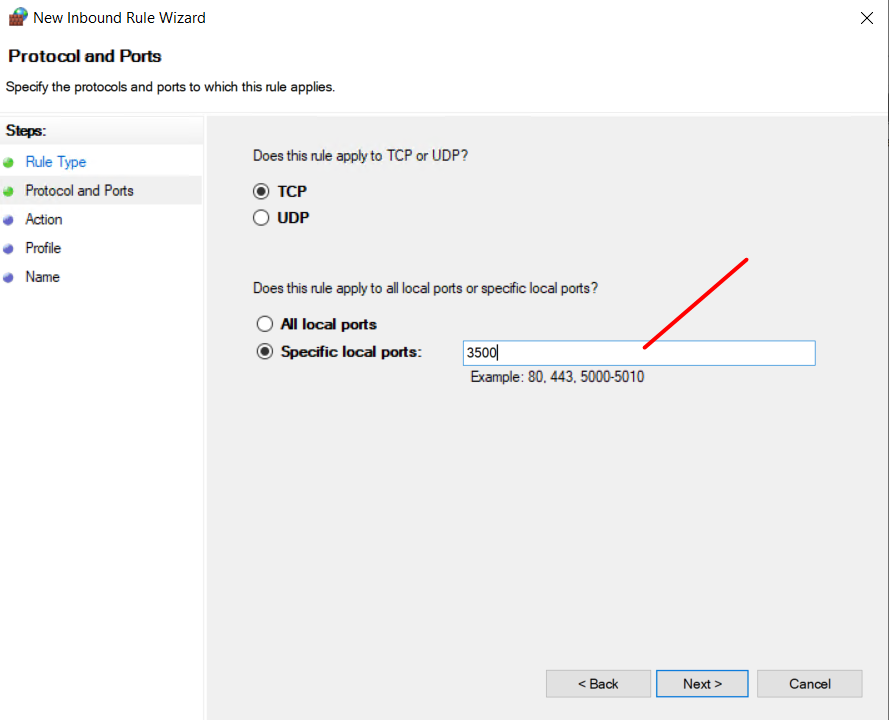
- Then under the Protocol and Ports section, you have to select the “TCP” as the type of protocol.
- After that, you have to type “20002” in the “Specific local ports” input field.
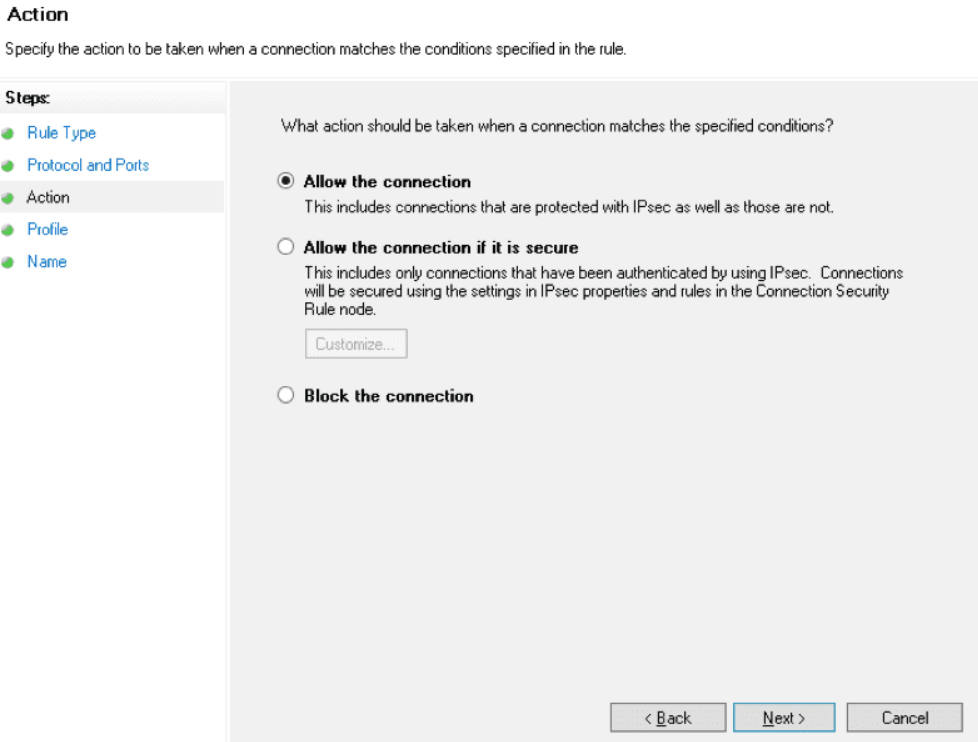
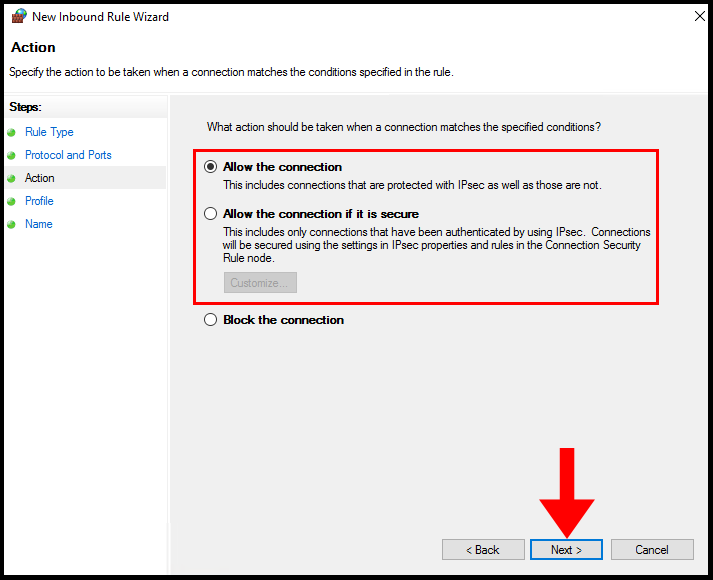
- Next, you have to head to the Action section in which you have to select “Allow the Connection“ and then you have to click on the “Next” button.
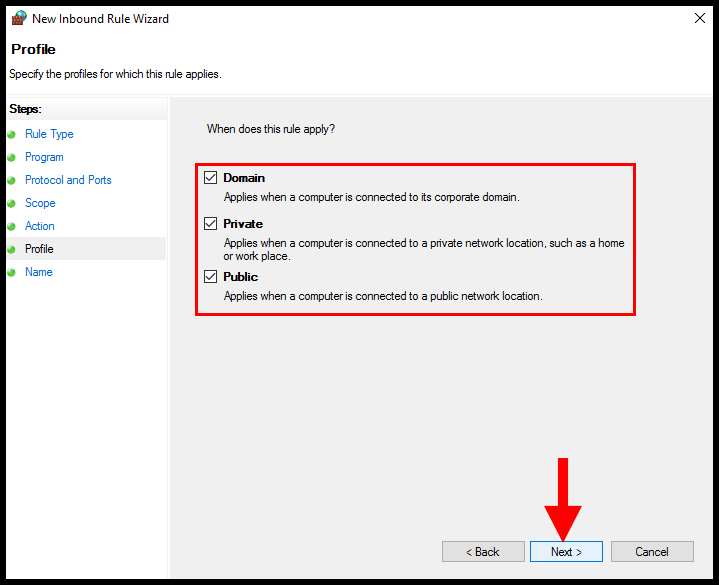
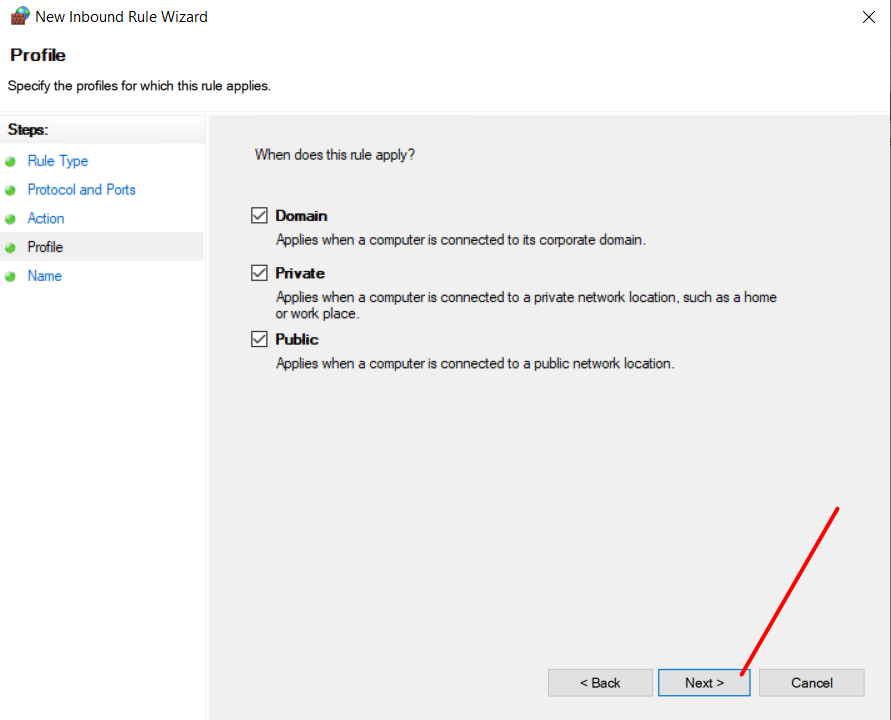
- Now under the Profile section, you have to select all three options and click on the “Next” button.

(NOTE: Here at this point if you wish to limit the connection to a particular profile then you can simply select the profiles that are appropriate to your setup.)
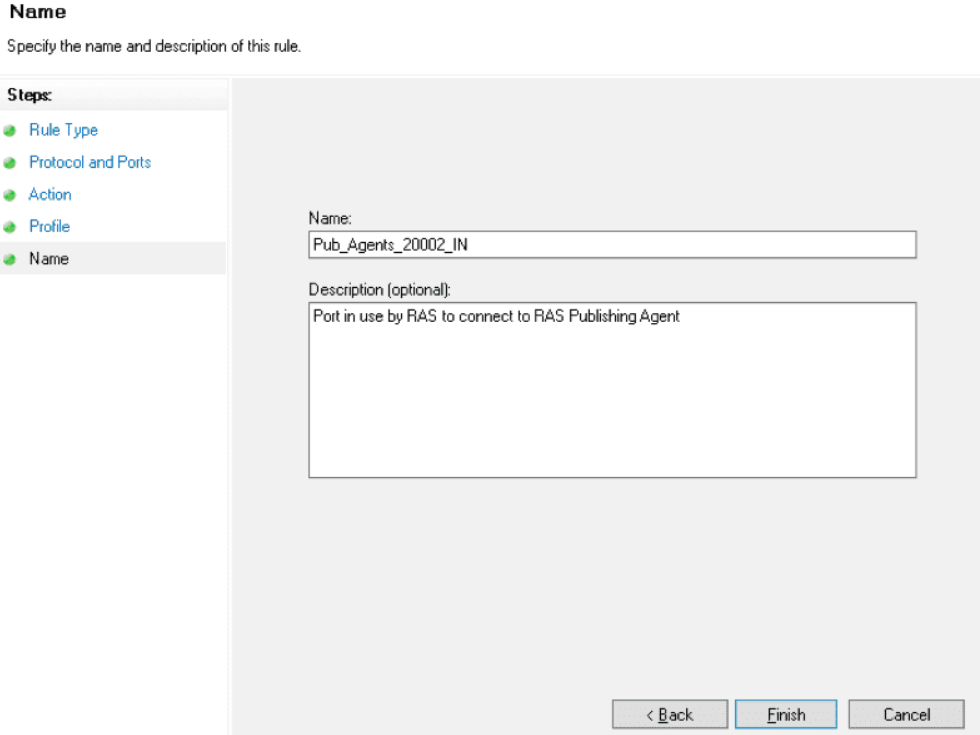
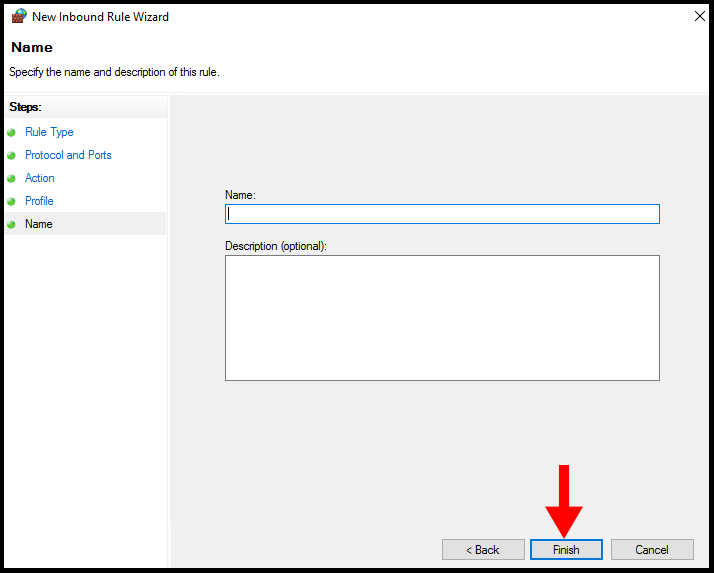
- After that, now you have to enter a “Name” for this rule under the Name section, and then click on the “Finish” button when you are done.
- That’s it, now you are done.
Open Ports through command line (netsh)
- First of all, using an administrator account you have to login to the server.
- Then you have to open and run the Command Prompt as Administrator.
- For the Publishing Agents role on the servers, open the TCP port 20002 with the following command.

- That’s it, now you are done.
Open Ports through PowerShell commands
- First of all, using an admin account you have to Log in.
- Then you have to run the Windows PowerShell as Administrator.
- You need to open the TCP port 20002 on the publishing agents server using the following command.

- That’s it, now you are done.
Once all is done, now immediately after creating this rule, the firewall rule will allow traffic to (or from) your server. While if you want to open a port for both sending and receiving, you need to repeat the process as an Outbound rule.
Ports play a very important role in any computer system. In computer networks, ports are used to connect computers and other devices to one another. When you open a port, you are allowing specific types of information to go in and out of your computer.
For example, if you want to host a website, you need to open port 80 to allow web traffic to go in and out. This blog is all about how to open ports on a Windows server and we hope that you liked it.
FAQs
What is a firewall and how does it work?
A firewall is a security system that is used to protect computer resources from unauthorized access. It checks incoming and outgoing traffic on a network or server, and according to the configured rules, decides whether to allow or block traffic.
How do I open ports on Windows Server?
There are three ways to open ports on Windows Server 2008/2012 R2/2016 and Windows Server 2019: using MMC, command line (netsh), or PowerShell commands. To open a port using MMC, you need to log in as an admin, click on Start > Administrative Tools > Windows Firewall with Advanced Security, click on Inbound Rules, then click on New Rule, and follow the five steps to open a port and accept incoming connections.
What is a TCP/IP port and why do applications need them?
TCP/IP ports are reserved for applications when they want to access the network, which means that no one else can use them. Ports are used to connect computers and other devices to one another. When you open a port, you are allowing specific types of information to go in and out of your computer.
What is the difference between Inbound and Outbound rules when opening a port?
Inbound rules control traffic coming into the server, while outbound rules control traffic going out of the server. If you want to open a port for both sending and receiving, you need to repeat the process as an outbound rule.
Why is it important to open ports on a Windows server?
Opening ports on a Windows server is important because it allows specific types of information to go in and out of your computer. For example, if you want to host a website, you need to open port 80 to allow web traffic to go in and out. By opening ports, you can ensure that the applications and services you want to use can communicate properly.
Port forwarding, also known as port mapping, is a networking process that directs incoming and outgoing communication to a specific path. It’s a crucial component of ensuring proper communication between your servers and other devices. In this guide, we’ll walk through the process of setting up port forwarding on a Windows Server.
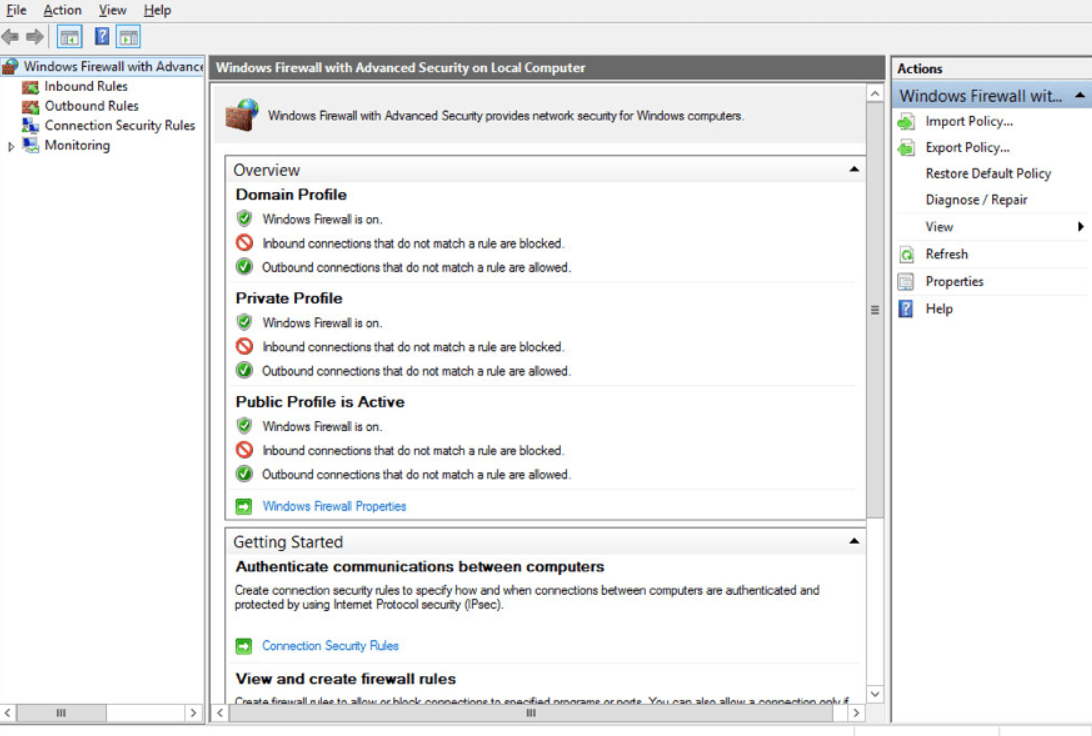
1. To start off, log in to your Windows Server machine. Then search for and open Windows Firewall with Advanced Security.
2. In the Windows Firewall with Advanced Security window, you’ll see an overview of your firewall settings. On the left side, click on Inbound Rules to set up port forwarding rules for incoming traffic.
3. Then, on the right-hand side under the Actions panel, click on New Rule….

4. A New Inbound Rule Wizard window will pop up. Here, select the Port option, then click Next.
5. In the next window, make sure TCP is selected. Then, in the Specific local ports: field, type in the port number you want to forward. Click Next when you’re done. (In this example, we are using port 3128)

6. The wizard will then ask you what action to take when a connection matches the specified conditions. Select Allow the connection, and then click Next.
7. On the next screen, you’ll be asked when this rule applies. Tick the boxes for Domain, Private, and Public networks, according to your needs. Once you’ve made your selections, click Next.
8. Finally, you will be asked to name and describe your rule. Provide a recognizable name and a brief description of the rule for future reference. Once done, click Finish to finalize the rule.
Your new inbound rule is now created and active in the Windows Firewall. Any incoming connections on the port you specified will be forwarded as per your configuration. Remember, port forwarding is a critical function that helps your server communicate correctly with other devices, so use it wisely! Always ensure that your server is secure and that you’re forwarding ports for trusted applications only. And there you have it! You’ve successfully set up port forwarding on your Windows Server 2016 machine. Feel free to repeat this process for any other ports you wish to forward.
Hello! One of the protection mechanisms of the server is the implementation of the Firewall. Although there are third party options, Microsoft offers a Firewall integrated into the operating system. It is very efficient and highly configurable. Additionally, it can allow or block connections or redirect connection requests. Also, by customizing the rules it is possible to allow only authorized communications. On the other hand, port management is vital within the Firewall. Since they allow communication between the server and the external network. In fact, the vast majority of attacks are carried out through these ports. For this reason, the Firewall blocks most of the ports. However, it is occasionally necessary for an app to have access to one. In this case, the administrator must authorize the program’s access to the required port. So let’s see how to open a firewall port in Windows Server 2019/2016.
How to open the firewall port using the advanced settings.
In the first place it is necessary to enter the Control Panel and follow the next path:
- System and security
- Windows Defender Firewall
- Advanced Settings

The advanced settings of the Windows Firewall are immediately displayed. There are the entry and exit rules plus the security rules for connections. Finally, there are the firewall supervision options.

Clicking on the input rules will display the pre-configured Windows Server rules. As the name implies, they are related to incoming network connections and packets. Also, some rules are not activated by default. Therefore, you just need to double-click on them and then enable them.

Creating a new rule in the Windows Server Firewall.
By right-clicking on inboud rules, you can create a new rule.

There are several options for the creation of the rule. However, you should only select Port. Press Next to continue

Now it’s time to set your connection preferences:
- TCP: It is a connection-oriented protocol. In other words, its function is to create connections with the aim of sending data flow.
- UDP: It is a non connection-oriented protocol. Consequently, its development is based on the exchange of data grams.
On the other hand, it is possible to enable all ports for connection. This is obviously an unsecured option. Or you can configure specific ports.

Now it is time to determine what action the new rule will take:
- Allow connection through the port.
- Allow connection if secure. That is, allow data to be transmitted only if the connection is authenticated through Ipsec.
- Block connection through the port.

Please select the option corresponding to Allow connection and press Next. Now it is time to determine which profiles the new rule will be applied to.

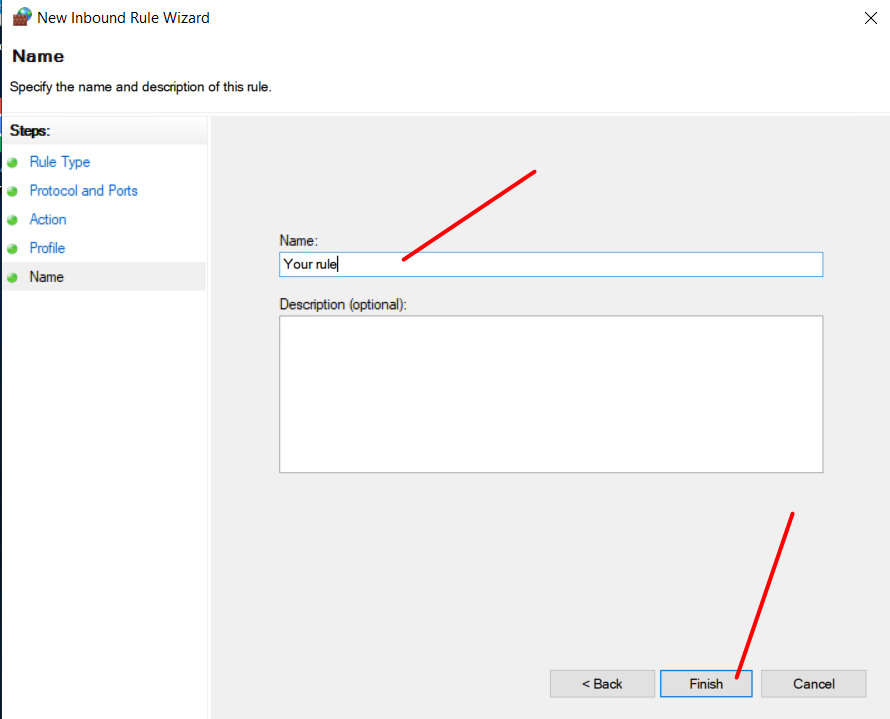
Finally, you can assign a name and description to the new rule. This way it is easier to locate it later.

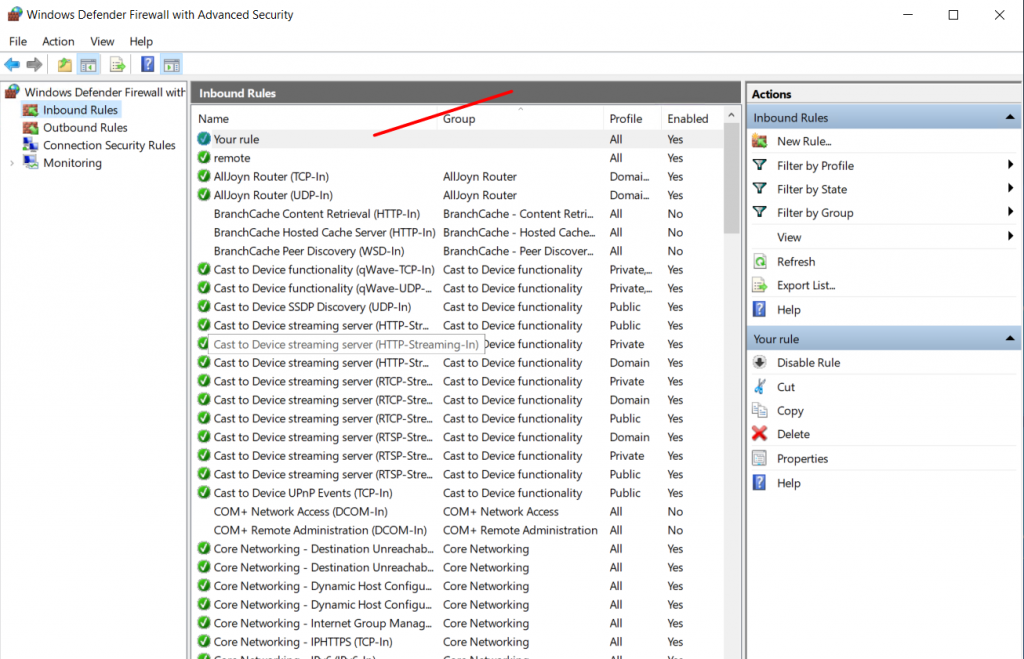
Back to the previous screen, you can see the new rule created.

Ultimately we have seen how to open a firewall port in Windows Server 2019/2016. In addition, the tutorial also serves to block a specific port. This way, the administrator can increase the functionality of the Firewall. All right, that’s it for now. Greetings!
— Advertisement —
Everything Linux, A.I, IT News, DataOps, Open Source and more delivered right to you.
Subscribe
«The best Linux newsletter on the web»
Introduction
Firewall represents one of mechanisms which provides protection for the Windows Server. Despite the fact that there exists a variety of third party solutions, Microsoft has implemented the Firewall into its operating system.
How to open the specific port using the advanced settings.
1. Click Start > Administrative Tools > Windows Firewall with Advanced Security
2. Click on “Inbound Rules” on the left of the MMC, then on “New Rule”
3. There are several options for the creation of the rule. To open a specific port, you should only select “Port”. Press “Next” to continue
4. In the “Protocol and Ports” section – select “TCP” as the type of protocol and type “your port″ in the “Specific local ports” input field:
5. In the “Action” section, select the option “Allow connection” and press “Next”.

6. In the “Profile” section, select all three options and click “Next”
7. In the “Name” section – you can enter a name and description to the new rule
8. Back to the previous screen, you can see the new rule created.
9. Finally, we have a new rule to open a desired firewall port in Windows Server 2019/2012