
Applies ToWindows 11 Windows 10
Ручка планшета может улучшить взаимодействие с устройством, делая задачи более интуитивно понятными и эффективными. Представьте себе, что вы рисуете свои идеи прямо на экране с подвижностью традиционного пера, но с дополнительными преимуществами цифровых инструментов. Ручка планшета обеспечивает точное управление, что делает ее идеальной для рисования, заметок и даже навигации по вашему устройству. Ручка не предназначена для замены мыши или клавиатуры, но улучшает способ работы и создания.
Когда вы используете ручку с Windows, она обеспечивает естественное ощущение. Чувствительность к давлению и распознавание наклона имитируют опыт использования реального пера, что делает его идеальным инструментом для художников и дизайнеров. Для учащихся это означает создание заметок более организованным и интерактивным способом с возможностью выделять, добавлять заметки и даже преобразовывать рукописный текст в текст.
Ручка также может помочь вам быть более продуктивным. Вы можете быстро отбирать идеи, размечать документы и легко перемещаться по презентациям. Интеграция с Windows Ink Workspace еще больше расширяет его полезность, предлагая набор инструментов, предназначенных для повышения эффективности работы с пером.
В этой статье описаны некоторые распространенные действия и параметры в Windows для максимально эффективного использования пера.
Ручка планшета использует Bluetooth для подключения к компьютеру, поэтому сначала необходимо связать в Windows. Чтобы связать ручку с компьютером, выполните следующие действия.
-
Нажмите кнопку Пуск , а затем выберите Параметры > Устройства Bluetooth & .
Или
Выберите следующий ярлык bluetooth & устройства :
Открытие устройств Bluetooth &
-
Убедитесь, что ручка находится в режиме связывания. Это действие зависит от типа пера. Например, с помощью ручки Surface нажмите и удерживайте верхнюю кнопку пера в течение 5–7 секунд, пока индикатор не мигает белым, чтобы включить режим связывания Bluetooth.
-
Выберите Добавить устройство.
-
В окне Добавление устройства выберите Bluetooth.
-
Выберите имя ручки. Например, «Ручка Surface».
-
После подключения нажмите кнопку Готово , чтобы закрыть окно.
-
Дополнительные сведения см. в статье Связывание устройства Bluetooth в Windows.
Меню пера в Windows 11 упрощает доступ к любимым приложениям.
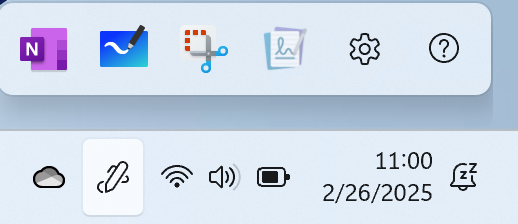
По умолчанию меню пера содержит сочетания клавиш для OneNote, Whiteboard, ножницы и Журнал.
Показать меню пера на панели задач
Может потребоваться включить отображение меню пера на панели задач.
-
Щелкните правой кнопкой мыши панель задач и выберите Параметры панели задач или используйте следующее сочетание клавиш:
Панель задач
-
В разделе Значки системного лотка включите меню пера.
Затем на панели задач появится значок пера .
Чтобы открыть меню пера, коснитесь значка пера .
Совет: Если у пера есть кнопка ярлыка, вы можете настроить его функцию, чтобы открыть меню пера. Например, см. раздел Использование ручки Surface.
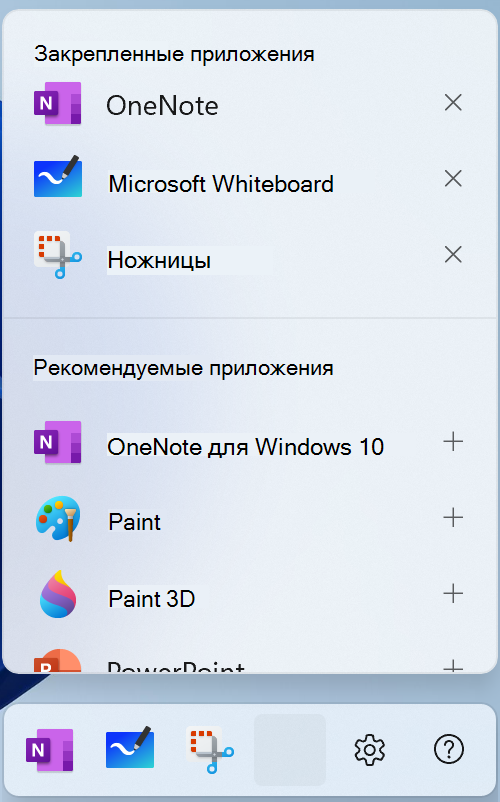
Добавление или удаление ярлыков
Вы можете добавить до четырех приложений в качестве ярлыков в меню пера.
-
Выберите меню пера в углу панели задач.
-
Когда появится меню пера, выберите Параметры , а затем изменить меню пера .
-
Чтобы удалить приложение из меню пера, щелкните значок удаления рядом с приложением в списке закрепленных приложений.
Совет: В меню пера можно закрепить только четыре приложения. Вы не можете добавить приложение, если четыре приложения уже закреплены.
-
Чтобы добавить приложение в доступный слот в меню пера, прокрутите страницу, чтобы найти приложение в списке предлагаемых приложений или всех приложений. Затем щелкните значок добавления рядом с приложением.
Вы можете настроить возможности пера и его работу на своем компьютере. Выберите, с какой рукой вы пишете, или что делает ваш компьютер при касании, двойном касании или удерживании кнопки ярлыка пера.
Чтобы изменить параметры, выберите Пуск > Параметры > Устройства Bluetooth & > Ручка & Windows Ink .
Или используйте следующий ярлык:
Открытие параметров

Большинство цифровых перьев для Windows являются перезаряжаемыми или имеют заменяемый аккумулятор AAAA. Прежде чем начать, проверка инструкции, поставляемые с ручкой.
Для большинства перьев можно заменить батарею, откручив конец ручки. Если вам нужны более конкретные инструкции, проверка с производителем пера.
Например, чтобы заменить батарею в ручке Surface без клипа, вытяните верхний конец прямо снизу. Дополнительные сведения о других моделях ручки Surface см. в статье Изменение батареек ручки Surface.
Статьи по теме
-
Рукописный ввод
-
Рисование заметок и создание эскизов в OneNote
-
Whiteboard помощь & обучении
-
Использование приложения «Ножницы» для захвата снимков экрана
-
Справка и обучение Журнал Microsoft
-
Помощь и обучение по ручке Surface
-
Определение модели ручки Surface и ее функций
-
Приложение Surface в Microsoft Store
Нужна дополнительная помощь?
Нужны дополнительные параметры?
Изучите преимущества подписки, просмотрите учебные курсы, узнайте, как защитить свое устройство и т. д.
Quick Links
Windows 10 gained a new pen settings panel with the Anniversary Update. If your device has a pen or another type of stylus, you can customize exactly how it works and what its buttons do from the Settings window.
This previously required device-specific apps like the Microsoft Surface app for configuring the Surface Pen on Surface devices. The Microsoft Surface app still allows you to adjust a Surface Pen’s pressure sensitivity, and other device-specific tools may still have additional settings. But most common options are now built into Windows.
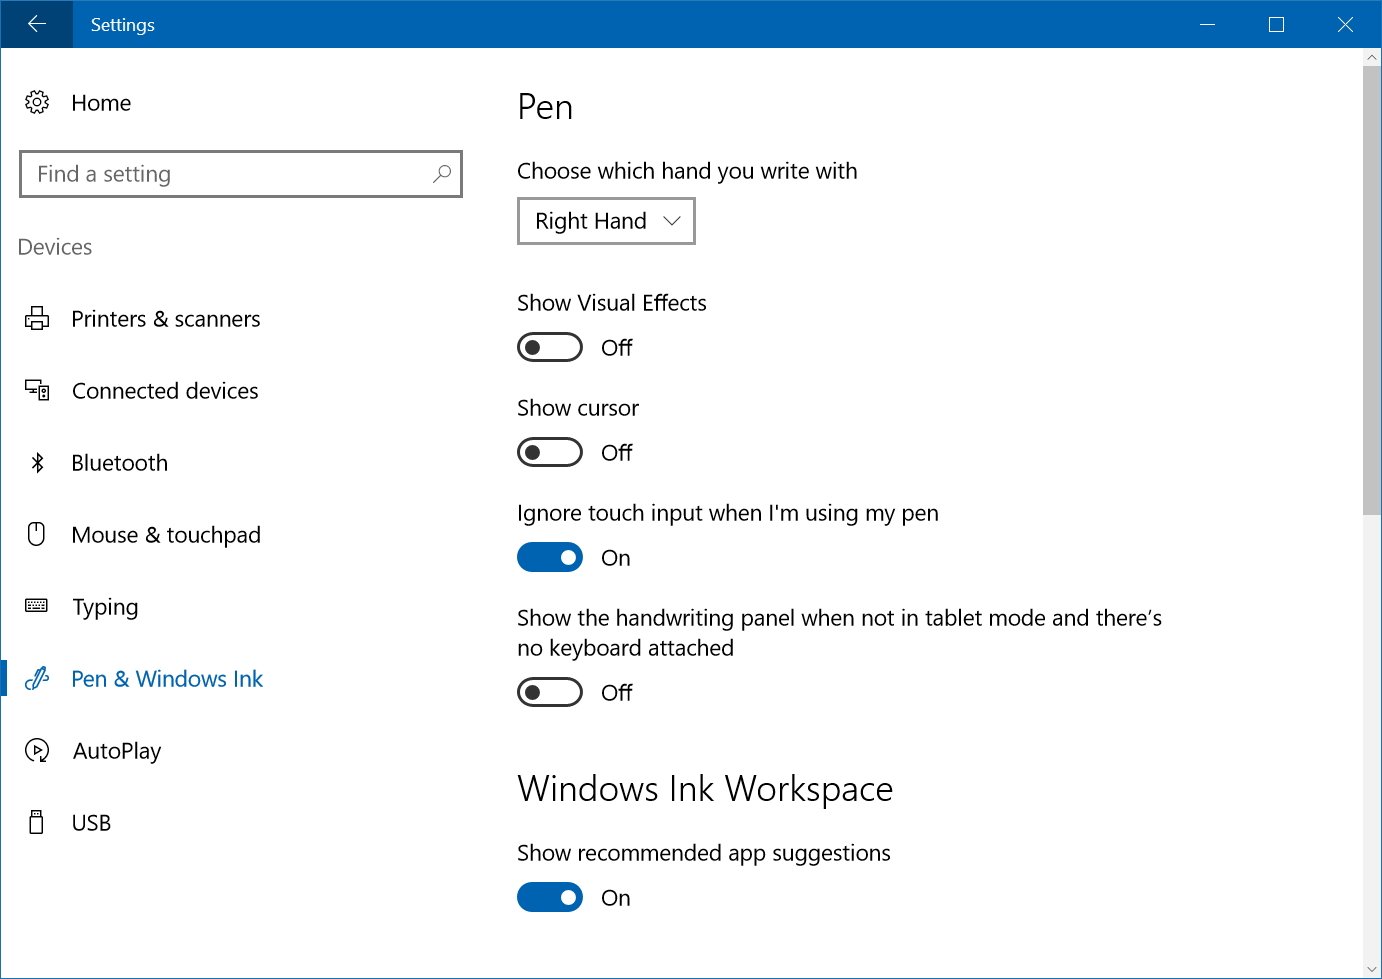
Pen Settings
To access pen settings, open the Settings app and select Devices > Pen & Windows Ink.
The «Choose which hand you write with» setting controls where menus appear when you use the pen. For example, if you open a context menu while it’s set to «Right Hand», it will appear to the left of the pen tip. If you open a context menu while it’s set to «Left Hand», it will appear to the right of the pen tip. Windows tries to avoid opening context menus behind your hand, where you can’t see them.
By default, Windows 10 assumes you’re right handed. If you’re left handed, you’ll want to select the Left Handed option under «Choose which hand you write with».
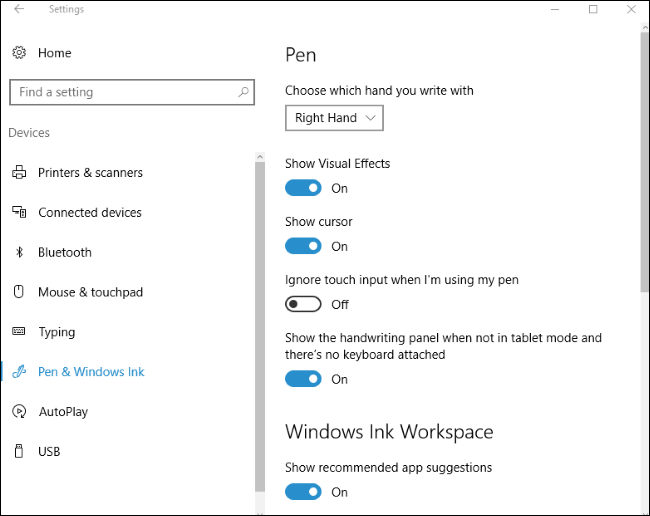
Windows 10 uses visual effects and a cursor appear by default, but you can disable them. The «Show visual effects» option makes graphical effects like a ripple appear when you touch your pen on the screen. If you dislike this, you can turn off this option.
The «Show cursor» option makes a cursor appear—often a dot-shaped cursor—when you hover your pen over the screen. If you don’t want to see a cursor, you can disable this option.
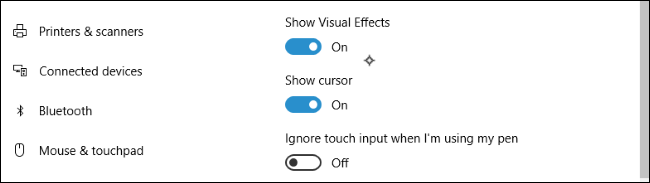
Many devices attempt to perform palm rejection while you’re using your pen, letting you accidentally bump the touch screen without causing problems. If you find yourself bumping the screen while drawing, enable the «Ignore touch input when I’m using my pen» option here.
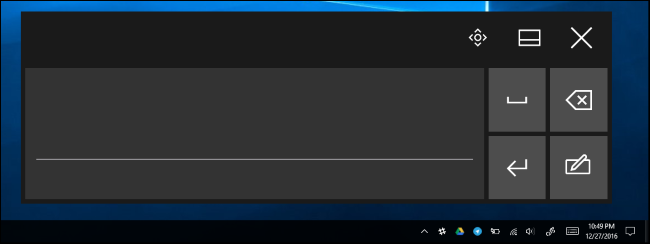
Windows 10 has handwriting feature that allows you to write with your pen and have it converted to typed text. The «Show the handwriting panel when not in tablet mode and there’s no keyboard attached» option makes this option easier to access.
With this option enabled, you can tap the keyboard icon in your notification area with the pen while your device is in tablet mode and the handwriting keyboard will appear instead of the normal touch keyboard. Tap it with your finger and the touch keyboard will still appear.
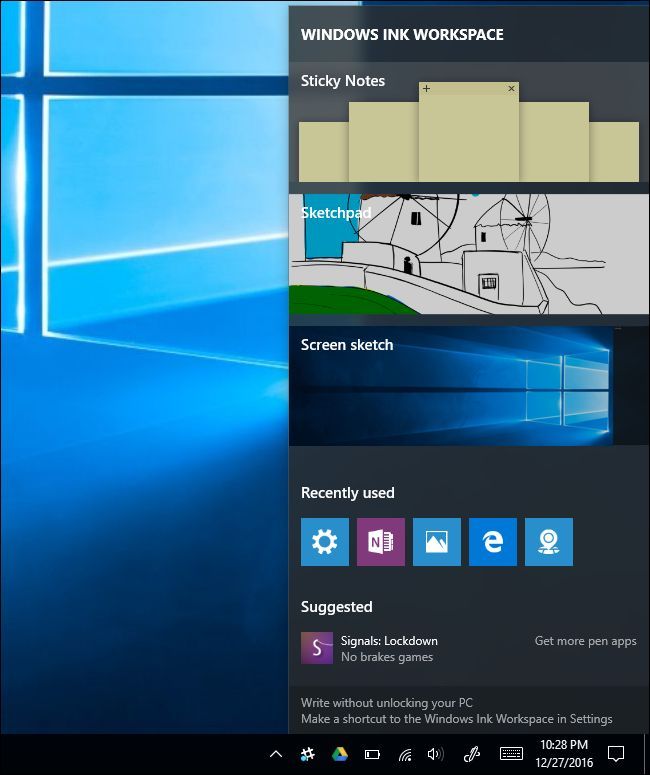
Windows Ink Workspace
The Anniversary Update also added the «Windows Ink Workspace» feature. By default, you can open it by pressing a shortcut button on your pen—if your pen has one—or clicking the pen-shaped Windows Ink icon in the notification area. If you don’t see the button, right-click the Windows taskbar and select «Show Windows Ink Workspace button».
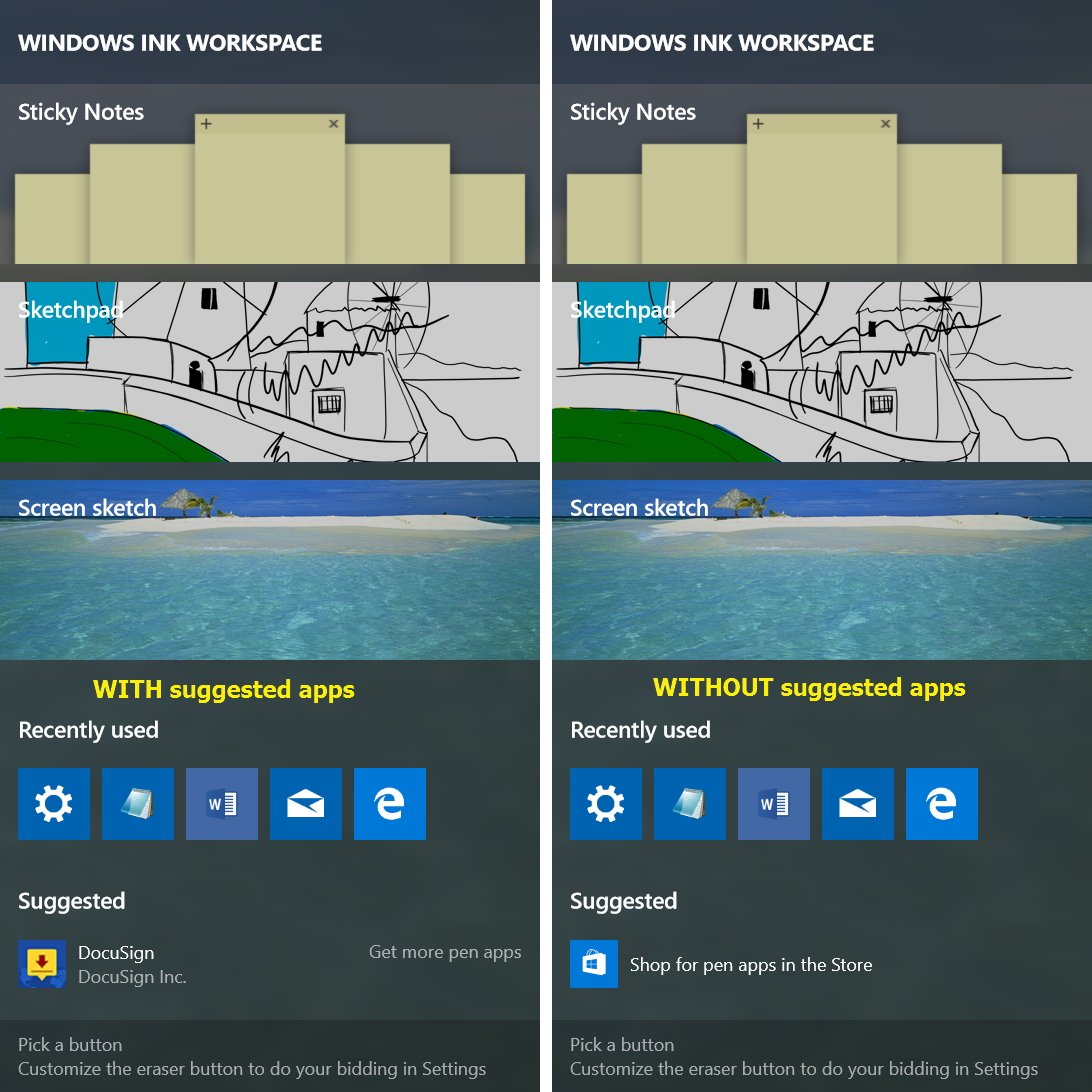
This panel provides shortcuts to pen-enabled apps like Sticky Notes and OneNote. It also suggests pen-enabled apps found in the Windows Store at the bottom of the panel. To disable this feature and make the panel stop showing suggested apps from the Store, turn off the «Show recommended app suggestions» feature.
If this feature is disabled, you’ll simply see a «Shop for pen apps in the Store» link that takes you to the Windows Store rather than a link to a specific app or two.
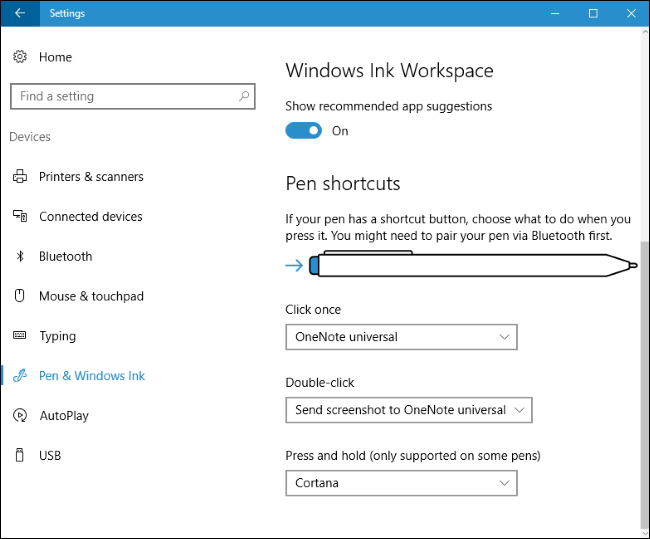
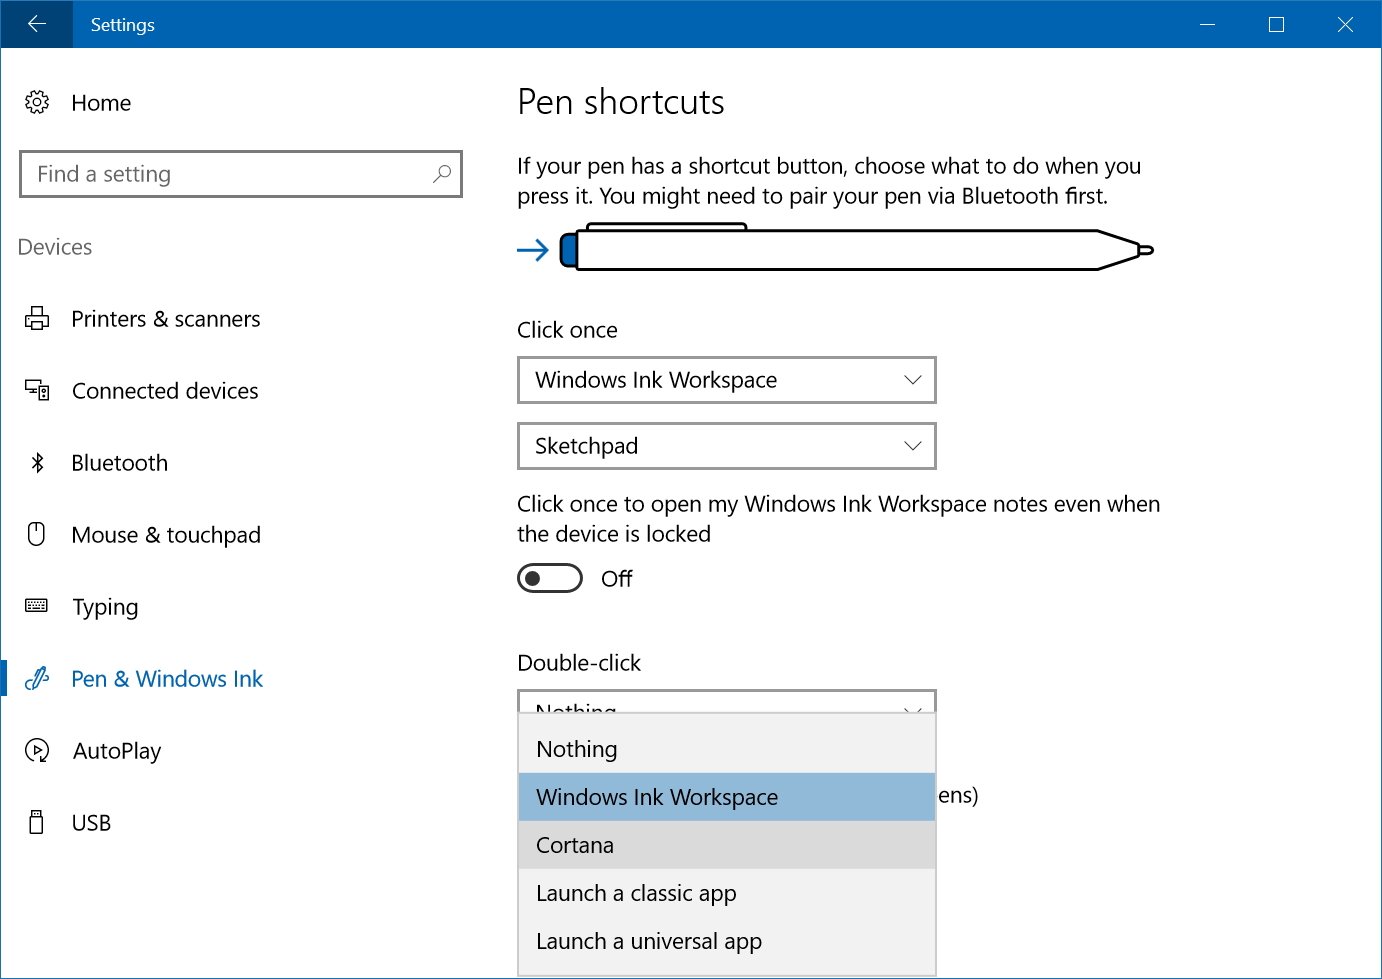
Pen Shortcuts
Many pens—but not all pens—have a shortcut button. For example, on the Surface Pen, you’ll find the shortcut button on the tip of the pen, where an eraser would be on a pencil. The options at the bottom of the panel allow you to control when you click the button once, double-click it, or press and hold it. The press and hold feature only works on some pens.
By default, clicking the button once will open the universal OneNote app, double-clicking will send a screenshot to the universal OneNote app, and pressing and holding will open Cortana. As this window says, you may need to pair the pen with your PC via Bluetooth if nothing happens when you press its buttons.
You can configure these buttons to do whatever you like—you can even disable them so nothing happens when you press the button, if you find yourself bumping it. The buttons can set to open the Windows Ink Workspace, open the universal OneNote app, open the desktop OneNote 2016 app, launch a classic desktop app of your choice, or launch a universal app of your choice. If you set the button to launch a classic desktop app, you can browse to any .exe file on your computer. If you set it to launch a universal app, you can select any installed universal app from a list.
Microsoft will probably continue to add more features and pen-button options in future updates to Windows 10. If you want to configure another feature on your device’s pen, look for a manufacturer-provided app or tool to configure it.
On the Windows 10 Anniversary Update, Microsoft is bringing a lot of new features and changes. One of the areas the company is focusing with the new major update is on pen support for touch-enabled devices, such as the Surface Pro 4 and Surface Book.
Microsoft is expanding its pen support through the new Windows Ink experience, which is just a fancy name the company now uses to refer to the existing pen support, but with new improvements. The new experience let you use your active pen more efficiently throughout the operating system, and to access three new features, including the redesigned Sticky notes, Sketchpad, and Screen Sketch that let you quickly annotate screenshots.
In order to make the experience more complete, the Anniversary Update also introduces a new set of customization options.
Pen & Windows Ink settings
The new options are available in the new «Pen & Windows Ink», under Devices, in the Settings app.
The new page is divided into three sections that let you customize a different set of options for your active pen on Windows Ink.
Pen
The Pen section gives you access to a number of essential and other interesting options:
- Choose which hand you write with: Optimizes the pen experience for left-handed or right-handed use.
- Show Visual Effects: Some active pens may show a ripple effect when pressing down, you can turn off this option to disable the visual effects.
- Show cursor: If you ever used a Surface Pen or any other digital pen, you probably noticed that a cursor appears as the pen gets closer to the screen. This little element can be distracting, so now you can disable the cursor from showing when you’re using the pen.

- Ignore touch input when I’m using my pen: Disables responses to on-screen touch gestures when you’re using the pen; this could be useful if you’re having trouble with palm or fingertip rejection.
- Show the handwriting panel when not in tablet mode and there’s no keyboard attached: When enabled, clicking the keyboard icon in the notification area will open the handwriting panel instead of the on-screen keyboard.
Windows Ink Workspace
The new handwriting experience also includes a hub called «Windows Ink Workspace»; it features a list of suggested apps from Store designed to use the pen. Think of it as a Start Menu, but for your pen. If you don’t want to see the list of recommendations, you can quickly remove it by turning off the Show recommended apps suggestions option (see above image).
All the latest news, reviews, and guides for Windows and Xbox diehards.
The image below shows you how the Windows Ink Workspace looks with (left) and without (right) suggested apps.
Pen Shortcuts
The Pen Shortcuts section is meant to help you customize what happens when you press the pen’s button. Of course, this is only supported on pens featuring a shortcut button, such as the Surface Pen. (Note that Bluetooth pairing may be required depending on the hardware.)
With this feature, you can configure three actions, including «Click once», «Double-click», and «Press and hold» (this last option is only available in certain pens).
In either case, you can configure the action to do nothing or to open a particular app. For example, you can select the Windows Ink Workspace from the list. Then a second drop-down menu will appear to choose whether you want to open «Home», «Sketchpad», «Sticky Notes», or «Screen sketch».
Specific to Windows Ink Workspace, you can also choose to open the experience even if the device is locked.
In addition, you can choose to open OneNote, classic or Windows Store apps.
Wrapping things up
Keep in mind that these new options are not just available for Surface tablets with the Surface Pen — they are available for all devices with pen support. Microsoft is still shipping the Surface app to let you configure more specific settings for the Surface Pen, so Surface users will have to use both Settings and the Surface app to fully customize their pen experience.
And while it may be obvious, it’s important to note that the «Pen & Windows Ink» settings page will only appear on compatible devices.
What settings are you configuring on your touch-enabled device with the Windows 10 Anniversary update? Let us know in the comments below.
More Windows 10 resources
For more help articles, coverage, and answers on Windows 10, you can visit the following resources:
- Windows 10 on Windows Central – All you need to know
- Windows 10 help, tips, and tricks
- Windows 10 forums on Windows Central
Mauro Huculak has been a Windows How-To Expert contributor for WindowsCentral.com for nearly a decade and has over 15 years of experience writing comprehensive guides. He also has an IT background and has achieved different professional certifications from Microsoft, Cisco, VMware, and CompTIA. He has been recognized as a Microsoft MVP for many years.
Contents:
- Pen & Windows Ink Overview
- How to Customize Pen on Windows 10?
- How to Enable Windows Ink Workspace on Windows 10?
Pen & Windows Ink Overview
As a new feature brought by Windows 10, Pen and Windows Ink are the tools which are devoted to facilitating various operations on Windows 10. To better use of the pen, Microsoft provides you with an expanded pen supporting on Windows 10, namely Windows Ink Workspace.
With the Windows Ink Workspace, as long as you have a connected pen on Windows 10, you can gain the access to the different Windows Ink functionalities, such as Sticky Notes, Sketchpad, and Screen Sketch. On the other hand, your Pen on Windows 10 will work more smoothly under if you have enabled or turned the Windows Ink Workspace on.
This post is concentrated on making it clear about how to personalize or use Pen and Windows Ink on Windows 10. Of course, it is indispensable as well to teach you the way to let Windows Ink Workspace get started on Windows 10.
How to Customize Pen on Windows 10?
Usually, if you are using a Pen on Windows 10, it is inevitable that you come across numerous issues of the Pen and Windows Ink, for they are closely associated with each other. In most cases, you simply want to adjust the settings for Pen and Windows Ink in Devices.
1. Click Start Button and choose Settings.
2. Select Devices from Windows Settings.
3. Navigate to Pen & Windows Ink, change or personalize Pen settings.
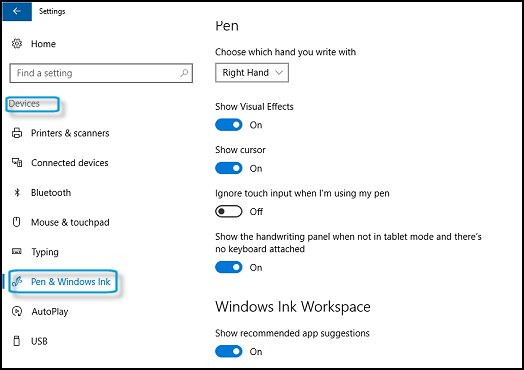
For Choose which hand you write with the Pen, you can set the Right hand or the Left Hand.
Here, for instance, if you are left-handed, it is no doubt that you should choose Left Hand.
For Visual effect, it means that you can choose whether to show the writing content or not.
For Show cursor, it is suggested that you turn it off, for the cursor will appear so long as your Pen get closer to the screen.
For Ignore the touch input when I’m using my Pen, when you are typing, you are able to avoid the palm influence by enabled this option.
For Show the handwriting panel when not in tablet mode and there’s no keyboard attached, once turned on, the handwriting panel will show in the notification area.
Here, you can also Change Windows Ink Workspace settings, such as Show recommended app suggestions.
At this point, it is certain that you can use and configure Pen and Windows Ink on Windows 10. But if you still have no idea about how to enable Windows Ink Workspace on Windows 10, the advantages that Pen and Windows Ink offer are not accessible to you as well. So go ahead to do more settings about Windows Ink Workspace.
How to Enable Windows Ink Workspace on Windows 10?
As discussed above, if you hope to use or efficiently use the connected Pen on Windows 10, it is a must for you to turn on the Windows Ink Workspace. In this way, obey the following guidance to get the Windows Ink Workspace started on Windows 10.
1. Right-click the taskbar and choose Show Windows Ink Workspace button. The Taskbar is usually set at the bottom of the desktop.
Then you can the Windows Ink apps come into sight, such as Sticky notes, Sketchpad and Screen sketch. And if you have opened the option that shows recommended app suggestions, you can also see the suggested apps.
As for the different apps in Windows Ink Workspace, it is suggested that you try to use them according to their features.
If you wish to make use of any one of them, just click it in Windows Ink Workspace.
With Sticky notes, you can write a note for the purpose of reminding you of something, such as appointments or events or telephone numbers.
With Sketchpad, you are able to draw a line with the ruler or picture something you like, for there are various tools for drawing. It is no less than what you need to draw on a paper.
With Screen Sketch, the best and unique thing you can do is make a screenshot. For instance, if you want to highlight one point in a web page or in a document, it is a wise choice for you to complete it with the help of Screen Sketch in Windows Ink Workspace.

From the above analysis, it is apparent that from this tutorial, you are able to learn how to use and personalize Pen and Windows Ink settings on Windows 10. And meanwhile, you are proficient in enabling and using Windows Ink Workspace on Windows 10.
More Articles:
Photoshop Pen Pressure Not Working on Windows 10, 8, 7
Fixed: Windows 10 Settings Won’t Open (2021 Update)
Fixed: Pink Screen of Death on Windows 10
Jane He
Jane is a tech-writer and content writer with an endless passion for exploring computer problems and technologies. She loves solving problems and helping others with challenges in dealing with technical problems. Hence, she has been writing articles for Tencomputer.com to provide technical support and suggestions for people.
Если вы используете планшет или ноутбук Windows 11/10 с поддержкой пера, то могли заметить, что в отличие от Android или iPadOS, использование пера для рисования или других действий не отключает реакцию сенсора на касания по умолчанию, что может быть не очень удобным.
В этой простой инструкции о том, как изменить это поведение в Windows и сделать так, чтобы при использовании пера в Windows экран не реагировал на случайные касания ладонью или пальцами.
Настройки параметров пера в Windows Ink
Необходимая опция присутствует в параметрах Windows 11/10. Чтобы включить её, достаточно выполнить следующие шаги:
- Откройте настройки пера и Windows Ink через меню пера в панели задач, если оно отображается, либо в «Параметры» — «Bluetooth и Устройства» в Windows 11 (или просто «Устройства» в случае Windows 10) — Перо и Windows Ink.

- Здесь вы можете настроить необходимые свойства вашего пера. В контексте этой инструкции нас будет интересовать пункт «Игнорировать сенсорный ввод при использовании пера», находящийся в разделе «Дополнительные параметры пера» — достаточно отметить его.


Рекомендую изучить и другие доступные настройки пера в этом разделе Параметров, возможно, среди них найдутся и дополнительные опции, полезные для вашего сценария использования.
Готово, теперь при создании заметок или рисунков с использованием пера экран не должен реагировать на прикосновения ладони или пальцев:

Учитывайте, что описанные действия сработают лишь для сенсорных экранов с поддержкой ввода пером и при наличии соответствующего пера: не все сенсорные экраны предназначены для этого, а «универсальные стилусы», подходящие для любых емкостных сенсорных экранов, работают иначе — как обычный палец, а не как специальное перо.