Environment variables are key-value pairs a system uses to set up a software environment. The environment variables also play a crucial role in certain installations, such as installing Java on your PC or Raspberry Pi.
In this tutorial, we will cover different ways you can set, list, and unset environment variables in Windows 10.
Prerequisites
- A system running Windows 10
- User account with admin privileges
- Access to the Command Prompt or Windows PowerShell
Check Current Environment Variables
The method for checking current environment variables depends on whether you are using the Command Prompt or Windows PowerShell:
List All Environment Variables
In the Command Prompt, use the following command to list all environment variables:
set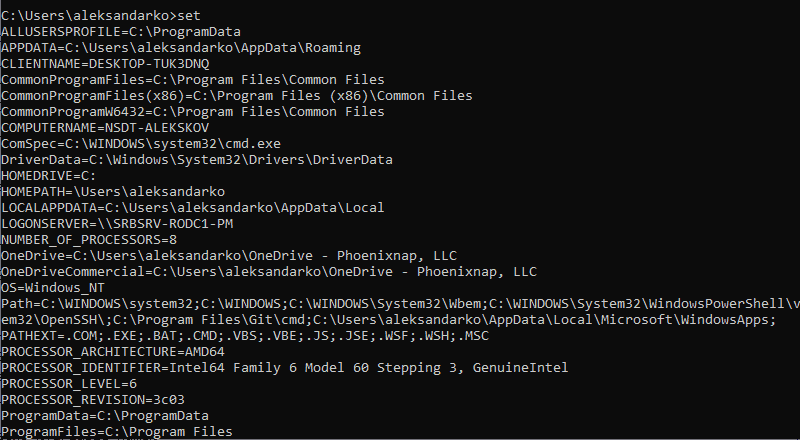
If you are using Windows PowerShell, list all the environment variables with:
Get-ChildItem Env: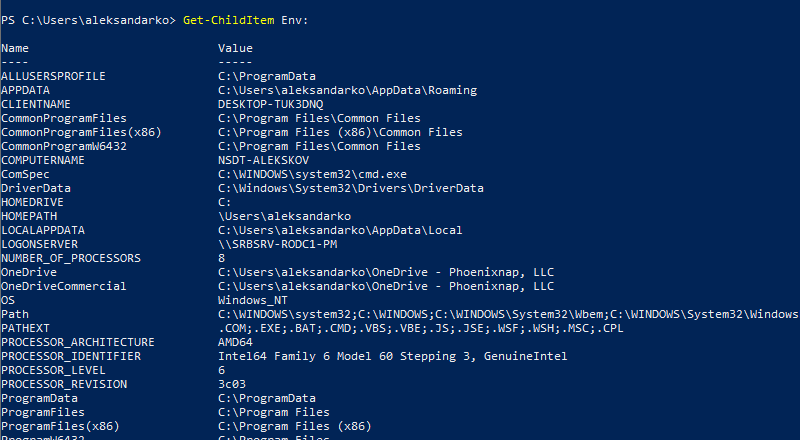
Check A Specific Environment Variable
Both the Command Prompt and PowerShell use the echo command to list specific environment variables.
The Command prompt uses the following syntax:
echo %[variable_name]%
In Windows PowerShell, use:
echo $Env:[variable_name]
Here, [variable_name] is the name of the environment variable you want to check.
Set Environment Variable in Windows via GUI
Follow the steps to set environment variables using the Windows GUI:
1. Press Windows + R to open the Windows Run prompt.
2. Type in sysdm.cpl and click OK.
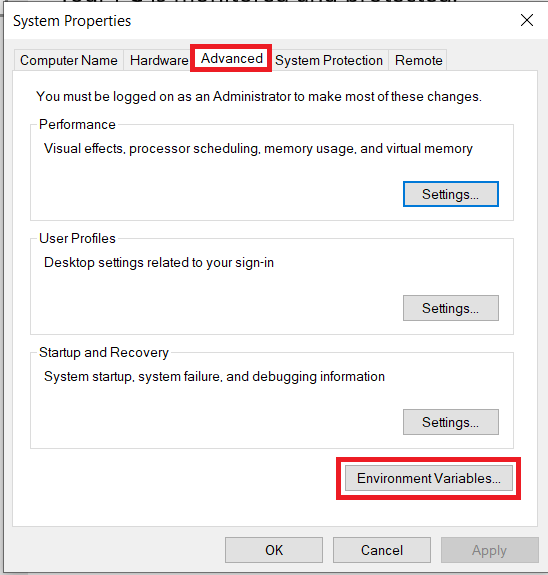
3. Open the Advanced tab and click on the Environment Variables button in the System Properties window.
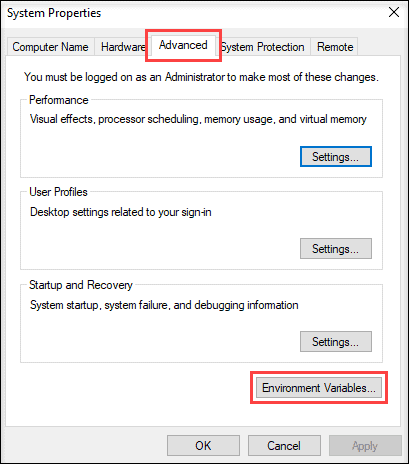
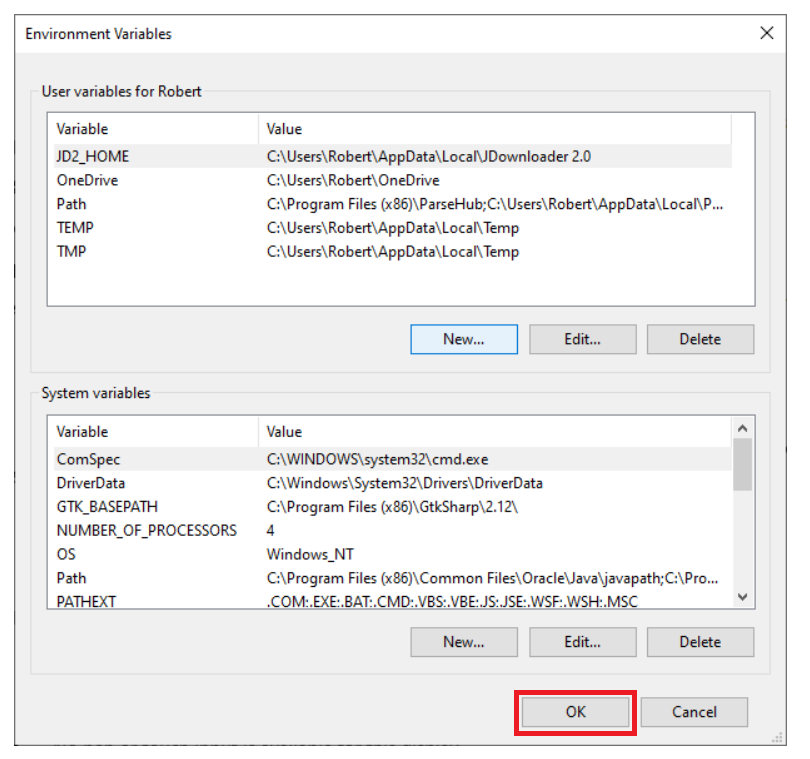
4. The Environment Variables window is divided into two sections. The sections display user-specific and system-wide environment variables. To add a variable, click the New… button under the appropriate section.
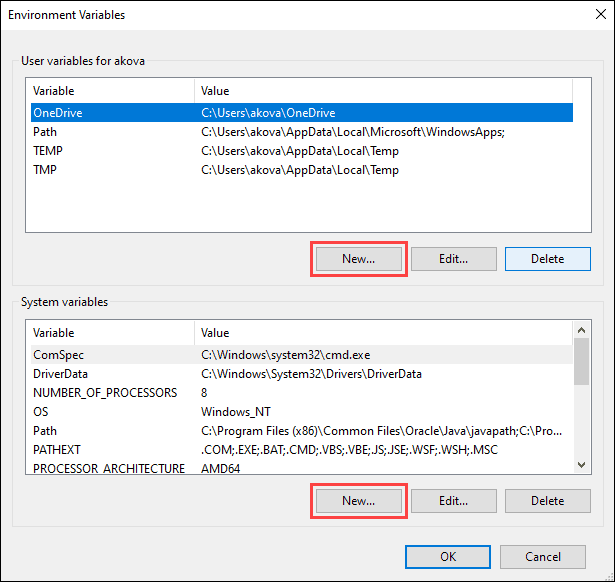
5. Enter the variable name and value in the New User Variable prompt and click OK.

Set Environment Variable in Windows via Command Prompt
Use the setx command to set a new user-specific environment variable via the Command Prompt:
setx [variable_name] "[variable_value]"Where:
[variable_name]: The name of the environment variable you want to set.[variable_value]: The value you want to assign to the new environment variable.
For instance:
setx Test_variable "Variable value"
Note: You need to restart the Command Prompt for the changes to take effect.
To add a system-wide environment variable, open the Command Prompt as administrator and use:
setx [variable_name] "[variable_value]" /M
Unset Environment Variables
There are two ways to unset environment variables in Windows:
Unset Environment Variables in Windows via GUI
To unset an environment variable using the GUI, follow the steps in the section on setting environment variables via GUI to reach the Environment Variables window.
In this window:
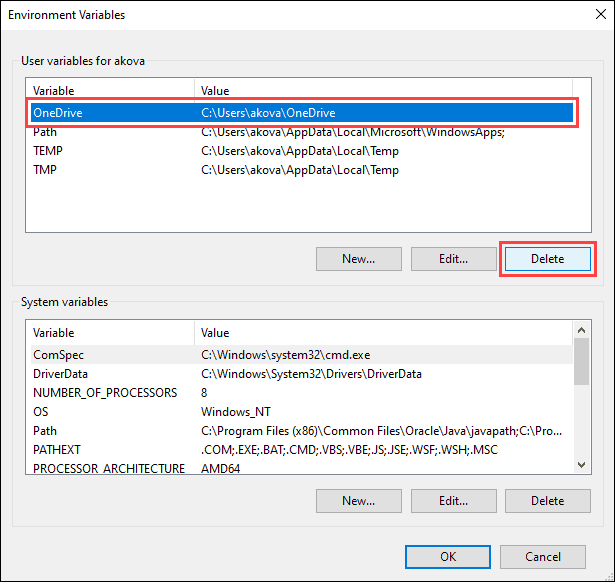
1. Locate the variable you want to unset in the appropriate section.
2. Click the variable to highlight it.
3. Click the Delete button to unset it.
Unset Environment Variables in Windows via Registry
When you add an environment variable in Windows, the key-value pair is saved in the registry. The default registry folders for environment variables are:
- user-specific variables: HKEY_CURRENT_USEREnvironment
- system-wide variables: HKEY_LOCAL_MACHINESYSTEMCurrentControlSetControlSession ManagerEnvironment
Using the reg command allows you to review and unset environment variables directly in the registry.
Note: The reg command works the same in the Command Prompt and Windows PowerShell.
Use the following command to list all user-specific environment variables:
reg query HKEY_CURRENT_USEREnvironment
List all the system environment variables with:
reg query "HKEY_LOCAL_MACHINESYSTEMCurrentControlSetControlSession ManagerEnvironment"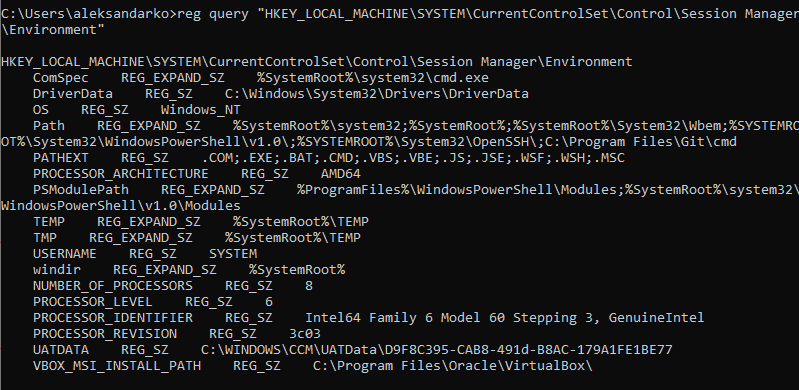
If you want to list a specific variable, use:
reg query HKEY_CURRENT_USEREnvironment /v [variable_name]
or
reg query "HKEY_LOCAL_MACHINESYSTEMCurrentControlSetControlSession ManagerEnvironment" /v [variable_name]
Where:
/v: Declares the intent to list a specific variable.[variable_name]: The name of the environment variable you want to list.
Use the following command to unset an environment variable in the registry:
reg delete HKEY_CURRENT_USEREnvironment /v [variable_name] /f
or
reg delete "HKEY_LOCAL_MACHINESYSTEMCurrentControlSetControlSession ManagerEnvironment" /v [variable_name] /f
Note: The /f parameter is used to confirm the reg delete command. Without it, entering the command triggers the Delete the registry value EXAMPLE (Yes/No)? prompt.
Run the setx command again to propagate the environment variables and confirm the changes to the registry.
Note: If you don’t have any other variables to add with the setx command, set a throwaway variable. For example:
setx [variable_name] trash
Conclusion
After following this guide, you should know how to set user-specific and system-wide environment variables in Windows 10.
Looking for this tutorial for a different OS? Check out our guides on How to Set Environment Variables in Linux, How to Set Environment Variables in ZSH, and How to Set Environment Variables in MacOS.
Was this article helpful?
YesNo
Все способы:
- Переменные среды Windows
- Переменные PATH и PATHEXT
- Создание переменных среды
- Заключение
- Вопросы и ответы: 6
Переменная среды (переменная окружения) – это короткая ссылка на какой-либо объект в системе. С помощью таких сокращений, например, можно создавать универсальные пути для приложений, которые будут работать на любых ПК, независимо от имен пользователей и других параметров.
Переменные среды Windows
Получить информацию о существующих переменных можно в свойствах системы. Для этого кликаем по ярлыку Компьютера на рабочем столе правой кнопкой мыши и выбираем соответствующий пункт.

Переходим в «Дополнительные параметры».
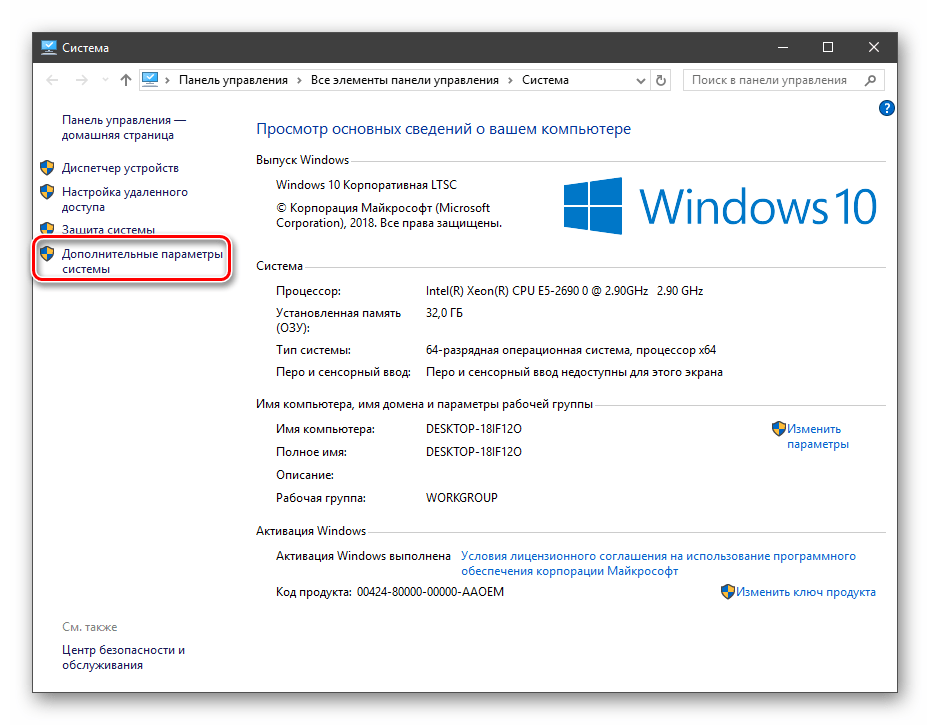
В открывшемся окне с вкладкой «Дополнительно» нажимаем кнопку, указанную на скриншоте ниже.
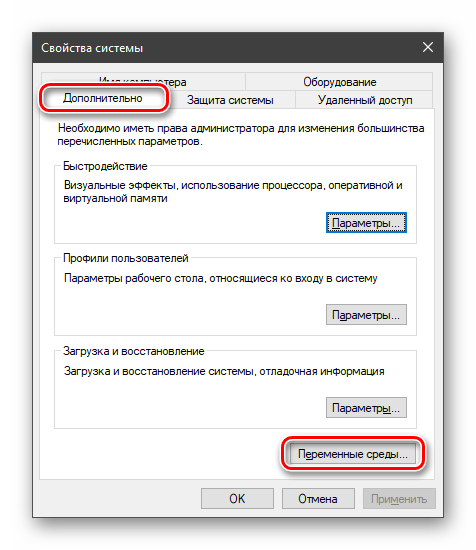
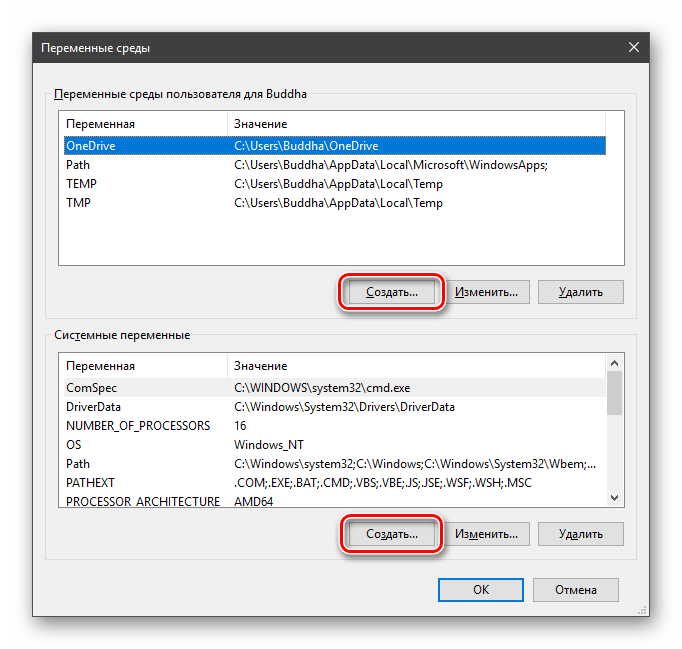
Здесь мы видим два блока. Первый содержит пользовательские переменные, а второй системные.
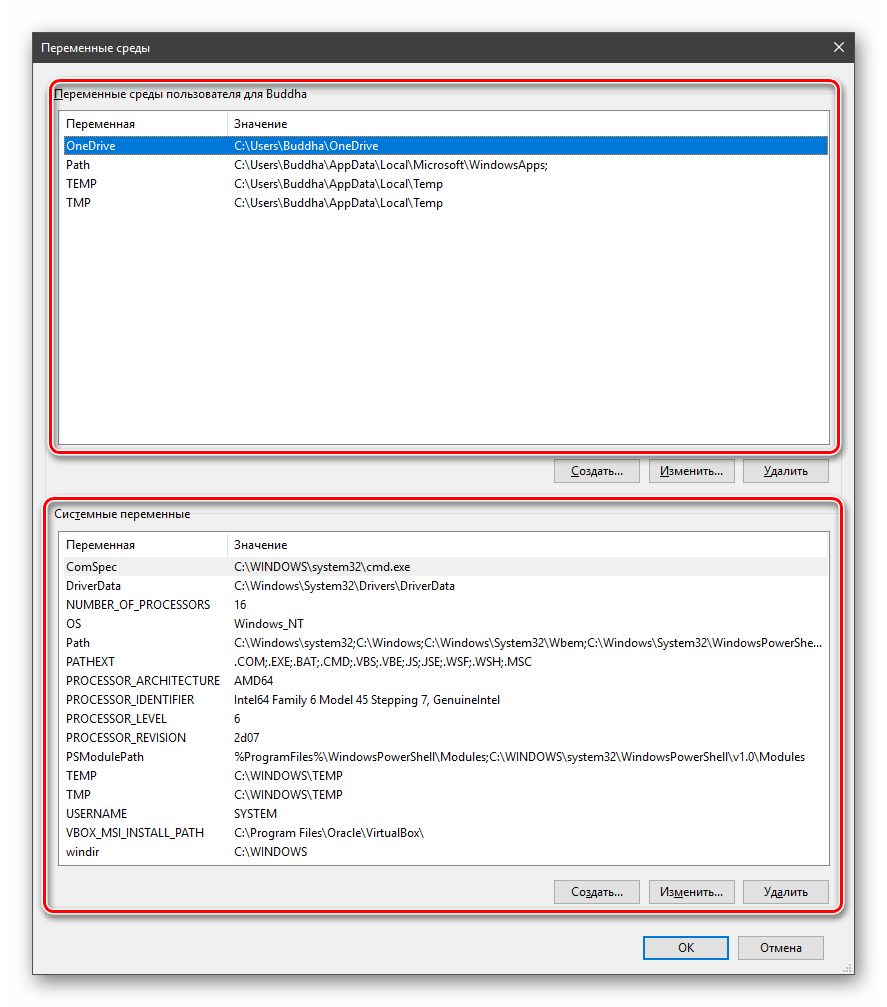
Если требуется просмотреть весь перечень, запускаем «Командную строку» от имени администратора и выполняем команду (вводим и нажимаем ENTER).
set > %homepath%\desktop\set.txt

Подробнее: Как открыть «Командную строку» в Windows 10
На рабочем столе появится файл с названием «set.txt», в котором будут указаны все переменные окружения, имеющиеся в системе.
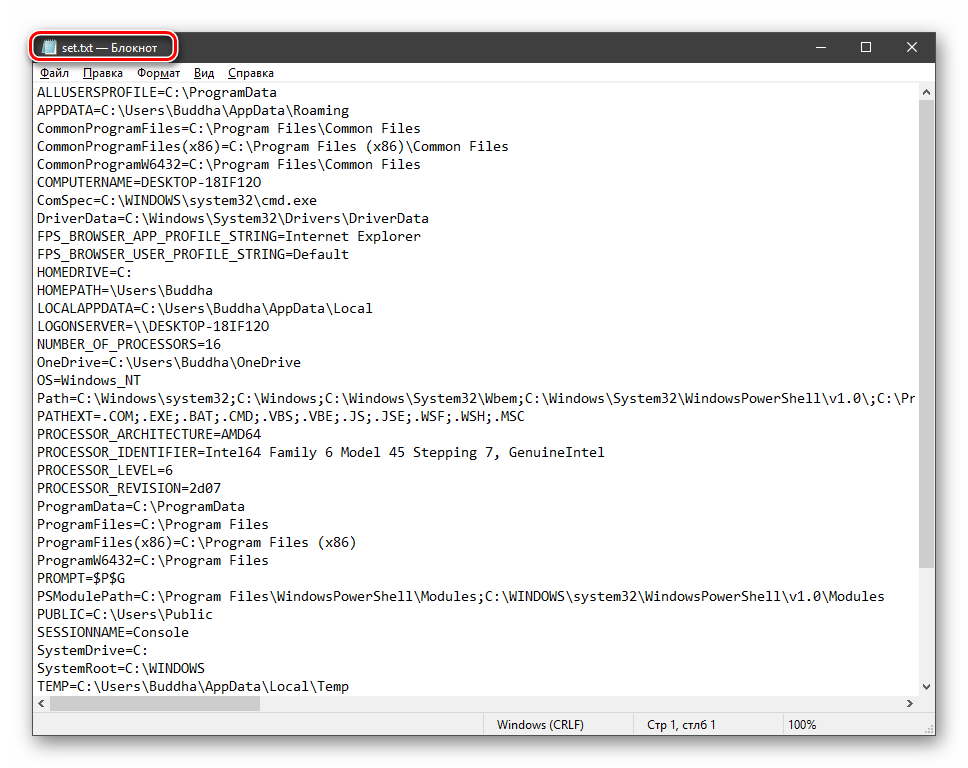
Все их можно использовать в консоли или скриптах для запуска программ или поиска объектов, заключив имя в знаки процента. Например, в команде выше вместо пути
C:\Users\Имя_пользователя
мы использовали
%homepath%
Примечание: регистр при написании переменных не важен. Path=path=PATH
Переменные PATH и PATHEXT
Если с обычными переменными все понятно (одна ссылка – одно значение), то эти две стоят особняком. При детальном рассмотрении видно, что они ссылаются сразу на несколько объектов. Давайте разберемся, как это работает.

«PATH» позволяет запускать исполняемые файлы и скрипты, «лежащие» в определенных каталогах, без указания их точного местоположения. Например, если ввести в «Командную строку»
explorer.exe
система осуществит поиск по папкам, указанным в значении переменной, найдет и запустит соответствующую программу. Этим можно воспользоваться в своих целях двумя способами:
- Поместить необходимый файл в одну из указанных директорий. Полный список можно получить, выделив переменную и нажав «Изменить».
- Создать свою папку в любом месте и прописать путь к ней. Для этого (после создания директории на диске) жмем «Создать», вводим адрес и ОК.
%SYSTEMROOT% определяет путь до папки «Windows» независимо от буквы диска.
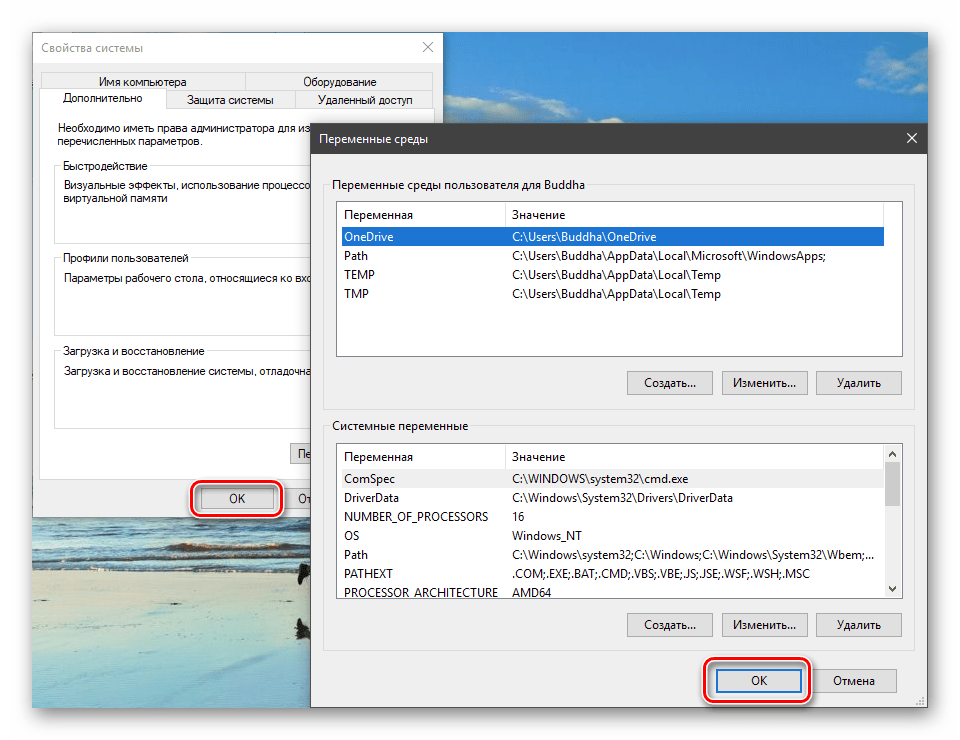
Затем нажимаем ОК в окнах «Переменные среды» и «Свойства системы».
Для применения настроек, возможно, придется перезапустить «Проводник». Сделать это быстро можно так:
Открываем «Командную строку» и пишем команду
taskkill /F /IM explorer.exe
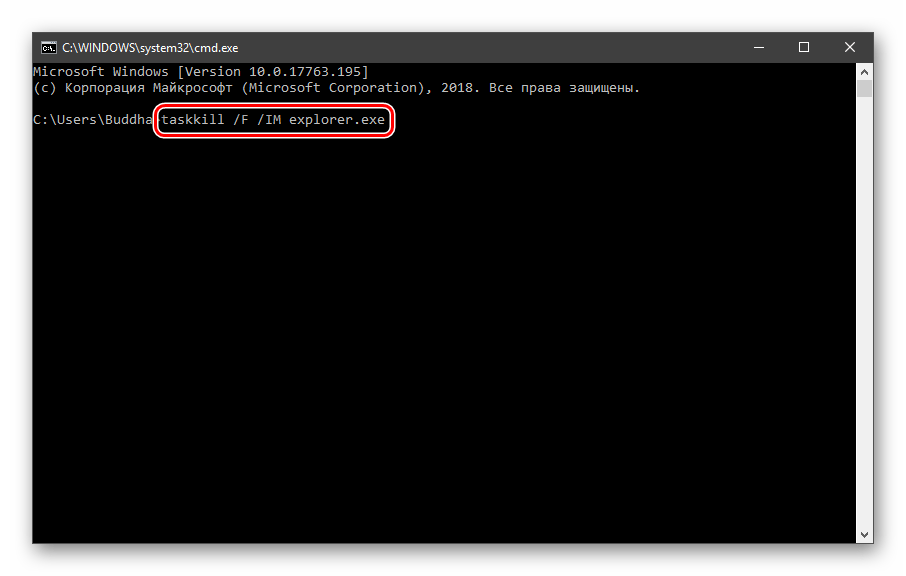
Все папки и «Панель задач» исчезнут. Далее снова запускаем «Проводник».
explorer
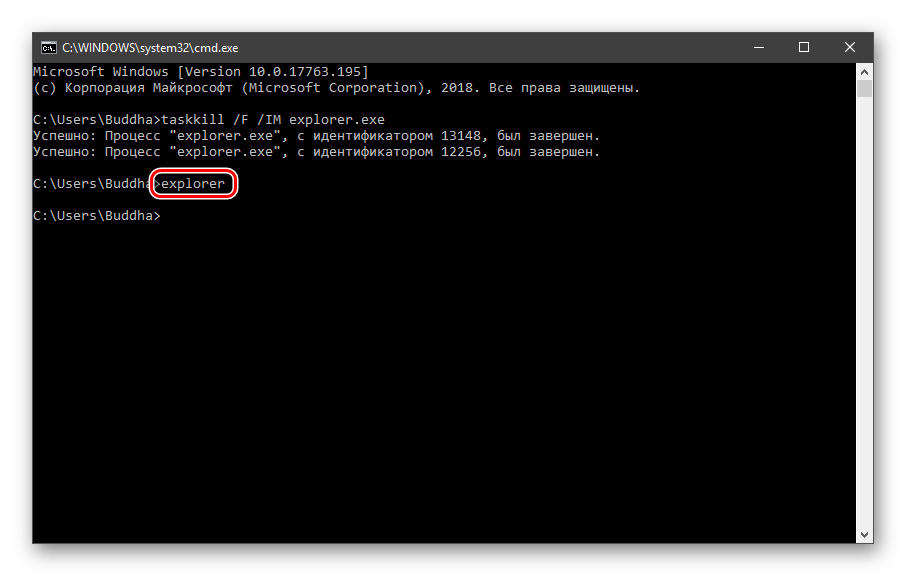
Еще один момент: если вы работали с «Командной строкой», ее также следует перезапустить, то есть консоль не будет «знать», что настройки изменились. Это же касается и фреймворков, в которых вы отлаживаете свой код. Также можно перезагрузить компьютер или выйти и снова зайти в систему.
Теперь все файлы, помещенные в «C:\Script» можно будет открывать (запускать), введя только их название.
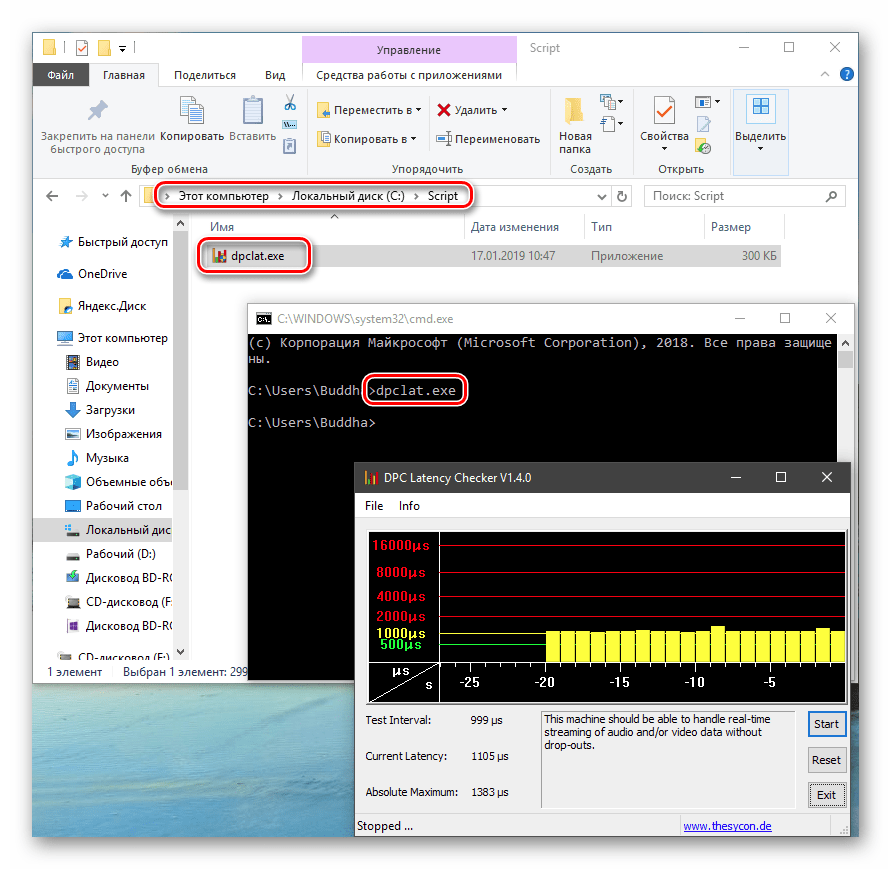
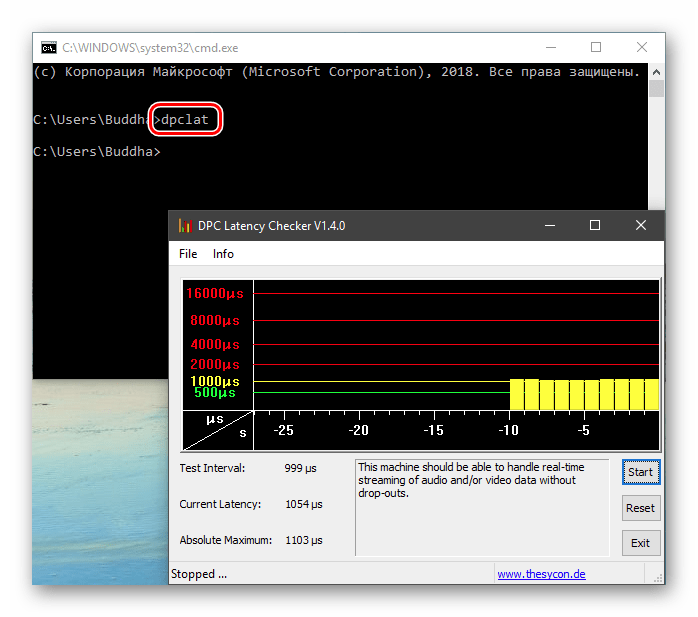
«PATHEXT», в свою очередь, дает возможность не указывать даже расширение файла, если оно прописано в ее значениях.

Принцип работы следующий: система перебирает расширения по очереди, пока не будет найден соответствующий объект, причем делает это в директориях, указанных в «PATH».
Создание переменных среды
Создаются переменные просто:
- Нажимаем кнопку «Создать». Сделать это можно как в пользовательском разделе, так и в системном.
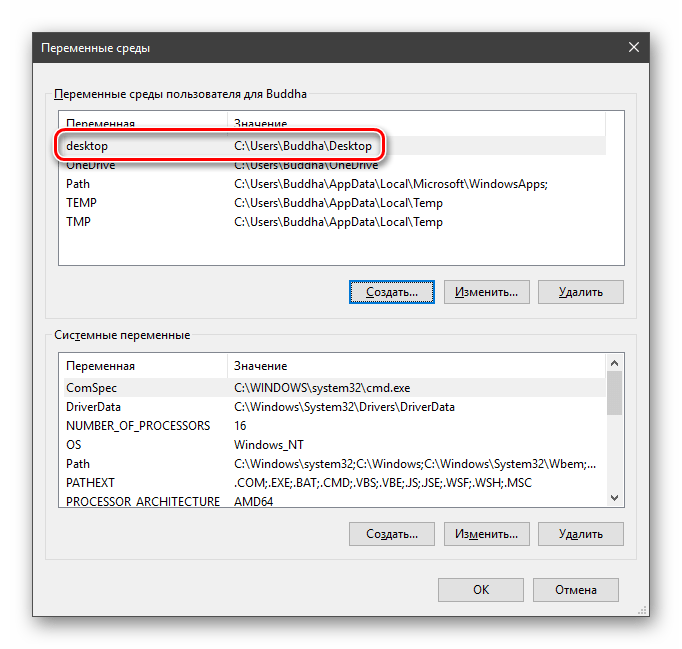
- Вводим имя, например, «desktop». Обратите внимание на то, чтобы такое название еще не было использовано (просмотрите списки).
- В поле «Значение» указываем путь до папки «Рабочий стол».
C:\Users\Имя_пользователя\Desktop - Нажимаем ОК. Повторяем это действие во всех открытых окнах (см. выше).
- Перезапускаем «Проводник» и консоль или целиком систему.
- Готово, новая переменная создана, увидеть ее можно в соответствующем списке.
Для примера переделаем команду, которую мы использовали для получения списка (самая первая в статье). Теперь нам вместо
set > %homepath%\desktop\set.txt
потребуется ввести только
set > %desktop%\set.txt
Заключение
Использование переменных окружения позволяет значительно сэкономить время при написании скриптов или взаимодействии с системной консолью. Еще одним плюсом является оптимизация создаваемого кода. Имейте в виду, что созданные вами переменные отсутствуют на других компьютерах, и сценарии (скрипты, приложения) с их использованием работать не будут, поэтому перед тем, как передавать файлы другому пользователю, необходимо уведомить его об этом и предложить создать соответствующий элемент в своей системе.
Наша группа в TelegramПолезные советы и помощь
Different programs and processes require different environments to run. On a single machine, Windows needs to make sure that all programs and processes can access the environments they need.
To do this, Windows needs to know the kind of environment every program requires to work. Windows must store this information somewhere for easier retrieval. Environment variables make that possible.
Environment variables are, in short, data storing mechanisms.
Let’s dig a little deeper to see how environment variables work and how you can create, edit, and delete them effectively.
What Are Environment Variables in Windows 10?
Environment variables are dynamic variables that store data related to creating different environments for different programs and processes.
To understand them better, let us take the example of a program that needs to use a built-in Windows tool to run.
For the program to use the tool, the program needs to know the tool’s location to access it. The program also needs to find out if it has permission to use the tool or not. Similarly, there are things that a program needs to know before it can use the tool.
So, a program can access all of this information by asking Windows. Windows then looks up environment variables (EVs) for this data and creates an environment in which that program can run.
In other words, EVs store data that is accessible to every program and process running on the system across all users. The data these variables store helps the programs run in the environment they were designed for.
Some of the most important EVs on Windows include PATH, HOMEPATH, and USERNAME. All of these variables contain values that any user and process of the system can access at any time. For instance, the USERNAME environment variable contains the name of the current user. Windows can look up this variable whenever it needs to find out the name of the current user.
How to Set Environment Variables in Windows 10?
First things first, if you want to set system-wide EVs, you need to have administrative privileges. So, if you are not the admin, inform your system administrator and ask for their help.
Now that you have admin privileges:
- Type Advanced system settings in the Start menu search box and select the Best match.
- In the System Properties box, click on Environment Variables to open the Environment Variables panel.
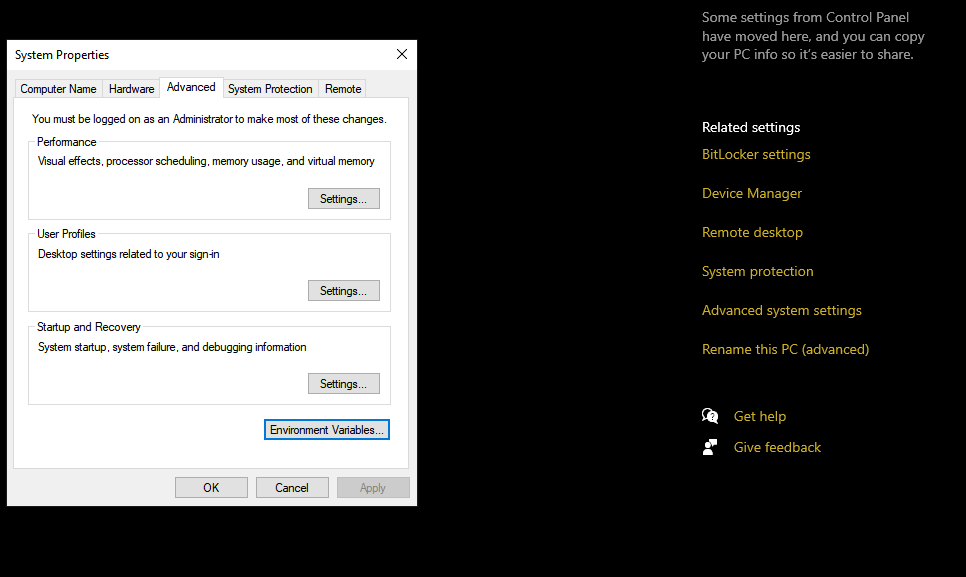
The EVs panel lists two types of variables depending upon your need. If you want to change EVs for the current user only and don’t want the changes to reflect system-wide, you will change User variables.
On the contrary, if you want system-wide changes, you will change System variables.
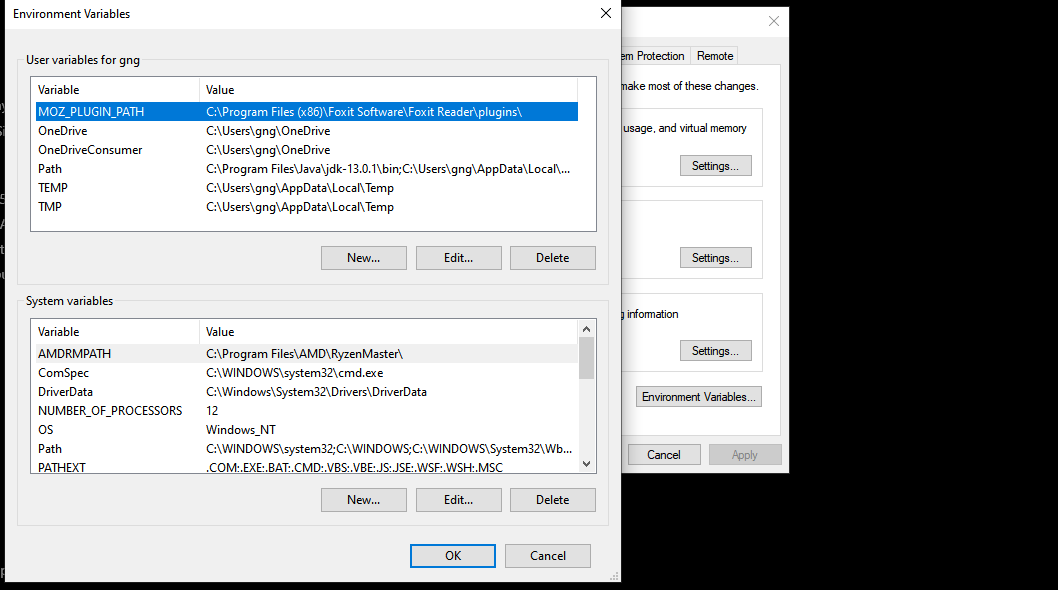
Let’s say you’ve just installed Java and want to add the java path to the EVs. To do this:
- Click on New under the User/System variables. This will open up the New User Variable box.
- Enter JAVA_HOME in the Variable name field and browse to the directory where you’ve installed Java to populate the path in Variable value.

Pressing OK will add the JAVA_HOME variable to the PATH variable.
How to Edit Environment Variables
To edit different environment variables, select any variable from the list. Then, press Edit. This will open up the Edit environment variable panel. Here you can create, delete, and edit variables.
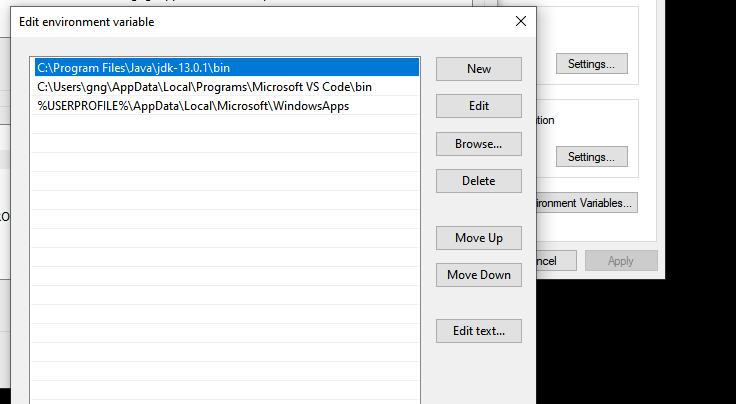
From the list of variables, select the one that you want to modify and click on Edit. Afterward, you can change the variable value to anything you like.
You can also delete the variables in a similar fashion.
What Is the Windows PATH Variable and How Can I Change it?
In simple terms, the PATH variable is an address book of programs and commands on your computer. Whenever you have a new program on your computer that you want to run from the command line interface, you must specify its address in the PATH variable.
A thing to remember here, not all programs are in the PATH environment variable. Only the programs that are meant to be used from the command line interface appear in the PATH variable. So, programs intended to be used from a Graphical User Interface don’t have their addresses in the PATH variable.
The way the process works involves Windows looking up the address for a certain command. Whenever you issue a command on a command line, Windows first searches the current directory for the command. If the OS can’t find it in the current directory, it looks up the PATH variable to find the address.
To enter an address in the PATH variable, the process is the same as before. Open up the Environment Variable box, select the PATH variable, and click on Edit.
In the Edit box, you can add, remove, and edit directories.
One final thing to remember, the PATH variable is not the same for every user on a system. So different users can list different directories without changing the variable for every user. So, if you want a tool to be available for every user, you have to edit the PATH variable under the System Variables.
Environment Variables in Windows 10 Store Data that Programs Need to Work
Programs need data to work. To make sure that data is available efficiently, Windows stores this data in global variables that all programs can access. These global variables are Environment Variables.
You can add, edit, and remove Environment Variables inside the Advanced System Settings panel.
Furthermore, if you have more than one user on a machine, user Environment Variables will be different for each user. For instance, one user may have listed a command under the PATH variable that won’t be available for other users.
On the other hand, system EVs are available for all users. These variables require admin privileges to edit or delete.
In short, EVs are Windows’ way to store important data. So, be sure you know what you are doing before modifying them.
Windows 10 supports a number of legacy features from older versions of the operating system. One of those legacy features is the environment variable. Environment variables offer a useful way to control the way Windows operates with an extremely small footprint in terms of memory usage.
For example, one common environment variable is called PATH, which is simply an ordered text string containing a list of directories that Windows should look in when an executable file is called. The PATH environment variable allows users to quickly launch programs without having to know where those programs live on the hard drive.
Setting environment variables is very useful and, fortunately, very simple. In this article, we’ll go over how to find and set your environment variables in Windows 10.
- Once logged in to Windows, right-click the Windows button in the lower-left corner of your screen and click System from the Power User Task Menu that’s displayed on the screen.
- Under the System menu, you need to click the Advanced System Settings.
- If you can’t find Advanced System Settings there, type “advanced system settings” into the search box and hit return to bring it up.
- Once Advanced System Settings is open, click on the Advanced tab, then look on the bottom-right side for the Environment Variables.
- Next, to create a new environment variable, click New. You might need to make a System variable depending upon what you’re doing.
- A dialog box will pop up, allowing you to enter a new variable name and to set its initial value:
- New adds a new environment variable.
- Edit lets you edit whatever environment variable you have selected.
- Delete lets you delete the selected environment variable.
- Save any changes that you make by clicking OK.
How to Find the PATH Variable in Windows 10
- Under the Environment Variables window, choose or highlight the PATH variable in the System Variables section shown in the window.
- After highlighting the PATH variable from System Variables, click the Edit button.
- You can add or modify the path lines with the directories you want your computer to look in for executable files.
- You will find that each different directory is separated with a semicolon, for example:
C:Program Files;C:Winnt;C:WinntSystem32
- You will find that each different directory is separated with a semicolon, for example:
- There are other environment variables in the System Variables section that you can examine by clicking Edit.
- Likewise, there are different environment variables, such as PATH, HOME, USER PROFILE, HOME and APP DATA, TERM, PS1, MAIL, TEMP, and so on. These Windows environment variables are very useful and can be used in scripts as well as on the command line.
- Once finished, you can test your changes by opening a new PowerShell window and entering the following:
$env:PATH
Frequently Asked Questions
Here is some more information about Environment Variables for you:
How Do I Find Environment Variables in Windows 10?
To find environment variables in Windows 10, you can follow the steps described above to find the environment variable information tucked away inside the system’s advanced settings.
Alternatively, if you just need to see what the variables are but don’t need to change them, you can simply open a command-line interface by hitting Ctrl +Esc and typing “cmd” in the command box, then type “set” in the command window. This prints out all the environment variables that are set on your system.
Why Can’t I Edit the Environment Variables?
There are several reasons that you may not be able to set these variables.
1. The first of your problems could be that you don’t have Admin rights. To set or edit this function, you must be the Administrator of the system.
2. If you are the Admin, yet the edit function is greyed out, try accessing the Environment Variables by accessing the Control Panel from the Start menu. Click on Advanced System Settings, then click Environment Variables.
Final Thoughts
Windows 10 environment variables make it incredibly easy to take control of your Windows device and make it run more efficiently. To find and set environment variables in Windows 10, follow the simple steps laid out in this article to get started.
Disclaimer: Some pages on this site may include an affiliate link. This does not effect our editorial in any way.
Send To Someone
Missing Device
Environmental Variables are dynamic objects which define different elements in a Windows environment. These variables can be used by different programs from anywhere within Windows and provide certain parameters to perform specific tasks.
Creating custom environment variables in Windows assists you in the longer run, as it enables you to run a program or a .exe file from any directory in Windows, and the title of the program would still be recognizable.
If you are using the same path or directory over and over again, it would be better to create a variable and provide a path of your directory and just use that variable instead of having to give complete paths each time.
You can say these variables as shortcuts to your apps. This can make you move around in Windows rather quickly. Before we dig into the process of creating a custom environmental variable, let us briefly discuss a bit about them.
Table of Contents
Types of Variables
There are two types of environment variables: A system variable and a user variable. Both are combined to make a complete computer environment.
System Variables
System variables are termed global variables and can be accessed or used by any user account on your computer.
User Variables
User variables are termed specific variables, which can only be accessed within the same user account. Other accounts on your computer are not familiar with such variables.
Use of Environment Variables
If you have to go to User Profile, and you have created a system variable with the name “userprofile”. You don’t need to open File Explorer and then navigate to your profile. Just simply access the variable you have created by typing “%userprofile%” into the Start Menu.
Accessing the variable, in this specific example, will automatically open your current user account.

Another example of using an environmental variable is while using a .exe file in the Command Prompt. If you have placed a .exe file in the “Downloads” folder, then you will need to provide the path “%userprofile%\Downloads\ABC.exe” each time to use the file. However, if it is declared as a user or system variable, then simply putting in “ABC.exe” will automatically fetch the .exe file, regardless of your current directory in the Command Prompt.
Now you know how these variables are helpful. Let us now show you how you can create your own custom variables and assign a path to save your time and navigate quickly within your OS.
Creating User Defined Environment Variables
Let’s create our own environment variables. Follow the steps below to do so:
- Type in sysdm.cpl in Run to open System Properties.
- From the System Properties window, switch to the Advanced tab and then click Environmental Variables.
- From the Environmental Variables window, click New under User or System variables (Your choice).
- In the New Variable popup, enter a name for your variable and then enter its complete path in Variable Value. Click Ok when done. In our case, we want to access the “Company” folder so we put the address of that particular folder in “Variable Value” of the new variable.
A new variable is now added to your environmental variables list.

Now typing in the name of your environmental variable in Run or Command Prompt will automatically open the desired location.
You can also create environmental variables for .exe files, batch files, etc., and use them to pass parameters and perform certain tasks.
If you wish to know the path for a variable, open the Command Prompt and type “echo” followed by the environmental variable inside percentage (%) signs, as in the following example:

In case you do not wish to use a variable in the future or want to edit it, you can delete the variable by selecting it in the Environmental variables window and then clicking Delete, or you may also click Edit to change its path or name.
Closing Words
Creating your own customized variables can be super helpful in cases where you have to use a path over and over again. What methods do you use as shortcuts for opening your favorite programs and folders?


