
Virtual Box, Виртуализация, Программное обеспечение
- 05.10.2016
- 169 929
- 20
- 30.08.2020
- 168
- 151
- 17
- Содержание статьи
- Установка гостевых дополнений
- Включаем общий буфер обмена
- Включаем Drag & Drop
- Комментарии к статье ( 20 шт )
- Добавить комментарий
Установка гостевых дополнений
Для включения возможности обмена буфером обмена между хостом (компьютером на котором установлен VirtualBox,) и виртуальной машиной (компьютером, запущенным в виртуальной машине), необходимо установить «Гостевые дополнения», которые находятся на виртуальном образе, примонтировать который можно через меню VirtualBox «Устройства — Подключить образ диска Дополнений гостевой ОС».
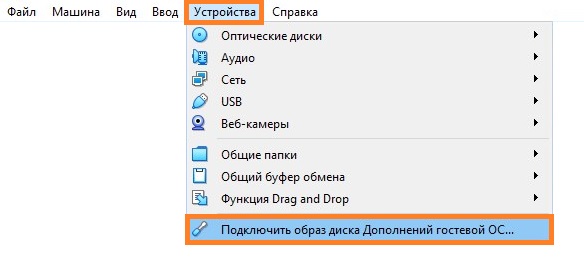
После этого в виртуальной машине появится привод с диском, на котором находятся нужные для установленной операционной системе дополнения, которые следует установить. Во время установки достаточно просто нажимать «Далее» («Next»), после чего потребуется перезагрузка.
Подробнее про установку гостевых дополнений можно прочитать в отдельной статье.
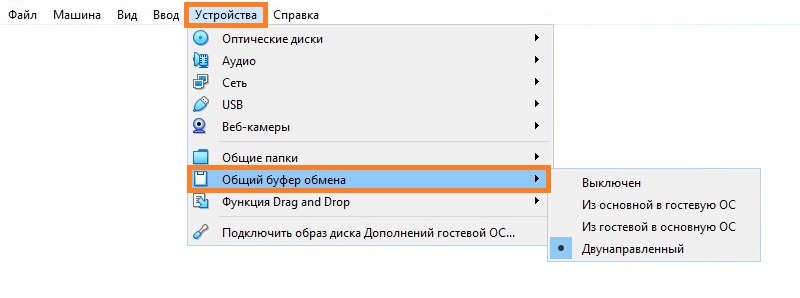
Включаем общий буфер обмена
В том же пункте меню «Устройства» необходимо открыть подменю «Общий буфер обмена» в котором необходимо выбрать один из четырех вариантов:
Общий буфер обмена предназначен только для копирования и вставки текста!
Для передачи файлов используйте функцию Drag & Drop (см. ниже).
- Выключен — в данном случае возможность что-либо скопировать или вставить из реального компьютера в виртуальный, или наоборот, будет отсутствовать;
- Из основной ОС в гостевую ОС — обмен «буфером обмена» будет возможен только в одну сторону — с реального компьютера, в виртуальный;
- Из гостевой ОС в основную ОС — будет возможность копирования с виртуального компьютера на хост, с хоста в виртуальную машину не будет;
- Двухнаправленный — буфер обмена будет работать в обе стороны;
Изменения функции обмена буфером обмена между основным компьютером и виртуальным будут применены сразу после изменения настроек.
Включаем Drag & Drop
Drag’n’Drop называют действие, которое можно перевести на русский язык как «перетаскивание». Конкретно в VirtualBox оно позволяет перетащить файл с виртуальной машины в реальную, и наоборот. Для этого нужно включить в настройках виртуальной машины поддержку этой функции. Делается это следующим образом:
- В верхнем меню VirtualBox находим пункт «Устройства». В нем будет находится подпункт «Функция Drag & Drop».

- Выбираем подходящий параметр:
- Выключен — функция Drag & Drop выключена;
- Из основной ОС в гостевую ОС — возможность перетаскивать файлы и папки только в виртуальную машину, но не из неё;
- Из гостевой ОС в основную ОС — возможность перетаскивать файлы и папки только из виртуальной машины, но не в неё;
- Двухнаправленный — возможность перетаскивать файлы и папки как с виртуальной машины, так и в неё;
- Настройки применяются сразу, а значит после включения функции Drag & Drop можно сразу ей воспользоваться.

Прочитано: 5 031
Чтобы включить общий буфер обмена между виртуальной системой VirtualBox и физической системой, нужно открыть свойства виртуальной машины (либо клавиатурное сокращение Ctrl + S).
Далее открываем вкладку:
«Общие» – «Дополнительно»

Чтобы работал общий буфер между виртуальной системой и физической нужно выбрать в списке – Двухнаправленный.

После загружаем, виртуальную машину и у нас уже работает буфер. Данная опция очень полезна, когда идёт тестирование скриптов, правка конфигурационных файлов, да и просто повседневная работа с системой. На этом всё, удачи!!!
After installing a Linux ( Ubuntu or CentOS ) or Windows in Oracle VirtualBox, you should want to enable the copy & paste function between the virtual machine and the host machine. This article will tell you how to do it.
1. Prerequisite.
- First, you should start the virtual machine.
- Then click Devices —> Insert Guest Additions CD image… menu item to install the VirtualBox Guest Additions software in your virtual machine OS.
- If you install Linux on the virtual machine, you may meet an error during the above process, you can read the article How To Resolve VirtualBox Guest Additions: Kernel Headers Not Found For Target Kernel Error to learn how to fix it.
- If you install Windows on the virtual machine, you may find there is nothing happened like the above Linux virtual machine.
- For Windows guest virtual machine, it will add the VirtualBox Guest Additions in the guest virtual OS CD drive. You can click the CD drive to open it then click the VBoxWindowsAdditions.exe file to install the guest additions.
- After installing the guest additions, you need to restart the guest OS to enable it.
2. Enable Copy & Paste ( Share Clipboard ), Drag & Drop Between Oracle VirtualBox Virtual Machine And Host Machine Steps.
- Right-click the virtual machine in VirtualBox.
- Then click the Settings… menu item in the popup list.
- Then click the Advanced tab in the General settings window.
- Select the Bidirectional item in the Shared Clipboard drop-down list.
- You can also select the Bidirectional item in the Drag’n Drop drop-down list.
- You can also click Devices —> Shared Clipboard —> Bidirectional , Devices —> Drag and Drop —> Bidirectional menu item to configure above settings.
- If you still can not copy files between the host and guest virtual machine, you can read the article How To Share Folders Between Virtualbox Host And Guest Virtual Machine to share the files between the host and guest virtual machine to copy the files between them.
3. How To Enable Copy/Paste From Mac To Virtual Machine.
3.1 Question(2022/05/17).
- My host machine is a Mac machine. And I install a Windows 7 virtual machine in the Virtual box.
- I write source code in a macOS editor, and I want to copy the source code from the macOS to the editor in the windows 7 virtual machine.
- I have installed the guest editions option and enabled it on the virtual machine.
- But I do not know how to configure the virtual machine to enable the copy & paste feature so that I can copy the source code from the source code editor on macOS to the windows 7 virtual machine.
3.2 Answer1.
- You can open the virtual machine’s Settings configuration window.
- Then click the General item on the Settings window left side.
- Click the Advanced tab on the right side.
- Select the Bidirectional item from the Shared Clipboard drop-down list on the Advanced tab.
- Then you can copy & paste text, files, and so on between your macOS host and Windows7 guest.
3.3 Answer2.
- To copy text or files in macOS, you should press the ⌘ + C.
- To paste the clipboard data to VirtualBox windows 7 virtual machine, you should press Ctrl + ↑ + V.
- To copy text or files on a windows 7 virtual machine, you should press Ctrl + ↑ + C.
- Paste text or files to macOS, you should press the ⌘ + V.
3.4 Answer3.
- Open the macOS Finder window and click the Applications item on the Finder window’s left side.
- Right-click the Virtualbox.app application on the Finder window right side, then click the Show Contents menu item in the popup menu list.
- Then you can find the VBoxGuestAdditions.iso file in the macOS folder and copy this file to another local folder.
- Assign the VBoxGuestAdditions.iso file to the Virtual machine’s optical disk and then run it to install the VBox guest additions.
- After you install the VBox guest additions, the copy & paste function can work between the macOS host and the guest, but my guest os is Ubuntu.
Для настройки обмена буфером между хостовой системой и гостевой (Debian) в VirtualBox, тебе нужно установить **Guest Additions** и убедиться, что настройки VirtualBox корректны. Вот пошаговая инструкция:

### Шаг 1: Настройка параметров VirtualBox

1. **Отключи виртуальную машину Debian**.
2. В **VirtualBox**, выдели свою виртуальную машину с Debian.
3. Перейди в настройки машины:
   - **Devices** -> **Shared Clipboard** (Общий буфер обмена) и выбери **Bidirectional** (Двунаправленный), чтобы можно было копировать как из хостовой системы в гостевую, так и наоборот.
   - **Drag and Drop** (Перетаскивание файлов) тоже можно установить на **Bidirectional**.
4. Нажми **OK**.

### Шаг 2: Установка VirtualBox Guest Additions в Debian

1. Запусти виртуальную машину с Debian.
2. Открой терминал и обнови систему:
   ```bash
   sudo apt update
   sudo apt upgrade
   ```

3. Установи пакеты, необходимые для сборки Guest Additions:
   ```bash
   sudo apt install build-essential dkms linux-headers-$(uname -r)
   ```

4. В меню **Devices** в VirtualBox выбери **Insert Guest Additions CD Image...**. После этого диск с `VBoxGuestAdditions` должен появиться в системе.

5. Смонтируй образ, если он не смонтировался автоматически:
   ```bash
   sudo mount /dev/cdrom /media/cdrom
   ```

6. Запусти установку Guest Additions:
   ```bash
   sudo /media/cdrom/VBoxLinuxAdditions.run
   ```

7. После установки перезагрузи виртуальную машину:
   ```bash
   sudo reboot
   ```

### Шаг 3: Проверка работы

После перезагрузки проверь, работает ли обмен буфером. Для этого скопируй текст из хостовой системы и попробуй вставить его в терминал или текстовый редактор на виртуальной машине. Также попробуй копировать текст из виртуальной машины в хостовую систему.

### Шаг 4: Дополнительные действия (если не работает)

1. Убедись, что модули Guest Additions загружены:
   ```bash
   lsmod | grep vbox
   ```

   Если они не загружены, попробуй вручную перезагрузить модули:
   ```bash
   sudo modprobe vboxsf
   sudo modprobe vboxguest
   ```

2. Проверь, работает ли служба VirtualBox Guest Additions:
   ```bash
   sudo systemctl status vboxadd
   ```

Если после выполнения всех этих шагов буфер обмена всё ещё не работает, дай знать, чтобы мы могли найти причину вместе!13 Apr 2018
Reading time ~1 minute
Host system: Windows 10
Guest system: Ubuntu 16.0 in VirtualBox
Goal 1 To copy and paste text from Clipboard btw VirtualBox Linux and Windows host.
Goal 2 To share files btw VirtualBox Linux and Windows host. NOTE: all shared files should be placed in a shared folder which will be mentioned below.
STEP 1
Open VirtualBox, single-click “ubuntu 16.0”, click Settings > General > Advanced, set “Shared Clipboard” and “Drag’n’Drop” from “Disabled” to “Bidirectional”, then run “ubuntu 16.0”.
Alternatively, open VirtualBox, run “ubuntu 16.0”. On left-top of Linux, click Devices > Shared Clipboard > Bidirectional, click Devices > Drag and Drop > Bidirectional.
STEP 2
On left-top of Linux, click Devices > Shared Folders > Shared Folders Settings > Shared Folders > Machine Folders > + > choose/create a shared folder. For me, I created a folder as “D:\ProgramFiles\Oracle\sharedBothVinLinux”. NOTE: this folder is physically stored on Windows host.
STEP 3
On left-top of Linux, click Devices > Insert Guest Additions CD image. If you get an error message as below:
Unable to insert the virtual optical disk /usr/share/virtualbox/VBoxGuestAdditions.iso into the machine LM173KDE_Basic. Could not mount the media/drive ‘/usr/share/virtualbox/VBoxGuestAdditions.iso’ (VERR_PDM_MEDIA_LOCKED). Result Code: NS_ERROR_FAILURE (0x80004005) Component: ConsoleWrap Interface: IConsole {872da645-4a9b-1727-bee2-5585105b9eed} Callee: IMachine {b2547866-a0a1-4391-8b86-6952d82efaa0}
It means the Devices already has the .iso file. Please eject it: click Devices > Optical Drives > check VBoxGuestAdditions.iso, click Devices > Optical Drives > Remove disk from virtual drive; or go to files manager, eject VBox_GAs_5.2.8.
STEP 4
Go to Terminal, run sudo apt-get install virtualbox-guest-utils.
STEP 5
To access the shared folder as root/superuser, go to Terminal. cd /media/, sudo mount -t vboxsf sharedBothWinLinux /media/sf_sharedBothWinLinux/. NOTE:sf_ was prefixed to the shared folder name by default.
STEP *
In case can’t find the shared folder on Linux next time, redo STEP 5.