
Сегодня мы рассмотрим вопрос организации общего доступа к интернет и автоматической настройки сети на платформе Windows. Несмотря на то, что это более дорогое решение, его применение будет оправдано когда необходима тесная интеграция с сетевой инфраструктурой развернутой на базе Windows Server.
Онлайн-курс по устройству компьютерных сетей
На углубленном курсе «Архитектура современных компьютерных сетей» вы с нуля научитесь работать с Wireshark и «под микроскопом» изучите работу сетевых протоколов. На протяжении курса надо будет выполнить более пятидесяти лабораторных работ в Wireshark.
В качестве рабочей платформы мы использовали Windows Server 2008 R2, как наиболее актуальную на сегодняшний день платформу, однако все сказанное с небольшими поправками применимо и к предыдущим версиям Windows Server 2003 / 2008.

Первоначально необходимо настроить сетевые интерфейсы. В нашем случае интерфейс смотрящий в сеть провайдера получает настройки по DHCP, мы переименовали его в EXT. Внутренний интерфейс (LAN) имеет статический IP адрес 10.0.0.1 и маску 255.255.255.0.
Настройка NAT
Простейшим способом организовать общий доступ к интернет будет включение соответствующей опции в настройках сетевого подключения. Однако при всей простоте такой способ чрезвычайно негибок и приемлем только если никаких других задач маршрутизации перед сервером ставиться не будет. Лучше пойти более сложным, на первый взгляд, путем, зато получить в свои руки весьма мощный и гибкий инструмент, позволяющий решать гораздо более сложные сетевые задачи.
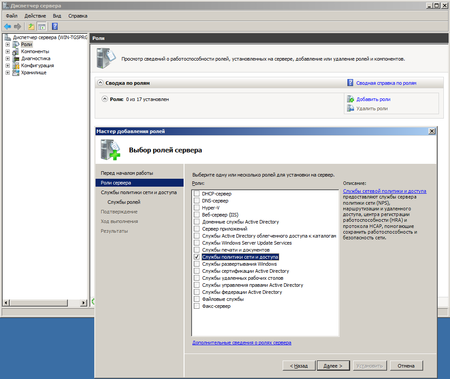
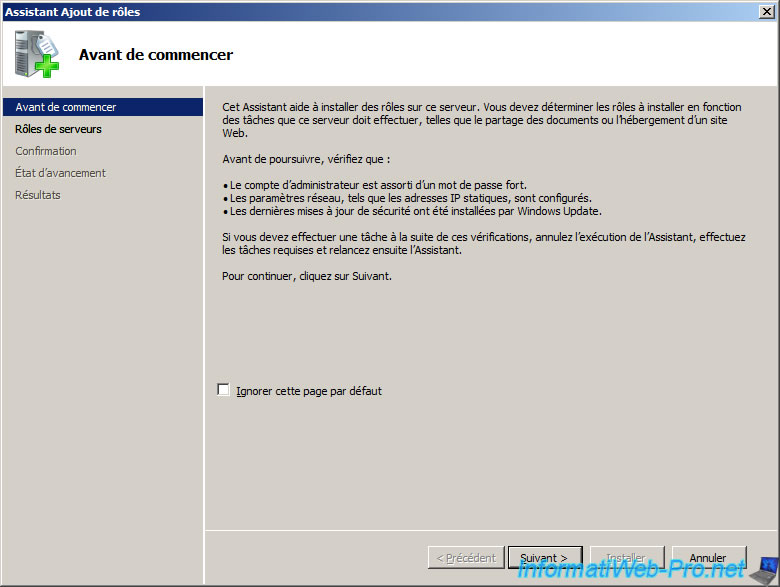
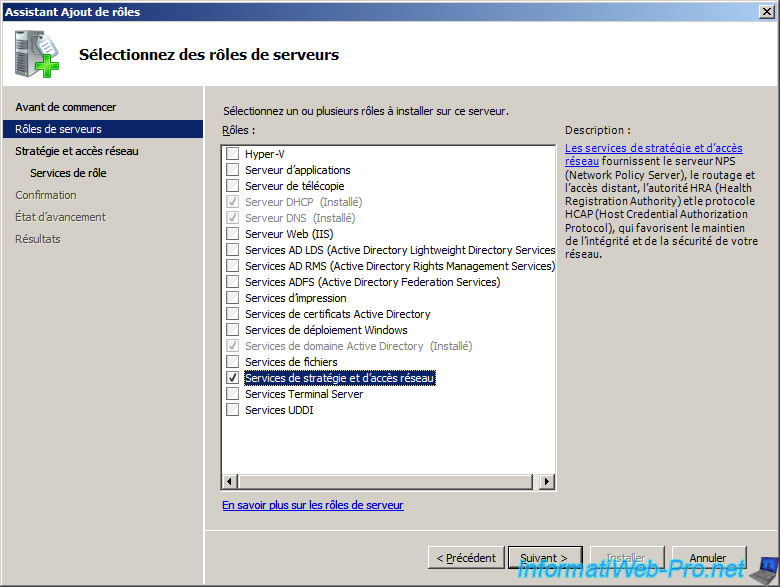
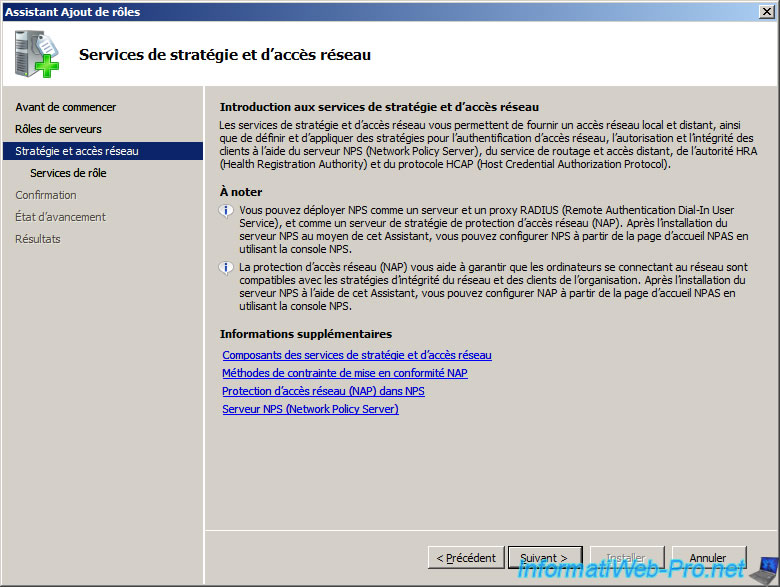
Начнем, как полагается, с добавления новой роли сервера: Служб политики сети и доступа.
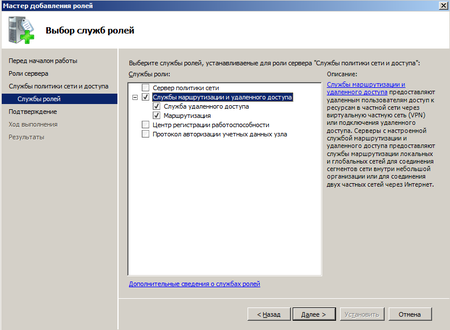
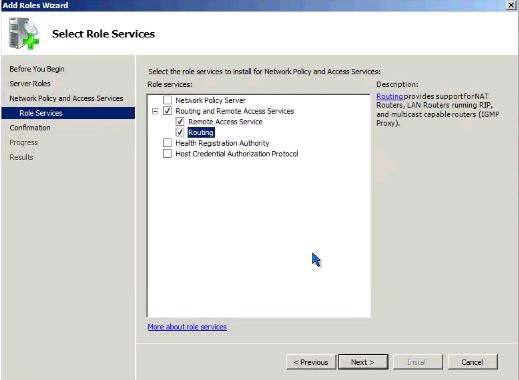
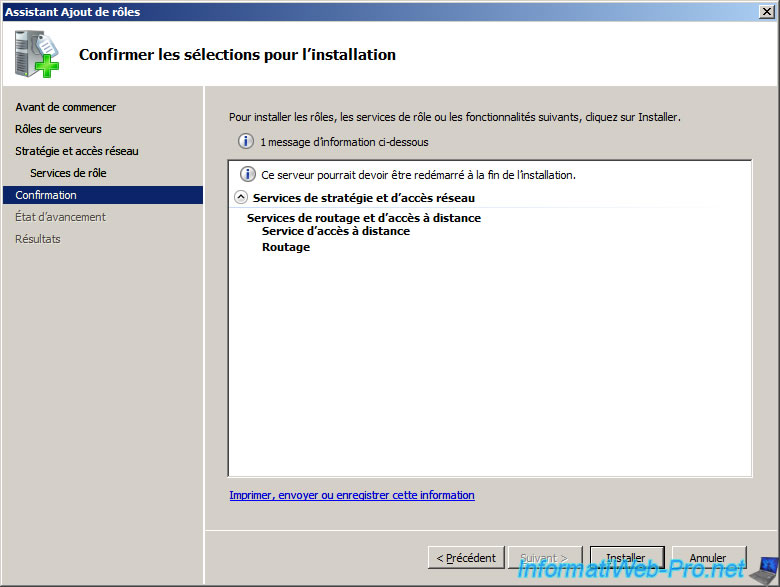
В службах ролей отмечаем Службы маршрутизации и удаленного доступа, все остальное нас сейчас не интересует. После успешной установки роли можно будет переходить к настройкам маршрутизации.
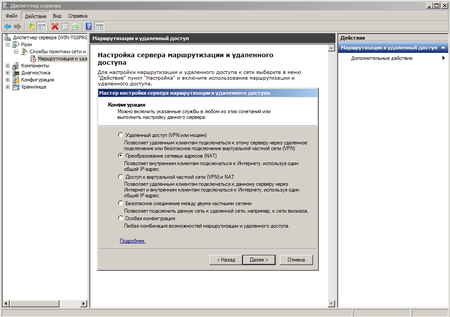
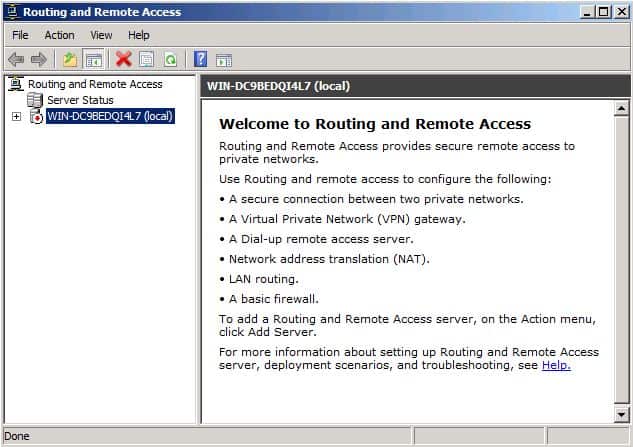
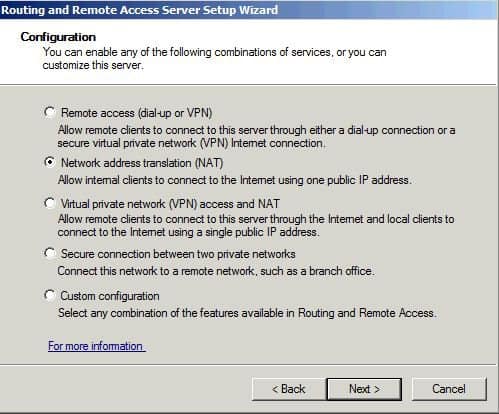
В Ролях находим службу маршрутизации и через меню Действия выбираем Настроить и включить маршрутизацию и удаленный доступ. Настройка производится с помощью мастера, который пошагово проведет нас через все этапы настройки. В качестве конфигурации выбираем Преобразование сетевых адресов (NAT), любые другие возможности можно будет настроить позже вручную.

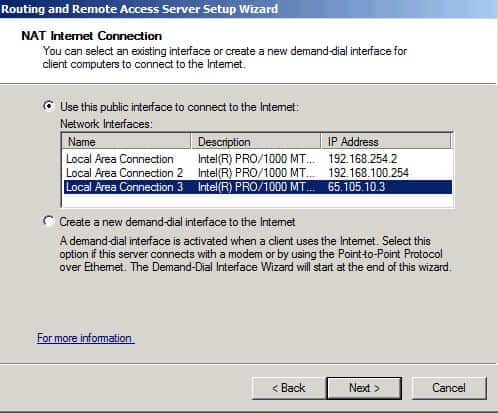
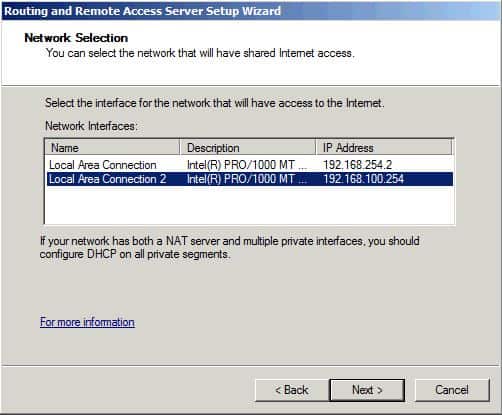
Здесь нужно указать интерфейс которым наш сервер подключен к интернету, при необходимости его можно создать (например при использовании PPPoE или VPN соединения).
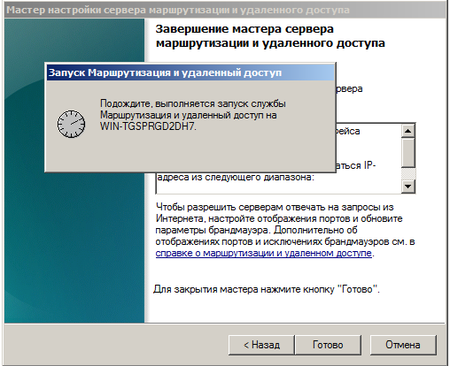
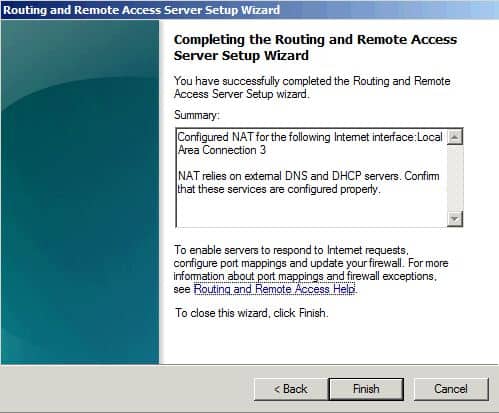
Остальные настройки оставляем по умолчанию и после нажатия на кнопку готово произойдет запуск службы Маршрутизации и удаленного доступа, наш сервер готов обслуживать клиентов из внутренней сети. Проверить работоспособность можно указав клиентской машине IP адрес из диапазона внутренней сети и указав в качестве шлюза и DNS сервера адрес нашего сервера.
Настройка DHCP
Для автоматической настройки сетевых параметров на клиентских машинах, ну не бегать же от места к месту вручную прописывая IP адреса, следует добавить роль DHCP сервера.
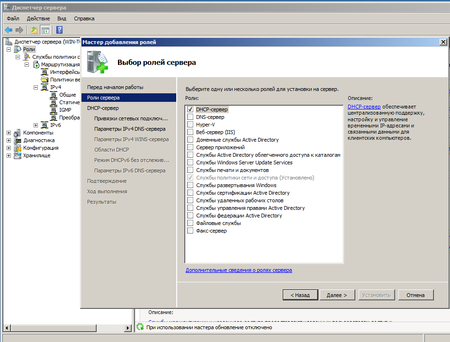
Для этого выбираем Добавить роль в Диспетчере сервера и отмечаем необходимую нам опцию.
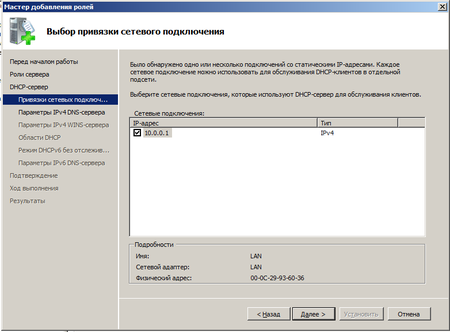
Теперь нам предстоит ответить на ряд несложных вопросов. В частности выбрать для каких внутренних сетей следует использовать DHCP, при необходимости можно настроить различные параметры для разных сетей. Потом последовательно указать параметры DNS и WINS серверов. Последний, при его отсутствии, можно не указывать. Если в вашей сети отсутствуют старые рабочие станции под управлением ОС отличных от Windows NT 5 и выше (2000 / XP / Vista / Seven), то необходимости в WINS сервере нет.
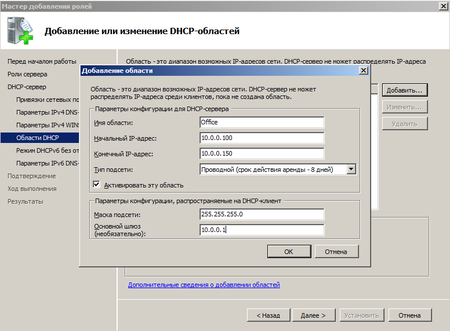
К добавлению DHCP-области нужно отнестись с повышенной внимательностью, ошибка здесь может привести к неработоспособности всей сети. Ничего сложного здесь нет, просто внимательно вводим все необходимые параметры сети, следя, чтобы выделяемый диапазон IP не перекрывал уже выделенный для других устройств и не забываем правильно указывать маску и шлюз.
Отдельно следует обратить внимание на такой параметр как срок аренды адреса. По истечении половины срока аренды клиент посылает серверу запрос на продление аренды. Если сервер недоступен, то запрос будет повторен через половину оставшегося срока. В проводных сетях, где компьютеры не перемещаются в пределах сети, можно выставлять достаточно большой срок аренды, при наличии большого количества мобильных пользователей (например публичная Wi-Fi точка в кафе) срок аренды можно ограничить несколькими часами, иначе не будет происходить своевременное освобождение арендованных адресов и в пуле может не оказаться свободных адресов.
Следующим шагом отказываемся от поддержки IPv6 и после установки роли DHCP сервер готов к работе без каких либо дополнительных настроек. Можно проверять работу клиентских машин.

Выданные IP адреса можно посмотреть в Арендованных адресах, относящихся к интересующей нас области. Здесь же можно настроить резервирование за определенным клиентом конкретного адреса (привязав по имени или MAC-адресу), при необходимости можно добавить или изменить параметры области. Фильтры позволяют создать разрешающие или запрещающие правила основываясь на MAC-адресах клиентов. Более полное рассмотрение всех возможностей DHCP-сервера Windows Server 2008 R2 выходит за рамки данной статьи и скорее всего мы посвятим им отдельный материал.
Онлайн-курс по устройству компьютерных сетей
На углубленном курсе «Архитектура современных компьютерных сетей» вы с нуля научитесь работать с Wireshark и «под микроскопом» изучите работу сетевых протоколов. На протяжении курса надо будет выполнить более пятидесяти лабораторных работ в Wireshark.
In computer networking, network address translation (NAT) is the process where a network device, usually a perimeter router or firewall, maps a public, routable IP address to a private IP address used on the local area network (LAN). The main purpose of NAT is to limit the number of public IP addresses an organization must use for their internal network clients to access public resources.
There are not enough IP addresses in the IPv4 scheme for every device that needs access to public resources. NAT provides an economical and secure way for internal clients to access public resources without having a dedicated public IP address. Microsoft provides as part of the server operating system, a fully functional software-based routing solution that supports the NAT service.
Installing Routing and Remote Access Service
You install the Routing and Remote Access Service by using the Add Roles Wizard. Membership in the local Administrators group, or equivalent, is the minimum required to complete this procedure. Follow the steps outline.
- Launch Server Manager from the Administrative Tools folder.
- In the Server Manager console, under Roles Summary, click Add roles.
- In the Add Roles Wizard, click Next.
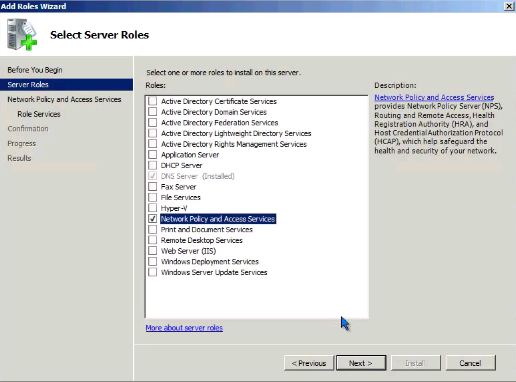
- In the list of server roles, select Network Policy and Access Services. Click Next twice.

- In the list of role services, select Routing and Remote Access Services to select all of the role services.

- Proceed through the steps in the Add Roles Wizard to complete the installation.
After you add the Network Policy and Access Services Role and complete the installation, the Routing and Remote Access service is installed in a disabled state. To enable and configure the remote access server, you must be logged on as a member of the Administrators group.
The next step is to enable the Routing and Remote Access Service (RRAS). If the RRAS server is a member of the domain, you need to add the computer account of this server to the RAS and IAS Servers security group in the domain of which this server is a member.
- Start the Routing and Remote Access console in the Administrative Tools folder.
- Right-click the server object, and then click Configure and Enable Routing and Remote Access.

- Follow through the steps in the wizard to complete the configuration of RRAS.


Required configuration :
— DHCP
Windows Server 2008 End of Support
Extended support for Windows Server 2008 by Microsoft ended on January 14, 2020.
It’s therefore advisable to upgrade to a more recent version of Windows Server, such as : Windows Server 2012.
To configure NAT et network routing on Windows Server 2012, refer to our «NAT and network routing on Windows Server 2012» tutorial.
First, we must add a second network card. So add a second (physical) NIC and then follow this tutorial.
Unlike Windows Server 2003, routing functionality is not installed by default. We must therefore go through this window «Server Manager» to install.
To install the routing system, you must first click on «Roles» in the left column and then click «Add Roles» in the right column.

Click «Next».
Select the «Network Policy and Access Services» role.
The wizard displays a description of services strategies and network access.
Check the «Services Routing and Remote Access» box.

Then click «Install».
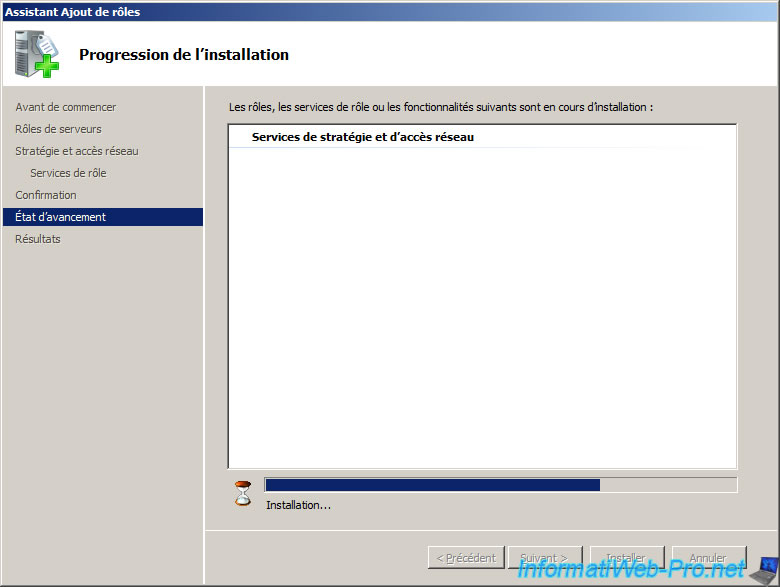
Installation of «Strategy and access network services» begin.
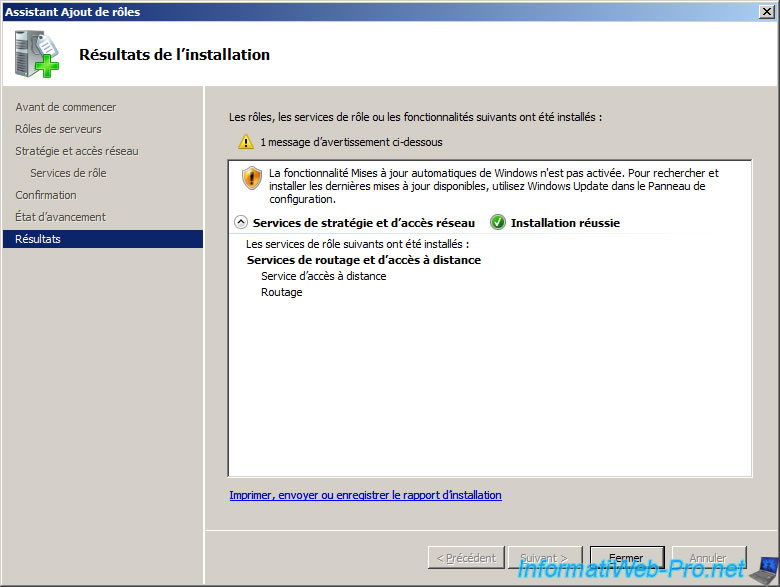
Once the installation is complete, click «Close».
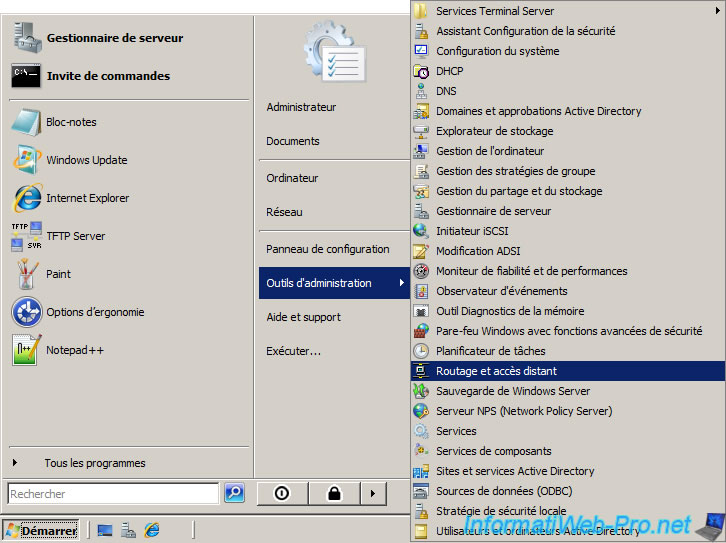
Then go to the start menu -> Administrative Tools -> Routing and Remote Access.
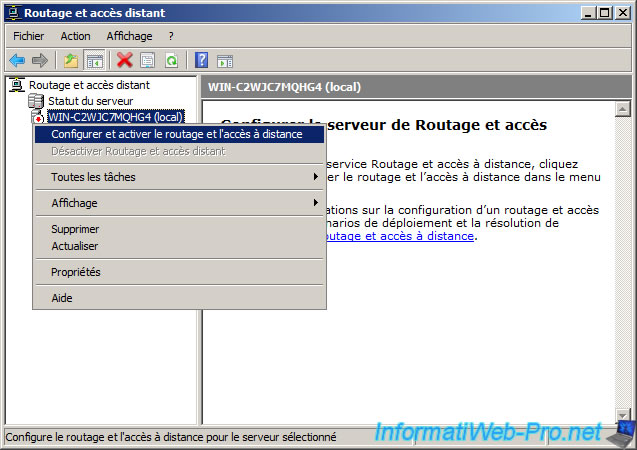
Click «Configure and Enable Routing and Remote Access».
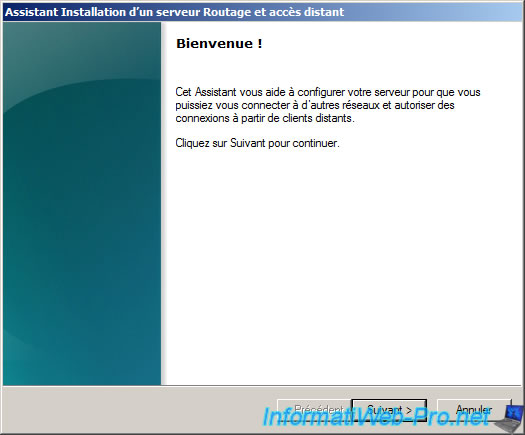
Click «Next».
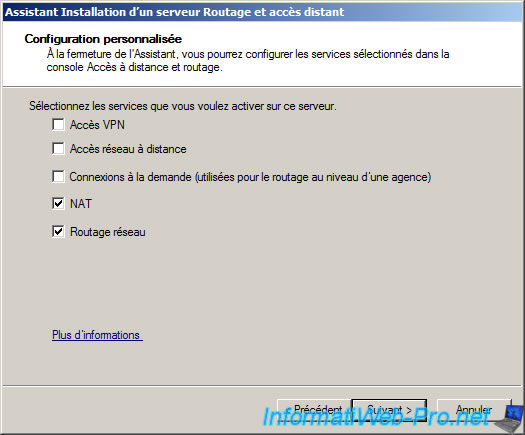
Select «Custom Settings».
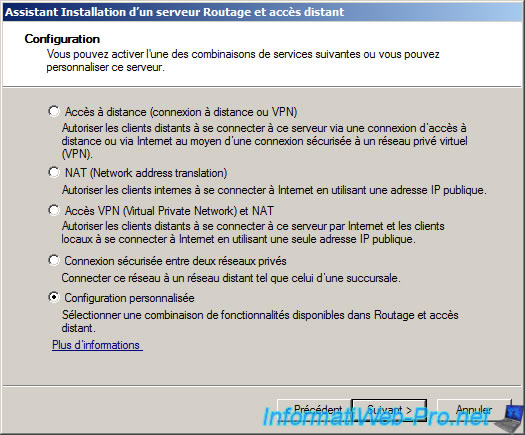
Check the «NAT» and «Network Routing».
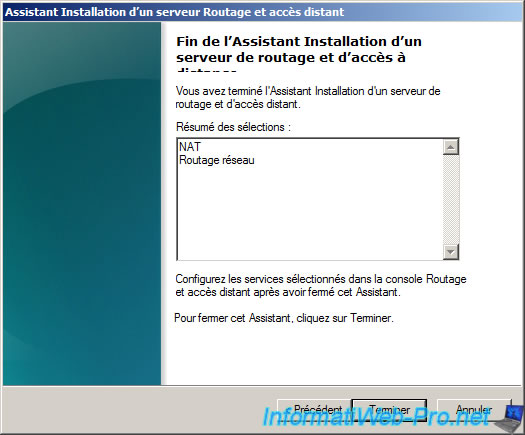
Click «Finish».
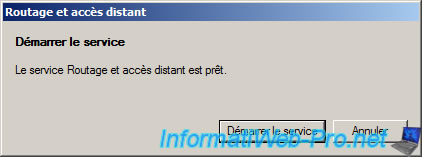
Click «Start Service».
To simplify the configuration of this service, we will first rename the two network connections (one for each network card).
The internal network «Local Area Connection (Internal)» which is configured with the settings on the DHCP tutorial are :
— IP : 10.0.0.1
— Subnet mask : 255.0.0.0
— Bridge : 10.0.0.0
— DNS server : 10.0.0.1
The Internet network «Local Area Connection (Internet)», which is configured with the following parameters :
— IP : 192.1681.5
— Subnet mask : 255.255.255.0
— Bridge : 192.168.1.254
— DNS server : 192.168.1.254
The parameters of the connection «Local Area Connection (Internet)» must obviously match the settings of your network.
When you want to configure the settings for the 2nd LAN connection static you get a warning due to multiple gateways are on different classes. It will work through NAT so click «Yes».
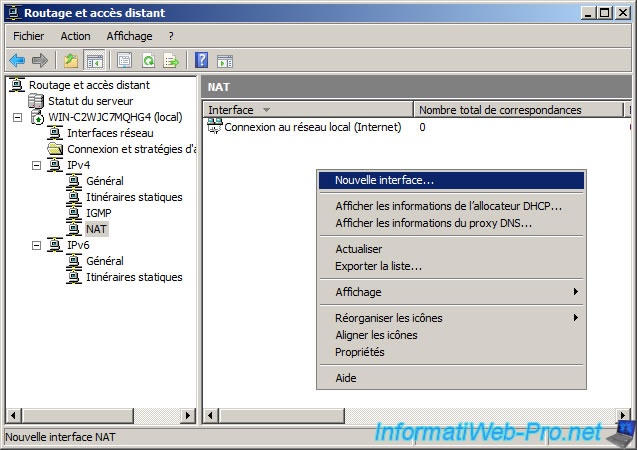
Then, in the «Routing and Remote Access» window, click «IPv4 -> NAT» then right click on the right side to add an interface.
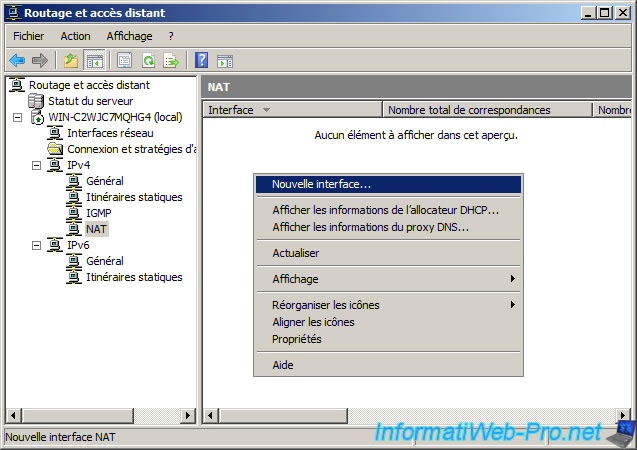
Select the Local Area Connection (Internet) and click OK.
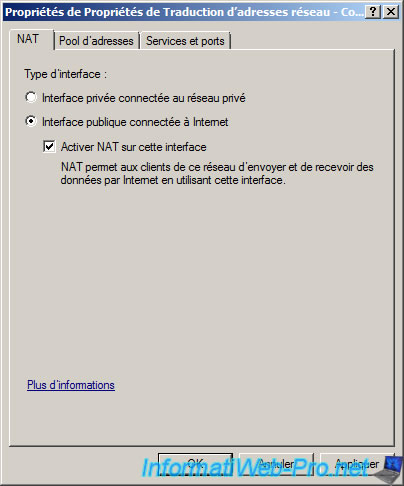
Select «Public interface connected to the Internet» and check «Enable NAT on this interface».
Perform almost the same procedure to connect to the Local Area Connection (Internal). To do this, right click on the right side and click on «New Interface».
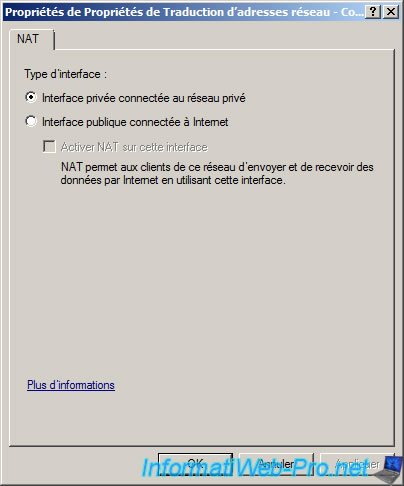
Select «Local Area Connection (Internal)». Be careful not to be confused with the «Internal» interface that appears in this list because it does not physically exist.
Select «Private interface connected to private network».
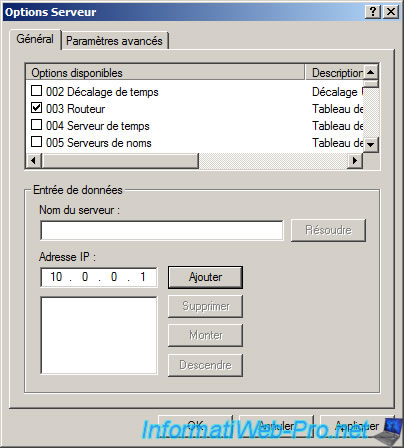
Now that the routing service is configured, it only remains to give the IP address of our server as the default gateway (also called a router). The server will route packets from private network to the Internet and vice versa. To send the IP gateway to customers, you can add the server options or those of one or more scopes. In our case, we will add the server options. To do this, right click on «Server Options» and click «Configure Options».
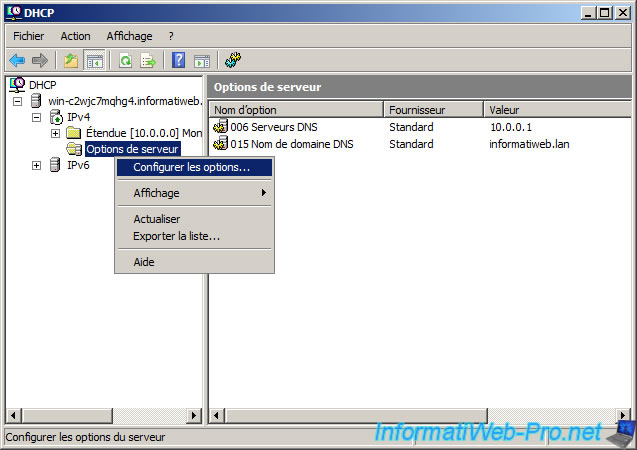
In the list of options, check «3 Router» and the name of the server (this is the name of the computer called NetBIOS) or IP address (for Local Area Connection (Internal) private network).
Then, to verify that it works, turn a client (that’s Windows Vista in this case). If you have not turned off the client from, restart it for receive the new settings from DHCP.
Attempt to access the Internet by opening «Mozilla Firefox» or «Internet Explorer» and trying to access Google.
On the client, click on the small icon next to the time (called the systray system) and then click «Network and Sharing Center». Click on «Manage network connections» in the left column and double-click on «Local Area Connection» and then click Details.
If your client has received the information from your DHCP server, you should get a result like this :
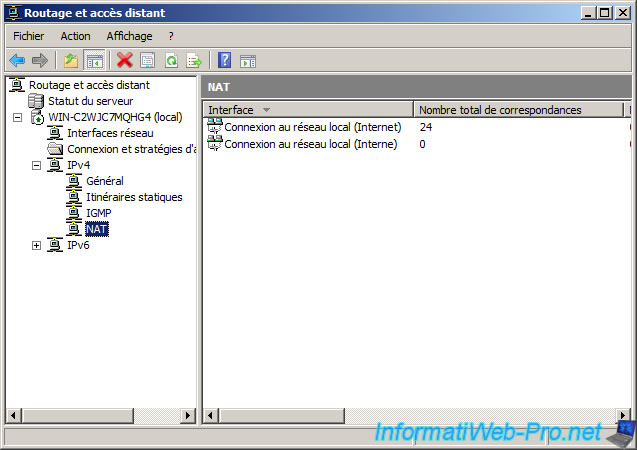
Then, in the server, go to the configuration of «Routing and Remote Access» and click on «Basic Firewall / NAT». Look at the columns. If they are not zero is that packets are going from the client to the Internet or vice versa which means that NAT is configured.
Lab: Using Windows Server 2008 R2 as a Simple NAT Router
We have a number of lab setups that require the VMs to be on their own Private Network in Hyper-V but still have access to the Internet.
In some cases we need to have access to that private network and the VMs just as we would a product network.
In comes Windows Server 2008 R2 SP1. We set up the VM with two vNICs. One is connected to the Private Network while the other is connected to the Internet via our internal production network (gives us quick access to the lab VMs).
- We install the OS
- Install Integration Services.
- Install the Network Policy and Access Services Role.
- Run the Configure and Enable Routing and Remote Access.
- Choose VPN and NAT
- Set the WAN connection.
- Allow DHCP to be set automatically.
- No RADIUS for authentication
- Click OK to the DHCP Relay warning.
We now have an internal router that will allow the VMs on the Private Network to reach out to the Internet.
Finally, to publish internal services via the WAN connection:
- Click on NAT under IPv4
- Right click on the WAN Interface in the centre pane and click Properties.
- Click on HTTPS (443) and a window pops up.
- Enter the IP address of the server hosting HTTPS and click OK.
- Tick the check to the left of HTTPS and then click Apply (if it did not do so).
- Repeat for the needed published services.
- Test the connections:
-

-


In the end, it should take no more than 20 minutes to have the first router configured.
Philip Elder
MPECS Inc.
Microsoft Small Business Specialists
Co-Author: SBS 2008 Blueprint Book
Windows Live Writer
Network Management — In this article we will install a test network using a DSL router to connect to the Internet.
This test network needs to be installed on a secondary network with an Internet connection. In this network, we will install Windows Server 2008 on an unused computer, which will have two network interface cards (NICs). It will then install the Routing and Remote Access Service service, and use this computer as a router between the test network and the working network.

Figure 1: Network organization model using RRAS as a router that connects two secondary networks.
Basically, we can follow two methods. First, configure RRAS as an IP router to relay traffic between two secondary networks. This will allow workstations on the test network to send information to the server on the Internet, however, traffic will not be allowed to be returned to workstations. This is because a packet sent via the DSL router from the Internet will be redirected to a network with 172.16.11.0 Ip address, so this data will not be accessible to the client on the network with IP address 10.0.0.0 . The solution to this problem is to add a static router to the DSL router to directly forward any data to the specified destination. However, we do not have administrative access to the DSL router because this router is managed with the Internet service provider, so this method is not feasible.
We can apply the second method of configuring RRAS systems as a router Network Address Translation (NAT). NAT is an IETF standard that provides methods to translate IPv4 addresses of computers on a network to IPv4 addresses of computers on another network. Of course, the DSL router on the working network is also configured as a NAT router, so the result of this method will create cascading NAT or double NAT. Internet connections work stably through two, or even 3-tiered NATs, although some applications may have problems with this type of network topology. For example, Windows Home Server does not support tiered NATs.
Server settings
First, the Windows Server 2008 operating system will be installed on the computer with two network interface cards (NICs), and the IPv4 settings of each NIC are configured as follows:
The NIC connects to the test LAN
- IP address is 10.0.0.1
- Subnet mask is 255.0.0.0
- Default gateway left blank
- DNS servers are empty
The NIC connects to the working LAN
- IP address is 172.16.11.220
- Subnet mask is 255.255.255.0
- Default gateway is 172.16.11.1
- DNS servers are the public IP addresses of DNS servers of ISP providers.
Note that the NIC connected to the test LAN (10.0.0.0) will not have a Default gateway because computers connected to multiple networks can only be assigned a gateway address. In addition, the NIC connected to this test LAN has been configured with the IP address of the public DNS host blood. This is not necessary so that workstations on the test network can access the Internet, but if we want to access the Internet right on the RRAS server, do not ignore this operation.
Install workstation on test network
Next, the Windows 7 operating system will be installed on the workstations, then the IPv4 installation will be configured as follows:
- IP address is 10.0.0.101 (.102, .103, .)
- Subnet mask is 255.0.0.0
- Default gateway is 10.0.0.1 (Next interface of RRAS system)
- DNS servers are the public IP addresses of the DNS servers of the ISP we are using.
At this point, all cables are connected, but if we try to ping the DSL router from a workstation on the test network, or if we monitor to navigate an address on a public network from the same workstation, then failure messages will indicate that the test network is not connected to the Internet as shown in Figure 2.
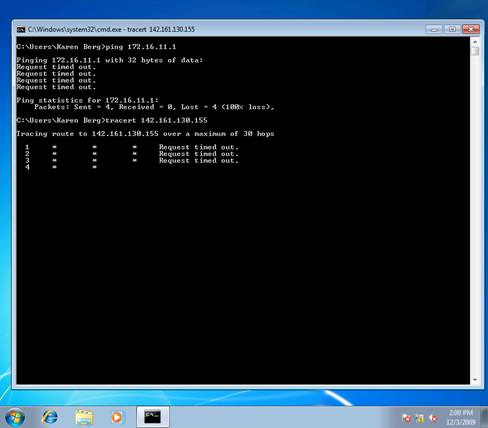
Figure 2: Cannot ping a public IP address from a workstation on the test network.
Meanwhile, we also cannot access the Internet from the workstation.

Figure 3: Web access failed.
Installing and configuring RRAS
To enable workstations on the test network to access the Internet, we need to install RRAS on the server, then configure the server as a NAT router. To install the RRAS feature, launch Add Roles Wizard from Server Manager or OOBE.exe and add the Network Policy and Access Services role (Figure 4).

Figure 4: Select the Network Policy and Access Services role.
On the next page of this Wizard, select Routing and Remote Access Services to install two functional services, including Remote Access Service and Routing .

Figure 5: Select Routing and Remote Access Services.
When you have completed the steps on this Wizard, open the Routing and Remote Access console from Administrative Tools , right-click the additional server and select the Configure and Enable Routing and Remote Access to launch the Routing and Remote Access Server Setup Wizard . Then select the Network Address Translation (NAT) option on this Wizard’s Configuration page and click Next .
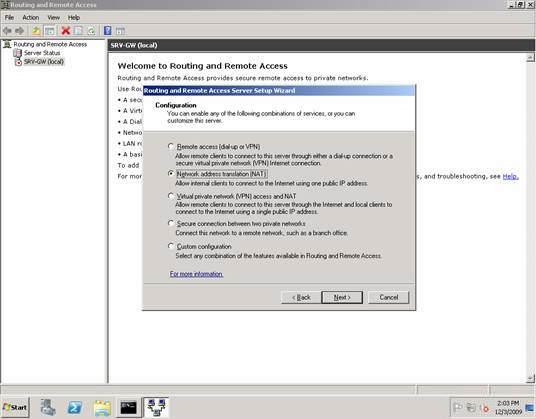
Figure 6: RRAS configuration.
Next, on the NAT Internet Connection page, we will select the network interface on the working LAN that is the public interface of the NAT router.
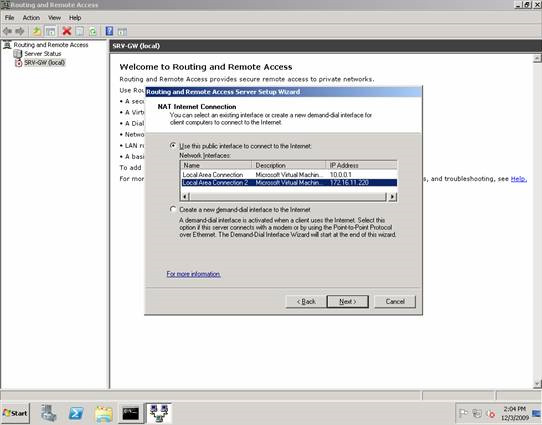
Figure 7: Selecting the network interface on the working LAN.
The next page will ask us if the NAT router is required to provide DNS and DHCP services to the computers on the test network (this network is connected to the private interface of the NAT router). Since all workstations are assigned a static IP address, we will not actually perform this task by selecting the option I will set up name and address services later .
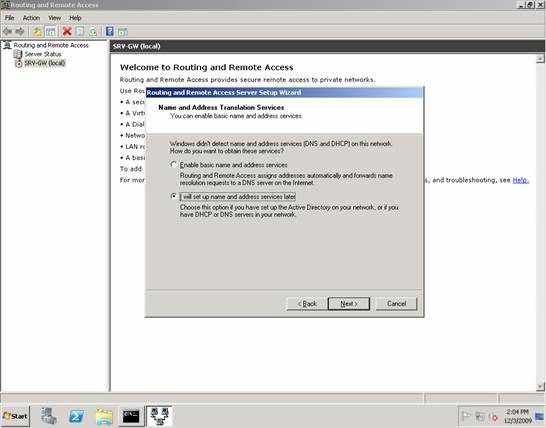
Figure 8: Select option I will set up name and address services later on the page
Name and Address Translation Wizard.
After completing the above steps, the RRAS service will launch, and this service is configured for both IPv4 Routing and NAT. To confirm this information, right-click the local server in RRAS Console and select Properties . The General tab shows that IPv4 Routing is enabled, meaning that IPv4 packets can be forwarded from one NIC to another.

Figure 9: Properties dialog of the local server.
When selecting the NAT node in the RRAS Console we will see the network interfaces created when the NAT is configured on the server using the Routing and Remote Access Server Setup Wizard . Figure 10 shows the properties of Local Area Connection , in this case the network connection to the test network (10.0.0.0). Note that NAT will treat this network as a private network, which is the network behind the NAT router.

Figure 10: Properties dialog of Local Area Connection.
Figure 11 shows the properties of Local Area Connection 2 , in this case the working network (172.16.11.0). Note that NAT considers this network a public network, which is the front end of the NAT router.
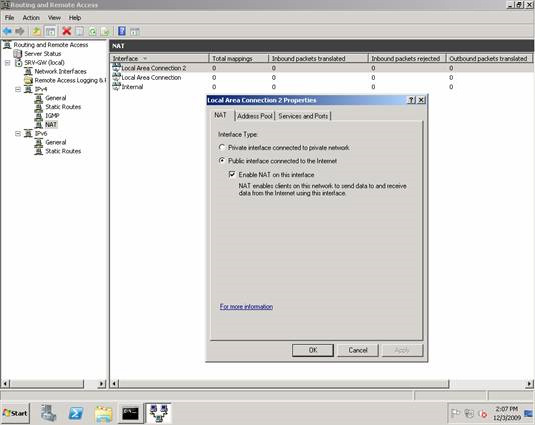
Figure 11: Properties dialog of Local Area Connection 2.
Intranet communication is also added to configuring NAT as a private interface.
Testing NAT
So far, NAT has been configured with IP Routing, if we try to ping the DSL router from a test network workstation, or track it from one workstation to another on the Internet, these processes will work.

Figure 12: Network connection is verified between the test network and the Internet.
In addition, we can also browse the Web from a workstation on the test network.

Figure 13: Computers behind the NAT router can browse the Web.
We can control NAT operation with RRAS Console. To do this, open the RRAS Console and select the NAT node, and check the network data of Local Area Connection 2 (NAT communication to the Internet or to the public network) as shown in Figure 14.

Figure 14: Check the NAT operation.
Finally, clicking on this interface selects Show Mappings, we can open a new window showing detailed information about what the NAT router is doing (Figure 15).

Figure 15: Details about NAT operation.
Conclude
By taking advantage of RRAS’s Network Address Translation and IP Routing feature in Windows Server 2008, we can set up a secondary test network on the main network and ensure that all computers on the secondary network This level can connect to the Internet.