-
Home
-
News
- How to Set Monitor to 144Hz Windows 10/11 If It Is Not?
By Vera | Follow |
Last Updated
144Hz monitor only showing 60Hz? How to set monitor to 144Hz or how to make sure your monitor is running at 144Hz? After reading this post from MiniTool, you know what you should do in Windows 10/11. Let’s go to look through the following ways.
144Hz Monitor Only Showing 60Hz Windows 10/11
You may buy a 144Hz monitor for high performance in games since it can refresh the monitor 144 times per second to show new images on the high-resolution screen. However, during the use, you find this monitor doesn’t run at 144Hz as advertised. Usually, you may run into this situation – 144Hz monitor only showing 60Hz.
Why my 144Hz monitor is only showing 60Hz? Then you may ask this question. The possible reasons are default monitor settings, an unsuitable HDMI or display port, outdated GPU driver, etc.
Well then, how to change monitor to 144Hz in Windows 10/11? Try some ways below to fix the issue so that your monitor can work at 144Hz.
How to Set Monitor to 144Hz Windows 11/10 via Some Fixes
Set 144Hz in Settings
If your monitor doesn’t run at 144Hz but 60Hz, you should make sure the monitor is configured correctly. Do this task in these steps:
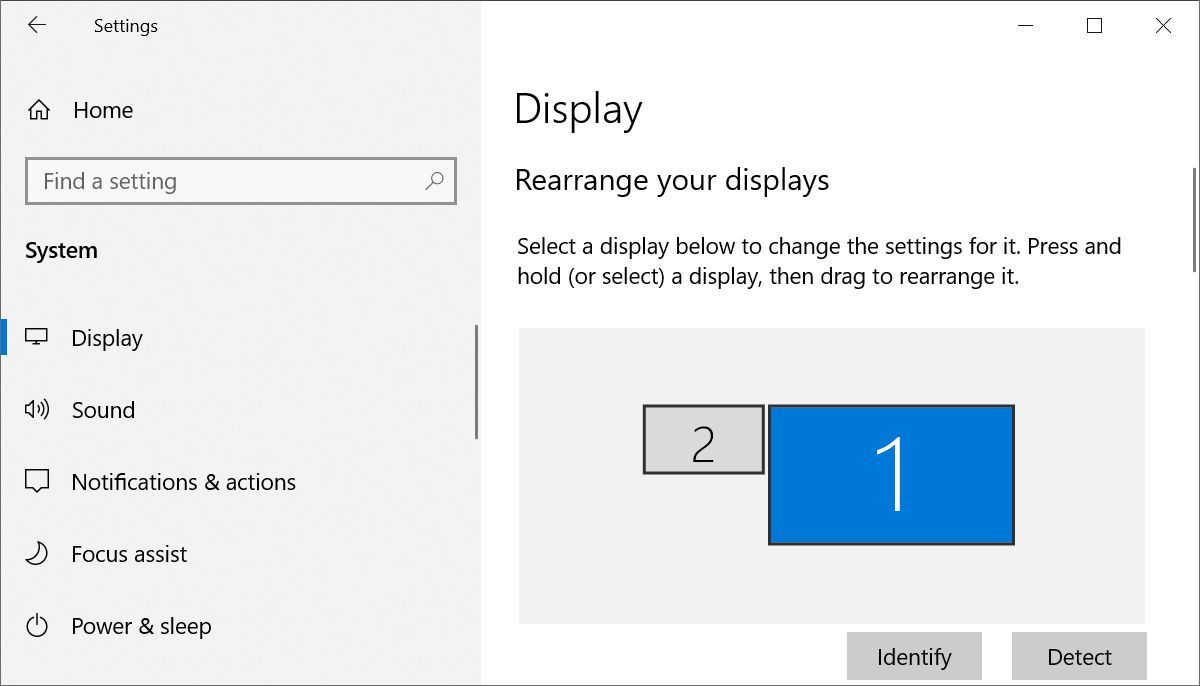
Step 1: In Windows 11/10, go to Settings by pressing Win + I and click System > Display.
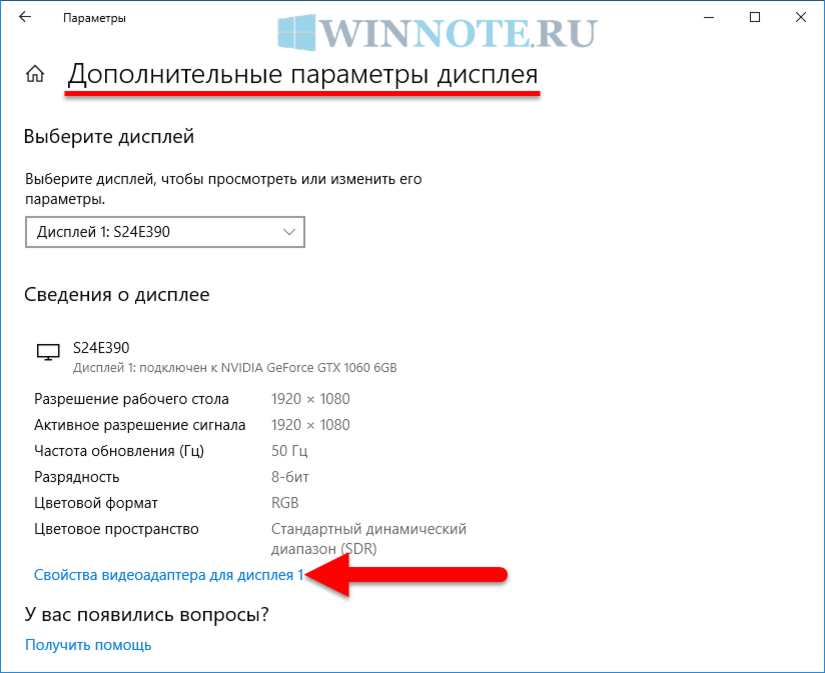
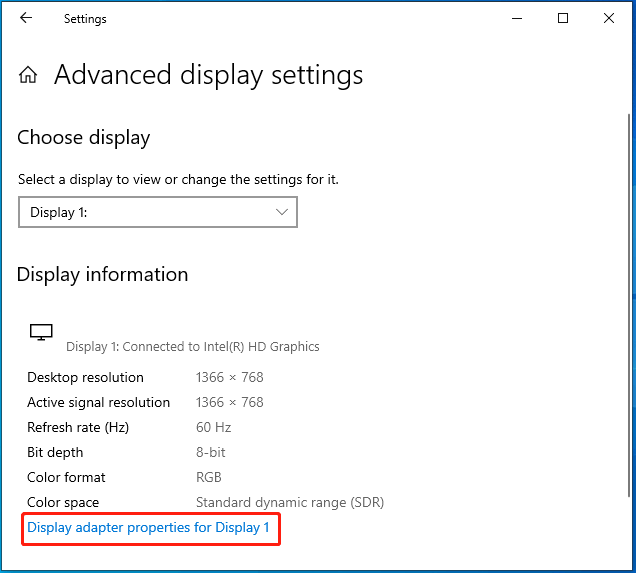
Step 2: Click Advanced display or Advanced display settings, select a display, and tap on Display adapter properties for Display (Number).
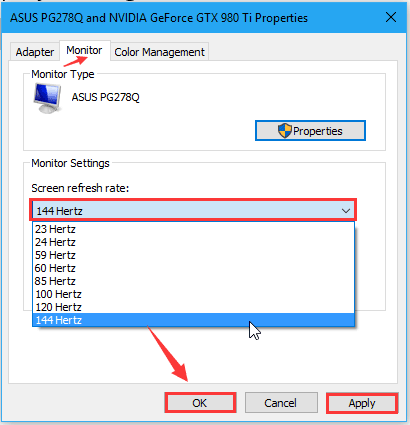
Step 3: In the Monitor tab, set Screen refresh rate to 144Hertz. Click OK to save the change.
Tips:
If there is no 144Hertz option in the list in Windows 11/10, it means your monitor doesn’t support this refresh rate. But if your purchased monitor actually supports 144 Hz, perhaps something blocks you from setting the refresh rate.
Check Your Cables
Some displays support HDMI and DisplayPort ports at the same time but the refresh rate may be limited to 60Hz when using HDMI. This is why is your 144Hz monitor only showing 60Hz. In this case, use a DisplayPort cable that should be properly certified and built to the DisplayPort specification.
Set Monitor to 144Hz via NVIDIA Control Panel
If you are using an NVIDIA dedicated graphics card, you can open its control panel to change monitor to 144Hz. Or when you meet 144Hz not showing up in display settings, you can also try this if you are an NVIDIA user.
See how to set monitor to 144Hz using NVIDIA Control Panel:
Step 1: Right-click on anywhere on the desktop and choose NVIDIA Control Panel.
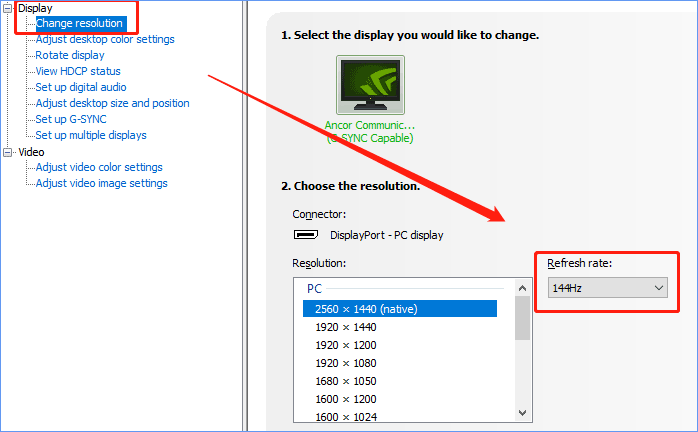
Step 2: Click Change resolution from the Display tab, locate the refresh rate and choose 144Hz.
If you cannot see 144Hz but you make sure your monitor supports this refresh rate and uses the correct cable, you can click Customize > Create Custom Resolution and directly input 144 under Refresh Rate (Hz). Next, save the change.
Tips:
Sometimes you cannot see the control panel even if you are an NVIDIA user. Go to find solutions from this post — How to Fix NVIDIA Control Panel Missing on Windows 10.
Check If Your Console Supports 144Hz
If you run into the issue of 144Hz monitor only showing 60Hz, one common issue is that the monitor supports 144Hz but the console doesn’t support it. All the models of PS4 and Xbox One offer a maximum refresh rate of 60Hz. For PS5 and Xbox Series X consoles, the maximum refresh rate is 120 Hz. Thus, play games on a PC to unlock the peak performance.
Update Graphics Card Driver
An outdated graphics card driver can impact the refresh rate due to some reason. You should make sure the PC uses an up-to-date GPU driver. So, how to set monitor to 144Hz via driver update in Windows 10/11?
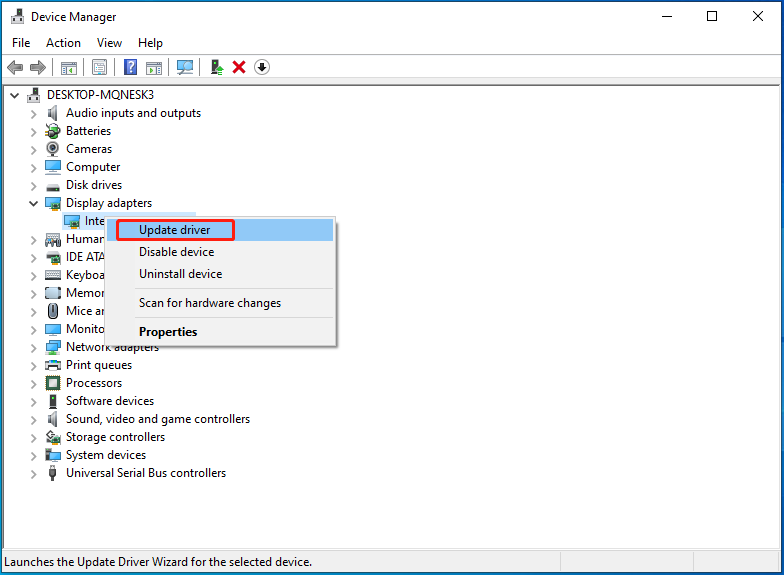
It is easy to update your video card driver. You can go to Device Manager, expand Display adapters, right-click on your GPU and choose Update driver. Then, click the first option to update the driver.
Adjust In-Game Setting
How to set monitor to 144Hz if it shows 60Hz in games? If the running game has its integrated graphics settings, you can go to the graphics options menu of each game to choose the native resolution of your monitor and the refresh rate of 144Hz. Or else, the game can use the lower refresh rate.
Final Words
How to set monitor to 144Hz in Windows 10/11 or how to make sure your monitor is running at 144Hz if it shows 60Hz? After trying the workarounds above, you can easily achieve the aim. If you have some other ideas, let us know in the comment below.
About The Author
Position: Columnist
Vera is an editor of the MiniTool Team since 2016 who has more than 7 years’ writing experiences in the field of technical articles. Her articles mainly focus on disk & partition management, PC data recovery, video conversion, as well as PC backup & restore, helping users to solve some errors and issues when using their computers. In her spare times, she likes shopping, playing games and reading some articles.
Если вам потребовалось изменить частоту обновления экрана монитора компьютера или ноутбука, сделать это можно несколькими способами: с помощью настроек Windows, используя ПО NVIDIA или AMD и с помощью сторонних программ.
В этой инструкции подробно о том, как изменить частоту обновления на мониторе различными способами, а также о причинах, по которым может не получаться выставить поддерживаемую вашим экраном частоту.
Изменение частоты обновления экрана в Windows 11
Стандартный способ изменить частоту обновления экрана монитора в Windows 11 — соответствующий раздел в Параметрах. Необходимые шаги:
- Нажмите правой кнопкой мыши в пустом месте рабочего стола и выберите пункт «Параметры экрана».
- Внизу открывшейся страницы параметров, в разделе «Сопутствующие параметры» нажмите «Расширенные параметры дисплея».

- Выберите частоту обновления в соответствующем пункте. Если у вас подключено несколько мониторов, нужный можно выбрать в поле вверху.

- Частота автоматически изменится. Если всё в порядке — подтвердите изменение в появившемся диалоговом окне. Если после изменений изображение на экране пропало, просто подождите несколько секунд — параметры сбросятся к исходным автоматически.


Ещё одна возможность изменения частоты обновления в этой версии ОС:
- На том же экране параметров (Расширенные параметры дисплея) вы можете нажать по ссылке «Свойства видеоадаптера для дисплея».
- Если нажать кнопку «Список всех режимов» в следующем окне, вы можете выбрать один из режимов работы монитора, включая частоту и разрешение.


Изменение частоты обновления монитора в Windows 10 и предыдущих версиях ОС
Для того, чтобы изменить частоту обновления экрана монитора встроенными средствами Windows 10 выполните следующие простые шаги:
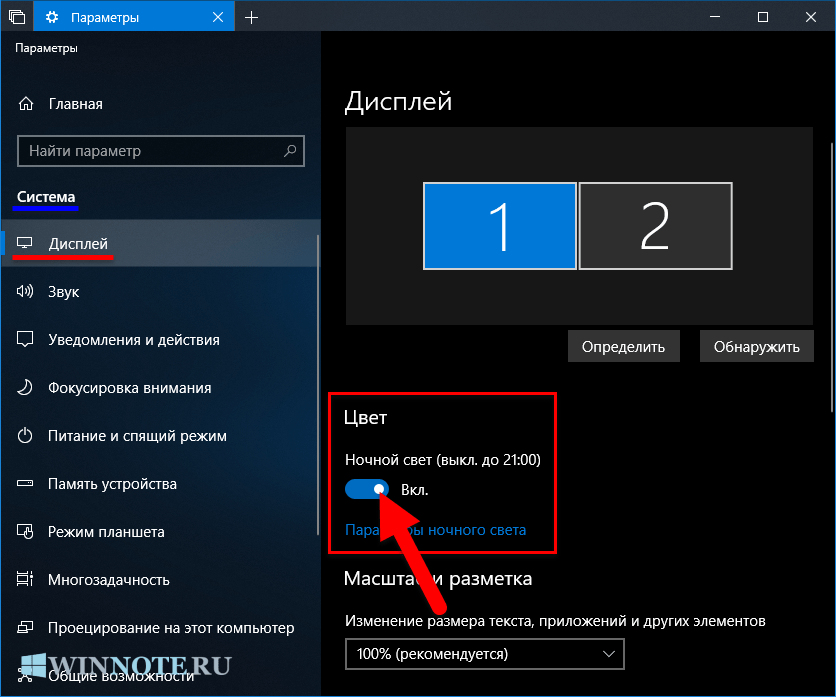
- Откройте параметры экрана: нажатие правой кнопкой мыши в пустом месте рабочего стола и выбор пункта «Параметры экрана» или Пуск — Параметры (можно просто нажать клавиши Win+I) — Система — Дисплей.
- В списке доступных параметров нажмите по пункту «Дополнительные параметры дисплея».

- Если у вас установлена Windows 10 20H2 (октябрь 2020) или новее, то внизу дополнительных параметров установите нужную частоту обновления. Иначе перейдите к шагу 4.

- В разделе «Сведения о дисплее» для нужного монитора нажмите по «Свойства видеоадаптера для дисплея».

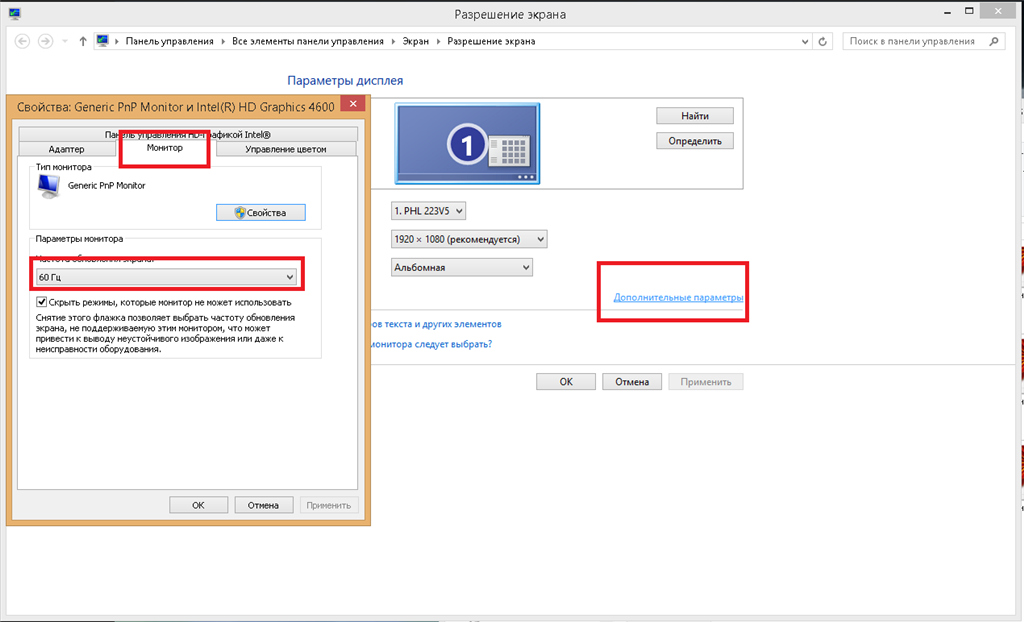
- В следующем окне вы можете поменять частоту обновления двумя способами. Первый — открыть вкладку «Монитор» и выставить желаемую частоту обновления.
- Второй — на вкладке «Адаптер» нажать по пункту «Список всех режимов» и выбрать как разрешение и глубину цвета, так и частоту обновления экрана.
- Если после применения настроек изображение на мониторе пропало и появилось сообщение Вне диапазона (Out of range) или Вход не поддерживается (Input not supported) просто подождите 15 секунд и ничего не нажимайте: параметры автоматически вернутся к исходным значениям.


То же самое можно сделать и в Windows 8.1 или Windows 7.
Шаги 4-6 отличаться не будут, а чтобы открыть окно с нужными параметрами нажмите правой кнопкой мыши по рабочему столу, выберите пункт «Разрешение экрана» (также можно использовать раздел панели управления «Экран»), а затем в параметрах дисплея нажмите по пункту «Дополнительные параметры».

Как изменить частоту обновления экрана в ПО NVIDIA, AMD и Intel
Производители интегрированных и дискретных видеокарт вместе с драйверами распространяют и свои собственные программы для настройки параметров изображения, позволяющие, в том числе, менять частоту обновления экрана.
Обычно, необходимые настройки можно запустить одним из следующих способов:
- Найти нужную утилиту в меню Пуск или используя поиск в панели задач, например, новый центр управления графикой Intel не отображается как описано в предыдущих пунктах.
- Нажатие правой кнопкой мыши по пустому месту рабочего стола и выбор «Панель управления NVIDIA», «Настройка AMD Radeon» («AMD Catalyst Control Center») или «Настройки графики Intel».
- Открыть панель управления (в Windows 10 для этого можно использовать поиск в панели задач) и найти пункт «Панель управления NVIDIA», «Настройки графики Intel».
Запустив утилиту управления параметрами видеокарты, вы можете задать необходимые параметры, включая частоту обновления экрана монитора:
Кроме этого, фирменное ПО позволяет создавать собственные профили с заданными вами вручную разрешением и частотой обновления. Например, у Intel это можно сделать в разделе «Пользовательские разрешения», а у NVIDIA — в разделе «Изменение разрешения» — «Настройка» — «Создать пользовательское разрешение».
Однако, учитывайте, что они не всегда могут работать. Более того, даже поддерживаемые монитором и видеокартой частоты обновления могут работать не всегда, о чем — далее.
Нельзя выбрать и установить нужную частоту обновления экрана или она отсутствует в списке — что делать?
Иногда при изменении частоты обновления экрана вы можете не обнаружить нужные параметры в списке: может не быть нужных вам 144 Гц для недавно купленного монитора, а порой — даже вполне штатных 60 или 75 Гц.
Возможные причины невозможности выбрать правильную частоту обновления:
- Прежде всего — драйверы видеокарты. Но, надеюсь, уж с этим вы справились. Если нет, то я писал об этом, например, в статье: Не меняется разрешение экрана Windows 10. Учтите, что сообщение диспетчера устройств о том, что «драйвер не нуждается в обновлении» не означает, что у вас установлен нужный драйвер.
- Для некоторых «продвинутых» мониторов стоит также установить драйверы. Обычно они доступны на официальном сайте производителя (скачивайте драйверы именно для вашей модели монитора).
- Используемая видеокарта. Например, интегрированное видео Intel/AMD имеет значительные ограничения по частоте обновления экрана при использовании разных интерфейсов и разрешений: актуальные на момент написания этой статьи версии Intel HD не дадут вам вывести изображение 4K по HDMI с частотой выше 30 Гц и это не единственное ограничение: для других режимов и выходов лимит может быть на уровне 50 или 60 Гц.
- Используемый для подключения кабель. Допустим, у вас современная видеокарта и такой же монитор с высоким разрешением, частотой обновления и глубиной цвета. Оба устройства поддерживают высокие разрешения и частоту обновления. Но нужный кабель в комплект не входил, и вы взяли старый Display Port 1.2 или HDMI 1.4a (также подобное может произойти если просто купить первый попавшийся дешевый кабель). Как результат — недостаточная пропускная способность, чтобы обеспечить нужные параметры отображения.
- Особенности монитора и типов подключения. Некоторые, во всём отличные мониторы, могут поддерживать максимальное разрешение и частоту обновления только при использовании определенного типа подключения: например, работать «на полную» только при подключении Display Port или USB Type-C, но иметь ограничения при использовании HDMI. Внимательно изучите информацию на официальном сайте, обратите внимание на версии интерфейсов.
Некоторые дополнительные сведения, которые могут быть полезными в контексте изменения частоты обновления экрана:
- Существуют возможности настройки частоты обновления, которой нет в списке доступных. Обычно для этих целей используют утилиту Custom Resolution Utility. Подробнее об этом в статье Как разогнать матрицу экрана монитора в Windows.
- Использование конвертеров или переходников для подключения старого монитора к новому ПК (или наоборот) может приводить к тому, что в списке доступных частот обновления не будет тех, которые по факту поддерживаются дисплеем.
One of the unidentified reasons for screen flickering issues or display resolution is the lower value of the refresh rate. The issue is termed as 144Hz not showing up Windows 10. As stated earlier, the error in the setting may cause issues with the monitor display screen. In case the refresh rate is set to 60Hz, the article has the answer to the question of how do I fix 144Hz monitor only showing 60Hz. This would fix the issue by setting the refresh rate to a higher rate. Also, the answer to the question of how do I enable 144Hz is explained in this article. Read the article till the end to find out the methods to fix the issue on your PC.

Table of Contents
144Hz refresh rate means that the display would refresh 144 times in a second to display an image on the screen. The 60Hz refresh rate, on the other hand, would refresh the display on the screen for 75 frames per second.
The following are the advantages of using the 144Hz over any other refresh rate in the monitor display.
- The display quality of the visuals on the screen is better.
- The response time taken by the monitor to display any visual is increased.
- The FPS of Frame per Second rate is improved. This would help in resolving the rendering issues in gaming.
- The flickers that occur while any video is played or the input lag or motion blur of the video is reduced.
- On the whole, the overall quality of the visuals on the display screen is improved.
What Causes of 144Hz Not Showing up Issue in Windows 10
The following are the reasons for which the issue with the 144Hz resolution would occur on Windows 10 PC.
- Default monitor setting- At most times, the monitor of the Windows PC may not support the 144Hz refresh rate.
- Hardware Issues- If there are issues with the hardware such as connecting ports or connecting cables of your Windows PC are damaged or connected improperly, you may experience this issue.
- Outdated Display Driver- The refresh rate may not be supported by an outdated Display driver on your PC.
Method 1: Basic Troubleshooting Methods
As a preliminary approach, you can try using the basic troubleshooting methods to enable 144Hz explained in this section.
1A. Fix Hardware Issues
Most of the time the issue is caused due to issues in the hardware of the Windows PC and other connected devices. You can try the following options as an answer to the question of how do I fix 144Hz monitor only showing 60Hz and see if the issue with the hardware connections is resolved.
- To connect the monitor of the Windows PC, try using the DisplayPort instead of the HDMI port.
- Ensure that you are connecting the connection cable to the corresponding ports, that is, the HDMI cable to the HDMI port.
- Use HDMI 2.0 or DisplayPort 1.2 or a dual-link DVI cable for a better visual.
- If the connection port is damaged, connect the cable to another port.
- If the connecting cable is damaged, replace the cable with a new one and use the cable provided with the PC preferably.
1B. Check Configurations of Device
If the connecting device does not support the 144Hz refresh rate, you may experience 144Hz not showing up Windows 10 issue. You can check for the configurations by referring to the user guide manual or on the official website to find out if the question of how do I enable 144Hz is suited to the device.
Option I: On Windows PC
You can check for the specifications of the Windows PC on the official website using your default web browser. For explanatory purposes, Dell is chosen as the PC manufacturer. Choose the version in the drop-down menu and check if the PC monitor can support 144Hz. You can visit the manufacturer support page (e.g. Dell) and check the your monitor specs.
Note: To know your device model, follow our guide to check monitor model in Windows 10.

Also Read: How to Setup 3 Monitors on a Laptop
Option II: On Xbox Console
If you have connected your Xbox console to the Windows PC, ensure that the console supports the 144Hz refresh rate to display the visuals. You can check for the specifications using your default web browser. For explanatory purposes, the screen configurations of the Xbox One console are described as shown below.

1C. Update Windows OS
Another method to fix 144Hz not showing up Windows 10 issue easily is to update the Windows OS on your PC. You can refer to the instructions in the guide to download and install Windows 10 latest updates.

Method 2: Update Display Drivers
If the above methods did not work and you are still thinking how do I enable 144Hz, then outdated display drivers may be stopping you to do so. Since the refresh rate is directly dependent on the visuals, it is necessary to ensure that the display driver on your PC is updated to the latest version. You can use the guide in the link given here to find out the methods to update graphics driver in Windows 10 on your PC.

Also Read: Fix Windows Found Drivers for Your Device but Encountered an Error
Method 3: Rollback Driver Updates
If your system had been working correctly and began to malfunction after an update, rolling back the drivers might help. The rollback of the driver will delete the current driver installed in the system and replace it with its previous version. To Rollback drivers, read out our guide on How to Rollback drivers on Windows 10.

Method 4: Reinstall Display Drivers
If updating the display driver does not solve the issue, you can try reinstalling it on your PC. To do this, follow the instructions in our guide to uninstall and reinstall device drivers on Windows 10.

Also Read: Fix NVIDIA Driver Not Compatible with this Version of Windows
Method 5: Modify Display Settings
Most of the time, the display setting may be configured incorrectly and you may not be able to use the refresh rate. As an answer to the question of how do I fix 144Hz monitor only showing 60Hz, you can check the display settings and alter it on your PC to fix the issue.
Option I: Through Monitor Display Settings
The first option is to alter the monitor display settings on your PC and customize the refresh rate to 144Hz. This is the major answer to the question of how do I enable 144Hz on your Windows PC.
1. Open the Settings app using the Windows + I keys and click on the System option in the menu.

2. In the Display tab, click on the Advanced display settings option in the Multiple displays section.

3. You can find the Refresh rate (Hz) in the Display information section.

4. To alter the refresh rate, click on the Display adapter properties for Display1 option.

5. Navigate to the Monitor tab and click on the required refresh rate in the drop-down menu of the Screen refresh rate.

6. To apply the change, click on the Apply button.

7. Click on the Keep changes button in the confirmation window.
8. Click on the OK button and check if the refresh rate is altered.

Also Read: Change DPI Scaling Level for Displays in Windows 10
Option II: Through NVIDIA Control Panel
If you are using the NVIDIA Graphics card, you can use the NVIDIA Control Panel to alter the display settings to fix 144Hz not showing up Windows 10 issue.
1. Press any empty space on Desktop and click on the NVIDIA Control Panel option.
2. In the Display tab on the left pane, click on the Change resolution option.

3. Select the 144Hz option in the Refresh rate drop-down menu.
4. If you cannot select the refresh rate, click on the Customize… button.
5. Click on the Create Custom Resolution… button.
6. In the Display mode (as reported by Windows) section, type the value 144 in the Refresh rate (Hz) field.
7. Click on the Test button to check the display settings.
8. Click on the Yes button on the confirmation window to save the setting.
Also Read: Fix NVIDIA Display Settings Are Not Available Error
Option III: Through AMD Catalyst Control Center
If you are using a Gaming PC, you can use this option as an answer to the question of how do I fix 144Hz monitor only showing 60Hz. The method to alter the refresh rate on the AMD Radeon Graphics card using the AMD Catalyst Control Center is elaborated here.
1. In the Desktop, right-click on any empty space, and select the AMD Catalyst Control Center option.
2. Expand the Desktop Management tab on the left pane and click on the Desktop Properties option.

3. Set the Refresh rate to 144Hz in the Settings section and click on the Create button.
Thus, if you were having query on how do I enable 144Hz, then this is the solution.
Pro Tip: Adjust In-Game Settings
As an additional method to fix 144Hz not showing up Windows 10 issue, you can try adjusting the display settings of the gaming apps you have installed on your PC. This would fix the incompatibility between the gaming apps and display settings and help you in finding the answer to the question of how do I enable 144Hz.
Note: For explanatory purposes, the in-game settings of the Skyrim game are used.
1. Launch the Skyrim game in Stream
2. Open the in- game settings.
3. In the Detail section, click on the Advanced… option.

4. In the Detail tab, set the Shadow Quality and Shadow Distance options to Low using the drop-down menu and click on the OK button.
5. Relaunch the Skyrim game using the search bar and see if the issue is resolved.
Recommended:
- Fix Xbox Live Error 8015190e
- How to Increase RAM on Windows 7 & 10
- Fix Not Currently Using Display Attached to NVIDIA GPU Desktop Issue
- Fix Windows 10 DisplayPort Not Working
The methods to fix 144Hz not showing up Windows 10 issue are explained in the article. Let us know which of the methods is a perfect solution for the question of how do I fix 144Hz monitor only showing 60Hz. Also, please use the comments section to share your suggestions and queries.
Applies ToWindows 11 Windows 10
Частота обновления экрана — это количество обновлений изображения на экране в секунду. Например, экран с частотой 60 Гц будет обновляться 60 раз в секунду.
Каковы преимущества изменения частоты обновления дисплея?
Преимущества изменения частоты обновления дисплея зависят от типа просматриваемого содержимого и возможностей дисплея. Ниже приведены некоторые преимущества.
-
Игры: более высокая частота обновления может улучшить игровой процесс, уменьшив размытие движения и разрыв экрана. Это может дать вам конкурентное преимущество в быстро развивающихся играх, уменьшая задержку ввода и повышая скорость реагирования.
-
Просмотр и рукописный ввод. Более высокая частота обновления может сделать прокрутку и использование цифрового пера более плавной и естественной. Это также может уменьшить напряжение глаз и усталость путем минимизации мерцания и призрака.
-
Срок службы батареи. Снижение частоты обновления может сэкономить заряд батареи, уменьшив количество потребляемой дисплеем энергии. Это может быть полезно, если вы используете ноутбук или планшет и хотите продлить время работы батареи.
Изменение частоты обновления
Изменения частоты обновления дисплея можно изменить в параметрах дополнительного дисплея:
-
Выберите Параметры > Системный > Дисплей > Дополнительно .
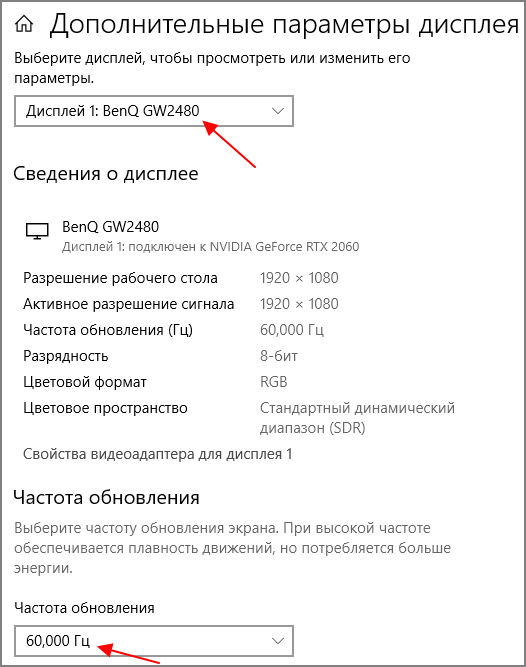
На панели Сведений о отображении отображается текущее разрешение и частота обновления для выбранного дисплея, а также указано, поддерживает ли дисплей переменную частоту обновления (VRR).
Если ваша мотивация для изменения частоты обновления дисплея заключается в улучшении игрового процесса, это может оказаться ненужным, если ваш дисплей поддерживает VRR, так как многие популярные игры автоматически используют VRR для динамической адаптации частоты обновления, чтобы обеспечить лучший игровой интерфейс.
Чтобы изменить частоту обновления на странице Дополнительные параметры отображения, выполните следующие действия.
-
Выберите нужную частоту рядом с пунктом Выберите частоту обновления.
Частота обновления зависит от вашего дисплея и поддерживаемых им показателей. Выбор ноутбуков и внешних дисплеев будет поддерживать более высокую частоту обновления.
Важно: Раскрывающийся список частоты обновления отображает звездочку (*) рядом с частотой обновления, которая не поддерживает текущее разрешение. Если выбрать одну из этих частот, разрешение экрана изменится, чтобы достичь выбранной частоты обновления.
Что такое динамическая частота обновления (DRR)?
Windows 11 представляет новую функцию под названием Динамическая частота обновления (DRR), которая автоматически настраивает частоту обновления в зависимости от того, что вы делаете в данный момент. Это поможет вам получить все возможное из обоих миров: плавный опыт, когда он вам нужен для игр, просмотра или рукописного ввода, и более длительное время автономной работы, когда вы не делаете эти типы вещей.
Чтобы включить или отключить DRR, выполните приведенные далее действия.
-
Выберите Пуск > Параметры > Системный > Дисплей > Дополнительно .
-
Используйте переключатель Динамической частоты обновления , чтобы включить или выключить DRR. Примечание. Включить DRR можно только в том случае, если ваше оборудование поддерживает DRR.
Важно: DrR требует, чтобы дисплей поддерживал VRR и частоту обновления не менее 120 Гц. DRR не должен влиять на игры, предназначенные для VRR, но может ограничить максимальную частоту обновления других игр. Если вы включите DRR и обнаружите, что любимая игра работает с более низкой частотой обновления, лучше всего отключить DRR.
Нужна дополнительная помощь?
Нужны дополнительные параметры?
Изучите преимущества подписки, просмотрите учебные курсы, узнайте, как защитить свое устройство и т. д.
Настройте монитор на максимальную частоту обновления для плавного воспроизведения изображения и улучшенного игрового опыта.
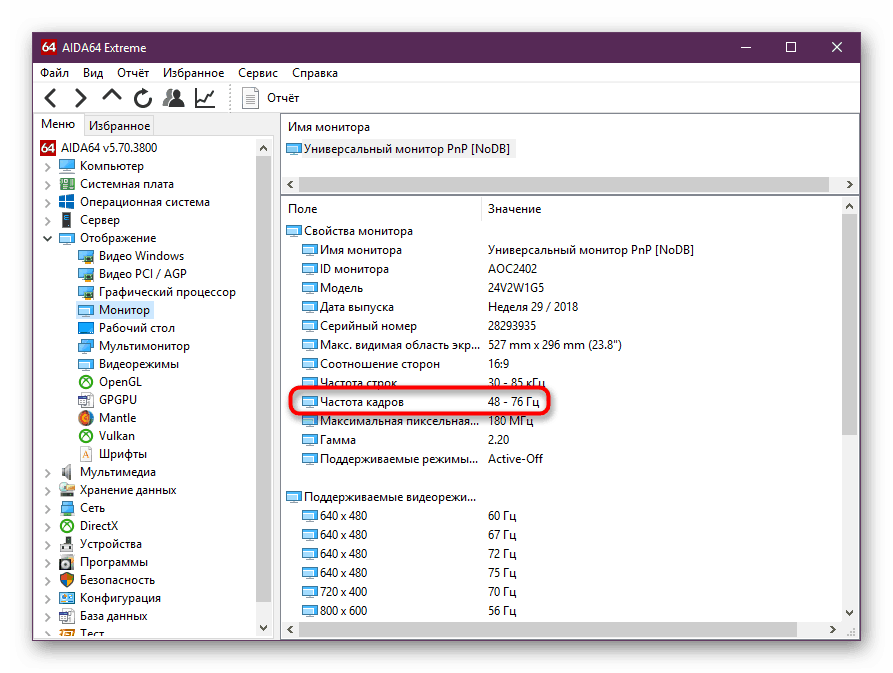
Проверьте поддерживает ли ваш монитор частоту 144 Герц и, если да, активируйте ее в настройках дисплея.
Сбрасывается частота обновления монитора? / Решение / Так же и фикс \
Обновите драйвера графической карты до последней версии, чтобы обеспечить оптимальную работу с новой частотой обновления.
Что делать если монитор не показывает 144 FPS/Некорректно показывает цвета/Не включается HDR?
Проверьте качество кабеля HDMI или DisplayPort, который соединяет монитор с компьютером, и при необходимости замените его на более качественный.
Настройка 144гц монитора и включение функции freesync на нём.
Убедитесь, что настройки разрешения и частоты обновления в Windows 10 совпадают с возможностями вашего монитора.
Windows 10 не видит 144 герца на мониторе 2.5к LG UltraGear

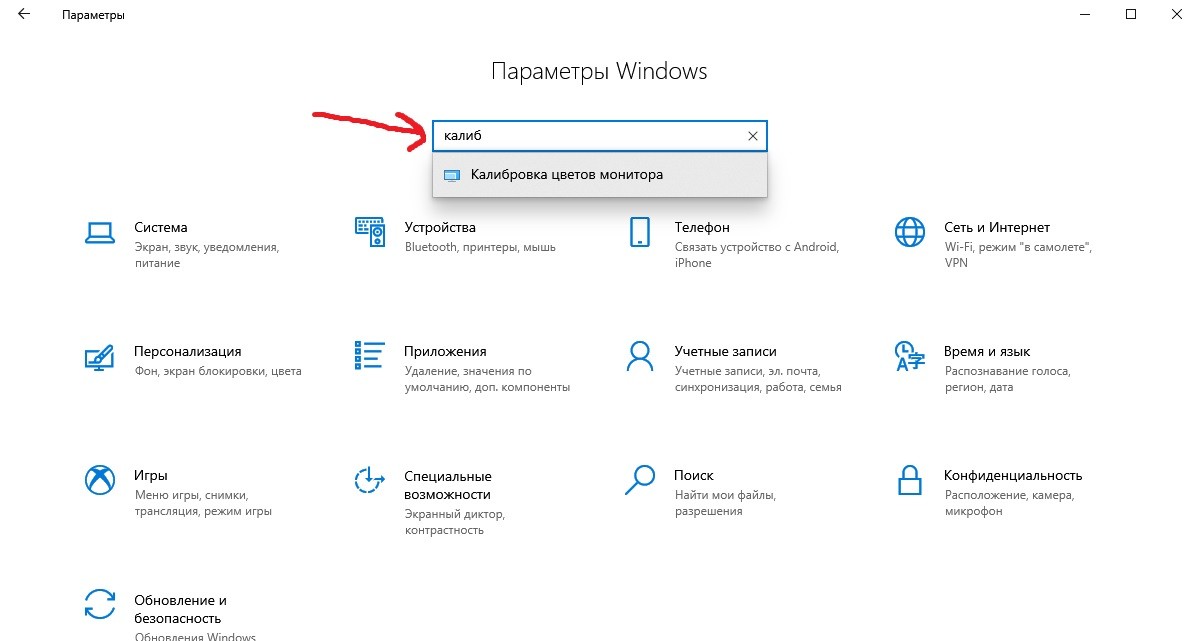
Выполните калибровку экрана для дополнительной точности цветопередачи и контрастности при увеличенной частоте обновления.
Как установить 120 ГЦ на fixicomp.ruние графики
Избегайте использования сторонних программ, которые могут изменять настройки частоты обновления монитора без вашего ведома.
Как правильно настроить 144Hz монитор после покупки
Запустите тесты на стабильность системы после установки новой частоты обновления, чтобы исключить возможные проблемы совместимости.
Как на 10 винде включить 144 Гц монитора (100/120)

Постоянно следите за температурой видеокарты и процессора, особенно в условиях повышенной частоты обновления монитора.
Монитор гаснет на секунду и включается снова
Что делать если монитор не показывает 144 FPS/Некорректно показывает цвета/Не включается HDR?
При возникновении артефактов или мерцания изображения при 144 Герцах, вернитесь на более стандартную частоту обновления.
Как включить частоту 144Гц на старой видеокарте NVIDIA. Enable 144Hz on an Old NVIDIA

Не забудьте регулярно обновлять все драйвера и операционную систему, чтобы избежать возможных проблем с работой монитора на повышенной частоте обновления.