
A quick reference to setup and configure your controller deadzone, anti-deadzone, maxzone and other axis mapping options with DS4Windows.
What is Controller Deadzone?
Controller deadzone is the distance on your control stick that needs to be moved before it interacts with the game.
A low deadzone allows for accurate, responsive gameplay – requiring only a slight movement of the control stick to initiate an input. However, an excessively worn controller or loose sticks may cause ‘drift,’ resulting in your controller not behaving correctly.
As such, larger deadzones are typically suggested as they create more lag but prevent accidental movements from occurring.
Configuring Controller Deadzone on DS4Windows
Users needing to configure their dead-zone settings can utilize DS4Windows to resolve any analog stick drift and/or get a much faster stick drift for game advantages. Here you can find detailed information on all axis mapping sections and preferred options.
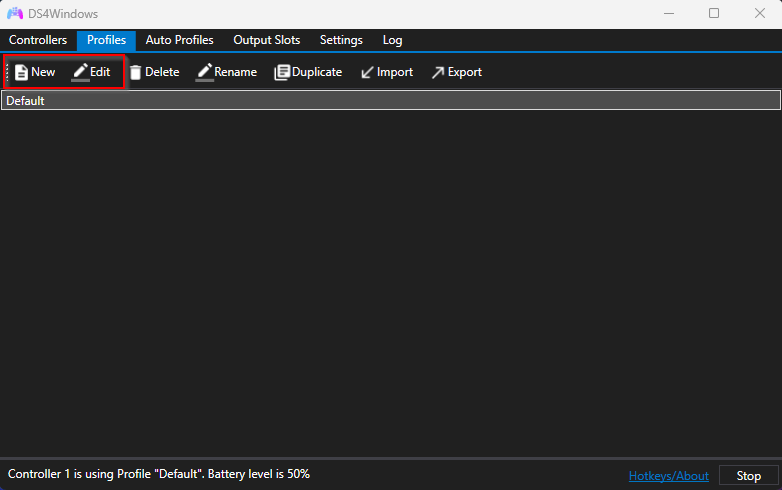
To edit and configure dead zone settings on DS4windows – load your current default profile or create a new profile – Then hit the controller Readings tab on your left and Axis Config on your right.

While there’s quite a lot of options one can configure – which can be a bit daunting – you can find detailed information about each section below.
Learn more about controller deadzone settings and configure your controller to meet your needs. Additionally, read our troubleshooting guide on misbehaving controllers to distinguish the correct settings.
Deadzone
A deadzone represents the region of an axis that should be considered as having zero output. Having a deadzone in place will better ensure that there is no accidental output value generated by having your finger at rest on an analog stick or trigger and no accidental output value is generated from an axis that does not return to the absolute resting position. This is especially important if you re-map an analog LS or RS axis to digital buttons (for example D-pad buttons). A digital button is either on or off, so having a deadzone in LS/RS analog axis makes sure that an analog axis drifting is not constantly converted as digital button event. Some controllers may require bigger deadzone than others because of hardware differences.
LS: 0.09
RS: 0.09
L2: 0.30
R2: 0.30
Check out how the Dead Zones and Anti Dead Zones work for the given Input and the Output. When the input is inside the Dead Zone (Red Area), the output is properly centered.
0
0.10
0.20
0.40
0.60
0.80
0
0.10
0.20
0.40
0.60
0.80
Anti-Deadzone
An anti-deadzone acts as an offset for use with an axis to denote the minimum output value generated after an axis has left its assigned deadzone. This is mainly meant to help with mapping an axis to the assigned deadzone value used for an axis in a video game. For example, the typical assigned deadzone for XInput LS in a video game is around 8000 (25%). With no anti-deadzone assigned, an axis would have to move past the assigned deadzone in DS4Windows along with the game’s assigned axis deadzone.
LS: 0.25
RS: 0.25
L2: 0.00
R2: 0.00
0
0.10
0.20
0.40
0.60
0.80
0
0.10
0.20
0.40
0.60
0.80
Maxzone
A maxzone denotes how far an axis will have to travel before the maximum output value will be generated. This setting mainly helps with older controllers as an axis might not be able to reach its maximum output value as an axis gets worn out with use. This setting can also help if you would like to reduce the amount of travel required to reach the maximum axis value.
LS: 1.00
RS: 1.00
L2: 1.00
R2: 1.00
Max Output
In some situations, it might be useful to limit the maximum value that is output by the output analog stick. Max Output allows throttling the final output value of the analog stick. The default is 1.00.
Vertical Scale
Allows scaling the vertical output (Y axis) of the analog stick compared to the value of the X axis. It an be useful depending on POV settings in a game. It can also be useful when mapping an analog stick to Mouse Controls and you want to have a different vertical mouse speed. The default is 1.00.
Rotation
The rotation setting is meant to help correct the orientation of an analog stick if your thumb is slightly shifted when moving an analog stick. For example, your thumb might be slightly shifted from center when the analog stick is moved fully north. My thumbs shift slightly to the right when moving an analog stick fully north due to the way my hands grip the DS4. The value used denotes the number of degrees used to adjust the final axis output value.
Output Curve
You can assign an output curve to LS/RS/L2/R2/SA axies when the normal linear curve doesn’t work well in some use cases. This is especially useful if LS/RS stick is used to emulate a mouse because the normal linear output curve doesn’t give a “mouse like feeling” or precision. Predefined enhanced precision output curve works well when a stick is used as a mouse.
Custom output curve is useful when you need, for example, more accurate aiming precision in a game and the default linear curve is too fast in the beginning of the curve. The custom output curve option lets you to tweak the curve to feel better.
DS4Windows supports following output curve options:
Linear: The normal default output curve.
Enhanced Precision: Slower output curve in the beginning, but gets faster towards the end of the curve.
Quadratic: Slow easein curve (easein quadratic).
Cubic: Very slow easein curve (easein cubic).
Easeout quad: Fast in, but the curve gets slower towards the end of the curve.
Easeout cubic: Very fast in, but slow easeout.
Custom: User customized output curve (a graphical web app to draw the curve)
The custom option uses bezier curve to tweak the output curve. In practice bezier curve supports both easein and easeout curves (or both at the same time). Custom output curve web app
To some degree it is possible to achieve similar results just using the custom output curve setting than using dead-zone, sensitivity and max zone settings together to tweak the output curve of an analog axis.
Square Stick
Normally when LS/RS stick is fully extended to one direction (N/S/E/W compass directions) and you start to move move the stick along the vertical or horizontal axis side ways (NW/NE/SW/NE compass directions) the output value of LS/RS stick follows an arc curve. This means that the 1.0 output value of the axis starts to move slightly towards 0.0 value. This might be an issue especially in games where LS/RS stick is re-mapped as digital d-pad keys. You can tweak how DS4Windows smooths out the output value of LS/RS stick corners by tweaking Square Stick setting and 0..5 roundness value.
The following post has pictures explaining this better than words can do. Square Stick – Roundness option value
Fuzz
Fuzz specifies the minimum number of units the analog stick moves before the output is registered as changed in the mapper. This setting can be useful for worn sticks that cannot maintain a constant position. The value is expressed in raw stick units. The default value is 0 units.
Sensitivity
LS: 1.00
RS: 1.00
L2: 1.00
R2: 1.00
Sixaxis X: 1.00
Sixaxis Z: 1.00
Two Stage Triggers
Utilizing Two Stage Triggers allows two actions to be bound to the L2 or R2 trigger. When using Two Stage Triggers, one Soft Pull action will be bound for most of the trigger and a Full Pull action can be bound when the trigger hits its maximum value. There are several different modes of operation for how the two zones behave.
Two Stage Modes
Disabled
Disables use of Two Stage Triggers. Only bind one action to L2 or R2
Normal
Normal (simple) Two Stage Trigger activation. Activates Soft Pull action when under maximum output. Activates Full Pull action as well when trigger reaches maximum value.
Exclusive
Activates Soft Pull action when under maximum output. When trigger reaches maximum output, deactivate Soft Pull action and then activate Full Pull action
Hair Trigger
Similar to Normal Two Stage Trigger mode with one difference. Activates Soft Pull action when under maximum output. Activates Full Pull action as well when trigger reaches maximum value. When the trigger is partially released from Full Pull, both Full Pull and Soft Pull actions deactivate. Activating Full Pull action will activate the Soft Pull again as well.
Hip Fire
Takes the Hip Fire Delay time into account. The trigger will not activate an action until the time has expired. Once the time has expired, the current action for the trigger output will be determined. This mode allows skipping the activation of Soft Pull and only firing a Full Pull action.
Hip Fire Exclusive
Similar to Hip Fire mode. The main difference is only one action will ever be activated.
What is Deadzone?
Simply put the distance the stick on the controller requires to move for throwing in an input in the game is called the deadzone.
Therefore, if you keep a low deadzone, you can have more accurate gameplay, but you cannot prevent accidental movements. However, if you keep a large deadzone then though you can prevent accidental movements, you require dealing with lag. Let us see now how to configure deadzone in DS4Windows.
How to Configure Deadzone in DS4Windows?
To access deadzone in DS4Windows, first, you require loading a profile. Once the profile loads, tap on Controller Readings > Axis Config. In this section, you will witness a lot of options discussed in detail below.


Deadzone
The value given here will decide the region of axis that will not have any output. This setting is recommended to have a certain value to prevent accidental output. Moreover, if you have a controller whose stick does not return to its absolute center; having a deadzone axis value in place will help any kind of accidental interaction with the game and ensure smooth gameplay.
Anti Deadzone
In simple terms, an anti deadzone is an offset utilized along with an axis that indicates the minimum output value generated after an axis leaves the deadzone. This comes in handy to map an axis for the assigned deadzone value utilized as an axis in the video game.
Also, check out – Fix* DS4Windows Not Detecting Controller (Solved, 2024)
Maxzone
As the name suggests, Maxzone value indicates how much distance the axis will travel before the generation of the maximum output value. If you are using an older worn-out controller, this setting is handy as physically the controller might not be able to reach the maximum output. Below are the default values of Maxzone.
LS: 1.00
RS: 1.00
L2: 1.00
R2: 1.00
Max Output
With the default value being 1.00, the Max Output value helps to limit the maximum value generated by the analog stick on the controller.
LS: 1.00
RS: 1.00
Vertical Scale
This setting helps to scale the vertical output or the Y axis of the analog stick in comparison to the value present as the X axis. This setting is helpful when you must map the analog stick to mouse controls, and you require the vertical mouse speed to be different. The default value is 1.00.
LS: 1.00
RS: 1.00
Rotation
If when moving the analog stick of a controller, your thumb shifts depending upon the way you handle the controller, then the Rotation setting will come in handy to adjust the value of the final axis output. The values that you provide here acts as adjustments for the final axis output value. Consider below example.
LS: -4
RS: 4
Output Curve
Suppose you must use the LS/RS Stick to emulate a mouse; the normal linear curve does not give the mouse like feeling. In cases like this, the Output Curve setting comes in handy. Especially in aiming games, the custom output curve helps you to land a more accurate aiming precision. The following are the curve options supported by DS4Windows.
- Linear > Normal.
- Enhanced Precision > Slower output in the beginning but gets faster as it reaches the end.
- Quadratic > Slow easing in.
- Cubic > Very Slow easing in.
- Easeout quad > Fast in but gets slower towards the end.
- Easeout cubic > Very fast but gets slower towards the end.
- Customer > Set up your value.
Don’t miss out this guide to fix all your problems-
Fix DS4Windows Not Working/Not Opening|Crashing/Not Starting
Fuzz
The minimum number of units that an analog stick must move before the output getting registered in the mapper. Again, this setting is helpful in the case of old controllers with worn-out sticks. The default value is 0.
LS: 0
RS: 0
Two Stage Triggers
With the help of this setting, you can associate two actions with the L2 or R2 trigger. In this option, one Soft Pull action accounts for a majority of the trigger and we can associate a Full Pull action upon the trigger hitting the maximum value. Check out the different modes of operation that exist here.
- Disabled > Disable the option.
- Normal > Activates the action associated with Soft Pull during maximum output. When the trigger reaches the maximum value, the Full Pull action kicks in.
- Exclusive > Same as Normal but when the trigger reaches the maximum value, the Soft Pull action is deactivated before activating the action set up on Full Pull.
- Hair Trigger > Under maximum output, Soft Pull action kicks in. Upon reaching the maximum value, Full Pull action also kicks in simultaneously.
- Hip Fire > This option is utilized, if you only wish to activate one action. It considers the associated delay time. No action gets activated until the delay time is over.
You should check out these –
8 Best DS4Windows Alternatives (Software 2024)
DS4Windows Drivers for DualShock 4/DualSense 5 – (LATEST)
Final Words
We hope the above helps you to understand the Controller Deadzone option better. If you have any questions or queries, please feel free to put them down in the comments below.
Leave a Comment
Sign in to your How-To Geek account
Quick Links
-
Adjusting Dead Zone to Eliminate Drift
-
Adjusting Dead Zone for a Competitive Advantage
-
Where to Find Dead Zone Settings
When browsing through your controller settings, you may have seen a setting where you can adjust the «dead zone» of the controller. Dead zone adjustment can be crucial to getting the best experience using a controller if you know what it does.
What Is the Dead Zone?
The dead zone (or sometimes «deadzone») of a controller is the distance the stick can move from the neutral position before it starts registering as an input in games and applications. A controller with a large dead zone takes longer to register inputs than one with a small dead zone. However, if the dead zone is too small, the controller may become too sensitive. It may even exhibit false inputs when the stick is untouched.
Every controller has an inherent dead zone out of the box, but it can be tweaked to a certain extent. Why would you? There are two main reasons to adjust your controller’s dead zone: eliminating drift or getting a more responsive controller.
Adjusting Dead Zone to Eliminate Drift
Most mainstream controllers use a sensor design susceptible to wear and tear over the course of the controller’s life. Eventually, this wear can exhibit as «drift», which is when the controller detects inputs when none are present. For example, your character might keep walking even with your thumbs off the stick, or the camera could keep spinning.
Often drift is quite subtle, and by enlarging the dead zone slightly, you can cancel out the effect of drift. This is a great way to extend the life of a controller that’s started to show signs of drift and if you’re lucky, it won’t degrade any further. In the worst-case scenario, you’ll buy some time until the drift worsens to the point where a usable dead zone isn’t possible anymore.
Adjusting Dead Zone for a Competitive Advantage
The other main reason to adjust your dead zone is to improve the responsiveness of your controller in-game or to decrease that sensitivity if that makes the game more playable. In the higher echelons of competitive gaming, the fraction of a second a smaller dead zone can fight you in reaction time can be the difference between taking out your opponent or being taken out.
Where to Find Dead Zone Settings
There are generally two places where you’ll adjust the dead zone of a controller. The first is at the system level. For example, when you run the controller calibration function on a Nintendo Switch (which is notorious for drift) you’re adjusting the dead zone to cancel out drift along with other calibrations. These are then saved to the controller itself.
If you open the Start Menu in Windows, type «Controllers» and select «Set Up USB Controllers» you’ll see this window.
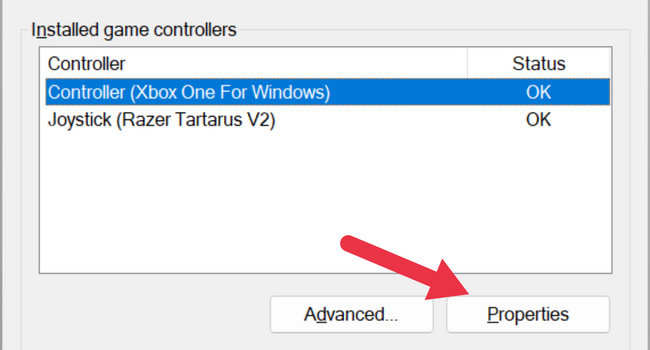
Select your controller and click «Properties».
Under the settings tab you can calibrate the controller or reset it to default to adjust the dead zone to combat drift.
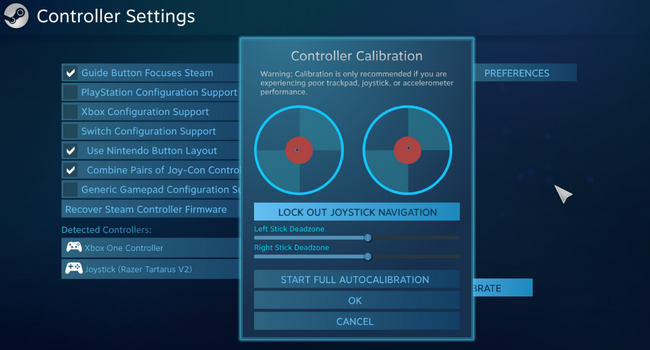
In Steam, you can go to Steam > Settings > Controller > General Controller Settings. Select your controller then click on «Calibrate».
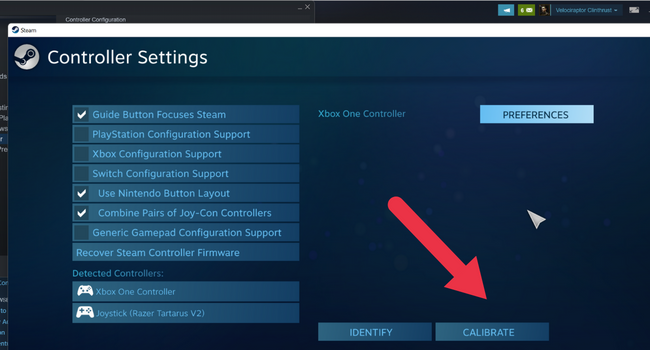
Here you can manually adjust dead zone sliders, making it a great general-purpose solution for all your Steam games.
If you aren’t looking to fix a drift issue, then you’re better off adjusting your dead zone on a per-game basis. Most games that support controllers have a dead zone setting in their menus. With a little experimentation, you can find a dead zone setting that represents the best balance of responsiveness without being twitchy.

Plugging in a new device and setting it up can be a nuisance, especially if you want to get into a competitive game. Controllers are not new, by technology standards, but for some people, they might be the newest smartphone with an unknown operating system.
Apart from the standard controller options that have to be set on a per-game basis, controller deadzone comes to mind as a frequent problematic experience gamers have. With that in mind, what comes next is an explanation of what controller deadzone is and how to troubleshoot and fix it.
What is Deadzone on Controller?
Controllers have analog sticks that are used to move along the x and y axis in various video games, from shooters to RPGs, or rather, any 3D game. They have been around since the first PlayStation and XBox.
The deadzone is the distance you can move your sticks before the input is registered. This matters for a couple of reasons, the first one is sensitivity. The higher the value for the deadzone, the more you have to move your sticks before they register.
This Rocket League visualizer should help understand what a controller deadzone is.
Most people would set the deadzone as low as possible, right? Most people would like to, however, stick drift prevents them from doing so.
What is Controller Deadzone? Stick Drift Explained
Given that we move our hands around while gaming, analog sticks are also very likely to move, even without us intentionally doing so. Poorly made controllers are even worse in this case, where sticks can move at the slightest nudge.
When you set the deadzone sensitivity too low, sticks can move on their own, seemingly without any input. This is known as stick drift. Stick drift can be very frustrating to deal with, but so is an unresponsive controller. The key is to set the deadzone in between, so that there is no drift, but the controller remains responsive and usable.
How to Find and Fix Deadzone Problems
- The first thing one should do is check whether their sticks are wobbly and poorly made. Regular issue PS5 and XBox Series S/X controllers should be good enough. The best controllers and those made for competitive gaming will not have any stick drift issues unless the sensitivity is set too low.
- Once you troubleshoot that you do not have a faulty controller, the next step would be to check if your specific controller has an application which can change its hardware sensitivity, something most competitive mice have.
- If the controller does not have a specific application to adjust its sensitivity, the next step would be to test the controller on a per-game basis. Every modern game has its own sensitivity settings for controllers.
- Start with putting the sensitivity as low as possible, slowly moving upwards until the drift stops. From that point, adjust the sensitivity per your own preference. Some like a really responsive controller, others find such settings very hard to aim with.
Controller Deadzone Rocket League
As far as video games are concerned, deadzone settings should be done in every game respectively. For Rocket League, that means adjusting a few different settings.
- The first setting that one should look at is controller deadzone, which controls the deadzone that we have been discussing up to now.
- The next setting is the dodge deadzone setting, which controls the deadzone of the second jump. In Rocket League, it is possible to do flips, a front, back or side flip, but that can accidentally be done if the dodge deadzone is set too low.
- Following are the sensitivity settings for steering and aerial. These control how much your car moves when you move the stick. Too low and you will have to move the stick a lot, too high, and you will be doing 360 turns with a slight bump. It is down to personal preference, but most professionals have both sensitivities at a maximum of 2.00.
Mouse sensitivity has nothing to do with controller settings, other than to irk players and start PC vs console or mouse and keyboard vs controller debates.
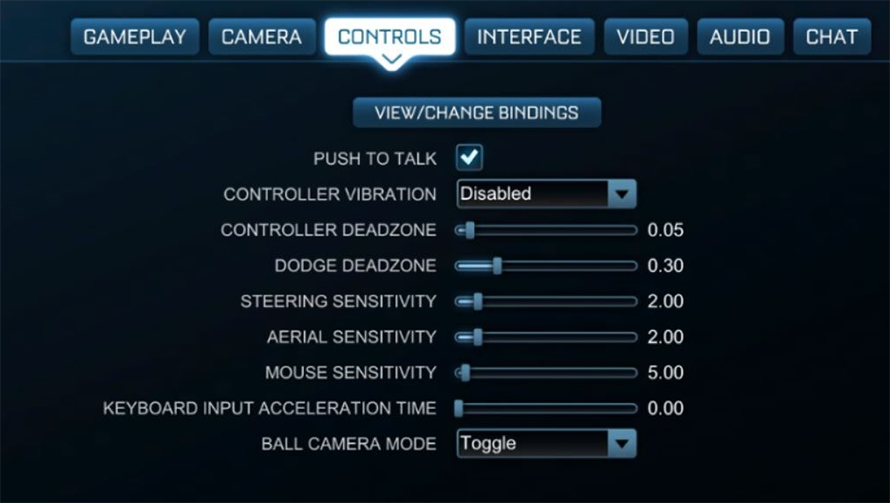
Rocket league controls panel, where you adjust various input-related controls.
How to Change Deadzone on XBox One Controller
When it comes to Microsoft and the XBox, controller settings can be confusing. Luckily, Microsoft support is quick to answer questions and clear things up.
- Regular XBox controllers do not have a dedicated settings application. Settings for every XBox controller has to be done per game, which you should do with any game, to be fair.
- XBox Elite controllers can be adjusted without going into a game. The XBox Accessories app allows response curve adjustments which behave in a similar way to deadzone settings.
One should still adjust their controller for every game according to their preference. A universal setting is hard to maintain over a plethora of games due to every game having different acceleration and sensitivity curves.
Summary and Conclusion
Controller deadzone is an area where the input of your controller is not registered. It is used to adjust the analog sticks so that they do not drift (move without any input) or so that they are not overly slow and laggy.
- Depending on the controller and game, deadzone settings will vary and will have to be adjusted if you change either the device or game.
- Starting from the lowest possible deadzone setting where there is no drift, adjust the value upwards until you find the balance between no drift and good response.
- Check controllers for damage, because there is no setting that can adjust for broken sticks which move on their own.
- Lastly, invest in an industry standard gaming controller if you want a decent and lag-free experience.
Remember to adjust the settings in every game so that your controller sits at just the right spot for a good experience.
Post navigation
Приложение PlayStation Accessories позволяет настраивать параметры контроллеров и обновлять их встроенное программное обеспечение с помощью компьютера Windows PC.
- Интенсивность вибрации и триггерных эффектов
- Изменение профилей
- Выбор профилей
- Настройки контроллера
- Обновление встроенного программного обеспечения
Как создать профиль на беспроводном контроллере DualSense Edge на PC
Приложение PlayStation Accessories позволяет создавать, изменять и выбирать пользовательские профили беспроводного контроллера DualSense Edge™ на PC.
- Подключите контроллер к PC.
- Обратитесь к руководству ниже, чтобы загрузить приложение PlayStation Accessories.
- Запустите приложение.
Управляйте приложением с помощью мыши или клавиатуры. - Выберите Создать профиль или один из профилей с пометкой Не назначено.
Если подключено несколько контроллеров, выберите меню под тем, который хотите использовать. - Введите название профиля и выберите Далее.
- Выберите значок для профиля, а затем Создать профиль.
- Настройте профиль, выбирая параметры на экране.
После каждого изменения выбирайте Применить. Иначе изменения будут утрачены при возвращении на предыдущий экран.
- Закончив изменение параметров, выберите Готово.
- Переключаться между созданными профилями можно без приложения. В ходе игры удерживайте кнопку Fn и нажмите кнопку «треугольник», «круг», «крест» или «квадрат» для выбора соответствующего профиля.
- Стандартному профилю соответствуют кнопки Fn + «треугольник». Чтобы восстановить заводские настройки контроллера, выберите Стандартный профиль.
- Для каждого контроллера можно создать до трех профилей. Стандартный профиль в их число не входит.
Что можно изменить
Вы можете изменить настройки кнопок и джойстиков беспроводного контроллера DualSense Edge™, а затем сохранить эти изменения в виде пользовательского профиля. Как использовать пользовательские профили
- Смена профилей с помощью значков
На каждом контроллере можно сохранить до четырех профилей, включая стандартный.
Для быстрого переключения между ними во время игры используйте значки. - Использование сохраненных профилей на других устройствах
Профили сохраняются на вашем контроллере. Используя один и тот же контроллер на разных компьютерах или мобильных устройствах, вы можете загружать свои профили и играть с привычными настройками.
В профилях можно сохранять следующие настройки.
- Назначение кнопок
- Чувствительность джойстика/мертвая зона
- Мертвая зона спуска
- Интенсивность вибрации и триггерных эффектов
Также для персонализации контроллера можно заменять некоторые его детали: например, задние кнопки и накладки на джойстики.
За информацией о таких деталях и способах их замены обращайтесь к документации контроллера.
Как изменить назначение кнопок контроллера на PC
- Создайте или измените пользовательский профиль.
- Выберите кнопку, которую хотите изменить, а затем выберите функцию, которую хотите ей назначить.
Если вы нажмете Отключить, то при нажатии кнопки никакое действие выполняться не будет. - Выберите Применить.
Как настроить чувствительность и мертвые зоны джойстиков на PC
Вы можете настраивать чувствительность и мертвые зоны джойстиков контроллера. Вот несколько примеров того, для чего это нужно:
- Изменив чувствительность джойстика, вы можете ускорить или замедлить движение персонажа или обзор.
- Установив мертвую зону, вы можете повысить точность управления движением персонажа или обзором.
Пунктами от А до D обозначены примеры для правого джойстика. Левый джойстик можно настроить точно так же.
Выберите один из 6 типов чувствительности:
Стандартный
Зарегистрированный ввод увеличивается пропорционально движению джойстика.
Быстрый
Интенсивность зарегистрированного ввода увеличивается с отклонением джойстика. Хорошо подходит для быстрых движений. Помогает быстро прицеливаться в динамичных шутерах.
Точный
При отклонении джойстика регистрируется минимальная интенсивность ввода. Хорошо подходит для выполнения точных движений. Любителям шутеров может пригодиться возможность медленного и точного прицеливания.
Плавный
Интенсивность ввода ограничена, даже если вы сильно наклоните джойстик. Обеспечивает плавное и стабильное движение.
Цифровой
Даже при небольшом отклонении джойстика регистрируется почти максимальная интенсивность ввода. Функции аналогичны кнопкам направлений на контроллере. Мгновенный ввод для ваших файтингов и шутеров.
Динамический
Интенсивность ввода ограничена, когда вы слегка или сильно отклоняете джойстик, но усиливается при среднем отклонении.
Обеспечивает универсальный игровой процесс в шутерах, где вам нужно не только тщательно прицеливаться, но и быстро поворачиваться.
Мертвая зона – это диапазон, в котором вы можете отклонять джойстик без регистрации ввода. Например, при мертвой зоне в 10% вам нужно превысить наклон 10%, прежде чем игра зарегистрирует ввод.
Горизонтальная ось – это наклон джойстика, а вертикальная ось – ввод, отраженный в игре. Например, при плавном типе чувствительности сильный наклон джойстика приводит к плавному движению. При резком типе чувствительности даже небольшое отклонение джойстика приводит к быстрому движению.
Как настроить мертвую зону спуска на PC
Мертвая зона – это диапазон, в пределах которого вы можете нажимать кнопку без регистрации ввода.
Например, вы можете настроить ее таким образом, что если вы крепко сжимаете контроллер и случайно нажимаете кнопки L2 или R2, то ввод регистрироваться не будет.
А) Применить одинаковые настройки спуска слева и справа
При включении отображается только одна сторона. Вносимые вами изменения одинаково влияют на настройки спуска и слева, и справа.
B) Диапазон входного сигнала
Установите диапазон, в котором при нажатии на спуск будет регистрироваться ввод. Например, если вы установите диапазон входного сигнала от 30 до 70, для регистрации ввода необходимо будет нажать на спуск сильнее, чем на 30. Максимальный диапазон входного сигнала – 70. При нажатии на спуск слабее 30 или сильнее 70 входной сигнал регистрироваться не будет.
С) Проверка контроллера
Оцените диапазон входного сигнала, нажимая кнопки L2 или R2.
Как настроить интенсивность вибрации и триггерных эффектов на PC
Вы можете настроить интенсивность вибрации и триггерных эффектов контроллера, а также полностью отключить эти функции. Функция триггерных эффектов позволяет чувствовать различные уровни усилия на кнопках L2 и R2 в зависимости от того, что происходит в игре. К примеру, это усилие может возрастать, когда вы натягиваете тетиву лука или резко нажимаете на тормоз.
- Функция триггерных эффектов доступна только в тех играх, которые ее поддерживают.
- Функция триггерных эффектов можеть не работать при некоторых значениях мертвой зоны спуска.
Вы можете настроить длину хода кнопок L2 и R2 при их нажатии, используя ползунки останова L2 и R2 на задней панели контроллера. Начиная сверху, вы можете установить большую, среднюю и малую длину хода.
Если установить ползунки останова L2 и R2 на средней или малой длине хода, функция триггерного эффекта работать не будет.
Как изменить профиль на PC
- Выберите профиль, который вы хотите изменить.
- Выберите Изменить.
- Выбрав Проверка контроллера, вы можете проверить чувствительность и диапазон входного сигнала контроллера.
- Стандартный профиль нельзя изменить или удалить.
Как выбирать профили на PC
Запустив игру, удерживайте кнопку Fn и нажмите кнопку «треугольник», «круг», «крест» или «квадрат» для выбора соответствующего профиля.
При смене профиля контроллер завибрирует, а индикатор игрока мигнет определенное число раз.
- Кнопка Fn + «треугольник»: Одно мигание
- Кнопка Fn + «круг»: Два мигания
- Кнопка Fn + «крест»: Три мигания
- Кнопка Fn + «квадрат»: Четыре мигания
Поведение контроллера при смене профиля можно изменить в меню Настройки контроллера.
Как изменять настройки контроллера в приложении PlayStation Accessories
- Запустите приложение PlayStation Accessories.
- Выберите значок Настройки контроллера.
Вы можете изменить следующие настройки:
Сигнализировать о смене профилей
Настройка вибрации контроллера и мигания его индикаторов при смене профилей.
Яркость индикаторов контроллера
Регулировка яркости индикатора игрока и световой панели контроллера.
Краткий тур
Повторный просмотр приветственного экрана, демонстрируемого при первом подключении беспроводного контроллера DualSense Edge.
Выполните сброс беспроводного контроллера DualSense Edge
Удаление всех профилей и восстановление заводских настроек контроллера.
Как обновить встроенное программное обеспечение DualSense Edge на PC
- Запустите приложение PlayStation Accessories.
- Выберите Встроенное ПО для вашего контроллера.
В этом меню вы можете узнать текущую версию встроенного программного обеспечения своего контроллера.
При наличии новой версии здесь также отображается Обновить.
- Во время обновления не выключайте питание Windows PC и не отключайте контроллер.
- При наличии нескольких контроллеров обновляйте их по одному.
- Чтобы узнать способ подключения контроллера, выберите Добавить контроллер.