
Все способы:
- Вариант 1: Настройка физической кнопки питания
- Способ 1: Настройка через «Панель управления»
- Способ 2: Редактирование локальной групповой политики
- Способ 3: Редактирование реестра
- Способ 4: Назначение действий через «Командную строку»
- Вариант 2: Настройка кнопки питания в «Пуске»
- Способ 1: Настройка списка через «Панель управления»
- Способ 2: Использование консольных утилит
- Способ 3: Изменение локальной групповой политики
- Способ 4: Редактирование реестра
- Вопросы и ответы: 4
Вариант 1: Настройка физической кнопки питания
В рамках данной статьи мы разберем два разных варианта настройки кнопки питания в Windows 11. Первый подойдет тем пользователям, кто хочет переназначить действие на физическую кнопку, находящуюся на панели компьютера или ноутбука. Вместе с этим будут предложены методы и для кнопки, предназначенной по умолчанию для отправки компьютера в сон, если такая поддерживается на вашей модели устройства. Вы сможете выбрать подходящий для себя способ и без проблем реализовать его, следуя предложенным инструкциям.
Способ 1: Настройка через «Панель управления»
Самый простой метод редактирования параметров действия кнопки питания в Windows 11 — изменение настроек через «Панель управления». В ней можно как поменять стандартные действия, так и дополнительно отредактировать план электропитания, что особенно актуально будет для владельцев ноутбуков. Давайте разберемся со всем по порядку.
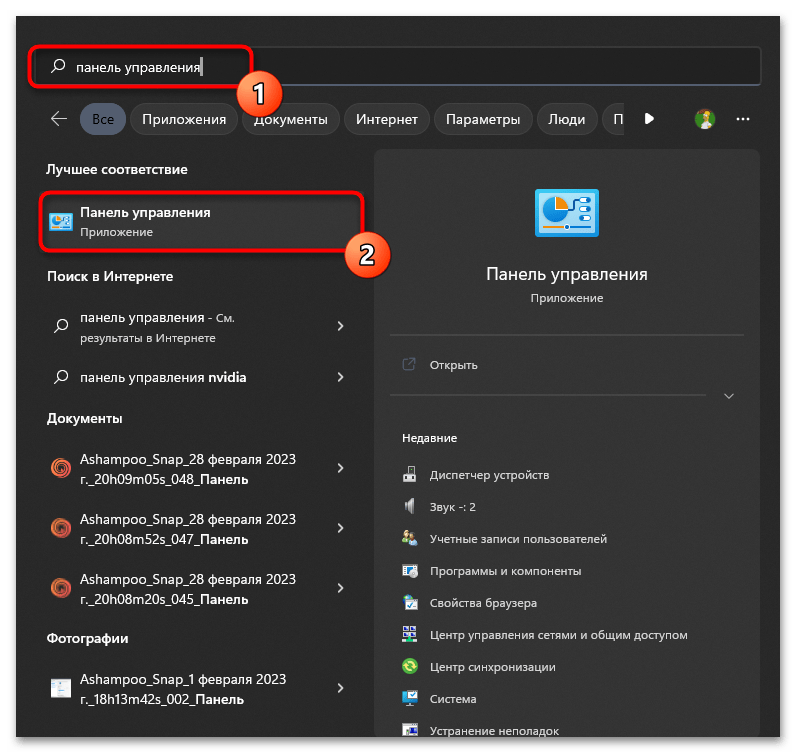
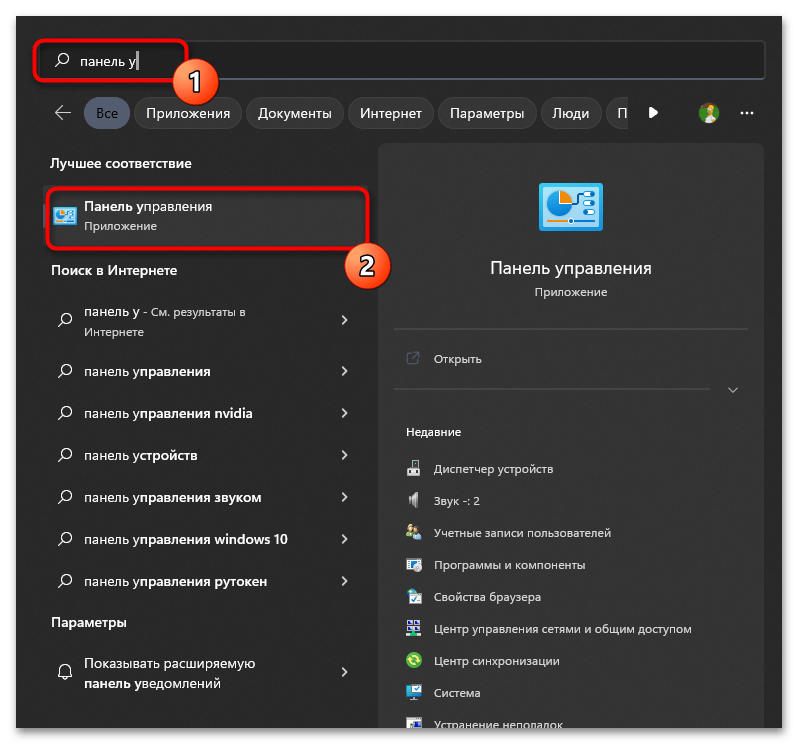
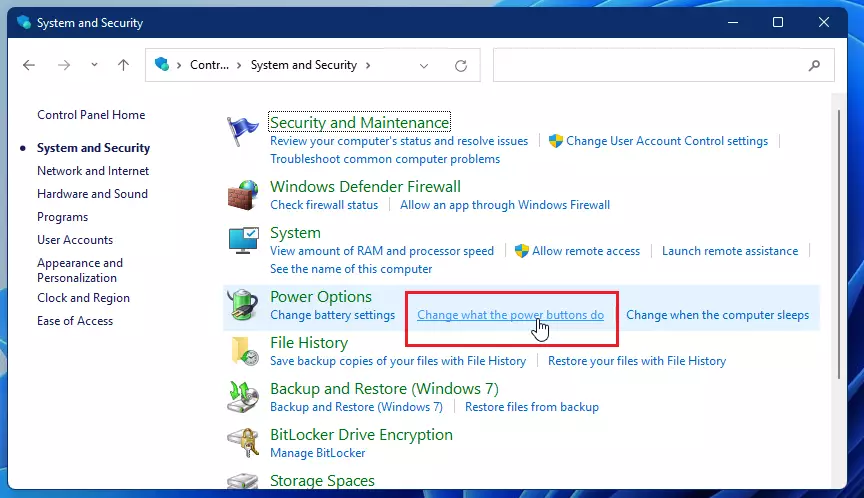
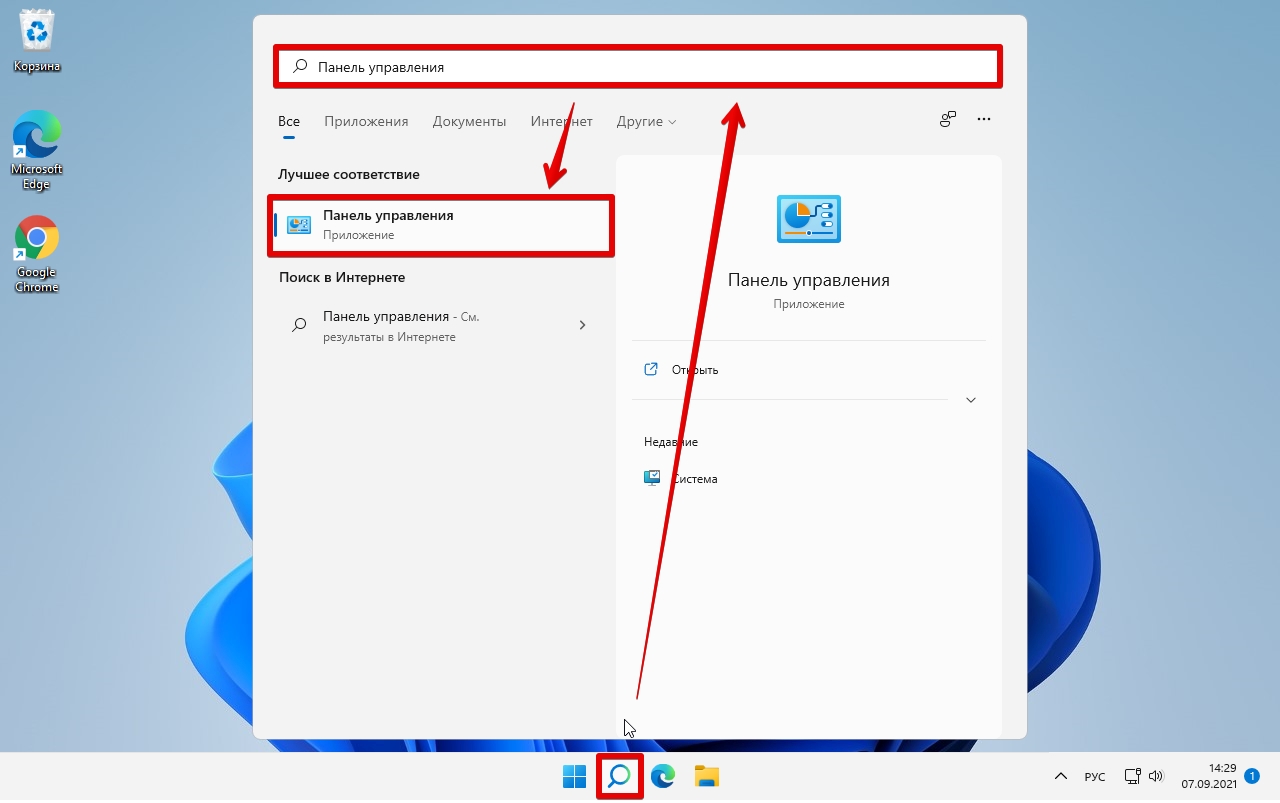
- Откройте «Пуск», через поиск отыщите «Панель управления» и нажмите левой кнопкой мыши по появившемуся соответствию.
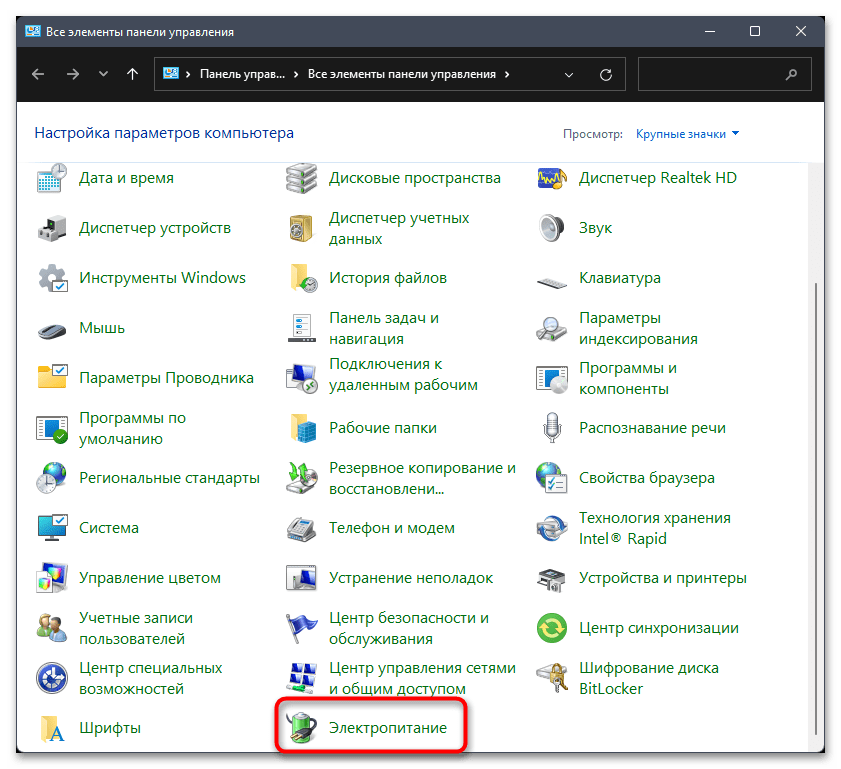
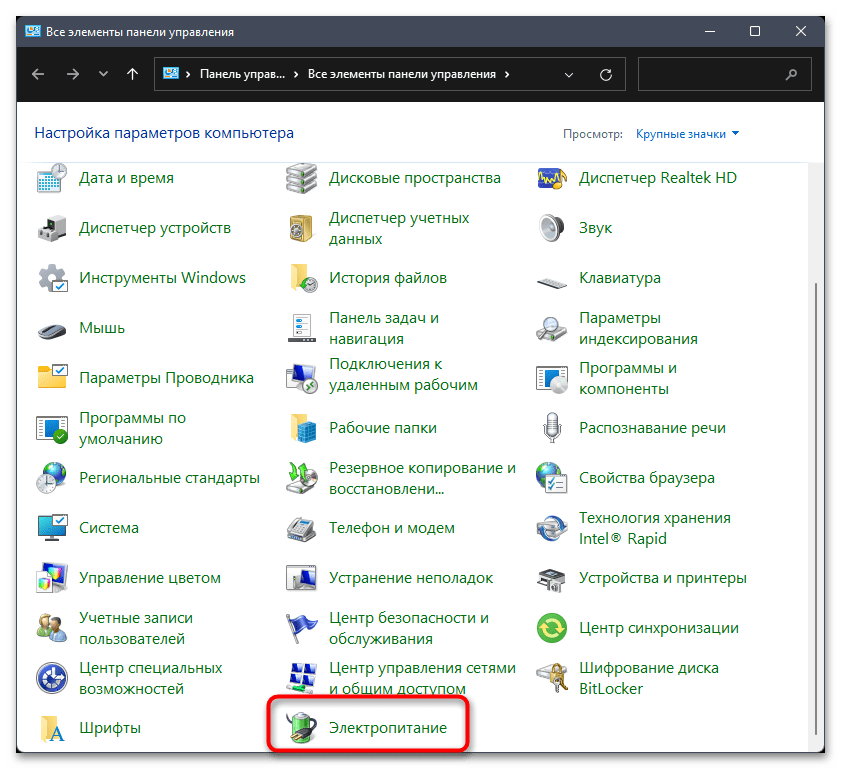
- Пролистайте список со значками и щелкните по «Электропитание».
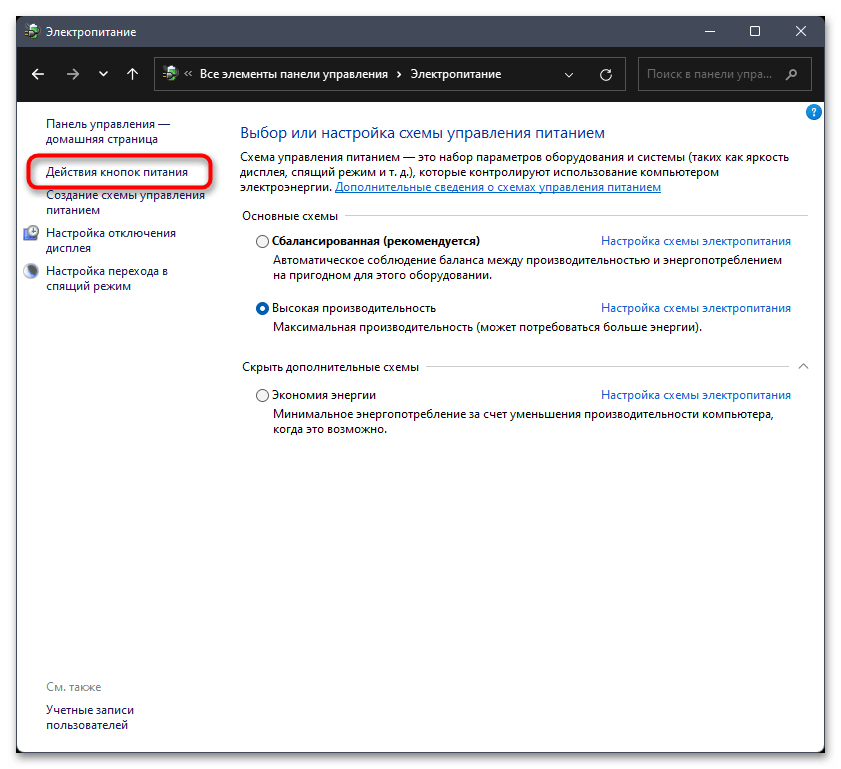
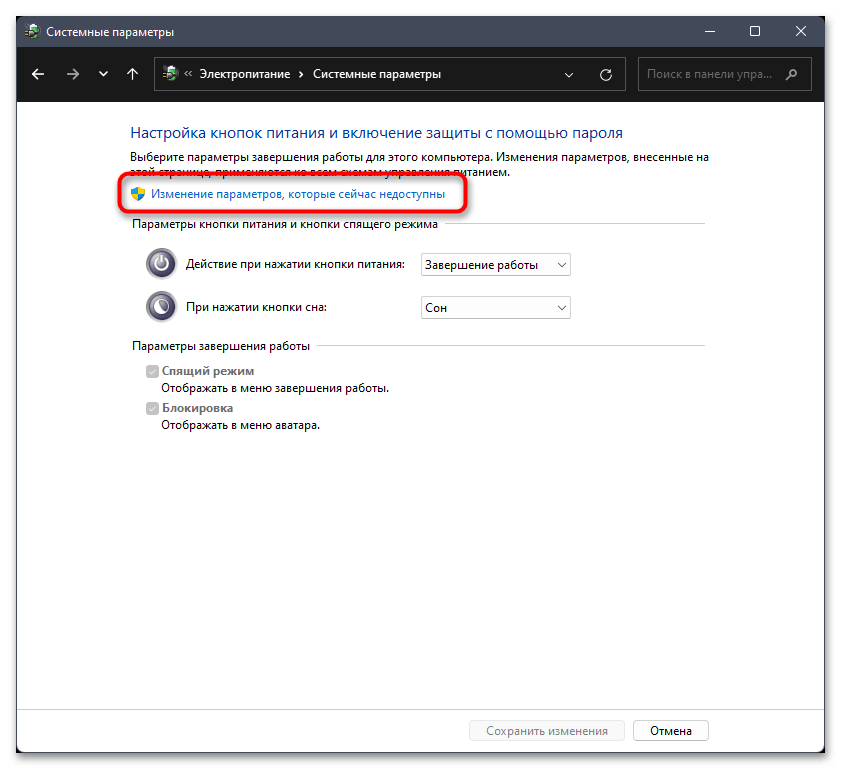
- На панели слева вас интересует ссылка «Действия кнопок питания».
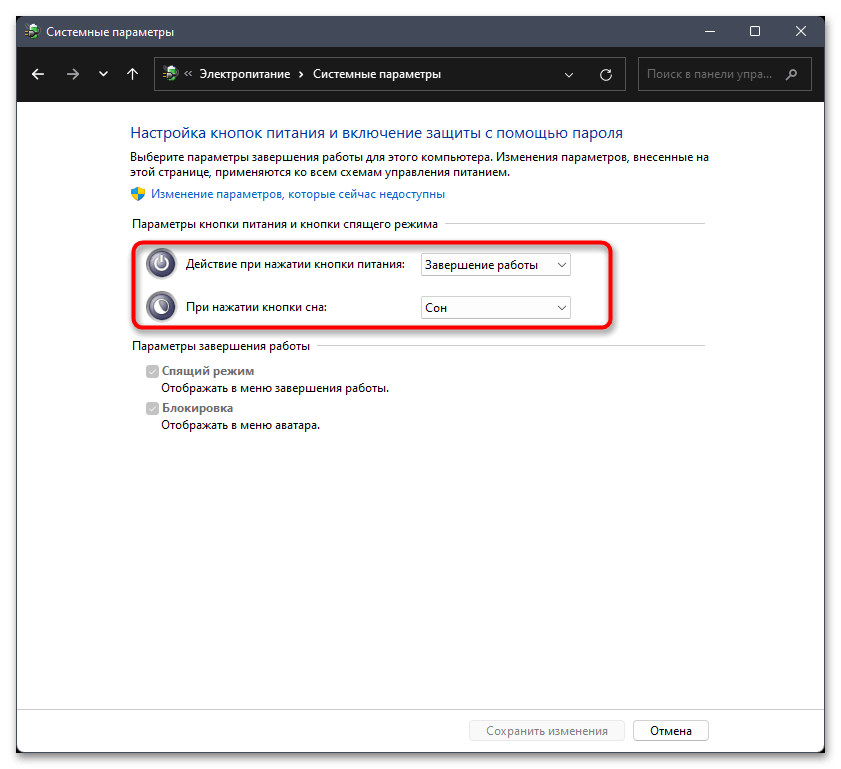
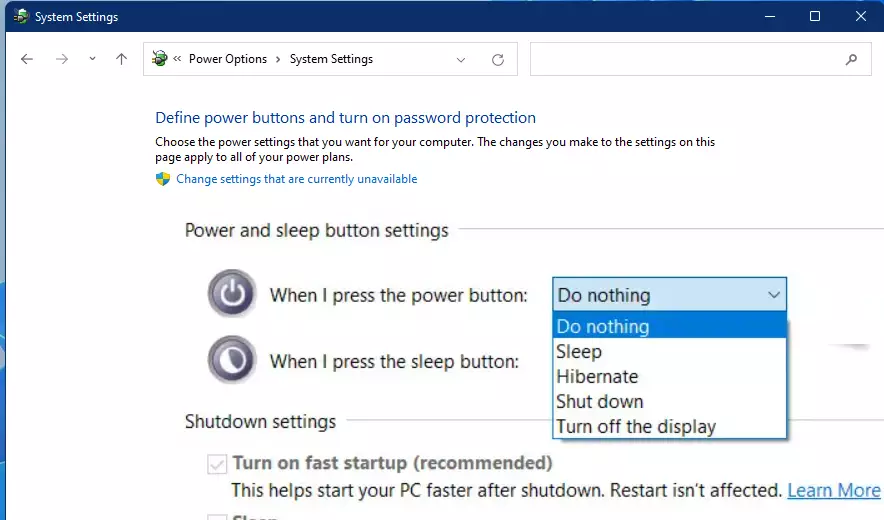
- Теперь вы видите действия как для кнопки питания, так и для кнопки сна. Разворачивайте списки и выбирайте подходящие для вас настройки. Не забудьте сохранить изменения, а затем переходите к проверке данного метода.
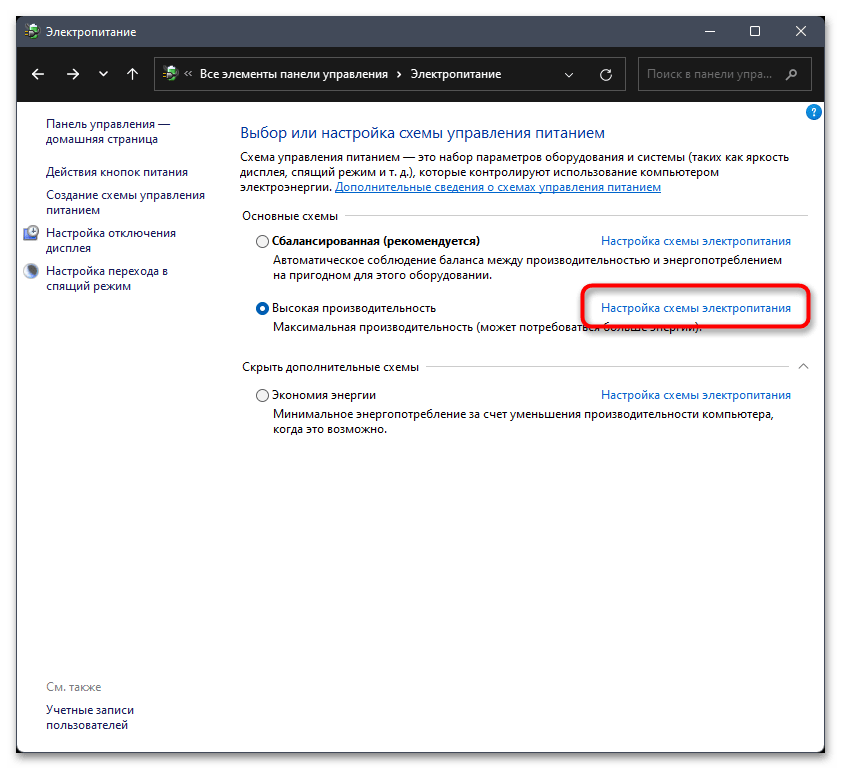
Если говорить о ноутбуках, то их владельцы могут изменить действие при нажатии кнопки питания, отталкиваясь от того, работает лэптоп от сети или от батареи. В таком случае изменяется текущий план электропитания, то есть его дополнительные параметры.
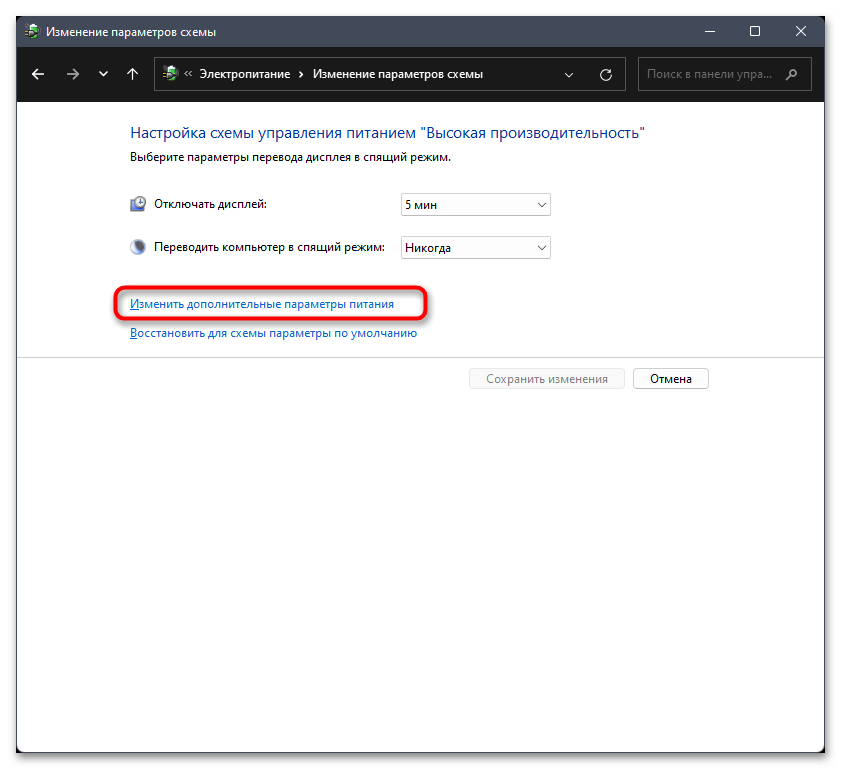
- В основном меню «Электропитание» нажмите по ссылке «Настройка схемы электропитания» напротив используемой.
- Далее щелкните по «Изменить дополнительные параметры питания».
- В новом окне найдите раздел с названием «Действия кнопки питания» и задайте подходящие для вас варианты в зависимости от типа работы лэптопа.
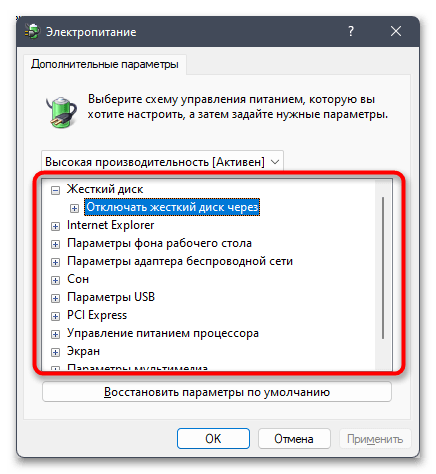
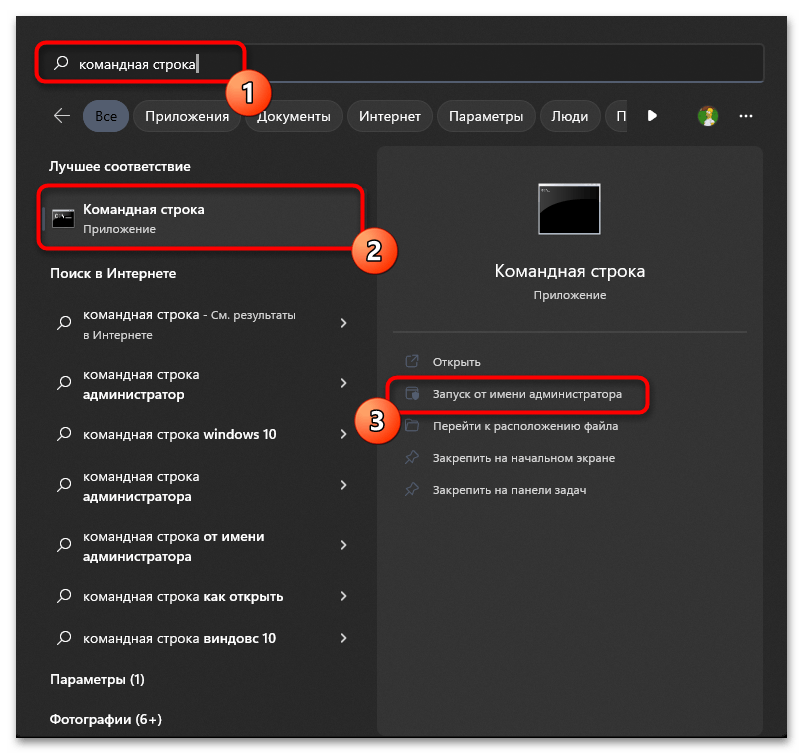
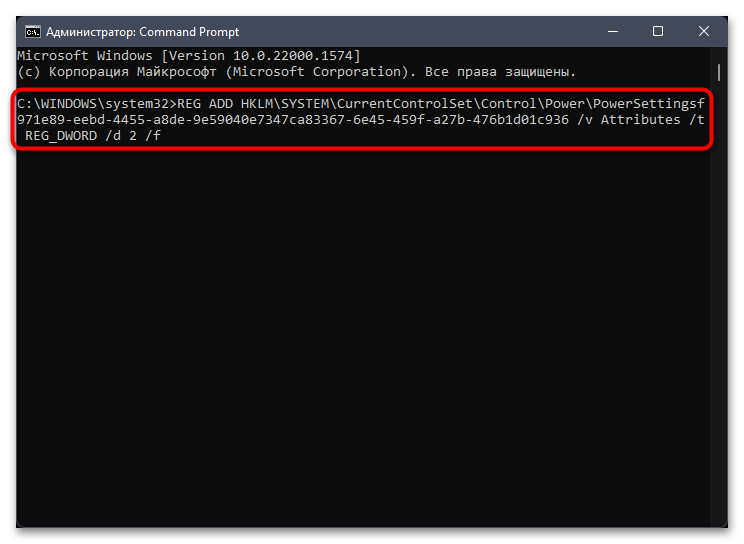
Если вы столкнулись с проблемой, что описанный раздел с нужными настройками не отображается в дополнительных настройках плана электропитания, понадобится эту ситуацию исправить вручную. Осуществляется это путем внесения изменений в реестр путем использования всего одной консольной команды.
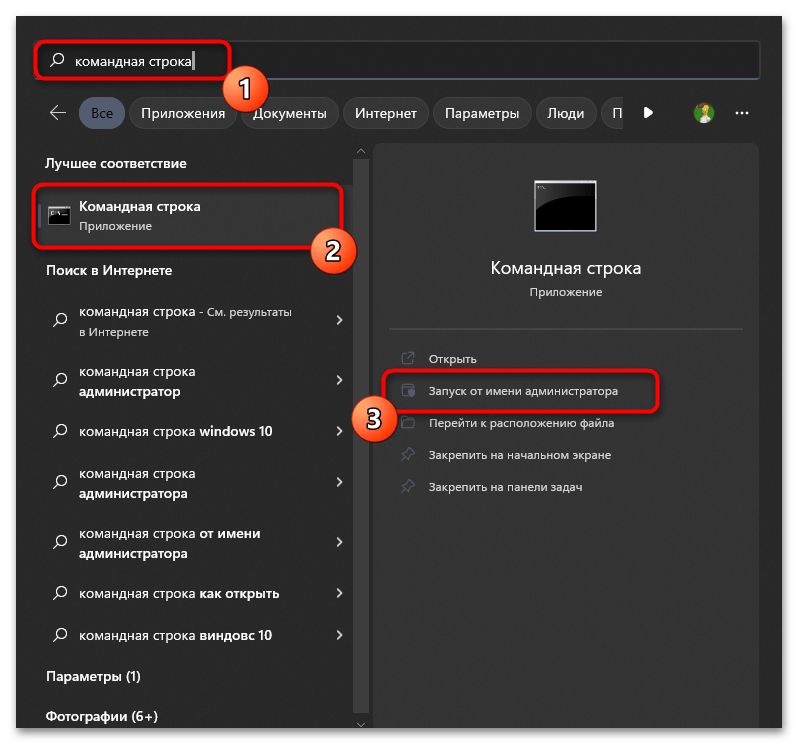
- Откройте «Пуск», найдите «Командную строку» и обязательно запустите ее от имени администратора.
- Введите команду
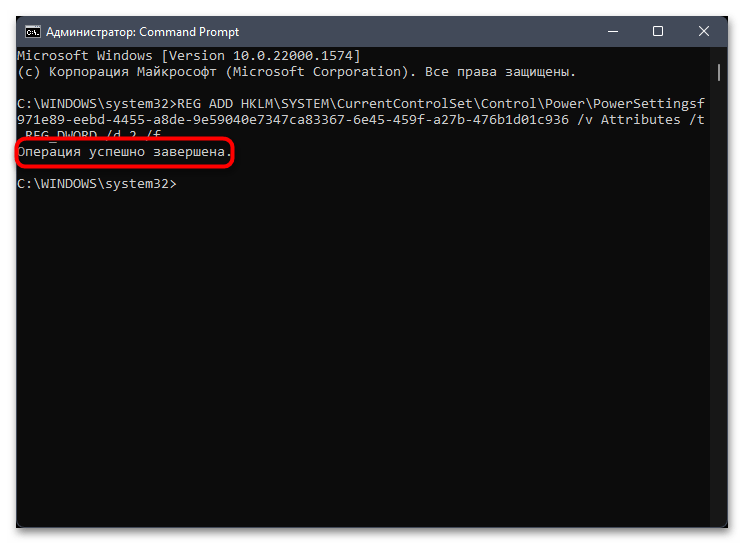
REG ADD HKLM\SYSTEM\CurrentControlSet\Control\Power\PowerSettingsf971e89-eebd-4455-a8de-9e59040e7347ca83367-6e45-459f-a27b-476b1d01c936 /v Attributes /t REG_DWORD /d 2 /fи подтвердите ее ввод нажатием по Enter. - На экране должно отобразиться сообщение «Операция успешно завершена». После этого обязательно перезагрузите ноутбук и проверьте, появились ли в дополнительных настройках плана электропитания нужные вам пункты с настройками действий кнопок.
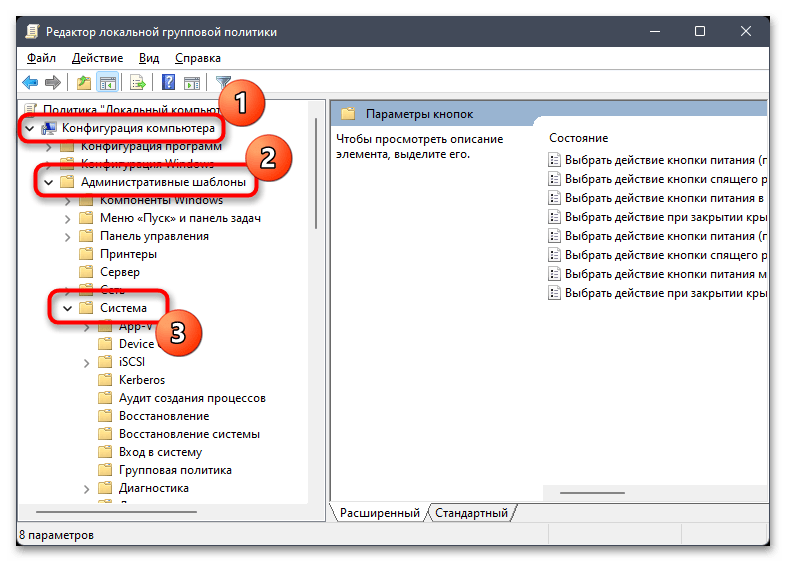
Способ 2: Редактирование локальной групповой политики
Использовать данный метод смогут исключительно обладатели Windows 11 Pro и Enterprise, поскольку меню управления локальной групповой политики недоступно в других редакциях Виндовс 11. Если так оказалось, что и у вас необходимый редактор отсутствует, можете ознакомиться со следующим способом, поскольку он позволяет достичь в точности того же эффекта, но немного другим путем.
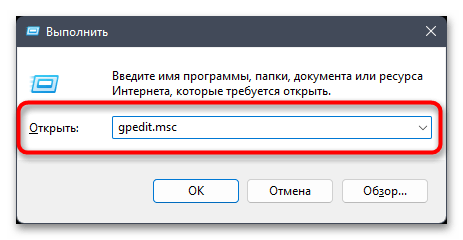
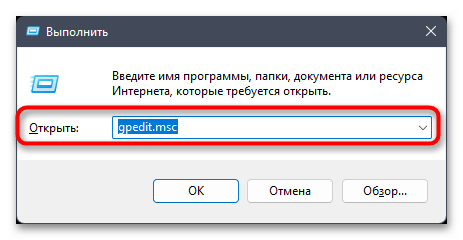
- Откройте утилиту «Выполнить», используя для этого сочетание клавиш Win + R. Введите команду
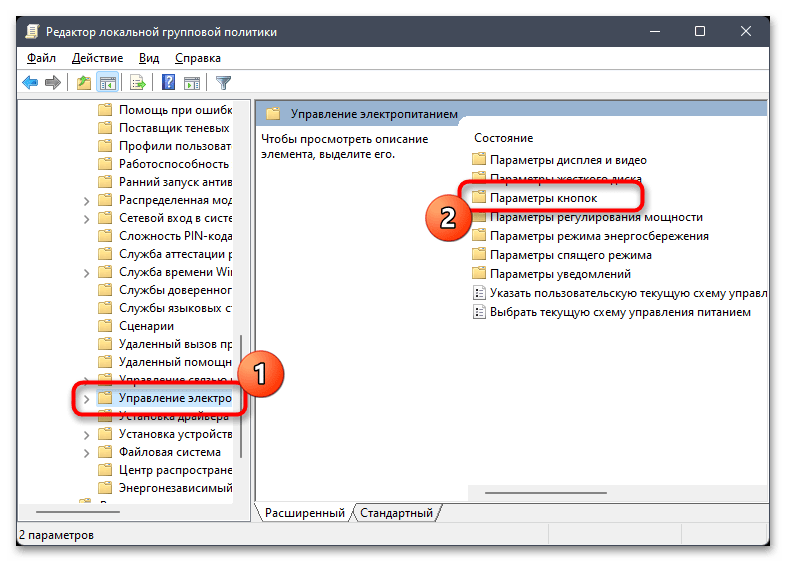
gpedit.mscи нажмите Enter для применения команды. - В окне «Редактора локальной групповой политики» разверните раздел «Конфигурация компьютера», затем выберите «Административные шаблоны» и папку «Система».
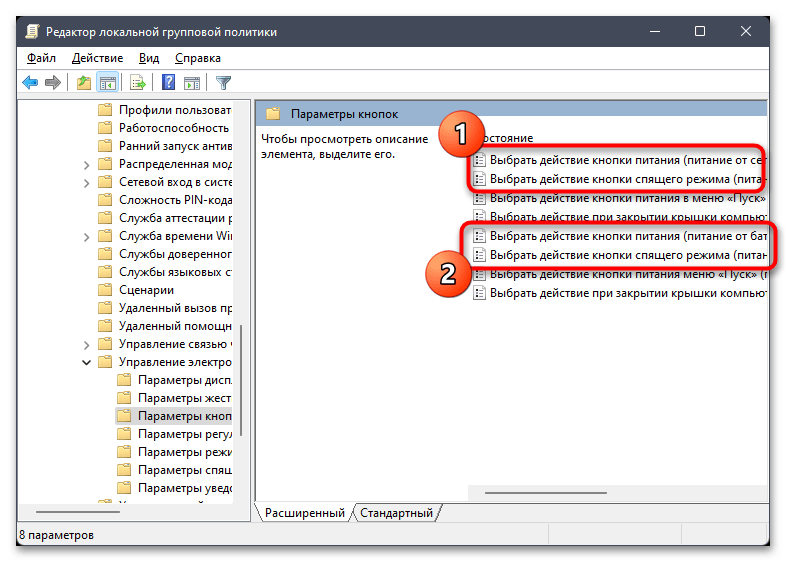
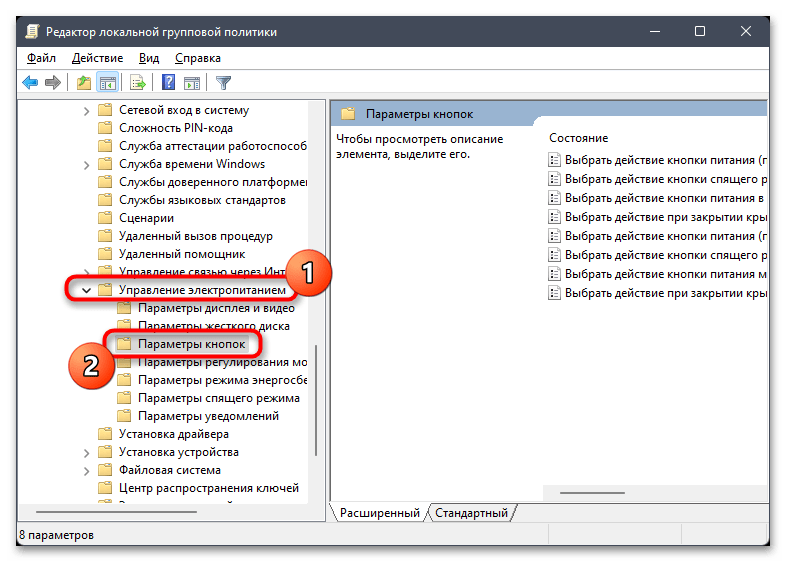
- В данном каталоге левой кнопкой мыши выделите директорию «Управление электропитанием» и на панели справа выберите «Параметры кнопок».
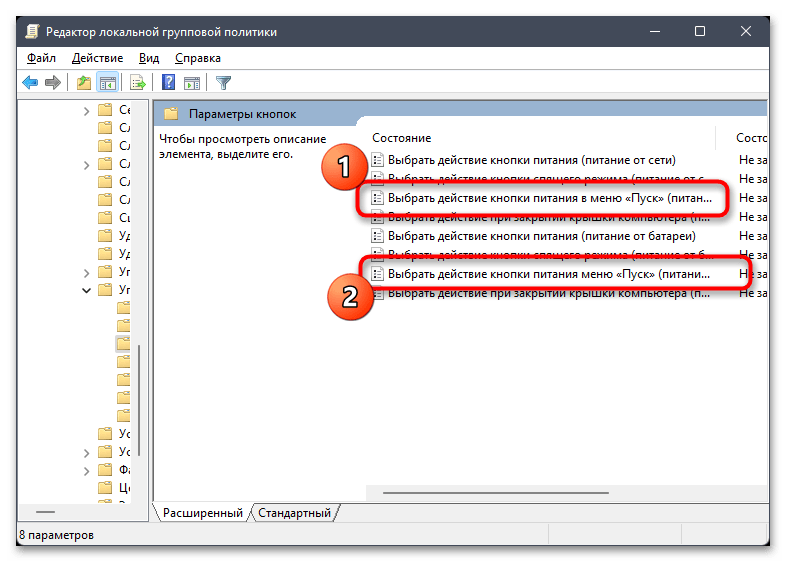
- Теперь вас интересуют политики с названиями «Выбрать действие кнопки…». Их будет всего четыре, для каждой из двух кнопок по два параметра в зависимости от типа работы устройства. Прочитайте полное название политики, чтобы понять, какая из них нужна конкретно в вашем случае.
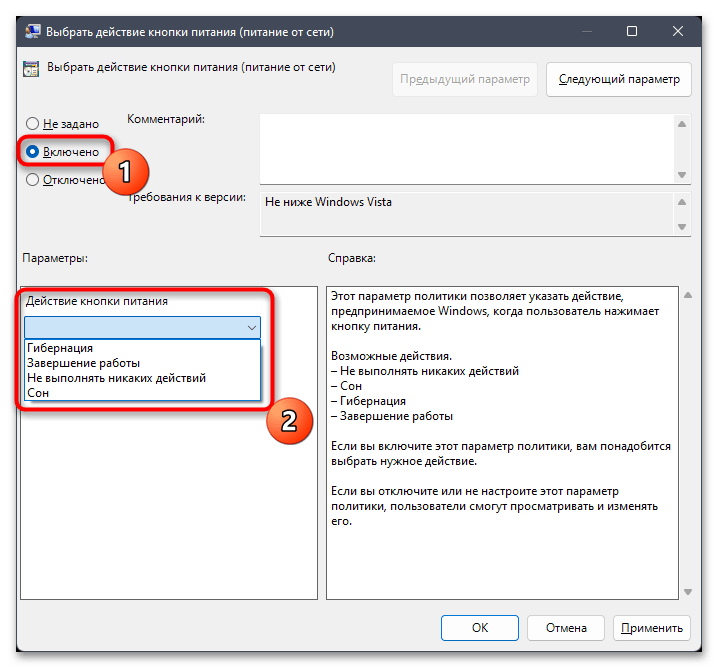
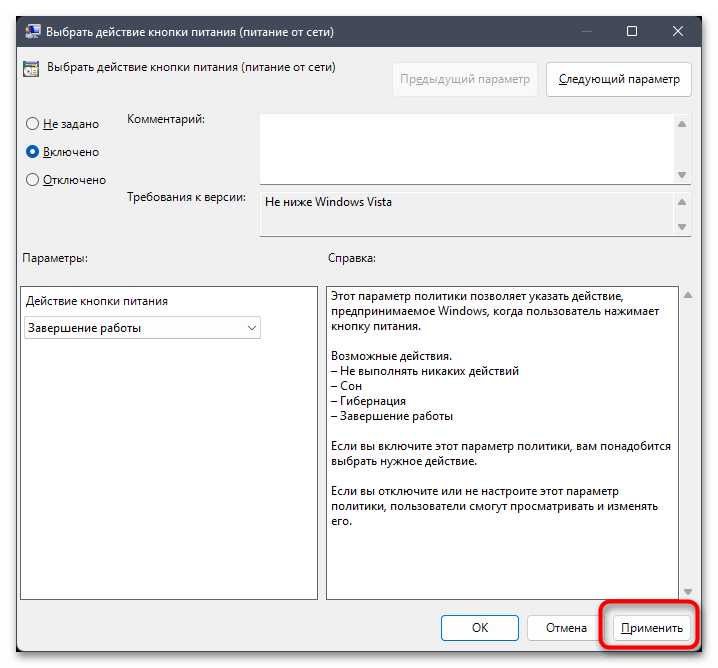
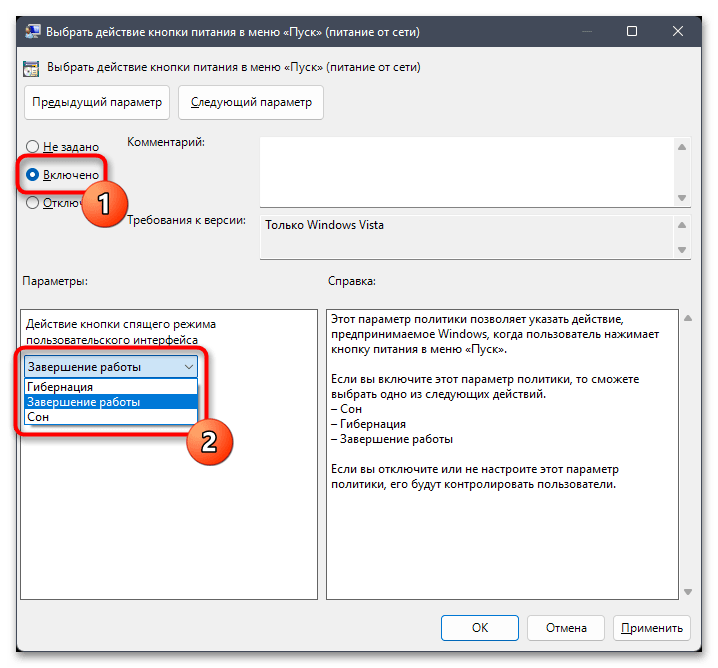
- Дважды щелкните ЛКМ по нужной вам политике и в открывшемся окне свойств задайте параметр «Включено», затем из списка выберите подходящее действие кнопки питания.
- Перед выходом обязательно примените изменения, затем перезагрузите ПК, поскольку только после этого настройки вступят в силу.

Способ 3: Редактирование реестра
Этот метод универсален для всех редакций и позволит тоже достичь изменений в действиях кнопки питания, но для этого понадобится приложить немного больше усилий. В следующей инструкции вы получите всю информацию о том, как создать необходимые ключи в реестре Windows 11 и какие параметры в них задать, чтобы настроить действие кнопки питания так, как это нужно конкретно в вашем случае.
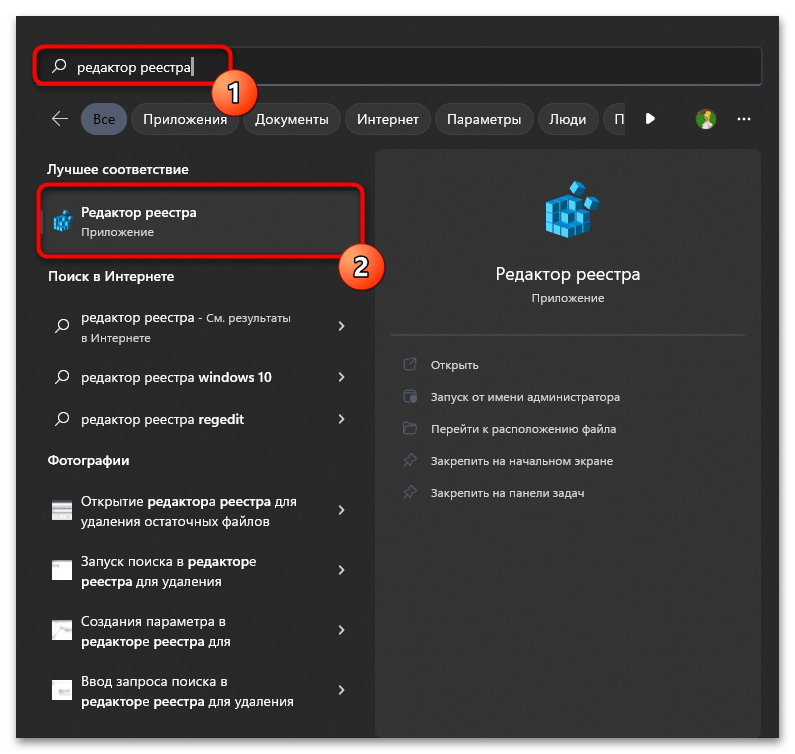
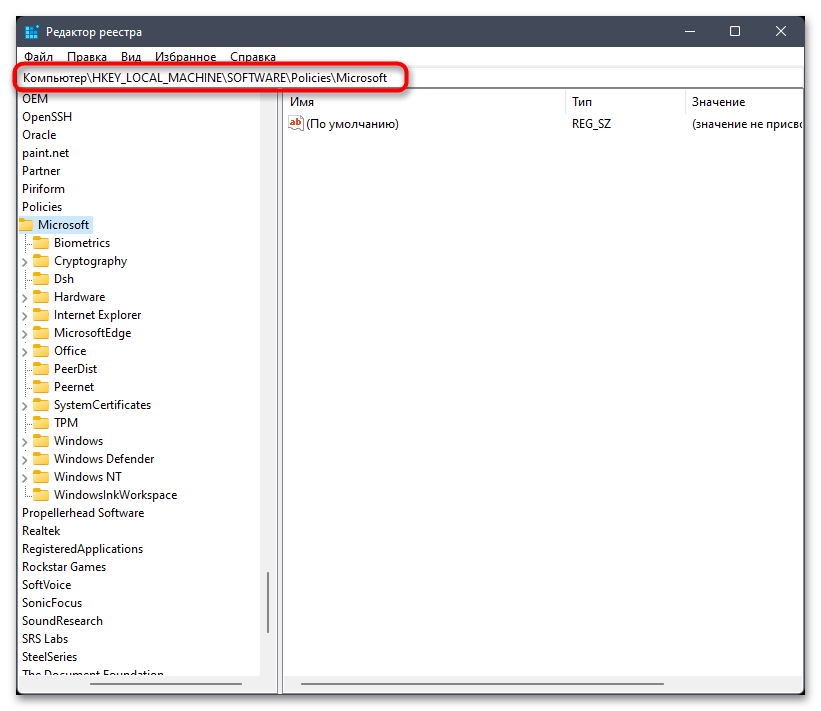
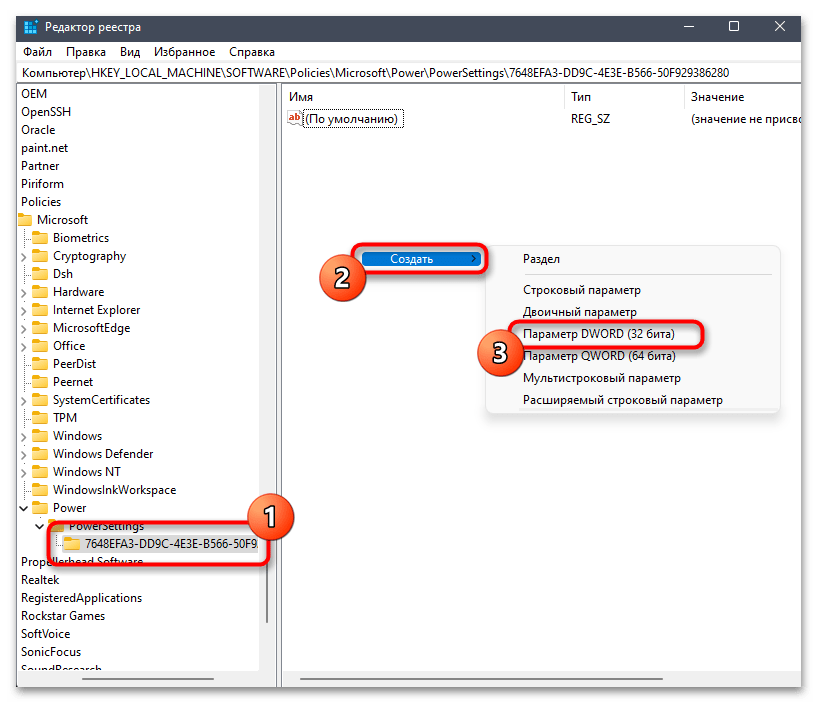
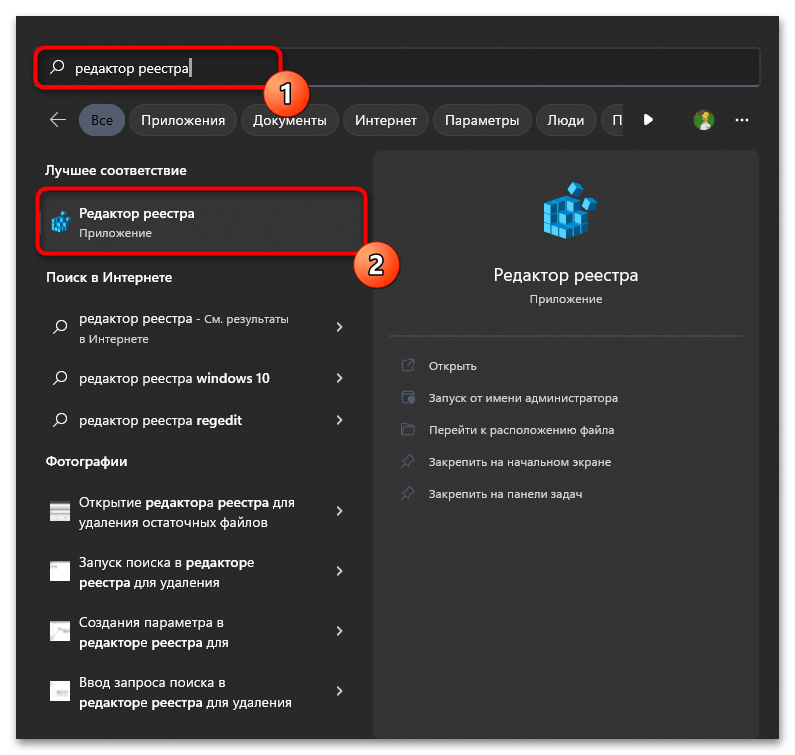
- Откройте «Пуск», отыщите «Редактор реестра» и запустите данное классическое приложение.
- В нем перейдите по пути
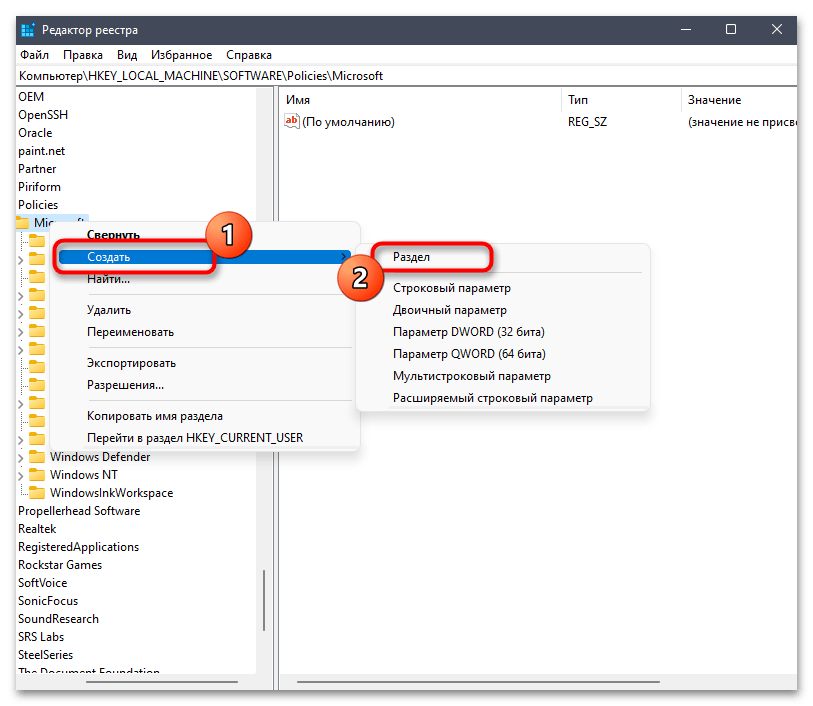
Компьютер\HKEY_LOCAL_MACHINE\SOFTWARE\Policies\Microsoft\. Можете просто вставить это в адресную строку и нажать Enter для быстрого перемещения. - Нажмите правой кнопкой мыши по каталогу «Microsoft», наведите курсор на «Создать» и выберите пункт «Раздел».
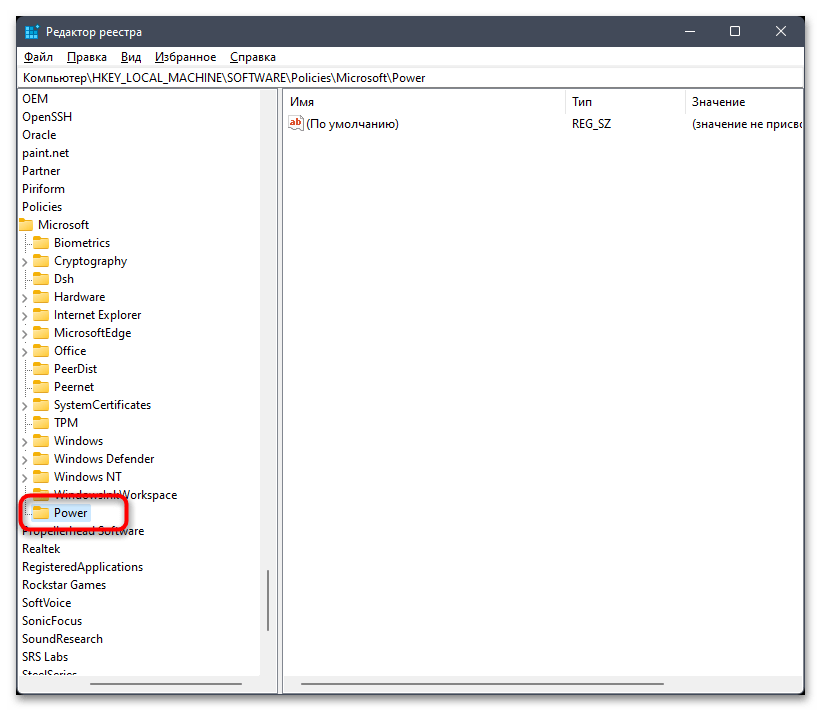
- Задайте для раздела название «Power».
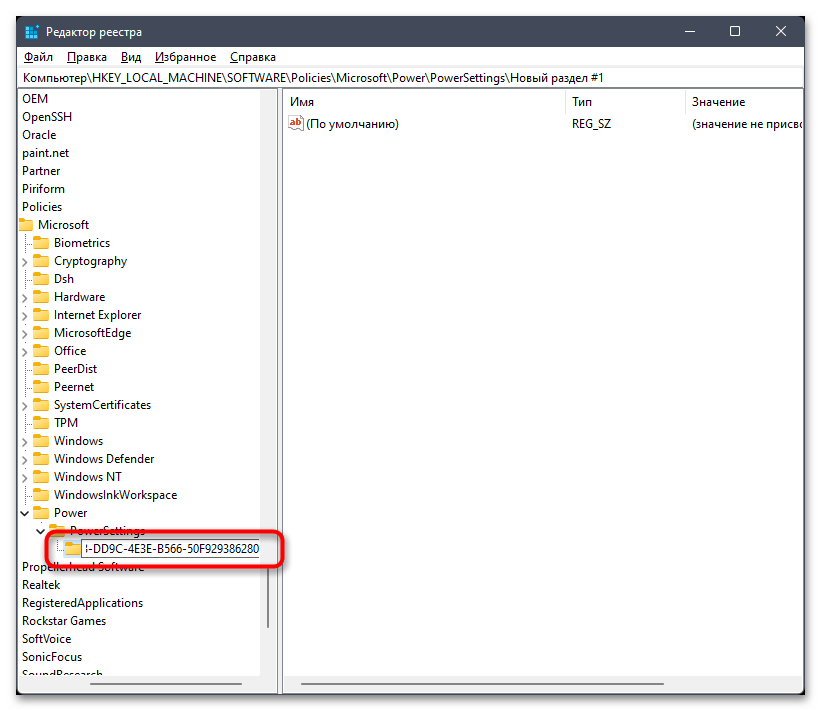
- Щелкните по новому разделу правой кнопкой мыши и создайте уже в нем новый раздел с названием «PowerSettings».
- В каталоге «PowerSettings» понадобится создать последний раздел с ключом «7648EFA3-DD9C-4E3E-B566-50F929386280».
- Перейдите в этот раздел, на панели справа кликните ПКМ по пустому месту, наведите курсор на «Создать» и выберите пункт «Параметр DWORD (32 бита)».
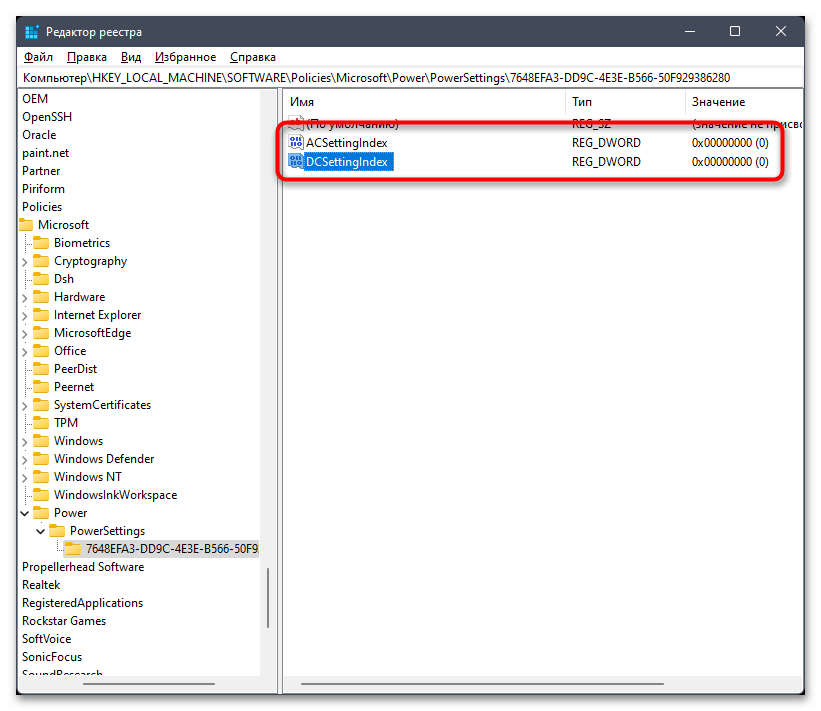
- Вам понадобится создать два таких параметра, если работаете с ноутбука: с названиями «ACSettingIndex» и «DCSettingIndex». Первый отвечает за действие кнопки питания при работе от сети, а второй — от батареи.
- Дважды щелкните по каждому из параметров ЛКМ и задайте значение от «0» до «3». Без действия это «0», «1» — спящий режим, «2» — гибернация и «3» — завершение работы.

Способ 4: Назначение действий через «Командную строку»
Последний метод изменения действий физической кнопки питания в Windows 11 подразумевает внесение изменений через «Командную строку». Вам понадобится выполнить несколько команд, но адаптировать их под себя, чтобы назначить на кнопку нужное действие именно вам. Вместе с этим изменения можно будет применять как для текущего плана электропитания, так и для любого существующего, но об этом немного позже.
- Для начала запустите «Командную строку» от имени администратора, например, отыскав ее через «Пуск».
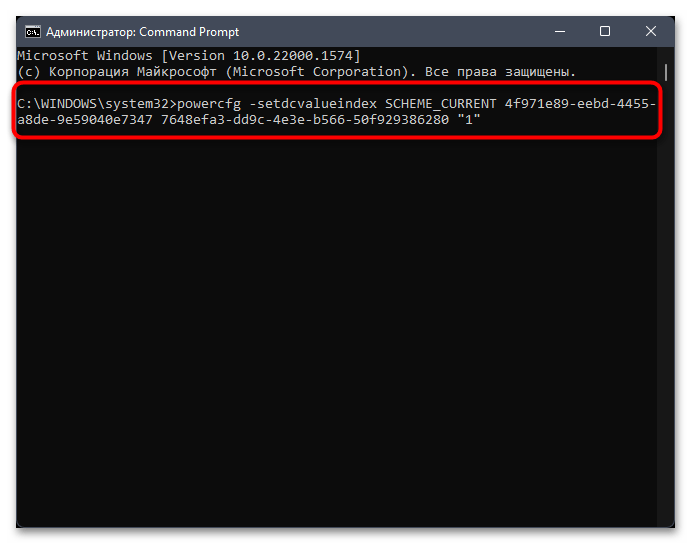
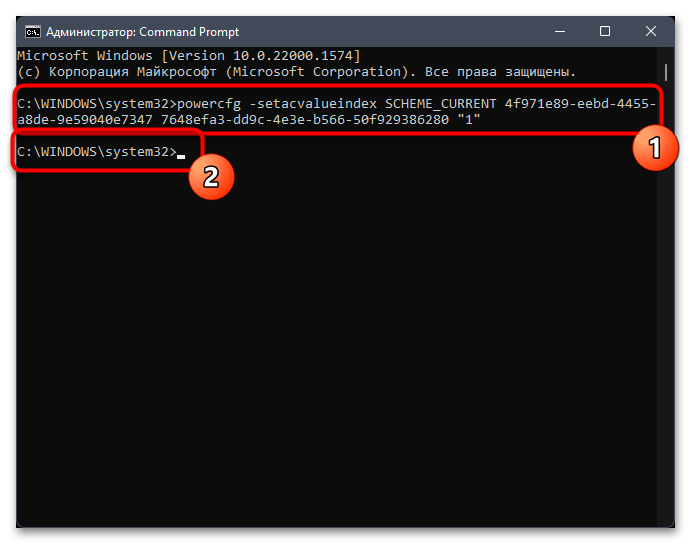
- Далее введите команду
powercfg -setdcvalueindex SCHEME_CURRENT 4f971e89-eebd-4455-a8de-9e59040e7347 7648efa3-dd9c-4e3e-b566-50f929386280 "0", заменив последнее число в кавычках на номер действия. «0» — отсутствие действия, «1» — сон, «2» — гибернация, «3» — завершение работы и «4» — отключение дисплея. Эта команда для кнопки питания, когда ноутбук работает от батареи. - Для работы от сети используется
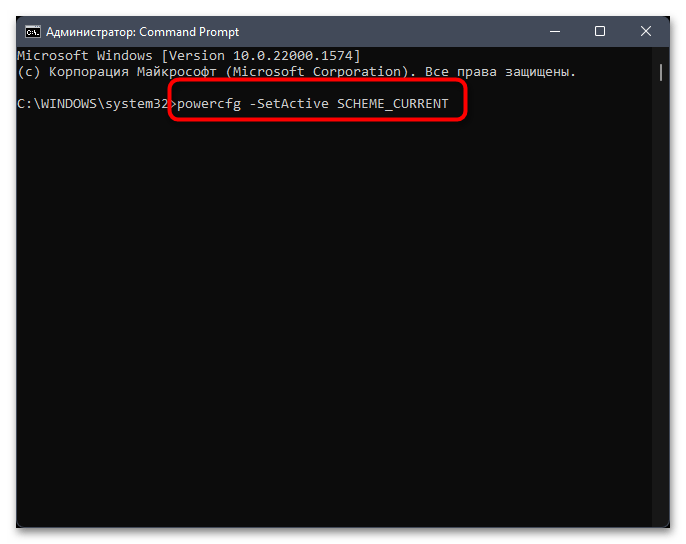
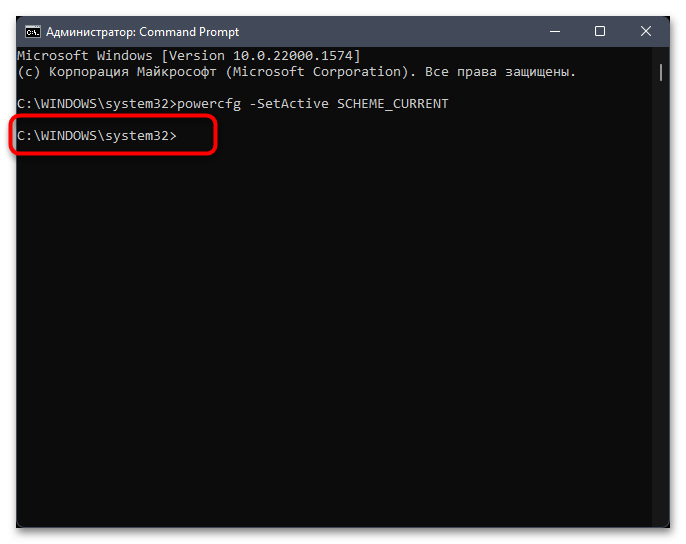
powercfg -setacvalueindex SCHEME_CURRENT 4f971e89-eebd-4455-a8de-9e59040e7347 7648efa3-dd9c-4e3e-b566-50f929386280 "0", где «0» тоже меняется на необходимую цифру. Если на экране после активации команды появилась следующая строка ввода, значит, никаких проблем не возникло. - Теперь вам понадобится активировать выбранную схему электропитания, для которой и были внесены изменения. Выполните команду
powercfg -SetActive SCHEME_CURRENT. - Вы должны получить точно такую же пустую строчку ввода, что свидетельствует об успешном применении схемы.
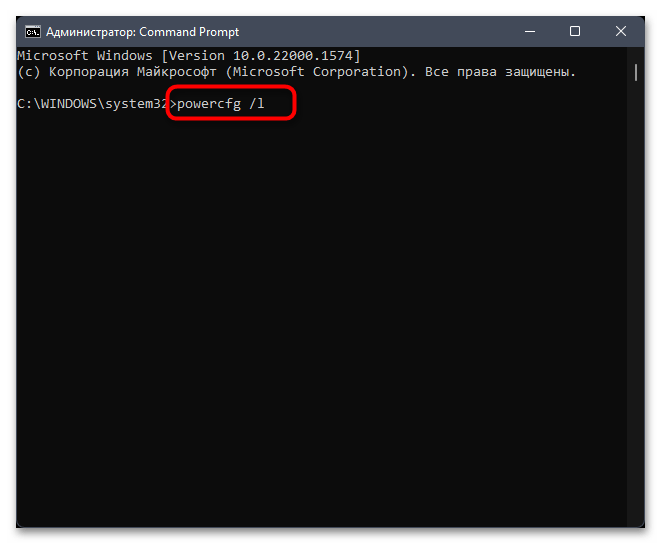
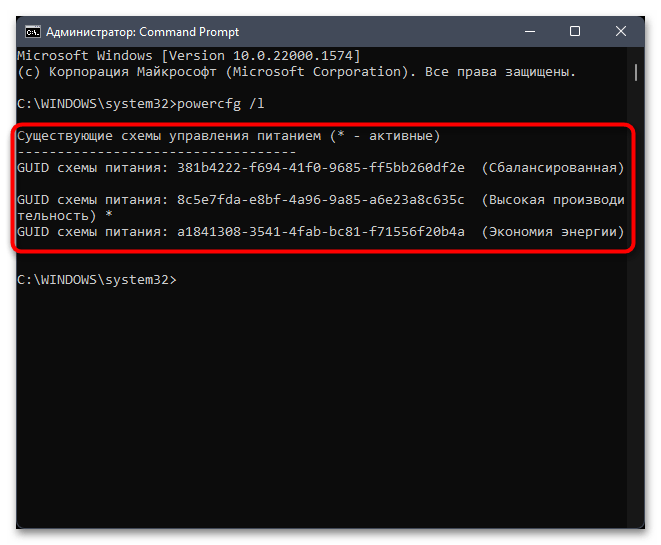
- Если вас интересует внесение изменений для других схем электропитания, для начала понадобится определить номер нужной вам. Для этого используйте команду
powercfg /l. - Скопируйте GUID и замените его в командах, которые использовались ранее, не забывая вручную выбирать цифру для действия кнопки питания.
Вариант 2: Настройка кнопки питания в «Пуске»
Если все предыдущие настройки отвечали за действие физической кнопки питания при ее нажатии, то следующие ориентированы на доступные опции в «Пуске», когда пользователь нажимает по виртуальной кнопке выключения. Вы можете самостоятельно выбирать, какие из действий там будут отображаться, чтобы максимально быстро выбрать требуемое.
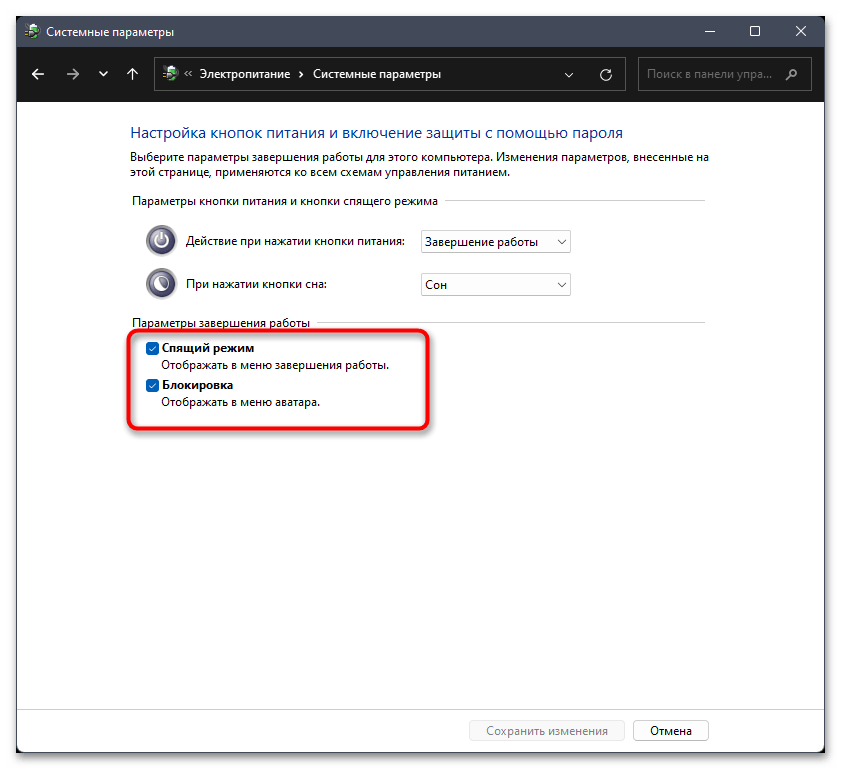
Способ 1: Настройка списка через «Панель управления»
Проще всего выбрать нужные действия через «Панель управления», если все требуемые для вас пункты там будут присутствовать. Понадобится только активировать изменение параметров и поставить или снять галочки, что выглядит следующим образом:
- Найдите «Панель управления» через поиск в «Пуске» и нажмите левой кнопкой мыши по значку приложения.
- Отыщите «Электропитание» и перейдите в данный раздел с настройками.
- На панели слева щелкните по ссылке «Действия кнопок питания».
- Активируйте настройку параметров, нажав по ссылке «Изменение параметров, которые сейчас недоступны».
- Далее вы увидите «Параметры завершения работы» со всеми доступными опциями. Снимите или поставьте галочки возле требуемых. Обязательно примените изменения и только после этого переходите к проверке.
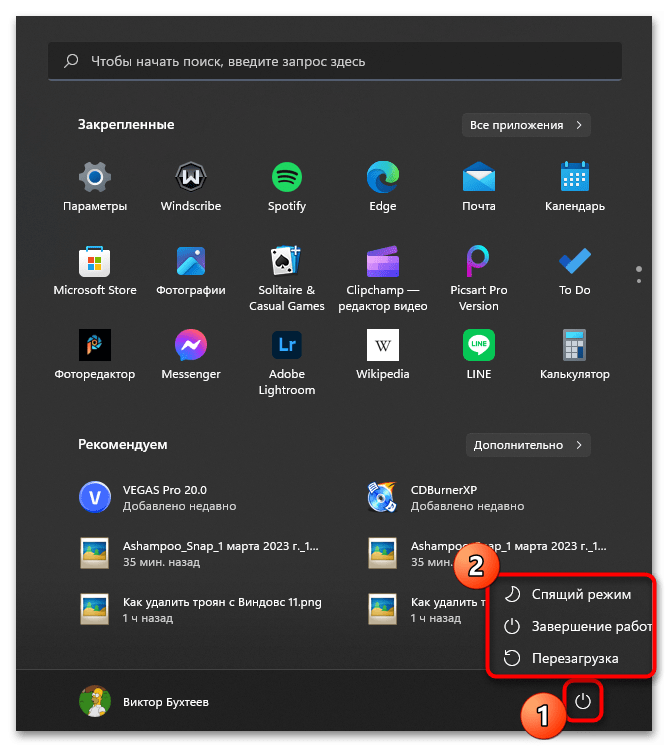
- Вызовите меню «Пуск», нажмите по кнопке питания и проверьте, отображаются ли там все требуемые для вас пункты.

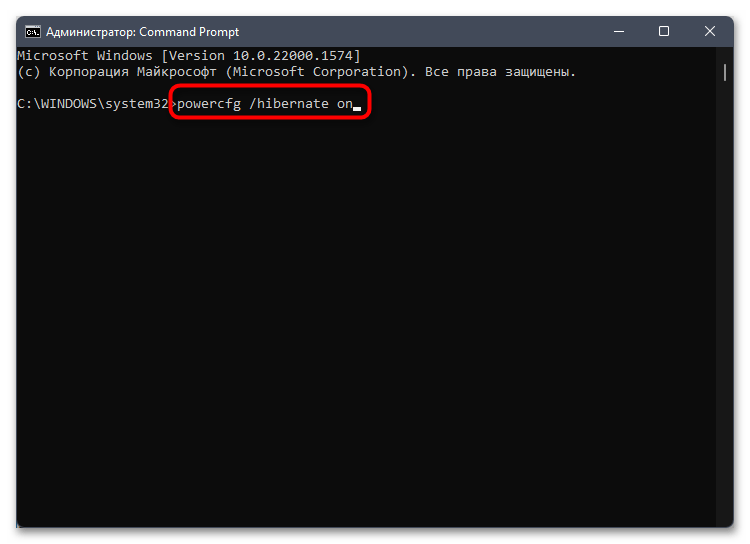
Способ 2: Использование консольных утилит
Через «Командную строку» не просто осуществляется добавление действий в меню кнопки питания «Пуска», но и производится включение соответствующих функций, если ранее они были отключены. Это касается перехода в режим сна и гибернации. В консоли вам нужно будет ввести одну из следующих команд, отталкиваясь от личных предпочтений.
| Команда | Действие |
|---|---|
| powercfg /hibernate on | Включить гибернацию |
| powercfg /hibernate off | Отключить гибернацию |
| powercfg /sleep on | Включить спящий режим |
| powercfg /sleep off | Отключить спящий режим |
Способ 3: Изменение локальной групповой политики
Теперь затронем метод, подходящий для тех пользователей, кто может открыть «Редактор локальной групповой политики» (Win 11 Pro / Enterpriese) для внесения соответствующих изменений. В нем можно найти параметры, отвечающие за действие кнопки питания в меню «Пуск» как при работе от сети, так и от батареи, если речь идет о ноутбуке.
- Откройте утилиту «Выполнить» и введите команду
gpedit.msc, затем нажмите Enter, чтобы перейти к необходимому меню. - В нем выберите «Конфигурация компьютера», затем «Административные шаблоны» и каталог «Система».
- Далее разверните «Управление электропитанием» и выделите левой кнопкой мыши «Параметры кнопок».
- Найдите параметры «Выбрать действие кнопки питания в меню «Пуск»» и откройте свойства той политики, которая отвечает вашим требованиям по типу питания устройства.
- Активируйте работу политики и настройте действие кнопки в пользовательском интерфейсе. Не забудьте применить изменения и перезагрузить компьютер.
Способ 4: Редактирование реестра
В случае с настройками доступных действий кнопки питания в «Пуске» через «Редактор реестра» понадобится выполнить меньше шагов, нежели это было при переназначении физической кнопки. Связано это с тем, что все параметры уже существуют, нужно только изменить их значения в соответствии с требованиями.
- Откройте «Пуск», найдите «Редактор реестра» и запустите классическое приложение.
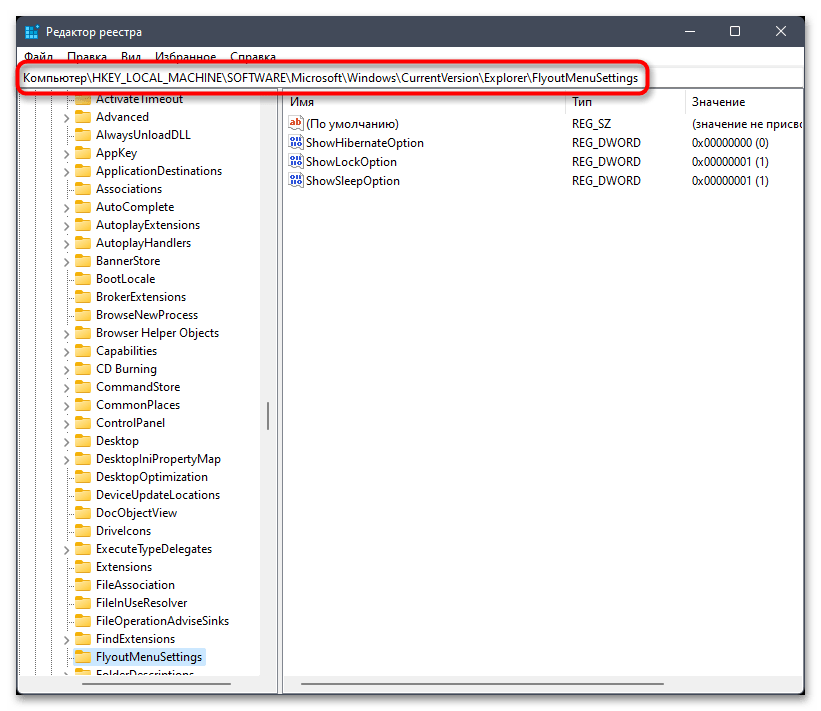
- В нем перейдите по пути
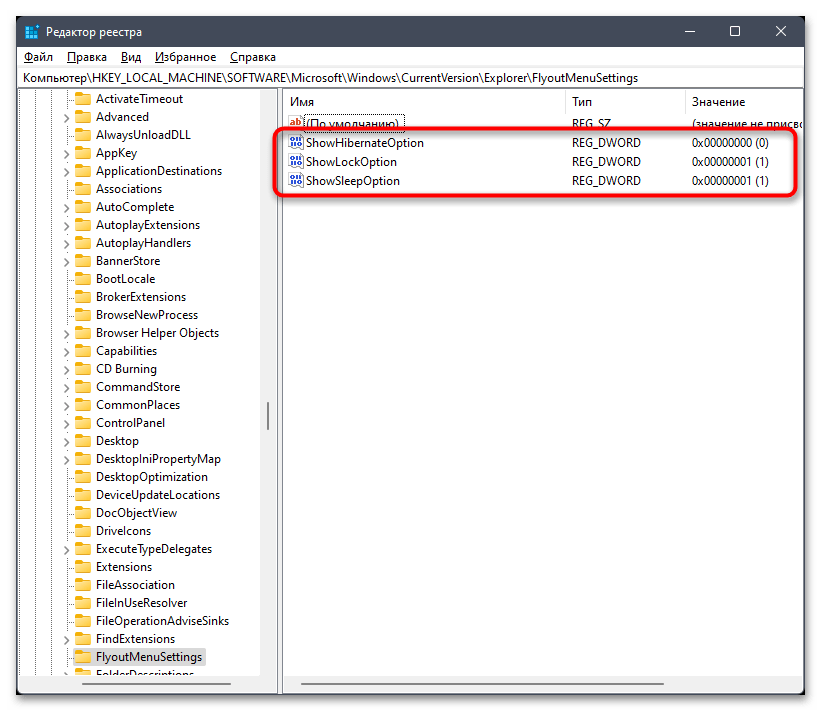
Компьютер\HKEY_LOCAL_MACHINE\SOFTWARE\Microsoft\Windows\CurrentVersion\Explorer\FlyoutMenuSettings. - В разделе вы видите три разных параметра, предназначенных для выключения компьютера, отправки его в спящий режим или гибернацию. Дважды кликните по требуемому, чтобы открыть его свойства.
- Установите значение «0», если хотите отключить параметр, или «1» — для его активации. Обязательно перезагрузите компьютер, поскольку только после этого изменения вступят в силу.
Наша группа в TelegramПолезные советы и помощь
This post shows students and new users steps to change their computer’s power button action settings in Windows 11. Your PC power button action settings specify the action to take when the system power button is pressed.
One can select different actions to specify what to do when the PC power button is pressed. These include doing nothing, sleeping, hibernating, or shutting down when the power button is pressed.
Changing how the power button works in Windows 11 requires you to log in as an administrator and open the Control Panel app in Windows 11.
Below is how to configure one’s PC power button action in Windows 11.
Here are the different options one can specify what to do when the power button is pressed on one’s PC:
- Do Nothing: No action is taken when the power button is pressed.
- Sleep: Your PC goes into a low-power sleep mode.
- Hibernate: Your PC saves its session in a memory disk and shuts down.
- Shut Down: Shut down the PC when the power button is pressed.
- Turn off the Display: Your display turns off, but your PC keeps running.
How to change the power button action in Windows 11
As mentioned above, the button action settings specify the action to take when the system power button is pressed.
Below is how to configure that.
First, launch the Control Panel in Windows 11.
In the Control Panel, select the Hardware and Sound category.
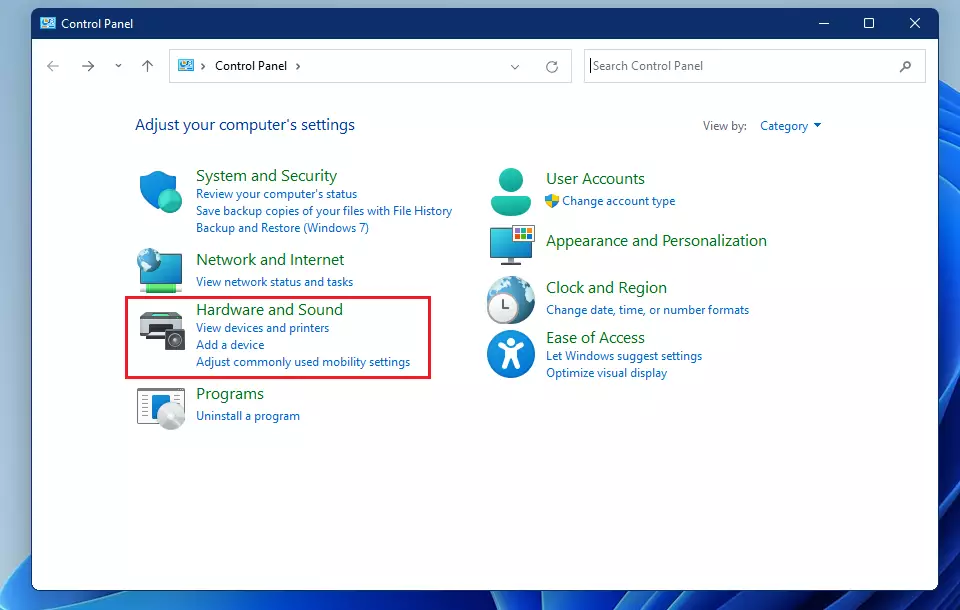
In the Hardware and Sound category, locate the Power Options section and click Change what the power buttons do.
On the next page, you can choose the power settings you want for your computer. Then, under the Power and Sleep Button Settings, locate the power button icon next to When I Press the Power Button.
Using the drop-down for the power button selection, you’ll have these options available to choose from:
- Do Nothing: Nothing happens when the power button is pressed.
- Sleep: Your PC goes into a low-power sleep mode.
- Hibernate: Your PC saves its session in a memory disk and shuts down.
- Shut Down: Shuts down the PC when the power button is pressed.
- Turn off the Display: Your display turns off, but your PC keeps running.
Alternatively, use the steps below to change the settings.
First, select the Power Options settings group highlighted below in the Hardware and Sound category.

Next, select the Change plan settings link in the Power Options pane, as highlighted below.

Next, click Change advanced power settings link as highlighted below.

Expand the Power buttons and lid and Power button action settings as highlighted below. Under the Power button action, choose what action to take when the laptop lid close:
- On battery:
- Do nothing
- Sleep
- Hibernate
- Shutdown
- Plugged in:
- Do nothing
- Sleep
- Hibernate
- Shutdown

Make your selection and click OK to save your settings.
That should do it!
Conclusion:
- Changing power button action settings in Windows 11 provides users with control over the system’s response to the power button being pressed.
- By accessing the Control Panel and navigating to the Hardware and Sound category, users can modify settings to dictate whether the power button action results in nothing, sleep, hibernation, shutting down, or turning off the display.
- Users also have alternative options via the Power Options settings group, which allows further customization for actions when the power button is pressed.
- Ultimately, understanding and configuring the power button action settings in Windows 11 can help users tailor their computer’s behavior to best suit their preferences and needs.
The power button in your PC is not merely to power up your PC. You can also press it while your PC is on to perform certain tasks, such as shutdown or restart. Many users set such functions, but you can also set it to do nothing if you’re afraid of pressing it unintentionally.
It’s very easy to change the setting for the power button action. Regardless of the method you use, it takes less than a minute. Laptop users can also change the setting for each power mode (plugged in or on battery).
So, let’s move on to the possible methods for this process on a Windows 11 PC.
How to Change the Keyboard Power Button Settings
This section deals with changing your system’s action if you press your keyboard’s power button. If you want to change the options for the power button on the GUI (e.g., Start Menu), head over to the next section.
There are many ways to change the power button settings. These methods have different precedence. So read carefully and pick one according to your preference.
Through Power Options
This is the default method of changing the power button settings using the GUI. Power Options is a Control Panel feature that configures all power settings. You can either change the power button actions for all power plans or a specific one.
For All Power Plans
Here are the steps for this method:
- Press Win + R to open Run.
- Type
powercfg.cpland press Enter. It will load Power Options. - Click Choose what power buttons do.
- Click on the drop-down boxes next to When I press the power button.

- Select the option you want.
- Click Save Changes.

For Specific Power Plan
Follow the steps below to change power button settings for a specific plan:
- Open Power Options.
- Click on Change plan settings for your power plan.
- Select Change advanced power settings.
- Expand Power buttons and lid > Power button action.

- Click the drop-down boxes for On battery and Plugged in, and set the option you want.
- Click Apply and Ok.

If you can’t see the Power buttons and lid option, open Command Prompt as admin and enter the following command:
REG ADD HKLM\SYSTEM\CurrentControlSet\Control\Power\PowerSettingsf971e89-eebd-4455-a8de-9e59040e7347ca83367-6e45-459f-a27b-476b1d01c936 /v Attributes /t REG_DWORD /d 2 /f
Using Group Policy Editor
Another way to change power button actions is by changing its policy settings. Such policies take precedence over the Power Options settings. To change the power button policies,
- Open Run and enter
gpedit.mscto open the Local Group Policy Editor. - Go to Computer Configuration > Administrative Templates > System > Power Management > Button Settings.
- Double-click on Select the Power button action (plugged in).

- Check Enabled and set Power Button Action to your preference.
- Click Apply and Ok.
- Apply the same process for Select the Power button action (on battery).

With Registry Editor
You can also change the Power Button Settings in the registry configuration. You can do so by using the Registry Editor. First, back up your registry and then, follow the steps below:
- Launch Run and enter
regedit. It directs you to the Registry Editor. - Navigate to
Computer\HKEY_LOCAL_MACHINE\SOFTWARE\Policies\Microsoft\ - Right-click on Microsoft and select New > Key.
- Set its name to Power.
- Create a new key
PowerSettingsinside Power. - Create new key
7648EFA3-DD9C-4E3E-B566-50F929386280inside PowerSettings and go inside this key. - Right-click on an empty area and select New > DWORD (32-bit) Value.
- Set its name it
ACSettingIndex. - Create another DWORD value and name it as
DCSettingIndex. - Double-click on the entries to set their Value data to any of the following options:
- Take no action = 0
- Sleep = 1
- Hibernate = 2
- Shut down = 3
ACSettingIndex specifies the power button action for the plugged-in mode. And the other entry determines the action for the on battery power mode.
You don’t need to create the keys and entries if they already exist. Simply change their values.
Using Command-line Interface
If you’re familiar with the CLI, you might find it easier to use it to change such settings. You can change the power button settings for the current or any specific power plan. Pick one according to your need.
For the Current Power Plan
Here are the steps to change power button actions for your current power plan using a CLI:
- Open the Command Prompt or Windows PowerShell.
- Enter the following commands:
powercfg -setdcvalueindex SCHEME_CURRENT 4f971e89-eebd-4455-a8de-9e59040e7347 7648efa3-dd9c-4e3e-b566-50f929386280 “Option Index”powercfg -setacvalueindex SCHEME_CURRENT 4f971e89-eebd-4455-a8de-9e59040e7347 7648efa3-dd9c-4e3e-b566-50f929386280 “Option Index”- Make sure to replace “Option Index” with a value as follows:
- Do nothing – 0
- Sleep – 1
- Hibernate – 2
- Shutdown – 3
- Turn off display – 4

- Type
powercfg -SetActive SCHEME_CURRENTand press Enter.

For a Specific Power Plan
You need to know the GUID of a power plan to change its setting. The complete process of altering power button settings is as follows:
- Open the Command Prompt or Windows PowerShell.
- Enter
powercfg /land note the GUID number for the plan you want. - Enter the same commands as the above method while replacing SCHEME_CURRENT with the GUID number.
How to Change the GUI Power Button Options
If you want to change the GUI Power Menu options rather than the power key settings, this is the section for you. The power menu always contains Restart and Shut down. But you can choose if you want to show the Hibernate or Sleep options.
There are many ways of doing so, such as:
Through Power Options
Using the Power Options is always the usual method of making any changes to your power settings. Here’s what you need to do to change the power menu options:
- Open Run and enter
powercfg.cpl. - Click Choose what power buttons do.
- Select Change settings that are currently unavailable.
- Under Shutdown settings, check/uncheck Sleep and Hibernate for the Power Button menu.
- Click Save Changes.

With CLI
You can also enable or disable the two options using the Command-line Interface. Follow the instructions below to use the Command Prompt for this purpose:
- Press Win + R to open Run.
- Type
cmdand press Ctrl + Shift + Enter to open the elevated Command Prompt. - Enter the following options to change the hibernate/sleep options in the Power menu:
Enable Hibernate: powercfg /hibernate onDisable Hibernate: powercfg /hibernate offEnable Sleep: powercfg /sleep onDisable Sleep: powercfg /sleep off
Using Group Policy Editor
Another way to change the power menu options is through their policy settings. To do so,
- Enter
gpedit.mscon Run. - Head over to Computer Configuration > Administrative Templates > Windows Components > File Explorer.
- Double-click on Show hibernate in the power options menu or Show sleep in the power options menu.
- Check Enabled or Disabled according to your preference and click Ok.
With Registry Editor
You can also go to the Registry Editor and change the entries corresponding to the options. Follow the directions below to do so:
- Enter
regediton Run. - Go to
Computer\HKEY_LOCAL_MACHINE\SOFTWARE\Microsoft\Windows\CurrentVersion\Explorer\FlyoutMenuSettings - Set ShowHibernateOption and ShowSleepOption to 1 to enable and 0 to disable them.
If you don’t see FlyoutMenuSetting, create the key. Then, create the two DWORD entries as we mentioned above and set their value accordingly.

This tutorial will show you how to change the default action to take when pressing the power button in Windows 10 and Windows 11.
The power button action setting lets users specify the default action to take when the system hardware power button on the PC is pressed.
Users can specify one of the following actions to take:
- Do Nothing = No action is taken when the power button is pressed.
- Sleep = The system enters sleep when the power button is pressed. This is usually the default setting for laptops and tablets.
- Hibernate = The system enters hibernate when the power button is pressed.
- Shut Down = The system shuts down when the power button is pressed. This is usually the default setting for desktops.
- Turn off the display = All displays will be turned off when the power button is pressed.
Reference:
Contents
- Option One: Change Power Button Action for Current Power Plan in Settings
- Option Two: Change Power Button Action for Current Power Plan in Power Options
- Option Three: Change Power Button Action for Specific Power Plan in Advanced Power Options
- Option Four: Change Power Button Action for Current Power Plan in Windows Terminal
- Option Five: Change Power Button Action for Specific Power Plan in Windows Terminal
- Option Six: Specify Power Button Action for All Power Plans in Local Group Policy Editor
- Option Seven: Specify Power Button Action for All Power Plans using REG file
Option One
Change Power Button Action for Current Power Plan in Settings
This option is only available starting with Windows 11 build 25309.
1 Open Settings (Win+I).
2 Click/tap on System on the left side, and click/tap on Power & battery on the right side. (see screenshot below)

3 Click/tap on Power button controls to expand it open. (see screenshot below step 4)
4 Select Do nothing, Sleep, Hibernate, Shut down, or Display Off for what you want in the Pressing the power button will make my PC drop menus for Plugged in and On battery. (see screenshot below)

Option Two
Change Power Button Action for Current Power Plan in Power Options
1 Open the Control Panel (icons view), and click/tap on the Power Options icon.
2 Click/tap on the Choose what the power buttons do link in the left pane. (see screenshot below)

3 In both the On battery and Plugged in drop menus for the When I press the power button setting, select Do nothing, Sleep, Hibernate, Shut down, or Turn off the display for what you want, and click/tap on Save changes.
Desktop computers will not have separate On battery and Plugged in options available unless it has a data connection to a UPS.

Option Three
Change Power Button Action for Specific Power Plan in Advanced Power Options
1 Open the Control Panel (icons view), and click/tap on the Power Options icon.
2 Click/tap on the Change plan settings link for the power plan you want to apply this to. (see screenshot below)
3 Click/tap on the Change advanced power settings link. (see screenshot below)

4 Expand open the Power buttons and lid and Power button action settings. (see screenshot below step 5)
You can add Power button action to Power Options if you do not have it available.
5 In both the On battery and Plugged in drop menus for the Power button action setting, select Do nothing, Sleep, Hibernate, Shut down, or Turn off the display for what you want, and click/tap on OK.
Desktop computers will not have separate On battery and Plugged in options available unless it has a data connection to a UPS.

Option Four
Change Power Button Action for Current Power Plan in Windows Terminal
1 Open Windows Terminal, and select either Windows PowerShell or Command Prompt.
2 Copy and paste the command below you want to use for when on battery and/or plugged in into Windows Terminal, and press Enter. (see screenshot below)
(Do nothing)
powercfg -setdcvalueindex SCHEME_CURRENT 4f971e89-eebd-4455-a8de-9e59040e7347 7648efa3-dd9c-4e3e-b566-50f929386280 0
OR
(Sleep)
powercfg -setdcvalueindex SCHEME_CURRENT 4f971e89-eebd-4455-a8de-9e59040e7347 7648efa3-dd9c-4e3e-b566-50f929386280 1
OR
powercfg -setdcvalueindex SCHEME_CURRENT 4f971e89-eebd-4455-a8de-9e59040e7347 7648efa3-dd9c-4e3e-b566-50f929386280 2
OR
(Shut down)
powercfg -setdcvalueindex SCHEME_CURRENT 4f971e89-eebd-4455-a8de-9e59040e7347 7648efa3-dd9c-4e3e-b566-50f929386280 3
OR
(Turn off the display)
powercfg -setdcvalueindex SCHEME_CURRENT 4f971e89-eebd-4455-a8de-9e59040e7347 7648efa3-dd9c-4e3e-b566-50f929386280 4
AND/OR
You would use this option for a desktop computer, since desktop computers will not have separate On battery and Plugged in options available unless it has a data connection to a UPS.
(Do nothing)
powercfg -setacvalueindex SCHEME_CURRENT 4f971e89-eebd-4455-a8de-9e59040e7347 7648efa3-dd9c-4e3e-b566-50f929386280 0
OR
(Sleep)
powercfg -setacvalueindex SCHEME_CURRENT 4f971e89-eebd-4455-a8de-9e59040e7347 7648efa3-dd9c-4e3e-b566-50f929386280 1
OR
powercfg -setacvalueindex SCHEME_CURRENT 4f971e89-eebd-4455-a8de-9e59040e7347 7648efa3-dd9c-4e3e-b566-50f929386280 2
OR
(Shut down)
powercfg -setacvalueindex SCHEME_CURRENT 4f971e89-eebd-4455-a8de-9e59040e7347 7648efa3-dd9c-4e3e-b566-50f929386280 3
OR
(Turn off the display)
powercfg -setacvalueindex SCHEME_CURRENT 4f971e89-eebd-4455-a8de-9e59040e7347 7648efa3-dd9c-4e3e-b566-50f929386280 4
3 Copy and paste the powercfg -SetActive SCHEME_CURRENT command into the Windows Terminal, and press Enter.
4 Restart the computer to apply.

Option Five
Change Power Button Action for Specific Power Plan in Windows Terminal
1 Open Windows Terminal, and select either Windows PowerShell or Command Prompt.
2 Copy and paste the powercfg /L command into Windows Terminal, and press Enter. Make note of the GUID number (ex: 381b4222-f694-41f0-9685-ff5bb260df2e) of the power plan (ex: «Balanced») you want to apply this to. (see screenshot below)
The power plan (ex: «Balanced») with an asterisk (*) to the right of it is your current active power plan scheme.

3 Type the command below you want to use for when on battery and/or plugged in into Windows Terminal, and press Enter.
(Do nothing)
powercfg -setdcvalueindex GUID 4f971e89-eebd-4455-a8de-9e59040e7347 7648efa3-dd9c-4e3e-b566-50f929386280 0
OR
(Sleep)
powercfg -setdcvalueindex GUID 4f971e89-eebd-4455-a8de-9e59040e7347 7648efa3-dd9c-4e3e-b566-50f929386280 1
OR
powercfg -setdcvalueindex GUID 4f971e89-eebd-4455-a8de-9e59040e7347 7648efa3-dd9c-4e3e-b566-50f929386280 2
OR
(Shut down)
powercfg -setdcvalueindex GUID 4f971e89-eebd-4455-a8de-9e59040e7347 7648efa3-dd9c-4e3e-b566-50f929386280 3
OR
(Turn off the display)
powercfg -setdcvalueindex GUID 4f971e89-eebd-4455-a8de-9e59040e7347 7648efa3-dd9c-4e3e-b566-50f929386280 4
AND/OR
You would use this option for a desktop computer, since desktop computers will not have separate On battery and Plugged in options available unless it has a data connection to a UPS.
(Do nothing)
powercfg -setacvalueindex GUID 4f971e89-eebd-4455-a8de-9e59040e7347 7648efa3-dd9c-4e3e-b566-50f929386280 0
OR
(Sleep)
powercfg -setacvalueindex GUID 4f971e89-eebd-4455-a8de-9e59040e7347 7648efa3-dd9c-4e3e-b566-50f929386280 1
OR
powercfg -setacvalueindex GUID 4f971e89-eebd-4455-a8de-9e59040e7347 7648efa3-dd9c-4e3e-b566-50f929386280 2
OR
(Shut down)
powercfg -setacvalueindex GUID 4f971e89-eebd-4455-a8de-9e59040e7347 7648efa3-dd9c-4e3e-b566-50f929386280 3
OR
(Turn off the display)
powercfg -setacvalueindex GUID 4f971e89-eebd-4455-a8de-9e59040e7347 7648efa3-dd9c-4e3e-b566-50f929386280 4
Substitute GUID in the command above with the actual GUID (ex: «381b4222-f694-41f0-9685-ff5bb260df2e») from step 2 above for the power plan (ex: «Balanced») you want to apply this to.
For example:
powercfg -setacvalueindex 381b4222-f694-41f0-9685-ff5bb260df2e 4f971e89-eebd-4455-a8de-9e59040e7347 7648efa3-dd9c-4e3e-b566-50f929386280 3
4 Copy and paste the powercfg -SetActive SCHEME_CURRENT command into the Windows Terminal, and press Enter.
5 Restart the computer to apply.

Option Six
Specify Power Button Action for All Power Plans in Local Group Policy Editor
You must be signed in as an administrator to use this option.
The Local Group Policy Editor is only available in the Windows 11 Pro, Enterprise, and Education, editions.
All editions can use Option Seven below to configure the same policy.
1 Open the Local Group Policy Editor (gpedit.msc).
2 Navigate to the policy location below in the left pane of the Local Group Policy Editor. (see screenshot below)
Computer Configuration > Administrative Templates > System > Power Management > Button Settings.

3 In the right pane of Button Settings, double click/tap on the Select the Power button action (plugged in) and/or Select the Power button action (on battery) policy you want to edit. (see screenshot above)
4 Do step 5 (default), step 6 (hibernate), step 7 (shut down), step 8 (sleep), or step 9 (Take no action) below for which default action you want to specify.
5 Default User Choice for Power Button Action
This will allow users to use Option One, Option Two, Option Three, Option Four, and Option Five.
A) Select (dot) Not Configured, click/tap on OK, and go to step 10 below. (see screenshot below step 9)
6 To Specify «Hibernate» for Power Button Action
This will override and gray out Option One, Option Two, Option Three, Option Four, and Option Five.
A) Select (dot) Enabled, select Hibernate in the Power Button Action drop menu under Options, click/tap on OK, and go to step 10 below. (see screenshots below step 9)
7 To Specify «Shut down» for Power Button Action
This will override and gray out Option One, Option Two, Option Three, Option Four, and Option Five.
A) Select (dot) Enabled, select Shut down in the Power Button Action drop menu under Options, click/tap on OK, and go to step 10 below. (see screenshots below step 9)
8 To Specify «Sleep» for Power Button Action
This will override and gray out Option One, Option Two, Option Three, Option Four, and Option Five.
A) Select (dot) Enabled, select Sleep in the Power Button Action drop menu under Options, click/tap on OK, and go to step 10 below. (see screenshots below step 9)
9 To Specify «Take no action» for Power Button Action
This will override and gray out Option One, Option Two, Option Three, Option Four, and Option Five.
A) Select (dot) Enabled, select Take no action in the Power Button Action drop menu under Options, click/tap on OK, and go to step 10 below. (see screenshots below)


10 When finished, you can close the Local Group Policy Editor if you like.
Option Seven
Specify Power Button Action for All Power Plans using REG file
You must be signed in as an administrator to use this option.
1 Do step 2 (default), step 3 (hibernate), step 4 (shut down), step 5 (sleep), or step 6 (Take no action) below for which default action you want to specify.
2. Default User Choice for Power Button Action
This will allow users to use Option One, Option Two, Option Three, Option Four, and Option Five.
A) Click/tap on the Download button you want below to download the plugged in AND/OR on battery file below, and go to step 7 below.
Default_user_choice_for_power_button_action-plugged-in.reg
(Contents of REG file for reference)
Code:
Windows Registry Editor Version 5.00

[HKEY_LOCAL_MACHINE\SOFTWARE\Policies\Microsoft\Power\PowerSettings\7648EFA3-DD9C-4E3E-B566-50F929386280]
"ACSettingIndex"=-AND/OR
Default_user_choice_for_power_button_action-on-battery.reg
(Contents of REG file for reference)
Code:
Windows Registry Editor Version 5.00

[HKEY_LOCAL_MACHINE\SOFTWARE\Policies\Microsoft\Power\PowerSettings\7648EFA3-DD9C-4E3E-B566-50F929386280]
"DCSettingIndex"=-
3. To Specify «Hibernate» for Power Button Action
This will override and gray out Option One, Option Two, Option Three, Option Four, and Option Five.
A) Click/tap on the Download button you want below to download the plugged in AND/OR on battery file below, and go to step 7 below.
Specify_hibernate_for_power_button_action-plugged-in.reg
(Contents of REG file for reference)
Code:
Windows Registry Editor Version 5.00

[HKEY_LOCAL_MACHINE\SOFTWARE\Policies\Microsoft\Power\PowerSettings\7648EFA3-DD9C-4E3E-B566-50F929386280]
"ACSettingIndex"=dword:00000002AND/OR
Specify_hibernate_for_power_button_action-on-battery.reg
(Contents of REG file for reference)
Code:
Windows Registry Editor Version 5.00

[HKEY_LOCAL_MACHINE\SOFTWARE\Policies\Microsoft\Power\PowerSettings\7648EFA3-DD9C-4E3E-B566-50F929386280]
"DCSettingIndex"=dword:00000002
4. To Specify «Shut down» for Power Button Action
This will override and gray out Option One, Option Two, Option Three, Option Four, and Option Five.
A) Click/tap on the Download button you want below to download the plugged in AND/OR on battery file below, and go to step 7 below.
Specify_shut_down_for_power_button_action-plugged-in.reg
(Contents of REG file for reference)
Code:
Windows Registry Editor Version 5.00

[HKEY_LOCAL_MACHINE\SOFTWARE\Policies\Microsoft\Power\PowerSettings\7648EFA3-DD9C-4E3E-B566-50F929386280]
"ACSettingIndex"=dword:00000003AND/OR
Specify_shut_down_for_power_button_action-on-battery.reg
(Contents of REG file for reference)
Code:
Windows Registry Editor Version 5.00

[HKEY_LOCAL_MACHINE\SOFTWARE\Policies\Microsoft\Power\PowerSettings\7648EFA3-DD9C-4E3E-B566-50F929386280]
"DCSettingIndex"=dword:00000003
5. To Specify «Sleep» for Power Button Action
This will override and gray out Option One, Option Two, Option Three, Option Four, and Option Five.
A) Click/tap on the Download button you want below to download the plugged in AND/OR on battery file below, and go to step 7 below.
Specify_sleep_for_power_button_action-plugged-in.reg
(Contents of REG file for reference)
Code:
Windows Registry Editor Version 5.00

[HKEY_LOCAL_MACHINE\SOFTWARE\Policies\Microsoft\Power\PowerSettings\7648EFA3-DD9C-4E3E-B566-50F929386280]
"ACSettingIndex"=dword:00000001AND/OR
Specify_sleep_for_power_button_action-on-battery.reg
(Contents of REG file for reference)
Code:
Windows Registry Editor Version 5.00

[HKEY_LOCAL_MACHINE\SOFTWARE\Policies\Microsoft\Power\PowerSettings\7648EFA3-DD9C-4E3E-B566-50F929386280]
"DCSettingIndex"=dword:00000001
6. To Specify «Take no action» for Power Button Action
This will override and gray out Option One, Option Two, Option Three, Option Four, and Option Five.
A) Click/tap on the Download button you want below to download the plugged in AND/OR on battery file below, and go to step 7 below.
Specify_do_nothing_for_power_button_action-plugged-in.reg
(Contents of REG file for reference)
Code:
Windows Registry Editor Version 5.00

[HKEY_LOCAL_MACHINE\SOFTWARE\Policies\Microsoft\Power\PowerSettings\7648EFA3-DD9C-4E3E-B566-50F929386280]
"ACSettingIndex"=dword:00000000AND/OR
Specify_do_nothing_for_power_button_action-on-battery.reg
(Contents of REG file for reference)
Code:
Windows Registry Editor Version 5.00

[HKEY_LOCAL_MACHINE\SOFTWARE\Policies\Microsoft\Power\PowerSettings\7648EFA3-DD9C-4E3E-B566-50F929386280]
"DCSettingIndex"=dword:00000000
7 Save the .reg file to your desktop.
8 Double click/tap on the downloaded .reg file to merge it.
9 When prompted, click/tap on Run, Yes (UAC), Yes, and OK to approve the merge.
10 You can now delete the downloaded .reg file if you like.
That’s it,
Shawn Brink
Related Tutorials
- Change Lid Close Action in Windows 11
- Change Lid Open Action in Windows 11
- Change Sleep Button Action in Windows 11
- Turn On or Off «Enable forced button/lid shutdown» in Windows 11
Если ваш ПК остается включенным, когда вы пытаетесь завершить работу, нажимая на кнопку питания, это сигнал о том, что в операционной системе Windows 11 не все в порядке. Проблема может быть связана как с установленным программным обеспечением, которое мешает нормальной работе вашего компьютера, так и с самой ОС. В редких случаях причиной может служить и сломанная кнопка питания на корпусе компьютера.
Настройка кнопки питания
В ОС Windows 11 есть настройка, контролирующая действия, которые происходят при нажатии на кнопку питания. Если кнопка питания настроена на бездействие при однократном нажатии, компьютер останется включенным, когда вы попытаетесь выключить его. Этот параметр существует для предотвращения случайного отключения.
Для проверки этих настроек переходим в «Панель управления». Найти ее можно через поиск Windows 11.
Далее переходим в раздел «Оборудование и звук».

Находим «Электропитание» — «Настройка функций кнопок питания» и переходим в эту настройку.
Если для кнопки питания установлена настройка «Действие не требуется», то при нажатии на кнопку питания ничего не будет происходить. Для выключения ПК устанавливаем действие «Завершение работы» и нажимаем кнопку «Сохранить изменения».

Windows 11 теперь будет нормально завершать работу после нажатия кнопки питания. Если по-прежнему не удается выключить ПК, возможно кнопка питания неисправна или не подключена на материнской плате, используйте другие способы выключения.