
Тонкая настройка фильтра безопасности SmartScreen позволит комфортно использовать преимущества системы защиты, а также избавиться от надоедливых оповещений. Ниже будут приведены варианты настройки или полного отключения SmartScreen.

Содержание
- Варианты настройки защиты и отключения SmartScreen
- Режимы работы SmartScreen
- Проблемы с отключением SmartScreen
- Как отключить фильтр SmartScreen в магазине Windows 10
- Как отключить фильтр SmartScreen через редактор групповой политики
Фильтр SmartScreen является одной из функций встроенной системы безопасности ОС Windows. Данная утилита предназначена для защиты компьютера от вредоносного ПО, скачанного из сети. Принцип работы SmartScreen заключается в сравнении скачанного и запускаемого файла с базой данных вредоносных программ. Если подобный файл будет обнаружен в базе данных вирусов, система автоматически запретит запускать его, предостерегая компьютер от угроз. SmartScreen работает в проводнике системы и встроенном браузере Internet Explorer.
Интересный факт: браузер Internet Explorer стал тестовой площадкой для фильтра SmartScreen, откуда данная утилита была интегрирована в проводник Windows 8 и 10.
На первый взгляд, фильтр SmartScreen приносит много пользы, «фильтруя» вредоносные сайты и запрещая запускать файлы, хранящиеся в базе вирусов. С другой стороны, такая защита очень навязчива, ведь практически вся информация из сети будет проходить сверку с базой данных и под блокировку смогут попадать даже полезные данные.
К счастью, файлы и сайты не из списка не будут полностью заблокированы, ведь фильтр SmartScreen автоматически выдаст оповещение о потенциально опасном ресурсе, на который пользователь все равно сможет перейти на свой страх и риск. Тем не менее, многие опытные пользователи специально отключают или подстраивают защиту под себя, чтобы избежать траты времени на различные подтверждения и добавления отдельных файлов в белый список.
Ниже будут описаны способы отключения и настройки SmartScreen, которые рекомендуется применять только опытным пользователям с установленными сторонними антивирусными программами, обеспечивающими надежную защиту.
Варианты настройки защиты и отключения SmartScreen
Для перехода в меню настроек SmartScreen необходимо:
Шаг 1. Открыть «Панель управления», нажав правой кнопкой мыши по кнопке «Пуск». Также панель управления можно открыть через поиск.

Шаг 2. В панели управления в режиме отображения «Категории» выбрать пункт «Система и безопасность».

Шаг 3. В открывшемся окне выбрать пункт «Безопасность и обслуживание».

Шаг 4. Нажать по пункту «Изменение параметров SmartScreen» и выбрать необходимый режим работы или полностью отключить фильтр.

Режимы работы SmartScreen
Запрос утверждения. Фильтр SmartScreen будет запрашивать от пользователя подтверждения открытия файла.
Предупреждение. SmartScreen будет выдавать уведомления о подозрительных файлах.
Отключение SmartScreen для проводника Windows.
Проблемы с отключением SmartScreen
В некоторых случаях после перехода в меню настроек SmartScreen пользователь может обнаружить неактивные пункты режимов работы фильтра. Для решения этой проблемы следует прибегнуть к внесению изменений в редакторе реестра.
Это можно сделать следующим образом:
Шаг 1. Нажимаем ПКМ по кнопке «Пуск» и выбираем пункт «Выполнить». В открывшемся окне вводим команду «regedit» для вызова меню редактора реестра.

Шаг 2. Переходим в реестре по пути «HKEY_LOCAL_MACHINE\SOFTWARE\Microsoft\Policies\Microsoft\Windows Defender» и в данном каталоге создаем новый параметр, нажав ПКМ и выбрав пункт «Параметр DWORD (32 бита)».

Шаг 3. Переименовываем новосозданный параметр на «DisableAntiSpyware», дважды кликаем по нему левой кнопкой мыши и в открывшемся окне в графе значение ставим единицу и подтверждаем действие кнопкой «Ок».

После перезагрузки компьютера фильтр Windows будет полностью отключен. Чтобы снова активировать SmartScreen, достаточно в последнем шаге ввести вместо единицы ноль и перезагрузить ПК.
Как отключить фильтр SmartScreen в магазине Windows 10
После отключения фильтра в проводнике системы можно отключить SmartScreen в магазине Windows, что позволит скачивать различные приложения и утилиты, минуя встроенную систему защиты.
Шаг 1. Нажимаем ПКМ по кнопке «Пуск» и выбираем пункт «Параметры».
Шаг 2. В открывшемся окне переходим в раздел «Конфиденциальность» (находится в нижней части меню).

Шаг 3. В графе «Общее» находим пункт «Включить фильтр SmartScreen для проверки веб-содержимого…» и переводим переключатель в выключенное состояние.

После выполнения вышеуказанных шагов, SmartScreen в магазине Windows будет отключен.
Как отключить фильтр SmartScreen через редактор групповой политики
В случае использования Корпоративной или Профессиональной версии Windows 10 существует еще один способ отключения фильтра SmartScreen. Для этого следует воспользоваться редактором групповой политики, который позволяет производить ручную настройку приложений.
Шаг 1. Открываем «Редактор групповой политики». Для этого нажимаем ПКМ по «Пуск», выбираем пункт «Выполнить» и вводим команду «gpedit.msc».

Шаг 2. В левой графе следует перейти по следующему пути: «Конфигурация компьютера», «Административные шаблоны», «Компоненты Windows», «Проводник» и в правой графе найти пункт «Настроить функцию SmartScreen…».

Шаг 3. Дважды кликаем по найденному пункту и в открывшемся окне переводим кнопку слева в режим «Отключено».

Часто задаваемые вопросы
Smart Screen – это одна из функций, отвечающих за безопасность в Windows. Суть Smart Screen заключается в сравнении скачанного с интернета ПО, которое вы хотите запустить с базой данных вредоносных программ. Это позволяет более эффективно защитить вашу систему от вирусов.
К сожалению иногда случается, что Smart Screen воспринимает некоторые приложения пользователя как вирусы. О том, как с этим бороться читайте на нашем сайте.
Скачайте и установите программу RS Partition Recovery. Она разработана как раз для таких случаев и позволяет восстановить утерянные файлы вследствие случайного удаления, форматирования диска, повреждений логической структуры дисков и т.д.
Скачайте и установите программу RS Partition Recovery. Она разработана как раз для таких случаев и позволяет восстановить утерянные файлы вследствие случайного удаления, форматирования диска, повреждений логической структуры дисков и т.д.
Если пункты режимов работы Smart Screen неактивны, то для его отключения придется редактировать реестр Windows. Процесс отключения Smart Screen через реестр детально описан на нашем сайте.
Summary
- Microsoft Defender SmartScreen is enabled by default in Windows and provides reputation-based protection against malicious apps and websites. It can be disabled if it mistakenly blocks safe files.
- SmartScreen is also a part of Microsoft Edge’s security settings and can be turned off or on from the browser’s settings menu. It helps protect against phishing sites and blocks potentially unwanted apps.
- SmartScreen can be turned off or on using various methods, including the Windows Security settings, Microsoft Edge settings, Internet Properties dialog, Registry Editor, and Group Policy Editor. It is recommended to enable SmartScreen for added PC security.
Microsoft Defender SmartScreen is part of the Windows Security solution. It helps you protect against common threats by warning against downloading or installing potentially malicious files from other computers.
SmartScreen is enabled by default in Windows. However, sometimes, you may want to disable the feature if it identifies and blocks genuine apps and files as malicious. Fortunately, you can disable SmartScreen easily. Here, we show you how to disable the SmartScreen filter in Windows.
How Does Windows SmartScreen Filter Work?
SmartScreen relies on reputation-based protection to protect your device from malicious or potentially unwanted apps and websites.
When enabled, SmartScreen screens your downloads against known suspicious sites and developers. When a match is found, it blocks the download or site access and warns the user about the action taken.
You can configure it to block apps and files by checking unrecognized apps and files from the web. It can also protect you from Microsoft Store and third-party sourced apps that are low on reputation and known to cause unexpected behavior.
SmartScreen is also part of Microsoft Edge’s security settings. When enabled, it helps protect your computer against malicious and phishing sites and block downloads.
SmartScreen is enabled by default on all the Windows OS running systems. However, some experienced users may find the feature annoying as it can block safe apps, requiring additional steps to run the setup.
While we recommend you always turn the SmartScreen filter on, you can disable it easily from the Windows Security settings. Here’s how to do it.
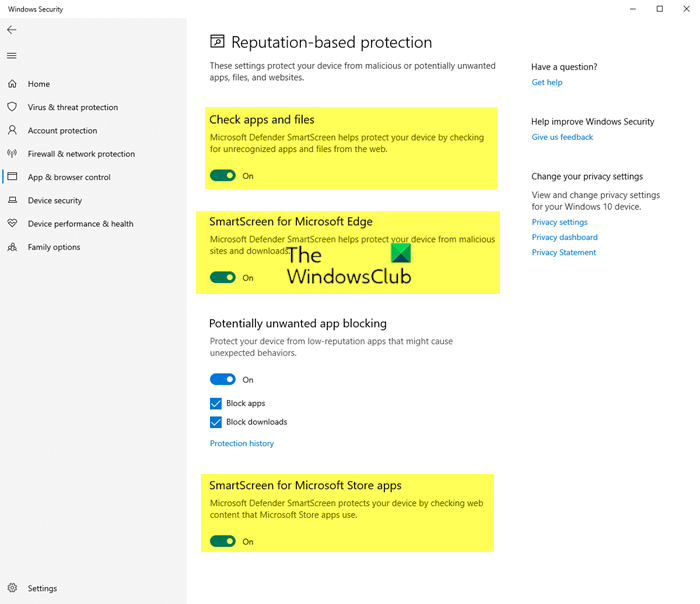
1. How to Turn Off SmartScreen Using Windows’ Security Settings
The easiest way to turn off SmartScreen is via the Windows Settings panel. You can configure all the aspects of your system security from the Windows Security panel. Here’s how to do it.
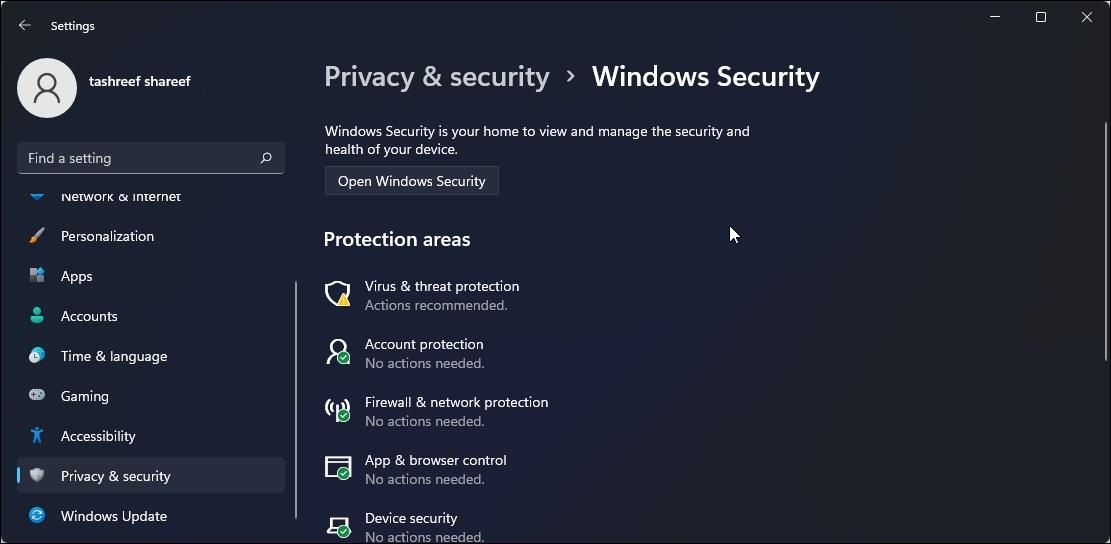
- Press Win + I to open Settings.
- Open the Privacy and Security tab in the left pane.
-
Click on Windows Security.

-
Next, click on Open Windows Security.

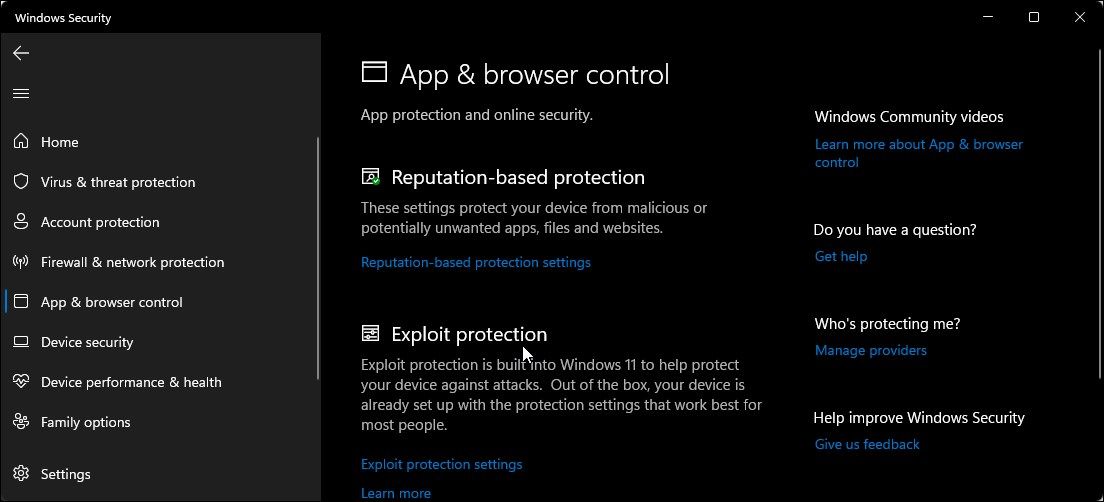
- Open the App & browser control tab in the left pane.
-
Click on Reputation-based protection settings under Reputation-based protection.
-
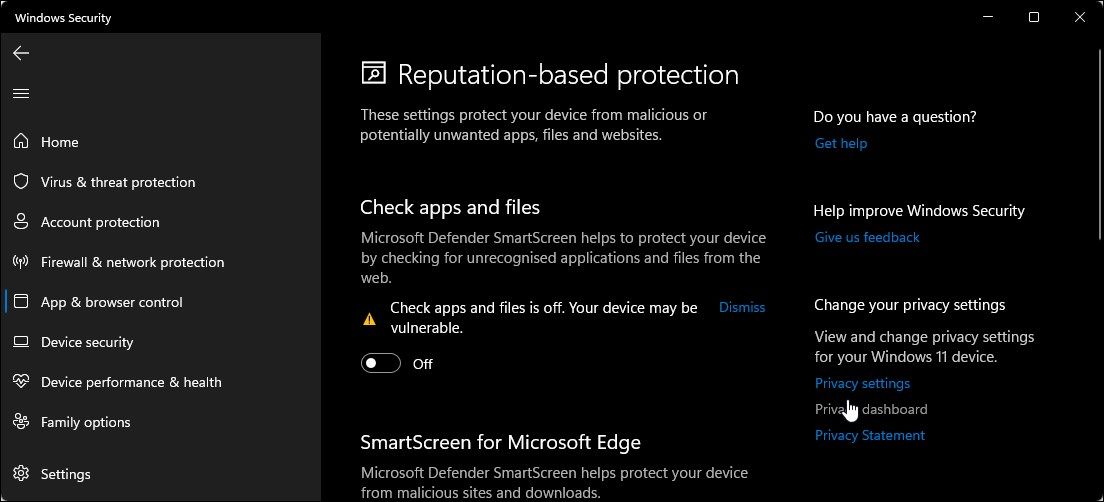
Here, you’ll find four different SmartScreen filters you can individually enable or disable. If you want to turn off the filter for files and executables, turn off Check apps and files and Potentially unwanted app blocking filters. The other two filters are for Microsoft Edge and Microsoft Store apps.
- If you want to turn off SmartScreen completely, disable all four filters.
When you have difficulty accessing the Windows Security window, refer to our troubleshooting guide to fix a blank Windows security screen.
If any of the SmartScreen filters are grayed out with the message «this setting is managed by your administrator,» you must contact your administrator or try another method.
2. How to Disable SmartScreen for Microsoft Edge
Microsoft Edge has a built-in option to enable and disable Microsoft Defender SmartScreen. Here’s how to access it:
- Launch Microsoft Edge and click the three-dots menu icon in the top right corner.
- Click on Settings.
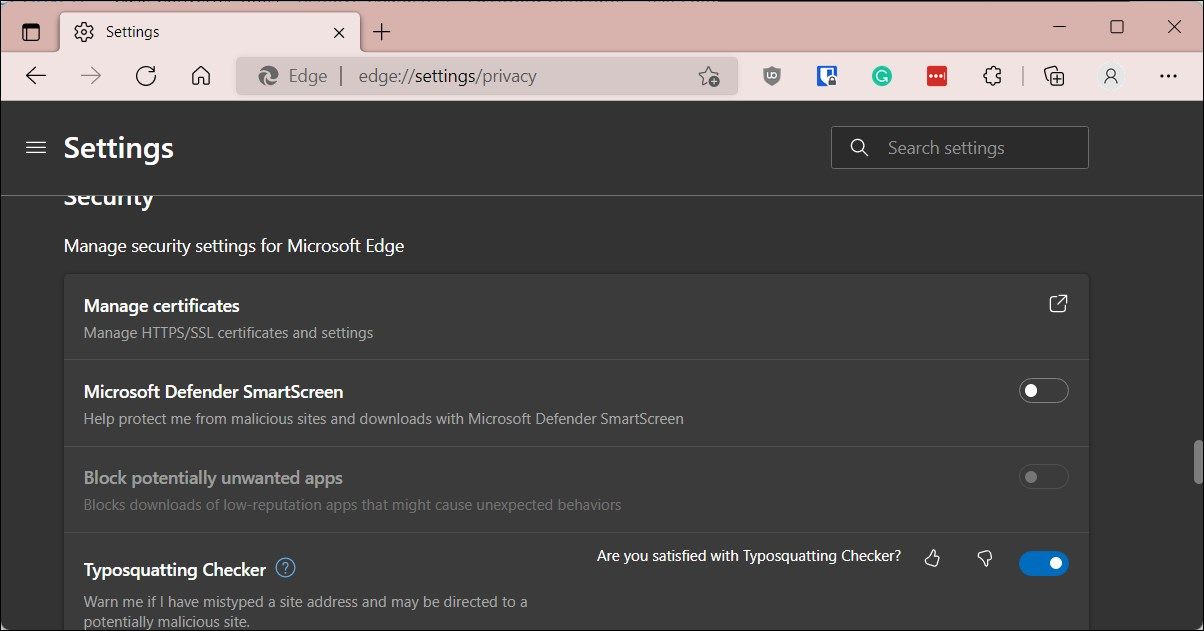
- Open the Privacy, search, and services tab in the left pane.
- Scroll down to the Security section.
- Toggle the switch for Microsoft Defender SmartScreen to turn it off. This will disable the Block potentially unwanted apps option as well.
- If you choose to enable SmartScreen again, you must manually enable the Block potentially unwanted apps feature.
Additionally, you can disable SmartScreen for Microsoft Edge using the Windows Security app and Registry Editor. Here’s how to do it.
Disable Microsoft Edge SmartScreen Using Windows Security
Microsoft Edge SmartScreen is for your browsing safety against phishing and malware sites and software you download. Unless an administrator manages it, you can turn it off.
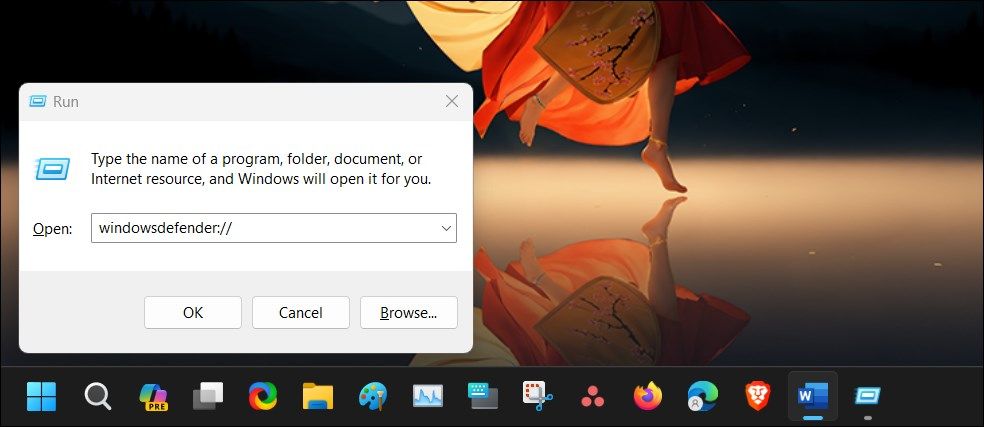
- Press Win + R to open Run.
-
Type windowsdefender:// and click OK to open the Windows Security app.

- Open the App & browser control tab in the left pane.
-
Next, click the Reputation-based protection settings link under Reputation-based protection.

- Toggle the switch for SmartScreen for Microsoft Edge to turn off Microsoft Defender SmartScreen for the Edge browser.

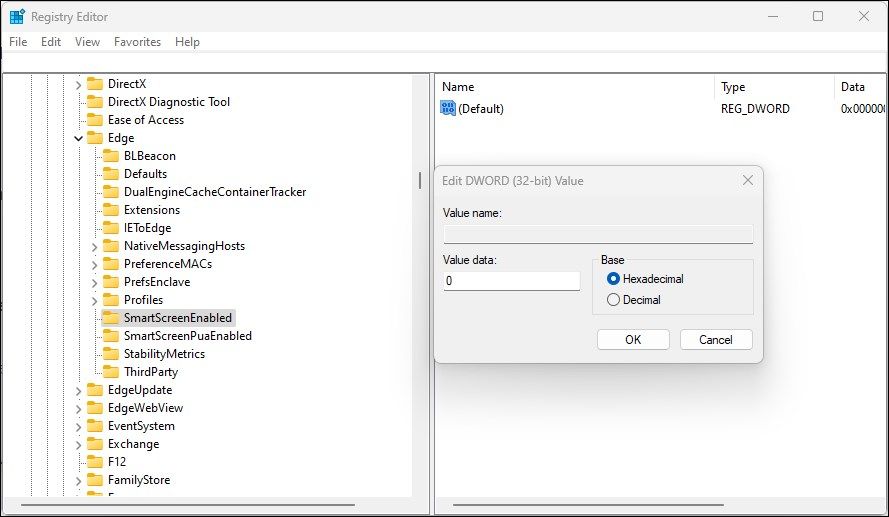
Disable SmartScreen for Microsoft Edge Using Registry Editor
Editing the registry entry is an alternative (but more complicated) method to disable the SmartScreen for the Edge browser permanently.
- Press Win + R to open Run.
- Type regedit and click OK to open Registry Editor.
-
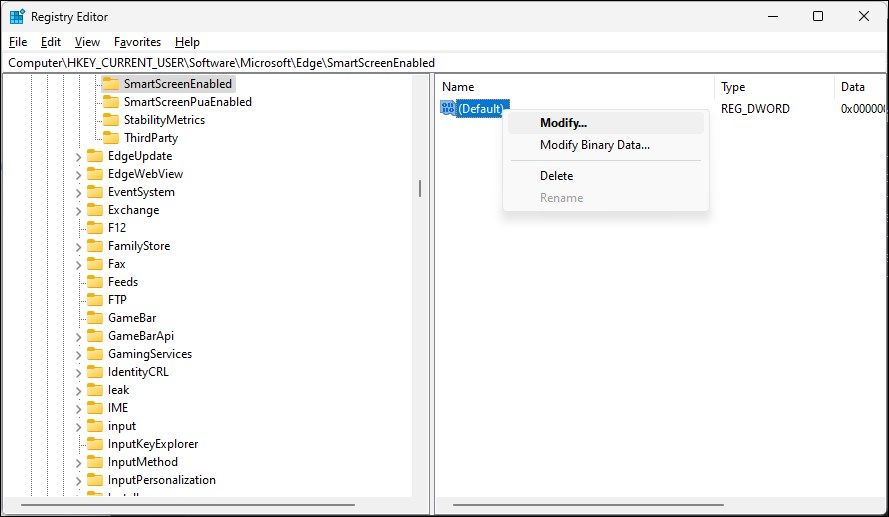
Next, navigate to the following location:
HKEY_CURRENT_USER\Software\Microsoft\Edge\SmartScreenEnabled -
In the right pane, right-click on the Default value and select Modify.

-
Type 1 in the Value data field and click OK to save the changes.
- You may need to restart your computer to see the changes live.
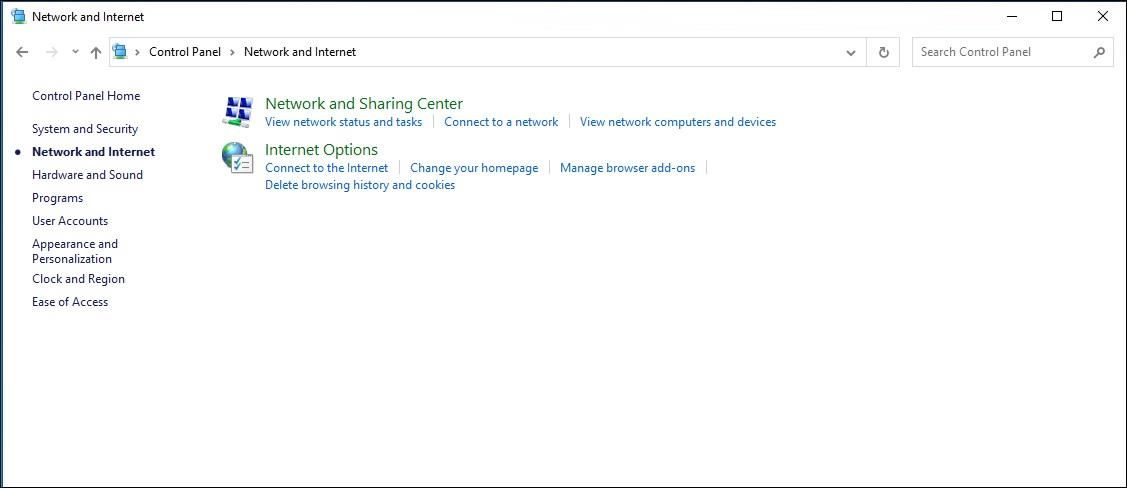
3. How to Turn Off Windows Defender SmartScreen Using Internet Properties
You can turn on or off Windows Defender SmartScreen using the Internet Properties dialog in Windows 10. Also known as Internet Options, it lets you configure security and access settings, add-ons, Active-X controls, and more.
Follow these steps to turn off SmartScreen using Internet Options:
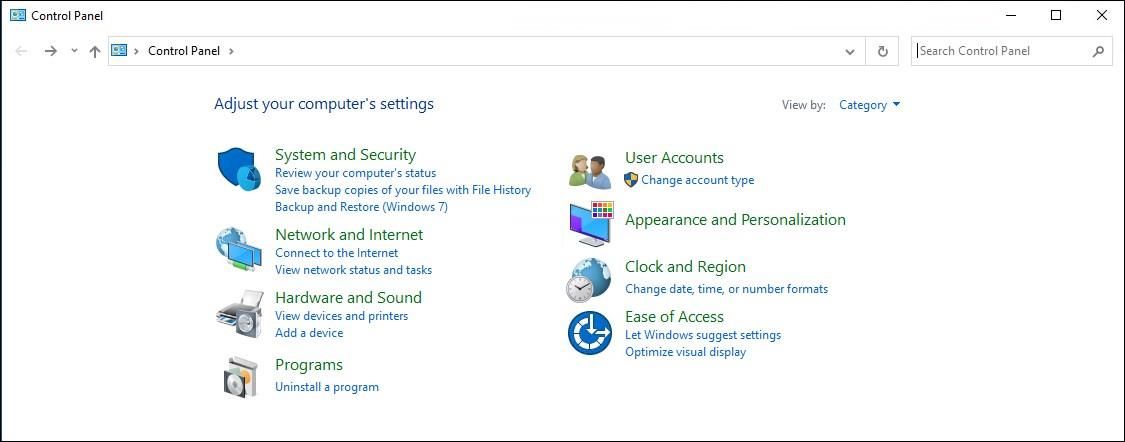
- Press Win + R to open Run.
- Type control and click OK to open the Control Panel.
-
Click on Network and Internet.

- Next, click on Internet Options.
-
In the Internet Properties window, open the Advanced tab.

-
Scroll down to the Security section.

- Uncheck the Enable Windows Defender SmartScreen option.
- Click Apply and OK to save the changes.
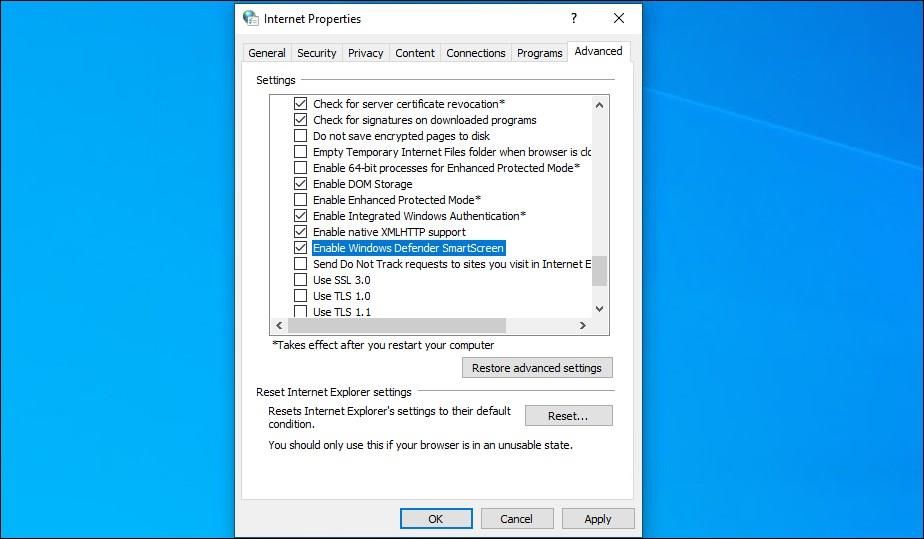
On a newer version of Windows, including Windows 11, you may not find any option to enable or disable Windows Defender SmartScreen in Internet Properties.
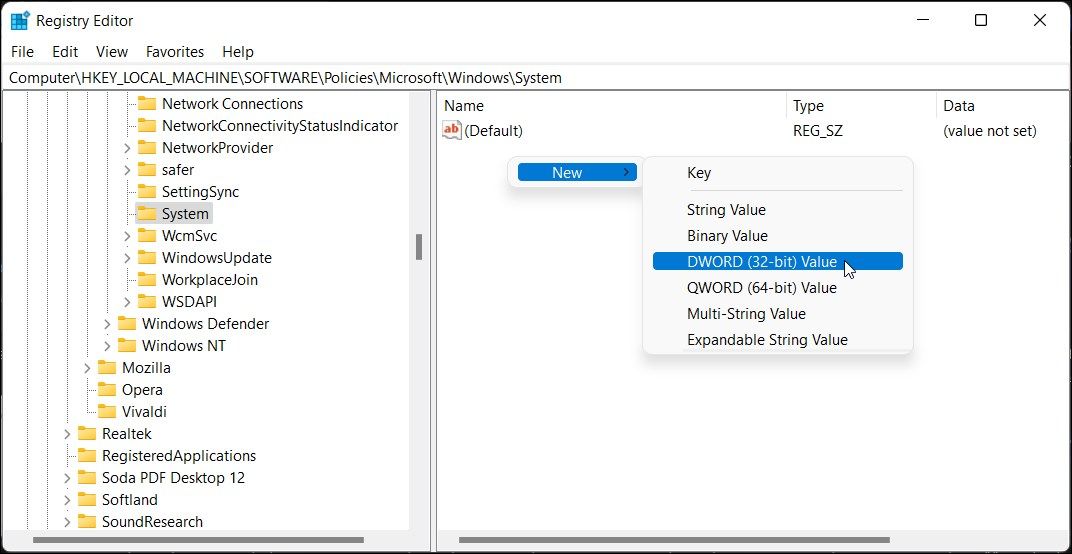
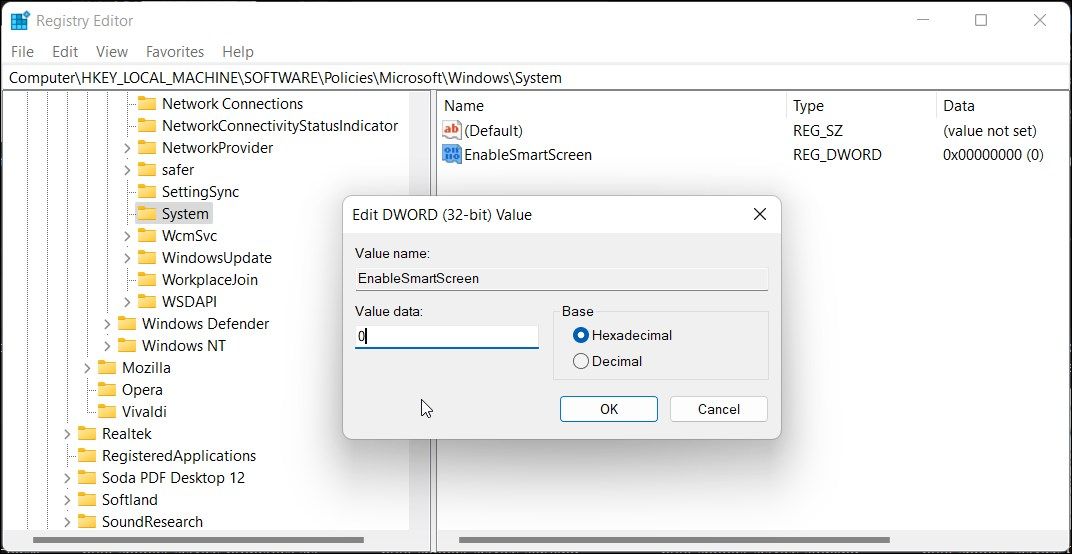
4. How to Enable or Disable SmartScreen Using Registry Editor
You can also turn the Windows Defender SmartScreen on or off using the Registry Editor. Useful if you cannot access it from the Settings app or Internet Properties.
Note that incorrect modification to the registry entries can cause system malfunction. Therefore, create a restore point before proceeding with the steps below.
- Press Win + R to open Run.
- Type regedit and click OK to open the Registry Editor. Click Yes if prompted by UAC to grant administrative privilege.
-
In the Registry Editor, navigate to the following location:
HKEY_LOCAL_MACHINE\SOFTWARE\Policies\Microsoft\Windows\System
-
In the right pane, locate the EnableSmartScreen filter value. You will need to create a new value if no value is found.

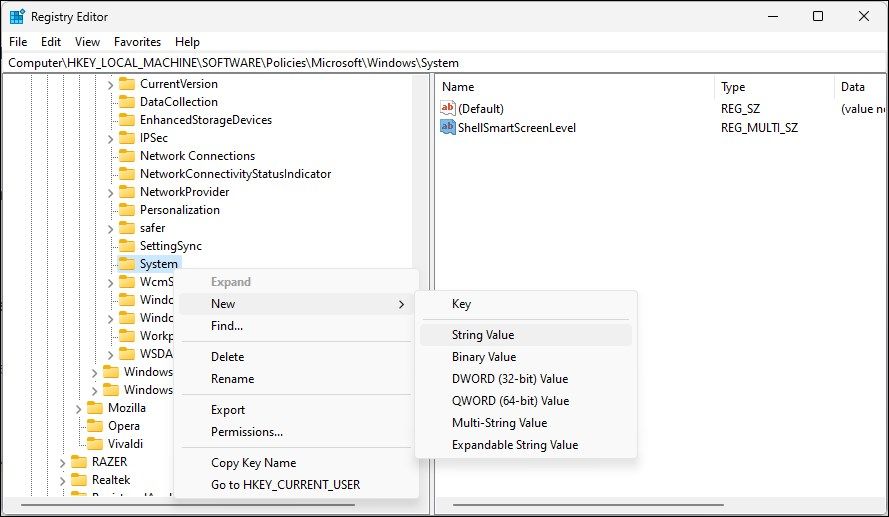
- To create a new value, right-click on the System key and select New > DWORD (32-bit) Value.
- Rename the value as EnableSmartScreen.
-
Next, right-click on the EnableSmartScreen value and select Modify.
- Type 0 in the Value data field and click OK to save the changes.
- To enable the SmartScreen filter, type 1 in the Value data field and click OK.
- Close the Registry Editor and restart your PC to apply the changes.
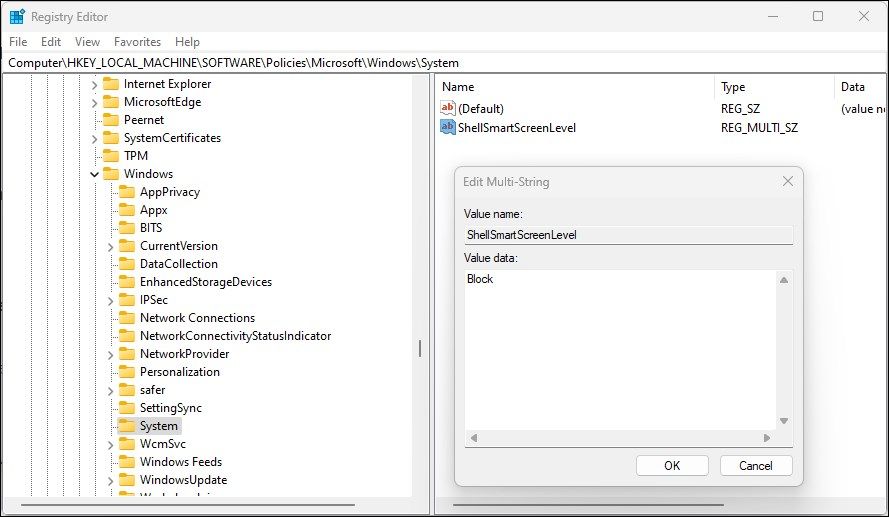
You can further tweak the registry to create a new String Value to set the blocking level to Warn or Block. Using Warn will show a SmartScreen warning with an option to proceed. In contrast, the Block option will show a warning and block the app from running on your computer.
To set a new ShellSmartScreenLevel String Value in Registry Editor:
-
Right-click on the System subkey and select New > String Value. Rename the value as ShellSmartScreenLevel.
-
Next, right-click on ShellSmartScreenLevel and select Modify.;
- Type Warn or Block depending on what you want the SmartScreen Level to do. Click OK to save the changes and exit Registry Editor.
5. How to Turn the SmartScreen Filter On or Off Using the Group Policy Editor
If you want to manage the SmartScreen filter for multiple computers at your organization, you can use the Group Policy Editor to do this task.
Note that Group Policy Editor is only available on Windows Pro, Edu, and Enterprise editions of the OS. If you are using Home, explore our guide to enable Group Policy Editor on the Windows Home edition.
To configure the SmartScreen filter using GPEdit:
- Press Win + R to open Run.
- Type gpedit.msc and click OK to open the Group Policy Editor.
-
Next, navigate to the following location in Group Policy Editor:
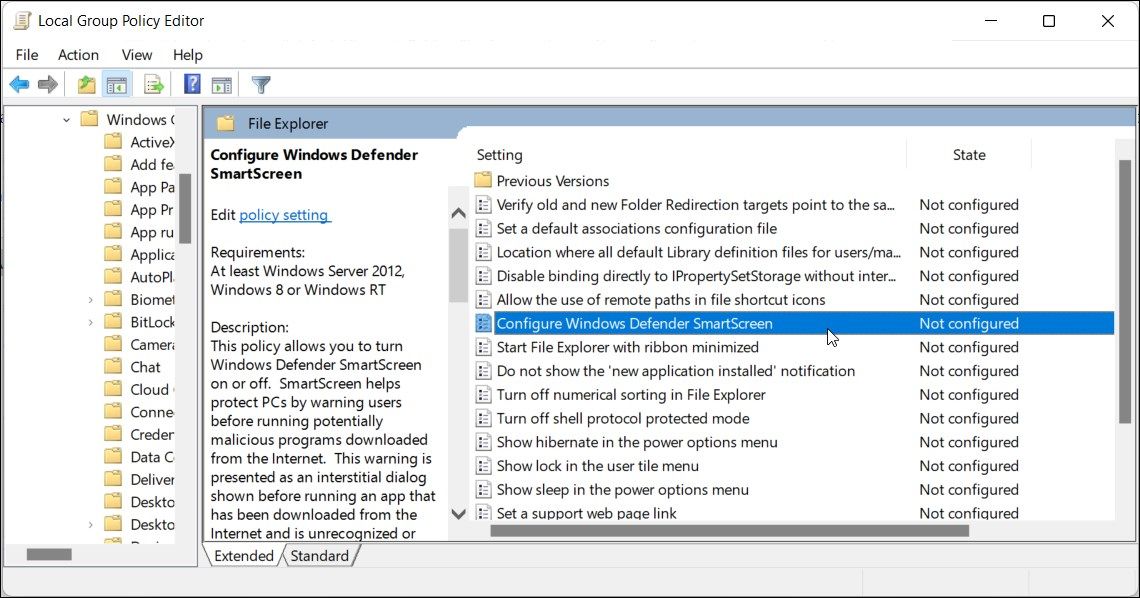
Computer Configuration > Administrative Templates > Windows Components > File Explorer. -
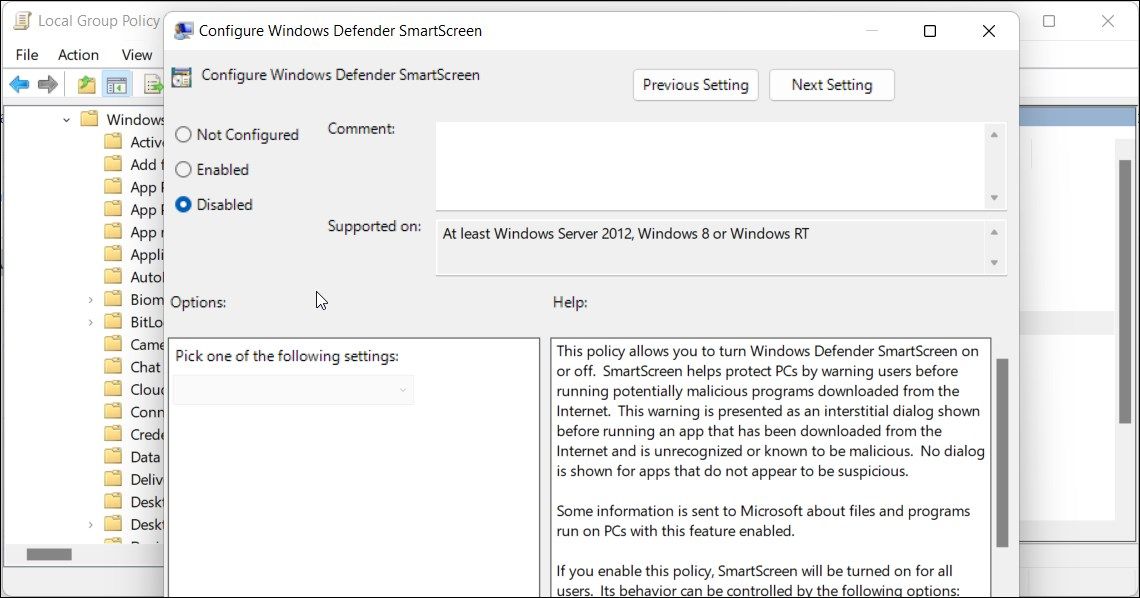
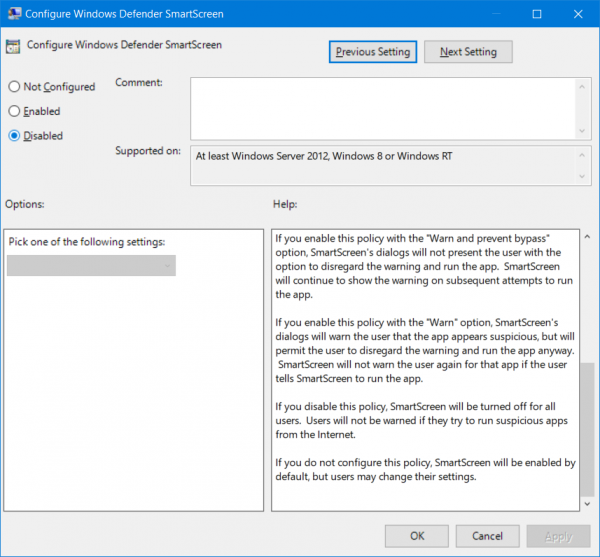
In the right pane, right-click on Configure Windows Defender SmartScreen policy and select Edit.

- To disable SmartScreen, select Disabled.
-
If you want to enable SmartScreen, select Not Configured or Enabled.
- Click Apply and OK to save the changes.
- Close Group Policy Editor and restart your PC.
Manage the SmartScreen Filter in Windows
While you can easily disable the SmartScreen filter in Windows, it is an extremely useful security tool. It can protect you against malicious files and programs and screen and block suspicious sites. It’s an added layer of protection to Windows Defender and helps keep your PC safe. Make sure to enable the SmartScreen filter once the task is finished.
Windows SmartScreen появился довольно давно, еще в 2009 году. Тогда он был частью браузера Internet Explorer 8 и предназначался для защиты от фишинга и загрузки нежелательного ПО. Поскольку работа фильтра оказалась довольно эффективной, то в Windows 8 он был встроен уже в саму операционную систему, для защиты от всех потенциально опасных исполняемых файлов.
Основная задача фильтра SmartScreen — предупреждать пользователя о запуске неизвестных программ, загруженных из интернета. Работа фильтра базируется на облачной системе рейтингов, по которой проверяется каждый загружаемый файл. Если файл помечен как небезопасный или он отсутствует в базе, то его загрузка\выполнение блокируется.
Проверка производится на нескольких этапах. Так если вы используете браузер IE или Edge, то фильтр срабатывает при попытке загрузить неизвестный файл. При этом загрузка прерывается, а пользователю выводится соответствующее предупреждение.

Если же файл уже загружен с помощью другого браузера (Firefox, Chrome и т.п.), то фильтр срабатывает при попытке запустить файл на выполнение. При этом у пользователя есть выбор — отказаться от запуска или запустить файл на свой страх и риск.

Говоря о SmartScreen, стоит упомянуть об одной немаловажной детали, а именно — он передает информацию обо всех загружаемых и устанавливаемых приложениях на сервера Microsoft. Это необходимо для пополнения базы приложений и составления их рейтинга.
По умолчанию фильтр SmartScreen включен, но при необходимости его можно перенастроить или совсем выключить. Для этого есть несколько способов, начнем с самого простого.
Настройка из графической оснастки
Для настройки фильтра открываем классическую Панель управления (Win+R -> control), переходим в раздел «Безопасность и обслуживание» и в левой части выбираем пункт «Изменение параметров Windows SmartScreen».
В открывшемся окне выбираем один из трех вариантов работы SmartScreen:
• Запрашивать утверждения администратора перед запуском неопознанного приложения из интернета (выбор по умолчанию);
• Предупреждать перед выполнением неопознанного приложения, но не требовать утверждения администратором;
• Ничего не делать (отключить SmartScreen).

Настройка с помощью групповых политик
Также настройки можно произвести с помощью групповых политик (как локальных, так и доменных). Для настройки на локальном компьютере открываем редактор локальной групповой политики, для чего нажимаем (Win+R -> gpedit.msc). Затем переходим в раздел Конфигурация компьютера\Административные шаблоны\Компоненты Windows\Проводник (Computer configuration\Administrative Templates\Windows Components\File Explorer) и находим параметр «Настроить Windows SmartScreen» (Configure Windows SmartScreen).

Устанавливаем его в положение Включено и выбираем один из вариантов работы фильтра SmartScreen:
• Требовать утверждения администратора, прежде чем выполнять загруженное неизвестное программное обеспечение;
• Предупреждать пользователя, прежде чем выполнять загруженное неизвестное программное обеспечение;
• Отключить SmartScreen.

Примечание. Обратите внимание, что при использовании групповых политик настройка SmartScreen из графического интерфейса становится недоступной.
Редактирование реестра
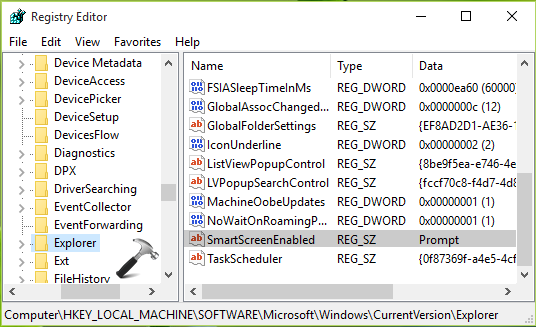
Настройки фильтра SmartScreen можно изменить и напрямую в реестре. Для этого надо найти в разделе HKLM\SOFTWARE\Microsoft\Windows\CurrentVersion\Explorer параметр SmartScreenEnabled и задать для него одно из трех значений:
• RequireAdmin — запрашивать подтверждение администратора перед запуском подозрительного приложения (значение по умолчанию);
• Prompt — выводить предупреждение перед запуском приложения, не требуя подтверждения администратора;
• Off — не отслеживать запуск приложений (отключить фильтр).

В заключение скажу, что фильтр SmartScreen является еще одним уровнем защиты от вредоносного ПО, поэтому лично я не рекомендую его отключать без веских причин.
Is your SmartScreen Filter turned off? Or do you get the message SmartScreen Filter cannot check this website? If that is so, this post will show you how to enable or disable SmartScreen Filter on Windows 11/10 using the UI, the Group Policy, and the Registry Editor.

For those who don’t know what SmartScreen is, it is a feature that helps detect phishing websites, and can also help protect you from installing malicious software or malware. So whenever you encounter a suspicious site, a warning will be displayed on the browser window to notify the user about the site’s nature and whether the user trusts the site owner/publisher to continue further on the URL provided.
Read: SmartScreen filter warning messages explained.
Here, we will show you the following three methods to enable or disable the SmartScreen Filter on Windows 11/10.
- Via Windows 11/10 Settings
- By using the Local Group Policy Editor
- Via the Registry Editor
Let’s see all these methods in detail.
Enable or disable SmartScreen Filter using Windows 11/10 Settings
Use the following steps:
- Open Windows 11/10 Settings.
- Go to Privacy & security > Windows Security.
- Click Open Windows Security.
- Select App & browser control in Windows Security.
- Now, click on the Reputation-based protection settings link.
- Turn on or off the following settings as required
- Check apps and files
- SmartScreen for Microsoft Edge
- SmartScreen for Microsoft Store apps.
Do note that when you turn off the above-mentioned options, you will leave your computer vulnerable.
Via Microsoft Edge
You can also enable or disable SmartScreen Filter in Microsoft Edge Settings. However, when you turn on or off this feature for Microsoft Edge in Windows 11/10 Settings, the feature will automatically disabled in Edge Settings. Go through the following instructions:

- Open Microsoft Edge.
- Open its Settings by clicking on the three dots on the top right side.
- Select the Privacy, search, and services category from the left side.
- Scroll down to the Security section on the right pane.
Here toggle the Microsoft Defender SmartScreen switch to the Off or On position as required.
Via Internet Properties
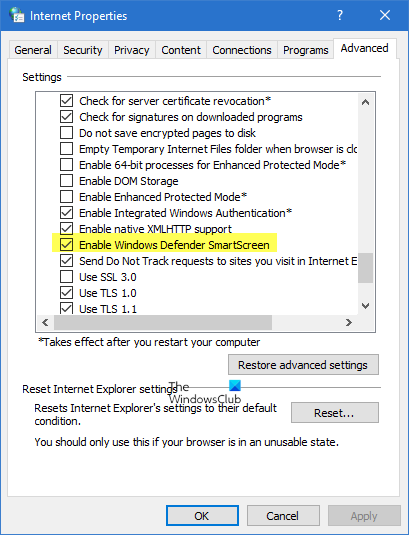
You can also open Internet Options/Properties. Go to the Advanced tab and scroll down for Security Category. There if you want to enable/disable the feature, you can accordingly check the box captioned “Enable SmartScreen Filter” and then press OK.
Now after you enable the feature, every time you encounter a suspicious URL it will display a message.
If you don’t want to use this feature, you can just uncheck the checkbox to disable the same, but it’s highly recommended since phishing attacks are increasing day by day, increasing the potential threat to confidential information of email accounts.
In the latest version of the Windows 11 operating system, the option to enable or disable SmartScreen Filter is not available in the Internet Properties. Therefore, you have to use Windows 11 Settings for the same.
TIP: You can also quickly bypass the SmartScreen filter and download files, without turning off SmartScreen Filter.
SmartScreen Filter is turned off
You can also enable and disable the SmartScreen Filter via the Local Group Policy Editor and the Registry Editor. This method is also useful if your SmartScreen is turned off or you receive the message that it is disabled by an administrator.

Enable or Turn on SmartScreen Filter using the Local Group Policy Editor
The Local Group Policy Editor is not available in Windows 11/10 Home Edition. Therefore, if you are a Windows 11/10 Home user, you can skip this method.
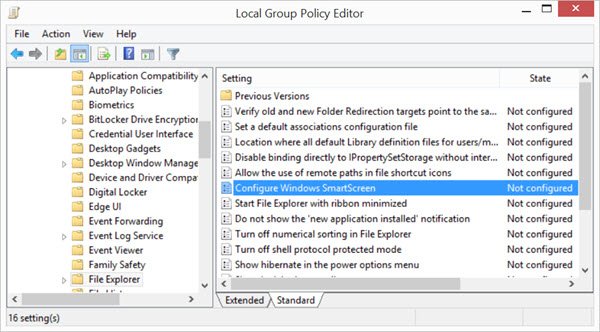
Open the Run command box (Win + R keys) and type gpedit.msc. Click OK to open the Group Policy Editor. Now, navigate to the following path:
Computer Configuration > Administrative Templates > Windows Components > File Explorer
In the right pane, double-click on Configure Windows SmartScreen to change its settings. In recent Windows 11/10 versions, it is called Configure Windows Defender SmartScreen.
This policy setting allows you to manage the behavior of Windows SmartScreen. Windows SmartScreen helps keep PCs safer by warning users before running unrecognized programs downloaded from the Internet. Some information is sent to Microsoft about files and programs run on PCs with this feature enabled. If you enable this policy setting, Windows SmartScreen behavior may be controlled by setting one of the following options: Require approval from an administrator before running downloaded unknown software, Give user a warning before running downloaded unknown software or Turn off SmartScreen. If you disable or do not configure this policy setting, Windows SmartScreen behavior is managed by administrators on the PC by using Windows SmartScreen Settings in Action Center.
Read: How to disable SmartScreen for Microsoft Store apps.
Enable SmartScreen Filter using Registry Editor
This method required modifications in the Windows Registry. Therefore, before you proceed, we recommend you create a System Restore Point and back up your Registry. This will help you revert the changes if any problem occurs.
Open the Run command box and type regedit. Click OK and then click yes in the UAC prompt. This will open the Registry Editor.
Now, navigate to the following path:
HKEY_LOCAL_MACHINE\SOFTWARE\Policies\Microsoft\Windows\System

To easily go to the above-mentioned path, copy and paste it into the address bar of the Registry Editor. Hit Enter after that. In the right pane, you may find a DWORD value EnableSmartScreen.
If this value is not there, create it manually. Make sure that the System key is selected on the left side. Now, right-click in the empty space on the right side and select New > DWORD (32-bit) Value. Rename this newly created value as EnableSmartScreen.
Right-click on the EnableSmartScreen value and select Modify. Enter 0 in its Value data to turn off SmartScreen. Enter 1 in its Value data to turn on SmartScreen.
We have explained different values for EnableSmartScreen below:
- 0: To turn off SmartScreen
- 1: Give the user a warning before running downloaded unknown software
- 2: Require approval from an administrator before running downloaded unknown software.
After modifying the value in the Registry Editor, you need to restart your computer for the changes to take effect. This Registry Editor value will make the SmartScreen option for apps and files greyed out and you will see the following message in Windows Security UI:
This setting is managed by your administrator.
To fix this problem, you have to delete the EnableSmartScreen value in the Registry Editor. But to do this, you need to log into your system as an administrator. Open the Registry Editor and go to the above-mentioned path. Right-click on the EnableSmartScreen value and select Delete. After doing so, restart your computer for the changes to take effect.
That’s it. I hope this helps.
Is Microsoft Defender SmartScreen safe?
Microsoft Defender SmartScreen is completely safe and was developed by Microsoft. This feature is enabled by default. However, if you want, you can disable it in Windows Settings. If this is turned on, it will provide you [phishing protection, malware protection, reputation-based URL and app protection, etc. It also blocks the URLs associated with potentially unwanted applications.
Is disabling SmartScreen safe?
SmartScreen in Windows 11/10 computers protects users from many vulnerabilities. The SmartScreen for Microsoft Edge protects you from visiting malicious websites and downloading malicious files. Therefore, disabling this feature is not safe. Doing so will make your device vulnerable.
You might want to read these posts too:
- Windows SmartScreen filter, Download Reputation, XSS Security features
- Prevent bypassing of SmartScreen filter warnings.
Many times users download anonymous files from the Internet and try to run it on Windows. If you’re using Windows 8 or later, those files will not run directly, unlike earlier versions of Windows series. The reason behind this is presence of Windows SmartScreen filter.
Page Contents
Windows SmartScreen Filter In Windows 10
Windows SmartScreen is basically a security check against those files/apps which can compromise or harm your system. This feature is available in Windows 8 or later editions and runs in the background. When users run an application/file that comes from unrecognized source, Windows immediately blocks the item, so that your machine remain safe. In such case, you’ll see following message on the screen:
Windows SmartScreen prevented an unrecognized app from starting. Running this app might put your PC at risk.
[Run anyway] [Don’t run]
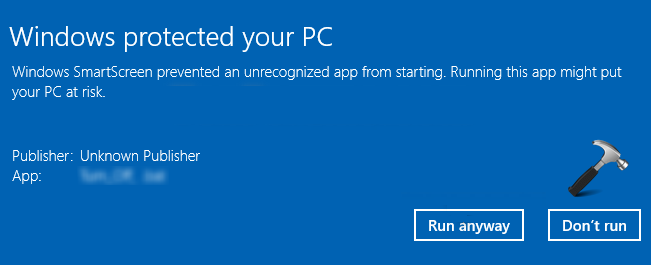
If you select Don’t run option in above message, your system will remain in default state. In case if you know that internal contents of app/file you’re trying to run and you believe that they couldn’t harm your machine, select Run anyway option.
How To Enable or Disable Windows SmartScreen Filter In Windows 10
To manage Windows SmartScreen filter settings, follow these steps:
1. Press + R key combination, type following and hit Enter:
C:\Windows\System32\SmartScreenSettings.exe
Substitute C: with your system root drive.
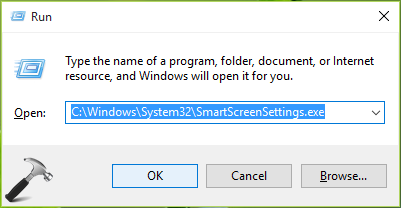
2. In the Windows SmartScreen configuration window appearing next, you can enable or disable this security feature (default is enabled). Once you’re done, click OK.
You may have to restart your machine to make your changes effective.
INFO: You can also access Windows SmartScreen configuration window from Control Panel > All Control Panel Items > Security and Maintenance > Change Windows SmartScreen settings.
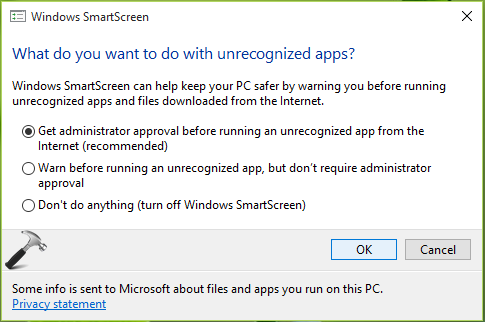
FIX : Can’t Change Windows SmartScreen Filter Settings
We’ve have observed that sometimes users are not able to change Windows SmartScreen filter settings as mentioned above. This is because the options in Windows SmartScreen configuration window are greyed out (see screenshot below).
The root cause behind this may be various. In some cases, other security programs you use might block it. While on an other note, systems part of domain might get this error after domain controller’s restriction. Workaround to this problem is to change Windows SmartScreen filter settings using registry as mentioned below:
Registry Disclaimer: The further steps will involve registry manipulation. Making mistakes while manipulating registry could affect your system adversely. So be careful while editing registry entries and create a System Restore point first.
1. Press + R and put regedit in Run dialog box to open Registry Editor (if you’re not familiar with Registry Editor, then click here). Click OK.
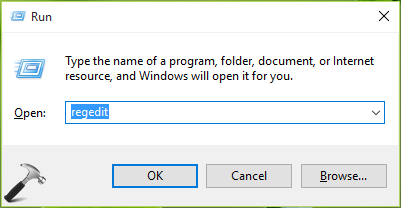
2. In the left pane of Registry Editor, navigate to following registry key:
HKEY_LOCAL_MACHINE\SOFTWARE\Microsoft\Windows\CurrentVersion\Explorer
3. In the right pane of Explorer folder, look for registry string named SmartScreenEnabled. Double click on this string to modify it:
4. You can type any one (mentioned in bold) of the following to set corresponding option:
RequireAdmin (Get administrator approval before running an unrecognized app from the internet)
Prompt (Warn before running an unrecognized app, but don’t require administrator approval)
Off (Disable Windows SmartScreen feature)
Once you’re done, click OK. Close Registry Editor and reboot.
Hope you find the Windows SmartScreen filter helpful!