
DNS is used for translating host names to IP addresses and the reverse, for both private and public networks (i.e.: the Internet). DNS does this by using records stored in its database. On the Internet DNS mainly stores records for public domain names and servers whereas in private networks it may store records for client computers, network servers and data pertaining to Active Directory.
In this article, we will install and configure DNS on a standalone Windows Server 2003. We will begin by setting up a cache-only DNS server and progress to creating a primary forward lookup zone, a reverse lookup zone, and finally some resource records. At the end of this article we will have set up a DNS server capable of resolving internal and external host names to IP addresses and the reverse.
Install DNS on Windows Server 2003
Before installing and configuring DNS on our server we have to perform some preliminary tasks. Specifically, we have to configure the server with a static IP address and a DNS suffix. The suffix will be used to fully-qualify the server name. To begin:
1. Go to Start > Control Panel > Network Connections , right-click Local Area Connection and choose Properties .
2. When the Local Area Connection Properties window comes up, select Internet Protocol (TCP/IP) and click Properties . When the Internet Protocol (TCP/IP) window comes up, enter an IP address , subnet mask and default gateway IP addresses that are all compatible with your LAN.
Our LAN is on a 192.168.1.0/24 network, so our settings are as follows:
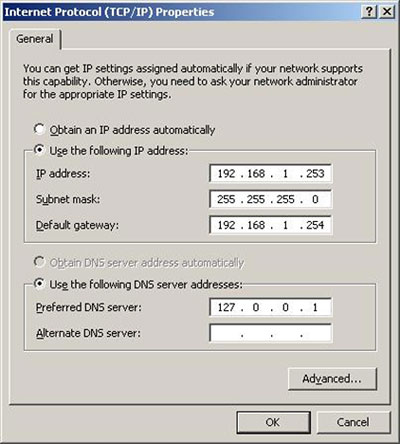
3. For the Preferred DNS Server , enter the loopback address 127.0.0.1 . This tells the server to use its own DNS server service for name resolution, rather than using a separate server. After filling out those fields , click the Advanced button.
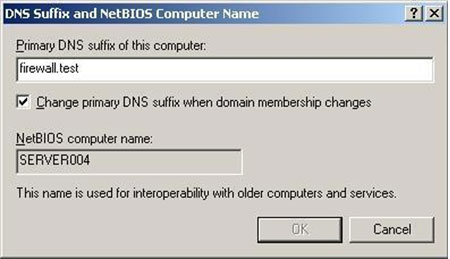
4. When the Advanced TCP/IP Settings window comes up, click the DNS tab, enter firewall.test on the DNS suffix for this connection text field, check Register this connection’s address in DNS , check Use this connection’s DNS suffix in DNS registration , and click OK , OK , and then Close:
Now that we have configured our server with a static IP address and a DNS suffix, we are ready to install our DNS Server. To do this:
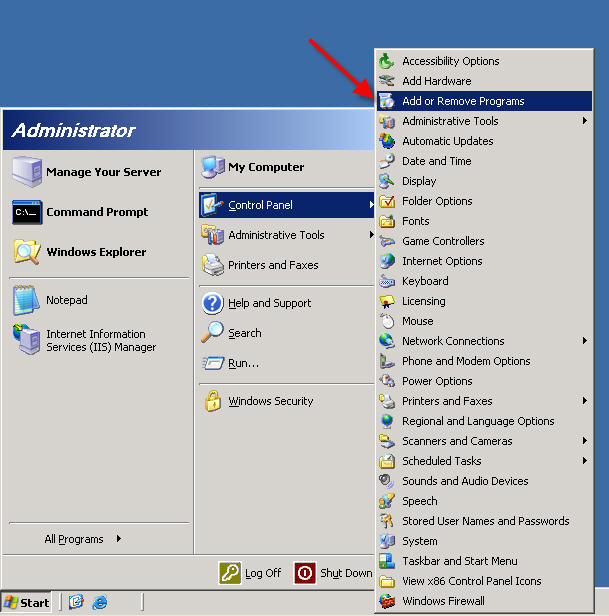
1. Go to Start > Control Panel > Add or Remove Programs .
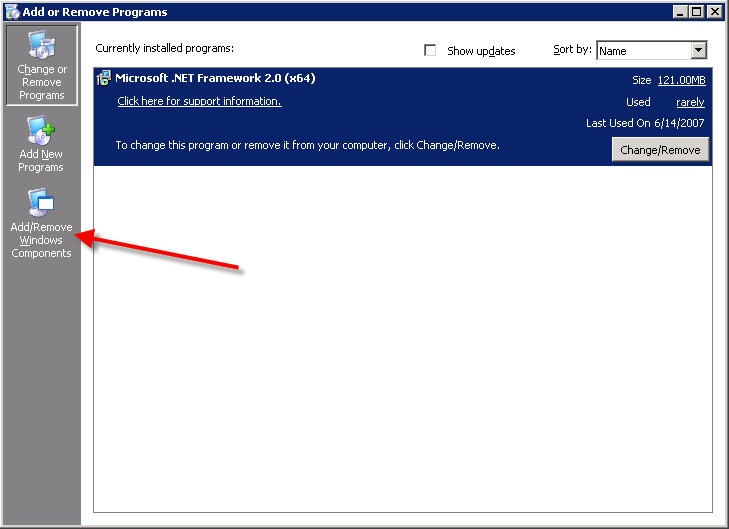
2. When the Add or Remove Program window launches, click Add/Remove Windows Components on the left pane.
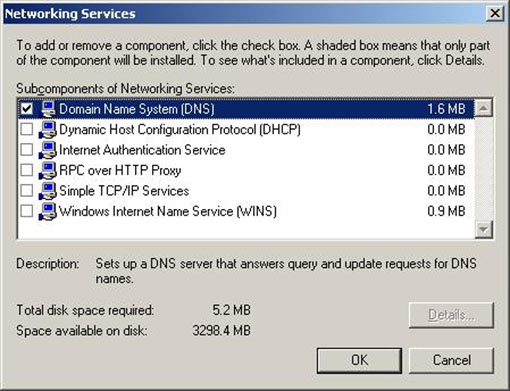
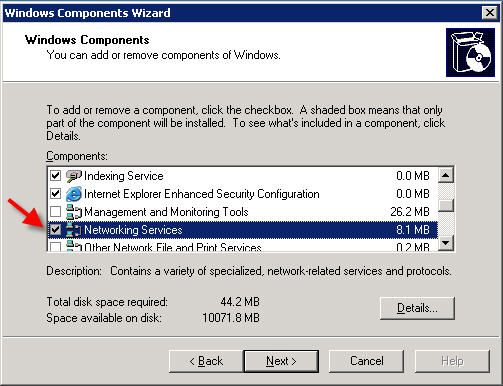
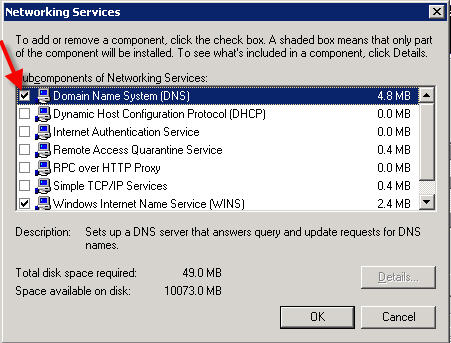
3. When the Windows Components Wizard comes up, scroll down and highlight Networking Services and then click the Details button.
4. When the Networking Services window appears, place a check mark next to Domain Name System (DNS) and click OK and OK again.
Note that, during the install, Windows may generate an error claiming that it could not find a file needed for DNS installation. If this happens, insert your Windows Server 2003 CD into the server’s CD-ROM drive and browse to the i386 directory. The wizard should automatically find the file and allow you to select it. After that, the wizard should resume the install.
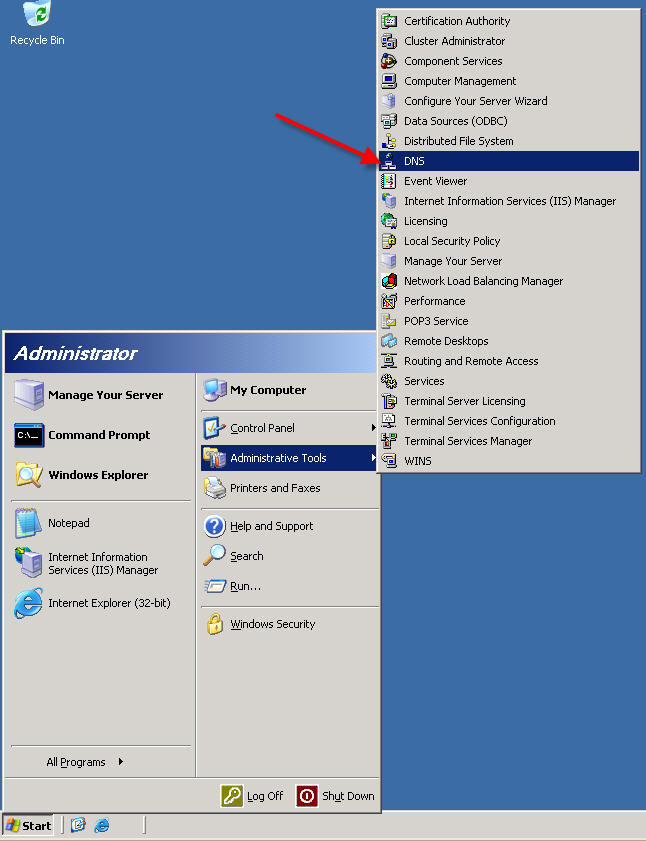
After this, DNS should be successfully installed. To launch the DNS MMC, go to Start > Administrative Tools > DNS
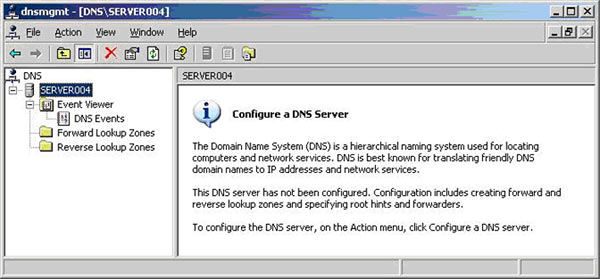
As our DNS server was just installed it is not populated with anything. On the left pane of the DNS MMC, there is a server node with three nodes below it, titled Forward Lookup Zones, Reverse Lookup Zones and Event Viewer.
The Forward Lookup Zones node stores zones that are used to map host names to IP addresses, whereas the Reverse Lookup Zones node stores zones that are used to map IP addresses to host names.
Setting Up a Cache-Only DNS Server
A cache-only DNS server contains no zones or resource records. Its only function is to cache answers to queries that it processes, that way if the server receives the same query again later, rather than go through the recursion process again to answer the query, the cache-only DNS server would just return the cached response, thereby saving time. With that said, our newly installed DNS server is already a cache-only DNS server!
Creating a Primary Forward Lookup Zone
With its limited functionality, a cache-only DNS server is best suited for a small office environment or a small remote branch office. However, in a large enterprise where Active Directory is typically deployed, more features would be needed from a DNS server, such as the ability to store records for computers, servers and Active Directory. The DNS server stores those records in a database, or a zone .
DNS has a few different types of zones, and each has a different function. We will first create a primary forward lookup zone titled firewall.test . We do not want to name it firewall.cx , or any variation that uses a valid top-level domain name, as this would potentially disrupt the clients’ abilities to access the real websites for those domains.
1. On the DNS MMC, right-click the Forward Lookup Zones node and choose New Zone .
2. When the New Zone Wizard comes up, click Next .
3. On the Zone Type screen, make sure that Primary zone is selected and click Next .
4. On the Zone Name screen, type firewall.test .
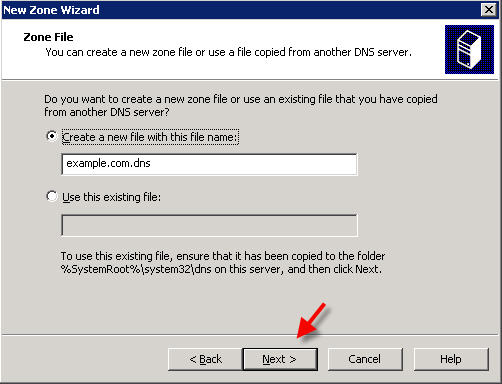
5. On the Zone File screen, click Next .
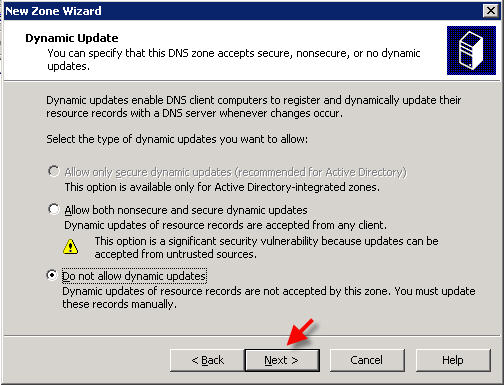
6. On the Dynamic Update screen, make sure that “ Do not allow dynamic updates ” is selected and click Next .
7. On the next screen, click Finish .
We now have a foundation that we can place resource records in for name resolution by internal clients.
Creating a Primary Reverse Lookup Zone
Contrary to the forward lookup zone, a reverse lookup zone is used by the DNS server to resolve IP addresses to host names. Not as frequently used as forward lookup zones, reverse lookup zones are often used by anti-spam systems in countering spam and by monitoring systems when logging events or issues. To create a reverse lookup zone:
1. On the DNS MMC, right-click the Reverse Lookup Zones node and choose New Zone .
2. When the New Zone Wizard comes up, click Next .
3. On the Zone Type screen, make sure that Primary zone is selected and click Next .
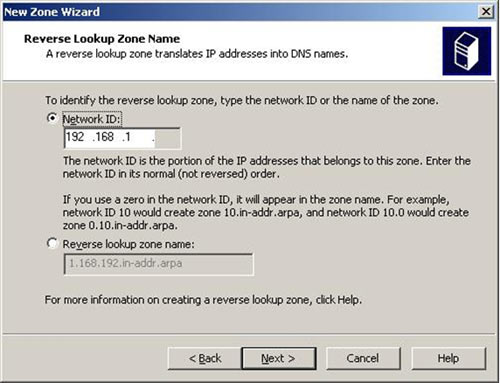
4. On the Reverse Lookup Zone Name screen, enter 192.168.1 and click Next .
5. On the Zone File screen, click Next .
6. On the Dynamic Update screen, make sure that “Do not allow dynamic updates” is selected and click Next .
7. On the next screen, click Finish .
There is now a reverse lookup zone titled 192.168.1.x Subnet on the left pane of the DNS MMC. This will be used to store PTR records for computers and servers in those subnets.
Using the instructions above, go ahead and create two additional reverse lookup zones, one for a 192.168.2.x subnet and for a 192.168.3.x subnet.
Creating Resource Records
DNS uses resource records (RRs) to tie host names to IP addresses and the reverse. There are different types of resource records, and the DNS server will respond with the record that is requested in a query.
The most common resource records are: Host (A); Mail Exchanger (MX); Alias (CNAME); and Service Location (SRV) for Active Directory zones. As such, we will create all but SRV records because Active Directory will create those automatically:
1. On the DNS MMC, expand the Forward Lookup Zones node followed by the firewall.test zone.
2. Right-click firewall.test zone and choose Other New Records .
3. On the Resource Record Type window, select Host (A) and click Create Record
4. On the New Resource Record window, type “ webserver001 ” on the Host text field, type “ 192.168.2.200” in the IP address text field, check the box next to “Create associated pointer (PTR) record” and click OK .
This tells DNS to create a PTR record in the appropriate reverse lookup zone. And, for demonstration purposes, it does not matter whether this server actually exists or not.
5. Back at the Resource Record Type window, select Host (A) again and click Create Record .
6. On the New Resource Record window, type “ mailserver001 ” on the Host text field and type “ 192.168.3.200” in the IP address text field. Make sure that the check box next to “Create associated pointer (PTR) record” is checked and click OK . A corresponding PTR record will be created in the appropriate reverse lookup zone.
7. Back at the Resource Record Type window, select Alias (CNAME) and click Create Record .
8. On the New Resource Record window, type “ www ” on the Alias name text field, then click Browse .
9. On the Browse window, double-click the server name, then double-click Forward Lookup Zones, then double-click firewall.test , and finally double-click webserver001 . This should populate the webserver001’s fully qualified domain name in the Fully qualified domain name (FQDN) for target host text field. Click OK afterwards.
10. Back at the Resource Record Type window, select Mail Exchanger (MX) and click Create Record .
11. On the New Resource Record window, click Browse , double-click the server name, then double-click Forward Lookup Zones, then double-click firewall.test, and finally double-click mailserver001 . This should populate the mailserver001’s fully qualified domain name in the Fully qualified domain name (FQDN) of mail server text field. Click OK afterwards.
12. Back at the Resource Record Type window, click Done .
Summary
Our standalone Windows Server 2003 DNS server now has a primary forward lookup zone, a primary reverse lookup zone, and multiple resource records. As a standard function, it will also cache the answers to queries that it has already resolved.
This tutorial will show you how to install and configure DNS services on your dedicated server or VPS server.
This tutorial assumes you are not using a control panel system such as Helm or Plesk (if you are then the DNS setup is automatically done for you when you add a domain to your server through your control panel)
If you would like to run your own DNS service, you first need to install the DNS service in Windows 2003:
1)
To install the DNS service, go to Start -> Control Panels -> Add or Remove Programs:
Click on the ‘Add/Remove Windows Components’ button:
Double-click on ‘Networking Services’:
Place a check-mark in the box titled «Domain Name System (DNS)»
Press OK, and then press NEXT.
If you get a window asking for a Windows CD-ROM or Service Pack CD-ROM, please contact support with your VPS information and request that we mount this disk(s) for you.
Once the CD is mounted simply tell the installer where to find the files (browse to the mounted CD) and the installation should complete.
2)
Once DNS services have been installed, open the DNS Manager by going to Start –> Administrator Tools –> DNS
Go to the ‘Action’ menu and select ‘Configure a DNS Server…»
Click Next
Select the option ‘Create a forward lookup zone’
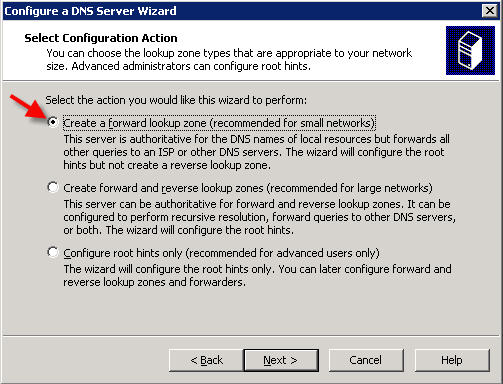
Click Next.
On the next screen, select the option ‘This server maintains the zone’

Click Next.
Enter your domain name in the Zone Name box:
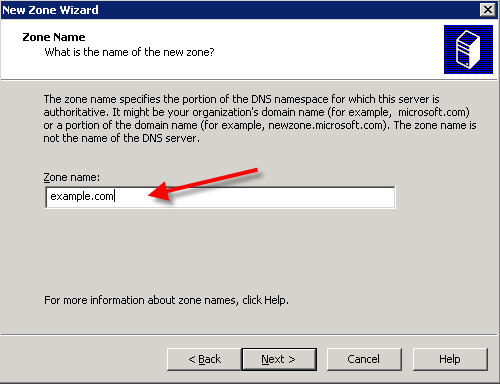
Click Next.
Click Next again at the next screen:
click Next again:
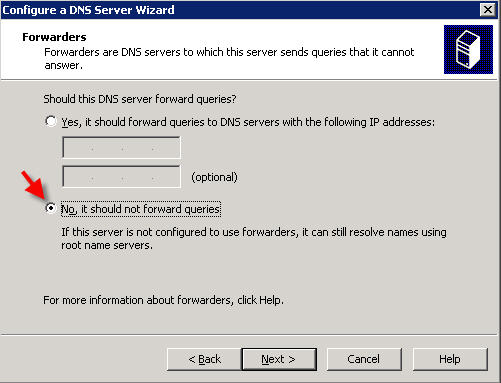
On the Forwarders screen, select ‘No’ and click Next:
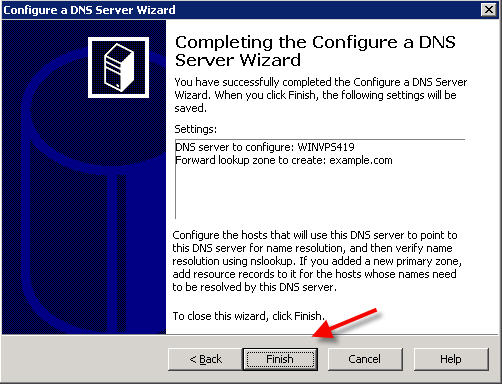
Click Finish:
3)
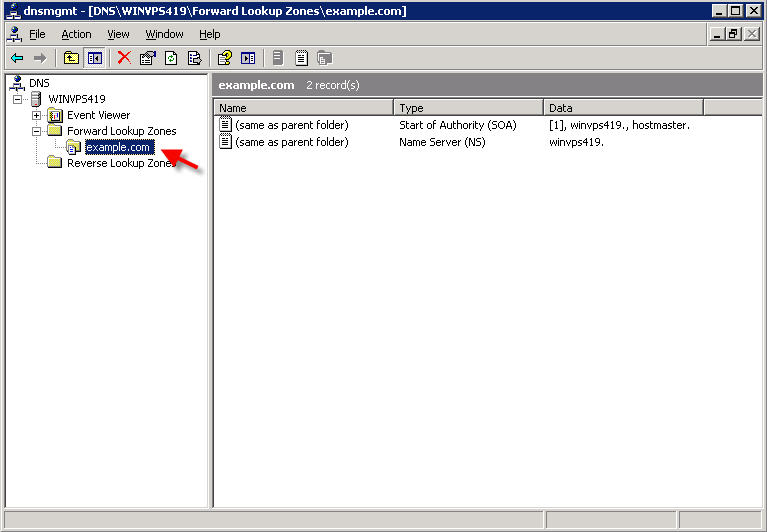
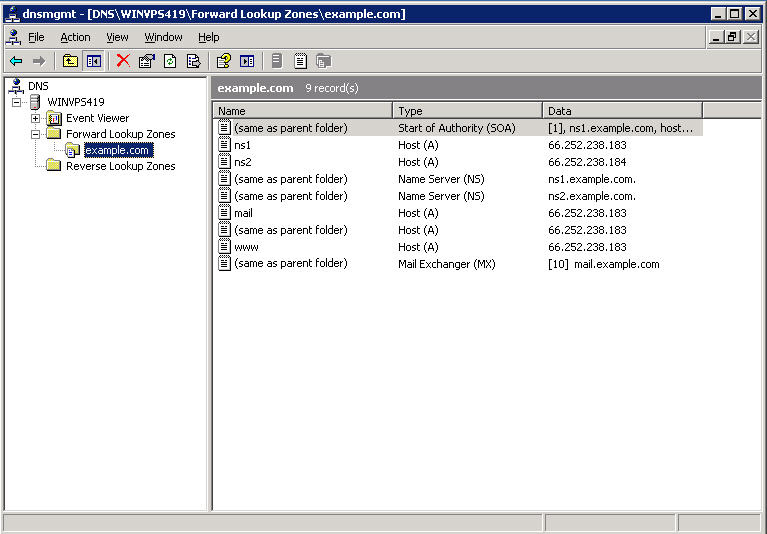
Now you’ll need to add A records for your nameservers.
Click the + sign to expand your server name, and expand the Forward Lookup Zones, and click on the domain you wish to configure:
Right click on your primary domain and select «New Host (A)…»

Enter ns1 in the name box, and the IP address of your primary nameserver in the IP address box:
Click ‘Add Host’
Repeat the above steps to add your secondary nameserver (ns2). Click ‘Done’ when finished.
Right-click on the Start of Authority record, and select ‘Properties’:

Enter the name of your primary nameserver in the «Primary Server» box, and the responsible person’s email address for your server in the Responsible person box (NOTE: you must use a period instead of an @ sign in the email address. So for example, if the address you want to add is hostmaster@example.com, you need to enter hostmaster.example.com in this box)
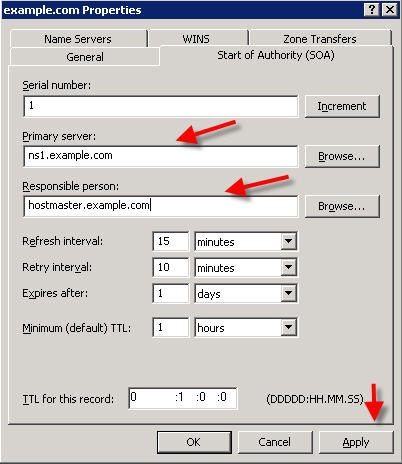
Click Apply.
Click on the ‘Name Servers’ tab.
If any nameservers are already listed in this screen, click on them and remove them. After removing existing nameservers, click the Add button:
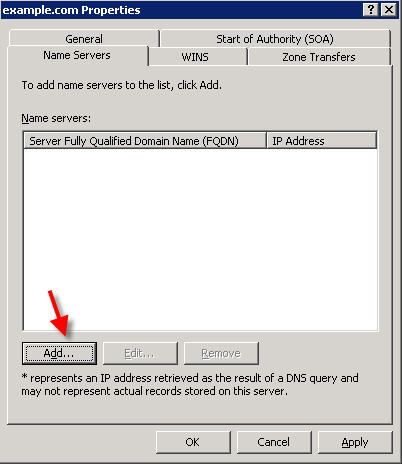
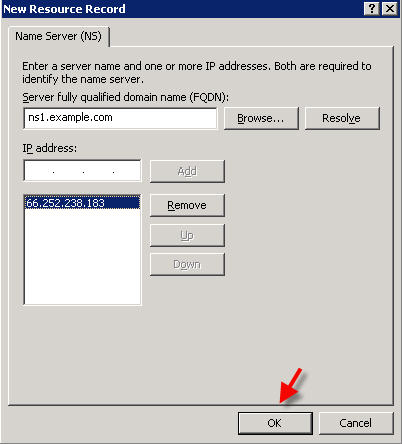
Enter the name of your primary nameserver and click «Resolve«
The IP address of your primary nameserver will now appear in the box below. Click OK:
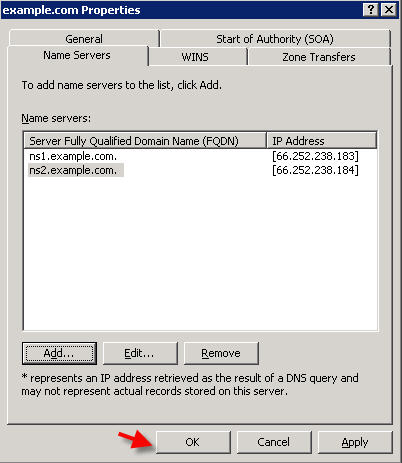
Click ‘Add‘ again, and follow the same steps to add your secondary nameserver.
4)
Now you’ll want to add three more ‘A’ records:
1) mail
2) www
3) (blank, so that your domain will work without a www in front)
Right click on the domain, and choose ‘New Host (A)…‘
and add each of the above, pointing to the same IP address as this domain.
(if you are configuring the ‘mail’ A records for additional domains on your server, use the main server IP for the mail A record as that is the IP your mail server should be using)
Repeat the same step as above to add ‘www’ and blank.
Click ‘Done‘ when finished.
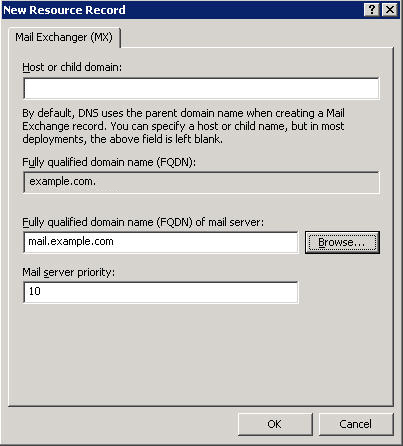
The last entry you need to add is the MX mail entry. Right click on the domain and select ‘New Mail Exchanger (MX)…’

Enter the name into the FQDN of the mail server and click OK:
You have now completed the DNS setup for your primary domain:
5)
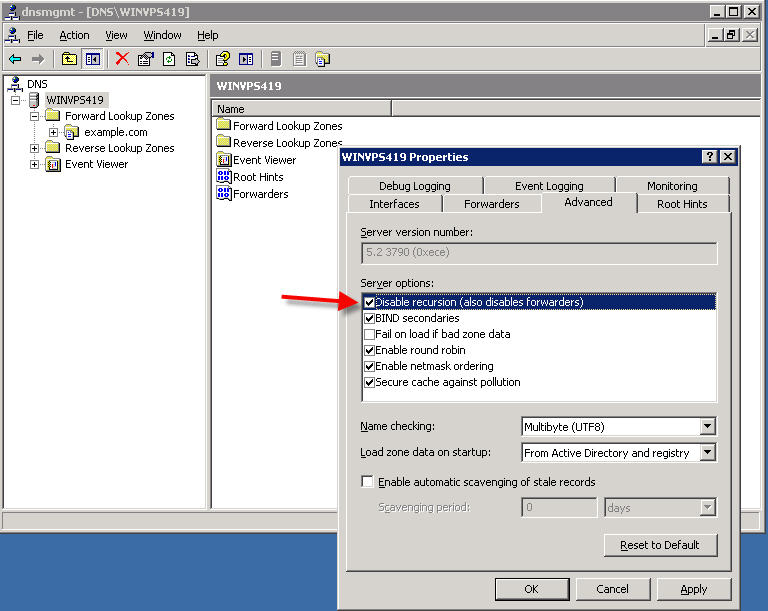
Disable DNS Recursion:
In the DNS MMC, right click on your server name, and select Properties:

Go to the ‘Advanced‘ tab, and place a checkmark in the box «Disable Recursion» and press OK:
6)
The last thing you’ll need to do is to register your nameservers at your domain’s registrar. We have tutorials for the most common domain registrars at http://support.appliedi.net/kb/c58/creating-private-name-servers.aspx
Большинство системных администраторов знают, насколько важным является такой начальный этап сетевой конфигурации, как отладка DNS в доменах 2к/2k3. По большому счету вся серьезность этой процедуры обусловлена тем, что ошибки, которые способны повлечь за собой неадекватную работу локальной сети, достаточно сложно выявить. Настройка DNS – достаточно ответственный этап, в котором важно предусмотреть и выполнить грамотно определенные ключевые моменты. Предлагаем рассмотреть далее несколько аспектов отладки в рамках сервера DNS.
Настройка
Для начала необходимо удалить зону корневых серверов (» ») из зон прямых просмотров сервера DNS. Далее осуществляем перезапуск «DNS-сервер»-службы. Существует несколько разных типичных ситуаций в данном вопросе, которые следует обозначить.
-
В рамках домена, где предусмотрено от двух и более доменных контроллеров, в разделе «Свойства TCP/IP» на каждом из них для всех внутренних интерфейсов необходимо задать такие параметры:
-
«1 сервер DNS». IP иного ближе всех расположенного топологически контроллера имеющегося домена с DNS;
-
«2 сервер DNS». В качестве IP – тот же интерфейс, исключая 127.0.0.1.
-
В рамках доменов с одним доменным контроллером заходим в свойства «TCP/IP» и указываем IP-шник того же интерфейса (раздел «Предпочтительный сервер DNS»). Альтернативный DNS-сервер просто не указываем.
Также не следует делать контроллер мультидоменным. Но если все же на контроллер с функционирующим DNS установлен не один, а несколько интерфейсов сети, то следует прописать DNS так, как мы указали в примерах для интерфейсов смотрящих внутрь, а для тех интерфейсов, которые обращены наружу в качестве 1-го DNS-а прописываем исключительно IP-шник того же интерфейса.
Перейдем в «Свойства» DNS-server и на вкладке «Forwarding» разрешаем отсылку на сервер DNS высшего уровня. Для того чтобы изменения вступили в силу, необходимо перезапустить DNS-серверную службу. Во вкладке «Forwarding» указываем до двух DNS своего хостинг-провайдера максимум для каждого DNS-сервера. Кроме вкладки «Пересылка» («Forwarding») указывать свои IP нигде больше не следует (в частности это касается интернет-шлюза).
В качестве предпочтительного DNS-сервера в рамках каждой рабочей станции и каждого stadalone-сервера следует указать IP ближнего доменного контроллера (снова идем в свойства «TCP/IP»). Здесь можно указать в качестве DNS-сервера альтернативного IP любого ближнего домен-контроллера (при наличии нескольких вариантов таковых).
Проверяем работоспособность на клиентах
Для этого предстоит выполнить ряд команд, таких как:
C:\>nslookup cat
Server: server-166.admin.veta.ru
Addrеss: 172.31.252.4
Name: cat.admin.veta.ru
Address: 172.31.252.1
C:\>nslookup magister.admin.veta.ru.
Server: server-166.admin.veta.ru
Address: 172.31.252.4
Name: magister.admin.veta.ru
Address: 172.31.252.2
C:\>nslookup 172.31.252.3
Server: server-166.admin.veta.ru
Address: 172.31.252.4
Name: melissa.admin.veta.ru
Address: 172.31.252.3
C:\>nslookup microsoft.com.
Server: server-166.admin.veta.ru
Address: 172.31.252.4
Non-authoritative answer:
Name: microsoft.com
Addresses: 207.46.245.222, 207.46.245.214
C:\>exit
Если требуется произвести Magister внутри домена Admin.veta.ru, можно воспользоваться следующим способом (используя команду NSLOOKUP):
C:\>nslookup magister
Server: server-166.admin.veta.ru
Address: 172.31.252.4
Name: magister.admin.veta.ru
Address: 172.31.252.2
По результатам тестирования в идеале не должно всплывать никаких ошибок. Именно это будет означать, что все выполнено правильно. В случае запроса веб-ресурсов вывод lookup в «Request time out» не является ошибкой – просто NSLOOKUP может долго ожидать ответа от сервера DNS (более двух секунд). Это зачастую происходит потому, что, что запрашиваемые данные у серверов авторитативного типа в Интернете не были найдены вашим DNS-сервером.
Тем не менее, при повторном введении запроса ответ будет положительным, так как ваш DNS уже успел получить те данные, которые были запрошены в первый раз (ответ берется из кэша). А вот в случае, когда подобное сообщение возникает, когда вы запрашиваете адреса local network, это означает, что ваша локалка, скорее всего, неправильно настроена.
Installing the DNS Server Service
By default, all
computers running Windows Server 2003 and Windows XP have the DNS Client
service installed and running. However, the DNS Server service is not
installed by default in any Windows operating system. To install the DNS
Server service on a computer running Windows Server 2003, you first
need to add the DNS server role through the Manage Your Server page.
Once you have added
this role, the DNS console appears in the Administrative Tools program
group. The DNS console is the main tool for configuring and monitoring
DNS servers, zones, domains, and resource records.
Note
As
an alternative to adding the DNS server role, you can install the DNS
Server service through Add Or Remove Programs in Control Panel. Select
Add/Remove Windows Components, and use the Windows Components Wizard to
install the Domain Name System (DNS) subcomponent within the Networking
Services Windows component.
To install a DNS server, complete the following steps:
|
1. |
Insert the Windows Server 2003 installation CD-ROM into the computer on which you want to install a DNS server. |
|
2. |
Verify that you have assigned the computer a static address. |
|
3. |
Click Start and then click Manage Your Server to open the Manage Your Server page. |
|
4. |
Click Add Or Remove A Role. |
|
5. |
On the Preliminary Steps page of the Configure Your Server Wizard, follow the instructions, and then click Next. |
|
6. |
On the Configuration Options page, select the Custom Configuration option, and click Next. |
|
7. |
On the Server Role page, select DNS Server in the Server Role list, and then click Next. |
|
8. |
In the Summary Of Selections page, click Next. When the DNS server component has finished installing, the Configure A DNS Server Wizard appears. |
|
9. |
To |
Configuring a DNS Server
To simplify the
customization of DNS server settings and the creation of new zones, you
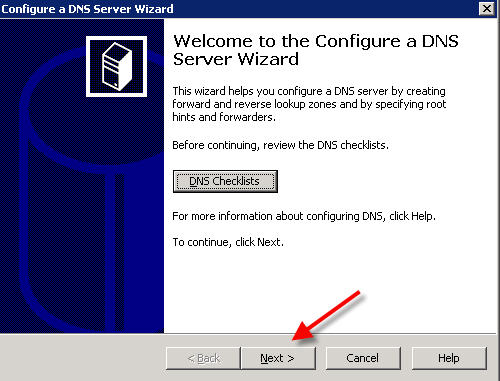
can run the Configure A DNS Server Wizard. This wizard is invoked
automatically when you add the DNS server role. After the wizard is run,
you can refine your DNS server configuration later through the DNS
console. (You can access this console through Administrative Tools on
the Start menu.) You can also configure your DNS server completely
through the server properties dialog box in the DNS console without ever
running the Configure A DNS Server Wizard.
To run or rerun the
Configure A DNS Server Wizard after the DNS Server service is installed,
right-click the server you want to configure in the DNS console tree,
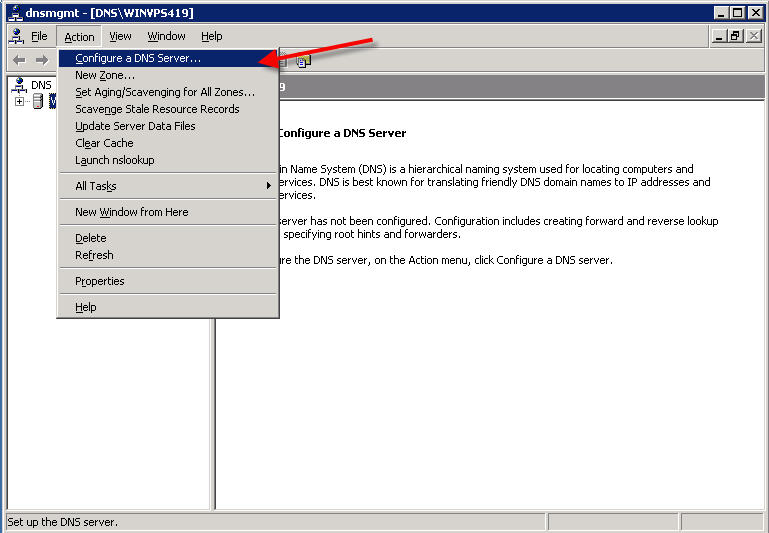
and then select Configure A DNS Server. This process is shown in Figure 1.
Figure 1. Launching the Configure A DNS Server Wizard

Creating Zones
Zones
are created in one of two categories: forward lookup and reverse
lookup. In forward lookup zones, DNS servers map FQDNs to IP addresses.
In reverse lookup zones, DNS servers map IP addresses to FQDNs. Forward
lookup zones thus answer queries to resolve FQDNs to IP addresses, and
reverse lookup zones answer queries to resolve IP addresses to FQDNs.
Note
You
can create a root server in a DNS namespace by naming a zone with a
single dot, “.” When you perform this task, you cannot configure the
server to forward queries to another name server.
To create forward
and reverse lookup zones, you can use the Configure A DNS Server Wizard.
You can also create new zones at any time by using the DNS console. To
do so, right-click either the Forward Lookup Zones folder or the Reverse
Lookup Zones folder, and then select New Zone, as shown in Figure 4-6. This process launches the New Zone Wizard.
Figure 2. Creating a new zone
Zone Types
The New Zone Wizard allows you to configure the server’s role in each of its zones. These roles include the following:
-
Primary
In this kind of zone, the zone data provides the original source data
for all domains in the zone. Zone data can be backed up from this zone
to a secondary zone. -
Secondary This kind of zone is an authoritative backup zone for the primary zone or for other secondary zones.
-
Stub
This server hosts a stub zone, which is a copy of a zone containing
only those resource records necessary to identify the authoritative DNS
servers for the master zone.
В этой статье подробно рассмотрен процесс настройки системы доменных имен (DNS) для подключения к Интернету в продуктах Windows Server 2003. Система DNS — это основной компонент для разрешения имен в Интернете. Система DNS выполняет процедуру разрешения имен между именами узлов и интернет-адресами.
Запуск изолированного сервера, работающего под управлением Windows Server 2003
Этот изолированного сервер, работающий под управлением Windows Server 2003, будет DNS-сервером для вашей сети. На первом этапе серверу назначается статический IP-адрес. Динамически назначаемые IP-адреса не используются для DNS-серверов, поскольку смена адреса может стать причиной разрыва связи между клиентом и DNS-сервером.
Шаг 1. Настройка протокола TCP/IP
- Нажмите кнопку Пуск, выделите пункт Панель управления, затем — пунктСетевые подключения и щелкните правой кнопкой мыши команду Подключение по локальной сети.
- Выберите команду Свойства.
- Выделите пункт Протокол Интернета (TCP/IP) и нажмите кнопку Свойства.
- Откройте вкладку Общие.
- Установите флажок Использовать следующий IP-адрес, а затем введите в соответствующих полях IP-адрес, маску подсети и адрес основного шлюза.
- Нажмите кнопку Дополнительно и перейдите на вкладку DNS.
- Установите переключатель в положение Дописывать основной DNS-суффикс и суффикс подключения.
- Установите флажок Дописывать родительские суффиксы осн. DNS-суффикса.
- Установите флажок Зарегистрировать адреса этого подключения в DNS.
Обратите внимание, что DNS-серверы под управлением Windows Server 2003 в настройках службы DNS должны указывать на самих себя. Если этот сервер должен разрешать имена от поставщика услуг Интернета, необходимо настроить пересылку. Пересылки рассматриваются ниже в этой статье в разделе Настройка пересылки.
- Трижды нажмите кнопку ОК.
Примечание. Если появится предупреждение службы кэшируемого распознавателя DNS, нажмите кнопку ОК, чтобы закрыть предупреждение. (Кэшируемый распознаватель пытается обратиться к DNS-серверу, настройка которого еще не закончена).
Шаг 2. Установка DNS-сервера корпорации Майкрософт
- В меню Пуск выделите пункт Панель управления и выберите команду Установка и удаление программ.
- Щелкните ссылку Установка компонентов Windows.
- В списке Компоненты выберите пункт Сетевые службы и нажмите кнопку Состав.
- Установите флажок DNS и нажмите кнопку ОК.
- Нажмите кнопку Далее.
- В ответ на приглашение вставьте в дисковод CD-ROM или DVD-ROM установочный компакт-диск Windows Server 2003.
- После завершения работы программы установки нажмите кнопку Готово в окне Завершение работы мастера компонентов Windows.
- Нажмите кнопку Закрыть в окне Установка и удаление программ.
Шаг 3. Настройка DNS-сервера
Чтобы настроить DNS с помощью оснастки DNS в консоли управления MMC, выполните следующие действия.
- Нажмите кнопку Пуск, выделите в меню Программы пункт Администрирование, а затем — DNS.
- Щелкните правой кнопкой мыши пункт Зоны прямого просмотра и выберите команду Новая зона.
- В окне мастера создания новой зоны нажмите кнопку Далее.
Укажите тип зоны. Зоны бывают следующих типов.
- Основная зона. Создает копию зоны, которая может быть обновлена непосредственно на этом сервере. Информация этой зоны хранится в текстовом файле с расширением .dns.
- Дополнительная зона. Стандартная дополнительная зона копирует всю информацию из своего основного DNS-сервера. Основной DNS-сервер может быть зоной, интегрированной в Active Directory, основной или дополнительной зоной, которая настраивается на передачи зон. Сведения о зоне не могут быть изменены на дополнительном DNS-сервере, поскольку они копируются с основного DNS-сервера.
- Зона-заглушка. Зона-заглушка содержит только те записи о ресурсах, которые необходимы для идентификации DNS-серверов, обслуживающих эту зону. Эти записи ресурсов включают записи «Сервер имен» (Name Server, NS), «Начальная запись зоны» (Start of Authority, SOA), а также, возможно, записи узлов (тип A).
Имеется также параметр, позволяющий хранить зону в Active Directory. Этот параметр доступен только в том случае, когда DNS-сервер является контроллером домена.
- Для поддержки динамических обновлений новая зона прямого просмотра должна иметь тип «Основная» или «Интегрированная в Active Directory». Выберите пункт Основная и нажмите кнопку Далее.
- Новая зона содержит записи локатора для данного домена Active Directory. Имя зоны должно совпадать с именем домена Active Directory или являться логическим DNS-контейнером для этого имени. Например, если домен Active Directory называется support.microsoft.com, допустимо только имя зоны support.microsoft.com.
Примите предлагаемое по умолчанию имя для файла новой зоны. Нажмите кнопку Далее.
Примечание. На этом этапе опытные администраторы DNS могут создать зону обратного просмотра, воспользовавшись соответствующими функциями мастера. DNS-сервер способен разрешать два основных вида запросов: прямой и обратный просмотр. Прямой просмотр встречается чаще и означает разрешение имени узла в IP-адрес с записью типа А или записью ресурса узла. Обратный просмотр — это разрешение IP-адреса в имя узла с записью типа PTR или записью ресурса указателя. После настройки обратных зон DNS можно автоматически создавать связанные обратные записи одновременно с исходными прямыми записями.
Удаление корневой зоны DNS
Процесс разрешения имен на DNS-сервере под управлением Windows Server 2003 проходит следующим образом. Вначале DNS-сервер опрашивает свой кэш, проверяет записи зон, отправляет запросы на пересылки, а затем пытается выполнить разрешение имен, используя корневые серверы.
По умолчанию DNS-сервер (Microsoft) подключается к Интернету для дальнейшей обработки DNS-запросов с корневыми ссылками. При повышении роли сервера до контроллера домена с помощью программы Dcpromo этому контроллеру домена потребуется служба DNS. Если установка службы DNS происходит в процессе повышения роли сервера, то создается корневая зона, которая указывает серверу DNS, что он является корневым сервером Интернета. По этой причине DNS-сервер не использует пересылок и корневых ссылок в процессе разрешения имен.
- Нажмите кнопку Пуск, выделите пункт Администрирование и выберите команду DNS.
- Разверните узел имя_сервера, где имя_сервера — имя нужного сервера, выберите Свойства и затем разверните узел Зоны прямого просмотра.
- Щелкните правой кнопкой мыши зону «.» и выберите команду Удалить.
Настройка пересылки
Windows Server 2003 дает возможность использовать DNS-пересылки. Это средство выполняет пересылку DNS-запросов внешним серверам. Если DNS-серверу не удается найти запись ресурса в своих зонах, он может отправить запрос другому DNS-серверу для дальнейшего разрешения. Часто используется направление запросов на DNS-серверы поставщика услуг Интернета.
- Нажмите кнопку Пуск, выделите пункт Администрирование и выберите команду DNS.
- Щелкните правой кнопкой мыши элемент имя_сервера, где имя_сервера — имя нужного сервера, а затем откройте вкладку Пересылки.
- Выберите DNS-домен в списке Домен DNS. Или нажмите кнопку Создать, введите в поле Домен DNS имя DNS-домена, на который следует пересылать запросы, и нажмите кнопку OK.
- В поле IP-адрес сервера пересылки для выбранного домена укажите IP-адрес первого DNS-сервера, на который следует выполнять пересылку, и нажмите кнопку Добавить.
- Повторяйте шаг 4, пока не будут добавлены все DNS-серверы, на которые следует выполнять пересылку.
- Нажмите кнопку ОК.
Настройка корневых ссылок
Windows может использовать корневые ссылки. Записи ресурсов корневых ссылок могут храниться как в Active Directory, так и в текстовом файле (%SystemRoot%\System32\DNS\Cache.dns). Windows использует стандартный корневой сервер Internic. Кроме того, обращаясь к корневому серверу, сервер под управлением Windows Server 2003 обновляет свой список корневых серверов.
- Нажмите кнопку Пуск, выделите пункт Администрирование и выберите команду DNS.
- Щелкните правой кнопкой мыши элемент имя_сервера, где имя_сервера — имя нужного сервера, и выберите команду Свойства.
- Откройте вкладку Корневые ссылки. Корневые серверы DNS-сервера перечислены в списке Серверы имен.
Если вкладка Корневые ссылки недоступна, значит, сервер все еще настроен в качестве корневого. См. раздел Удаление корневой зоны DNS, приведенный выше в этой статье. Может возникнуть необходимость использования специальных корневых ссылок вместо принятых по умолчанию. Однако конфигурация, которая в настройках корневых ссылок указывает на тот же сервер, всегда неправильна. Не следует изменять корневые ссылки. Если корневые ссылки неправильны и требуется их заменить, обратитесь к следующей статье базы знаний Майкрософт:
Настройка DNS под защитой брандмауэра
Прокси-серверы и устройства NAT (Network Address Translation) ограничивают доступ к определенным портам. Служба DNS использует UDP-порт 53 и TCP-порт 53. Консоль «Управление DNS» использует также удаленный вызов процедур (RPC), для которого требуется доступ к порту 135. Все может вызвать проблемы при настройке службы DNS и брандмауэра.