
Дорогие друзья, у меня для вас хорошие новости! Проблемы с моим ПК улажены и поэтому мы можем вернуться к циклу статей, посвященному настройке DHCP. Сегодня мы рассмотрим процесс установки и конфигурации DHCP сервера на базе Windows Server 2008.
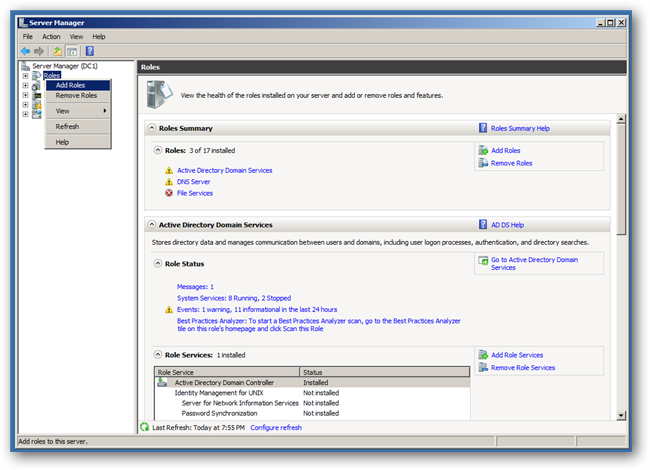
Для того, чтобы ваш сервер под управлением Windows Server 2008 стал функционировать в качестве DHCP сервера, необходимо добавить к нему соответствующую роль. Для этого необходимо открыть оснастку «Управление сервером» (Server Manager).

|
| Сразу после установки данная оснастка доступна в меню «Пуск» |

|
| Внешний вид оснастки «Управление сервером» в Windows Server 2008 |
В открывшейся оснастке выбрать раздел «Роли»(Roles) и щелкнуть по кнопке «Добавить роль» (Add Roles).

|
| Просматриваем роли данного сервера |
Далее будет показано окно, содержащее ряд предупреждений. По хорошему, перед установкой любой из ролей, на реальном сервере, необходимо проверить выполнение каждого из пунктов данного предупреждения. Если же вы просто тренируетесь, то можно смело проигнорировать данное сообщение.

|
| Предупреждение перед установкой новой роли |
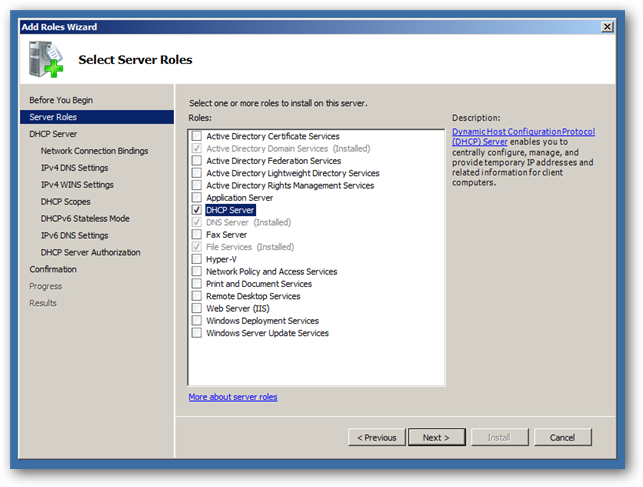
На следующем шаге, вам будет предложено выбрать устанавливаемые роли. Выбираем DHCP Server.

|
| Выбираем устанавливаемую роль, в данном случае DHCP Server |
Если вы проигнорировали ранее предупреждение о том, что серверу нужно задать статический IP адрес, то при попытке выбора роли DHCP Server появится сообщение, говорящие об отсутствии статического IP у сервера. Перейдите к конфигурации протокола TCP/IP и задайте IP адрес, после чего попробуйте выбрать данную роль снова.

|
| Серверу не задан статический IP адрес |
На экране появиться информация о том, для чего нужен DHCP сервера, если вам интересно, то читаем, после чего нажимаем на кнопку «Далее» (Next).

|
| Информация о протоколе DHCP |
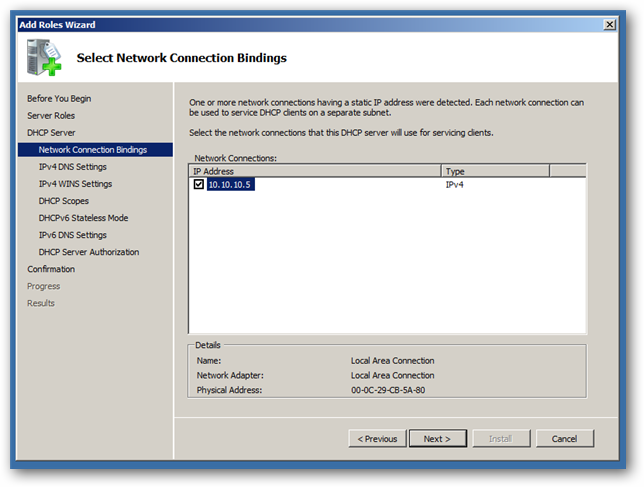
Выбираем сетевое подключение, существующее на компьютере, которое будет использовать DHCP сервер. Если на компьютере всего одно подключение, то оно будет выбрано по умолчанию.

|
| Выбор сетевого подключения |
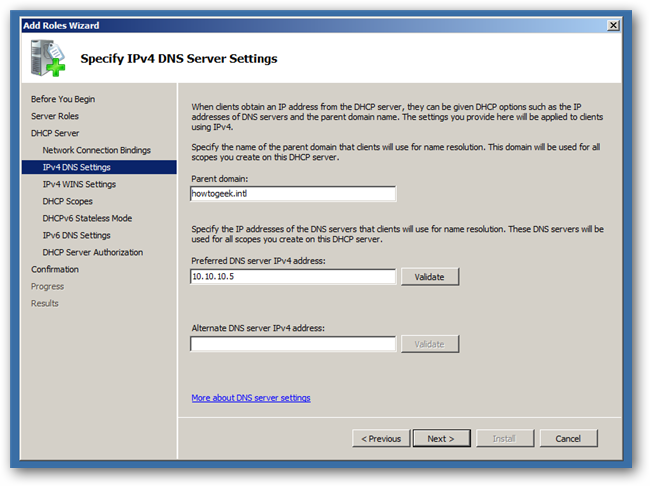
Далее задаем ряд параметров, которые будут раздаваться компьютерам сети при помощи протокола DHCP: родительский домен, основной и альтернативный DNS сервера (используются для преобразования доменных имен в IP адреса).

|
| Задаем раздаваемые параметры |
На следующем шаге указываем стоит ли использовать WINS. Если говорить в общем, то WINS это аналог DNS для NetBIOS. WINS позволяет разрешать NetBIOS имена компьютеров в их IP адреса. Если в вашей сети есть WINS сервера, то указываем его адрес и он будет раздаваться компьютерам сети при помощи DHCP, если нет, то говорим что WINS не будет использоваться.

|
| При необходимости указываем адрес WINS сервера |
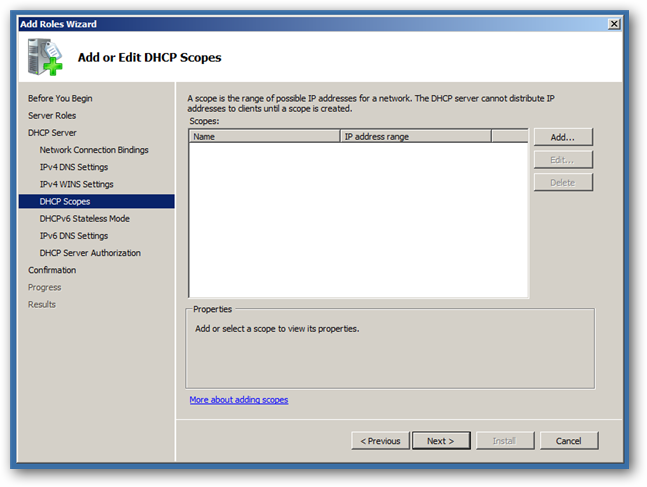
Далее нам будет предложено создать диапазон, из которого мы будем раздавать IP адреса устройствам клиентам. Для этого нажмите на кнопку «Add…».

|
| Создаем диапазон раздаваемых IP адресов |
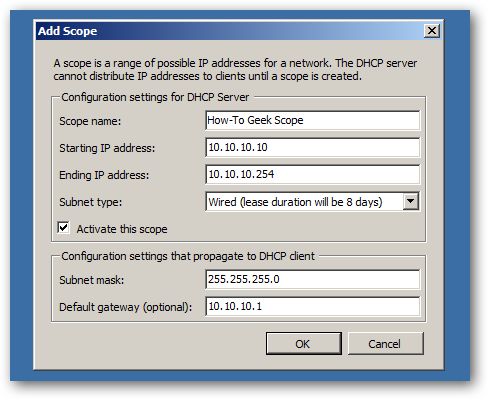
Указываем основные параметры данного диапазона: его имя (любой, главное чтобы было понятно), границы данного диапазона (именно из данного диапазона будут выдаваться IP адреса клиентам), маску подсети (таже что и у всех компьютеров в данной сети), основной шлюз, а также тип сетевого подключения, на основе которого будет выбрано время аренды IP адреса.

|
| Параметры диапазона IP адресов |
Если все сделано верно, в разделе DHCP Scopes появиться информация о созданном вами диапазоне.

|
| Только что созданный диапазон |
Если в вашей сети используются IPv6 клиенты, и вы хотите раздавать им IPv6 адреса при помощи DHCP, то укажите что требуется включить поддержку протокола DHCPv6. В противном случае, выберите вариант «Отключить DHCPv6…»(Disable DHCPv6…).

|
| Выбираем требуется ли включать поддержку IPv6 |
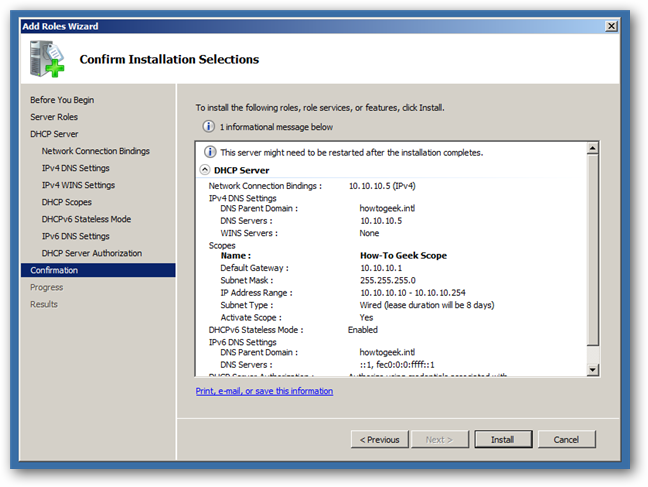
Далее вам будет показана сводная информация, о тех настройках DHCP сервера, которые вы ввели ранее. Проверьте их хорошенько и если все верно, то нажимайте на кнопку «Install».

|
| Сводная информация о конфигурации DHCP сервера |
Начнется процесс установки роли DHCP Server, который может занять несколько минут.

|
| Установка роли DHCP Server в Windows Server 2008 |
После завершения установки будет показано окно результатов. В котором будет отражено состояние установки роли DHCP Server.

|
| Результаты установки роли |
Фактически после этого ваш DHCP сервер уже функционирует, если включить один из компьютеров, находящийся в той же сети, что и DHCP сервер, то можно увидеть, что клиентский компьютер уже получил все указанные настройки от DHCP сервера.

|
| Компьютер под управлением Windows XP получил настройки от DHCP сервера |
Если вы захотите внести какие либо изменения в конфигурации вашего DHCP сервера (например, выполнить резервирование определенных IP адресов за компьютерами с заданными MAC адресами), то вам потребуется перейти в раздел Administrative Tools – DHCP.

|
| Вот тут можно внести изменения в конфигурацию DHCP cервера |
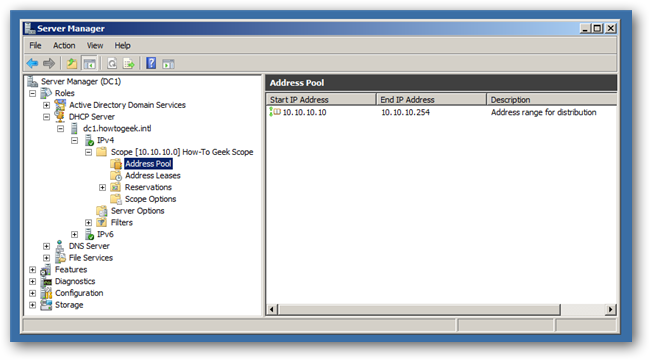
Для того, чтобы просмотреть, изменить существующие пулы (диапазоны) IP адресов, которые раздаются в настоящий момент перейдите в раздел «Address Pool» оснастки DHCP.

|
| Тут можно изменить раздаваемые IP адреса |
Для того чтобы выполнить резервирование определенных IP адресов за компьютерами с заданными MAC адресами, щелкните правой кнопкой мыши по разделу «Reservation» и выберите пункт «New Reservation…».

|
| Создаем резервирование IP адресов на DHCP сервере |
Укажите соответствие IP и MAC адреса, а также протоколы используемые для автоконфигурирования хоста с данным физическим адресом.

|
| Резервирование IP адреса за хостом с определенным MAC адресом |
С помощью протокола DHCP, можно раздавать хостам целую кучу различных параметров. Ознакомиться с их перечнем можно в разделе «Scope Options» оснастки DHCP, в разделе отображаются только уже сконфигурированные параметры.

|
| Тут можно задать остальные параметры раздаваемые протоколом DHCP |
Ну вот и все, мы познакомились с процессом установки DHCP сервера в ОС Windows Server 2008. В принципе он похож на установку DHCP сервера в ОС Windows Server2003, но имеет небольшие отличия.
DHCP (Dynamic Host Configuration Protocol) is a networking protocol that allows for automatic configuration of IP addresses on a network. By setting up a DHCP server on your Windows Server 2008, you can simplify the process of assigning and managing IP addresses for devices on your network. In this tutorial, we will guide you through the steps to configure DHCP on Windows Server 2008.
Step 1: Open the Server Manager on your Windows Server 2008. To do this, click on the «Start» button and then select «Server Manager.«
Step 2: In the Server Manager window, navigate to «Roles» and click on «Add Roles.» This will open the «Add Roles Wizard.«
Step 3: In the «Add Roles Wizard,» select «DHCP Server» from the list of available roles. Click «Next» to proceed.
Step 4: Read the information provided about DHCP and click «Next» to continue.
Step 5: On the «Select Network Connection Bindings» page, select the network connection(s) that you want the DHCP server to be active on. Click «Next» to proceed.
Step 6: Configure the DHCP scope by specifying the range of IP addresses that will be available for assignment. You can also set the lease duration, default gateway, and DNS server addresses. Click «Next» to continue.
Step 7: Review the configuration summary and click «Install» to begin the installation process.
Once the installation is complete, you will have successfully configured DHCP on your Windows Server 2008. DHCP will now automatically assign IP addresses to devices on your network, simplifying the network configuration process.
| Pros | Cons |
|---|---|
| 1. Simplifies the process of assigning and managing IP addresses. | 1. May require additional configuration and troubleshooting in complex network setups. |
| 2. Reduces manual workload by automating IP address assignment. | 2. In case of DHCP server failure, IP address assignment may be disrupted. |
| 3. Allows for easy scalability and management of IP addresses. | 3. DHCP may introduce a small overhead in terms of network traffic. |
Video Tutorial:How to setup DHCP on Windows Server 2008?
How to configure DHCP server step by step?
Configuring a DHCP (Dynamic Host Configuration Protocol) server allows you to allocate and manage IP addresses to devices on your network automatically. Here’s a step-by-step guide on how to configure a DHCP server:
1. Identify your network requirements: Determine the IP address range, subnet mask, and other settings you want to use for your network. Make sure these settings are compatible with your network infrastructure.
2. Choose a DHCP server software: There are various DHCP server software options available, such as ISC DHCP, Windows Server DHCP, and many open-source alternatives. Select a suitable DHCP server software depending on your requirements and familiarity with the platform.
3. Install and configure the DHCP server software: Install the chosen DHCP server software on a server or a dedicated device on your network. Follow the software’s installation instructions to set it up properly.
4. Locate the configuration file: In most DHCP server software, the configuration file contains all the necessary settings for the server. Locate the configuration file for your chosen DHCP server software.
5. Open the configuration file: Use a text editor to open the DHCP server configuration file. This file typically contains various parameters that need to be set or modified for the DHCP server to function correctly.
6. Configure global settings: Set the global settings for the server, such as the default lease time, maximum lease time, DNS server addresses, and gateway addresses. These settings may vary depending on the DHCP server software being used.
7. Define subnet configuration: Specify the subnet settings, including the network address, subnet mask, range of IP addresses to allocate, and routers’ IP address on that subnet.
8. Configure options: DHCP server software often allows you to define additional options such as domain name, NTP server addresses, and more. Customize these options as per your network requirements.
9. Save and close the configuration file: Once you have made the necessary changes in the configuration file, save it, and close the text editor.
10. Restart the DHCP server: Restart the DHCP server software to apply the new configuration settings. This step is crucial for the changes to take effect.
11. Test the DHCP server: Connect a client device to the network and ensure it is set to obtain an IP address from DHCP. Once the client device is connected, it should receive an IP address automatically from the DHCP server.
It’s important to note that the exact steps and configuration options may vary depending on the DHCP server software you choose. Always refer to the documentation and resources provided by the specific DHCP server software for detailed instructions and troubleshooting.
How to configure DHCP step by step?
Configuring DHCP (Dynamic Host Configuration Protocol) allows for the automatic allocation of IP addresses to devices within a network. Here are the steps to configure DHCP:
1. Identify the DHCP server: Determine which device should act as the DHCP server. Typically, this is a router or a dedicated server within the network.
2. Access the DHCP server configuration: Log in to the DHCP server or router’s administrative interface. This is typically accessed through a web browser by entering the device’s IP address.
3. Enable DHCP server functionality: Locate the DHCP configuration settings and turn on the DHCP server functionality if it’s not already enabled.
4. Define the IP address range: Determine the range of IP addresses that the DHCP server will assign to client devices. Specify the starting and ending IP addresses of this range.
5. Set the lease duration: Decide on the lease duration for IP addresses. The lease duration determines how long a client device can retain an assigned IP address before it must be renewed. Specify a suitable lease duration based on your network requirements.
6. Configure additional DHCP options (optional): DHCP servers often provide additional configuration options such as DNS (Domain Name System) server addresses, gateway addresses, and subnet masks. Configure these options to ensure proper network connectivity for the client devices.
7. Verify and save settings: Review the configured DHCP settings to ensure accuracy. Save the settings to apply them on the DHCP server.
8. Client device setup: On the client devices that will receive IP addresses automatically, ensure that their network settings are configured to obtain IP addresses automatically via DHCP. This setting is usually available in the network settings of the device’s operating system.
9. Test and troubleshoot: Connect client devices to the network. Verify that they receive valid IP addresses from the DHCP server. If any issues arise, check the DHCP server’s configuration and ensure client devices are configured properly to receive DHCP addresses.
By following these steps, you can successfully configure DHCP on your network, allowing devices to acquire IP addresses automatically and simplifying the overall management of your network infrastructure.
How to reserve IP address in DHCP Windows Server 2008?
To reserve an IP address in a DHCP server running on Windows Server 2008, follow these steps:
1. Open the «DHCP» management console: Click on the «Start» button, go to «Administrative Tools,» and select «DHCP.«
2. Expand the «IPv4» or «IPv6» node based on which type of IP address you want to reserve.
3. Expand the DHCP server, and then expand the relevant scope in which you want to reserve the IP address.
4. Right-click on «Reservations» and select «New Reservation.«
5. In the «New Reservation» dialog box, enter the following details:
– Enter a «Name» for the reservation to identify it easily.
– Specify the «IP address» you want to reserve.
– Enter the «MAC address» of the device for which you want to create the reservation. Make sure to enter the correct MAC address; double-check it if necessary.
– You can also specify a «Description» to provide additional information about the reservation if needed.
6. Click «Add» and then «Close» to complete the reservation.
By following these steps, you have successfully reserved a specific IP address for a particular device within the DHCP server. This ensures that the DHCP server always assigns the reserved IP address to the respective device based on its MAC address. This can be helpful for managing and organizing IP addresses in your network environment.
How to configure a DHCP server from static IP?
Configuring a DHCP server from a static IP requires a few steps. Here’s a professional perspective on the process:
1. Install the DHCP Server Software: Begin by installing a DHCP server software package on the server that will be hosting the DHCP service. Some popular options include Windows Server’s DHCP role, ISC DHCP Server for Unix-like systems, and dnsmasq for small networks.
2. Verify Network Connectivity: Ensure that the server’s static IP address is correctly configured and that it has connectivity to the network. You can do this by pinging other devices on the network or accessing the internet.
3. Disable DHCP Services on Other Devices: To avoid conflicts, make sure there are no other DHCP servers active on the network. Disable any DHCP services running on routers or other devices.
4. Access DHCP Server Configuration: Open the configuration file of the DHCP server software. This file contains settings that determine the IP address range, lease duration, DNS server information, and other parameters.
5. Configure DHCP Scope: Define the IP address range that the DHCP server will assign to client devices. Specify the starting IP address and the number of addresses in the range. Additionally, configure options such as subnet mask, default gateway, and DNS server addresses.
6. Assign Lease Duration: Specify the lease duration for IP addresses. This determines how long client devices can use an assigned IP address before the DHCP server renews or reassigns it.
7. Configure DNS Options: Configure the DHCP server to provide DNS server addresses to client devices. These DNS servers will be used for resolving domain names to IP addresses.
8. Enable DHCP Server: Start the DHCP server service on the configured software. This allows it to begin offering IP addresses to client devices on the network.
9. Test DHCP Functionality: Connect a client device to the network and ensure it receives an IP address automatically from the DHCP server. Verify that the device has network connectivity and can access the internet.
By following these steps, you can successfully configure a DHCP server from a static IP address. Remember to adapt the instructions according to the specific DHCP server software you are using.
Setting up DHCP (Dynamic Host Configuration Protocol) in Windows Server allows you to automatically assign IP addresses and network configuration to client devices on your network. Here are the steps to set up DHCP in Windows Server:
1. Install the DHCP Server role:
– Open the Server Manager on your Windows Server.
– Click on «Add roles and features.«
– Select «Role-based or feature-based installation» and click «Next.«
– Choose the appropriate server from the server pool and click «Next.«
– Scroll down and check the box next to «DHCP Server.«
– Review the introduction and click «Next.«
– Click «Install» and wait for the installation to complete.
– Once finished, click «Close.«
2. Configure DHCP:
– Open the DHCP console by clicking on the «Start» menu, selecting «Administrative Tools,» and choosing «DHCP.«
– Right-click on the server name and select «Configure Options.«
– In the window that appears, select the options you want to configure, such as DNS servers or gateway information. Click «OK» when done.
– Right-click on «IPv4» or «IPv6» (depending on your network) and choose «New Scope.«
– Follow the wizard to specify the scope’s name, IP address range, subnet mask, default gateway, DNS server, lease duration, and any exclusions. Click «Next» to advance.
– Configure any additional options like router settings, WINS servers, or DNS domain name. Click «Next.«
– Select appropriate lease settings for your environment, and click «Next» to continue.
– Review the settings summary and click «Finish» to create the new scope.
3. Authorize the DHCP server:
– Right-click on the DHCP server name in the console and select «Authorize.» This step is crucial to confirm the server’s legitimacy on your network.
4. Activate and test the DHCP configuration:
– Right-click on the new DHCP scope and select «Activate.» This step enables the assigned IP addresses to be distributed.
– On a client device, navigate to the network adapter settings and ensure that it is configured to obtain an IP address automatically.
– Restart the client device (or run the command «ipconfig /renew» in the command prompt) to obtain an IP address from the DHCP server.
– Verify that the client receives the correct network configuration by checking its IP address, subnet mask, default gateway, and DNS server settings.
And that’s it! You have successfully set up DHCP on your Windows Server, enabling automatic IP address assignment to client devices on your network.
Прочитано: 1 663
И так у нас имеется развернутый Active Directory и именем домена polygon.local. Сейчас я покажу как поднять DHCP-сервер для динамического назначения IP-адресов.
Исходные данные:
Домен контроллер — dc1.polygon.local
Статический IP- адресс домен контроллера — 10.0.2.15
Доменная учетная запись — ekzorchik, имеет права «Domain Admins».
Пароль доменной учетной записи — Aa1234567
Заходим на домен контроллер (dc1) под учетной записью ekzorchik.
Открываем консоль:
«Start» — «Control Panel» — «Administrative Tools» — «Server Manager», переходим в пункт «Roles» — и добавляем роль: «DHCP Server» (DHCP-сервер) и после щелкните два раза Далее (Next).
На странице, Выбор привязки сетевого подключения (Network bindings) будет выведен список сетевых подключений со статическими IPv4-адресами. Выбираем сетевое подключение, при помощи которого сервер будет обслуживать DHCPv4-клиентов:

На следующем этапе указываем параметры IPv4 DNS-сервера (Specify IPv4 DNS Server Settings):
Родительский домен — polygon.local
DNS — сервер — 10.0.2.15

На странице где задаются параметры для WINS-сервера оставляем все как есть, я не буду использовать поддержку WINS в сети:

Далее нужно создать область для DHCP-сервера:
Нажимаем Add и заполняем значениями,
поясню, где
Scope name — произвольное обозначения для выдаваемых адресов для домена polygon.local.
Starting IP Address и Ending IP Address — диапозон выдаваемых адресов (т. е. Получается для 50 станций).
Subnet mask — маска для сети.
Default gateway — кто будет являться шлюзом.

Полученный результат:

На следующем этапе отключаем режим DHCPv6.

На следующем этапе указываем учетные данные для авторизации DHCP-сервера в Active Directory:
Т.к. Я настраиваю DHCP-сервер из под учетной записи ekzorchik с правами Администратора домена, то оставляем пункт как есть:

Ну вот собственно и всё, на последней шаге отображаются все настройки которые я указал и жмем Install, мастер приступит к установке и настройке сервера.

Собственно вот и всё, поднят dhcp-сервер и авторизован на домен контроллере polygon.local.
Continuing our series on learning IT basics, today we’re going to show you how to setup DHCP on Windows Server 2008 instead of using it on a router.
Note: this is part of our ongoing series teaching IT administration basics, and might not apply to everybody.
This guide assumes that you have Server 2008 up and running on a machine—if you don’t, you should check out our guide on how to install it. You should also have set a static IP address on the server before continuing.
To get started, fire up the Server Manager, right click on roles, and then select add roles.
You will be prompted with the normal “Before You Begin” screen, and after clicking Next you’ll be able to choose DHCP Server.
Next you’ll want to select the network connection to bind the DHCP protocol to.
Put in the IP address of your DNS Server, which in this case is the same machine—but be careful not to put the loopback address (127.0.0.1) as this will be the address your clients will go to for name resolution.
Click next again to skip the WINS setup, this will bring you to creating a DHCP Scope, where you can click the Add button.
Now you need to:
- Give your scope a name
- Enter the first address that you want available to clients to use
- Enter the last address that you want available to clients to use
- Enter the subnet mask (usually 255.255.255.0)
- Enter the IP address of your default gateway (usually your router IP at .1)
Once you have clicked on OK, you can click next 4 times to get to the confirmation screen where you can finally click install.
Once the installation is complete your DHCP will be functioning, and you can start managing your DHCP server right away.
If you want to add redundancy to the DHCP server service in Windows Server 2008 R2, you have a few options. Such as installing two servers, where you split the scope among them, 50/50, 80/20 etc. Another option is to have a hot standby, where you (manually) import the DHCP database, if your primary DHCP server fails. But the best option on Windows Server 2008 R2, is probably a clustered DHCP server.
That way you will have a cluster consisting of two or more nodes, where the DHCP database will reside on shared storage. So if one of the nodes fails, the DHCP database will automatically be moved to another node, in a process called failover.
In this post we will look at installing a clustered DHCP server on a cluster consisting of two nodes. I’m assuming that the cluster and available shared storage is already in place. If you want to know how to setup a failover cluster in a test lab, you can check the step-by-step guide for that.
Before we begin on the step-by-step portion of this guide, I would just like to clarify three simple matters
- Configuration of DHCPv6 Stateless Mode
- Size of the shared disk for the clustered DHCP server.
- Which IP address will be the IP helper-address
DHCPv6 Stateless or Stateful Mode
Enable DHCPv6 stateless mode for this server
- This will make the DHCP server stateless.
- Clients will obtain only configuration options (DNS, Router’s IP address etc.) from the DHCPv6 Server.
- Clients will self-configure IPv6 addresses by exchanging router solicitation and router advertisement messages with a neighbouring IPv6 router.
- Keep in mind, this behaviour can be configured differently, by setting configuration flags on either the routers or the dhcp clients (computers). But thats really not the subject of this blog post, so lets just keep the discussion simple. 🙂
Disable DHCPv6 stateless mode for this server.
- This will make the DHCP server stateful.
- Clients will obtain both DHCP options and ip addresses from the DHCPv6 Server.
- Therefore an ipv6 scope must be configured on the server.
So if you are not utilizing IPv6 on your network, which mode should you choose? You should disable DHCPv6 stateless mode, and then not configure any IPv6 scopes on the DHCP server. This will result in clients not receiving IPv6 addresses from neither a neighbouring router (since you are not utilizing IPv6 on your network) nor the DHCP server. But rather they will only assign themselves Link-Local IPv6 addresses, these type of addresses are equivalent to APIPA addresses on IPv4.
Size of the shared disk
The DHCP database in itself is not very large. Obviously nor are the automatic backups that are created of the database, by the DHCP server. So it all boils down to how large log files you’d like to keep. Personally I feel that 30GB is a good round number for the DHCP service. Then you can keep large log files if you like.
IP-helper address
Lets just keep it simple, the IP-helper address will be the address you specify in step 2.5 In other words the address that will be assigned to the clustered DHCP service. The individual IP addresses of the nodes in the cluster, will not be specified as IP-helper addresses.
With that out of the way, lets start installing a clustered DHCP server
1. Install the DHCP Server role on both nodes
1.1 In Server Manager click Add Roles
1.2 Click Next

1.3 Choose DHCP Server, and then click Next

1.4 Click Next

1.5 Choose the network interface, from which the DHCP server will service the clients. As you can see I have three NICs, one is for heartbeat communication among the cluster nodes (192.168.2.20), one is for iSCSI connection to the shared storage (192.168.1.20), while the last one is the only one connected to the production environment, so that is the one I have chosen here.

1.6 Fill in the DNS options for your DHCP server. This is option 006 and option 015 of the Server Options of a DHCP server.

1.7 Click Next, as you are probably not utilizing Wins anymore

1.8 Do not add any scopes for now. You can obviously add or import scopes later, when the clustered DHCP server service has been created.

1.9 Unless your DHCP servers are going to service DHCPv6 clients, choose disable DHCPv6 stateless mode for this server, and then do not add any IPv6 scopes later on.

1.10 Authorize the DHCP server

1.11 Click Install, and then click Close. Repeat the same procedure on the second node of the cluster.
2. Install the DHCP service on the failover cluster
2.1 Click Start – Administrative Tools – Failover Cluster Manager
2.2 Expand your cluster – right-click Services and applications – choose Configure a Service or Application

2.3 Click Next

2.4 Choose DCHP Server, click Next

2.5 Give you clustered DHCP server a name and an IP address, then click next. This will obviously be an IP address from the same range as the one you chose in step 1.5 The IP address you provide here, will be the ONLY IP-helper address, in my case IP-helper address will be 192.168.0.70

2.6 Choose available storage, and click next

2.7 Click Next

2.8 Click Finish, and you are done

2.9 Click on the clustered DHCP server service you just created, right-click DHCP Server beneath DHCP Service, and choose properties

2.10 Here you can view the different paths for files and folders associated with the DHCP server

3. How the DHCP service works on a clustered DHCP server
In enterprise environments, you for the most part have a baseline GPO for all member servers, where different services are disabled for various roles, as all member servers will not be running those roles. Then you have a specific GPO for each role, where that role’s service’s startup mode is configured.
For the DHCP server, the startup mode is configured as automatic. So the DHCP server service is started each time the DHCP server boots up. But in a clustered DHCP server, you don’t need to define the DHCP server service’s startup mode as automatic, as the cluster will set it to manual regardless, and take command of the DHCP server service on the active node.
This is how the DHCP server service works on a clustered DHCP server
Node1 (active) – The cluster sets startup type of the DHCP server service on the node to manual, and starts the service
Node2 (passive) – No changes are made
Failover from Node1 to Node2
Node 1 (passive) – The cluster stops the DHCP server service on the node, and makes no changes to startup type of the service
Node 2 (active) – The cluster sets startup type of the DHCP server service on the node to manual, and starts the service
Failover from Node2 to Node1
Node 1 (active) – The cluster sets startup type of the DHCP server service on the node to manual, and starts the service
Node 2 (passive) – The cluster stops the DHCP server service on the node, and makes no changes to startup type of the service
Every time a node becomes active, the cluster will set the startup type of the DHCP server service on that node to manual, and then start the service. On the passive node, the DHCP server service is stopped, but no changes are made to the startup type of the service.
Therefore its best to configure the startup type of the DHCP service as manual in the GPO that will be applied to your DHCP servers. If you configure it as automatic, you will receive the following error on the passive node, each time group policy refresh runs, since the passive node is unable to connect to the shared storage, where the DHCP database resides.
Additional Resources:
Technet: DHCP Step-by-Step Guide: Demonstrate DHCP Failover
Technet: Understanding DHCPv6 address configuration
4sysops.com: Difference between Stateless and Stateful mode