
Рано или поздно системные администраторы задаются вопросом о децентрализованном хранении информации или хотя бы об объединении нескольких существующих файловых серверов в единый. Параллельно этому поднимается вопрос о безопасности хранимой информации. Относительно простым, менее затратным и популярным среди администраторов AD (Active Directory) является использование DFS. Рассмотрим что это и как настроить.
DFS — Distributed File System — распределенная файловая система. Является продуктом компании Microsoft, предназначенный для упрощения доступа пользователей к файлам. Что примечательно, файлы могут быть разнесены территориально.
Выделяют два типа DFS:
1. Namespace DFS (Пространство имен DFS). Данный тип реализует виртуальное дерево, которое объединяет общие каталоги сети в единое пространство имен. Существует возможность настройки нескольких пространств имен.
2. Replication DFS (Репликация DFS) — репликация уже существующего каталога с отслеживанием содержимого и внесенных изменений.
Установка (DFS Installation)
Сразу заострим внимание, что установку, в рамках данного примера, будем выполнять на уже настроенный контроллер домена.
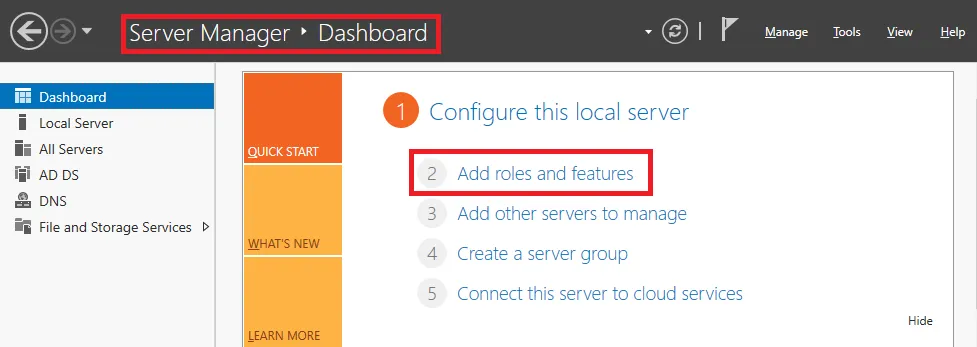
Открываем диспетчер серверов. В основной части окна кликаем по «Добавить роли и компоненты»:

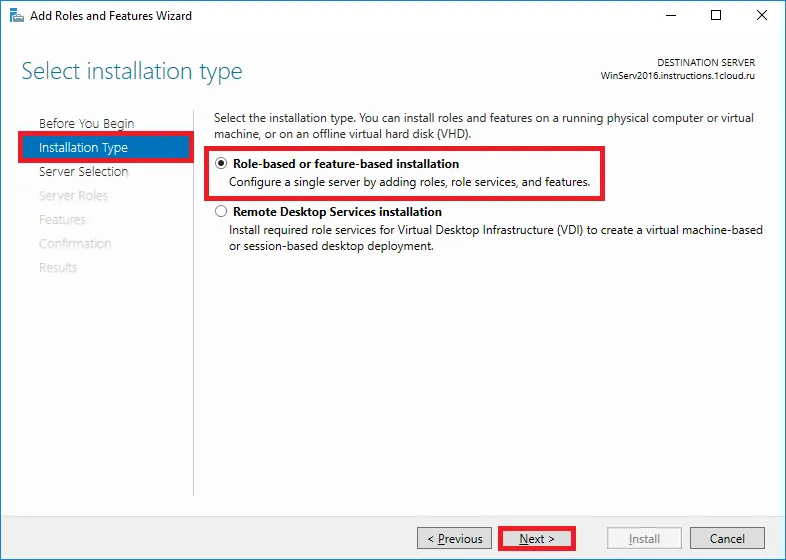
В новом окне переходим к пункту «Тип установки», выбираем параметр «Установка ролей и компонентов», нажимаем кнопку «Далее»:

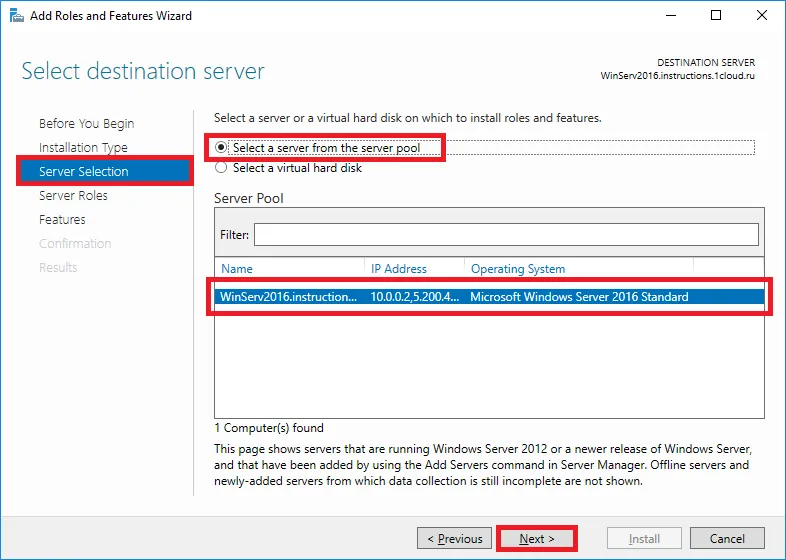
В обновленном окне выбираем текущий сервер и кликаем по кнопке «Далее»:

Следующим шагом, в списке доступных ролей находим «Файловые службы и службы хранилища» и раскрываем список, в котором необходимо отыскать «Файловые службы и службы iSCSI». Также раскрываем список параметров. Отмечаем галочками «Пространства имен DFS» и «Репликация DFS». В появившемся окне кликаем «Добавить компоненты». Нажимаем кнопку «Далее» несколько раз и дожидаемся окончания установки:

Создание пространства имен DFS
Перед тем, как приступить к созданию пространства имен DFS, необходимо создать хотя бы одну сетевую директорию на любом из серверов входящих в домен. В нашем случае будем использовать директорию созданную на том же контроллере домена.
Для того чтобы папка стала доступна из сети, кликаем по ней правой кнопкой мыши, в контекстном меню выбираем «Поделиться», затем «Отдельные люди»:

В поле ввода указываем «Пользователи домена», нажимаем кнопку «Добавить», затем «Поделиться»:

Общий доступ к папке готов. Кликаем по кнопке «Готово»:

Теперь сервер доступен по пути:
WINSERVER2019net_share
Создадим пространство имен DFS.
Для этого в меню «Пуск» выбираем «Средства администрирования Windows». Также можно через Панель управления ➝ Система и безопасность ➝ Администрирование.
В открывшемся окне, выбираем «Управление DFS»:

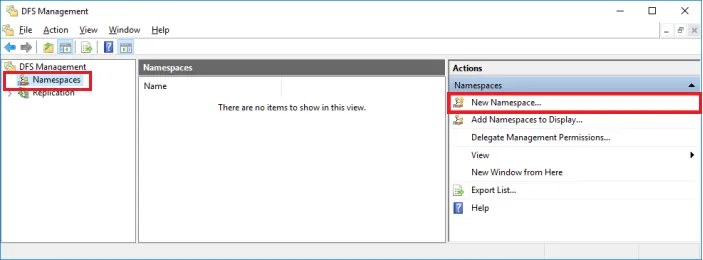
В новом окне «Управление DFS», в правой части кликаем по «Новое пространство имен …»:

В окне мастера указываем имя сервера. Его можно отыскать как в окне, которое откроется при клике по кнопке «Обзор», так и в свойствах системы на вкладке «Имя компьютера». Нажимаем «Далее»:

Следующим шагом указываем имя пространства имен. В нашем случае, пусть будет «MyDFS». Нажимаем кнопку «Изменить настройки…». В новом окне следует обратить внимание на строку «Локальный путь общей папки», при необходимости измените его. В том же окне установим переключатель на значение «Использовать пользовательские разрешения» и кликаем кнопку «Настроить»:

В открывшемся окне разрешаем полный доступ для всех и нажимаем кнопку «OK»:
Окно изменения настроек закрываем кликом по кнопке «OK», в окне мастера нажимаем кнопку «Далее»:

На новом этапе выбора типа пространства имен устанавливаем переключатель на значение «Доменное пространство имен», нажимаем кнопку «Далее».
Внимательно просматриваем настройки. Все устраивает — нажимаем «Создать»:

В случае успеха мастер покажет следующее окно:

Нажимаем кнопку «Закрыть».
Добавляем новый каталог в существующее пространство имен
Смысла в проделанном выше нет, если не добавить каталоги к уже существующему пространству имен. В примере процесс будет выполнен на том же сервере, однако, метод применим ко всем серверам в домене.
В окне управления DFS, в левой его части, разворачиваем дерево управления DFS до существующего, кликаем по необходимому. В правой части окна, в разделе действий, выбираем «Создать папку…»:

В открывшемся окне «Создание папки» указываем имя, в нашем случае «Test» и нажимаем кнопку «Добавить»:
В новом окне необходимо добавить путь к существующей сетевой папке. Список доступных каталогов можно посмотреть кликнув по кнопк «Обзор…». По окончании, нажимаем «OK»:

Результат будет таким:
Нажимаем «OK».
Доступ к DFS можно получить из любой адресной строки (Пуск->Выполнить, или из адресной строки любой папки) по шаблону:
<доменное_имя_сервера><имя_пространства_имен_DFS>
Например:
laa.testMyDFS
Результат таков:

Настройка DFS-репликации
Для выполнения репликации данных необходимо добавить второй сервер в этот же домен и установить на нем роль сервера «Репликация DFS» с помощью диспетчера серверов:

На этом же сервере создаем папку и разрешаем общий доступ к ней. В эту папку будут реплицироваться данные из директории, расположенной на сервере контроллера домена:

При открытии доступа и позже, в меню свойств папки можно увидеть сетевой путь до каталога:

Возвращаемся к контроллеру домена и развернутому на нем пространству имен DFS. Открываем уже знакомое из примеров выше окно «Управление DFS». В левой части окна, разворачиваем дерево до созданного пространства имен. В правой части окна выбираем «Добавить конечный объект папки…». В новом окне вводим адрес до общего каталога на другом сервер (который создали ранее). Нажимаем кнопку «OK»:

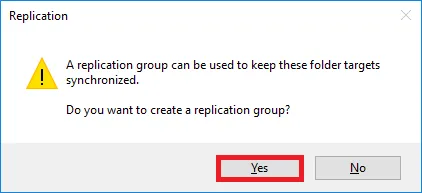
Система задаст вопрос желании создать группу репликации. Нажимаем кнопку «Да»:

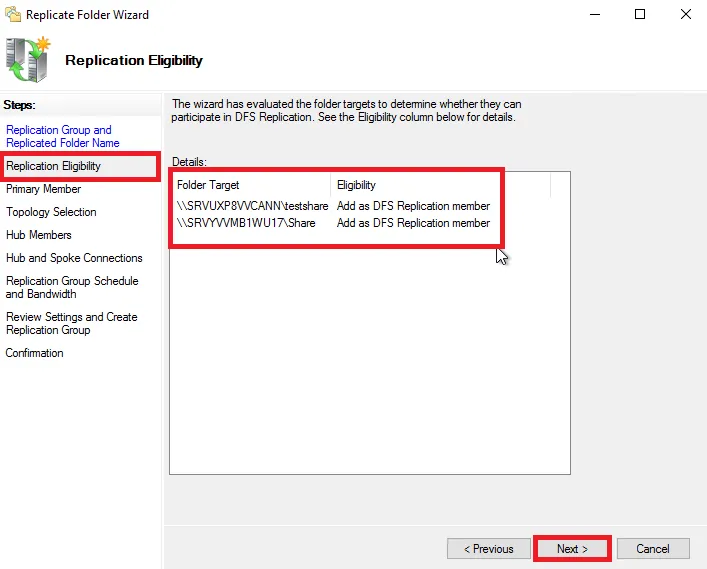
Дожидаемся окончания хода выполнения. Итогом будет открытое окно «Мастера репликации папок». Необходимо проверить имя группы репликации, а также имя каталога, который будет реплицирован. Переходим к следующему шагу кликнув по кнопке «Далее»:

На данном этапе проверяем пути до сетевых каталогов и нажимаем «Далее»:

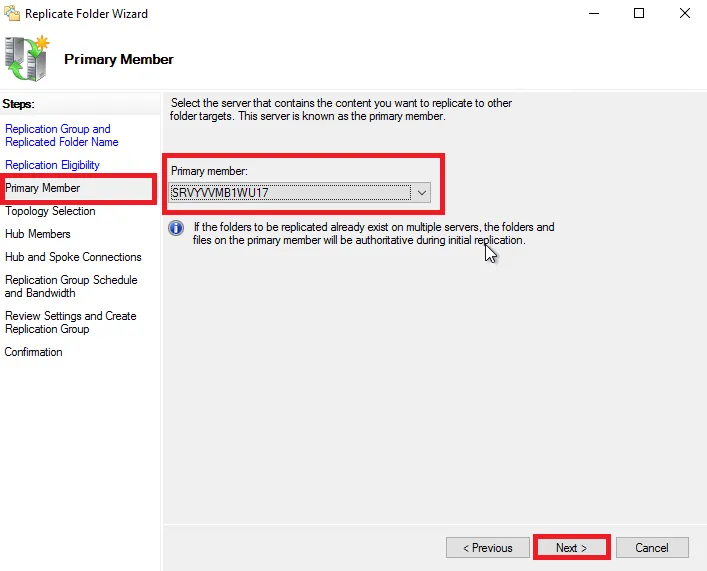
Следующим шагом предстоит выбрать основной узел из выпадающего списка. Это тот узел с которого данные будут реплицироваться. В случае с примером, основной член репликации сервер с именем WINSERV2016 — это сервер, на котором поднят контроллер доменов. Конкретный пример, лишний раз напоминает о необходимости определения понятных имен для серверов и прочих узлов сети. Нажимаем «Далее»:

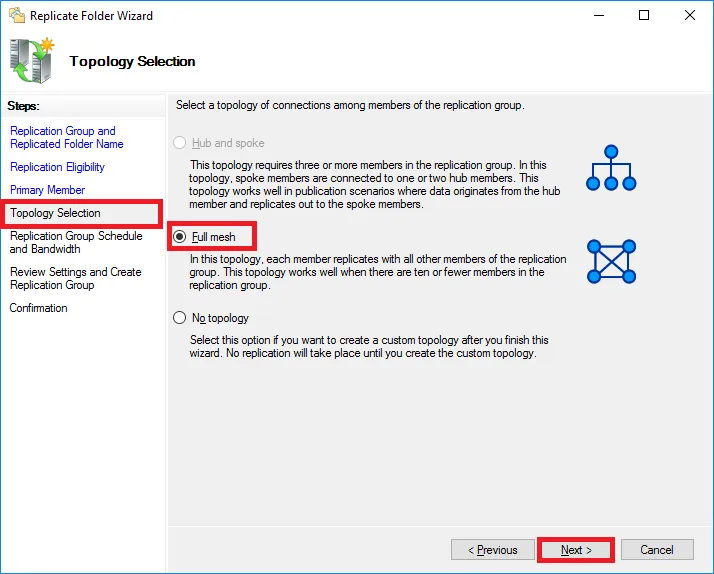
Теперь предстоит выбрать топологию подключений между членами репликации. Выбираем доступную — «Полная сетка», однако если вы желаете создать свою топологию репликации позже, то выбирайте «Нет топологии». Нажимаем «Далее»:

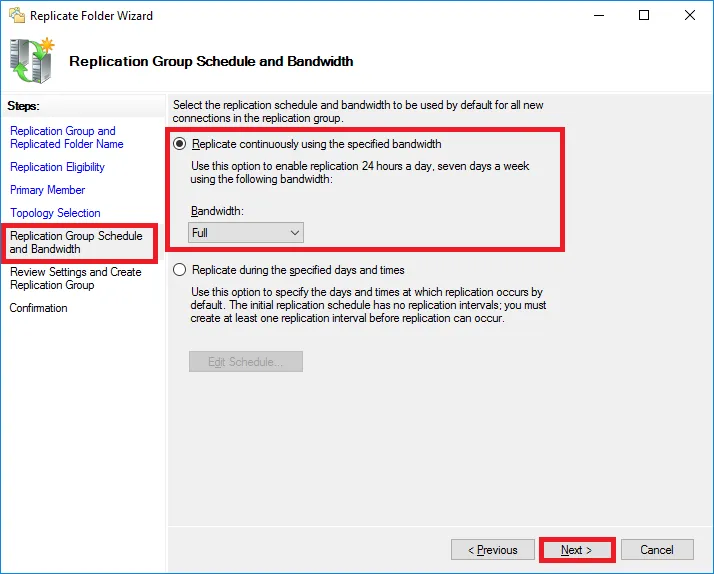
Настройка подходит к концу и на этом шаге следует определиться с периодичностью репликации данных. Выбираем вариант с постоянной репликацией. Преимущества этого метода в том, что данные будут дублироваться сразу. Недостаток — нагружает локальную сеть при больших объемах информации, а также нагрузка на жесткий диск.
Второй вариант, предлагает настроить репликацию по расписанию. Минус этого способа в том, что данные будут синхронизированы «потом». Выбираем желаемый вариант и нажимаем «Далее»:

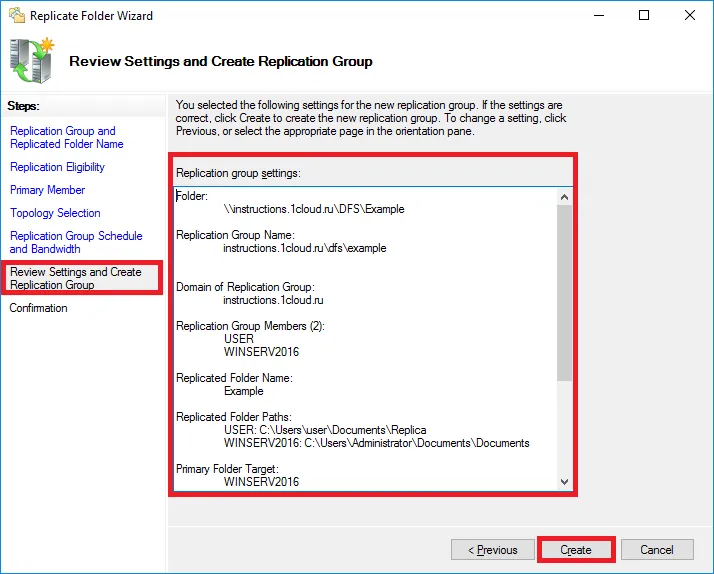
Программа предлагает просмотр выбранных параметров. Если все устраивает — нажимаем кнопку «Создать»:

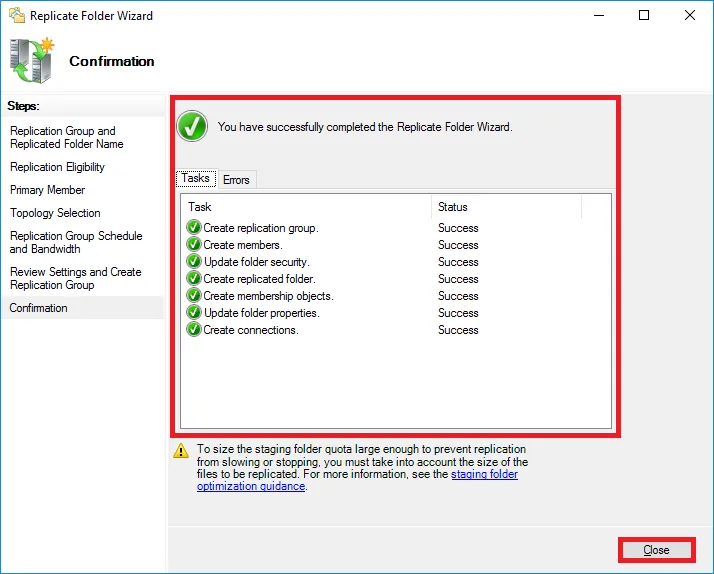
В случае успеха результат будет таким:

Нажимаем кнопку «Закрыть».
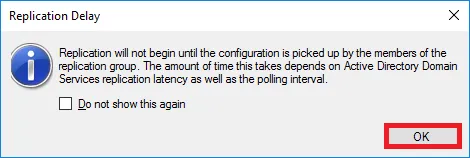
Система напомнит о задержках репликации. Чтобы не получать это сообщение вновь, при желании, следует установить галочку в соответствующем месте. Нажимаем кнопку «OK»:

Настройку распределенной файловой системы, а также репликацию данных можно считать оконченной.
220140
Минск
ул. Домбровская, д. 9
+375 (173) 88-72-49
700
300
ООО «ИТГЛОБАЛКОМ БЕЛ»
220140
Минск
ул. Домбровская, д. 9
+375 (173) 88-72-49
700
300
ООО «ИТГЛОБАЛКОМ БЕЛ»
Рассказываем о настройке DFS на Windows Server 2012, 2016, 2019, об установке служб Namespace DFS и Replication DFS, как создать пространство имён, добавить в него папки и как настроить группу репликации.
Распределённая файловая система (Distributed File System) — серверная технология Microsoft, появившаяся ещё во времена Windows NT. С её помощью настраивают доступ и группируют файловые ресурсы, находящиеся на разных серверах. Ресурсы, географически расположенные в разных местах, объединяются в одну структуру, которая отображается как виртуальное дерево каталогов с общим доступом. Благодаря настроенной репликации данных, сведения об изменениях, внесённых в систему на одном из узлов сети, передаются на все остальные узлы.
Технология DFS на Windows Server начиная с 12-й версии работает на основе двух служб:
- Namespace DFS — служба, объединяющая файловые ресурсы сети в логическую структуру. Пространство имён отображается как виртуальный каталог с вложенными подкаталогами и файлами. При этом реальная конфигурация сети остаётся неизвестной для пользователя.
- Replication DFS ответственна за копирование данных между серверами, подключёнными к распределённой файловой системе.
Установка Distributed File System
DFS — специализированной инструмент для Windows. Данная инструкция актуальна для машин под управлением ОС Windows Server 2012, 2016, 2019. Сервер, на который производится установка, может быть и рядовым членом сети, и управляющим.
- Зайдите в консоль Windows (Server Manager), затем в раздел Dashboard → конфигурации (Configure this local server, или «Настройка этого локального сервера»), выберите Add roles and features («Добавление ролей и свойств»).
Вы можете запустить мастер настройки альтернативным способом, кликнув по пункту Manage («Управление») в верхнем меню Диспетчера управления и выбрав Add roles and features из выпадающего списка. Выбор любого из способов приведёт вас в мастер для установки ролей и свойств.
- На начальном экране будут отображены все существующие роли и свойства, пропустите его и перейдите к Installation type. Нужно выбрать Role-based or feature-based installation («Установка на базе ролей и свойств») → Next.
- На следующем этапе Server selection выберите из списка сервер, которому вы будете добавлять новую роль или свойство. Список находится в окне Server pool. По умолчанию сервер отображает там только самого себя, но если в Диспетчер добавлены другие находящиеся в вашей сетевой среде сервера, то они также будет в списке, и появится возможность удалённой установки служб.
- На этапе Server roles в дереве ролей выберите DFS Namespaces и DFS Replication.

- В следующем окне установите выбранные роли на Windows Server. Мастер также предложит добавить свойства, но так как никаких дополнительных свойств устанавливать не нужно, пропустите этот этап. После завершения установки перезагрузите систему.
Есть и второй способ добавить нужные роли и установить DFS Managment — через командную строку. Запустите PowerShell с правами root и введите следующую команду:
Install-WindowsFeature FS-DFS-Namespace, FS-DFS-Replication, RSAT-DFS-Mgmt-Con Как открыть доступ к целевому каталогу
Чтобы предоставить доступ к целевому каталогу, нужно кликнуть по нему и в выпадающем меню выбрать «Предоставить доступ…» (Give access to), указав пользователя или их группу и уровень их прав. Вы получите ссылку вида \\путь\каталог, содержащую реальный путь к нему. Этот каталог мы укажем как целевой объект виртуального корневого каталога.
Как настроить Namespace DFS
После такой подготовки переходим к созданию пространства имён DFS.
- В стартовом меню консоли зайдите в Windows Administrative Tools, затем в DFS Managment. Также меню управления DFS можно найти по запросу dfsmgmt.msc.
- Справа находится раздел Actions; выберите в нём New Namespace.
- Укажите сервер, на который установлена служба DFS. Он будет назначен основным.
- Задайте имя нового Namespace, подойдёт любое название. Затем кликните по Edit Settings для редактирования настроек.
- Окно с параметрами доступа. Вы можете выбрать из четырёх вариантов настроек или назначить их индивидуально — для этого установите флажок на Use custom permissions («Применить пользовательские разрешения») и нажмите Customize.
В примере мы даём всем пользователям (группа «Все») максимальные разрешения: «Полный доступ» (Full control), права на «Изменение» и «Чтение». «Полный доступ» отличается от «Изменения» и «Чтения» тем, что пользователь с таким уровнем разрешений сам может назначать разрешения и стать владельцем папки или файла. Эти параметры используются по умолчанию для всех новых общих ресурсов. Если нужно изменить настройки, то сделайте это и кликните по Apply («Применить»), а после — OK.
- Следующий этап — настройка типа Namespace. Если вы пользуетесь Active Directory, то выбирайте первый вариант — с привязкой к домену.
- При выборе Domain-based namespace данные хранятся распределённо на нескольких серверах Active Directory, что повышает их доступность. Также такой тип структуры упрощает перенос DFS namespace. Путь к ресурсам начинается с доменного имени (\\DomainName\КорневойКаталог).
- Если вы не пользуетесь Active Directory, то отметьте Stand-alone namespace (автономное). Для хранения данных и конфигурации используется локальный сервер (его системный реестр); чтобы снизить риск их потери и улучшить доступность, пользуйтесь отказоустойчивым кластером. Путь начинается с имени корневого сервера (\\ServerName\КорневойКаталог).
- Перепроверьте заданные параметры и нажмите Create, чтобы создать новое пространство.
- Мастер оповестит об успешном завершении процесса.
Как добавить новый каталог
- Чтобы добавить папку в созданное ранее пространство, выберите его в DFS Management, перейдите в раздел Actions → New Folder.
- Задайте имя. В поле Preview of namespace появится путь к нему в DFS. В поле Folder targets нужно вставить реальную ссылку на целевой объект, нажмите для этого Add:
- Введите реальный путь к целевому объекту или найдите его в дереве каталогов. Каждая папка может иметь несколько целевых объектов.
- Все параметры новой папки заданы. Примените изменения.
Чтобы зайти в пространство, укажите в проводнике адрес вида:
\\DomainName\КорневойКаталог\ВложенныйКаталогDFS Replication на Windows Server
Репликация обеспечивает повышение отказоустойчивости созданной DFS, служба управляет копированием данных и перенаправляет трафик в соответствии с существующей нагрузкой.
- Прежде чем настраивать репликацию, нужно установить DFS Replication на все серверы домена, которые будут включены в группу. Это можно сделать с помощью мастера добавления ролей и свойств или через PowerShell. Кроме того, все они должны входить в состав одного леса Active Directory.
- Также на каждом подключаемом сервере должен быть целевой каталог, где будут храниться реплицированные данные. Создайте его и откройте к нему общий доступ.
- Вернитесь на основной сервер, войдите в DFS Management, выберите Namespace и корневой каталог, затем в разделе Actions выберите Add Folder Target.
- Задайте путь к папке, которая будет хранить реплицируемые данные (она была создана на втором шаге):
- Подтвердите создание группы:
- Откроется мастер настройки папок репликации. Убедитесь, что на всех этапах были введены верные данные.
Имена группы репликации и папки:

- Пути к папкам:
- Укажите Primary member — главный узел-участник пространства, данные с которого система будет реплицировать на другие сетевые узлы при первичной синхронизации.
- Далее необходимо указать тип топологии сети. В примере мы выбираем полносвязную топологию, или Full mesh. При таком построении сети всем устройствам назначается одинаковый топологический тег, благодаря чему каждый узел сети будет соединён с каждым другим узлом и сможет напрямую обмениваться с ним данными.
- Последний этап — настройка расписания копирования. В первом варианте обмен данными будет происходить постоянно, то есть изменения, внесённые в файлы, сразу же будут переданы на остальные узлы сети.
Второй вариант предполагает настройку расписания.
- Ещё раз перепроверьте правильность данных и нажмите «Создать» (Create).
- Мастер должен вывести сообщение об успешно выполненных заданиях.
- Затем система сообщит, что репликация данных не начнётся, пока члены группы не начнут поддерживать данную конфигурацию. Закройте это окно.
- Откройте папку репликации, в появившемся сообщении нажмите «Продолжить» (Continue), после чего начнётся репликация данных:
Теперь DFS создана и репликация данных между её узлами настроена.
Читайте в блоге:
- Устанавливаем бесплатный сертификат Let’s Encrypt на IIS с Windows Server 2016/2012 R2
- Как узнать версию MySQL в ОС Linux и Windows
- Как выпустить SSL-сертификат для сайта
DFS stands for Distributed File System, and it provides the ability to consolidate multiple shares on different servers into a common namespace. Whether or not there are multiple locations providing easy access to that data is something that we and IT are charged with. If we can provide easy access, one that consolidates the different locations where data can exist under a single store in a single path, that makes things a lot easier for our users, which in turn makes it easier for us as admins. It is attempting to resolve both of these situations that is the reason why DFS exist and indeed has existed for a number of OS versions.
Let’s take a look at on example where DFS is useful. I am talking here about standalone DFS namespace and not the domain DFS namespace. I will talk about differences so that you know what to choose. Imagine you have the following share setup in your organization. What is “wrong” with the left side?

Well, imagine you were to move the software data or any other share to a new file server. You’re going to have to update all the user drive mappings to redirect them to the new server share. Now this might be a simple case of updating a logon script, but what about all those users that have mapped it manually. You’re going to have to let them know that you’ve made this change and then you’ll have to go through the process of fixing it, and explain to them why this IT change broke their share access. If you take a look at the right side, DFS will allow us to simplify this by presenting a common namespace to the users, whilst in the background transparently redirecting them to the various share locations. So we can update these locations in the background without affecting the UNC path. So for a standalone DFS namespace it would look something like this. We would have the server name (DFS01), we would have the DFS namespace name(Shared Files), and then we would have subfolders representing project Organization, Home, UserFiles, and Software, etc. So now we’ve got a single drive mapping, in this case S, which is mapping to all these shares in the background, and as I say, if you wanted to redirect or move those shares, then you can do that using the DFS namespace without having to go through and update all the user client drive mappings.
Now, if we were doing this using a Domain DFS namespace, then instead of using the server, DFS01, as as the server name, you actually use the Active Directory domain name, and like before, the user will see the shares presented as subfolders.
STANDALONE VS DOMAIN NAMSPACE
Tthe key difference is the referral server and where the DFS information is stored. On a standalone DFS implementation, the referral information is stored locally on the single DFS referral server that you choose when you configured DFS. Now this type of configuration is useful if you don’t have an Active Directory domain or if for some reason you don’t want to integrate with Active Directory, but the downside is that you can only have a single referral server, and if that server is offline then you’re not going to be able to access the DFS namespace. The more common and generally preferred approach is to use Domain DFS. In Domain DFS you can have multiple DFS namespace referral servers, perhaps spread out amongst your core sites, and we use Active Directory to direct the clients to the closest referral server.
DFS Replication
DFSR is the component of DFS that allows you to duplicate the DFS data and replicate copies of that data across multiple locations. DFSR enables you to take file data and keep the data synchronized across two or more locations, and that’s an important differentiation from BranchCache as BranchCache maintains a single master copy with only a local read-only cache. When you have multiple copies of the same data, there are inherent risks from people updating that data in multiple locations at the same time. Therefore, before setting up DFSR, ask yourself, will people, or maybe processes, be likely to be updating the files simultaneously in multiple locations? If this is expected to happen a lot, then DFSR may cause you issues and you may want to consider using BranchCache or perhaps just keeping a single copy of the data.
DFSR is very powerful, and it enables you to create really any type of replication topology that you can think of, and a useful feature of any replication mechanism is the ability to schedule and throttle the replication. If your WAN link is constrained, then you can protect it by only enabling replication in the evenings. Anytime you’re going about replicating content from two different locations, there’s always the chance that those two locations could get manipulated or changed at the same time. And so, for that reason, it can be important for us to configure staging or essentially a temporary location where data goes before it ends up replication from one site to the other. And finally, it also supports remote differential compression. This enables it to officially replicate only the changes to files, and not have to replicate the whole file itself when perhaps only a few bytes of data has changed. We will see how this works a little bit later.
DFSR Topologies
- One – to – One Replication –> This is where data is synchronized between two servers. This is an easy to understand topology, and relatively easy to troubleshoot, and it’s good if you have two main locations dispersed over a WAN link.
- One – to – Many Replication –> This is useful if you have a main central site and you want your branch sites to have local copies of the data. A great use case for this could be a software distribution share or maybe you have read-only reference information that you want to make available to your branch users. It’s worth highlighting that the shares on DFS within your branch sites or even your central site, can be made read-only, and the standard NTFS file permissions apply.
- Many – to – One Replication –> This, as the name suggests, is where multiple sites all replicate their data into a central location. So where might this be used? Well, it could be used for backup, where you have all the data replicated from your branch site, replicated into a single central site, and we have the backup software running on that central site.
- Hub – Spoke Replication –> this is similar to many-to-one replication, however, it’s bidirectional. This means that there would be two replication hubs between the branch sites because the branch sites would need to send data to the central site, and then the central site would replicate it out to the other branch sites.
- Full Mesh –> full mesh is where any server can potentially replicate with any other server. Now this can speed up the replication of changes, as there is a direct connection between sites, but it can also cause excessive replication, and it can also be very complicated to troubleshoot.
So, as you can see, you can configure replication pretty much as you wish, and as a rule of thumb I’d recommend aligning your replication topology to match your underlying physical network topology. So if all your branch sites connect via the central hub site, then the hub-spoke replication topology might make sense. However, like most design decisions, always strive to keep things as simple as possible, and always be able to justify why you’ve configured something in a particular way.
INSTALL AND CONFIGURE DFS NAMESPACE (STANDALONE)
The first thing we’re going to do is configure a standalone DFS namespace. A standalone DFS namespace is useful when you don’t want to integrate with Active Directory, but you want to store the DFS information locally.
The first thing we need to do is install the DFS namespace’s role within Windows

Once done click on Tools –> DFS Management
DFS Management Console will open and we can see both halves of DFS (Namespaces and Replication) We will talk about replication later.

For the first step in this process, let’s actually go through for the configuration of a namespace, which will point to our share location that we wanna make available. To create a new Namespace, right-click on Namespaces and select New Namespace

Now we need to select or tell DFS what server is going to be the Namespace Server. In my case that will be DFS. Click Next
(IF YOU NOTICE THAT YOU ARE NOT ABLE TO USE BROWSE IN WINDOWS SERVER 2016 DFS, UNINSTALL KB3186568 AND REBOOT THE SERVER.
The issue is connected to update Microsoft .NET Framework 4.7 (KB3186539 for 2012R2 and KB3186568 for 2016 and Win10)

Now we need to create a name for the namespace that we’re interested in. Now, this name for the namespace does not necessarily need to be the same thing as the share name. Instead, what we wanna create is a location that users can go to where subfolders of which, at least from their perspective will be the variety of different folders or shares that already exist. You can call it everything, or software or Shared Documents etc, I will call mine Data
Now, just like any old share, we also need to configure the permissions on that share as well as the location as to where it goes. Click on Edit Settings

Here you can change the permission of the share folder according to your requirements. Remember, this is not yet the company shared location. We’ll plug that in after we configure this DFS route. Our local path currently is C:\DFSRoots\Data and then you can also configure some permissions on this shared folder as well. will leave the defaults and click OK and next
Now we have important distinction here because on one hand, you have what’s called a domain-based namespace where the namespace in pathing itself exists in Active Directory. On the other side, you have what’s called a standalone namespace, which correspond to the file server on which we’ve installed DFS. Now, in the case of a standalone namespace, you’re effectively creating a share just like you would a traditional share that collects and aggregates all the links of the share folders. Short of hosting this share on top of a fail over cluster, as you can see down in the description, this doesn’t provide you any height availability for the share. Now, this stands in contrast with the domain based namespace where when the namespace itself exists in Active Directory, any Active Directory domain controller can point that user to the correct location as long as you just have an Active Directory in place for them to reference against. Now, the biggest difference here is the idea that with the domain based namespace, you’re actually referring to the name of the domain itself as the source location for that share. So here we’re doing \mehic.se\data is the root for the namespace we’re creating. This is different from down in the bottom where again, it’s just the file server itself.
We will first create a standalone namespace so that you see how it looks like and then we will create domain-based namespace. Click Stand-alone namespace and click next and Create


Now we can see that the namespace has been created. So the first part of the namespace, because it’s a standalone one, is the DFS name that we selected, followed by the namespace name.

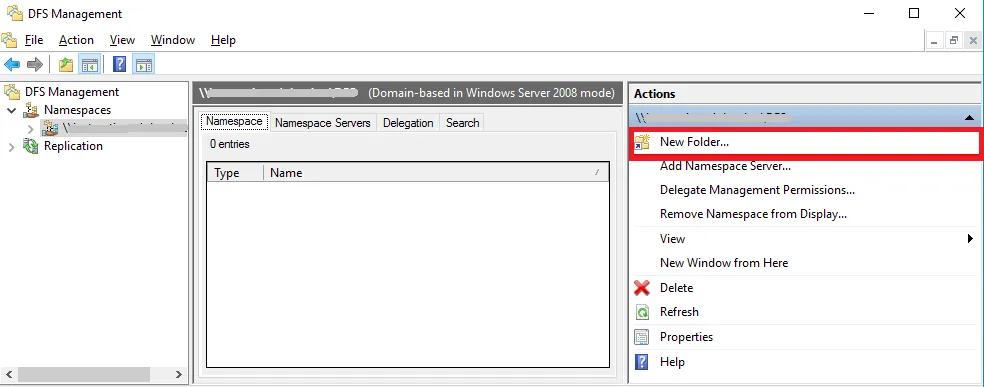
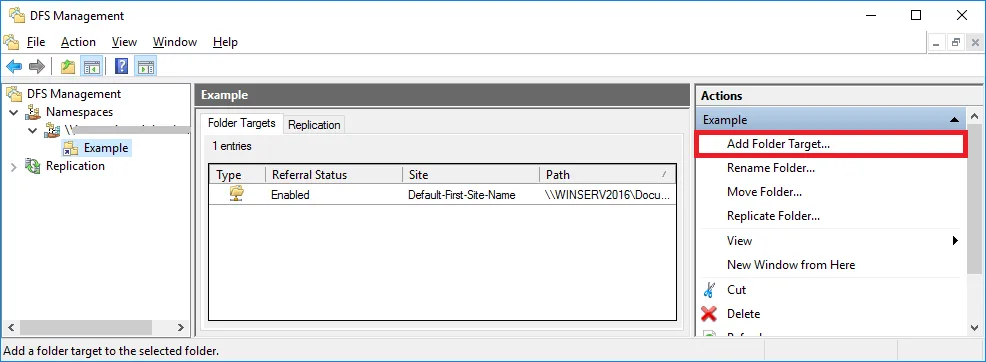
Now a namespace without any targets is not much use to anyone, so the next thing we need to do is create a referral target. We will create a new folder which becomes the first in that series of links that we want to aggregate under the namespace. Right click on the namespace and choose New Folder

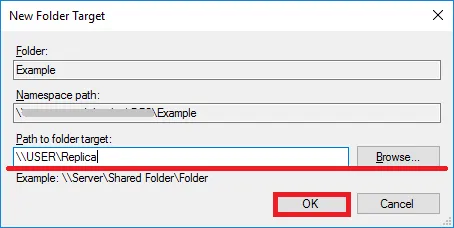
I will call it UserFiles –> Click ADD –> Browse and then for the folder target, we will set up the path of the folder target on our server DFS and we’ll associate it with that shared UserFiles.
Click OK 2 times.


Now let’s just go add a couple more, but now I’m going to add a share or a folder path that is on a different server. Right-Click on the Namespace and select New Folder
I will call it IPAM Share 1 ( This is just a friendly name that the users are going to see under the Data path within the namespace so you can type in whatever you want).

So this is just to demonstrate that even though it’s a standalone namespace you can still point to Folder Targets, or folder shares, on different servers. The standalone namespace just means that the referral information is stored on one server.

And you can see if I go to the Namespace again, you can see the IPAM path is present even though that’s on a different server.

INSTALL AND CONFIGURE DFS NAMESPACE (DOMAIN-BASED NAMESPACE)
This is very similar to what we do in the standalone namespace, but this time the information is going to be stored within Active Directory. I will use my servers FILESRV01 and FILESRV02 for this and for the DFSR part as well.
I already installed DFS Namespace and DFS Replication role on both servers.

Open DFS Management Console and right click on Namespace and select new namaspace

This time server will be filesrv01, click next

Now we need to give it a name and this time I will call it UserData and I will leave the permissions as default, click next

This time we will select the option Domain-Based namespace. Enable Windows Server 2008 mode will give us support for scalability as a function of Active Directory and also, so you to be able to use access base enumeration. Be aware that if you should choose the non-server 2008 mode and you later need to enable it, the only way to do that is to actually remove and then recreate the namespace in order to turn on this extra functionality like access based enumeration. So unless you’ve got an old server, it’s best to select that. Click next and create

Now, the difference you’ll notice is that now the namespace path is actually \, my domain name, which is mehic.se\UserData, whereas on a standalone namespace it would have been \, and then the server name, so that’s the obvious difference between domain and standalone from a user’s perspective.
Let’s add some target folders to this. Right-Click on the namespace and select New Folder

Give it a name and browse to the shares. You will need to add the one by one.


CONFIGURE NAMESPACE REFERRAL SERVER
The referral servers are the servers that refer the DFS client requests for either a domain or a standalone DFS namespace, and redirects them to the target shares. Right now I have only one referral server and we can see that by clicking on DFS namespace –> Namespace Servers

However, we don’t have any backup servers, so if this server goes offline we’re going to lose our namespace. Just to point to be able to add second server you will need to have DFS Namespace role installed on that server. I will use my FILESRV02 for this. When that is done we can click on Add Namespace server in DFS Management Console –> Actions Pane –> Add Namespace server

Add your server and click on OK

You will notice in the middle it’s actually telling us what Active Directory site this server is in as well. DFS is Active Directory site aware, which basically means that if you have folder targets in different sites, then it’s going to try and allocate the client to the closest folder target based on the client site.
That’s it. Next part will focus on DFSR and how we can configure it. We will take a look at replication targets, scheduling, staging etc.
Thanks for reading!
Cheers,
Nedim
In this lesson, you will learn how to implement DFS to your Windows Server 2016 for your branch office locations.
Step 1. Open Server Manager
Open the Server Manager by clicking the Windows button and clicking the Server Manager or by searching it on the list of programs.
Step 2. Add the DFS role
- Click on Manage from the top right-hand corner, and then click Add Roles and Features.
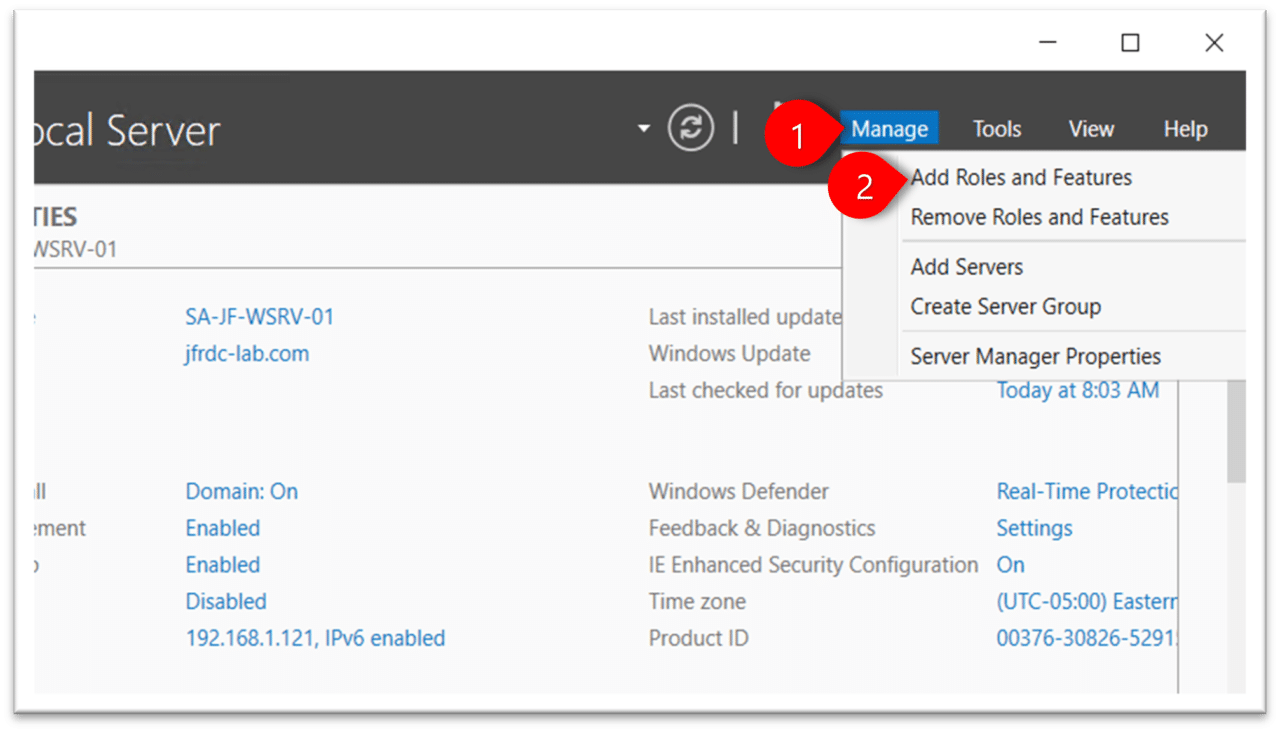
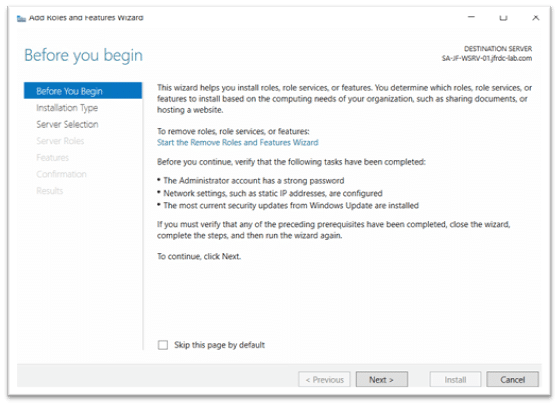
2. In the Add Roles and Features Wizard, click Next
3. Choose Role-based or feature-based installation on the Select installation type, then click Next.
4. On the Select destination server page, you will see the name of the server you have previously configured selected, click Next.
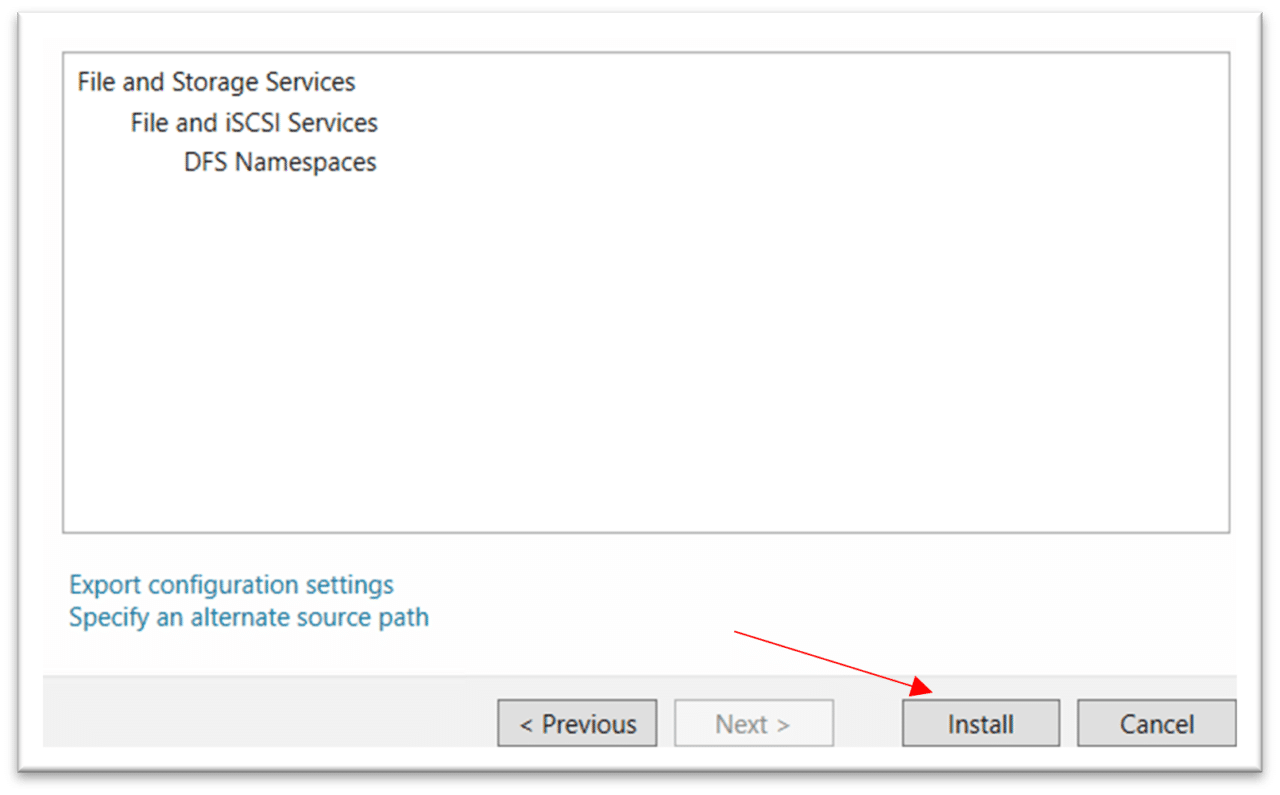
5. On the Select server roles page, expand the File and Storage Services (installed), do the same thing for File and iSCSI Services, and then select the DFS Namespaces checkbox.

6. From the Add Roles and Features pop-up window, click Add Features.
7. On the Select features page, click Next.
8. On the Confirm installation selections page, click Install. Once the installation is complete, hit the Close button.
Step 3. Configuring your DFS Namespace.
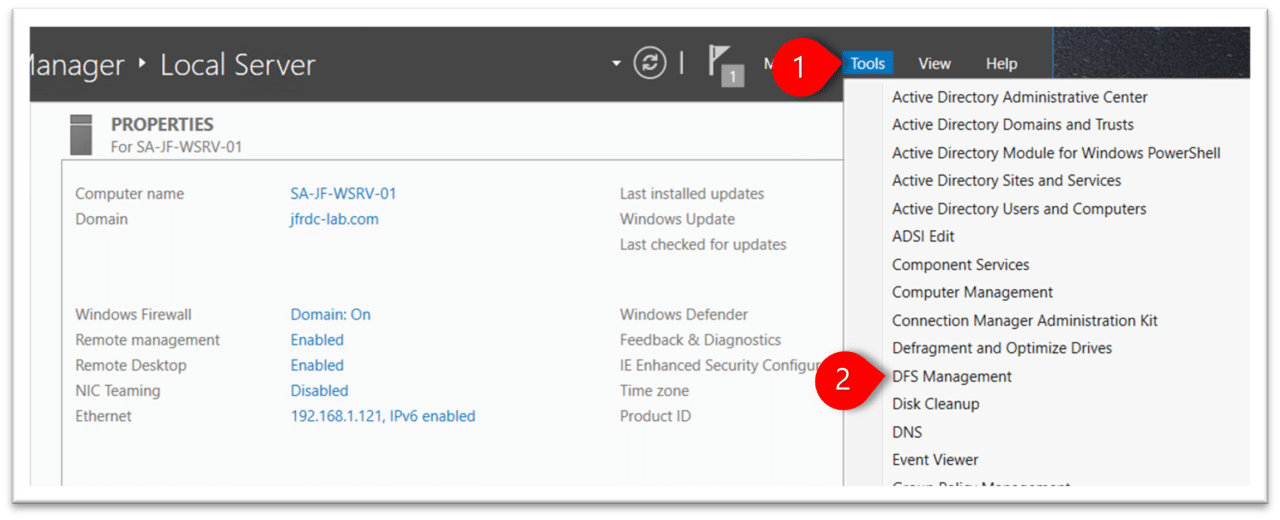
- Go back to the Server Manager, click Tools, and then go to DFS Management.
2. On the DFS Management window, from the navigation pane, click Namespaces.
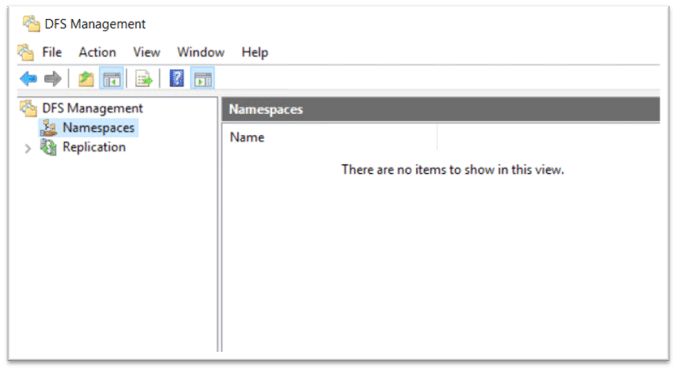
3. Right-click Namespaces, and then click the New Namespace.
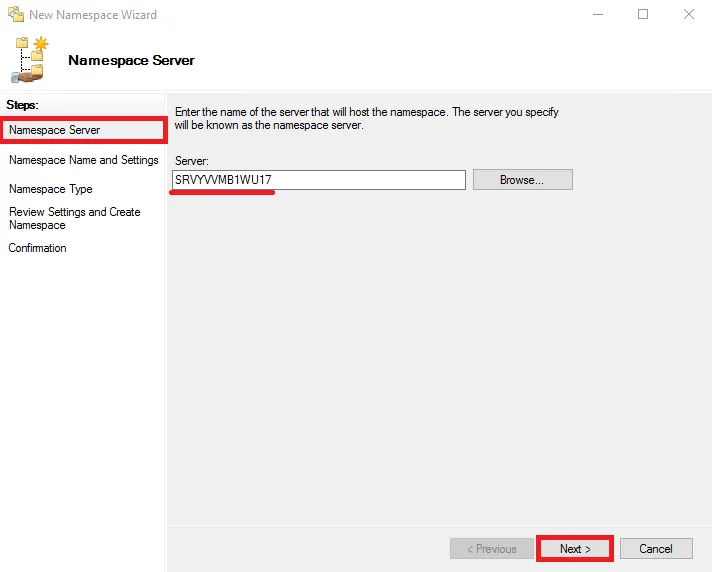
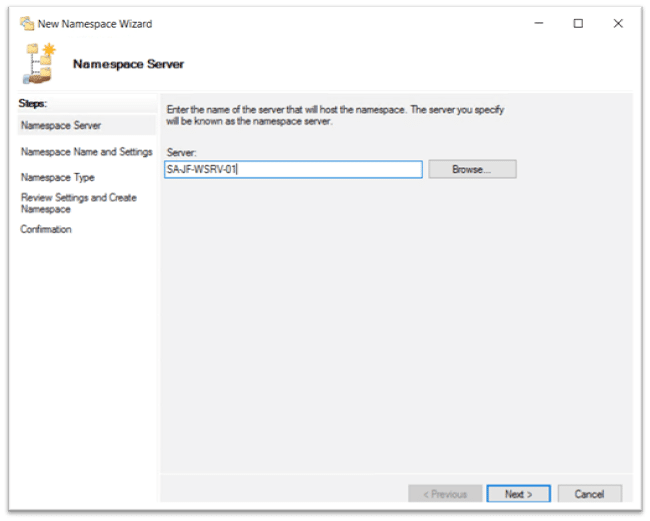
4. From New Namespace Wizard, on the Namespace Server page, under Server, type the name of your server (on this example, it is SA-JF-WSRV-01), and then click Next.
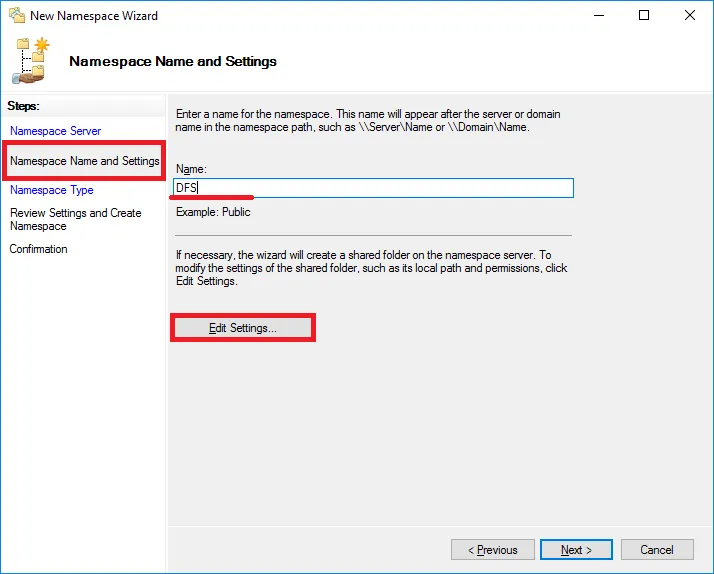
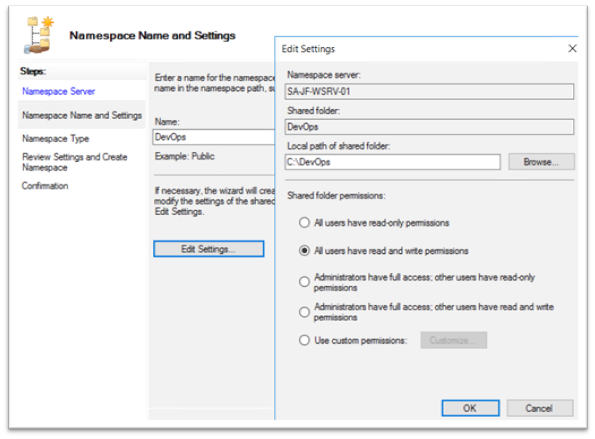
5. On the Namespace Name and Settings page, under Name, type the name of the namespace you want to set it to (for our example, mine is DevOps) and then click Edit Settings.

6. Type C:\<namespace> (for this example, C:\DevOps) under Local path of shared folder and choose All users have read and write permissions and click OK. (The Drive C here is the example of where actually your target folder is located on your server. This will only be visible to you as the server administrator. Using the namespace will hide this local path to your users.)
7. On Namespace Name and Settings window, click Next.
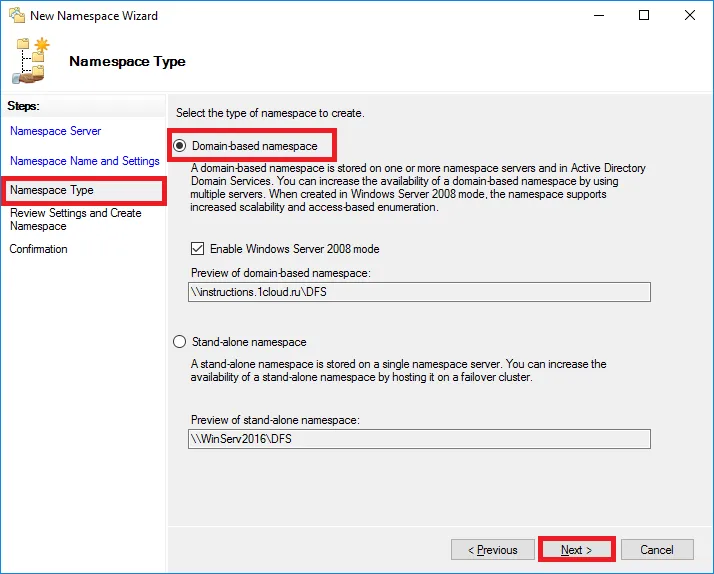
8. On the Namespace Type page, make sure that Domain-based namespace is selected. Please also note that the namespace will be accessed by \\<yourcreateddomain>\DevOps (For this example it will be \\jfrdc-lab.com\DevOps)
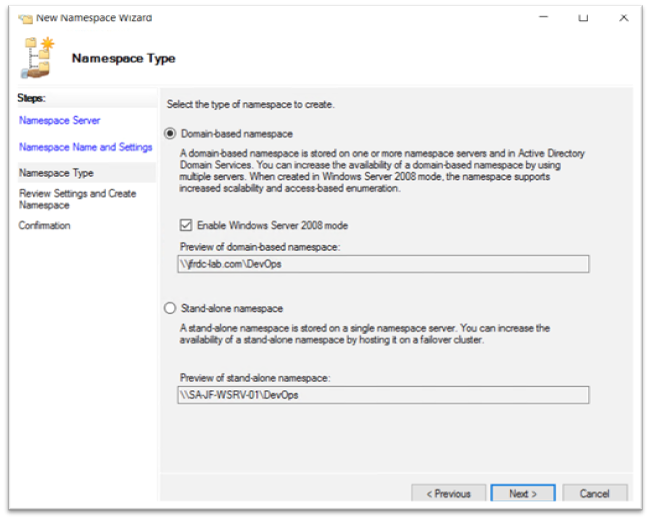
9. Ensure that the Enable Windows Server 2008 mode check box is selected, and then click Next.
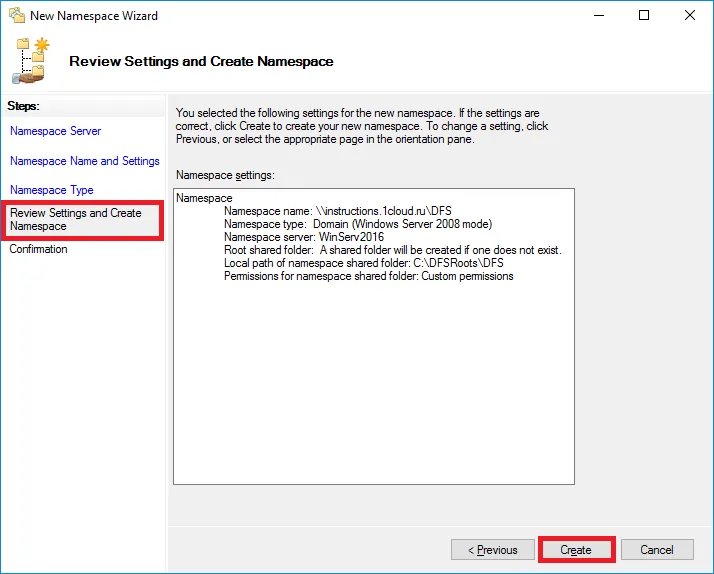
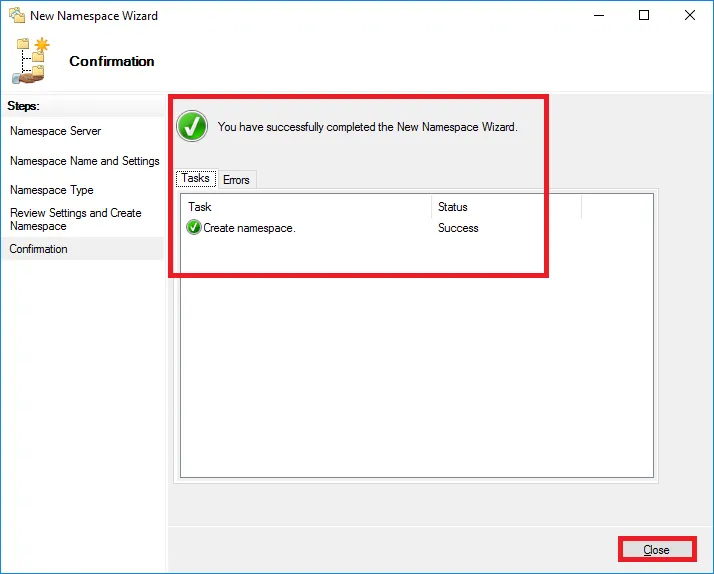
10. On the Review Settings and Create Namespace page, click Create.
11. You will see the confirmation “You have successfully completed the New Namespace Wizard”, click the Close button.
Step 4. Verify DFS functionality for your server. Create sample file.
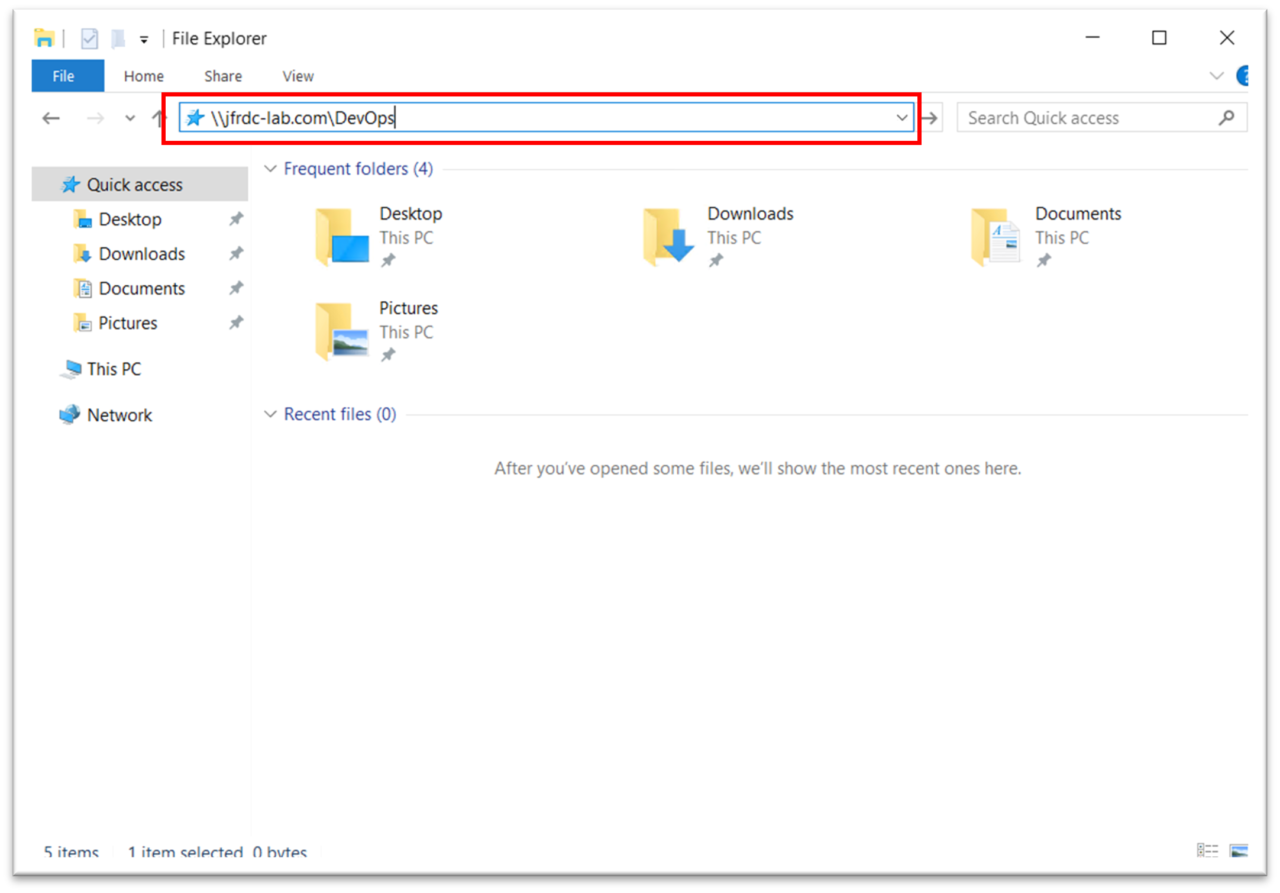
- Go to the File Explorer. (Press Windows logo + “E” or simply click the File Explorer icon on the taskbar)
- On the address bar of your file explorer, type the namespace you have created and hit enter. (For this example, it is \\jfrdc-lab.com\DevOps)
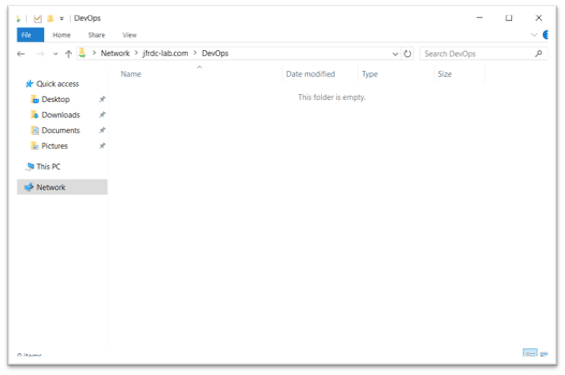
3. Verify that you can access the target folder of your namespace.
4. Create a sample text file by doing a right click inside the target folder.
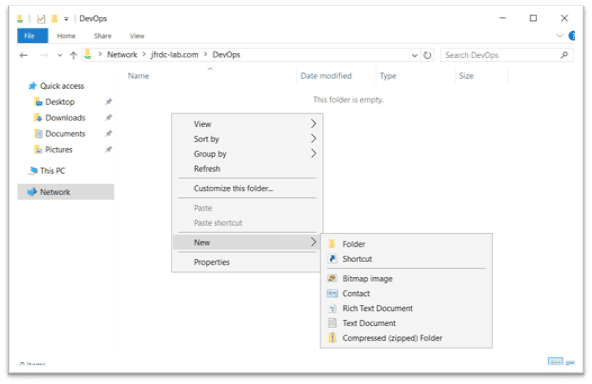
5. Name your file as “Sample Text File“.
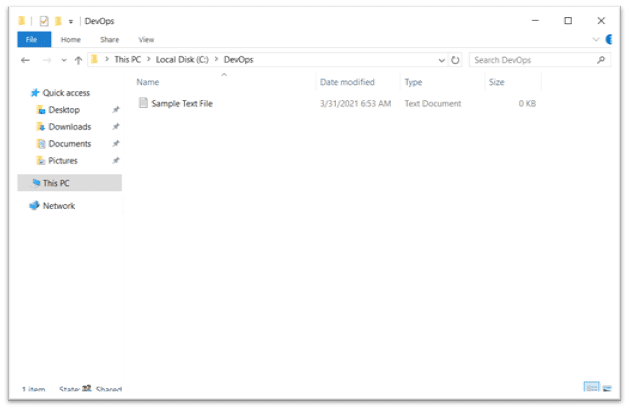
6. To verify that the file also exists on your local drive, navigate to where you saved your target folder. On this example it is C:\DevOps
7. You should be able to see the text file you have created.
Next process is to create target folder on your created namespace. To learn about adding target folder, click here.
The Distributed File System on Windows Server 2016 consists of two components. Distributed File System Namespaces and Distributed File System Replication. In this blog post we will review Distributed File System Namespaces, and then look at how to install and configure DFS-N on Microsoft Windows Server 2016.
Navigation
1. Distributed File System Namespaces (DFS-N)
1.1 Installing DFS-N
1.2 Creating a DFS Namespace
1.3 Adding Namespace Server to the Namespace
1.4 Adding a DFS-N Folder with Folder Targets
1.5 Configuring the properties of a DFS-N root
1.6 Additional Configuration options for DFS-N
.
1. Distributed File System Namespaces (DFS-N)
With DFS-N, you can create namespaces. Namespaces are shares under which you can group shared folders from different servers on your network. A namespace functions as a “links” page that points the clients to the particular server or servers where the different shares reside. So instead of creating drive maps for multiple servers and their shares, you can simply create a drive map to the namespace, under which users will find the different shares.
| Without DFS-N | With DFS-N |
|---|---|
| \\FS001\Sales \\FS002\Marketing \\FS010\Users |
\\Shabaztech.com\Shares\Sales \\Shabaztech.com\Shares\Marketing \\Shabaztech.com\Shares\Users |
A DFS namespace consists of the following 4 elements,
♦ Namespace server – The server that hosts the namespace.
♦ Namespace root – The root is the starting point of the namespace. In the picture above, the name of the root is Public, and the path is \\Shabaztech.com\Public
♦ Folder – Empty folders, ie those without a folder target, can be used to structurize the namespace.
♦ Folder targets – A folder target points to a shared folder on one or many servers.
There are two types of DFS namespaces that you can create on Windows Server 2016,
Domain-based namespaces
The metadata for this type of namespaces is stored in Active Directory Domain Services, and they are deployed when there is a need to ensure that the namespace remains available, even if one of the servers hosting the namespace is offline. In other words, multiple servers can host the same namespace. Domain-based namespaces can be hosted on a member server or a domain controller in the same domain in which the namespace is configured. Since the metadata is stored in AD DS, users can browse to the namespace by using the Netbios or FQDN of the domain, such as for example \\shabaztech.com\Public, and they don’t have to know the name of the namespace servers hosting the namespace.
There are two different modes you can deploy domain-based namespaces in,
• Windows 2008 mode
⇒ Supports 50 000 folder targets
⇒ Supports Access-based enumeration
⇒ Requires that the domain hosting the namespace must be at minimum Windows Server 2008 domain functional level
⇒ Requires that the Active Directory forest functional level is minimum Windows Server 2003
• Windows 2000 mode
⇒ Supports only 5000 folder targets
Stand-alone namespaces
The metadata for this type of namespaces is not stored in Active Directory, and they can only be hosted by a single server. That server can be a stand-alone server, a member server or a domain controller. Stand-alone namespaces support up to 50 000 folder targets, and are generally deployed when you can not deploy a domain-based namespace in Windows 2008 mode, due to the domain not being at required functional level. Stand-alone namespaces can be hosted by a failover cluster to increase availability.
.
1.1 Installing DFS-N
You can install the DFS-N role by using the Add Roles And Features Wizard in Server Manager.
1.1.1 Select the Role-Based Or Feature-Based Installation option
1.1.2 On the Select Server Roles page, select File Server and DFS Namespaces

1.1.3 Click Add Features to install management tools as well

1.1.4 Click Next twice, and then click on Install
.
1.2 Creating a DFS Namespace
1.2.1 Start DFS Management
1.2.2 Right-click Namespaces → New Namespace

1.2.3 Enter the name of the server that will host the namespace, Click Next

1.2.4 Enter a name for the new namespace, this will by default also be the name of the shared folder that the New Namespace Wizard will create

1.2.5 By clicking on Edit Settings on the Namespace Name and Settings page of the Wizard, you can change path and shared folder permissions for the new namespace
1.2.6 Select the type of namespace to create, click Next

1.2.7 Click Create

1.2.8 Click Close

1.2.9 A domain-based namespace automatically publishes its topology (the roots, links, and targets) in the domain partition of Active Directory Domain Services. You can view this information by using the ADSI-edit tool.

.
1.3 Adding Namespace Server to the Namespace
1.3.1 Right-click Namespaces → Add Namespace Server

1.3.2 Enter the name of the server that will also host the namespace, then click Ok. (Clicking on the Edit Settings button will bring up the same dialog box as step 1.2.5)

1.3.3 The namespace server will be added

.
1.4 Adding a DFS-N Folder with Folder Targets
1.4.1 Right-click the Namespace → New Folder

1.4.2 Give the new folder a name, and then click on Add to add folder targets
1.4.3 Click on Browse to browse for folder targets
1.4.4 You can add an existing shared folder, or create a new one
1.4.5 You can also create several targets for the same DFS-N folder, and then use DFS-R to synchronize those shared folders on different servers. When you are done, click on Ok.
.
1.5 Configuring the properties of a DFS-N root
To access the properties sheet of a namespace, Right-click the namespace → Properties
General Tab only gives you information about the namespace, and you can add a description for the namespace if you like
Referrals Tab
A referral is an ordered list of servers that a client computer receives from a domain controller or namespace server when the user accesses a namespace root or DFS folder with targets. Targets that are located in the same Active Directory site as the clients are listed first in the referral. On this tab, you can define three options,
⇒ The duration referrals will be cached on the client, before the client retrieves the list a new from a domain controller or namespace server.
⇒ Ordering method for targets outside of the client’s AD site.
⇒ If a target becomes unavailable, you can configure clients to fail back to the target after it is restored.
Advanced Tab
Two settings can be defined on this tab,
⇒To maintain a consistent domain-based namespace across namespace servers, it is necessary for namespace servers to periodically poll Active Directory Domain Services to obtain the most current namespace metadata. Microsoft recommends that you select Optimize for consistency if there are 16 or fewer servers hosting the namespace. Otherwise you should select Optimize for scalability.
⇒ Enable/Disable Access-based enumeration for the namespace
.
1.6 Additional Configuration options for DFS-N
1.6.1 To delegate permissions on DFS-N, you can right-click the Namespaces node and select Delegate Permissions. Permissions at the top most level will allow users to create domain-based namespaces. Permissions at the namespace level will allow users to add a namespace server to the domain-based namespace (also requires said user to be local admin on the namespace server to be added), and generally manage the namespace.

1.6.2 Properties sheet of a Namespace server
General Tab
⇒ Enable/disable referrals for this namespace server. If you disable referrals, users will be prevented from being directed to this namespace server. This can be useful during maintenance of a server.
⇒ Set share permissions for the Namespace root
⇒ Information about which AD site the name server belongs to
Advanced Tab
Specify referral ordering. This is self-explanatory.
1.6.3 Properties sheet of a folder with folder targets
General Tab only gives you information about the folder, and you can add a description for the folder if you like

Referrals Tab
⇒ The duration referrals will be cached on the client, before the client retrieves the list a new from a domain controller or namespace server.
⇒ Ordering method for targets outside of the client’s AD site.
⇒ If a target becomes unavailable, you can configure clients to fail back to the target after it is restored.
Advanced Tab lets you configure view permissions on the DFS folder. For security reasons you should define explicit view permissions on the DFS folder, otherwise all domain users will be able to view this folder in the namespace.