
Большинство пользователей не сталкиваются с необходимостью ручной установки цветовых профилей монитора в Windows 11/10 и используют стандартные: обычно это не несёт каких-то проблем, а изображение выглядит именно так, как предполагалось производителем мониторов.
Однако, для некоторых мониторов, особенно предполагающих работу с графикой, производители обычно поставляют подходящий цветовой профиль, который разумным будет установить и использовать в Windows после приобретения монитора или переустановки системы. О том, как это сделать и пойдет речь далее в инструкции.
Процесс установки или изменения цветового профиля
Цветовой профиль представляет собой файл .icm или .icc и обычно доступен в комплекте ПО монитора или на официальной странице поддержки конкретной модели монитора отдельно или в составе драйвера. При этом:
- Он может устанавливаться автоматически при установке драйвера монитора — здесь вопросов обычно не возникает, всё происходит автоматически. Несмотря на то, что почти все мониторы исправно работают без установки драйвера вручную, для некоторых моделей, функции и характеристики которых отличаются от стандартных, имеет смысл установить драйвер производителя.

- Может требовать ручной установки.

Далее будет рассмотрен пример именно ручной установки профиля монитора ICM (Image Color Management) или ICC (International Color Consortium).
Необходимые шаги будут следующими:
- Нажмите правой кнопкой мыши по файлу цветового профиля и выберите пункт «Установить профиль в контекстном меню». Каких-либо сообщений вы не увидите, но профиль будет добавлен в системе.

- Нажмите клавиши Win+R на клавиатуре, либо нажмите правой кнопкой мыши по кнопке «Пуск» и выберите пункт «Выполнить», введите colorcpl в окне «Выполнить» и нажмите Ok или Enter.
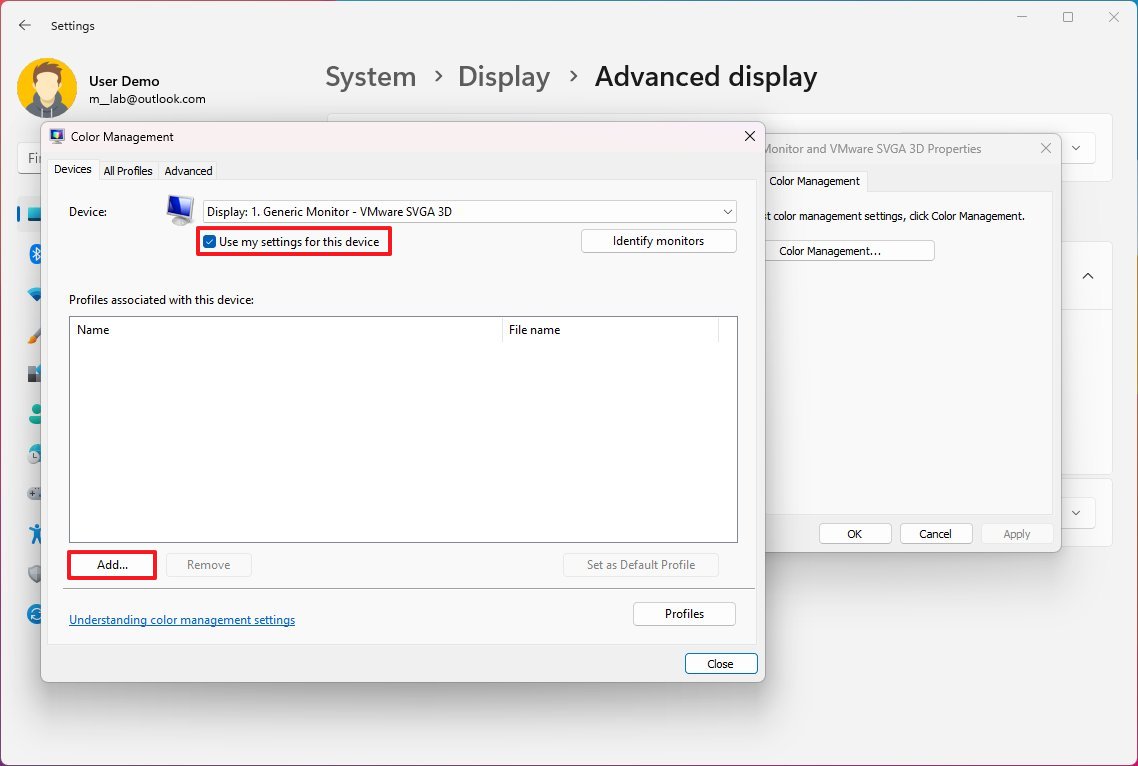
- В поле «Устройство» выберите нужный монитор, установите отметку «Использовать мои параметры для этого устройства, нажмите кнопку «Добавить» и выберите недавно установленный профиль в списке, нажмите «Ок». Для добавления профиля в список также можно нажать кнопку «Обзор» и выбрать файл профиля, если вы пропустили 1-й шаг.

- Убедитесь, что нужный профиль выбран и нажмите кнопку «Сделать профилем по умолчанию».


После выполнения указанных шагов (иногда только после перезагрузки) монитор должен слегка изменить цвета и начать их отображать так, как было спроектировано и настроено производителем.
Дополнительная информация
Некоторые дополнительные сведения, которые могут быть полезными в части установки цветовых профилей:
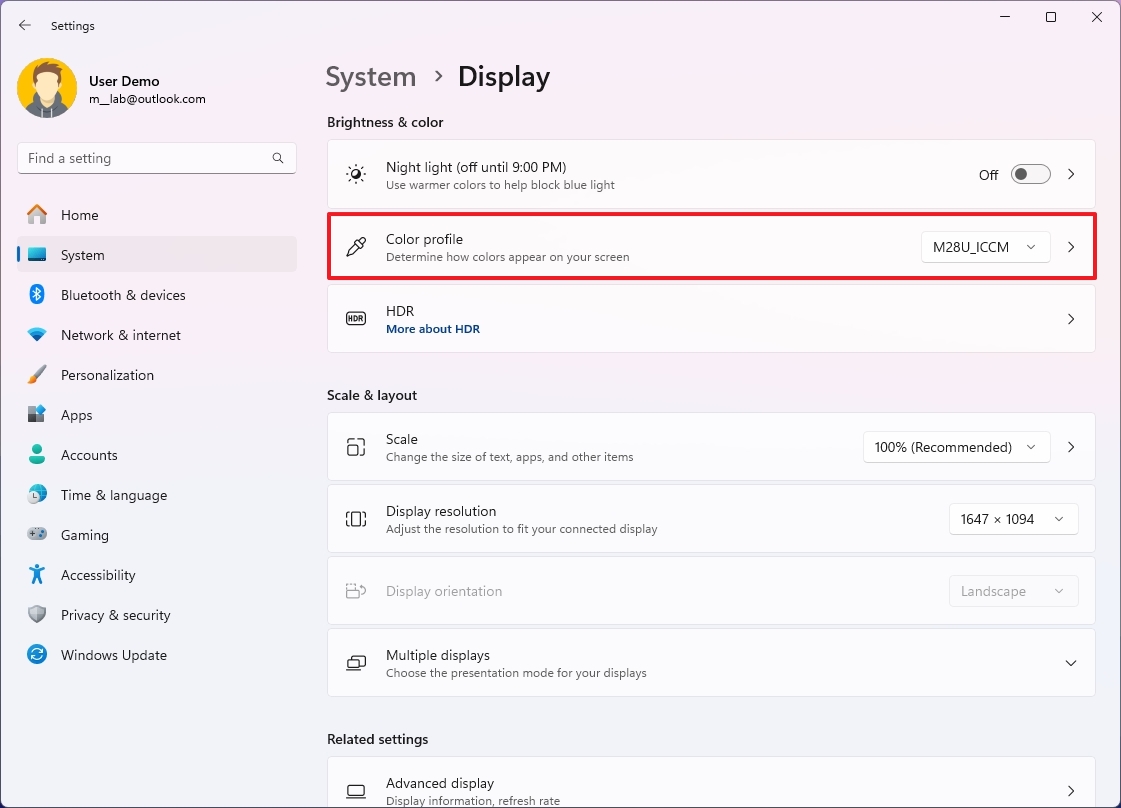
- Если вам требуется регулярно менять цветовой профиль монитора, вы можете сделать это в параметрах дисплея Windows: в списке будут отображаться профили, добавленные на 3-м шаге, между которыми вы легко сможете переключаться.

- При включенном режиме HDR, при использовании переходников для подключения монитора, выбор цветового профиля может быть недоступен, либо они могут работать не так, как ожидается.
- В некоторых случаях системные настройки Windows работают не лучшим образом в части цветовых профилей: например, некоторые сталкиваются с невозможностью смены цветового профиля в сценарии, когда к компьютеру подключены два монитора, а в параметрах дисплея установлен показ только на 2-м мониторе.
- Иногда эффективнее обратиться к ПО производителя монитора или к простым утилитам, таким как Colorprofile Keeper.
- Цветовой профиль может автоматически переключаться при запуске 3D приложений, полноэкранных игр и в других сценариях.
- Для Windows 11 Майкрософт предлагает отдельное приложение (доступно в Microsoft Store) — Windows HDR Calibration, позволяющее откалибровать работу дисплея при включенном режиме HDR.
- Некоторые программы для работы с графикой могут иметь собственные настройки отображения цветов. Например, в Adobe Photoshop и Illustrator их можно обнаружить в разделе меню «View» (Вид), пункты Proof Setup и Proof Colors.

Надеюсь, представленная информация поможет разобраться, если вы столкнулись с необходимостью установить или изменить цветовой профиль для вашего монитора. Если же остаются вопросы, вы можете задать их в комментариях.
(Image credit: Mauro Huculak)
On Windows 11, similar to any operating system, accurate color rendering on the screen is critical, even more for those professionals working on video editing, photography, or gamers. As a result, in this guide, you will learn the steps to set the correct color profile for your monitor.
A color profile is a combination of settings that manufacturers create to describe how colors should be rendered on the display. Only after setting the correct profile will you be able to experience the intended color representation.
Although the operating system can detect and configure the appropriate profile if you notice that the colors don’t look accurate, the problem is probably not the monitor but rather the profile, which you can update from the Color Management application available on Windows 11.
In this how-to guide, I will walk you through the steps to use the correct color profile on Windows 11 version 24H2, 23H2, and older releases.
How to download color profiles for a display on Windows 11
Usually, the color profiles («ICM» or «ICC» files) available for your monitor come in the driver package or the installation disc. However, you can always download the files from the manufacturer’s website.
To find and download the correct color profile on Windows 11, use these steps:
- Open the monitor’s support page.
- Quick note: Some of the popular manufacturer’s sites include LG, BenQ, Samsung, Dell, and HP.
- Browse to the download section.
- Search for the latest monitor driver (not the graphics driver) using the model number of your device.
- Quick tip: You can find the monitor model number on the back of the device or, on Windows 11, open Settings > Displays > Advanced display.
- Click the Download button and save the file on your computer.

- Double-click to open the file.
- Click the Extract all button from the command bar (if this is a Zipped folder).
- Continue with the on-screen directions to extract its content.
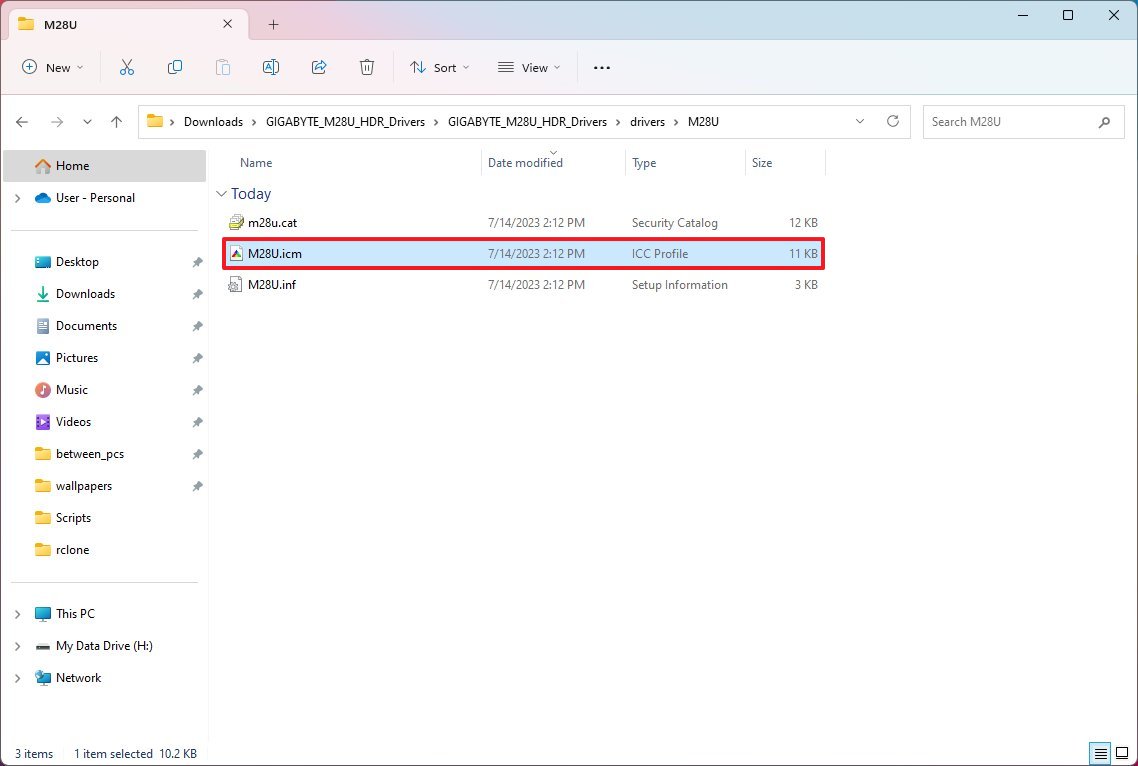
- Open the folder with the extracted files.
- Confirm the «.icm» file, which is the color profile for your monitor.
Once you complete the steps, you can install the appropriate color profile for the computer’s monitor on Windows 11.
All the latest news, reviews, and guides for Windows and Xbox diehards.
How to install color profiles for a display on Windows 11
On Windows 11, you can install and manage color profiles from the «Color Management» tool or from the Settings app starting with version 24H2 and higher releases.
Steps for Windows 11 2023 Update
To install a color profile on Windows 11 (version 23H2 and older releases) from the legacy Color Management settings, use these steps:
- Open Settings.
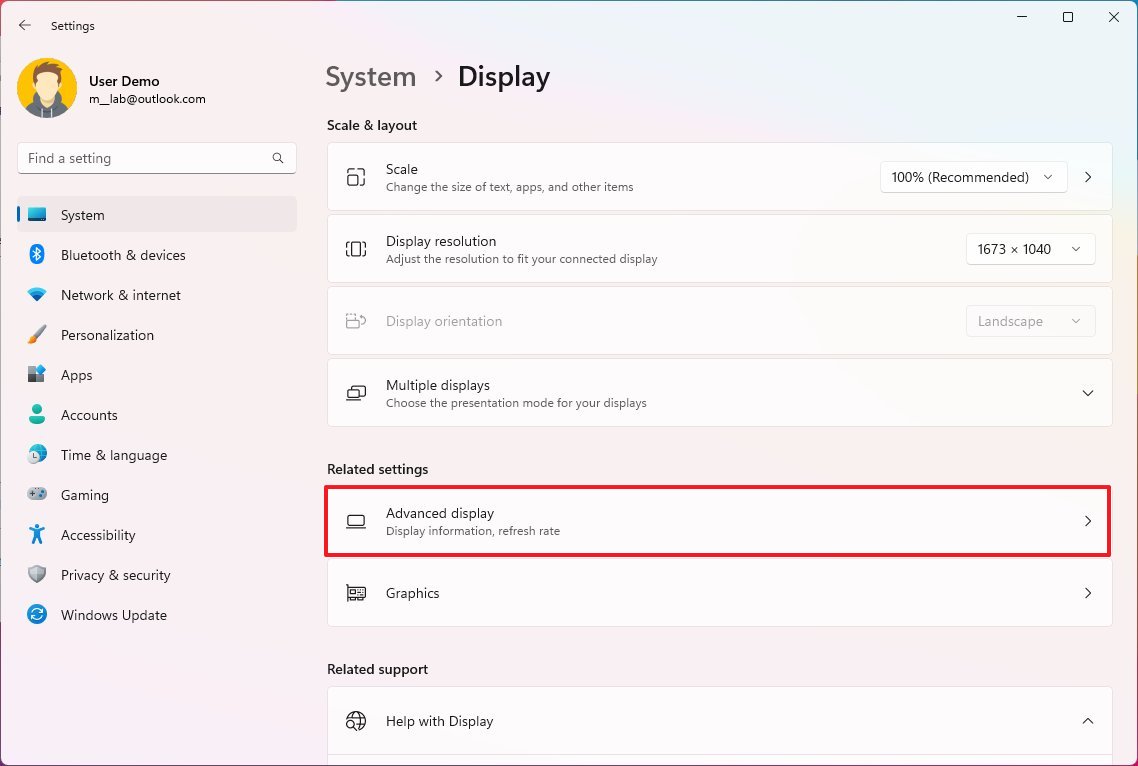
- Click on Display.
- Under the «Related settings» section, click the Advanced display setting.
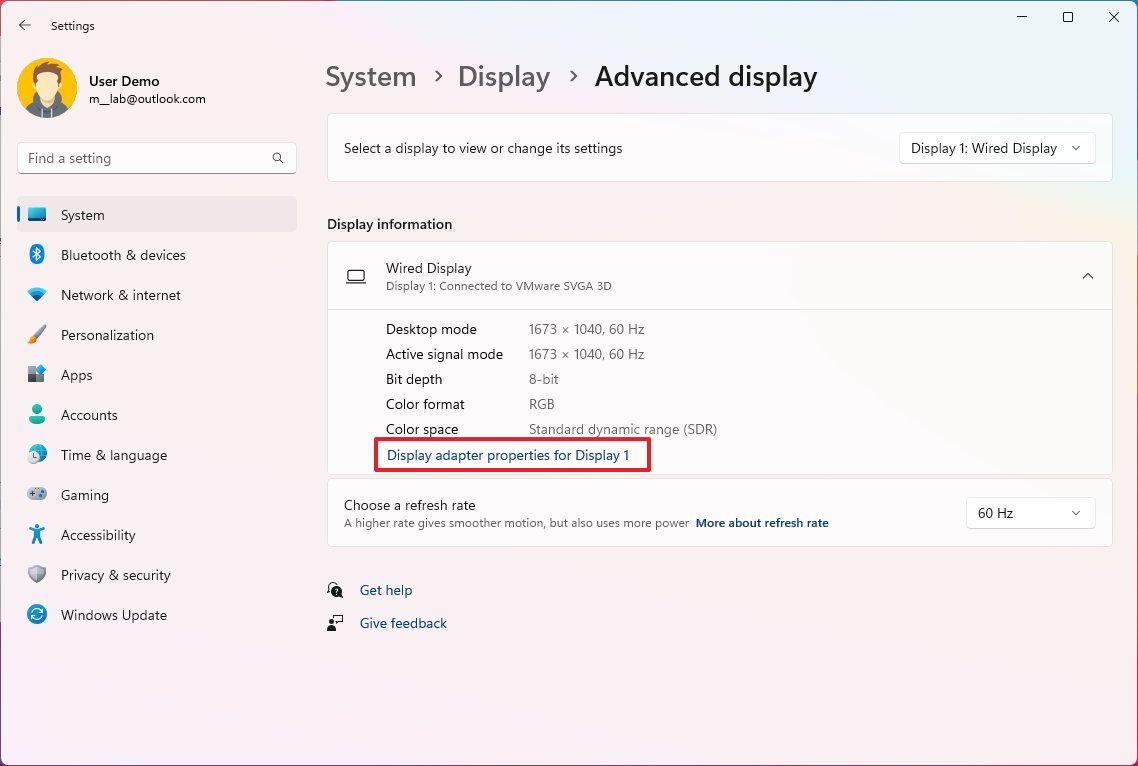
- Under the display settings, click the «Display adapter properties for» settings to graphics adapter properties.
- Click the Color Management tab.
- Click the Color Management button.

- Click the Devices tab.
- Choose the monitor to apply a new color profile using the «Device» setting.
- Quick tip: If you have a multi-monitor setup and you’re not sure which monitor you’re about to update, click the «Identify monitors» button.
- Check the «Use my settings for this device» option.
- Click the Add button.
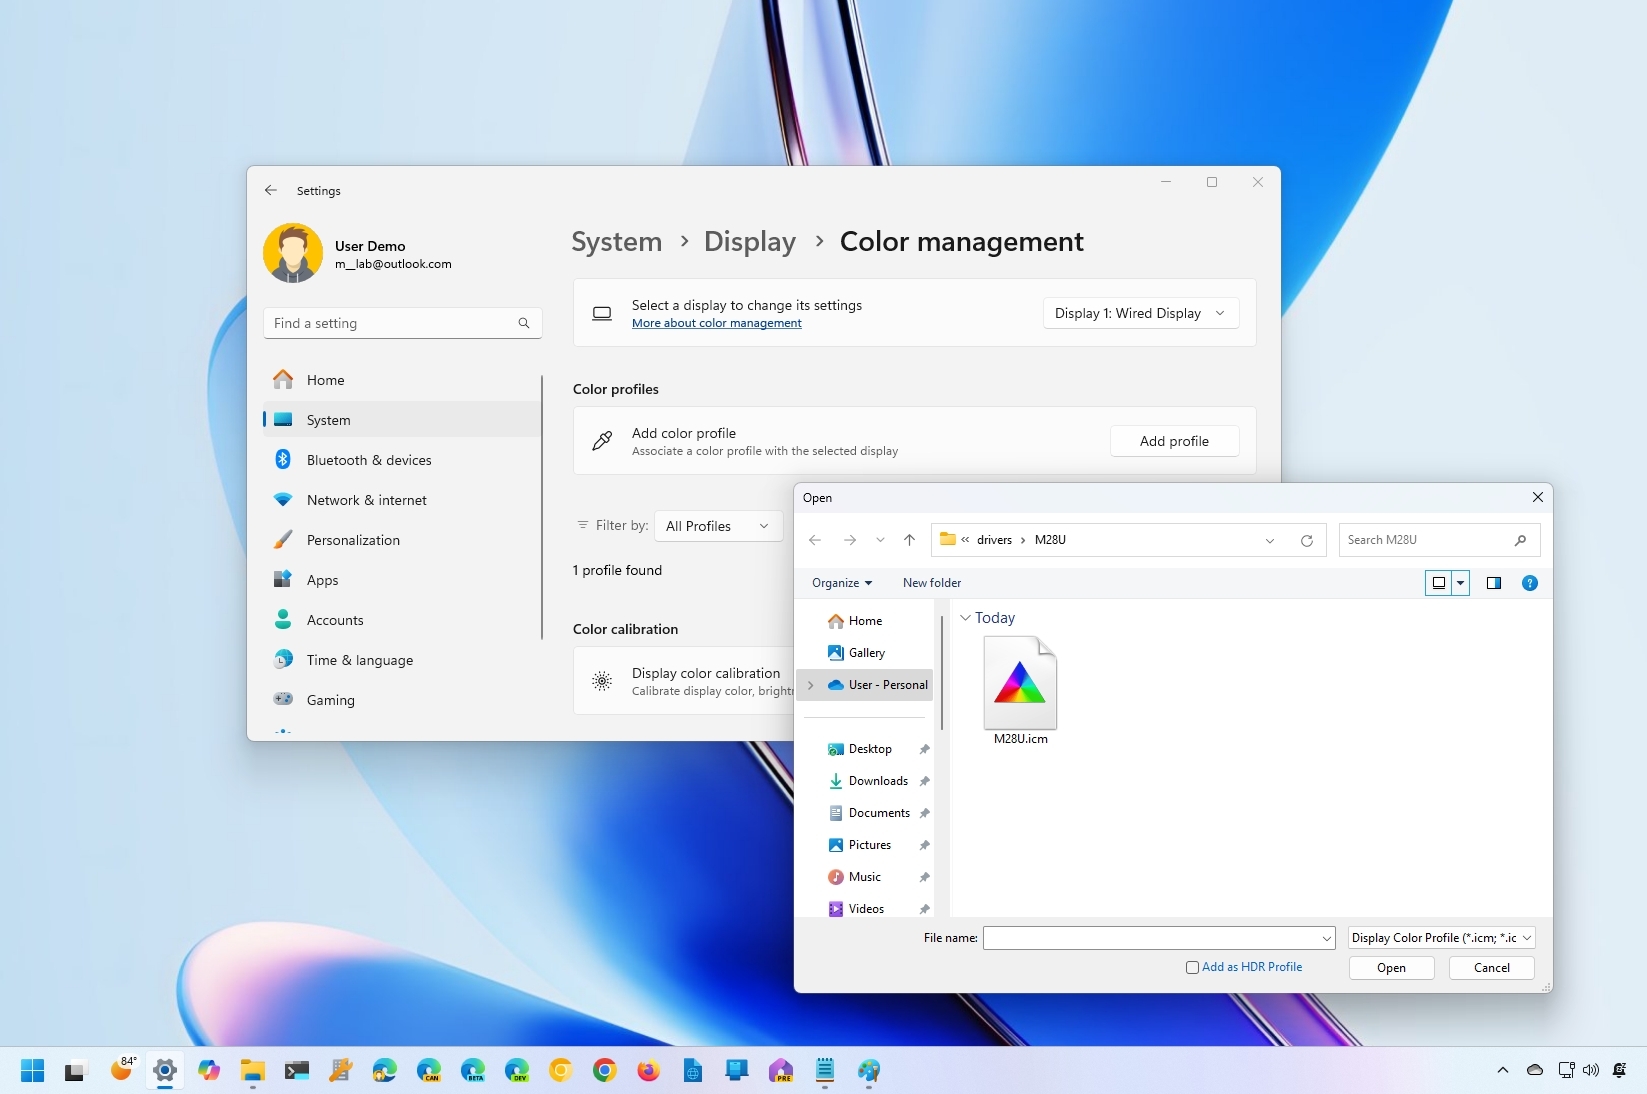
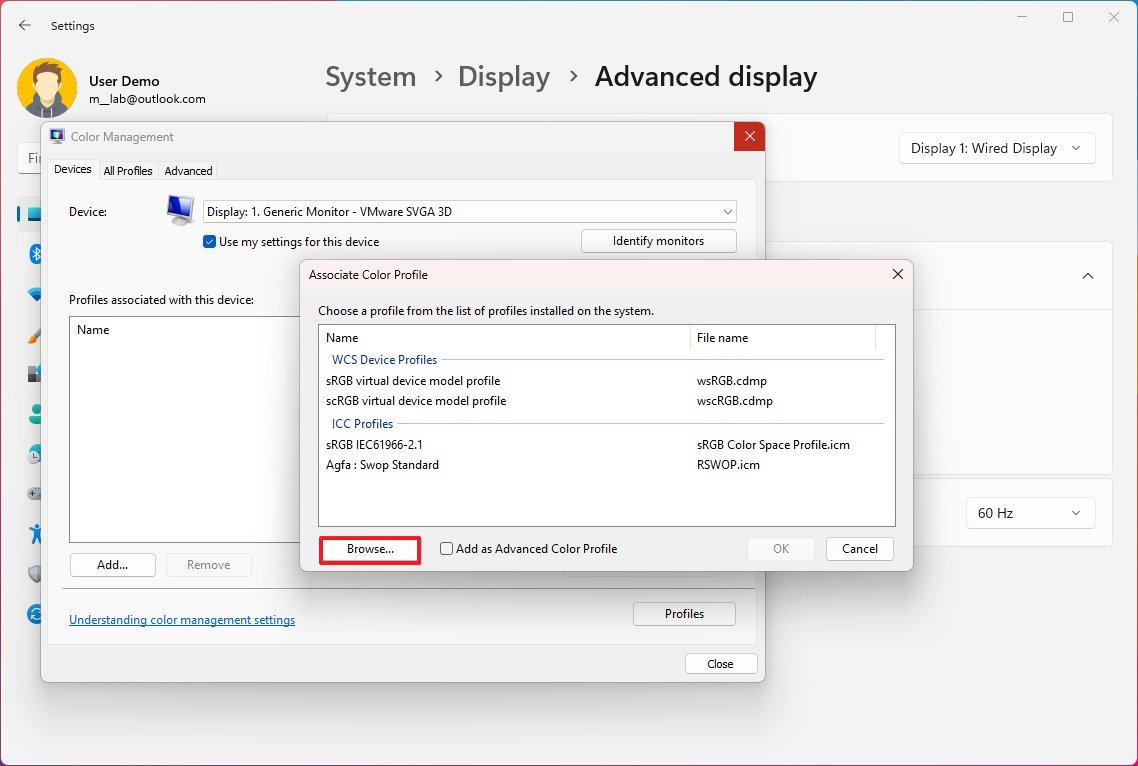
- In the «Associated Color Profile» page, click the Browse button.
- Open the folder with the color profile file.
- Select the «.icm» file.
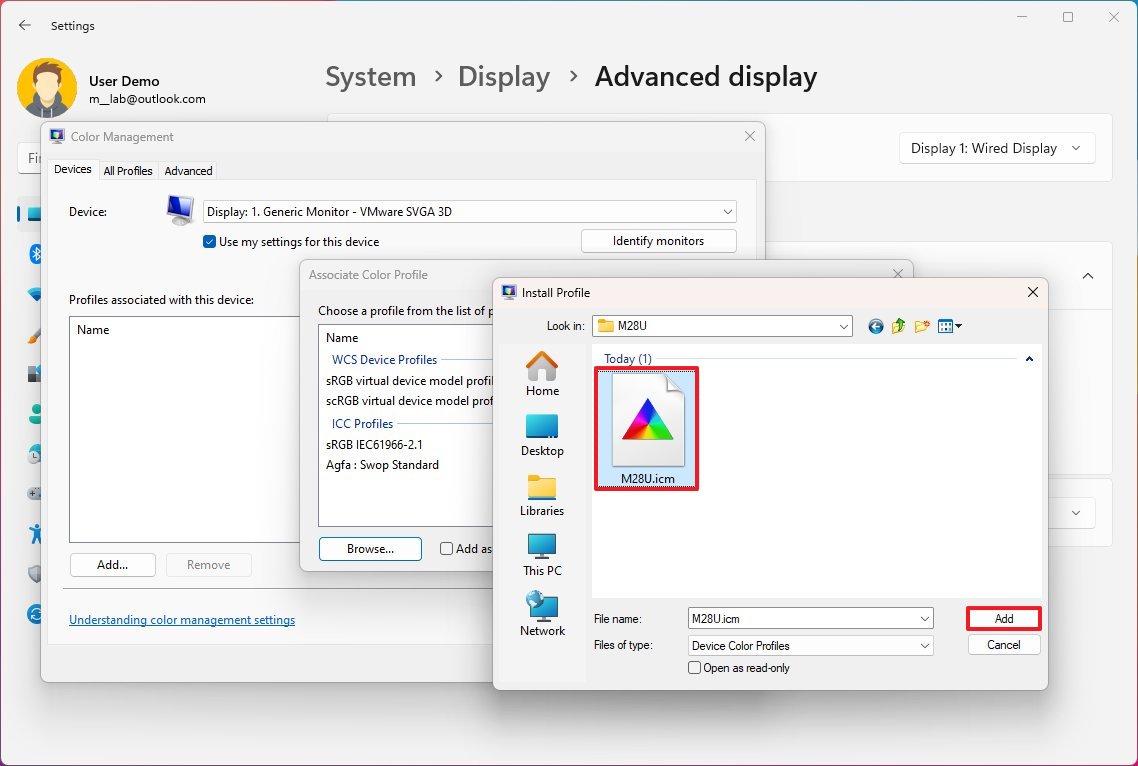
- Click the Add button.
- Click the Close button.
After you complete the steps, the profile will apply, and you should now be able to notice a change in how the display renders colors.
If you want to remove the specific profile, follow the same instructions, but in step 9, select the profile from the list and click the «Remove» button. However, the file containing the profile instructions will continue to be available on your computer. You can refer to the reset instructions to remove it.
Steps for Windows 11 2024 Update
To install a color profile on Windows 11 (version 24H2 and higher releases) from the modern Color Management settings, use these steps:
- Open Settings.
- Click on System.
- Click the Display page on the right side.
- Click the Color profile setting under the «Brightness & color» section.
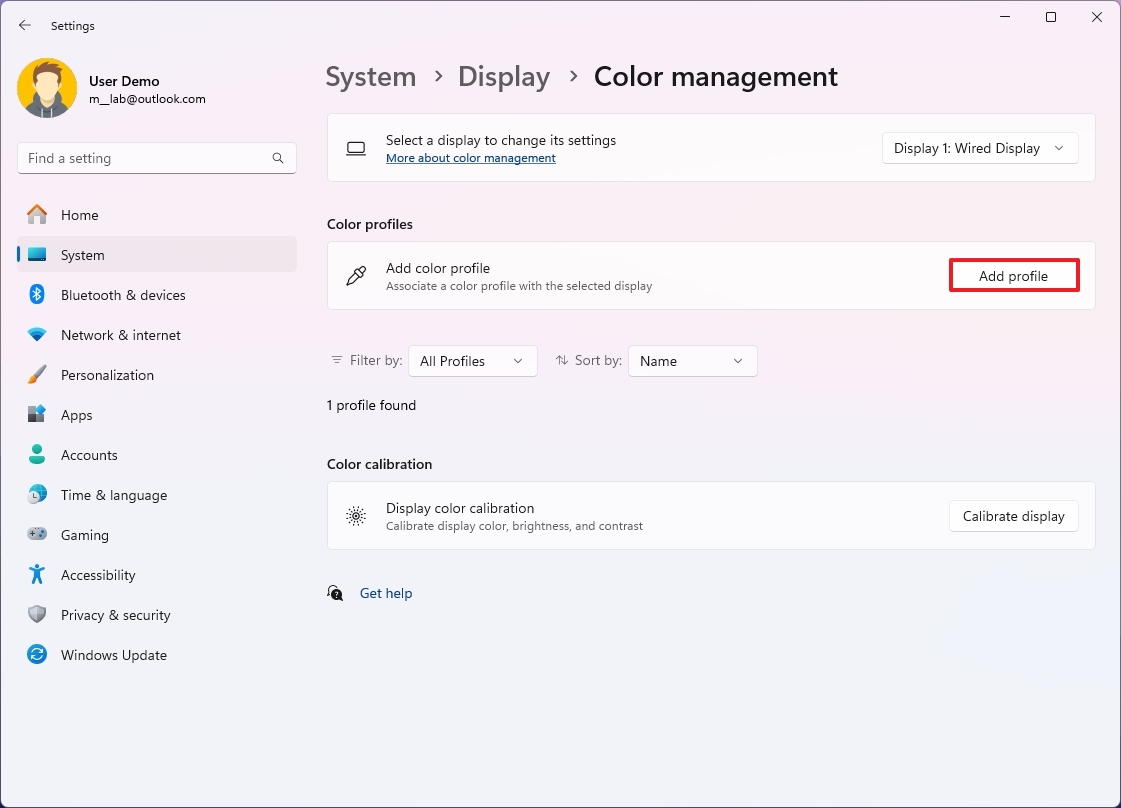
- Click the Add profile button in the «Add color profile» setting.
- Choose the profile file with the «icm» or «icc» extension.
- Click the Open button.

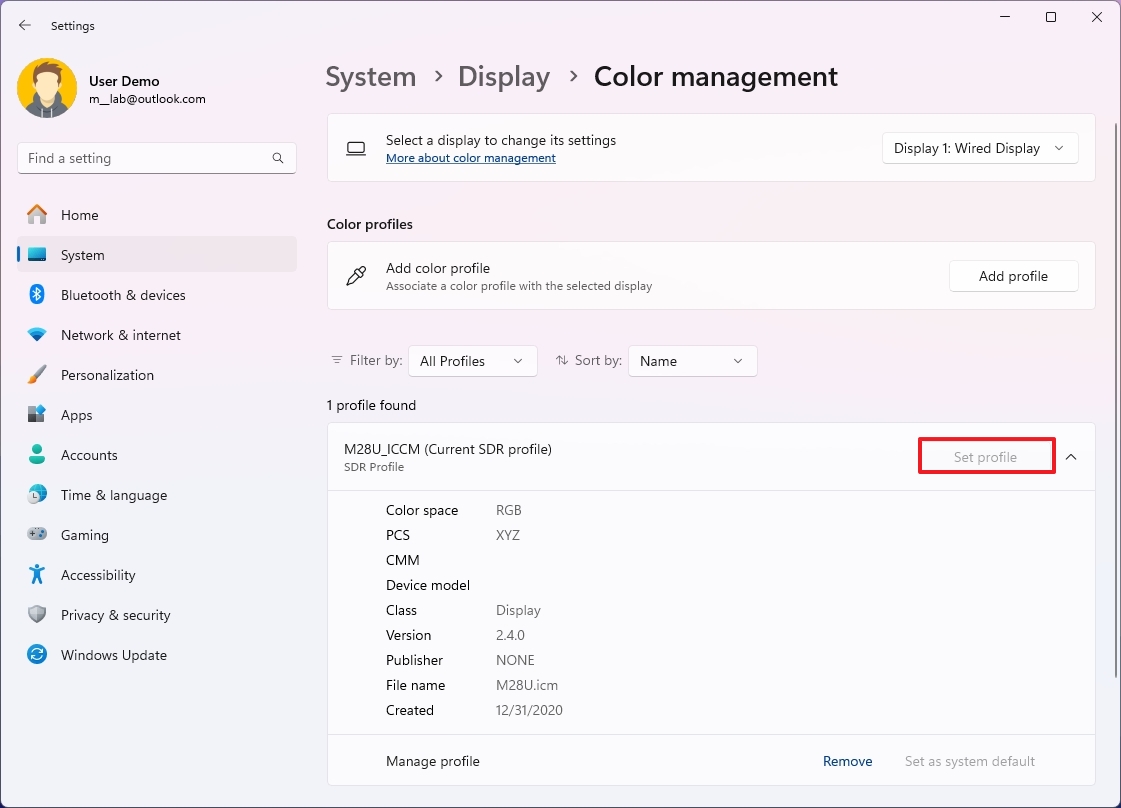
- (Optional) Click the profile setting to review the different details like color space, version, file name, and more.
- (Optional) Click the Set profile button if you have multiple profiles.
Once you complete the steps, the new profile will be applied to your computer.
If you want to remove the specific profile, follow the same instructions, but in step 9, click the «Remove» button. However, the file containing the profile instructions will continue to be available on your computer. You can refer to the reset instructions to remove it.
How to reset color profile settings on Windows 11
In the case that you need to roll back the previous settings, you can use the instructions below to reset to the default color profile configuration on Windows 11 version 24H2, 23H2, and older releases.
To reset the color profile to the default settings, use these steps:
- Open Start.
- Search for Color Management and click the top result to open the app.
- Click the Devices tab.
- Click the Profile button.
- Select the monitor to reset using the «Device» setting.
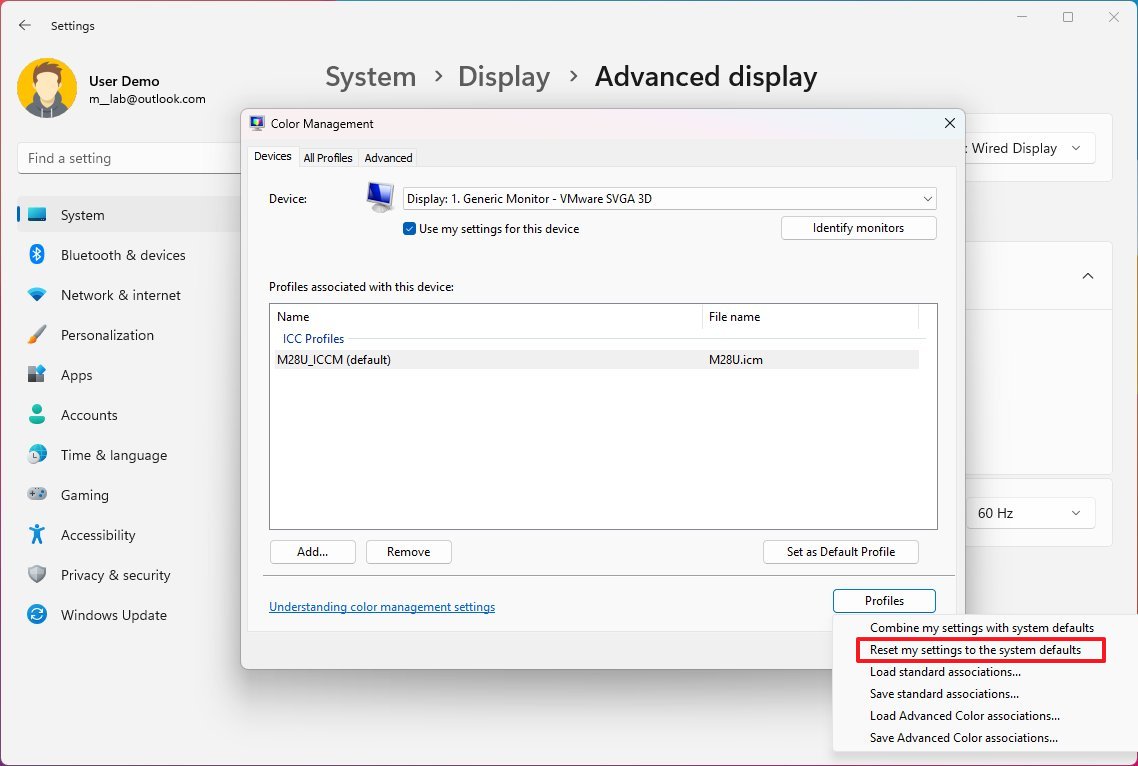
- Click the Profiles button and choose the «Reset my settings to the system defaults» option.
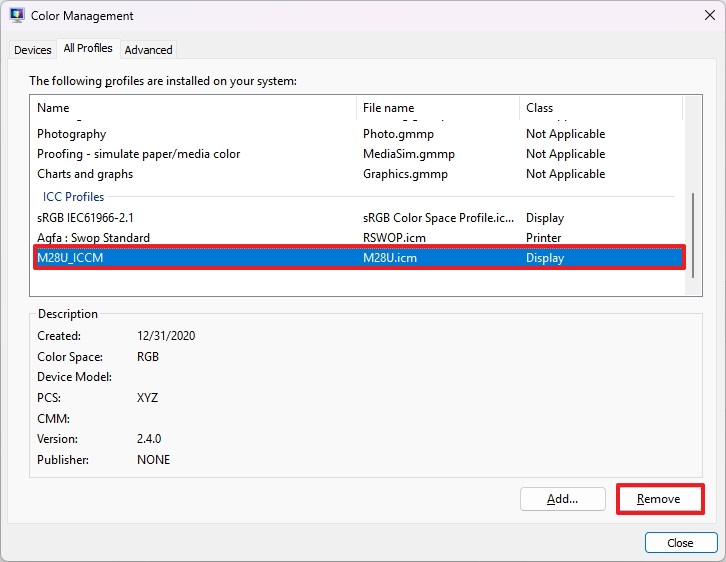
- (Optional) Click the All profiles tab.
- Select the profile you want to remove.
- Click the Remove button.
Once you complete the steps, the profile settings will roll back to the original configuration for that specific monitor.
It’s important to note that even though you can configure a custom profile for your monitor manually, typically, when you connect a display to the computer, the system sets up the recommended color profile. As a result, you should only consider using these instructions if the device is using the wrong profile or you have specific requirements to change the color profile on Windows 11.
More resources
For more helpful articles, coverage, and answers to common questions about Windows 10 and Windows 11, visit the following resources:
- Windows 11 on Windows Central — All you need to know
- Windows 10 on Windows Central — All you need to know
Mauro Huculak has been a Windows How-To Expert contributor for WindowsCentral.com for nearly a decade and has over 15 years of experience writing comprehensive guides. He also has an IT background and has achieved different professional certifications from Microsoft, Cisco, VMware, and CompTIA. He has been recognized as a Microsoft MVP for many years.
- To change the color profile on Windows 11 24H2, open Settings > System > Display > Color profile, click “Add profile,” and open the “ICM” or “ICC” file to change the profile.
- On Windows 11 23H2 and older versions, open Settings > System > Display > Advanced display, click the adapter properties setting, click on “Color Management” from the “Color Management” tab, choose the display, open the “ICM” or “ICC” file, and click “Close.”
On Windows 11, you can add and change a monitor’s color profile to ensure that colors appear as accurately as possible on the screen. In this guide, I will show the steps to complete this configuration, whether you have an older or newer version of Windows.
What is a color profile?
A color profile is a file with instructions that describe how the system should render the correct colors for a specific display. You’ll find two types of profiles, including the ICC and ICM.
While both profiles are virtually the same, “ICC” stands for International Color Consortium, the organization that created the standard format for this profile type, and “ICM” stands for Image Color Management, a term used by Microsoft for color profiles.
How to find and download color profiles?
The easiest way to download color profiles is to open your display manufacturer’s support website, search for your display model, and download the corresponding files on the support page.
Usually, display manufacturers provide these profiles as part of the support aside from the drivers. However, anyone can create and share a color profile. For instance, for this guide, while looking for the profile for my monitor, I found out that the Rtings website also offers color profiles in its reviews. You may also find color profiles from well-known video and photo editing companies.
It’s important to note that sometimes, computer manufacturers will preinstall the corresponding profile in the default installation of Windows 11. Also, when purchasing a monitor, the box typically includes a disc with the drivers and the different profiles, or at least you will receive instructions to download the files from the support website.
In this guide, I will outline the steps to add and switch color profiles on Windows 11.
- Change color profile on Windows 11 24H2
- Change color profile on Windows 11 23H2
To change the color profile of a display on version 24H2 and higher releases, use these steps:
-
Open Settings.
-
Click on System.
-
Click the Display page.
-
Click the Color profile setting to open the “Color management” page.

-
Select the display to change the setting (multi-monitor display).
-
Click the Add profile button from the “Add color profile” setting.

-
Select the ICM or ICC file with the color calibration information.
-
Click the Open button to set the new profile.
-
(Optional) Click the profile setting and click on “Set as system default.”


Once you complete the steps, the monitor should now render the most optimal colors on the screen.
If you have multiple profiles, you can switch them from Settings > System > Display > Color profile and clicking the “Set profile” button. You can also switch profiles from System > Display.
Remove color profile on version 24H2
To remove a profile from your computer, use these steps:
-
Open Settings.
-
Click on System.
-
Click the Display page.
-
Click the Color profile setting to open the “Color management” page.
-
Click on the profile you no longer want.
-
Click the Remove option.

After you complete the steps, the color profile will be removed from Windows, and the settings will reset to the generic configuration.
On Windows 11 23H2, you can switch profiles from System > Display from the “Color profile” setting.
Change color profile on Windows 11 23H2
To change the color profile on version 23H2 and older releases, use these steps:
-
Open Settings.
-
Click on System.
-
Click the Display page.
-
Click the Advanced display setting under the “Related settings” section.

-
Choose the monitor from the “Select a display to view or change its settings” option.
-
Click the “Display adapter properties for Display X” setting.
-
Click the Color Management tab.
-
Click the Color Management button.

-
Choose the display from the “Device” drop-down menu.
-
Check the “Use my settings for this device” option.
-
Click the Add button.

-
Click the Browse button.
-
Open the folder with the color profile file.
-
Select the ICM or ICC file.
-
Click the Add button.
-
Click the OK button.
-
(Optional) Click the “Set as Default Profile” button.
-
Click the Close button.


Once you complete the steps, the screen should now display colors more accurately.
Remove color profile on version 23H2
To remove a specific color profile from your computer, use these steps:
-
Open Settings.
-
Click on System.
-
Click the Display page.
-
Click the Advanced display setting under the “Related settings” section.
-
Choose the monitor from the “Select a display to view or change its settings” option.
-
Click the “Display adapter properties for Display X” setting.
-
Click the Color Management tab.
-
Click the Color Management button.
-
Choose the display from the “Device” drop-down menu.
-
Select the profile from the list.
-
Click the Remove button.

After you complete the steps, the profile file will be deleted, and the screen will continue to work, using the default settings to display colors.
Although the default color rendering should be fine for most users, it’s a critical component for those working with video and photo editing, graphic designers, and gamers.
It’s important to note that setting a color profile does not replace color calibration. If your work relies on color accuracy, you should be using both features.
Color profile vs color calibration
On the one hand, the color profile contains information about a display’s specific capabilities, which helps the operating system render color more accurately. On the other hand, color calibration uses software and sometimes hardware (colorimeter) to measure your monitor’s response to various colors, and then you can use this information to adjust the settings on the monitor.
You can even use calibration to capture the correct measurements to create a custom color profile.
The reason why you have to use both color methods is that all displays will show colors differently, even those from the same company and the same model. For instance, I have a multi-monitor setup. One of the monitors has a brightness level of 36, and the other one is set to 45 for a more even viewing experience.
Are you using a custom color profile on your computer? Let me know in the comments.
В этой статье:
-
Настройка яркости дисплея
-
Ночной свет
-
Управление цветным профилем
-
Использование HDR
Настройка яркости дисплея
Управление яркостью дисплея может значительно улучшить просмотр и сэкономить время работы батареи. Вы можете настроить яркость вручную или позволить компьютеру обрабатывать ее автоматически в зависимости от условий освещения или содержимого.
Важно: Ползунок Яркость может не отображаться на устройствах с внешним монитором. Чтобы изменить яркость внешнего монитора, используйте кнопки на нем.
Чтобы настроить яркость экрана, щелкните значок Сеть в правой части панели задач, а затем переместите ползунок Яркость , чтобы настроить яркость.
Кроме того, можно настроить яркость дисплея в разделе Параметры > системный > дисплей.
Важно: Ползунок Яркость может не отображаться на настольных компьютерах с внешним монитором. Чтобы изменить яркость внешнего монитора, используйте кнопки на нем.
На некоторых компьютерах Windows может автоматически регулировать яркость экрана в зависимости от текущих условий освещения. Чтобы узнать, поддерживает ли это ваш компьютер, выберите Параметры > системный > дисплей. Выберите Яркость, найдите поле Изменение яркости автоматически при изменении освещения проверка а затем выберите его, чтобы использовать эту функцию. Благодаря этой автоматической настройке текст на экране будет хорошо виден независимо от окружающих условий. Даже если вы используете его, вы все равно можете переместить ползунок Яркость, чтобы точно настроить уровень яркости для встроенного дисплея.
Примечание: На дисплеях HDR Windows оптимизирует автоматическую корректировку яркости в соответствии с тем, как воспринимает изменение яркости человеческий глаз. В результате регулировка яркости может занять больше времени на дисплеях HDR при изменении условий освещения.
Некоторые Windows 11 пк могут автоматически настраивать яркость и контрастность экрана в зависимости от содержимого, отображаемого на встроенном экране. Например, если вы смотрите видео с темной сценой, за которой следует более яркая сцена (например, с ярким солнечным днем), яркость и контрастность могут измениться. Это нормально.
Адаптивное управление яркостью содержимого обеспечивает идеальный уровень яркости и контрастности, одновременно экономя питание и обеспечивая более длительное время работы батареи. Если эти внезапные изменения яркости отвлекают вас или если вы работаете в приложениях для фото и видео, где точность цвета важна для вас, эти параметры можно настроить в соответствии с вашими потребностями между обеспечением соответствующей яркости и контрастности и экономией заряда батареи.
-
Нажмите кнопку Пуск и введите параметры. Выберите Параметры > Системный > Дисплей .
-
В разделе Параметры отображения выберите Яркость , а затем при необходимости задайте раскрывающийся список Изменить яркость на основе содержимого:
-
От: Адаптивное управление яркостью будет отключено, а яркость и контрастность экрана не будут регулироваться. Это может привести к более короткому сроку работы батареи.
-
Всегда:Адаптивное управление яркостью всегда будет работать независимо от того, подключено ли устройство к сети или от батареи.
-
Только от батареи: Адаптивное управление яркостью будет активировано только в том случае, если устройство работает от аккумулятора.
-
Ночной свет
Дисплей излучает синий свет, похожий на дневной. Однако ночью этот свет может мешать вам спать. Чтобы лучше засыпать, включите ночной свет для дисплея. В результате свет дисплея смягчится и не будет утомлять глаза.
Примечание: Ночной индикатор недоступен, если на устройстве используются определенные драйверы, например DisplayLink или Basic Display.
Щелкните значок Сеть в правой части панели задач. затем найдите Ночной свет в разделе Быстрые параметры и выберите его, чтобы включить или отключить его.
Кроме того, можно переключить параметр Ночной свет в разделе Параметры > системный > дисплей.
-
Нажмите кнопку Пуск , а затем введите параметры в поле поиска. Выберите Параметры > Система > Отображение > ночного света.
-
Переместите ползунок прочности, чтобы отрегулировать интенсивность уменьшения синего света.
-
Нажмите кнопку Пуск , а затем введите параметры в поле поиска. Выберите Параметры > Система > Отображение > ночного света.
-
Включите параметр Расписание ночного света. Затем выберите От заката до рассвета или Установить время и задайте время включения и отключения ночного света.
Управление цветным профилем
Параметры управления цветом Windows позволяют пользователям добавлять или удалять цветовые профили, задавать цветовые профили по умолчанию для подключенных дисплеев, а также получать доступ к калибровке дисплея и включать автоматическое управление цветом.
Творческие профессионалы и энтузиасты заботятся о полностью откалиброванных, точных цветах, потому что это помогает обеспечить согласованность цветов от начала до конца своих проектов. Автоматическое управление цветами в Windows обеспечивает управление цветом на уровне системы, чтобы цвета в приложениях Windows отображались точно и согласованно на поддерживаемых дисплеях независимо от того, управляются ли они цветом.
Автоматическое управление цветом также помогает новым и обновленным приложениям отображать больше цветов с большей точностью. Это обеспечивает дополнительную детализацию и меньшее число цветовых артефактов (например, в градиентах, тени и более темных сценах или рисунках). Благодаря автоматическому управлению цветом приложения могут использовать миллиарды цветов с точностью от 10 до 16 бит. Даже на дисплеях, поддерживающих только 8-разрядный цвет, автоматическое управление цветом помогает улучшить качество цвета с помощью различных методов, таких как дизеринг.
Включение автоматического управления цветом
-
Нажмите кнопку Пуск , а затем выберите Параметры > Системный > Дисплей > Профиль цвета.
-
Выберите дисплей в верхней части экрана, а затем проверка для следующего параметра: Автоматическое управление цветом для приложений.
-
Выберите Автоматически управлять цветом для приложений, чтобы включить его.
-
Перейдите в раздел Параметры > Системный > Дисплей > Профиль цвета.
-
На странице Параметры управления цветом выберите дисплей, для которого вы хотите управлять цветными профилями.
-
Добавьте новый цветной профиль, щелкнув Добавить профиль и найдите цветной профиль.
-
Перейдите в раздел Параметры > Системный > Дисплей > Профиль цвета.
-
На странице Параметры управления цветом выберите дисплей, для которого вы хотите управлять цветными профилями.
-
Разверните цветной профиль, который нужно удалить, и нажмите кнопку Удалить в нижней части экрана.
-
Перейдите в раздел Параметры > Системный > Дисплей > Профиль цвета.
-
На странице Параметры управления цветом выберите дисплей, для которого вы хотите управлять цветными профилями.
-
Задайте один из цветовых профилей по умолчанию, нажав кнопку Задать профиль.
-
Перейдите в раздел Параметры > Системный > Дисплей > Профиль цвета.
-
Выберите Calibrate display (Калибровка дисплея ) и следуйте инструкциям по калибровке дисплея. При этом будет создан новый цветовой профиль для дисплея, на котором расположен инструмент калибровки.
Использование HDR
Содержимое HDR в Windows обеспечивает лучшую яркость и цветовые возможности по сравнению с традиционным содержимым (иногда называемое стандартным динамическим диапазоном [SDR]). Традиционное содержимое обычно показывает детали в яркой части сцены или более темной части сцены, но не в обеих частях одновременно.
Дополнительные сведения о параметрах HDR в Windows см. в статье Что такое HDR в Windows?
Do you want to install an ICC profile on your Windows 11 system to adjust your display color with a particular device?
But before starting installing the ICC profiles, you want to know the step-by-step installation process. You also want to learn the ICC profile load or activation process to avoid color issues on your Windows 11 computer.
Right now, you are looking for a complete step-by-step guide to installing the ICC profiles and color adjustments process.
If this is your scenario, you are landed in the right place.
In this in-depth guide, I will walk you through the steps to help you install the ICC profiles. You will also learn the process of active or loading the ICC profile and adjustments of color profile to avoid color issues on your Windows 11 computer.
Keep reading and precisely follow the step-by-step guide.
So, let’s begin to learn the ICC profiles installation process.
Installing the ICC profiles is an easy and quick process. Within a few clicks and minutes, you can install your ICC profile.
ICC profiles are used to match the external devices such as a printer, camera, scanner, etc., color values on your display, and it automatically synchronizes your external devices’ color accuracy.
The ICC profiles allow you to easily get the external devices’ color accuracy on your computer display, which helps you do your work efficiently.
This section will describe an ultimate step-by-step guide to installing the ICC profiles on your Windows 11 computer.
There are a few ways to install the ICC profiles on your Windows 11 computer. Here I will describe all of those methods.
So, let’s get started to know the ICC profiles installation process.
Check out the easiest way to Fix Installation Failed Error 800f0830 on Windows 11.
Here are the steps to install ICC profiles on Windows 11 computer:
1. Install via Right Mouse Click
The first method to install the ICC profiles is by right-clicking on your mouse. It is the easiest and quick way to install the ICC profiles on your Windows 11 computer.
Here are the steps to install the ICC profiles:
- Go to your specific external device website to download the ICC profile you want to install.
- Click on the download button to download the ICC profile file.
- Open the folder where the ICC profile file is downloaded.
- Select your downloaded .icc extension profile file and right-click on it to open the file context menu.
- Select the Install Profile to start the installation process.
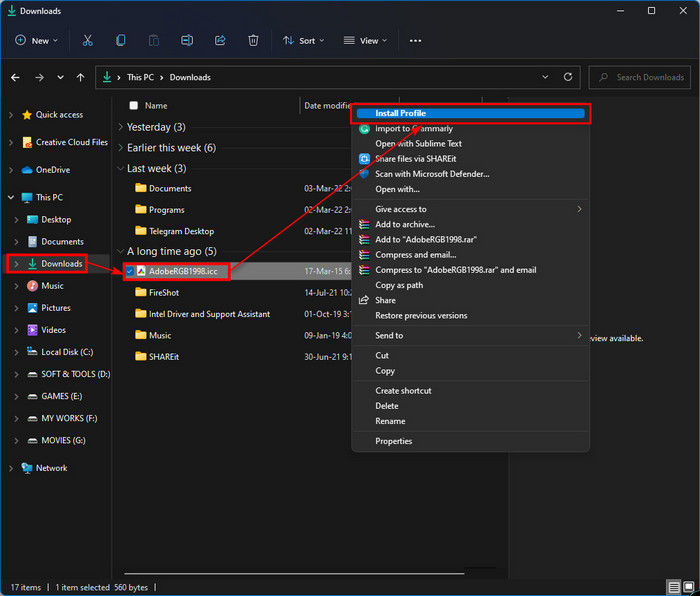
- Wait a few moments to finish the installation.
After some time, your ICC profile installation is completed, and you are ready to use the ICC profile on your Windows 11 computer.
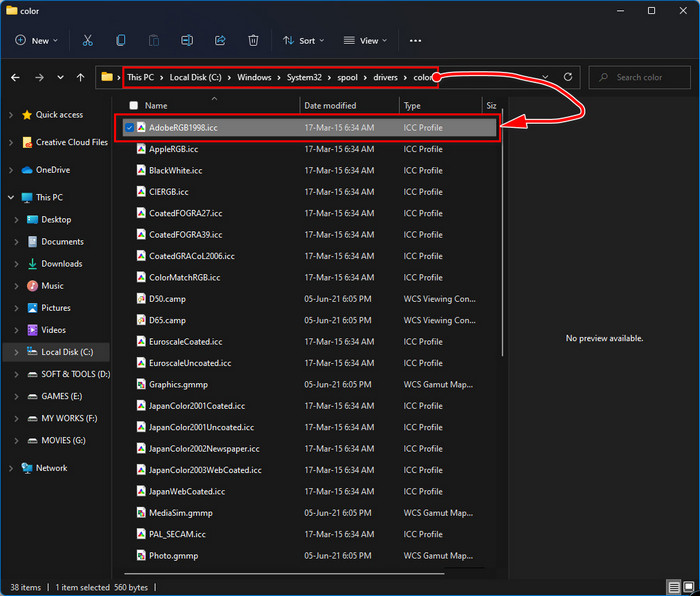
2. Install via Copy & Paste
Another effective and easy method to install the ICC profiles on your Windows 11 computer is copying and pasting your ICC profiles file into your Windows driver’s color folder.
Here are the steps to install the ICC profiles:
- Go to your specific external device website to download the ICC profile you want to install.
- Click on the download button to download the ICC profile file.
- Open your download folder where the ICC profile file is downloaded.
- Select and copy your downloaded .icc extension profile file.
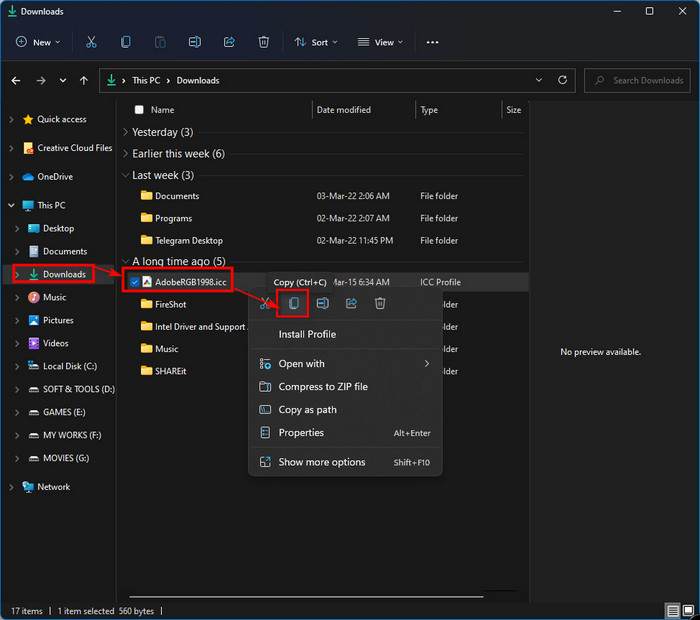
- Go to the C:/Windows/system32/spool/drivers/color folder.
- Paste your copied file into the color folder for installing your ICC profile.
Also, check our latest post on how to Fix Sound Cracking Issue on Windows 11.
How to Activate or Load ICC Profiles on Windows 11
After installing the ICC profiles successfully on your Windows 11 computer, you need to activate or load to use the ICC profile on your display.
Here are the steps to activate or load the ICC profile on Windows 11:
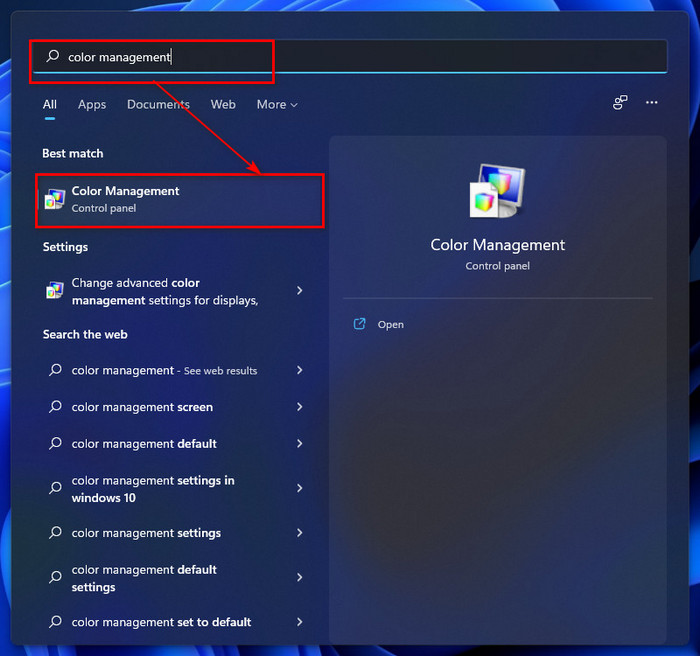
- Press Win + S on your keyboard to open the Windows Search panel.
- Type color management on the search bar.
- Click on the search result or hit the Enter key to open Color Management.
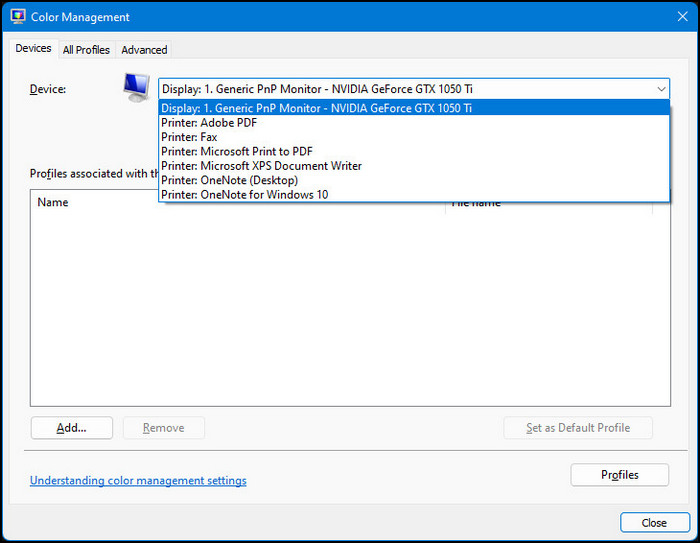
- Click on the drop-down menu next to the Device.
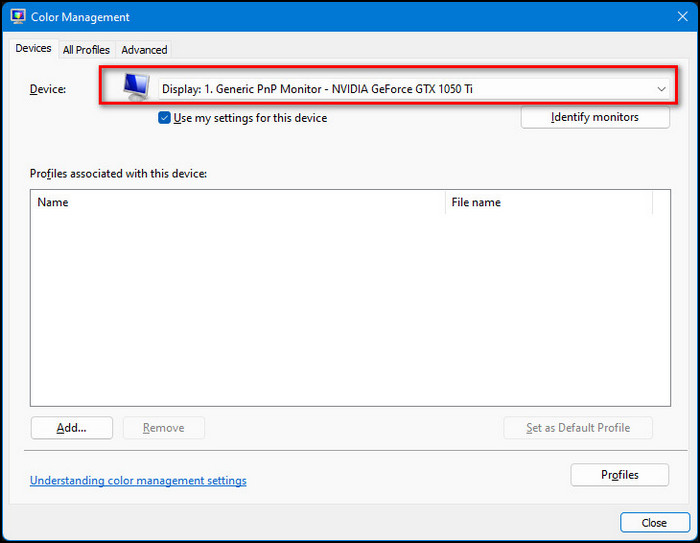
- Select your specific display to show the ICC color profile if you use more than one monitor. If you use a single display, ignore this option because your display is automatically selected.
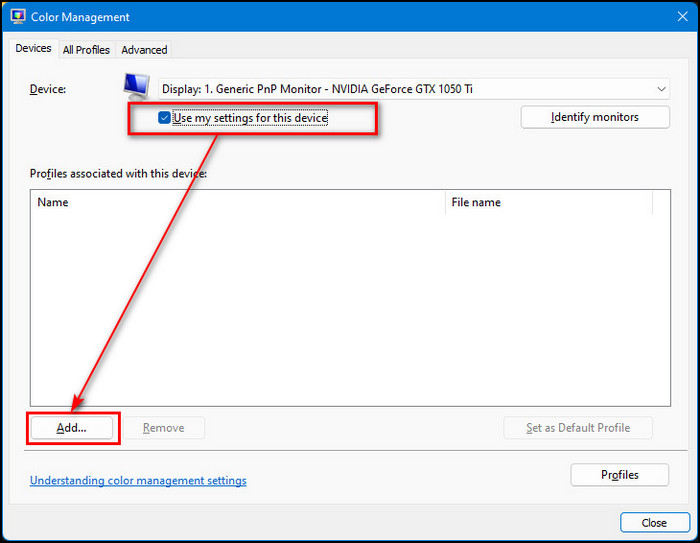
- Check to Use my settings for this device checkbox.
- Click on the Add button to add your installed ICC profile.
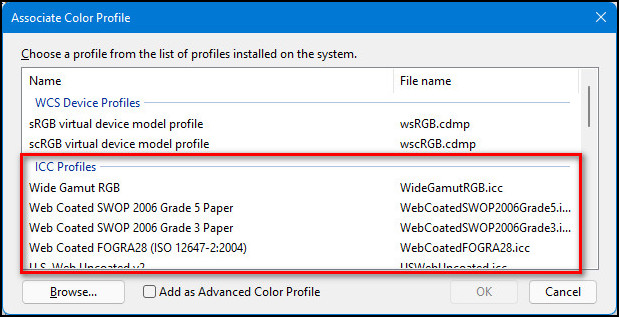
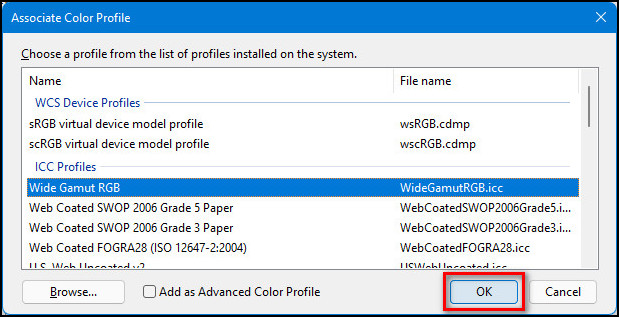
- Choose your ICC profile from the list of profiles installed on the system under the ICC Profiles.
- Click on the OK button to activate or load your profile.
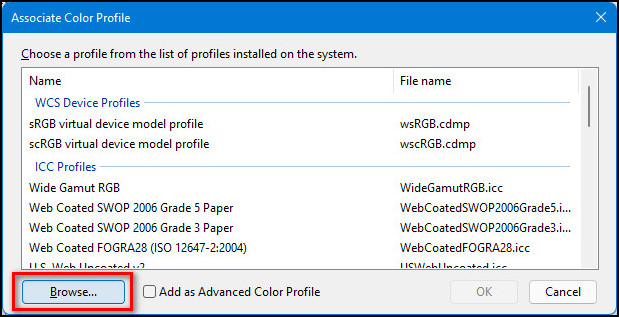
- Click on the Browse button and select your ICC profile .icc file to install and activate your ICC profile directly if you want.
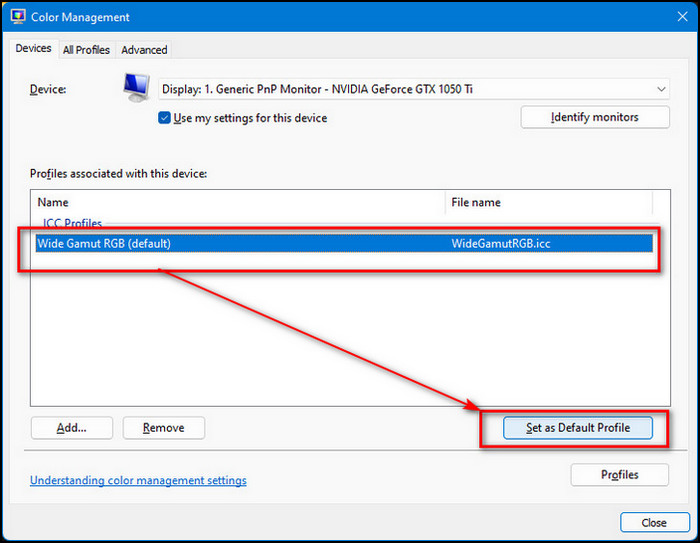
- Select your profile and click on the Set as Default Profile button to set the profile as a default profile on your display.
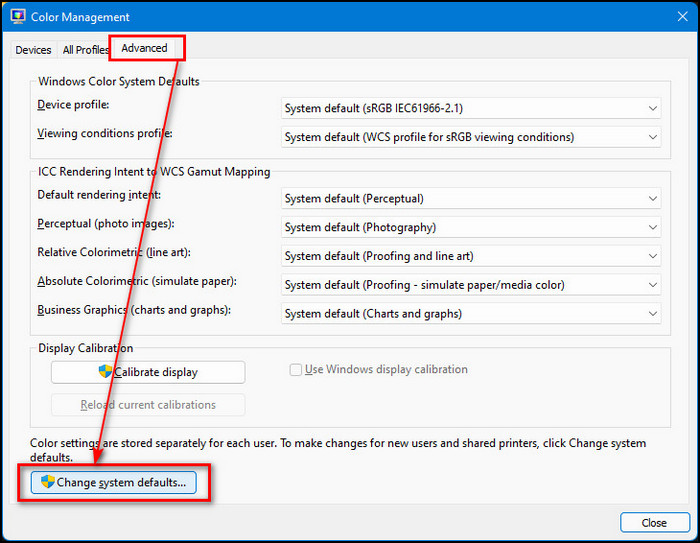
- Go to the Advanced tab.
- Click on the Change system defaults button at the bottom of the window and go to the Advanced tab again.
- Check to Use Windows display calibration checkbox.
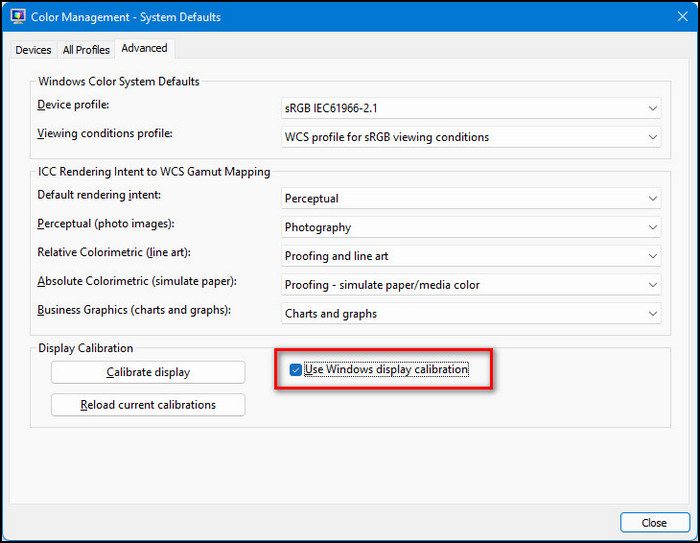
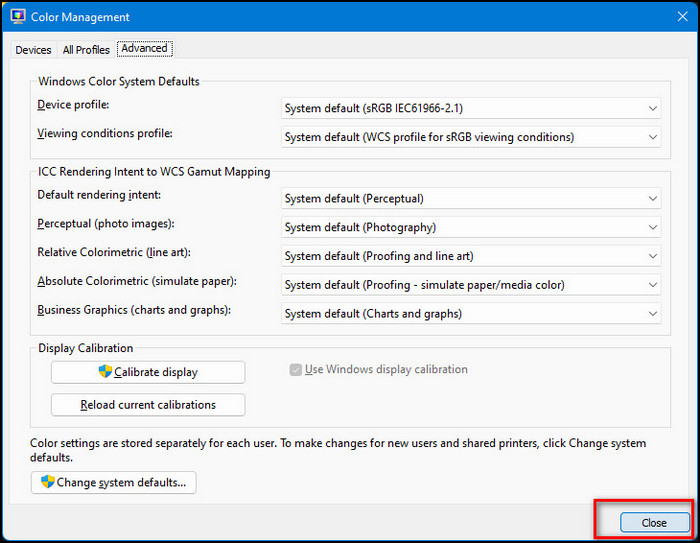
- Click on the Close button to leave the window.
Related guide: How to Backup and Restore in Windows 11.
Final Thoughts
The ICC profiles are simple to install and take only a few minutes. You may install your ICC profile within a few clicks.
After reading and following the whole instructions, you learn the ultimate step-by-step guide to installing the ICC profiles on your Windows 11 computer.
You also understand how to load or activate the ICC profiles on your Windows 11 computer.
If any solutions can solve your problem, let me know which method works for you. I hope this post is helpful and easy to understand for you, and you can easily install the ICC profiles on your Windows 11 system.
Farhan Max
Farhan Max is a tech geek with a particular interest in computer hardware. He’s been fascinated by gaming since childhood and is now completing his undergraduate studies while researching and testing the latest tech innovations. Alongside his love for all things geeky, Farhan is also a skilled photographer.