
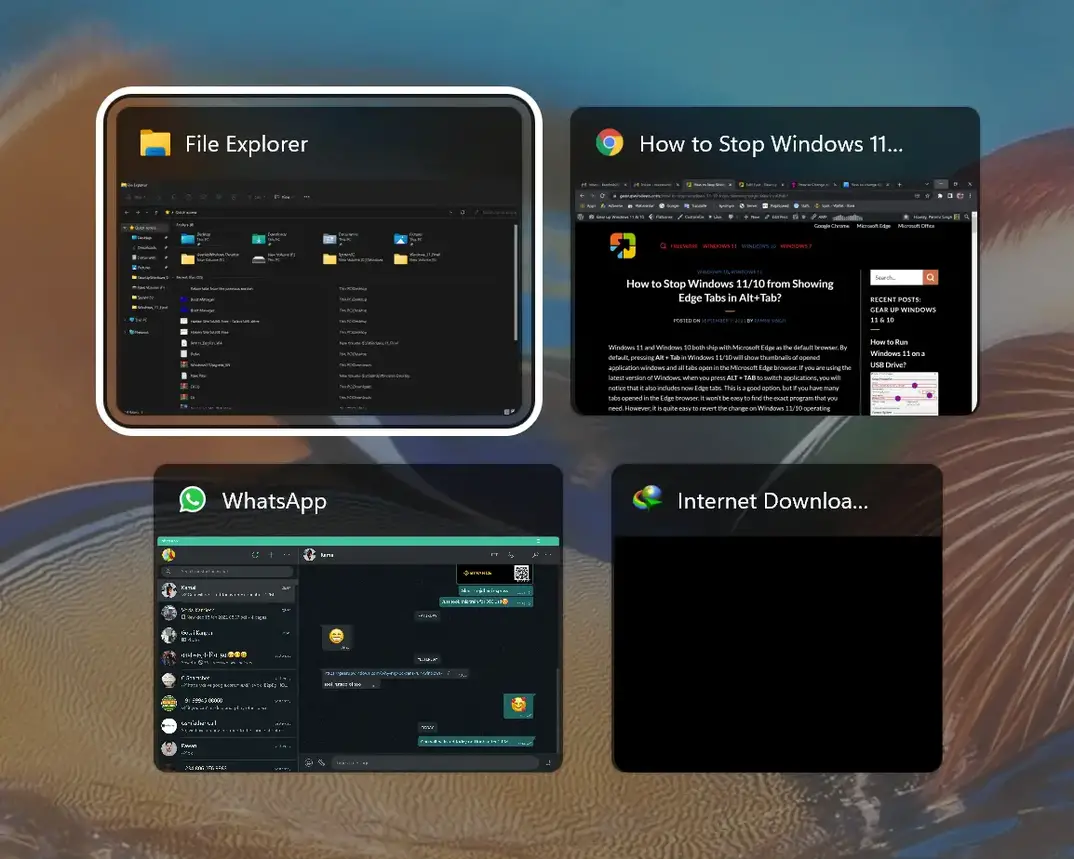
When we press the Alt+Tab hotkey on a Windows 11 PC, it shows the thumbnails of opened windows and Microsoft Edge tabs and helps us switch from one application to another. If you want, you can customize this default Alt+Tab behavior.
Simply hold down the Alt key and keep pressing the Tab key to scroll through your open windows. When you see an outline around the window you want to work on, release both Alt and Tab keys.
Alt+Tab hokey moves typically forward, from left to right. If you miss a window, hold the Alt key and keep pressing the Tab key until you get back to the window you want to select. When you see the desired window, release both keys.
You can also use the Alt+Shift+Tab hotkey to move through the windows in reverse order instead of from left to right.
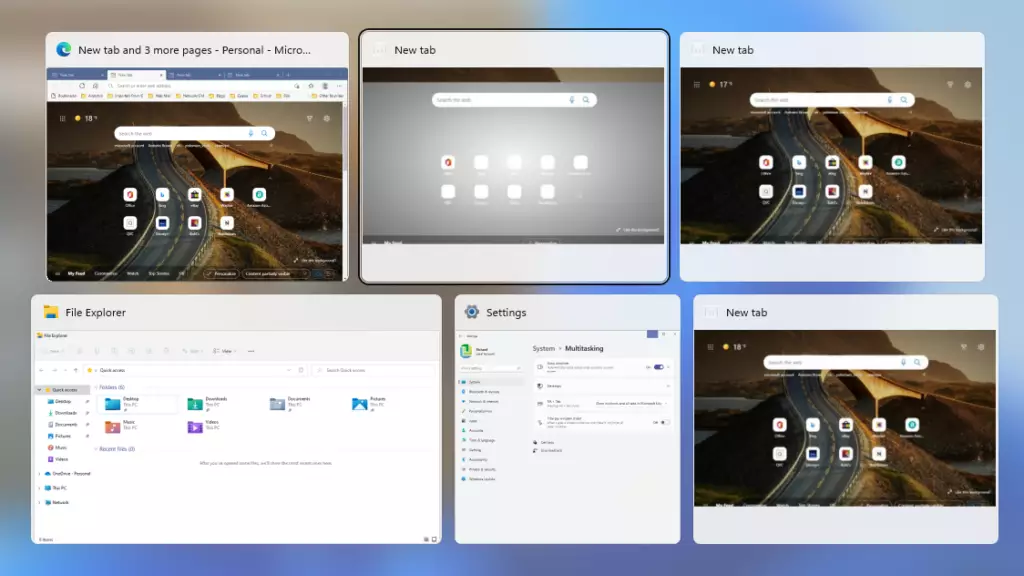
In Windows 11, Microsoft has added additional features to the Alt+Tab hotkey to open Microsoft Edge tabs as windows. If you want, you can configure the Alt+Tab keys to perform the following actions:-
- Open windows and all tabs in Microsoft Edge.
- Open windows and 5 most recent tabs in Microsoft Edge (default).
- Open windows and 3 most recent tabs in Microsoft Edge.
- Open windows only.
How to Configure Alt+Tab Settings in Windows 11?
To change or configure Alt+Tab settings in Windows 11, do the following:-
Step 1. First, launch the Settings app by pressing the Windows + I keys.

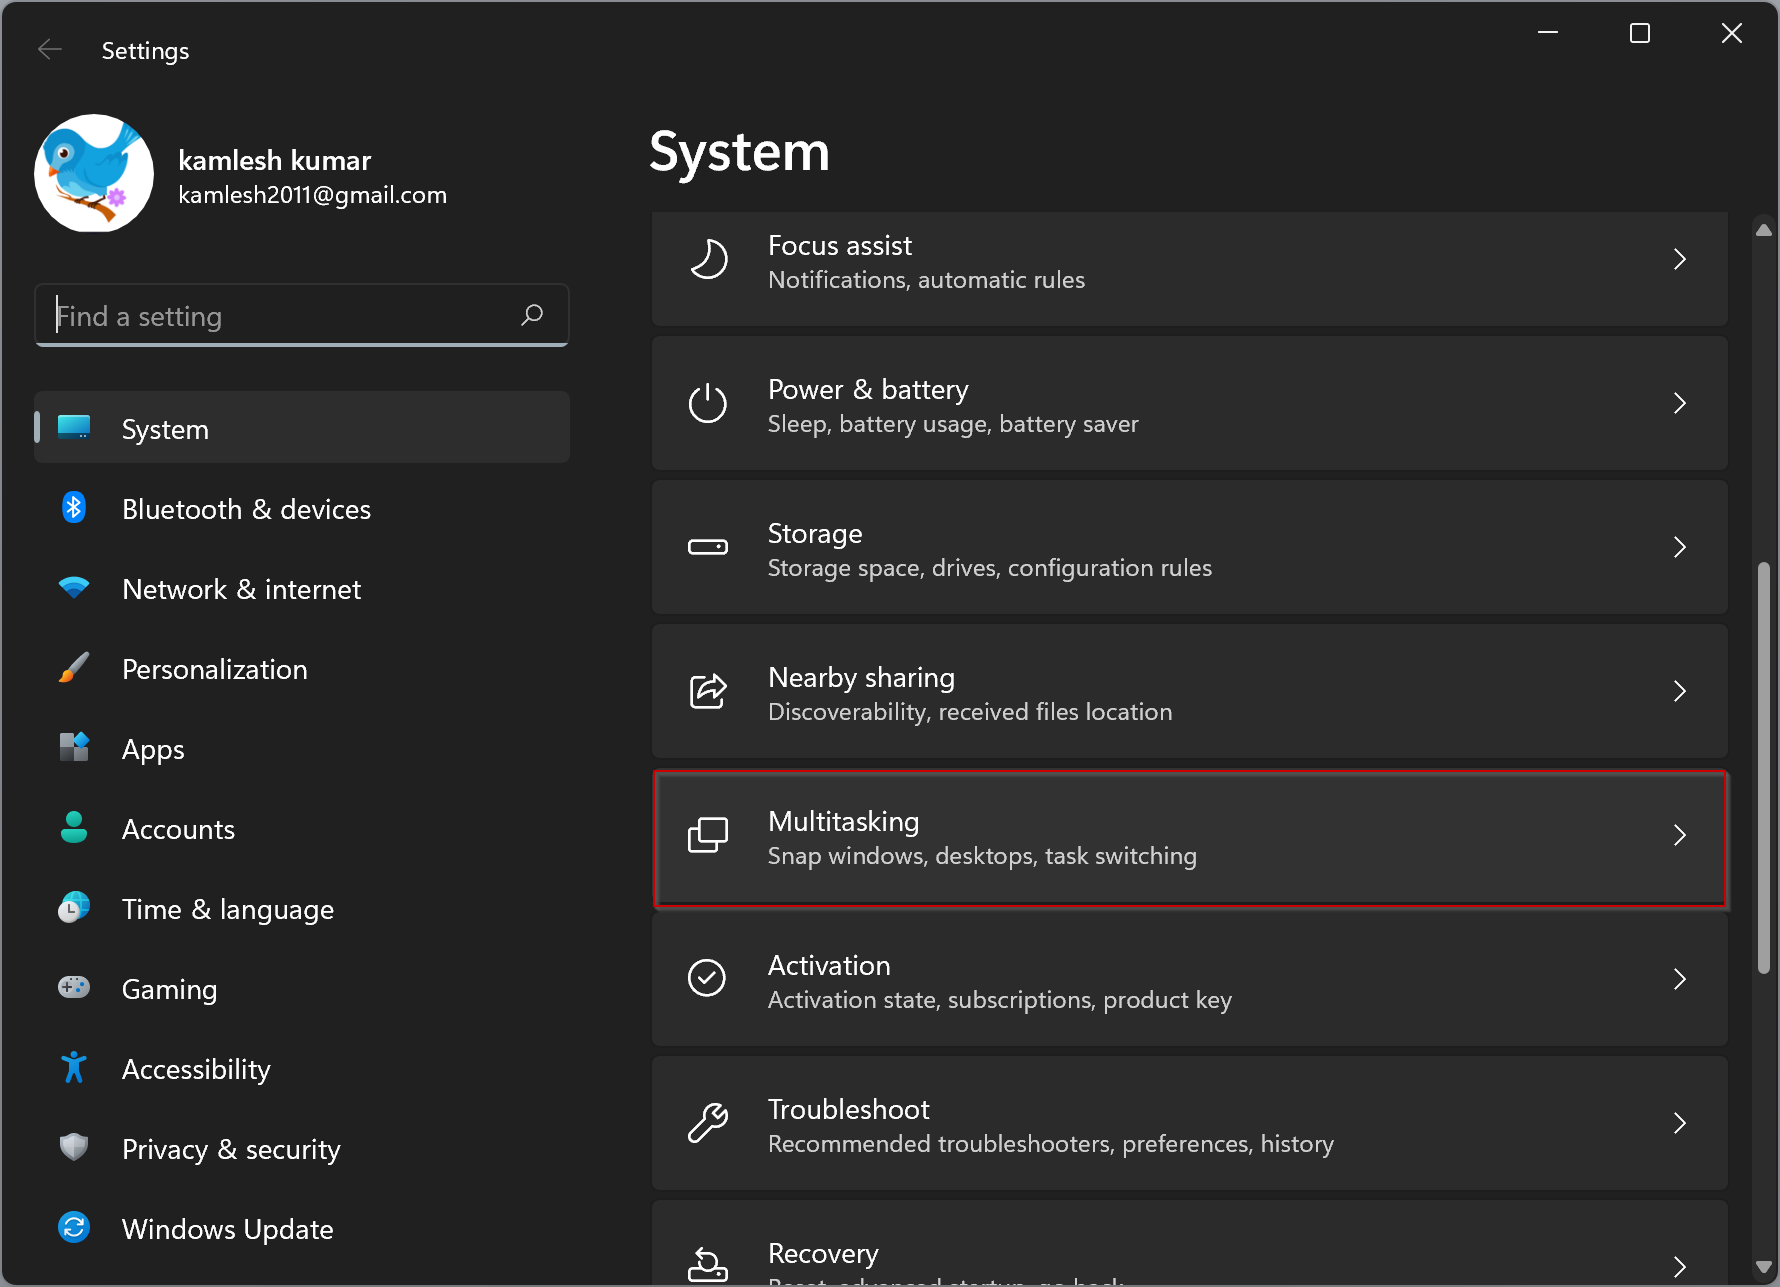
Step 2. When Windows Settings appears on your computer, select the System category in the left side pane.
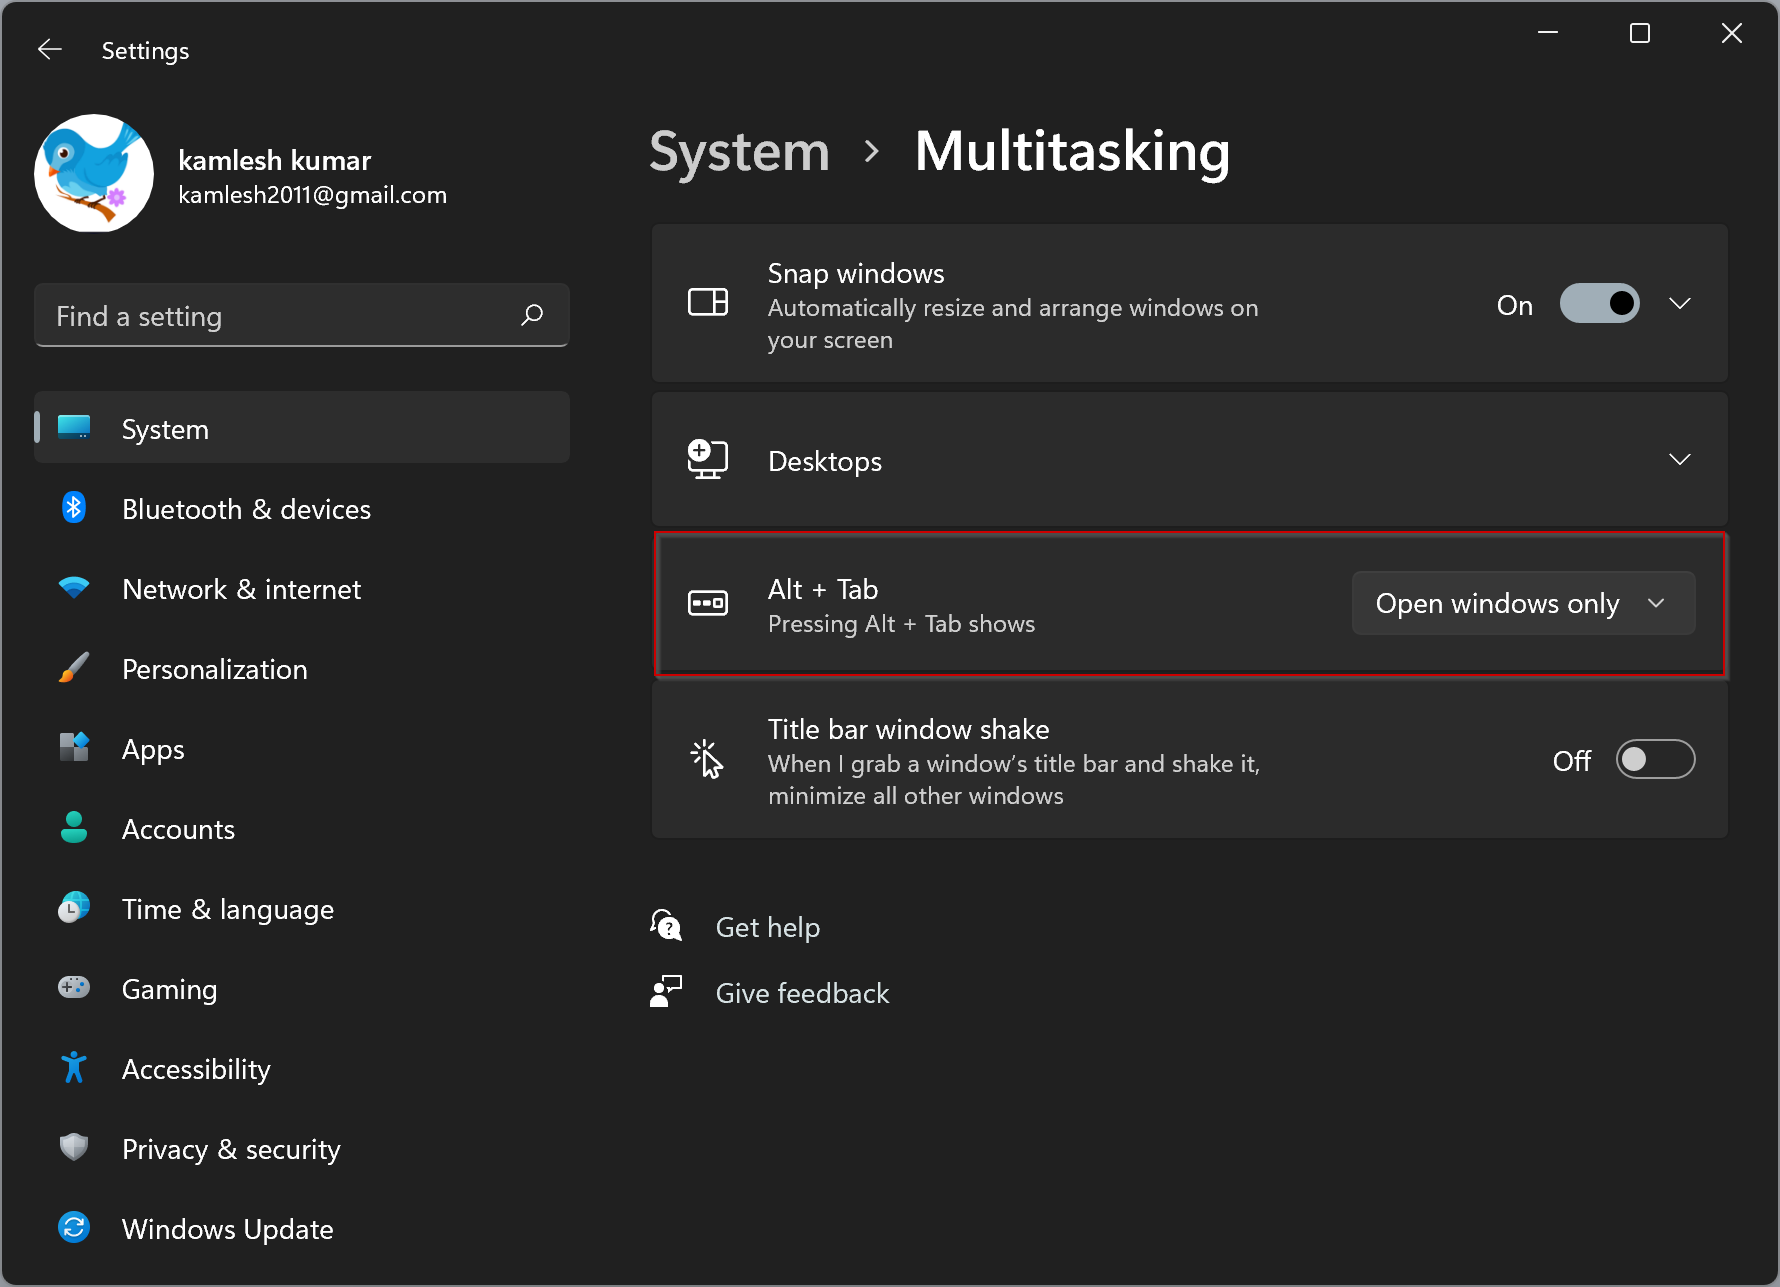
Step 3. Then, select the Multitasking tile on the right side pane of the System.
Step 4. On the Multitasking settings page, locate the “Alt + Tab” header and click the drop-down menu there.
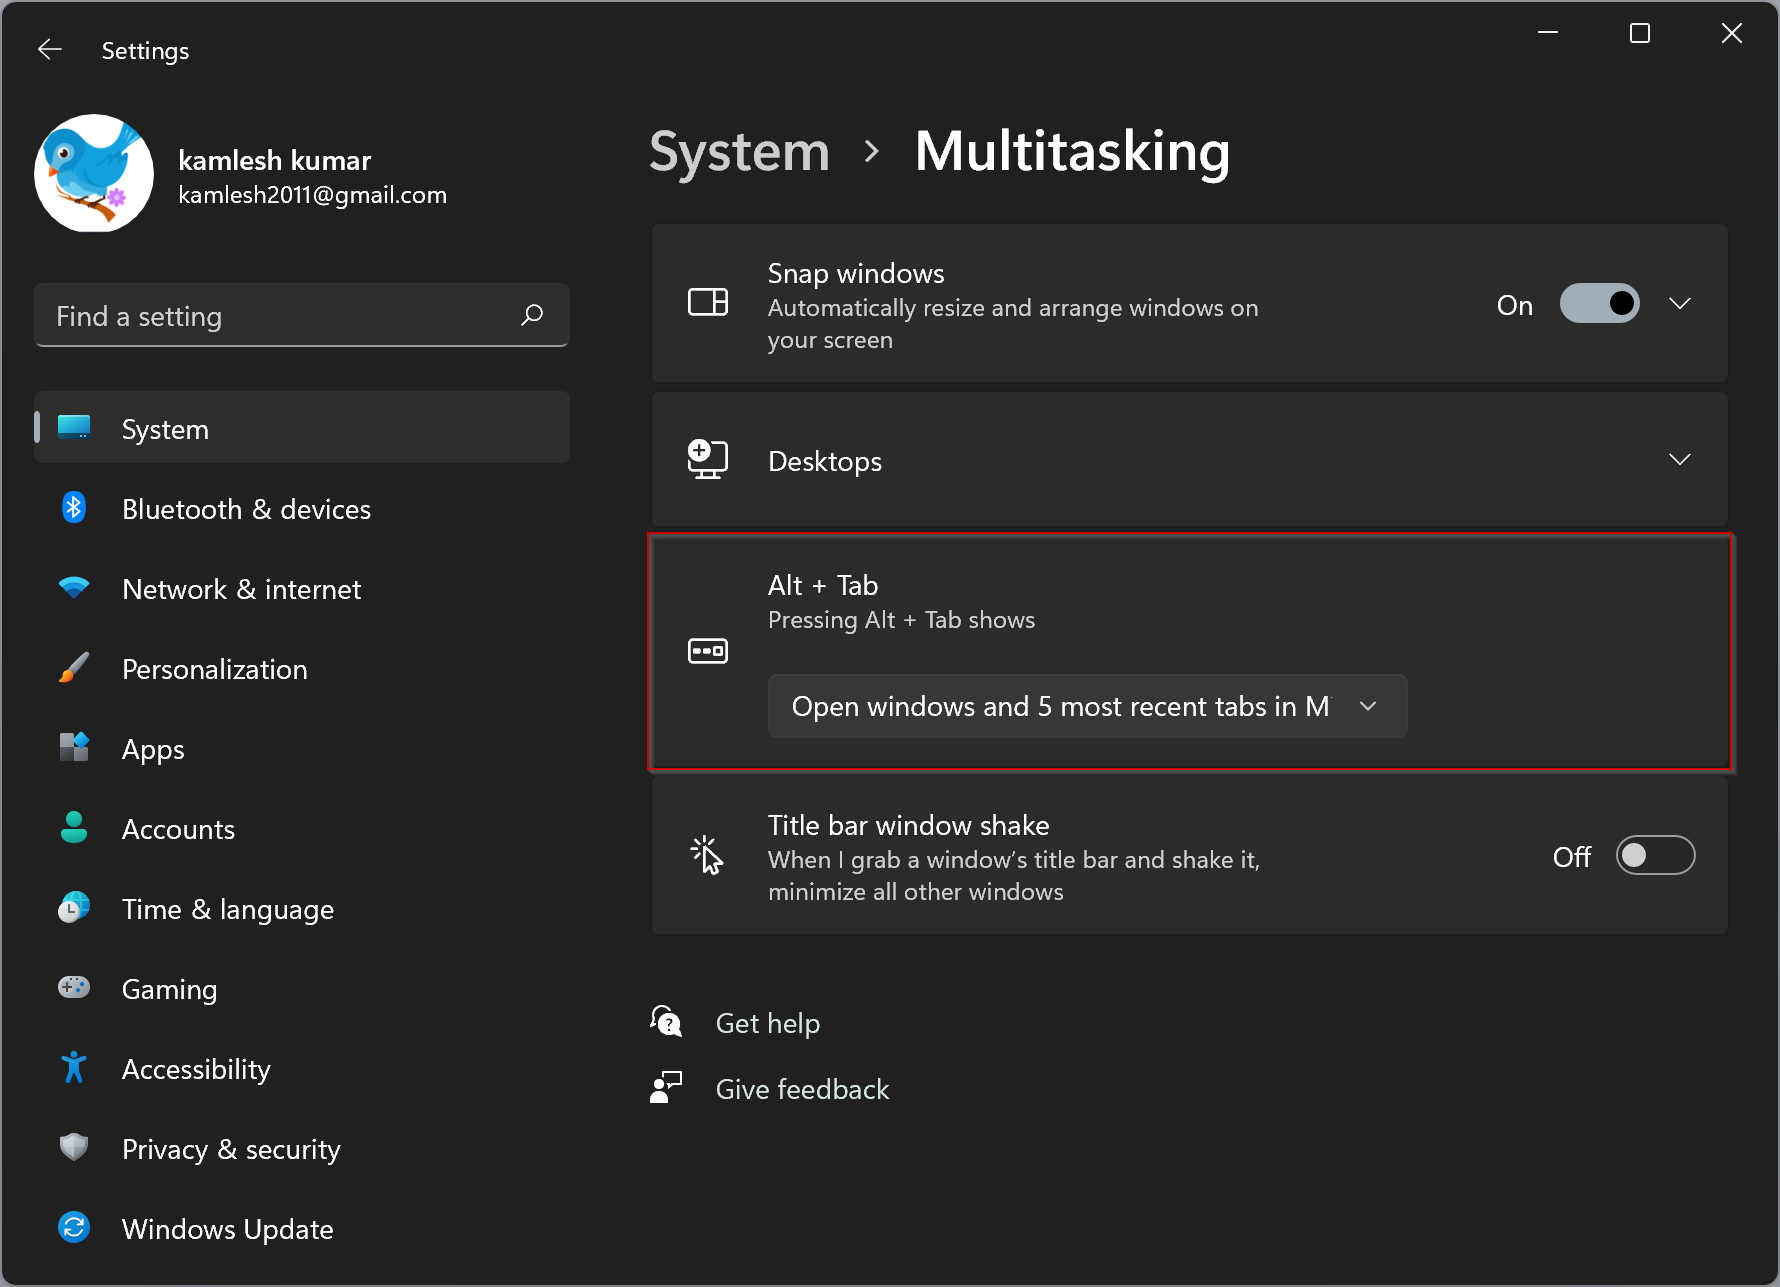
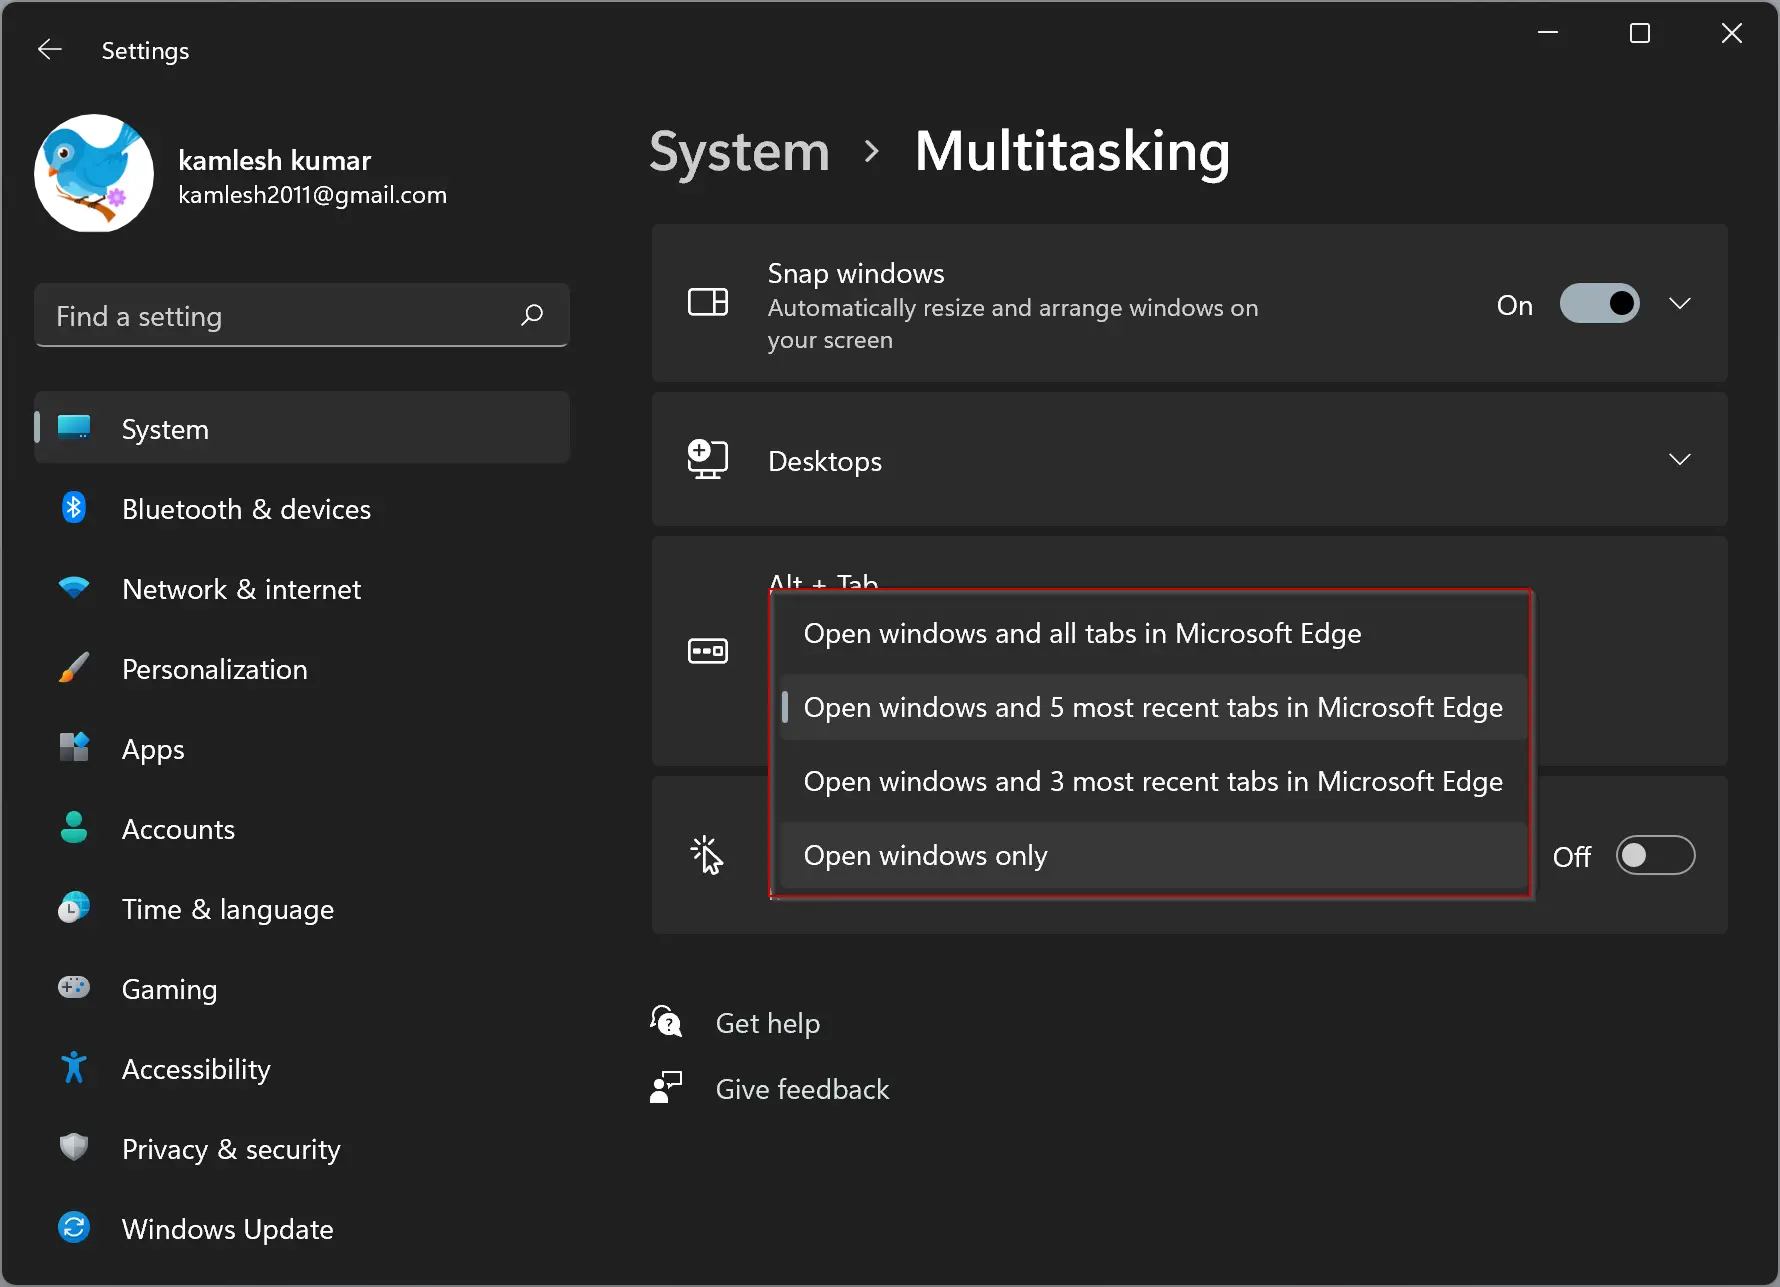
Step 5. In the drop-down menu, select an item according to your needs:-
- Open windows and all tabs in Microsoft Edge.
- Open windows and 5 most recent tabs in Microsoft Edge (default).
- Open windows and 3 most recent tabs in Microsoft Edge.
- Open windows only.
Once done, close the Settings app.
Conclusion
In conclusion, the Alt+Tab hotkey is a useful feature that allows us to switch between open windows and Microsoft Edge tabs quickly. Windows 11 provides the ability to customize this feature according to our preferences. By following the steps outlined above, we can change the Alt+Tab settings to open windows and all tabs in Microsoft Edge, or just open windows, or choose from a few other options. The customization of Alt+Tab settings in Windows 11 allows for a more personalized and efficient user experience.
This article explains configuring what the Alt + Tab shows in Windows 11.
By default, the Alt + Tab lets you switch between open windows in Windows 11 and other versions of Windows.
Press the Alt+Tab keys on your keyboard while holding down the Alt key and tapping on the Tab key. This will scroll through your open windows. When you see an outline around the window you want, release the Alt key to select it.
That’s the most common way to use the Alt+Tab keys in Windows. Alt + Tab moves typically forward, from left to right. So, if you miss a window, you’ll keep pressing the Alt key until you return to the window you want to select.
You can also use the Alt+Shift+Tab to move through the windows in reverse order instead of from left to right.
In Windows 11, Microsoft added features to the Alt+Tab keys to open Microsoft Edge tabs as Windows. You can now configure the Alt+Tab key to perform the following actions:
- Open windows and all tabs in Microsoft Edge
- Open windows and 5 most recent tabs in Microsoft Edge (default)
- Open windows and 3 most recent tabs in Microsoft Edge
- Open windows only
Below is how to configure the Alt+Tab keys in Windows 11.
How to choose what to show when the Alt+Tab keys are pressed in Windows 11
As mentioned above, by default, the Alt+Tab lets you switch between open windows in Windows 11 and other versions of Windows.
In Windows 11, you can choose what to show when you press the Alt+Tab keys, and below is how to configure that setting.
Windows 11 has a centralized location for the majority of its settings. All can be done from the pane, from system configurations to creating new users and updating Windows.
To get to System Settings, you can use the Windows key + I shortcut or click on Start ==> Settings, as shown in the image below:

Alternatively, you can use the search box on the taskbar to search for Settings. Then select to open it.
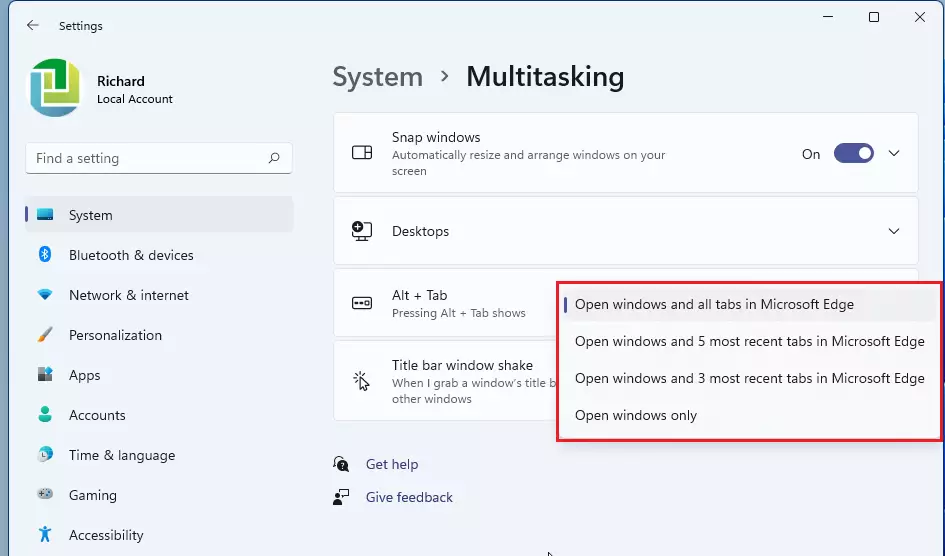
In Windows Settings, click System, then on the right pane, and select the Multitasking tile to expand it.

On the Multitasking settings pane, select the tile for the Alt + Tab tile, then using the drop-down option, choose what to show when you press the Alt + Tab keys on your keyboard.
You can select Alt+Tab to show:
- Open windows and all tabs in Microsoft Edge
- Open windows and 5 most recent tabs in Microsoft Edge (default)
- Open windows and 3 most recent tabs in Microsoft Edge
- Open windows only
You can now exit the Settings app.
That should do it!
Conclusion:
In summary, configuring the Alt + Tab settings in Windows 11 allows you to customize your multitasking experience. Here are the key points to remember:
- The Alt + Tab function enables efficient switching between open windows.
- You can select from multiple options regarding how many Microsoft Edge tabs are displayed when using Alt + Tab.
- The configuration can be easily accessed through the System Settings under Multitasking.
- Customizing the Alt + Tab settings can enhance your workflow and improve productivity.
- Check your settings periodically to ensure they align with your current usage preferences.
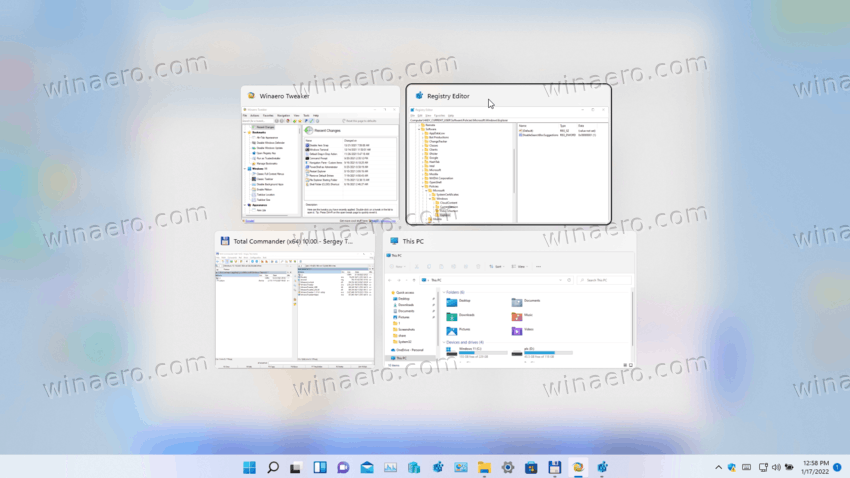
You can enable the classic Classic Alt+Tab dialog in Windows 11, which doesn’t show window thumbnails but only shows app icons. It is less distractive than the default one, and more compact. Hence it has a lot of fans, despite its age.
Currently, Windows 11 includes a modern Alt+Tab window switcher that occupies the whole screen. It renders window thumbnails in the middle of the screen, filling the rest area with a background blur effect.
Microsoft is also working on a new version of the Alt + Tab appearance for Windows 11, which resembles the style of Windows 7. It is a windowed dialog without blur. As of this writing, you can manually enable it on recent Insider builds.
The classic Alt+Tab dialog is actually the third and the oldest window swticher available to you in Windows 11. It was first introduced in Windows 95, and was used until Windows XP without major changes. Still, it remains accessible in all modern Windows versions. Here’s how you can turn it on.
How to enable the Classic Alt+Tab Dialog
To enable the Classic Alt+Tab Dialog in Windows 11, do the following.
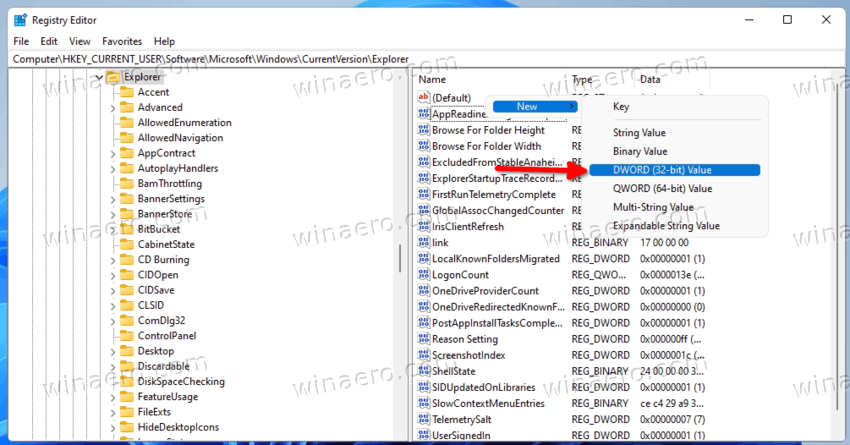
- Press Win + R, type
regeditinto the Run box, and hit Enter to launch the Registry Editor. - Go to the following key:
HKEY_CURRENT_USER\Software\Microsoft\Windows\CurrentVersion\Explorer. You can simply copy and paste this path into the address bar of regedit. - Right-click anywhere in the right pane and select New > 32-bit DWORD from the menu.

- Rename the new value to
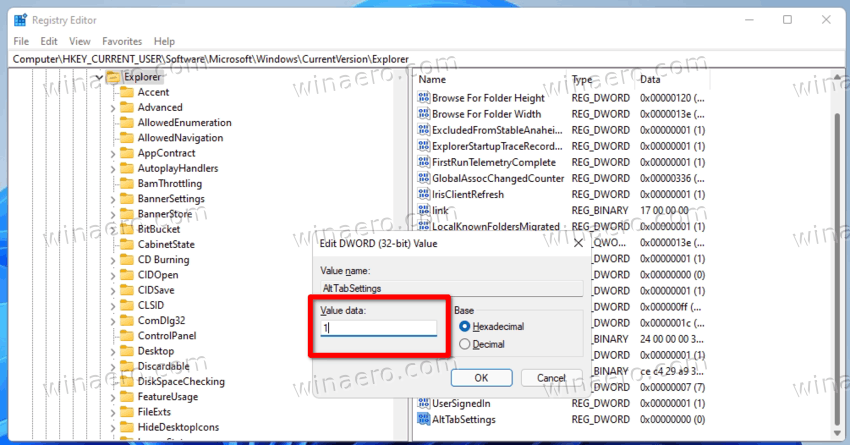
AltTabSettings. - Now, double-click itand change its value data to 1.
- Finally, right-click the Start button and select Shut down or sign out > Sign out.

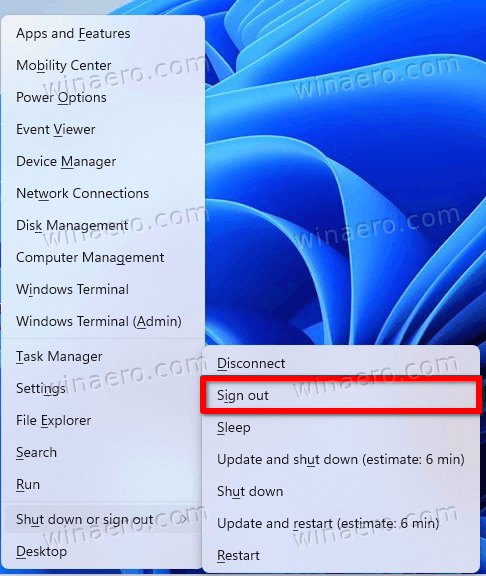
You are done! Once you sign in back to Windows 11, you will see this Alt+Tab dialog.
If you decide to restore the newer Alt+Tab in Windows 11, all you need to do is to remove the AltTabSettings value you have created. Again, to make the change take effect, you need to sign out from Windows 11 and sign in back. By the way, restarting the Explorer shell will also do the trick.
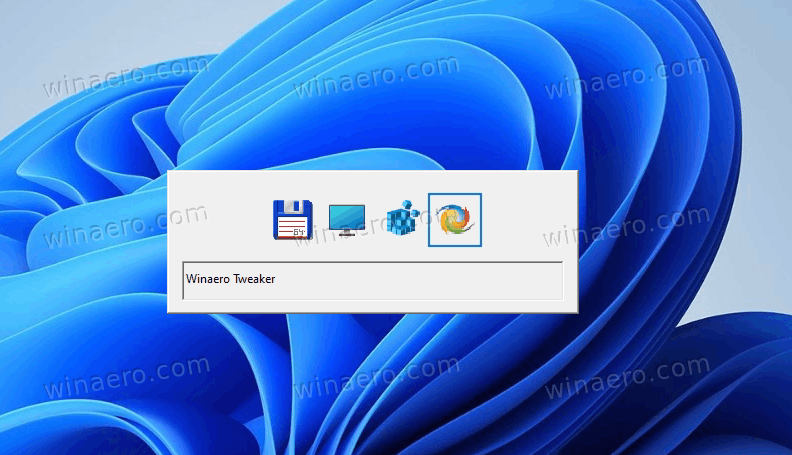
Alternatively, you can enable the older window switcher with Winaero Tweaker.
Enable Classic Alt+Tab in Windows 11 with Winaero Tweaker
- Download Winaero Tweaker from here, then install and launch it.
- In the navigation tree on the left, select Appearance > Alt + Tab appearance.
- On the right, enable the check box «Enable classic Alt + Tab dialog«.

- Restart the Explorer shell when prompted.
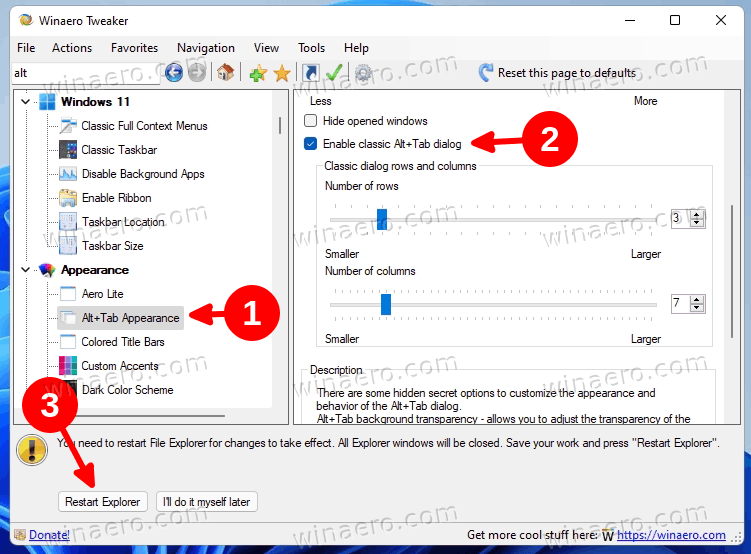
As you can see in the screenshot above, you can also customize the classic window switcher by changing its number of rows and columns.
While you can easily adjust them with Winaero Tweaker, you may be interested in changing them manually via the Registry. Let’s learn more about these options.
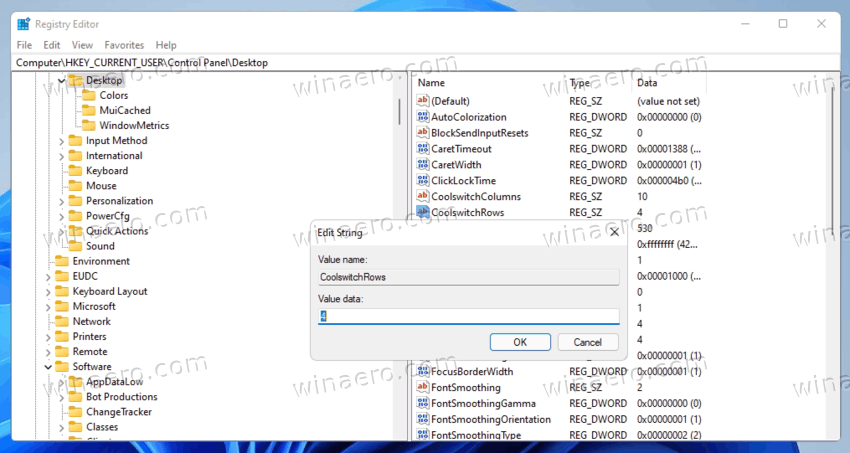
Customize the classic Alt+Tab window switcher
- Launch the Registry Editor; press Win + R and type
regeditin the Run box. - Go to the
HKEY_CURRENT_USER\Control Panel\Desktopkey in the left pane. - On the right, modify or create a new STRING (REG_SZ) value CoolSwitchRows.
- Set its value data to the number of rows for the classic dialog. The default is 3, and the supported range is from 1 to 20.

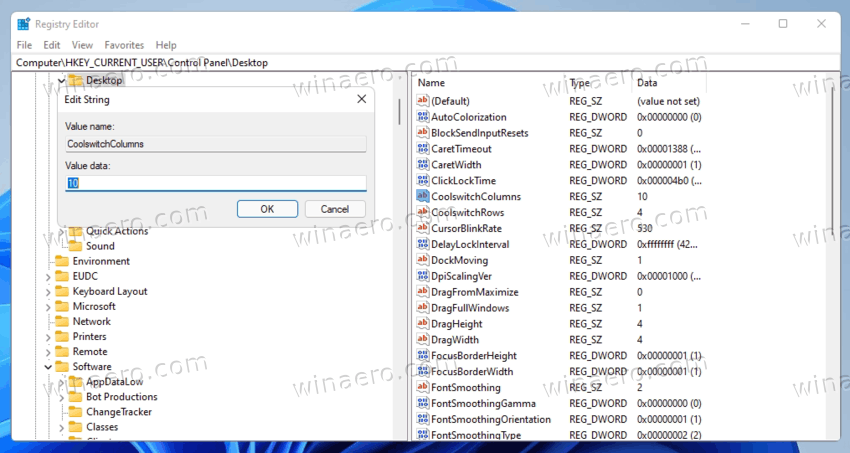
- Now, modify or create a new STRING (REG_SZ) value CoolSwitchColumns.
- Set it to the desired number of columns for the classic dialog. The default value is
7, and you can specify it in range of 1 — 43.
- Sign out and sign in to Windows 11 to apply the change.
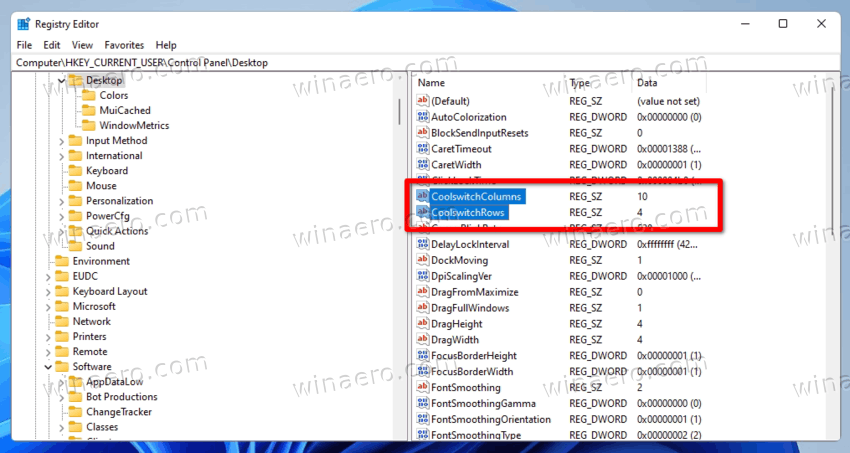
Done!
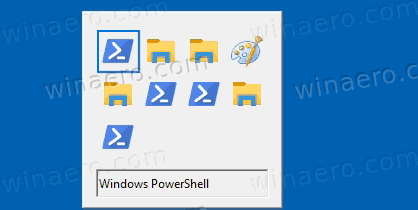
This is the default look of the classic Alt+Tab.
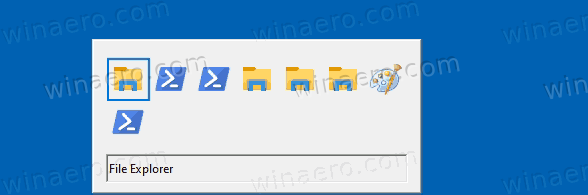
But you can get something like this.
Finally, I would like to show you how to temporarily enable the classic Alt +Tab. The above reviewed methods will enable the older window switcher permanently with a Registry tweak. But you can make it appear without changing the Registry. There is a hidden secret keyboard shortcut for that.
Termporarily open the classic Alt+Tab in Windows 11
- Press the left Alt key and do not release it.
- Press and then release the right Alt key. Do not hold down the right alt key.
- Finally, press and hold the Tab key.
Done! That will show you the classic Alt+Tab dialog without using any additional software or Registry tweaks. But the next time you press the regular Alt + Tab key sequence, it will open the default (newer) window switcher.
So, every time you want to see the classic app switching UI, carefully press the keys from the above intruction. This is pretty enough for users who only occasionally need to use the classic Alt+Tab.
That’s it.
Support us
Winaero greatly relies on your support. You can help the site keep bringing you interesting and useful content and software by using these options:
If you like this article, please share it using the buttons below. It won’t take a lot from you, but it will help us grow. Thanks for your support!
Пару дней назад Microsoft выпустила новую инсайдерскую сборку Windows 11 под номером 22526 для канала Dev, в которой начала тестирование обновлённого меню Alt + Tab. Компания планирует отказаться от полноэкранного варианта этого меню в пользу более компактной версии, которая напоминает меню Alt + Tab времён Windows 7.
Но, как это часто бывает, обновлённое меню пока доступно лишь некоторым инсайдерам. Дело в том, что Microsoft проводит A/B-тестирование, в рамках которого функцию вначале включают небольшой фокус-группе, собирают отзывы, и лишь затем активируют для всех пользователей.
Однако не стоит расстраиваться, так как вы можете включить эту функцию вручную с помощью утилиты ViVeTool или простой правки реестра. Рассказываем, как это сделать:
Инструкция
Вариант 1. ViVeTool
- Скачайте утилиту ViVeTool по этой ссылке.
- Распакуйте скачанный архив в любое место на вашем компьютере (например, можно создать папку ViVeTool в корне диска C и поместить файлы туда).
- Откройте командную строку от имени администратора (например, набрав CMD в поиске и выбрав соответствующий пункт).
- В командной строке перейдите в папку с ViVeTool с помощью команды cd /d <путь к папке>, после чего нажмите Enter. Например:
cd /d "C:\ViVeTool" - Введите команду
vivetool addconfig 36226836 2и нажмите Enter.- Для PowerShell команда будет следующей:
.\vivetool.exe addconfig 36226836 2
- Для PowerShell команда будет следующей:
- Убедитесь, что в командной строке появилось сообщение «Successfully set feature configuration».
- Перезагрузите компьютер.
Если вы хотите вернуться к старому варианту, то воспользуйтесь этой командой: vivetool delconfig 36226836 2.
Вариант 2. Редактор реестра
- Скачайте архив new_alttab.zip [345 b] (cкачиваний: 272)
, откройте его и запустите файл New_Alt+Tab.reg.
- При желании, вы можете вручную создать файл реестра и добавить в него следующее содержимое:
Windows Registry Editor Version 5.00

[HKEY_LOCAL_MACHINE\SYSTEM\ControlSet001\Control\FeatureManagement\Overrides\4\702590604]
"EnabledState"=dword:00000002
"EnabledStateOptions"=dword:00000001
"Variant"=dword:00000000
"VariantPayload"=dword:00000000
"VariantPayloadKind"=dword:00000000
- При желании, вы можете вручную создать файл реестра и добавить в него следующее содержимое:
- Согласитесь на слияние изменений.
- Перезагрузите компьютер.
Если вы захотите вернуться к старому варианту, то вам нужно будет открыть «Редактор реестра» и удалить ключ 702590604 по следующему пути: HKEY_LOCAL_MACHINE\SYSTEM\ControlSet001\Control\FeatureManagement\Overrides\4. После этого необходимо перезагрузить компьютер.
Кстати, предлагаем вам подписаться на наш второй проект Win1Leaks в Telegram и ВКонтакте, где вы найдёте множество интересной информации о Windows, Surface и других продуктах Microsoft. Подобные инструкции, как правило, там появляются раньше, чем на сайте.
If you frequently use ALT + TAB Switcher on your Windows 11 PC, then there’s a good news for you. Starting with Windows 11 build 22526, the company has released updated ALT+TAB interface and looks alike Windows 7 ALT + Tab interface.
FYI, ALT + TAB Switcher is a nifty feature of Windows OS using which users can quickly switch between open windows, and Edge browser tabs, if enabled.
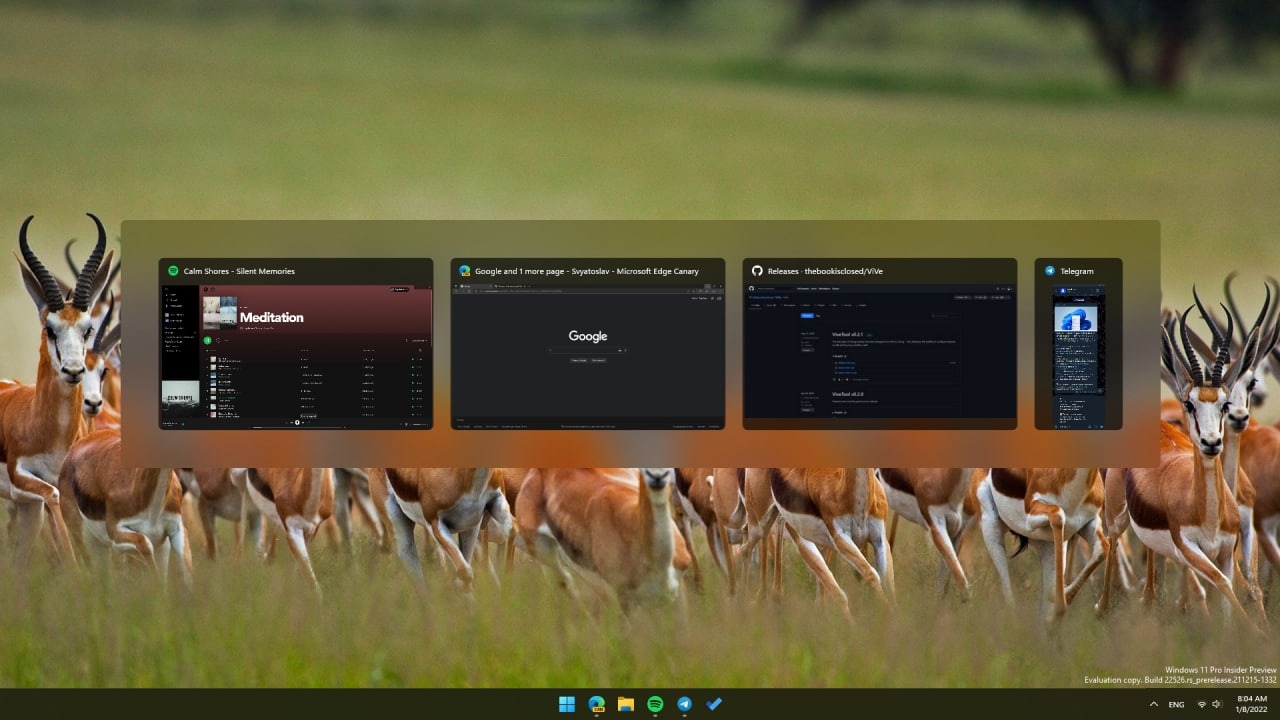
In the Stable build of Windows 11, if you launch ALT + TAB Switcher it open up in full-screen UI, while in previous version of Windows OS, let say Windows 7 it open up in Windowed UI.
After receiving updated ALT + TAB Switcher UI on my Windows 11 PC, it seems like company is planning to switch back to Windowed UI that matches the design of Windows 11.
Microsoft is testing Windowed ALT + TAB Switcher UI with limited insider running Windows 11 build 22526 or above in Dev channel. In case, you’ve enrolled in Windows 11 Insider program, then you can check the new UI by pressing ALT + Tab keys. You can check difference below:
Full Screen ALT + TAB UI

In Full-screen ALT + TAB UI, switcher cover the full screen and show you list of active windows.
Windowed ALT + TAB UI

In Windowed ALT + TAB UI, switcher instead of using the full screen show list of active windows in Windowed UI.
In case, you’re running Windows 11 build 22526, still your device didn’t get the updated Windowed ALT + TAB Switcher UI, then there’s a quick workaround with which you can show ALT + TAB as windowed instead of full screen in Windows 11. Here’s what you need to do:
Click on the Search icon available on the Taskbar and then type regedit. When Registry Editor appear in search results, click to open it.
When UAC dialog box appear, click Yes to continue.
In Registry editor, you need to head over to following key: HKEY_LOCAL_MACHINE\SYSTEM\ControlSet001\Control\FeatureManagement\Overrides\4\702590604.
If 702590604 key is missing, then you can create one manually. For that, right-click on 4 key and select New > Key and name it 702590604.

Select 702590604 and then on the right side, you need to create two DWORD 32-Bit value i.e. EnabledState and EnabledStateOptions.
For that, right-click on the empty space and from the menu select New > DWORD 32-Bit Value and name it EnabledState and EnabledStateOptions.

Double-click on EnabledState and set its Value data to 2 and following same procedure, set Value data of EnabledStateOptions to 1.

After that close Registry editor and reboot your computer to apply the changed.
At any point, you want to resotre the full-screen user interface for Windows 11 ALT + TAB Switcher, then all you need to do is to delete EnabledState and EnabledStateOptions both delete words value.
If you have get access to Windowed ALT + TAB UI in Windows 11, then let us know your opinion in the comments.
Viney Dhiman, the mind behind GeekerMag, is a seasoned content writer with over 12 years of experience. Specializing in simplifying complex tech concepts, he covers Windows OS, Android, iOS, web apps, and product reviews. His work can be found on popular tech websites like Gizmodo and The Verge, and he has been interviewed by the Microsoft Edge team.