
Windows Logo Design
Create your perfect Windows Logo today! Fill out the AI prompts below to get started. Click Create and within seconds your logo will be ready.
Create your own Windows Logo in seconds
1. Start with a Simple Design Brief
Start your logo creation journey by filling out a simple design brief. Describe your vision, brand personality, preferred styles, colors, and any special elements. Our intuitive form makes it easy to convey your ideas in just a few minutes.
2. Watch AI Bring Your Ideas to Life
Our advanced AI technology instantly analyzes your design brief to generate unique and professional logo concepts. Leveraging the latest in artificial intelligence, our logo creator crafts designs that align with your brand identity, ensuring a perfect match every time.
3. Get High-Resolution Files Instantly
Once your logo is created, download it in high-resolution formats suitable for any purpose. From print-ready files for business cards and billboards to optimized digital versions for websites and social media, you’ll have everything you need in one click.
Audience
Are you a small business owner looking to establish a strong brand identity? Or maybe you’re a graphic designer seeking an easy-to-use tool for creating professional Windows logos? Whatever your background, our Windows logo maker is designed to meet the needs of both beginners and experts alike.
Our intuitive interface and extensive library of pre-designed templates make it simple for anyone to create a stunning Windows logo. No design experience is necessary! Whether you need a logo for your website, software application, or business cards, our Windows logo maker has got you covered.
Icons
Our Windows logo maker offers a diverse selection of icons to choose from, all categorized and easily searchable. From the classic Windows logo to a wide range of industry-specific symbols, you’ll have no trouble finding the perfect icon to represent your brand.
Customize the color, size, and position of the icons to ensure they align perfectly with your vision. With just a few clicks, you can create a unique and memorable Windows logo that sets your brand apart from the competition.
Color
Color plays a crucial role in logo design, as it conveys emotion and establishes brand recognition. With our Windows logo maker, you have complete control over the color scheme of your logo. Choose from an extensive palette of colors or enter your brand’s specific hex code to ensure consistency with your existing brand identity.
Additionally, our color matching tool allows you to easily find complementary colors that work harmoniously together. Experiment with different color combinations until you find the perfect balance that captures the essence of your brand.
Fonts
Typography is another essential element of logo design. Our Windows logo maker offers a wide range of fonts to suit any style or industry. From modern and sleek to classic and elegant, you’ll find the perfect font to convey your brand’s message.
Customize the size, spacing, and alignment of your text to ensure optimal readability. With our text editing tools, you can easily create eye-catching Windows logos that leave a lasting impression on your audience.
Layout
Creating a visually balanced logo is essential for effective branding. Our Windows logo maker provides a range of layout options to help you achieve professional results. Choose from various configurations, such as centered, stacked, or aligned to the left or right.
Experiment with different arrangements of icons and text to find the layout that best showcases your brand. With our flexible design tools, you can easily adjust the size, position, and spacing to create a visually pleasing and cohesive Windows logo.
Usage
Once you’ve designed your Windows logo, it’s important to ensure it is versatile and can be used across various platforms and mediums. Our Windows logo maker allows you to download your logo in multiple file formats, including high-resolution PNG, JPEG, and SVG.
Whether you need to use your logo on your website, social media profiles, or print materials, our Windows logo maker ensures that your logo retains its quality and sharpness across different applications. With our comprehensive range of exporting options, you can confidently use your logo wherever your brand takes you.
Testimonials
“Best logo maker!”
Super easy, great concepts and actually free. Thanks for this resource!
Erick Rowe
Founder at Ace Consulting
“Thanks LogoCreator”
My favourite branding app. I’d recommend this logo creator to any entrepreneur.
Adnan Ayad
Why Use LogoCreator?
High-Quality Output
Despite being a free platform, our app delivers high-quality logo files that are suitable for both digital and print use. The platform allows you to download your logo in various file formats, ensuring that you have the right format for different applications. This means you can confidently use your logo on websites, social media profiles, business cards, merchandise, and more, all while maintaining its visual integrity.
Customization Options
Our logo maker provides ample customization options, enabling you to tailor your logo to your brand’s unique requirements. You can adjust the size, color, and orientation of elements, as well as experiment with different fonts and text layouts. This level of customization ensures that your logo will be a true reflection of your brand’s personality and values.
Extensive Design Resources
We offer a vast library of design resources, including a diverse collection of icons, fonts, and color options. With these resources at your fingertips, you can experiment with different elements to create a logo that perfectly represents your brand’s identity. The wide variety of choices ensures that you can craft a logo that stands out from the competition.
Time-Efficient Design Process
Creating a logo with our app is a quick and efficient process. You can have a professional-looking logo ready in a matter of minutes or a few hours, depending on the complexity of your design. This is especially advantageous for businesses that need a logo promptly or wish to iterate on their logo design without long turnaround times.
Zero Cost, Maximum Value
One of the most significant advantages of Logocreator.io is that it is entirely free to use. Unlike hiring a professional graphic designer or purchasing expensive design software, our web app allows you to create a high-quality logo without incurring any costs. This makes it an ideal choice for startups and small businesses with limited budgets.
User-Friendly Interface
Our logo creator boasts an intuitive and user-friendly interface. You don’t need to be a graphic design expert to create a logo. The platform’s simple drag-and-drop tools, extensive library of icons, and customizable templates make logo design accessible to anyone, regardless of their design experience. This ease of use ensures that you can bring your creative vision to life without any steep learning curve.
Download Article
Download Article
Do you have a website, blog, or a business and you can’t think of an idea for a logo? This article will show you how to create an easy logo in Microsoft Paint.
-

-
Advertisement
-
-

-
-
-

Advertisement
Add New Question
-
Question
How do I draw the Nissan logo in MS Paint?
You can download the Nissan logo from Google and import it into Paint, then practice with different tools.
-
Question
How do I use MS Paint on my jio phone?
Just use limbo emulator, or install Windows on your jio phone (Windows XP-Windows 10 are recommended).
-
Question
Where can I find it on an iPad?
Download a drawing app from the App Store.
Ask a Question
200 characters left
Include your email address to get a message when this question is answered.
Submit
Advertisement
Thanks for submitting a tip for review!
-
Don’t steal the logo of another website, blog, or business because you could get in a lot of trouble.
Advertisement
Things You’ll Need
- A Windows Computer
- Microsoft Paint
- Blog, Website, or Business
About This Article
Thanks to all authors for creating a page that has been read 201,366 times.
Is this article up to date?
Добрый день! С Вами художественная школа Империя Пикчер и сегодня я покажу Вам как нарисовать Windows маркерами.
Ну а мы начинаем!

Рисовать будем в нашем классном скетчбуке от «Империя Пикчер».

В наборе у нас есть непромокайка для маркеров, которую мы подкладываем под
листочик, чтобы у нас ничего не отпечатывалось.

А приобрести наши скетчбуки Вы можете на Вайлдбериз
https://www.wildberries.ru/catalog/158710687/detail.aspx?targetUrl=GP

Для наброска я буду использовать карандашик мягкости В.

Намечу две диагонали слевой и с правой стороны.

Чтобы до края листа были одинаковые расстояния между ними.

Затем, сверху создаю волну.

Соединяю две диагонали.

Где-то по центру идёт преломление.

Уголочик приподнимается вверх.

Далее, мы по центру рисуем такую же волну.

И разделяем на два квадрата верхнюю часть.

Между ними оставляем расстояние. Небольшое расстояние.

После этого, так же отступаю немножечко.

И рисую третий квадрат.

И волну снизу.

И вот здесь справа будет четвертый квадрат.

Немного редактирую краешек.

После, нам нужно будет прорисовать небольшую толщиночку,
чтобы знак был объёмным.

И для этого, я добавлю толщиночку по правой стороне.

И снизу. Она будет совсем узенькая. И вот здесь на второй половинке.

А так же, на верхней тоже.

После этого, я беру черный линер.

И начинаю аккуратно обводить карандашный контур.

Стараясь не выходить за него.

Обводим всё постепенно.

После того, как Вы линером всё обвели, стераем карандаш ластиком.

И можем приступить к работе маркерами.

На данном этапе нам понадобится непрмокайка для маркеров.

Для начала, мы берём оранжевый цвет номер 122.

И закрашиваем им верхний левый квадратик полностью.

После этого, беру цвет чуть темнее номер 22.

И закрашиваю снизу толщиночку, а так же добавляю тени
слевой и с правой стороны.

Оставляя наверху светлую полосочку.

После, использую зелёный номер 124 светленький.

Закрашиваю правую часть.

И так же, добавляю тень слева и справа.

Оставляя по центру светлый кусочик.

Так же, толщиночки тоже будут тёмненькими.

После этого, беру желтый цвет номер 37.

И закрашиваю серединку нижнего правого квадрата.

Оттенком номер 24 закрашиваю по краям и толщиночку.

Далее, идёт голубой цвет номер 63. Так же беру его светленький.

И добавляю по центру на последний наш квадратик. Немножко можно обвести
по краю такой светлый рефлекс.

71 оттенком закрашиваем все остальное.

Белой ручкой добавляем блики в виде линий на выступающие части.

А именно на вот эти квадратики, которые у нас светлее.

Данная часть располагается на свету.

Поэтому, она будет немножко выделяться.

И вот такой Windows маркерами в скетчбуке «Империя Пикчер»
у нас с Вами получился!

1. Создаем новое изображение 250 на 250 пикселей.
2. Рисуем шар на всю ширину и высоту изображения, зажатым SHIFT для построения круга а не овала.
3. Для того чтобы удобнее расположить в дальнейшем части логотипа Windows. Сделаем направляющие горизонтальные и вертикальные установив View>New Guide — 125 px
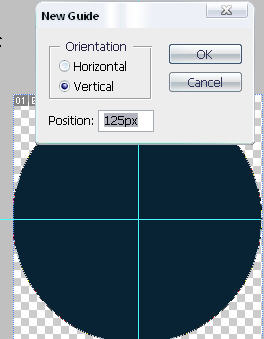
4. Рисуем квадрат в верхней части шара, примерно такого размера как у меня.
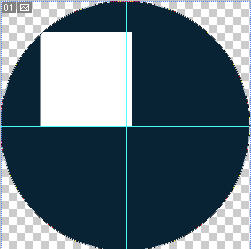
5. Необходимо свободно деформировать квадрат. Так как сделал я:
6. Теперь дублируем слоем и поворачиваем на 180′.Всего надо сделать 1 копию исходного и 1 копию повернутой части. Расставляем так: (на этом этапе вам возможно будет необходимо уменьшить размер части чтобы влезло 4.)

7. Заливаем части цветами — верхлево: #e23016, низправо: #f18b03, низлево: #06358f, верхправо: #306f07

8. Рисуем круглое белое выделение в центре.
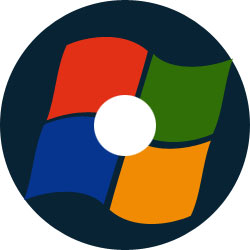
9. Применяем фильтр к белому выделению Filter>Blur>Gaussian Blur Radius: 20 pixels

10. Выделяем контур нижнего круга. И выделением овальным с установкой вычитания добиваемся такого выделения
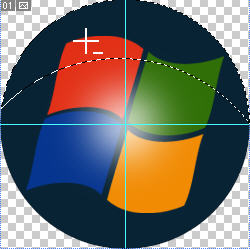
11. Заливаем градиентом от белого к прозрачному. Устанавливаем прозрачность на свой вкус.

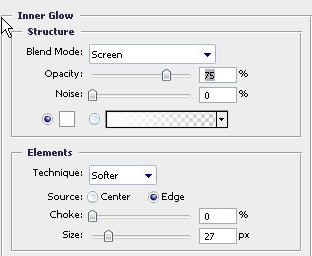
12. Создаем выделение круглое на новом слое над слоем круга основы и частей логотипа windows. заливаем белым цветом и также применяем фильтр Filter>Blur>Gaussian Blur Radius: 20 pixels. здесь также можно установить на этот слой прозрачность.

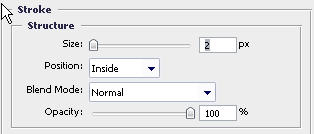
13. Применяем к кругу основе настройки смешивания — Blending Options.
Логотип в стиле Windows Vista готов:

Вопросы и ответы. Выкладываем свои работы.