
-
Use the
Drawing.Ellipse()Method to Draw Circles inC# -
Use the
FillEllipse()Method to Fill Circles inC#

In this article, we will be looking at how we can draw a circle in C#.
Use the Drawing.Ellipse() Method to Draw Circles in C#
System.Drawing doesn’t have an explicit circle draw. We can use the Drawing.Ellipse() method, which provides the same functionality or create a new FORM with Windows.FORMS(.NET FRAMEWORK) to allow us to experiment with interfaces.
Draw Circles in C# Using .NET Framework
Ensure that the Paint method is called when you have booted into a FORM. Double click on the form, and the properties will open up.
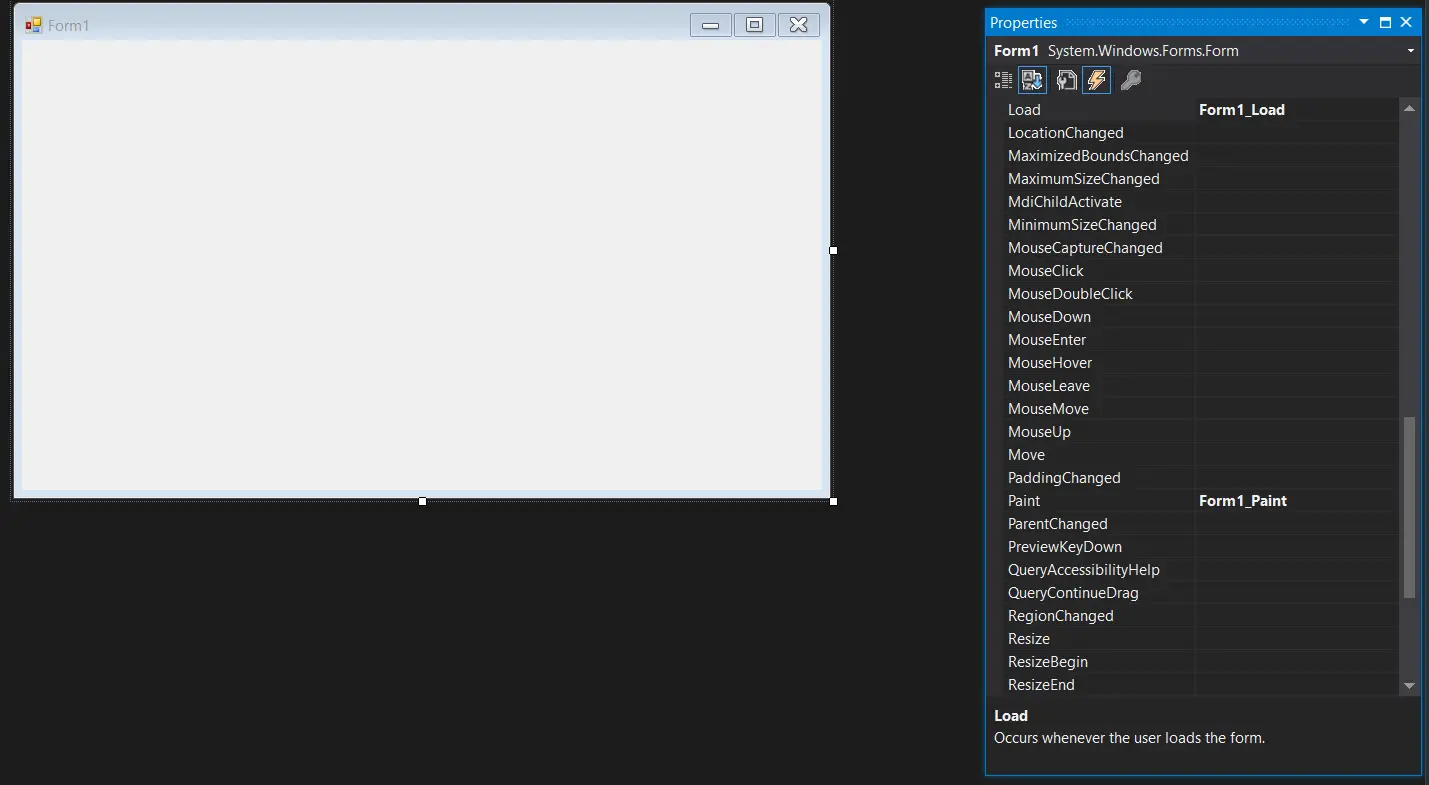
Switch over to the EVENTS section.

Inside the EVENTS section now, scroll down till you find the PAINT and double click on it to produce the PAINT function.

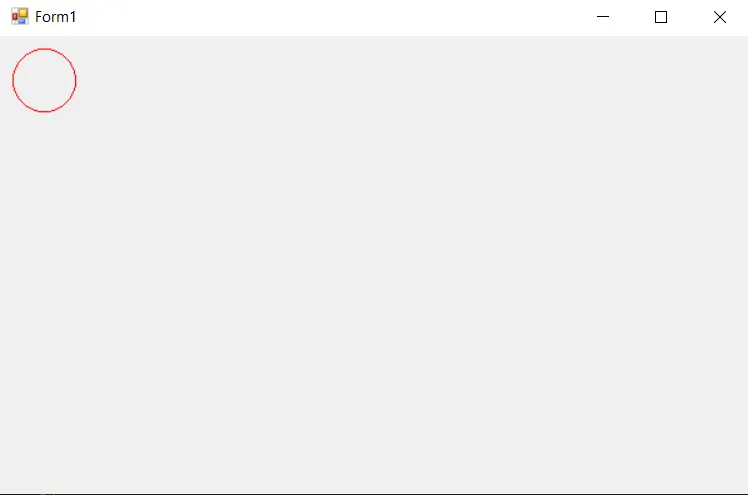
Now, we create our ELLIPSE using the System.Drawing and then choose the Ellipse option.
e.Graphics.DrawEllipse(new Pen(System.Drawing.Color.Red), new Rectangle(10, 10, 50, 50));
We have chosen a new PEN in the parameters with the color red. The next parameter tends to draw the RECTANGLE encapsulating the circle.
Think of it like the size of the circle, with the first two parameters denoting the origin points ( x and y ) and the last two parameters being the size of the x-axis and the y-axis.
Output:
Use the FillEllipse() Method to Fill Circles in C#
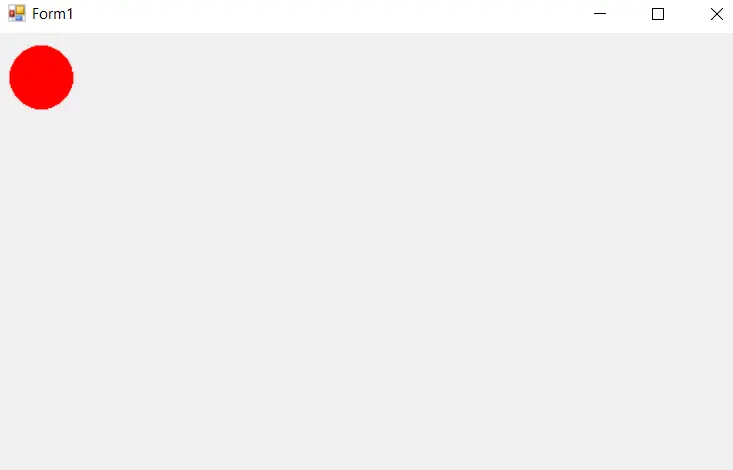
To fill the circle on the above output, we will use the FILLELLIPSE() function.
e.Graphics.FillEllipse(Brushes.Red, 10, 10, 50, 50);
We defined the same points for the FillEllipse() function as we did for the Drawing.Ellipse() to ensure that the correct area is filled. We have chosen the Brushes.Red brush for it as the first parameter.
Output:
Full Code Snippet:
using System;
using System.Collections.Generic;
using System.ComponentModel;
using System.Data;
using System.Drawing;
using System.Linq;
using System.Text;
using System.Threading.Tasks;
using System.Windows.Forms;

namespace WindowsFormsApp1 {
  public partial class Form1 : Form {
    public Form1() {
      InitializeComponent();
    }

    private void Form1_Load(object sender, EventArgs e) {}

    private void Form1_Paint(object sender, PaintEventArgs e) {
      e.Graphics.DrawEllipse(new Pen(System.Drawing.Color.Red), new Rectangle(10, 10, 50, 50));

      e.Graphics.FillEllipse(Brushes.Red, 10, 10, 50, 50);
    }

    private void Form1_MouseHover(object sender, EventArgs e) {}
  }
}
That is how you draw a circle in C#. We hope you learned this well and can modify it as per your needs.
Enjoying our tutorials? Subscribe to DelftStack on YouTube to support us in creating more high-quality video guides. Subscribe
Как перейти от Waterfall к Agile
EggHead 06.05.2025
Каскадная модель разработки Waterfall — классический пример того, как благие намерения превращаются в организационный кошмар. Изначально созданная для упорядочивания хаоса и внесения предсказуемости. . .
Оптимизация SQL запросов — Продвинутые техники
Codd 06.05.2025
Интересно наблюдать эволюцию подходов к оптимизации. Двадцать лет назад всё сводилось к нескольким простым правилам: «Избегайте SELECT *», «Используйте индексы», «Не джойните слишком много таблиц». . . .
Создание микросервисов с gRPC и Protobuf в C++
bytestream 06.05.2025
Монолитные приложения, которые ещё недавно считались стандартом индустрии, уступают место микросервисной архитектуре — подходу, при котором система разбивается на небольшие автономные сервисы, каждый. . .
Многопоточность и параллелизм в Python: потоки, процессы и гринлеты
py-thonny 06.05.2025
Параллелизм и конкурентность — две стороны многопоточной медали, которые постоянно путают даже бывалые разработчики.
Конкурентность (concurrency) — это когда ваша программа умеет жонглировать. . .
Распределенное обучение с TensorFlow и Python
AI_Generated 05.05.2025
В машинном обучении размер имеет значение. С ростом сложности моделей и объема данных одиночный процессор или даже мощная видеокарта уже не справляются с задачей обучения за разумное время. Когда. . .
CRUD API на C# и GraphQL
stackOverflow 05.05.2025
В бэкенд-разработке постоянно возникают новые технологии, призванные решить актуальные проблемы и упростить жизнь программистам. Одной из таких технологий стал GraphQL — язык запросов для API,. . .
Распознавание голоса и речи на C#
UnmanagedCoder 05.05.2025
Интеграция голосового управления в приложения на C# стала намного доступнее благодаря развитию специализированных библиотек и API. При этом многие разработчики до сих пор считают голосовое управление. . .
Реализация своих итераторов в C++
NullReferenced 05.05.2025
Итераторы в C++ — это абстракция, которая связывает весь экосистему Стандартной Библиотеки Шаблонов (STL) в единое целое, позволяя алгоритмам работать с разнородными структурами данных без знания их. . .
Разработка собственного фреймворка для тестирования в C#
UnmanagedCoder 04.05.2025
C# довольно богат готовыми решениями – NUnit, xUnit, MSTest уже давно стали своеобразными динозаврами индустрии. Однако, как и любой динозавр, они не всегда могут протиснуться в узкие коридоры. . .
Распределенная трассировка в Java с помощью OpenTelemetry
Javaican 04.05.2025
Микросервисная архитектура стала краеугольным камнем современной разработки, но вместе с ней пришла и головная боль, знакомая многим — отслеживание прохождения запросов через лабиринт взаимосвязанных. . .
Basic overview of drawing in C#
How to use the Graphics class to draw to the screen in C#
The Graphics class is one of the fundamental classes used in programming with Windows Forms and GDI+. Through the Graphics class, you gain access to information about the display resolution and device capabilities. In this article, you’ll learn about the Paint event and how it supplies you regarding an adequately initialized Graphics object. This article also covers the most common operations performed using the Graphics object.
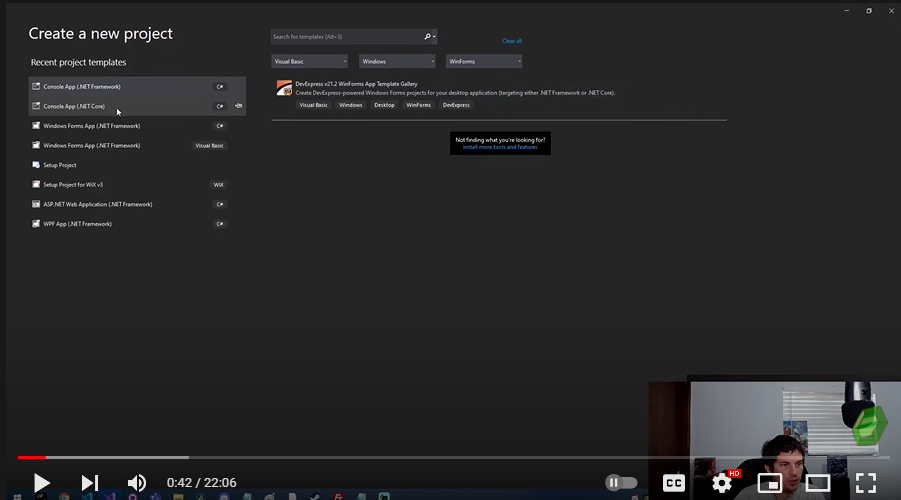
The first thing we will do is open Visual Studio and click “Create a new project” to get started. We are going to create a new Windows Form in C#. You could choose any project name you would like and its destined location on your desktop/pc.

A blank project will be generated to serve as your canvas. You could change the width and height based on your preference. The next thing we need to handle is the paint event for the form. When the form is drawing itself, it will call this paint event, and then inside of that, we will get a handle to the graphics object. Afterward, we could paint the form ourselves. It is a step-by-step process that we need to accomplish.

Declare a new graphics object with this syntax above. With this step, we could make new shapes like rectangles.
How to draw a rectangle
To draw rectangles and squares in C#, the GraphicsObject provides the DrawRectangle() method. There are two ways to use the DrawRectangle() method. We will begin by drawing a rectangle without a pre-created Rectangle object.

- The first step is to create a new brush. The syntax above is the code that you can use to alter the color and name of the brush.
- It also needs the coordinates of the rectangle you want to create. To do that, you can encode the x, y coordinates like in the syntax attached.

- Since we’ve used 100×100 as the coordinates, it came out as square, but you could change the coordinates to generate your desired shape.
For the second method
- To draw a rectangle, you will draw four lines. We will make a drawing pin and set that equal a new pen in this method. You could also set the color for your rectangle. The syntax above is the example that will generate your rectangle.
How to draw a circle
Ellipses and circles are drawn in C# using the DrawEllipse() method of the GraphicsObject class.
We made a drawing scene representing the “sun,” a circle in one of our examples.
- You could declare a “new brush” to create the round object. The syntax above shows the various brushes for different objects: the ground and the sun in the said scene.
- An ellipse will be generated using the declared sun brush and filled with this syntax in the next step.
How to draw a line
Lines are drawn in C# using the DrawLine() method of the Graphics Object. This method takes a pre-instantiated Pen object and two sets of x and y coordinates (the start and endpoints of the line) as arguments.

A “ground” was made to complete the drawing scene in the example. A straight line represents it.
Coordinates were also filled up to determine the width, height, and length to set up the ground.
The next step in this project is to try drawing a person! A stickman person, to be exact. It will be composed of a circle for its head, a line for its limbs and body.
- We added another drawing pen to change its color, white.
In the syntax above, we tried to make a whole component to make a stickman. With various lines and objects, it resulted in the image below.
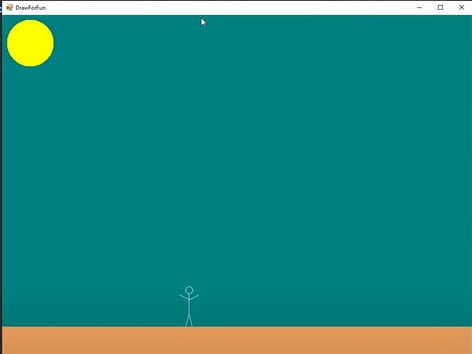
The background is also changed to the color blue! And there you go, a scene with a stickman was made using simple objects and lines.
How to draw an image
To draw an image, it will require creating a bitmap from the file. To do this, the syntax below will help to run the image. We will use the image above as the background for our generated image.
The syntax above draws the image, but the problem is that our form and image aren’t the exact sizes. We could stretch the image to fit the form by doing a new rectangle.


The image will be stretched to fit the form better with this code.

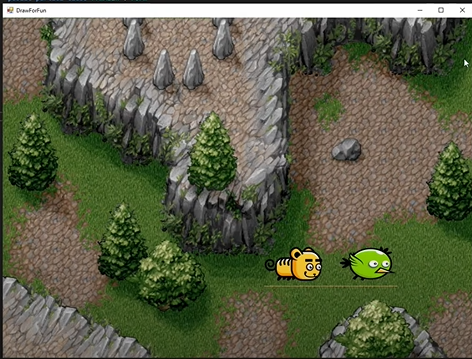
We will also try to attach some images to the scene. We will do next to draw an image bitmap from the file again.
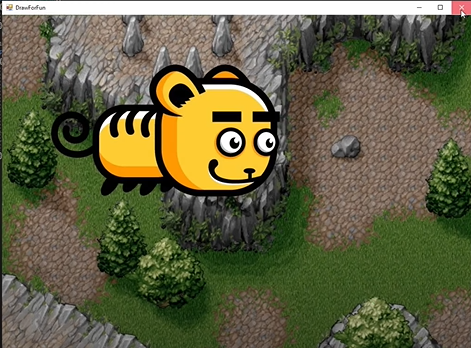
The attached image is quite big, so you could opt for a smaller size of the image you want.

This is the revised image of the cat once you’ve scaled it correctly.
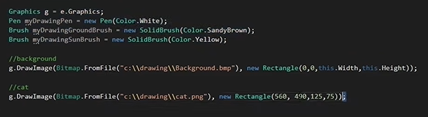
Here is the complete syntax for the background and the cat. Make sure to layer your drawings correctly to make them appear in the correct order. After the cat image, we will draw the bird.
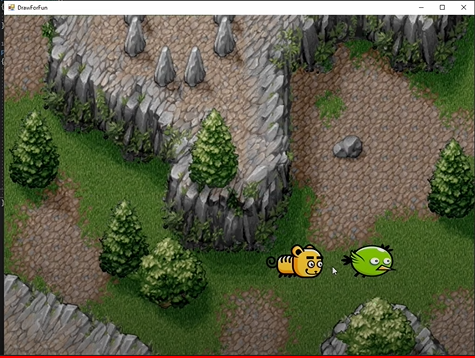
Here is the image after the code for the bird image is generated and run.
To add an extra effect, we will add a line object in the scene.
The last thing that we will add to this project is text. To include text in your image, follow this syntax below. Make sure to set a font style first!
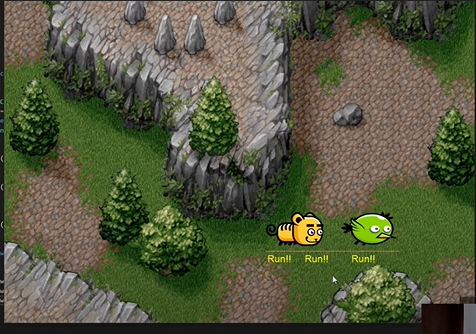
The text is added and repeated three times. The project is done!
This article shows how various graphical objects can be drawn within a drawing programmatically using C#. It may be quite challenging, but first but with troubleshooting, patience, and creativity, you could also finish a project in no time!
Sign in to your MUO account

Windows Forms is a framework that lets you build desktop applications. You can click and drag components like buttons onto a visual user interface. It also helps you manually create various shapes within your code.
This article will show you how to add lines, shapes, and images to your application. This tutorial uses the Visual Studio 2019 Community Edition to show examples.
What Are the Built-In Classes Used for Drawing Graphics?
Windows Forms uses the C# programming language. Its built-in classes and methods allow you to draw various shapes onto a Windows Form canvas. These include the Graphics, Pen, Color, and Brush classes.
|
Class |
Description |
|---|---|
|
Graphics |
The Graphics class allows you to draw shapes and lines onto the canvas. It includes methods such as:
|
|
Pen |
The Pen class allows you to specify the properties of a ‘pen’ tip which you can use to draw your shapes. You can specify properties such as color, thickness, or dash style. Methods include:
|
|
Color |
A color object made up of R (red), G (green), and B (blue) values. You will need a color object for many of the built-in methods that create shapes. |
|
SolidBrush, HatchBrush, TextureBrush |
These brush classes derive from the «Brush» interface. These classes allow you to color in blank spaces on the canvas. You can also choose to fill the spaces using different patterns or textures. You can specify properties such as the color. |
|
Rectangle, Line, Polygon, Ellipse |
You can create objects based on these shapes, and use them when calling methods such as DrawRectangle(). Instead of passing the x, y, width, and height as arguments, you can choose to pass an existing Rectangle object instead. |
To view the source code for a running example of the above tutorial, visit the GitHub repository. You can try out the following examples once you’ve created a Winforms application.
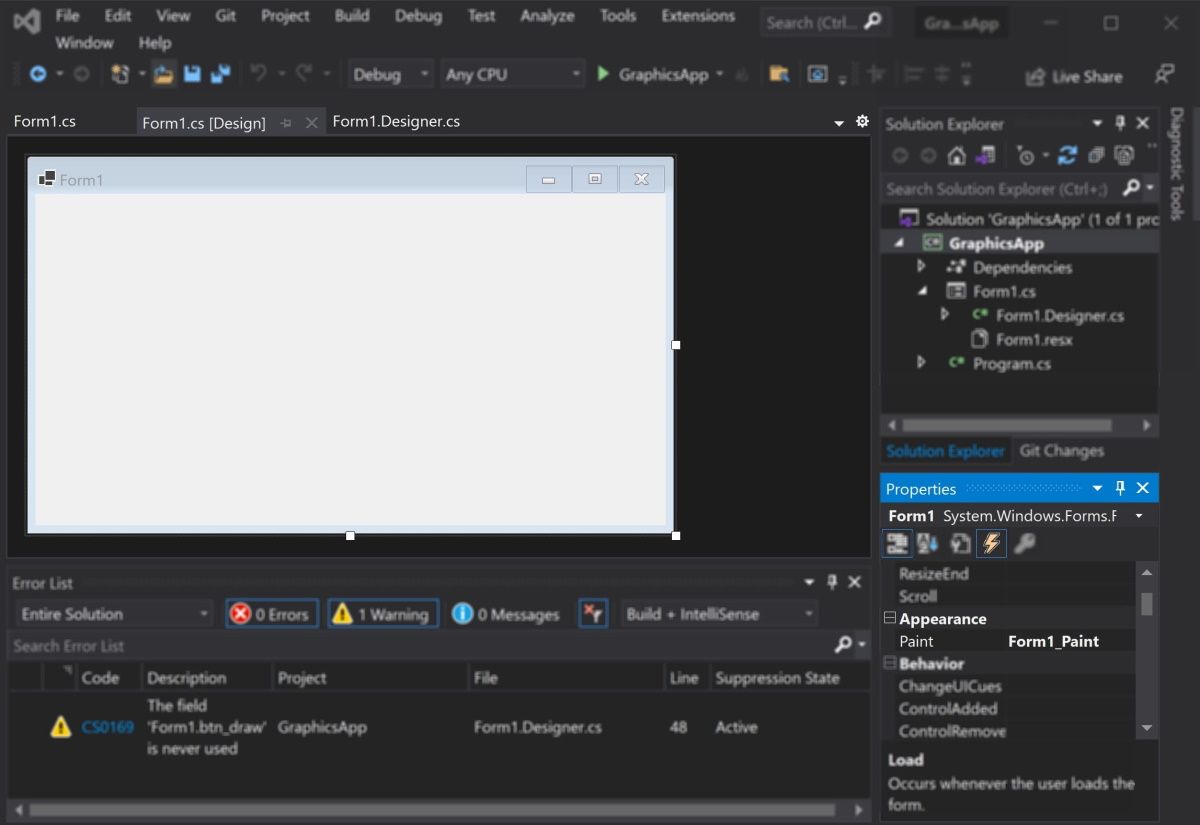
How to Add a Paint on Form Load Event Handler
First, add an event handler to draw shapes when the canvas loads.
-
Add a Paint function for the form.
        private void Form1_Paint(object sender, PaintEventArgs e)
{
    // Code goes here
} - Go into the Design View Tab.
- In the Properties window, select the lightning icon to open the «Events» tab.
-
In «Paint», under «Appearance», select the Form1_Paint function. This will execute the function when you run the application.

How to Draw Lines Onto a Windows Form Canvas
You can use a Color, Pen, and the DrawLine() method to draw lines on a canvas.
-
Inside the Form1_Paint() function, create a Color object with the color you want the line to be. Then, create a Pen object to draw the line with.
        Color black = Color.FromArgb(255, 0, 0, 0);
Pen blackPen = new Pen(black); -
The DrawLine() method from the Graphics class will draw a line using the pen. This will start drawing a line from an x, y position to another x, y position.
e.Graphics.DrawLine(blackPen, 300, 200, 800, 200); -
You can modify the properties for the pen object to change its width, dash style, and start or end cap.
        blackPen.Width = 20;
blackPen.DashStyle = System.Drawing.Drawing2D.DashStyle.Dash;
blackPen.StartCap = System.Drawing.Drawing2D.LineCap.ArrowAnchor;
e.Graphics.DrawLine(blackPen, 300, 200, 800, 200); -
Press the green play button at the top of Visual Studio to see the changes.


How to Draw Shapes Such as Rectangles and Circles
You can use the shapes classes for different shapes, or draw shapes manually onto the canvas.
-
Create a Color and Pen object as shown in the previous steps. Then, use the DrawRectangle() method to create the rectangle. The arguments are the x and y coordinates for the top-left of the rectangle, along with its width and height.
        Color red = Color.FromArgb(255, 255, 0, 0);
Pen redPen = new Pen(red);
redPen.Width = 5;
e.Graphics.DrawRectangle(redPen, 100, 100, 500, 200); -
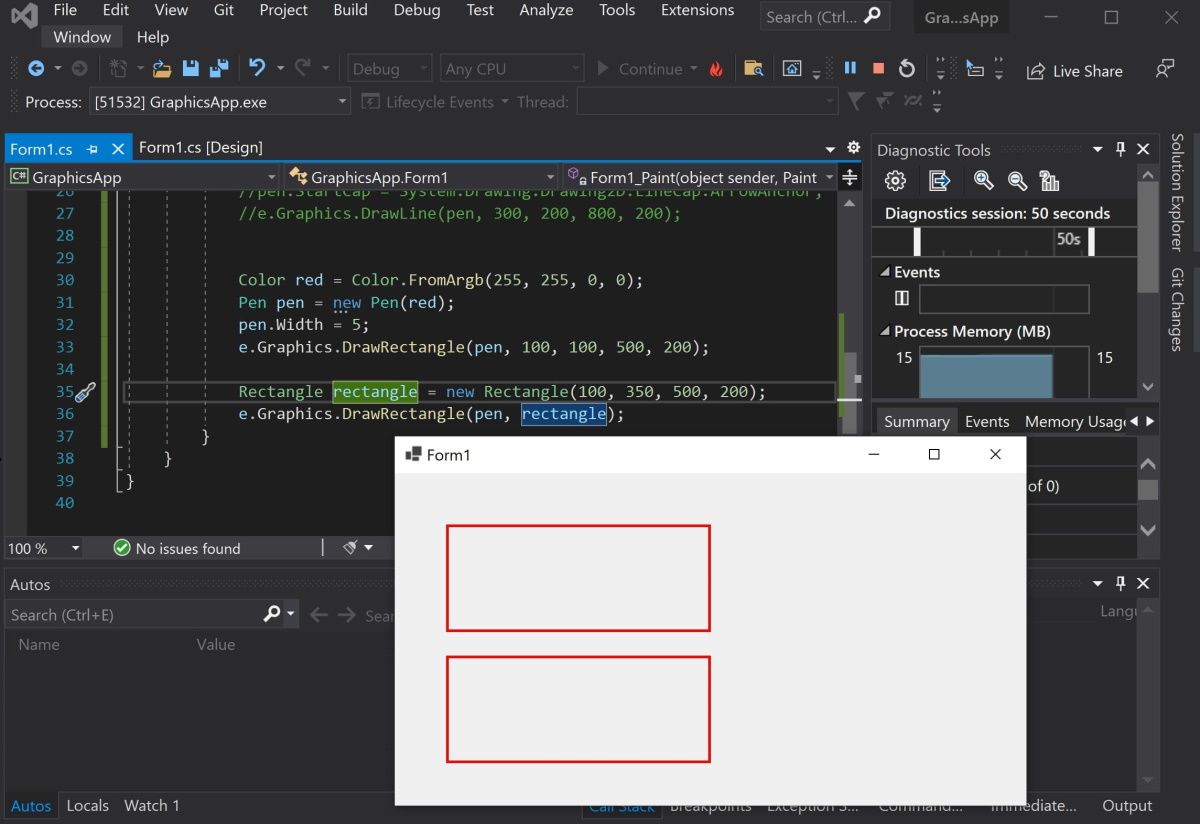
You can also create a rectangle using the Rectangle Class. First, create a Rectangle object. The arguments are also the x and y coordinates for the top-left corner, width, and height.
Rectangle rectangle = new Rectangle(100, 350, 500, 200); -
Use the DrawRectangle() function to draw the rectangle. Instead of passing the x, y, width, and height like before, you can use the Rectangle object instead.
e.Graphics.DrawRectangle(redPen, rectangle); -
Press the green play button at the top of Visual Studio to see the changes.

-
Go back to the code to draw other shapes. Use the DrawEllipse() function to draw a circle.
        Color green = Color.FromArgb(255, 0, 255, 0);
Pen greenPen = new Pen(green);
greenPen.Width = 5;
e.Graphics.DrawEllipse(greenPen, 400, 150, 400, 400);
When you draw a circle, the x and y coordinates (x=400, y=150) refer to the top-left corner of the circle, not the center of the circle.

-
To draw other shapes such as triangles or hexagons, use the DrawPolygon() method. Here you can specify a list of coordinates to represent the points of the shape.
        Color blue = Color.FromArgb(255, 0, 0, 255);
Pen bluePen = new Pen(blue);
bluePen.Width = 5;PointF[] coordinatesForTriangle = new PointF[] {
    new PointF(400, 150),
    new PointF(300, 300),
    new PointF(500, 300)
};e.Graphics.DrawPolygon(bluePen, coordinatesForTriangle);
The DrawPolygon() method will draw lines between the points specified.


How to Use the Brush Class to Fill In Shapes With Color
You can use the FillRectangle(), FillEllipses() or FillTriangle() methods to create shapes with a solid color.
-
First, create a brush object.
        Color purple = Color.FromArgb(255, 128, 0, 0);
SolidBrush solidBrush = new SolidBrush(purple); -
Use the FillRectangle(), FillEllipses() or FillTriangle() methods. They work the same way as the draw functions above, except instead of a Pen, they use a Brush object.
        e.Graphics.FillRectangle(solidBrush, 50, 50, 200, 250);
e.Graphics.FillEllipse(solidBrush, 300, 50, 200, 200);
e.Graphics.FillPolygon(solidBrush, new PointF[] { new PointF(700, 150), new PointF(600, 300), new PointF(800, 300) });
-
You can also input a shape object directly instead of providing coordinates.
        Rectangle rectangle = new Rectangle(100, 350, 500, 200);
e.Graphics.FillRectangle(solidBrush, rectangle); -
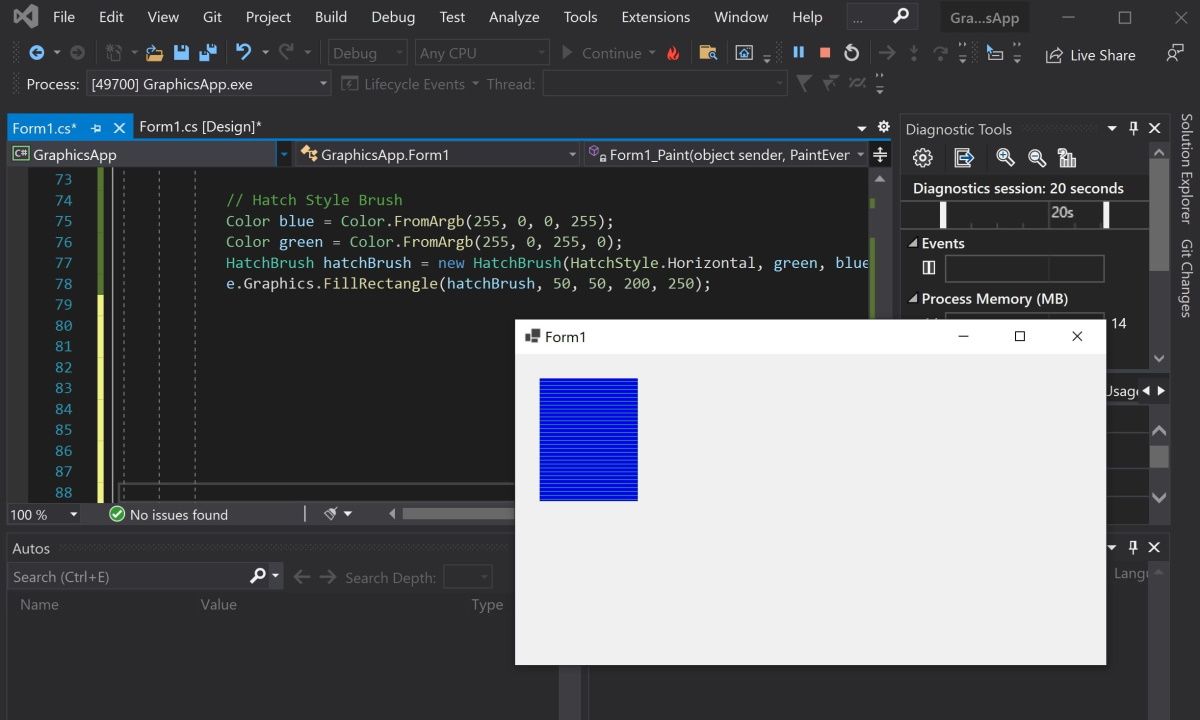
Use the HatchBrush to fill the shape using a different fill style, such as a horizontal or vertical pattern.
        Color blue = Color.FromArgb(255, 0, 0, 255);
Color green = Color.FromArgb(255, 0, 255, 0);
HatchBrush hatchBrush = new HatchBrush(HatchStyle.Horizontal, green, blue);
e.Graphics.FillRectangle(hatchBrush, 50, 50, 200, 250);
-
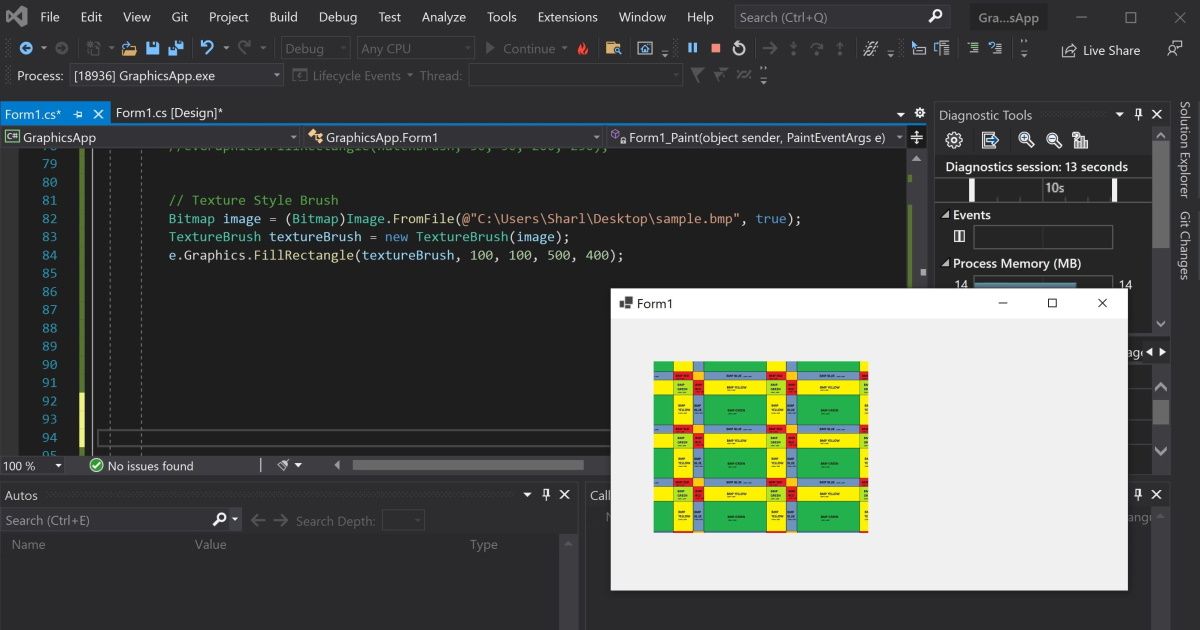
You can use the TextureBrush to fill a shape using an image. Here, create a bitmap by pointing to an image file. Instead of creating a brush using a color, create it using the image.
        Bitmap image = (Bitmap)Image.FromFile(@"C:\Users\Sharl\Desktop\flag.bmp", true);
TextureBrush textureBrush = new TextureBrush(image);
e.Graphics.FillRectangle(textureBrush, 100, 100, 500, 400);

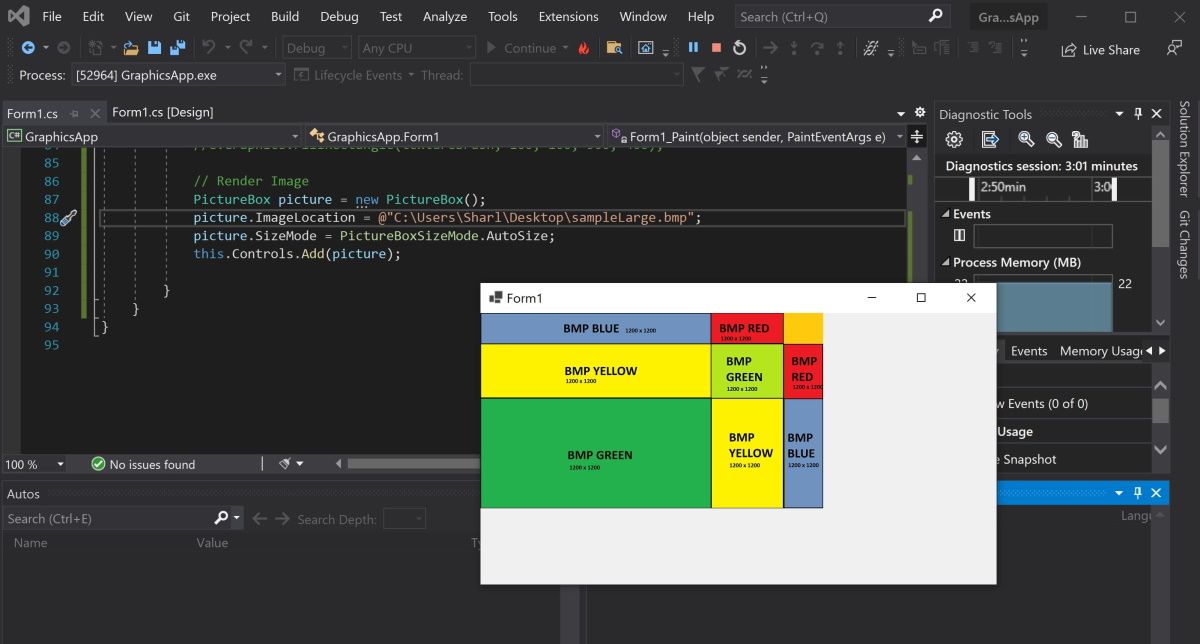
How to Render Images Onto the Form
To render an image, create a PictureBox control object and add it to the form.
-
Create a PictureBox control object using an image file.
        PictureBox picture = new PictureBox();
picture.ImageLocation = @"C:\Users\Sharl\Desktop\flagLarge.bmp"; -
Set the size of the image and add it onto the form so it renders.
        picture.SizeMode = PictureBoxSizeMode.AutoSize;
this.Controls.Add(picture); -
Press the green start button at the top to view the image.

Adding More Shapes to Your Windows Form
You should now understand how to add lines, shapes, and images to your Windows form. You can combine shapes to create new shapes. You can also play around with the built-in functions to create more complex shapes.