
Время на прочтение6 мин
Количество просмотров85K

Однажды вы задумаетесь, как превратить скрипт или приложение в Windows-службу. Скорее всего, задача окажется не такой уж тривиальной – приложению как минимум потребуется специальный интерфейс для получения команд от системы. А раз есть требования и ограничения, то есть и скрипты, и милые сердцу костылики для преодоления.
Статья будет полезна тем, кто, как и я — «программист не настоящий».
Зачем нужна служба, если есть назначенные задания
В отличие от назначенных заданий служба работает постоянно, запускается при старте ПК и может управляться средствами Windows. А еще регулярно запускаемому скрипту могут понадобиться данные с предыдущего запуска, и может быть полезно получение данных из внешних источников — например, в случае TCP или Web сервера.
Лично мне за последние пять лет приходилось создавать службу три с половиной раза:
- Потребовалось создать сервис на fail2ban для Windows 2003., который работал с логами FileZilla и Apache, а при подозрении на брутфорс блокировал IP штатными средствами Windows — ipsec.
- Аналог телнет-сервера для домашних версий Windows. Понадобилось выполнять команды на удаленных рабочих станциях, которые были под управлением Windows 7 Home. По сути, вторая попытка поиграть в службы.
- Музыкальный проигрыватель для торгового зала под Windows. Задачу по ТЗ можно было решить при помощи mpd и пачки скриптов, но я решил — если уж делать скрипты, то почему бы и не «сваять» проигрыватель самому. За основу взял библиотеку BASS.dll.
- Когда выбирали веб-сервер с поддержкой загрузки файлов под Windows, одним из вариантов был HFS. Сам по себе работать он не может, поэтому пришлось «запихивать» его в службу. В результате решение не понравилось, и просто установили «тему» Apaxy на web-сервере Apache.
Для создания службы можно использовать взрослые языки программирования вроде C. Но если вы не хотите связываться с Visual Studio, то возьмите готовые утилиты. Существуют платные решения вроде FireDaemon Pro или AlwaysUp, но мы традиционно сосредоточимся на бесплатных.
Способ первый. От Microsoft
Этот уже немолодой механизм состоит из двух компонентов: утилиты instsrv.exe для установки сервиса и srvany.exe — процесса для запуска любых исполняемых файлов. Предположим, что мы создали веб-сервер на PowerShell при помощи модуля Polaris. Скрипт будет предельно прост:
New-PolarisGetRoute -Path '/helloworld' -Scriptblock {
    $Response.Send('Hello World!')
}

Start-Polaris -Port 8080

while($true) {
    Start-Sleep -Milliseconds 10
}
Работа так называемого «сервера».
Теперь попробуем превратить скрипт в службу. Для этого скачаем Windows Resource Kit Tools, где будут наши утилиты. Начнем с того, что установим пустой сервис командой:
instsrv WebServ C:\temp\rktools\srvany.exe
Где WebServ — имя нашего нового сервиса. При необходимости через оснастку services.msc можно задать пользователя, под которым будет запускаться служба, и разрешить взаимодействие с рабочим столом.
Теперь пропишем путь к нашему скрипту при помощи магии реестра. Параметры службы есть в разделе реестра HKLM\SYSTEM\CurrentControlSet\Services\WebServ. В нем нам нужно добавить новый раздел Parameters и создать там строковый параметр Application, указав в нем путь к исполняемому файлу. В случае скрипта PowerShell он будет выглядеть так:
C:\Windows\System32\WindowsPowerShell\v1.0\powershell.exe -ExecutionPolicy Bypass -NoProfile -File C:\temp\Polaris\server.ps1

Настроенная служба.
Можно запустить и радоваться.

Работающая служба.
Однако у этого способа есть недостатки:
- Утилиты старые, разработаны до изобретения PowerShell, UAC и прочих вещей.
- Srvany не контролирует работу приложения. Даже если оно выпадет в ошибку, служба продолжит свое дело как ни в чем не бывало.
- Придется донастраивать и копаться в реестре. Вы же помните, что копаться в реестре небезопасно?
Поэтому перейдем к методу, частично лишенному этих проблем.
Способ второй, почти взрослый
Существует утилита под названием NSSM — Non-Sucking Service Manager, что можно перевести как не-плохой менеджер служб. В отличие от предыдущей, она поддерживается разработчиком, и исходный код опубликован на сайте. Помимо обычного способа, доступна и установка через пакетный менеджер Chocolately.
Создать сервис можно из обычной командной строки, вооружившись документацией на сайте разработчика. Но мы воспользуемся PowerShell. Потому что можем, разумеется.
$nssm = (Get-Command ./nssm).Source
$serviceName = 'WebServ'
$powershell = (Get-Command powershell).Source
$scriptPath = 'C:\temp\Polaris\server.ps1'
$arguments = '-ExecutionPolicy Bypass -NoProfile -File "{0}"' -f $scriptPath
& $nssm install $serviceName $powershell $arguments
& $nssm status $serviceName
Start-Service $serviceName
Get-Service $serviceName
Установка через PowerShell.
Для разнообразия проверим работу службы не браузером, а тоже через PowerShell командой Invoke-RestMethod.
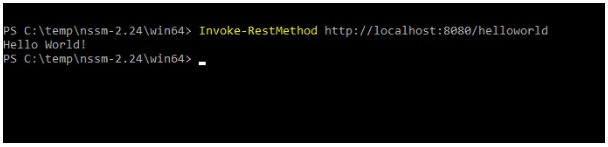
И вправду работает.
В отличие от srvany, этот метод позволяет перезапускать приложение на старте, перенаправлять stdin и stdout и многое другое. В частности, если не хочется писать команды в командную строку, то достаточно запустить GUI и ввести необходимые параметры через удобный интерфейс.
GUI запускается командой:
nssm.exe install ServiceName
Настроить можно даже приоритет и использование ядер процессора.
Действительно, возможностей куда больше, чем у srvany и ряда других аналогов. Из минусов бросается в глаза недостаточный контроль над всем процессом.
Налицо нехватка «жести». Поэтому я перейду к самому хардкорному методу из всех опробованных.
Способ третий. AutoIT
Поскольку я давний любитель этого скриптового языка, то не смог пройти мимо библиотеки под названием _Services_UDF v4. Она снабжена богатой документацией и примерами, поэтому под спойлером сразу приведу полный текст получившегося скрипта.
Листинг скрипта
Итак, попробуем «завернуть» в нее наш веб-сервис:
#NoTrayIcon
#RequireAdmin
#Region
#AutoIt3Wrapper_Version=Beta
#AutoIt3Wrapper_UseUpx=n
#AutoIt3Wrapper_Compile_Both=y
#AutoIt3Wrapper_UseX64=y
#EndRegion

Dim $MainLog = @ScriptDir & "\test_service.log"

#include <services.au3>
#include <WindowsConstants.au3>

$sServiceName="WebServ"

If $cmdline[0] > 0 Then
    Switch $cmdline[1]
        Case "install", "-i", "/i"
            InstallService()
        Case "remove", "-u", "/u", "uninstall"
            RemoveService()
        Case Else
            ConsoleWrite(" - - - Help - - - " & @CRLF)
            ConsoleWrite("params : " & @CRLF)
            ConsoleWrite(" -i : install service" & @CRLF)
            ConsoleWrite(" -u : remove service" & @CRLF)
            ConsoleWrite(" - - - - - - - - " & @CRLF)
            Exit
    EndSwitch
Else
    _Service_init($sServiceName)
    Exit
EndIf

Func _main($iArg, $sArgs)
If Not _Service_ReportStatus($SERVICE_RUNNING, $NO_ERROR, 0) Then
    _Service_ReportStatus($SERVICE_STOPPED, _WinAPI_GetLastError(), 0)
    Exit
EndIf

$bServiceRunning = True
$PID=Run("C:\Windows\System32\WindowsPowerShell\v1.0\powershell.exe -ExecutionPolicy Bypass -NoProfile -File C:\temp\Polaris\server.ps1")

While $bServiceRunning
_sleep(1000)
WEnd
ProcessClose($PID)

_Service_ReportStatus($SERVICE_STOP_PENDING, $NO_ERROR, 1000)
DllCallbackFree($tServiceMain)
DllCallbackFree($tServiceCtrl)
_Service_ReportStatus($SERVICE_STOPPED, $NO_ERROR, 0)
DllClose($hAdvapi32_DLL)
DllClose($hKernel32_DLL)
EndFunc

Func _Sleep($delay)
Local $result = DllCall($hKernel32_DLL, "none", "Sleep", "dword", $delay)
EndFunc

Func InstallService()
    #RequireAdmin
    Local $bDebug = True
    If $cmdline[0] > 1 Then
        $sServiceName = $cmdline[2]
    EndIf
    If $bDebug Then ConsoleWrite("InstallService("&$sServiceName &"): Installing service, please wait")
    _Service_Create($sServiceName, $sServiceName, $SERVICE_WIN32_OWN_PROCESS, $SERVICE_AUTO_START, $SERVICE_ERROR_SEVERE, '"' & @ScriptFullPath & '"');,"",False,"","NT AUTHORITY\NetworkService")
    If @error Then
        Msgbox("","","InstallService(): Problem installing service, Error number is " & @error & @CRLF & " message : " & _WinAPI_GetLastErrorMessage())
    Else
        If $bDebug Then ConsoleWrite("InstallService(): Installation of service successful")
    EndIf
    Exit
EndFunc

Func RemoveService()
    _Service_Stop($sServiceName)
    _Service_Delete($sServiceName)
    If Not @error Then
    EndIf
    Exit
EndFunc

Func _exit()
    _Service_ReportStatus($SERVICE_STOPPED, $NO_ERROR, 0);
EndFunc

Func StopTimer()
    _Service_ReportStatus($SERVICE_STOP_PENDING, $NO_ERROR, $iServiceCounter)
    $iServiceCounter += -100
EndFunc

Func _Stopping()
    _Service_ReportStatus($SERVICE_STOP_PENDING, $NO_ERROR, 3000)
 EndFunc
Разберу подробнее момент запуска приложения. Он начинается после операции $bServiceRunning = True и превращается в, казалось бы, бесконечный цикл. На самом деле этот процесс прервется, как только служба получит сигнал о завершении — будь то выход из системы или остановка вручную.
Поскольку программа для скрипта является внешней (powershell.exe), то после выхода из цикла нам нужно закончить ее работу с помощью ProcessClose.
Для этого скрипт необходимо скомпилировать в .exe, а затем установить службу, запустив exe с ключом -i.

Оно работает!
Разумеется, этот способ не самый удобный, и все дополнительные возможности придется реализовывать самостоятельно, будь то повторный запуск приложения при сбое или ротация логов. Но зато он дает полный контроль над происходящим. Да и сделать в итоге можно куда больше — от уведомления в Telegram о сбое службы до IPC-взаимодействия с другими программами. И вдобавок — на скриптовом языке, без установки и изучения Visual Studio.
Расскажите, а вам приходилось превращать скрипты и приложения в службы?
Создание службы для Windows
Последнее обновление: 16.10.2019
Одним из важнейших компонентов ОС Windows являются службы. Фактически это отдельные приложения, которые не имеют графического интерфейса и
которые выполняют различные задачи в фоновом режиме. Службы могут быть запущены при старте операционной системы, так и в любой другой момент работы пользователя.
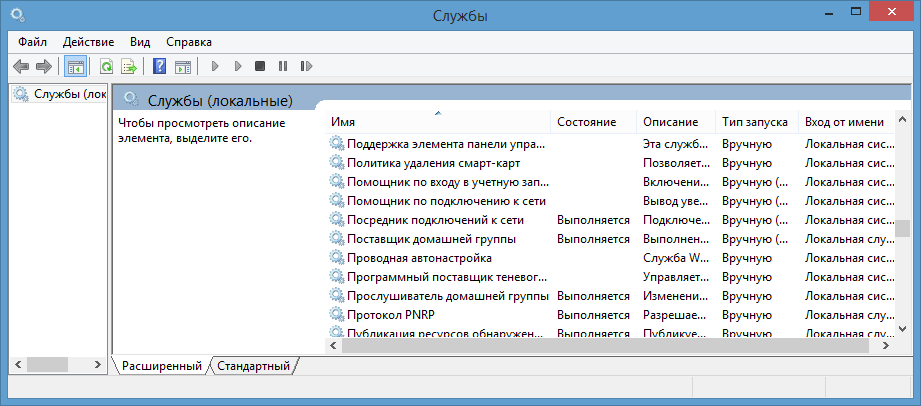
Распространенным примером служб являются различные веб-серверы, которые в фоновом режиме прослушивают
определенный порт на наличие подключений, и если подключения имеются, то взаимодействуют с ними. Это могут быть также различные вспомогательные сервисы
обновлений для других установленных программ, которые обращаются к серверу, чтобы узнать, есть ли новая версия приложения. В общем то мы можем
открыть панель служб и сами увидеть все установленные и запущенные службы:
Рассмотрим, как создавать свои службы в C#. В качестве реализуемой задачи выберем наблюдение за изменениями в определенной папке в файловой системе.
Теперь создадим для ее выполнения службу.
Вначале создадим новый проект, который будет иметь тип Windows Service. Назовем проект FileWatcherService:
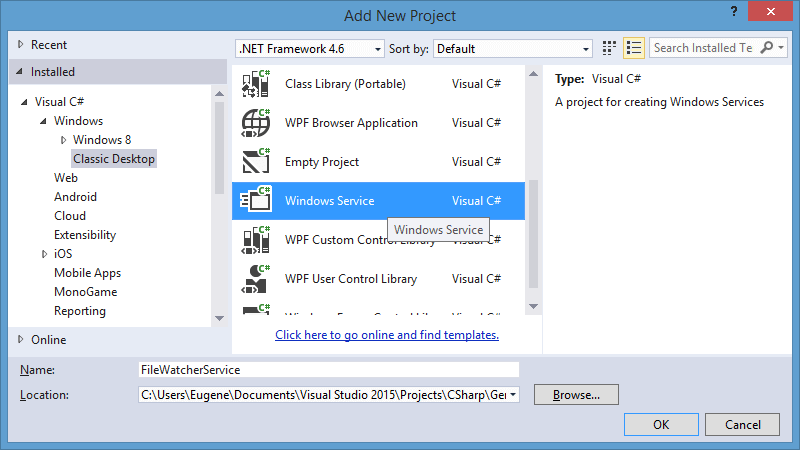
После этого Visual Studio генерирует проект, который имеет все необходимое. Хотя в принципе нам необязательно выбирать именно этот тип проекта,
можно было бы создать проект библиотеки классов, и затем в нем определить все необходимые классы.
Итак, новый проект выглядит следующим образом:
Здесь также есть файл Program.cs и есть собственно узел службы Service1.cs.
Служба представляет обычное приложение, но она не запускаетс сама по себе. Все вызовы и обращения к ней проходят через менеджер управления службами
(Service Control Manager или SCM). Когда служба запускается автоматически при старте системы или вручную, то SCM обращается к методу Main в классе Program:
static class Program
{
    static void Main()
    {
        ServiceBase[] ServicesToRun;
        ServicesToRun = new ServiceBase[]
        {
            new Service1()
        };
        ServiceBase.Run(ServicesToRun);
    }
}
Метод Main по умолчанию определен таким образом, чтобы запускать сразу несколько служб, которые определены в массиве ServicesToRun. Однако по умолчанию
проект содержит только одну службу Service1. Сам запуск производится с помощью метода Run: ServiceBase.Run(ServicesToRun).
Сама запускаемая служба представлена узлом Service1.cs. Однако на самом деле
это не простой файл кода. Если мы откроем этот узел, то увидим в нем файл дизайнера службы Service1.Designer.cs и класс Service1.
Класс Service1 собственно представляет службу. По умолчанию он имеет следующий код:
using System;
using System.Collections.Generic;
using System.ComponentModel;
using System.Data;
using System.Diagnostics;
using System.Linq;
using System.ServiceProcess;
using System.Text;
using System.Threading.Tasks;

namespace FileWatcherService
{
    public partial class Service1 : ServiceBase
    {
        public Service1()
        {
            InitializeComponent();
        }

        protected override void OnStart(string[] args)
        {
        }

        protected override void OnStop()
        {
        }
    }
}
Класс службы должен наследоваться от базового класса ServiceBase. Этот класс определяет ряд методов, важнейшие из которых
метод OnStart(), который запускает действия, выпоняемые службой, и метод OnStop(), останавливающий
службу.
После того, как SCM вызовет метод Main и зарегистрирует службу, происходит непосредственный ее вызов через запуск метода OnStart.
Когда в консоли служб или через командную строку мы посылаем команду на остановку службы, то SCM обращается к методу OnStop для ее остановки.
Кроме этих двух методов в классе службы можно переопределить еще несколько методов базового класса ServiceBase:
-
OnPause: вызывается при приостановке службы
-
OnContinue: вызывается при возобновлении работы службы после ее приостановки
-
OnShutdown: вызывается при завершении работы Windows
-
OnPowerEvent: вызывается при изменении режима электропитания
-
OnCustomCommand: вызывается при получении службой пользовательской команды от Менеджера Управления Службами (Service Control Manager / SCM)
В конструкторе класса Service1 вызывается метод InitializeComponent(), который определен в файле дизайнера Service1.Designer.cs:
namespace FileWatcherService
{
    partial class Service1
    {
        private System.ComponentModel.IContainer components = null;

        protected override void Dispose(bool disposing)
        {
            if (disposing && (components != null))
            {
                components.Dispose();
            }
            base.Dispose(disposing);
        }
        private void InitializeComponent()
        {
            components = new System.ComponentModel.Container();
            this.ServiceName = "Service1";
        }
    }
}
Единственное, что надо в нем отметить, это установка названия службы (свойство ServiceName):
this.ServiceName = "Service1";
Это то название, которое будет отображаться в консоли служб после установки данной службы. Мы можем его изменить, а можем и оставить как есть.
Теперь изменим код службы следующим образом:
using System;
using System.ServiceProcess;
using System.IO;
using System.Threading;

namespace FileWatcherService
{
    public partial class Service1 : ServiceBase
    {
        Logger logger;
        public Service1()
        {
            InitializeComponent();
            this.CanStop = true;
            this.CanPauseAndContinue = true;
            this.AutoLog = true;
        }

        protected override void OnStart(string[] args)
        {
            logger = new Logger();
            Thread loggerThread = new Thread(new ThreadStart(logger.Start));
            loggerThread.Start();
        }

        protected override void OnStop()
        {
            logger.Stop();
            Thread.Sleep(1000);
        }
    }

    class Logger
    {
        FileSystemWatcher watcher;
        object obj = new object();
        bool enabled = true;
        public Logger()
        {
            watcher = new FileSystemWatcher("D:\\Temp");
            watcher.Deleted += Watcher_Deleted;
            watcher.Created += Watcher_Created;
            watcher.Changed += Watcher_Changed;
            watcher.Renamed += Watcher_Renamed;
        }

        public void Start()
        {
            watcher.EnableRaisingEvents = true;
            while(enabled)
            {
                Thread.Sleep(1000);
            }
        }
        public void Stop()
        {
            watcher.EnableRaisingEvents = false;
            enabled = false;
        }
		// переименование файлов
        private void Watcher_Renamed(object sender, RenamedEventArgs e)
        {
            string fileEvent = "переименован в " + e.FullPath;
            string filePath = e.OldFullPath;
            RecordEntry(fileEvent, filePath);
        }
		// изменение файлов
        private void Watcher_Changed(object sender, FileSystemEventArgs e)
        {
            string fileEvent = "изменен";
            string filePath = e.FullPath;
            RecordEntry(fileEvent, filePath);
        }
		// создание файлов
        private void Watcher_Created(object sender, FileSystemEventArgs e)
        {
            string fileEvent = "создан";
            string filePath = e.FullPath;
            RecordEntry(fileEvent, filePath);
        }
		// удаление файлов
        private void Watcher_Deleted(object sender, FileSystemEventArgs e)
        {
            string fileEvent = "удален";
            string filePath = e.FullPath;
            RecordEntry(fileEvent, filePath);
        }

        private void RecordEntry(string fileEvent, string filePath)
        {
            lock (obj)
            {
                using (StreamWriter writer = new StreamWriter("D:\\templog.txt", true))
                {
                    writer.WriteLine(String.Format("{0} файл {1} был {2}",
                        DateTime.Now.ToString("dd/MM/yyyy hh:mm:ss"), filePath, fileEvent));
                    writer.Flush();
                }
            }
        }
    }
}
Ключевым классом, который инкапсулирует всю функциональность, является класс Logger. С помощью объекта FileSystemWatcher он будет вести мониторинг изменений в папке D://Temp.
В методе Start() устанавливается, что мы будем отслеживать изменения через объект FileSystemWatcher. И вся работа будет идти, пока булевая переменная enabled равна true. А метод Stop() позволит
завершить работу класса.
События FileSystemWatcher позволяют отслеживать все изменения в наблюдаемой папке.
При этом будет вестись запись изменений в файл templog.txt. Чтобы не было гонки ресурсов
за файл templog.txt, в который вносятся записи об изменениях, процедура записи блокируется заглушкой lock(obj).
В итоге после создания, изменения, переименования и удаления файл лога будет содержать что-то наподобие:
30.07.2015 12:15:40 файл D:\Temp\Новый текстовый документ.txt был создан
30.07.2015 12:15:46 файл D:\Temp\Новый текстовый документ.txt был переименован в D:\Temp\hello.txt
30.07.2015 12:15:55 файл D:\Temp\hello.txt был изменен
30.07.2015 12:15:55 файл D:\Temp\hello.txt был изменен
30.07.2015 12:16:01 файл D:\Temp\hello.txt был удален
В самом классе службы Service1 в конструкторе устанавливается ряд опций:
this.CanStop = true; // службу можно остановить
this.CanPauseAndContinue = true; // службу можно приостановить и затем продолжить
this.AutoLog = true; // служба может вести запись в лог
В методе OnStart() для запуска объекта Logger вызывется новый поток:
protected override void OnStart(string[] args)
{
    logger = new Logger();
    Thread loggerThread = new Thread(new ThreadStart(logger.Start));
    loggerThread.Start();
}
Новый поток нужен, так как текущий поток обрабатывает только команды SCM и должен возвращаться из метода OnStart как можно быстрее.
Когда от менеджера SCM поступает команда на остановку службы, срабатывает метод OnStop, который вызывает метод logger.Stop(). Дополнительная задержка
позволит потоку логгера остановиться:
protected override void OnStop()
{
    logger.Stop();
    Thread.Sleep(1000);
}
Однако самого класса службы еще недостаточно. Нам необходимо еще создать устанощик службы.
Службы в Windows — особые процессы, выполняемые в фоновом режиме, в том числе от учетной записи «СИСТЕМА», которые могут быть запущены в том числе до входа в систему. При желании вы можете создать свою собственную службу, которая будет работать таким же образом.
В этой инструкции подробно о том, как создать службу в Windows 11 или Windows 10 средствами системы, ограничениях методов и одном дополнительном способе заставить работать ваш процесс в качестве службы.
Создание службы в командной строке
Первый способ — использование команды командной строки для создания своей службы, шаги будут следующими:
- Запустите командную строку от имени Администратора (способы запуска командной строки от Администратора).
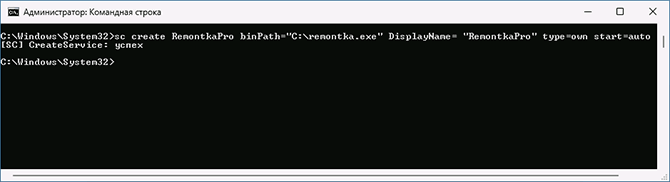
- Используйте команду, заменив текстовые описания и пути на свои:
sc create Имя_службы binPath="C:\service-file.exe" DisplayName= "Описание_службы" type=own start=auto
- После нажатия Enter вы получите сообщение: CreateService: успех, что означает, что служба была успешно создана.

В указанной команде используются следующие параметры:
- binPath — путь к исполняемому файлу службы.
- DisplayName — отображаемое в списке служб имя службы.
- start — тип запуска, возможные значения: boot, auto, demand (значение по умолчанию), disabled, delayed-auto
- type — тип службы, по умолчанию own, возможны другие значения: share (делит исполняемый файл с другими службами), kernel (драйвер), filesys (драйвер файловой системы), interact (интерактивная служба с возможность взаимодействия с пользователем, поддержка этого типа служб прекращается).
После создания службы вы сможете увидеть её в списке служб (Win+R — services.msc), а автоматический запуск произойдет при следующей перезагрузке системы.
Создание службы в Windows PowerShell
Создать службу можно и в PowerShell, запущенном от имени администратора (или в Терминале Windows). Базовый вариант команды с параметрами по умолчанию:
New-Service -Name "Имя_Службы" -BinaryPathName '"C:\путь_к_файлу параметры_запуска"'
Расширенный вариант с указанием описания и типа запуска:
New-Service -Name MyService -BinaryPathName '"C:\путь_к_файлу параметры_запуска"' -DisplayName "Имя_службы" -Description "Описание службы" -StartupType "Automatic"
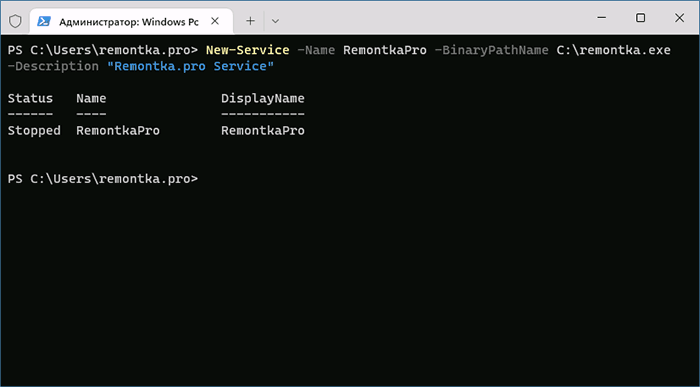
В случае, если выполняется запуск исполняемого файла без параметров, а путь не содержит пробелов, использование кавычек не обязательно, например:
-BinaryPathName C:\remontka.exe
При создании служб в PowerShell доступны и ряд дополнительных параметров, описанных в официальной справке на сайте Майкрософт.
Удаление созданной службы
Удалить созданную службы вы можете также в командной строке, запущенной от имени Администратора с помощью команды:
sc delete Имя_службы

Или в Windows PowerShell:
Remove-Service -Name MyService
После выполнения указанных команд созданная вами служба будет удалена из Windows.
Созданная служба не работает, варианты решения
Из описания можно предположить, что любой файл .exe может быть службой, однако, при попытке добавить свои фоновые утилиты и заставить их работать в виде службы рядовые пользователи обычно сталкиваются с ситуацией, когда процесс запускается, а затем закрывается сам. А при запуске службы вручную через некоторое время сообщает, что служба не ответила на запрос своевременно или о других ошибках.
Причина в том, что исполняемые файлы служб — не совсем обычные программы, они, помимо прочего, обмениваются данными с системой. Если ваш EXE не отвечает на соответствующие запросы системы, Windows «делает вывод» о том, что со службой что-то не так.
Как быть, если вы всё-таки настойчиво хотите использовать свой прикладной исполняемый файл в качестве службы?
- Использовать планировщик заданий и запуск от соответствующего пользователя — это не будет в полной мере службой, но почти то, что нужно.
- Ранее существовала программа RunAsSvc, позволяющая запускать любые процессы в качестве службы, но для современных ОC он не применима, а разработка была прекращена.

- Использовать инструменты INSTSRV.EXE и SRVANY.EXE из Windows Server 2003 Resource Kit Tools при создании службы Windows.

Создание пользовательской службы с помощью INSTSRV.EXE и SRVANY.EXE
Последний вариант из приведённого выше списка рассмотрим подробнее. Шаги будут следующими:
- Загрузите (вероятнее всего, придется найти в Интернете на сторонних сайтах) Windows Server 2003 Resource Kit полностью или только файлы INSTSRV.EXE и SRVANY.EXE, располагаем их у себя на диске, в моем примере путь — C:\Windows
- В командной строке от имени администратора используйте команду (пути меняем на свои):
C:\Windows\instsrv.exe Имя_службы C:\Windows\srvany.exe

- Если вы получили сообщение о том, что The service was successfully added, всё прошло успешно. Теперь требуется запустить редактор реестра (Win+R — regedit).
- В редакторе реестра перейдите по пути
HKEY_LOCAL_MACHINE\SYSTEM\CurrentControlSet\Services\
и найдите раздел с вашим именем службы. Нажимаем по нему правой кнопкой мыши и выбираем пункт «Создать» — «Раздел», задаем имя «Parameters» для раздела.
- Выберите созданный раздел, нажмите правой кнопкой мыши в правой панели редактора реестра и создайте новый строковый параметр с именем Application
- Дважды нажмите по параметру и в поле «Значение» укажите путь к вашему файлу exe для запуска службы.


Закройте редактор реестра — служба создана, её можно запустить из services.msc или она будет автоматически запущена после перезагрузки компьютера.
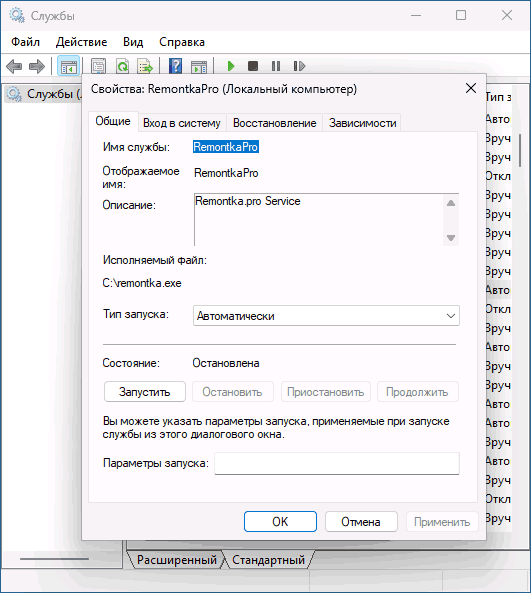
Учитывайте, что во всех приведенных примерах служба по умолчанию запускается с учетной записью «СИСТЕМА». В некоторых случаях это может приводить к неправильной работе. В этом случае может иметь смысл зайти в свойства службы в services.msc и изменить параметры на вкладке «Вход в систему».
In this tutorial, we will explore how to create a Windows Service with .NET Core. .NET Core is a versatile and powerful framework that allows developers to build a variety of applications, including Windows Services. The creation of Windows Services can be crucial for developing systems that require continuous background processes, such as system monitoring or data processing tasks.

Here’s the step-by-step guide to creating a Windows Service with .NET Core:
Step 1: Setting Up the .NET Core Console Application
First, you need to set up a new .NET Core console application. Open the command prompt and create a new directory for your project. Navigate into the directory and run the following command:
dotnet new console -n MyWindowsServiceThis command creates a new console application with the name ‘MyWindowsService’.
Step 2: Implementing the Main Functionality
Next, you need to implement the main functionality of your service. Open the ‘Program.cs’ file and add the following code:
using System;
using System.Threading;

namespace MyWindowsService
{
    class Program
    {
        static void Main(string[] args)
        {
            while(true)
            {
                Console.WriteLine("Windows Service is running...");
                Thread.Sleep(1000);
            }
        }
    }
}
This code will make the service print a message «Windows Service is running…» every second.
Step 3: Converting the Console App to a Windows Service
To convert the console app to a Windows Service, we will use the Microsoft.Extensions.Hosting package. First, add the package to your project with the following command:
dotnet add package Microsoft.Extensions.HostingNow, update the ‘Program.cs’ file:
using Microsoft.Extensions.Hosting;
using System;
using System.Threading;
using System.Threading.Tasks;

namespace MyWindowsService
{
    public class Program
    {
        public static void Main(string[] args)
        {
            CreateHostBuilder(args).Build().Run();
        }

        public static IHostBuilder CreateHostBuilder(string[] args) =>
            Host.CreateDefaultBuilder(args)
                .ConfigureServices((hostContext, services) =>
                {
                    services.AddHostedService<MyService>();
                });
    }

    public class MyService : IHostedService
    {
        public Task StartAsync(CancellationToken cancellationToken)
        {
            Console.WriteLine("Service starting...");
            return Task.CompletedTask;
        }

        public Task StopAsync(CancellationToken cancellationToken)
        {
            Console.WriteLine("Service stopping...");
            return Task.CompletedTask;
        }
    }
}
This code will make your console application run as a Windows Service.
Step 4: Installing the Windows Service
To install the Windows Service, publish your application first:
dotnet publish --configuration Release --output ./publishThen, install the service using the New-Service cmdlet from PowerShell:
New-Service -Name "MyService" -BinaryPathName "C:\path\to\your\app\publish\MyWindowsService.exe"Your Windows Service is now installed and will start automatically with Windows.
If you’re looking to hire .NET remote developers to assist with similar projects, consider reaching out to experienced professionals.
Conclusion
Creating a Windows Service with .NET Core is a straightforward process that involves setting up a console application, implementing the main functionality, converting the app to a service, and installing the service. With this guide, you should be able to create your own Windows Services using .NET Core.
Remember, if you need professional help, don’t hesitate to hire .NET remote developers.
Windows services are programs that are automatically started when the system starts up, or when the user logs in. They run in the background and can run with a different account than the logged-in user. .NET makes it easy to create Windows services or Linux daemons as shown in this article.

Intro
Instead of creating Windows services and Linux daemons, nowadays you might think about using Docker instead. Docker orchestrators can be used to monitor and scale containers. Before creating a Windows service, you might think about this alternative. However, there are still many scenarios where Windows services are of great use.
What are some of the scenarios where Windows services are used? Looking at the services running with Windows, (start the Services app), services to update applications and the operating system (e.g. Windows Update, Microsoft Edge Update Service, Mozilla Maintenance Service, Google Update Service, AdobeUpdateService), services to store credentials for users and applications (Credential Manager), services to offer geolocation information for applications (Geolocation Service), malware checkers (Microsoft Defender Antivirus Service), services to deliver sensor data (Sensor Service), and many more. Not every of these services is implemented as a separate application – some of the services use the same executable. Looking at the properties of a service you can check the path for the executable including its command-line arguments. Many services that are part of Windows make use of the svchost.exe, the Geolocation service invokes this with the -k netsvcs -p options.

Services can be configured to automatically start when the operating system starts up (startup type Automatic). The Automatic Delayed start option allows the user to login before the service is started. Delayed started services are started after the Automatic started service. With the Manual configuration, the service starts up based on an event – e.g. a domain is joined, a firewall port is opened, a group policy is changed, or a custom event based on Event Tracing for Windows (ETW) is fired.
Create a Worker
Let’s start creating a Windows service by creating a background worker. With .NET 6, a background worker can be created using Visual Studio or the dotnet CLI command dotnet new worker.
The top-level statements created with this application use the Host class. The method CreateDefaultBuilder contains functionality to setup the dependency injection container, configuration, and logging. The dependency injection container managed by the Host class is configured by invoking the method ConfigureServices. In the generated code, the extension method AddHostedService is used to register a background class that implements the interface IHostedService. This interface is indirectly implemented by the Worker class by deriving from the base class BackgroundService. The interface IHostedService defines the methods StartAsync and StopAsync. Adding a hosted service, invoking the Run method of the host starts the host and in turn invokes the startup of the IHostedService.

The Worker class derives from the class BackgroundService. BackgroundService implements the interface IHostedService and defines the abstract method ExecuteAsync. This abstract method is called by the StartAsync method in the BackgroundService. StartAsync is defined by the IHostedService interface. With the implementation of the Worker class, ExecuteAsync uses an endless loop (until cancellation is requested) and writes a log message once a second.

The main functionality for the Host class is creating the dependency injection container, configuration, and logging. Using CreateDefaultBuilder, configuration is read from the configuration files appsettings.json, appsettings.{env.EnvironmentName}.json, environmental variables, and the command line.
Logging configuration is read from the section Logging within the configuration settings. Using the worker template, the configuration file appsettings.json defines logging based on the log level. The default configuration is set to Information:

If the application runs on a Windows system, the method CreateDefaultBuilder also adds logging to the Windows event log and sets a filter provider to only log warnings and more critical issues to this provider.
Running the application, log information is written to the console. The worker writes a message every second.
info: SimpleWorkerService.Worker[0]
      Worker running at: 03/17/2022 10:45:55 +01:00
info: SimpleWorkerService.Worker[0]
      Worker running at: 03/17/2022 10:45:56 +01:00
info: SimpleWorkerService.Worker[0]
      Worker running at: 03/17/2022 10:45:57 +01:00
info: SimpleWorkerService.Worker[0]
      Worker running at: 03/17/2022 10:45:58 +01:00
info: SimpleWorkerService.Worker[0]
      Worker running at: 03/17/2022 10:45:59 +01:00
Convert to a Windows Service
To build a Windows Service, you just need to add the NuGet package Microsoft.Extensions.Hosting.WindowsServices, and add the method invocation UseWindowsService to the IHostBuilder fluent API:

To see information level logging in the Windows event log, the filter is explicitly applied with the ConfigureLogging method used with the host builder. The UseWindowsService method configures the source name the same as the application name. This information is overwritten configuring the EventLogSettings. In addition to setting the SourceName property of the EventLogSettings, the LogName is set which creates a separate category for logging shown in the Event Viewer.
Because the
EventLogLoggerProviderand theEventLogSettingsclasses are only available on Windows, theOperatingSystemclass is used to check if the application is running on Windows before this API is invoked. In case your application is not used to run on Linux, you can use theSupportedOSPlatformattribute instead. You can also specify <TargetPlatform> and specify a Windows Target Framework Moniker.
Installing and Managing the Windows Service
After building the application, the new Windows Service can be published using dotnet publish (or by using Visual Studio):
dotnet publish -c Release -o c:\sampleservice
To control Windows Services, the sc command can be used. Creating a new Windows Service is done using sc create passing the name of the service and the binPath parameter referencing the executable. This command requires administrator rights:
sc create "Sample Service" binPath= c:\sampleservice\SimpleWorkerService.exe
Using sc create, you can configure the account with which the service should run (the default is LocalSystem), services which are required to be started before this service (depend), and more.
The status of the service can be queried using the Services MMC, or with the command line sc query:
sc query "Sample Service"
After the service is created, it is stopped and need to be started:
sc start "Sample Service"
To stop and delete the service, the sc stop and sc delete commands can be used.
After starting the service, log information can be seen with the Windows Event Viewer. Because the LogName property was set, there’s a separate category with Application and Services Logs:

Passing Arguments
With a Windows Service, it’s possible to pass command-line arguments with the service configuration. To read the arguments, the Environment class can be used as shown in the following code snippet.

When creating the service using sc create, pay attention to leave a blank after the binPath option. You can supply the parameters within the quotes:
sc create "Sample Service" binPath= "c:\sampleservice\SimpleWorkerService.exe --p1=one --p2=two"
Web Application as Windows Service
What about hosting Kestrel as a Windows Service? There’s not a lot difference using the package Microsoft.Extensions.Hosting.WindowsServices – in principle just the API UseWindowsService needs to be invoked. Let’s get into details using the .NET 6 WebApplicationBuilder class.
A Web API project can be created using dotnet new webapi. This template creates an API returning random weather information. With the option –use-minimal-apis, controllers are not used, and the complete functionality of the API can be defined with top-level statements. The parameter –no-https specifies to create an implementation with HTTP. Using HTTPS, it’s necessary to create and configure a certificate that’s used by the account running the service. Depending on the scenario how you use this Windows service, HTTP can be ok.
dotnet new webapi --use-minimal-apis --no-https -o ASPNETCoreWindowsService
The UseWindowsService method is an extension method for IHostBuilder. With .NET 6, WebApplication and WebApplicationBuilder are used instead of the Host and HostBuilder classes. Of course, you can also change the code to the old .NET 5 version. WebApplication offers an abstraction layer of the Host class and makes it easier to configure ASP.NET Core middleware. With .NET 5, the Startup class has been used. Instead of using the Startup class now everything can be done with top-level statements. The Minimal API makes use of C# 10 features and adds some APIs, e.g. a new overload of the MapGet method. Using the WebApplicationBuilder class, the functionality of the IHostBuilder can be accessed using the Host property. This property returns a ConfigureHostBuilder instance which implements the interface IHostBuilder. Here you can use the extension method UseWindowsService like before. The UseWindowsService extension method configures the content root path to AppContext.BaseDirectory for the Windows service. Because the CreateBuilder method already needs this directory, this directory needs to be specified with the WebApplicationOptions as shown. To specify a log category with the Windows event logs, the EventLogSettings are configured as before with the console application:

The Kestrel server can be configured accessing the WebHost property of the WebApplicationBuilder, invoking the method ConfigureKestrel. With the sample application, the Kestrel server is configured using appsettings.json:

Now the service can be build, published, and configured as a Windows Service in the same way as mentioned before using the worker application. Opening a browser to reference the configured port with the controller route WeatherForecast returns JSON information from the API service:
http://localhost:9200/weatherforecast

Accessing the Windows Service from a different system, the Firewall needs to be configured to allow accessing this port from the outside.
Linux Daemons
What about running this application on Linux? The method UseWindowsService checks if it’s running on Windows as a Windows service, and returns if this is not the case. With this you can run the application on the Linux system as well. To create a Linux daemon, you can add the NuGet package Microsoft.Extensions.Hosting.Systemd, and invoke the method UseSystemd. What’s different is the configuration of systemd. To use systemd with WSL-2, you can use Distrod to run your Ubuntu environment. See a link below for Distrod.
Take away
Starting with .NET 3, the Host class was introduced which abstracts configuration for logging, dependency injecction, and configuration in one place. Extension methods make it easy to offer more features. With this, using the NuGet package Microsoft.Extensions.Hosting.WindowsServices just one API method is required to create a Windows Service. This way, background functionalty based on the worker template, but also hosting a Kestrel server for offering ASP.NET Core Web applications and services is an easy task.
If you like this article, it would be great if you buy a coffee: