
Уровень сложностиСредний
Время на прочтение10 мин
Количество просмотров48K
Небольшая предыстория
Совсем недавно я перешёл на 3 курс технического университета, где на нашу группу вновь навалилась целая куча новых предметов. Одним из них являлся ИиУВМ(Интерфейсы и устройства вычислительных машин), на котором нам предстояло изучать, как те или иные части компьютера взаимодействуют между собой. Уже на 2 лабораторной работе нам выдали задание, суть которого заключалась в переборе всех устройств на PCI шине и получению их Vendor и Device ID через порты ввода-вывода. Для упрощения задачи преподаватель выдал ссылку на специальный драйвер и dll библиотеку под Windows XP и заявил, что это оптимальный вариант выполнения работы, так как по другому сделать её невозможно. Перспектива писать код под устаревшую OS меня не радовала, а слова про «невозможность» другой реализации лишь разожгли интерес. После недолгих поисков я выяснил, что цель может быть достигнута с помощью самописного драйвера.
В этой статье я хочу поделиться своим опытом, полученным в ходе длительных блужданий по документации Microsoft и попыток добиться от ChatGPT вменяемого ответа. Если вам интересно системное программирование под Windows — добро пожаловать под кат.
Важно знать
Современные драйвера под Windows могут быть основаны на одном из двух фреймворков: KMDF и UMDF (Kernel Mode Driver Framework и User Mode Driver Framework). В данной статье будет рассматриваться разработка KMDF драйвера, так как на него наложено меньше ограничений в отношении доступных возможностей. До UMDF драйверов я пока не добрался, как только поэкспериментирую с ними, обязательно напишу статью!
Разработка драйверов обычно происходит с помощью 2 компьютеров (или компьютера и виртуальной машины), на одном вы пишите код и отлаживаете программу (хост-компьютер), на другом вы запускаете драйвер и молитесь, чтобы система не легла после ваших манипуляций (целевой компьютер).
Перед началом работы с драйверами обязательно создайте точку восстановления, иначе вы рискуете положить свою систему так, что она перестанет запускаться. В таком случае выходом из ситуации станет откат Windows в начальное состояние (то есть в состояние при установке), что уничтожит не сохранённые заранее файлы на системном диске. Автор данной статьи наступил на эти грабли и совсем забыл скопировать свои игровые сохранения в безопасное место…
Первый запуск драйвера после добавления обработки IOCTL запросов на моём компьютере приводит к падению системы с необходимостью откатываться на точку восстановления. После этого драйвер запускается и работает без проблем. Самое странное, что если перенести тот же код в новый проект и запустить этот драйвер, то падения не происходит. Причины этого найти мне не удалось, так что прошу помощи в комментариях.
Я не профессиональный разработчик и данная статья лишь способ проложить дорогу для тех, кому так же, как и мне, стало интересно выйти за рамки привычных user mode приложений и попробовать что-то новое. Критика и дополнения приветствуются, постараюсь по возможности оперативно исправлять все ошибки. Теперь точно всё 
Установка компонентов
-
В данной статье я не буду рассматривать вопрос о создании Hello world драйвера, этот вопрос полностью разобран тут. Рекомендую чётко следовать всем указаниям этого руководства, для того чтобы собрать и запустить свой первый драйвер. Это может занять некоторое время, но как можно достигнуть цели не пройдя никакого пути? Если у вас возникнут проблемы с этим процессом, я с радостью помогу вам в комментариях.
-
Полезно будет установить утилиту WinObj, которая позволяет вам просматривать имена файлов устройств и находить символические ссылки, которые на них указывают. Качаем тут.
-
Также неплохой утилитой является DebugView. Она позволяет вам просматривать отладочные сообщения, которые отправляются из ядра. Для этого необходимо включить опцию Kernel Capture на верхней панели.
Теперь с полным баком всяких утилит и библиотек переходим к самому интересному.
Начинаем веселье
В результате выполнения всех пунктов руководства Microsoft вы должны были сформировать файл драйвера cо следующим содержимым (комментарии добавлены от меня):
#include <ntddk.h>
#include <wdf.h>

// Объявление прототипа функции входа в драйвер, аналогично main() у обычных программ
DRIVER_INITIALIZE DriverEntry;

// Объявление прототипа функции для создания экземпляра устройства
// которым будет управлять наш драйвер
EVT_WDF_DRIVER_DEVICE_ADD KmdfHelloWorldEvtDeviceAdd;

// Пометки __In__ сделаны для удобства восприятия, на выполнение кода они не влияют.
// Обычно функции в пространстве ядра не возвращают данные через return
// (return возвращает статус операции)
// так что при большом числе аргументов такие пометки могут быть полезны
// чтобы не запутаться
NTSTATUS
DriverEntry(
  // Фреймворк передаёт нам этот объект, никаких настроек мы для него не применяем
    _In_ PDRIVER_OBJECT     DriverObject,
    // Путь, куда наш драйвер будет помещён
    _In_ PUNICODE_STRING    RegistryPath
)
{
    // NTSTATUS переменная обычно используется для возвращения
    // статуса операции из функции
    NTSTATUS status = STATUS_SUCCESS;

    // Создаём объект конфигурации драйвера
    // в данный момент нас не интерсует его функциональность
    WDF_DRIVER_CONFIG config;

    // Макрос, который выводит сообщения. Они могут быть просмотрены с помощью DbgView
    KdPrintEx((DPFLTR_IHVDRIVER_ID, DPFLTR_INFO_LEVEL, "HelloWorld: DriverEntry\n"));

    // Записываем в конфиг функцию-инициализатор устройства
    WDF_DRIVER_CONFIG_INIT(&config,
        KmdfHelloWorldEvtDeviceAdd
    );

    // Создаём объект драйвера
    status = WdfDriverCreate(DriverObject,
        RegistryPath,
        WDF_NO_OBJECT_ATTRIBUTES,
        &config,
        WDF_NO_HANDLE
    );
    return status;
}

NTSTATUS
KmdfHelloWorldEvtDeviceAdd(
    _In_    WDFDRIVER       Driver,     // Объект драйвера
    _Inout_ PWDFDEVICE_INIT DeviceInit  // Структура-иницализатор устройства
)
{
    // Компилятор ругается, если мы не используем какие-либо параметры функции
    // (мы не используем параметр Driver)
    // Это наиболее корректный способ избежать этого предупреждения
    UNREFERENCED_PARAMETER(Driver);

    NTSTATUS status;

    // Объявляем объект устройства
    WDFDEVICE hDevice;

    // Снова вывод сообщения
    KdPrintEx((DPFLTR_IHVDRIVER_ID, DPFLTR_INFO_LEVEL, "KmdfHelloWorld: DeviceAdd\n"));

    // Создаём объект устройства
    status = WdfDeviceCreate(&DeviceInit,
        WDF_NO_OBJECT_ATTRIBUTES,
        &hDevice
    );

    // Утрированный пример того, как можно проверить результат выполнения операции
    if (!NT_SUCCESS(status)) {
        return STATUS_ERROR_PROCESS_NOT_IN_JOB;
    }

    return status;
}
Данный драйвер не делает ничего интересного, кроме 2-х отладочных сообщений и создания экземпляра устройства. Пока мы не можем общаться с устройством из пространства пользователя. Нужно это исправить!
Весь дальнейший код будет добавляться в функциюKmdfHelloWorldEvtDeviceAddДля достижения цели необходимо создать файл устройства и символическую ссылку на него в пространстве ядра. С этим нам помогут функции WdfDeviceInitAssignNameи WdfDeviceCreateSymbolicLinkОднако просто вызвать их, передав имена файлов, не получится, нужна подготовка.
Начнём с тех самых имён. Они представляют собой строки в кодировке UTF-8. Следующий пример показывает способ инициализации строки в пространстве ядра.
UNICODE_STRING  symLinkName = { 0 };
UNICODE_STRING deviceFileName = { 0 };


RtlInitUnicodeString(&symLinkName, L"\\DosDevices\\PCI_Habr_Link");
RtlInitUnicodeString(&deviceFileName, L"\\Device\\PCI_Habr_Dev");
Желательно придерживаться показанного в примере стиля именования файла устройства, то есть начинаться имя должно с префикса \Device\
Следующим шагом становится установление разрешения на доступ к устройству. Оно может быть доступно или из пространства ядра, или из системных или запущенных администратором программ. Внимание на код.
 UNICODE_STRING securitySetting = { 0 };
 RtlInitUnicodeString(&securitySetting, L"D:P(A;;GA;;;SY)(A;;GA;;;BA)");

 // SDDL_DEVOBJ_SYS_ALL_ADM_ALL
 WdfDeviceInitAssignSDDLString(DeviceInit, &securitySetting);
Комментарий капсом — это пометка какой тип разрешения на устройство здесь выставлен. В документации Microsoft описаны константы, аналогичные комментарию, однако у меня компилятор их не видел, и мне пришлось вставлять строку в сыром виде. Ссылка на типы разрешений тут.
Далее необходимо настроить дескриптор безопасности для устройства. Если коротко, то это реакция устройства на обращения к своему файлу.
// FILE_DEVICE_SECURE_OPEN означает, что устройство будет воспринимать обращения
// к файлу устройства как к себе
WdfDeviceInitSetCharacteristics(DeviceInit, FILE_DEVICE_SECURE_OPEN, FALSE);
Наконец-то мы можем создать файл устройства:
 status = WdfDeviceInitAssignName(
     DeviceInit,
     &deviceFileName
 );

// Напоминание о том, что результат критичных для драйвера функций нужно проверять
 if (!NT_SUCCESS(status)) {
     WdfDeviceInitFree(DeviceInit);
     return status;
 }
Переходим к символической ссылке, следующий код должен быть вставлен после функции WdfDeviceCreate
 status = WdfDeviceCreateSymbolicLink(
     hDevice,
     &symLinkName
 );
Итоговый код функции KmdfHelloWorldEvtDeviceAdd должен иметь следующий вид:
NTSTATUS
KmdfHelloWorldEvtDeviceAdd(
    _In_    WDFDRIVER       Driver,     // Объект драйвера
    _Inout_ PWDFDEVICE_INIT DeviceInit  // Структура-иницализатор устройства
)
{
    // Компилятор ругается, если мы не используем какие-либо параметры функции
    // (мы не используем параметр Driver)
    // Это наиболее корректный способ избежать этого предупреждения
    UNREFERENCED_PARAMETER(Driver);

    NTSTATUS status;

    UNICODE_STRING  symLinkName = { 0 };
    UNICODE_STRING deviceFileName = { 0 };
    UNICODE_STRING securitySetting = { 0 };

    RtlInitUnicodeString(&symLinkName, L"\\DosDevices\\PCI_Habr_Link");
    RtlInitUnicodeString(&deviceFileName, L"\\Device\\PCI_Habr_Dev");
    RtlInitUnicodeString(&securitySetting, L"D:P(A;;GA;;;SY)(A;;GA;;;BA)");

    // SDDL_DEVOBJ_SYS_ALL_ADM_ALL
    WdfDeviceInitAssignSDDLString(DeviceInit, &securitySetting);

    WdfDeviceInitSetCharacteristics(DeviceInit, FILE_DEVICE_SECURE_OPEN, FALSE);

    status = WdfDeviceInitAssignName(
        DeviceInit,
        &deviceFileName
    );

    // Hезультат критичных для драйвера функций нужно проверять
    if (!NT_SUCCESS(status)) {
        WdfDeviceInitFree(DeviceInit);
        return status;
    }

    // Объявляем объект устройства
    WDFDEVICE hDevice;

    // Снова вывод сообщения
    KdPrintEx((DPFLTR_IHVDRIVER_ID, DPFLTR_INFO_LEVEL,"HelloWorld: EvtDeviceAdd\n"));

    // Создаём объект устройства
    status = WdfDeviceCreate(&DeviceInit,
        WDF_NO_OBJECT_ATTRIBUTES,
        &hDevice
    );

    status = WdfDeviceCreateSymbolicLink(
        hDevice,
        &symLinkName
    );

    // Утрированный пример того, как можно проверить результат выполнения операции
    if (!NT_SUCCESS(status)) {
        return STATUS_ERROR_PROCESS_NOT_IN_JOB;
    }

    return status;
}
После сборки и установки драйвера, в утилите WinObj по пути «GLOBAL??» вы сможете увидеть следующее:

Общаемся с устройством
Взаимодействие с устройством происходит через IOCTL запросы. В режиме пользователя есть специальная функция, которая позволяет отправлять их устройству и получать данные в ответ. Пока сконцентрируемся на обработке этих запросов на стороне драйвера.
С чего начнётся этот этап? Правильно! С инициализации необходимых компонентов. Следите за руками:
WDF_IO_QUEUE_CONFIG  ioQueueConfig;
WDFQUEUE  hQueue;

// Инициализируем настройки очереди, в которую будут помещаться запросы
// Параметр WdfIoQueueDispatchSequential говорит то, что запросы будут обрабатываться
// по одному в порядке очереди
WDF_IO_QUEUE_CONFIG_INIT_DEFAULT_QUEUE(
    &ioQueueConfig,
    WdfIoQueueDispatchSequential
);

// Обработчик HandleIOCTL будет вызываться в ответ на функцию DeiviceIOControl
// Уже скоро мы создадим его
ioQueueConfig.EvtIoDeviceControl = HandleIOCTL;

// Создаём очередь
status = WdfIoQueueCreate(
      hDevice,    // Объект устройства уже должен существовать
      &ioQueueConfig,
      WDF_NO_OBJECT_ATTRIBUTES,
      &hQueue
);
if (!NT_SUCCESS(status)) {
      return status;
}
Очередь есть, но нет обработчика. Работаем:
// Выглядит страшно, но по сути код может быть любым числом, этот макрос использован
// для более подробного описания возможностей IOCTL кода для программиста
#define IOCTL_CODE CTL_CODE(FILE_DEVICE_UNKNOWN, 0x3000, METHOD_BUFFERED, GENERIC_READ | GENERIC_WRITE)

VOID HandleIOCTL(
    _In_ WDFQUEUE Queue,   // Объект очереди, применения ему я пока не нашёл
    _In_ WDFREQUEST Request, // Из этого объекта мы извлекаем входной и выходной буферы
    _In_ size_t OutputBufferLength,
    _In_ size_t InputBufferLength,
    _In_ ULONG IoControlCode // IOCTL код, с которым к устройству обратились
)
{
    NTSTATUS status = STATUS_SUCCESS;

    UNREFERENCED_PARAMETER(Queue);
    UNREFERENCED_PARAMETER(InputBufferLength);
    UNREFERENCED_PARAMETER(OutputBufferLength);
    UNREFERENCED_PARAMETER(Request);

   switch (IoControlCode)
   {
      case IOCTL_CODE:
      {
          // Обрабатываем тут
          break;
      }
   }

    // По сути своей return из обработчика
    // Используется, если запрос не возваращает никаких данных
    WdfRequestComplete(Request, status);
}
Вот мы уже и на финишной прямой, у нас есть очередь, есть обработчик, но последний не возвращает и не принимает никаких данных. Сделаем так, чтобы обработчик возвращал нам сумму переданных чисел.
Объявим 2 структуры, из их названий будет понятно для чего они будут использоваться. В режиме ядра лучше использовать системные типы данных, такие как USHORT, UCHAR и другие.
struct DeviceRequest
{
    USHORT a;
    USHORT b;
};

struct DeviceResponse
{
    USHORT result;
};
Обновлённая функция обработки IOCTL запроса:
VOID HandleIOCTL(
    _In_ WDFQUEUE Queue,   // Объект очереди, применения ему я пока не нашёл
    _In_ WDFREQUEST Request, // Из этого объекта мы извлекаем входной и выходной буферы
    _In_ size_t OutputBufferLength,
    _In_ size_t InputBufferLength,
    _In_ ULONG IoControlCode // IOCTL код, с которым к устройству обратились
)
{
    NTSTATUS status = STATUS_SUCCESS;

    UNREFERENCED_PARAMETER(Queue);
    UNREFERENCED_PARAMETER(InputBufferLength);
    UNREFERENCED_PARAMETER(OutputBufferLength);

    size_t returnBytes = 0;

    switch (IoControlCode)
    {
    case IOCTL_CODE:
    {
        struct DeviceRequest request_data = { 0 };

        struct DeviceResponse *response_data = { 0 };

        PVOID buffer = NULL;
        PVOID outputBuffer = NULL;
        size_t length = 0;

        // Получаем указатель на буфер с входными данными
        status = WdfRequestRetrieveInputBuffer(Request,
                                               sizeof(struct DeviceRequest),
                                               &buffer,
                                               &length);

        // Проверка на то, что мы получили буфер и он соотвествует ожидаемому размеру
        // Очень важно делать такие проверки, чтобы не положить систему :)
        if (length != sizeof(struct DeviceRequest) || !buffer)
        {
            status = STATUS_INVALID_DEVICE_REQUEST;
            break;
        }

        request_data = *((struct DeviceRequest*)buffer);

        // Получаем указатель на выходной буфер
        status = WdfRequestRetrieveOutputBuffer(Request,
                                                sizeof(struct DeviceResponse),
                                                &outputBuffer,
                                                &length);
        if (length != sizeof(struct DeviceResponse) || !outputBuffer)
        {
            status = STATUS_INVALID_DEVICE_REQUEST;
            break;
        }
        response_data = (struct DeviceResponse*)buffer;

        // Записываем в выходной буфер результат
        response_data->result = request_data.a + request_data.b;
        // Вычисляем сколько байт будет возвращено в ответ на данный запрос
        returnBytes = sizeof(struct DeviceResponse);

        break;
    }
    }

    // Функция-return изменилась, так как теперь мы возвращаем данные
    WdfRequestCompleteWithInformation(Request, status, returnBytes);
}
Последний шаг — программа в режиме пользователя. Cоздаём обычный С или C++ проект и пишем примерно следующее:
#include <windows.h>
#include <iostream>

//Эта часть аналогична тем же объявлениям в драйвере
//================
#define IOCTL_CODE CTL_CODE(FILE_DEVICE_UNKNOWN, 0x3000, METHOD_BUFFERED, GENERIC_READ | GENERIC_WRITE)

struct DeviceRequest
{
    USHORT a;
    USHORT b;
};

struct DeviceResponse
{
    USHORT result;
};
// ===========================

int main()
{
	HANDLE hDevice = CreateFileW(L"\\??\\PCI_Habr_Link",
                                 GENERIC_READ | GENERIC_WRITE,
                                 FILE_SHARE_READ,
                                 NULL,
                                 OPEN_EXISTING,
                                 FILE_ATTRIBUTE_NORMAL,
                                 NULL);

	DeviceRequest request = { 0 };
	request.a = 10;
	request.b = 15;

	LPVOID input = (LPVOID)&request;

	DeviceResponse response = {  0};
	LPVOID answer = (LPVOID)&response;
	DWORD bytes = 0;

	bool res = DeviceIoControl(hDevice, IOCTL_CODE, input, sizeof(DeviceRequest),
		answer, sizeof(DeviceResponse), &bytes, NULL);

	response = *((DeviceResponse*)answer);
	std::cout << "Sum : " << response.result << std::endl;
	char ch;
	std::cin >> ch;

	CloseHandle(hDevice);
}
При запуске вы должны получить такой результат:

Заключение
Собственно, на этом всё. В конечном итоге мы получили драйвер, способный принимать и отвечать на запросы пользовательских программ. Дальнейшие модификации проекта ограничиваются лишь вашей фантазией.
Предыстория
Для очередного проекта возникла необходимость написать простенький софтверный драйвер под Windows, но так как опыта в написании драйверов у меня примерно столько же, сколько и в балете, я начал исследовать данную тему. В таких делах я предпочитаю начинать с основ, ибо если кидаться сразу на сложные вещи, то можно упустить многие базовые понятия и приёмы, что в дальнейшем только усложнит жизнь.
После 20 минут поисков по сети я наткнулся на Github Павла Иосифовича (zodiacon — Overview). Личность легендарная в своих кругах, достаточно посмотреть на его репозиторий, публикации и выступления на именитых конференциях. Помимо этого, Павел является автором/соавтором нескольких книг: «Windows Internals» (книга, имеющаяся у меня на полке, которая принесла немало пользы), и «Windows Kernel Programming» 2019 года выпуска (бегло пролистав 11 Глав или 390 страниц, я понял – это то, что нужно!).
Кстати, книгу вы можете купить прямо на сайте Павла
Ссылка скрыта от гостей
Книгу я приобрёл в бумажной версии, чтобы хоть и немного, но поддержать автора. Безупречное качество, несмотря на то, что она издается в мягком переплете. Хорошие плотные листы формата А4 и качественная краска. (книга без проблем пережила вылитую на нее кружку горячего кофе).
Пока я сидел на балконе и читал четвёртую главу книги, в голову пришла мысль: а почему бы не сделать ряд статей на тему «Программирования драйвера под Windows», так сказать, совместить полезное, с еще более полезным.
И вот я здесь, пишу предысторию.
Как я вижу этот цикл статей и что от него ожидать:
Это будут статьи, которые будут базироваться на вышеупомянутой книге, своеобразный вольный и сокращенный перевод, с дополнениями и примечаниями.
Базовые понятия о внутреннем устройстве Windows (Windows Internals)
Для того, чтобы начать разрабатывать Драйвер под Windows, то есть работать на уровне с ядром ОС, необходимо базовое понимание того, как эта ОС утроена. Так как я хочу сосредоточиться на написании драйвера, а не на теории об операционных системах, подробно описывать понятия я не буду, чтобы не растягивать статью, вместо этого прикреплю ссылки для самостоятельного изучения.
Следовательно, нам стоит ознакомиться с такими базовыми понятиями как:
Ссылка скрыта от гостей
Процесс – это объект, который управляет запущенной инстанцией программы.
Ссылка скрыта от гостей
Технология, позволяющая создавать закрытые пространства памяти для процессов. В своем роде — это песочница.
Ссылка скрыта от гостей
Это сущность, которая содержится внутри процесса и использует для работы ресурсы, выделенные процессом — такие, как виртуальная память. По сути, как раз таки потоки и запускают код.
Ссылка скрыта от гостей
В своем роде это прокладка, которая позволяет программе отправлять запросы в Ядро операционной системы, для выполнения нужных ей операций.
Ссылка скрыта от гостей
Это сложно описать словами коротко, проще один раз увидеть картинку.
В упрощённом виде это выглядит так:

Ссылка скрыта от гостей
Дескрипторы и объекты необходимы для регулирования доступа к системным ресурсам.
Объект — это структура данных, представляющая системный ресурс, например файл, поток или графическое изображение.
Дескриптор – это некая абстракция, которая позволяет скрыть реальный адрес памяти от Программы в пользовательском режиме.
Для более глубокого понимания Операционных систем могу посоветовать следующие материалы:
Книги:
- Таненбаум, Бос: Современные операционные системы
- Windows Internals 7th edition (Part 1)
Видео:
Настройка рабочего пространства
Для разработки драйвера, как и любого другого софта необходима подходящая среда.
Так как мы работаем в операционной системе Windows, её средствами мы и будем пользоваться.
Что нам понадобится:
1. Visual Studio 2017 и старше.
(Community Version хватает с головой) Также во вкладке „Individual components” необходимо установить
Код:
MSVC v142 - VS 2019 C++ ARM build tools (Latest)
MSVC v142 - VS 2019 C++ ARM Spectre-mitigated libs (Latest)
MSVC v142 - VS 2019 C++ ARM64 build tools (Latest)
MSVC v142 - VS 2019 C++ ARM64 Spectre-mitigated libs (Latest)
MSVC v142 - VS 2019 C++ ARM64EC build tools (Latest - experimental)
MSVC v142 - VS 2019 C++ ARM64EC Spectre-mitigated libs (Latest - experimental)
MSVC v142 - VS 2019 C++ x64/x86 build tools (Latest)
MSVC v142 - VS 2019 C++ x64/x86 Spectre-mitigated libs (Latest)
и далее по списку.
2. Windows 10/11 SDK (последней версии)
Ссылка скрыта от гостей

Тут все просто. Качаем iso файл, монтируем и запускаем установщик.
3. Windows 10/11 Driver Kit (WDK)
Ссылка скрыта от гостей

В конце установки вам будет предложено установить расширение для Visual Studio. Обязательно установите его!

После закрытия окна установки WDK появится установщик Расширения VisualStudio

4. Sysinternals Suite
Ссылка скрыта от гостей
Скачайте и распакуйте в удобное для вас место. Это набор полезных утилит, которые пригодятся для исследования Windows, дебага драйвера и прочего.

5. Виртуальная Машина с Windows для тестов.
Выбор ПО для виртуализации на ваше усмотрение. Я буду использовать «VMware Workstation 16 pro».
Написанные драйверы лучше тестировать именно в виртуальной машине, так как Ядро — ошибок не прощает, и вы будете часто улетать в синий экран смерти.
После того, как все было установлено, пора запускать Visual Studio и начинать писать драйвер.
Создание проекта
Запускаем Visual Studio и создаем новый проект. Создадим пустой проект „Empty WDM Driver“

Называем его как душе угодно.
И вот он, наш свеженький чистенький проект для нашего первого драйвера.

Теперь необходимо создать cpp файл, в котором мы будем писать сам драйвер.


Вот и все. Настройку системы и среды мы закончили.

Первый драйвер
Сначала импортируем ntddk.h эта одна из базовых библиотек для работы с ядром. Больше информации
Ссылка скрыта от гостей
. Как и у любой программы, у драйвера должна быть точка входа DriverEntry, как функция Main в обычной программе. Готовый прототип этой функции выглядит так
C++:
#include <ntddk.h>
NTSTATUS DriverEntry(_In_ PDRIVER_OBJECT DriverObject, _In_ PUNICODE_STRING RegistryPath) {
/*
    In_ это часть SAL(Source Code Ananotation Language) Аннотации не видимы для компилятора,
    но содержат метаданные которые, улучшают анализ и чтение кода.
*/
    return STATUS_SUCCESS;
}
Если мы попробуем собрать наш проект, то получим следующие ошибки и предупреждения.

В данном случае пункт 1 является следствием пунктов 2 и 3. Дело в том, что по дефолту в Visual Studio некоторые “предупреждения” расцениваются как ошибки.
Чтобы решить эту проблему есть 2 пути.
- Отключить эту фичу в Visual Studio, что делать не рекомендуется. Так как сообщения об ошибках могут быть полезны и сэкономят вам время и нервы в дальнейшем.
- Более правильный и классический метод это использовать макросы в c++. Как видно из сообщения с кодом C4100 объекты RegistryPath и DriverObject не упомянуты в теле функции. Подробнее
Ссылка скрыта от гостей
.
Для того, чтобы избавиться от предупреждений, и заставить наш код работать, стоит поместить объекты в макрос UNREFERENCED_PARAMETER(ObjectName)
C++:
include <ntddk.h>

NTSTATUS DriverEntry(_In_ PDRIVER_OBJECT DriverObject, _In_ PUNICODE_STRING RegistryPath) {
    UNREFERENCED_PARAMETER(DriverObject);
    UNREFERENCED_PARAMETER(RegistryPath);
    return STATUS_SUCCESS;
}
Теперь, если пересобрать проект, то мы увидим, что ошибка С220 и предупреждение C4100 пропали, но к ним на смену пришли LNK2019 и LNK1120. Однако это уже не ошибки компиляции — это ошибки линкера. А кто говорил что будет легко?
О том, что такое линкер можно почитать
Ссылка скрыта от гостей
.
Дело в том, что наша функция не представлена в стандартном линкере С++ и вообще она девушка капризная и хочет Си-линкер. Удовлетворим желание дамы и дадим ей то, чего она хочет.
Делается это просто. Перед функцией надо добавить extern "C" так наш линкер будет понимать, что эта функция должна линковаться С-линкером.
Собираем проект заново и вуаля — Драйвер собрался.

Что на данный момент умеет наш драйвер? Сейчас это по сути пустышка, которая после загрузки, в случае успеха, вернет нам сообщения об удачном запуске. Давайте заставим его нас поприветствовать и проверим его работоспособность. Выводить сообщения мы будем при помощи функции KdPrint(()); да именно в двойных кавычках.
Итоговый код драйвера будет выглядеть так:
C++:
#include <ntddk.h>

//Указываем линкеру, что DriverEntry должна линковаться С-линкером
extern "C"
NTSTATUS DriverEntry(_In_ PDRIVER_OBJECT DriverObject, _In_ PUNICODE_STRING RegistryPath)
{
    //Убираем варнинг C4100 и связанную с ним ошибку C220
    UNREFERENCED_PARAMETER(DriverObject);
    UNREFERENCED_PARAMETER(RegistryPath);
    //Выводим сообщение
    KdPrint(("Hi Codeby, this is our first driver! Yuhu!\n"));

    return STATUS_SUCCESS;
}
Собираем или пересобираем драйвер.

Важно! Сборка драйвера должна происходить в режиме Debug!!!

После чего в папке нашего проекта мы сможем найти результаты нашего труда. Вы только посмотрите на него, какой маленький и хорошенький.

Но что делать дальше? Как проверить его работоспособность?
Для этого нам и понадобится наша виртуальная машина с Windows, но перед запуском на ней драйвера, нам придется проделать пару манипуляций. Дело в том, что в Windows есть встроенная защита, и если драйвер не подписан «нужной» подписью ака сертификатом, то драйвер просто не загрузится.
Дальнейшие действия нужно проделать в Windows на виртуальной машине.
Чтобы отключить эту проверку подписи, а точенее перевести Windows в тестовый режим, запустите cmd.exe от имени администратора и введите следующую команду bcdedit /set testsigning on.

Перезагрузите виртуальную машину.
Если все прошло удачно, в правом нижнем углу вы увидите следующую надпись (2 нижнее строчки могут отличиться в зависимости от версии Windows)
Возвращаемся в папку с драйвером и копируем его в виртуальную машину. Теперь нам надо создать службу для запуска драйвер. Открываем консоль от имени администратора и вводим следующую команду:
sc create Name type= kernel binPaht= PATH_TO_DRIVER
в моем случае это выглядит так:

Также проверить успешность создания можно через реестр.

В той же консоли мы можем попробовать запустить нашу службу.
sc start CodebyDriver

Отлично, драйвер запустился и мы даже не улетели в синьку, а это всегда приятно. Теперь давайте проверим, выводится ли сообщение от драйвера.
Для этого нам необходимо провести подготовительные работы.
Создадим новый ключ в реестре и назовем его Debug Print Filter.

В качестве значения задаем DWORD с именем DEFAULT и определяем данные для значения как 8.

Перезагружаем виртуальную машину.
После перезапуска запускаем DebugView данный инструмент находится в архиве Sysinternals, который мы ранее скачали. Ее можно смело скопировать в виртуальную машину.
Запускаем DebugView от имени Администратора и ставим галочку “Capture Kerner”

Capture Win32 и Capture Global Win32 можно снять, если летит много сообщений.
Затем запускаем консоль от имени администратора и запускаем службу загрузки драйвера.

Все отработало отлично, и мы видим приветствие от нашего драйвера!
На этой приятной ноте первая статья из цикла заканчивается. В дальнейших статьях мы добавим функционала нашему драйверу, научим его выгружаться и получать данные.
Спасибо за чтение!
P.S: Я сам только начал изучать тему работы с драйверами. Так что если у вас есть предложения или правки по технической части статьи, прошу отписать в комментарии, чтобы я мог внести изменения в статью.
P.P.S: Как вы могли заметить, писать мы будем преимущественно на С++, посему могу посоветовать отличный канал с уроками по С++ — The Cherno.
While applications with user-friendly interfaces run in user mode, some protected data can only be accessed in kernel mode. To securely and efficiently work with user data, applications rely on software drivers that process user mode requests and deliver results back to the application.
In this article, we provide a practical example of writing a Windows Driver Model (WDM) driver for encrypting a virtual disk that stores user data. Most of the steps described will also work for other types of drivers. This article will be useful for development teams and project leaders who are considering developing a custom software driver.
Contents:
- What do you need to build a Windows software driver?
- Encryption disk architecture
- Building a WDM driver
- Creating a device object
- Registering callback methods
- Implementing callback methods
- Implementing read/write operations for a virtual disk
- Mounting the disk
- Unmounting the disk
- Encrypting the disk
- Running a demo
- Finalizing the implementation of WDM requirements
- Debugging the disk
- Conclusion
What do you need to build a Windows software driver?
In the article How to Develop a Virtual Disk Driver for Windows: A No-Nonsense Guide, we discuss in detail how to build a basic virtual disk driver for Windows. This time, even though we’re once again working with a virtual disk driver, we are building a software driver for Windows that won’t directly interact with any physical devices or hardware. The driver is part of a project written in C, so we also cover some language-related limitations.
In this guide, we show you how to develop a Windows driver for creating an encrypted virtual disk — a file that operates similarly to a physical disk. You’ll be able to see the virtual disk in File Explorer and perform operations in it such as creating, saving, and deleting data. The driver’s key task is to process requests received from the operating system and send them to the virtual disk instead of a real device.
To follow along with our driver development guide, you’ll need the following tools:
- Visual Studio (we used Visual Studio 2019)
- Windows Software Development Kit (SDK) (for versions older than Visual Studio 2017; we used SDK version 10.0.19041.0.)
- Windows Driver Kit (WDK) (we used WDK version 10.0.19041.685)
- VMWare (to create a virtual machine for driver debugging)
Note: Starting with Visual Studio 2017, Windows SDK is installed automatically when you select the Desktop development with C++ option when installing Visual Studio. WDK, however, still must be downloaded separately.
If WDK was installed properly, you’ll see driver project templates in the dialog window for creating new Visual Studio projects:
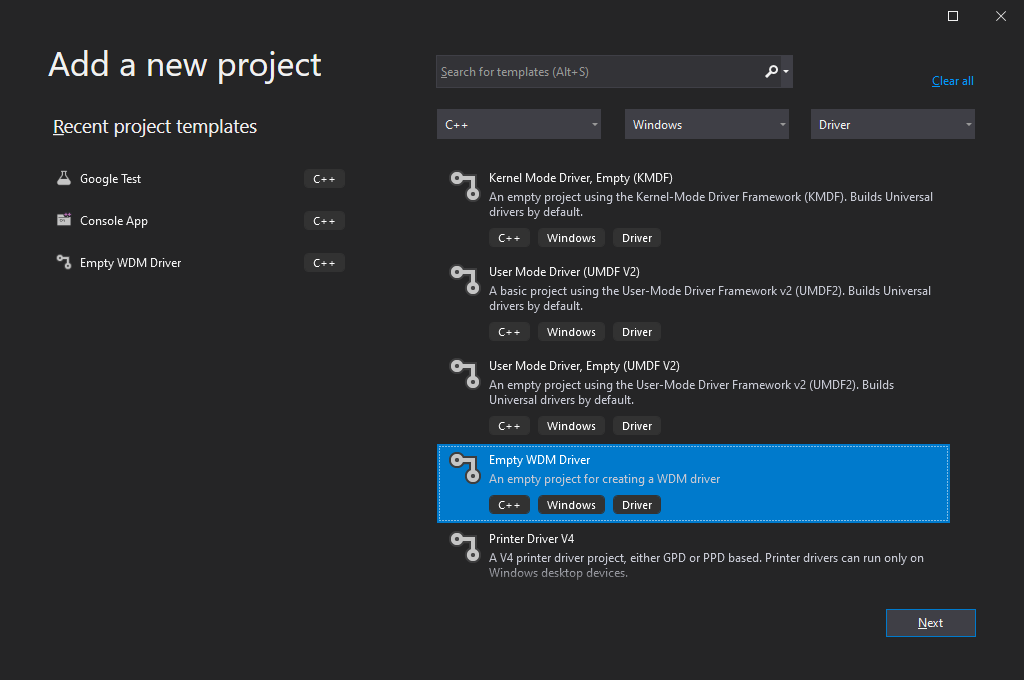
Screenshot 1: Visual Studio 2019 interface for creating driver projects
Working with WDK
Note that your approach to working with WDK depends on the version(s) of Windows you want your driver to be compatible with.
Before Visual Studio 2012 (WDK 8.0), Windows Driver Kit was a standalone solution that had its own compiler and other tools needed for developing a Windows driver. Driver assembly used to consist of two main steps:
- Call the setenv.bat script to set build options
- Call the build.exe utility from WDK
To build a basic driver for Windows, you needed two files:
1. The Makefile file, containing a directive to include the final makefile from the WDK. This directive was always standard:
Makefile
!include $(NTMAKEENV)\makefile.def2. The Sources file, containing build options and a list of driver sources.
WDK is currently integrated into Visual Studio via an extension that gets installed automatically. Therefore, you no longer need to work with Sources and Makefile, as you can select the project type, WDK version, and libraries to link to your driver in project settings.
When you use older versions of WDK to build drivers supporting Windows OS, your driver should also be able to support newer versions of Windows. However, to enable support for older Windows versions, you might need to use older versions of WDK when building your driver.
For example, to build a driver supporting Windows XP, you’ll need to use WDK version 7.1.0 (7600.16385.1) or older. This driver will also work under Windows versions 7, 8, and 10. At the same time, with WDK version 10.0.19041.685 (used in our guide), you can build a driver that supports Windows 7 or later, but it won’t work properly on Windows XP.
To learn more about writing drivers for different Windows versions, read Microsoft’s recommendations.
Overall, if you’re working on a new driver that doesn’t need to support older versions of Windows, it’s best to use the latest WDK version and create the project directly in Visual Studio.
With that in mind, let’s move to the actual process of Windows driver development.
Preparing to develop a Windows driver
Microsoft explains in detail the nature and purpose of drivers in Windows. Below, we summarize the core information you need to know to follow our guide.
First, let’s outline what a driver is and what its tasks are. A driver is a portable executable (PE) file that has a .sys extension. The format of this file is similar to the format of any .exe file, but the driver file links to the kernel (ntoskrnl.exe) and other system drivers (although this capability won’t be used in our example):
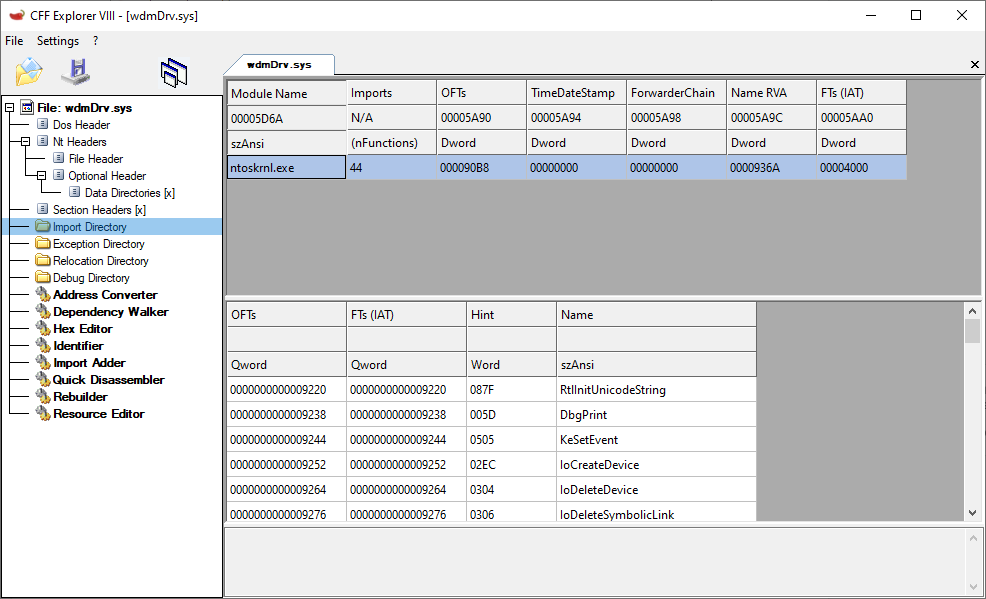
Screenshot 2: List of a driver’s linked modules with imported APIs
Drivers also have a different entry point — the GsDriverEntry function and the /SUBSYSTEM – NATIVE parameter.
Usually, drivers are written in C. However, as Microsoft doesn’t provide things like a C runtime for the kernel or a standard C++ library, you can’t use common C++ features like new/delete, C++ exceptions, or global class object initialization in the kernel. You can still write your code in a .cpp file and state a class, and the compiler will understand it; but full-scale support for C++ is absent.
Also, Microsoft recommends not using standard C++ functions like memcpy and strcpy for kernel driver development, even though they can be exported by the kernel. Instead, they recommend using safe implementations designed specifically for the kernel, such as the RtlCopyMemory and RtlCopyString functions.
To work with a project that relies on C, you can use a C++ runtime (cppLib) and an STL library (STLport) ported to the kernel. To simplify our example, we don’t use either of those and work with almost pure C.
To make it easier to write drivers, Microsoft created the Windows Driver Framework (WDF). This framework can help you significantly shorten the code for interacting with Plug and Play (PnP) devices and power management.
WDF is based on the Windows Driver Model. The choice of a driver model depends on many factors, including the type of driver under development.
With WDF being more suitable for building device drivers, in this article, we build our software driver with WDM.
Encryption disk architecture
To build properly functioning WDM drivers, we need to create two components:
- wdmDrv.sys — a driver that implements a virtual disk in Windows
- wdmDrvTest.exe — a user application that manages the driver
First, we need to mount our disk so it appears in the system and is accessible from File Explorer. To do this, we need a separate user application — wdmDrvTest.exe — that will send commands to the driver to mount and unmount the disk. We can also use the Windows registry to specify mount options for the disk (disk letter, path to the virtual disk file, disk size, etc.) and read those options when the driver is loaded into the system.
Then, for reasons of data security, we need to make sure the data is encrypted before it’s written to the disk and decrypted only after it’s read from the disk. As a result, data stored on the disk will always be encrypted.
Our driver is responsible for performing read/write operations on our virtual disk. The WdmDrvTest.exe application is responsible for encrypting and decrypting data. This application can also read and write data to and from the file where our virtual disk is stored. Therefore, our driver will delegate the processing of read/write operations to wdmDrvTest.exe.
Building a WDM driver
Any Windows driver starts with the DriverEntry function, which is called by the Windows operating system when the driver is loaded:
C
NTSTATUS DriverEntry(
IN PDRIVER_OBJECT DriverObject,
IN PUNICODE_STRING RegistryPath)
In our case, this function is responsible for:
- Creating a device object that will receive control commands.
- Registering callback methods that Windows calls for the created device objects. For example, in the case of a request to read data from the disk, the system will call a read callback in our driver.
- Registering the DriverUnload method, which Windows calls to unload the driver and free the allocated resources.
Basically, the DriverEntry function works similarly to the Main function in user applications.
However, while the Main function executes a certain algorithm and then returns control to the operating system, a driver remains loaded in memory and waits for Windows to call the appropriate handler in response to a new event even after execution of the DriverEntry function.
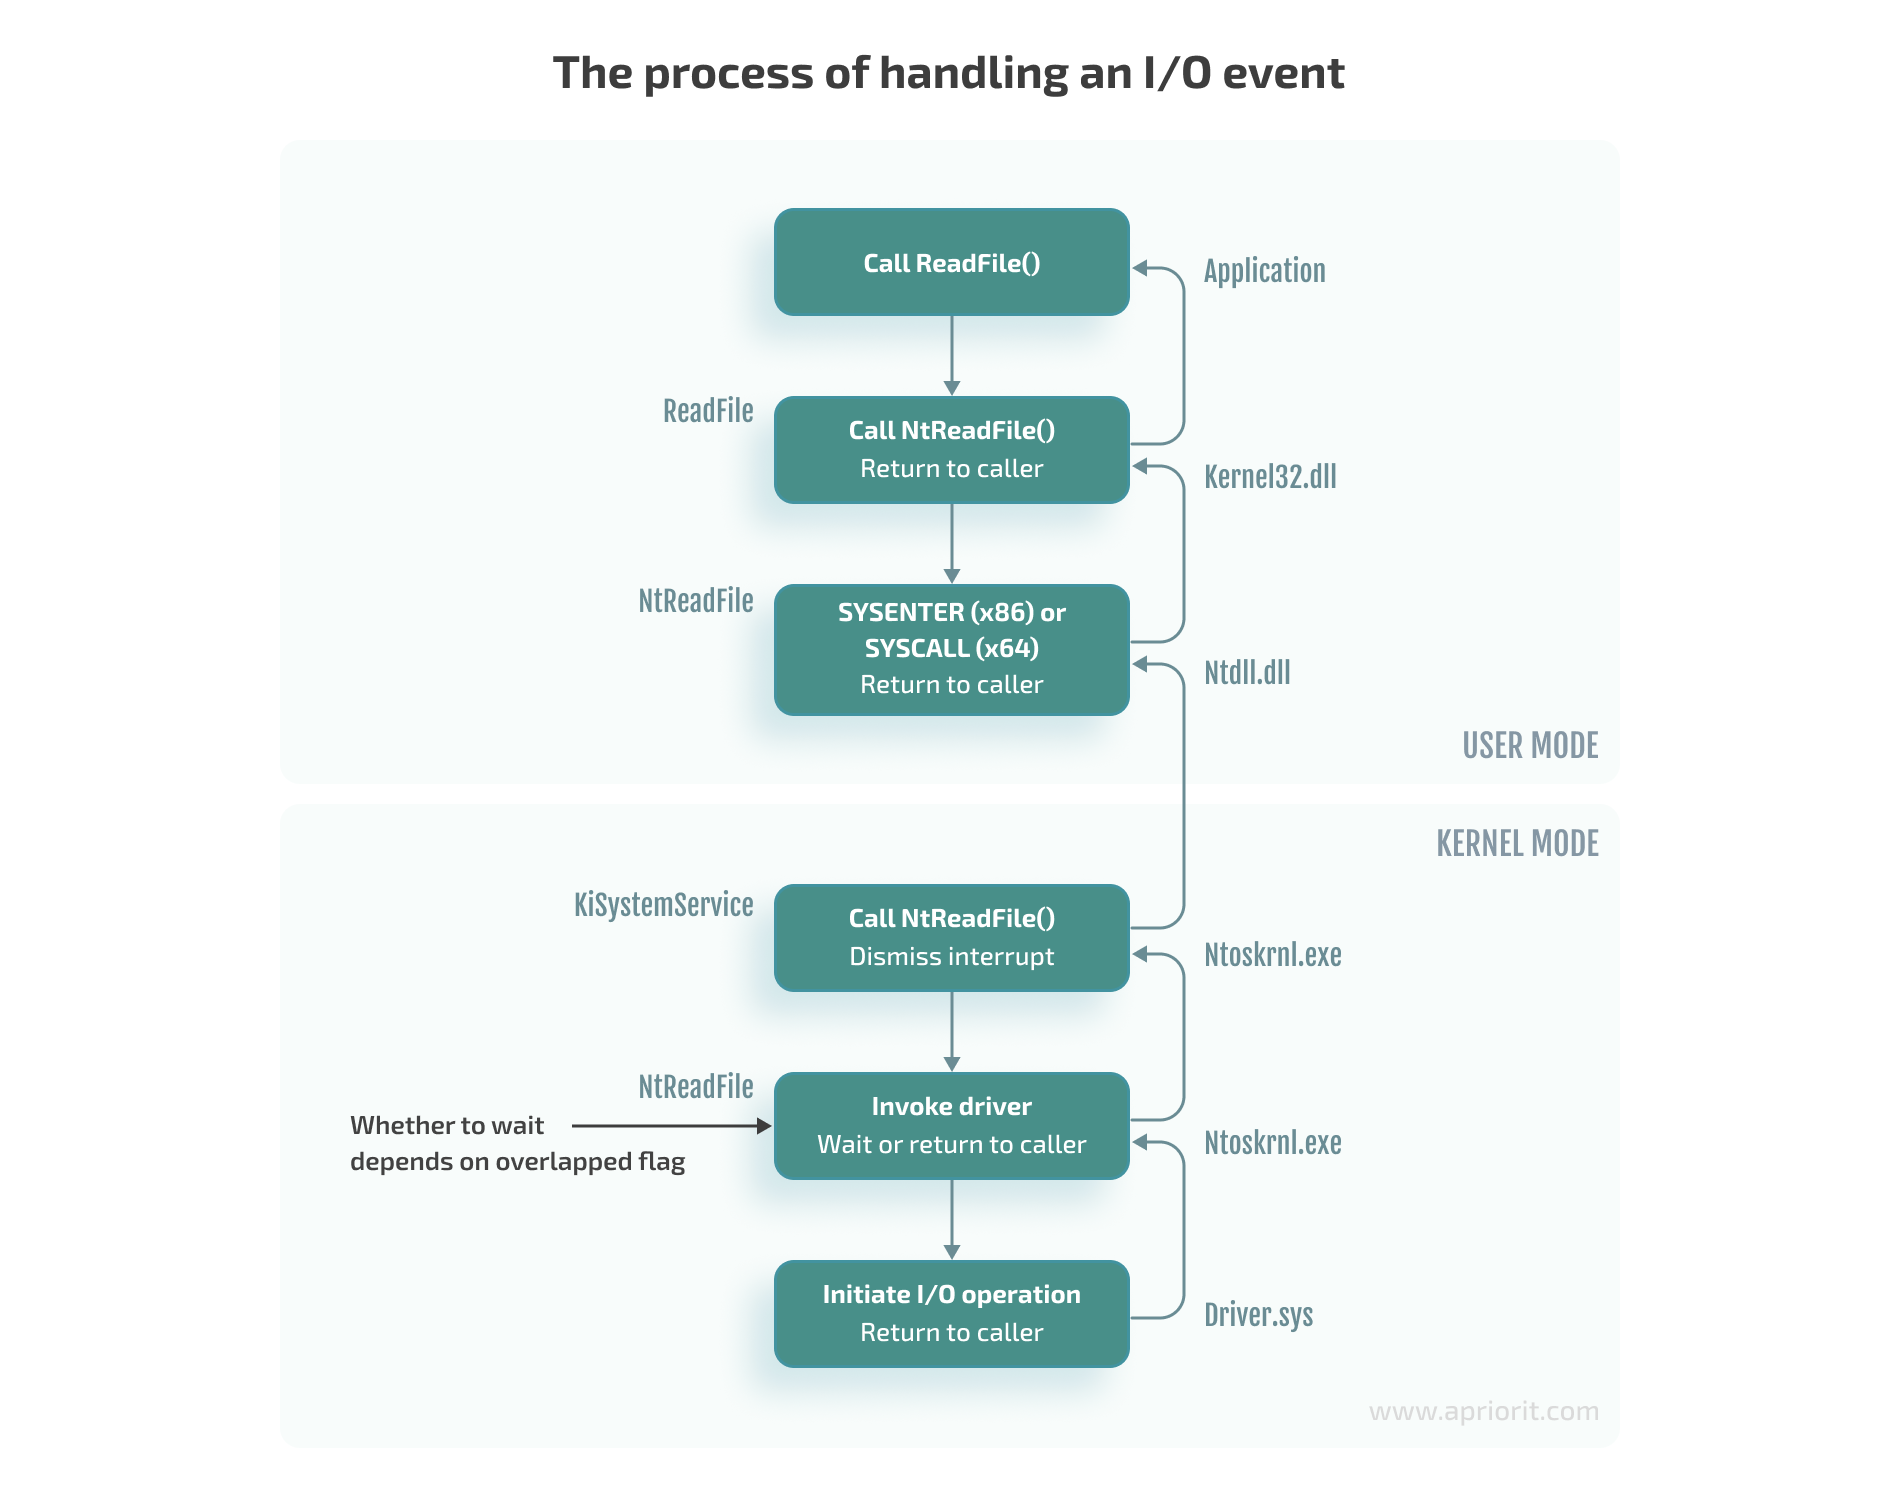
The following diagram shows the execution of a process in user mode and the work of a driver as part of a system process:
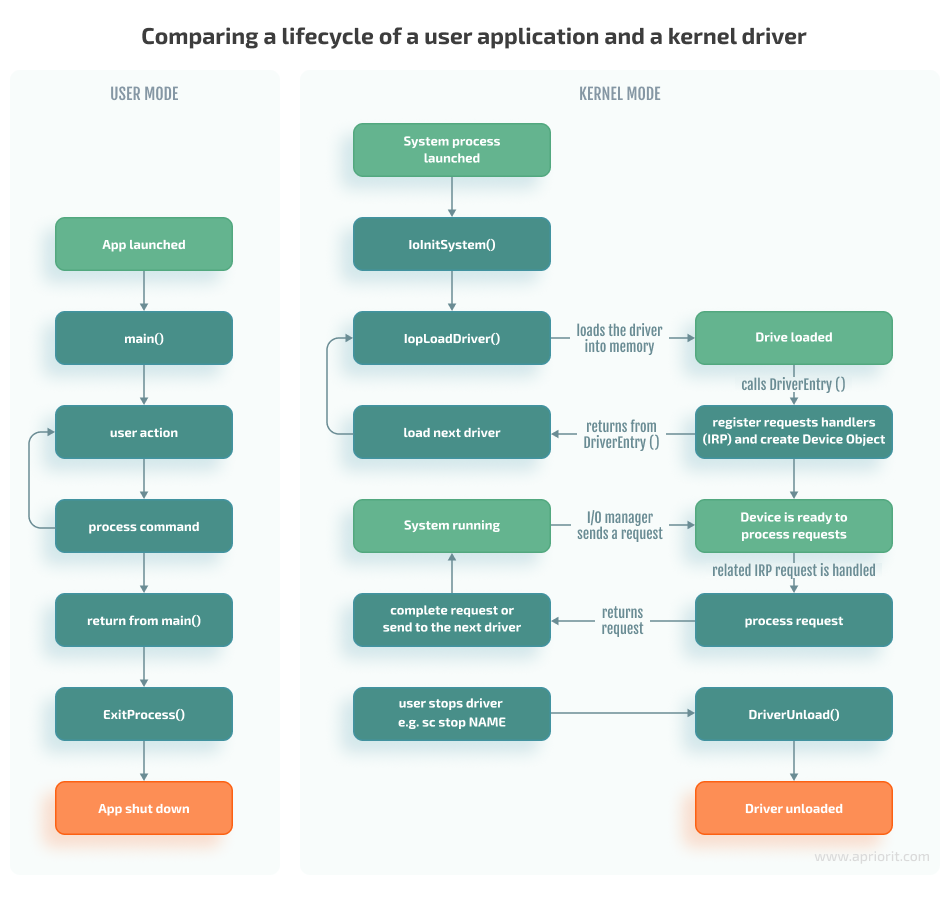
Here, the input/output (I/O) manager should be seen as a set of functions called to process I/O events rather than a separate module in the system.
Creating a device object
To create a device object, use the IoCreateDevice and IoCreateDeviceSecure functions:
NTSTATUS IoCreateDeviceSecure(
    [in]             PDRIVER_OBJECT     DriverObject,
    [in]             ULONG              DeviceExtensionSize,
    [in, optional]   PUNICODE_STRING    DeviceName,
    [in]             DEVICE_TYPE        DeviceType,
    [in]             ULONG              DeviceCharacteristics,
    [in]             BOOLEAN            Exclusive,
    [in]             PCUNICODE_STRING   DefaultSDDLString,
    [in, optional]   LPCGUID            DeviceClassGuid,
    [out]            PDEVICE_OBJECT     *DeviceObject
);
IoCreateDeviceSecure allows us to additionally specify the parameters for the DefaultSDDLString security descriptor. For example, we can specify which user groups can write to the device. Starting from Windows 7, this parameter must be used to, for instance, successfully format a disk.
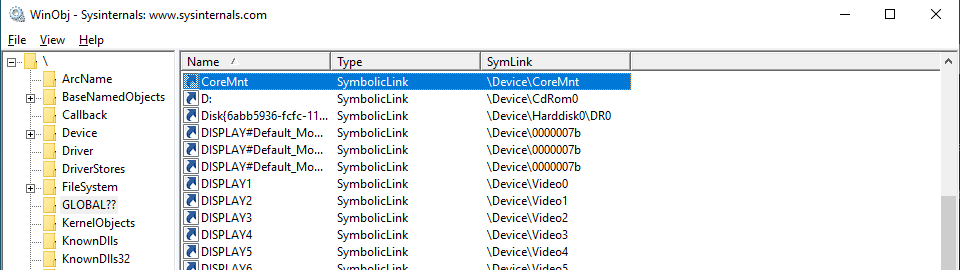
The DeviceName parameter is the name of the device, which might look like \Device\MyDevice. This parameter is created in the Device directory, which is a standard directory where all devices in the system are listed. To view this directory, we can use the winobj utility. Here is our virtual disk in the Device directory:
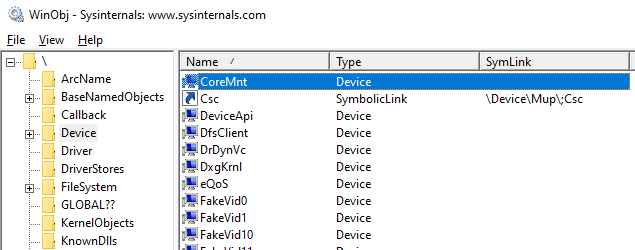
However, the devices in this directory can’t be accessed from user mode. Therefore, if we try to open a device by calling the CreateFile function, we’ll get the INVALID_HANDLE_VALUE value with the ERROR_FILE_NOT_FOUND error.
To make a device accessible from user mode, we need to create a symbolic link to it in the GLOBAL?? directory. To do that in the kernel, we call the IoCreateSymbolicLink function:
Now, using the name of our device, any user application can open the device object and send requests to it:
C++
CreateFileW(L"\\.\CoreMnt", GENERIC_READ | GENERIC_WRITE, 0, NULL, OPEN_EXISTING, 0, NULL);To learn more on the topic of naming device objects, you can read the guidelines from Microsoft or the Naming Devices section in the book Programming the Microsoft Windows Driver Model by Wolter Oney.
Continuing with our guide, we need to create two devices:
- A control device for interacting with the user application: particularly, for performing mount/unmount commands on our disk. This device is created in DriverEntry.
- A disk device for receiving and processing I/O operations. The control device creates a disk device when it receives the disk mount command.
Now, let’s look closer at the rest of the IoCreateDeviceSecure parameters:
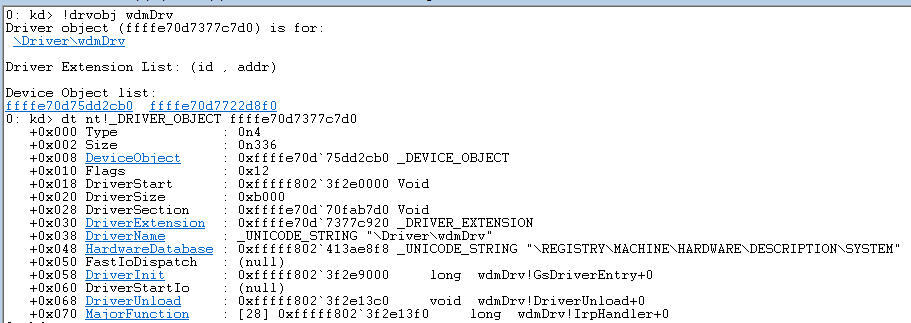
DriverObject is a structure created by Windows and passed to the DriverEntry function. This structure contains a list of all device objects created for the driver.
Here’s how we can find a DriverObject by the driver name and see the entire structure using WinDbg (see the Debugging the disk section below) and the !drvobj command:
DeviceExtensionSize is the parameter defining the size of the structure that we want to store in the created device object. This parameter is specified in the DeviceExtension field.
Windows will allocate memory for this structure and save the pointer to it in the created device object. This structure is where we will store everything we need to process requests: the I/O request queue, disk size, etc. In terms of C++ classes, this structure can be seen as the device object’s data members.
DeviceType is one of the numerical values defined in wdm.h, such as FILE_DEVICE_DISK, FILE_DEVICE_PRINTER, and FILE_DEVICE_UNKNOWN. Based on this parameter, the system assigns a default security descriptor to the device object of the virtual disk.
DeviceCharacteristics defines additional device characteristics such as FILE_READ_ONLY_DEVICE. In our case, we pass 0 as the value of this parameter.
Exclusive is a parameter that prohibits the opening of more than one device handler (HANDLE). In our case, we set the value of this parameter to FALSE.
DeviceObject is the address of the created device object.
The next important step in writing WDM drivers is registering its callback methods. Let’s take a look at this process.
Registering callback methods
Windows uses the I/O request packet (IRP) structure to handle various I/O events. For solutions where we have two different drivers interacting with each other, we can create and send IRPs to the second driver ourselves. But in our case, the operating system is responsible for both creating this structure and passing it to the driver.
Let’s see how an I/O event is usually handled, using the ReadFile function as an example. When the ReadFile function is called, this is what happens in the user application:
1. The ReadFile function calls the ntdll!NtReadFile function, which switches to kernel mode and calls the corresponding nt!NtReadFile function in the kernel (ntoskrnl.exe).
2. Using the passed HANDLE for the nt!NtReadFile file, the nt!NtReadFile function:
- Finds the device corresponding to the file. For example, this can be done through calls to ObReferenceObjectByHandle or IoGetRelatedDeviceObject functions.
- Creates an IRP structure using, for example, a call to the IoAllocateIrp function.
- Calls the appropriate device driver by passing the created IRP structure to it. This can be done by, for example, calling the nt!IoCallDriver function.
Note that the HANDLE is stored in the table of process objects and therefore only exists within a specific process.
3. The nt!IoCallDriver function takes a pointer to the driver object from the structure describing the device and passes the received IRP structure to the appropriate handler. The pseudocode for this process looks like this:
C++
NTSTATUS IoCallDriver(PDEVICE_OBJECT device, PIRP irp)

{

// get FunctionIdx from irp

PDRIVER_OBJECT driver = device->DriverObject;

return(*driver->MajorFunction[FunctionIdx])(device, irp);

}
4. The execution flow is then transferred to the IRP_MJ_READ (0x03) handler of the corresponding driver.
Note that there’s a function similar to NtReadFile — the ZwReadFile function. ZwReadFile can be exported by both the kernel and ntdll. If we need to call a function from the user mode, we can work with either NtReadFile or ZwReadFile. But if we need to call a function from the kernel mode, then it’s best to use ZwReadFile, as it allows us to avoid errors when passing the data buffer from the user mode. You can learn more about working with these two functions in Microsoft documentation.
To process various control events or I/O events, the driver needs to register the appropriate handlers in the DriverObject->MajorFunction array. The full list of supported functions can be found in the wdm.h file.
For example, to process read/write requests, we need to provide implementations of functions with the IRP_MJ_READ and IRP_MJ_WRITE indexes:
C++
NTSTATUS IrpHandler(IN PDEVICE_OBJECT fdo, IN PIRP pIrp){...}

NTSTATUS DriverEntry(IN PDRIVER_OBJECT DriverObject, ...)

{

DriverObject->MajorFunction[IRP_MJ_READ] = IrpHandler;

DriverObject->MajorFunction[IRP_MJ_WRITE] = IrpHandler;

}
However, we don’t have to register all possible handlers. The system provides a default implementation that reports failed request processing. We can also see all handlers registered for a particular driver:
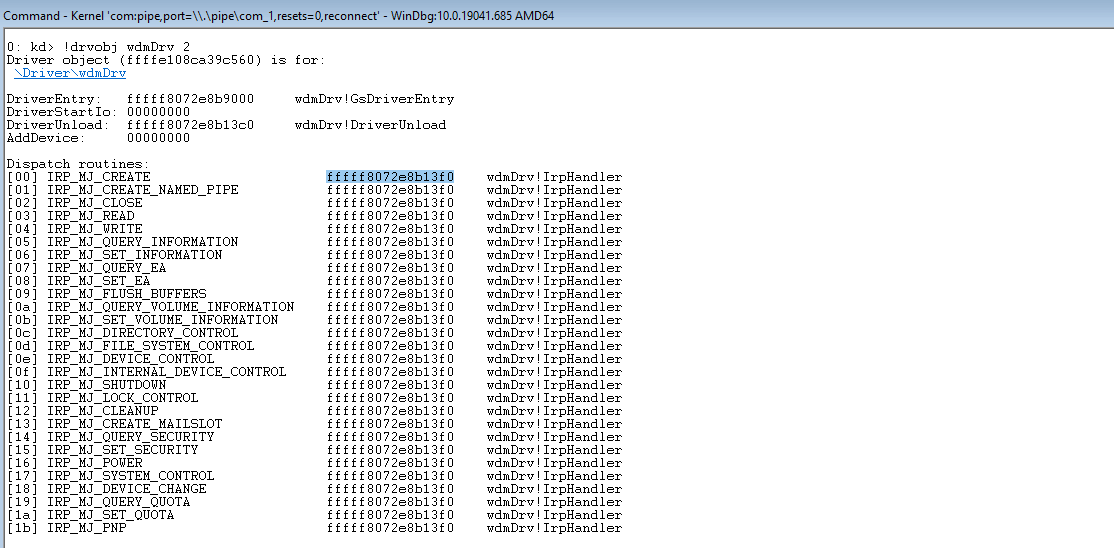
Note: It’s impossible to unload a driver without registering the DriverUnload method. Antivirus software and similar products often leverage this feature to ensure that no one can unload their drivers from the system.
Implementing callback methods
When creating the IRP structure, the I/O manager allocates an array of IO_STACK_LOCATION structures for it. This array is located at the very end of the IRP structure.
The array size is specified in the DEVICE_OBJECT structure of the device that will receive this IRP first; specifically, in the StackSize field of this structure. The MajorFunction code is also located in this structure and not in the IRP itself. As a result, the operation code may change when the IRP structure is passed from one device to another. For example, when passing a request to read to a USB device, the operation code may change from IRP_MJ_READ to something like IRP_MJ_INTERNAL_DEVICE_CONTROL.
To access the IO_STACK_LOCATION structure of the current device, we need to call the IoGetCurrentIrpStackLocation function. Then, depending on the value of MajorFunction, we need to perform the corresponding operation:
C++
PIO_STACK_LOCATION ioStack = IoGetCurrentIrpStackLocation(irp);

switch(ioStack->MajorFunction)

{

caseIRP_MJ_CREATE:

...

caseIRP_MJ_WRITE:

...

default:

returnCompleteIrp(irp, STATUS_INVALID_DEVICE_REQUEST, 0);
Overall, there are three possible scenarios for request processing:
1. Process the IRP request immediately. For example, if it’s a request for disk size (IOCTL_DISK_GET_LENGTH_INFO), we can return the result immediately, as this information is known:
C
irp->IoStatus.Status = STATUS_SUCCESS;

irp->IoStatus.Information = 0x1000000;

IoCompleteRequest(irp, IO_NO_INCREMENT);

returnSTATUS_SUCCESS;
In case of failed request processing, the Information field usually has a 0 value in it. If a request is processed successfully, this field will contain the size of the data to be sent.
The IO_NO_INCREMENT (0) value means there’s no need to boost the priority of the threads waiting for IRP completion. If we were building a sound card driver, we could pass the IO_SOUND_INCREMENT (8) value, where 8 would represent the priority level corresponding to the driver type.
2. Pass the IRP request to the next driver in the device stack. While we don’t do this in our example, it can be done with the following command:
C++
IoSkipCurrentIrpStackLocation(irp);

returnIoCallDriver(lowerDeviceObject, irp);
This scenario can be used, for instance, when we need to process requests in a minifilter driver.
3. Save the IRP request to be further processed by the driver and mark it as pending. Add this structure to the list stored in the device’s extension and return STATUS_PENDING (see the example below). This scenario is often applied for read/write operations and can be used when, for example, there’s a call to a real device that needs to be processed after processing the initial request:
C++
IoMarkIrpPending(irp);

ExInterlockedInsertTailList(list, &irp->Tail.Overlay.ListEntry, listLock);

KeSetEvent(&requestEvent, (KPRIORITY)0, FALSE);

returnSTATUS_PENDING;
Next, in the case of a synchronous call, the user mode application that called the Read/WriteFile function will call NtWaitForSingleObject for the HANDLE file to wait for the operation’s completion. Later, our driver will complete the stored IRP request by calling the IoCompleteRequest function. Calling this function will cause the event inside nt!_FILE_OBJECT to be set, which, in turn, will end the waiting for the HANDLE file.
Here’s how you can put a breakpoint in the code above to see the IRP request:
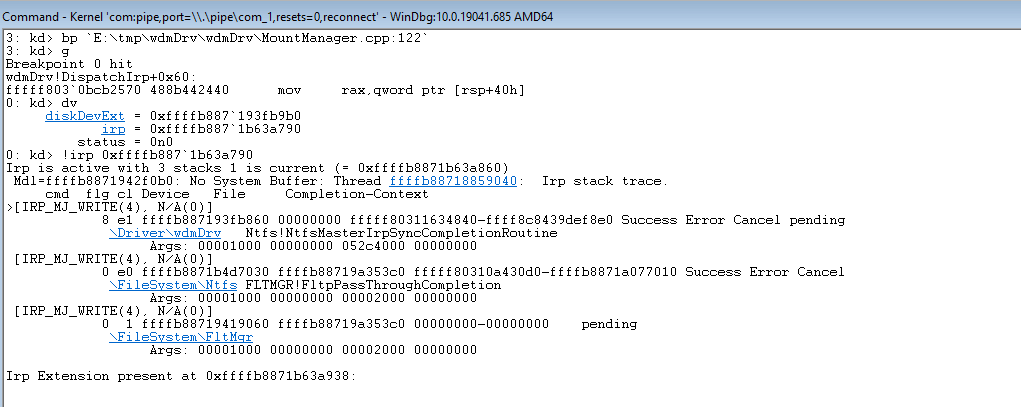
Now, let’s move to implementing read/write operations for a virtual disk.
Implementing read/write operations for a virtual disk
As we mentioned earlier, read/write requests are saved to a list stored in the device extension. Here’s a common way to process such requests:
- Create a thread in the kernel where we subtract requests from this list in a loop.
- Execute the corresponding operation of reading or writing to the file.
- For read operations, copy read data to the irp->MdlAddress buffer.
- Complete the request by calling the IoCompleteRequest function.
With this approach, requests are fully processed within the driver. However, as we need to work with the virtual disk file on the user application’s side, we need to apply a different approach where:
- The wdmDrvTest.exe application creates a thread in which it requests data on the last saved request from the driver.
- Based on the data received after Step 1, wdmDrvTest.exe reads data from and writes data to the disk file.
- The application sends the result back to the driver.
- In the case of a read operation, the driver copies the read data to IRP.
- The driver completes the request by calling the IoCompleteRequest function.
When compared to processing requests directly in the driver, this approach has several advantages. It enables us to:
- Use various libraries available in user mode
- Use programming languages other than C/C++
- Place the logic in DLLs, which we can dynamically load or replace without unloading the entire driver or rebooting the system
- Simplify code testing
- Increase overall system stability, as even if an error occurs, it doesn’t lead to a system shutdown.
However, this approach also has disadvantages — the increased complexity of and time needed for request processing.
Let’s see how this approach works in practice.
To request the saved IRP, we need to send a special control code (ioctl) from the wdmDrvTest.exe application. To do this, we call the DeviceIoControl function so the driver receives the IRP_MJ_DEVICE_CONTROL request.
First, we wait for the setting of the event, indicating that the request has been added to the list (see the previous section). Then we get the object of the saved IRP.
C++
KeWaitForSingleObject(requestEvent, Executive, KernelMode, FALSE, NULL);

PLIST_ENTRY request;

if((request = ExInterlockedRemoveHeadList(list, listLock)) == NULL)

{

// the list is empty, the event is set during unmounting

returnSTATUS_SUCCESS;

}

PIRP lastIrp = CONTAINING_RECORD(request, IRP, Tail.Overlay.ListEntry);
From the IRP, we get data such as the offset on the disk for read/write operations, the size of the data, and the data buffer for write operations. Then we copy this data to irp->AssociatedIrp.SystemBuffer and complete the IRP_MJ_DEVICE_CONTROL request. After that, we can perform steps two through five.
Working with the lpOverlapped parameter
When implementing read/write operations, it’s crucial to properly configure the lpOverlapped parameter when calling the DeviceIoControl function.
lpOverlapped is a pointer to the OVERLAPPED structure for making asynchronous calls. If you don’t pass this parameter to the DeviceIoControl function, the call to this function will be executed synchronously, which may cause wdmDrvTest to hang when sending other ioctl calls.
Here is what can happen when this disk unmounting scenario takes place:
- Thread 1 sends an ioctl call to get a saved request.
- The driver receives this ioctl call and waits for a new request to appear in the request list.
- Thread 0 (main) tries to send an ioctl call to unmount the drive.
- Thread 0 hangs because the DeviceIoControl function is waiting for the call from step 2 to be completed.
Now, we can move to the process of disk mounting.
Mounting the disk
Onсe we’ve created a disk device and implemented IRP processing for it, we need to make this device available for users so that it can be accessed from File Explorer. To do this, we need to create a symbolic link between our disk device and the drive name:
C++
UNICODE_STRING deviceName, symLink;

RtlInitUnicodeString(&deviceName, L"\\Device\\CoreMntDevDir\\disk");

RtlInitUnicodeString(&symLink, L"\\GLOBAL??\\Z:");

NTSTATUS ntStatus = IoCreateSymbolicLink(&symLink, &deviceName);
We need to create such a symbolic link in the global namespace so that the Z drive can be:
- Seen from the wdmDrvTest.exe application launched in administrator mode so we can lock the volume before unmounting (see the next section)
- Found via File Explorer and launched by a regular user
After that, the first time a file or folder is accessed on the drive, the I/O manager will mount the volume:
C++
05 nt!IopMountVolume
06 nt!IopCheckVpbMounted
07 nt!IopParseDevice
08 nt!ObpLookupObjectName
09 nt!ObOpenObjectByNameEx
0a nt!IopCreateFile
0b nt!NtCreateFile
0c nt!KiSystemServiceCopyEnd
0d ntdll!NtCreateFile
0e KERNELBASE!CreateFileInternal
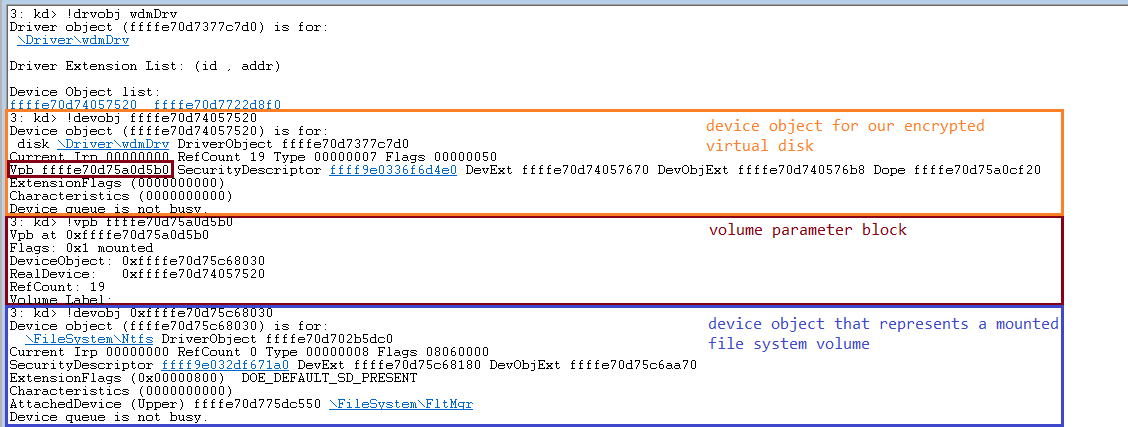
0f KERNELBASE!CreateFileWDuring volume mounting, the system creates a volume parameter block (VPB) and links the volume device object (also created by the system) to the device object of our drive. The VPB address will be saved to the VPB field inside our device object.
Here’s what it looks like for our disk:
Unmounting the disk
While the system automatically creates a device object for the volume and associates it with our disk through the VPB structure, unmounting this volume is still our task.
The whole process consists of the following steps:
- Unmount the volume
- Complete the thread that receives requests from the driver
- Delete our disk device object by calling the IoDeleteDevice function
- Delete the symbolic link to the Z drive
Note: Volume unmounting should always be performed first because the system can write data from the cache to the disk even during unmounting, potentially causing the system to hang.
The logic of the volume unmounting process is implemented in the wdmDrvTest.exe application. The application sends the following ioctl requests to the volume: FSCTL_LOCK_VOLUME, FSCTL_DISMOUNT_VOLUME, and FSCTL_UNLOCK_VOLUME. These commands can only be run by a user with administrator rights.
After executing these commands, the VPB in our Device Object will be updated and will no longer contain a pointer to the volume device object.
At this point, we only have one control device object left for our driver. We can resend a disk mounting request to this device object, thus causing the whole cycle to repeat itself. This control device object will be removed after calling the DriverUnload function and unloading our driver.
Now, let’s talk about the security of our disk’s data.
Encrypting the disk
To secure the disk, we can use OpenSSL to implement data encryption in our wdmDrvTest.exe application.
Here’s what the encryption algorithm would look like when our user application receives a read request from the driver:
1) The application reads the data from the file with the contents of our virtual disk (see screenshot 10 below)
2) The application deciphers the requested data
3) The application returns the deciphered results to the driver so that the driver can copy that data to the IRP request and complete it
C++
void EncryptedImage::Read(char* buf, uint64_t offset, uint32_t bytesCount)
{
    if (bytesCount % SECTOR_SIZE || offset % SECTOR_SIZE)
    {
        throw std::exception("wrong alignment");
    }
    std::vector<unsigned char=""> encData(bytesCount);
    m_image->Read(&encData[0], offset, bytesCount);

    uint64_t startSector = offset / SECTOR_SIZE;
    DecryptLongBuf(encData, bytesCount, startSector, m_key, buf);
}
In the case of a write request, the algorithm would be a bit different — we would first need to encrypt the data, then write it to the disk.
When we mount the disk in the wdmDrvTest.exe application, the system passes a password to the PKCS5_PBKDF2_HMAC function. We get the encryption key from that password.
The size of our encryption key is 256 bits, but since it’s encoded with the 128-bit Advanced Encryption Standard (AES) ciphertext stealing (XTS) cipher, the key gets split into two blocks of 128 bits each. The first block will be used for encrypting the data, and the second block will be used for encrypting the tweak.
A tweak is basically an analog of the initialization vector in Cipher Block Chaining (CBC). The only difference is that a tweak is applied for each block — not only the first one. The tweak is generated from the disk sector number, so different tweaks will be used to encrypt different sectors of our disk.
There are two key advantages of working with this cipher:
1) Each data block (disk sector) is encrypted independently from the others
2) For different data blocks, the same plaintext will return different ciphertext
As a result, even if one disk sector gets damaged, decryption of the remaining sectors won’t be affected. In the case of CBC, this would be impossible because each data block relies on the encryption results of the previous block. At the same time, the use of a tweak prevents data leaks common with electronic codebook (ECB) mode, which also encrypts all blocks independently.
It’s also possible to implement encryption directly in the driver using standard tools like Cryptography API: Next Generation and BitLocker. However, these tools support AES-XTS encryption only in Windows 10 and later versions.
With most of the technical steps of our driver development processes over, let’s try to run the driver we’ve created.
Running a demo
Once we’ve finished with all the preparations, all that’s left is to click the Build Solution button in Visual Studio to complete the process of building our driver. After that, we can configure a virtual machine running Windows 10 to launch and debug our driver. For our example, we used VMWare.
Note: When setting up a virtual machine in VMWare, it’s important to enable secure boot in the settings:
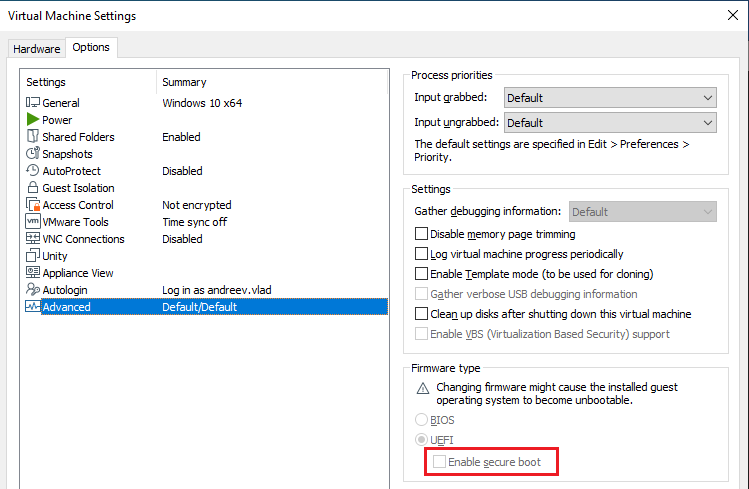
Otherwise, the following commands won’t work.
First, we need to allow the loading of test-signed drivers so that the driver will be automatically signed with the wdmDrv.cer certificate during the build. To do that, we need to run the following command as an administrator:
Bash
> bcdedit.exe -set TESTSIGNING ONThen, we need to copy the binaries and run the deploy.bat script (also as an administrator). This script copies our driver to the \system32\drivers\ directory and loads it.
After that, we can run the wdmDrvTest.exe application. The following command creates a vd.img file in the current folder and mounts the disk:
Bash
> wdmDrvTest.exe --create -p password -i vd.img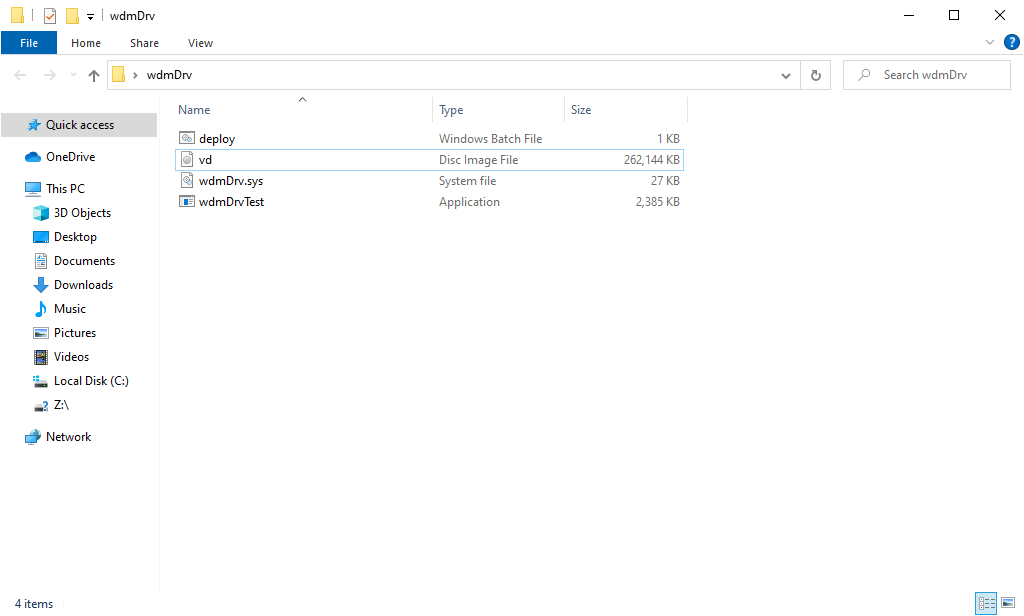
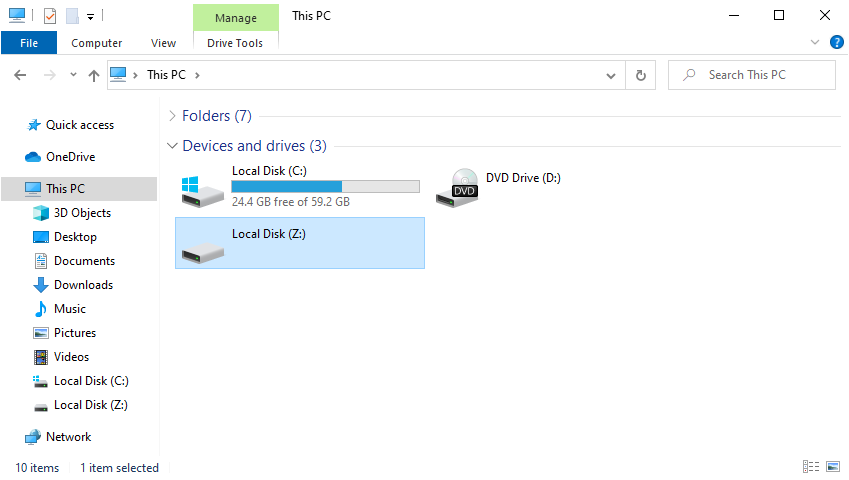
Now we can open the disk, which will cause the formatting window to appear. It allows us to format the disk with the required file system. Then we can create several files on the disk and go back to the wdmDrvTest.exe application and press any button to unmount the disk. To mount the disk from the file once more, we need to remove the –create parameter from the command above. After running the changed command as an administrator, the disk will appear in File Explorer again, but now with all the files created earlier.
To check if the data on the disk is encrypted, we can try opening the vd.img file with FTK Imager:
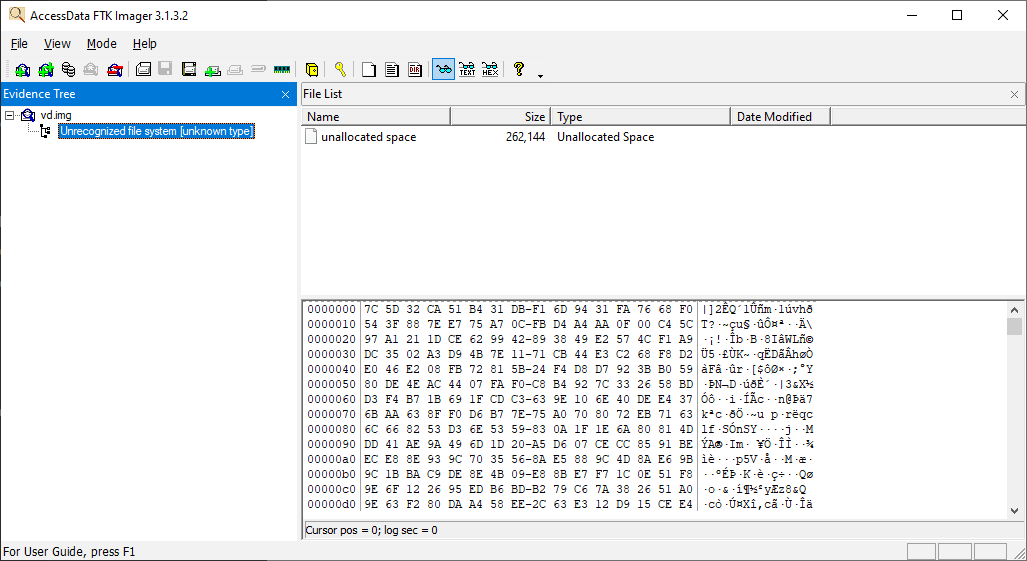
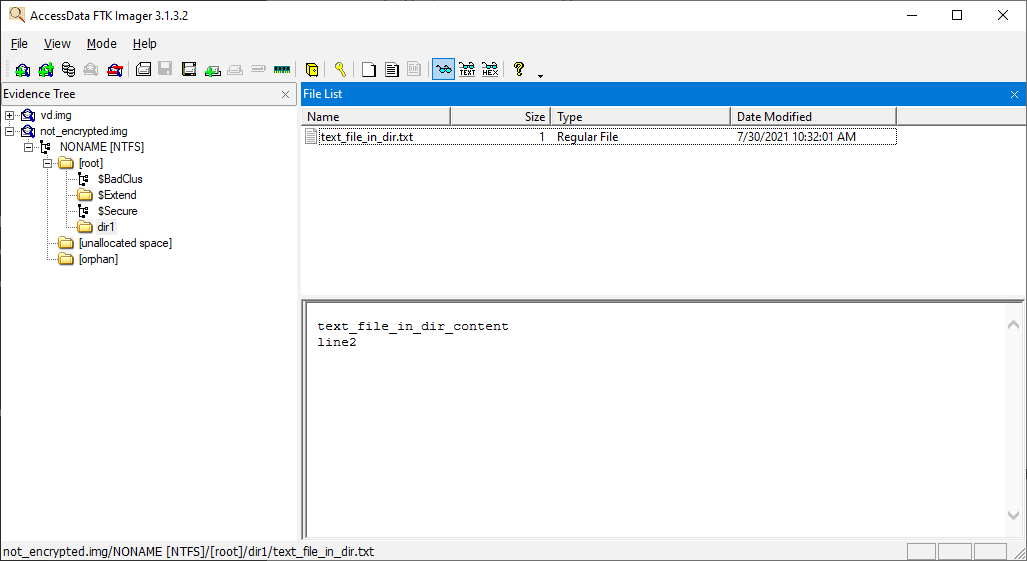
If we turn off encryption, we’ll be able to see all of the contents of our virtual disk:
Finalizing the implementation of WDM requirements
Currently, we have a legacy driver. To turn it into a Windows Driver Model driver, we need to introduce the following changes:
- Create the inf file
- Create the AddDevice routine
- Create callbacks for additional IRPs
To make these changes. Let’s use the toastMon sample from WDK 7600.16385.1. Note that the toaster’s version on GitHub already uses the Kernel-Mode Driver Framework (KMDF).
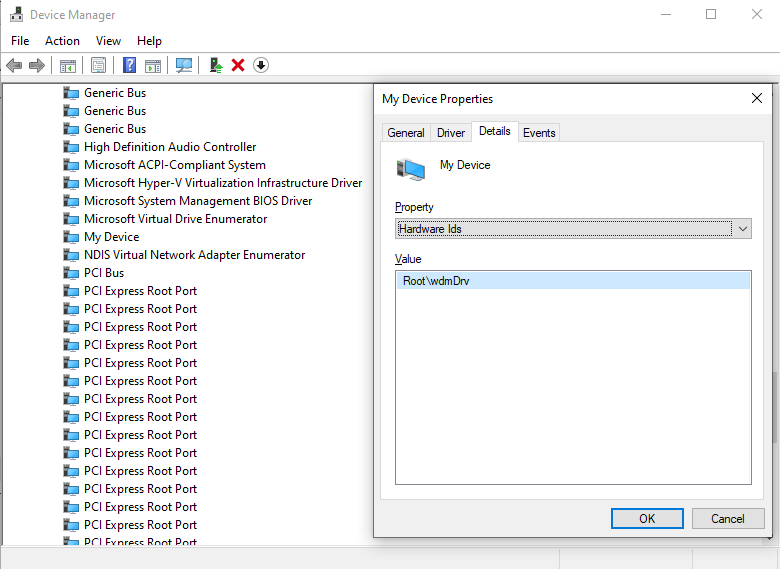
First, we update the inf file created by default in the beginning. This file contains HardwareID 一 Root\wdmDrv, which the system uses to find a driver which will serve this device:
C++
[Manufacturer]
%ManufacturerName%=Standard,NT$ARCH$

[Standard.NT$ARCH$]
%DeviceDesc%=wdmDrv_Device, Root\wdmDrv

[Strings]
ManufacturerName="VvCorp"
DeviceDesc= "My Device"
Now, if we try to install inf without changes in the driver, we’ll see the Unable to find any matching devices error in C:\Windows\INF\setupapi.dev.log.
Next, let’s add the AddDevice callback and specify its address in DriverEntry:
C++
DriverObject->DriverExtension->AddDevice = AddDevice;Here’s how the system calls the DriverEntry function:
C++
00 wdmDrv!DriverEntry
01 wdmDrv!GsDriverEntry
02 nt!PnpCallDriverEntry
03 nt!IopLoadDriver
04 nt!PipCallDriverAddDeviceQueryRoutine
05 nt!PnpCallDriverQueryServiceHelper
06 nt!PipCallDriverAddDevice
07 nt!PipProcessDevNodeTree
08 nt!PiRestartDevice
09 nt!PnpDeviceActionWorker
0a nt!ExpWorkerThread
0b nt!PspSystemThreadStartup
0c nt!KiStartSystemThread
After that, the system calls the AddDevice function for the device which is defined in the inf file:
C++
00 wdmDrv!AddDevice
01 nt!PpvUtilCallAddDevice
02 nt!PnpCallAddDevice
03 nt!PipCallDriverAddDevice
04 nt!PipProcessDevNodeTree
05 nt!PiRestartDevice
06 nt!PnpDeviceActionWorker
07 nt!ExpWorkerThread
08 nt!PspSystemThreadStartup
09 nt!KiStartSystemThread
Now, we have to create our control device in the AddDevice routine instead of DriverEntry. After this, we’ll attach our created control device to the device stack using the following call:
C++
deviceExtension->TopOfStack = IoAttachDeviceToDeviceStack(
        gDeviceObject,
        PhysicalDeviceObject);
Let’s take a closer look at the elements from the example above:
- PhysicalDeviceObject (PDO) is the device for \Driver\PnpManager, which we received from the system in AddDevice arguments
- gDeviceObject is the control device we created
Here’s how the device stack in WinDbg looks like once the device is successfully attached to the stack:

The call mentioned above also sets the StackSize field for our control device, making it 2: PDO->StackSize+1. And deviceExtension->TopOfStack will hold PhysicalDeviceObject. We’ll use it to pass IRPs down to the stack.
Next, we specify callbacks for PnP, Power Management, and Windows Management Instrumentation (WMI):
C++
DriverObject->MajorFunction[IRP_MJ_PNP]=DispatchPnp;
DriverObject->MajorFunction[IRP_MJ_POWER]=DispatchPower;
DriverObject->MajorFunction[IRP_MJ_SYSTEM_CONTROL]=DispatchSystemControl;
For Power Management and WMI, we only forward the IRP to the next device in the stack.
As for PnP, after AddDevice the system will call the DispatchPnp routine. Here, we are only interested in IRP_MN_START_DEVICE and IRP_MN_REMOVE_DEVICE IRPs (see below). We need to wait for IRP completion by PDO. For that, let’s set our CompletionRoutine and pass IRP down to PDO. When PDO completes IRP, all devices in the stack will be started. So our upper device can finish its start activity:
C++
00 wdmDrv!CompletionRoutine
01 nt!IopfCompleteRequest
02 nt!IofCompleteRequest
03 nt!IopPnPCompleteRequest
04 nt!IopPnPDispatch
05 nt!IofCallDriver
06 wdmDrv!DispatchPnp
07 nt!IofCallDriver
08 nt!PnpAsynchronousCall
09 nt!PnpSendIrp
0a nt!PnpStartDevice
0b nt!PnpStartDeviceNode
0c nt!PipProcessStartPhase1
0d nt!PipProcessDevNodeTree
…
Now, we can install our driver using the inf file and the Device Console (DevCon) tool from WDK:
C++
> devcon.exe install wdmDrv.inf Root\wdmDrvAfter that, our driver will be displayed in Device Manager:
We can also see our device in the PnP tree in WinDbg by using “!devnode 0 1” command:
C++
DevNode 0xffffd988b0e0fcc0 for PDO 0xffffd988b23022e0
    InstancePath is "ROOT\SYSTEM\0001"
    ServiceName is "wdmDrv"
    State = DeviceNodeStarted (0x308)
    Previous State = DeviceNodeEnumerateCompletion (0x30d)
To uninstall device, execute:
C++
> devcon remove Root\wdmDrvOur driver will receive IRP_MN_REMOVE_DEVICE IRP and the stack will look like this:
C++
00 wdmDrv!DispatchPnp
01 nt!IofCallDriver
02 nt!IopSynchronousCall
03 nt!IopRemoveDevice
04 nt!PnpRemoveLockedDeviceNode
05 nt!PnpDeleteLockedDeviceNode
06 nt!PnpDeleteLockedDeviceNodes
07 nt!PnpProcessQueryRemoveAndEject
08 nt!PnpProcessTargetDeviceEvent
…
Now, let’s delete our control device here instead of DriverUnload. And after this IRP, our driver will be unloaded from memory.
As you can see, WDM requires handling of additional IRPs for PnP, Power Management, and WMI. If you use KMDF, all of these will be under the hood. So, instead of writing boilerplate code which can potentially have bugs, it would be better to use KMDF. But first, you’ll need to determine which type of driver you need. In our case, a legacy driver was enough. Note: if you need to monitor filesystem activity, for example, you also don’t need KMDF. Consider going with a minifilter driver in such a case.
Now, we can move to the final stage of the driver development process and debug our driver.
Debugging the disk
First, we need to install the WinDbg tool. It comes as part of Windows SDK and WDK, although you can also install it separately by checking only the Debugging tools for Windows option during setup.
Microsoft recommends using the Hyper-V hypervisor for driver debugging. They also provide a detailed guide on a simplified debugging process for Windows 10, which has Hyper-V built in. Recommendations on how to enable Hyper-V and configure a virtual machine with it are also provided on the Microsoft website. Alternatively, you can debug a driver using VirtualKD.
Since we created our virtual machine using VMWare, we use a slightly different approach:
1. Choose Add -> Serial Port in the settings of the virtual machine and check the boxes as shown in the following screenshot:
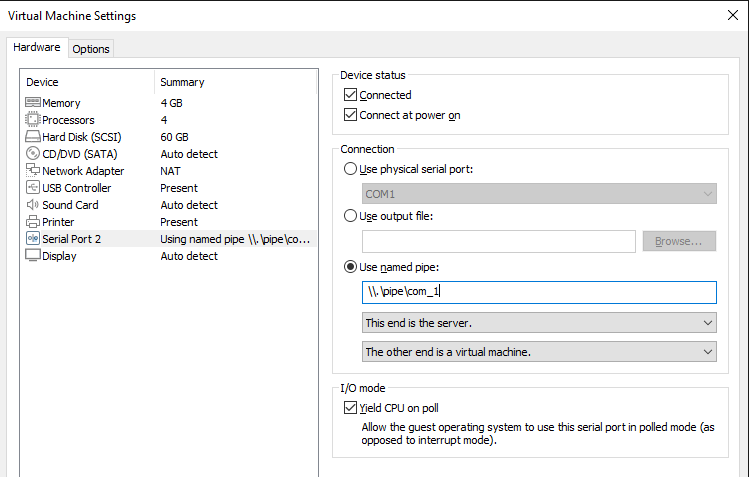
The name com_1 will be used in the WinDbg connection settings, so you can change it to a different one.
2. Start the virtual machine and run the following commands as an administrator:
Bash
> bcdedit /debug on
> bcdedit /dbgsettings serial debugport:2 baudrate:115200
3. On the machine with WinDbg installed, run the following command as an administrator:
Bash
> setx _NT_SYMBOL_PATH srv*c:\symbols*http://msdl.microsoft.com/download/symbolsThis command adds the environment variable indicating where to look for the symbols (.pdb).
4. Create a WinDbg shortcut and add Target parameters at the end to launch kernel debugging:
Bash
-k com:pipe,port=\\.\pipe\com_1,resets=0,reconnectMake sure to change the pipe name when you repeat these actions on your virtual disk.
5. Double-click on the WinDbg shortcut and restart the virtual machine.
Once the system restarts, we can:
- Open WinDbg and press Ctrl+Break
- Specify the path to the pdb driver using the .sympath+ command
- Run the commands listed in this article once again to better memorize the described approach
And that’s it. We’ve successfully created a Windows WDM driver.
To learn details about drivers, check out our articles about Windows driver testing and USB WiFi driver development.
Conclusion
Software drivers play an essential role in building Windows applications and expanding their capabilities. This process requires Windows driver developers to have a deep understanding of driver development specifics, keen knowledge of Windows internals, and expertise in C/C++.
Apriorit driver development professionals have successfully helped many businesses tackle their driver development challenges and deliver well-performing, secure, and competitive products.
У нас Windows 10-64.
Задача разработать например драйвер устройства под Windows.
Устанавливаем Windows Device Driver Kit 7 :
Скачиваем с офф.сайта microsoft ISO, разархивируем , запустим KitSetup.exe
так выглядят в Панель управления\Программы\Программы и компоненты
установлен у меня в C:\WinDDK\7600.16385.1
В C:\WinDDK\7600.16385.1\src много примеров исходных кодов.
Примечание : если у вас уже установлен Win Driver Kit 10 , то придется удалить.
Фишка в том , что сборку надо запускать через запуск сначала командного файла (который устанавливает переменные среды) :
см. Пуск->Windows Driver
открывается консоль, где и надо ввести build (в каталоге вашего проекта). Процесс сборки выглядит примерно так:
для x64 входим через C:\Windows\System32\cmd.exe /k C:\WinDDK\7600.16385.1\bin\setenv.bat C:\WinDDK\7600.16385.1\ fre x32-64
Windows 10 — надо сначала отключить проверку цифровой подписи (у меня срабатывает при нажатой SHIFT + клик Перезагрузка)
Отключаем.
Далее просто пробуем написать простейший kernel драйвер
На самом деле в дальнейшем в этой ветке сайта мы будем заниматься UMDF драйверами, но для проверки первого драйвера подвернулся пример driver.sys (kernel драйвер, драйвер уровня ядра)
Компилируем простейший драйвер (sys — кернел драйвер)
#include <wdm.h>

static
VOID Unload(DRIVER_OBJECT * pDriverObj)
{
	DbgPrint("...........Unload\n");
}

NTSTATUS DriverEntry(DRIVER_OBJECT * pDriverObj, UNICODE_STRING * pRegPath)
{
	DbgPrint("DriverEntry................\n");
    return STATUS_SUCCESS;
}
Для варианта сборки x86 пробуем зарегистрировать драйвер
Для варианта сборки amd64 получаем
Теперь по другому пробуем проверить запущен ли все-таки драйвер через программу OSR Driver Loader:
Получается драйвер все-таки запускается несмотря на ругань по поводу сертификата.
смотрим например еще так :
C:\WINDOWS\system32>sc query mydriver

Имя_службы: mydriver
        Тип                : 1  KERNEL_DRIVER
        Состояние          : 4  RUNNING
                                (STOPPABLE, NOT_PAUSABLE, IGNORES_SHUTDOWN)
        Код_выхода_Win32   : 0  (0x0)
        Код_выхода_службы  : 0  (0x0)
        Контрольная_точка  : 0x0
        Ожидание           : 0x0
osr driver loader — прекрасно и сама регистрирует / запускает / останавливает / удаляет драйвер. Только не забывайте перезагружаться.
Отладка
У нас на сайте см. отдельный раздел по отладке драйверов.
Интернет-портал habrahabr.ru, июнь, 2017<br>
Статья Анатолия Михайлова, руководителя группы разработки Secret Disk Linux компании «Аладдин Р.Д.»
Вряд ли пользователь домашнего ПК заинтересуется тем, чтобы блокировать устройства на своём ПК. Но если дело касается корпоративной среды, то всё становится иначе. Есть пользователи, которым можно доверять абсолютно во всём, есть такие, которым можно что-то делегировать, и есть те, кому доверять совсем нельзя. Например, вы заблокировали доступ к Интернету одному из пользователей, но не заблокировали устройства этого ПК. В таком случае пользователю достаточно просто принести USB-модем, и Интернет у него будет. Т.е. простым блокированием доступа к Интернету дело не ограничивается.
Однажды примерно такая задача и стояла передо мной. Времени на поиск каких-либо решений в Интернете не было, да и они, как правило, небесплатные. Поэтому мне было проще написать такой драйвер, и его реализация отняла у меня один день.
В этой статье я расскажу немного теоретическую часть, на основе которой все строится, и расскажу принцип самого решения.
Также полные исходные коды могут быть найдены в папке USBLock хранилища git по адресу: https://github.com/anatolymik/samples.git.
Структура DRIVER_OBJECT
Для каждого загруженного драйвера система формирует структуру DRIVER_OBJECT. Этой структурой система активно пользуется, когда отслеживает состояние драйвера. Также драйвер отвечает за её инициализацию, в частности за инициализацию массива MajorFunction. Этот массив содержит адреса обработчиков для всех запросов, за которые драйвер может отвечать. Следовательно, когда система будет посылать запрос драйверу, она воспользуется этим массивом, чтобы определить, какая функция драйвера отвечает за конкретный запрос. Ниже представлен пример инициализации этой структуры.
for ( ULONG i = 0; i <= IRP_MJ_MAXIMUM_FUNCTION; i++ ) {
DriverObject->MajorFunction[i] = DispatchCommon;
}
DriverObject->MajorFunction[IRP_MJ_CREATE] = DispatchCreate;
DriverObject->MajorFunction[IRP_MJ_CLOSE] = DispatchClose;
DriverObject->MajorFunction[IRP_MJ_READ] = DispatchRead;
DriverObject->MajorFunction[IRP_MJ_WRITE] = DispatchWrite;
DriverObject->MajorFunction[IRP_MJ_CLEANUP] = DispatchCleanup;
DriverObject->MajorFunction[IRP_MJ_PNP] = DispatchPnp;
DriverObject->DriverUnload = DriverUnload;
DriverObject->DriverExtension->AddDevice = DispatchAddDevice;
Такая инициализация обычно выполняется при вызове системой точки входа драйвера, прототип которой изображён ниже.
NTSTATUS DriverEntry( PDRIVER_OBJECT DriverObject, PUNICODE_STRING RegistryPath );
Как видно из примера, сначала весь массив MajorFunction инициализируется одним и тем же обработчиком. В реальности типов запросов больше, чем в примере. Поэтому предварительно весь массив инициализируется так, чтобы запросы, которые не поддерживаются драйвером, обрабатывались корректно. Например, завершались с ошибкой. После инициализации массива обычно инициализируются обработчики для тех запросов, за которые драйвер отвечает.
Также инициализируется поле DriverUnload структуры, которое содержит адрес обработчика, отвечающего за завершение работы драйвера. Это поле может быть оставлено непроинициализированным, в таком случае драйвер становится невыгружаемым.
Обратите внимание на то, что в поле DriverExtension->AddDevice устанавливается адрес обработчика, который вызывается всякий раз, когда система обнаруживает новое устройство, за работу которого драйвер отвечает. Данное поле может быть оставлено непроинициализированным, в таком случае драйвер не сможет обрабатывать это событие.
Более подробно данная структура описана по адресу: https://msdn.microsoft.com/en-us/library/windows/hardware/ff544174(v=vs.85).aspx.
Структура DEVICE_OBJECT
Структура DEVICE_OBJECT представляет ту или иную функциональность драйвера. Т.е. эта структура может представлять физическое устройство, логическое устройство, виртуальное устройство или просто некий функционал, предоставляемый драйвером. Поэтому когда система будет посылать запросы, то в самом запросе она будет указывать адрес этой структуры. Таким образом, драйвер сможет определить, какой функционал от него запрашивается. Если не использовать такую модель, тогда драйвер может обрабатывать только какую-нибудь одну функциональность, а в современном мире это недопустимо. Прототип функции, которая обрабатывает конкретный запрос, приведена ниже.
NTSTATUS Dispatch( PDEVICE_OBJECT DeviceObject, PIRP Irp );
Массив MajorFunction ранее упомянутой структуры DRIVER_OBJECT содержит адреса обработчиков именно с таким прототипом.
Сама структура DEVICE_OBJECT всегда создаётся драйвером при помощи функции IoCreateDevice. Если система посылает запрос драйверу, то она всегда направляет его какому-либо DEVICE_OBJECT, как это следует из вышепредставленного прототипа. Также, прототип принимает второй параметр, который содержит адрес IRP-структуры. Эта структура описывает сам запрос, и она существует в памяти до тех пор, пока драйвер не завершит его. Запрос отправляется драйверу на обработку при помощи функции IoCallDriver как системой, так и другими драйверами.
Также со структурой DEVICE_OBJECT может быть связано имя. Таким образом, этот DEVICE_OBJECT может быть найден в системе.
Более подробно структура DEVICE_OBJECT описана по адресу: https://msdn.microsoft.com/en-us/library/windows/hardware/ff543147(v=vs.85).aspx. А структура IRP описана по адресу: https://msdn.microsoft.com/en-us/library/windows/hardware/ff550694(v=vs.85).aspx.
Фильтрация
Фильтрация являет собой механизм, который позволяет перехватывать все запросы, направленные к конкретному DEVICE_OBJECT. Чтобы установить такой фильтр, необходимо создать другой экземпляр DEVICE_OBJECT и прикрепить его к DEVICE_OBJECT, запросы которого необходимо перехватывать. Прикрепление фильтра выполняется посредством функции IoAttachDeviceToDeviceStack. Все DEVICE_OBJECT, прикреплённые к перехватываемому DEVICE_OBJECT, вместе с ним формируют так называемый стек устройства, как это изображено ниже.

Стрелкой изображено продвижение запроса. Сначала запрос будет обрабатываться драйвером верхнего DEVICE_OBJECT, затем драйвером среднего и, в конце концов, управление на обработку запроса получит драйвер целевого DEVICE_OBJECT. Также нижний DEVICE_OBJECT называется дном стека, т.к. он ни к кому не прикреплён.
Наличие такого механизма позволяет добавлять функционал, которого нет изначально в драйверах. Например, таким образом, без доработки файловой системы FAT, поставляемой в Windows, можно добавить проверку прав доступа к файлам этой файловой системы.
PnP менеджер
PnP менеджер отвечает за диспетчеризацию устройств всей системы. В его задачи входит обнаружение устройств, сбор информации о них, загрузка их драйверов, вызов этих драйверов, управление аппаратными ресурсами, запуск и остановка устройств и их удаление.
Когда драйвер той или иной шины обнаруживает устройства на своих интерфейсах, то для каждого дочернего устройства он создаёт DEVICE_OBJECT. Этот DEVICE_OBJECT также называют Physical Device Object или PDO. Затем посредством функции IoInvalidateDeviceRelations он уведомляет PnP менеджер о том, что произошли изменения на шине. В ответ на это PnP менеджер посылает запрос с minor кодом IRP_MN_QUERY_DEVICE_RELATIONS с целью запросить список дочерних устройств. В ответ на этот запрос драйвер шины возвращает список PDO. Ниже изображён пример такой ситуации.
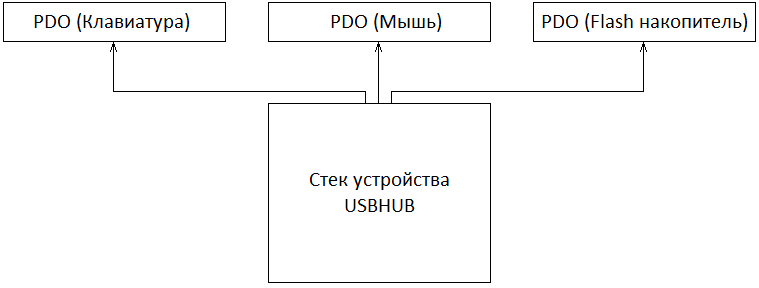
Как отражено на рисунке, в данном примере в качестве шины выступает драйвер USB-хаба. Конкретные DEVICE_OBJECT стека устройства этого хаба не изображены для краткости и с целью сохранения последовательности пояснений.
Как только PnP менеджер получит список всех PDO, он по отдельности соберёт всю необходимую информацию об этих устройствах. Например, будет послан запрос с minor кодом IRP_MN_QUERY_ID. Посредством этого запроса PnP менеджер получит идентификаторы устройства, как аппаратные, так и совместимые. Также PnP менеджер соберёт всю необходимую информацию о требуемых аппаратных ресурсах самим устройством. И так далее.
После того, как вся необходимая информация будет собрана, PnP менеджер создаст так называемую DevNode, которая будет отражать состояние устройства. Также PnP создаст ветку реестра для конкретного экземпляра устройства или откроет существующую, если устройство ранее подключалось к ПК.
Следующая задача PnP — это запуск драйвера устройства. Если драйвер не был ранее установлен, тогда PnP будет ожидать установки. Иначе, при необходимости, PnP загрузит его и передаст ему управление. Ранее упоминалось, что поле DriverExtension->AddDevice структуры DRIVER_OBJECT содержит адрес обработчика, который вызывается всякий раз, когда система обнаруживает новое устройство. Прототип этого обработчика изображён ниже.
NTSTATUS DispatchAddDevice(
PDRIVER_OBJECT DriverObject,
PDEVICE_OBJECT PhysicalDeviceObject
);
Т.е. всякий раз, когда PnP обнаруживает устройство, управлением которого занимается тот или иной драйвер, вызывается зарегистрированный обработчик этого драйвера, где ему передаётся указатель на PDO. Информация об установленном драйвере также хранится в соответствующей ветке реестра.
В задачу обработчика входит создание DEVICE_OBJECT и его прикрепление к PDO. Прикреплённый DEVICE_OBJECT также называют Functional Device Object или FDO. Именно этот FDO и будет отвечать за работу устройства и представление его интерфейсов в системе. Ниже представлен пример, когда PnP завершил вызов драйвера, отвечающего за работу устройства.
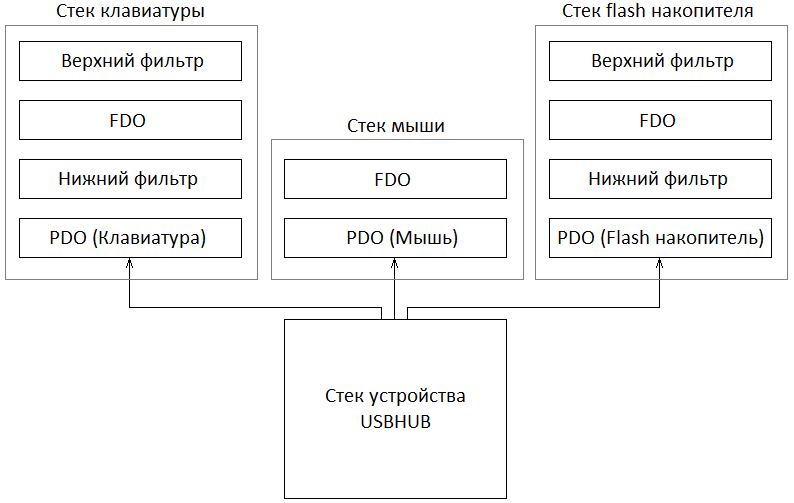
Как отражено на примере, кроме драйвера самого устройства также могут быть зарегистрированы нижние и верхние фильтры класса устройства. Следовательно, если таковые имеются, PnP также загрузит их драйвера и вызовет их AddDevice обработчики. Т.е. порядок вызова драйверов следующий: сначала загружаются и вызываются зарегистрированные нижние фильтры, затем загружается и вызывается драйвер самого устройства, и в завершении загружаются и вызываются верхние фильтры. Нижние и верхние фильтры являются обычным DEVICE_OBJECT, которые создают драйвера и прикрепляют их к PDO в своих обработчиках AddDevice. Количество нижних и верхних фильтров не ограничено.
В этот момент стеки устройств полностью сформированы и готовы к работе. Поэтому PnP посылает запрос с minor кодом IRP_MN_START_DEVICE. В ответ на этот запрос все драйвера стека устройства должны подготовить устройство к работе. И если в этом процессе не возникло проблем, тогда запрос завершается успешно. В противном случае, если любой из драйверов не может запустить устройство, тогда он завершает запрос с ошибкой. Следовательно, устройство не будет запущено.
Также, когда драйвер шины определяет, что произошли изменения на шине, он посредством функции IoInvalidateDeviceRelations уведомляет PnP о том, что следует заново собрать информацию о подключенных устройствах. В этот момент драйвер не удаляет ранее созданный PDO. Просто при получении запроса с minor кодом IRP_MN_QUERY_DEVICE_RELATIONS он не включит этот PDO в список. Затем PnP на основании полученного списка опознает новые устройства и устройства, которые были отключены от шины. PDO отключенных устройств драйвер удалит тогда, когда PnP пошлёт запрос с minor кодом IRP_MN_REMOVE_DEVICE. Для драйвера этот запрос означает, что устройство более никем не используется, и оно может быть безопасно удалено.
Более подробную информацию о модели драйверов WDM можно найти по адресу: https://msdn.microsoft.com/en-us/library/windows/hardware/ff548158(v=vs.85).aspx.
Суть решения
Суть самого решения заключается в создании верхнего фильтра класса USB-шины. Зарезервированные классы можно найти по адресу: https://msdn.microsoft.com/en-us/library/windows/hardware/ff553419(v=vs.85).aspx. Нас интересует класс USB с GUID равным 36fc9e60-c465-11cf-8056-444553540000. Как гласит MSDN, этот класс используется для USB хост контроллеров и хабов. Однако практически это не так, этот же класс используется, например, flash-накопителями. Это немного добавляет нам работы. Код обработчика AddDevice представлен ниже.
NTSTATUS UsbCreateAndAttachFilter(
PDEVICE_OBJECT PhysicalDeviceObject,
bool UpperFilter
) {
SUSBDevice* USBDevice;
PDEVICE_OBJECT USBDeviceObject = nullptr;
ULONG Flags;
NTSTATUS Status = STATUS_SUCCESS;
PAGED_CODE();
for ( ;; ) {
// если нижний фильтр уже прикреплен, тогда здесь больше делать нечего
if ( !UpperFilter ) {
USBDeviceObject = PhysicalDeviceObject;
while ( USBDeviceObject->AttachedDevice ) {
if ( USBDeviceObject->DriverObject == g_DriverObject ) {
return STATUS_SUCCESS;
}
USBDeviceObject = USBDeviceObject->AttachedDevice;
}
}
// создаем фильтр
Status = IoCreateDevice(
g_DriverObject,
sizeof( SUSBDevice ),
nullptr,
PhysicalDeviceObject->DeviceType,
PhysicalDeviceObject->Characteristics,
false,
&USBDeviceObject
);
if ( !NT_SUCCESS( Status ) ) {
break;
}
// инициализируем флаги созданного устройства, копируем их из объекта к
// которому прикрепились
Flags = PhysicalDeviceObject->Flags &
(DO_BUFFERED_IO | DO_DIRECT_IO | DO_POWER_PAGABLE);
USBDeviceObject->Flags |= Flags;
// получаем указатель на нашу структуру
USBDevice = (SUSBDevice*)USBDeviceObject->DeviceExtension;
// инициализируем деструктор
USBDevice->DeleteDevice = DetachAndDeleteDevice;
// инициализируем обработчики
for ( ULONG i = 0; i <= IRP_MJ_MAXIMUM_FUNCTION; i++ ) {
USBDevice->MajorFunction[i] = UsbDispatchCommon;
}
USBDevice->MajorFunction[IRP_MJ_PNP] = UsbDispatchPnp;
USBDevice->MajorFunction[IRP_MJ_POWER] = UsbDispatchPower;
// инициализируем семафор удаления устройства
IoInitializeRemoveLock(
&USBDevice->Lock,
USBDEVICE_REMOVE_LOCK_TAG,
0,
0
);
// заполняем структуру
USBDevice->SelfDevice = USBDeviceObject;
USBDevice->BaseDevice = PhysicalDeviceObject;
USBDevice->UpperFilter = UpperFilter;
// инициализируем paging семафор
USBDevice->PagingCount = 0;
KeInitializeEvent( &USBDevice->PagingLock, SynchronizationEvent, true );
// прикрепляем устройство к PDO
USBDevice->LowerDevice = IoAttachDeviceToDeviceStack(
USBDeviceObject,
PhysicalDeviceObject
);
if ( !USBDevice->LowerDevice ) {
Status = STATUS_NO_SUCH_DEVICE;
break;
}
break;
}
// в зависимости от результата делаем
if ( !NT_SUCCESS( Status ) ) {
// отчистку
if ( USBDeviceObject ) {
IoDeleteDevice( USBDeviceObject );
}
} else {
// или сбрасываем флаг инициализации
USBDeviceObject->Flags &= ~DO_DEVICE_INITIALIZING;
}
return Status;
}
static NTSTATUS DispatchAddDevice(
PDRIVER_OBJECT DriverObject,
PDEVICE_OBJECT PhysicalDeviceObject
) {
UNREFERENCED_PARAMETER( DriverObject );
return UsbCreateAndAttachFilter( PhysicalDeviceObject, true );
}
Как следует из примера, мы создаём DEVICE_OBJECT и прикрепляем его к PDO. Таким образом, мы будем перехватывать все запросы, направленные к USB-шине.
В нашу задачу входит перехватывать запросы с minor кодом IRP_MN_START_DEVICE. Код обработчика этого запроса изображён ниже.
static NTSTATUS UsbDispatchPnpStartDevice( SUSBDevice* USBDevice, PIRP Irp ) {
bool HubOrComposite;
NTSTATUS Status;
PAGED_CODE();
for ( ;; ) {
// проверить, позволено ли устройству работать, также обновить
// информацию об устройстве, является ли оно хабом или композитным
Status = UsbIsDeviceAllowedToWork( &HubOrComposite, USBDevice );
if ( !NT_SUCCESS( Status ) ) {
break;
}
USBDevice->HubOrComposite = HubOrComposite;
// продвинуть запрос
Status = ForwardIrpSynchronously( USBDevice->LowerDevice, Irp );
if ( !NT_SUCCESS( Status ) ) {
break;
}
break;
}
// завершаем запрос
Irp->IoStatus.Status = Status;
IoCompleteRequest( Irp, IO_NO_INCREMENT );
// и освобождаем устройство
IoReleaseRemoveLock( &USBDevice->Lock, Irp );
return Status;
}
Как изображено на рисунке, обработчик вызывает функцию UsbIsDeviceAllowedToWork. Эта функция выполняет все необходимые проверки, чтобы определить, разрешено ли устройству работать. В первую очередь функция позволяет всегда работать хабам и композитным устройствам, клавиатурам и мышам. А также тем устройствам, которые находятся в списке разрешённых. Если функция возвращает неуспешный код возврата, тогда запрос завершается с ошибкой. Таким образом, работа устройства будет заблокирована.
Обратите внимание: функция определяет, является ли устройство хабом или композитным устройством. Это необходимо потому, что, как уже было упомянуто, класс устройств, который используется для хабов и хост контроллеров, используется не только этими устройствами. А нам в первую очередь необходимо контролировать дочерние устройства только хабов, хост контроллеров и композитных устройств. Т.е. для хабов и композитных устройств дополнительно перехватывается запрос перечисления дочерних устройств, на этом этапе, важно также прикрепить ко всем дочерним устройствам фильтр, и этот фильтр будет нижним. В противном случае контроль над дочерними устройствами будет потерян.
Все упомянутые определения выполняются на основе идентификаторов устройств.
Заключение
Несмотря на свою простоту в моем случае данный драйвер достаточно эффективно решает поставленную задачу. Хотя из недостатков следует выделить обязательную перезагрузку после того, как список разрешённых устройств будет обновлён. Чтобы устранить этот недостаток, драйвер потребуется несколько усложнить. Ещё большим недостатком является полное блокирование устройства, а не частичное. Описание, представленное выше, не раскрывает всех деталей реализации. Сделано это было намеренно, и упор был сделан больше на саму концепцию. Желающие разобраться во всем до конца могут ознакомиться с исходным кодом.