
Keeping Windows 10 up-to-date is really important as it makes your system more stable and secure. However, the installation process of updating often takes a long time, gets blocked, or becomes stuck. Recently, some users reported Windows Update Error 0x80245006 while trying to update Windows.
If your computer is also having the same problem, then try to implement the given suggestions one by one. This guide provides a list of the solutions that will help you resolve the error 0x80245006 on Windows 10.
What causes Windows Update Error 0x80245006

Several conditions could result in Update Error 0x80245006 appearing in Windows 11/10. Below are some possible causes.
- The Windows Update database is corrupted.
- Background Intelligent Transfer Service (BITS) lacks a content link header.
- System files that are needed by the system are not correctly registered.
To fix Windows Update Error 0x80245006, you can use the following methods –
- Check your internet connection
- Run Windows Update Troubleshooter
- Reset SoftwareDistribution & Catroot2 folders
- Restart some required services
- Perform a Clean boot
- Install the updates manually
1. Check your internet connection
Having problems with your internet connection increases the chance of getting Error 0x80245006. Therefore, make sure your system is connected to the internet first and then try any other method.
If there’s a poor connection on your network, disconnect other devices and if necessary, place the device close to the router and see if that fixes it. You can try the next solution if your network is up and running.
2. Run Windows Update Troubleshooter
There are different types of built-in troubleshooters in Windows 10 that can help fix various types of problems. If you encounter Windows Update Error 0x80245006, the next thing you should do is to run the Windows Update troubleshooter to reset the Windows Update settings to defaults. The procedure is as follows –
Windows 11
- Right-click on Start and select Settings.
- From the left pane, click System > Troubleshoot > Other troubleshooters.

- Next to Windows Update, click on the Run button.
Windows 10
- Press Win+I to open the Settings app.
- Then click on Updates & Security.
- Click the Troubleshoot tab.
- Go to the right side of the page and select Additional Troubleshooters.

- Select Windows Update and then click Run the troubleshooter.
- Then follow the instructions on your screen.
- When the solution is available, click on the Apply this fix button
- Once you have completed all the steps, restart your computer and try to update your Windows again
3. Rename SoftwareDistribution & Catroot2 folders
Here is another effective method of solving the Windows Update Error 0x80245006. This step will certainly work to fix any problems related to the Windows components. Use the following guide to do this –
- Open the elevated command prompt.
- Enter the below commands one after the other, and press Enter after each one –
net stop wuauserv
net stop cryptSvc
net stop bits
net stop msiserver
- Running the above commands will halt the update processes for a while.
ren C:\Windows\SoftwareDistribution SoftwareDistribution.old
ren C:\Windows\System32\catroot2 Catroot2.old
- By doing this, you will rename the SoftwareDistribution folder and the Catroot2 folder. As a result, the next time you try to update, Windows will be fresh.
net start wuauserv
net start cryptSvc
net start bits
net start msiserver
- All the services that you had stopped earlier will now be restarted
- Close the command prompt window and restart your device.
4. Restart some required Services
Some services need to be running for Windows updates. A recent system change could cause the update process to be interrupted, causing this error code. It is best to try restarting any stopped services with the troubleshooting package. If it did not, start them using the below steps –
- Click on Start and search for Services.
- Select the result from the list to open the application.
- Search for the Background Intelligent Transfer Service (BITS) and double-click on it.

- On the General tab, check the Service status.
- Make sure that the Startup type is Automatic.
- If the status is Stopped, click on the Start button.
- In the same way, check the status of the Windows Update and Workstation services.
- And start their status if you find them stopped.
- Once you’re done, close the Services application and check for the error code.
5. Perform a Clean boot
In case you continue to receive this error code, try to perform the Clean Boot states to start Windows with a minimal set of drivers. By doing this, you can eliminate most software conflicts that are induced when you install a program or update your Windows PC.
- Click on Start, search for System Configuration, and then select it from the search results.

- On the Services tab, check the box next to Hide All Microsoft Services.
- Then click on the Disable all button.
- Now switch to the Startup tab and click Open Task Manager.
- If any startup program seems to be causing you problems, click it
- Then click the Disable button.
- Similarly, disable other startup programs that might be causing this issue.
Once you have completed the steps, close the window and restart the computer. After restarting your PC, only essential services will run.
6. Install the updates manually
Another method is to download Windows Update manually from the Microsoft Update Catalog. Using this service, you can distribute certain updates across several devices.
- Right-click on Start and select Settings.
- For Windows 11 – Scroll down to Windows Update and then select Update history.

- For Windows 10 – Select Update & Security > Windows Update > View update history.

- Search for the failed update and then note its KB number from the list.
- Now open the Microsoft Update Catalog page.
- Enter the KB number in the search box and then search for it.
- Choose the most appropriate version for your operating system, then click on Download.
- You will now need to follow the on-screen instructions and restart your PC once you are finished
That’s all. This article hopefully helps you resolve this issue.
Read Next:
- How to fix Update error 0x800f0831 in Windows 10
- Fix Windows Update Error 0x800f0990 on Windows 10
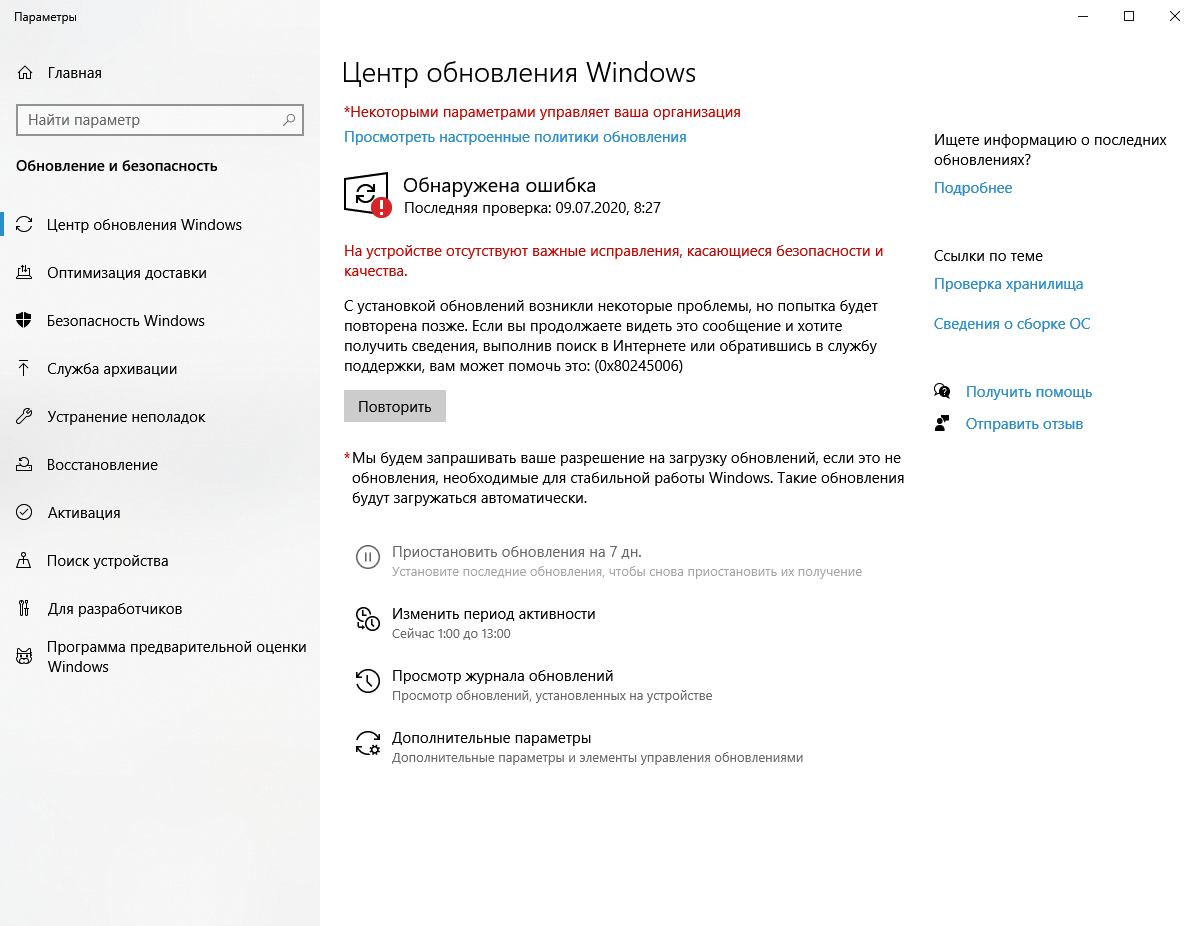
Когда юзеры пытаются установить или обновить Windows на своих ПК, они часто сталкиваются с ошибкой 0x80245006. Эта ошибка обычно указывает на проблему со службой Центра обновления (ЦО сокращено) или программными компонентами, которые активно участвуют в загрузке и инсталляции свежих апдейтов.
Обновления критически важны для стабильности, безопасности и производительности ОС Windows, независимо редакции. В них включены исправления багов, ошибок, исправления безопасности, обновления драйверов и улучшения функций, устраняющие известные проблемы и уязвимости. Поддерживая ОС в актуальном состоянии, вы обеспечиваете ее защиту от новых угроз, бесперебойную работу с улучшенной совместимостью и использование самых последних функций и оптимизаций.
Завидев 0x80245006, пользователи могут столкнуться с рядом не самых приятных последствий. Прежде всего, из-за того, что критические патчи и исправления не устанавливаются, система может оказаться уязвимой перед угрозами извне. Кроме того, из-за устаревших драйверов могут возникнуть проблемы совместимости с определенным ПО или аппаратным обеспечением. Может снизиться общая производительность системы, что приведет к замедлению времени отклика, сбоям или другим проблемам со стабильностью.
Решение ошибки 0x80245006 при обновлении Windows
Для устранения ошибки 0x80245006 необходимо устранить основную причину. Возможными решениями являются перезапуск службы и сброс компонентов ЦО, проверка наличия свободного места на SSD/HDD или решение проблем с сетевым подключением.
Способ 1. Исправьте поврежденные системные файлы
Используйте команды Командной строки для устранения повреждений системных файлов:
- Откройте Командную строку от админа (WIN+R→CMD→CTRL+SHIFT+ENTER).
- Используйте следующую команду и нажмите ENTER:
- sfc /scannow
- Перезагрузите систему.
- Если SFC выдал ошибку, используйте следующие командные строки, нажимая ENTER после каждой:
- DISM /Online /Cleanup-Image /CheckHealth
- DISM /Online /Cleanup-Image /ScanHealth
- DISM /Online /Cleanup-Image /RestoreHealth
Способ 2. Проверите диск на ошибки
Убедитесь, что диск не поврежден. Проверку можно выполнить с помощью командной строки (от админа):
- Если в качестве основного диска используется HDD (на котором установлена операционная система – по умолчанию C:), выполните следующую команду и нажмите ENTER:
- chkdsk c: /f
- Если вы используете SSD, используйте следующую команду:
- chkdsk c: /f /r /x
- Если вы получите ошибку, введите Y и нажмите ENTER.
- Перезагрузите устройство, чтобы выполнить проверку.
Способ 3. Запустите средство устранения неполадок ЦО
- Нажмите клавиши WIN+X и перейдите в раздел «Параметры».
- Перейдите в раздел «Обновление и безопасность».
- Нажмите «Устранение неполадок».
- Выберите «Дополнительные средства устранения неполадок».
- Запустите средство устранения неполадок обновления.
- Перезагрузитесь.
Способ 4. Перезапустите службы Windows
- Нажмите WIN+R, чтобы открыть окно «Выполнить».
- Введите services.msc и нажмите «OK».
- Дважды щелкните ЛКМ на службу «Background Intelligent Transfer Service (BITS)».
- Если в статусе указано «Остановлена», нажмите «Запустить» и затем нажмите «OK».
- Если статус «Выполняется», нажмите на кнопку «Перезапустить».
- Найдите службу ЦО и дважды щелкните по ней ЛКМ.
- Если в статусе указано «Остановлена», нажмите «Запустить» и «ОК». Если статус «Выполняется», щелкните ПКМ и выберите «Перезапустить».
Способ 5. Восстановите целостность ЦО
Как правило, восстановление компонентов ЦО помогает решить даже самые сложные неполадки, включая и ошибку
- Откройте Командную строку от админа (↑указано выше↑).
- Скопируйте и вставьте следующие команды и нажмите ENTER после каждой из них:
- net stop wuauserv
- net stop cryptSvc
- net stop bits
- net stop msiserver
- ren C:\Windows\SoftwareDistribution SoftwareDistribution.old
- ren C:\Windows\System32\catroot2 Catroot2.old
- cd /d %windir%\system32
- regsvr32.exe atl.dll
- regsvr32.exe urlmon.dll
- regsvr32.exe mshtml.dll
- regsvr32.exe shdocvw.dll
- regsvr32.exe browseui.dll
- regsvr32.exe jscript.dll
- regsvr32.exe vbscript.dll
- regsvr32.exe scrrun.dll
- regsvr32.exe msxml.dll
- regsvr32.exe msxml3.dll
- regsvr32.exe msxml6.dll
- regsvr32.exe actxprxy.dll
- regsvr32.exe softpub.dll
- regsvr32.exe wintrust.dll
- regsvr32.exe dssenh.dll
- regsvr32.exe rsaenh.dll
- regsvr32.exe gpkcsp.dll
- regsvr32.exe sccbase.dll
- regsvr32.exe slbcsp.dll
- regsvr32.exe cryptdlg.dll
- regsvr32.exe oleaut32.dll
- regsvr32.exe ole32.dll
- regsvr32.exe shell32.dll
- regsvr32.exe initpki.dll
- regsvr32.exe wuapi.dll
- regsvr32.exe wuaueng.dll
- regsvr32.exe wuaueng1.dll
- regsvr32.exe wucltui.dll
- regsvr32.exe wups.dll
- regsvr32.exe wups2.dll
- regsvr32.exe wuweb.dll
- regsvr32.exe qmgr.dll
- regsvr32.exe qmgrprxy.dll
- regsvr32.exe wucltux.dll
- regsvr32.exe muweb.dll
- regsvr32.exe wuwebv.dll
- net start wuauserv
- net start cryptSvc
- net start bits
- net start msiserver
- Перезагрузите компьютер.
Способ 6. Установить обновление вручную
Если обновления Windows не устанавливаются автоматически, вы всегда можете попробовать сделать это вручную. Для начала необходимо выяснить, какой номер KB является для вас актуальным.
- Щелкните ПКМ на кнопке Пуск и выберите пункт «Параметры».
- Перейдите в раздел «Обновление и безопасность».
- Справа найдите и щелкните «Просмотр истории обновлений».
- В списке обратите внимание на номер KB, который не удается установить с кодом ошибки.
- Перейдите на страницу каталога обновлений Microsoft, введите номер KB и нажмите «Поиск».
- Скачайте обновление и установите его вручную.
Если ничего из первых пяти способов не помогло, то последней, шестой, по крайней мере позволит обойти ошибку 0x80245006.
Сразу после выхода новой ОС, все стали интересоваться, как узнать ключ установленной Windows 10, хотя в большинстве случаев он не требуется. Тем не менее, если вам все-таки требуется ключ для тех или иных целей, его сравнительно просто определить, как для установленной ОС, так и зашитый производителем в UEFI ключ продукта (они могут отличаться).
В этой инструкции описаны простые способы узнать ключ продукта Windows 10 с помощью командной строки, Windows PowerShell, а также сторонних программ. Заодно упомяну о том, почему разные программы показывают разные данные, как отдельно посмотреть OEM ключ в UEFI (для ОС, которая изначально была на компьютере) и ключ установленной в данный момент системы.
Примечание: если вы произвели бесплатное обновление до Windows 10, а теперь хотите узнать ключ активации для чистой установки на том же компьютере, вы можете это сделать, но это не обязательно (к тому же у вас будет ключ такой же, как и у других людей, получивших десятку путем обновления). При установке Windows 10 с флешки или диска, вас попросят ввести ключ продукта, но вы можете пропустить этот шаг, нажав в окне запроса «У меня нет ключа продукта» (и Майкрософт пишет, что так и нужно делать).
После установки и подключения к Интернету, система будет автоматически активирована, поскольку активация «привязывается» к вашему компьютеру после обновления. То есть поле для ввода ключа в программе установки Windows 10 присутствует только для покупателей Retail-версий системы. Подробнее про такую активацию: Активация Windows 10. А при желании, можно использовать Windows 10 и без активации.
Просмотр ключа продукта установленной Windows 10 и OEM-ключа в ShowKeyPlus
Есть множество программ для описываемых здесь целей, о многих из которых я писал в статье Как узнать ключ продукта Windows 8 (8.1) (подойдет и для Windows 10), но мне больше других приглянулась найденная недавно ShowKeyPlus, которая не требует установки и отдельно показывает сразу два ключа: установленной в текущий момент системы и OEM ключ в UEFI. Заодно сообщает, для какой именно версии Windows подходит ключ из UEFI. Также с помощью этой программы можно узнать ключ из другой папки с Windows 10 (на другом жестком диске, в папке Windows.old), а заодно проверить ключ на валидность (пункт Check Product Key).
Все, что нужно сделать — запустить программу и посмотреть отображаемые данные:
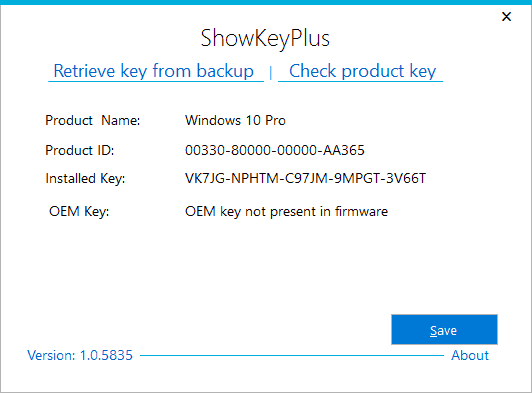
- Installed Key — ключ установленной системы.
- OEM Key (Original Key) — ключ предустановленной ОС, если она была на компьютере, т.е. ключ из UEFI.
Также эти данные можно сохранить в текстовый файл для дальнейшего использования или архивного хранения, нажав кнопку «Save». Кстати, проблема с тем, что порой разные программы показывают разные ключи продукта для Windows, как раз и появляется из-за того, что некоторые из них смотрят его в установленной системе, другие в UEFI.
Скачать ShowKeyPlus можно со страницы https://github.com/Superfly-Inc/ShowKeyPlus/releases/, также с недавних пор приложение доступно для загрузки в Microsoft Store.
Еще две программы, чтобы узнать ключ продукта Windows 10
Если по той или иной причине ShowKeyPlus для вас оказался неподходящим вариантом, можно использовать следующие две программы:
Просмотр ключа установленной Windows 10 с помощью PowerShell
Там, где можно обойтись без сторонних программ, я предпочитаю обходиться без них. Просмотр ключа продукта Windows 10 — одна из таких задач. Если же вам проще использовать бесплатную программу для этого, пролистайте руководство ниже. (Кстати, некоторые программы для просмотра ключей отправляют их заинтересованным лицам)
Простой команды PowerShell или командной строки, для того чтобы узнать ключ установленной в настоящий момент времени системы не предусмотрено (есть такая команда, показывающая ключ из UEFI, покажу ниже. Но обычно требуется именно ключ текущей системы, отличающийся от предустановленной). Но можно воспользоваться готовым скриптом PowerShell, который отображает необходимую информацию (автор скрипта Jakob Bindslet).
Вот что потребуется сделать. Прежде всего, запустите блокнот и скопируйте в него код, представленный ниже.
#Main function
Function GetWin10Key
{
	$Hklm = 2147483650
	$Target = $env:COMPUTERNAME
	$regPath = "Software\Microsoft\Windows NT\CurrentVersion"
	$DigitalID = "DigitalProductId"
	$wmi = [WMIClass]"\\$Target\root\default:stdRegProv"
	#Get registry value
	$Object = $wmi.GetBinaryValue($hklm,$regPath,$DigitalID)
	[Array]$DigitalIDvalue = $Object.uValue
	#If get successed
	If($DigitalIDvalue)
	{
		#Get producnt name and product ID
		$ProductName = (Get-itemproperty -Path "HKLM:Software\Microsoft\Windows NT\CurrentVersion" -Name "ProductName").ProductName
		$ProductID =  (Get-itemproperty -Path "HKLM:Software\Microsoft\Windows NT\CurrentVersion" -Name "ProductId").ProductId
		#Convert binary value to serial number
		$Result = ConvertTokey $DigitalIDvalue
		$OSInfo = (Get-WmiObject "Win32_OperatingSystem"  | select Caption).Caption
		If($OSInfo -match "Windows 10")
		{
			if($Result)
			{

				[string]$value ="ProductName  : $ProductName `r`n" `
				+ "ProductID    : $ProductID `r`n" `
				+ "Installed Key: $Result"
				$value
				#Save Windows info to a file
				$Choice = GetChoice
				If( $Choice -eq 0 )
				{
					$txtpath = "C:\Users\"+$env:USERNAME+"\Desktop"
					New-Item -Path $txtpath -Name "WindowsKeyInfo.txt" -Value $value   -ItemType File  -Force | Out-Null
				}
				Elseif($Choice -eq 1)
				{
					Exit
				}
			}
			Else
			{
				Write-Warning "Запускайте скрипт в Windows 10"
			}
		}
		Else
		{
			Write-Warning "Запускайте скрипт в Windows 10"
		}

	}
	Else
	{
		Write-Warning "Возникла ошибка, не удалось получить ключ"
	}

}
#Get user choice
Function GetChoice
{
    $yes = New-Object System.Management.Automation.Host.ChoiceDescription "&Yes",""
    $no = New-Object System.Management.Automation.Host.ChoiceDescription "&No",""
    $choices = [System.Management.Automation.Host.ChoiceDescription[]]($yes,$no)
    $caption = "Подтверждение"
    $message = "Сохранить ключ в текстовый файл?"
    $result = $Host.UI.PromptForChoice($caption,$message,$choices,0)
    $result
}
#Convert binary to serial number
Function ConvertToKey($Key)
{
	$Keyoffset = 52
	$isWin10 = [int]($Key[66]/6) -band 1
	$HF7 = 0xF7
	$Key[66] = ($Key[66] -band $HF7) -bOr (($isWin10 -band 2) * 4)
	$i = 24
	[String]$Chars = "BCDFGHJKMPQRTVWXY2346789"
	do
	{
		$Cur = 0
		$X = 14
		Do
		{
			$Cur = $Cur * 256
			$Cur = $Key[$X + $Keyoffset] + $Cur
			$Key[$X + $Keyoffset] = [math]::Floor([double]($Cur/24))
			$Cur = $Cur % 24
			$X = $X - 1
		}while($X -ge 0)
		$i = $i- 1
		$KeyOutput = $Chars.SubString($Cur,1) + $KeyOutput
		$last = $Cur
	}while($i -ge 0)

	$Keypart1 = $KeyOutput.SubString(1,$last)
	$Keypart2 = $KeyOutput.Substring(1,$KeyOutput.length-1)
	if($last -eq 0 )
	{
		$KeyOutput = "N" + $Keypart2
	}
	else
	{
		$KeyOutput = $Keypart2.Insert($Keypart2.IndexOf($Keypart1)+$Keypart1.length,"N")
	}
	$a = $KeyOutput.Substring(0,5)
	$b = $KeyOutput.substring(5,5)
	$c = $KeyOutput.substring(10,5)
	$d = $KeyOutput.substring(15,5)
	$e = $KeyOutput.substring(20,5)
	$keyproduct = $a + "-" + $b + "-"+ $c + "-"+ $d + "-"+ $e
	$keyproduct


}
GetWin10Key
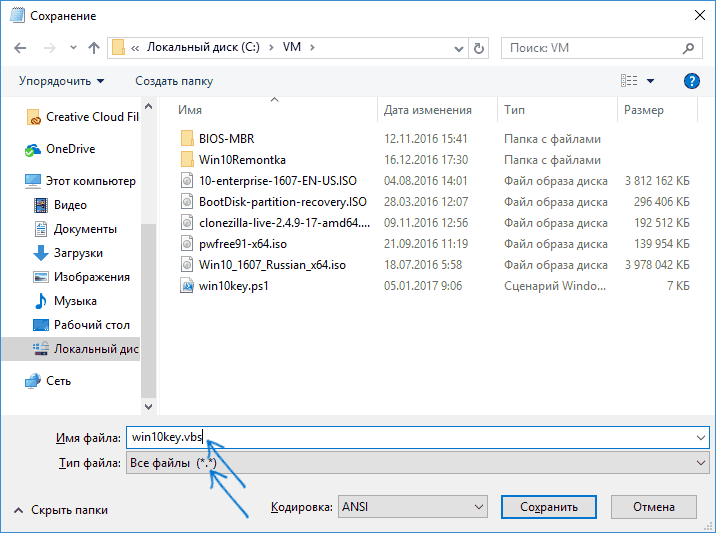
Сохраните файл с расширением .ps1. Для того, чтобы сделать это в блокноте, при сохранении в поле «Тип файла» укажите «Все файлы» вместо «Текстовые документы». Сохранить можно, например, под именем win10key.ps1
После этого, запустите Windows PowerShell от имени Администратора. Для этого, можно начать набирать PowerShell в поле поиска, после чего кликнуть по нему правой кнопкой мыши и выбрать соответствующий пункт.
В PowerShell введите следующую команду: Set-ExecutionPolicy RemoteSigned и подтвердите ее выполнение (ввести Y и нажать Enter в ответ на запрос).
Следующим шагом, введите команду: C:\win10key.ps1 (в данной команде указывается путь к сохраненному файлу со скриптом).
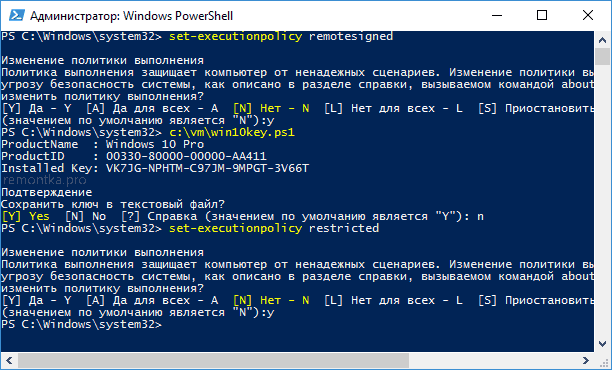
В результате выполнения команды вы увидите информацию о ключе установленной Windows 10 (в пункте Installed Key) и предложение сохранить ее в текстовый файл. После того, как вы узнали ключ продукта, можете вернуть политику выполнения скриптов в PowerShell к значению по умолчанию с помощью команды Set-ExecutionPolicy restricted
Как узнать OEM ключ из UEFI в PowerShell
Если на вашем компьютере или ноутбуке была предустановлена Windows 10 и требуется просмотреть OEM ключ (который хранится в UEFI материнской платы), вы можете использовать простую команду, которую необходимо запустить в командной строке от имени администратора.
wmic path softwarelicensingservice get OA3xOriginalProductKey
В результате вы получите ключ предустановленной системы при его наличии в системе (он может отличаться от того ключа, который используется текущей ОС, но при этом может использоваться для того, чтобы вернуть первоначальную версию Windows).
Еще один вариант этой же команды, но для Windows PowerShell
(Get-WmiObject -query "select * from SoftwareLicensingService").OA3xOriginalProductKey
Как посмотреть ключ установленной Windows 10 с помощью скрипта VBS
И еще один скрипт, уже не для PowerShell, а в формате VBS (Visual Basic Script), который отображает ключ продукта установленной на компьютере или ноутбуке Windows 10 и, возможно, удобнее для использования.
Скопируйте в блокнот строки, представленные ниже.
Set WshShell = CreateObject("WScript.Shell")
regKey = "HKLM\SOFTWARE\Microsoft\Windows NT\CurrentVersion\"
DigitalProductId = WshShell.RegRead(regKey & "DigitalProductId")
Win10ProductName = "Версия Windows 10: " & WshShell.RegRead(regKey & "ProductName") & vbNewLine
Win10ProductID = "ID продукта: " & WshShell.RegRead(regKey & "ProductID") & vbNewLine
Win10ProductKey = ConvertToKey(DigitalProductId)
ProductKeyLabel ="Ключ Windows 10: " & Win10ProductKey
Win10ProductID = Win10ProductName & Win10ProductID & ProductKeyLabel
MsgBox(Win10ProductID)
Function ConvertToKey(regKey)
Const KeyOffset = 52
isWin10 = (regKey(66) \ 6) And 1
regKey(66) = (regKey(66) And &HF7) Or ((isWin10 And 2) * 4)
j = 24
Chars = "BCDFGHJKMPQRTVWXY2346789"
Do
Cur = 0
y = 14
Do
Cur = Cur * 256
Cur = regKey(y + KeyOffset) + Cur
regKey(y + KeyOffset) = (Cur \ 24)
Cur = Cur Mod 24
y = y -1
Loop While y >= 0
j = j -1
winKeyOutput = Mid(Chars, Cur + 1, 1) & winKeyOutput
Last = Cur
Loop While j >= 0
If (isWin10 = 1) Then
keypart1 = Mid(winKeyOutput, 2, Last)
insert = "N"
winKeyOutput = Replace(winKeyOutput, keypart1, keypart1 & insert, 2, 1, 0)
If Last = 0 Then winKeyOutput = insert & winKeyOutput
End If
a = Mid(winKeyOutput, 1, 5)
b = Mid(winKeyOutput, 6, 5)
c = Mid(winKeyOutput, 11, 5)
d = Mid(winKeyOutput, 16, 5)
e = Mid(winKeyOutput, 21, 5)
ConvertToKey = a & "-" & b & "-" & c & "-" & d & "-" & e
End Function
Должно получиться как на скриншоте ниже.

После этого сохраните документ с расширением .vbs (для этого в диалоге сохранения в поле «Тип файла» выберите «Все файлы».
Перейдите в папку, где был сохранен файл и запустите его — после выполнения вы увидите окно, в котором будут отображены ключ продукта и версия установленной Windows 10.
Как я уже отметил, программ для просмотра ключа есть множество — например, в Speccy, а также других утилитах для просмотра характеристик компьютера можно узнать эту информацию. Но, уверен, тех способов, что описаны здесь, будет достаточно практически в любой ситуации.
May. 30, 2023 / Updated by
Renata to
Windows 10

Windows 10 is a popular operating system used by millions of users worldwide. The system is constantly updated to improve its performance, fix bugs, and provide enhanced security features. However, sometimes Windows 10 updates can fail to install, and users may encounter error messages such as 0x80245006, which is related to Windows Update. This error can occur due to various reasons, such as network connectivity issues, corrupt system files, outdated drivers, or misconfigured updates settings. Here are some steps that can help you fix the Windows 10 update error 0x80245006.
Step 1: Check Network Connectivity
One of the common reasons behind the Windows 10 update error 0x80245006 is an unstable or weak network connection. Therefore, the first thing you should do is check your internet connection and ensure that it is stable. Here’s how:
— Ensure that your router is turned on and properly connected to the internet.
— Check if other devices on your network can access the internet.
— If your network is secured with a password, make sure that you have entered the correct password.
— Try resetting your network by turning off your modem/router for a few seconds and then turning it back on.
Step 2: Update Drivers
Outdated or malfunctioning drivers can cause issues with Windows Update. Updating your drivers can help you resolve the 0x80245006 error. Here’s how:
1. Download and install Driver Talent
Download Driver Talent
2. Click on the «Scan» button to scan your computer for outdated, missing, or corrupt drivers.
3. Once the scan is complete, you will see a list of all the problematic drivers on your computer.
4. Click on the «Download» button next to the driver you want to update or install.
5. Wait for the download to finish, then click on the «Install» button to install the new driver on your computer.
6. You can also use Driver Talent to backup and restore your drivers or to uninstall unwanted drivers.
7. Once you have installed all the necessary drivers, restart your computer to apply the changes.

Step 3: Clear Windows Update Cache
Sometimes, the Windows Update cache can become corrupted, resulting in update errors such as 0x80245006. Clearing the update cache can help you resolve the issue. Here’s how:
— Press the Windows key + R on your keyboard to open the Run dialog box.
— Type services.msc and press Enter to open the Services console.
— Scroll down to Windows Update, right-click on it, and select Stop.
— Minimize the Services console and press the Windows key + E to open File Explorer.
— Navigate to C:\Windows\SoftwareDistribution by typing it in the address bar and pressing Enter.
— Delete everything in the SoftwareDistribution folder.
— Go back to the Services console, right-click on Windows Update, and select Start.
Step 4: Check Date and Time Settings
Incorrect date and time settings can cause issues with Windows Update. Make sure that your computer’s date and time are correct and synced with the internet. Here’s how:
— Press the Windows key + I to open Windows Settings.
— Click on Time & Language and then select Date & Time.
— Toggle the «Set time automatically» and «Set time zone automatically» options to On.
— If your date and time are incorrect, toggle off the options mentioned above and manually adjust them.
Step 5: Run Windows Update Troubleshooter
Windows 10 comes with a built-in troubleshooter that can detect and fix issues related to Windows Update. Running the Windows Update troubleshooter can help you identify and resolve any issues that may be causing the 0x80245006 error. Here’s how:
— Go to Windows Settings by pressing the Windows key + I on your keyboard.
— Click on Update & Security and then select Troubleshoot from the left sidebar.
— Scroll down to the Get up and running section and click on Windows Update.
— Click on Run the troubleshooter and follow the on-screen instructions.
Step 6: Reset Windows Update Components
If none of the above steps work, resetting the Windows Update components can help you resolve the 0x80245006 error. Here’s how:
— Press the Windows key + R to open the Run dialog box.
— Type cmd and press Ctrl + Shift + Enter to open the Command Prompt as an administrator.
— Type the following command and hit Enter after each one:
net stop bits
net stop cryptsvc
net stop wuauserv
net stop msiserver
ren C:\Windows\SoftwareDistribution SoftwareDistribution.old
ren C:\Windows\System32\catroot2 catroot2.old
net start bits
net start cryptsvc
net start wuauserv
net start msiserver
— Once the commands have run successfully, restart your computer and try updating Windows again.
Keyword List:
— Windows 10 Update Error 0x80245006
— Windows 10 updates
— error messages
— Windows Update
— network connectivity issues
— corrupt system files
— outdated drivers
— misconfigured updates settings
— troubleshooter
— Windows Update cache
— date and time settings
— update drivers
— reset Windows Update components.
Download Driver Talent
Recommended Download
|
ExplorerMax |
Driver Talent for Network Card | |||
| Smart and advanced file explorer tool for Windows platforms | Download & Install Network Drivers without Internet Connection | |||
|
30-day Free Trial |
Free Download |

Many Windows users face the 0x80245006 error code randomly during the update process. If you have encountered the same thing, there can be several reasons. In this guide, let’s find out the reasons and how to get rid of this Windows Update error code.
Even though the 0x80245006 error code may occur due to various reasons, you can implement several methods to fix it. In the following section, we will share some effective solutions to get rid of this error code.
Method 1: Check Internet Connection
A stable network is essential to complete the Windows update. When you don’t have a fast internet connection, you can encounter the 0x80245006 error code. Restart your router or modem to check if your internet connection is stable.
Method 2: Use Troubleshooter
The Windows Update troubleshooter is a built-in program that can help users resolve different issues. As per some experts, running the troubleshooter can help you get rid of error code 0x80245006. Follow these steps to run the Windows Update troubleshooter:
Step 1: First, press the Windows + I keys to open Windows Settings and then select the Update & Security option.
Step 2: Next, go to Troubleshoot and click Additional Troubleshooters from the right side.
Step 3: As a pop-up window appears, click the Windows Update option and then Run the troubleshooter.
Step 4: Once done, the troubleshooter will automatically detect Windows Update issues. If it finds any issue, follow the on-screen instructions.
Method 3: Enable the Needed Services
Sometimes, you can encounter the 0x80245006 error code if Windows updates are disabled. In that case, you have to enable the needed services by following these steps:
Step 1: First, open the Run dialog by pressing Windows + R keys
Step 2: Type services.msc in the box and press Enter.

Step 3: As the Service window appears, keep scrolling through the following services and check if they are disabled. If you find a service is disabled, right-click on it and select Start. But, if they are already enabled, right-click it and select Restart.
Method 4: Disable Antivirus Software
Sometimes, your PC’s antivirus software recognizes Windows Update as a threat and stops the process. As a result, you can encounter the error code. To solve this error code, disable the antivirus temporarily.
Method 5: Run SFC and DISM Scans
Another effective way to resolve the error code 0x80245006 is by running SFC and DISM scans. Keep reading the following guide to fix this issue by running these scans:
Step 1: Run the Command Prompt as an administrator and type sfc /scannow in the box before pressing Enter.
Step 2: Once the scan is finished, restart your computer and open the Command Prompt again.
Step 3: Next, type the following commands one by one and press Enter after each:
- DISM /Online /Cleanup-Image /CheckHealth
- DISM /Online /Cleanup-Image /ScanHealth
- DISM /Online /Cleanup-Image /RestoreHealth
Method 6: Check Hard Drive
Sometimes, the error code can arrive due to disk error. In that case, you have to check the hard drive’s health. You can download a professional disk manager to check the hard drive.
Method 7: Perform a Clean Boot
When any of these methods aren’t working, it’s better to perform a clean boot. By doing this, you can bypass the application conflicts and solve the error code issue.
Conclusion
Even though the 0x80245006 error code can occur anytime while completing Windows Update, you can implement some effective methods to get rid of it. If any of these methods aren’t working, you can contact the support team.
FAQs
Why is my Windows Update showing error code 0x80245006?
You may encounter the 0x80245006 error code due to various reasons like the antivirus software blocking Windows Update, not having a stable internet connection, or the needed services being disabled.
How to resolve the 0x80245006 error code?
There are various effective ways to resolve the 0x80245006 error code like performing a clean boot, running SFC and DISM scans, and using a troubleshooter.
Can I perform a clean boot to fix the 0x80245006 error code?
Yes, you can perform a clean boot to fix the 0x80245006 error code.
About the author
Raj Hirvate
Raj Hirvate is the founder and visionary behind techqrew.com, a platform dedicated to exploring the intersections of technology, innovation, and daily life. With a keen eye for the latest tech trends and a passion for making technology accessible.