
Все способы:
- Вариант 1: Расположение файла неизвестно
- Способ 1: «Командная строка»
- Способ 2: «PowerShell»
- Вариант 2: Получение пути к файлу
- Способ 1: Контекстное меню
- Способ 2: Свойства объекта
- Способ 3: Пакетный режим
- Вопросы и ответы: 1
Вариант 1: Расположение файла неизвестно
Чтобы найти файл на компьютере, не обязательно запоминать его расположение — достаточно помнить его название или даже часть названия. Также при поиске файлов на компьютере можно использовать такие данные, как расширение, размер, дату создания и прочие атрибуты. Основных способов поиска два: возможностями самой Windows 10 и средствами сторонних приложений.
Приложений для поиска файлов существует достаточно много, среди них имеются как бесплатные, так и коммерческие. Наиболее быстрыми из них являются те, которые выполняют поиск по файловой таблице, куда заносятся имена всех объектов файловой системы. Такой подход обеспечивает почти мгновенный поиск без индексации.
Штатные средства поиска также могут быть эффективными, если уметь ими правильно пользоваться. В Windows 10 для поиска файлов и папок можно использовать функционал «Проводника», классической «Командной строки» и консоли «PowerShell».
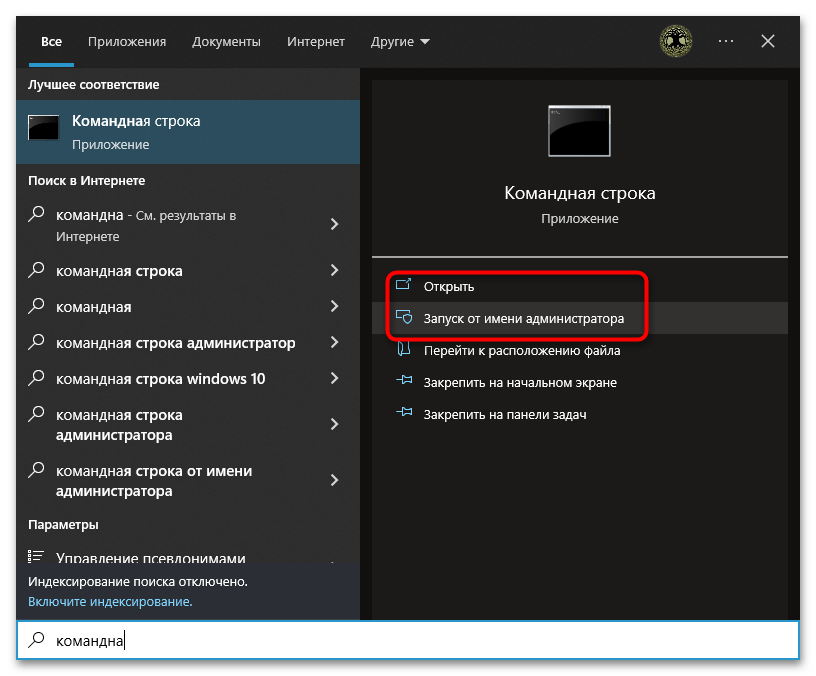
Способ 1: «Командная строка»
Если известно название файла и буква диска, на котором он предположительно находится, найти его можно с помощью «Командной строки».
- Запустите консоль «cmd» из поиска Windows или другим известным способом.
- Выполните команду
dir /a /s c:\file.name, где file.name – имя файла с расширением, например text.docx.
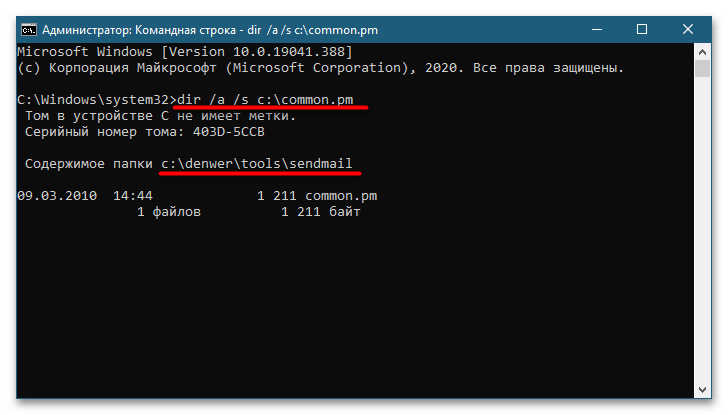
Если файл имеется на диске, команда выведет в консоль путь к нему.
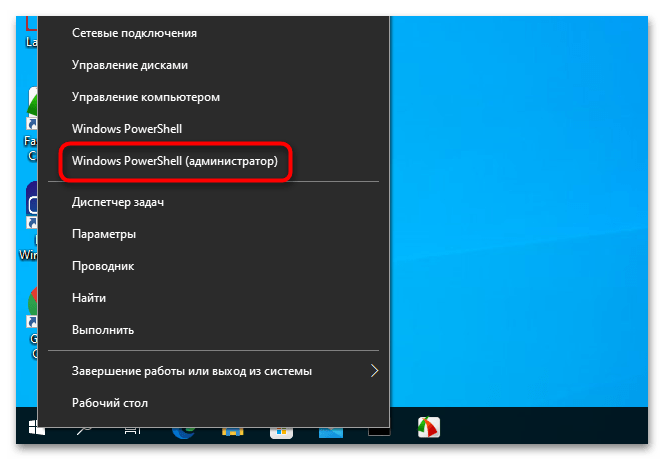
Способ 2: «PowerShell»
Более широкими возможностями обладает консоль «PowerShell», способная искать файлы по разным параметрам. Далее приведен самый простой пример – поиск по имени и расширению.
- Запустите «PowerShell» из контекстного меню кнопки «Пуск».
- Сформируйте и выполните команду
Get-ChildItem -Path C:\ "file.name" -Recurse -Force -ErrorAction SilentlyContinue, где file.name – имя файла с расширением, а C:\ — буква диска, на котором выполняется поиск.
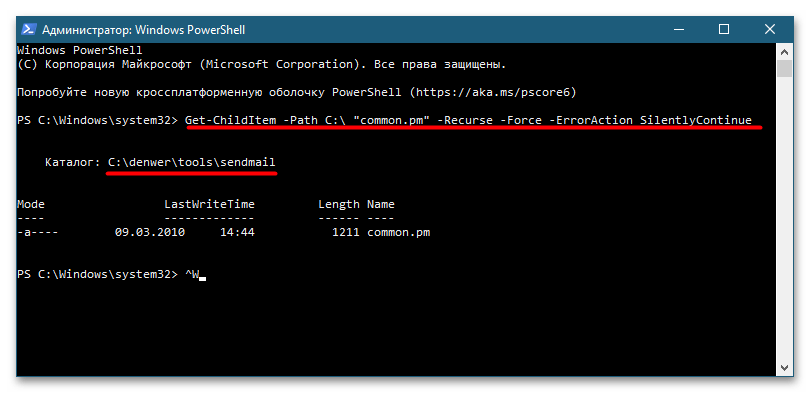
Результат будет выведен в консоль.
Подробнее: Способы поиска файлов в Windows 10
Вариант 2: Получение пути к файлу
Если нужно получить пути файлов, расположение которых уже известно, либо узнать расположение файла по его ярлыку, достаточно будет средств «Проводника». Способы, в свою очередь, можно использовать разные.
Способ 1: Контекстное меню
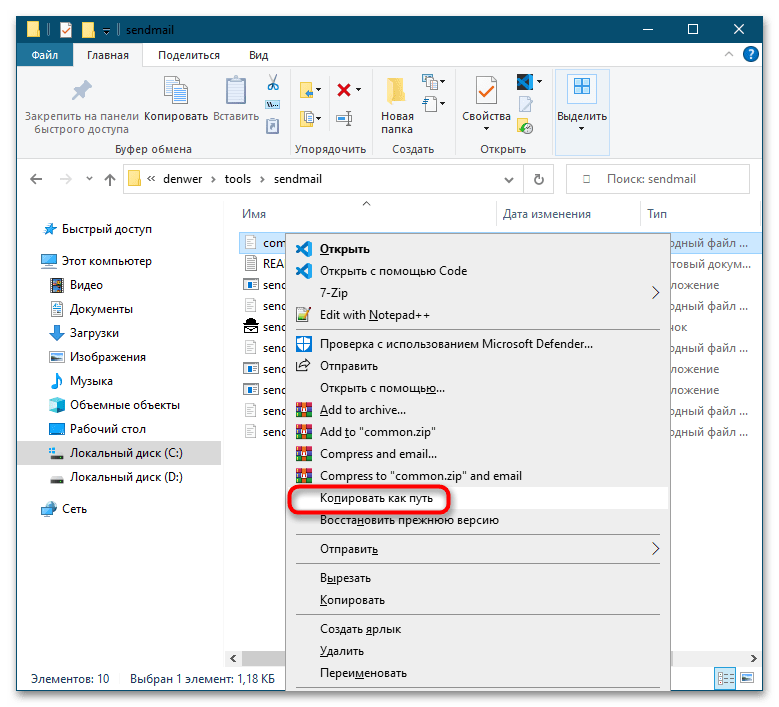
В расширенном контекстном меню файлов, папок и ярлыков имеется опция копирования полного пути к объекту. Зажмите на клавиатуре клавишу Shift, после чего кликните по файлу правой кнопкой мыши. Выберите опцию «Копировать как путь» — путь к файлу будет скопирован в буфер обмена.
Способ 2: Свойства объекта
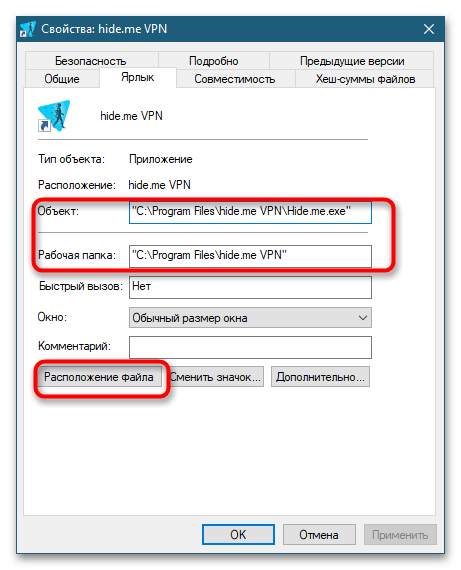
Если нужно определить месторасположение файла по его ярлыку, откройте «Свойства» данного ярлыка и посмотрите, что указано в поле «Объект». Это и будет путь файла в системе. В поле «Рабочая папка» указывается путь к папке, в которой искомый файл находится.
Обратите также внимание на кнопку «Расположение файла» — если ее нажать, будет открыт каталог с целевым файлом.
Способ 3: Пакетный режим
Если нужно получить пути к группе файлов, расположенных в конкретной папке, воспользуйтесь средствами той же консоли «PowerShell». Запустите приложение и выполните в нем команду Get-Childitem -File -Path D:\Folder | Out-File D:\filelist.txt.
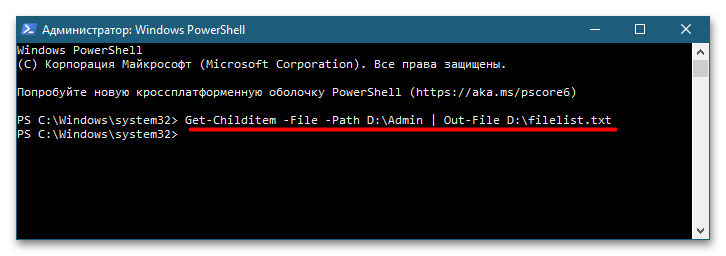
В этой команде имеется два пути: D:\Folder – путь папке с файлами, пути которых нужно получить, и D:\filelist.txt – путь к автоматически создаваемому текстовому логу, куда «PowerShell» запишет данные. Заметьте, что команда получает пути только в родительской папке, поэтому если каталог нужно исследовать рекурсивно, сразу перед ключом -File в команду нужно добавить ключ -Recurse.
Наша группа в TelegramПолезные советы и помощь
Last Updated :
13 Mar, 2025
Ever lost a file on your computer and wished there was a quick way to find it without clicking through endless folders? Say hello to the Windows Command Prompt (CMD) a powerful little tool that can help you search for files fast. In this how-to blog, we will explore the steps to search for files using CMD simple commands, so you can find what you need in no time, no fancy software required.
So without further ado, let’s get into the process of finding files using CMD in Windows 10 and well in Windows 11.
How to Find Files Using CMD in Windows?
In this section we have mentioned some steps, so follow the few steps to get the lost file or file that you are looking for.
Step 1: Open CMD
To find your file first, open CMD or Windows Command Prompt, and to do this, click the Win+R button and type CMD, or you can click the Windows key and type CMD to open Windows Command Prompt.
Step 2: Use DIR Command
After successfully launching the Command Prompt, type the below command and press Enter to pull up a list of files and folders.
dir
Step 2: Use CD Folder Command
For moving down into a particular directory, use the below command followed by a folder name, until you reach the folder you want to search.
cd folder_name
Step 3: Use Aging DIR Command
Now type the dir command again but this time with your search term, follow dir with your search term in quotes with an asterisk term before closing the quotes (For example, type dir “Raveling*”) and press Enter. The command prompt will show you the file location along with the list of files name starting with a similar keyword.
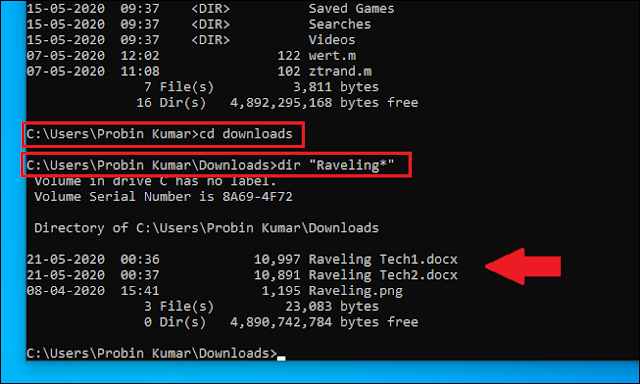
The asterisk is what’s known as a wildcard and, in our example, it stands for anything that follows the word ‘highlands’, such as ‘raveling.doc’, ‘raveling.xls’ or My Business plans.txt’.
If you don’t know the exact location of your file in your hard drive, then instead of manually navigating through your directories, start searching from the very top level of your hard drive and include every sub-folder.
Step 4: Use Raveling Command
The top level of the drive is represented by a backslash and, to include subdirectories, you add a forward slash and ‘s’ to the end of the query as shown below:
dir “\Raveling*” /s
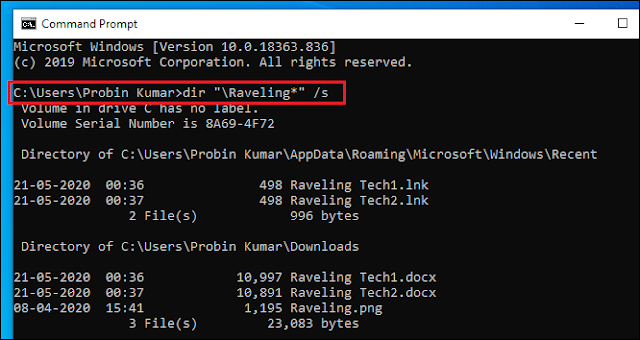
The above command is my all-time favorite because, with the help of this command, I don’t have to force my brain to remember the location of the files. This trick usually takes seconds to search the entire drive for the file.
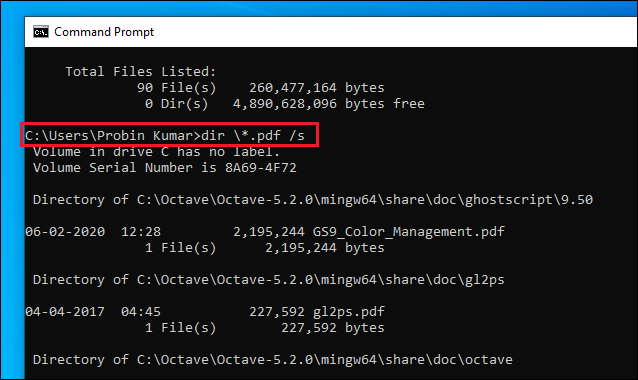
You can also search for a particular file type by using a command dir \*.pdf /s and it will show you all files saved with the .pdf extension. You can try this for other files too (for example: .doxc, .png, .exe and more).
Note: The position asterisk symbol in the command matters a lot so type carefully and check once before executing the command.
How All The Commands Works?
Now you know enough to find any file on your entire hard drive within few seconds but if you are more curious to know how all these commands are working and what all these symbols stand for, then continue reading this post.
Let’s discuss each term one by one:
- dir command is for showing files on the current directory, but it can also show files from anywhere in the drive of the system.
- / tells dir to search from the top-level or root directory of the hard drive.
- /s is used for searching sub-directories.
- * asterisk is using before text (for example *.pdf) show all files ending with .pdf and * using at the end (for example raveling*) show you all file-names starting with that word.
Conclusion
Using the Command Prompt to search files in CMD is a valuable skill for anyone who frequently navigates through files and directories on a Windows system. By understanding the various commands available, you can easily find files with CMD and streamline your workflow. Whether you’re searching by name, location, or content, this method ensures that you can quickly locate the files you need with minimal effort.
If you are an advanced user of Windows, you might want to use the command line to find files on your system. You can use the command line to find files by date, content, size, and location, etc. In this article, I will show you how to use various methods and commands to find files using the command line in Windows 10/11.
Basic File Search Commands
One of the simplest ways to search for files using the command line is to use the dir and findstr commands. The dir command lists the files and folders in a directory, and you can use it with wildcards (*) to find file by name or extension from the Windows command line. For example, to use CMD to search for files with the extension TXT in the current directory, you can use the command:
dir *.txt

The Findstr command searches for a string of text in a file or files. You can use it with the /i option to ignore case sensitivity and with the /s option to search in all subdirectories. For example, to search for the word “hello” in all text files in the current directory and its subdirectories, you can use the command:
findstr /i /s "hello" *.txt
CMD Find File Name Containing a String
As mentioned, you can use the dir command to find a file name containing a specific string. For example, to find a file name containing the string “share” in the current directory and its subdirectories, you can type:
dir /s /b *share*
This will return a list of file names that match the pattern. The /s switch tells the command to search in all subdirectories, and the /b switch tells it to display only the bare file name.
You can also use wildcards to specify more complex patterns. For example, to find a file name that starts with “report” and with extension “.docx”, you can type:
dir /s /b report*.docx
Advanced File Search Commands
The find command searches for files that match certain criteria, such as name, size, date, and attributes. You can search words within files using the command prompt.
For example, to search for the word “hello” in all text files in the current directory, you can use the following command:
findstr /i /m "hello" *.txt
To search for all files larger than 1 MB in the C: drive, you can use the command:
forfiles /P C:\ /S /C "cmd /c if @fsize gtr 1048576 echo @path"
where Command for Executable Files
If you want to search for executable files, such as programs and applications, you can use the where command. It is mainly for locating executable files in a specified path or paths. You can use wildcards (*) with the where command to search for files with a specific name or extension. For example, to search for all executable files with the word “chrome” in their name in the C: drive, you can use the command:
where /r C:\ *chrome*.exe
Combine Dir and Find Commands
You can also use advanced filtering options with the dir command to search for files based on their attributes, such as size, date, and extension. You can use various switches with the dir command to filter your results. For example, to search for all readonly files in the current directory, you can use the command:
dir /a:r
To search for all files modified after January 1st, 2024 in the current directory, you can use the command:
dir /t:w /o:d | findstr /b "01/01/2024"
To search for all PDF files smaller than 100 KB in the current directory and its subdirectories, you can use the command:
dir /s *.pdf | findstr /v "<DIR>" | findstr /v "bytes" | findstr /r "[09][09][09] KB"
Windows CMD Find File Recursively
If you want to perform recursive searches using the dir command, you can use the /s switch. The /s switch searches for files in the current directory and all its subdirectories. For example, to search for all text files in the current directory and its subdirectories, you can use the command:
dir /s *.txt
Recursive searches are useful for locating files that are buried deep in your system’s folders.
You can also use the Where command to search recursively. For example, to list all files that start with “ffmp” in the c:\windows directory and its subdirectories, use the following command:
where /r c:\users ffmp*

PowerShell Commands for File Searches
PowerShell is a powerful command line tool that allows you to perform various tasks on your system. You can also use PowerShell commands to find files based on various criteria. For example, to search for all text files that contain the word “hello” in the current directory and its subdirectories, you can use the command:
Get-ChildItem -Path .\* -Include *.txt -Recurse | Select-String -Pattern "hello"
To search for all files larger than 1 MB in the C: drive, you can use the command:
Get-ChildItem -Recurse -Path C:\ | Where-Object {$_.Length gt 1MB}
To search for all PDF files created before January 1st 2024 in the current directory and its subdirectories, you can use the command:
Get-ChildItem -Path .\* -Include *.mp4 -Recurse | Where-Object { $_.CreationTime -lt '2024-01-01' }

Common CommandLine File Search Parameters
Here are some general tips for optimizing your command line file searches in Windows:
- Use wildcards (*) to search for files with a specific name or extension.
- Use the /s switch with the dir, find, and findstr commands to search in all subdirectories.
- Use the /r switch with the where command to search in a specified path or paths.
- Use the /a switch with the dir and find commands to filter files by attributes, such as hidden, readonly, system, etc.
- Use the /t switch with the dir command to filter files by date, such as creation, modification, or access.
- Use the /o switch with the dir command to sort files by name, size, date, or extension.
- Use PowerShell commands to perform more advanced file searches with various criteria.
Conclusion
In this article, I have shown you how to find files using the command line in Windows 11/10. Hopefully, you have learned to use advanced filtering and sorting options with these commands to get your results quickly.
In the Windows command prompt (CMD), we use the where command to find files that match a specific search pattern.
where /r dir file_nameThe where command searches for files in the given directory and all subdirectories and returns the full path of each matching file to the standard output.
First, let’s look at a few examples to understand how CMD where command works.
Examples
Search c:\ drive for the file file1.txt:
where /r c:\ file1.txtFind the location of the chrome.exe:
where /r c:\ chrome.exeThe following command finds all files that contain «report» anywhere in the filename in the c:\windows and all subdirectories:
where /r c:\windows *report*This command search c:\ drive to find filenames starting in «report»:
where /r c:\ report*The following command search c:\ drive to find filenames ending in «report»:
where /r c:\ *reportIn this example, every file in the c:\windows (and all subdirectories) is searched for filenames ending in .txt:
where /r c:\windows *.txtFind all mp3 files in the d:\ drive:
where /r d:\ *mp3The following command finds all mp3 files in the d:\ drive and copies the output to the clipboard instead of printing it to the command prompt.
where /r d:\ *mp3 | clipIn this example, we save the output to a text file called output.txt:
where /r d:\ *mp3 > C:\output.txtAdd the /t option to display the file size and last modification date and time:
where /t /r c:\windows *.logCommand Options
| /r Dir | Specify the directory to search (the search is recursive). |
| /f | If you use this option, the where command encloses filenames in quotation marks in the output. |
| /t | Displays file size and last modification date. |
| /? | Displays command options. |
If you know the exact name of the file you want to find, then specify the name without using any wildcards:
where /r c:\ file1.txtThe above command will search for file1.txt in C: drive recursively.

If you don’t know the exact name, but only a part of it, then put an asterisk (*) before and after the search term, as shown in the following example:
where /r c:\Docs *report*In the above example, CMD where command will return any files that have the string report anywhere in the filename.

To find files that start with a specific pattern, put an asterisk (*) after the search term, as shown in the following example:
where /r c:\ report*To find files that end with a specific pattern, put an asterisk before the search term:
where /r c:\ *reportIn the following example, the where command finds all files that have the .avi extension on the C: drive:
where /r c:\ *.aviRemarks
- You can only use the
wherecommand to find files on CMD. It will not work on Windows PowerShell. - Run the
where /?command to see a list of all the options.
Программистам часто приходится работать в консоли — например, чтобы запустить тестирование проекта, закоммитить новый код на Github или отредактировать документ в vim. Всё это происходит так часто, что все основные действия с файлами становится быстрее и привычнее выполнять в консоли. Рассказываем и показываем основные команды, которые помогут ускорить работу в терминале под OS Windows.
Для начала нужно установить терминал или запустить командную строку, встроенную в Windows — для этого нажмите Win+R и введите cmd. Терминал часто встречается и прямо в редакторах кода, например, в Visual Studio Code.
Чтобы ввести команду в консоль, нужно напечатать её и нажать клавишу Enter.
Содержимое текущей папки — dir
Выводит список файлов и папок в текущей папке.
C:\content-server>dir
 Том в устройстве C имеет метку SYSTEM
 Серийный номер тома: 2C89-ED9D

 Содержимое папки C:\content-server

06.10.2020  00:41    <DIR>          .
06.10.2020  00:37    <DIR>          .circleci
16.07.2020  16:04               268 .editorconfig
16.07.2020  16:04                10 .eslintignore
16.07.2020  16:04               482 .eslintrc
06.10.2020  00:37    <DIR>          .github
16.07.2020  16:04                77 .gitignore
06.10.2020  00:41    <DIR>          assets
06.10.2020  00:41    <DIR>          gulp
16.07.2020  16:10               379 gulpfile.js
16.07.2020  16:10           296 320 package-lock.json
16.07.2020  16:10               751 package.json
16.07.2020  16:04               509 README.md
Открыть файл
Чтобы открыть файл в текущей папке, введите его полное имя с расширением. Например, blog.txt или setup.exe.
Перейти в другую папку — cd
Команда cd без аргументов выводит название текущей папки.
Перейти в папку внутри текущего каталога:
C:\content-server>cd assets
C:\content-server\assets>
Перейти на одну папку вверх:
C:\content-server\assets>cd ..
C:\content-server>
Перейти в папку на другом диске:
c:\content-server>cd /d d:/
d:\>
Чтобы просто изменить диск, введите c: или d:.
Создать папку — mkdir или md
Создаём пустую папку code внутри папки html:
d:\html>mkdir coded:\html>dir

 Содержимое папки d:\html

03.11.2020  19:23    <DIR>           .
03.11.2020  19:23    <DIR>           ..
03.11.2020  19:25    <DIR>           code
               0 файлов              0 байт
               3 папок  253 389 438 976 байт свободно
Создаём несколько пустых вложенных папок — для этого записываем их через косую черту:
d:\html>mkdir css\js
d:\html>dir
 Том в устройстве D имеет метку DATA
 Серийный номер тома: 0000-0000

 Содержимое папки d:\html

03.11.2020  19:23    <DIR>           .
03.11.2020  19:23    <DIR>           ..
03.11.2020  19:25    <DIR>           code
03.11.2020  19:29    <DIR>           css
Создаётся папка css, внутри которой находится папка js. Чтобы проверить это, используем команду tree. Она показывает дерево папок.
Удалить папку — rmdir или rd
Чтобы удалить конкретную папку в текущей, введите команду rmdir:
d:\html\css>rmdir js
При этом удалить можно только пустую папку. Если попытаться удалить папку, в которой что-то есть, увидим ошибку:
d:\html\css>d:\html>rmdir css
Папка не пуста.
Чтобы удалить дерево папок, используйте ключ /s. Тогда командная строка запросит подтверждение перед тем, как удалить всё.
d:\html>rmdir css /s
css, вы уверены [Y(да)/N(нет)]? y
Показать дерево папок — tree
В любом момент мы можем увидеть структуру папок. Для этого используется команда tree.
d:\html>tree
Структура папок тома DATA
Серийный номер тома: 0000-0000
D:.
├───code
└───css
    └───js
Если вы хотите посмотреть содержимое всего диска, введите tree в корне нужного диска. Получится красивая анимация, а если файлов много, то ещё и немного медитативная.
Удаление файла — del или erase
Команда для удаления одного или нескольких файлов.
d:\html>del blog.txt
Переименование файла — ren или rename
Последовательно вводим ren, старое и новое имя файла.
d:\html>dir
 Содержимое папки d:\html

03.11.2020  19:23    <DIR>            .
03.11.2020  19:23    <DIR>            ..
03.11.2020  19:59                 0 blag.txt

d:\html>ren blag.txt blog.txt

d:\html>dir
 Содержимое папки d:\html

03.11.2020  19:23    <DIR>            .
03.11.2020  19:23    <DIR>            ..
03.11.2020  19:59                 0 blog.txt
Команды одной строкой
Очистить консоль — cls.
Информация о системе — systeminfo.
d:\html>systeminfo

Имя узла:                         DESKTOP-6MHURG5
Название ОС:                      Майкрософт Windows 10 Pro
Версия ОС:                        10.0.20246 Н/Д построение 20246
Изготовитель ОС:                  Microsoft Corporation
Параметры ОС:                     Изолированная рабочая станция
Сборка ОС:                        Multiprocessor Free
Информация о сетевых настройках — ipconfig.
d:\html>ipconfig
Настройка протокола IP для Windows
Адаптер Ethernet Ethernet 2:

   Состояние среды. . . . . . . . : Среда передачи недоступна.
   DNS-суффикс подключения . . . . . :
Список запущенных процессов — tasklist.
c:\>tasklist

Имя образа                     PID Имя сессии          № сеанса       Память
========================= ======== ================ =========== ============
System Idle Process              0 Services                   0         8 КБ
System                           4 Services                   0     2 688 КБ
Secure System                   72 Services                   0    23 332 КБ
…
Справка по командам — help
Команда help без аргументов выводит список всех возможных команд. help вместе с именем команды выведет справку по этой команде.
d:\html>help tree
Графическое представление структуры папок или пути.

TREE [диск:][путь] [/F] [/A]

   /F   Вывод имён файлов в каждой папке.
   /A   Использовать символы ASCII вместо символов национальных алфавитов.
В этой статье приведены не все команды и не все их возможности, но вы всегда можете воспользоваться командой help и узнать о том, что ещё может командная строка.
👉🏻 Больше статей о фронтенде и работе в айти в телеграм-канале.
Подписаться
Материалы по теме
- 10 горячих клавиш VS Code, которые ускорят вашу работу
- Полезные команды для работы с Git
- Полезные команды для работы с Node. js
«Доктайп» — журнал о фронтенде. Читайте, слушайте и учитесь с нами.
ТелеграмПодкастБесплатные учебники