
We usually use a compiler with a graphical user interface to compile our C program. This can also be done by using cmd. The command prompt has a set of steps we need to perform in order to execute our program without using a GUI compiler. In this article, we will understand how to compile and Run a C program in the command prompt.
So let us get with this article on how to compile C progam in command prompt,
How to Compile and Run C Program in Command Prompt?
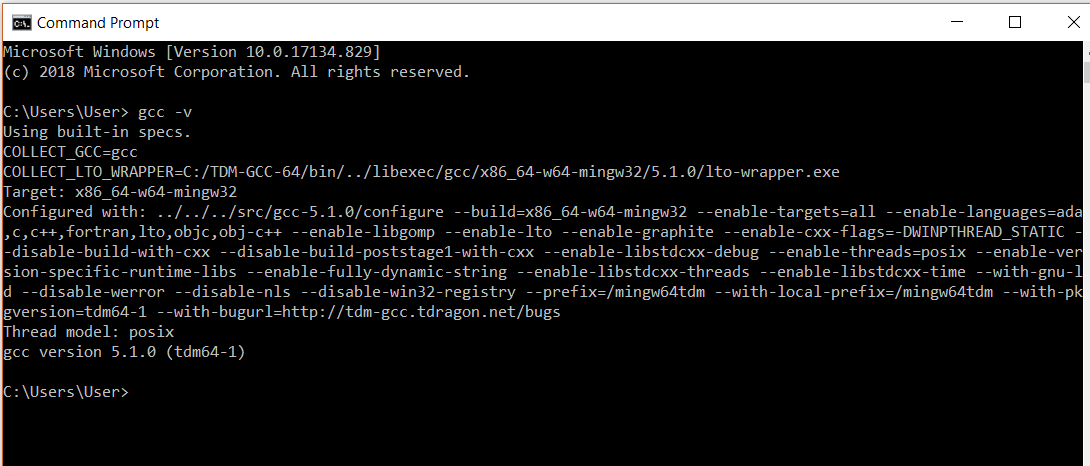
STEP 1: Check for Compiler
Run the command ‘gcc -v’ to check if you have a compiler installed. If not you need to download a gcc compiler and install it. You can search for cmd in your windows system to open the command prompt.
STEP 2: Create the Program
Create a c program and store it in your system. I have written a program to find the Armstrong Number and store it in the directory user. We would be using following code.
#include <stdio.h>
int main()
{
int num, original, rem, sum = 0;
printf("Enter a three digit Number: ");
scanf("%d", &num);
original = num;
while (original != 0)
{
rem = original%10;
sum =sum + rem*rem*rem;
original =original/ 10;
}
if(sum == num)
printf("%d is an Armstrong number.",num);
else
printf("%d is not an Armstrong number.",num);
return 0;
}
STEP 3: Change the Directory
Change the working directory to where you have your C program. You can do that by using the command ‘cd’, which changes the directory. We need to pass the name of the directory in which the program is stored.
Example: >cd Desktop
Our program is already in the user directory so, we don’t need to change it.
STEP 4: Compile the program
The next step is to compile the program. To do this we need to use the command gcc followed by the name of the program we are going to execute. In our case, we will use Armstrong.c.
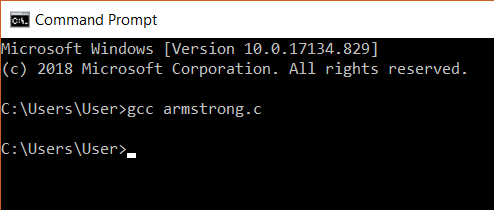
After this, an executable file will be created in the directory that your c file exists in. Eg: Armstrong.exe
STEP 5: Run the Program
In the next step, we can run the program. This is done by simply giving the name of the executable file without any extension. On giving this we will get an output. Here, our Armstrong code is executed and we got output for this code.

But What Happens Inside the Compilation Process?
The term “compile” refers to the procedure by which C language source code is translated into machine code. C is a middle-level programming language, so we need a compiler to turn it into machine code before we can run it.
During the compilation process, the C program goes through the following steps:
How to Run C program in Terminal?
If running a C program in a terminal is what you want to do, Here’s what you should do:
- Write Your C Program: You need to prepare a file containing your C code, hello.c for example.
- Open Terminal: Launch the terminal program you are using (Terminal as an example on macOS or Linux and Command Prompt and Powershell on Windows or Cygwin or WSL if you are using Windows).
- Go to the Program Folder: To do this, type cd followed by the path leading to the folder containing your C file i.e. cd path/to/your/folder.
- You can convert the C Program to a Runnable File: Transform your code so that it becomes executable by using programs such as gcc. To change hello.c into a program called hello, type gcc -o hello hello.c This means that one can also replace it with clang as follows: clang -o hello hello.c.
- Start Running It: Once it is in a state whereby it can be executed, you may commence running this system. If using Linux or macOS, type ./hello to execute doing so.
To compile and run your C program from the terminal without any problems, simply type hello.exe on a regular command prompt in a Windows environment or in a unix-like one, use the command ./hello.exe.
Here you find lots of online compilers and integrated development environments; these are the best.
1. Replit
Go to replit.com
Start a new Repl and choose the language, C.
Write your code and just click the Run button.
2. OnlineGDB
Go to onlinegdb.com
Write your C code in the editor.
Click Run – to compile and execute the code.
3. JDoodle
Go to jdoodle.com
Choose language C, input your code and click the Execute button.
4. Compiler Explorer
Go to godbolt.com.
Select C and write your code below. This site primarily displays assembly output, but you are able to run code –
go through the exercise
5. TutorialsPoint
Open your browser to tutorialspoint.com
Write your C code below and use the “Compile & Execute” button
Practice the Steps
Open your browser to the site you selected
Set your language to programming C
Write below or copy and past your C code here
Ensure that the compile and run button is pressed to compile and run your program
These sites allow you to practice C code without having to make a whole local configuration of your own.
To execute a program in Command Prompt (CMD) of Windows:
1. Open cmd. Press Windows + R, type in cmd, and hit Enter.
2. Open a Program Directory. You can use the following cd command to navigate to the folder where the program meant to run is. For example:
cd C:pathtoyourprogram
(executable) or programmable scripts then you can just type name of your script and press Enter
program.exe
4. Script or Batch File
execute here you may have a script (eg. .bat or .py file) that also needs invoked this way
execute a batch file here:
script.bat
execute a python script file:
python script.py
Example
Goto directory:
cd C:UsersYourNameDocuments
Now execute the program:
myprogram.exe
More Help
To list contents of a directory use dir
To launch a program with administrator privilege, right-click the CMD icon and select Run as administrator
And that’s all there is to it! You’ve just executed a program via the Command Prompt.
To execute a program in Command Prompt (CMD) of Windows:
1. Open cmd. Press Windows + R, type in cmd, and hit Enter.
2. Open a Program Directory. You can use the following cd command to navigate to the folder where the program meant to run is. For example:
cd C:pathtoyourprogram
(executable) or programmable scripts then you can just type name of your script and press Enter
program.exe
4. Script or Batch File
execute here you may have a script (eg. .bat or .py file) that also needs invoked this way
execute a batch file here:
script.bat
execute a python script file:
python script.py
Example
Goto directory:
cd C:UsersYourNameDocuments
Now execute the program:
myprogram.exe
More Help
To list contents of a directory use dir
To launch a program with administrator privilege, right-click the CMD icon and select Run as administrator
And that’s all there is to it! You’ve just executed a program via the Command Prompt!.
1. Write Your C Program
Create a text file with a text editor.
For example with nano:
nano myprogram.c
2. Compile the C Program
Compile your program using gcc:
gcc myprogram.c -o my program
3. Run the Executable
Run your compiled program using:
./myprogram
Example Steps
Create a text file:
#include <stdio.h>
int main() {
printf(“Hello, World!
“);
return 0;
}
Save this file as hello.c.
Compile:
gcc hello.c -o hello
Run.
Here is how you run your C program inside an Ubuntu Terminal shell.
Compile: gcc filename.c -o outputname
Run: ./outputname.
1. Write Your C++ Program
Create a file with a .cpp extension of you favorite
text editor, for example:
nano myprogram.cpp
2 Compile the C++ Program
Then compile the C++ source file some file.cpp using
g++ GNU C++ Compiler:
g++ myprogram.cpp -o myprogram
3 Run the Executable
Execute your compile program with:
./myprogram
Detailed Example
Let’s create a simple C++ source file:
#include <iostream>
int main() {
std::cout << “Hello, World!” << std::endl;
return 0;
}
Save this
Edit: Create new file with .cpp as extension
Compile: g++ filename.cpp -o outputname
Run: ./outputname
Doesn’t it look kind of easy to edit, compile, and run C++ code in Linux with just a little help from these steps?
FAQs
1.How do I compile the c program in terminal?
you can use the gcc command followed by the name of your source file. For instance, let’s consider a file named myprogram.c which needs to be compiled using gcc command as shown below: gcc myprogram.c -o myprogram. In plain terms, gcc is an acronym for GNU Compiler Collection whose work encompasses translating C code into assembly and finally binary code that computer hardware can execute properly under Unix-like operating systems. If these terms seem strange then consider this; “myprogram.c” stands for your source file or rather what contains the instructions/syntaxes together with “-o myprogram” denoting the output file name where myprogram will be an ultimate “executable” binary file.
2. How do I execute a C code in Linux online?
Repl.it, JDoodle and others are the examples of online platforms where someone may access a Linux runtime environment in order to compile and run C programs.
3. What happens when my C program takes advantage of libraries using <math.h>?
If you utilize standard libraries as <math.h> your C program will not require any special flags for compilation.If you include it right at the beginning through(#include <math.h>). Compiling is typically the same:gcc myprogram.c -o myprogram.
4. Is it possible to compile and run a C program without saving it as a file?
No, you have to save the C program as a .c file first so that you may compile and run it. The name of the file must be specified so that the source code for the C programming language can be read and processed.
With this we come to the end of this blog on ‘How To Compile C program in Command Prompt’. I hope you found this informative and helpful, stay tuned for more tutorials on similar topics.You may also checkout our training program to get in-depth knowledge on jQuery along with its various applications, you can enroll here for live online training with 24/7 support and lifetime access.
Got a question for us? Mention them in the comments section of this blog and we will get back to you.
Последнее обновление: 01.01.2023
Установка компилятора
Рассмотрим создание первой простейшей программы на языке Си с помощью компилятора GCC, который на сегодняшний день является одим из
наиболее популярных компиляторов для Cи и который доступен для разных платформ. Более подобному информацию о GCC можно получить на официальном сайте проекта https://gcc.gnu.org/.
Набор компиляторов GCC распространяется в различных версиях. Для Windows одной из наиболее популярных версий является пакет средств для разработки от
некоммерческого проекта MSYS2. Следует отметить, что для MSYS2 требуется 64-битная версия Windows 7 и выше (то есть Vista, XP и более ранние версии не подходят)
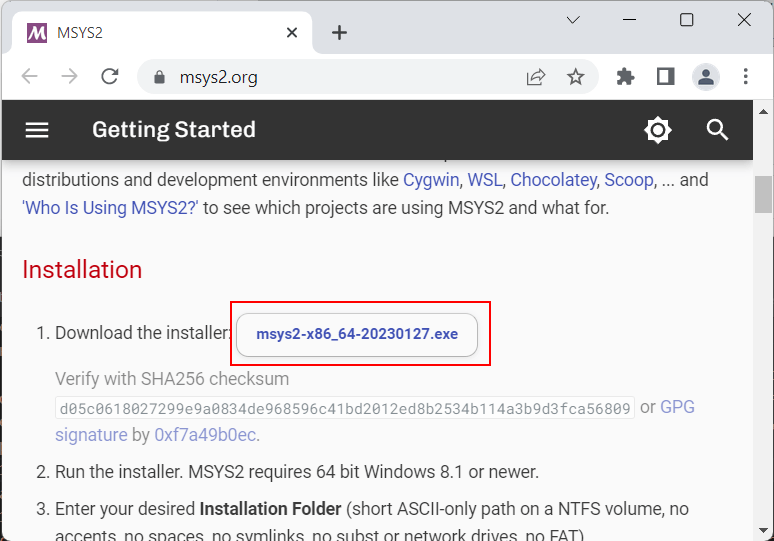
Итак, загрузим программу установки MSYS2 с официального сайта MSYS2:
После загрузки запустим программу установки:
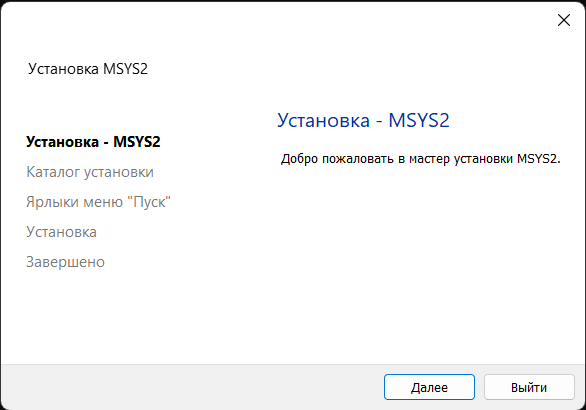
На первом шаге установки будет предложено установить каталог для установки. По умолчанию это каталог C:\msys64:
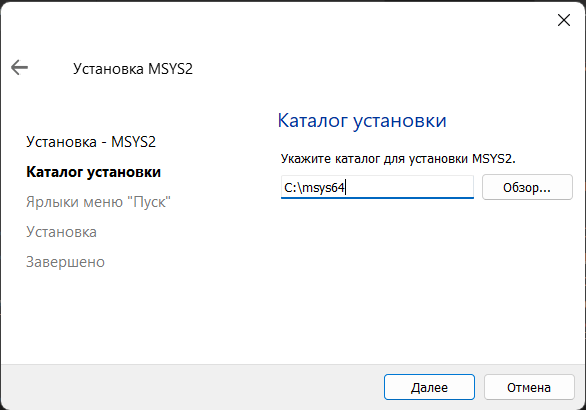
Оставим каталог установки по умолчанию (при желании можно изменить). На следующем шаге устанавливаются настройки для ярлыка для меню Пуск, и затем собственно будет произведена установка.
После завершения установки нам отобразить финальное окно, в котором нажмем на кнопку Завершить
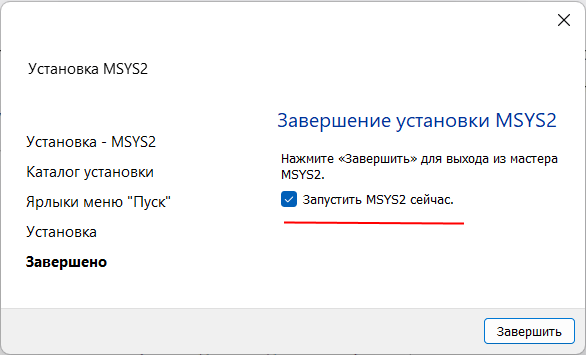
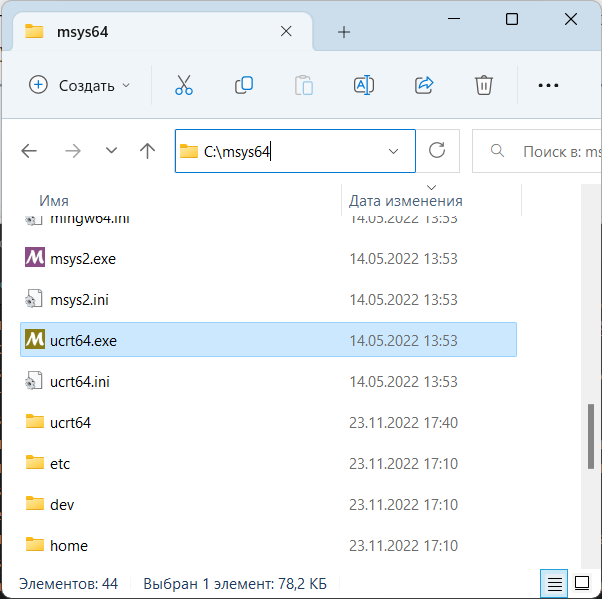
После завершения установки запустится консольное приложение MSYS2.exe. Если по каким-то причинам оно не запустилось,
то в папке установки C:/msys64 надо найти файл usrt_64.exe:
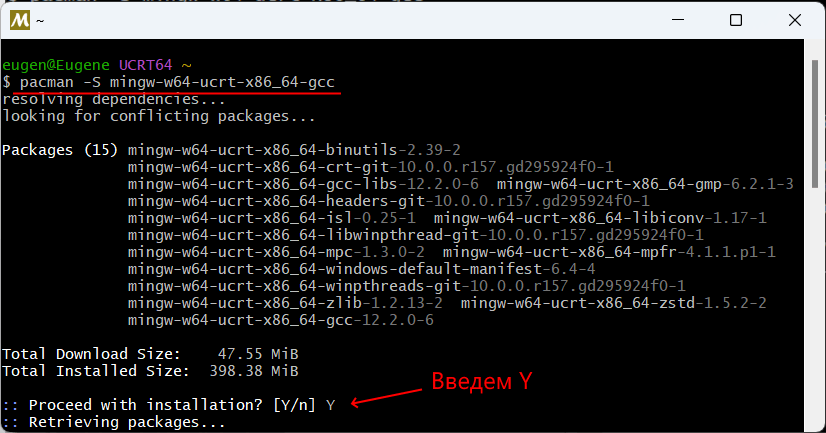
Теперь нам надо установить собственно набор компиляторов GCC. Для этого введем в этом приложении следующую команду:
pacman -S mingw-w64-ucrt-x86_64-gcc
Для управления пакетами MSYS2 использует пакетный менеджер Packman. И данная команда говорит пакетному менелжеру packman установить пакет mingw-w64-ucrt-x86_64-gcc,
который представляет набор компиляторов GCC (название устанавливаемого пакета указывается после параметра -S).
и после завершения установки мы можем приступать к программированию на языке Си. Если мы откроем каталог установки и зайдем в нем в папку C:\msys64\ucrt64\bin,
то найдем там все необходимые файлы компиляторов:
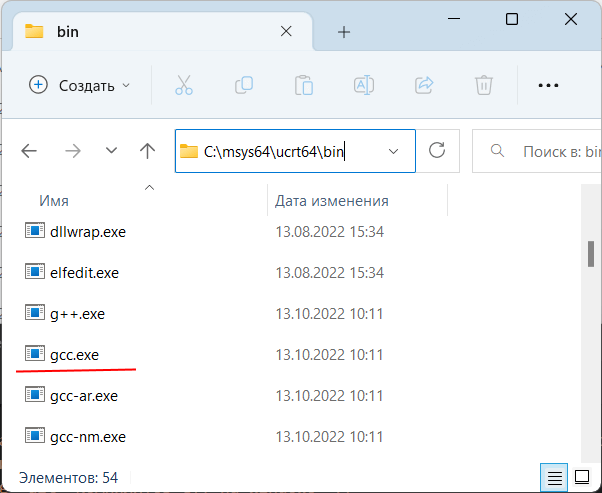
В частности, файл gcc.exe как раз и будет представлять компилятор для языка Си.
Далее для упрощения запуска компилятора мы можем добавить путь к нему в Переменные среды. Для этого можно в окне поиска в Windows ввести «изменение переменных среды текущего пользователя»:
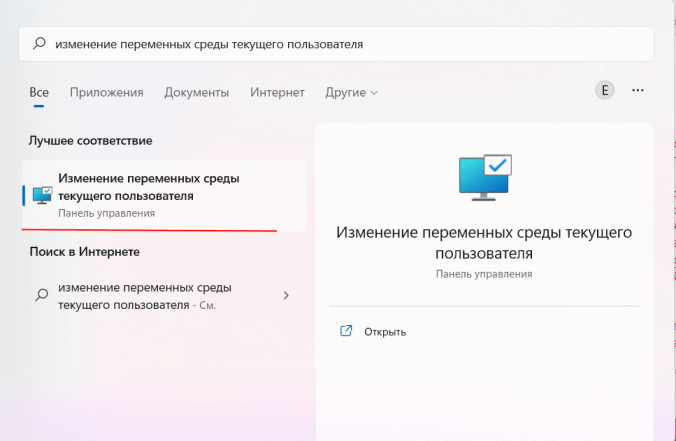
Нам откроется окно Переменныех среды:
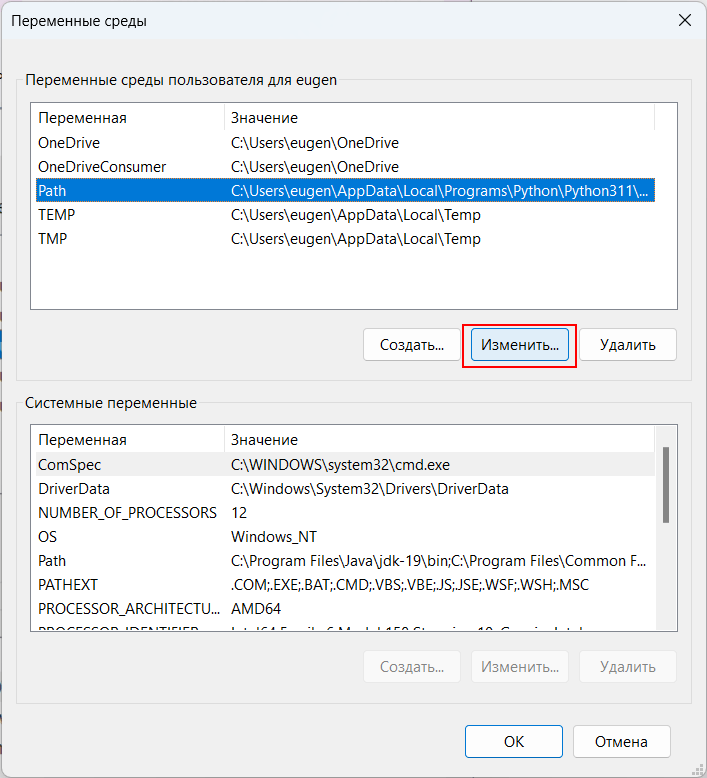
И добавим путь к компилятору C:\msys64\ucrt64\bin:

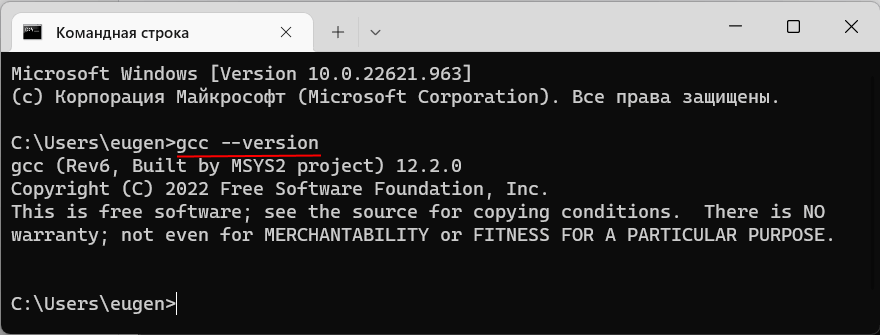
Чтобы убедиться, что набор компиляторов GCC успешно установлен, введем следующую команду:
В этом случае нам должна отобразиться версия компиляторов
Создание первой программы
Итак, компилятор установлен, и теперь мы можем написать первую программу. Для этого потребуется любой текстовый редактор для набора исходного кода.
Можно взять распространенный редактор Visual Studio Code или даже обычный встроенный Блокнот.
Итак, создадим на жестком диске папку для исходных файлов. А в этой папке создадим новый файл, который назовем hello.c.
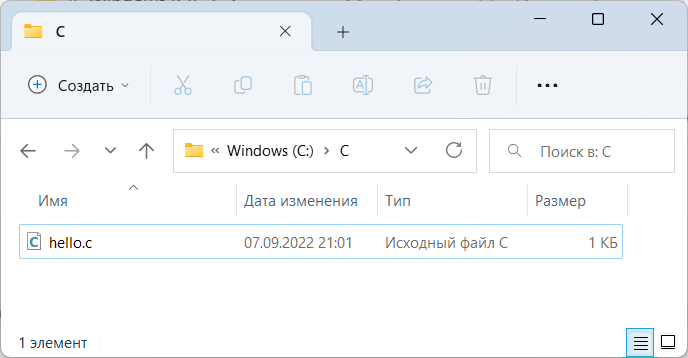
В моем случае файл hello.c находится в папке C:\c.
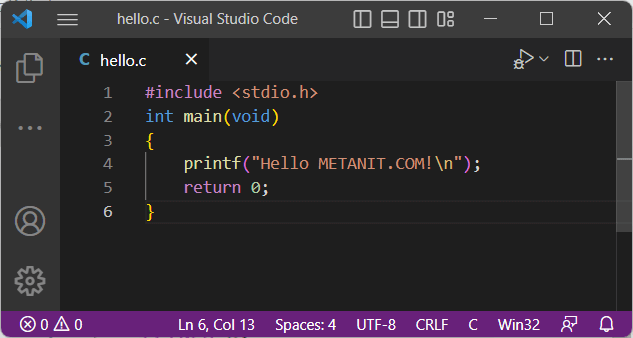
Теперь определим в файле hello.c простейший код, который будет выводить строку на консоль:
#include <stdio.h>			// подключаем заголовочный файл stdio.h
int main(void)						// определяем функцию main
{									// начало функции
	printf("Hello METANIT.COM!\n");	// выводим строку на консоль
	return 0;						// выходим из функции
}									// конец функции
Для вывода строки на консоль необходимо подключить нужный функционал. Для этого в начале файла идет строка
#include <stdio.h>
Директива include подключает заголовочный файл stdio.h, который содержит определение функции printf, которая нужна для вывода строки на консоль.
Далее идет определение функции int main(void). Функция main должна присутствовать в любой программе на Си, с нее собственно и начинается
выполнение приложения.
Ключевое слово int в определении функции int main(void) говорит о том, что функция возвращает целое число.
А слово void в скобках указывает, что функция не принимает параметров.
Тело функции main заключено в фигурные скобки {}. В теле функции происходит вывод строки на консоль с помощью функции printf, в которую передается выводимая строка «Hello METANIT.COM!».
В конце осуществляем выход из функции с помощью оператора return. Так как функция должна возвращать целое число, то после return указывается число 0.
Ноль используется в качестве индикатора успешного завершения программы.
После каждого действия в функции ставятся точка с запятой.
Теперь скомпилируем этот файл. Для этого откроем командную строку Windows и вначале с помощью команды cd перейдем к папке с исходным файлом:
Чтобы скомпилировать исходный код, необходимо компилятору gcc передать в качестве параметра файл hello.c:
После этого будет скомпилирован исполняемый файл, который в Windows по умолчанию называется a.exe. И мы можем обратиться к этому файлу
и в этом случае консоль выведет строку «Hello METANIT.COM!», собственно как и прописано в коде.
Стоит отметить, что мы можем переопределить имя компилируемого файла с помощью флага -o и передав ему имя файла, в который будет компилироваться программа.
Например:
В этом случае программа будет компилироваться в файл hello.exe, который мы также запустить.
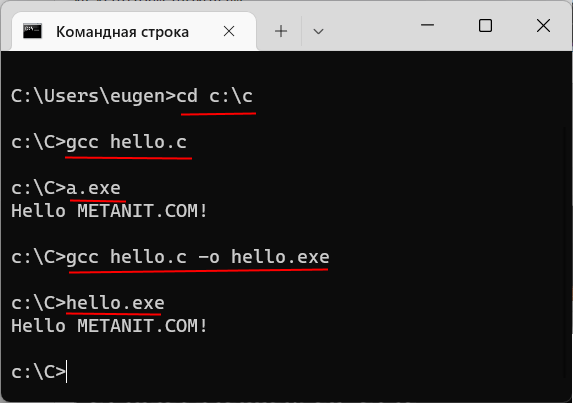
Чтобы не приходилось вводить две команды: одну для компиляции программы и другую для ее запуска, мы можем объединить команды:
gcc hello.c -o hello.exe & hello
Эта команда сначала компилирует код в файл hello.exe, а потом сразу запускает его.
Окружение: операционная система «Windows 10».
Ранее я написал ряд постов, посвященных изучению языка программирования C++ по учебнику Роберта Лафоре. В тех статьях я разбирал примеры и упражнения и выполнял их в интегрированной среде разработки (IDE), в качестве которой использовал «Microsoft Visual Studio». В то время я использовал бесплатную версию этой среды «Visual Studio Community 2017», а сейчас использую «Visual Studio Community 2022» (версия 17.5.3 от 21 марта, самая свежая на сегодня).
Начинающим изучать язык программирования C++ вполне себе можно стартовать с установки этой среды и работе в ней. (Следует иметь в виду, что у среды «Microsoft Visual Studio» есть ряд отличных альтернатив, я вовсе не хочу сказать, что изучение языка C++ в среде «Microsoft Visual Studio» — это единственный путь для начинающего.) У этой среды есть как свои достоинства, так и свои недостатки. Самый большой ее недостаток, на мой взгляд, в том, что она очень большая и неповоротливая, требует достаточно мощного компьютера. При этом бо́льшая часть инструментов этой среды начинающими не используется.
Одной из хороших альтернатив работе в интегрированной среде разработки для начинающего является работа с компилятором языка C++ из командной строки. Этот способ подходит тем, у кого слабый компьютер, который не тянет работу с большой IDE вроде «Microsoft Visual Studio». Бывают и другие причины для выбора работы из командной строки. (В принципе, на мой взгляд, начинающему изучать язык программирования C++ имеет смысл поработать и в IDE, и научиться работать из командной строки.)
Так же, как в случае работы в интегрированной среде разработки, для работы с кодом программ на языке C++ из командной строки есть ряд альтернатив, но в этом посте я буду описывать работу с компилятором «Microsoft Visual C++», который больше известен под аббревиатурой «MSVC».
Microsoft C++ Build Tools
Для работы из командной строки компания «Microsoft» предлагает набор инструментов (программ и скриптов) для сборки (Build Tools), который называется «Microsoft C++ Build Tools» (он же «Visual Studio Build Tools» или «Build Tools for Visual Studio» и тому подобное). Этот набор инструментов включает в том числе упомянутый выше компилятор «MSVC» и другие нужные для сборки кода на языке C++ инструменты.
В общем, набор инструментов «Microsoft C++ Build Tools» можно загрузить отдельно, либо его же можно загрузить в составе дистрибутива среды «Microsoft Visual Studio», если при установке этой среды выбрать рабочую нагрузку (workload), предназначенную для работы с кодом на языке C++ (например, «Desktop development with C++» или что-то вроде этого, название может слегка отличаться или быть на другом языке общения). Это значит, что в командной строке вы получаете те же самые инструменты, которые использует интегрированная среда разработки.
Набор инструментов «Microsoft C++ Build Tools» вы тоже можете использовать бесплатно (как и версию «Community» среды «Microsoft Visual Studio»), но там есть ограничения. Насколько я понимаю, для обучения и разработки программ с открытым исходным кодом этот набор инструментов точно можно использовать бесплатно (тут подробнее). Вот откуда можно загрузить к себе на компьютер этот набор инструментов для использования без IDE:
https://visualstudio.microsoft.com/visual-cpp-build-tools/
https://visualstudio.microsoft.com/downloads/?q=build+tools
У меня, как я упомянул в начале поста, установлена среда «Visual Studio Community 2022» с рабочей нагрузкой, предназначенной для работы с кодом на языке C++. Поэтому в моем случае нет необходимости устанавливать набор инструментов «Microsoft C++ Build Tools» отдельно. Я уже и так имею возможность работать с компилятором «MSVC» как из IDE, так и из командной строки.
Порядок запуска компилятора «MSVC» из командной строки
Компания «Microsoft» не рекомендует запускать инструменты из набора «Microsoft C++ Build Tools» из обычной программы-оболочки с командной строкой, как мы привыкли, так как для этого набора инструментов задействуется много разных переменных среды, которые должны быть правильно настроены. По крайней мере, начинающим этого точно делать не сто́ит.
Для запуска набора инструментов «Microsoft C++ Build Tools» предлагается использовать предварительно настроенные нужным образом версии программ-оболочек, которые можно запустить из меню кнопки «Пуск» операционной системы «Windows 10». В этом меню нужные пункты будут присутствовать, если вы установили набор инструментов «Microsoft C++ Build Tools» либо отдельно, либо в составе интегрированной среды разработки «Microsoft Visual Studio».
У меня в меню кнопки «Пуск» операционной системы присутствуют два подходящих пункта-ярлыка. Их можно быстро найти, набрав в поиске операционной системы (кнопка с увеличительным стеклом рядом с кнопкой «Пуск» на панели задач) слово «developer»:
– Developer Command Prompt for VS 2022
– Developer PowerShell for VS 2022
Первый из них использует программу-оболочку «cmd.exe», а второй — программу-оболочку «Windows PowerShell». Можно запустить любой из этих ярлыков и далее уже работать в открывшейся программе-оболочке, там всё будет настроено так, как следует.
Оба эти ярлыка в качестве хоста используют программу-«эмулятор терминала» «Windows Console», так как я работаю в операционной системе «Windows 10». Но мне уже полюбилась программа-«эмулятор терминала» «Windows Terminal» (предполагается, что «Windows Terminal» заменит «Windows Console» в операционной системе «Windows 11», но у меня нет доступа к «Windows 11», поэтому я не знаю, как оно там), поэтому я предпочитаю запустить ее и открыть программу-оболочку «Developer PowerShell for VS 2022» уже из нее. (У меня, кстати, есть ряд постов про программу-«эмулятор терминала» «Windows Terminal».)
К слову, программу «Windows Terminal» можно загрузить к себе на компьютер бесплатно и она «увидит» все имеющиеся на компьютере программы-оболочки, после чего любую из них можно будет запустить из программы «Windows Terminal».
На практике
Создаю новую папку «test» в местоположении «C:\Users\Илья\source\repos» с помощью программы «Проводник Windows». В принципе, отдельную папку можно не создавать, но я привык для каждой новой задачи (проекта) создавать новую папку, это удобно и это популярный метод работы. Также отмечу, что папку можно создать в любом месте, но я работаю с кодом программ в указанном выше местоположении, мне так удобно.
Перехожу в программе «Проводник Windows» в созданную папку «test» в местоположении «C:\Users\Илья\source\repos». С помощью редактора кода (я использую «Notepad++» или «VS Code», они оба хороши для небольших программ) создаю текстовый файл «first.cpp» в кодировке UTF-8 с сигнатурой (она же — метка BOM). (К сожалению, компилятор «MSVC» принимает файлы в кодировке UTF-8 только с меткой BOM, тут про это подробнее.) Сохраняю в этом файле следующий код (из учебника Лафоре, с добавленными мною измененениями):
#include <io.h>      // для функции _setmode
#include <fcntl.h>   // для константы _O_U16TEXT
#include <iostream>
using namespace std;

int main()
{
    // переключение стандартного потока вывода в формат Юникода
    _setmode(_fileno(stdout), _O_U16TEXT);

    wcout << L"У каждой эпохи свой язык\n";
    return 0;
}
Из контекстного меню (открывается щелчком правой кнопки мыши) запускаю программу-«эмулятор терминала» «Windows Terminal» и создаю в ней новую вкладку с нужной программой-оболочкой:

Как видно на иллюстрации выше, список доступных программ-оболочек можно открыть, нажав на кнопку со значком уголка, направленного вниз, или нажав соответствующее сочетание клавиш на клавиатуре. (При запуске программы «Windows Terminal» автоматически запускается вкладка с программой-оболочкой по умолчанию, у меня это программа-оболочка «PowerShell». Но в данном случае она не нужна и эту первую вкладку можно закрыть.) Вот что получилось:

Далее работаем из командной строки этой программы-оболочки. Сначала предлагается проверить работоспособность компилятора «MSVC». Исполняемый файл этого компилятора называется «cl.exe», поэтому для его запуска нужно использовать команду «cl»:
PS C:\Users\Илья\source\repos\test> cl
Оптимизирующий компилятор Microsoft (R) C/C++ версии 19.35.32216.1 для x64
(C) Корпорация Майкрософт (Microsoft Corporation).  Все права защищены.

использование: cl [ параметр... ] имя_файла... [ /link параметр_компоновки... ]
Приведенный в блоке кода выше выведенный компилятором текст не содержит сообщений об ошибках, а содержит только информацию о владельце программы и короткую инструкцию по использованию компилятора. Значит, все настройки правильные, можно начинать работу.
Создадим из нашей маленькой программы «first.cpp» исполняемый файл:
PS C:\Users\Илья\source\repos\test> cl /EHsc "first.cpp"
Оптимизирующий компилятор Microsoft (R) C/C++ версии 19.35.32216.1 для x64
(C) Корпорация Майкрософт (Microsoft Corporation).  Все права защищены.

first.cpp
Microsoft (R) Incremental Linker Version 14.35.32216.1
Copyright (C) Microsoft Corporation.  All rights reserved.

/out:first.exe
first.obj
В нашей папке «test» появилось два новых файла: «first.obj» и «first.exe». Как известно, процесс сборки программы из исходного кода в исполняемый файл обычно проходит в два этапа: 1) компиляция (выполняется компилятором); 2) «линковка», она же «компоновка» (выполняется «линкером», он же — «компоновщик»). На первом этапе из исходного кода (у нас — единственный текстовый файл «first.cpp») создается объектный файл (в нашем случае — «first.obj»). На втором этапе из объектного файла создается исполняемый файл.
Как видно из результата работы компилятора выше, он сначала делает свою работу (создает объектный файл «first.obj»), а затем автоматически запускает линковщик, который создает из объектного файла исполняемый файл. В принципе, компилятор можно заставить не запускать линковщик автоматически с помощью ключа /c. Тогда нужно будет запускать линковщик отдельно, вторым этапом, с помощью команды «link» (исполняемый файл линковщика называется «link.exe»). Такой подход бывает нужен в сложных случаях.
Ключ /EHsc определяет модель обработки ошибок, которая должна быть использована при компиляции. Это рекомендуемый ключ для начинающих.
Вообще у компилятора и компоновщика огромное количество разнообразных ключей, с помощью которых можно выполнить бесчисленное количество разных настроек. Вот тут можно посмотреть на все ключи компилятора «MSVC», перечисленные по алфавиту, чтобы иметь представление о масштабах этого кошмара. Рассмотрение этих ключей, или хотя бы самых полезных из них выходит за рамки этого поста.
Размеры полученных файлов:
PS C:\Users\Илья\source\repos\test> dir

    Каталог: C:\Users\Илья\source\repos\test

Mode                 LastWriteTime         Length Name
----                 -------------         ------ ----
-a----        04.04.2023     15:16            423 first.cpp
-a----        04.04.2023     15:52         231424 first.exe
-a----        04.04.2023     15:52         122560 first.obj
Как видно из блока кода, приведенного выше, исполняемый файл «first.exe» получился просто огромного размера, если соотнести размер в 226 Кб с тем, что эта программа делает (всего лишь выводит в окно консоли короткую строку). К примеру, если этот же исходный код в файле «first.cpp» скомпилировать в исполняемый файл в среде «Microsoft Visual Studio», то у меня получился исполняемый файл размером 12 Кб, что почти в 19 раз меньше.
Такая большая разница в размерах исполняемого файла получается из-за того, что среда «Microsoft Visual Studio» использует ключи компилятора, предназначенные для оптимизации размера исполняемого файла. Тема оптимизации — это тема не для начинающих. Кому интересно, можно начать изучение этого вопроса отсюда. На период изучения языка C++ по учебнику на размер исполняемого файла можно не обращать внимания. Но при создании реальных полезных программ вопрос оптимизации придется изучить досконально.
Запуск исполняемого файла на выполнение:
PS C:\Users\Илья\source\repos\test> .\first
У каждой эпохи свой язык
Как видим из блока кода выше, всё в порядке, программа выполнила свою работу, вывела в окно консоли нужную строку на русском языке.
Отмечу, что приведенный выше исходный код в файле «first.cpp» не является кроссплатформенным, но такая задача не ставилась и этот вопрос выходит за рамки данного поста.
Полезная статья, один из главных источников информации для данного поста: «Walkthrough: Compiling a Native C++ Program on the Command Line» (по-русски «Быстрое ознакомление: компиляция программы на C++ в командной строке»).
Download Article
Turn your C files into programs you can run
Download Article
- Installing Visual Studio
- Writing the Program
- Compiling and Running
|
|
If you’ve written or downloaded some C code on your Windows PC, you’ll need to compile the code to turn it into a program you can run. You can easily do so using the developer command prompt for Visual Studio, which is free to download for personal use. The developer command prompt works just like the standard command prompt, but has extra developer commands, such as the ability to compile and run C programs. This wikiHow article teaches you how to compile and run C programs using the developer command line.
Quick Steps
- Download and install Visual Studio Desktop Development with C++
- Write your C program using a text program such as Notepad.
- Save the file as a “.c” file.
- Open the Developer Command Prompt as an administrator.
- Type “cl” followed by the filename of your C program and press Enter.
- Type the executable name and press Enter to run the program.
-

Go to https://visualstudio.microsoft.com/downloads in a web browser. Visual Studio not only contains an IDE that allows you to write and compile C programs, but it also contains a Developer Command Prompt that allows you to compile C programs. The Developer Command Prompt works just like the regular Windows Command Prompt, except it has environment variables that allow you to run commands to compile C programs.
-
If you are just learning how to write a program or using it for personal use, click Free Download below “Community.” This is the free version of Visual Studio. If you are working for a small team, you can click Free Trial below “Professional.” If you work for a large company, you can click Free Trial below “Enterprise.” This will download the Visual Studio installer.
Advertisement
-
You can find it in your downloads folder by default. This will launch the Visual Studio installer. Once the installer launches, it will inform you that you need to set up a few things to configure the installation. Click Continue to proceed.
-
Installing Desktop Development with C++ will install the components needed to write and compile C++ and C programs. You can also install any other languages you are interested in working on (i.e., Python development).[1]
- Depending on what you are interested in working on, you may want to install other C++ development workloads, such as Mobile development with C++, Game development with C++, or WinUI application development.
- Additionally, you can click the Individual Components tab at the top and check individual boxes next to the tools you want to install, such as C++/CLI support.
-
This will begin installing the development workloads you selected. This may take a while.


Advertisement
-
You can use a basic text program such as Notepad to write basic C programs. Notepad comes pre-installed on Windows. You can find Notepad in the Windows Start menu.
- Alternatively, you can use a program such as Notepad++ or an integrated development environment such as Eclipse to write C programs. These programs have tools to assist you with writing code.
-
You can write your entire C program in Notepad. If you have no programming experience, you may want to take some time to learn. You can find plenty of tutorials online with examples of basic C programs.[2]
-
Use the following steps to do so:
- Click File in the menu bar at the top.
- Click Save as in the drop-down menu.
- Select All files next to “Save as type.”
- Enter a filename for the file.
- Add the extension “.c” at the end of the filename.
- Click Save.


Advertisement
-
Visual Studio installs a Developer Command Prompt that works just like CMD, but allows you to execute developer commands. Use the following steps to open the Developer Command Prompt.
- Click the Windows Start button.
- Type developer command prompt
- Right-click Developer Command Prompt for VS.
- Click Run as administrator.
-
You can change directories using the “CD” command. Type cd followed by the path to the location of your C program and press Enter. For example; cd C:\Users\[username]\Documents\C Programs\Hello.
-
For example, cl hello.c. This will compile the program and output an executable (.exe) file.
- You can compile more than one file at a time. To do so, enter each filename after the “cl” command separated by a space. For example, cl file1.c file2.c file3.c
- If you want to change the name of the executable file, type /out: followed by the name you want to give the executable file at the end of the command. For example, cl hello.c /out:helloworld.exe
-
To run the executable file in the command line, simply type the filename of the executable file (i.e., “helloworld.exe”) and press Enter. This will run the executable file.


Advertisement
Ask a Question
200 characters left
Include your email address to get a message when this question is answered.
Submit
Advertisement
Thanks for submitting a tip for review!
About This Article
Thanks to all authors for creating a page that has been read 327,027 times.
Is this article up to date?
Last Updated :
04 Jun, 2024
In C++, the GNU Compiler Collection (GCC) is one of the most popular C/C++ compiler that is used to compile and execute the C and C++ program. In this article, we will learn how to compile a C++ program using GCC.
Compiling a C++ Program Using GCC
The GNU Compiler Collection (GCC) is a versatile tool that can compile C++ programs. To compile a C++ program using GCC, we can follow the below steps :
Step 1: Open the terminal/CMD and navigate to the source code directory.
Use the cd command in the terminal/CMD to navigate to the directory where your C++ program file is located:
cd /path/to/your/directory
Step 2: Compile the C++ Program
To compiler the C++ program use the following command:
g++ -o output_file_name source_file.cpp
where:
- -o output_file_name: defines the name of the output executable file.
- source_file.cpp: is the name of your C++ program file.
Step 3: Run the Compiled Program
Finally, you can run the compiled program from the terminal using the below command:
./output_file_name /// for linux
output_file_name /// for windows
where: output_file_name is the name of the output executable file which was generated in the previous step.
C++ Program Compilation Using GCC
The below example demonstrates the process of compiling a C++ program using GCC:
C++
// C++ Program Compilation Using GCC
#include <iostream>
using namespace std;
int main()
{
    cout << "Hello, Geeks!" << endl;
      cout<< " This is a tutorial on Compiling a C++ program using GCC"<<endl;
    return 0;
}
Output (In the Terminal or Command Prompt)
PS C:\Users\Desktop> g++ -o result test.cpp
PS C:\Users\Desktop> .\result.exe
Hello, Geeks
This is a tutorial on Compiling a C++ program using GCC
Explanation: In the above example, we have defined a simple c++ program file that prints something on the console. We have compiled the program using the GCC. The name of the source file is set to test.cpp and the name of the output file is set to result.exe. At last, ./result.exe command is executed to run the compiled program.
To run the C++ program, the GCC should be installed in your computer. To know how to install it, refer to the below articles:
- How to Install GCC Compiler on Linux?
- Installing MinGW Tools for C/C++ and Changing Environment Variable