
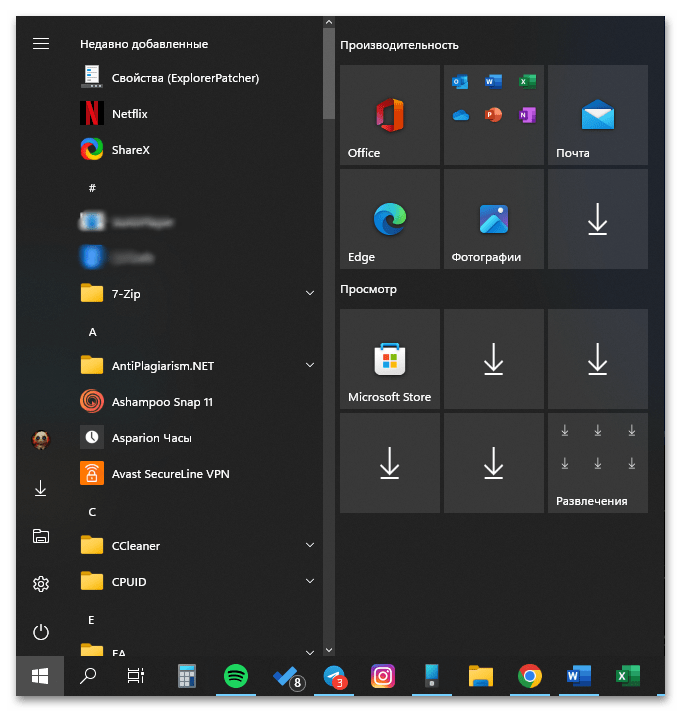
Windows 11 comes with a whole new set of features and improvements. One of the most talked about changes is the redesigned taskbar, which allows for more customization than ever before.
If you’re not happy with the default settings, don’t worry – there are some software options available to help you customize your taskbar just the way you want it.
To fix various Windows 10/11 problems, we recommend Outbyte PC Repair:
This software will repair common computer errors, protect you from file loss, malware damage, hardware failure, and optimise your computer for peak performance. In three simple steps, you can resolve PC issues and remove virus damage:
- Download Outbyte PC Repair Software
- Click Start Scan to detect Windows 10/11 issues that may be causing PC issues.
- Click Repair All to fix issues with your computer’s security and performance.
This month, Outbyte has been downloaded by 23,167 readers.
In this blog post, we will take a look at the best Windows 11 taskbar customization software options currently available.
#1. Ashampoo Taskbar Customizer

Ashampoo Taskbar Customizer is a great choice for those who are looking for an easy-to-use solution. It allows you to quickly and easily customize your taskbar in Windows 11. You can move icons, change their size, add more dividers, and much more. The program also offers some advanced options, such as customizing the context menu or creating your own keyboard shortcuts.
With ATC, you can modify the taskbar color and adjust the transparency as well, creating a more visually appealing experience.
#2. 7+ Taskbar Tweaker

7+ Taskbar Tweaker is a robust and powerful program that allows you to control nearly every aspect of your taskbar.
You can customize it any way you want, including changing the position of icons, organizing them into groups, and adding more dividers. The program also offers many advanced options, such as creating custom jump lists or setting up shortcuts.
With 7+ Taskbar Tweaker, there will be an option to lessen the extra space between anchored items and icons. Additionally, we may override the default behavior to define what should happen when double-clicking on a specific bar shortcut.
7+ Taskbar Tweaker is a great choice for people who want to customize their taskbar in more detail.
#3. TaskbarXI

TaskbarXI is a lightweight and simple taskbar customization tool developed by an independent developer Chris Andriessen. It allows you to convert your Windows 11 taskbar into a dock, pretty similar to macOS. It also gives you control over the position of your taskbar icons. You will be given the option to choose between a variety of different animations and change their speeds. The animations can be disabled if you don’t like animations and want them to move in an instant.
TaskbarXI is available on Microsoft Store, but it is not free to download. You can get it at a minimal price of $1.39.
#4. Start11

Start11 is an amazing Windows Start menu and taskbar customization tool developed by the Stardock software company. This amazing tool lets you customize your Windows 11 start menu and taskbar to provide it with a personal touch. The Start Menu in Windows 11 is undoubtedly one of the most significant changes, but if you don’t like it and are habitual of using the Windows 10 Start Menu, the Star11 will let you get back to the old Windows 10 Start menu on your Windows 11 system.
Along with that, it also comes with an amazing set of options to customize the taskbar. On Windows 11, there is no option to reposition your taskbar like in Windows 10. However, with Start11, you can move your taskbar to the top, left, or right.
The application is not available on Microsoft Store, but you can download it for free on Stardock’s official website.
#5. TranslucentTB

TranslucentTB is a lightweight program that offers an elegant way to customize the taskbar in Windows 11. The program has an intuitive user interface and allows you to easily change the transparency, color, size, and position of your taskbar.
The Windows 11 taskbar may be customized using this small, lightweight, and simple-to-use tool to give it a more attractive appearance by making it translucent and transparent. It consumes extremely few system resources, making it compatible with older or less powerful systems.
Conclusion
Windows 11 taskbar customizations can make your computer more attractive and easier to use. By utilizing any of these top Windows 11 taskbar customization software, you can easily customize the look and feel of your PC to make it more appealing while improving its productivity.
With the right software, you can customize your taskbar with just a few clicks. The programs listed here are some of the best Windows 11 taskbar customization software options currently available – each one offering its own unique features and advantages. Choose the one that fits your needs best, and start customizing your taskbar today!
What is the best Windows 11 taskbar customization software?
All of the programs listed here are excellent options for customizing your Windows 11 taskbar. It’s important to choose one that fits your needs and preferences, as each has its own unique features and advantages.
Is it safe to use a taskbar customization program?
Yes, it is safe to use a taskbar customization program. All of the programs listed here are reliable and secure, so you can feel confident about using them.
Can I customize my Windows 11 taskbar without using the software?
Yes, it is possible to customize your Windows 11 taskbar without using the software. You can use the built-in options in the Settings app to make changes to your taskbar – although some of the more advanced features may require a third-party program.
Peter is an Electrical Engineer whose primary interest is tinkering with his computer. He is passionate about Windows 10 Platform and enjoys writing tips and tutorials about it.
The Windows 11 taskbar styling guide
Table of contents
- Introduction
- Finding targets
- Missing customizations
- Contributing
- Themes
- General
- Taskbar size
- Taskbar background
- Taskbar border
- Task list
- Start button image
- Hide the start button
- Task list buttons size
- Task list buttons corner radius
- Task list labels
- Task list labels font
- Task list running indicator
- Notification area (system tray)
- Tray icons size
- Tray icons size (system icons)
- Tray icons spacing
- Tray icons padding
- Tray icons padding (system icons)
- Hide the network icon
- Hide the volume icon
- Chevron icon width
- Clock
- Hide the notification bell icon
- Copilot button image
- Hide the «Show Desktop» button
- Transforms
- Translate
- Rotate
- Scale
- Skew
- Other properties
- Colors
- Solid color
- Accent colors
- Transparent color
- Acrylic effect as color
- WindhawkBlur effect as color
- Mica effect as color
- Gradient as color
- Image as color
Introduction
This is a collection of commonly requested taskbar styling customizations for
Windows 11. It is intended to be used with the Windows 11 Taskbar
Styler Windhawk mod.
If you’re not familiar with Windhawk, here are the steps for installing the mod:
- Download Windhawk from windhawk.net and install it.
- Go to «Mods» in the upper right menu.
- Find and install the «Windows 11 Taskbar Styler» mod.
After installing the mod, open its Settings tab and adjust the styles according
to your preferences.
Some customizations are best to be adjusted with other Windhawk mods. Links to
those mods are provided where applicable.
See also: The Windows 11 start menu styling
guide,
The Windows 11 notification center styling
guide.
Finding targets
How to find targets using UWPSpy.
Missing customizations
If you’re looking for a customization that is not listed here, please open an
issue.
Contributing
If you have a taskbar styling customization or theme that you would like to
share, please submit a pull request.
Themes
Themes are collections of styles that can be imported into the Windows 11
Taskbar Styler mod. The following themes are available:
| Link | Screenshot |
|---|---|
| WinXP |

|
| Bubbles |

|
| TranslucentTaskbar |

|
| Squircle |

|
| RosePine |

|
| DockLike |

|
| WinVista |

|
| CleanSlate |

|
| Lucent |

|
| 21996Taskbar |

|
| BottomDensy |

|
| TaskbarXII |

|
| xdark |

|
| Matter |

|
General
Taskbar size
Use the Taskbar height and icon
size mod.
Taskbar background
Target:
Taskbar.TaskbarFrame > Grid#RootGrid > Taskbar.TaskbarBackground > Grid > Rectangle#BackgroundFill
To set a solid color background, use the following style:
Replace <color> with the desired color. See colors section for all
options (e.g. if you want blurred background effect).
Note
For some themes, a different target has to be used to customize the taskbar
background:
- The WinXP theme spans the taskbar border over the
full taskbar height. To customize the background, use the
Rectangle#BackgroundStroketarget. - The DockLike theme hides the standard taskbar
background element. To customize the background, use theGrid#RootGrid
target and theBackground=<color>style.
Taskbar border
Target:
Rectangle#BackgroundStroke
It can be customized in the same way as the background, see Taskbar
background.
Task list
Start button image
Target:
Taskbar.ExperienceToggleButton#LaunchListButton[AutomationProperties.AutomationId=StartButton] > Taskbar.TaskListButtonPanel > Border#BackgroundElement
Style:
Background:=<ImageBrush Stretch="Uniform" ImageSource="<image>" />
Target:
Taskbar.ExperienceToggleButton#LaunchListButton[AutomationProperties.AutomationId=StartButton] > Taskbar.TaskListButtonPanel > Microsoft.UI.Xaml.Controls.AnimatedVisualPlayer#Icon
Style:
Replace <image> with your own image, a local file path or a URL, for example:
- Windows 10:
https://i.imgur.com/lEvZStx.png. - Windows XP:
https://i.imgur.com/RX5DqT3.png(use withStretch="None").
To set a different image for each Start button state — normal, hovered, pressed —
refer to this
comment.
Hide the start button
Target:
Taskbar.ExperienceToggleButton#LaunchListButton[AutomationProperties.AutomationId=StartButton]
Style:
Task list buttons size
Use the Taskbar height and icon
size mod.
Task list buttons corner radius
Targets:
Taskbar.ExperienceToggleButton
Style:
Replace <radius> with the desired radius. A larger value will make the corners
more rounded. Default: 4.
Task list labels
Various task list label customizations are available in the Taskbar Labels for
Windows 11 mod.
Task list labels font
Target:
Style:
Replace <font> with the desired font. For a list of fonts that are shipped
with Windows 11, refer to this page.
Task list running indicator
Target:
Taskbar.TaskListLabeledButtonPanel@RunningIndicatorStates > Rectangle#RunningIndicator
Various styles can be applied to the running indicator. Here are some examples:
Styles:
Fill@ActiveRunningIndicator=Red
Width@ActiveRunningIndicator=20
The following visual states1 can be used:
ActiveRunningIndicatorInactiveRunningIndicatorRequestingAttentionRunningIndicator
Some customizations for the running indicator are available in the Taskbar
Labels for Windows 11 mod.
Notification area (system tray)
Tray icons size
Target:
SystemTray.ImageIconContent > Grid#ContainerGrid > Image
Styles:
Replace <size> with the desired size. Default: 16.
Tray icons size (system icons)
Target:
SystemTray.TextIconContent > Grid#ContainerGrid > SystemTray.AdaptiveTextBlock#Base > TextBlock#InnerTextBlock
Style:
Replace <size> with the desired size. Default: 32.
Tray icons spacing
Target:
SystemTray.NotifyIconView#NotifyItemIcon
Style:
Replace <width> with the desired width for the icon and the spacing. Default:
32.
Tray icons padding
Target:
SystemTray.ImageIconContent > Grid#ContainerGrid
Style:
To reduce the spacing even more, replace <padding> with the desired padding.
Default: 4,0.
Tray icons padding (system icons)
Target:
SystemTray.TextIconContent > Grid#ContainerGrid
Style:
Replace <padding> with the desired padding. Default: 4,0.
Hide the network icon
Target:
SystemTray.OmniButton#ControlCenterButton > Grid > ContentPresenter > ItemsPresenter > StackPanel > ContentPresenter[1] > SystemTray.IconView > Grid > Grid
Style:
Hide the volume icon
Target:
SystemTray.OmniButton#ControlCenterButton > Grid > ContentPresenter > ItemsPresenter > StackPanel > ContentPresenter[2] > SystemTray.IconView > Grid > Grid
Style:
Chevron icon width
Target:
SystemTray.ChevronIconView
Style:
Replace <width> with the desired width. Default: 32.
Clock
Clock customizations are available in the Taskbar Clock
Customization mod.
Hide the notification bell icon
Target:
SystemTray.OmniButton#NotificationCenterButton > Grid > ContentPresenter > ItemsPresenter > StackPanel > ContentPresenter > SystemTray.IconView#SystemTrayIcon > Grid > Grid > SystemTray.TextIconContent
Style:
Copilot button image
Target:
ContentPresenter#ContentPresenter > Grid#ContentGrid > Microsoft.UI.Xaml.Controls.AnimatedVisualPlayer#LottieIcon
Style:
Target:
SystemTray.CopilotIcon#CopilotIcon > Grid#ContainerGrid > Border#BackgroundBorder
Style:
Background:=<ImageBrush Stretch="None" ImageSource="<image>" />
- Copilot icon without preview label:
https://i.imgur.com/lfwEWzI.png. - Old Copilot icon:
https://i.imgur.com/Z6eCNH3.png.
Hide the «Show Desktop» button
Target:
SystemTray.Stack#ShowDesktopStack
Style:
Transforms
You can use transformation styles to translate, rotate, scale, or skew elements.
Tip
Should I use RenderTransform or Transform3D?
For 2D transformations, it is best to stick to RenderTransform in most cases. Using Transform3D for 2D transformations can cause elements to become blurry. For 3D transformations, you must use Transform3D.
Tip
You can mix and match transformations when using Transform3D! You can also use RenderTransform and Transform3D together.
For example: Transform3D:=<CompositeTransform3D TranslateY="-15" RotationZ="15" ScaleX="1.5" />
Translate
RenderTransform:=<TranslateTransform Y="-15" X="15" />
— or —
Transform3D:=<CompositeTransform3D TranslateY="-15" TranslateX="15" TranslateZ="-15" />
Rotate
RenderTransform:=<RotateTransform Angle="15" />
— or —
Transform3D:=<CompositeTransform3D RotationX="-15" RotationY="15" RotationZ="-15" />
X: 3D vertical rotation.Y: 3D horizontal rotation.Z: 2D rotation.
Scale
RenderTransform:=<ScaleTransform ScaleX="1.5" ScaleY="-1.5" />
— or —
Transform3D:=<CompositeTransform3D ScaleX="-1.5" ScaleY="1.5" ScaleZ="-1.5" />
Skew
RenderTransform:=<SkewTransform AngleX="-15" AngleY="15" />
Other properties
- Rotate, Scale and Skew:
CenterX: Offsets the transform’s origin on the X axis.CenterY: Offsets the transform’s origin on the Y axis.CenterZ: Offsets the transform’s origin on the Z axis. (Only forTransform3D)
Colors
In the following examples we’re gonna use Fill as an example, but this also
works for other properties that accept colors like Background.
Solid color
Replace <color> with the desired color.
A color can be a name (e.g. Red) or a hex code (e.g. #FF0000).
The color can be semi-transparent (e.g. #80FF0000). To have a fully
transparent background, use Transparent.
Accent colors
A Color can also be a ThemeResource or StaticResource. There are many such
styles built into Windows.
Fill:=<SolidColorBrush Color="{ThemeResource SystemAccentColor}" Opacity="0.8" />
Accent colors have different lightness available, like SystemAccentColorLight2
or SystemAccentColorDark1. The word Light or Dark is appended at end with
a number ranging from 1-3. Check out the official Microsoft
docs
for all variations.
Fill:=<SolidColorBrush Color="{ThemeResource SystemAccentColorDark2}" Opacity="0.5" />
Transparent color
To have a fully transparent background, use the following style:
Acrylic effect as color
In order to have an acrylic effect (a blurred background) you can use
AcrylicBrush, this comes with TintOpacity which defines how much of the
color needs to be applied.
Fill:=<AcrylicBrush TintColor="Black" TintOpacity="0.8" />
You can also mix acrylic with a variation of an accent color for a more dynamic
look that fits current theme.
Fill:=<AcrylicBrush TintColor="{ThemeResource SystemAccentColorDark2}" TintOpacity="0.3" />
WindhawkBlur effect as color
An alternative to Acrylic is the mod’s own blur implementation called WindhawkBlur. It differs from Acrylic because it has a customizable blur radius and has fewer bugs (e.g. ramensoftware/windhawk-mods#742).
Fill:=<WindhawkBlur BlurAmount="10" TintColor="#80ff0000" />
This example sets a blur that is tinted with red at 50% opacity.
BlurAmount: Radius of blur effect (set to 30 to mimic Acrylic).TintColor: Hex color in#AARRGGBBformat that is applied to the blur.ThemeResourcecolors and color names (e.g.Red) are currently not supported.
Mica effect as color
Note
Unfortunately I haven’t figured this out yet. If you have any info please
contribute by making a pull request.
Gradient as color
The background can also be a gradient. For example, to have a gradient from
yellow to red to blue to lime green, use the following style:
Fill:=<LinearGradientBrush StartPoint="0,0.5" EndPoint="1,0.5"><GradientStop Color="Yellow" Offset="0.0" /><GradientStop Color="Red" Offset="0.25" /><GradientStop Color="Blue" Offset="0.75" /><GradientStop Color="LimeGreen" Offset="1.0" /></LinearGradientBrush>
Image as color
The background can also be an image:
Fill:=<ImageBrush Stretch="UniformToFill" ImageSource="<image>" />
Replace <image> with your own image, a URL or a local file path.
-
See Finding targets on how to use UWPSpy to find all of the available visual states for an element ↩
Все способы:
- Шаг 1: Отображение элементов по умолчанию
- Шаг 2: Добавление элементов
- Шаг 3: Расположение на экране
- Шаг 4: Изменение цвета
- Шаг 5: Изменение размера
- Шаг 6: Перетаскивание файлов
- Шаг 7: Дополнительные настройки
- Решение возможных проблем
- Вопросы и ответы: 0
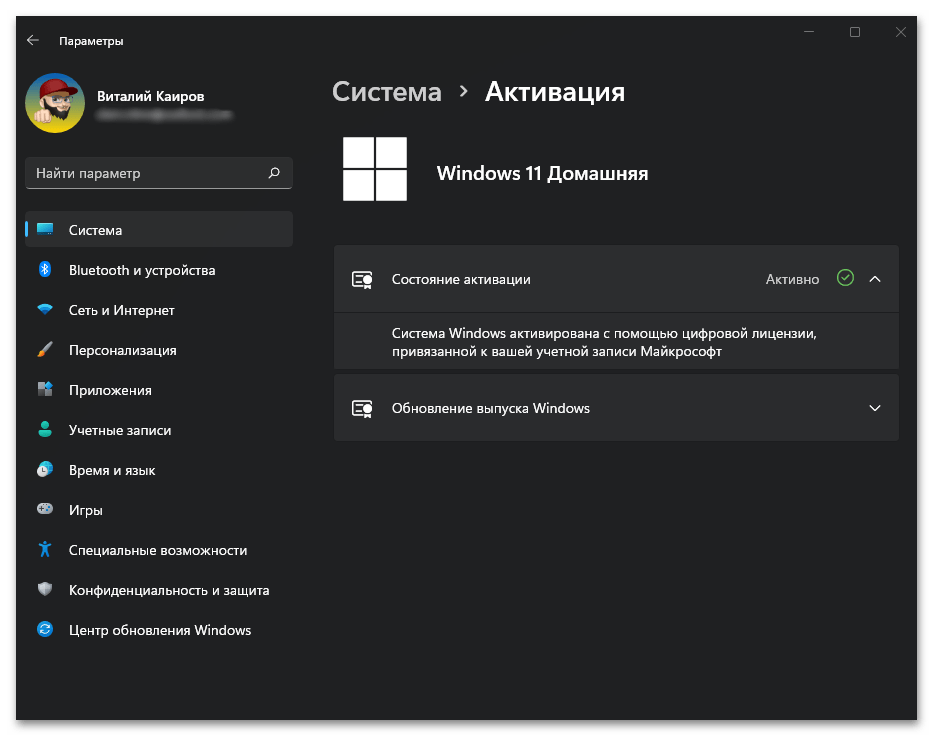
Важно! Обязательным условием для выполнения ряда манипуляций по настройке панели задач (ПЗ) является наличие активации Windows 11. Поэтому прежде, чем переходить к дальнейшим действиям, убедитесь, что установленная на вашем компьютере операционная система соответствует данному требованию, а если это не так, ознакомьтесь с представленными по ссылкам ниже статьями и выполните предложенные в них рекомендации.
Подробнее:
Как поверить активацию Виндовс 11
Как активировать ОС Виндовс 11
Шаг 1: Отображение элементов по умолчанию
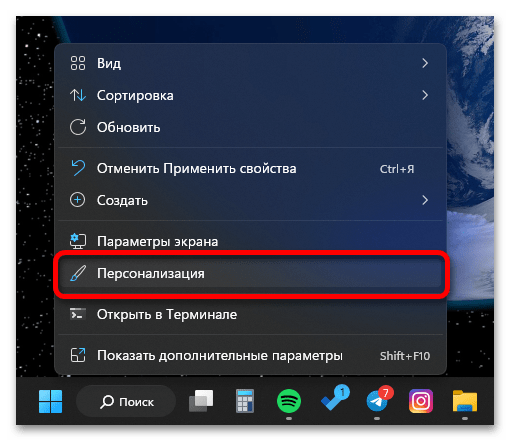
По умолчанию на ПЗ, помимо меню «Пуск» и нескольких закрепленных ярлыков, имеются кнопки поиска, представления задач, мини-приложений (меню с виджетами) и чата. Если они вам не нужны, выполните следующее:
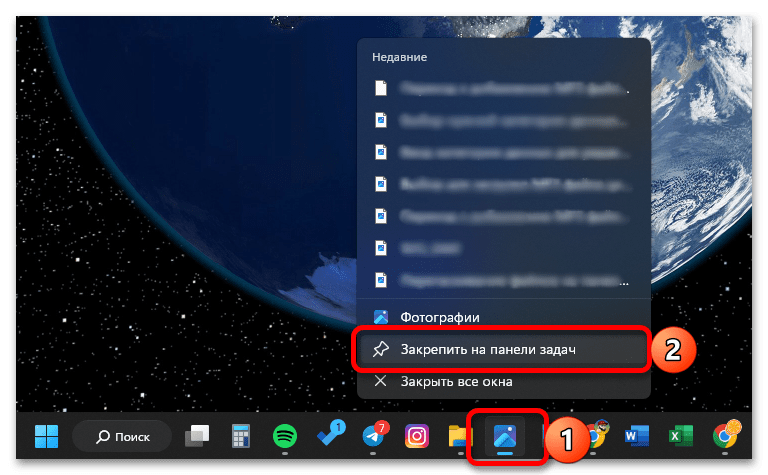
- Перейдите на рабочий стол Windows 11, кликните правой кнопкой мышки (ПКМ) в его свободной области и выберите в появившемся контекстном меню пункт «Персонализация».
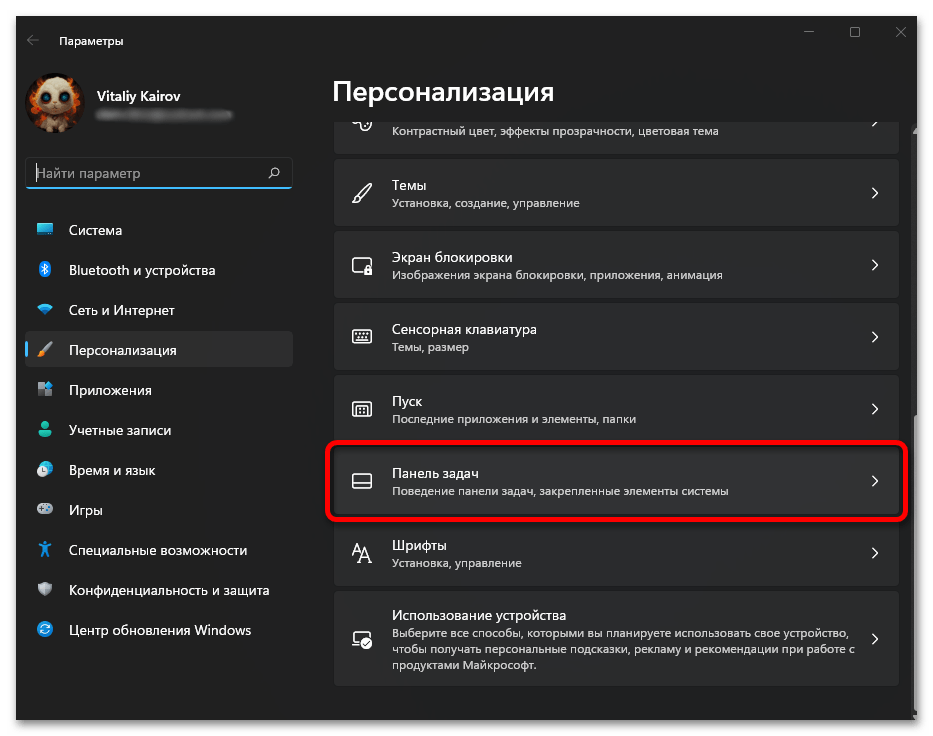
- Далее откройте раздел «Панель задач» системных «Параметров».
- Включая или отключая тумблеры напротив наименований в блоке «Элементы панели задач», определите то, какие из системных приложений вы (не)хотите видеть в ПЗ.
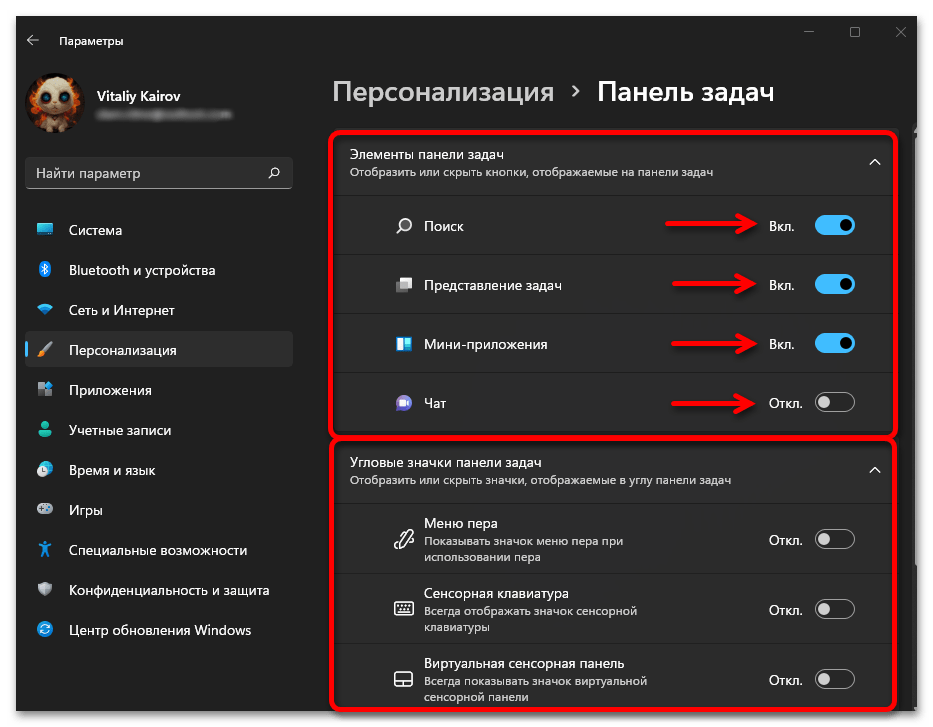
Читайте также: Как отключить мини-приложения и чат в Виндовс 11
В представленном ниже блоке вы также можете определить отображаемые «Угловые значки панели задач», если в этом есть необходимость.
Шаг 2: Добавление элементов
На панели задач можно без проблем закрепить ярлык любого запущенного приложения, но это не единственная возможность добавления элементов в данную часть интерфейса ОС. При желании на ПЗ легко может быть закреплена произвольная папка (например, с личными документами) и даже отдельный файл.
Шаг 3: Расположение на экране
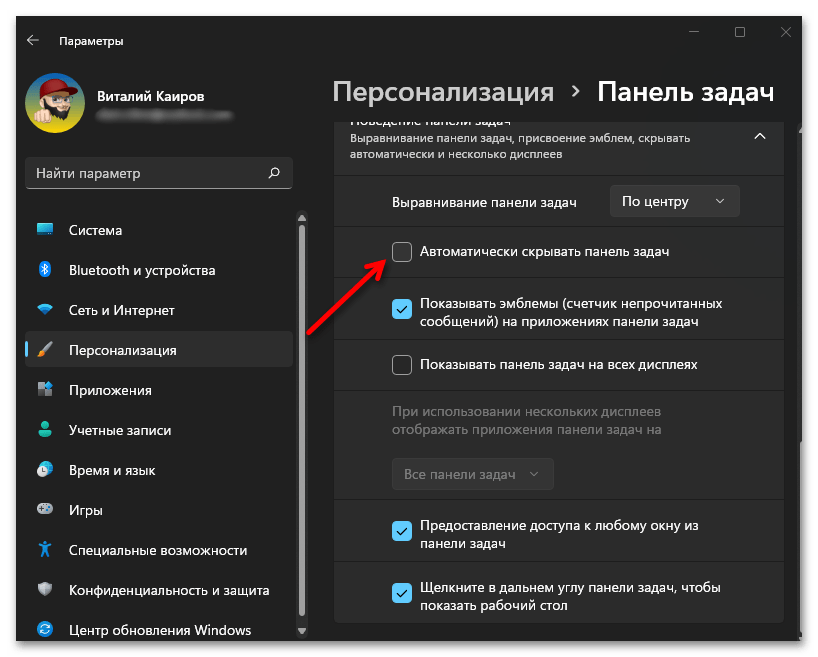
В отличие от десятой версии Виндовс, в настройках одиннадцатой по умолчанию отсутствует возможность перемещения панели задач. Единственное, что можно сделать стандартными средствами, – переместить изначально выровненные по центру элементы влево.
Подробнее: Как переместить кнопку «Пуск» влево в Windows 11

При этом сама ПЗ все же может быть помещена на верхнюю, левую или правую границу экрана, но делается это либо путем редактирования реестра, либо с помощью сторонних программ. Каждый доступный метод, а также возможные проблемы, с которыми можно столкнуться в ходе выполнения данных манипуляций, как и их решения, представлены в отдельной статье.
Подробнее: Как переместить панель задач в Виндовс 11

Еще одним возможным вариантом расположения ПЗ на экране является ее автоматическое скрытие, при котором данная часть интерфейса ОС будет отображаться только в том случае, если навести курсор мышки на выделенную под нее область (по умолчанию – нижняя граница экрана). Если вы хотите, чтобы панель была видимой только в тех ситуациях, когда вам требуется к ней обратиться, ознакомьтесь со следующей инструкцией.
Подробнее: Как скрыть панель задач в Windows 11
Шаг 4: Изменение цвета
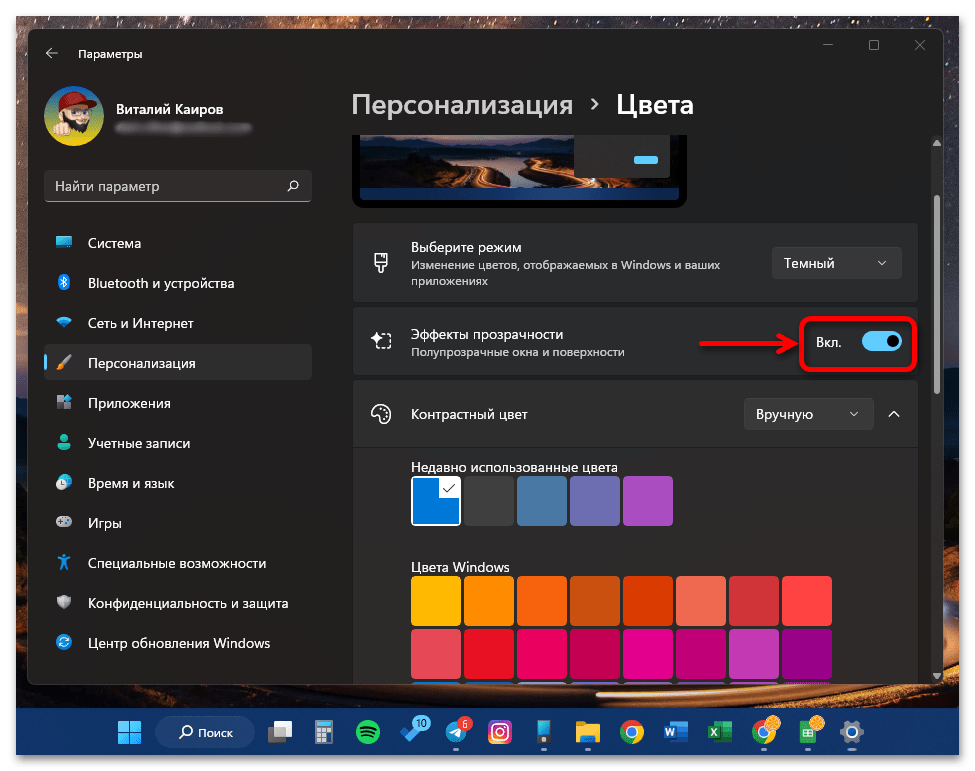
Изначально цвет ПЗ определяется установленной в «Параметрах» Виндовс 11 темой оформления – светлой или темной, но для того, чтобы задать любой другой вариант, достаточно изменить всего пару опций. Помимо непосредственно оттенка из довольно обширной цветовой палитры, также можно применить и эффект прозрачности. Подробнее об этом – по ссылке ниже.
Подробнее: Как изменить цвет панели задач в Windows 11
Многие пользователи задаются вопросом о том, как сделать ПЗ черной в самом прямом смысле этого слова, то есть еще более темной, чем это позволяет соответствующая тема оформления или цвет на палитре. Решений в данном случае несколько, и о каждом из них мы тоже рассказывали ранее.
Подробнее: Как сделать черную панель задач в Виндовс 11
Еще один актуальный вопрос, который напрямую не связан с цветом ПЗ – это ее прозрачность. Стандартные средства операционной системы позволяют достичь такого эффекта лишь частично, в то время как узкоспециализированное ПО от сторонних разработчиков достаточно качественно решает эту задачу. Чтобы узнать, как им пользоваться, ознакомьтесь с представленной по ссылке ниже инструкцией.
Подробнее: Как сделать панель задач прозрачной в Windows 11
Шаг 5: Изменение размера
Помимо того, что в «Параметрах» Виндовс 11 отсутствует возможность перемещения ПЗ, там также нельзя изменить ее размер, то есть разработчиками предполагается, что данная часть интерфейса не должна быть ни большей, ни меньшей. При желании данное ограничение можно обойти, для чего потребуется задействовать сторонний софт.
Забегая вперед, отметим, что ни уменьшенная, ни увеличенная панель не выглядит достаточно привлекательной и удобной в использовании (элементы масштабируются некорректно, а некоторые из них и вовсе становятся недоступными). Однако нельзя исключать тот факт, что для кого-то именно такой вариант оформления окажется наиболее предпочтительным.
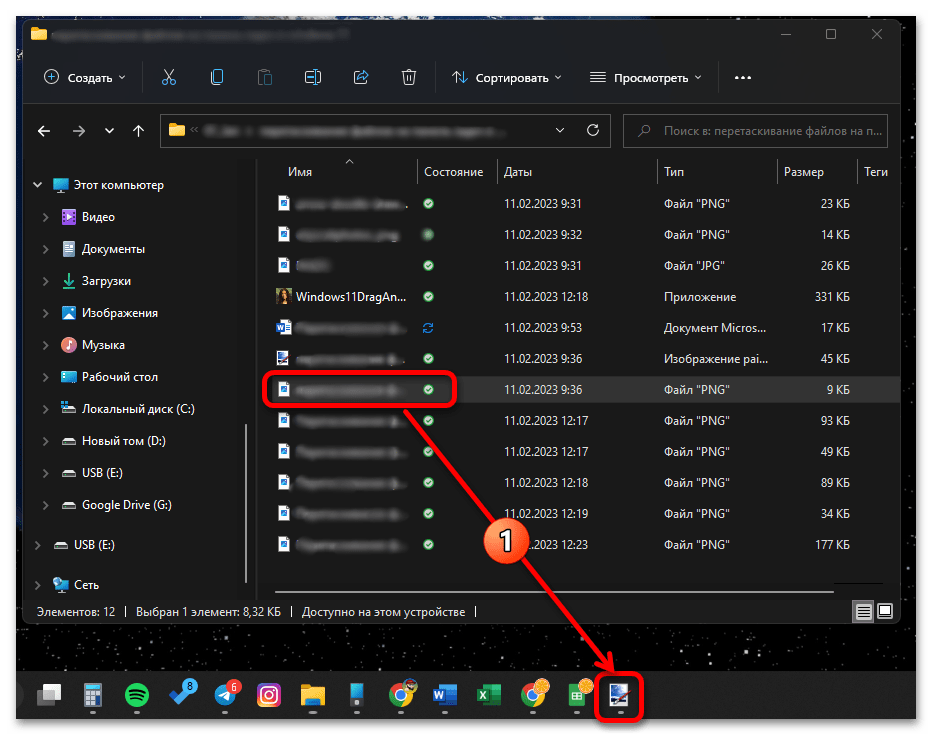
Шаг 6: Перетаскивание файлов
Одним из наиболее неочевидных, негативных нововведений Виндовс 11 стало исчезновение возможности простого перетаскивания файлов на панель задач для того, чтобы быстро открывать их в совместимых программах. То есть раньше можно было выделить, например, изображение, потащить его и навести на ярлык графического редактора, отобразив таким образом интерфейс последнего, и затем отпустить первый, чтобы сразу перейти к его просмотру или редактированию.
Шаг 7: Дополнительные настройки
Выше мы уже рассмотрели основные аспекты конфигурирования ПЗ, однако есть ряд более узконаправленных запросов. Например, многих интересует, как сделать меню «Пуск» и саму панель такими, какими они были в десятой версии Виндовс, и это вполне достижимо, но только с помощью стороннего программного обеспечения.
Подробнее: Как сделать меню «Пуск» Windows 11 таким, как в Windows 10
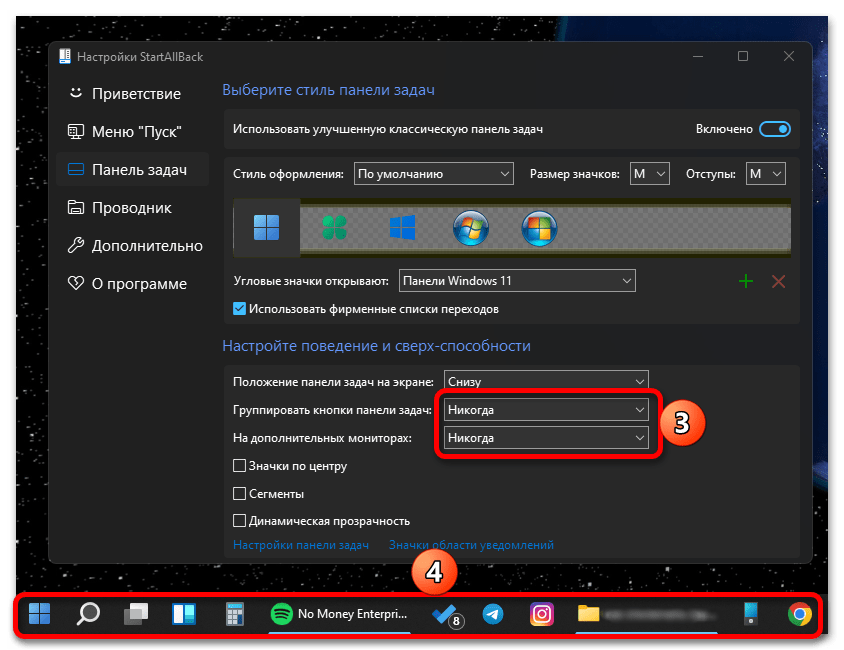
Кого-то не устраивает то, что значки на ПЗ всегда группируются, то есть отображаются только ярлыки, но без подписей окон. В предыдущих версиях Виндовс это решалось путем изменения системных настроек, однако в случае с актуальной одиннадцатой версией не обойтись без использования узкоспециализированных приложений для кастомизации интерфейса ОС.
Подробнее: Как отключить группировку значков на панели задач в Windows 11
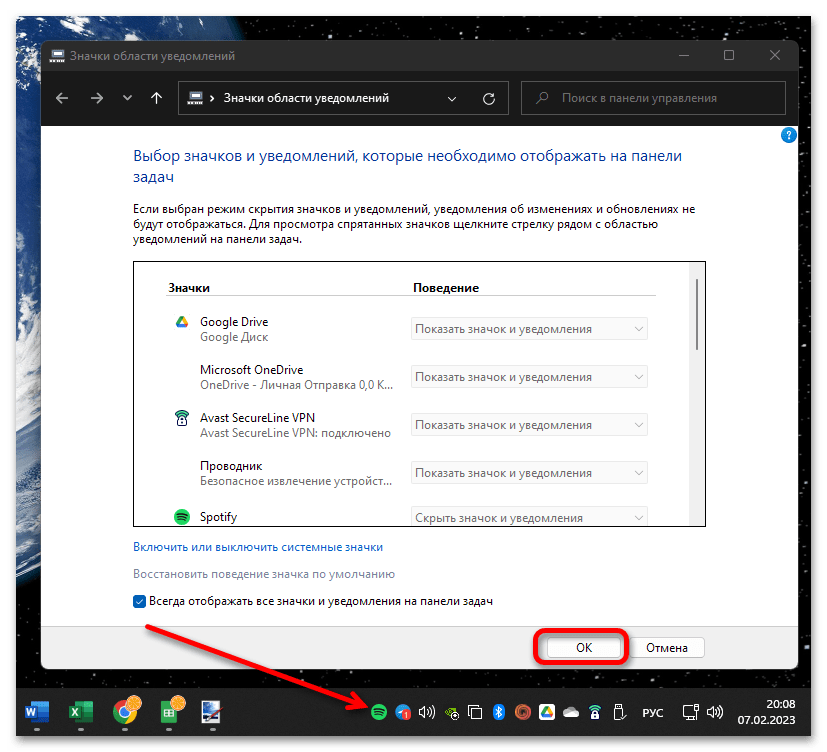
Помимо подписей окон многим пользователям также важно в режиме реального времени видеть не только все открытые и закрепленные на ПЗ приложения, но и тот софт, а также другие программные компоненты и индикаторы, которые по умолчанию работают в фоне и скрываются в системном трее. При желании все значки из данной области можно поместить в правую часть панели, причем делается это исключительно с помощью доступных в рамках ОС инструментов.
Подробнее: Как отобразить скрытые значки панели задач в Виндовс 11
Решение возможных проблем
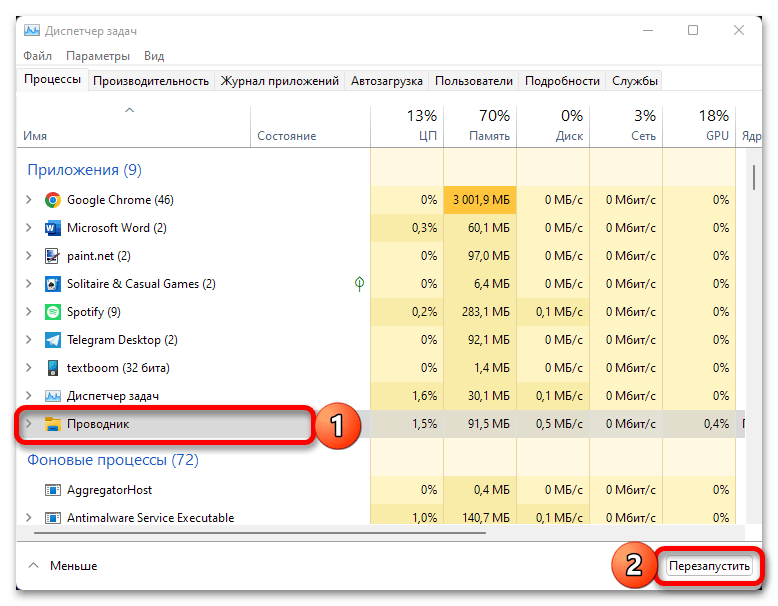
Windows 11, как и любая другая операционная система, не является идеальной, а потому неудивительно, что в работе отдельных ее компонентов могут возникать разного рода проблемы и сбои. Рассматриваемая нами в рамках настоящей статьи панель задач – не исключение. Так, она может не открываться, зависать, а то и вовсе исчезнуть с экрана. Чаще всего это решается предельно просто – достаточно перезапустить «Проводник», однако иногда могут потребоваться и более серьезные действия. Детальнее о каждой из возможных ситуаций и вариантах их исправления можно узнать из отдельных инструкций на нашем сайте.
Подробнее:
Как восстановить работоспособность панели задач в Виндовс 11
Наша группа в TelegramПолезные советы и помощь

Windows 11 has brought a lot of new features and upgrades to the table, and one of the most notable changes is its revamped taskbar. With its sleek design and customizable features, the Windows 11 taskbar significantly improved from its predecessor. If you are someone who likes to personalize their workspace or wants to optimize their workflow, then this guide is for you. In this article, we will provide a step-by-step Windows 11 taskbar customization guide to help you make the most out of your taskbar. From changing the taskbar color to pinning your favorite apps and tools, we have got you covered.
Customize the Windows Taskbar Settings
First, we will take a look at your default taskbar options. Open up your settings when clicking on the gear icon in your taskbar, or open up your start menu and search for Settings. Navigate to Personalization and select Taskbar.
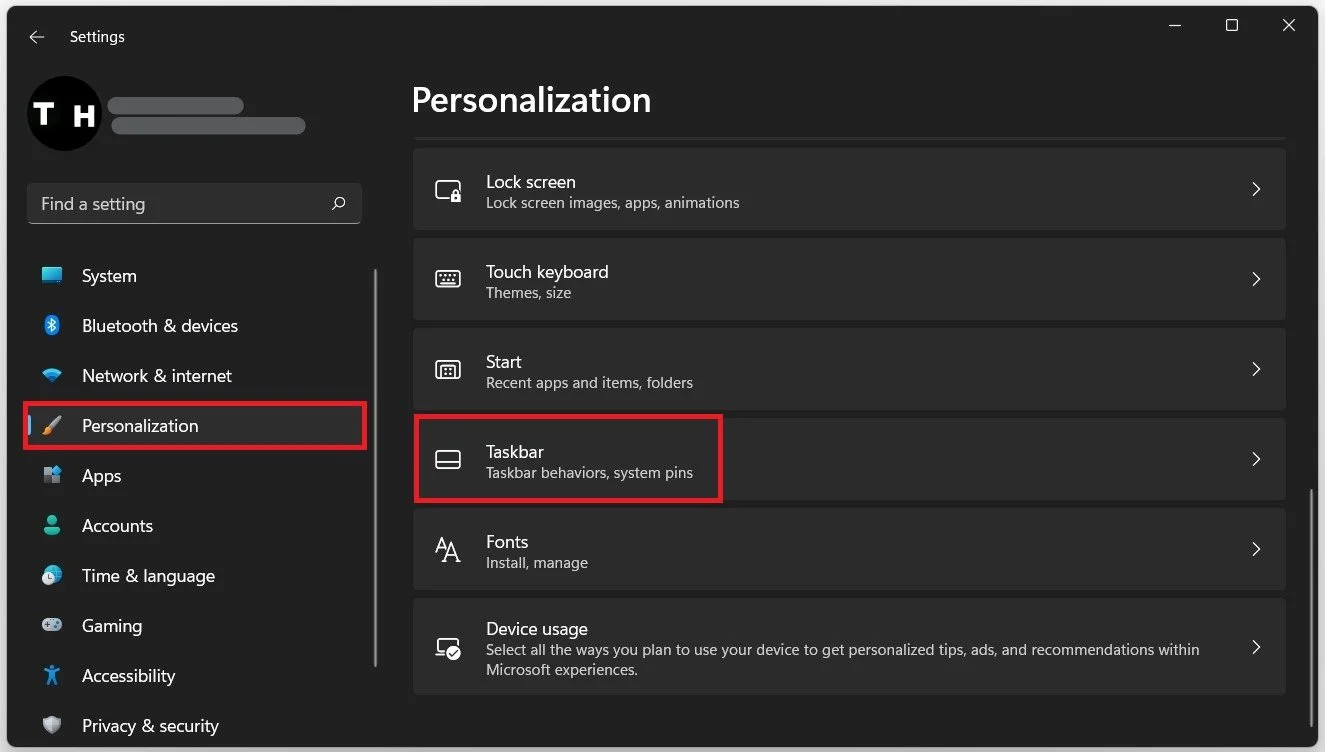
Windows Settings > Personalization > Taskbar
The first option lets you disable some of the default taskbar items. Enable or disable the Search, Task view and Widgets to your liking.
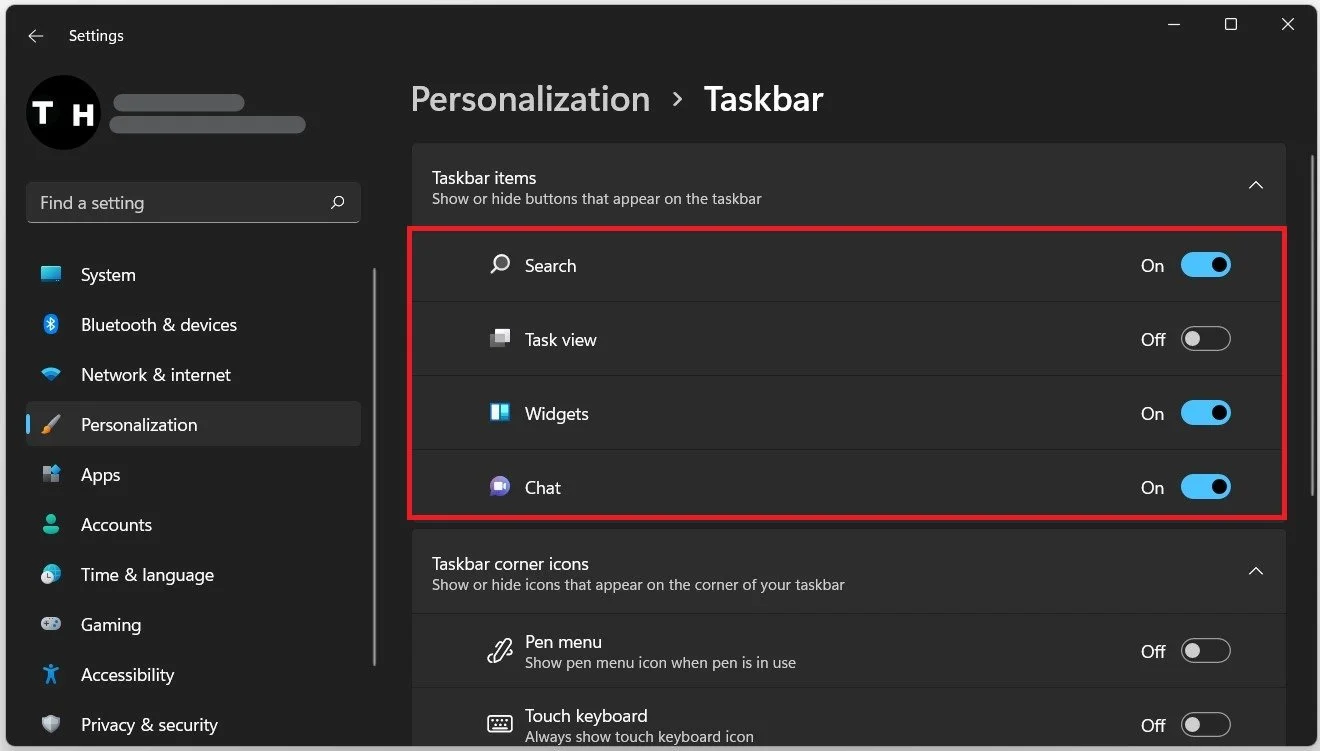
Windows Settings > Personalization > Taskbar > Taskbar Items
Below, you can show or hide icons on the corner of your taskbar next to your system tray. Expand your Taskbar corner overflow settings to show or hide more icons that could come in handy, depending on what you prefer to do with your taskbar. We will leave most of these settings disabled to keep a clean taskbar. Under Taskbar behaviors, you can change the taskbar alignment from the center to the left side, in case you prefer the Windows 10 look. You can also enable the Automatically hide the taskbar option. For users with multiple displays, you can also enable the Show my taskbar on all displays option.
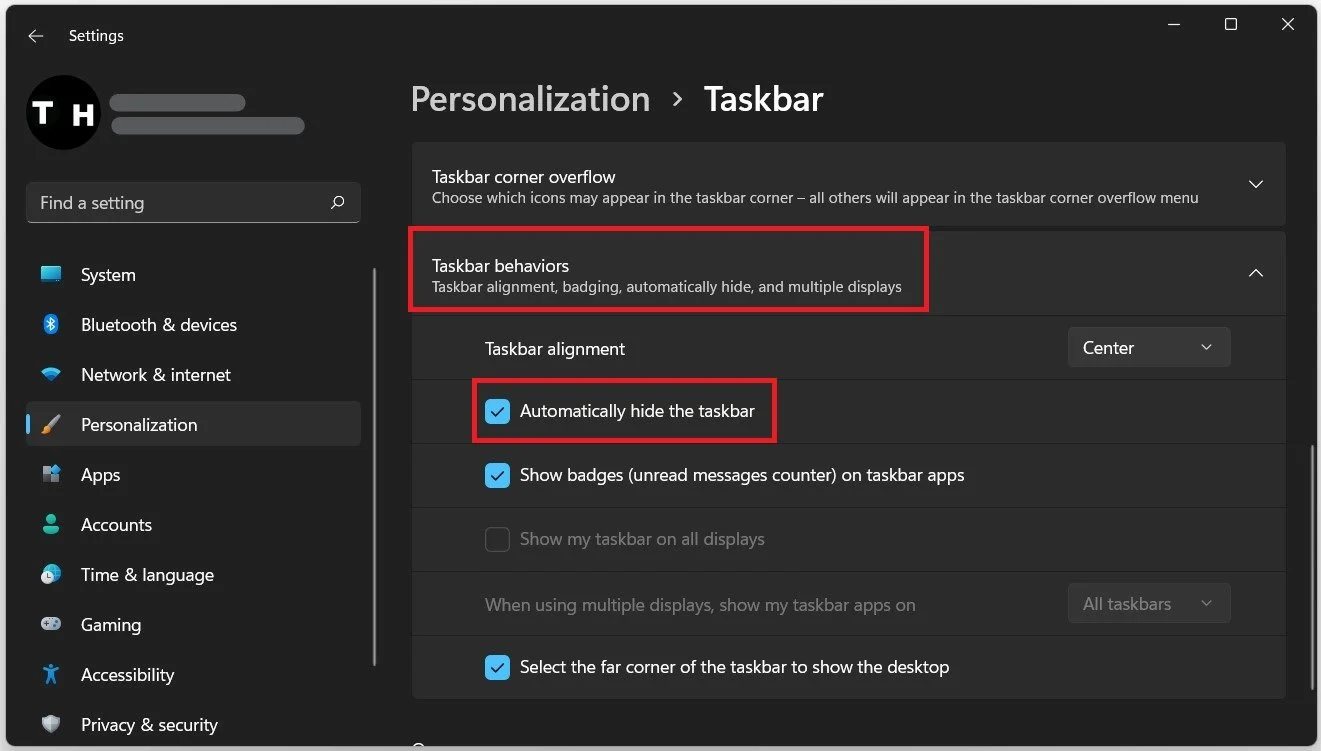
Windows Settings > Personalization > Taskbar > Taskbar Behaviors
Change the Taskbar Colors
After verifying these settings, navigate back to your main Personalization options. Click on Colors. Expand the Accent color, and you will find the Show accent color on Start and taskbar options. While this option is enabled, you can apply your selected accent color to your taskbar! Choose a Windows color, or click View colors to select any color you choose.
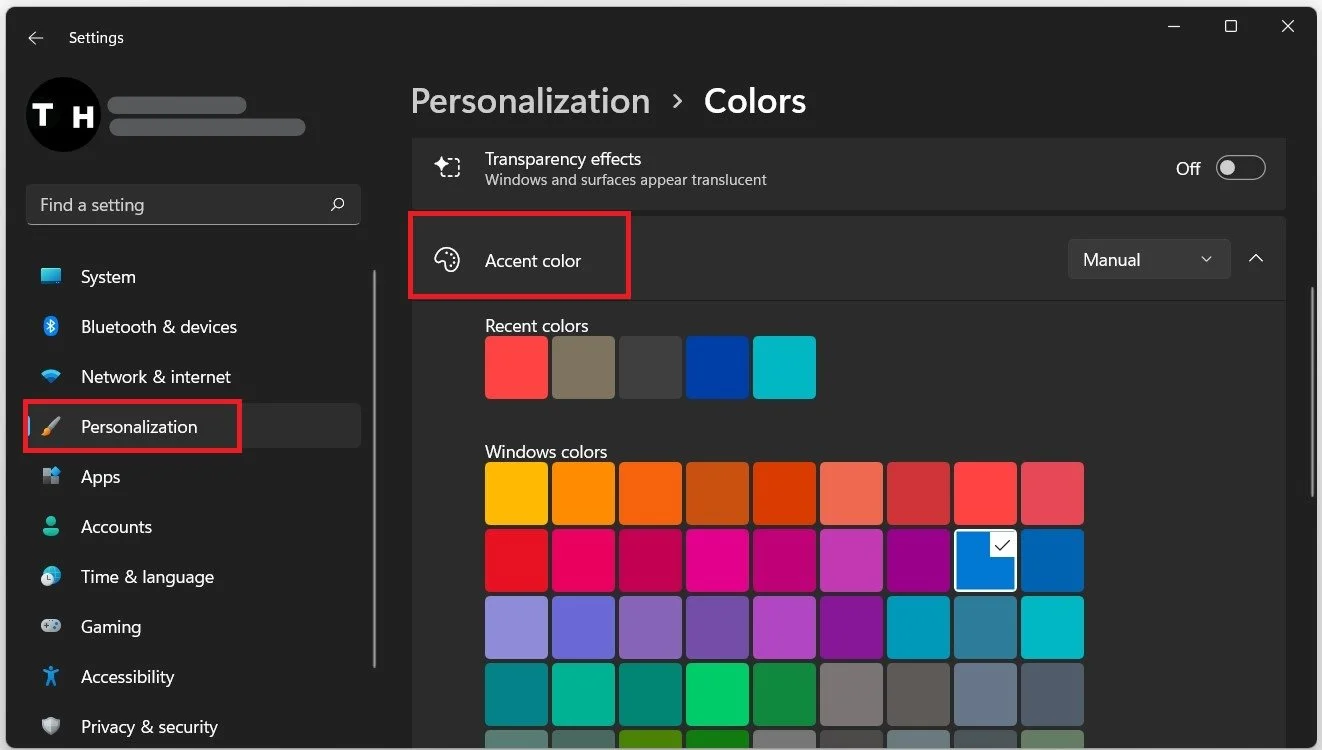
Windows Settings > Personalization > Taskbar > Colors
Transparent Windows 11 Taskbar
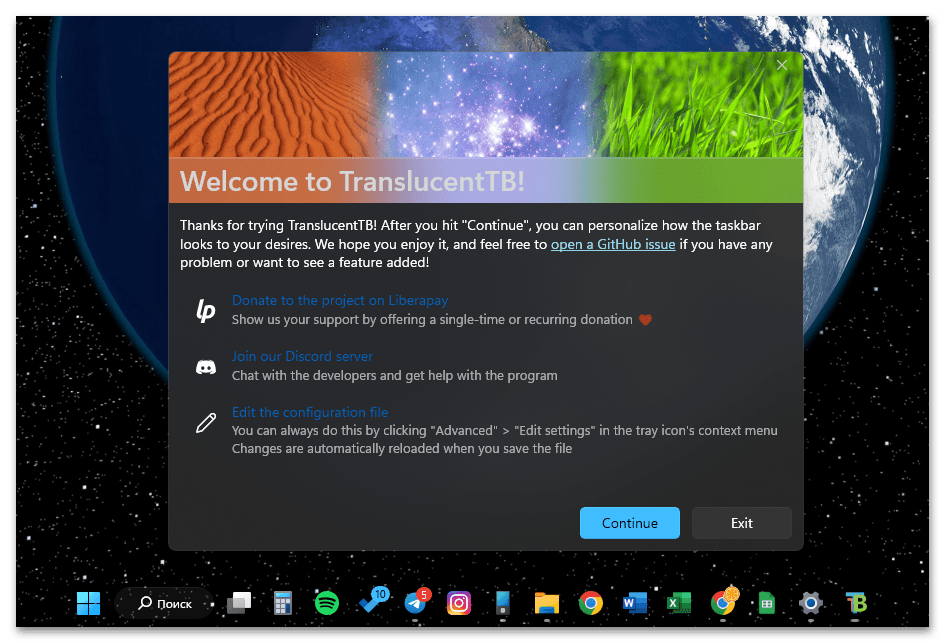
A simple app can make your taskbar transparent! Open up your Microsoft Store application and search for TranslucentTB to find this free-to-install application. Click Free, and Windows will take a moment to download and install the application. When it’s done, click on Launch, and you will be greeted with a pop-up message, telling you that you can tweak the taskbar’s appearance with the tray icon.
In your taskbar, click on the TB icon, to access its settings and play around with them to see what works best for you. When selecting Exit, you will exit out of the application and revert your taskbar back to normal. To re-apply the changes, simply search for TranslucentTB in your start menu search.

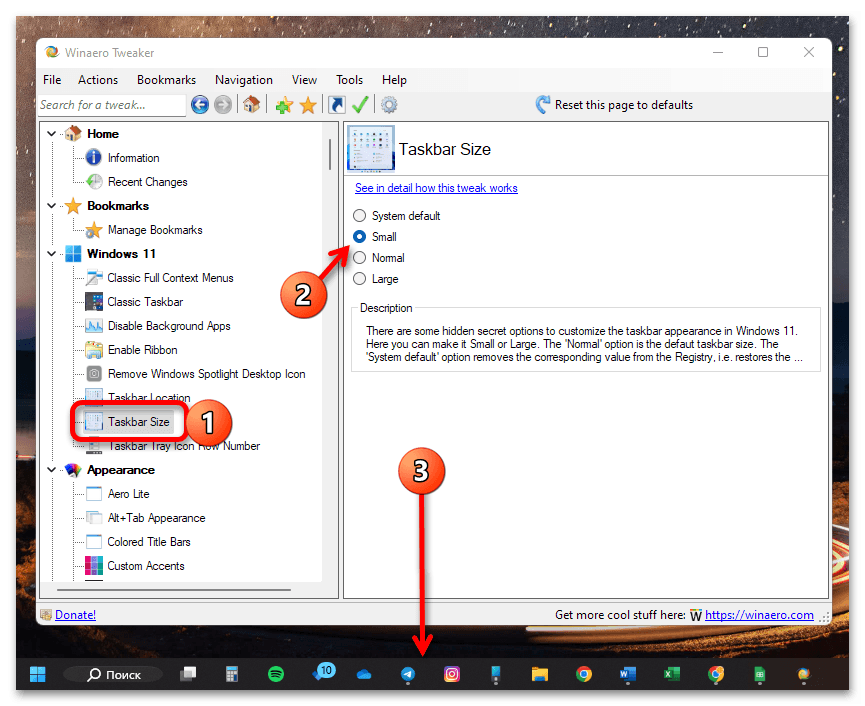
How to Change the Taskbar Size
You can also change the size of your taskbar by making a change in your registry editor. Simply search for Registry Editor in your start menu search to open it up. If you cannot find it here, open this dialogue box using the Windows key + R shortcut. Type regedit and hit enter. On the window, navigate to HKEY_CURRENT_USER\Software\Microsoft\Windows\CurrentVersion\Explorer\Advanced

-
Right-click anywhere within the Registry editor right side panel and choose New -> DWORD (32-bit) Value. Set the name of this DWORD to TaskbarSi.
-
Double-click TaskbarSi to set its value. For a small taskbar, make sure to set the value to 0. The default taskbar size is 1, and to make it larger, set this value to 2. Based on your preference, set the value as 0 or 2, assuming you don’t like the new default size of the taskbar in Windows 11. Notably, icons from third-party apps will look a little pixelated when you use the large taskbar.
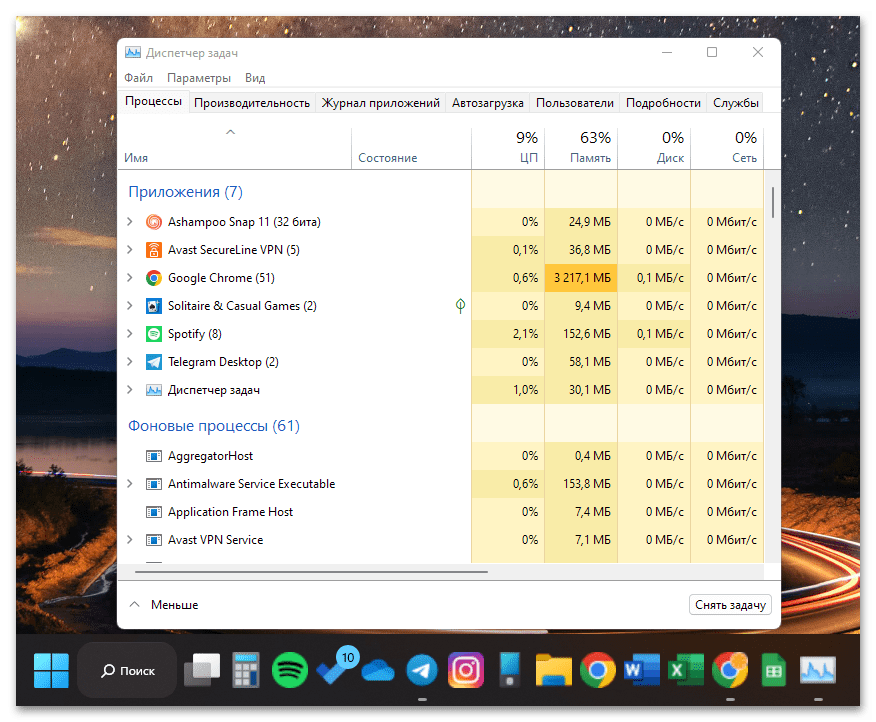
After setting your preferred value, restart your PC for the changes to take effect. Alternatively, you can also open up your task manager. Search for Task Manager in your start menu search to open it up. Under Apps, right-click Windows Explorer and select Restart. This will allow the changes in your Registry Editor to take effect without restarting your PC.

Task Manager > Processes > Windows Explorer > Restart
Windows 11 позволяет установить пользовательские цвета для панели задач, меню Пуск, а также некоторых дополнительных элементов: панели уведомлений, панели «Быстрые настройки», окна переключения языка ввода и некоторых других.
В этой инструкции подробно о том, как изменить цвет панели задач, меню Пуск и сопутствующих элементов в Windows 11 и о возможных проблемах, с которыми при этом можно столкнуться. Близкая тема: Как увеличить или уменьшить панель задач Windows 11.
Изменение цвета панели задач в параметрах персонализации
Для того, чтобы изменить цвет панели задач вручную и меню Пуск в Windows 11 достаточно выполнить следующие шаги:
- Открыть Параметры — Персонализация (быстро попасть в параметры персонализации можно через контекстное меню по правому клику на рабочем столе).
- Открыть пункт «Цвета».

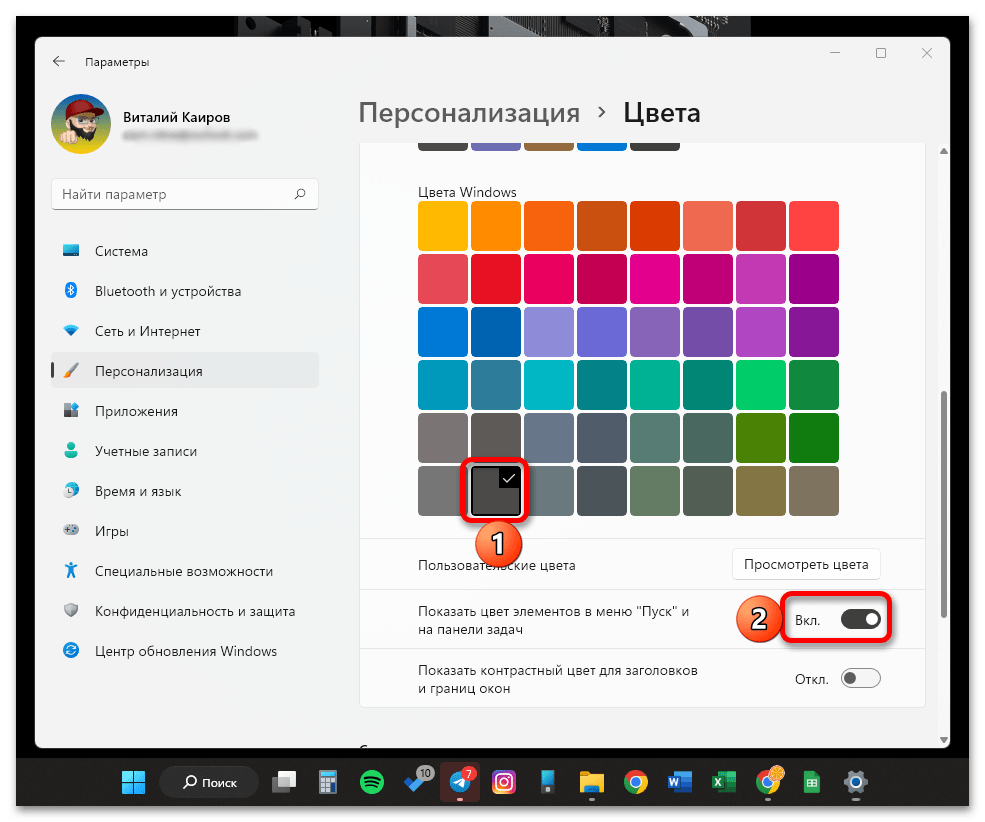
- Если в поле «Выберите режим» установлено «Светлый», переключить на «Темный» или «Особые», иначе возможность применения цвета к панели задач будет не активна. Если вам требуется светлое оформление — выберите «Особые», а затем установите темный режим для Windows и светлый режим для приложений.

- В пункте «Контрастный цвет» выберите желаемый цвет, для этого установите «Вручную» (в режиме «Автоматически» цвет будет выбираться в зависимости от обоев рабочего стола) и укажите желаемый цвет из списка или нажмите «Просмотреть цвета» для более точного выбора цвета.
- Включите переключатель «Показать цвет элементов в меню Пуск и на панели задач». Если он не активен и его нельзя включить, обратите внимание на 3-й шаг выше.

- Сразу после этого цвет будет использован на панели задач и других системных элементах Windows 11.


Отмечу, что при установке тем оформления Windows 11 все указанные настройки могут применяться автоматически — всё зависит от конкретной темы. Выше было рассмотрено ручное изменение цветов.
Что делать, если параметры персонализации Windows 11 недоступны
Если Windows 11 не активирована, то параметры персонализации будут недоступны. Однако, при желании мы можем изменить цвет панели задач и меню Пуск с помощью редактора реестра и в этом случае:
- Нажмите клавиши Win+R на клавиатуре (или нажмите правой кнопкой мыши по кнопке Пуск и выберите пункт «Выполнить»), введите regedit и перейдите в раздел реестра
HKEY_CURRENT_USER\Software\Microsoft\Windows\CurrentVersion\Themes\Personalize
- Дважды нажмите по параметру ColorPrevalence и измените его значение на 1.
- Изменения сразу начнут действовать, однако выбор цвета будет осуществляться автоматически в зависимости от цветов обоев рабочего стола.
- Если цвет после изменения выглядит «светлым», измените значение параметра SystemUsesLightTheme на 0 в том же разделе реестра.
К сожалению, для данного сценария попытки найти способ выбрать цвет с помощью изменения значений в расположениях в реестре (те же, что и в предыдущей версии Windows) или файле текущей темы не помогли — при моих тестах они не начинают действовать ни сразу ни после перезагрузки.