
The lock screen in Windows serves as the initial interface you encounter when you start your device or wake it from sleep. It provides a layer of security by requiring a biometric gesture, PIN, or password to access your desktop. Beyond its security function, the lock screen is highly customizable, allowing you to personalize it with different background images, such as a single picture, a slideshow, or dynamic content from Windows spotlight. You can also add useful information, making the lock screen both visually appealing and informative.
To learn how to configure the lock screen background image and add status information, expand the following sections:
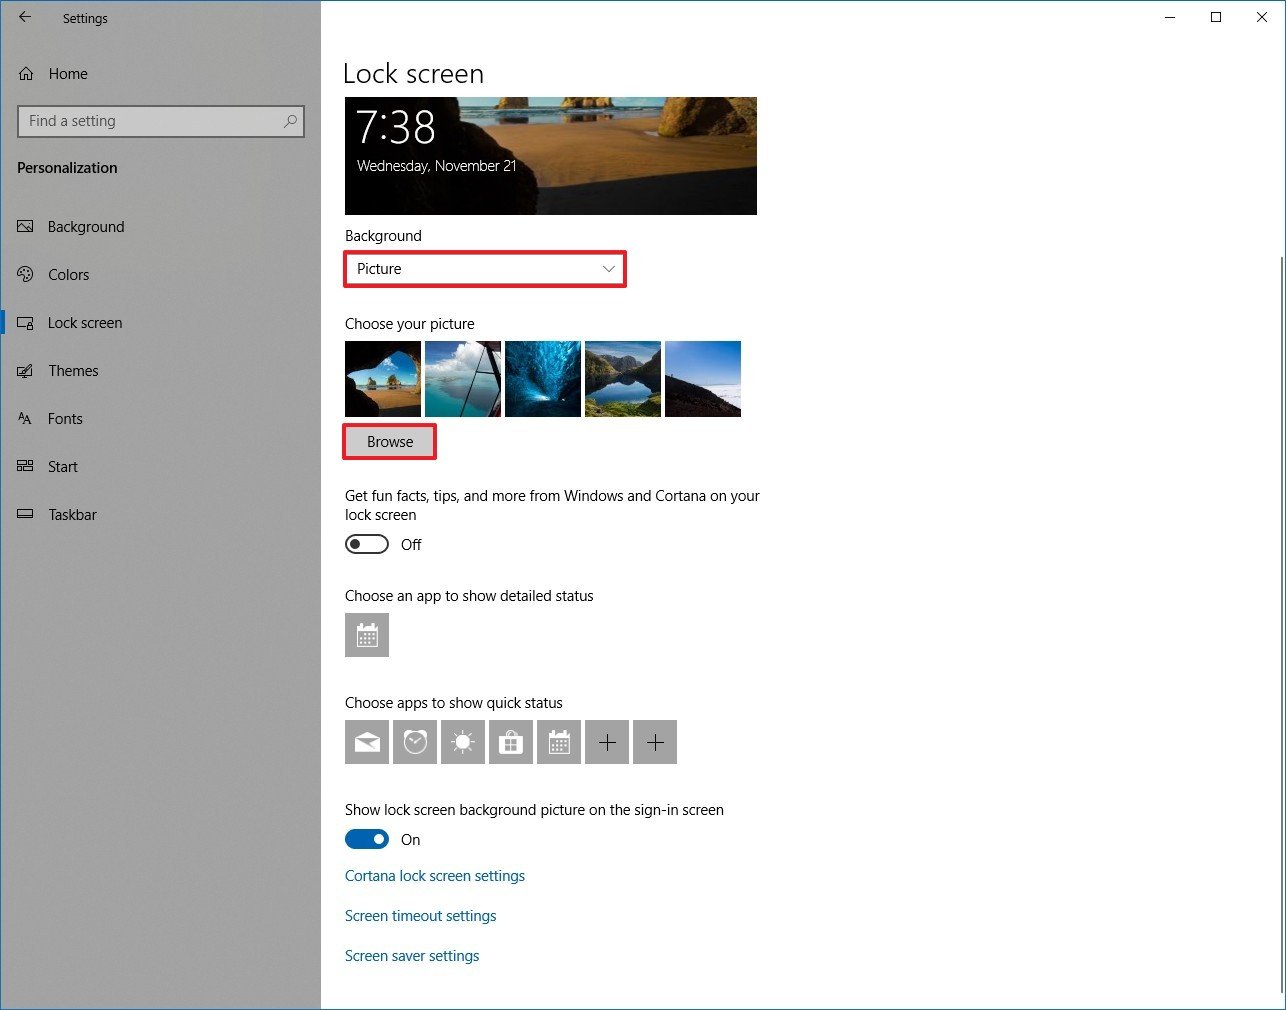
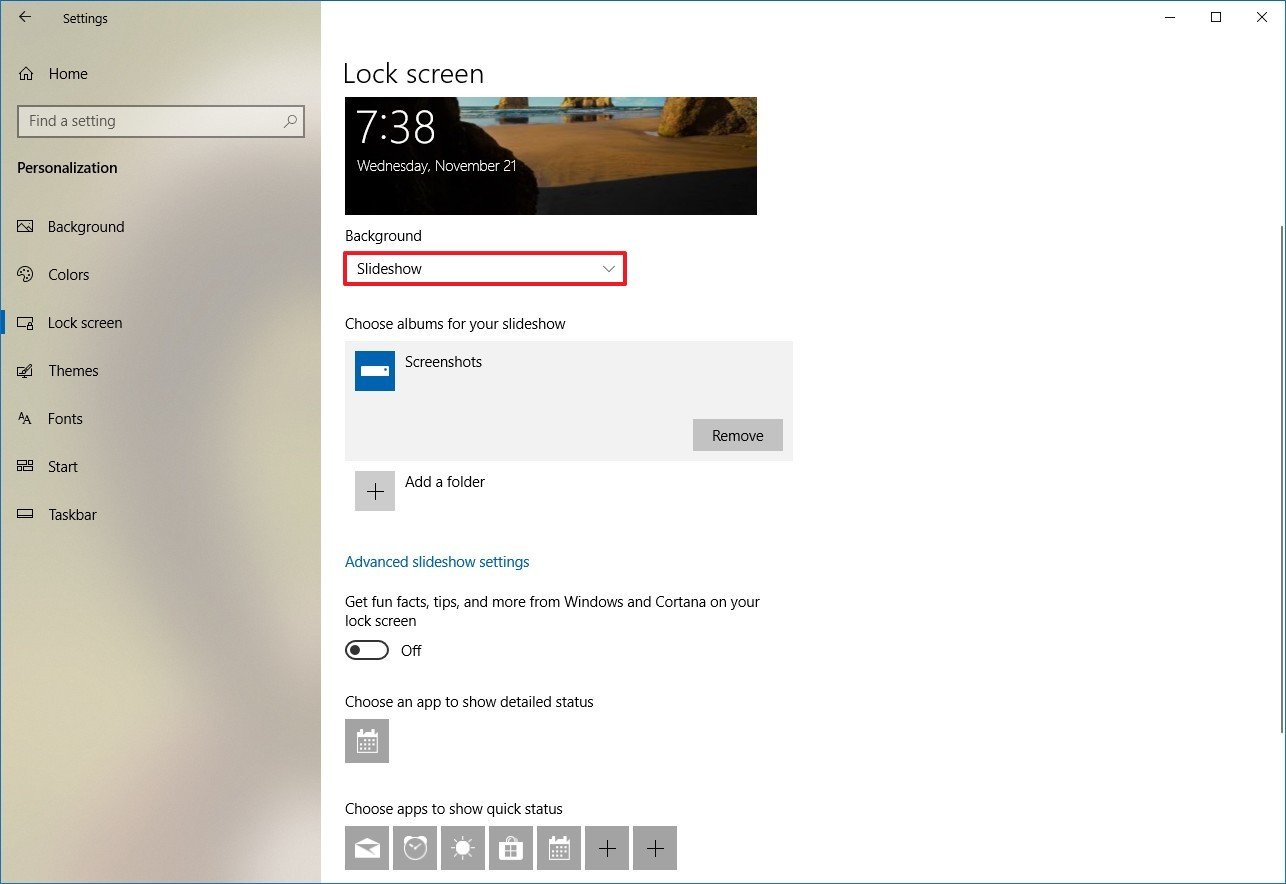
To customize the background image:
-
In the Settings app on your Windows device, select Personalization > Lock screen or use the following shortcut:
Lock screen
-
Under Personalize your lock screen, select one of the following options:
-
Windows spotlight: displays a rotating set of images from Microsoft, along with tips, tricks, and notifications
-
Picture: select a single image as your lock screen background. You can choose from the default images or browse your device for a custom picture
-
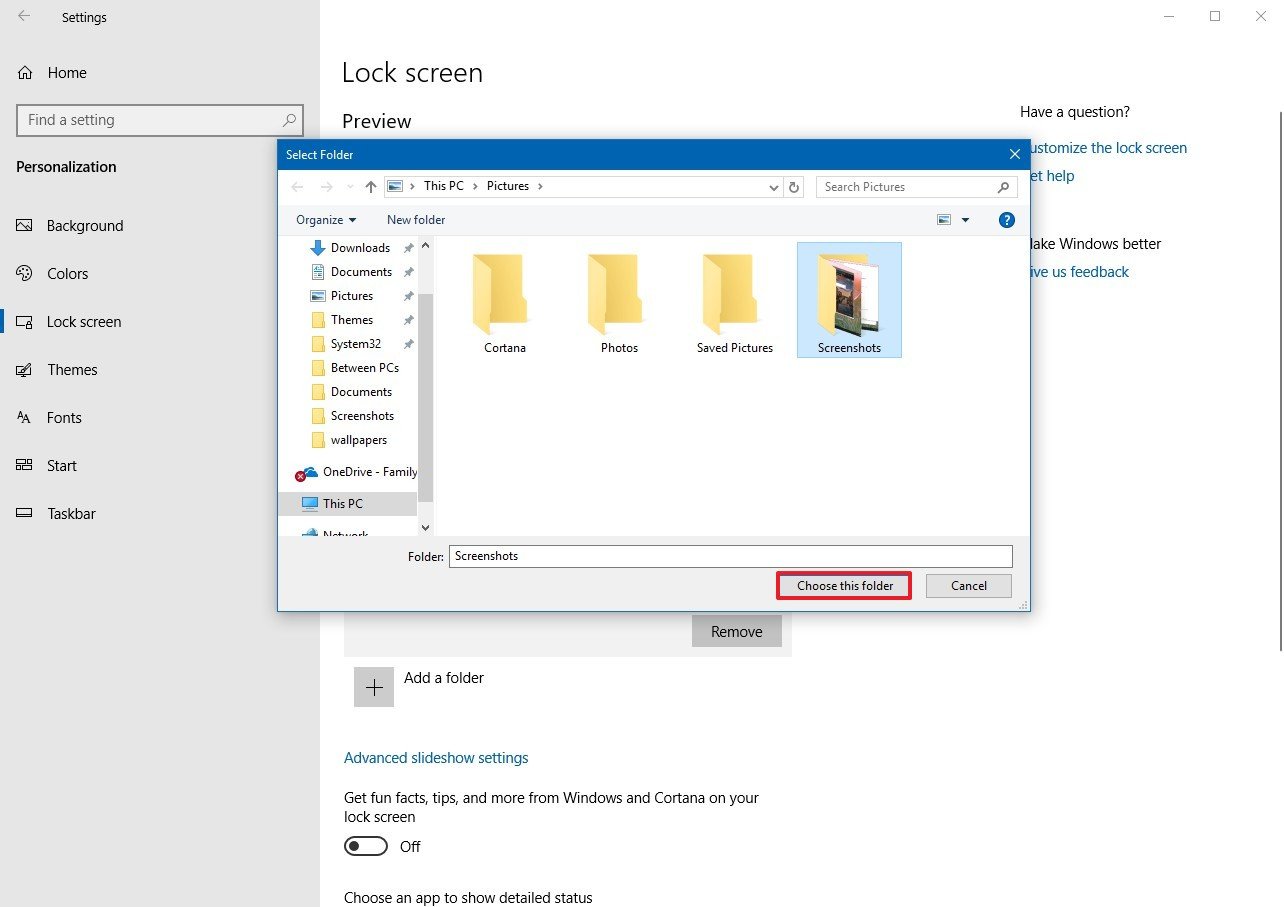
Slideshow: use a slideshow of images from a folder on your device. You can add multiple folders and customize the slideshow settings
Tip: enable the option Get Fun Facts, Tips, Tricks, and More on Your Lock Screen to receive additional content from Microsoft directly on your lock screen.
-
-
Toggle On or Off the option Make the lock screen image react when I move my PC to enable or disable the background motion feature. When enabled, the image will slightly pan or move in response to your device’s physical movement, creating a dynamic effect
-
Toggle On or Off the option Show the lock screen background picture on the sign-in screen to use the same background image for both the lock screen and the sign-in screen, ensuring a consistent visual experience
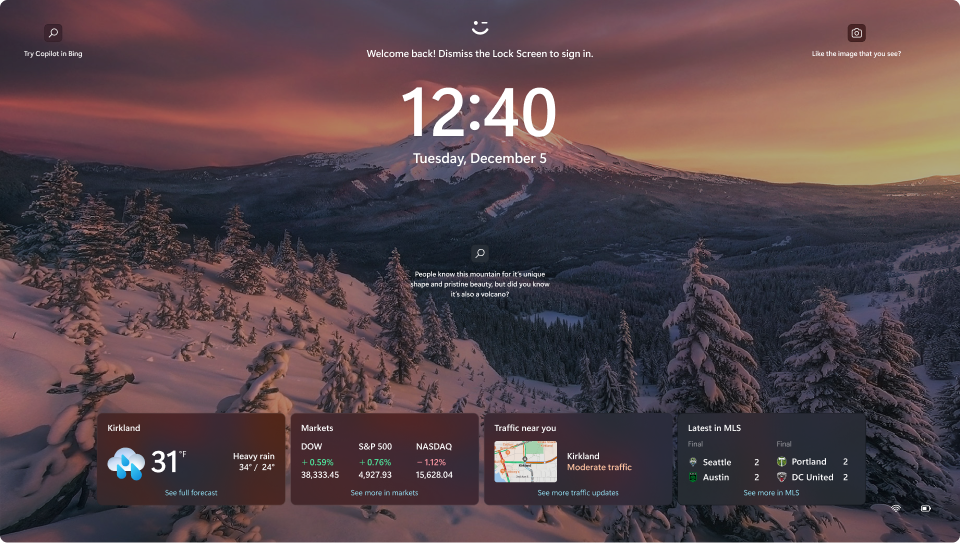
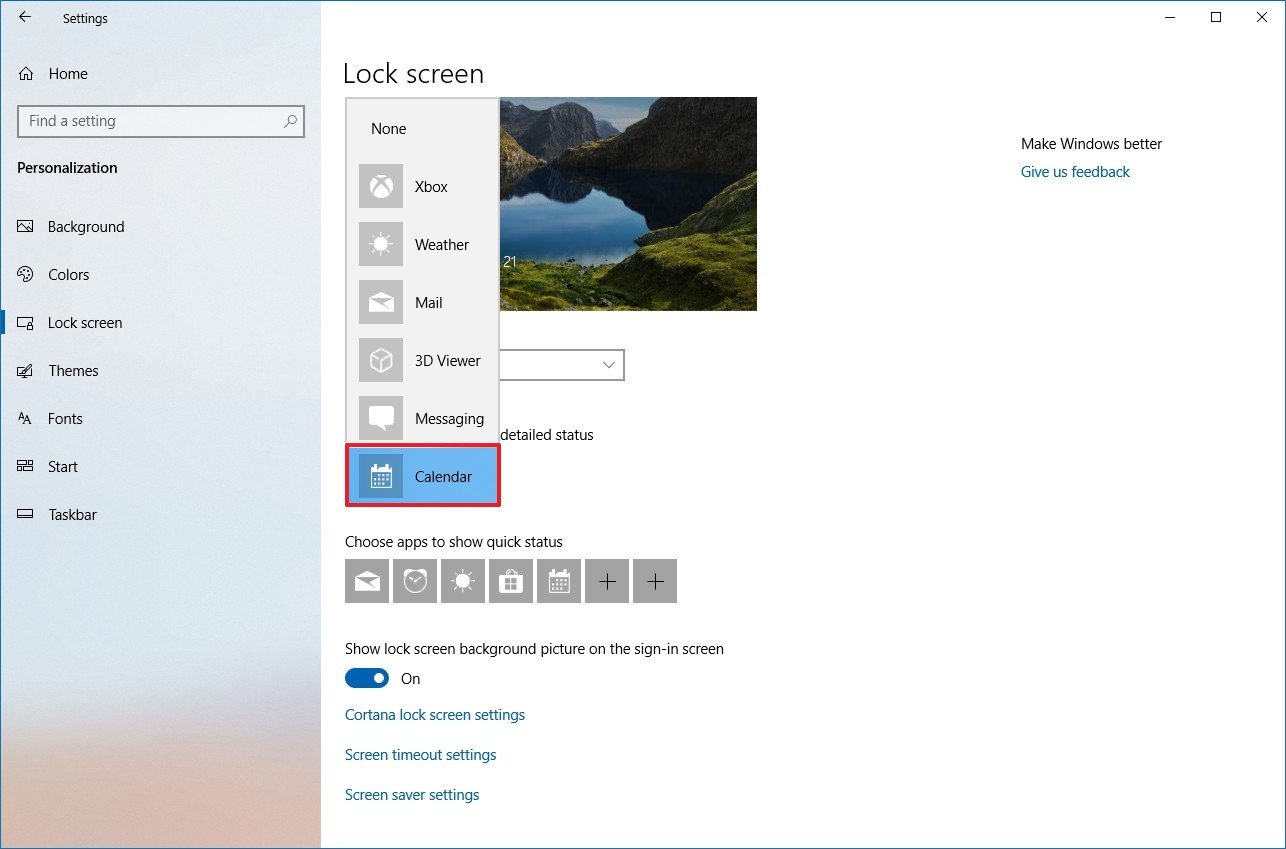
You can personalize your lock screen by displaying detailed status information from a specific app. This feature allows you to choose an app to show relevant updates directly on the lock screen.
-
In the Settings app on your Windows device, select Personalization > Lock screen or use the following shortcut:
Lock screen
-
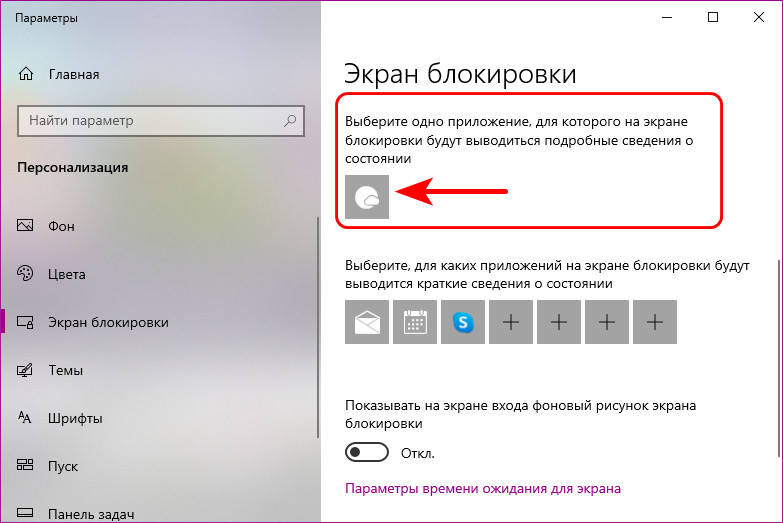
Under Lock screen status, select an app that can show detailed status on the lock screen, for example Weather and more. You can also select None if you don’t want to see detailed status on the lock screen
Weather and more app

The Weather and more app for the Windows lock screen enhances the lock screen experience by providing dynamic, real-time updates. It displays current weather conditions, dynamic updates related to finance, sports, traffic, and more through small widgets.
This app allows you to stay informed at a glance without unlocking your device, making it a convenient tool for quick updates. To read more about the information displayed on a widget, select it on the lock screen, sign in, and view the full details in Microsoft Edge.
Note: Currently, you can’t customize the widgets list in the Weather and more app.
The Weather and more app leverages the Widgets app for its configuration. You can customize location, language, region, and temperature units by configuring Widgets. For more information, see Configure Widgets settings.
Note: the Weather and more app on the lock screen might tailor content based on your location estimation to provide you with the most contextually relevant experience. Location estimation can come from the Windows Location service, if enabled, otherwise it might fall back on using the IP address of your internet connection.
Send us feedback
|
Let us know what you like, share your ideas, and offer suggestions on how to make the experience better through Feedback Hub. In the Feedback Hub app on your Windows device, select Desktop Environment > Lock screen. |
Need more help?
Want more options?
Explore subscription benefits, browse training courses, learn how to secure your device, and more.
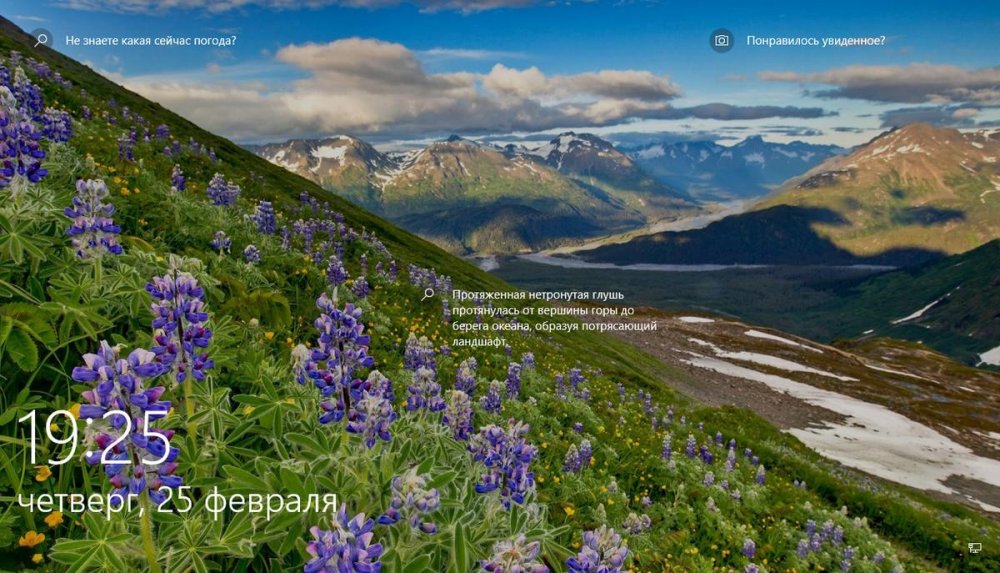
Привет, друзья. Тема этой публикации — как поменять экран блокировки на Windows 10. Создатель операционной системы — компания Microsoft – не особо щедра в реализации штатных пользовательских возможностей по настройке экрана блокировки, но кое-что немногое изменить в нём мы можем. Кстати, если он вам не нужен, вы можете его вообще отключить, а как это сделать, смотрите в статье сайта «Как отключить экран блокировки в Windows 10». Если же нужен, давайте разбираться с теми немногими настроечными возможностями, которые доступны для него. А это смена картинки, запуск слайд-шоу фотографий, настройка сведений приложений, настройка фона входа пользователя в Windows 10.

Итак, друзья, экран блокировки Windows 10. Это системная среда вне пользовательских учётных записей, среда, где пользователи операционной системы выполняют вход в свои учётные записи и имеют доступ к некоторым системным функциям. И сделана эта среда на фоне приятных картинок живописных пейзажей, показываемых нам в рамках по умолчанию активной функции «Windows: Интересное».
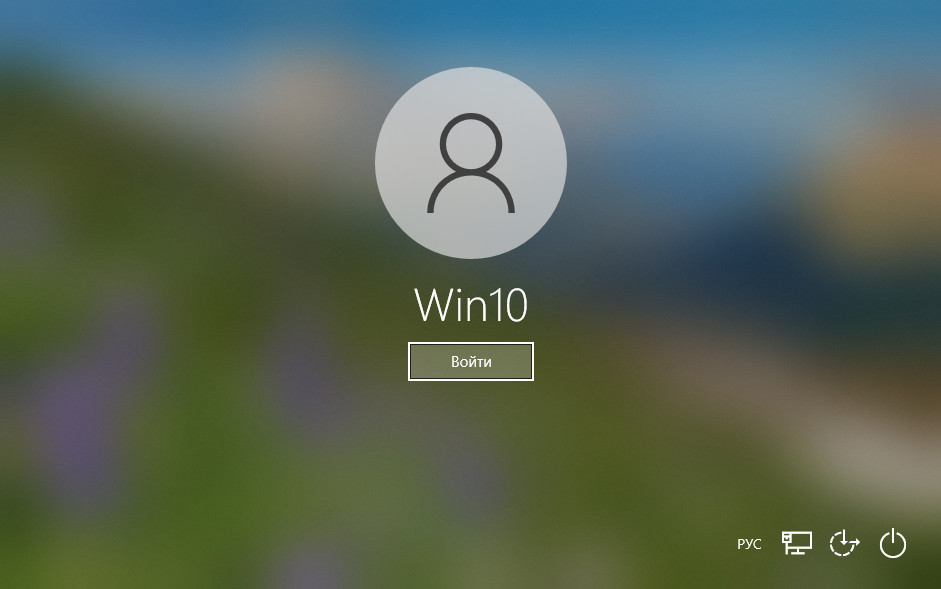
При клике по экрану блокировки фон заблюривается, и мы получаем доступ ко входу в наши учётные записи, а также к функциям смены языковой раскладки, настройки Интернета и выключения компьютера.
Настраивается экран блокировки в системных настройках персонализации Windows 10. А чтобы настройки персонализации были доступны, ваша операционная система, друзья, должна быть активирована. На рабочем столе вызываем контекстное меню и выбираем «Персонализация».
В самих настройках персонализации идём в радел «Экран блокировки». И вот что нам здесь доступно.
По умолчанию в качестве фона экрана блокировки Windows 10 показываются разные картинки в рамках активной функции «Windows: Интересное», она же Windows Spotlight. Эта функция подтягивает с ресурсов Microsoft эффектные пейзажи и меняет их каждый день. Кроме того, на самих картинках отображаются различные занимательные факты о местностях, изображённых на картинках. А иногда отображаются советы по работе с Windows 10 и продуктами Microsoft.
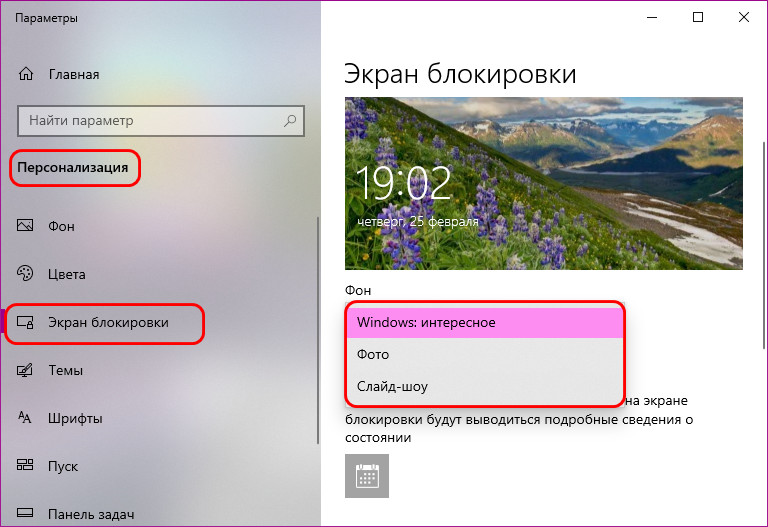
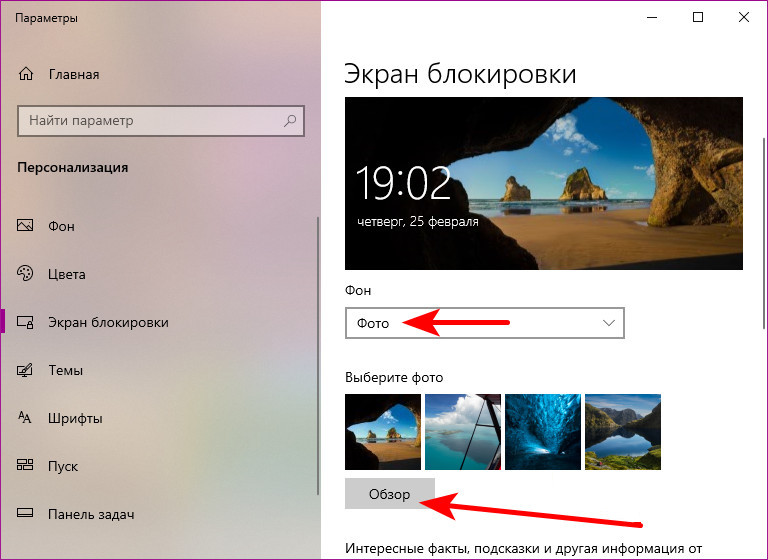
Если вы хотите на экране блокировки видеть свои изображения – свои пейзажи, иные картинки, свои фото, выбираем в качестве фона «Фото» и с помощью кнопки обзора указываем на изображение на диске компьютера.
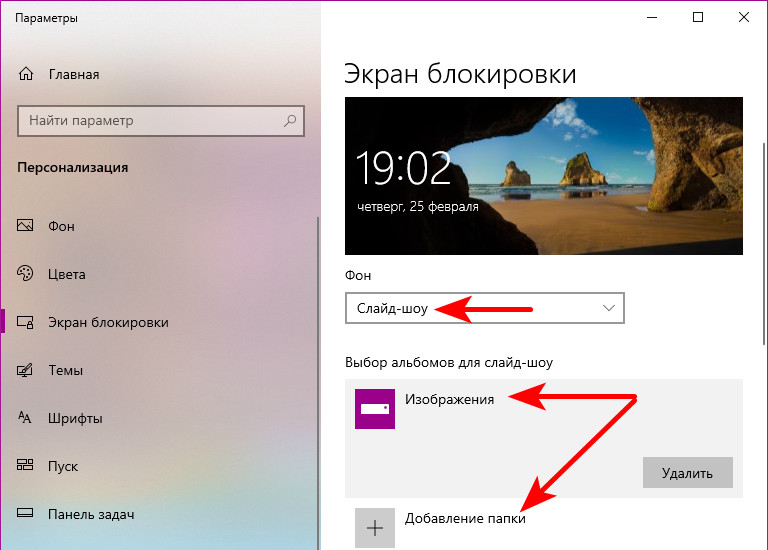
Третий вариант фона при настройке экрана блокировки Windows 10 – слайд-шоу. Этот вариант не меняет главное изображение экрана блокировки, но добавляет на экран воспроизведение слайд-шоу картинок из добавленных папок. Выбираем в качестве фона «Слайд-шоу» и добавляем папку с картинками на компьютере.
В настройках экрана блокировки Windows 10 можем выбрать современные универсальные приложения, которые будут выводить на экран какие-то сведенья – число новых писем или сообщений, пропущенные звонки по Скайпу, задачи планировщика и т.п. Одно приложение можно настроить для подробных сведений, а семь приложений — для кратких сведений. Конечно, у каждого свои приоритеты, но наверняка для многих актуальным будет отображение погоды на экране блокировки. Для этого нужно указать приложение «Погода» в качестве того одного, для которого будут отображаться подробные сведения.
И последняя настройка экрана блокировки Windows 10 – настройка экрана входа в учётную запись. Для него при желании можно отключить фоновый рисунок, применяемый к экрану блокировки.

И лицезреть просто однотонный фон из акцентного системного цвета.

Друзья, есть ещё одна возможность настроить экран входа в учётную запись Windows 10, не предусмотренная настройками персонализации – возможность убрать эффект блюра (размытия). Т.е. сделать так, как было в системе до версии 1903, которая и привнесла такое дизайнерское решение. Для этого нужно кое-что подправить в системном реестре. Запускаем его, вводим в системный поиск:
regedit
Раскрываем путь:
Компьютер\HKEY_LOCAL_MACHINE\SOFTWARE\Policies\Microsoft\Windows\System
Создаём 32-битный параметр DWORD.
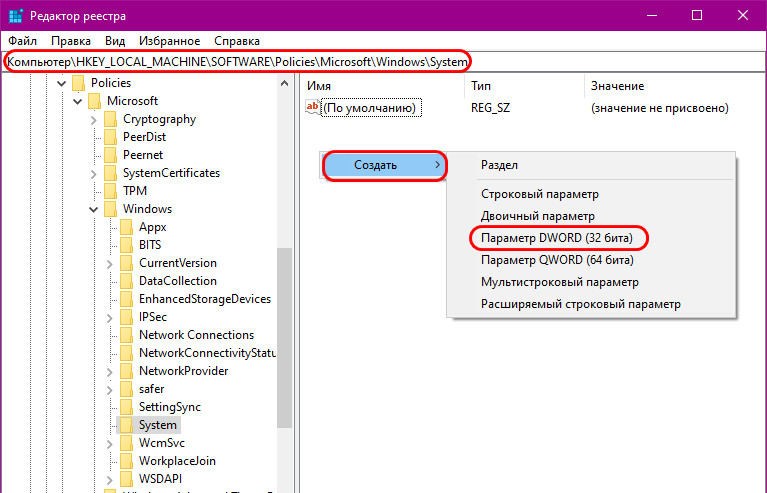
Называем его:
DisableAcrylicBackgroundOnLogon
Устанавливаем его значение 1.
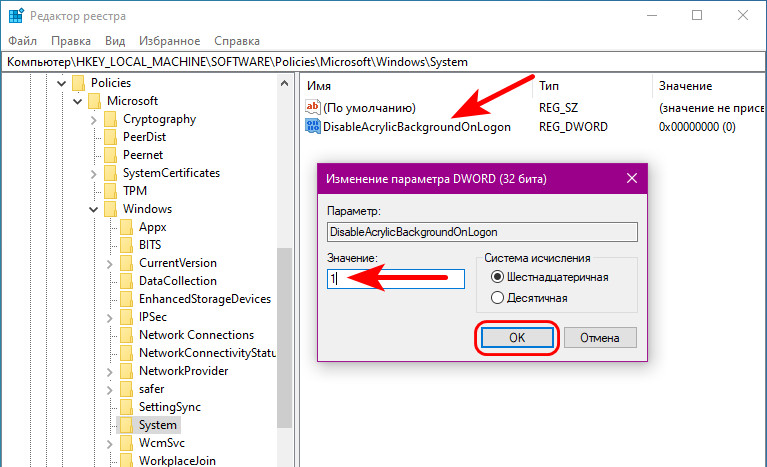
Если нужно будет впоследствии вернуть эффект блюра, просто удаляем этот параметр.
Вот это, друзья, как поменять экран блокировки на Windows 10: системные настроечные возможности в этом плане весьма скромны, но в общем-то более и не нужно. У Microsoft есть ещё много непаханых полей…
Экран блокировки Windows 10 — экран, как правило с каким-либо фото, отображением даты и времени, который появляется при включении компьютера перед входом в систему, вызывается сочетанием клавиш Windows + L и при выборе пункта «Заблокировать» после нажатия по значку учетной записи в меню Пуск, появляется после выхода компьютера или ноутбука из спящего режима.
Этот экран можно настроить — не только изменить обои экрана блокировки, но и добавить дополнительные элементы на него, о чем и пойдет речь в этой инструкции. Также может быть полезным: Как отключить экран блокировки Windows 10, Как отключить размытие фона на экране входа в Windows 10.
- Как поменять обои экрана блокировки Windows 10
- Добавление приложений на экран блокировки
- Видео инструкция
Как поставить или изменить обои на экране блокировки Windows 10
Самая простая задача — изменение обоев на экране блокировки, сделать это можно следующим образом:
- Нажмите правой кнопкой мыши в пустом месте рабочего стола и выберите пункт «Персонализация», либо зайдите в Параметры — Персонализация.
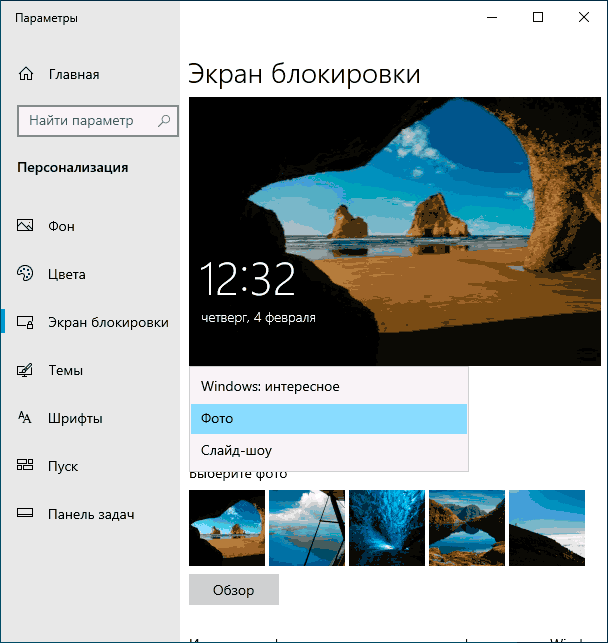
- В списке слева выберите пункт «Экран блокировки». А затем в поле «Фон» укажите, что отображать на экране блокировки, варианты описаны ниже.

- Windows: интересное — фотографии от Майкрософт, автоматически сменяющиеся время от времени). Если вы захотите забрать одно из таких фото себе, вам пригодится: Где хранятся обои экрана блокировки и рабочего стола Windows 10.
- Фото — вы можете выбрать фото из доступных ниже поля выбора фона, либо нажать «Обзор» и выбрать ваше изображение на компьютере
- Слайд шоу — при этом выборе на экране блокировки будут меняться фото из вашей папки «Изображения», а при желании, вы можете сами указать, из каких папок брать фото для обоев.


Эти же обои будут показываться не только на экране блокировке, но и на экране входа (с полем ввода пароля и кнопкой «Войти»). Если вы хотите отключить эту опцию — пролистайте список параметров внизу и отключите пункт «Показывать на экране входа фоновый рисунок экрана блокировки».
Внимание: очень частый вопрос пользователей связан с тем, что при выборе пункта «Windows: интересное» обои на экране блокировки не изменяются. Иногда это нормальное поведение (они не должны меняться каждый день и после каждой перезагрузки). Но иногда проблема более серьёзная и здесь может помочь инструкция Что делать, если не меняются обои на экране блокировки Windows 10.
Добавление приложений на экран блокировки
В Windows 10 присутствует возможность добавлять содержимое различных приложений Windows 10 — встроенных или из магазина Microsoft Store. Для этого:
- Перейдите в Параметры — Персонализация — Экран блокировки.
- В разделе «Выберите одно приложение, для которого на экране блокировки будут выводиться подробные сведения», нажмите по значку приложения и выберите, для какого приложения вам требуется видеть более подробную информацию. Например, вы можете добавить погоду на экран блокировки.

- Ниже укажите до 6 приложений, которые будут показывать информацию в кратком виде (впрочем, по какой-то причине некоторые из приложений хотя и можно выбрать, к каким-либо изменениям на экране блокировки не приводят).
- Также, возможно, вы захотите отключить пункт «Интересные факты, подсказки и другая информация от Windows и Кортаны на экране блокировки» вверху.

В итоге, после коротких экспериментов можно добиться нужного вам внешнего вида экрана блокировки, мой результат — на изображении ниже.

Здесь в качестве обоев установлено фото со сплошным черным цветом, а также добавлены некоторые приложения.
Видео
Если у вас есть собственные решения для настройки оформления экрана блокировки — буду рад комментарию к статье.
On Windows 10, the Lock screen is the experience that you always see before signing in to your account, and while it may seem like something unnecessary, it provides some useful functionalities, even before accessing the desktop.
For example, in the Lock screen, you can see the current date and time, show calendar events, and notifications from other apps. You can also interact with Cortana, showcase your favorite background images, personal pictures, and beautiful images from Bing using Windows Spotlight.
In this Windows 10 guide, we’ll walk you through the steps to customize and get the most out of the Lock screen experience.
- How to customize background in the Lock screen
- How to customize apps notifications in the Lock screen
- How to disable the Lock screen background in the sign-in screen
- How to allow Cortana above the Lock screen
- How to set screen timeout in the Lock screen
How to customize background in the Lock screen
Windows 10 allows you to customize the look of the Lock screen using the Windows Spotlight service, a single picture, or you can even showcase a collection of images from one or multiple folders.
Using Windows Spotlight
Spotlight is a feature that connects with Bing to download and set new background images automatically to keep the experience fresh every time you have to sign in to Windows 10. You can enable the feature using these steps:
- Open Settings.
- Click on Personalization.
- Click on Lock screen.
- Use the «Background» drop-down menu, and select the Windows Spotlight option.
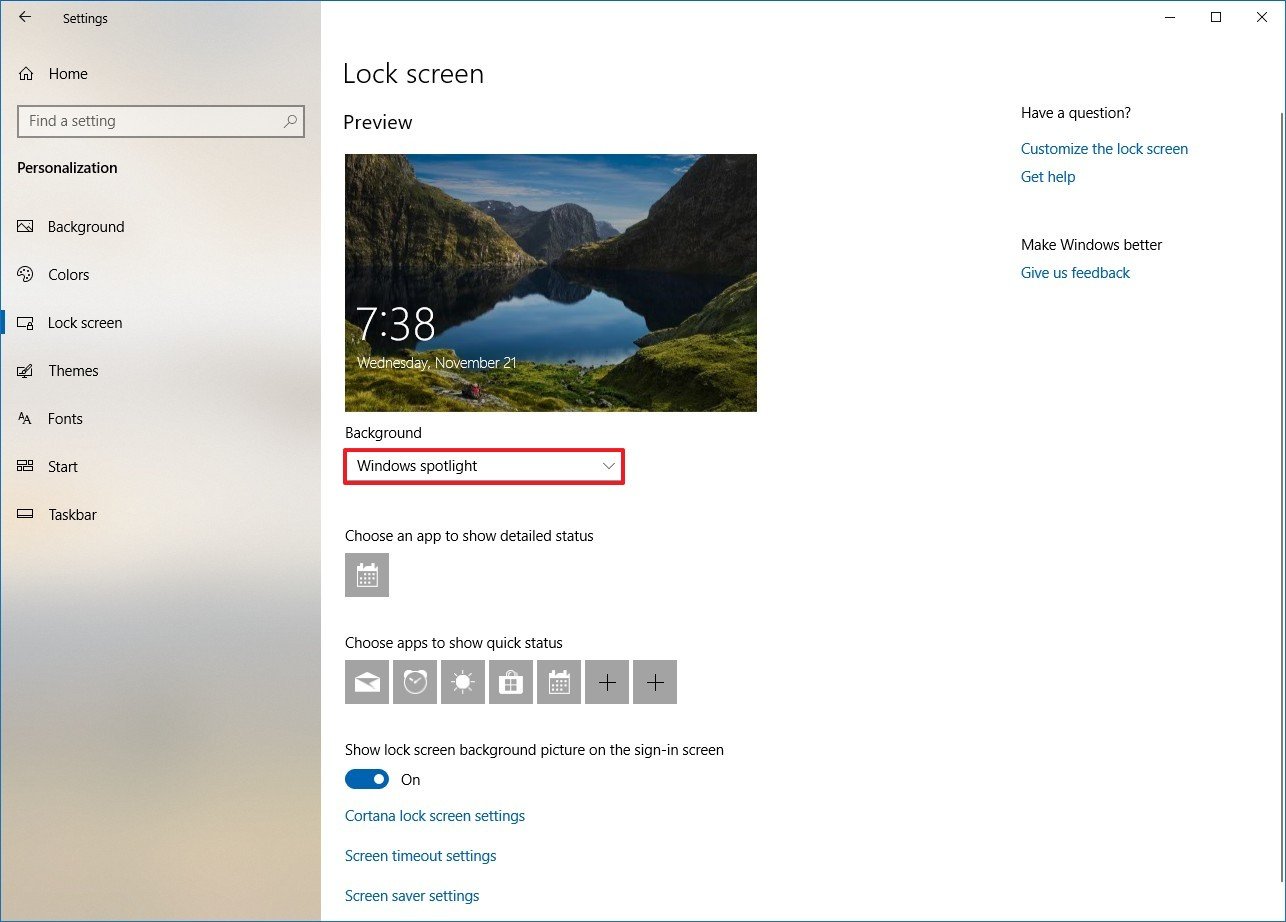
Once you’ve completed the steps, the Lock screen will now include a new image every time that you sign in to your account.
If you’re having problems getting Spotlight to work, you can use this guide to troubleshoot and fix most common issues.
All the latest news, reviews, and guides for Windows and Xbox diehards.
Using a single image
If you want to see always a particular image, you can customize the Lock screen to display a single image with these steps:
- Open Settings.
- Click on Personalization.
- Click on Lock screen.
- Use the «Background» drop-down menu, and select the Picture option.
- Click the Browse button to locate the image you want to use.
In addition, you may want to turn off the Get fun facts, tips, and more from Windows and Cortana on your lock screen toggle switch to get a cleaner experience.
Using image collection
Alternatively, you can use the following steps to showcase a collection of images from one or multiple folders in the Lock screen:
- Open Settings.
- Click on Personalization.
- Click on Lock screen.
- Use the «Background» drop-down menu, and select the Slideshow option.
- Select the Pictures item.
- Click the Remove item.
- Click the Add a folder button.Quick Tip: Using this option, you can add one or more folders with images.
- Browse the location of the folder with images that you want to showcase in the Lock screen.
- Select the folder.
- Click the Choose this folder button.
If you want to customize the experience further, click the Advanced slideshow settings option, and select enable or disable the options that you want to use while showing a collection of photos in the Lock screen, including:
- Include Camera Roll folders from this PC and OneDrive: In addition to the folders you selected, turning on this toggle switch, the Lock screen will also display images stored in your Camera Roll and OneDrive Camera Roll folders, which usually include the photos from your phone and other devices.
- Only use pictures that fit my screen: If you have multiple sizes of images in the folder, only those that will fit the screen will be displayed.
- When my PC is inactive, show lock screen instead of turning off the screen: This option is similar to setting up a screensaver on Windows 10. In addition, you can use the drop-down menu to specify when to turn off the screen after the slideshow played for a period of time.

Finally, you may also want to turn off the Get fun facts, tips, and more from Windows and Cortana on your lock screen toggle switch to get a cleaner experience.
How to customize apps notifications in the Lock screen
The Lock screen is also capable of showing notifications from apps. Using this feature, you can set a single app to display detailed notifications, and you can show quick notifications for multiple apps.
Setting app detailed status
To set an app to show detailed status, use these steps:
- Open Settings.
- Click on Personalization.
- Click on Lock screen.
- Under «Choose an app to show detailed status» section, click the Plus (+) button to select the app you want to see more details in the Lock screen. (Using the None option will disable this feature.)
Once you’ve completed the steps, notifications with detailed information from the app that you specified will appear in the bottom-left corner of the Lock screen.
Setting apps quick status
To set one or more apps to show the number of unseen updates, use these steps:
- Open Settings.
- Click on Personalization.
- Click on Lock screen.
- Under «Choose an app to show quick status» section, click the Plus (+) button to select the app you want to see more details in the Lock screen. (Using the None option removes the item from the experience.)

- Repeat step No.4 to configure quick notifications for additional apps (up to 7).
After completing the steps, in the bottom-left corner of the screen, you’ll see icons with badges letting you know the number of unseen updates for each application that you configured to appear in the Lock screen.
How to disable the Lock screen background in the sign-in screen
Using the Lock screen settings, you can even decide if the Sign-in screen uses the same background image as the Lock screen:
- Open Settings.
- Click on Personalization.
- Click on Lock screen.
- Turn off the Show lock screen background picture on the sign-in screen toggle switch.

Once you’ve completed the steps, the sign-in screen will no longer include the same image as the Lock screen. Instead, it’ll show a solid color background from the current scheme configured in the Personalization settings.
How to allow Cortana above the Lock screen
If your device is equipped with a microphone, you can also use Cortana while in the Lock screen to query basic questions. Here’s how:
- Open Settings.
- Click on Personalization.
- Click on Lock screen.
- Click the Cortana lock screen settings option.
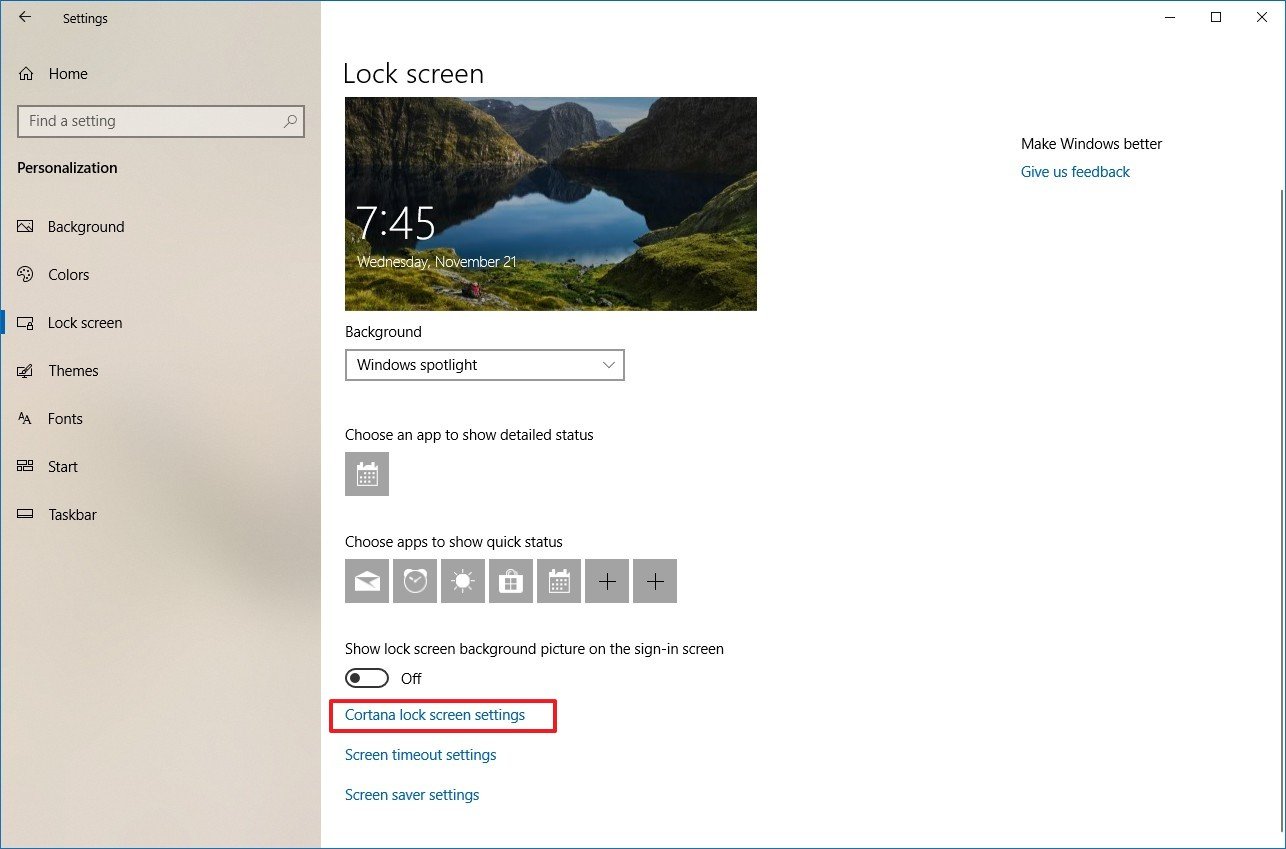
- Under the Lock screen section, turn on the Use Cortana even when my device is locked toggle switch.
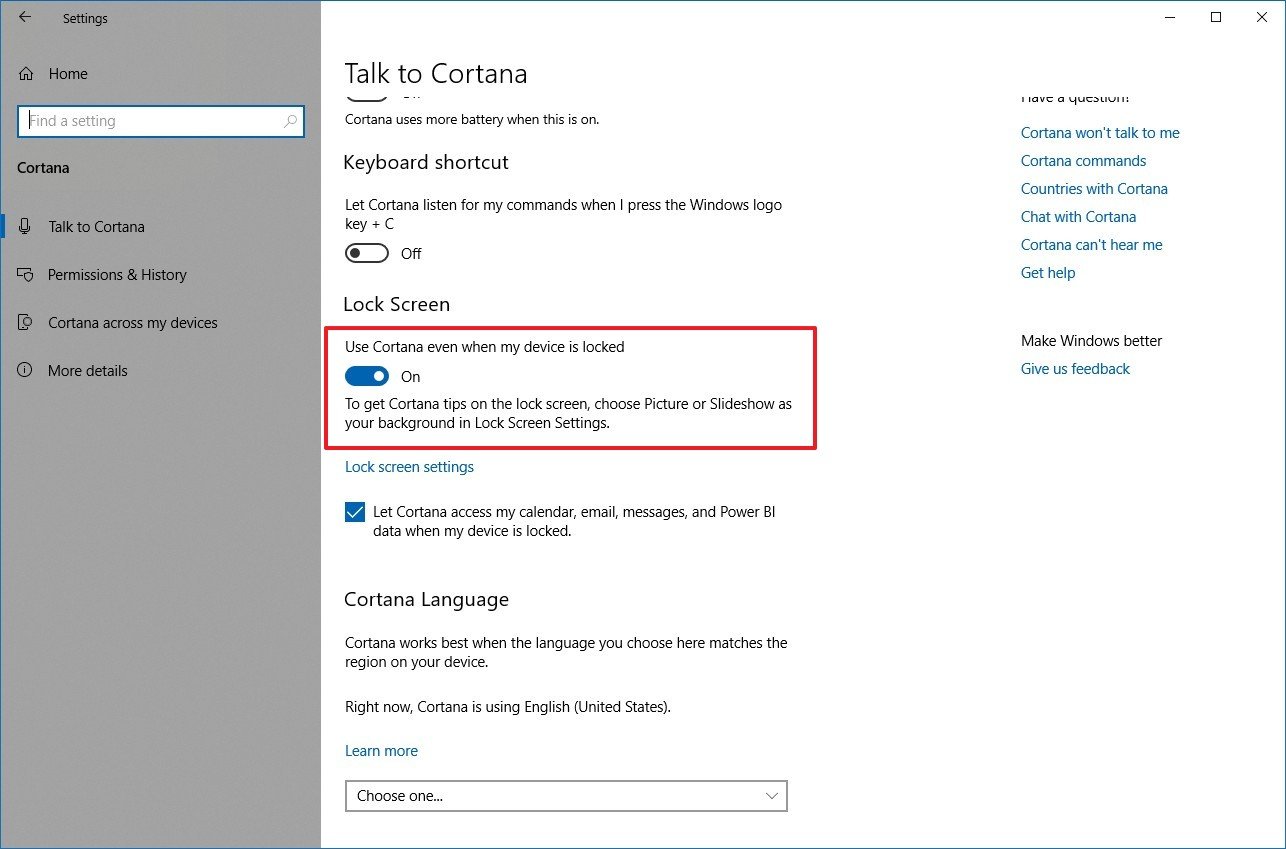
- (Optional) Check the Let Cortana access my calendar, email, messages, and Power BI data when my device is locked option.
After completing the steps, you can say the command «Hey Cortana» followed by your question, such as «How’s the weather?» to interact with the assistant in the Lock screen.
How to set screen timeout in the Lock screen
Also, if you always lock your device as you step out of the office using Dynamic lock or manually (Windows key + L), it’s also possible to set the time before the screen turns off automatically. Here’s how:
- Open Settings.
- Click on Personalization.
- Click on Lock screen.
- Click the Screen timeout settings option.

- Use the «Screen» drop-down menu to specify when your display should turn off when the device is plugged in.Quick Tip: If you’re changing these settings on a laptop, you’ll also see the option to adjust the screen settings when your computer is running on battery.
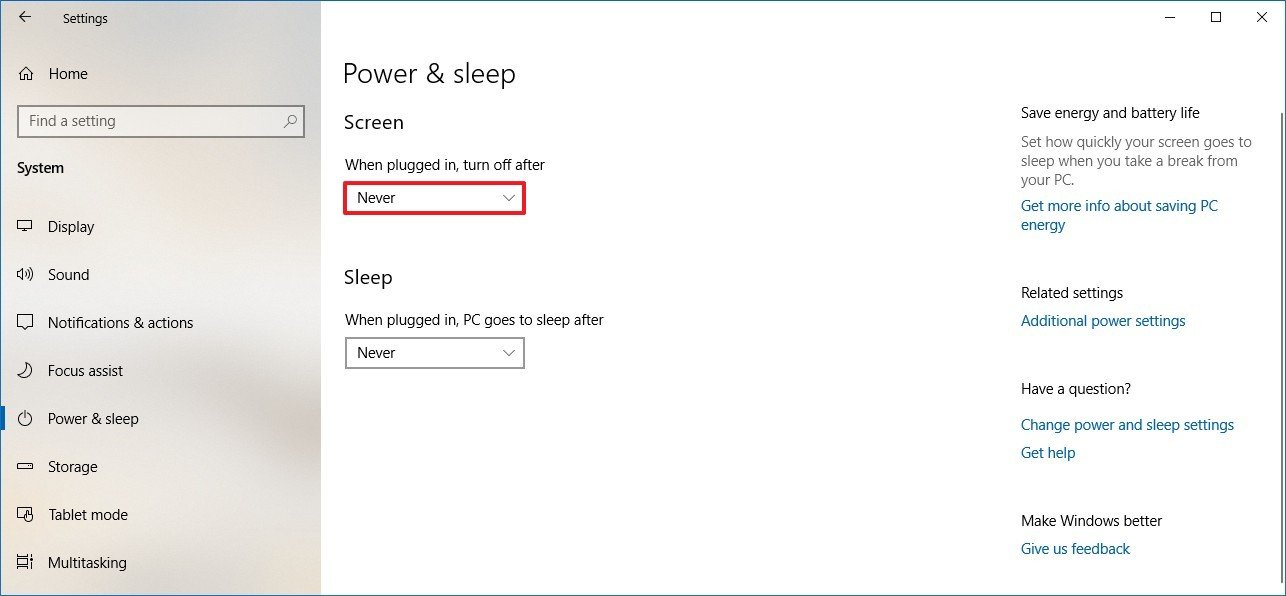
Once you’ve completed the steps, the screen will turn off automatically after the device is not active for the amount of time you specified.
More Windows 10 resources
For more helpful articles, coverage, and answers to common questions about Windows 10, visit the following resources:
- Windows 10 on Windows Central – All you need to know
- Windows 10 help, tips, and tricks
- Windows 10 forums on Windows Central
Mauro Huculak has been a Windows How-To Expert contributor for WindowsCentral.com for nearly a decade and has over 15 years of experience writing comprehensive guides. He also has an IT background and has achieved different professional certifications from Microsoft, Cisco, VMware, and CompTIA. He has been recognized as a Microsoft MVP for many years.
It’s something you stare at each time you sit down in front of your PC, but I doubt you even see it as you quickly type in your password and unlock windows. The
Windows 10
lock screen can be more than just a password-entry screen. It can be set up to show app notifications, calendar events and the date and time. You can add your own photos for its background or let Windows add rotating images. Here’s a handful of tips for customizing the Windows 10 lock screen.
Choose your background
You have three options for the lock screen background: Picture, Slideshow or Windows Spotlight. The Picture option lets you choose one of your photos for your background, and the Slideshow lets you choose a folder that will cycle through a collection of your photos. The Windows Spotlight will select high-resolution photos from Bing’s homepage. Spotlight photos cycle periodically. To make your selection, go to Settings > Personalization > Lock screen > Background.
Add some apps
If you want your lock screen to be functional, you can add up to eight apps that will display at-a-glance statuses — one app to show detailed statuses and seven apps to show quick statuses. To pick these apps, go to Settings > Personalization > Lock screen > Choose an app to show detailed status or Choose apps to show quick statuses. You can then click or tap a box to pick an app.
If you don’t want to show apps, click each box and set the app to None. Apps that can show statuses include Weather, Skype, Calendar, Mail, Store and Xbox. They’ll vary depending on the apps installed on your device.
Put Cortana on the lock screen
You can chat with Cortana without first unlocking your PC, but you’ll need to be comfortable with anyone being able to chat with Cortana. Head to Settings > Cortana and toggle on Use Cortana even when my device is locked. This will let her perform basic tasks, such as looking up information or the weather, while your device is locked. If you are comfortable with Cortana being able to access your personal information and do things like make appointments, you can check the box for Let Cortana access my calendar, email, messages, and Power BI data when my device is locked.
Change your sign-in screen background
You have two options for your sign-in screen background: A solid color or the photo displayed on your lock screen. To display a photo, go to Settings > Personalization > Lock screen and toggle on Show lock screen background picture on the sign-in screen. If you leave it toggled off, your sign-in screen will display a solid color. To choose this color, go to Personalization > Colors and pick an accent color.
Hide your email address
In the interest of privacy, Windows 10 lets you hide your email address on the sign-in screen. You can toggle it off by going to Settings > Accounts > Sign-in options > Privacy > Show account details (e.g. email address) on sign-in screen.
Turn off notifications
Lock screen notifications can be convenient but they can also be read by any passerby. To turn them off, go to Settings > System > Notifications & actions > Show notifications on the lock screen and toggle it off.
Originally published on Aug. 11, 2016.
Update, Dec. 6, 2018: Added information about Windows 10 October 2018 Update.