
Все способы:
- Шаг 1: Редактирование системного реестра
- Шаг 2: Изменение звука запуска системы
- Вариант 1: Значок звука в трее
- Вариант 2: Раздел «Персонализация»
- Вариант 3: «Панель управления»
- Если после выбора звука включения нет
- Вопросы и ответы: 5
Шаг 1: Редактирование системного реестра
Мелодия включения в «десятке» отличается от предыдущих ОС, но всегда есть возможность изменить ее, поставив собственный звук или из Windows 7 или XP.
Прежде чем менять звук в Windows 10, может потребоваться активировать данную функцию через «Редактор реестра», поскольку она может быть отключена по умолчанию. В отличие от предыдущих ОС, в этой доступна возможность смены только звука включения, а когда ПК выключается или выходит из сна – изначально системой никаких настроек для этого не предусмотрено.
Если вас интересует только звук запуска, то переходите к Шагу 2. Для активации возможности менять мелодию выключения внесите некоторые изменения в системном реестре.
Читайте также: Инструкция по созданию точки восстановления Windows 10
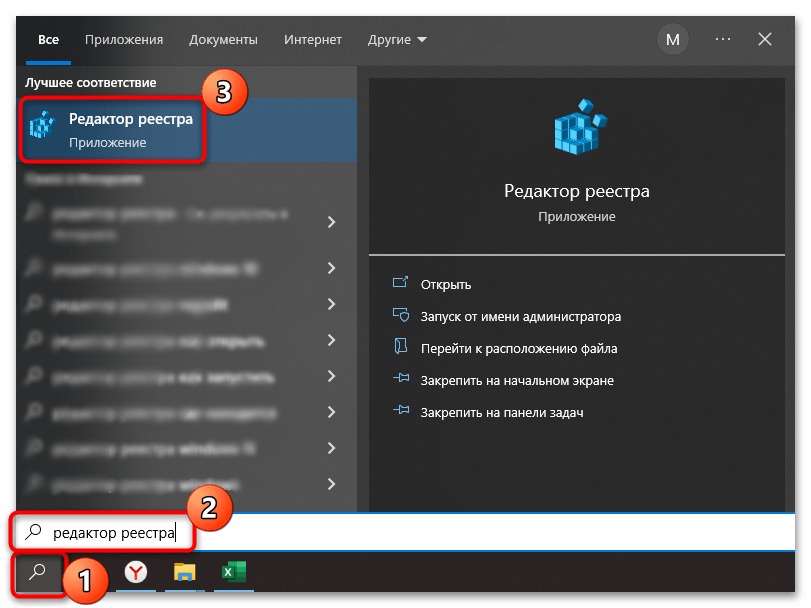
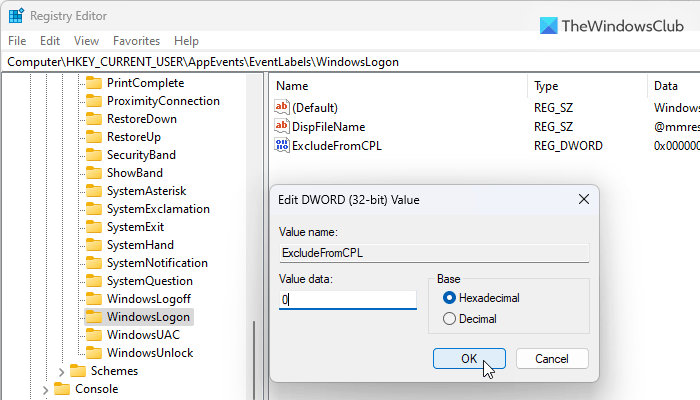
- Вызовите «Редактор реестра», отыскав приложение в меню «Пуска» через строку поиска.
- Перейдите по пути
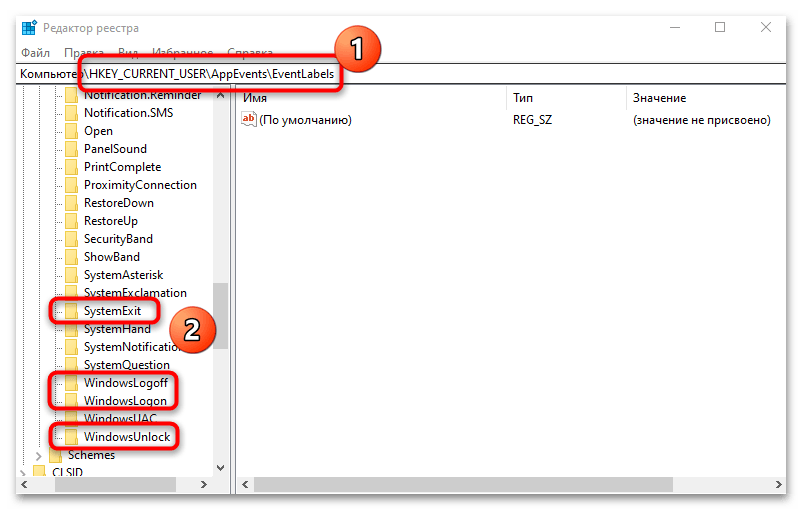
HKEY_CURRENT_USER\AppEvents\EventLabels. На панели слева обратите внимание на 4 раздела, которые соответствуют разным действиям в системе:
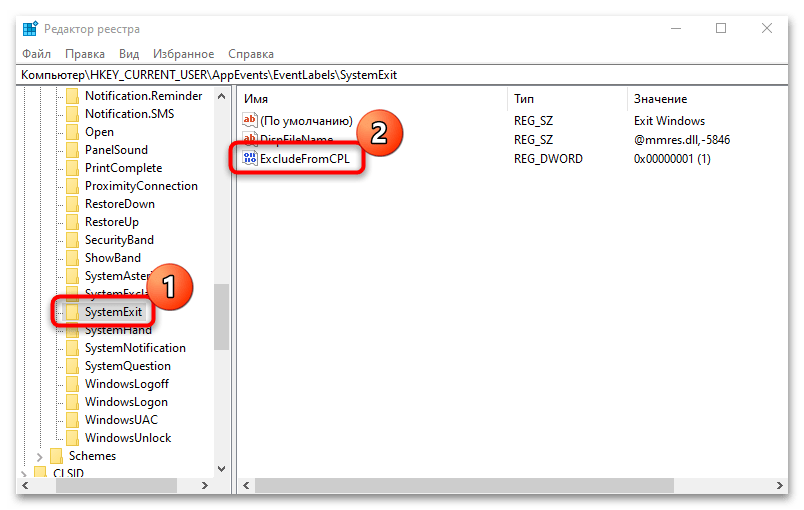
Название раздела Функция «SystemExit» Завершение работы Windows 10 «WindowsLogoff» Выход из системы «WindowsLogon» Вход в систему «WindowsUnlock» Разблокировка ОС - В каждом каталоге проделайте одну и ту процедуру с параметром под названием «ExcleudeFromCPL»: дважды щелкните по нему левой кнопкой мыши, чтобы перейти в окно с настройкой.
- В строке «Значение» пропишите «0» и сохраните настройки.
После этого при выборе мелодии в Шаге 2 станут доступны звуки не только для запуска, но и входа-выхода из системы, а также разблокировки.
Шаг 2: Изменение звука запуска системы
Звук старта Windows 10 меняется в одном и том же окне – «Звуки», но попасть в него можно несколькими способами. Разберем все, чтобы вы смогли выбрать наиболее предпочтительный.
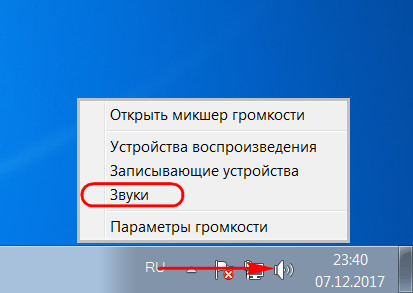
Вариант 1: Значок звука в трее
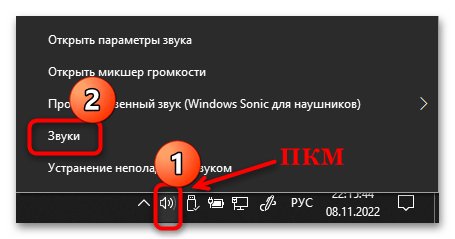
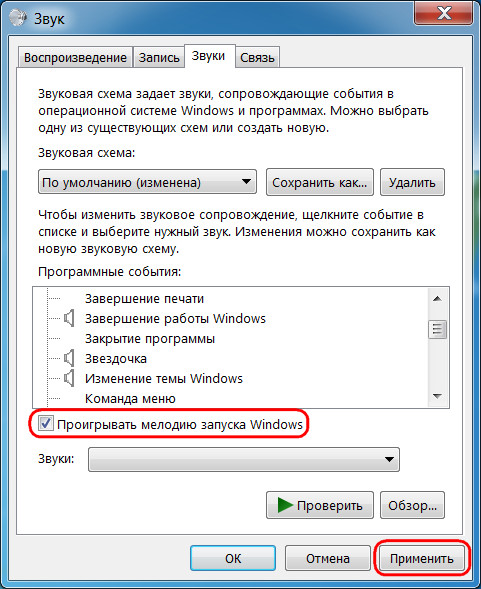
Самый быстрый и простой метод перейти в настройки звуков – это контекстное меню значка в виде динамика, который расположен в трее. Кликните по нему правой кнопкой мыши и в появившемся меню нажмите на «Звуки».
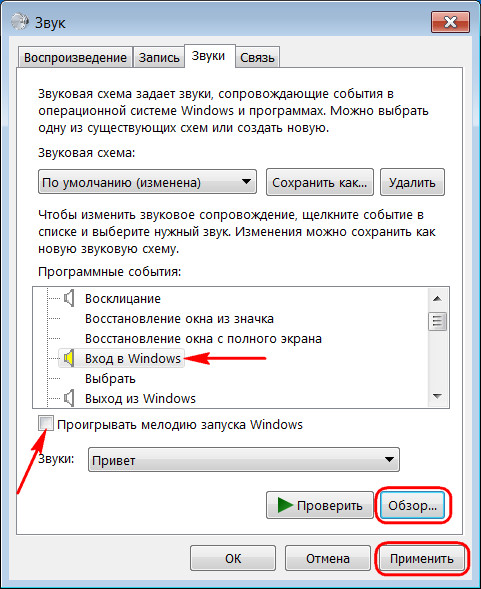
На одноименной вкладке выделите тип события в поле «Программные события» и отметьте галочкой пункт «Проигрывать мелодию запуска Windows», затем из выпадающего меню выберите другой звук, если нужно. Его можно прослушать, нажав на соответствующую кнопку.
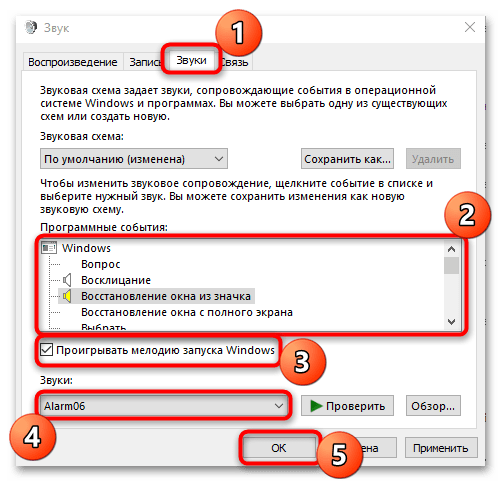
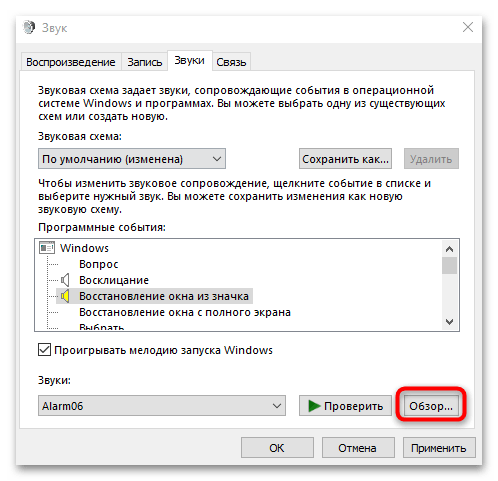
Настройки предусматривают возможность установить собственную мелодию, если стандартные варианты не устраивают: кликните по кнопке «Обзор» и выберите файл через интерфейс встроенного «Проводника».
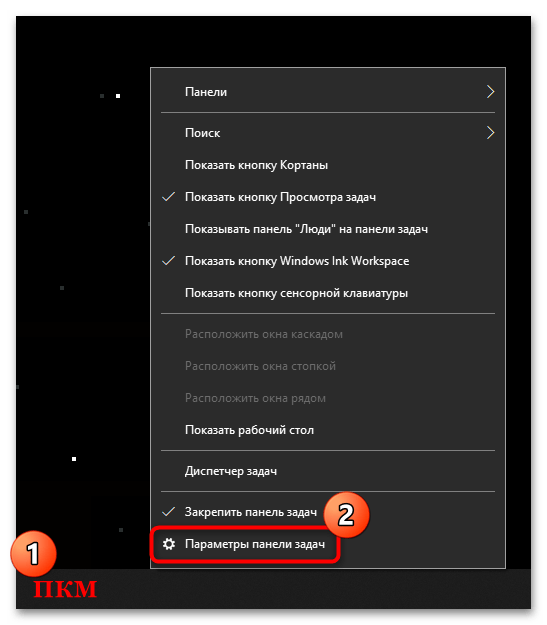
Если иконки на области уведомлений нет, возможно, ее отображение отключено. Чтобы включить:
- Щелкните по свободной области панели задач правой кнопкой мыши, затем на пункт «Параметры панели задач».
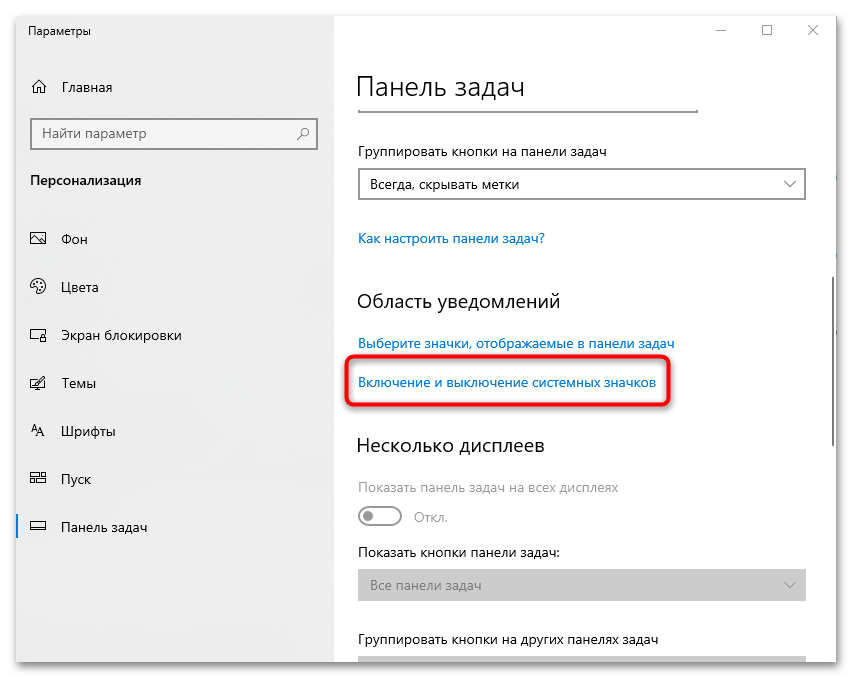
- Найдите блок «Область уведомлений» и кликните по строке «Включение и выключение системных значков».
- В новом окне переведите тумблер у параметра «Громкость» в активное состояние, если тот выключен.
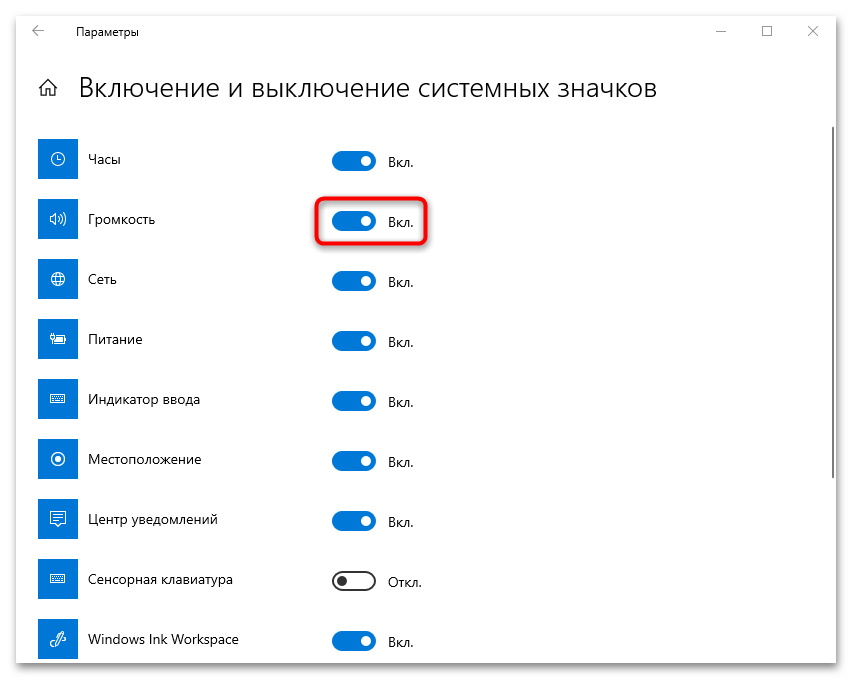
После этого в трее появится нужная иконка, через контекстное меню которой осуществляется быстрый переход в окно со звуками.
Вариант 2: Раздел «Персонализация»
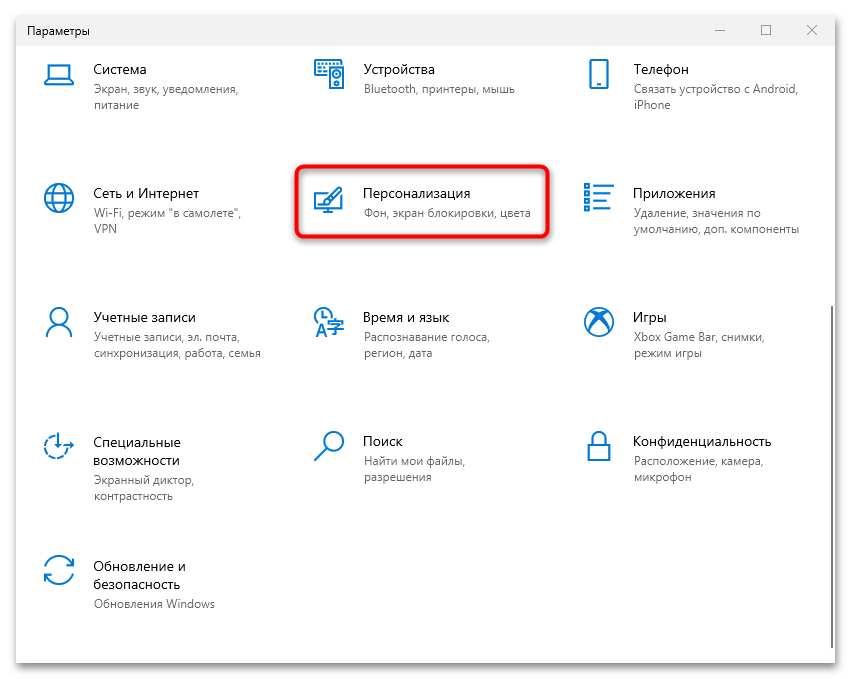
Изменить звук включения в Windows 10 можно через приложение «Параметры» и раздел «Персонализация»:
- Вызовите приложение «Параметры» через главное меню.
- Перейдите в раздел «Персонализация».
- Нажмите на вкладку «Темы» слева, затем в центральном окне на строку «Звуки».
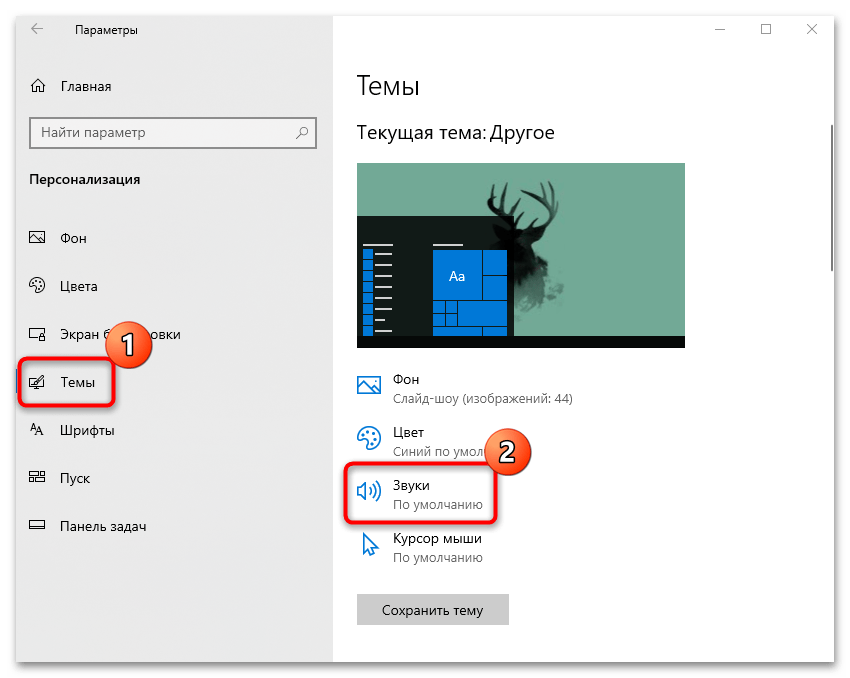
Вы попадете в то самое окно с настройкой звуков, где можно задать мелодию для запуска Windows 10, как уже было показано чуть выше.
Перейти в окно с персонализацией можно и через контекстное меню рабочего стола, щелкнув по свободной области правой кнопкой мыши.

Следует отметить, что настройки персонализации недоступны, если используется не активированная версия операционной системы. В такой ситуации вам помогут инструкции из Варианта 1 или 3.
Вариант 3: «Панель управления»
Также есть вариант изменить звук, используя интерфейс классической «Панели управления»:
- Откройте инструмент, вызвав для этого «Пуск» и введя в нем соответствующий запрос.
- В меню «Просмотр» из выпадающего меню выберите отображение разделов как мелкие или крупные значки. Нажмите на раздел «Звук».

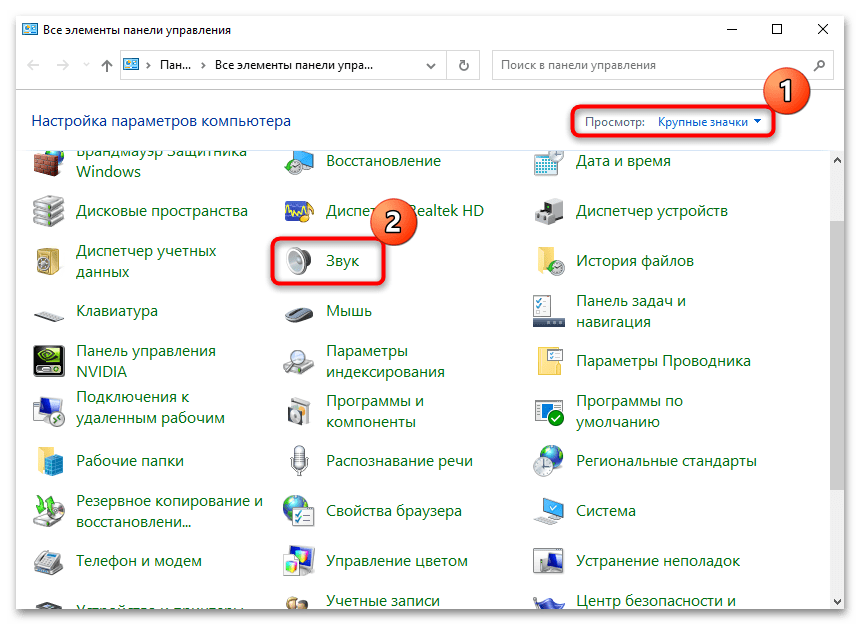
После этого откроется окно, где нужно перейти на вкладку «Звуки» и задать понравившуюся мелодия для старта Windows 10.
Читайте также: Открытие «Панели управления» на компьютере с Windows 10
Если после выбора звука включения нет
Активная функция быстрого запуска может стать причиной того, что при включении компьютера никаких звуков вовсе не слышно, даже если они выбраны и настроены. Это происходит по разным причинам, и чаще всего из-за конфликтов, вызванных сохранением части предыдущего сеанса для реализации этого самого быстрого запуска.
Чтобы исправить проблему со звуком при включении ПК, попробуйте отключить быстрый запуск с помощью настроек электропитания в «Панели управления» или посредством редактирования системного реестра. Об этом более детально можно узнать из нашей отдельной инструкции.
Подробнее: Отключение быстрого запуска в Windows 10

Наша группа в TelegramПолезные советы и помощь
Windows 10’s startup sound can be customized to play your favorite song or any other sound you like. If you get tired of Windows 10’s dull startup sound, you can change it to something you prefer.
To play a custom tune whenever your computer turns on, you must enable the startup sound setting. Otherwise, Windows 10 won’t start up with a startup sound.
First, you will need to disable fast boot. Once you have done that, you will be able to enable the startup sound.
Our gearupwindows article will walk you through every step required to enable Startup Sound in Windows 10.
How to Turn Off Fast Startup on Windows 10?
To disable the Fast Startup on Windows 10, follow these steps:-
Step 1. Open the Settings app by clicking the Start button, followed by the Settings icon.
Step 2. Click on the System category in the Settings window.
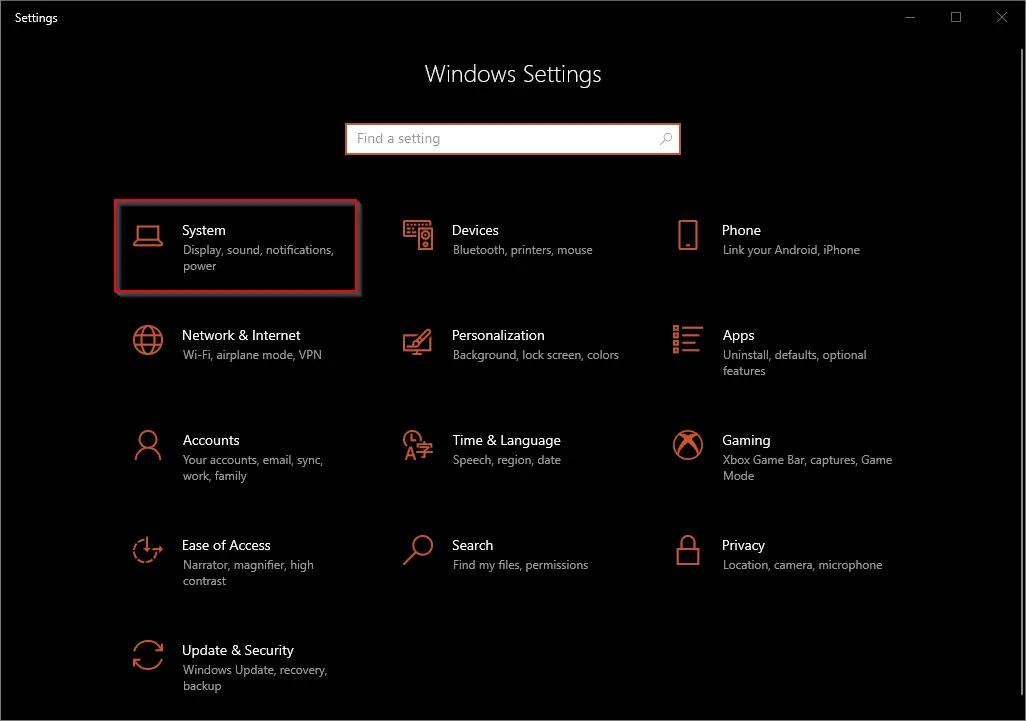
Step 3. Under “System,” click thePower & sleep tab.
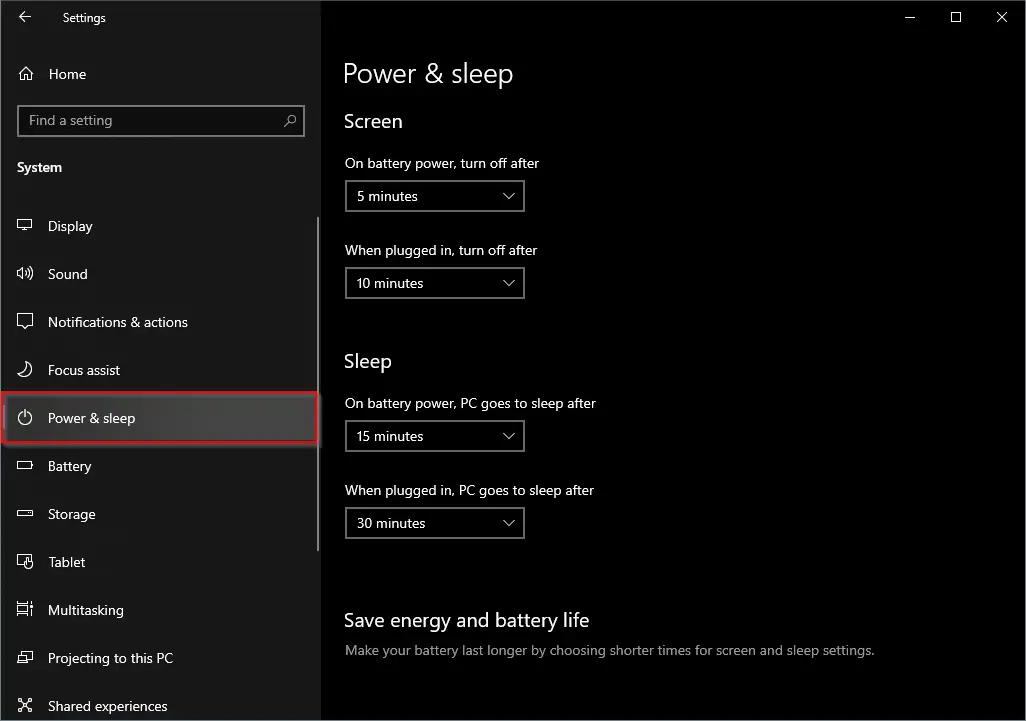
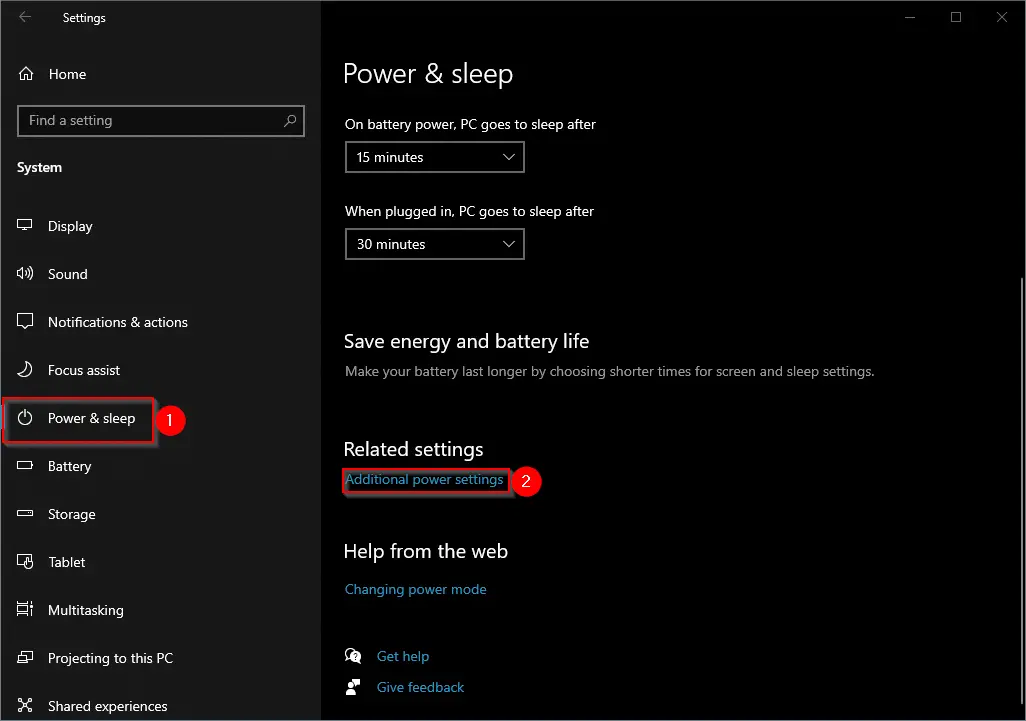
Step 4. Click the Additional power settings link on the right sidebar under the “Related settings” section.
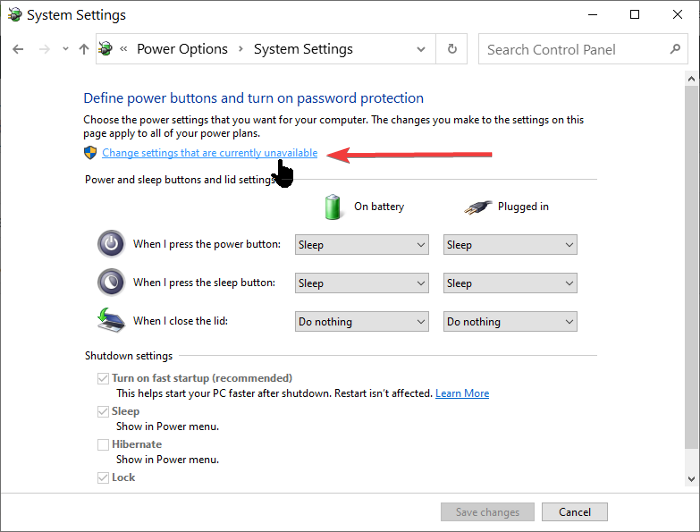
Step 5. In the Power Options window that opens, click the link “Choose what the power button does.”
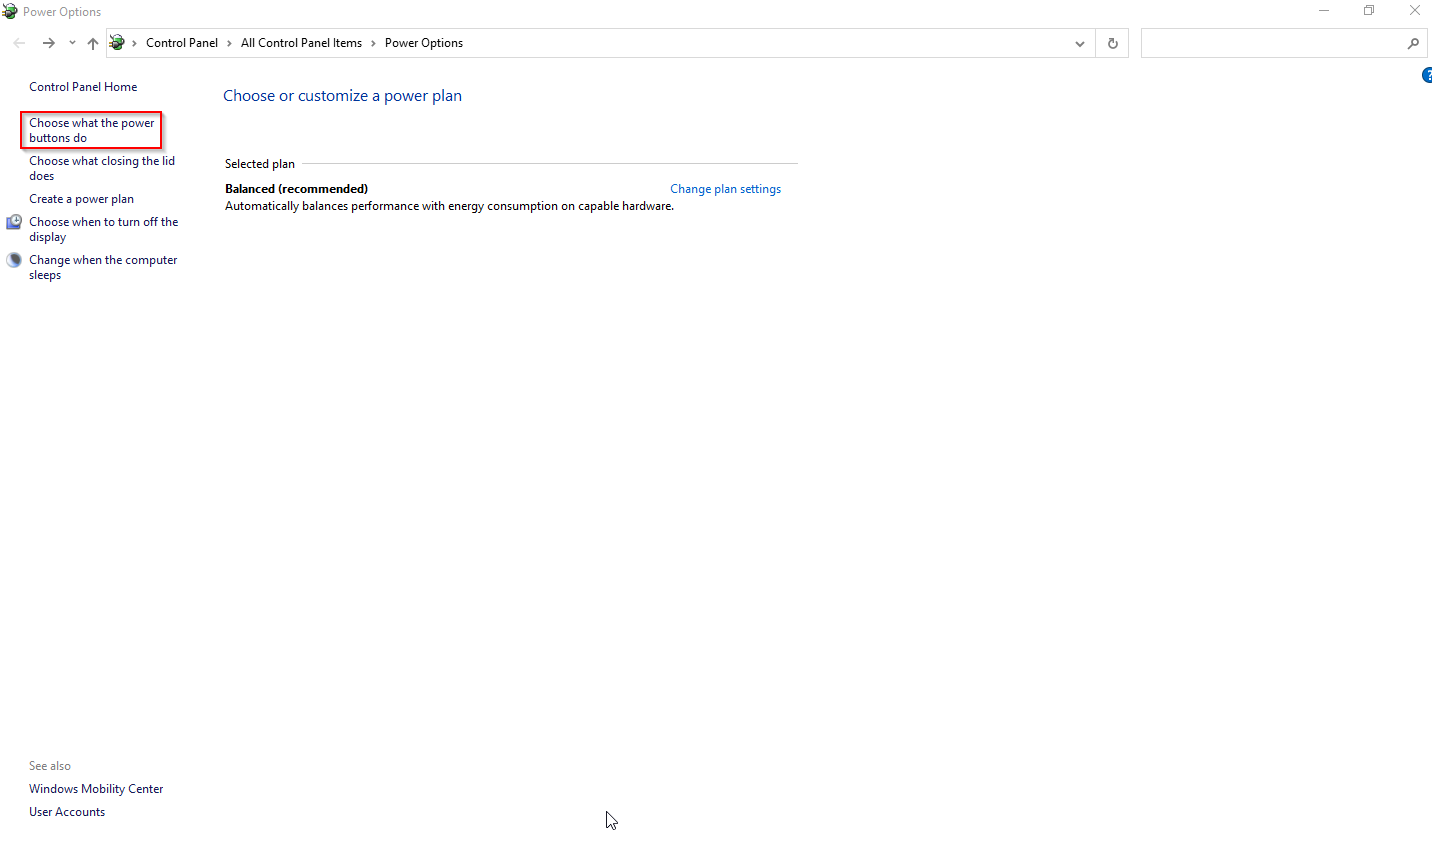
Step 6. Next, click the link “Change settings that are currently unavailable.”
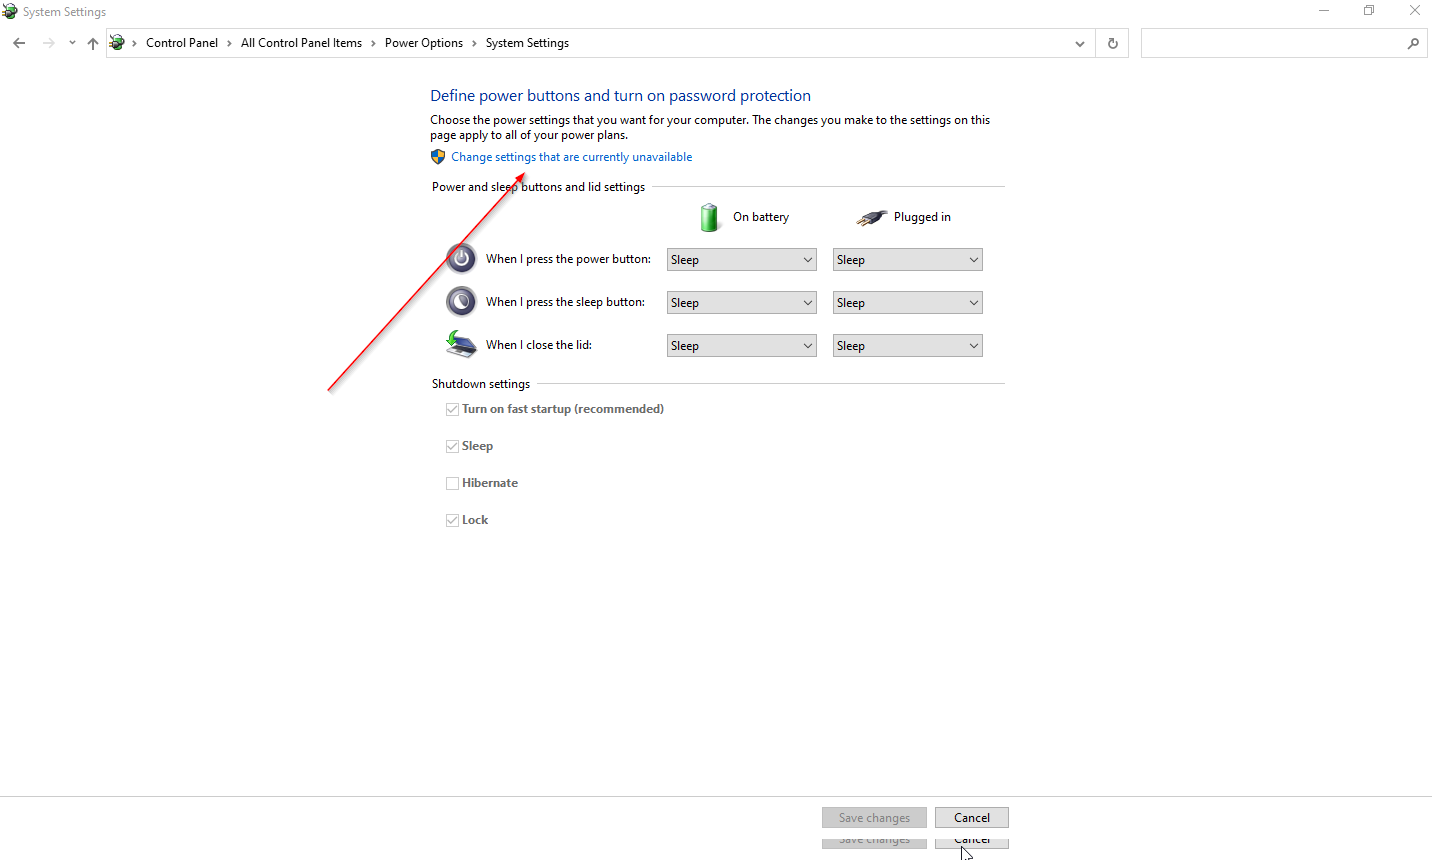
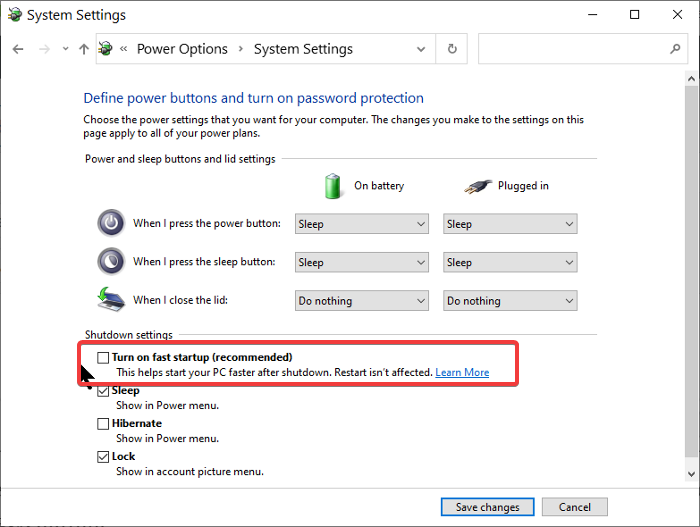
Step 7. Under the “Shutdown settings” section, uncheck the “Turn on fast startup” option.
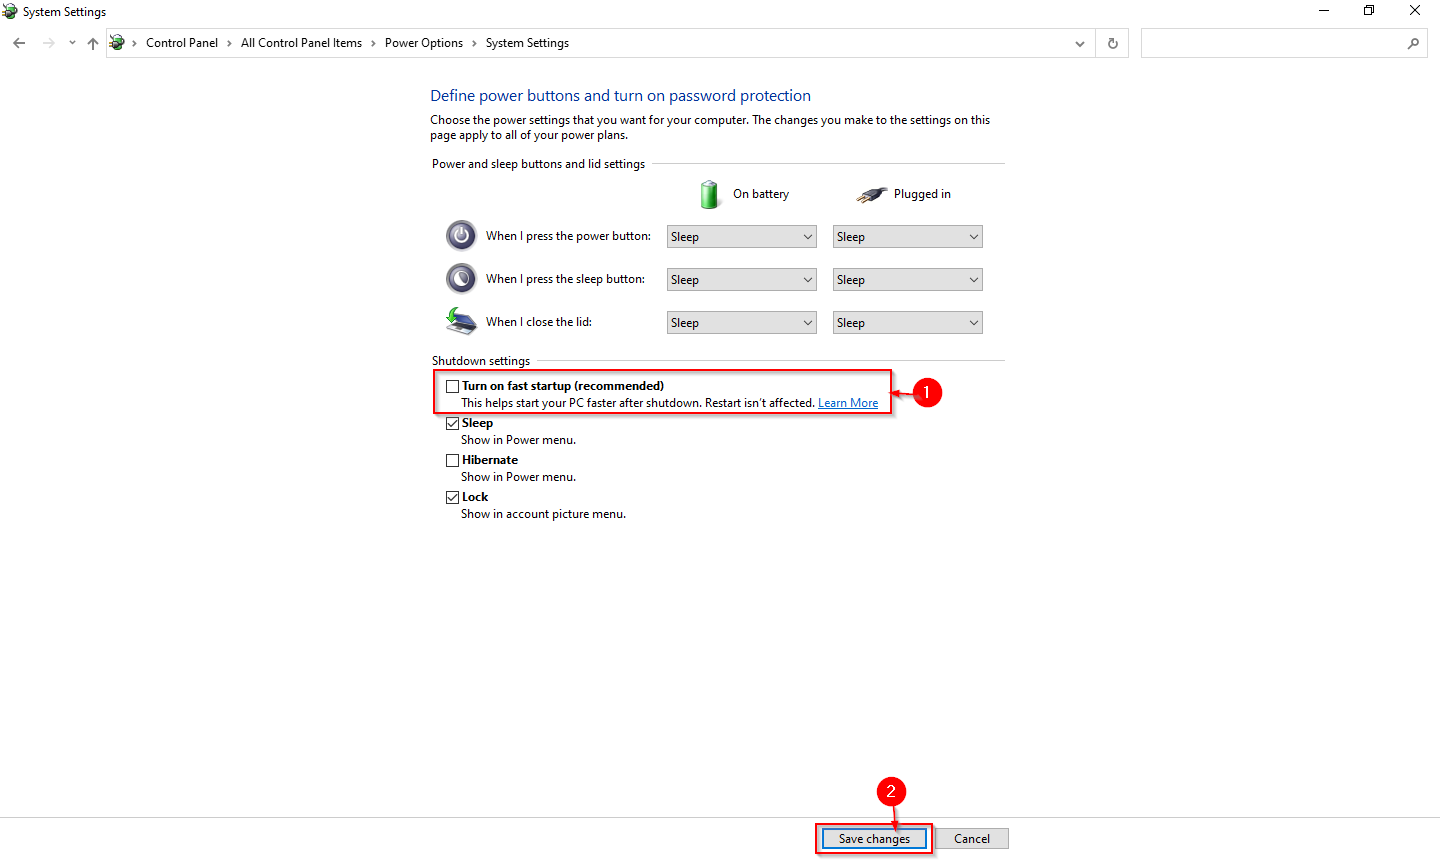
Step 8. Finally, click theSave changes button.
Following the above steps, the Fast Startup feature will be turned off on your Windows 10 machine.
How to Enable Windows 10 Startup Sound?
Now that fast boot has been disabled; you can turn on the startup sound. The process is as follows:-
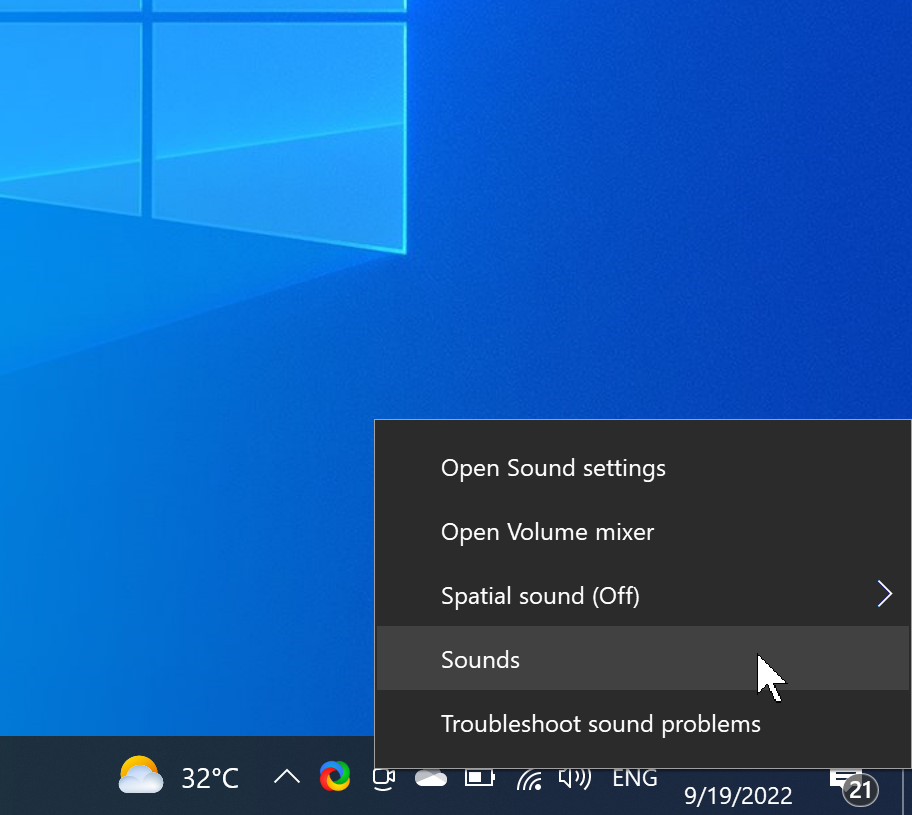
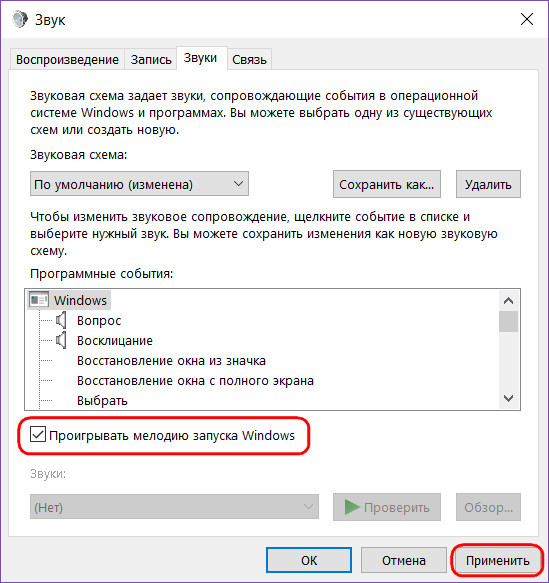
Step 1. Right-click the speaker icon on Taskbar and select Sounds in the menu to open the Sound window.
Step 2. Switch to the Sounds tab under the Sound window.
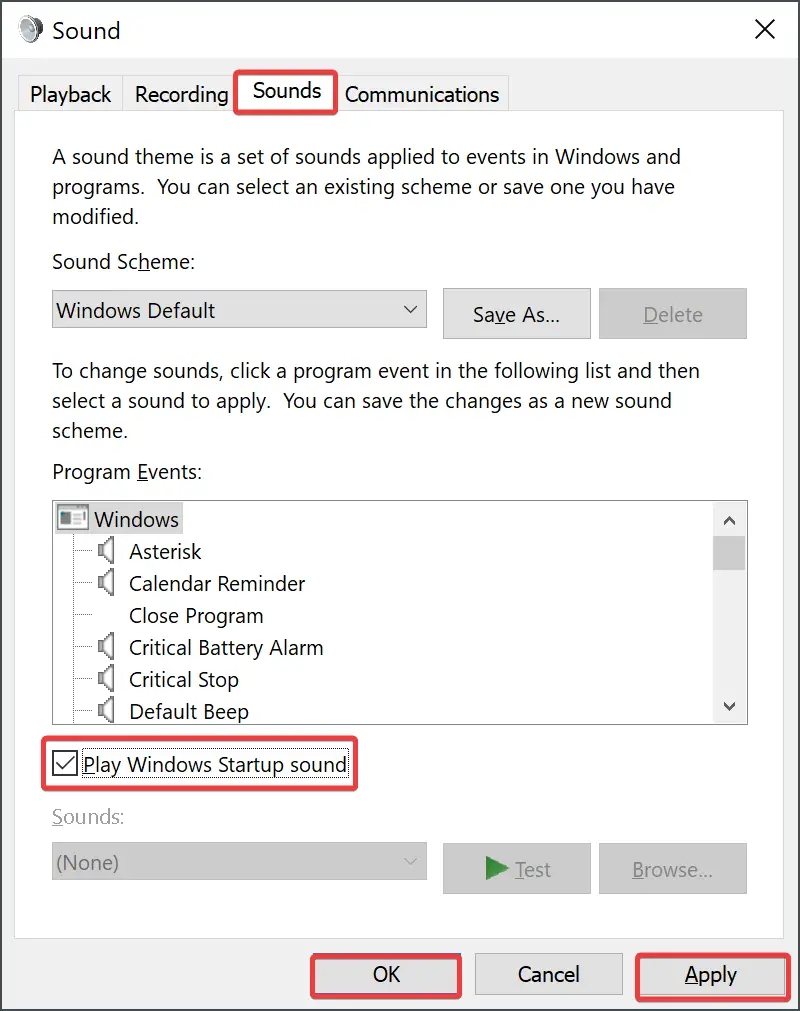
Step 3. Check the Play Windows Startup sound checkbox.
Step 4. Click the Apply button.
Step 5. Click the OK button.
Now, whenever you turn on your computer, you will hear the Windows 10 startup sound.
How to Change the Windows 10 Startup Sound?
Sadly, Windows 10 doesn’t let you customize the startup sound. To set a custom sound as your Windows 10 startup sound, you’ll need to install a third-party app or edit the Registry file.
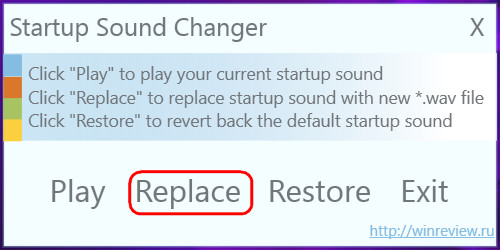
The Startup Sound Changer is a freeware program that allows you to change the default Windows startup sound. With a simple and convenient interface, you can apply any WAV file of your choice and customize it quickly.
Follow these steps to modify or change the Windows 10 Startup sound:-
Step 1. First, download Startup Sound Changer.
Step 2. Then, double-click on the downloaded portable executable file to open it.
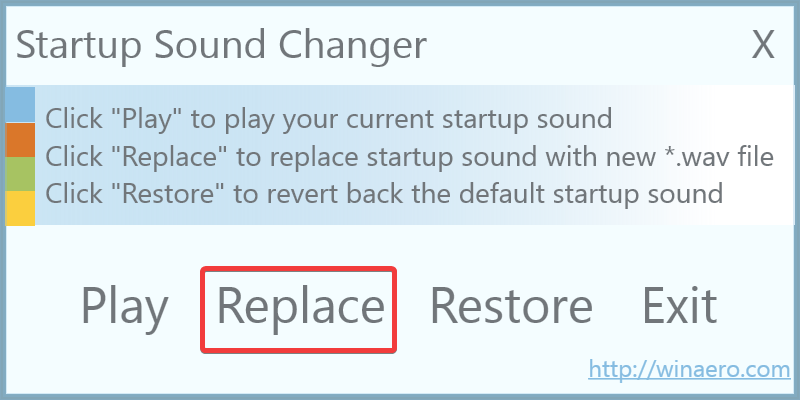
Step 3. Next, click on the Replace button.
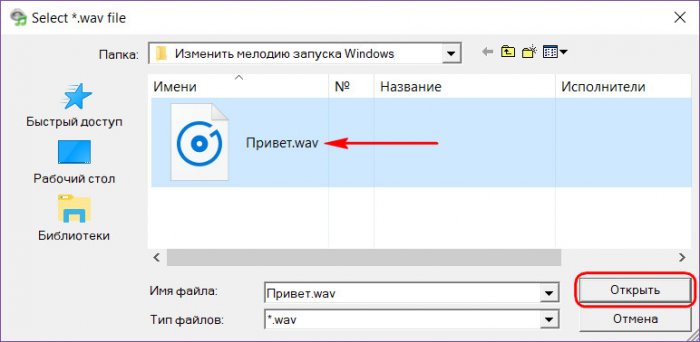
Step 4. Select a custom “.wav” file from your PC. If you don’t have one, choose one from the “C:\Windows\Media” folder.
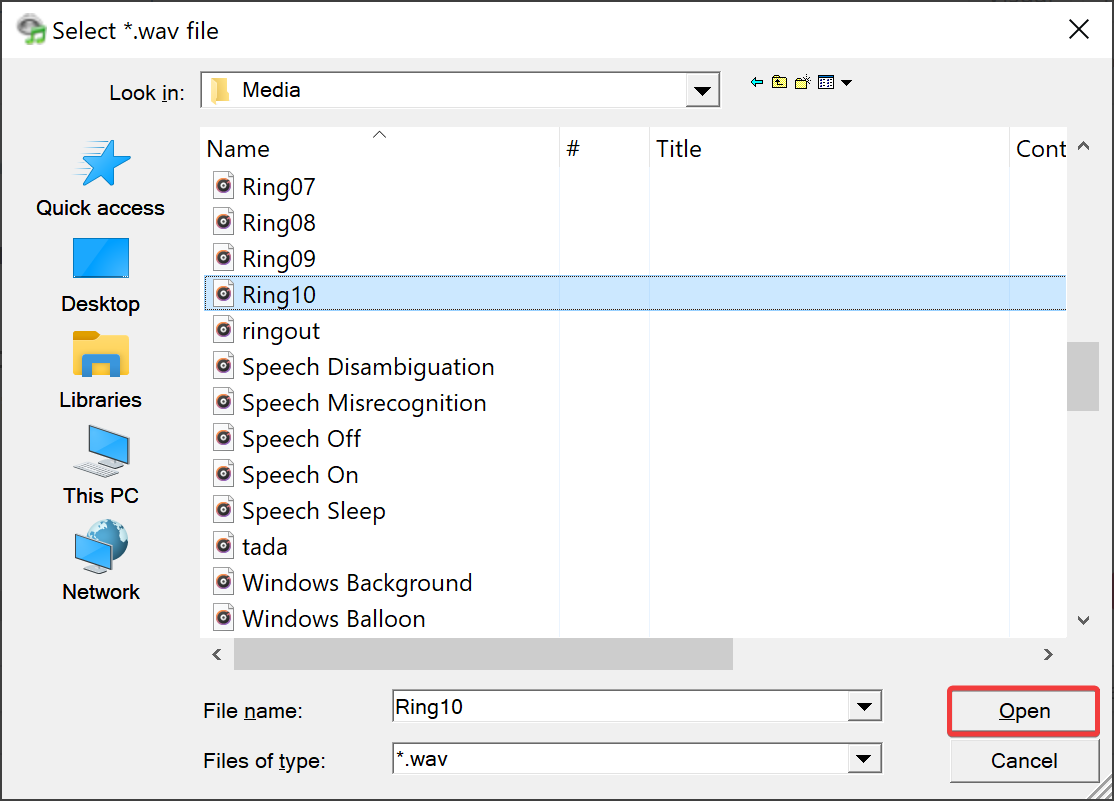
Step 5. Click the Open button.
That’s it. After restarting your Windows 10 machine, you will hear the new sound.
Quick Note: Sounds file must be stored in “C:/Windows/Media.” If you put them in another folder, Windows won’t find them.
How to Modify Startup and Shutdown Sound Registry Files?
If the Windows Logon (Startup) and Windows Logoff (Shutdown) options are missing in the Sound window, you need to enable the same from Registry Editor.
These steps will guide you through editing the Startup Sound registry files:-
Step 1. Open Registry Editor.
Step 2. In the left sidebar of the Registry Editor, click the following key:-
Computer\HKEY_CURRENT_USER\AppEvents\EventLabels\WindowsLogon
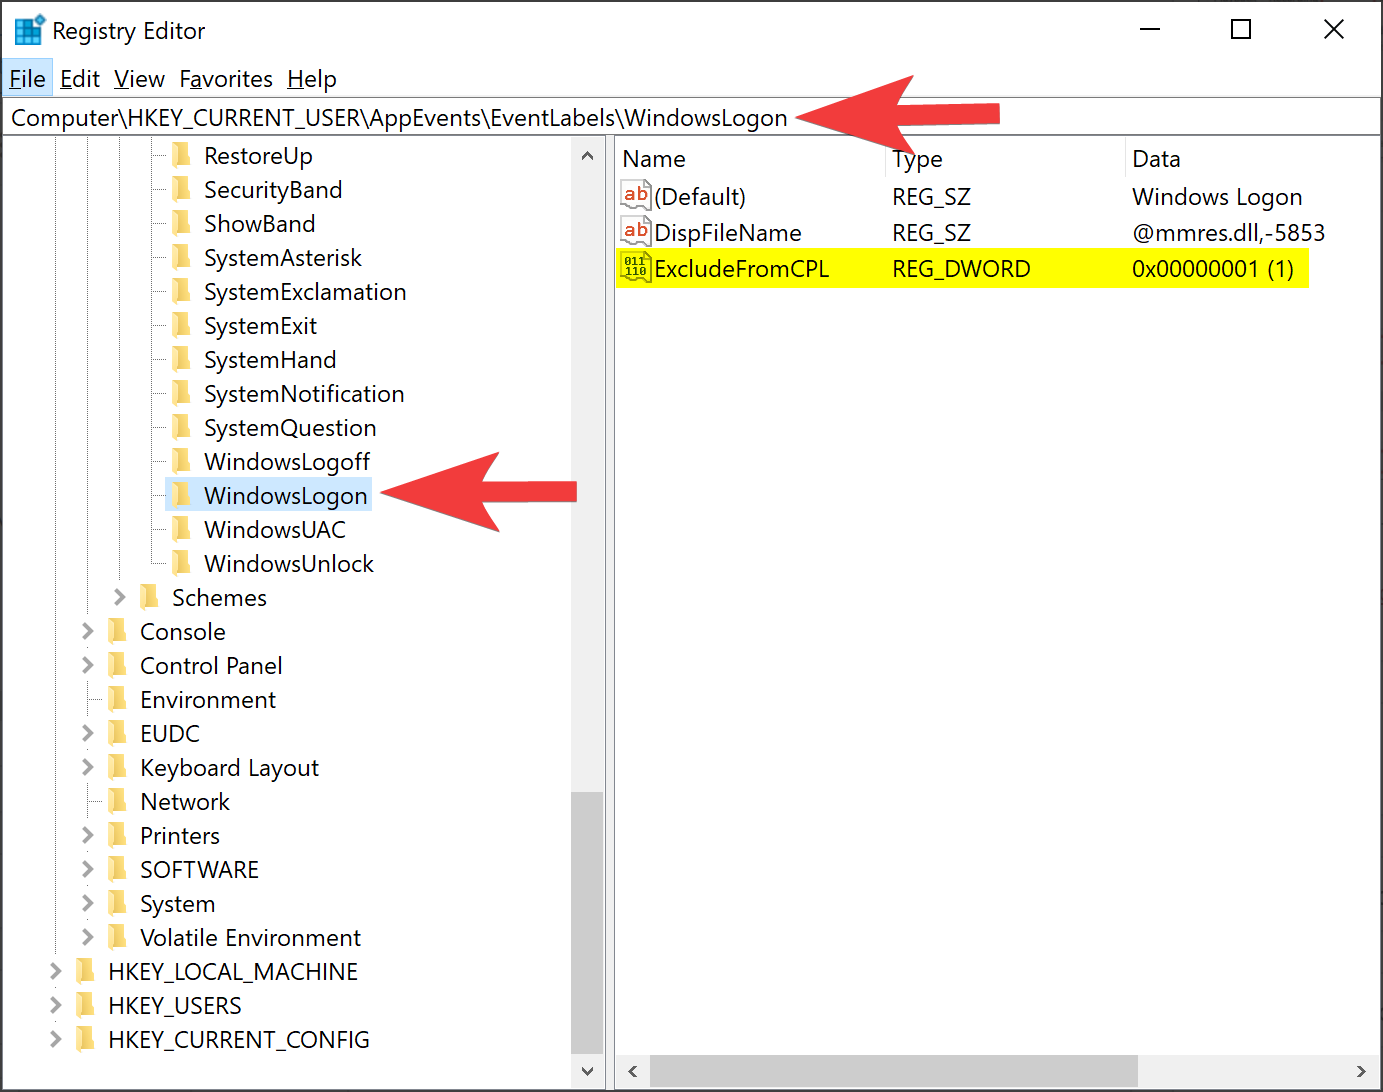
Step 3. Double-click on the REG_DWORD named ExcludefromCPL on the right sidebar.
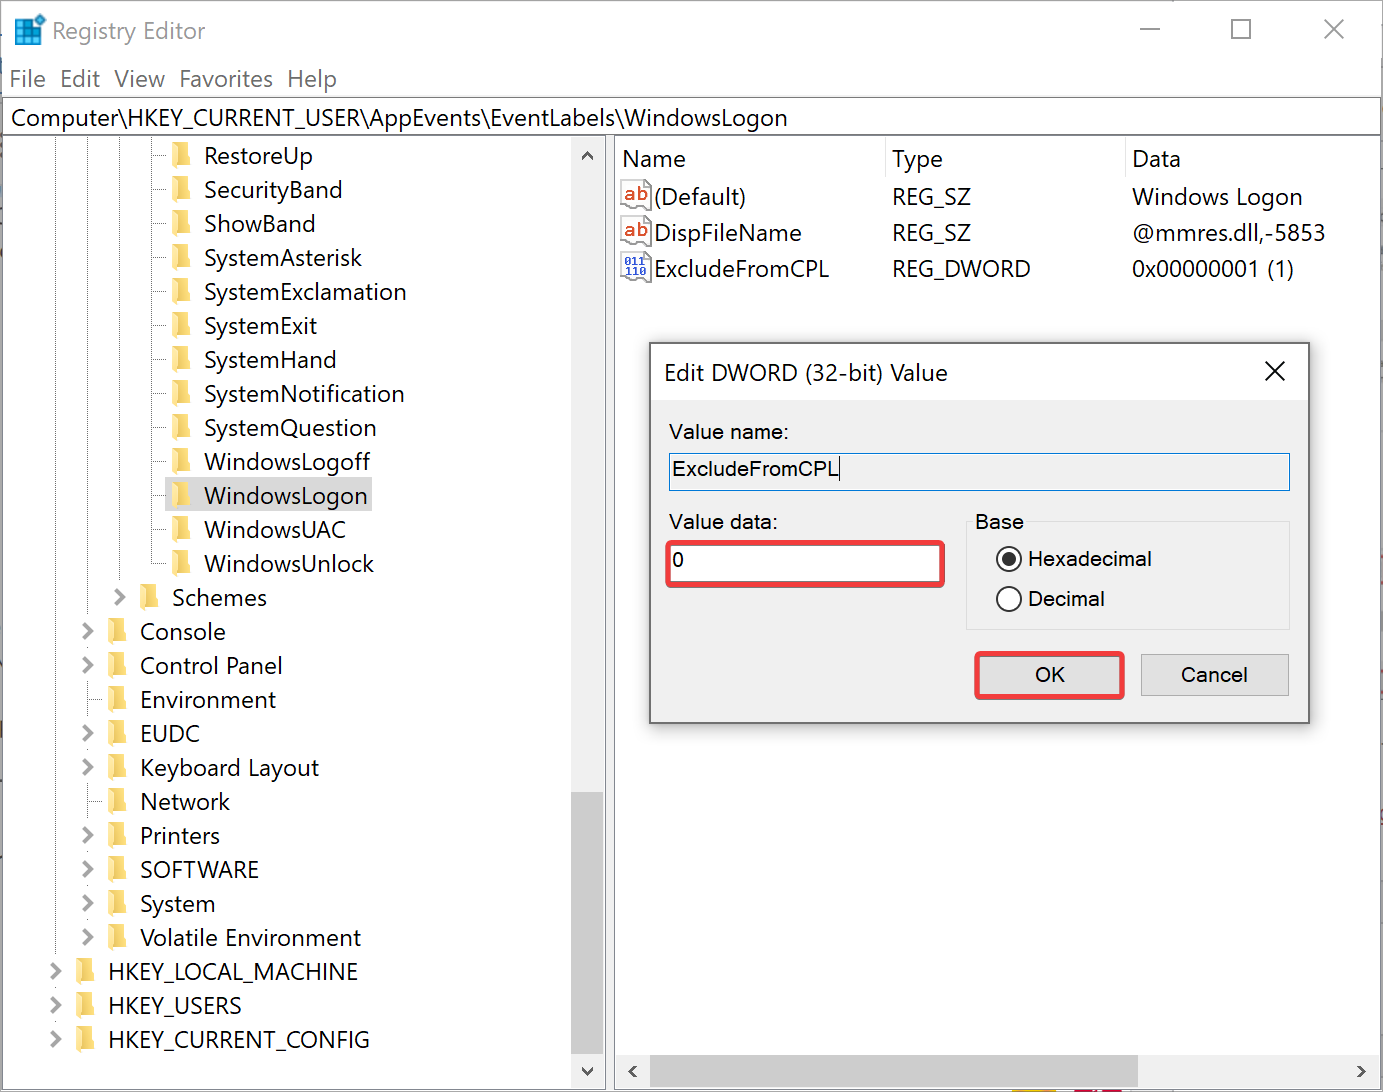
Step 4. Change the “Value data” from 1 to 0.
Step 5. Click the OK button to enable the Windows Logon option in the Sound setting.
Step 6. Similarly, if you want to enable the Shutdown or Windows Logoff sound setting, navigate to the following Registry key:-
Computer\HKEY_CURRENT_USER\AppEvents\EventLabels\WindowsLogoff
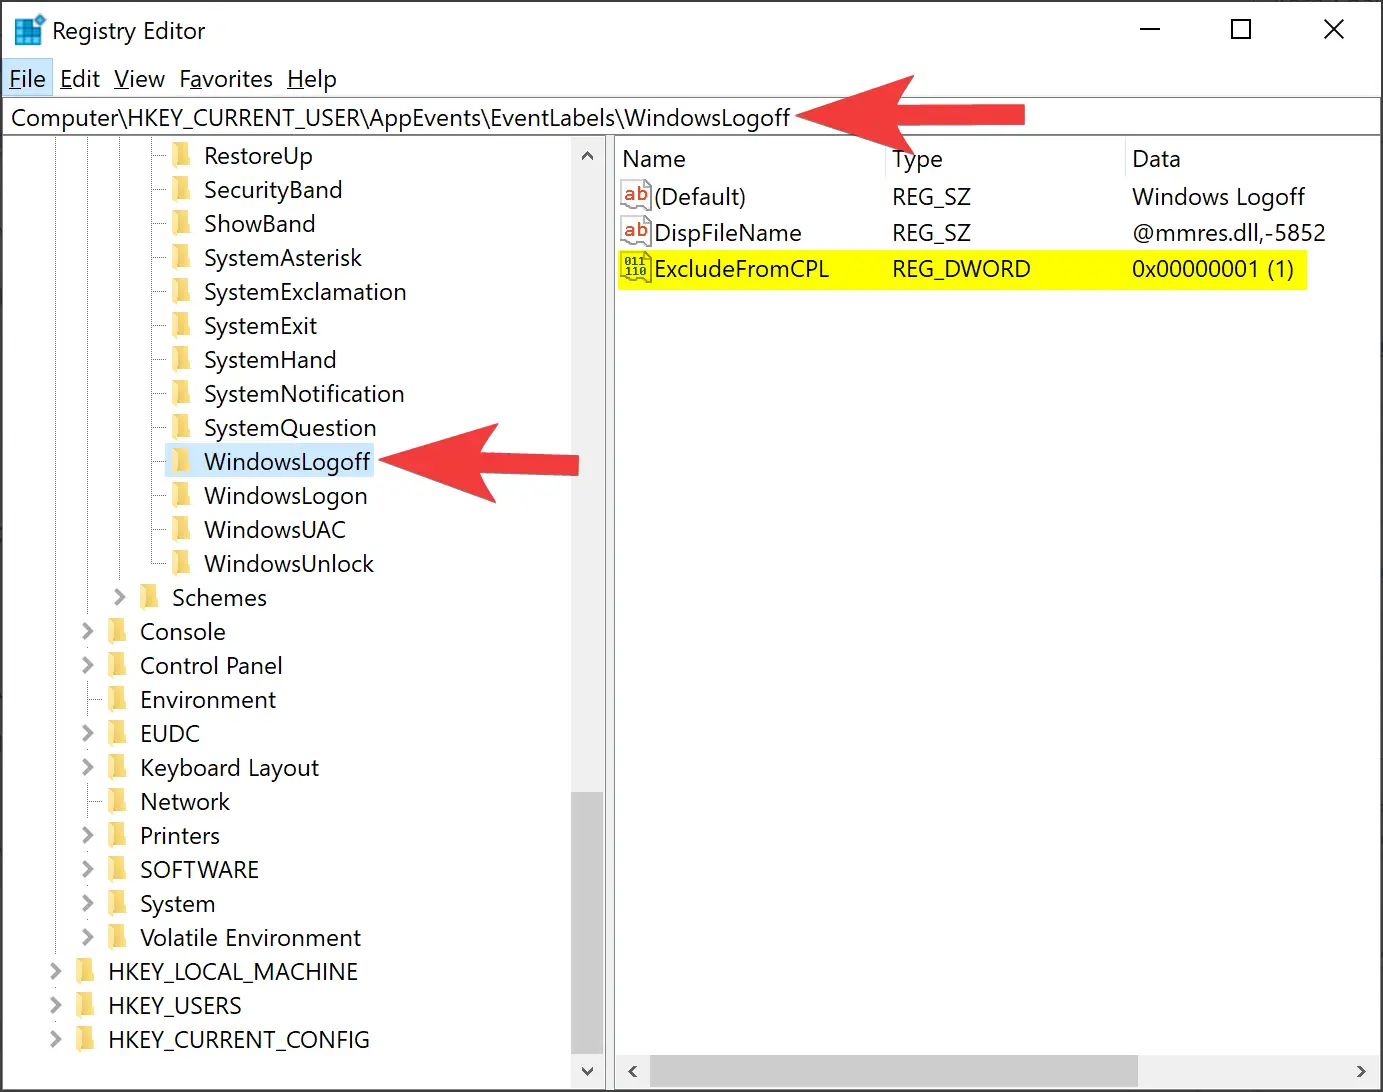
Step 7. Double-click on the REG_DWORD named ExcludefromCPL on the right sidebar.

Step 8. Set its “Value data” to 0 to enable the Windows Logoff option.
Step 9. Click the OK button.
That’s it. There is no need to restart your Windows 10 machine. Both Windows Logon and Windows Logoff options will now appear in the Sound window.
As soon as you have enabled the Windows Logon and Windows Logoff options in Sound settings for your Windows 10 machine, you can apply a custom sound from the Sound dialog. Here are the steps:-
Step 1. Right-click the speaker icon on Taskbar and select Sounds in the menu to open the Sound window.
Step 2. Switch to the Sounds tab under the Sound window.
Step 3. Check the Play Windows Startup sound checkbox.
Step 4. Now, select either Windows Logoff or Windows Logon option you want to change the sound for.
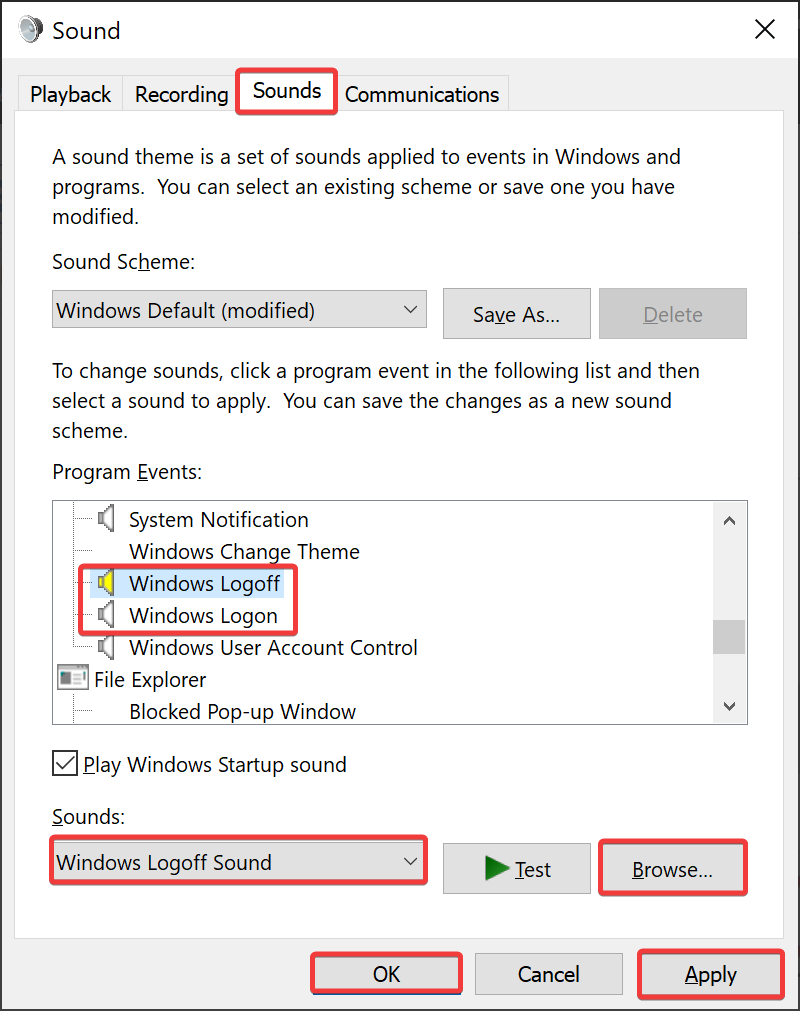
Step 5. Select preferred sound from the Sounds drop-down menu. Alternatively, click the Browse button and select the sound file (.wav) from the “C:\Windows\Media” folder you want to set.
Step 6. If you wish, you can choose to listen to the sound before applying it by clicking the Test button.
Step 7. Click the Apply button.
Step 8. Click the OK button.
For Windows 10, the maximum length of a startup or shutdown sound is between 4 – 6 seconds. If you change your computer’s startup or shutdown sound but still play the default jingle, it’s most likely due to its length.
Use an online audio cutter or trimmer (such as Clideo.com) to trim the audio file (in WAV format) to 4 to 6 seconds and try it again.
Good luck.
Conclusion
In conclusion, Windows 10 provides an easy way to customize the startup sound. You can change the default sound to your favorite song or any other sound of your choice by disabling the fast startup and enabling the startup sound feature in the Sounds tab. Unfortunately, Windows 10 does not offer an option to customize the startup sound, but you can use a third-party app like the Startup Sound Changer to modify it. Additionally, modifying the registry files can help you enable the Windows Logon and Windows Logoff options in the Sound window to apply a custom sound. By following the steps provided in this article, you can easily enable and customize the startup sound in Windows 10.
If you want to change the startup sound in Windows 11 or Windows 10 computers, here is how you can do that. In short, you can customize the startup sound of Windows 11 by enabling the Fast startup and using the Sounds panel that is already included and available on Windows 11/10 PC.
Windows 11/10 goes down arguably as the easiest-to-use computer operating system around. Among many great features it offers, its auditory signals notify you of when your attention is needed or when a task has been completed. Windows offers audio notifications for battery alerts, errors, disconnection of peripherals, a complete Startup, and much more.
The Startup sound is the most common many users are used to. To show how serious it meant to them, Microsoft contacted Brian Eno, a significant pioneer of ambient music, to play the Startup sound for Windows 95. As you know, each sound is a notification of some sort; the Startup sound indicates that the system has been booted successfully.
When you select the shutdown option, Fast Boot puts your PC in Hibernate mode, and when you restart it, it quickly turns your PC on, skipping the Start sound and restoring it to where you left off. So to change the sound, you have first to disable Fast Boot.
You can change the Windows 11/10 startup sound by following the steps below:
- Disable Fast startup.
- Enable the Startup sound.
- Enable the Logon sound from the Windows Registry.
- Customize the startup sound from Windows Settings.
Now, let’s take a closer look at the above steps to show you how to go about them.
1] Disable Fast startup
Microsoft gave up the startup sound to make way for the Fast startup feature in Windows 11/10. Fast startup works by keeping all your programs and applications running even after you shut down your PC.
You need to open your Power Options by right-clicking on the battery icon on your taskbar. Next, click on Choose what the power buttons do.
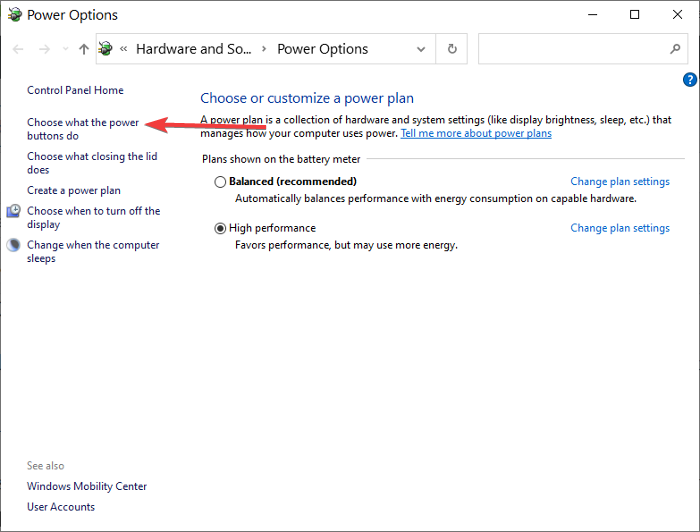
On the next screen, go to Change settings that are currently unavailable.
Uncheck the box labeled Turn on fast start (recommended) and finally, click on the Save changes button.
2] Enable Windows 11/10 startup sound
Take these steps to enable the Startup Sound on Windows 11.
Press the Windows key + I combination to open Windows Settings.
Go to Personalization and select Themes from the left-hand panel.
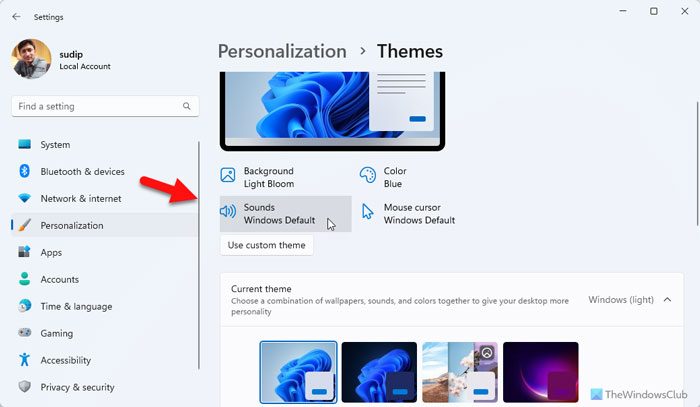
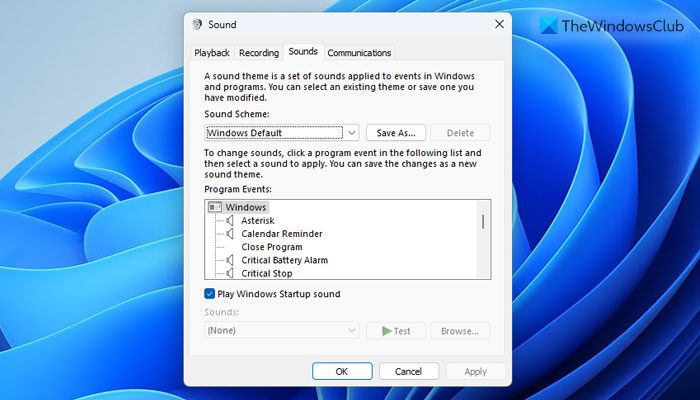
Locate and click the Sound button then mark the Play Windows Startup sound checkbox, which is under the Sounds tab.
Click on OK to confirm the settings.
3] Enable the logon sound from the Windows Registry
Please, follow the steps below carefully as they may seem a bit complicated. You will be working with the Registry Editor to change your PC’s Startup sound.
Type in Regedit in the Run dialogue box and click OK.
Go to:
HKEY_CURRENT_USER/AppEvents/EventLabels
Locate:
WindowsLogon
Click ExcludeFromCPL on WindowsLogon.
Next, change the Value data from 1 to 0.
Hit OK.
4] Customize the Startup sound from Windows Settings
Open Windows Settings and select Personalization > Themes. Click on Sounds and then scroll down to the Program Events list. Find and click on the Windows Logon option then select Browse. Locate your customized .WAV Start sound from File Explorer, Apply the changes, and click on OK.
Read: Nine Nostalgic Tech Sounds you probably haven’t heard in years.
Change the startup sound using free tool
The complexity involved in the method above is a path not everyone is willing to take. However, with a third-party tool like Startup Sound Changer, you can go about this easily. If you decide to use Startup Sound Changer, follow the steps below.
Go to its official site and download and install the application. Launch the app and select the Replace button from the options presented. Find your desired sound with the Windows Explorer and select it.
Note: Windows Startup sound can only be in the .WAV audio format.
Read: How to fix continuous beeping sound at startup in Windows PC
How to customize startup Sound in Windows 11?
Although you can enable or disable the startup sound in Windows 11 without any app, you need to use a third-party app to customize the same on your computer. First, you need to enable the Fast startup and open the Sounds panel to enable the Play Windows Startup sound checkbox. Then, you can use the Startup Sound Changer app to get the job done.
Can I change my PC startup Sound?
Yes, you can change your PC startup sound in Windows 11/10 PC. For that, you need to enable the Play Windows Startup sound setting first. Then, you can use the Startup Sound Changer app that is a freeware available for Windows 11 as well as Windows 10. However, you need to change the value data of ExcludeFromCPL from 1 to 0 too.
В старой Windows XP изменить звучание старта операционной системы можно было достаточно просто. Все системные звуки, включая мелодию запуска, в звуковом формате WAV хранились в каталоге по пути С:\Windows\Media. Нужно было открыть этот путь в проводнике и заменить исходный файл «Windows XP – запуск» на WAV-файл со своим звучанием, но переименованный как исходник. Начиная с версии Windows 7, стандартная мелодия запуска системы больше не являет собой отдельный WAV-файл, а включена в файл DLL-библиотеки imageres.dll, лежащий в папке System32. И, согласно официальной позиции компании Microsoft, изменить звук запуска системы по своему вкусу нельзя. Мы должны либо слушать то, что есть, либо не слушать вовсе ничего, как, собственно, и предлагается по умолчанию в последних версиях Windows 8.1 и 10. В этой статье рассмотрим, как всё же обойти жёсткие рамки Microsoft. И слушать при загрузке версий системы 7, 8.1 и 10 свои любимые рингтоны.
В «Семёрке» не позволено штатным способом настроить свою мелодию запуска системы, но эта версия хотя бы предусматривает возможность установки своих звуков на вход в систему, выход из неё и завершение работы. В версиях 8.1 и 10 и этого нет. Если на «Семёрке» работа проводится посредством запароленной учётной записи, в принципе, разницы между звуком запуска системы и звуком входа в неё нет. В последнем случае звук приветствия заиграет после этапа ввода пароля «учётки».
{banner_google1}
Чтобы изменить звучание входа в систему, в области задач вызываем контекстное меню на значке громкости и выбираем «Звуки».
В открывшемся окошке свойств кликаем программное событие «Вход в Windows». С помощью кнопки обзора выбираем свой звуковой WAV-файл. Убираем галочку с опции проигрывания мелодии запуска. Жмём «Применить».
Вот и всё.
Однако если на «Семёрке» работа проводится с незапароленной учётной записи, настроенный таким образом звук мы будем слышать только при намеренном выходе из системы и новом заходе.
При обычной загрузке компьютера звук входа в систему проигрываться не будет. Без пароля система просто молча запустится. Для случаев работы на компьютере с незапароленных «учёток» необходимо настраивать только мелодию запуска Windows.
А заменить её со стандартной на что-нибудь из своей коллекции рингтонов в любой из версий операционной системы можно с помощью сторонних программных средств.
Чтобы старт системы сопровождался звуковым приветствием, необходимо в первую очередь настроить его, ведь оно, напомню, в версиях 8.1, 10, 11 отключено по умолчанию. Чтобы включить приветствие, открываем системные настройки звучания. Универсальный способ для всех версий Windows — жмём клавиши Win+R, вписываем:
mmsys.cplПереходим на вкладку «Звуки».
В Windows 10 и 11 активируем галочку активности мелодии.
Таким образом мы активировали стандартный звук запуска Виндовс. Теперь нам нужно его подменить на свой рингтон. Сделать это можно двумя способами:
- Сложным – с предоставлением доступа с правами TrustInstaller для системной папки System32 и с участием программы для перепаковки ресурсов файлов. Последняя заменит исходный WAV-звук в составе imageres.dll на сторонний и перепакует файл библиотеки. Но так нужно будет делать каждый раз, когда нам рингтон надоест, и мы захотим сменить его на другой;
- Простым – с использованием твикеров StartupSoundChanger или WinaeroTweaker.
Простой способ и предлагаю рассмотреть детально.
Вариант 1. Утилита StartupSoundChanger
Скачиваем утилиту StartupSoundChanger.
В архиве с утилитой также упакован WAV-файл известной мелодии «Привет». Это одна из самых популярных альтернатив стандартному звуковому приветствию. Кто пока не определился с рингтоном, который хочет поставить, может временно разнообразить загрузку системы этим эффектным звуком.
StartupSoundChanger – портативная бесплатная утилита с очень узким спектром действия. Она может:
- Менять стандартную мелодию загрузки Виндовс на любой другой WAV-звук;
- Возвращать исходную, т.е. стандартную мелодию загрузки операционной системы на место.
И всё.
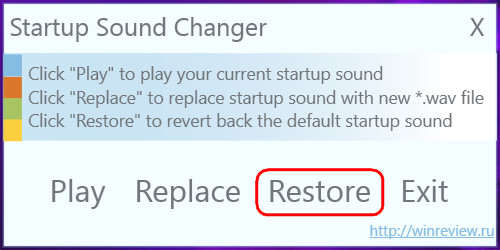
Запускаем программку. При нажатии «Play» она проиграет текущую мелодию запуска Windows. А при нажатии «Replace»
откроет окно обзора для указания любого WAV-файла.
После выбора последнего программка проиграет его, и он теперь впредь будет воспроизводиться при старте Windows. А если вдруг, мало ли, захочется вернуть стандартный звук загрузки системы, вновь открываем StartupSoundChanger и кликаем «Restore».
Вариант 2. Комплексная программа-твикер WinaeroTweaker
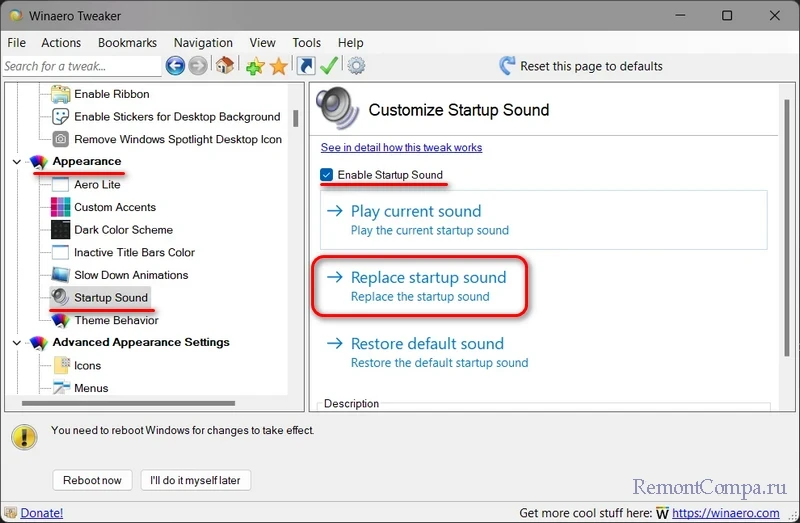
У программы Winaero Tweaker много возможностей по настройке Windows, недоступных посредством обычных системных настроек. Одна из них – включение звука запуска. В разделе «Appearance» кликаем «Startup Sound». Активируем галочку «Enable Startup Sound». Здесь есть 3 опции:
- Play current sound – проиграть дефолтную мелодию запуска Windows;
- Replace startup sound – установить свой звук запуска Windows из WAV-файла;
- Restore default sound – восстановить дефолтную мелодию запуска Windows.
Мелодией запуска Windows может быть любой звуковой WAV-файл. Правда, лучше, чтобы это был звук, длящийся не более 10 секунд и лояльно или хотя бы в тему затихающий. В противном случае система грубо обрежет мелодию, долго звук проигрываться не будет. Найти такие готовые звуки можно в Интернете, на любом сайте, где выкладываются, к примеру, те же рингтоны для мобильных. Таких сайтов по запросам типа «скачать WAV звуки», «скачать рингтоны WAV» и т.п. в сети масса. Единственное, что, возможно, не найдётся именно то, что вам, друзья, хочется. Или найдётся в формате звука MP3. Не беда, в любом из случаев можно прибегнуть к помощи бесплатной программы Wave Editor. Она может открывать файлы MP3 и на выходе сохранять их в WAV, обрезать треки и применять к ним эффекты плавного нарастания и затухания. С её помощью вы сможете сделать мелодию запуска Виндовс из любого своего трека в MP3, вырезав какой-нибудь кульминационный 10-секундный отрывок. Как всё это делается, читаем подробно в статье «Как обрезать песню на компьютере».
Quick Links
-
Add the Actions Back to the Sound Control Panel by Editing the Registry
-
Download Our One-Click Registry Hacks
Before Windows 10 came along, we were free to change the sounds that played when we shut down, logged off, or logged on to Windows. For some reason, Microsoft hid those sound actions from being modified in Windows 10. Here’s how to get them back.
Windows has always been pretty good about letting you customize every nook and cranny of the OS, including what sounds played for all kinds of different system events. You can even make Windows play a sound when you toggle your Caps Lock, Scroll Lock, and Num Lock keys. While you can still customize what sounds sounds play for most OS events, Windows 10 hid shut down, logoff, and logon from view. They’re still around, though. You just need to make a few mild changes in the Windows Registry to get them back.
Add the Actions Back to the Sound Control Panel by Editing the Registry
To add the shutdown, logoff, and logon actions back to the menu in the Sound Control Panel app, you just need to make a few little tweaks in the Windows Registry.
Standard warning: Registry Editor is a powerful tool and misusing it can render your system unstable or even inoperable. This is a pretty simple hack and as long as you stick to the instructions, you shouldn’t have any problems. That said, if you’ve never worked with it before, consider reading about how to use the Registry Editor before you get started. And definitely back up the Registry (and your computer!) before making changes.
Open the Registry Editor by hitting Start and typing “regedit.” Press Enter to open Registry Editor and then give it permission to make changes to your PC.
In the Registry Editor, use the left sidebar to navigate to the following key:
HKEY_CURRENT_USER\AppEvents\EventLabels
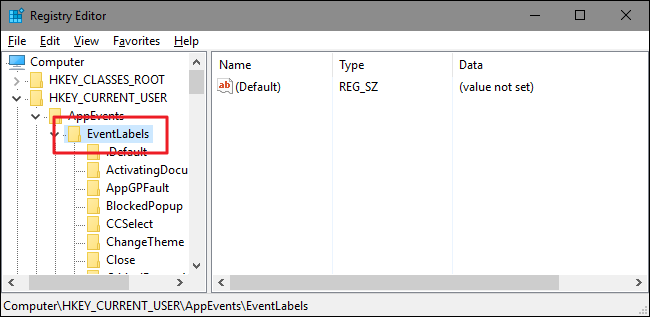
You’re going to be making one small change in each of three different subkeys inside that EventLabels key. First, we’ll tackle the shutdown sound or, as Windows likes to call it, System Exit. Under the EventLabels key on the left side of Registry Editor, select the SystemExit subkey. On the right side, double-click the ExcludeFromCPL value.
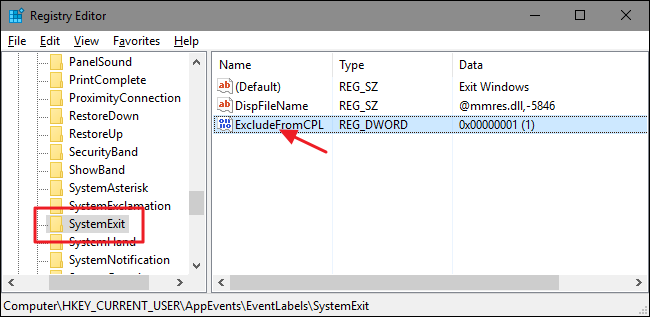
Note that by default, the value is 1, meaning that the action is excluded from the Control Panel. Change the value to 0 and then click «OK.»
Next, you’re going to make exactly the same change in two other subkeys inside the EventLabels key: WindowsLogoff and WindowsLogon . Head into each of those folders, open the ExcludeFromCPL value inside, and change the value from 1 to 0.
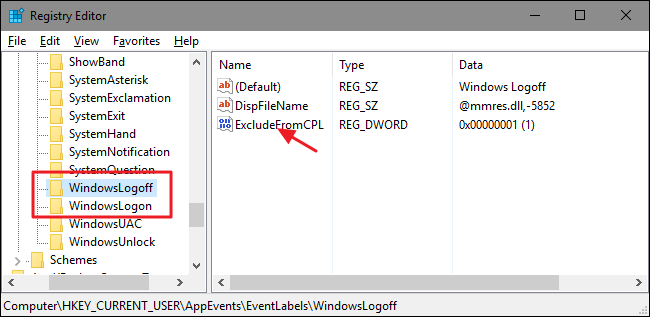
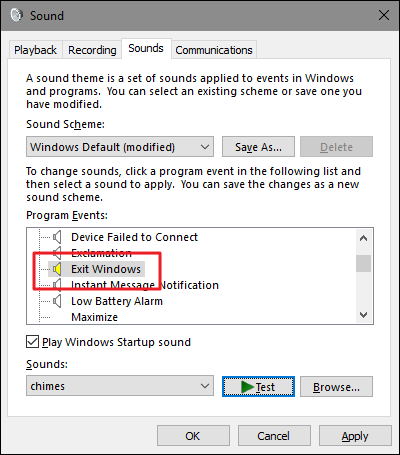
No need to restart Windows. You can go ahead and test your changes right away. Open up the Sound Control Panel app by right-clicking the speaker icon in your Notification Area and selecting «Sounds.»
You should now see the new actions (Exit Windows, Windows Logoff, and Windows Logon) available in the selection window and you can assign whatever sounds you like to those actions.
If, for whatever reason, you want to hide those actions from the Control Panel again, just head back into Registry Editor and change each of those ExcludeFromCPL values back to 1.
Download Our One-Click Registry Hacks

If you don’t feel like diving into the Registry yourself, we’ve created some registry hacks you can use. Download and unzip them first. Inside, you’ll find three folders named «System Exit Sound Hacks,» «Windows Logon Sound Hacks,» and «Windows Logoff Sound Hacks.» Inside each of those folders, you’ll find two hacks: one for adding the action to the Sounds Control Panel and one for removing the action again. Double-click the hack you want to use and click through the prompts. When you’ve applied the hack you want, the changes will take place immediately. No need to restart Windows.
Shutdown-Logoff-Logon Sound Hacks
These hacks are really just the individual SystemExit, WindowsLogoff, and WindowsLogon subkeys, stripped down to the ExcludeFromCPL values we talked about in the previous section and then exported to a .REG file. Running either of the hacks sets that value to the appropriate number. And if you enjoy fiddling with the Registry, it’s worth taking the time to learn how to make your own Registry hacks.