
Changing the boot logo in Windows 11 may seem like a daunting task, but with the right guidance and a little bit of patience, it can be accomplished. The boot logo is the image that appears when you start your computer, and customizing it can give your system a personalized touch. In this blog post, we will explore the challenge of changing the boot logo in Windows 11 and provide step-by-step methods to help you achieve it. Whether you’re a tech enthusiast or someone who wants to add a unique flair to their computer, this guide is for you.
Video Tutorial:
The Challenge of Changing Boot Logo in Windows 11
Changing the boot logo in Windows 11 is not as straightforward as it used to be in earlier versions of the operating system. Microsoft has implemented stricter security measures to prevent unauthorized modifications. This means that modifying the boot logo requires some additional steps and precautions. However, with the right tools and knowledge, it is still possible to customize your boot logo in Windows 11.
Things You Should Prepare for
Before we dive into the methods, let’s go through a list of things you should prepare for:
1. Backup: It’s crucial to create a backup of your system before attempting any modifications. In case something goes wrong, you can restore your computer to its previous state.
2. Familiarity with Advanced Tools: Changing the boot logo in Windows 11 requires the use of advanced tools and software. Make sure you are comfortable with using these tools and following technical instructions.
3. Administrative Privileges: To make changes to system files, you need administrative privileges. Ensure you are logged in as an administrator or have sufficient permissions.
4. Compatible Logo File: Prepare a logo file that meets the requirements for the boot logo. The logo file format should be PNG, and the dimensions should match your screen resolution.
Now that you are aware of the prerequisites, let’s explore the methods to change the boot logo in Windows 11.
Method 1: Using Third-Party Software
Changing the boot logo in Windows 11 can be made easier with the help of third-party software. These software tools are designed to simplify the process and provide a user-friendly interface. Here’s how you can change the boot logo using third-party software:
1. Download and install a reputable boot logo changer software, such as «BootSkin» or «WinCustomize.«
2. Launch the software and navigate to the boot logo customization section.
3. Select the option to change the boot logo and browse to locate your desired logo file.
4. Adjust any additional settings or options provided by the software, such as logo placement or animation effects.
5. Apply the changes and restart your computer to see the modified boot logo.
Pros:
1. User-friendly interface.
2. Simplifies the process of changing the boot logo.
3. Provides additional options and settings for customization.
Cons:
1. Reliance on third-party software.
2. Some software may not be free.
3. Limited compatibility with certain system configurations.
Method 2: Via Registry Editor
Another method to change the boot logo in Windows 11 is by manually modifying the Registry Editor. This method requires more technical knowledge and caution, as making incorrect changes in the Registry can lead to system instability. Follow these steps to change the boot logo using the Registry Editor:
1. Press Windows + R keys to open the Run dialog box. Type «regedit» and hit Enter to open the Registry Editor.
2. In the Registry Editor, navigate to the following location: HKEY_LOCAL_MACHINE\SOFTWARE\Microsoft\Windows\CurrentVersion\Authentication\LogonUI\Background.
3. Look for a key called «OEMBackground» and double-click on it to modify its value.
4. Set the value of «OEMBackground» to 1 if you want to enable custom boot logos. If the key doesn’t exist, create a new DWORD (32-bit) Value and name it «OEMBackground.«
5. Close the Registry Editor and navigate to the following file location: C:\Windows\System32\oobe\info\backgrounds.
6. Create a new folder named «backgrounds» if it doesn’t already exist. Inside the «backgrounds» folder, create another folder named «default.«
7. Place your desired logo file inside the «default» folder and name it «backgroundDefault.jpg.» Make sure the file is in PNG format and matches your screen resolution.
8. Restart your computer to see the changes reflected in the boot logo.
Pros:
1. Doesn’t rely on third-party software.
2. Allows for more customization options.
3. Can be done without an internet connection.
Cons:
1. Involves manual modification of the Registry Editor.
2. Requires advanced technical knowledge.
3. Can lead to system instability if not done correctly.
Method 3: Using Command Prompt
If you prefer using command-line tools, you can change the boot logo in Windows 11 using Command Prompt. This method requires familiarity with Command Prompt commands. Follow these steps to change the boot logo using Command Prompt:
1. Press Windows + X keys and select «Command Prompt (Admin)» to open an elevated Command Prompt window.
2. In the Command Prompt window, navigate to the following location: C:\Windows\System32\oobe.
3. Use the following command to create a backup of the existing boot logo: copy \windows\system32\authui.dll \windows\system32\authui.dll.backup.
4. Use the following command to replace the existing boot logo with your own custom logo: copy /y [path_to_logo_file] \windows\system32\authui.dll.
5. Restart your computer to see the modified boot logo.
Pros:
1. Doesn’t rely on third-party software.
2. Allows for customization through command-line commands.
3. Offers a more technical approach for advanced users.
Cons:
1. Requires familiarity with Command Prompt commands.
2. Potential risk of making incorrect modifications.
3. Limited customization options compared to other methods.
Method 4: Via Group Policy Editor
Another method to change the boot logo in Windows 11 is by using the Group Policy Editor. This method is only available in certain editions of Windows 11, such as Windows 11 Pro or Enterprise. Follow these steps to change the boot logo using Group Policy Editor:
1. Press Windows + R keys to open the Run dialog box. Type «gpedit.msc» and hit Enter to open the Group Policy Editor.
2. In the Group Policy Editor, navigate to the following location: Computer Configuration\Administrative Templates\System\Logon.
3. Look for a policy called «Always use custom logon background» and double-click on it to modify its settings.
4. Select the «Enabled» option and click on «Apply» or «OK» to save the changes.
5. Navigate to the following file location: C:\Windows\System32\oobe\info\backgrounds.
6. Create a new folder named «backgrounds» if it doesn’t already exist. Inside the «backgrounds» folder, create another folder named «default.«
7. Place your desired logo file inside the «default» folder and name it «backgroundDefault.jpg.» Make sure the file is in PNG format and matches your screen resolution.
8. Restart your computer to see the changes reflected in the boot logo.
Pros:
1. Built-in feature in specific editions of Windows 11.
2. Integration with Group Policy settings.
3. Allows for centralized customization in organizations.
Cons:
1. Limited to certain editions of Windows 11.
2. Requires administrative access to the Group Policy Editor.
3. Not available for home or basic editions of Windows 11.
Why Can’t I Change the Boot Logo?
There are a few reasons why you may encounter difficulties in changing the boot logo in Windows 11. Here are some possible reasons and their fixes:
1. Restricted System Files: Windows 11 has implemented stricter security measures to protect system files. To overcome this, ensure you have administrative privileges and take ownership of the necessary files before making changes.
2. Compatibility Issues: The boot logo customization methods may vary depending on your system configuration. Make sure you use the appropriate method that corresponds to your edition of Windows 11.
3. Manufacturer Restrictions: Some computer manufacturers lock down the boot logo to maintain branding consistency. In such cases, changing the boot logo may require additional modifications or circumvention techniques specific to your manufacturer.
Additional Tips:
1. Test the Boot Logo: Before finalizing the boot logo changes, it’s advisable to test it in a virtual machine or on a spare computer. This will ensure that the logo appears as expected before applying it to your main system.
2. Backup System Files: In addition to creating a full system backup, make sure to specifically backup the system files you modify, such as the modified logo file or the Registry Editor settings.
3. Stay Updated: Microsoft regularly releases updates for Windows 11 that may affect boot logo customization. Stay informed about the latest updates and ensure compatibility with the methods mentioned in this blog post.
5 FAQs about Changing the Boot Logo in Windows 11
Q1: Can I change the boot logo in all editions of Windows 11?
A: No, changing the boot logo using the Group Policy Editor is only available in specific editions like Windows 11 Pro or Enterprise.
Q2: What should be the dimensions and format of the logo file?
A: The logo file should be in PNG format and match your screen resolution. It’s best to use a transparent background and avoid exceeding the recommended dimensions for optimal results.
Q3: Do I need to restore the original boot logo before updating Windows 11?
A: It’s recommended to revert to the original boot logo before performing major updates or upgrades to Windows 11. This will help maintain system stability and prevent any potential conflicts.
Q4: Can I use animated boot logos?
A: Yes, it is possible to use animated boot logos. Some third-party software tools offer options for adding animation effects to your custom boot logo.
Q5: Will changing the boot logo void my warranty?
A: Generally, changing the boot logo alone should not void your warranty. However, it’s always advisable to check your computer manufacturer’s policies regarding system modifications.
In Conclusion
Changing the boot logo in Windows 11 can be an exciting way to personalize your computer and add a unique touch. While Microsoft has introduced stricter security measures, it is still possible to modify the boot logo with the right tools and knowledge. In this blog post, we explored several methods to change the boot logo in Windows 11, including the use of third-party software, Registry Editor, Command Prompt, and Group Policy Editor. Additionally, we discussed possible reasons for difficulties in changing the boot logo and provided some tips and FAQs to help you along the way. Remember to always exercise caution and take proper backups before making any modifications to your system.
Changing the boot logo in Windows 11 might sound tricky, but it’s actually quite simple if you follow the right steps. This guide will walk you through the process step by step, so even if you’re not a tech whiz, you can get it done. You’ll be using a tool called HackBGRT to change the boot logo. Ready to give your PC a personal touch? Let’s get started!
In this guide, we’ll show you how to change the boot logo on your Windows 11 computer. The boot logo is the image that shows up when your computer is starting. By using HackBGRT, you can replace the default Windows logo with any image you like.
Step 1: Disable Secure Boot
First, you’ll need to disable Secure Boot in your computer’s BIOS settings.
Secure Boot is a security feature that helps protect your PC, but it also prevents you from changing the boot logo. Restart your computer and enter the BIOS setup (usually by pressing a key like F2, F10, or DEL during startup). Look for the Secure Boot option and disable it.
Step 2: Download HackBGRT
Next, download the HackBGRT tool from a trusted source.
HackBGRT is a free, open-source tool designed specifically for changing the boot logo in Windows. Be sure to download it from a reliable site to avoid any issues with malware.
Step 3: Extract HackBGRT
After downloading, extract the contents of the HackBGRT zip file.
Use a tool like WinRAR or 7-Zip to extract the files. Make sure you extract them to a location you can easily access, like your Desktop.
Step 4: Run the Setup
Open the extracted folder and run the «setup.exe» file.
This will start the HackBGRT setup. Follow the on-screen instructions to proceed. The program will back up your current boot logo and other important files, so you can restore them later if needed.
Step 5: Replace the Boot Logo
Now, replace the default boot logo with your desired image.
In the HackBGRT folder, you’ll find a file named «splash.bmp.» Replace this file with your own image. Make sure your image is in the BMP format and has a resolution of 800×600 pixels for best results.
Step 6: Re-enable Secure Boot
Finally, re-enable Secure Boot in your BIOS settings.
Go back into your BIOS setup and turn Secure Boot back on. This will help keep your system secure while still allowing your new boot logo to be displayed.
After completing these steps, your computer will display the new boot logo whenever you start it up. Pretty cool, right?
Tips for Changing Boot Logo in Windows 11
- Backup Your Data: Always back up your important files before making changes to system settings.
- Use BMP Format: Ensure your image is in BMP format and is 800×600 pixels for optimal display.
- Test the New Logo: Restart your computer a couple of times to make sure the new logo displays correctly.
- Use Reliable Tools: Only download HackBGRT from trusted sources to avoid malware.
- Follow Instructions Carefully: Pay attention to each step to avoid any issues with your system.
Frequently Asked Questions
What happens if I don’t disable Secure Boot?
If you don’t disable Secure Boot, HackBGRT won’t be able to change the boot logo, and your system might not boot correctly.
Can I use any image as my boot logo?
Yes, but it must be in BMP format and ideally 800×600 pixels for the best display quality.
Is it safe to use HackBGRT?
HackBGRT is generally safe if downloaded from a reliable source. Always back up your data before making any changes.
Can I revert to the original boot logo?
Yes, HackBGRT backs up your original boot logo and files, so you can restore them if needed.
Will changing the boot logo affect my system performance?
No, changing the boot logo is purely a cosmetic change and won’t affect your system’s performance.
Summary
- Disable Secure Boot: Turn off Secure Boot in BIOS.
- Download HackBGRT: Get the tool from a trusted source.
- Extract HackBGRT: Unzip the downloaded file.
- Run the Setup: Start the setup process by running «setup.exe.»
- Replace the Boot Logo: Swap out the default logo with your BMP image.
- Re-enable Secure Boot: Turn Secure Boot back on in BIOS.
Conclusion
Changing the boot logo in Windows 11 is a fun and simple way to personalize your computer. By following these straightforward steps, you can swap out the boring default logo for something that reflects your style. Remember to disable and re-enable Secure Boot for the process to work smoothly, and make sure your new image is in the correct format. For anyone looking to add a personal touch to their PC, this guide has you covered. If you’re interested in more ways to customize your Windows experience, stay tuned for more tips and tricks. Happy customizing!
Matt Jacobs has been working as an IT consultant for small businesses since receiving his Master’s degree in 2003. While he still does some consulting work, his primary focus now is on creating technology support content for SupportYourTech.com.
His work can be found on many websites and focuses on topics such as Microsoft Office, Apple devices, Android devices, Photoshop, and more.
Windows 11 does not have any settings that allow users to change the boot screen logo or image. However, thanks to a utility, it is doable.
Here’s how to change the Windows 11 boot screen logo:
- Download Boot Logo Changer Utility
- Open Execution File in CMD
- Add Custom Boot Logo Image to MS Paint
If you do not like the change, you can revert back to original boot logo.
Step 1: Download Boot Logo Changer Utility
Download HackBGRT boot logo changer utility from GitHub.
Extract the downloaded .zip file on desktop.
Step 2: Open Execution File in CMD
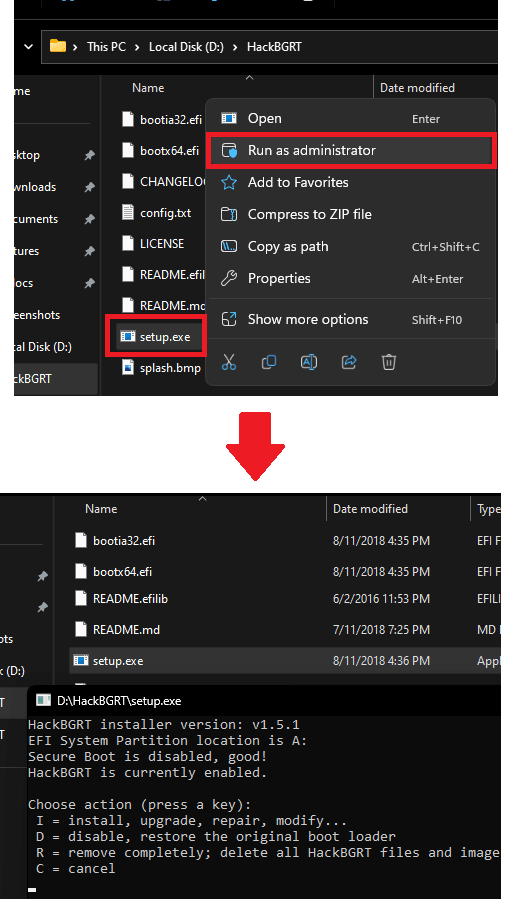
Open the extracted folder and look for “setup.exe” file there.
Right click it and select “Run as administrator” option from context menu.
Now, a command line prompt will be launched.
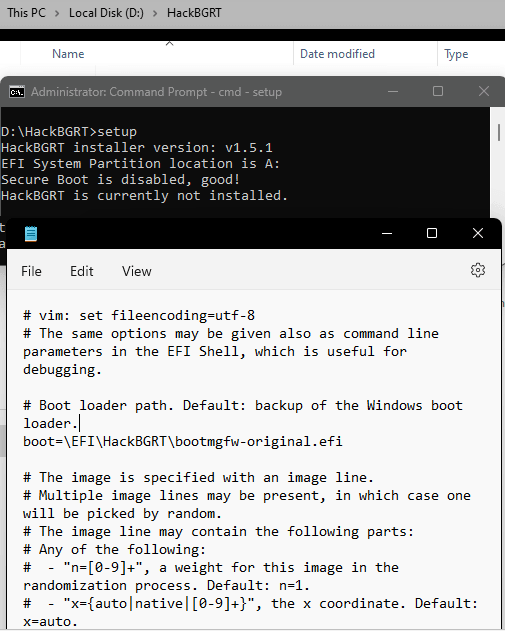
Press i key on keyboard to start the execution of utility and open a configuration file in NotePad.
Do not make any changes to the config file and simply close the NotePad.
Step 3: Add Custom Boot Logo Image to MS Paint
After closing NotePad, Windows Paint will be automatically opened on your Windows 11 PC. The paint will have HackBGRT logo.
Paste the image you want to set as boot screen logo on your Windows 11 computer in opened Paint file.
To do that, click on “Paste” button and select “Past from” option.
This will open browse for Window. Select the image that you can want to set as boot screen logo and click on “Open“.
Make sure that the image has black background, as Windows 11 does not support transparent or white background images for boot screen.
Once the image is opened, resize it to fit the required size. Once done, click on “File” and select “Save“.
Close the paint application. Now return back to opened CMD window and press any key to close it.
Reboot your PC to confirm the changes.
How to Restore Default Boot Logo on Windows 11
To restore back to default Windows 11 boot logo, follow these steps:
Open the HackBGRT folder.
Right click “Setup.exe” file there and click on “Run as administrator” option from context menu to open up Command Prompt.
Press “D” key on your keyboard to restore original boot logo. If you want to permanently remove HackBGRT application from your computer, press “R” keyboard key.
There you go folks. You see it is quite easy to replace default boot logo on Windows 11 PC with your favorite image or logo.
[yasr_overall_rating] [yasr_visitor_votes]
In this post, I will show you how to replace Windows 11 boot logo with any other image. If you want to customize the boot logo of your Windows 11 PC then here is a simple guide to do that. HackBGRT is a free open-source tool which lets you do it with ease. It basically replaces the specified logo in the system file that is responsible for showing the boot logo. It uses a simple configuration file that it builds dynamically for you and you just have to supply an image to be replaced with the original boot windows boot logo.
If you’d like to have a different boot logo on your PC then here is the software for you to use. But do note that Windows can only use BMP images. So, if you want to use a very colorful image then you will not be able to do so. Only 16 color palette images are supported to make sure that your logo is only composed of as few colors as possible. The software replaces the boot logo instantly and you can always revert to the original state of Windows boot.
You can go ahead and download HackBGRT here. After that, you just extract the ZIP file and you will find the following file structure. If your antivirus blocks then you will have to make an exception for it.
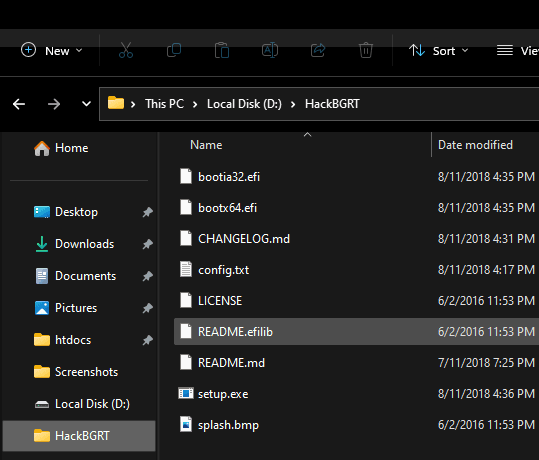
Now, you simply run the setup.exe file with admin access. Just right click on this file and choose Run as administration option. It will open a command window with some options to interact with the program. You can see that in the screenshot below.
Press “i” and start replacing the boot logo. It will open a text edit like shown below. We don’t have to make any changes in this text file. So, you just close it.
After you close the notepad, it will open MS Paint and will load a default BMP image that it comes with. Now, you have to create your logo in the Paint window that it opens. Do not close the paint window or create your image in some other program. If you do decide to use some other program to create the boot logo, you will have to paste that in the Paint window.
Now, after making sure everything is working fine, you just hit “Ctrl+S” option to save the image. The image must be saved in the same “splash.bmp” file.
Now, you simply close the MS Paint window and then changes will be saved to the system. And now, the boot logo has been updated as well. You simply restart your PC to see the changes.
In this way, you can simply replace the Windows boot logo with some other image. The only thing that you have to keep in mind is that you must use a BMP image. And when you want to revert to the original Windows boot logo, then simply run the tool with the administrator rights and then press “r” key. Reboot your PC and you will see that the boot image has been restored without any problems.
Final thoughts:
For Windows customization enthusiasts, this HackBGRT is a gem. If you don’t like the OEM logo then you can simply change that in a few clicks. I liked the fact that it includes a simple option to restore the original Windows boot logo. Also, not only Windows 11 but if you are using Window 10 then you can use it there as well. The process is the same for Windows 10 as well. All you have to do is keep in mind to always use BMP image and make sure Fast Startup is not active.
| [yasr_overall_rating] | |
| [yasr_visitor_votes] | |
| Home Page URL: | Click Here |
| Free/Paid: | Free |
Sign in to your MUO account
There was much speculation Microsoft would release a Windows 10X build, which had a progressive ring boot animation. That animation is an alternative to the dotted ring you see during Windows 11’s boot sequence. However, the big M has scrapped 10X.
Nevertheless, Microsoft’s latest desktop OS has retained some design features from 10X. You can still activate 10X’s alternative ring animation in Windows 11 even though there’s no visible option for enabling it. This is how you can change Windows 11’s boot animation to a progressive ring alternative.
How to Change the Boot Animation by Manually Editing the Registry
Windows 11’s progressive boot animation can be considered a hidden design feature. To enable it, a registry tweak needs to be applied that creates a new BootControl key with a BootProgressAnimation DWORD. That’s a pretty straightforward registry tweak you can apply as follows:
- Press the Win + R Run shortcut and input Regedit inside the Open box.
- Then select OK to view Registry Editor.
- Place the cursor inside Registry Editor’s address bar to select and clear the current location.
-
Open the Control key by inputting this path and pressing Return:
HKEY_LOCAL_MACHINE\SYSTEM\ControlSet001\Control -
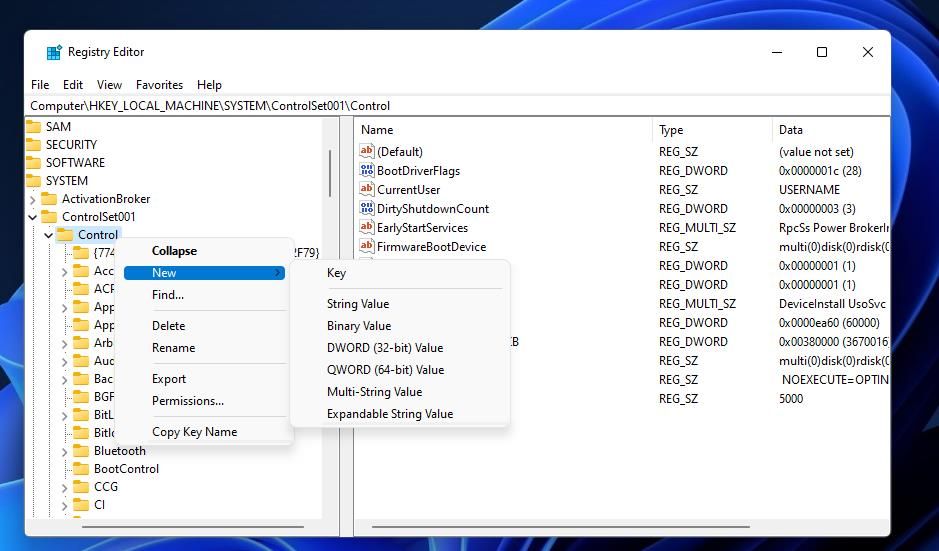
Next, right-click Control and select the New context menu option.

- Select the Key option to add a new registry entry.
- Type BootControl to be the new subkey’s title.
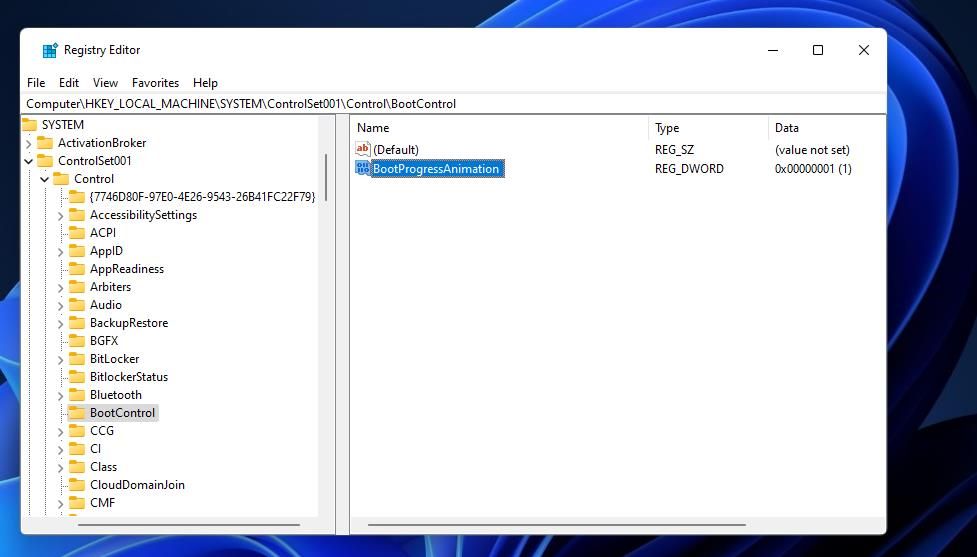
- Select the BootControl key.
- Right-click inside the Registry Editor’s right pane and select New > DWORD (32-bit).
-
Enter BootProgressAnimation in the text box for the DWORD.

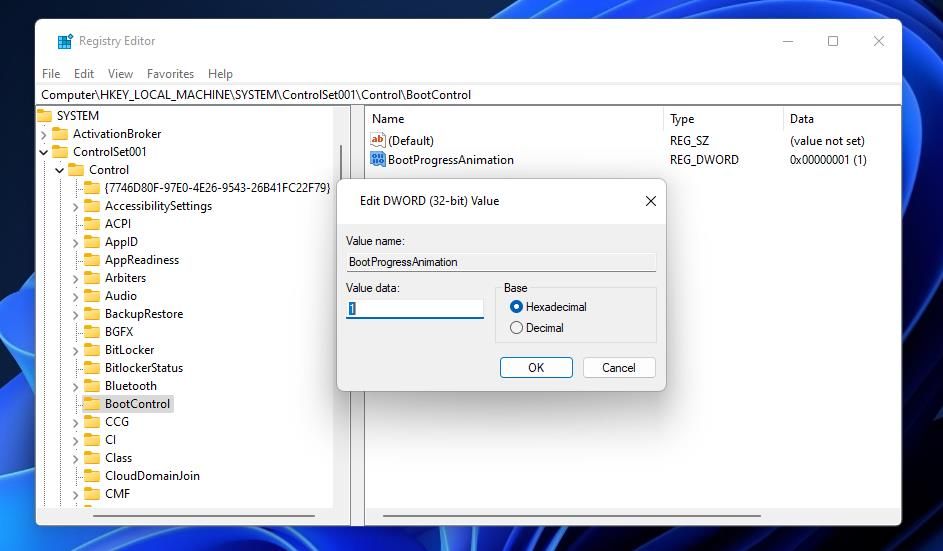
- Double-click the BootProgressAnimation DWORD to view a value window for it.
-
Erase 0 and input 1 in the Value data box.

- Select the OK option to save the new value.
- Click the Registry Editor’s window X button to close.
Now it’s time to see Windows 11’s new progressive ring boot animation. Click the Restart Start menu option. When Windows restarts, you’ll see a different ring, shown in the screenshot below.

The difference between them is that the new animation is a solid ring. The default Windows 11 boot ring is a dotted one. The solid ring from 10X is a slightly clearer and bolder boot animation.
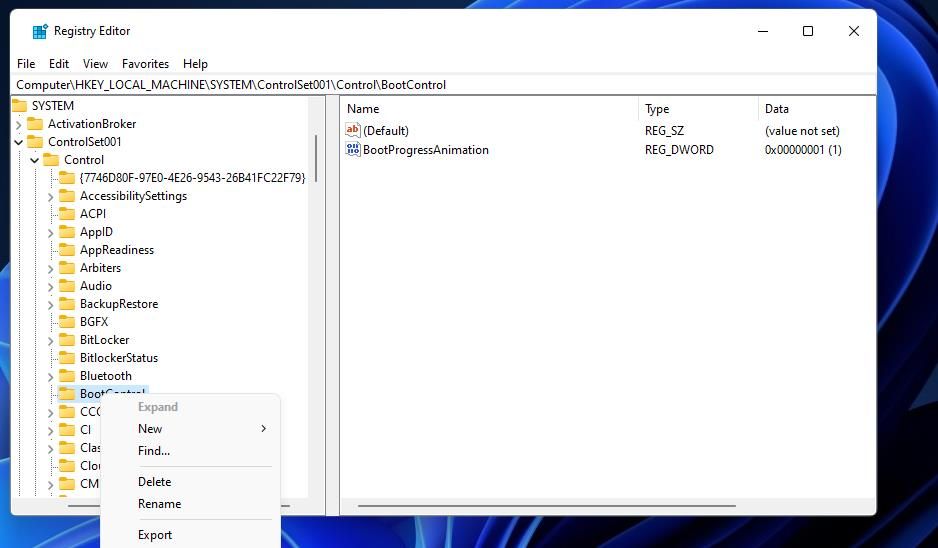
However, you can restore Windows 11’s original boot animation if you prefer it. Open the Control key, as covered in steps one to four above. Then right-click the BootAnimation key you added and select Delete. Click Yes to confirm you’re sure about erasing that registry entry.
How to Change the Boot Animation With a Registry Script
A registry script is a file that applies registry modifications. You can set up a registry script that enables the progressive ring animation in Windows 11, which is a slightly more automated method. This is how to set up a script that changes the boot animation:
- Press the taskbar button that has a magnifying glass icon.
- Open Notepad by right-clicking the search result for that text editor and selecting Run as administrator.
-
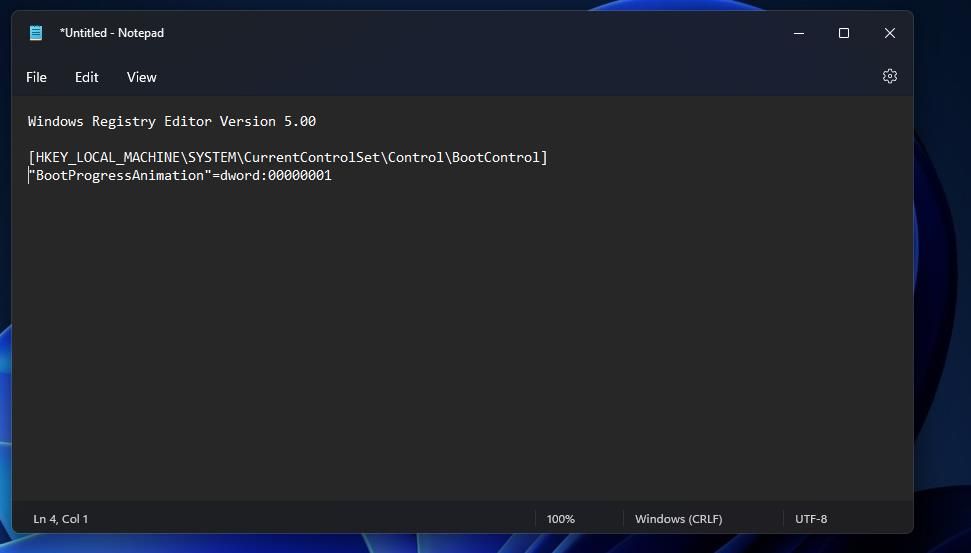
Select the script text below, and press the Ctrl + C key combination for copying.
Windows Registry Editor Version 5.00[HKEY_LOCAL_MACHINE\SYSTEM\CurrentControlSet\Control\BootControl]
"BootProgressAnimation"=dword:00000001 -
Click Notepad’s Edit menu, and select a Paste option from there.

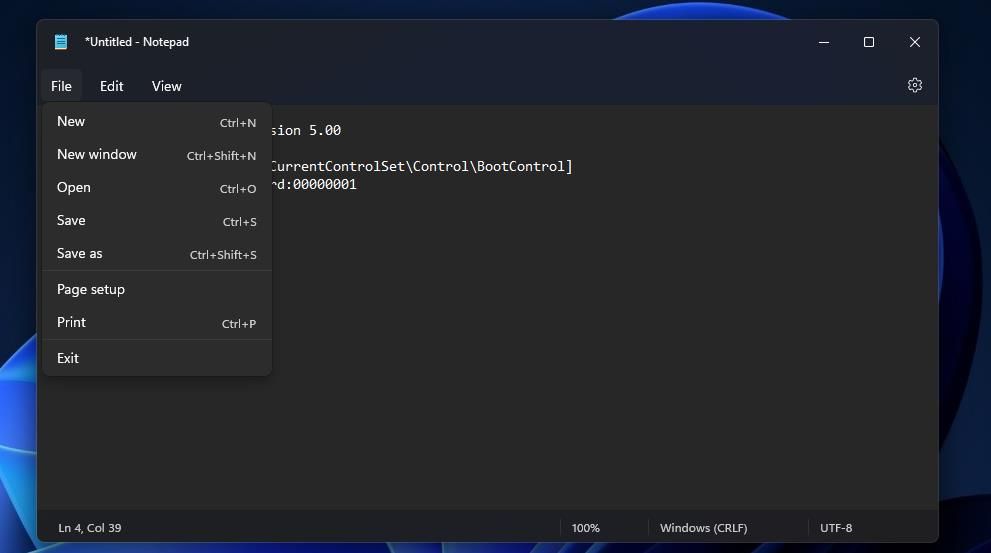
- Then select the File menu.
-
Click Save As to view options for saving.

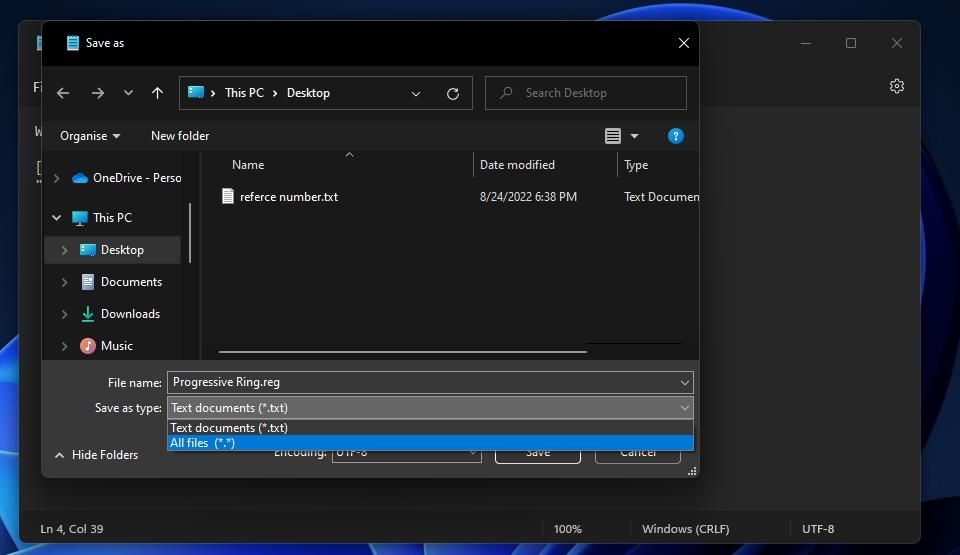
- Next, click anywhere along the Save as type drop-down menu to open it. Select the All files option from there.
-
Type Progressive Ring.reg in the File name text box. You can add a different file name there, but the .reg extension must be included at the end.

- Save the script in the Desktop folder so it’s easy to find.
- Click Notepad’s Save option.
- Then close the Notepad app to view the desktop.
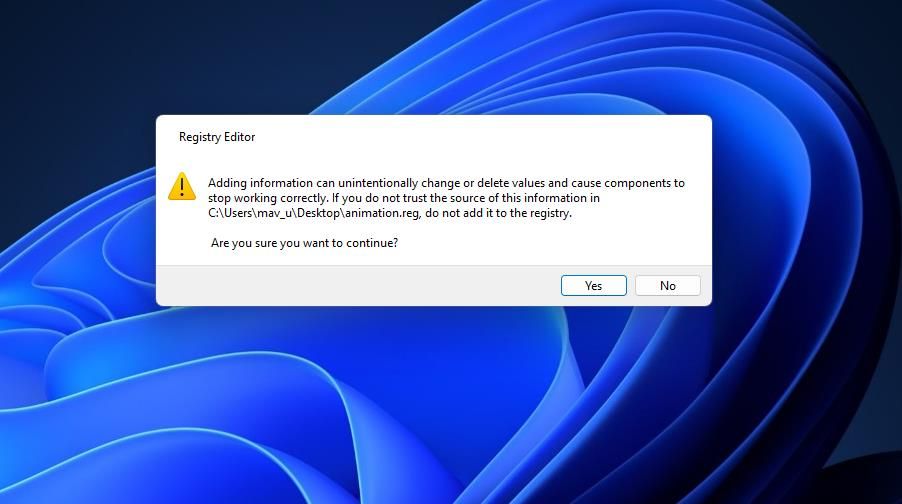
- Double-click the Progressive Ring.reg file on your desktop.
-
Press the Yes button when asked to continue.

- Finally, click OK on the Registry Editor window.
Now you’ll see the progressive ring animation when you restart Windows 11. You can disable that animation by deleting its key as covered at the end of method one. Or you can set up a registry script to do it for you. Create a registry script with the same steps above, but paste this code into Notepad instead:
        Windows Registry Editor Version 5.00[HKEY_LOCAL_MACHINE\SYSTEM\CurrentControlSet\Control\BootControl]
"BootProgressAnimation"=-
How to Change the Boot Animation With Winaero Tweaker
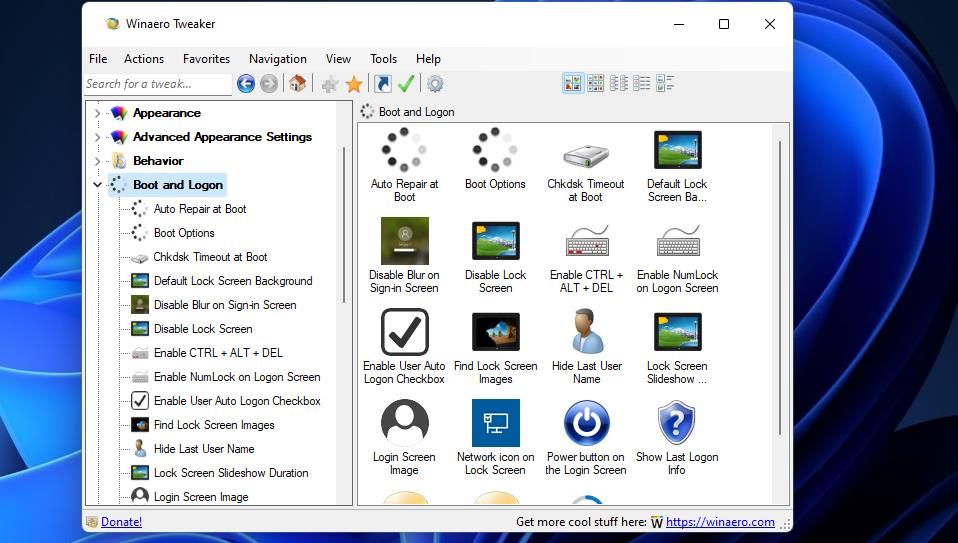
Winaero Tweaker is customization software with which you can change Windows 11’s boot animation. That freeware software incorporates numerous options for customizing the boot and login, among which is a Windows 10X Boot Animation setting. These are the steps for changing the boot animation with Winaero Tweaker:
- First, you’ll need to download and install Winaero Tweaker. You can download the ZIP archive for that software from the Winaero Tweaker website.
- Select the Download Winaero Tweaker link on that website.
- Extract the Winaero Tweaker archive, and install the software with its setup wizard. Our Winaero Tweaker guide for customizing Windows includes full instructions for installing the software.
- Bring up the Winaero Tweaker window.
-
Double-click Boot and Logon in the navigation sidebar.

- Select Windows 10X Boot Animation at the bottom of the Boot and Logon category.
-
Click the Enable Boot Animation from Windows 10X checkbox to select that setting.

- Then restart your Windows 11 desktop or laptop to see a new ring animation.
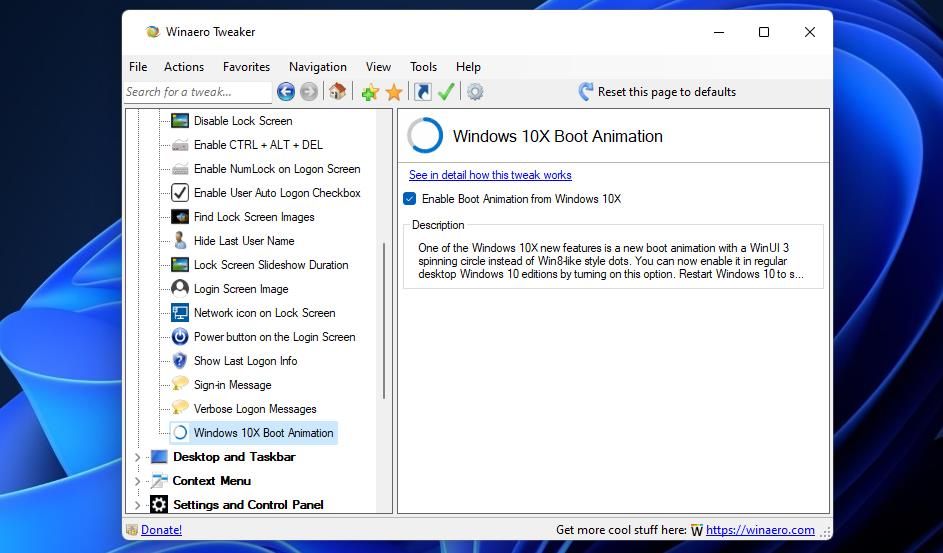
If you decide you don’t want a progressive ring circle, you can restore the default animation with Winaero Tweaker’s settings. Deselect the Enable Boot Animation from Windows 10X checkbox. Or you can click the Reset this page to defaults button.
Winaero Tweaker also includes some other interesting boot and login options worth noting. For instance, you can disable the boot animation ring altogether. To do that, click Boot Options to view the settings below. Unchecking the Enable loading circle checkbox will disable that animation. You can also remove the Windows 11 logo from the boot sequence by deselecting the Enable Windows logo box above that setting.
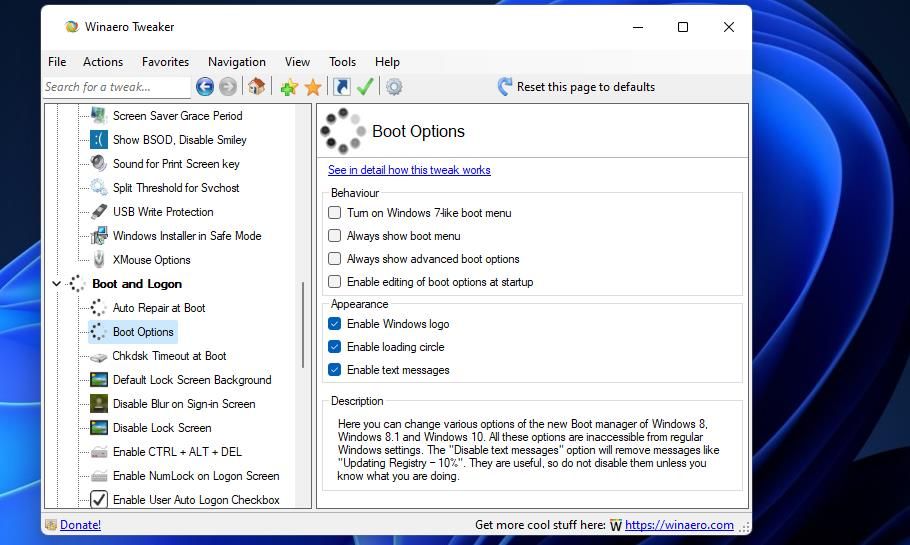
There you can also select four boot behavior settings. You can set Windows 11 to always display startup settings during startup by selecting the Always show advanced boot menus checkbox. Or select Always show boot menu to view the Windows Boot Manager when you start up your PC.
Add a Stylish New Boot Animation to Windows 11
So, how do you like the new 10X progressive ring boot animation in Windows 11? Some users will probably love the more stylish ring, but others may prefer the old one. Try enabling the progressive ring animation with one of the methods above to see which one you prefer.