
В Windows 11 для различных элементов: значков «Этот компьютер» и «Корзина», папок, файлов, дисков и других элементов используются привычные и стандартные значки, слегка обновленные по сравнению с предыдущими версиями системы. При желании, эти значки (или иконки) можно поменять.
В этой пошаговой инструкции подробно о том, как изменить значки для различных элементов в Windows 11, а также кратко о том, где взять файлы для значков/иконок.
Изменение значков системных элементов рабочего стола: Этот компьютер, Корзина, Папка пользователя, Сеть
На рабочем столе Windows 11 могут размещаться системные значки, не являющиеся папками или ярлыками: самые часто используемые — Этот компьютер (Мой компьютер) и Корзина. Изменить иконки для них можно в параметрах значков рабочего стола.
Шаги будут следующими:
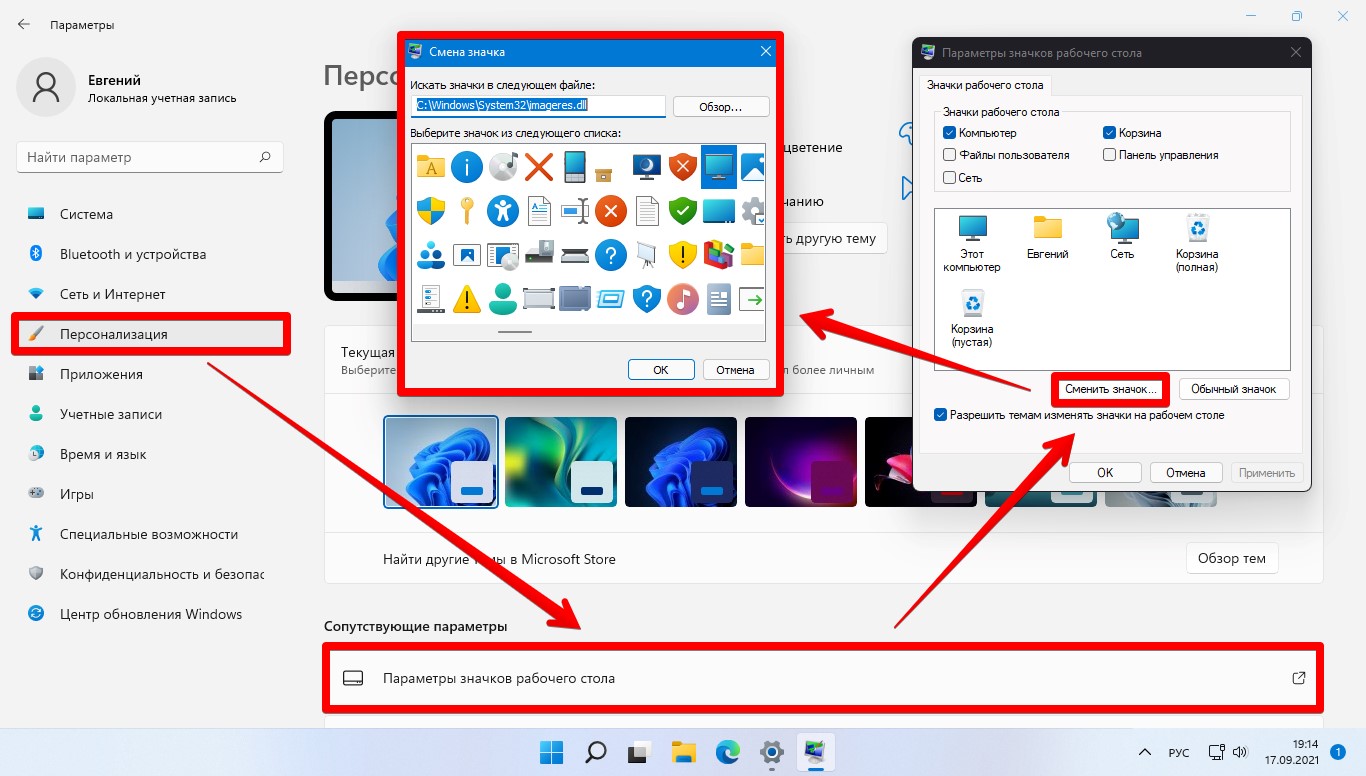
- Откройте параметры значков рабочего стола, для этого можно нажать правой кнопкой мыши по кнопке «Пуск», выбрать пункт «Выполнить» и ввести desk.cpl ,5 (пробел перед запятой обязателен) или перейти в Параметры — Персонализация — Темы — Параметры значков рабочего стола. Подробнее на тему: Как включить значок компьютера на рабочем столе Windows 11.
- Выберите нужный элемент, иконку которого вы хотите изменить и нажмите «Сменить значок».

- Выберите нужный значок из файлов ICO, библиотек DLL или файлов EXE. Подробнее о том, где раздобыть значки — в конце инструкции.
- Примените сделанные настройки.
Аналогичным образом вы можете поменять другие системные значки, например, установить свои иконки полной и пустой корзины.
Как изменить значки папки или ярлыка
Изменение значков папок и ярлыков Windows 11 выполняется почти одинаково, необходимые шаги:
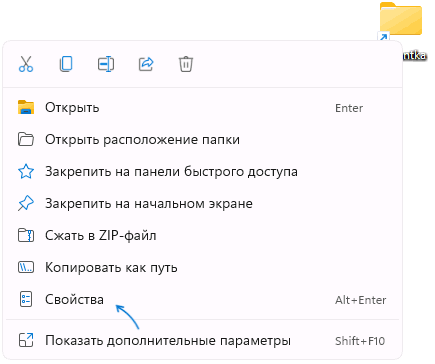
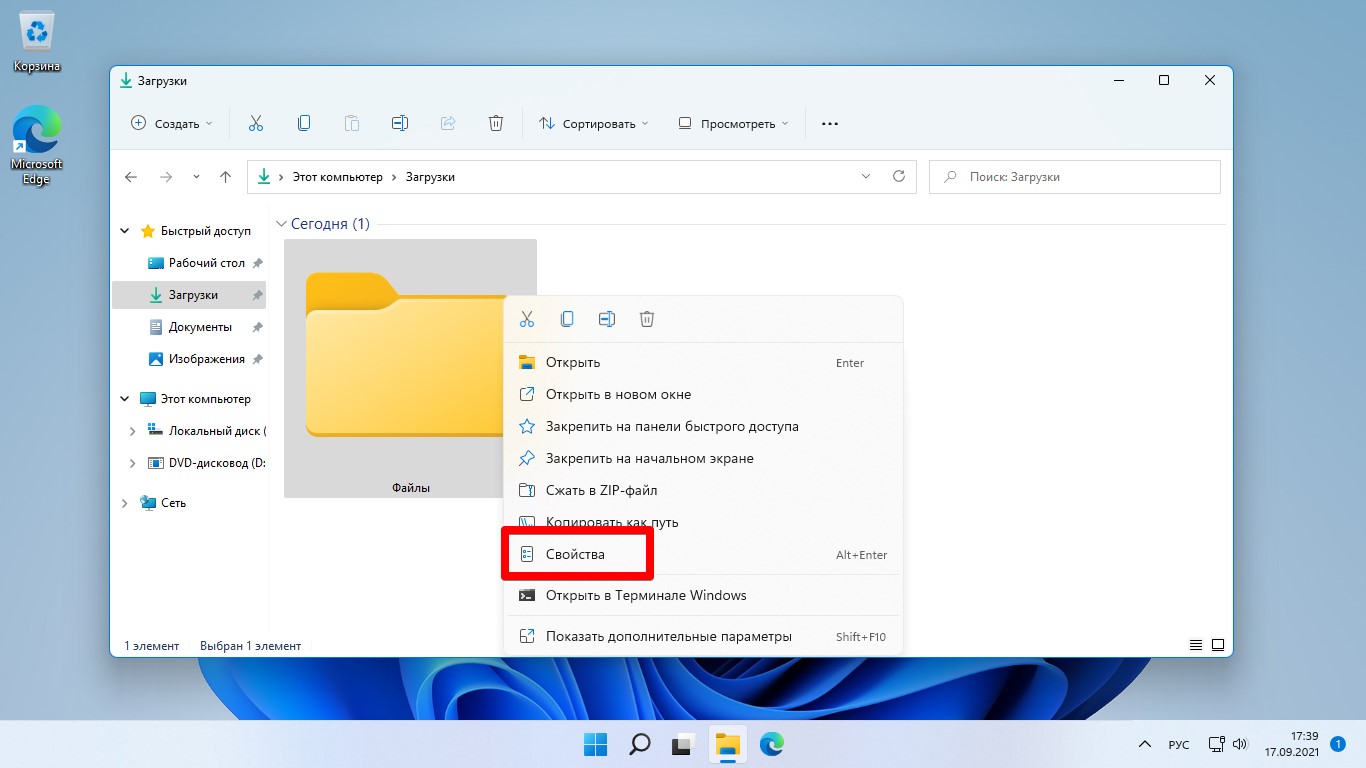
- Нажмите правой кнопкой мыши по папке или ярлыку и выберите пункт «Свойства» в контекстном меню.

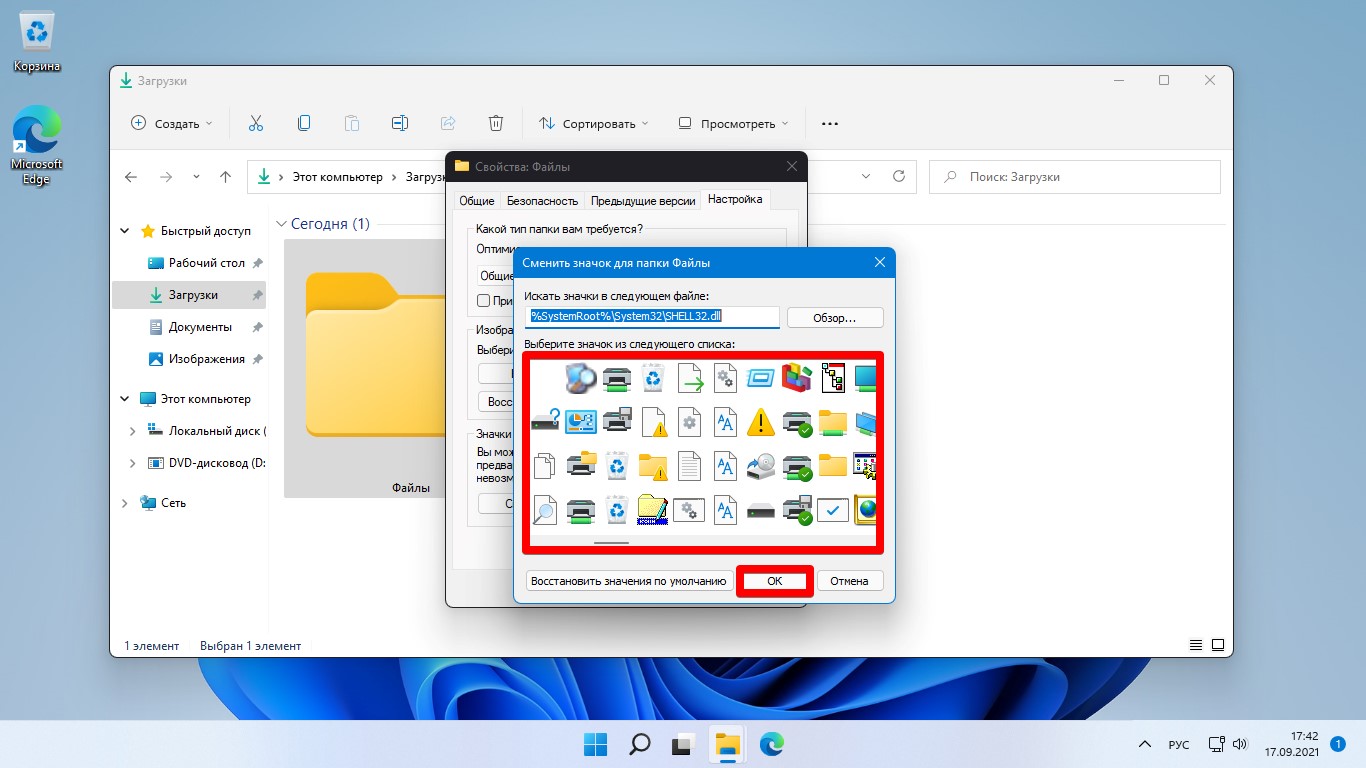
- Если это папка, то перейдите на вкладку «Настройка» и нажмите кнопку «Сменить значок». Если это ярлык, то перейдите на вкладку «Ярлык» и нажмите кнопку «Сменить значок».

- Выберите нужный значок из файлов иконок (ICO) или содержащих значки библиотек DLL и файлов EXE, примените настройки.
В результате значок выбранного элемента будет изменён. Если этого не произошло, нажмите клавишу F5 на рабочем столе (если значок располагается на нём) или в нужной папке, чтобы обновить отображаемые значки. В контексте темы может пригодиться: Как убрать стрелки с ярлыков Windows 11.
Изменение значков дисков Windows 11
В отличие от выше рассмотренных элементов, изменение значков дисков выполняется не столь очевидными методами. Для выполнения этой задачи придётся использовать редактор реестра:
- Нажмите правой кнопкой мыши по кнопке «Пуск» и выберите пункт «Выполнить», введите regedit и нажмите Enter для открытия редактора реестра.
- Перейдите к разделу реестра
HKEY_LOCAL_MACHINE\SOFTWARE\Microsoft\Windows\CurrentVersion\Explorer\DriveIcons
- Нажмите правой кнопкой мыши по разделу DriveIcons, выберите «Создать» — «Раздел» и создайте раздел с именем, соответствующим букве диска, например, C.
- Внутри созданного подраздела создайте ещё один с именем DefaultIcon.
- Выберите созданный подраздел и в правой панели редактора реестра дважды нажмите по значению «По умолчанию».

- В поле «Значение» укажите путь к файлу иконки (ICO) в кавычках, либо к индексу иконки в файле DLL без кавычек (пример: C:\Windows\system32\imageres.dll,-55).
- Примените сделанные настройки. Может потребоваться перезапуск проводника.

В результате, когда вы повторно откроете проводник, вы увидите изменённый значок диска. Есть и другие способы сделать это, более подробно в инструкции Как изменить значок (иконку) диска или флешки в Windows.
Изменение значков для типов файлов
При необходимости вы можете изменить значки для типов файлов. Ранее это была сравнительно простая задача, которая выполнялась почти так же, как смена значков для дисков в реестре: путем замены значения по умолчанию DefaultIcon для типа файла. Сегодня, когда для стандартных типов файлов многие иконки берутся из приложений Microsoft Store, выполнение задачи в реестре возможно, но трудоёмко.
Я рекомендую использовать бесплатную утилиту NirSoft FileTypesMan — в ней достаточно будет дважды нажать по нужному типу файла и задать нужный значок в пункте «Default Icon», как на изображении ниже.
Останется лишь применить настройки, чтобы значок всех файлов с указанным расширением изменился на выбранный.
Где взять значки для Windows
Значки для Windows 11 можно найти как в системе, так и скачать из Интернета или даже сделать самостоятельно.
- В папке C:\Windows\System32 есть несколько библиотек DLL с хорошими наборами системных значков: imageres.dll, shell32.dll, ddores.dll. Для определения индекса иконок в DLL можно использовать утилиту NirSoft IconsExtract.
- Файлы значков с расширением .ico можно найти в Интернете.
- Файлы PNG с прозрачным фоном можно найти в Интернете, а при необходимости — нарисовать самостоятельно, после чего использовать любой онлайн-конвертер PNG в ICO
- Есть программы для создания и редактирования иконок, причем в одном файле ICO могут быть значки с разными разрешениями. Можно обойтись и без программ, а с помощью онлайн-сервисов, например, xiconeditor.com
Если у вас остаются вопросы, касающиеся изменения значков различных элементов в Windows 11 — задавайте их в комментариях, не исключено, что решение найдётся.
We all love to customize the Windows look; that is why so many free and paid applications are available over the internet. A lot of Folder Icon Color Changer software for Windows 11 and 10 is available, but a few free tools are available to change drive icons on Windows 11 and 10 PCs.
If you don’t like the default drive icon of Windows and want to change the icon, it is possible to customize it without a third-party tool. However, in this gearupwindows article, we will share both methods to change the drive letter icon of the drive: manually as well as through third-party software.
If you need, you can download beautiful Icon Packs for Windows 11 and 10.
How do I Change Drive Icons in Windows 11 or 10 without Software?
If you don’t like to use a third-party application to change drive icons on Windows 11/10, perform the following steps:-
Step 1. Copy and paste the icon file (.ico) in the root of the drive that you want to change the drive icon. Rename the icon file as Drive.ico.
For example, if you would like to change the “C” drive icon, copy and paste the icon to C:.
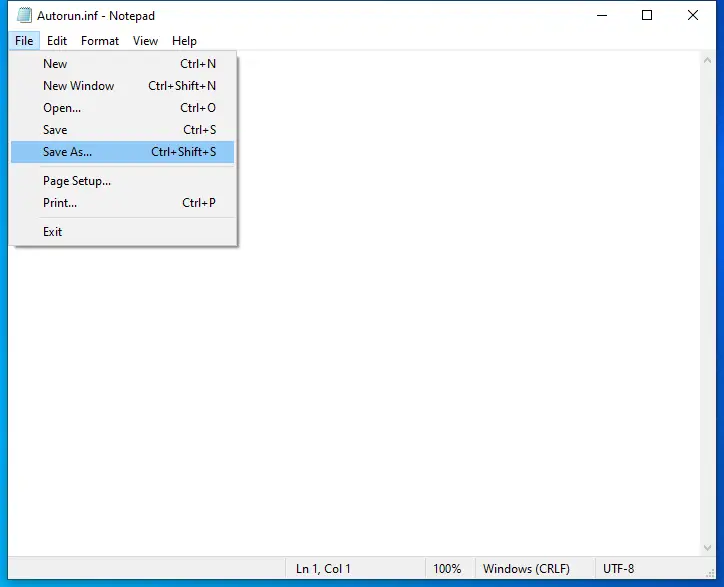
Step 2. Now, open a Notepad file in the root of the same drive [“C” drive], and then in the Notepad file, copy and paste the following code:-
[autorun]
ICON=Drive.ico
Step 3. Now, click the File menu on the Notepad and then select the Save as option.
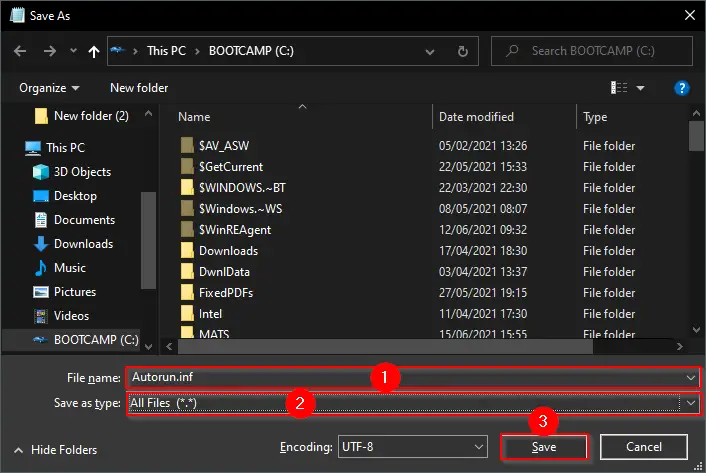
Step 4. In the dialog box that opens, next to the File name box, type Autorun.inf. From the “Save as type” drop-down menu, select the All Files option. Finally, click on the Save button.
Now, it should look like the below screenshot:-
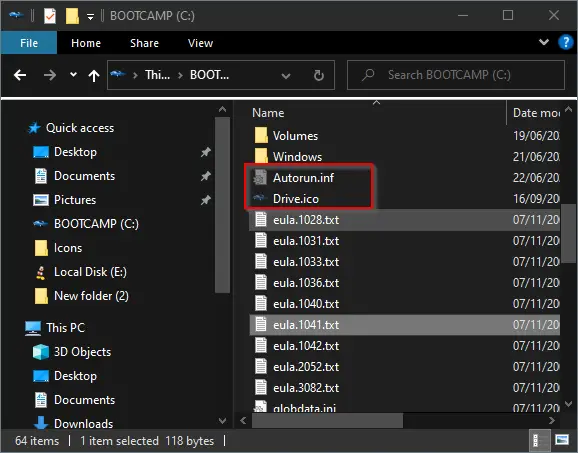
Step 5. Now reboot your PC to see the new icon for your drive.
If you want to set the new icon for all drives which are available under File Explorer, you need to repeat the above steps for all drives. In the future, if you change your mind and want to restore the original icons, delete the autorun.inf file which you have created and then restart your computer.
Once you complete the above steps, you should assign a new icon for your drive or restore it to default.
How do I Change Drive Icons in Windows 11 or 10 using Drive Icon Changer?
Drive Icon Changer is a tiny utility specially designed for Windows operating systems that easily change the File Explorer drive icons. Apart from the changes, this freeware also comes with a bunch of cool drive icons.
Step 1. Download the portable Drive Icon Changer software.
Step 2 Extract the ZIP file using any archiver tool.
Step 3. Now, right-click on Drive Icon Changer and select the Run as administrator option. If the User Account Control dialog opens, click the Yes button to continue.
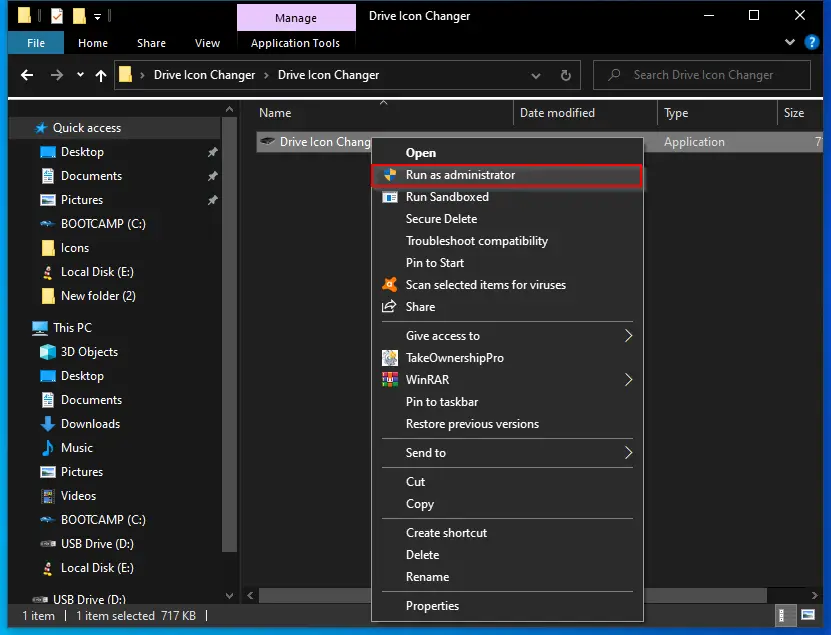
Step 4. Next, in the Drive Icon Changer application that opens, select the drive you want to change the icon on and then select the icon (.ico) file. Finally, click the Save button.
Step 5. Restart your computer to see the new icon on your drive.
If you still notice an old icon for drives after doing the above steps, you need to rebuild the icon cache.
Above all mentioned methods have been tested on Windows 11/10; however, the same procedure will work for Windows 8.1/8 and Windows 7 operating systems.
Download Drive Icon Changer
You can download the latest version of Drive Icon Changer from here.
How do I Change Drive Icons in Windows 11/10 through the My Drive Icon?
My Drive Icon is another freeware to change drive icons in Windows 11 and 10. It is a portable application, so there is no need to install it to change drive icons on your computer.
To change drive icons on a Windows 11 or 10 computer, do the following:-
Step 1. First, download My Drive Icon.
Step 2. After that, extract its contents in a folder using RAR Opener or any other archiving tool you like to use.
Step 3. Then right-click on the executable file and select the Run as administrator option from the context menu.
Step 4. Select an icon from your PC by clicking on the “Folder” icon in the “Select icon file” box.
Step 5. Next, select a drive for that you want to change the icon.
Step 5. Finally, hit the Apply Changes button.
The changes are immediate, so there is no need to restart your computer. After opening the File Explorer, you will see the selected drive icon changed.
Download My Drive Icon
You can download My Drive Icon from softpedia.com.
How to Change Drive Icon Using Registry Editor?
It is also possible to change the drive icon on Windows 11 and 10 using Registry Editor. Here are the steps:-
Step 1. First, open Registry Editor.
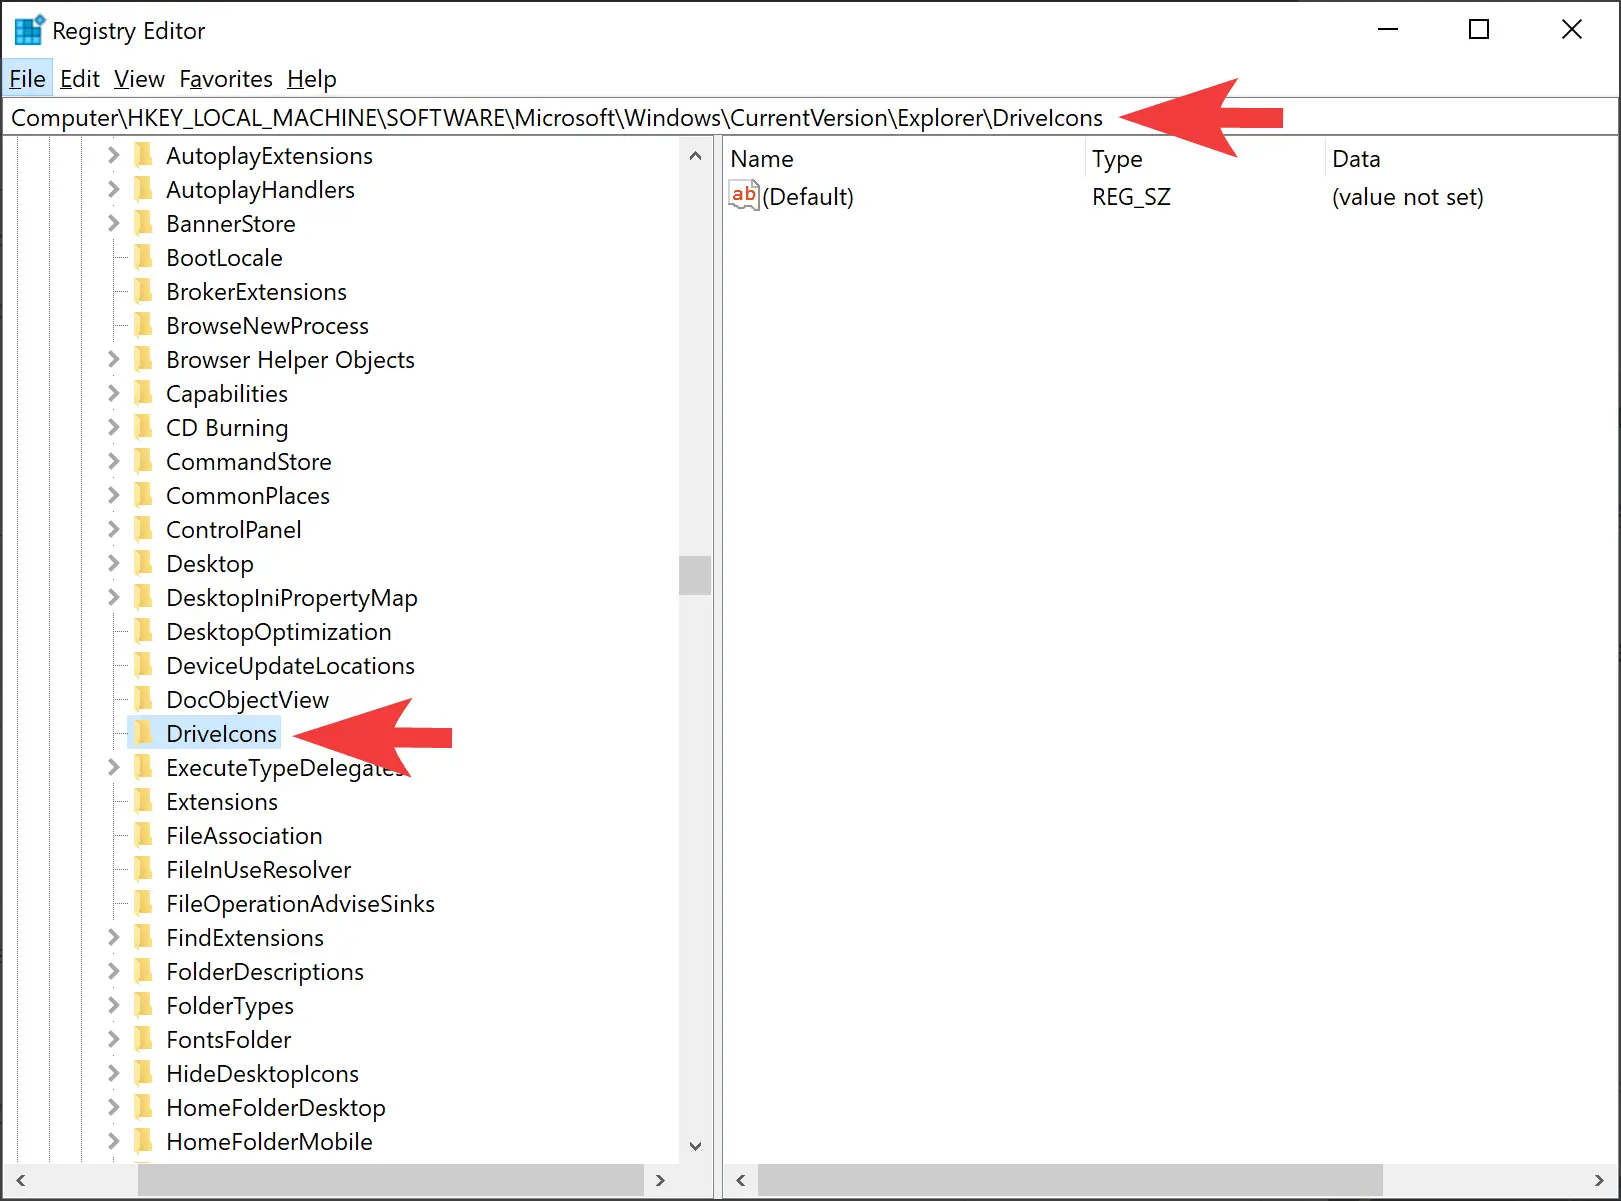
Step 2. When the Registry Editor window appears on your computer, navigate to the following key on the left side:-
HKEY_LOCAL_MACHINE\SOFTWARE\Microsoft\Windows\CurrentVersion\Explorer\DriveIcons
Step 3. Next, right-click the DriveIcons folder and select New > Key.

Step 4. After that, name the new key to the drive letter of your desired local drive. For instance, we’re going to set a custom change the icon for the drive “D,” so we named the key “D.”

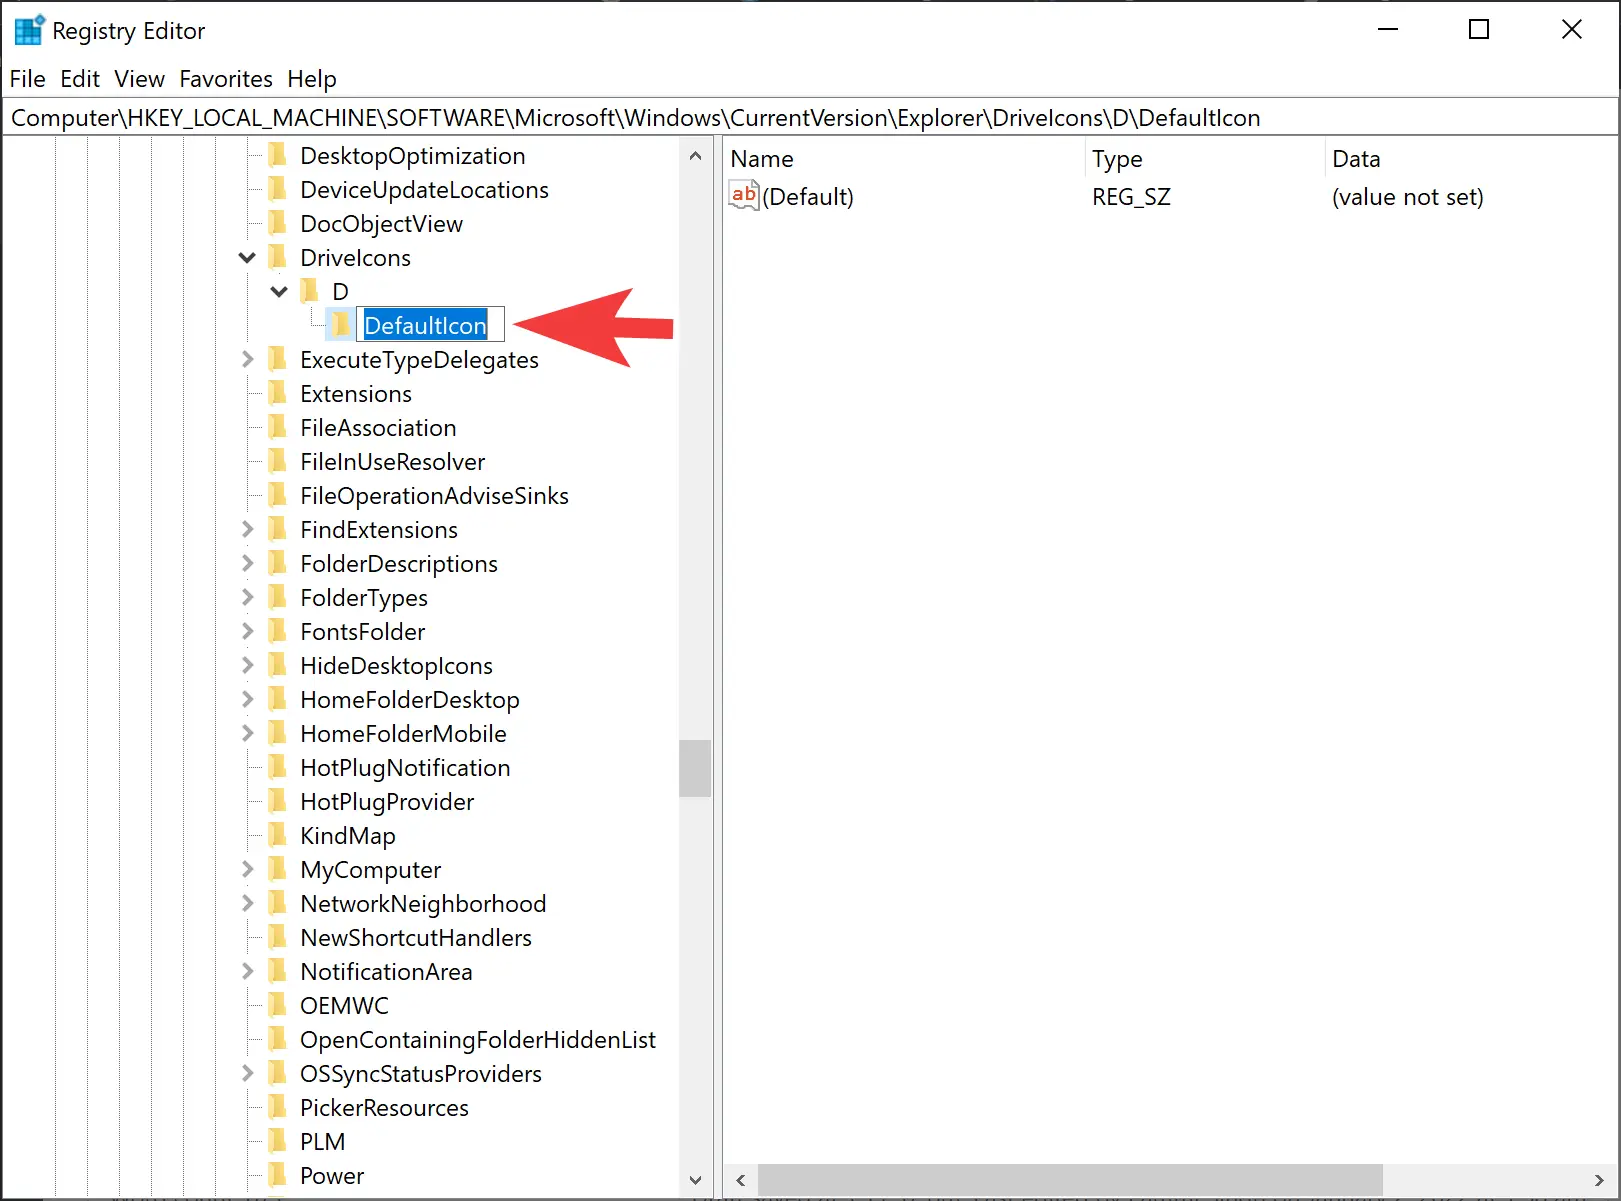
Step 5. Now, right-click on the newly created key and pick New > Key. Name this newly created key as DefaultIcon.
Step 6. Next, double-click the (Default) entry in the right pane.
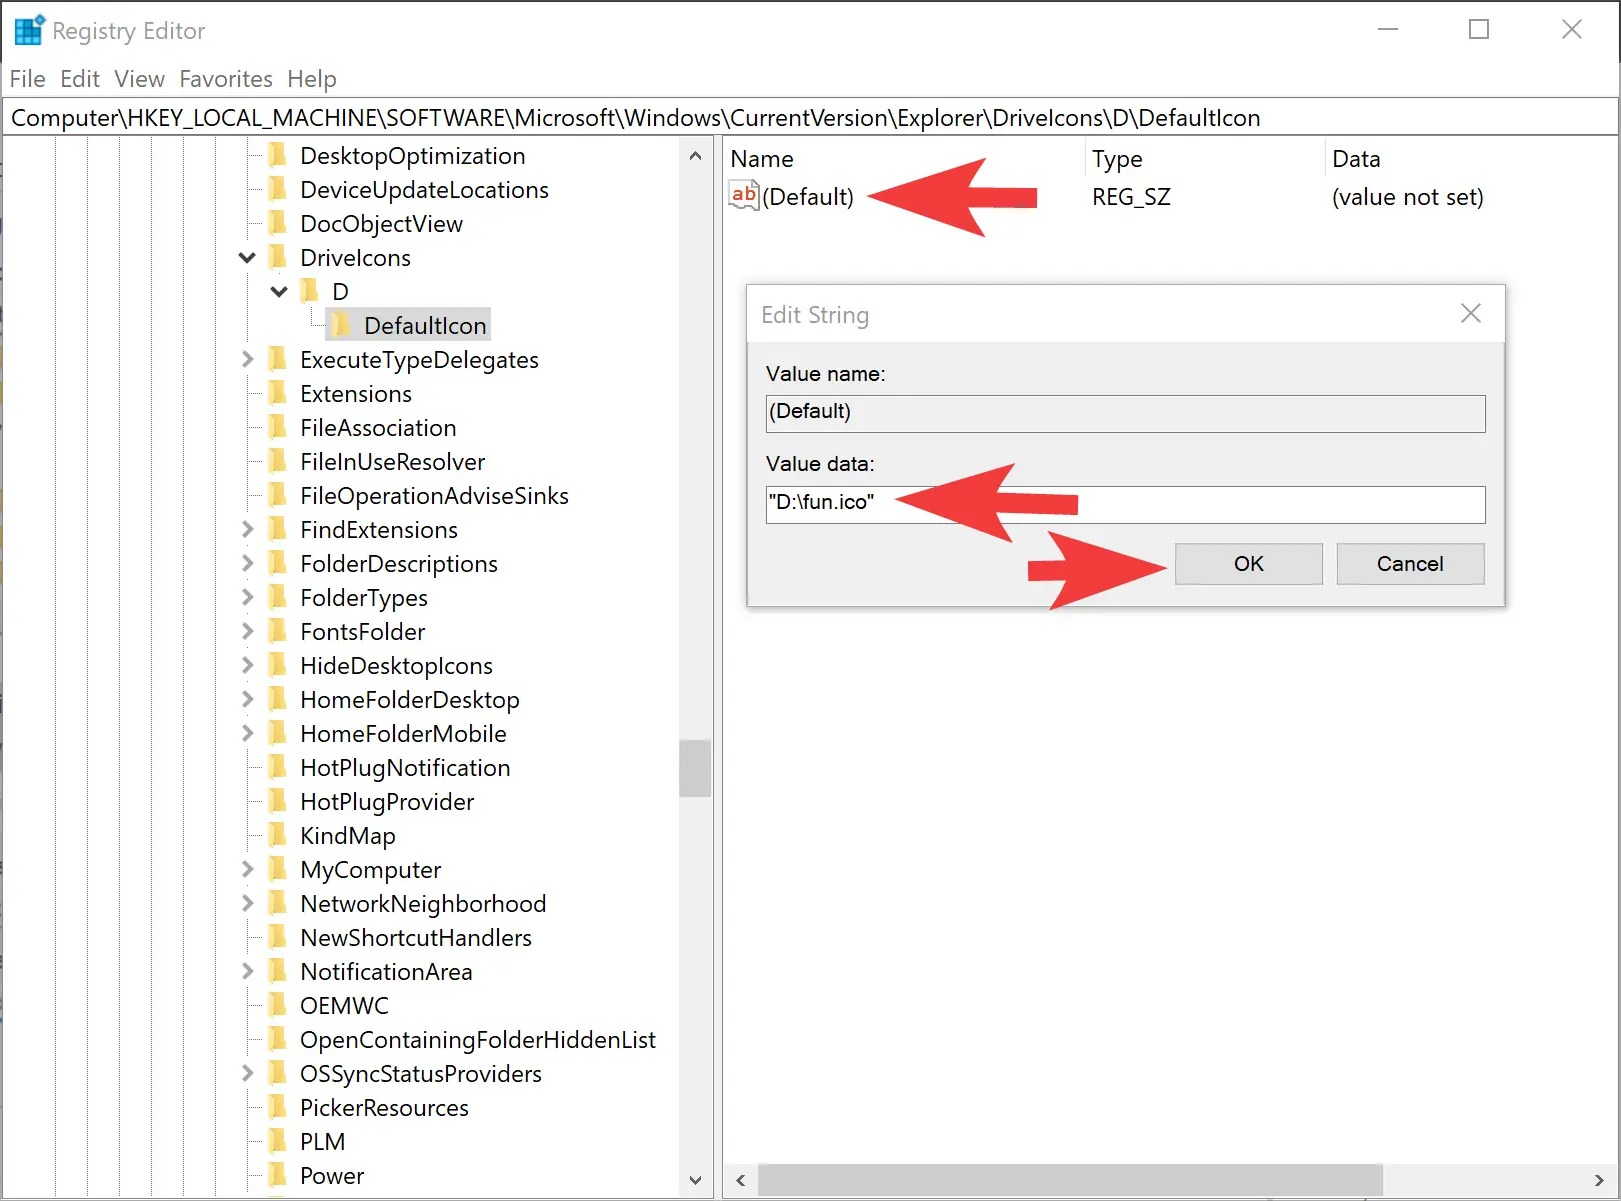
Step 7. Then, type the full path with quotes of the “.ico” file you want to use as your new drive icon inside the “Value data” box.
Step 8. Finally, click the OK button.
Once you complete the above steps, the new drive icon in File Explorer will immediately change. If you want to reverse the changes, just delete the DriveIcons key, and the default drive icon will return.
Conclusion
In conclusion, changing drive icons in Windows 11 or 10 is a simple process that can be done manually or with third-party software. The process involves copying the desired icon file to the root of the drive, creating an autorun.inf file, and restart the computer. Users can also use applications such as Drive Icon Changer and My Drive Icon to change drive icons easily. Additionally, it is possible to change the drive icon using the Registry Editor. Whatever method users choose, they can add their preferred icons to make their PC more personalized.
Also Read:
How to change file and folder icons in Windows 11/10?

This tutorial will show you how to change the icon of a drive to any icon for your account or all users in Windows 10 and Windows 11.
A drive icon is a graphical representation of a drive in File Explorer > This PC.
Windows will use a default icon for a drive based on what type of drive it is, such as a network drive, mapped drive, USB drive, internal drive, external drive, DVD drive, Windows drive, etc…
If you like, you can use your own custom icon for a drive instead of the default icon assigned to the drive by Windows.
Contents
- Option One: Change Icon of Drive for Current User in Registry Editor
- Option Two: Change Icon of Drive for All Users in Registry Editor
- Option Three: Change Icon of Drive using autorun.inf File
EXAMPLE: Default and custom icon for connected USB drive


Option One
Change Icon of Drive for Current User in Registry Editor
It is recommended to use Option Three instead for removable drives since their drive letters could change.
1 Open Registry Editor (regedit).
2 Navigate to the registry key below in the left pane of Registry Editor. (see screenshot below)
HKEY_CURRENT_USER\Software\Classes\Applications\Explorer.exe\Drives
If you do not have the Applications key, then right click on the Classes key, click/tap on New, click/tap on Key, type Applications for the key name, and press Enter to create it.
If you do not have the Explorer.exe key, then right click on the Applications key, click/tap on New, click/tap on Key, type Explorer.exe for the key name, and press Enter to create it.
If you do not have the Drives key, then right click on the Explorer.exe key, click/tap on New, click/tap on Key, type Drives, and press Enter to create it.

3 Right click on the Drives key, click/tap on New, click/tap on Key, type the capitalized drive letter (ex: «F») of the drive you want to change the icon of, and press Enter. (see screenshot above and below)
If you already have a drive letter sub key (ex: «F») for this drive letter (ex: «F») under the Drives key, then skip this step and go to step 4 instead.
If you ever change the drive letter of this drive, you will need to rename this drive letter sub key (ex: «F») to match the new drive letter.
To undo this, you would delete the drive letter sub key (ex: «F») for the drive, click/tap on Yes to confirm, and go to step 7.
4 Right click on the drive letter sub key (ex: «F») under the Drives key, click/tap on New, click/tap on Key, type DefaultIcon, and press Enter. (see screenshot below)
If you already have a DefaultIcon sub key under this drive letter key (ex: «F»), then skip this step and go to step 5 instead.

5 In the right pane of the DefaultIcon key, double click/tap on the (Default) string value to modify it. (see screenshot above)
6 Type the full path wrapped in quotes of the .ico file you want to use as the icon for this drive letter, and click/tap on OK. (see screenshot below)

7 You can now close Registry Editor if you like. (see screenshot below)
8 If File Explorer is currently open, close and reopen File Explorer (Win+E) to apply.
Option Two
Change Icon of Drive for All Users in Registry Editor
You must be signed in as an administrator to use this option.
It is recommended to use Option Three instead for removable drives since their drive letters could change.
This option will override Option One.
1 Perform the following steps to save the icon file into the C:\Windows folder: (see screenshots below)
- Open File Explorer (Win+E).
- Copy and paste the .ico file you want to use into the C:\Windows folder.
- Click/tap on Continue to approve.
- Close File Explorer.


2 Open Registry Editor (regedit).
3 Navigate to the registry key below in the left pane of Registry Editor. (see screenshot below)
HKEY_LOCAL_MACHINE\SOFTWARE\Microsoft\Windows\CurrentVersion\Explorer\DriveIcons
If you do not have the DriveIcons key, then right click on the Explorer key, click/tap on New, click/tap on Key, type DriveIcons for the key name, and press Enter to create it.

4 Right click on the DriveIcons key, click/tap on New, click/tap on Key, type the capitalized drive letter (ex: «F») of the drive you want to change the icon of, and press Enter. (see screenshot above and below)
If you already have a drive letter sub key (ex: «F») for this drive letter (ex: «F») under the DriveIcons key, then skip this step and go to step 5 instead.
If you ever change the drive letter of this drive, you will need to rename this drive letter sub key (ex: «F») to match the new drive letter.
To undo this, you would delete the drive letter sub key (ex: «F») for the drive, click/tap on Yes to confirm, and go to step 8.

5 Right click on the drive letter sub key (ex: «F») under the DriveIcons key, click/tap on New, click/tap on Key, type DefaultIcon, and press Enter. (see screenshot below)
If you already have a DefaultIcon sub key under this drive letter key (ex: «F»), then skip this step and go to step 6 instead.

6 In the right pane of the DefaultIcon key, double click/tap on the (Default) string value to modify it. (see screenshot above)
7 Type the full path wrapped quotes of the .ico file you want to use as the icon of this drive, and click/tap on OK. (see screenshots below)
8 You can now close Registry Editor if you like. (see screenshot below)
9 If File Explorer is currently open, close and reopen File Explorer (Win+E) to apply.
Option Three
Change Icon of Drive using autorun.inf File
This option is great to use for removable drives (ex: USB or SD Card) since the custom icon will be used on any PC it is connected to.
This option will override Option One and Option Two.
This option will not work for mapped network drives, but you can use Option One or Option Two instead.
You must be signed in as an administrator to use this option to change the Windows «C» drive icon.
1 Turn on show file name extensions in the ribbon.
2 Open the drive (ex: «F») you want to change the icon of in File Explorer > This PC.
3 Copy the .ico file (ex: «USB.ico») you want to use into the root directory of this drive. (see screenshot below)

4 Right click or press and hold on an empty space in the root directory of the drive, click/tap on New, and click/tap on Text Document. (see screenshot below)
If you already have a autorun.inf file in the root directory of this drive, then skip this step and go to step 6 instead.
If this is for the Windows C drive, you will not be able to directly create the autorun.inf file in the root directory of the Windows «C» drive. You will need to do steps 4, 5, 6, 7, and 8 on your desktop first, then move the autorun.inf to the root directory of the Windows C drive.
5 Rename the New Text Document.txt file to autorun.inf, and click/tap on Yes to confirm. (see screenshots below)
6 Open the autorun.inf file in the root directory of this drive to edit it in Notepad. (see screenshot below)
7 Enter the separate lines below into the autorun.inf file. (see screenshot below)
Code:
[autorun]
icon="<file name>.ico"
If any of these lines already exist in the autorun.inf file, then you would only add or change the icon line for the .ico file you want to use instead.
Substitute <file name> in the icon line with the actual name of the .ico file from step 3.
To undo this, you could either delete the icon line and save, or delete the autorun.inf file.

8 When finished, click/tap on File on the menu bar, click/tap on Save, and close the opened autorun.inf file. (see screenshot below)

9 Restart the computer to apply.
If this is for a removable drive, then you could just disconnect and reconnect the drive to apply instead.
That’s it,
Shawn Brink
В этой статье разберем, как изменить значки для любых папок в Windows 11. Мы рассмотрим способы изменения, как для обычных папок, так и для специальных ярлыков на рабочем столе (например, «Корзина» или «Этот компьютер»), а так же рассмотрим способ замены иконок ярлыков жестких дисков. В операционной системе Windows 11 есть собственный набор иконок, из которых вы можете выбирать, но вы также можете добавлять свои собственные иконки для папок.
Значок для обычных папок («желтая папка» на скриншоте ниже) можно изменить в окне свойств папки.
1. Для этого щелкаем правой кнопкой мыши по папке и выбираем пункт «Свойства», либо выделяем папку и нажимаем на клавиатуре «Alt+Enter».
2. Переходим во вкладку «Настройки» и в разделе «Значки папок» нажимаем на кнопку «Сменить значок…».
3. Откроется окно с коллекцией значков, которые по умолчанию установлены в ОС Windows 11. В этом же окне находится еще одна кнопка «Восстановить значения по умолчанию» — единственный простой способ, чтобы вернуть стандартную «жёлтую» иконку в исходное состояние.
4. Выбираем любой значок и нажимаем кнопку «ОК», чтобы применить настройку. Настройка применится немедленно.

Как сменить значки рабочего стола?
Чтобы изменить значки на рабочем столе для корзины и других специальных ярлыков и папок, необходимо перейти в специальный раздел в параметрах Windows 11.
1. Кликаем правой кнопкой мыши по меню «Пуск» и выбираем «Параметры», либо нажимаем «Win+I» на клавиатуре.
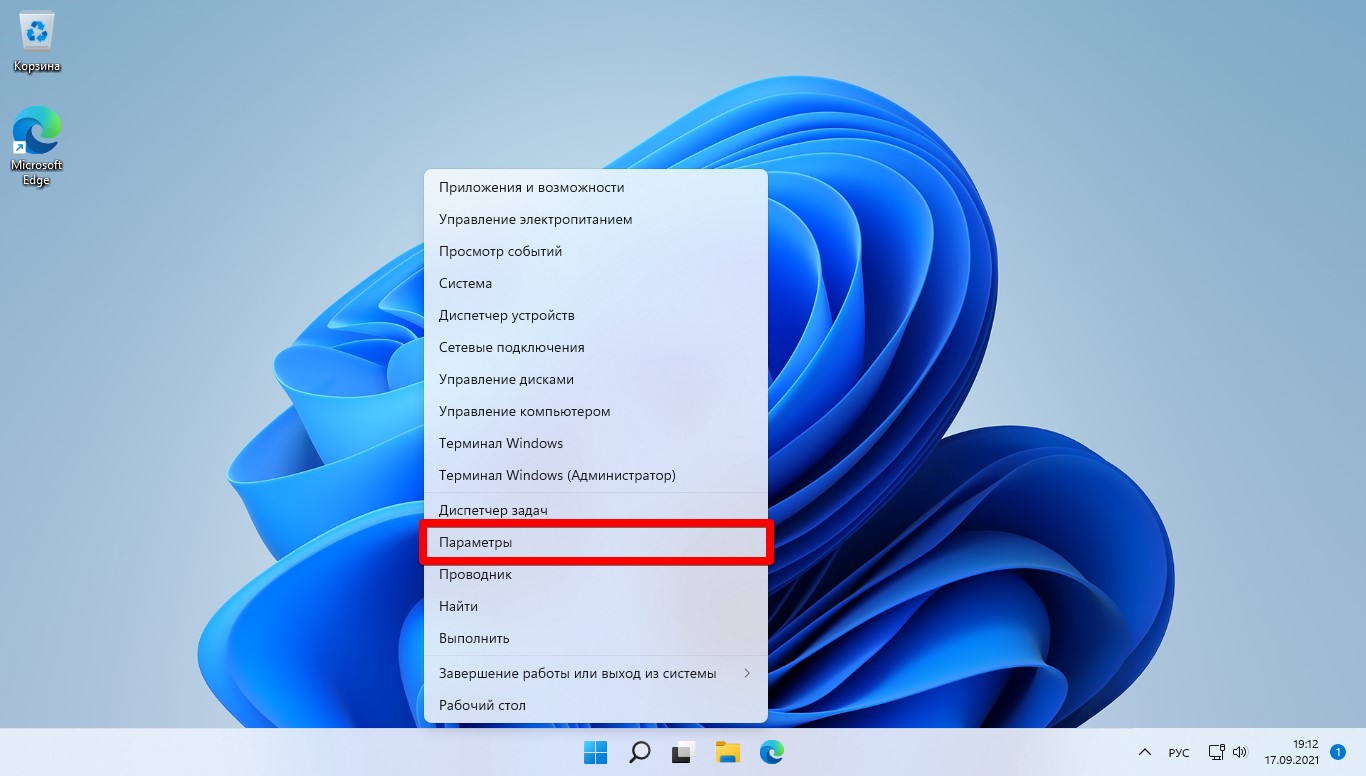
2. Переходим в окне параметров в «Персонализацию» — «Параметры значков рабочего стола» — в открывшемся окне выбираем один из элементов рабочего стола («Этот компьютер», «Сеть», «Корзина» и тд.) нажимаем кнопку «Сменить значок…» — выбираем значок и нажимаем кнопку «ОК».
3. Переходим на рабочий стол и наблюдаем результат.
Как изменить значок (иконку) у жестких дисков?
Еще один значок, который можно изменить в Windows 11 — значок, используемый для жестких дисков. Однако, параметров в Windows 11 для замены иконки для HDD нет, поэтому необходимо внести изменения в реестр Windows 11.
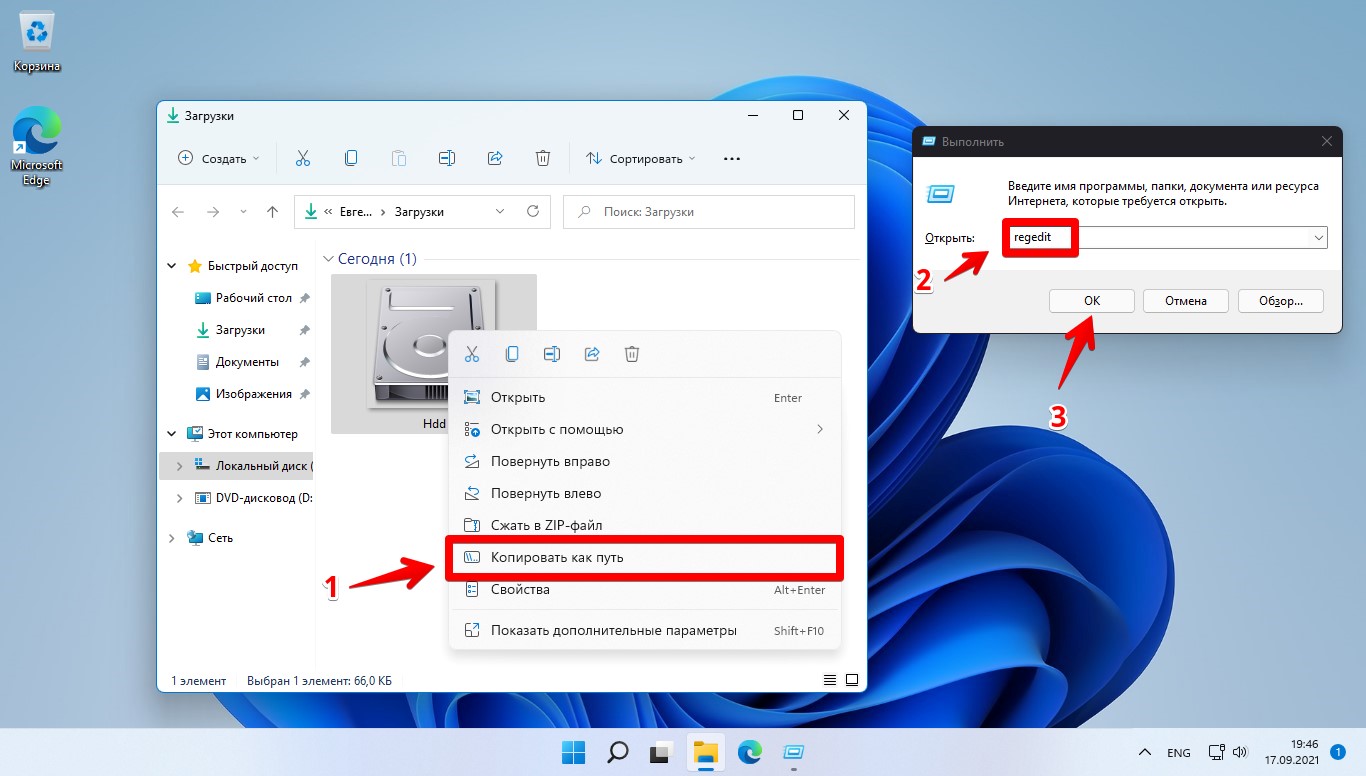
1. Скачиваем из Интернета иконку в формиате «.ICO».
2. Копируем путь к файлу «.ICO», который скачали ранее и собираемся использовать в качестве значка. Далее щелкаем по файлу правой кнопкой мыши и выбираем «Копировать как путь», чтобы сохранить путь в буфере обмена.
3. Нажимаем на клавиатуре клавиши «Win+R», чтобы вызвать окно «Выполнить». В открывшимся окне набираем команду «regedit» и нажимаем «ОК».
3. Откроется редактор реестра. Переходим в следующий раздел:
Компьютер\HKEY_LOCAL_MACHINE\SOFTWARE\Microsoft\Windows\CurrentVersion\Explorer\DriveIcons
4. Щелкаем правой кнопкой мыши по разделу «DriveIcons», выбираем «Создать», а затем выбираем «Раздел».
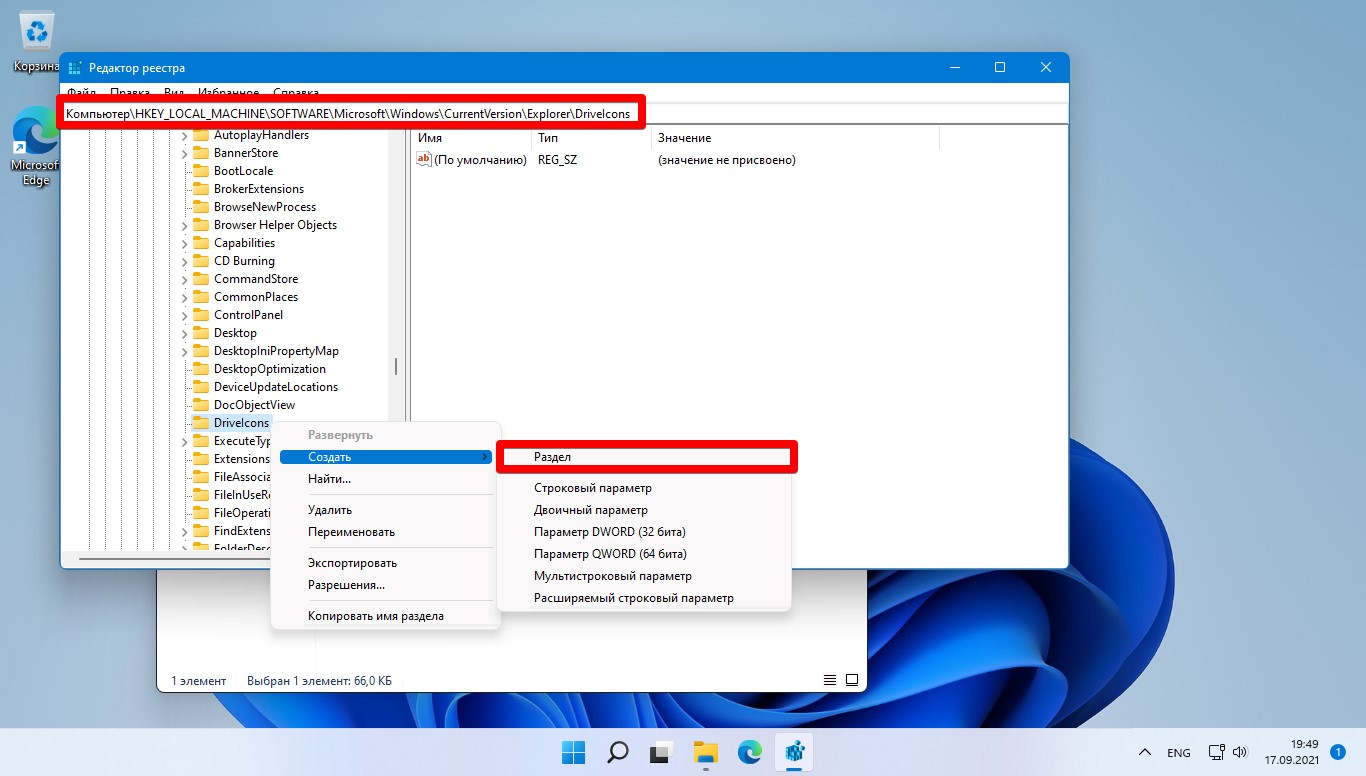
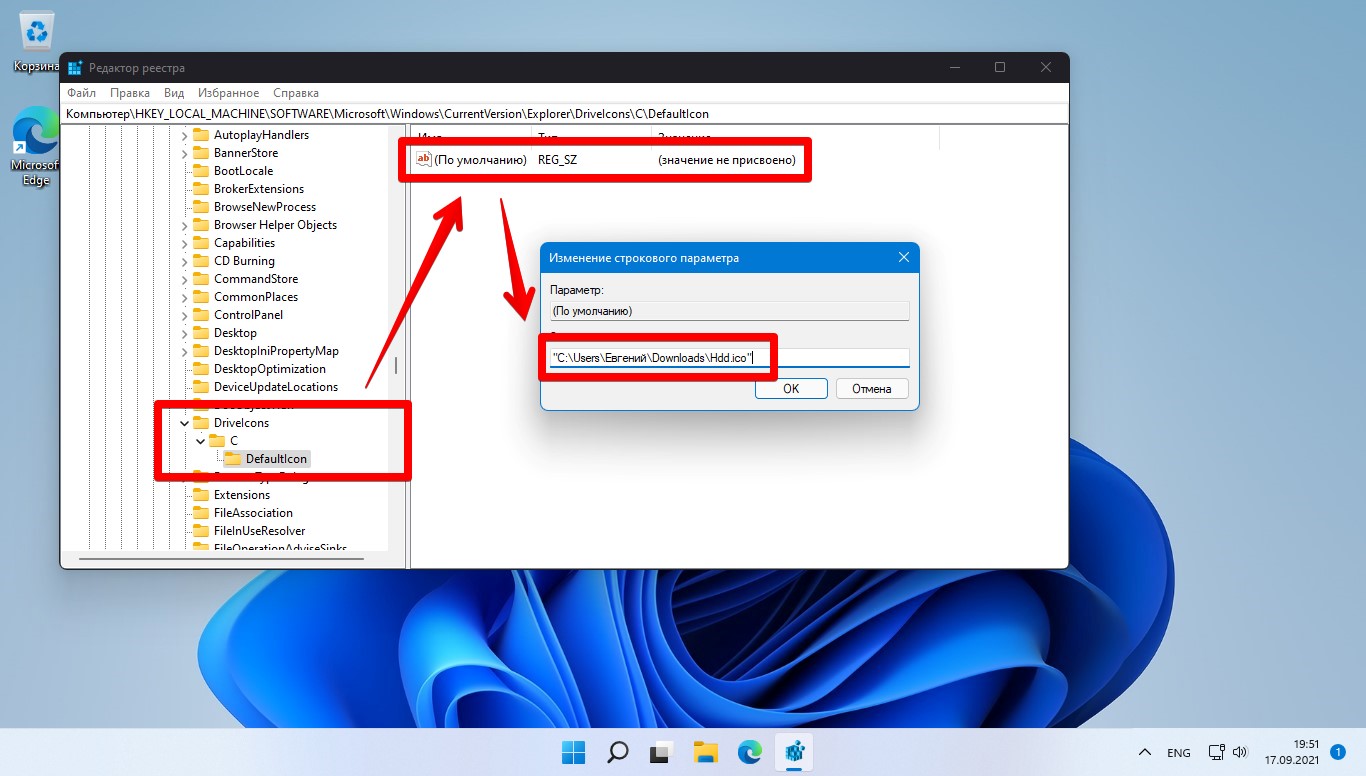
5. Если нужно поменять иконку для диска «С», то создаем раздел с именем «С». Затем повторяем действия и создаем подраздел с именем «DefaultIcon». Затем щелкаем по строковому параметру «(По умолчанию)» и выбираем «Изменить». Откроется окно изменения строкового параметра. В раздел «Значение» вставляем путь, скопированный в пункте «2» и нажимаем «ОК».
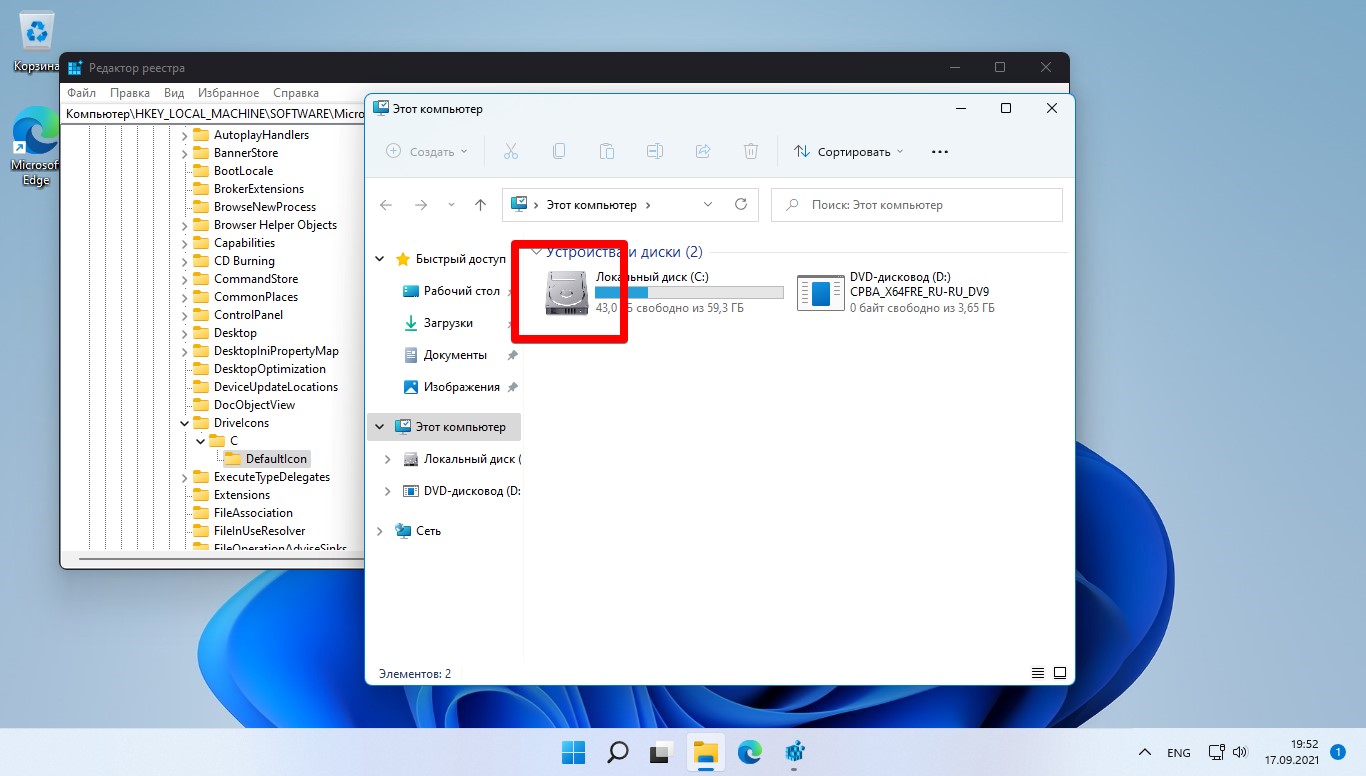
6. Переходим в окно «Этот компьютер» и наблюдаем изменение значка диска «С».
На чтение3 мин
Опубликовано
Обновлено
Windows 11 предлагает пользователю широкие возможности для настройки внешнего вида и персонализации операционной системы. Одной из таких возможностей является изменение значков дисков, что позволяет сделать ваш компьютер еще более уникальным и персонализированным.
Изменение значка диска в Windows 11 может быть полезно, если вы хотите сделать систему более удобной и организованной. Например, вы можете установить специальные значки для важных директорий или разделов диска, чтобы быстро и легко их отличать друг от друга.
В этой пошаговой инструкции мы покажем вам, как легко и быстро изменить значок диска в Windows 11. Для этого вам понадобится всего несколько минут и несколько простых действий.
Шаг 1: Зайдите в раздел «Мой компьютер» или «Этот компьютер», щелкнув на соответствующую ярлычок на рабочем столе или в Открывшемся меню «Пуск».
Шаг 2: Выберите нужный диск, для которого вы хотите изменить значок. Щелкните правой кнопкой мыши на выбранный диск и выберите в контекстном меню пункт «Свойства».
Шаг 3: В открывшемся окне «Свойства» выберите вкладку «Пользовательский значок» и нажмите на кнопку «Изменить значок».
Шаг 4: В появившемся окне «Изменить значок» вы можете выбрать из предложенных значков или указать путь к собственному значку на вашем компьютере. Выберите желаемый значок и нажмите на кнопку «ОК».
Шаг 5: После этого вы увидите, что значок диска изменился на выбранный вами. Нажмите на кнопку «Применить» и «ОК», чтобы сохранить изменения.
Поздравляю! Вы успешно изменили значок диска в Windows 11. Теперь ваш компьютер будет выглядеть еще более персонально и организованно. Повторите эти шаги для каждого диска, которому вы хотите присвоить уникальный значок.
Примечание: Инструкции могут незначительно отличаться в зависимости от версии Windows 11. Если вы столкнетесь с какими-либо сложностями, обратитесь к официальной документации Microsoft или поискайте помощи на специализированных форумах.
Как изменить значок диска в Windows 11
Вот пошаговая инструкция о том, как изменить значок диска в Windows 11:
- Щелкните правой кнопкой мыши на нужном диске и выберите «Свойства».
- В открывшемся окне «Свойства диска» перейдите на вкладку «Пользовательские иконки».
- Нажмите кнопку «Изменить значок…».
- Выберите иконку из представленных или щелкните на кнопке «Обзор» и найдите иконку на вашем компьютере.
- Подтвердите выбор иконки, нажав «ОК» во всех открытых окнах.
- Закройте окно «Свойства диска».
- Теперь значок диска будет изменен на выбранный вами.
Изменение значка диска в Windows 11 — это простая процедура, которая позволяет вам добавить немного индивидуальности в вашу операционную систему. Попробуйте изменить значки своих дисков и создайте уникальный стиль для вашего компьютера.
Причина и инструкция
Изменение значка диска может быть полезным для лучшего визуального отображения и упрощения идентификации дисков.
Чтобы изменить значок диска в Windows 11, выполните следующие шаги:
- Перейдите на рабочий стол и щелкните правой кнопкой мыши на иконке диска, значок которого вы хотите изменить.
- В появившемся контекстном меню выберите пункт «Свойства».
- В окне «Свойства диска» перейдите на вкладку «Общие».
- В разделе «Операции» нажмите на кнопку «Изменить иконку».
- Выберите желаемый значок из списка доступных иконок или нажмите на кнопку «Обзор» и выберите свой файл с иконкой.
- Подтвердите изменение, нажмите «ОК» в окне «Свойства диска» и «Применить» в основном окне папки.
После выполнения этих шагов значок диска будет изменен на выбранный вами.
Программное обеспечение
Изменение значка диска в Windows 11 можно осуществить с помощью специальных программных средств. Существует несколько приложений, которые позволяют настроить значок диска по вашему желанию.
Одним из таких приложений является программное обеспечение «Folderico». С помощью этой программы вы сможете легко изменить значок диска на более подходящий или оригинальный. Программа имеет простой интерфейс и не требует особых навыков для использования.
Для изменения значка диска с помощью «Folderico» вам необходимо открыть программу и выбрать нужный диск из списка сверху. Затем нажмите на кнопку «Выбрать значок» и выберите изображение, которое вы хотите использовать в качестве значка диска. После этого нажмите кнопку «Применить» и значок диска будет изменен.
Если вы хотите использовать другую программу, то можете обратить внимание на приложение «CustomizerGod». Это мощный инструмент, который позволяет изменять различные элементы интерфейса Windows, включая значки дисков. С помощью «CustomizerGod» вы сможете создавать собственные темы и настраивать значки дисков в соответствии со своими предпочтениями.
Для изменения значка диска с помощью «CustomizerGod» вам необходимо открыть программу и выбрать вкладку «Drive Icon». Затем выберите нужный диск и нажмите кнопку «Change Icon». Выберите изображение для значка и нажмите кнопку «Apply Changes». Значок диска будет изменен в соответствии с вашим выбором.
Использование программного обеспечения позволяет изменить значок диска в Windows 11 без необходимости вручную изменять системные файлы. Таким образом, вы сможете придать своему компьютеру уникальный и персонализированный вид.