
Applies ToWindows 7 Enterprise Windows 7 Professional Windows 7 Home Basic Windows 7 Home Premium Windows 7 Starter Windows 7 Ultimate Windows Server 2008 R2 Enterprise Windows Server 2008 R2 Datacenter Windows Server 2008 R2 for Itanium-Based Systems Windows Server 2008 R2 Foundation Windows Server 2008 R2 Standard Microsoft Windows XP Home Edition Microsoft Windows XP Professional Microsoft Windows XP Professional x64 Edition Microsoft Windows XP Tablet PC Edition Windows Server 2008 Datacenter Windows Server 2008 Enterprise Windows Server 2008 for Itanium-Based Systems Windows Server 2008 Foundation Windows Vista Business Windows Vista Enterprise Windows Vista Home Basic Windows Vista Home Premium Windows Vista Starter Windows Vista Ultimate Windows Server 2008 Datacenter without Hyper-V Windows Server 2008 Enterprise without Hyper-V Windows Server 2008 R2 Service Pack 1 Windows Server 2008 Service Pack 2 Windows Server 2008 Standard without Hyper-V Windows Vista Business 64-bit Edition Windows Vista Enterprise 64-bit Edition Windows Vista Home Basic 64-bit Edition Windows Vista Home Premium 64-bit Edition Windows Vista Service Pack 2 Windows Vista Ultimate 64-bit Edition Windows 7 Service Pack 1
Notes
-
This article is intended for advanced users, administrators, and IT Professionals.
-
Importing Registration Entries (.reg) files is a feature of Regedit.exe and is not supported by Regedt32.exe. You can use Regedit.exe to make some changes to the registry on a Windows NT 4.0-based or Windows 2000-based computer, but some changes require Regedt32.exe. For example, you cannot add or change REG_EXPAND_SZ or REG_MULTI_SZ values with Regedit.exe on a Windows NT 4.0-based or Windows 2000-based computer. Regedt32.exe is the primary Registry Editor for Windows NT 4.0 and Windows 2000. If you must use Regedt32.exe, you cannot use Registration Entries (.reg) files to modify the registry. For more information about the differences between Regedit.exe and Regedt32.exe, click the following article number to view the article in the Microsoft Knowledge Base:
141377 Differences between Regedit.exe and Regedt32.exe
IN THIS TASK
-
SUMMARY
-
Syntax of .Reg Files
-
Adding Registry Subkeys or Adding and Changing Registry Values
-
Deleting Registry Subkeys and Values
-
Renaming Registry Subkeys and Values
-
Distributing Registry Changes
-
Summary
Important This section, method, or task contains steps that tell you how to modify the registry. However, serious problems might occur if you modify the registry incorrectly. Therefore, make sure that you follow these steps carefully. For added protection, back up the registry before you modify it. Then, you can restore the registry if a problem occurs. For more information about how to back up and restore the registry, click the following article number to view the article in the Microsoft Knowledge Base:
322756 How to back up and restore the registry in Windows
This step-by-step article describes how to add, modify, or delete registry subkeys and values by using a Registration Entries (.reg) file. Regedit.exe uses .reg files to import and export registry subkeys and values. You can use these .reg files to remotely distribute registry changes to several Windows-based computers. When you run a .reg file, the file contents merge into the local registry. Therefore, you must distribute .reg files with caution.
back to the top
Syntax of .Reg Files
A .reg file has the following syntax:
RegistryEditorVersionBlank line
[RegistryPath1]
«DataItemName1«=»DataType1:DataValue1«DataItemName2«=»DataType2:DataValue2«Blank line
[RegistryPath2]
«DataItemName3«=»DataType3:DataValue3«
where:
RegistryEditorVersion is either «Windows Registry Editor Version 5.00» for Windows 2000, Windows XP, and Windows Server 2003, or «REGEDIT4» for Windows 98 and Windows NT 4.0. The «REGEDIT4» header also works on Windows 2000-based, Windows XP-based, and Windows Server 2003-based computers.
Blank line is a blank line. This identifies the start of a new registry path. Each key or subkey is a new registry path. If you have several keys in your .reg file, blank lines can help you to examine and to troubleshoot the contents.
RegistryPathx is the path of the subkey that holds the first value you are importing. Enclose the path in square brackets, and separate each level of the hierarchy by a backslash. For example:
[HKEY_LOCAL_ MACHINE\SOFTWARE\Policies\Microsoft\Windows\System]
A .reg file can contain several registry paths. If the bottom of the hierarchy in the path statement does not exist in the registry, a new subkey is created. The contents of the registry files are sent to the registry in the order you enter them. Therefore, if you want to create a new subkey with another subkey below it, you must enter the lines in the correct order.
DataItemNamex is the name of the data item that you want to import. If a data item in your file does not exist in the registry, the .reg file adds it (with the value of the data item). If a data item does exist, the value in your .reg file overwrites the existing value. Quotation marks enclose the name of the data item. An equal sign (=) immediately follows the name of the data item.
DataTypex is the data type for the registry value and immediately follows the equal sign. For all the data types other than REG_SZ (a string value), a colon immediately follows the data type. If the data type is REG_SZ , do not include the data type value or colon. In this case, Regedit.exe assumes REG_SZ for the data type. The following table lists the typical registry data types:
|
Data Type |
DataType in .reg |
|---|---|
|
REG_BINARY |
hexadecimal |
|
REG_DWORD |
dword |
|
REG_EXPAND_SZ |
hexadecimal(2) |
|
REG_MULTI_SZ |
hexadecimal(7) |
For more information about registry data types, click the following article number to view the article in the Microsoft Knowledge Base:
256986 Description of the Microsoft Windows registry
DataValuex immediately follows the colon (or the equal sign with REG_SZ) and must be in the appropriate format (for example, string or hexadecimal). Use hexadecimal format for binary data items.
Note You can enter several data item lines for the same registry path.
Note the registry file should contain a blank line at the bottom of the file.
back to the top
Adding Registry Subkeys or Adding and Changing Registry Values
To add a registry subkey or add or change a registry value, make the appropriate changes in the registry, and then export the appropriate subkey or subkeys. Exported registry subkeys are automatically saved as .reg files. To make changes to the registry and export your changes to a .reg file, follow these steps:
-
Click Start, click Run, type regedit in the Open box, and then click OK.
-
Locate and then click the subkey that holds the registry item or items that you want to change.
-
Click File, and then click Export.
This step backs up the subkey before you make any changes. You can import this file back into the registry later if your changes cause a problem.
-
In the File name box, type a file name to use to save the .reg file with the original registry items, and then click Save.
Note Use a file name that reminds you of the contents, such as a reference to the name of the subkey.
-
In the right pane, add or modify the registry items you want.
-
Repeat steps 3 and 4 to export the subkey again, but use a different file name for the .reg file. You can use this .reg file to make your registry changes on another computer.
-
Test your changes on the local computer. If they cause a problem, double-click the file that holds the backup of the original registry data to return the registry to its original state. If the changes work as expected, you can distribute the .reg you created in step 6 to other computers by using the methods in the «Distributing Registry Changes» section of this article.
back to the top
Deleting Registry Keys and Values
To delete a registry key with a .reg file, put a hyphen (-) in front of the RegistryPath in the .reg file. For example, to delete the Test subkey from the following registry key:
HKEY_LOCAL_MACHINE\Software
put a hyphen in front of the following registry key in the .reg file:
HKEY_LOCAL_MACHINE\Software\Test
The following example has a .reg file that can perform this task.
[-HKEY_LOCAL_MACHINE\Software\Test]
To delete a registry value with a .reg file, put a hyphen (-) after the equals sign following the DataItemName in the .reg file. For example, to delete the TestValue registry value from the following registry key:
HKEY_LOCAL_MACHINE\Software\Test
put a hyphen after the «TestValue»= in the .reg file. The following example has a .reg file that can perform this task.
HKEY_LOCAL_MACHINE\Software\Test
«TestValue»=-
To create the .reg file, use Regedit.exe to export the registry key that you want to delete, and then use Notepad to edit the .reg file and insert the hyphen.
back to the top
Renaming Registry Keys and Values
To rename a key or value, delete the key or value, and then create a new key or value with the new name.
Distributing Registry Changes
You can send a .reg file to users in an e-mail message, put a .reg file on a network share and direct users to the network share to run it, or you can add a command to the users’ logon scripts to automatically import the .reg file when they log on. When users run the .reg file, they receive the following messages:
Registry Editor
Are you sure you want to add the information in path of .reg file to the registry?
If the user clicks Yes, the user receives the following message:
Registry Editor
Information in path of .reg file has been successfully entered into the registry.
Regedit.exe supports a /s command-line switch to not display these messages. For example, to silently run the .reg file (with the /s switch) from a login script batch file, use the following syntax:
regedit.exe /s path of .reg file
You can also use Group Policy or System Policy to distribute registry changes across your network. For additional information, visit the following Microsoft Web site:
Need more help?
Want more options?
Explore subscription benefits, browse training courses, learn how to secure your device, and more.

(Image credit: Future)
On Windows 11 (and 10), the Registry is a critical hierarchical database that stores low-level settings that help the operating system and applications to work correctly.
You typically use the «Registry Editor» to modify this database when fixing an issue or configuring or turning off a specific feature. However, you probably may not know that the operating system includes «Reg.exe,» a command-line tool that allows you to edit the Registry through the Command Prompt.
«Reg.exe» comes built into Windows 11 and 10, including the same functionalities available in the Registry application. You can edit entries faster, as you don’t have to browse the confusing tree database manually. And you get the flexibility of being able to implement tweaks using scripts.
In this how-to guide, I will walk you through the steps to get started using the Microsoft «Reg.exe» tool to edit the Registry using Command Prompt.
Important: If you plan to use these commands on your computer, understand that modifying the Registry is risky and can cause irreversible damage to your installation if you don’t do it correctly. It’s recommended to make a full backup of your computer before proceeding.
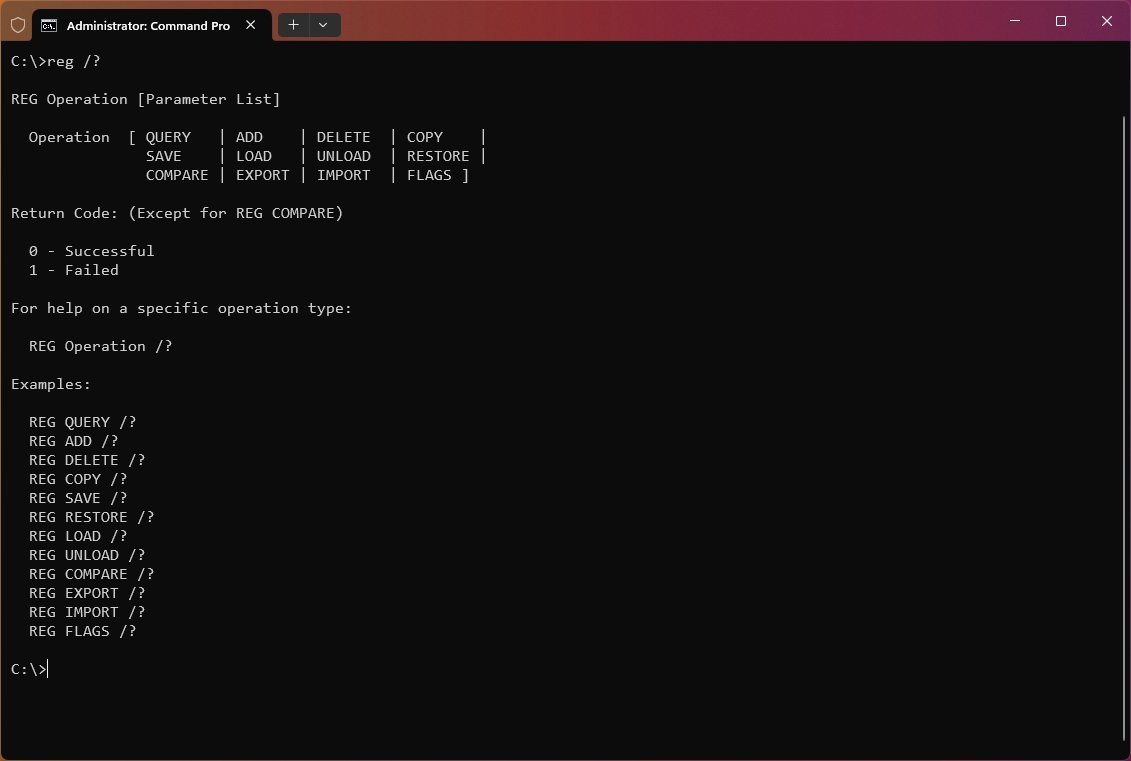
How to edit the Registry from Command Prompt
To start the Reg tool, you first need to start Command Prompt as an administrator using these steps:
- Open Start.
- Search for Command Prompt, right-click the result, and select Run as administrator.
- Type the following command to access the help menu and press Enter: reg /?
- Confirm the options available with the tool, including:
- REG Query
- REG Add
- REG Delete
- REG Copy
- REG Save
- REG Load
- REG Unload
- REG Restore
- REG Compare
- REG Export
- REG Import
- REG Flags
You can also use «REG» followed by the operation type and «/?» to get more help. For example, REG QUERY /? or REG ADD /?.
All the latest news, reviews, and guides for Windows and Xbox diehards.
Using this tool, you will also get two return codes, including «0,» meaning that the operation was completed successfully, and «1,» indicating that the operation failed. However, you won’t get any return codes using the «Compare» option.
While there is a long list of possible combinations, below, I will only highlight the most useful commands to get started using Reg with Command Prompt.
How to add and delete registry entries
Syntax
- Add:
REG ADD KeyName [{/v ValueName | /ve}] [/t Type] [/f] - Delete:
REG DELETE KeyName [{/v ValueName | /ve | /va}] [/f]
Command description
- KeyName: Defines the path to the subkey or entry. Valid registry key shortcuts include HKLM, HKCU, HKCR, HKU, and HKCC. If you want to edit the registry on a remote computer, you can only use HKLM and HKU shortcuts.
- /v ValueName: Specifies the name for the registry key to be added or deleted.
- /ve: Defines if you’re adding or deleting an entry with a null value.
- /f: Adds or deletes registry content without prompting for confirmation.
- /s Separator: Defines the character to separate multiple instances of data when the REG_MULTI_SZ data type is specified and you need to add more than one entry. The default separator is \0 if it is not specified.
- /d Data: Specifies the data for the new entry in the registry.
- /t Type: Specifies the type of registry entries. Here’s the list of valid types: REG_SZ, REG_MULTI_SZ, REG_DWORD_BIG_ENDIAN, REG_DWORD, REG_BINARY, REG_DWORD_LITTLE_ENDIAN, REG_LINK, REG_FULL_RESOURCE_DESCRIPTOR, and REG_EXPAND_SZ.
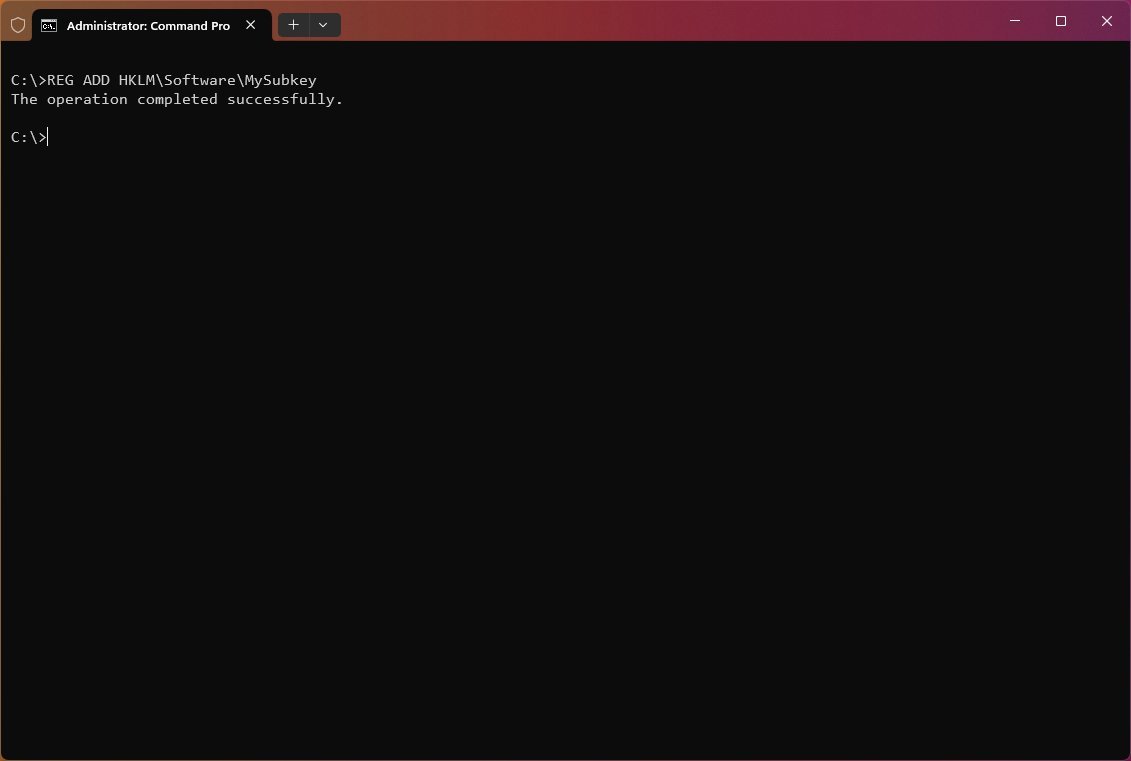
REG ADD examples
To add a subkey named MySubkey under HKEY_LOCAL_MACHINE\Software, use the following example: REG ADD HKLM\Software\MySubkey
To add a new DWORD (32-bit) value entry named «AppInfo» with the value of «1,» use the following example: REG ADD HKLM\Software\MySubkey /v AppInfo /t REG_DWORD /d 1
To add a new DWORD (32-bit) value entry named «AppInfo» with the value of «1» on a remote computer, use the following example: REG ADD \\ComputerName\HKLM\Software\MySubkey /v AppInfo /t REG_DWORD /d 1
To add a new Binary Value entry named «Data» with data of «fe340ead,» use the following example: REG ADD HKLM\Software\MySubkey /v Data /t REG_BINARY /d fe340ead
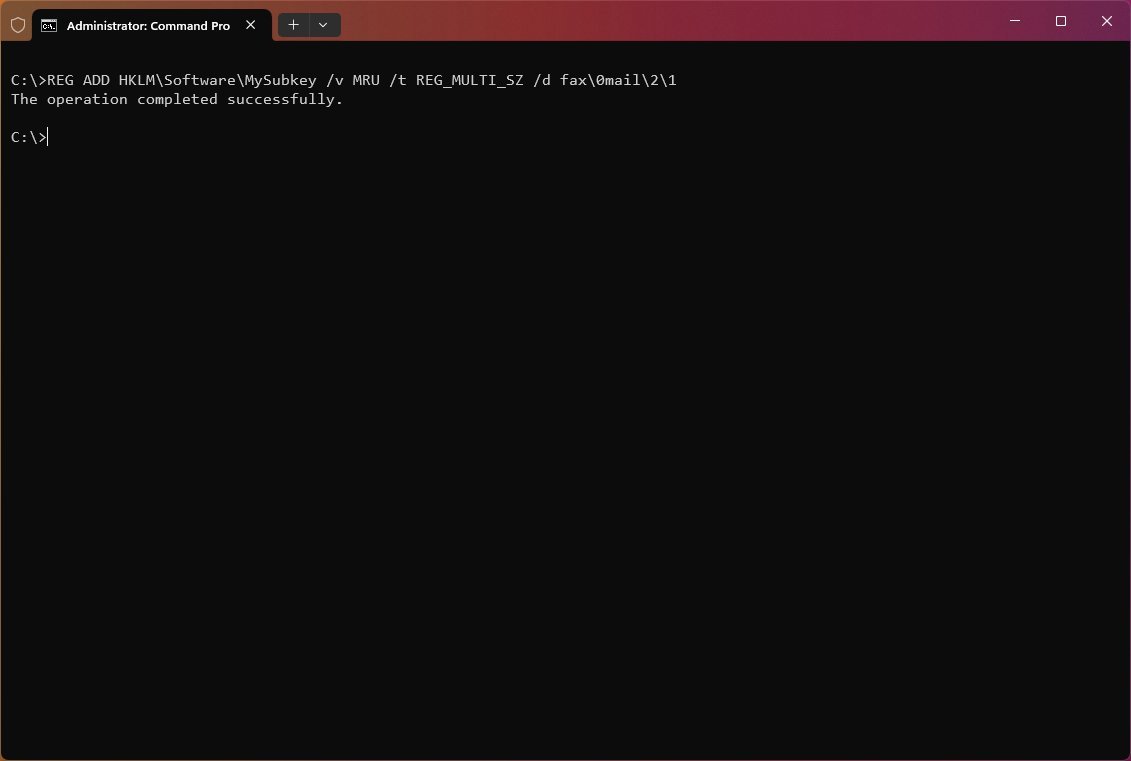
To add a registry entry with multiple values to «MySubkey» with a value name of MRU of type «REG_MULTI_SZ» and data of «fax\0mail\2\1,» use the following example: REG ADD HKLM\Software\MySubkey /v MRU /t REG_MULTI_SZ /d fax\0mail\2\1
To add an expanded registry entry to «MySubkey» with a value name of «Path» of type «REG_EXPAND_SZ» and data of «%systemroot%,» use the following example: REG ADD HKLM\Software\MySubkey /v Path /t REG_EXPAND_SZ /d ^%systemroot^%
REG DELETE examples
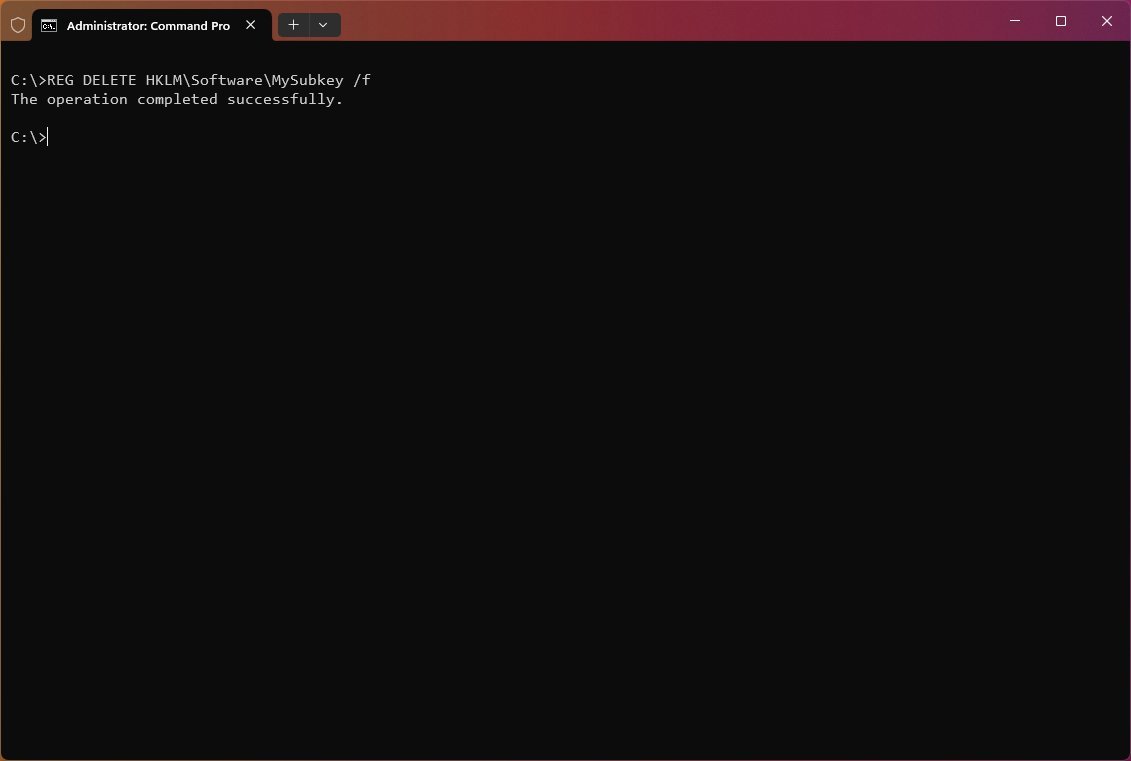
To delete the subkey named «MySubkey,» use the following example: REG DELETE HKLM\Software\MySubkey /f
To delete the subkey named «MySubkey» on a remote computer, use the following example: REG DELETE \\ComputerName\HKLM\Software\MySubkey /f
To delete the registry entry named «AppInfo» within the «MySubkey» subkey, use the following example: REG DELETE HKLM\Software\MySubkey /v AppInfo /f
To delete only the registry entries that have no value inside the subkey named MySubkey, use the following example: REG DELETE HKLM\Software\MySubkey /ve
To delete all the registry entries from the «MySubkey» subkey, use the following example: REG DELETE HKLM\Software\MySubkey /va
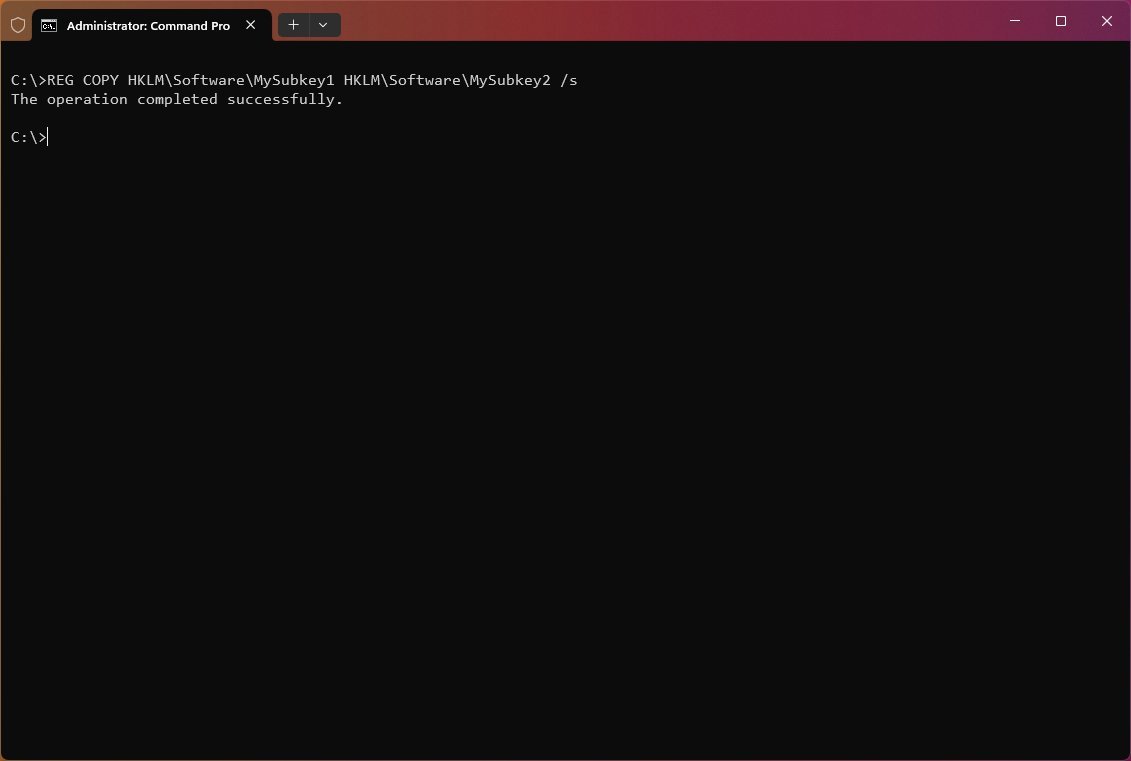
How to copy registry entries
Syntax
- Copy: REG COPY KeyName1 KeyName2 [/s] [/f]
Command description
- KeyName1: Defines the path to the subkey you want to copy. Valid registry key shortcuts include HKLM, HKCU, HKCR, HKU, and HKCC. If you’re trying to copy the registry on a remote computer, you can only use HKLM and HKU shortcuts.
- KeyName2: Defines the path to the subkey destination. Valid registry key shortcuts include HKLM, HKCU, HKCR, HKU, and HKCC. If you’re trying to copy the registry on a remote computer, you can only use HKLM and HKU shortcuts.
- /s: Copies all subkeys and entries of a particular subkey.
- /f: Executes the copy command without prompting for confirmation.
REG COPY examples
To copy all subkeys and values under the key «MySubkey1» to the key «MySubkey2,» use the following example: REG COPY HKLM\Software\MySubkey1 HKLM\Software\MySubkey2 /s
To copy all values under the subkey «MySubkey1» from a remote computer to the subkey «MySubkey2» on the new computer, use the following example: REG COPY \\ComputerName\HKLM\Software\MySubkey1 HKLM\Software\MySubkey2
How to export and import registry entries
Syntax
- Export: REG EXPORT KeyName FileName [/y]
- Import: REG IMPORT FileName
Command description
- KeyName: Defines the path to the subkey or entry. Valid registry key shortcuts include HKLM, HKCU, HKCR, HKU, and HKCC.
- FileName: Specifies the name and path of the .reg file to be exported or imported.
- /y: Overwrites the registry content without prompting for confirmation.
REG EXPORT examples
To export all the content within the subkey «MySubkey,» use the following example: REG EXPORT HKLM\Software\MySubkey C:\RegKeyBackup.reg

To export and overwrite any existing file, use the following example: REG EXPORT HKLM\Software\MySubkey C:\RegKeyBackup.reg /y
REG IMPORT examples
To import all the content, including subkeys, entries, and values within the subkey named «MySubkey,» use the following example: REG IMPORT C:\RegKeyBackup.reg
How to save and restore registry entries
Syntax
- Save: REG SAVE KeyName FileName [/y]
- Restore: REG RESTORE KeyName FileName
Command description
- KeyName: Defines the path to the subkey or entry. Valid registry key shortcuts include HKLM, HKCU, HKCR, HKU, and HKCC. If you’re trying to edit the registry on a remote computer, you can only use HKLM and HKU shortcuts.
- FileName: Specifies the name and path of the .hiv file to be saved or restored.
- /y: Overwrites the registry content without prompting for confirmation.
REG SAVE examples
To save a copy of subkeys, entries, and values within the subkey named «MySubkey,» use the following example: REG SAVE HKLM\Software\MySubkey C:\RegKeyBackup.hiv

To save and overwrite any existing file, use the following example: REG SAVE HKLM\Software\MySubkey C:\RegKeyBackup.hiv /y
REG RESTORE examples
To restore all the content, including subkeys, entries, and values within the subkey named «MySubkey,» use the following example: REG RESTORE HKLM\Software\MySubkey C:\RegKeyBackup.hiv

Although you can always use the Registry Editor, you’ll find that it’s sometimes easier and faster to use the Reg command-line tool. However, you will still be editing the system’s database, which can cause problems no matter the method.
When editing the Registry with commands, it’s recommended to double-check your commands before executing, as you can make mistakes. For example, «REG ADD HKLM\Sofware\MySubkey» is different from «REG ADD HKLM\Software\MySubkey.» A mistake like that might not do anything, or it could wreck your entire system.
If you’re wondering, yes, there is a big difference between «Export» and «Save.» The command EXPORT exports Registry content into a text format you can easily distribute to other computers as a «.reg» file. On the other hand, SAVE saves the Registry content into a hive file format (.hiv), which preserves ownership and additional important information. You should only use this command to restore entries to the same computer.
Also, while you can use many of these commands on a remote computer, «IMPORT» and «EXPORT» only work on a local computer (not over the network).
These instructions are more focused on Windows 11 and 10, but since the Reg tool has been part of the operating system for a long time, you can refer to these steps even in older versions, such as Windows 8.1 and 7.
More resources
For more helpful articles, coverage, and answers to common questions about Windows 10 and Windows 11, visit the following resources:
- Windows 11 on Windows Central — All you need to know
- Windows 10 on Windows Central — All you need to know
Mauro Huculak has been a Windows How-To Expert contributor for WindowsCentral.com for nearly a decade and has over 15 years of experience writing comprehensive guides. He also has an IT background and has achieved different professional certifications from Microsoft, Cisco, VMware, and CompTIA. He has been recognized as a Microsoft MVP for many years.
В многопользовательской системе такой как Windows 10, администратор может предоставить или аннулировать разрешение вносить изменения для любых пользователей. Это касается и реестра Windows при удалении или редактировании.
Что же делать, если вы не можете изменить или удалить важный параметр реестра, просто необходимо сменить владельца ветки реестра! Достаточно сменить владельца один раз и вам будет предоставлен полный контроль.
После прочтения, вы получите возможность менять владельца для любого раздела реестра после чего сможете вносить нужные вам правки и изменения в реестре.
Как изменить владельца ветки реестра Windows 10.
Примечание: Ваша учетная запись пользователя должна иметь права администратора.
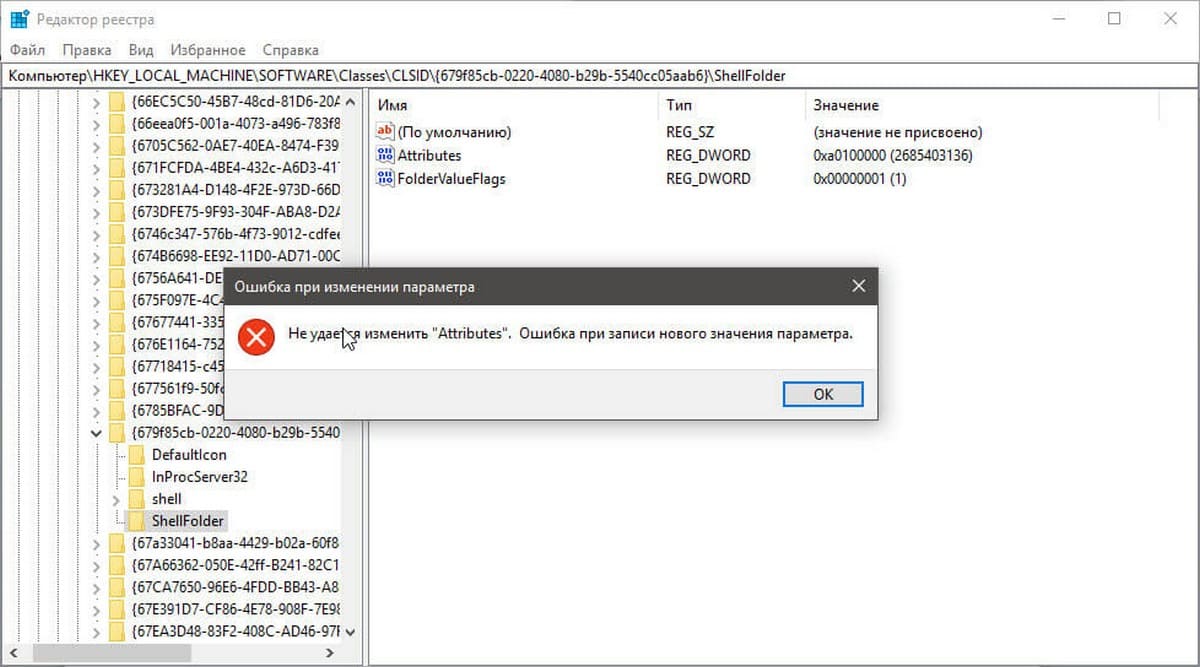
Вы, возможно уже сталкивались с проблемой при удалении или внесения изменений для записи реестра, получая сообщение «Не удается удалить. Ошибка при удалении ключа», «Не удается удалить все выделенные параметры» «Ошибка при записи нового параметра» и тд.. Это происходит потому, что вы не имеете достаточных прав для редактирования или удаления данного раздела реестра.
Будучи администратором, вы можете легко обойти эту проблему и использовать неограниченные права, для удаления разделов, параметров или модифицировать реестр с помощью твиков. Все, что вам нужно, это дать разрешение на владение разделом реестра конкретному пользователю:
Давайте предположим, вы выбрали ключ «Attributes», который находится в разделе реестра:
Компьютер\HKEY_LOCAL_MACHINE\SOFTWARE\Classes\CLSID\{679f85cb-0220-4080-b29b-5540cc05aab6}\ShellFolder
Изменив запись «Attributes», мы удалим Панель быстрого доступа из проводника Windows, но если вы попытаетесь изменить ее, вы получите сообщение, «Не удаётся изменить параметр «Attributes» Ошибка при записи нового параметра».
Изменить владельца для определенного раздела реестра Windows 10.
Шаг 1. Кликните правой кнопкой мыши на разделе реестра (папке) в которой находится нужный вам параметр (ключ) реестра и выберите в контекстном меню «Разрешения».
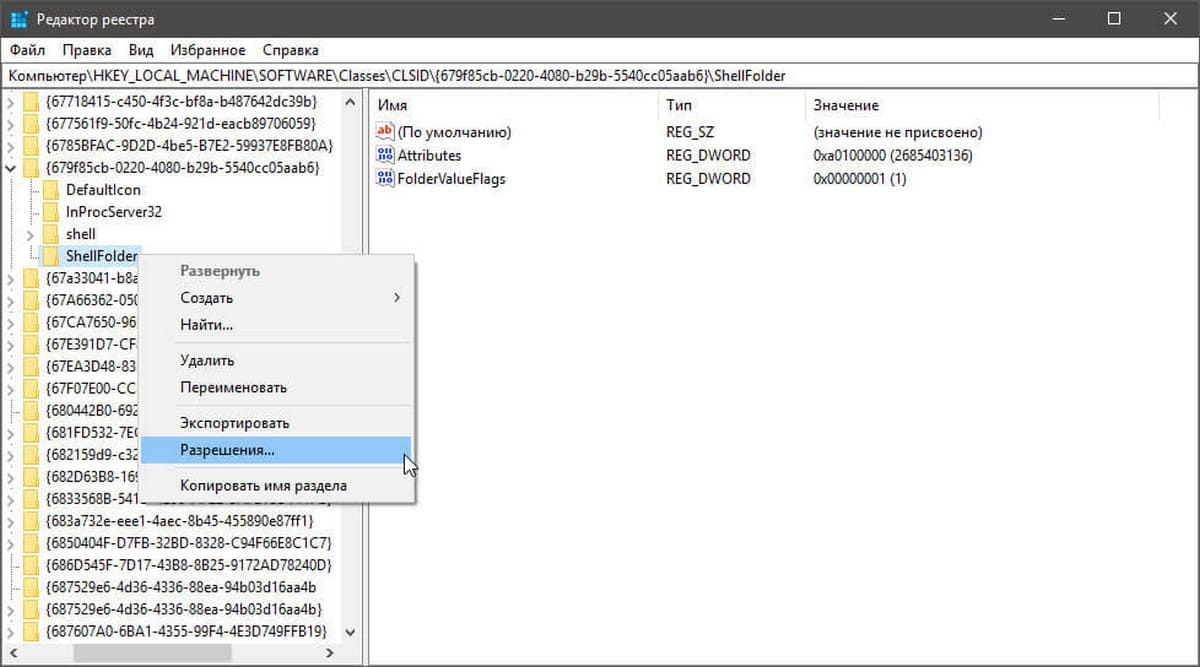
Шаг 2. В открывшемся окне нажмите на кнопку «Дополнительно».
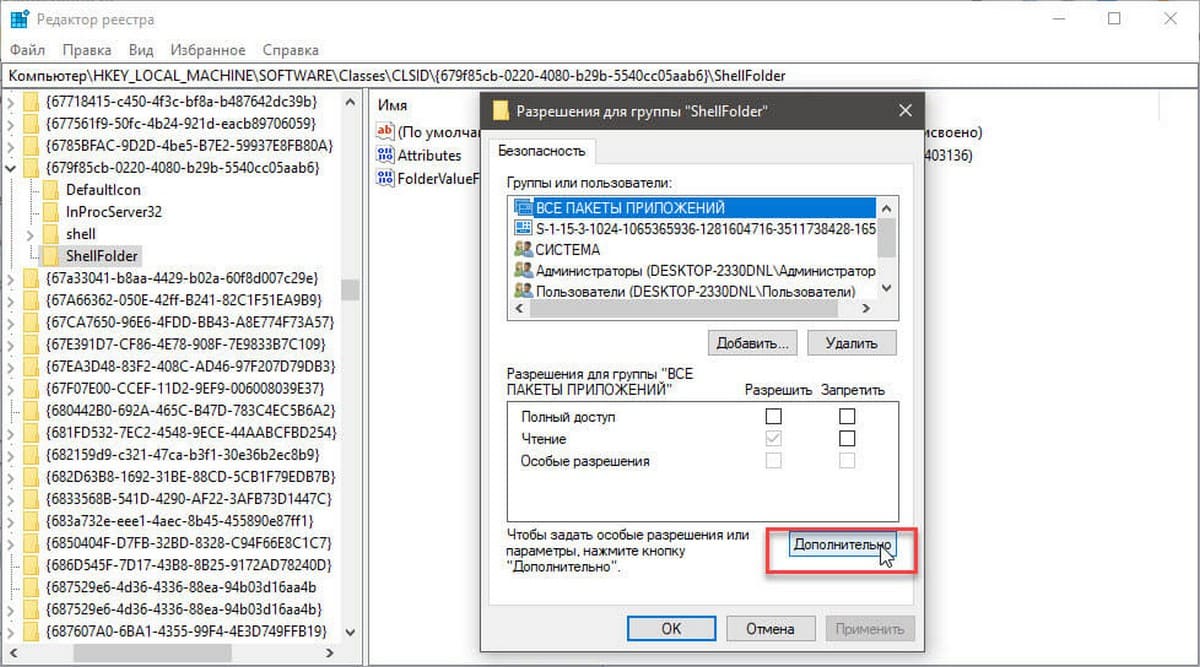
Шаг 3. В окне дополнительных параметров безопасности, Вы видите, что владельцем данного раздела и объектов в нем является «Система».
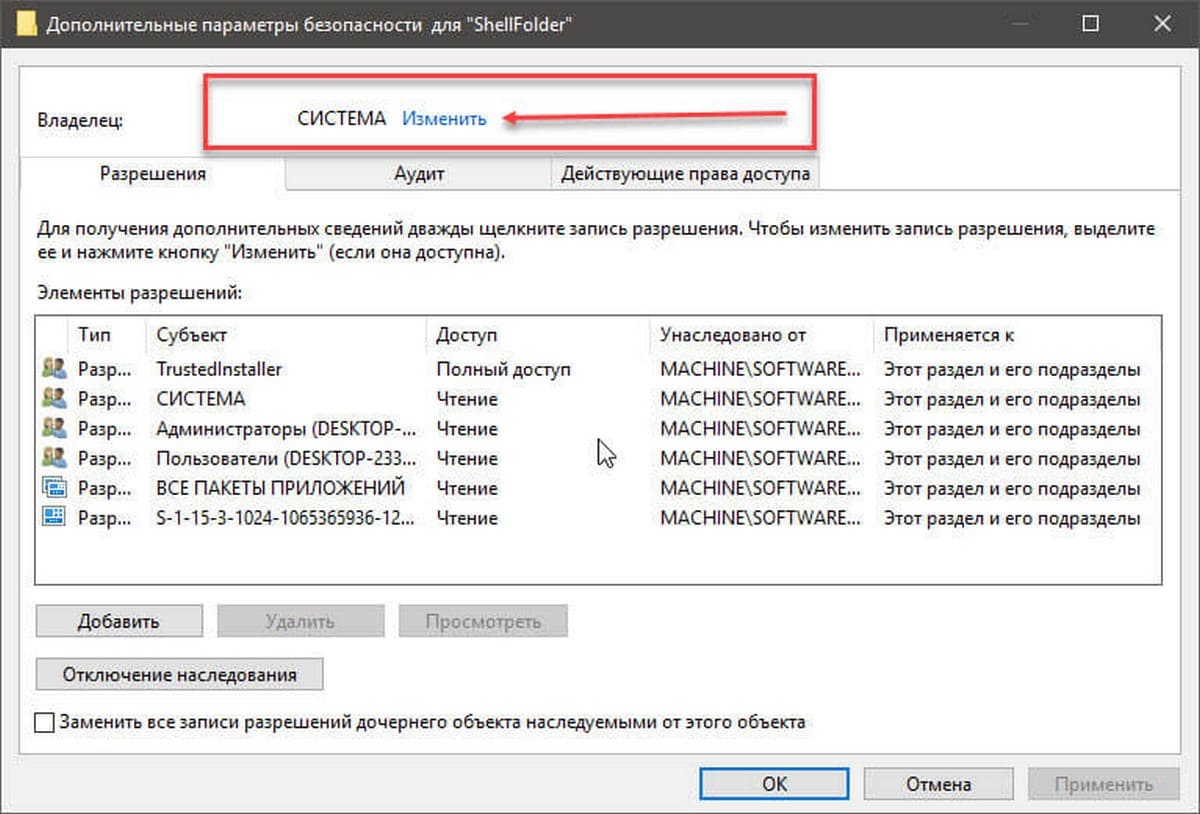
Шаг 4. В строке Владелец нажмите надпись «Изменить».
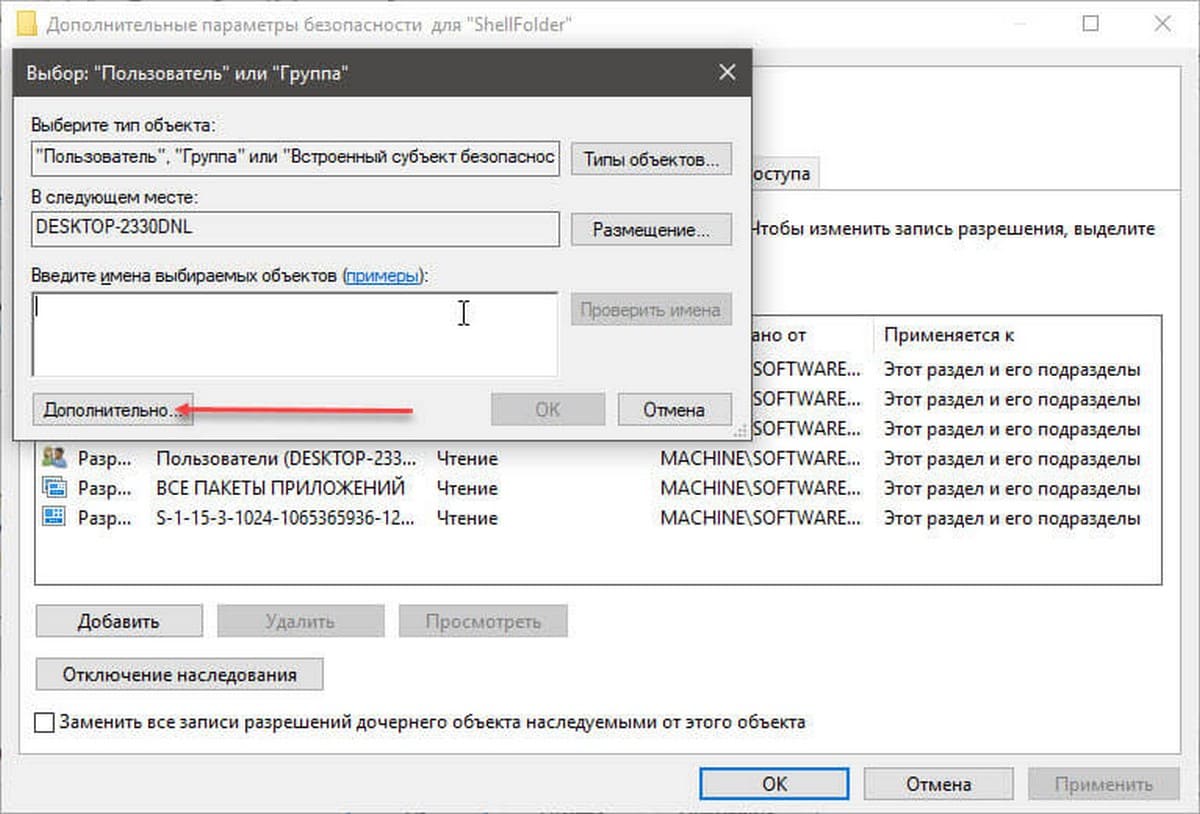
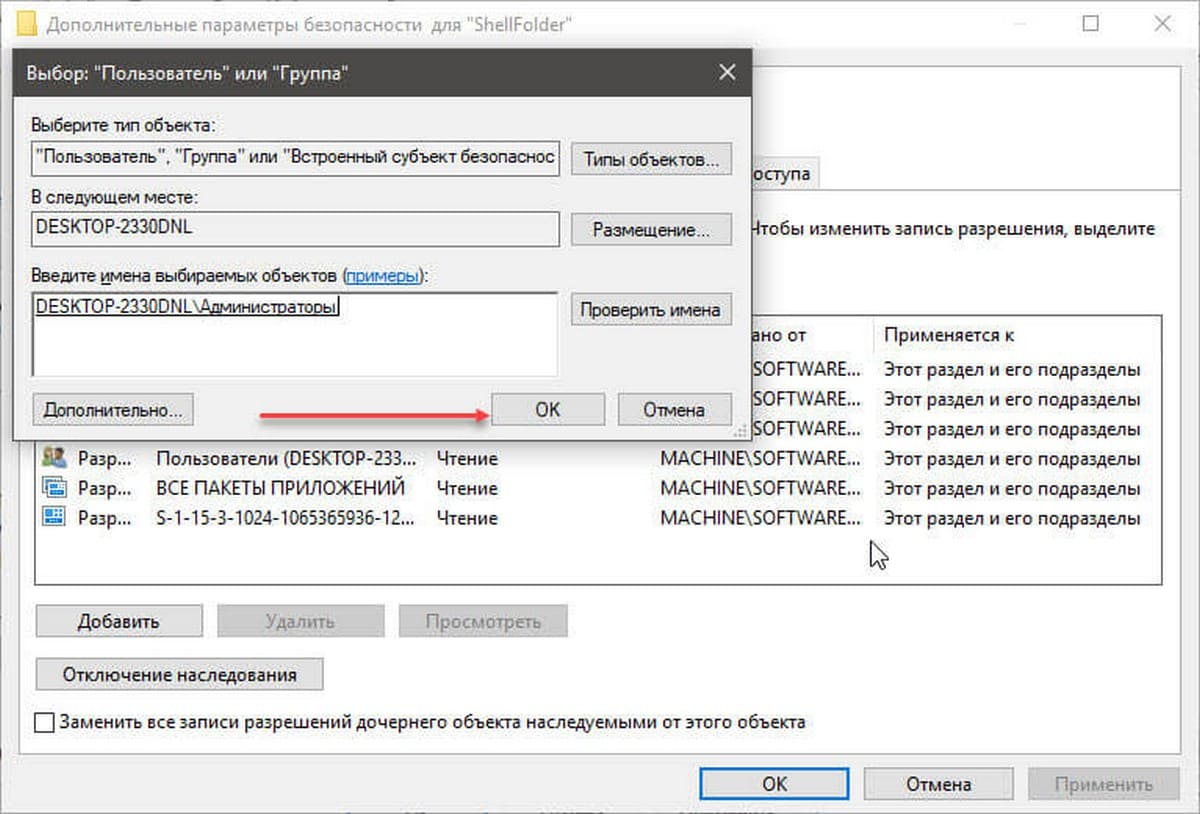
Шаг 5. В диалоговом окне «Выбор: Пользователь или Группа» нажмите кнопку «Дополнительно».
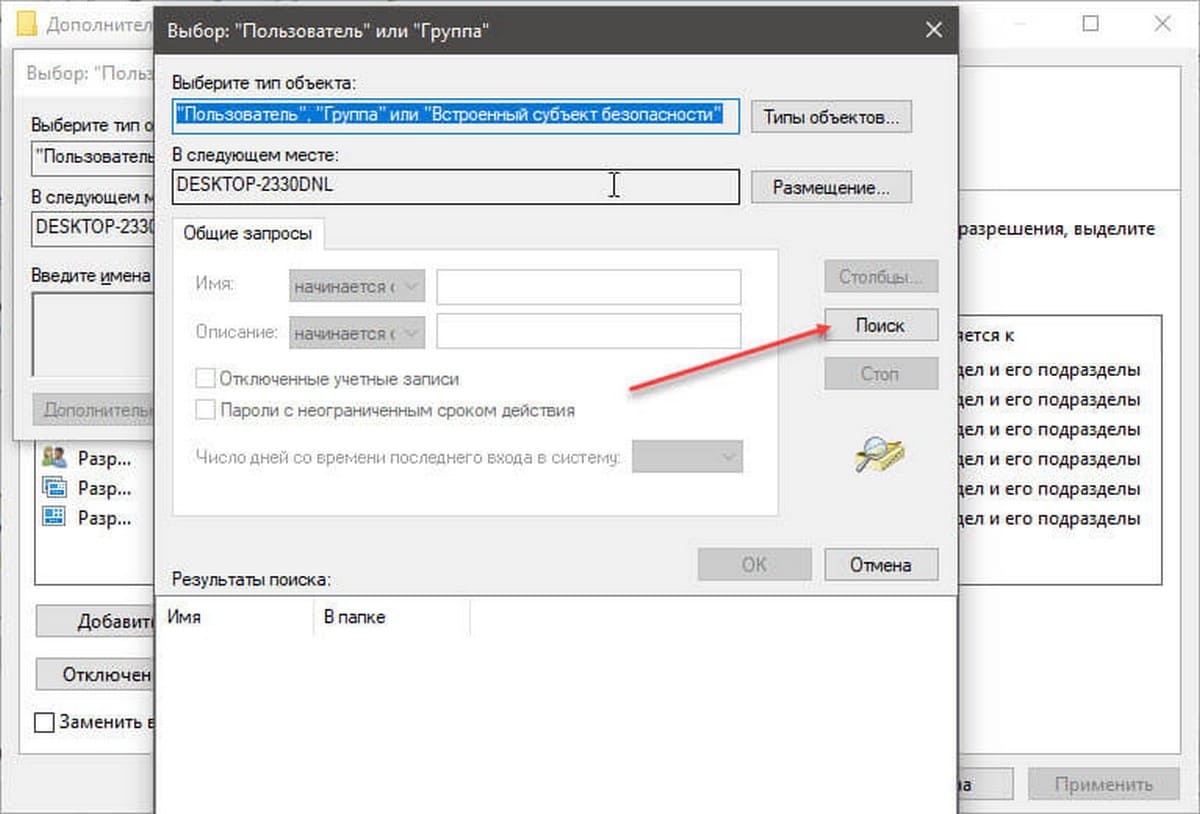
Шаг 6. В следующем окне нажмите кнопку «Поиск».
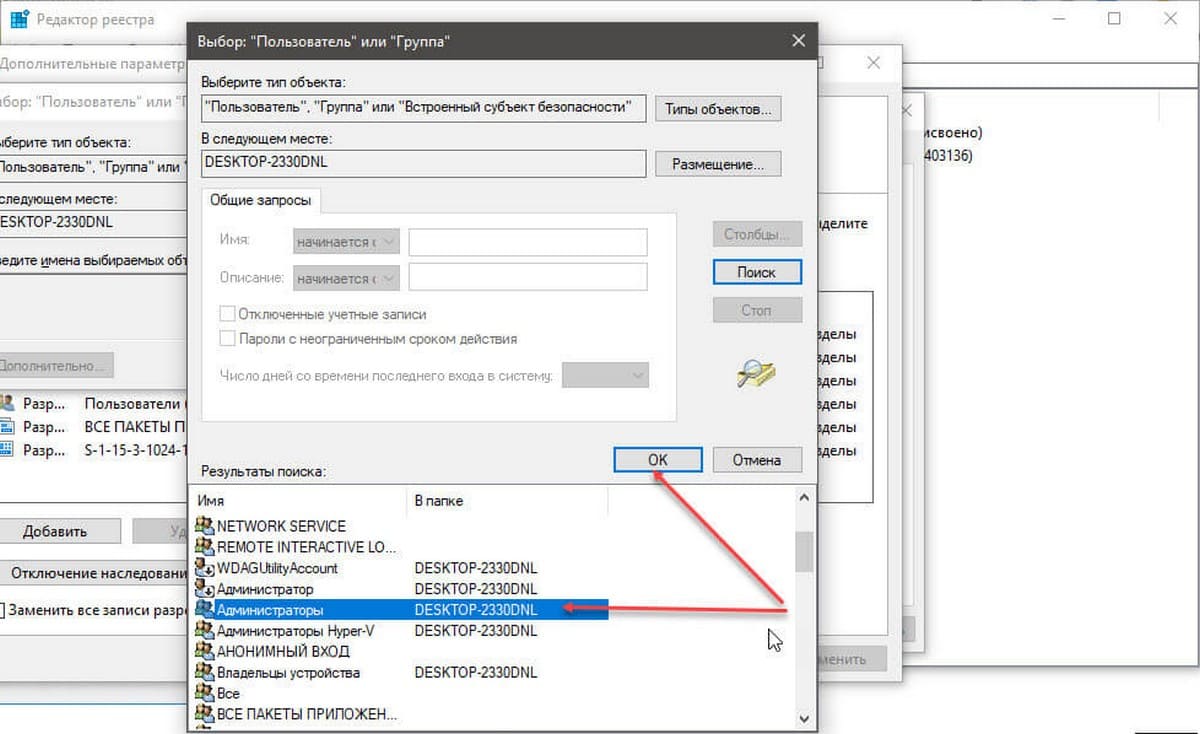
Шаг 7. В нижней части окна найдите и кликните мышкой надпись «Администраторы» (см. картинку) и нажмите «Ок».
Шаг 8. Вернувшись в окно «Выбор: Пользователь или Группа», снова нажмите кнопку «ОК».
Шаг 9. В окне «Дополнительных параметров безопасности» необходимо установить флажки в два чекбокса (см картинку ниже):
- Заменить владельца подконтейнеров и объектов
- Заменить все записи разрешений дочернего объекта наследуемыми от этого объекта
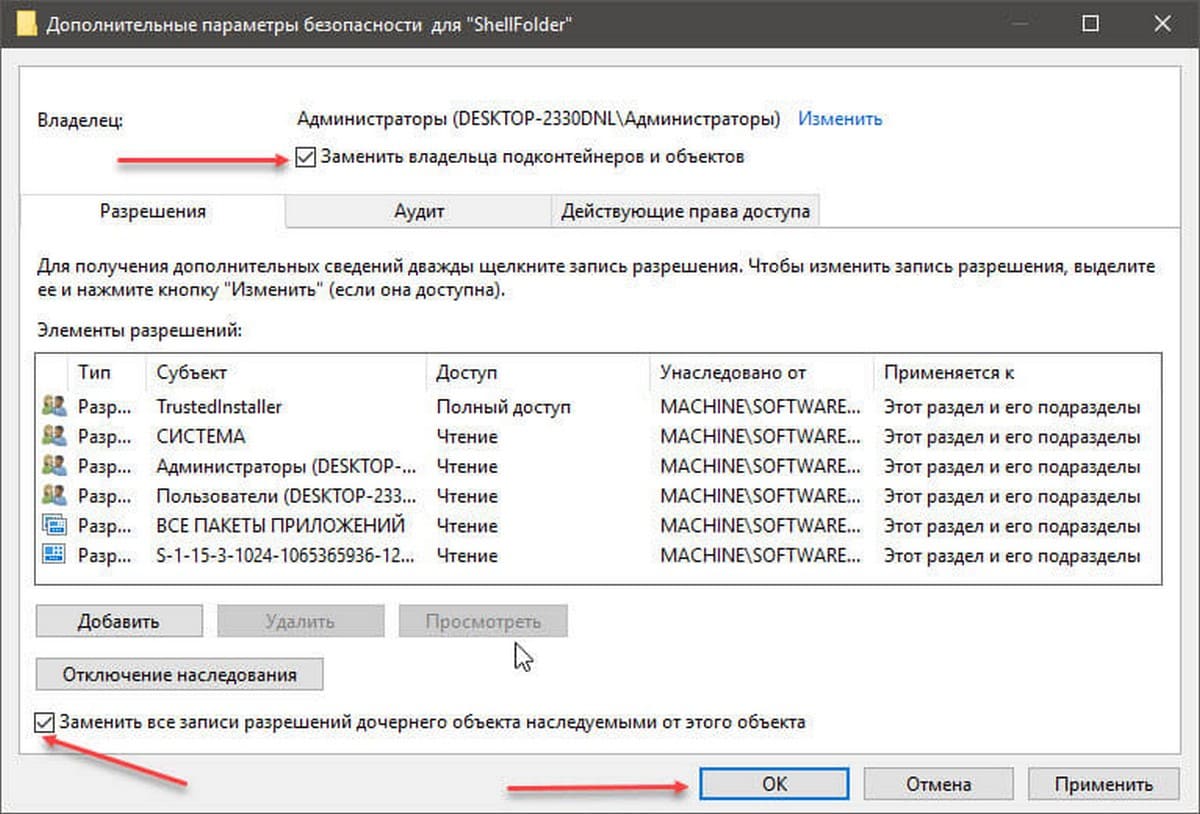
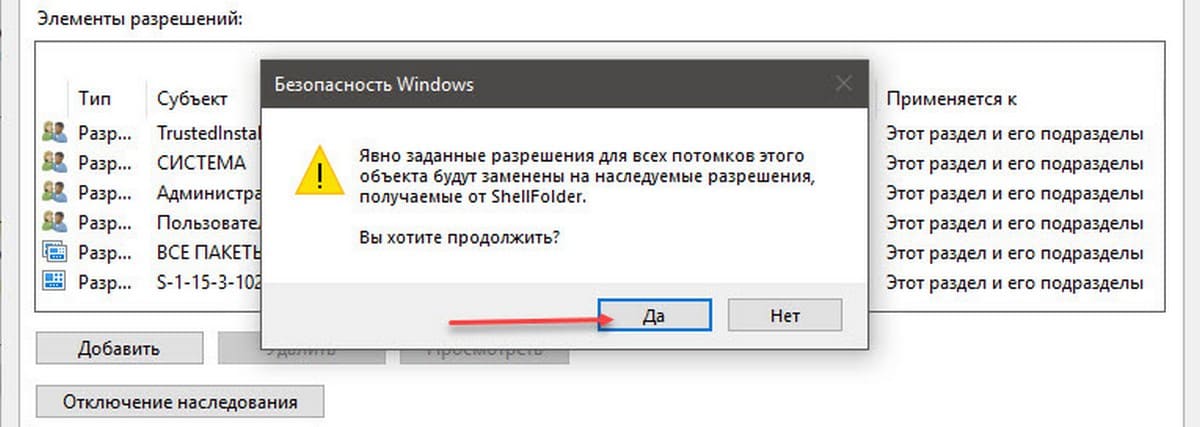
Шаг 10. Нажмите кнопку «Применить» → «ОК». Подтвердите запрос безопасности.
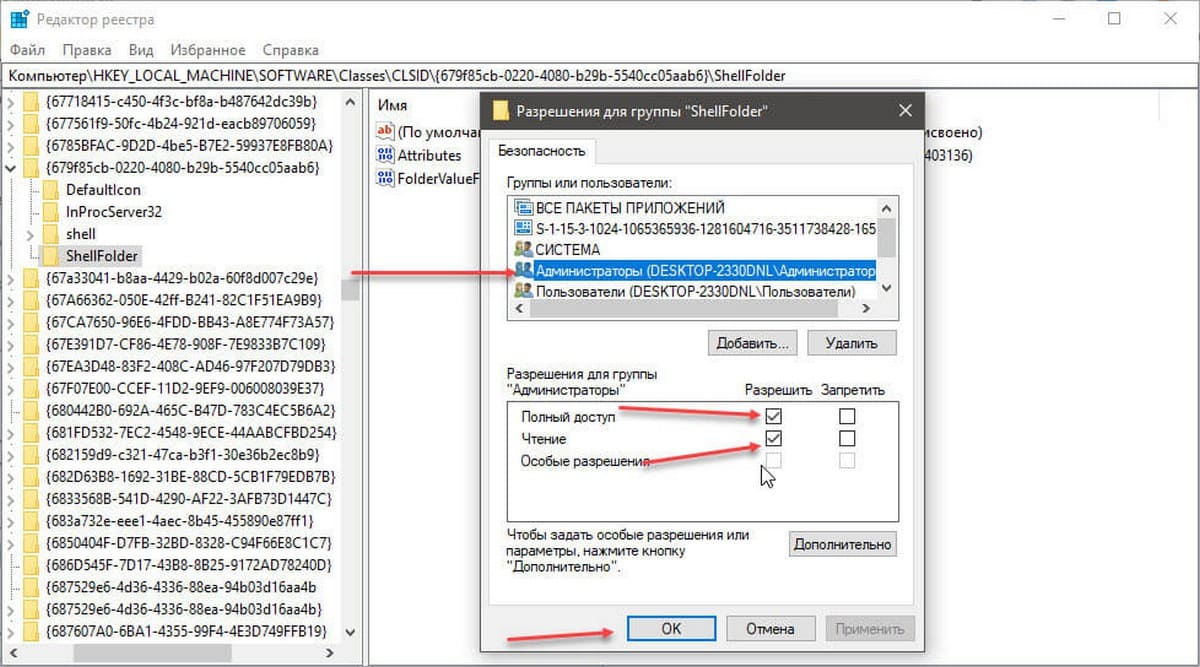
Шаг 11. Вы вернетесь к диалоговому окну «Разрешение для Группы». Выберите группу «Администраторы», в разрешениях группы необходимо также установить флажки в чекбоксы в пункте «Полный доступ», «Чтение» и нажмите «Применить» → «ОК».
Все, теперь вы сможете вносить изменения или удалить ключ в этой ветке реестра. Если вам потребуется изменить другой раздел реестра вам придется повторить все действия снова.
Теперь вы знаете, как получить полный доступ к конкретной записи реестра для редактирования или удаления, не забывайте делать резервную копию реестра если что то пойдет не так.
Рекомендуем: Как восстановить владельца TrustedInstaller в Windows 10.
Реестр – особая часть операционной системы Windows, которая представляет собой базу данных из всех параметров или настроек ОС. Все опции Панели управления и других мест системы, где есть возможность изменения каких-либо параметров, зафиксированы в реестре. Там же хранятся данные о путях к файлам, о расположении установленных программ и других моментах, связанных с функционированием Windows. Чтобы открыть реестр в Windows 10 используются те же способы, которые применялись в 7 и 8 версии ОС – здесь Microsoft ничего не переделывали. Настраивать и оптимизировать ОС можно также и с помощью сторонних программ.
Местонахождение
Физически реестр состоит из группы файлов, которые хранятся в папке System32\config. При загрузке ОС из этих файлов собирается база данных с текущими параметрами, которые и применяются в работе Windows. Эта база состоит из пяти главных веток. Редактировать файлы из указанного каталога напрямую не рекомендуется, поскольку для того, чтобы войти в реестр Windows 10, существует специальный инструмент, зовущийся regedit.
Редактор реестра
Запуск редактора значений реестра осуществляется следующим образом:
- Щелкнуть по поисковой строке на панели задач или воспользоваться сочетанием клавиш Win + S.
- Вписать в текстовое поле команду «regedit».
- При появлении результатов поиска нажать на кнопку «выполнить команду».
Совет! Eсли функции поиска на панели задач не активированы в настройках, то для запуска приложения можно всегда использовать стандартный диалог «Выполнить», который появляется по нажатию Win + R.
Изменение параметров
Процесс внесения правок в содержимое реестра представляет собой поиск нужной строки в определенном каталоге и указание нового значения для неё. Поиск нужной строки проще всего осуществить через соответствующую опцию, которая вызывается сочетанием клавиш Ctrl + F или кнопкой F3.
Редактировать реестр в Windows 10 нужно крайне осторожно, поскольку неверное значение в каком-либо параметре может привести к ошибке при следующей загрузке системы и выведению её из строя. Прежде чем вносить изменения в какой-либо параметр, следует поискать в интернете информацию о нём.
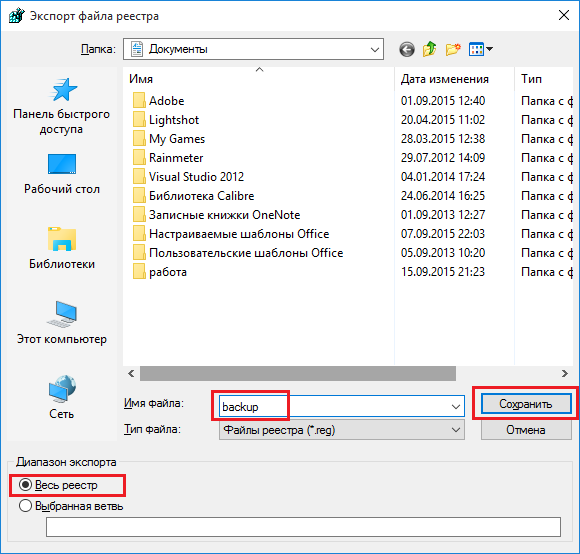
Совет! Перед редактированием реестра рекомендуется создавать резервную копию через меню «Файл» -> «Экспорт».
Сторонние программы для очистки реестра
Для очистки реестра Windows 10 от ненужных строк и ошибочных значений пользователи устанавливают стороннее программное обеспечение, поскольку ОС не обладает в своём составе необходимыми функциями. Ошибки в реестре могут появляться в результате сбоев установленных программ, а пустые строки – из-за не до конца удаленных приложений.
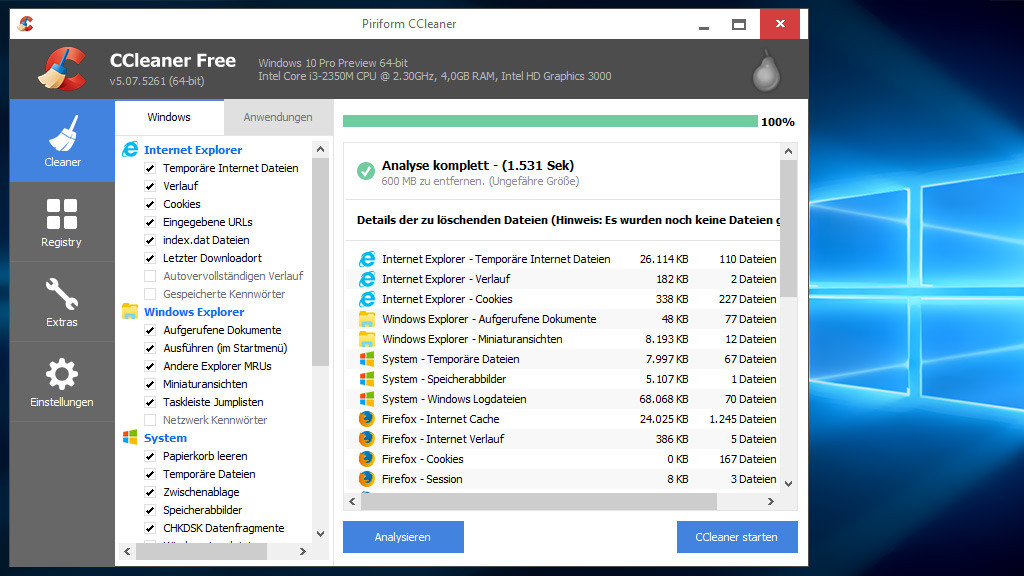
Например, почистить реестр на Windows 10 можно утилитой CCleaner, которая распространяется бесплатно на сайте компании-разработчика. Скачав и установив данный продукт, можно приступить к процедуре поиска неисправностей и их устранения. Для этого нужно:
- Запустить CCleaner.
- Перейти на вкладку «Реестр».
- Нажать на кнопку «Поиск проблем».
- Дождаться завершения процедуры поиска.
- Нажать на кнопку «Исправить».
- Подтвердить создание резервной копии и указать файл для сохранения текущей версии значений реестра.
- Щелкнуть по кнопке «Исправить отмеченные».
- Закрыть окно.
Восстановление значений реестра
В том случае, если после ручного редактирования значений реестра или автоматической чистки с применением стороннего программного обеспечения наблюдаются проблемы в работе операционной системы, нужно восстановить реестр Windows 10 до прежнего состояния. Делается это путём импортирования созданного на этапе редактирования файла.
Для того, чтобы записать значения из файла в реестр, потребуется:
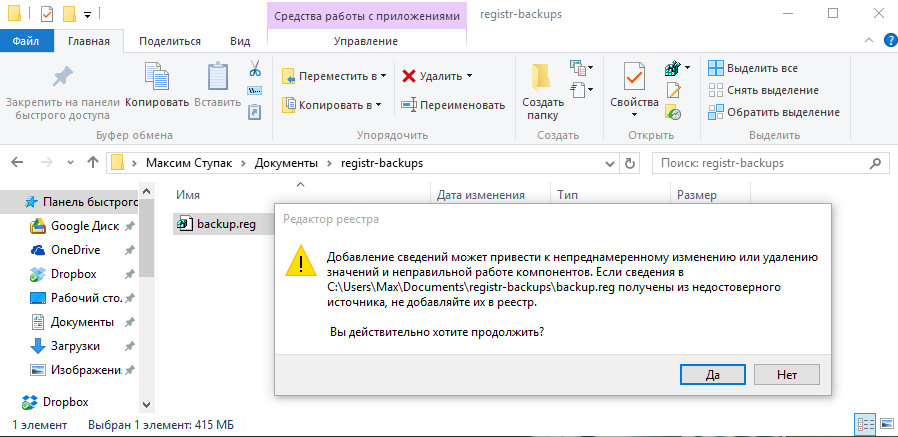
- С помощью Проводника Windows найти папку, хранящую *.reg-файл с резервной копией.
- Дважды кликнуть по файлу.
- Подтвердить импорт значений.
Совет! Восстановить данные из файла можно и непосредственно находясь в редакторе. Для этого используйте меню «Файл» -> «Импорт», и укажите ранее созданный reg-файл.
Видео
Наглядно увидеть работу с реестром ОС можно в этом видео.
Вывод
Реестр Windows – мощный инструмент для управления ОС, предоставляющий доступ ко многим параметрам, не реализованным в стандартном визуальном интерфейсе Windows. Для доступа к таким параметрам часто применяют программы-твикеры, которые могут настроить размер оконных рамок проводника, время проигрывания анимаций и много других параметров. В любом случае, изменять параметры реестра не рекомендуется без особой причины, а перед исправлением ошибочных значений всегда следует создавать резервную копию.
Загрузить PDF
Загрузить PDF
В реестре Windows хранится информация о параметрах системы, программ и устройств, которые подключены к компьютеру. Изменения в реестр можно внести с помощью предустановленного редактора реестра, что улучшит и ускорит системы. Но при этом можно нанести системе вред.Из данной статьи вы узнаете, как создать резервную копию реестра, отредактировать реестр и восстановить его, если что-то пойдет не так.
-

Сделайте это до того, как приступите к редактированию реестра, чтобы иметь возможность восстановить его.
-
Откроется окно «Выполнить».
-
Если появится запрос, нажмите «Да». Откроется редактор реестра.
-
-
-

-
Реклама


-
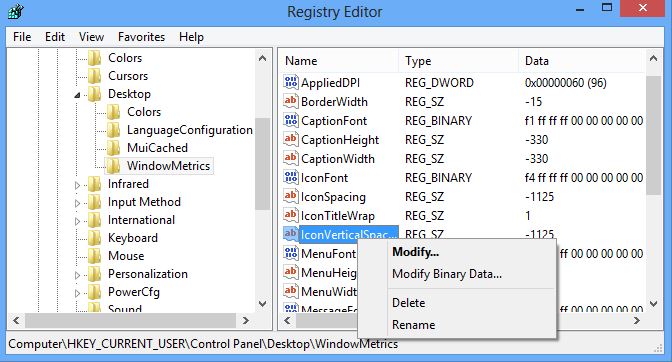
Реестр содержит два основных элемента: ключи и значения. Если вы знаете ключ, который нужно изменить, нажмите Control+f, чтобы открыть диалоговое окно «Поиск». [1]
-
-

Когда вы найдете ключ, дважды щелкните по нему, чтобы изменить его значение.
-
Чтобы изменения вступили в силу, перезагрузите компьютер.
Реклама


-
Следите за изменениями, чтобы иметь возможность вернуть значения к исходным величинам. Если вы внесли ряд ошибочных правок, восстановите резервную копию реестра, а не исправляйте внесенные изменения по одному.
-
-
-

Реклама


Советы
- Если войти в систему в качестве гостя, нельзя открыть редактор реестра.
- Сохраните резервную копию реестра на внешнем носителе.
Реклама
Об этой статье
Эту страницу просматривали 27 288 раз.