
Все способы:
- Вариант 1: Настройки электропитания
- Способ 1: «Параметры»
- Способ 2: «Панель управления»
- Вариант 2: Отключение экранной заставки
- Вариант 3: Отключение выключения экрана после блокировки ПК
- Вопросы и ответы: 7
Вариант 1: Настройки электропитания
За выключение экрана в системе отвечает таймер, который пользователь может изменить или отключить вовсе. Настройки управления экраном находятся в разных Windows 11, поэтому далее покажем два метода, ведущих к одному и тому же результату, а вы выбирайте подходящий.
Способ 1: «Параметры»
Через современное приложение для управления операционной системой отключить таймер довольно просто:
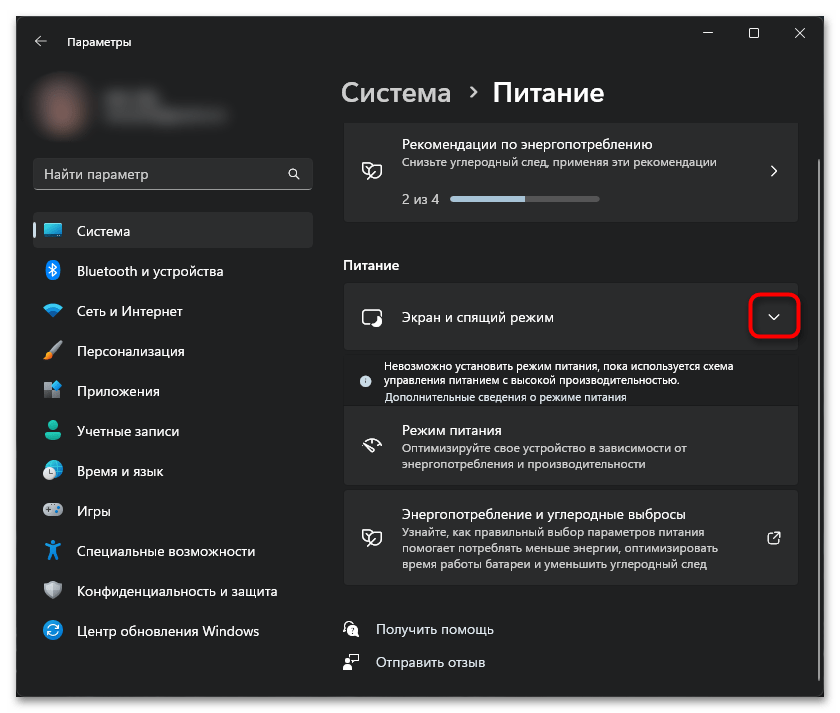
- Нажмите по «Пуску» правой кнопкой мыши и через меню быстрых ссылок перейдите в «Управление электропитанием». Туда же можно попасть можно, запустив «Параметры» и перейдя в «Система» > «Питание».
- В блоке «Питание» щелкните по стрелке вниз у пункта «Экран и спящий режим».
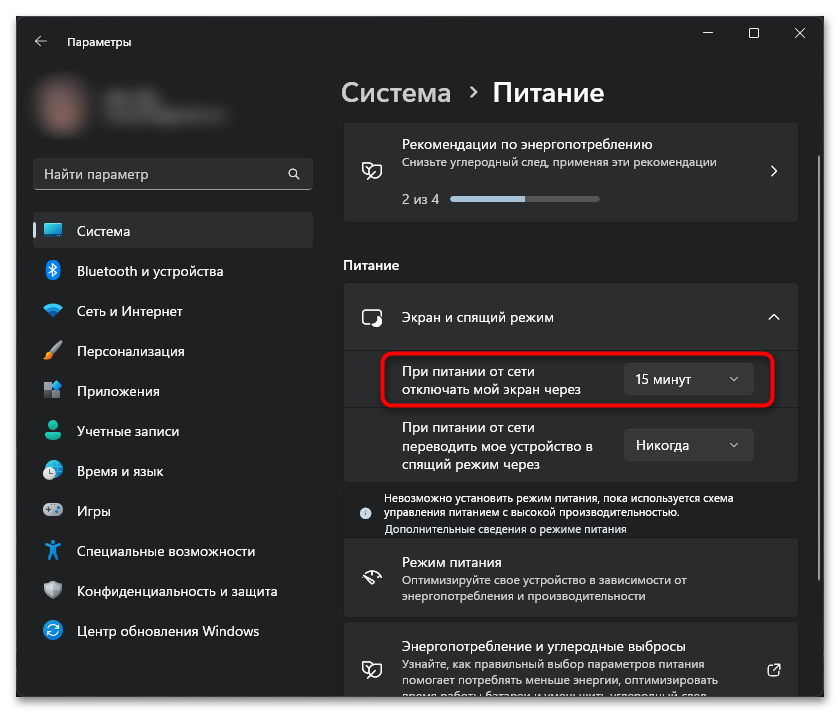
- Тут вам нужен пункт «При питании от сети отключать мой экран через». Если вы пользуетесь ноутбуком, то дополнительно будет и пункт про питание от аккумулятора.
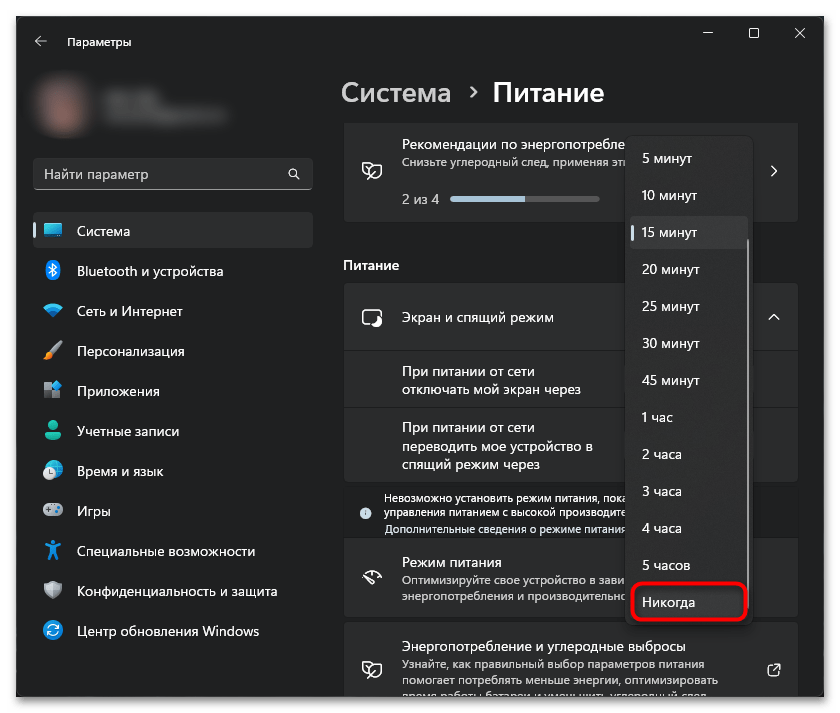
- Через выпадающее меню выставьте значение «Никогда» в одного или двух параметров. Окно можно закрыть, настройка будет применена сразу же.
Способ 2: «Панель управления»
Если вам привычнее пользоваться «Панелью управления», то для нее также есть инструкция.
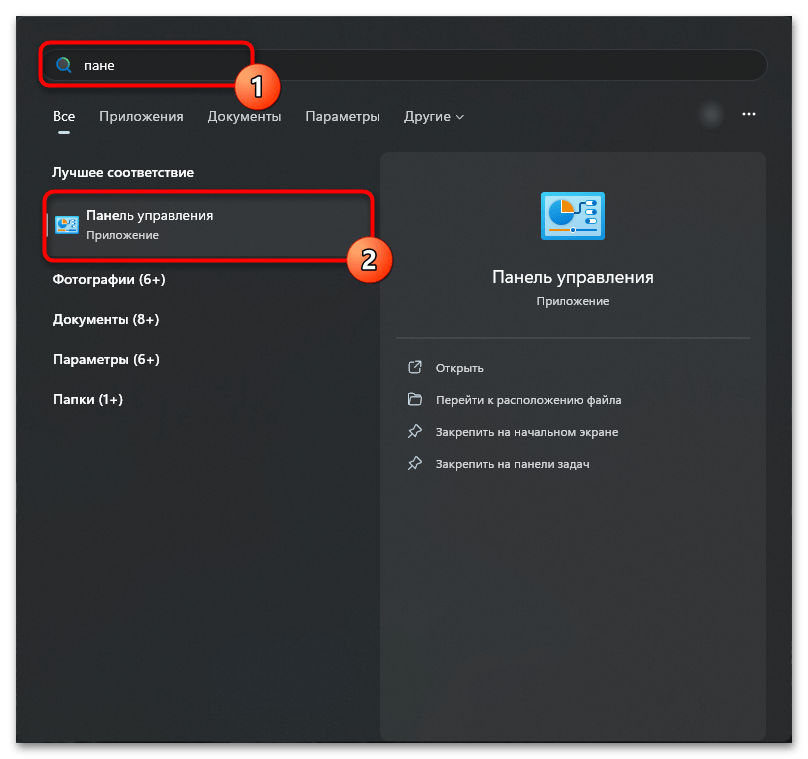
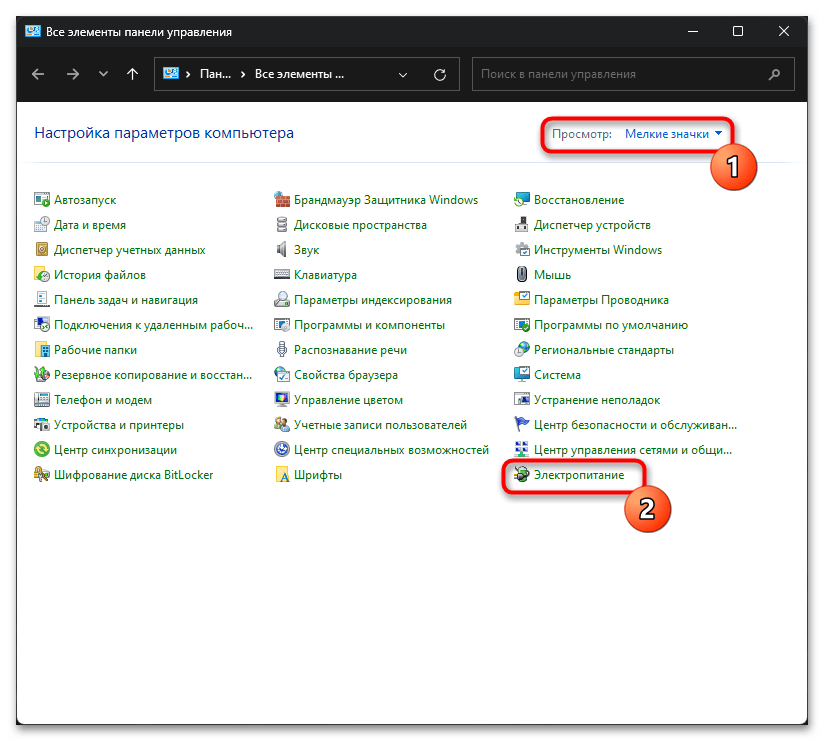
- Запустите это приложение любым удобным способом, например через поиск в «Пуске».
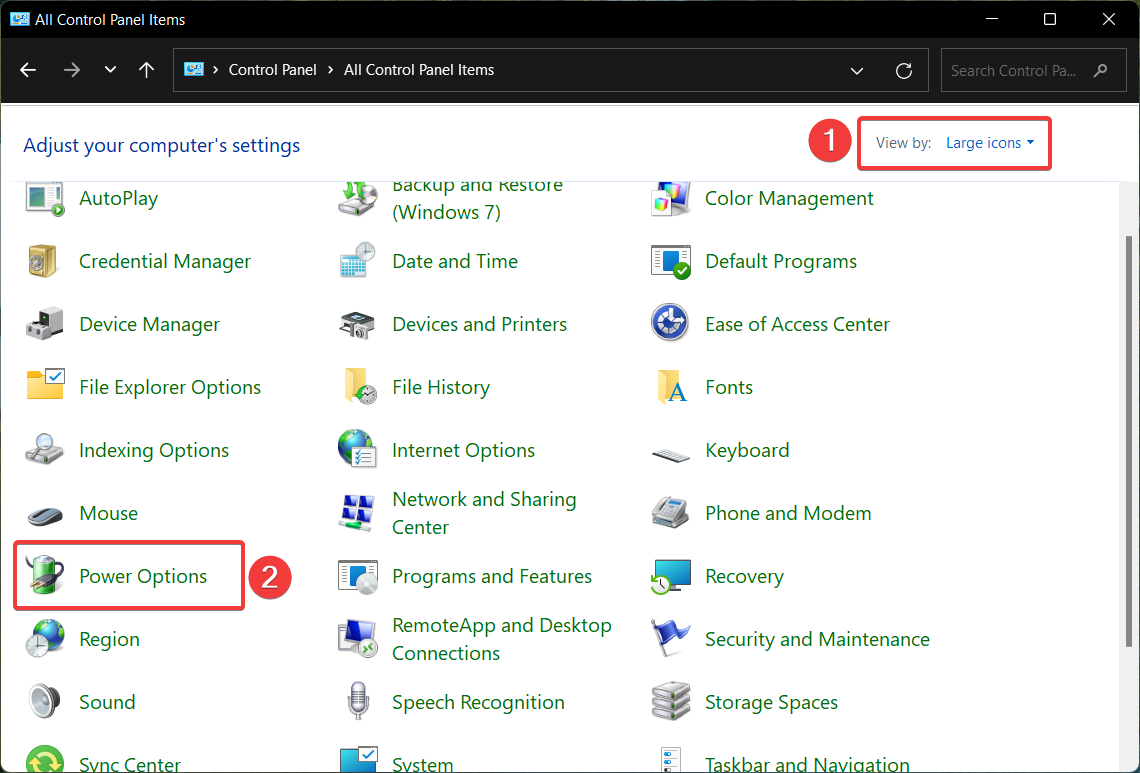
- Задайте просмотр как значки и нажмите по строке «Электропитание».
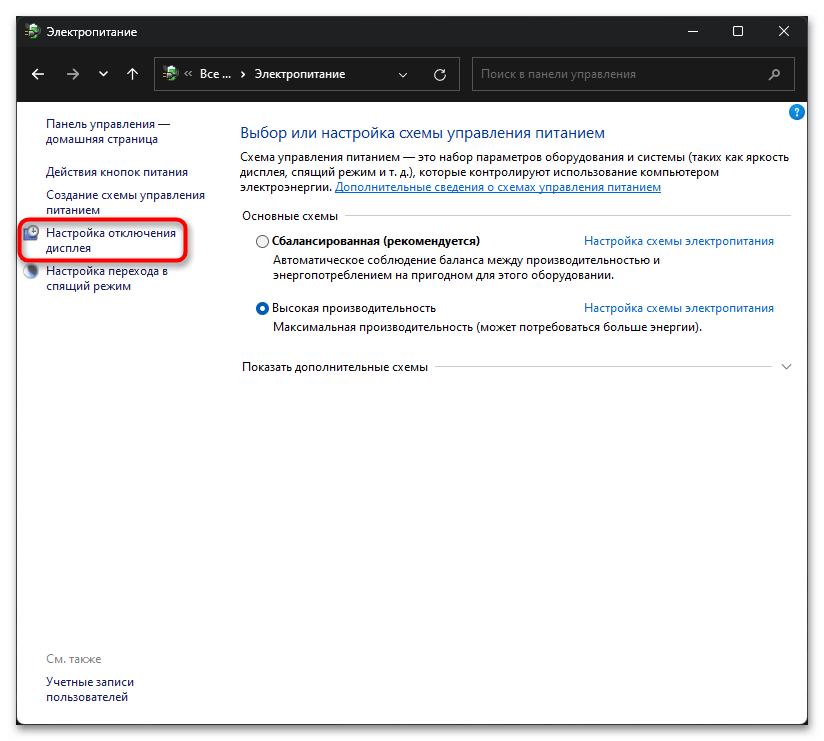
- На панели слева воспользуйтесь ссылкой «Настройка отключения дисплея».
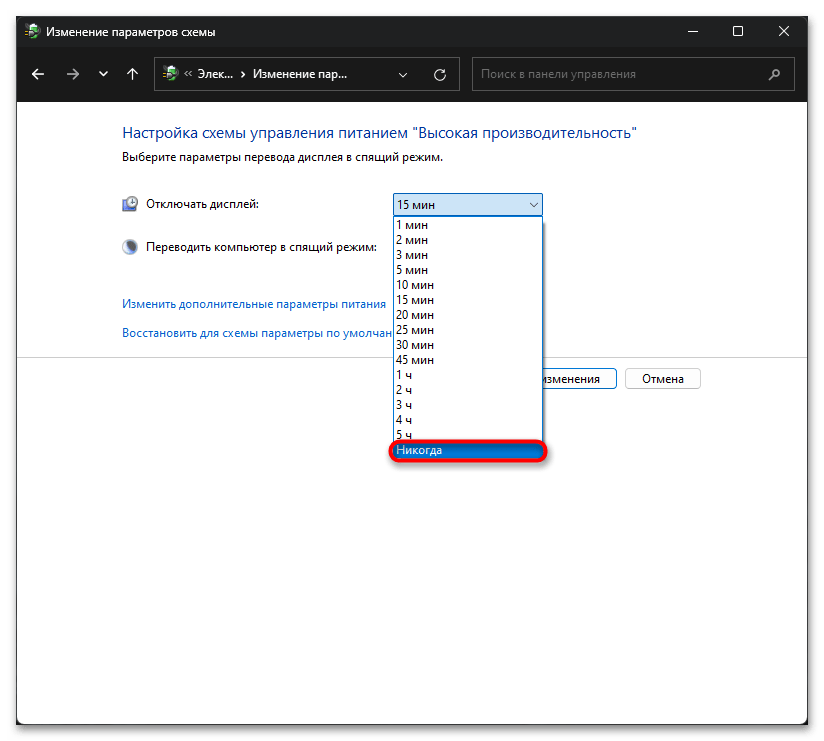
- У владельцев ПК будет только одна строчка «Отключать дисплей», а если у вас ноутбук, то будет деление на работу от сети и от аккумулятора. Редактируйте какой-то один или оба значения на ваше усмотрение.
- Разверните меню и выставьте «Никогда», после чего сохраните изменения одноименной кнопкой.

Вариант 2: Отключение экранной заставки
Возможно, в вашем случае экран не отключается, а включает заставку, которая просто отображает черный цвет. В этой ситуации процесс отключения будет несколько иным.
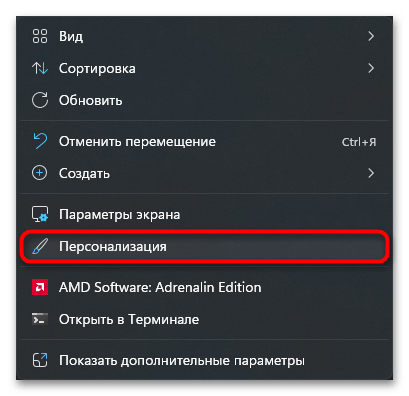
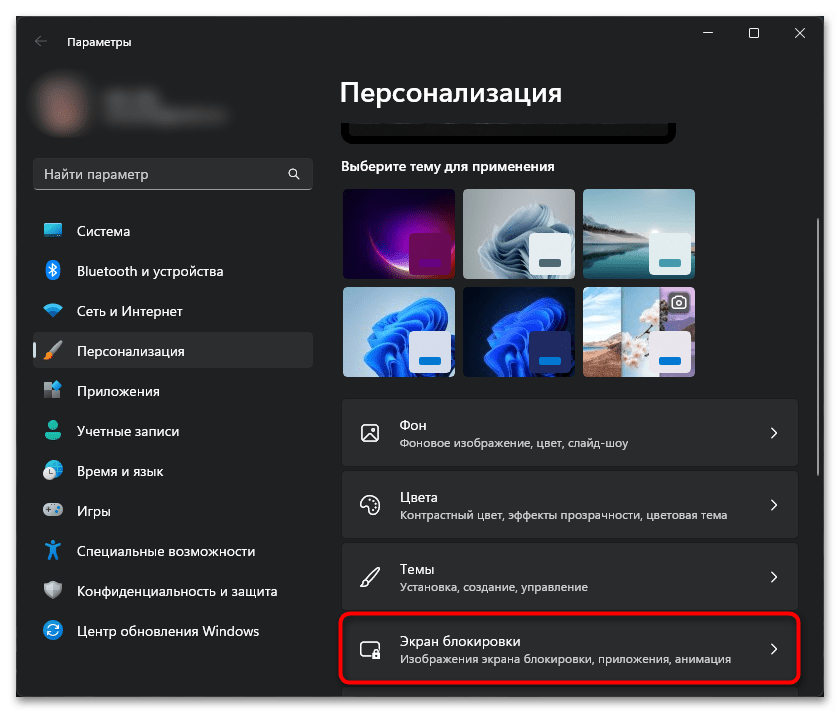
- Нажмите по пустому месту на рабочем столе и перейдите в «Персонализацию».
- Прокрутите основную часть окна до пункта «Экран блокировки» и нажмите на него.
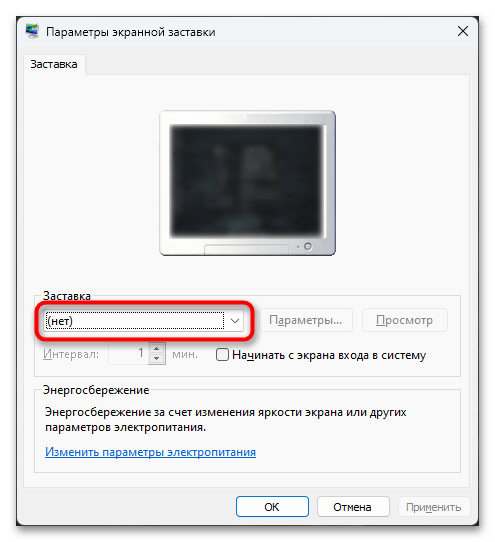
- Найдите тут плитку «Заставка» и кликните по ней.
- Откроется новое окно, в котором выставьте значение «(нет)» и сохранитесь кнопкой «ОК».

Вариант 3: Отключение выключения экрана после блокировки ПК
Эта инструкция подойдет только для тех пользователей, кто прибегает к блокировке компьютера, при которой отображаются время и дата, уведомления от приложений (плееры и др.), но воспользоваться компьютером без пин-кода (или другого настроенного способа входа) не получится.
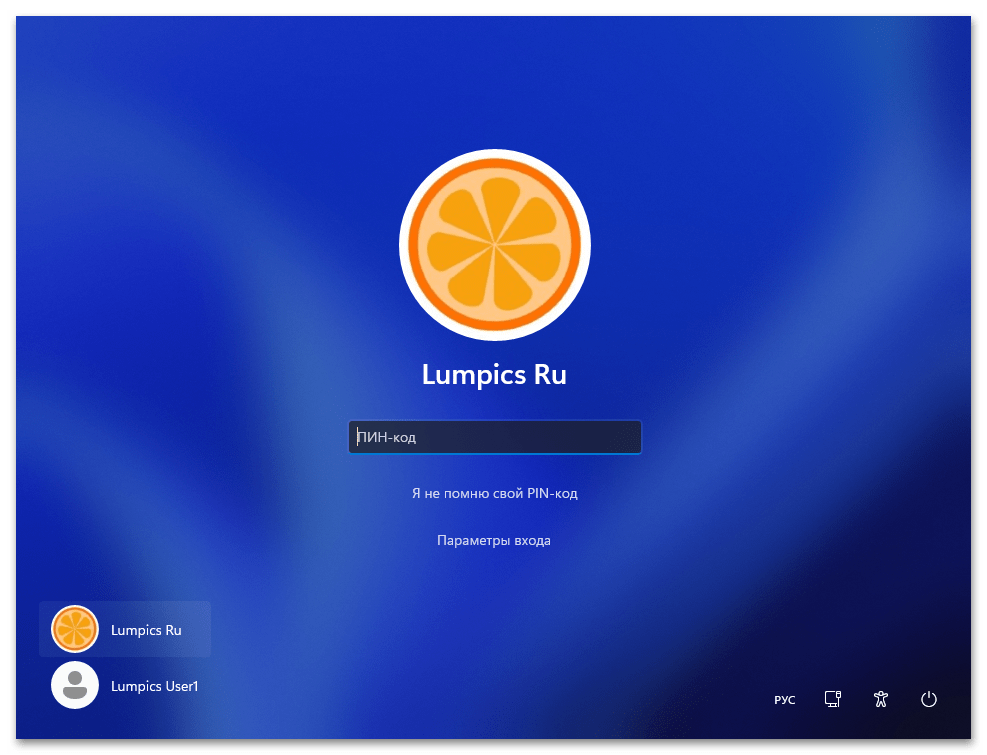
По умолчанию в этом режиме экран гаснет через минуту, что может не устроить некоторых юзеров. Эту опцию можно с легкостью изменить.
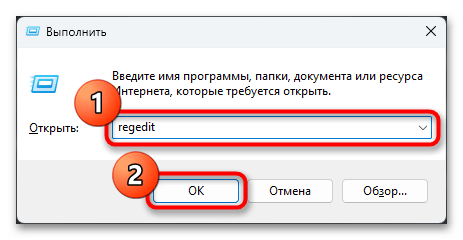
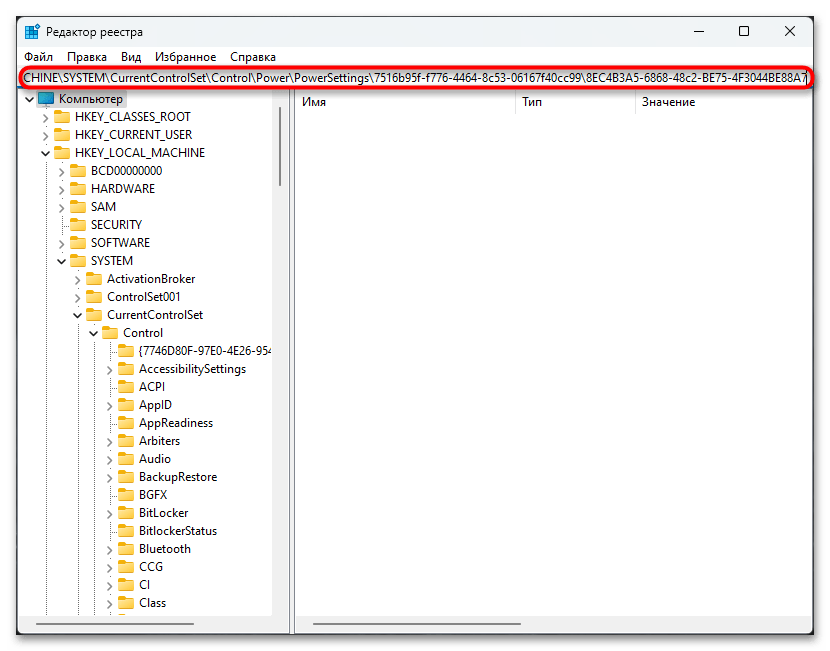
- Вызовите «Редактор реестра», найдя его через поиск в «Пуске» или нажав клавиши Win + R, написав команду
regeditи выполнив ее клавишей Enter либо кнопкой «ОК». - В адресную строку вставьте путь
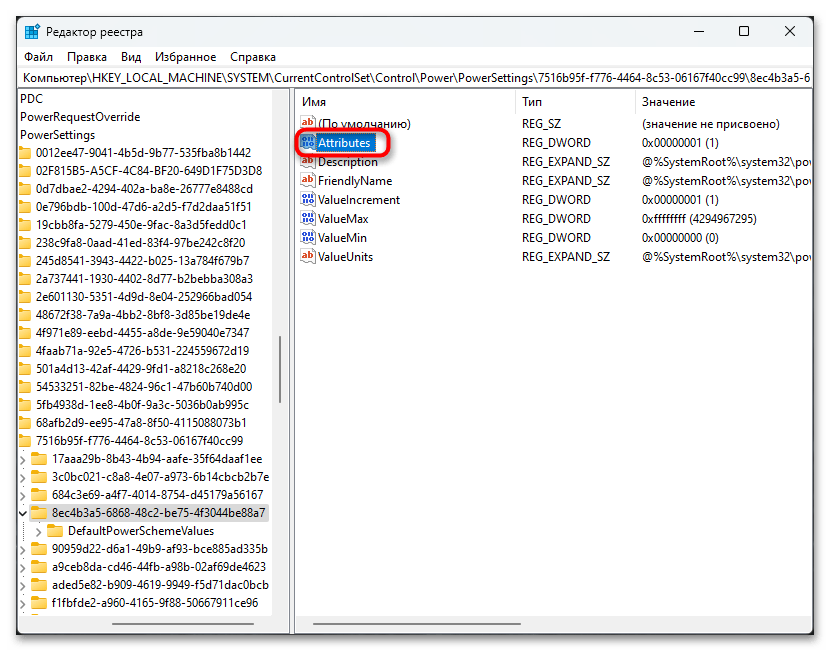
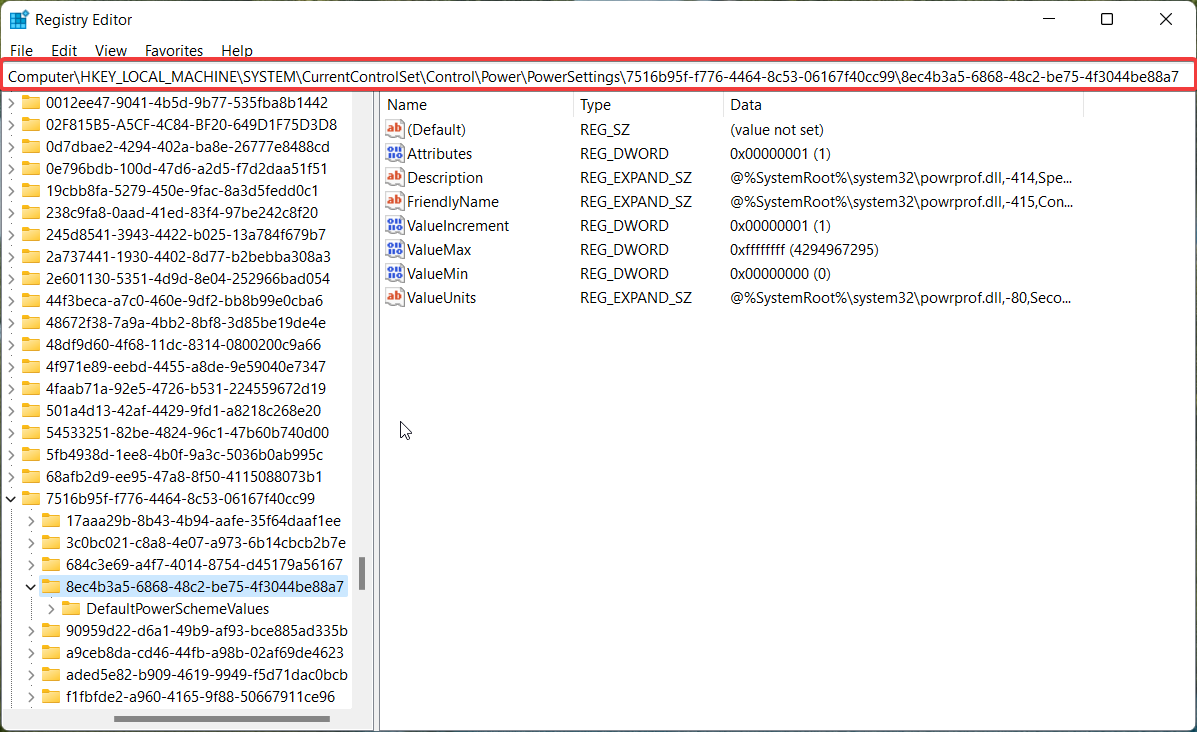
HKEY_LOCAL_MACHINE\SYSTEM\CurrentControlSet\Control\Power\PowerSettings\7516b95f-f776-4464-8c53-06167f40cc99\8EC4B3A5-6868-48c2-BE75-4F3044BE88A7и нажмите Enter для перехода. - В основной части экрана найдите параметр «Attributes» и дважды кликните по нему ЛКМ для открытия окна редактирования.
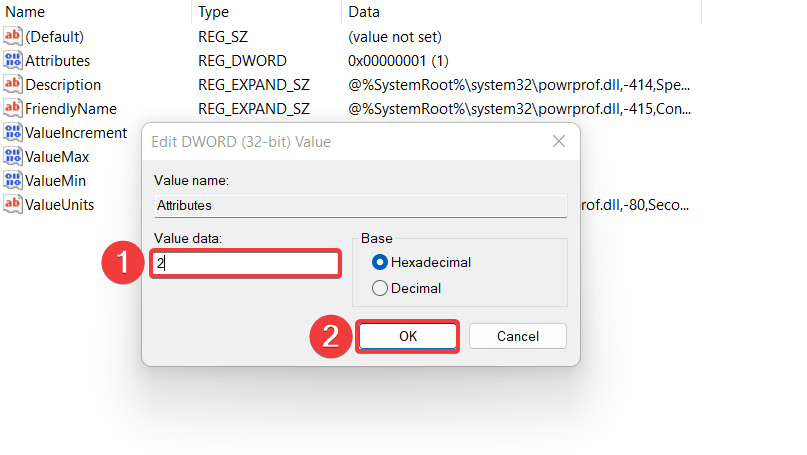
- В поле «Значение» измените цифру на «2» и нажмите «ОК».
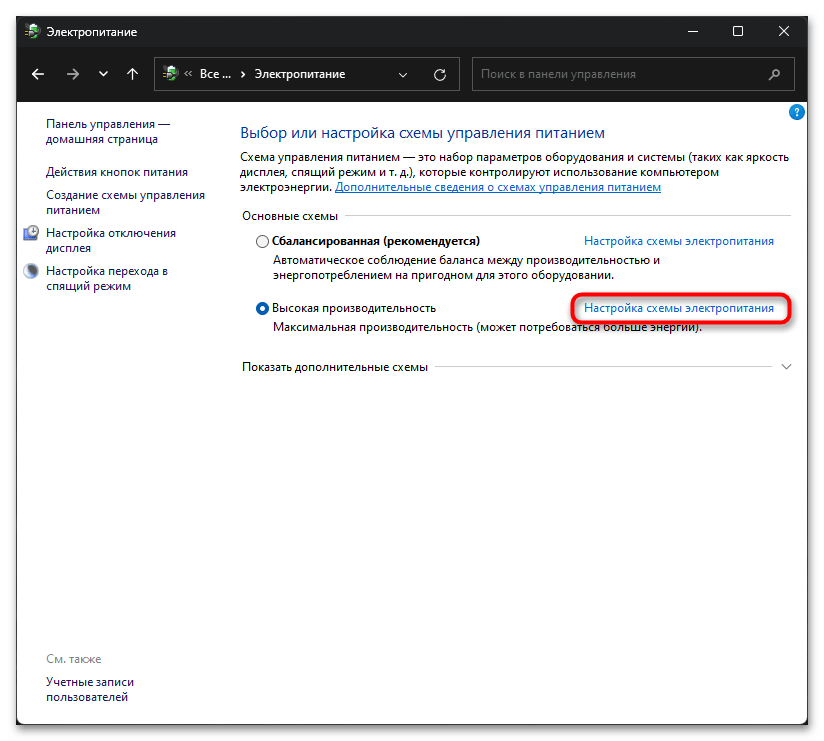
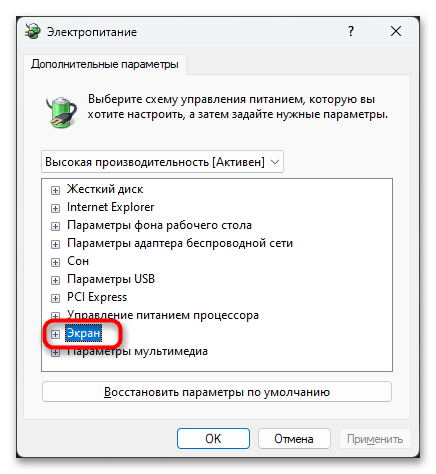
- Откройте «Панель управления», перейдите в «Электропитание» (выше уже было показано, как это сделать) и около выбранного режима производительности кликните по ссылке «Настройка схемы электропитания».
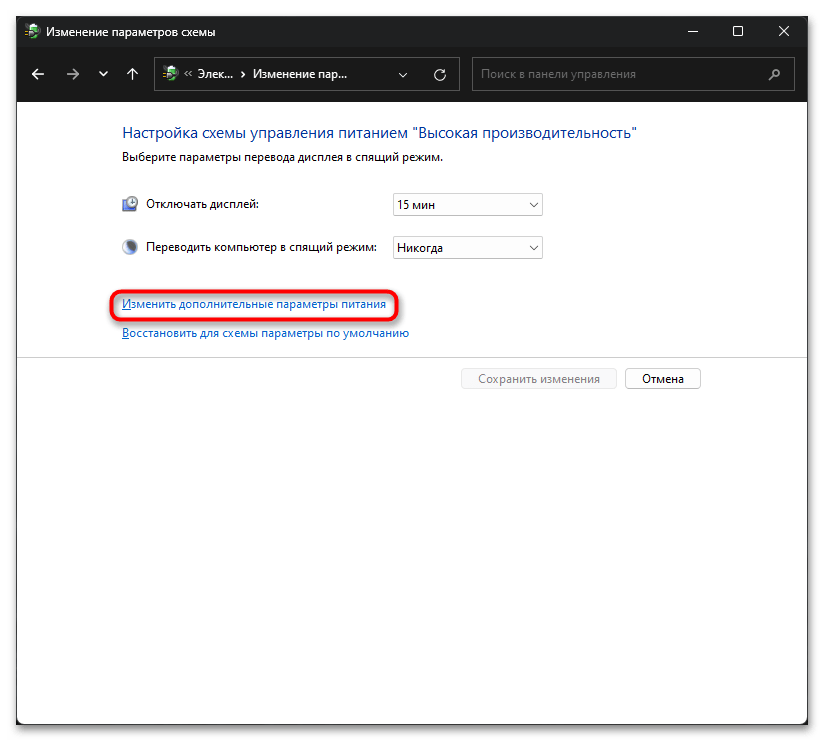
- Щелкните по ссылке «Изменить дополнительные параметры питания».
- Откроется новое окно, в котором найдите и разверните раздел «Экран».
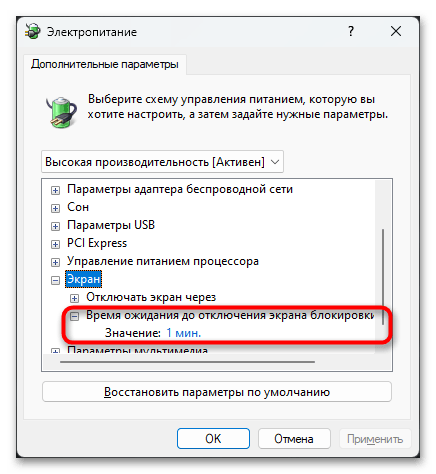
- В результате изменения параметра реестра должен был появиться новый пункт — «Время ожидания до отключения экрана блокировки консоли». Как видите, в его значении по умолчанию установлена минута, после которой экран и гаснет. Чтобы это исправить, нажмите по строке «Значение».
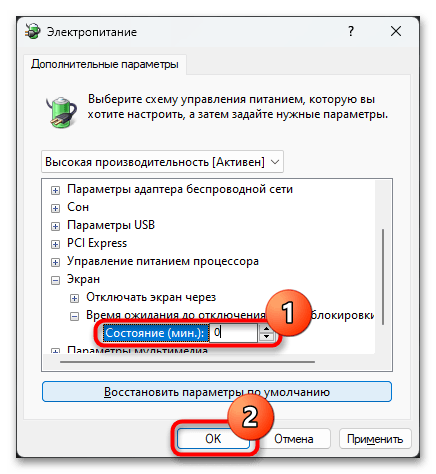
- Поставьте цифру «0» и кликните по кнопке «ОК».
Наша группа в TelegramПолезные советы и помощь
При нахождении на экране блокировки в Windows 11/10 экран автоматически выключается через 30 секунд или 1 минуту. Если вам требуется изменить это время или сделать так, чтобы экран не выключался, нужного параметры вы не найдёте, но возможность настройки существует.
В этой инструкции подробно о том, как добавить возможность настройки времени выключения экрана на экране блокировки в Windows 11 и Windows 10 в параметры электропитания и настроить этот промежуток времени.
Как добавить настройку времени отключения монитора в параметры схемы электропитания
В Windows 11 и Windows 10 предусмотрен параметр для настройки выключения экрана на экране блокировки, но он скрыт по умолчанию.
Соответственно, первое, что потребуется сделать — добавить опцию настройки времени отключения экрана на при заблокированной Windows в параметры электропитания, для этого придётся прибегнуть к использованию редактора реестра. Шаги будут следующими:
- Запустите редактор реестра. Для этого нажмите клавиши Win+R, либо нажмите правой кнопкой мыши по кнопке «Пуск» и выберите пункт «Выполнить». Введите regedit и нажмите Enter.
- Перейдите к разделу реестра
HKEY_LOCAL_MACHINE\SYSTEM\CurrentControlSet\Control\Power\PowerSettings\7516b95f-f776-4464-8c53-06167f40cc99\8EC4B3A5-6868-48c2-BE75-4F3044BE88A7
- В правой панели редактора реестра дважды нажмите по параметру с именем Attributes, замените его значение с 1 на 2 и примените настройки.

- Закройте редактор реестра.

Следующий шаг — настройка времени до выключения экрана на экране блокировки, для этого:
- Зайдите в Панель управления и откройте пункт «Электропитание», либо нажмите клавиши Win+R на клавиатуре, введите powercfg.cpl и нажмите Enter.
- Нажмите «Настройка схемы электропитания» справа от используемой схемы.

- В следующем окне нажмите «Изменить дополнительные параметры питания».
- Перейдите в раздел «Экран» и настройте нужные параметры в подразделе «Время ожидания до отключения экрана блокировки консоли». Время задается в минутах, если указать 0, выключение экрана выполняться не будет.

- Примените сделанные настройки


Учитывайте, что работать настройка будет только после уже выполненного входа в Windows 11/10 (т.е. когда мы заблокировали систему после входа или она заблокировалась сама), но не, например, после перезагрузки компьютера ещё до входа.
Изменение времени отключения экрана при блокировке Windows 10 с помощью powercfg.exe
Еще один способ изменить это же поведение — использовать утилиту командной строки для установки времени отключения экрана.
В командной строке от имени администратора выполните следующие команды (в зависимости от задачи):
-
powercfg.exe /setacvalueindex SCHEME_CURRENT SUB_VIDEO VIDEOCONLOCK время_в_секундах
(при питании от сети)

-
powercfg.exe /setdcvalueindex SCHEME_CURRENT SUB_VIDEO VIDEOCONLOCK время_в_секундах
(при питании от батареи)

Надеюсь, найдутся читатели, для которых информация из инструкции будет востребована.
Quick Tips
- You can always use the Settings app to change the screen timeout settings. Open the Power & Battery settings to get started.
- Control Panel can also be used to change screen timeout duration for when your device is on battery power and when plugged in.
- Ensure you enter the exact time (in seconds) when using Command Prompt to change screen timeout duration.
Method 1: Change Screen Timeout Using Settings
You can easily change the Windows 11 screen timeout duration using the Settings app. This will allow you to adjust the screen timeout duration for when your device is plugged in and on battery power. Follow the below steps to do it.
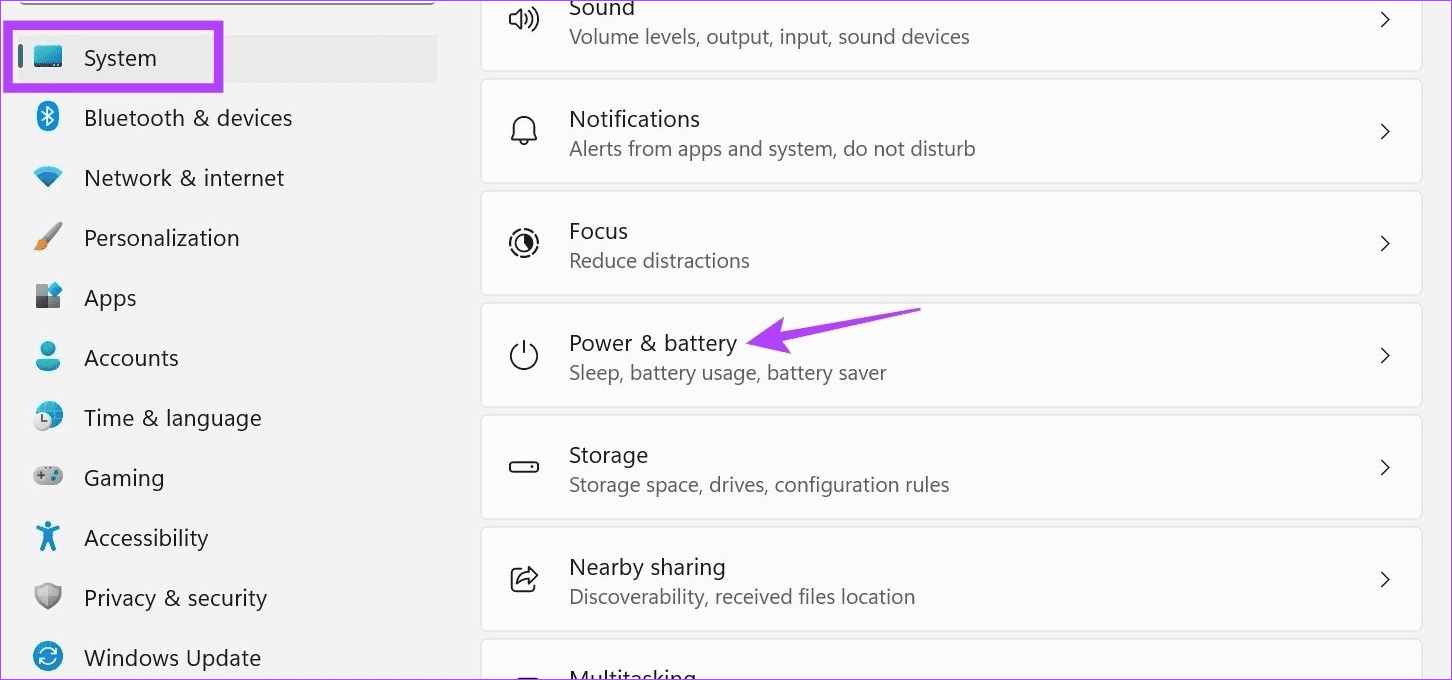
Step 1: Use the Windows + I key to open Settings. Click on System from the sidebar > Power & battery.
Step 2: Here, click on Screen and sleep to expand the options.
Step 3: Now, click on the drop-down next to the On battery power, turn off my screen after to adjust the screen timeout duration when on battery power.
Step 4: Then, click on the drop-down menu for When plugged in, turn off my screen after, and select the screen timeout duration for when your device is plugged in.

Also Read: How to fix Windows 11 screen keeps locking automatically
Method 2: Change Screen Timeout Using Control Panel
Two ways can be used to change screen timeout in Windows 11 when using the Control Panel. So, besides using the Power Options menu, you can also use the Advanced Power Plan settings to make the necessary changes. Here’s how to do it.
I. Using Power Options
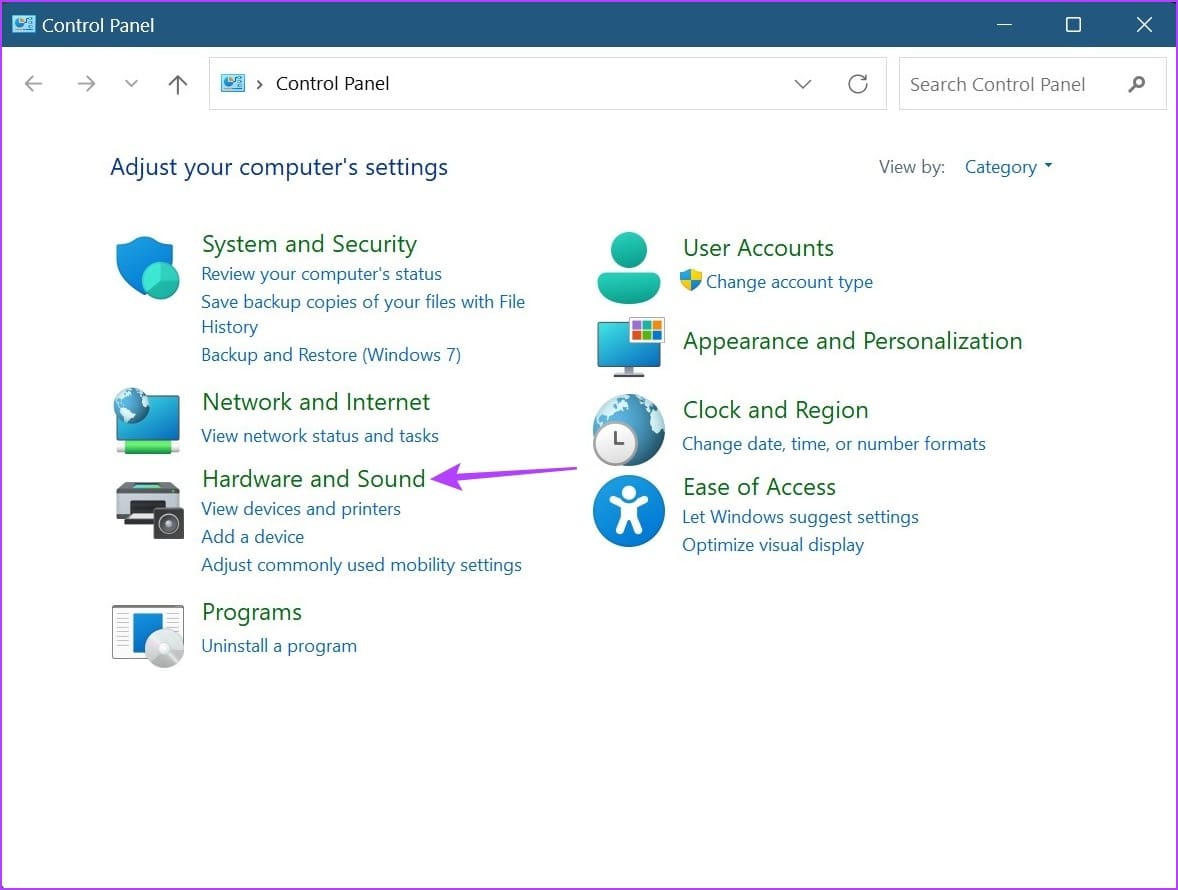
Step 1: Open the Control Panel and click on Hardware and Sound.
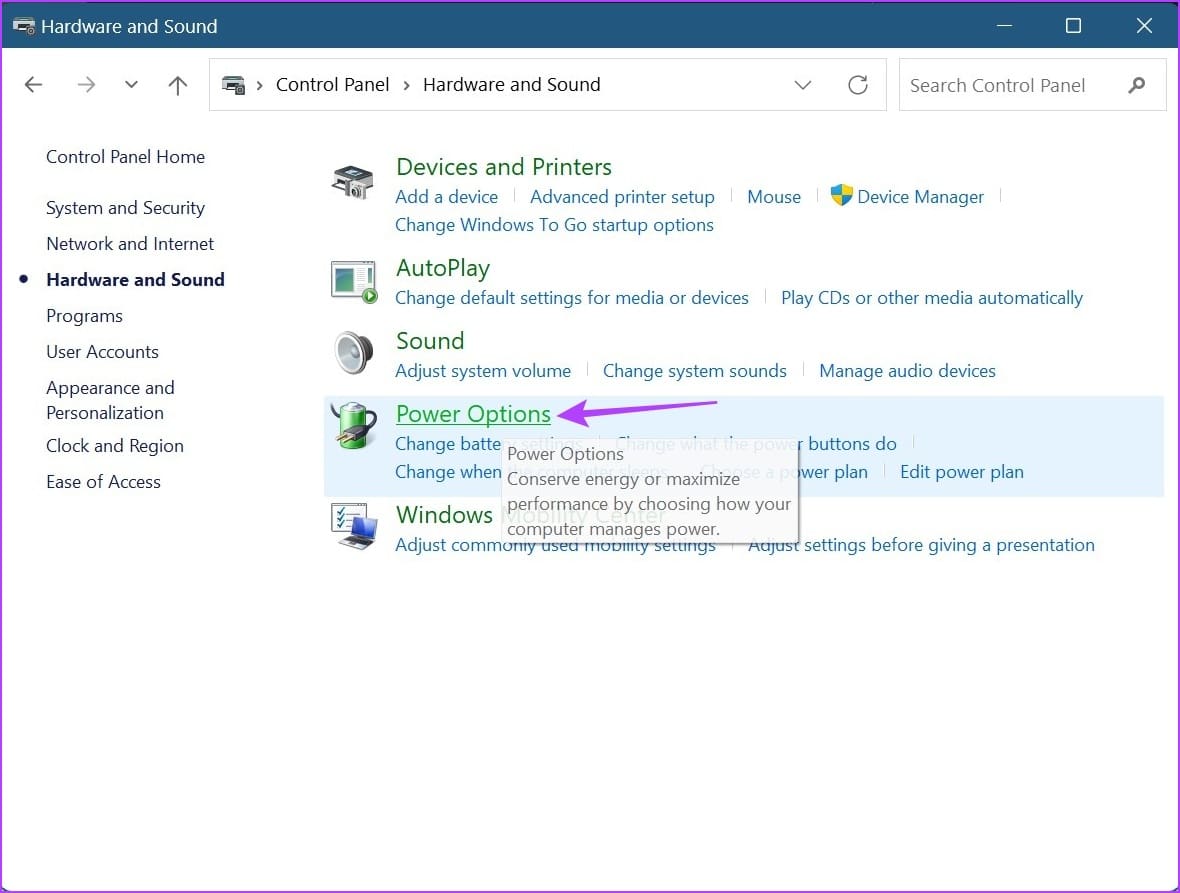
Step 3: Here, click on Power Options.
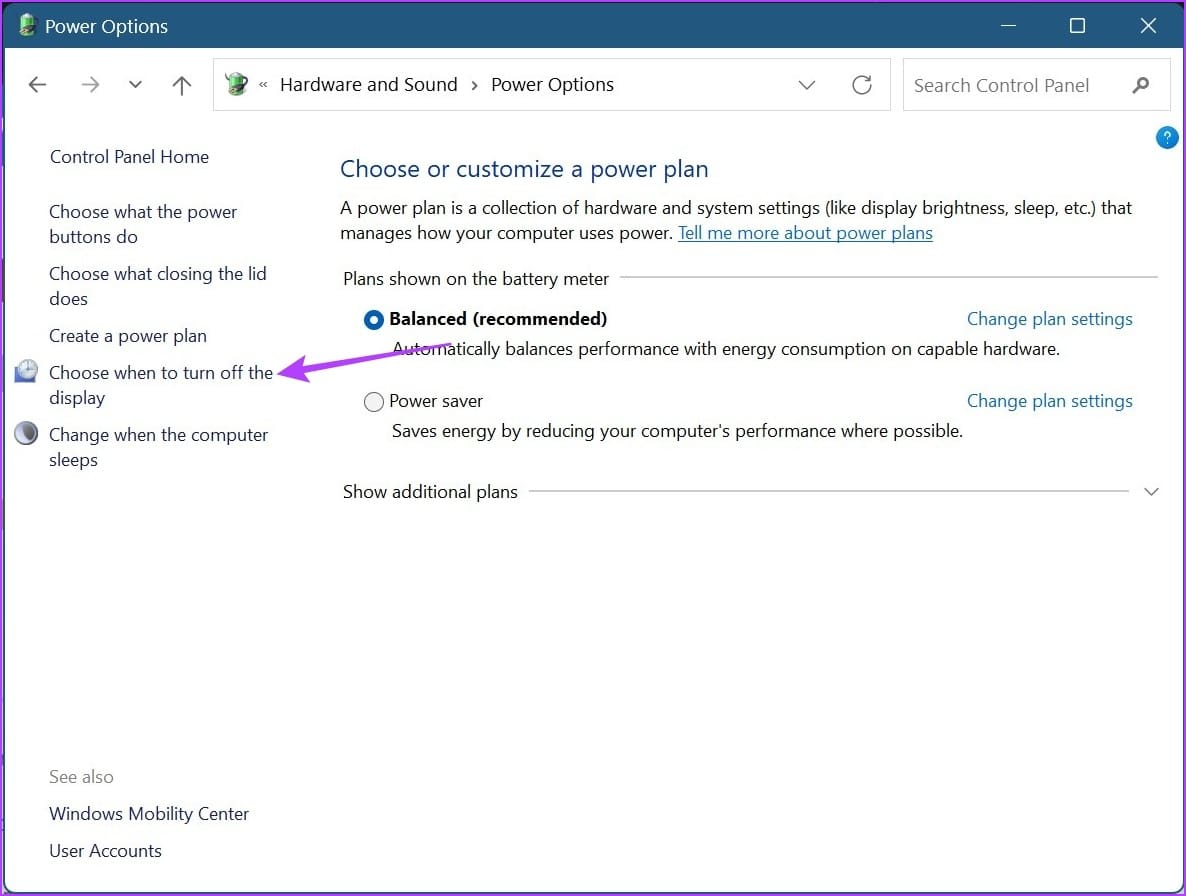
Step 4: From the sidebar, click on Choose when to turn off the display.
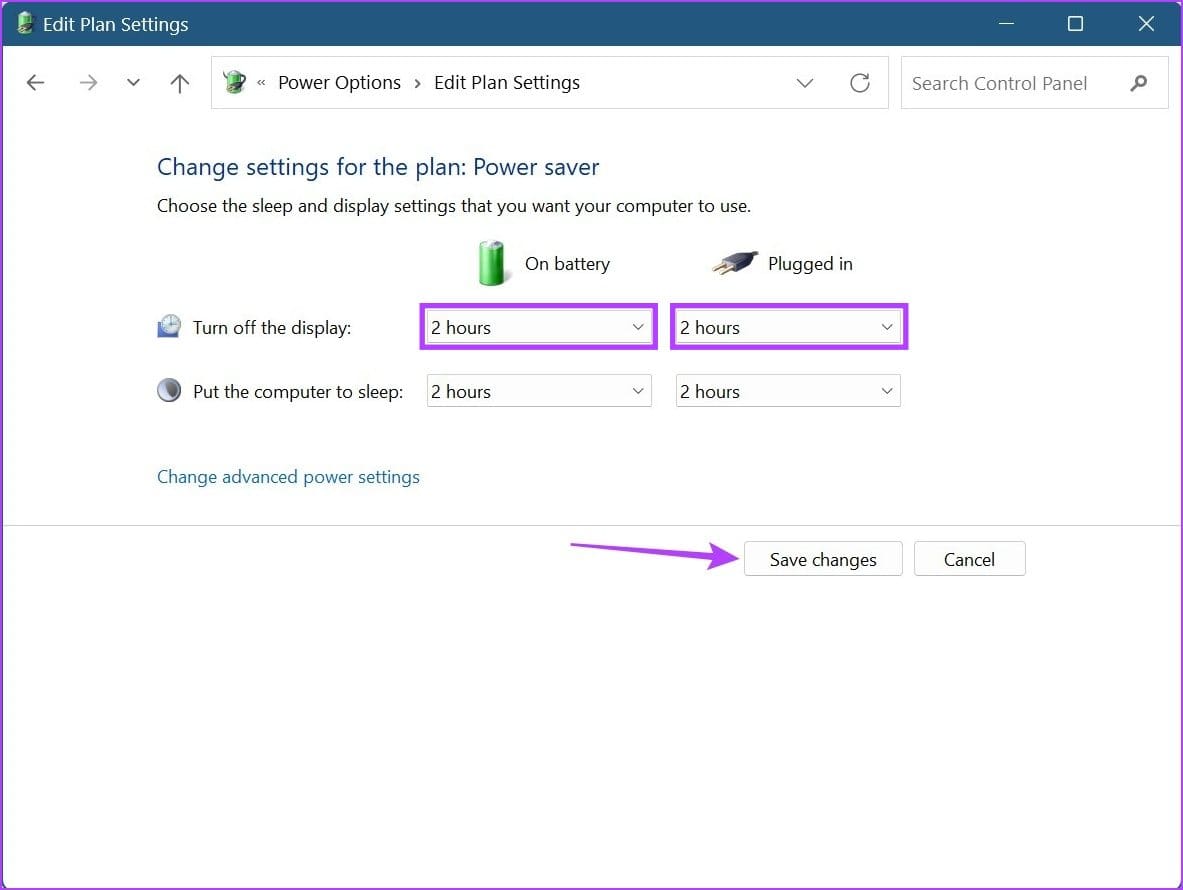
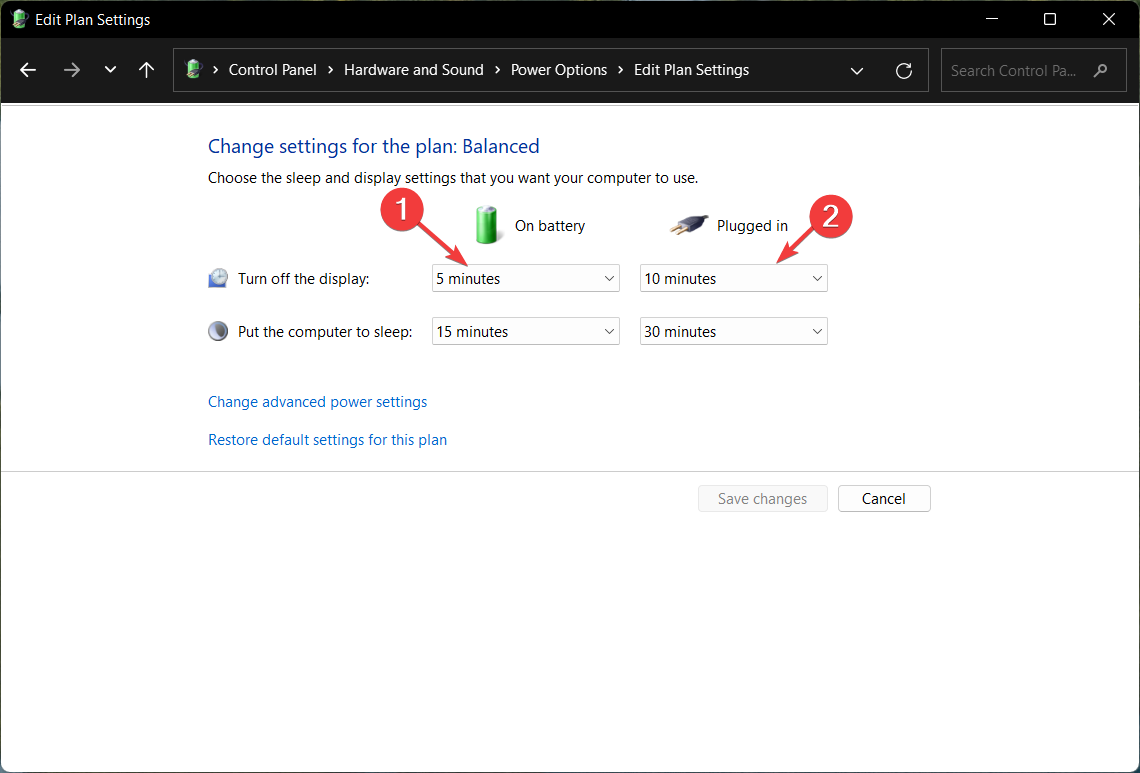
Step 5: Click on the first drop-down in front of Turn off the display to adjust screen timeout when on battery power.
Step 6: Then, click on the second drop-down to select the preferred screen timeout duration for when your device is plugged in. Once done, click on Save changes.
II. Using Advanced Power Plan Settings
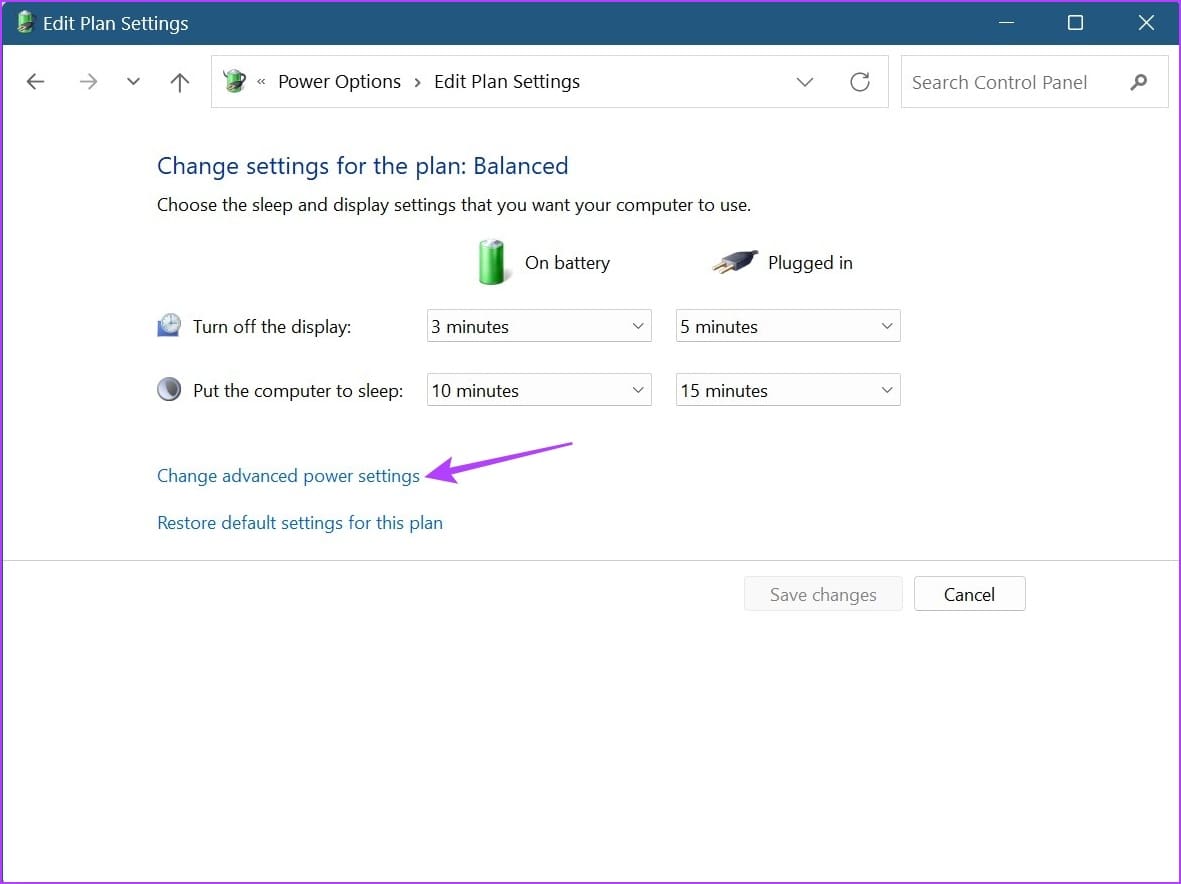
Step 1: On the Edit Plan Settings page in the Control Panel, click on Change advanced power settings.
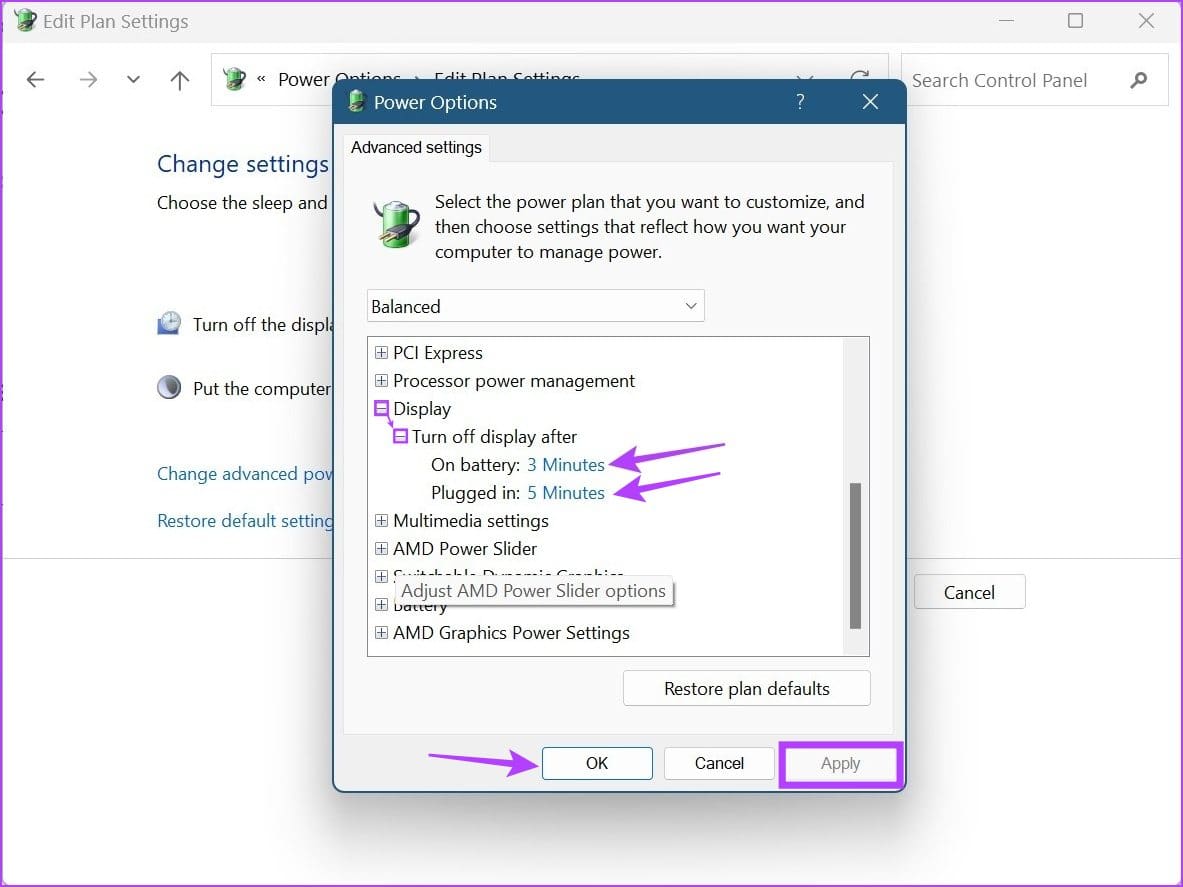
Step 2: Scroll down and click on Display. Once it expands, click on Turn off display after. Then, click on the time duration in front of On battery and select a duration.
Step 3: Click on the time duration for Plugged in and select a duration. Then, click on Apply and OK to save and exit the window.
Tip: You can also use the Registry Editor to change the screen timeout settings in Windows 11. However, if you’re unfamiliar with it, it can cause issues with critical Windows 11 resources.
Method 3: Modify Screen Timeout Using Command Prompt
While you can also use the Command Prompt to modify screen timeout in Windows 11, unlike the ways listed above, here you will have to input the exact duration you want in minutes. Here’s how.
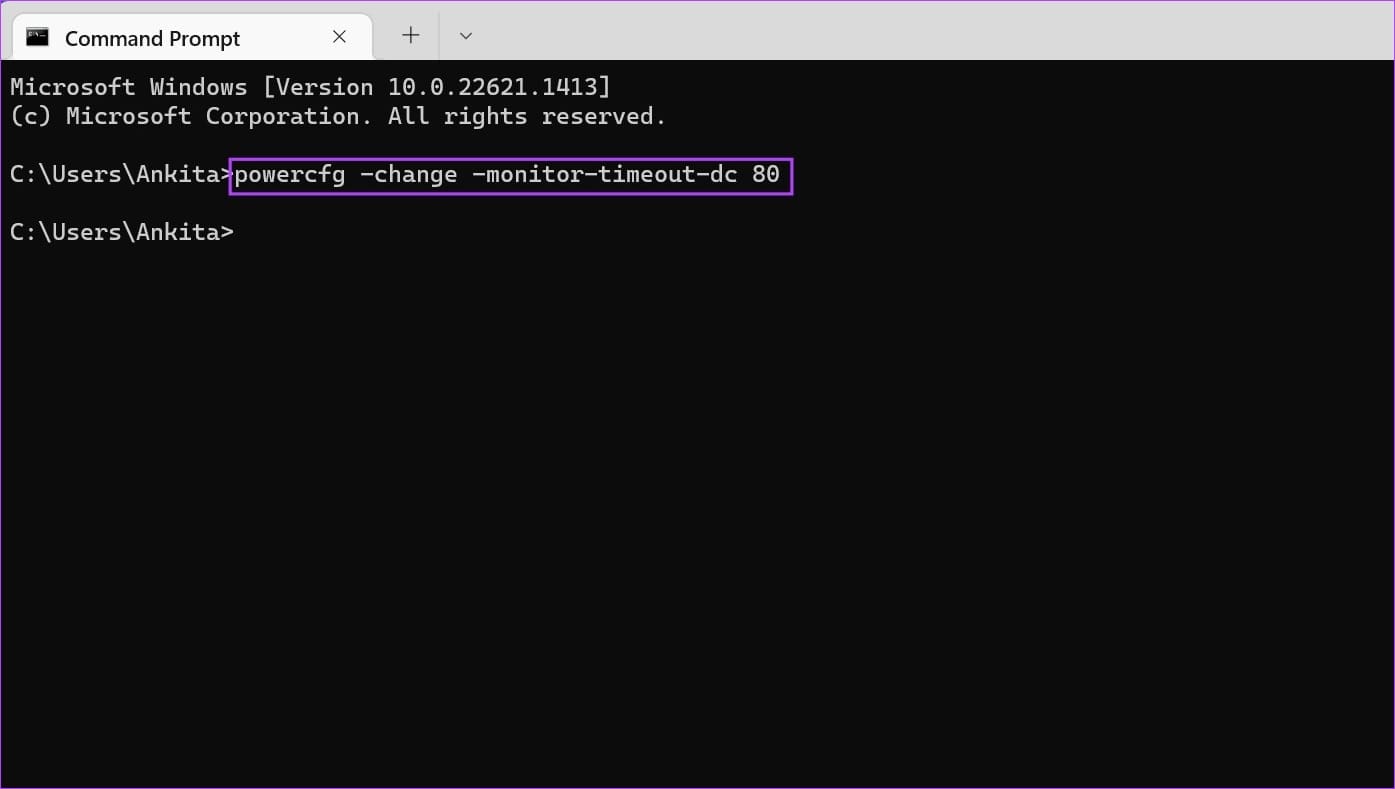
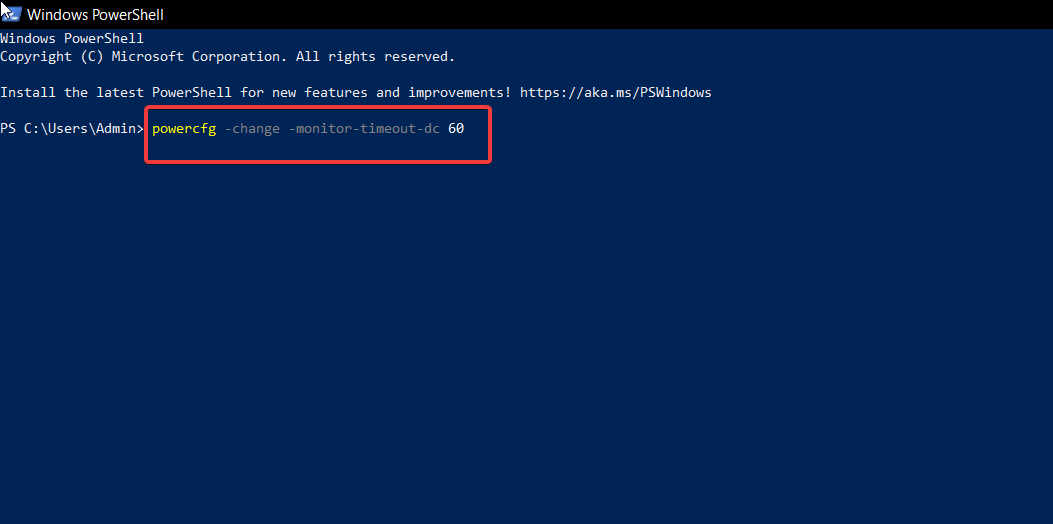
Step 1: Open Command Prompt and type the following command. Replace the x with the time duration you want to set. This value should be in minutes.
powercfg -change -monitor-timeout-dc x
Step 2: Then, press enter. This will change the screen timeout duration when your device is on battery power.
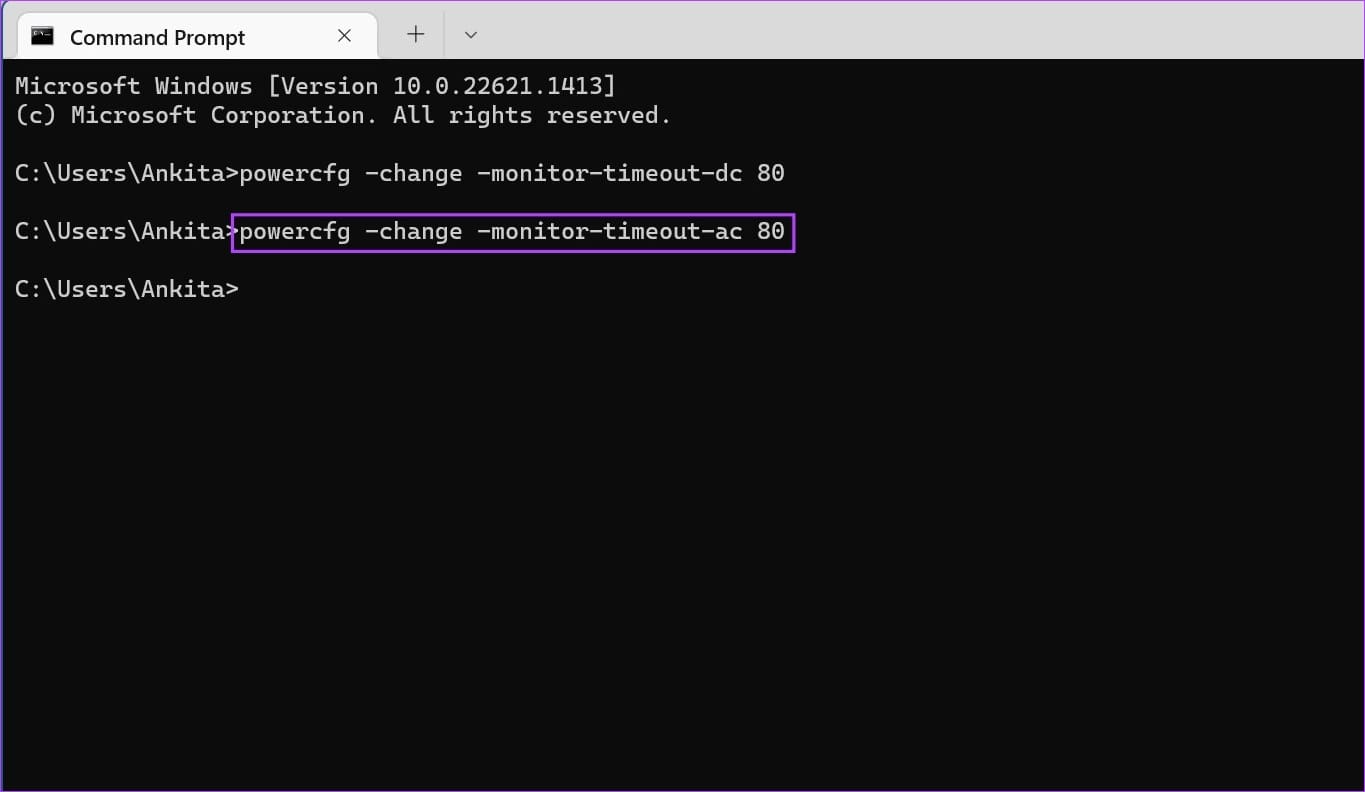
Step 3: You can also type the following command to change the screen timeout duration when your device is plugged in. Replace the x with your desired duration in minutes and press enter.
powercfg -change -monitor-timeout-ac x
If you want, you can also set up wake timers using the Command Prompt to make your Windows 11 device’s screen wake up at a scheduled time.
Was this helpful?
Thanks for your feedback!
The article above may contain affiliate links which help support Guiding Tech. The content remains unbiased and authentic and will never affect our editorial integrity.
Readers help support Windows Report. We may get a commission if you buy through our links.
Read our disclosure page to find out how can you help Windows Report sustain the editorial team. Read more
Does your Windows 11 system screen times out very quickly as you leave it idle? If so, it is possible to increase the screen timeout duration of your PC and get rid of the inconvenience. This guide explains the different ways to change the screen timeout in Windows 11.
Why does my screen turn off so quickly in Windows 11?
The most prominent reason why your Windows 11 computer screen turns off quickly is that a short duration is assigned to the screen timeout settings. Apart from this, other reasons can be:
- The Dynamic Lock feature is turned on – The Dynamic Lock feature, when enabled, automatically locks your device whenever you are away.
- A blank screensaver is enabled – If you have chosen a blank screensaver, the screen will appear inactive whenever the screensaver is activated.
- The sleep timeout setting is set to a lower value – If you assign a short duration here, your PC will be put into Sleep mode quickly after it is left unattended.
Now that we know how this can happen, let’s see how to extend the screen timeout.
How can I change the screen timeout settings in Windows 11?
1. Use the Settings app
- Right-click the Windows icon and click Settings from the Quick Links menu.

- From the System settings, choose Power & battery from the right section.

- Click to expand the Screen and sleep option located under the Power section.
- Assign a time duration for When plugged in, turn off my screen after option. Likewise, if you own a laptop, assign a suitable duration for On battery power, turn off my screen after as well.


You can also use the ms-settings:powersleep command in the Run window to access the Screen and sleep settings directly.
2. Use the Control Panel
- Press the Windows key to launch the Start menu, type control panel in the search bar and select the relevant result.

- Set View by as Category and choose Hardware and Sound.

- Next, select Power Options to access related settings.
- From the Choose or customize a power plan window, click the Change plan settings option for the current power plan.
- Assign the time duration for the Turn off the display option for both On battery and Plugged in scenarios.
- After making the changes, press the Save changes button on the bottom right.


Using Control Panel is an old-school method to customize the power plan settings and change screen timeout settings in Windows 11. We also recommend that you go through our guide to check the battery health of Windows 11 laptops.
3. Use Advanced Power Options
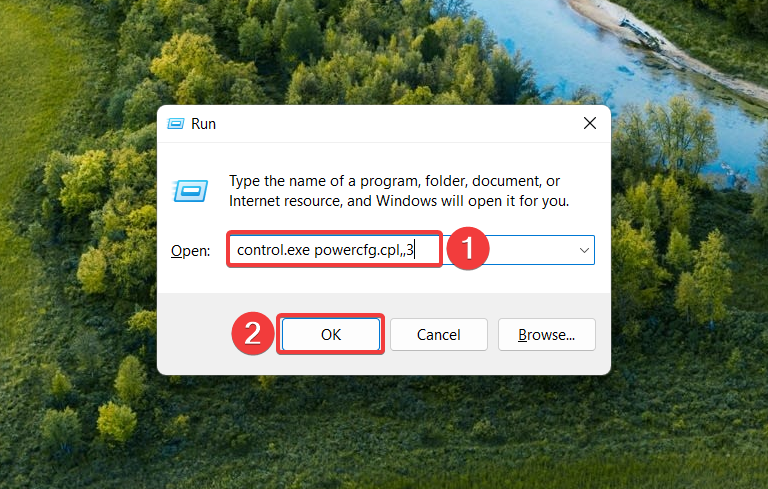
- Use the Windows + R shortcut to launch the Run dialog box, type or copy-paste the following command and press OK to execute it.
control.exe powercfg.cpl,,3
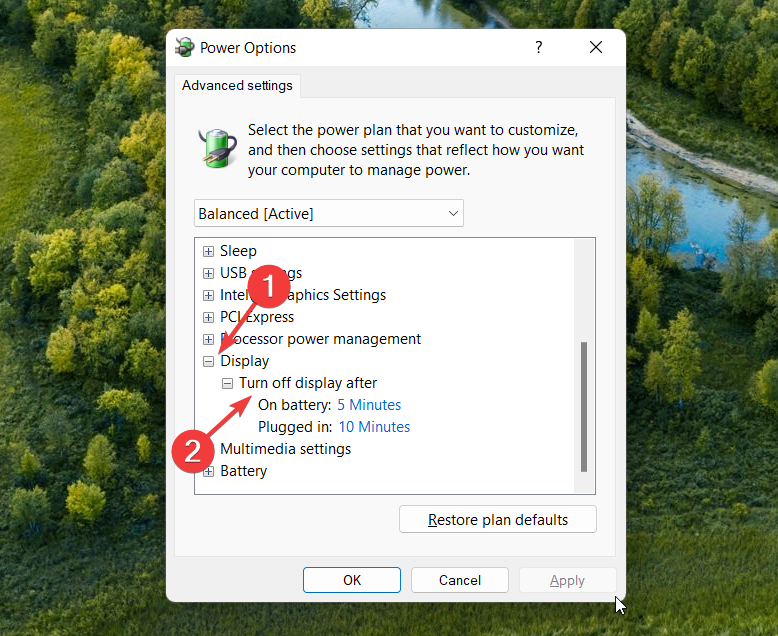
- This will directly take you to the Advanced Power Options settings. Expand the Display category and then the Turn off display after option.

- Specify the time duration in minutes for the On battery and Plugged in fields and press the OK button to save the settings.
- Recent Windows 11 update lets you disable profanity filter in voice typing
- Microsoft wants Windows 10 users to upgrade to Windows 11 or Copilot + PCs
- Windows 11 KB5055627 update makes File Explorer more fluid
4. Use a Windows PowerShell command
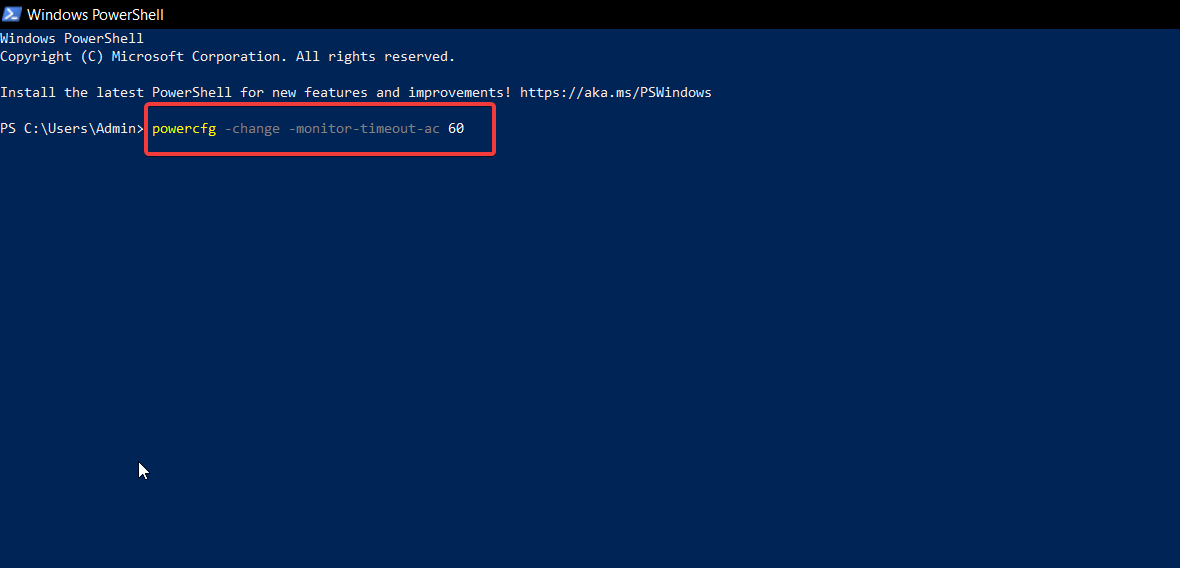
- Press the Windows key, type powershell in the search bar, and select Run as Administrator from the search result.
- Click Yes on the User Action Control Popup.
- Type or copy-paste the following command and press Enter key to assign a screen timeout when the computer is plugged in. Replace duration with the time duration in seconds.
powercfg -change -monitor-timeout-ac 60
- To change the screen timeout duration when the computer is powered by a battery, execute the following command. Here, again replace duration with the time duration in seconds.
powercfg -change -monitor-timeout-dc 60
The Powercfg command allows you to change the timeout settings in Windows 11 and specify how long the system screen should be active. This command works in both Command Prompt and Windows PowerShell, so you can choose any of the two you are comfortable with.
5. Use Registry Editor
5.1 Modify the Registry
- Press the Windows key to launch the Start menu, type regedit and select Run as Administrator.

- Choose Yes on the User Action Control prompt.
- In the Registry Editor, navigate to the following location.
Computer\HKEY_LOCAL_MACHINE\SYSTEM\CurrentControlSet\Control\Power\PowerSettings\7516b95f-f776-4464-8c53-06167f40cc99\8EC4B3A5-6868-48c2-BE75-4F3044BE88A7
- Here, right-click the Attributes key and choose Modify from the context menu.
- Now, assign 2 in the Value data and press the OK button to save the changes.


5.2 Change Advanced Power Settings
- Launch Control Panel once again, select Large icons in View by dropdown, and select Power Options.
- Next, select Change plan settings.
- Click the Change advanced power settings to excess the advanced settings property window.
- Expand the Display category and then the Console lock display off timeout option.

- Replace the default time with your preferred duration in minutes and press Apply button followed by OK.

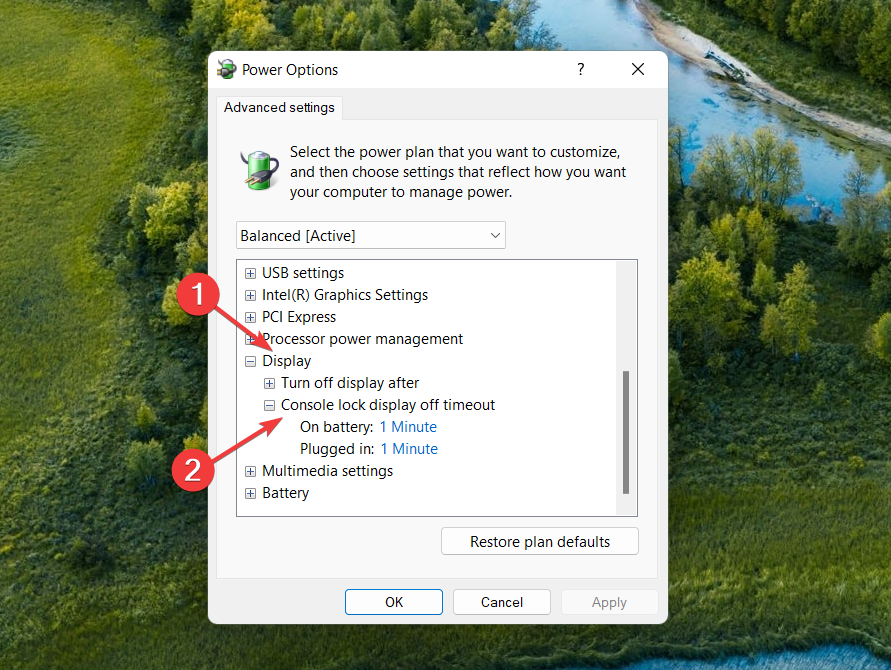
Modifying the Windows Registry unlocks the Console lock display off timeout option in Windows 11, which can be configured from the Advanced Power Options settings window.
That’s it! These are all the possible ways to change screen timeout in Windows 11 and assign a duration to your preference. You can check out our guide to stop the power plan from changing automatically if it often happens on your Windows 11 PC. For further help or to share your experience, reach out to us in the comments section.
Radu Tyrsina
Radu Tyrsina has been a Windows fan ever since he got his first PC, a Pentium III (a monster at that time).
For most of the kids of his age, the Internet was an amazing way to play and communicate with others, but he was deeply impressed by the flow of information and how easily you can find anything on the web.
Prior to founding Windows Report, this particular curiosity about digital content enabled him to grow a number of sites that helped hundreds of millions reach faster the answer they’re looking for.
Перейти к основному контенту
Поддержка
Поддержка
Войти
Войдите с помощью учетной записи Майкрософт
Войдите или создайте учетную запись.
Здравствуйте,
Выберите другую учетную запись.
У вас несколько учетных записей
Выберите учетную запись, с помощью которой нужно войти.
Applies ToWindows 11 Windows 10
Чтобы настроить параметры питания и спящего режима в Windows 11, выберите Пуск > Параметры > система > питание & батареи > экран, спящий режим & время ожидания в режиме гибернации.
-
Выключите экран после: Выберите время ожидания устройства перед выключением экрана, когда вы не используете устройство, как при его подключении, так и при включении батареи.
-
Перенесите устройство в спящий режим после: Выберите время ожидания устройства перед переходом в спящий режим, когда вы не используете его, когда оно подключено к сети и когда оно подключено к аккумулятору.
См. дополнительные сведения о том, как завершить работу компьютера, включить его в спящий режим или гибернировать.
Открытие параметров спящего режима Power &
ПОДПИСКА НА RSS-КАНАЛЫ
Нужна дополнительная помощь?
Нужны дополнительные параметры?
Изучите преимущества подписки, просмотрите учебные курсы, узнайте, как защитить свое устройство и т. д.
Преимущества подписки на Microsoft 365

Обучение работе с Microsoft 365

Microsoft Security

Центр специальных возможностей
Были ли сведения полезными?
(Отправьте отзыв в корпорацию Майкрософт, чтобы мы могли помочь.)
Насколько вы удовлетворены качеством перевода?
Что повлияло на вашу оценку?
Моя проблема решена
Понятные инструкции
Понятные сведения
Без профессиональной лексики
Полезные изображения
Качество перевода
Не соответствует интерфейсу
Неверные инструкции
Слишком техническая информация
Недостаточно информации
Недостаточно изображений
Качество перевода
Добавите что-нибудь? Это необязательно
После нажатия кнопки «Отправить» ваш отзыв будет использован для улучшения продуктов и служб Майкрософт.
Эти данные будут доступны для сбора ИТ-администратору.
Заявление о конфиденциальности.
Спасибо за ваш отзыв!
×