
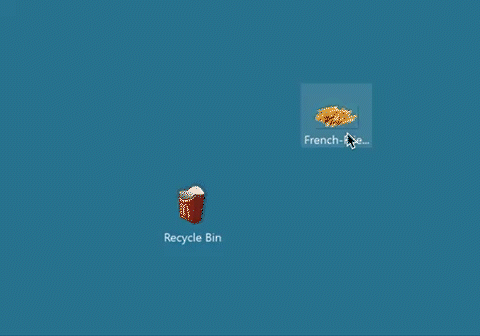
Иконка корзины в Windows практически никогда не менялась: её регулярно освежали вместе с дизайном всей операционной системы, но она всегда оставалась привычным белым ведром. Благо значки пустой и полной корзины легко менять самостоятельно, чем и воспользовался находчивый энтузиаст с ником Sdushantha на GitHub — он сделал небольшую коллекцию иконок, которыми можно оригинально заменить стандартные значки.
В чём суть и какие подводные камни
Microsoft позволяет менять стандартные иконки даже ключевых системных утилит (того же «Моего компьютера» и прочих) штатными способами, поэтому сделать это довольно легко без установки каких-либо приложений. Понадобится лишь картинка в формате .ico — в интернете полно конвертеров.
Единственное ограничение заключается в том, что эта функциональность причислена в системе к разделу персонализации — иными словами, ею можно воспользоваться только на активированной Windows.
Если вы захотите вернуть стандартные значки, это получится сделать нажатием одной кнопки в настройках.
Какие картинки собраны в коллекции
- French Fries

- Kanna

- Kirby

- Minecraft Chest

- Patrick Star
- Pop Cat
- Sword Kirby


Как изменить стандартные значки «Корзины» в Windows 10 и 11
- Скачайте нужные картинки с каталога на GitHub — откройте папку и загрузите два файла с разрешением .ico (на всякий случай, к этой статье прикреплён архив со всеми иконками).
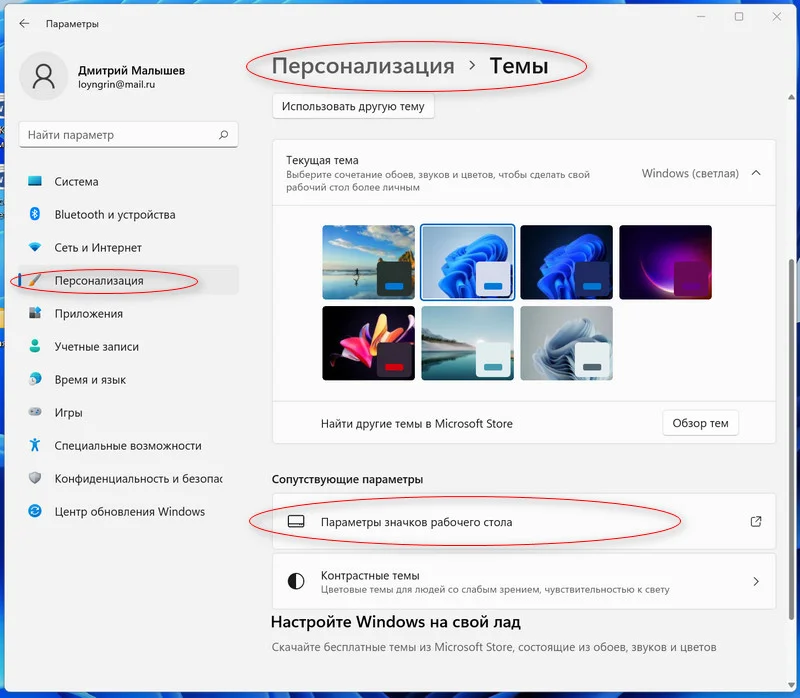
- Откройте «Настройки» ➝ «Персонализация» ➝ «Темы» ➝ «Параметры значков рабочего стола».
- В появившемся меню кликните на один из значков корзины, нажмите на кнопку «Сменить значок», а затем через кнопку «Обзор» найдите скачанные в первом пункте иконки. Выберите нужную: файл с приставкой empty — для пустой «Корзины», с full — для полной.
- Повторите аналогичное для второго значка.
- Откройте редактор реестра (Win+R и regedit или найдите через «Поиск») и перейдите по следующему пути (его можно скопировать и вставить в адресную строку):
Компьютер\HKEY_CURRENT_USER\Software\Microsoft\Windows\CurrentVersion\Explorer\CLSID\{645FF040-5081-101B-9F08-00AA002F954E}\DefaultIcon - Измените значение всех трёх пунктов, дважды кликнув мышкой на каждом и добавив в конце ноль через запятую (чтобы получилось ….ico,0).
Если вам потребуется вернуть прежние значки, проделайте инструкцию в обратном порядке — в настройках выбора значков нажмите на кнопку «Обычный значок».
Are you tired of the default trash icon on Windows 11? Want to personalize your desktop and give it a fresh look? Well, changing the trash icon is easier than you might think. In just a few simple steps, you can customize the trash icon on your Windows 11 computer to reflect your own style and preferences. Whether you’re a professional seeking a sleek design or simply someone who wants to add a touch of creativity to their desktop, the process is quick and hassle-free.
To change the trash icon on Windows 11, you’ll need to access the desktop personalization settings. Simply right-click on an empty area of your desktop and select «Personalize» from the dropdown menu. Once the settings window opens, navigate to the «Themes» tab and click on «Desktop icon settings» at the top. In the new window that appears, you’ll see a list of icons, including the trash icon. Choose the trash icon and click on the «Change icon» button. From here, you can browse through the available icon options or upload your own icon file. Select the desired icon, click «OK,» and then «Apply» to save the changes. Voila! Your trash icon has been successfully changed to give your desktop that personalized touch.
This feature to change the trash icon has been a welcomed addition for Windows 11 users who want to make their desktops more visually appealing. It allows individuals to express their unique style and preferences, adding a personal touch to their computing experience. With a variety of icon options to choose from, including custom icons that can be downloaded from the internet, the possibilities are endless. So, whether you want a modern, minimalist trash icon or a fun and whimsical one, Windows 11 gives you the flexibility to
To change the trash icon in Windows 11, follow these steps:
- Right-click on the desktop and select «Personalize.»
- Click on «Themes» in the left sidebar.
- Scroll down and click on «Advanced settings.»
- Click on «Icons» and then select «Change Icon» next to the Recycle Bin option.
- Choose the new icon from the list or click «Browse» to find a custom icon.
- Click «OK» to save the changes.
Customizing the Trash Icon in Windows 11
The trash icon in Windows 11 is a visual representation of the Recycle Bin, where deleted files and folders are temporarily stored. While the default trash icon in Windows 11 may be functional, you may want to personalize it to suit your preferences or give your desktop a unique look. Fortunately, Windows 11 offers different methods to change the trash icon, allowing you to customize it to your liking. In this article, we will explore various ways to change the trash icon in Windows 11, providing you with step-by-step instructions and tips to make the process easier.
Method 1: Using the «Properties» Menu
The first method to change the trash icon in Windows 11 involves using the «Properties» menu. Here’s how:
Step 1: Right-click on the Desktop
To begin, right-click on an empty area of your desktop. A context menu will appear.
Step 2: Select «Personalize» from the Context Menu
From the context menu, select the «Personalize» option. This will open the Personalization settings in the Settings app.
Step 3: Open the Desktop Icon Settings
In the Personalization settings, click on the «Themes» tab on the left sidebar. Then, scroll down and click on the «Desktop icon settings» link.
Step 4: Change the Trash Icon
In the Desktop Icon Settings window, under the «Desktop Icons» section, you will find a list of icons including the Recycle Bin. Select the «Recycle Bin (full)» or «Recycle Bin (empty)» icon and click on the «Change Icon» button. Choose a new icon from the list or click «Browse» to find a custom icon on your computer. Once you’ve selected the desired icon, click «OK» to apply the changes.
Method 2: Modifying the Registry
If you prefer a more advanced method, you can modify the registry to change the trash icon. Here’s how:
Step 1: Open the Registry Editor
Press the Windows key + R on your keyboard to open the Run dialog box. Type «regedit» and press Enter to open the Registry Editor.
Step 2: Navigate to the Recycle Bin Key
In the Registry Editor, navigate to the following key:
HKEY_LOCAL_MACHINE\SOFTWARE\Microsoft\Windows\CurrentVersion\Explorer\Shell Icons
If the «Shell Icons» key does not exist, you can create it by right-clicking on the «Explorer» key, selecting «New,» and choosing «Key.» Rename the new key as «Shell Icons.»
Step 3: Modify the Value of «Full» and «Empty»
In the «Shell Icons» key, you will find the values «Full» and «Empty.» These correspond to the full and empty trash icons, respectively. Double-click on each value to modify its data.
Step 4: Enter the Path of the Icon File
In the value data field, enter the path to the icon file that you want to use for the trash icon. This can be a system icon or a custom icon file. Make sure to use the correct path and enclose it in double quotation marks. For example:
%SystemRoot%\System32\shell32.dll,31
Once you’ve entered the path, click «OK» to save the changes.
Method 3: Using Third-Party Software
If you prefer a more user-friendly approach, you can use third-party software to change the trash icon in Windows 11. There are several software options available that provide a graphical interface for customizing icons, including the trash icon. Here are a few popular options:
- XWidget
- Stardock IconPackager
- Winstep Nexus
These software solutions offer a wide range of customization options and icon libraries to choose from, making it easy to change the trash icon to your liking.
Method 4: Using Icon Packs
An alternative method to change the trash icon in Windows 11 is by using icon packs. Icon packs contain a collection of icons that can be applied to various elements of the Windows interface, including the trash icon. Here’s how:
Step 1: Download and Install an Icon Pack
Search for and download an icon pack of your choice from a trusted source. Once downloaded, install the icon pack following the provided instructions.
Step 2: Apply the Icon Pack
After installation, right-click on an empty area of your desktop and select «Personalize» from the context menu. In the Personalization settings, click on the «Themes» tab on the left sidebar. Then, click on the «Change icon pack» button. Select the installed icon pack from the list and click «Apply» to change the icons, including the trash icon.
Step 3: Fine-Tune the Icon Pack
Some icon packs may provide additional customization options. Explore the settings or options of the installed icon pack to further customize the trash icon or other icons to your preference.
Enhance Your Windows 11 Experience with a Personalized Trash Icon
By following one of these methods, you can easily change the trash icon in Windows 11 and give your desktop a personalized touch. Whether you prefer a simple method using the properties menu or a more advanced approach through registry modifications, Windows 11 provides flexibility for customization. Furthermore, third-party software and icon packs offer additional options to enhance your Windows 11 experience. So go ahead, explore the possibilities, and make your trash icon a reflection of your style and preferences.
Changing the Trash Icon in Windows 11
If you’re looking to customize your Windows 11 experience, changing the trash icon is a great way to add a personal touch. Here’s a step-by-step guide on how to do it:
Method 1: Using the File Explorer Properties
1. Right-click on the desktop and select «Personalize» from the context menu.
2. In the Personalization settings, click on «Themes» in the left sidebar and then click on «Desktop icon settings» in the main window.
3. In the Desktop Icon Settings dialog box, select «Recycle Bin» and click on the «Change Icon» button.
4. Choose a new icon from the list or click on «Browse» to select a custom icon from your computer.
5. Click «OK» to save the changes and close the dialog box.
Method 2: Modifying the Registry
1. Press «Win + R» to open the Run dialog box, type «regedit» and hit Enter to open the Registry Editor.
2. Navigate to «HKEY_CURRENT_USER\SOFTWARE\Microsoft\Windows\CurrentVersion\Explorer\CLSID\{645FF040-5081-101B-9F08-00AA002F954E}\DefaultIcon».
3. Double-click on the «(Default)» value and enter the path of the new icon file, or the path of the icon library followed by the index number of the desired icon.
4. Click «OK» to save the changes and close the Registry Editor.
Key Takeaways:
- To change the trash icon in Windows 11, you need to download a new icon file.
- Ensure that the downloaded icon file is in the .ico format.
- Right-click on the desktop and select «Personalize» from the context menu.
- In the Personalization settings, click on «Themes» in the left sidebar.
- Scroll down and click on «Desktop icon settings» under the «Related Settings» section.
Frequently Asked Questions
Here are some commonly asked questions about changing the trash icon in Windows 11:
1. How can I change the trash icon in Windows 11?
To change the trash icon in Windows 11, you can follow these steps:
Step 1: Right-click on the desktop and select «Personalize» from the context menu.
Step 2: In the Settings app, click on «Themes» in the left sidebar.
Step 3: Scroll down and click on «Desktop icon settings» under the «Related settings» section.
Step 4: In the Desktop Icon Settings window, select «Recycle Bin» and click on the «Change Icon» button.
Step 5: Choose a new icon from the list or click on «Browse» to select a custom icon from your computer.
Step 6: Click on «OK» and then «Apply» to save the changes.
2. Can I use any image as the trash icon in Windows 11?
Yes, you can use any image as the trash icon in Windows 11. When you click on the «Browse» button in the Desktop Icon Settings window, you can navigate to any image file on your computer and select it as the new icon for the trash.
However, it’s important to note that the image you choose should be in ICO (icon) format for best compatibility. If you have a regular image file (e.g., JPEG or PNG), you can convert it to ICO format using online converters or dedicated software.
3. Is it possible to restore the default trash icon in Windows 11?
Yes, you can restore the default trash icon in Windows 11 by following these steps:
Step 1: Right-click on the desktop and select «Personalize.»
Step 2: In the Settings app, click on «Themes» in the left sidebar.
Step 3: Scroll down and click on «Desktop icon settings» under the «Related settings» section.
Step 4: In the Desktop Icon Settings window, select «Recycle Bin» and click on the «Restore Default» button.
Step 5: Click on «OK» and then «Apply» to save the changes.
4. Can I customize other desktop icons in Windows 11?
Yes, you can customize other desktop icons in Windows 11 using the same method described earlier. In the Desktop Icon Settings window, you can select icons like «This PC,» «Control Panel,» «Network,» and more, and change their icons to your preferred ones.
If you have a collection of icons in ICO format, you can use them to personalize your desktop icons and give your Windows 11 desktop a unique look.
5. Do I need administrative rights to change the trash icon in Windows 11?
No, you do not need administrative rights to change the trash icon in Windows 11. The option to change desktop icons, including the trash icon, is available to all users.
However, if your computer is managed by an administrator, they may have restricted access to certain settings. In such cases, you may need to contact your administrator to make changes to the desktop icons.
Changing the trash icon in Windows 11 is a simple and straightforward process. By following the steps outlined in this guide, you can personalize your desktop and make it truly reflect your style.
Remember to choose an icon that is easily recognizable as it will be replacing the default trash icon. With just a few clicks, you can transform the look of your desktop and make it more visually appealing.
If you want to change Recycle Bin icon in Windows 11/10, here is how you can do that. At times, you might want to use a different icon for the Recycle Bin or reset the Recycle Bin icon for your convenience. If so, you can use this guide to get the Recycle Bin icon as per your requirements.
Recycle Bin, as the name implies, stores all your deleted files, folders, documents, images, videos, etc. Every time you delete something, it gets deposited in the Recycle Bin. Although it doesn’t act normally when you delete something with the Shift button on, in other cases, it comes about how it’s been depicted here.
Recycle Bin shows two different icons – when you have some files in Recycle Bin and when it is empty, the Recycle Bin icons appear as per the contents. However, it is possible to change the Recycle Bin icon with the help of in-built options.
How to change Recycle Bin icon in Windows 11/10
To change Recycle Bin icon in Windows 11/10, follow these steps:
- Press Win+I to open Windows Settings.
- Switch to the Personalization tab.
- Click on the Themes menu on the right side.
- Click on the Desktop icon settings option at the bottom.
- Select Recycle Bin (full) or Recycle Bin (empty) option.
- Click on the Change Icon button.
- Select an icon you like to show for Recycle Bin.
- Click the OK button twice to save the change.
To learn more about these steps, continue reading.
To get started, press the Win+I to open the Windows Settings panel on Windows 11. Following that, switch to the Personalization tab on the left side and click on the Themes menu on the right side.
Here you can find an option called Desktop icon settings. You need to click on this option to open the Desktop Icon Settings panel on your screen.
Following that, you have two options or things to change – empty Recycle Bin and full Recycle Bin. You need to select one option at a time and click the Change Icon button.
Next, you need to select an icon you want to show in the place of the default Recycle Bin icon on the Desktop.
Then, click the OK button twice to save the change. You need to repeat the same steps for the other icon as well.
How do I create a custom Recycle Bin icon?
To set or create a custom Recycle Bin icon, you need to open the Desktop Icon Settings panel. You can either search for it in the Taskbar search box or open it via Windows Settings. Then, choose Recycle Bin (full) or Recycle Bin (empty) option, and click the Change Icon button to select an icon you like. You can also click on the Browse button to select a custom Recycle Bin icon.
That’s it! I hope it helped.
Read: 8 ways to open elevated Command Prompt in Windows
How to remove Recycle Bin on Desktop
To remove Recycle Bin on Desktop, follow these steps:
- Press Win+I to open Windows Settings.
- Go to the Personalization > Themes
- Click on the Desktop icon settings option under the Related settings menu.
- Head to the Desktop icons section.
- Remove the tick from the Recycle Bin checkbox.
- Click the OK button to save the change.
Once done, you won’t find the Recycle Bin icon on the Desktop. However, if you want to get to the Recycle Bin, you need to open the same Desktop Icon Settings panel and tick the Recycle Bin checkbox before clicking the OK button.
How do I get the Recycle Bin icon?
To get back the Recycle Bin icon in Windows 11/10 PC, you need to open the Desktop Icon Settings properties on your computer first. Then, you can head to the Desktop icons section visible on your screen. Here you can find a checkbox related to the Recycle Bin. You need to tick this checkbox and click the OK button.
How do I reset my Recycle Bin icon?
To reset your Recycle Bin icon, open the Desktop Icon Settings panel on your PC. You can use the Windows Settings to get to it. Then, you can see an option named Restore Default. You need to click on this button. Finally, click the OK button to get the job done.
Wrap up: Change Recycle Bin icon in Windows 11/10
It is not that difficult to change Recycle Bin icon in Windows 11 or Windows 10. However, it is rather easy on Windows 11 than on Windows 10. You need to open the Desktop Icon Settings panel to get started. After that, all you need to do is to select an icon you want.
Read: 3 ways to enable Dark Mode in Windows 11
Sudip Majhi
The article, you are reading, is written by Sudip, who starts and ends the day with computer. He contributes to some top media publications after gathering 12 years of experience in content writing in technology field. Email him to say hello!
В Windows 11 для различных элементов: значков «Этот компьютер» и «Корзина», папок, файлов, дисков и других элементов используются привычные и стандартные значки, слегка обновленные по сравнению с предыдущими версиями системы. При желании, эти значки (или иконки) можно поменять.
В этой пошаговой инструкции подробно о том, как изменить значки для различных элементов в Windows 11, а также кратко о том, где взять файлы для значков/иконок.
Изменение значков системных элементов рабочего стола: Этот компьютер, Корзина, Папка пользователя, Сеть
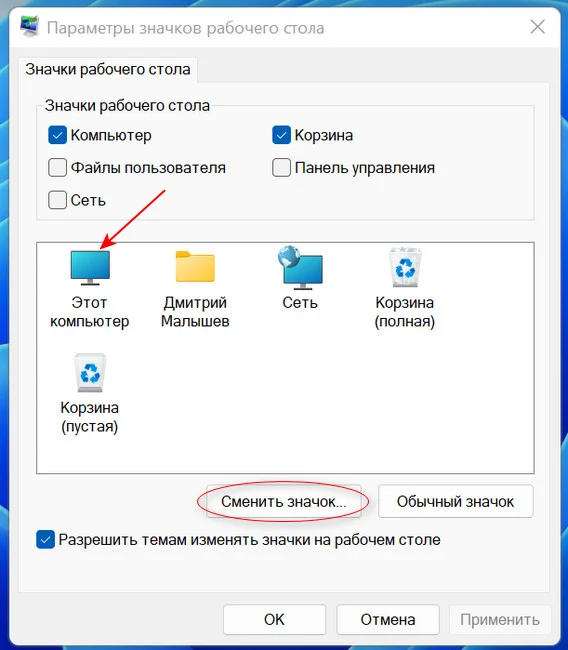
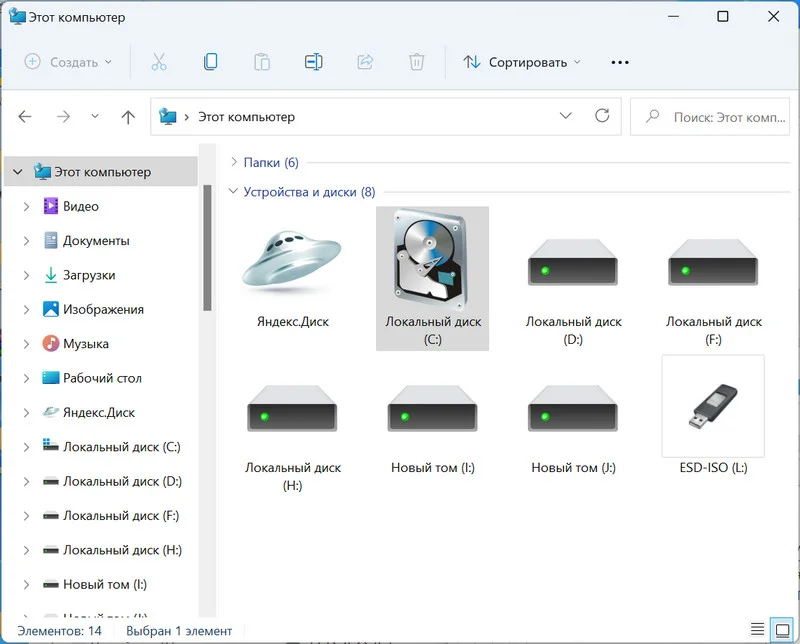
На рабочем столе Windows 11 могут размещаться системные значки, не являющиеся папками или ярлыками: самые часто используемые — Этот компьютер (Мой компьютер) и Корзина. Изменить иконки для них можно в параметрах значков рабочего стола.
Шаги будут следующими:
- Откройте параметры значков рабочего стола, для этого можно нажать правой кнопкой мыши по кнопке «Пуск», выбрать пункт «Выполнить» и ввести desk.cpl ,5 (пробел перед запятой обязателен) или перейти в Параметры — Персонализация — Темы — Параметры значков рабочего стола. Подробнее на тему: Как включить значок компьютера на рабочем столе Windows 11.
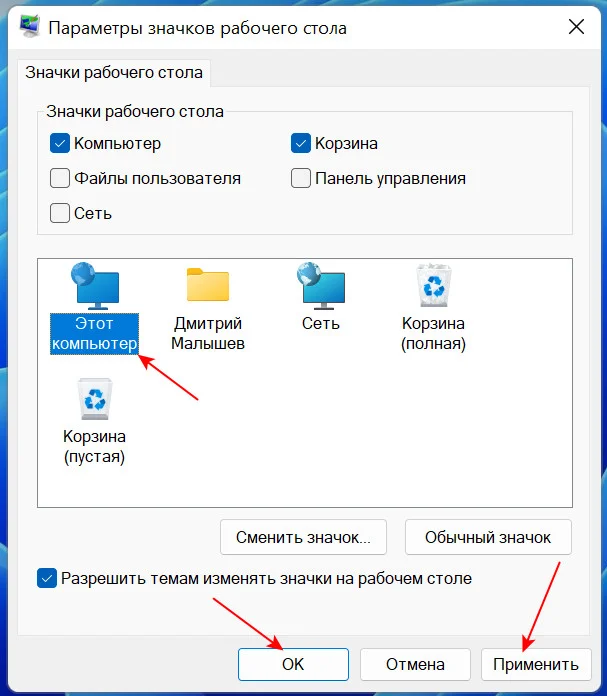
- Выберите нужный элемент, иконку которого вы хотите изменить и нажмите «Сменить значок».

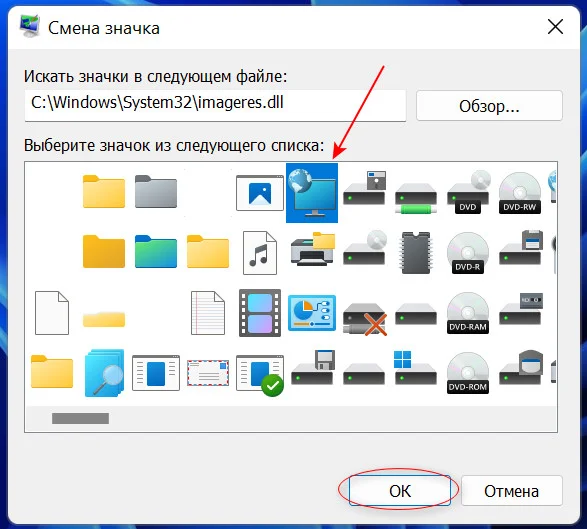
- Выберите нужный значок из файлов ICO, библиотек DLL или файлов EXE. Подробнее о том, где раздобыть значки — в конце инструкции.
- Примените сделанные настройки.
Аналогичным образом вы можете поменять другие системные значки, например, установить свои иконки полной и пустой корзины.
Как изменить значки папки или ярлыка
Изменение значков папок и ярлыков Windows 11 выполняется почти одинаково, необходимые шаги:
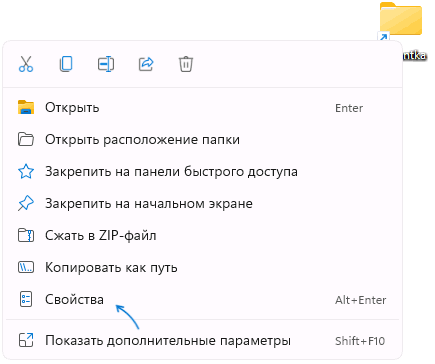
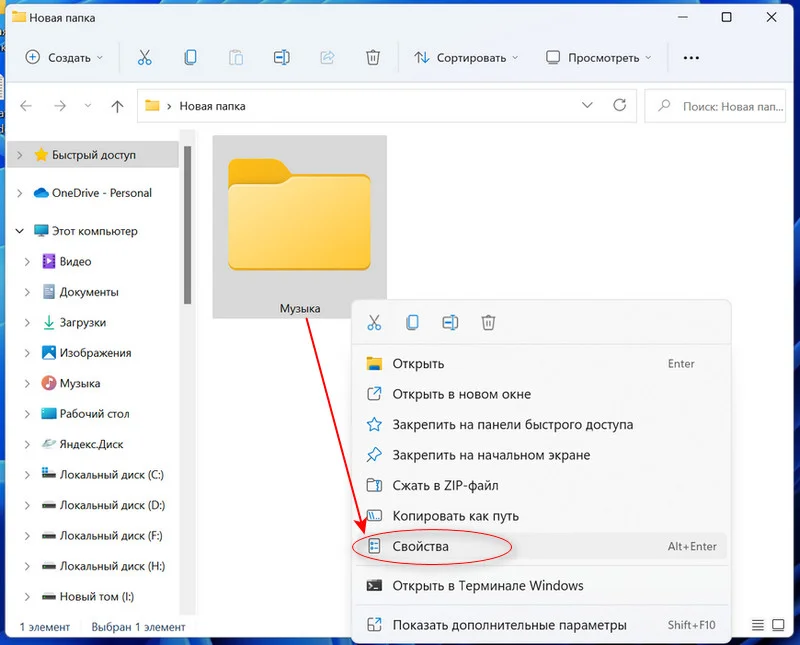
- Нажмите правой кнопкой мыши по папке или ярлыку и выберите пункт «Свойства» в контекстном меню.

- Если это папка, то перейдите на вкладку «Настройка» и нажмите кнопку «Сменить значок». Если это ярлык, то перейдите на вкладку «Ярлык» и нажмите кнопку «Сменить значок».

- Выберите нужный значок из файлов иконок (ICO) или содержащих значки библиотек DLL и файлов EXE, примените настройки.
В результате значок выбранного элемента будет изменён. Если этого не произошло, нажмите клавишу F5 на рабочем столе (если значок располагается на нём) или в нужной папке, чтобы обновить отображаемые значки. В контексте темы может пригодиться: Как убрать стрелки с ярлыков Windows 11.
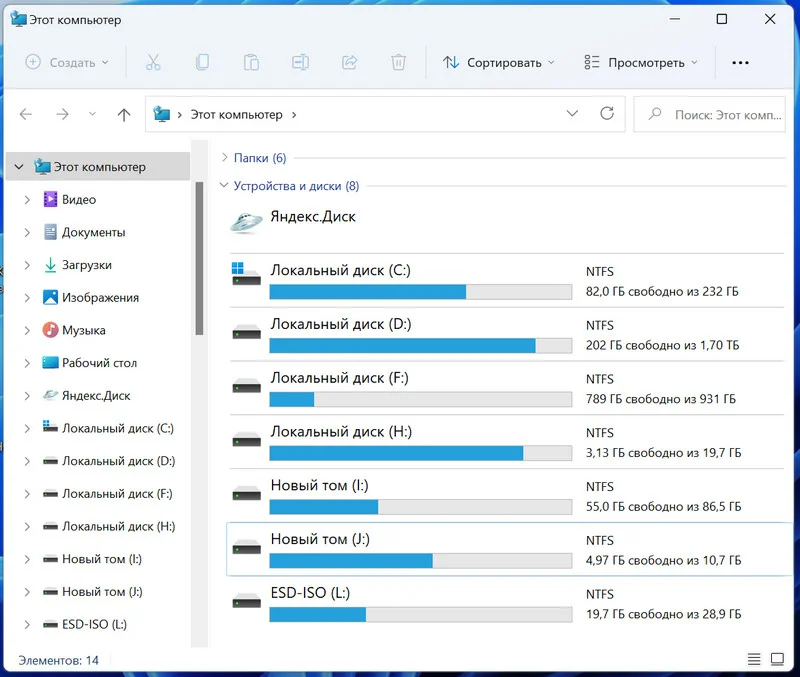
Изменение значков дисков Windows 11
В отличие от выше рассмотренных элементов, изменение значков дисков выполняется не столь очевидными методами. Для выполнения этой задачи придётся использовать редактор реестра:
- Нажмите правой кнопкой мыши по кнопке «Пуск» и выберите пункт «Выполнить», введите regedit и нажмите Enter для открытия редактора реестра.
- Перейдите к разделу реестра
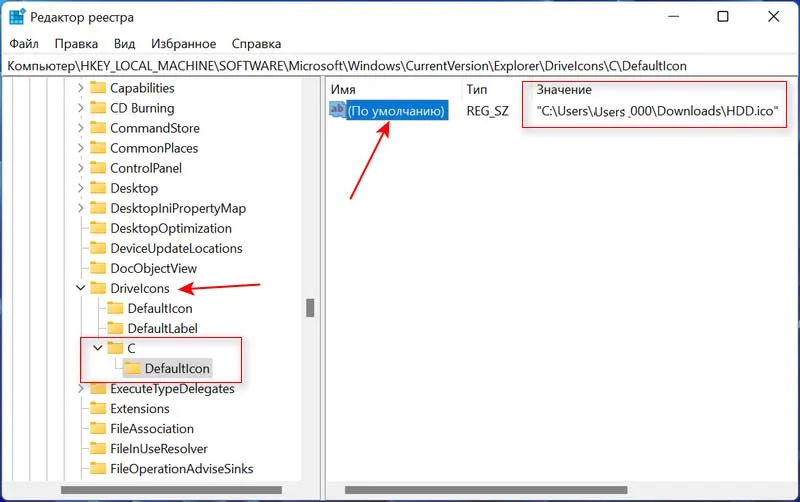
HKEY_LOCAL_MACHINE\SOFTWARE\Microsoft\Windows\CurrentVersion\Explorer\DriveIcons
- Нажмите правой кнопкой мыши по разделу DriveIcons, выберите «Создать» — «Раздел» и создайте раздел с именем, соответствующим букве диска, например, C.
- Внутри созданного подраздела создайте ещё один с именем DefaultIcon.
- Выберите созданный подраздел и в правой панели редактора реестра дважды нажмите по значению «По умолчанию».

- В поле «Значение» укажите путь к файлу иконки (ICO) в кавычках, либо к индексу иконки в файле DLL без кавычек (пример: C:\Windows\system32\imageres.dll,-55).
- Примените сделанные настройки. Может потребоваться перезапуск проводника.

В результате, когда вы повторно откроете проводник, вы увидите изменённый значок диска. Есть и другие способы сделать это, более подробно в инструкции Как изменить значок (иконку) диска или флешки в Windows.
Изменение значков для типов файлов
При необходимости вы можете изменить значки для типов файлов. Ранее это была сравнительно простая задача, которая выполнялась почти так же, как смена значков для дисков в реестре: путем замены значения по умолчанию DefaultIcon для типа файла. Сегодня, когда для стандартных типов файлов многие иконки берутся из приложений Microsoft Store, выполнение задачи в реестре возможно, но трудоёмко.
Я рекомендую использовать бесплатную утилиту NirSoft FileTypesMan — в ней достаточно будет дважды нажать по нужному типу файла и задать нужный значок в пункте «Default Icon», как на изображении ниже.
Останется лишь применить настройки, чтобы значок всех файлов с указанным расширением изменился на выбранный.
Где взять значки для Windows
Значки для Windows 11 можно найти как в системе, так и скачать из Интернета или даже сделать самостоятельно.
- В папке C:\Windows\System32 есть несколько библиотек DLL с хорошими наборами системных значков: imageres.dll, shell32.dll, ddores.dll. Для определения индекса иконок в DLL можно использовать утилиту NirSoft IconsExtract.
- Файлы значков с расширением .ico можно найти в Интернете.
- Файлы PNG с прозрачным фоном можно найти в Интернете, а при необходимости — нарисовать самостоятельно, после чего использовать любой онлайн-конвертер PNG в ICO
- Есть программы для создания и редактирования иконок, причем в одном файле ICO могут быть значки с разными разрешениями. Можно обойтись и без программ, а с помощью онлайн-сервисов, например, xiconeditor.com
Если у вас остаются вопросы, касающиеся изменения значков различных элементов в Windows 11 — задавайте их в комментариях, не исключено, что решение найдётся.
При повседневном использовании компьютера иногда не можешь быстро найти нужную папку, приложение или диск. Когда большое количество папок и все они одинаково выглядят, приходится вчитываться в названия. Чтобы это получалось быстрее и более интуитивно, можно изменить значки часто используемых папок, приложений и т.д. Ну или если вам просто не нравятся стандартные иконки Windows 11. Сейчас и разберёмся как это сделать.
С помощью этого способа можно поменять как значки обычных папок, так и ярлыки.
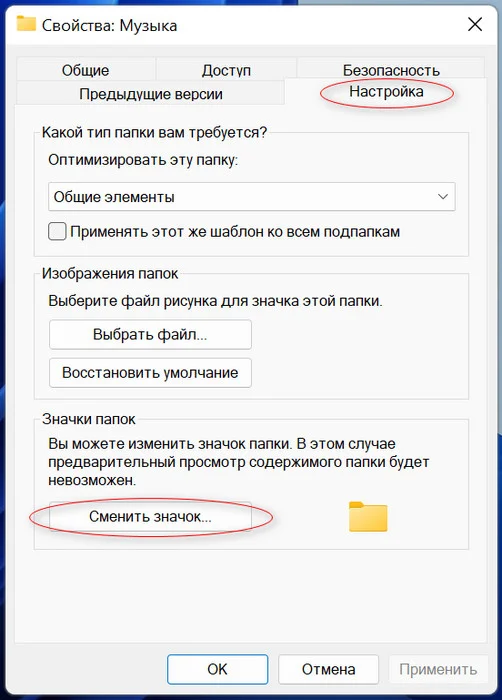
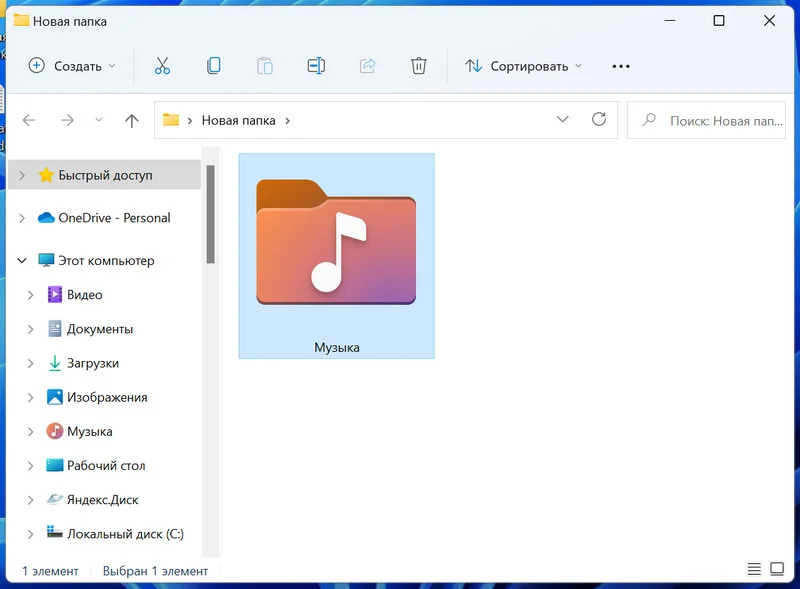
1. Первым делом выбираем папку, значок которой мы хотим поменять и щелкаем на неё ПКМ.
2. Далее кликаем по строке «Свойства». Также можно просто выделить папку и нажать сочетание «Alt+Enter».
3. Заходим в «Настройки» и жмём «Сменить значок».
4. Теперь нужно выбрать иконку из стандартного пакета системы.
5. Жмём «Ок».
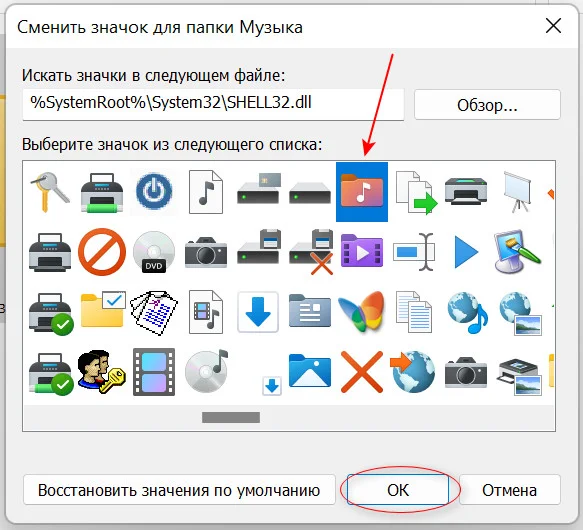
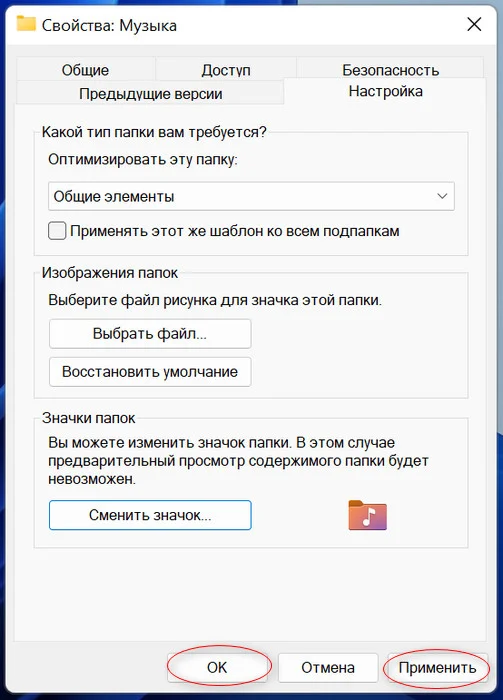
Тут же можно наблюдать пункт «Восстановить значения по умолчанию», который вернёт все иконки к первоначальному состоянию.
Если стандартные иконки вам не подходят, нужно скачать из интернета значок с форматом .ico или иконку с форматом PNG переконветировать в ICO.
Помимо обычных значков, которые меняются вышеописанным методом, есть иконки, которые таким способом не изменить, например, «Корзина», «Этот компьютер» и т.д. Они меняются в параметрах системы. Для этого нужно:
1. Вводим комбинацию «Win+I» или жмём Пуск и находим «Параметры».
2. Затем выбираем пункт «Персонализация».
3. После заходим в «Параметры значков рабочего стола».
4. Во всплывшем окне находим значок, который мы хотим изменить и кликаем на «Сменить значок».
5. Также откроется стандартная коллекция Windows, из которой можно выбрать необходимый понравившийся значок.
6. Жмём «Ок».
Значки HDD и SDD также возможно поменять, однако вышеприведёнными методами это сделать не выйдет. Тут уже придётся лезть в реестр.
1. Первым делом при смене иконки винчестера нужно скачать любой понравившийся значок из сети в формате «.ICO».
2. Путь к этому значку копируем.
3. Затем кликаем на файл иконки ПКМ и выбираем строку «Копировать как путь».
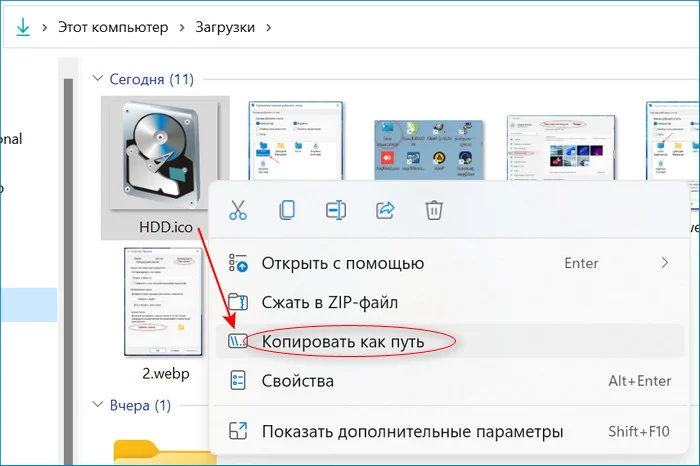
4. Далее жмём «Win+R», вводим «regedit» и щелкаем на «Ок».
5. Здесь нас интересует ключ, находящийся в
Компьютер\HKEY_LOCAL_MACHINE\SOFTWARE\Microsoft\Windows\CurrentVersion\Explorer\DriveIcons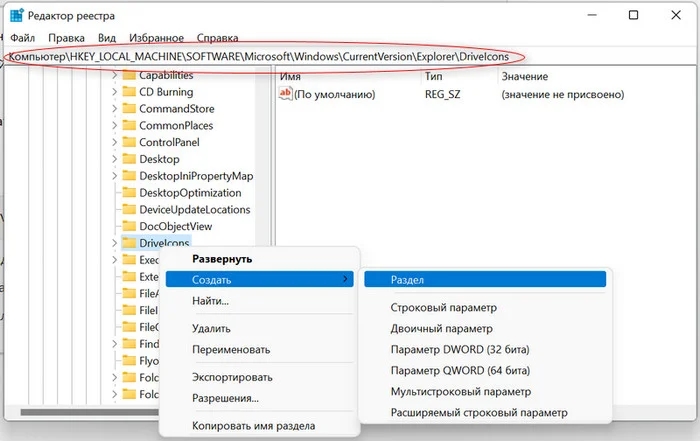
6. Жмём на «DriveIcons» ПКМ и нажимаем «Создать», после этого «Раздел».
7. В случае, когда значок нужно изменить на диске «C», то создаём раздел с таким же названием.
8. Теперь жмём на «DriveIcons» ПКМ, кликаем «Создать», далее «Раздел» и даём ему имя «DefaultIcon».
9. Щелкаем на него и кликаем на надпись «Изменить».
10. Должно всплыть окно «Изменение строкового параметра».
11. В пункт «Значение» вставляем маршрут до нашего значка.
12. Жмём «Ок».
В той ситуации если надо сменить все значки только нужного вида файлов, то это тоже реально провернуть в реестре.
1. Жмём сочетание «Win+R» и прописываем «regedit».
2. Проходим по маршруту
HKEY_CURRENT_USER\SOFTWARE\Microsoft\Windows\CurrentVersion\Explorer\FileExts3. В зависимости от формата, на котором надо поменять значок, жмём на папку, а затем «UserChoice».
4. В правой части окна задаём значение для «ProgId». Например, в случае когда вы хотите изменить тип файла txt, то «txtfile», если tif, то «tiffile».
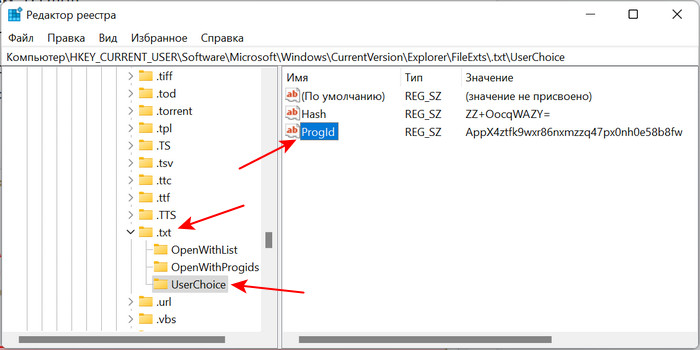
5. Затем переходим к ключу
HKEY_CLASSES_ROOT\txtfile\DefaultIconЕсли папки «DefaultIcon» в вашем случае не существует, то жмём ПКМ по txtfile (в зависимости от вашего типа файла), «Создать», затем «Раздел».
6. Справа два раза щелкаем «(По умолчанию)» и задаём путь к нашему значку.
Таким образом находить нужные программы, папки и файлы станет гораздо удобнее. Да и внешний вид системы будет соответствовать вашему вкусу.