
Последнее обновление: 16.12.2022
На одной рабочей машине одновременно может быть установлено несколько версий Python. Это бывает полезно, когда идет работа с некоторыми внешними библиотеками, которые поддерживают разные версии python, либо в силу каких-то
других причин нам надо использовать несколько разных версий. Например, на момент написания статьи последней и актуальной является версия Python 3.11.
Но, допустим, необходимо также установить версию 3.10, как в этом случае управлять отдельными версиями Python?
Windows
На странице загрузок https://www.python.org/downloads/ мы можем найти ссылку на нужную версию:
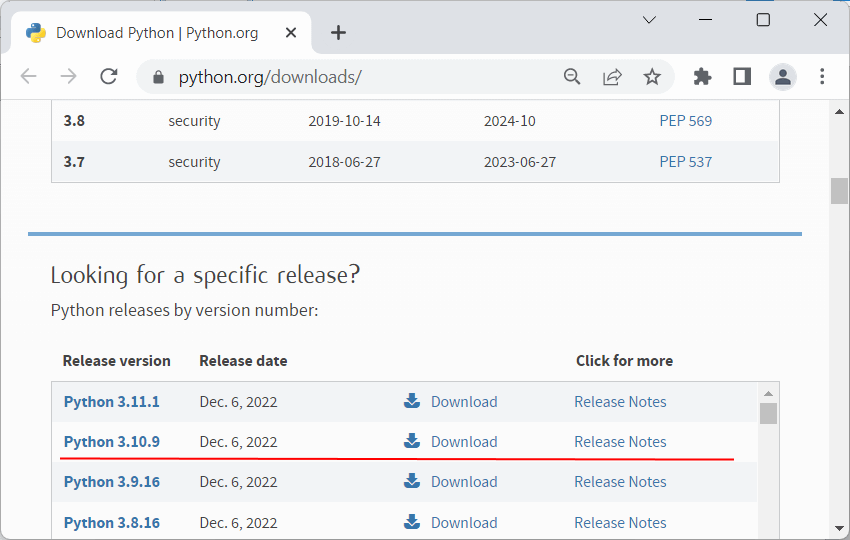
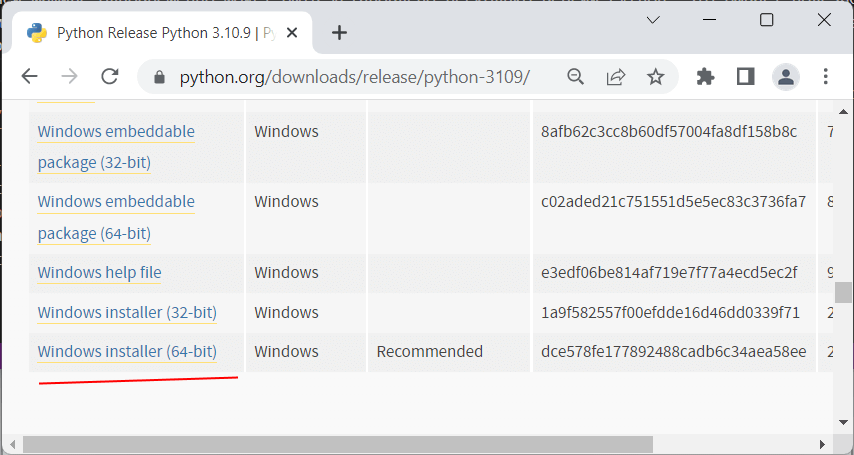
И также загрузить ее и установить:
Чтобы при использовании интерпретатора Python не прописывать к нему весь путь, добавим при установке его в переменные среды. Но здесь надо учитывать, что в переменных среды
может содержаться несколько путей к разным интерпретаторам Python:
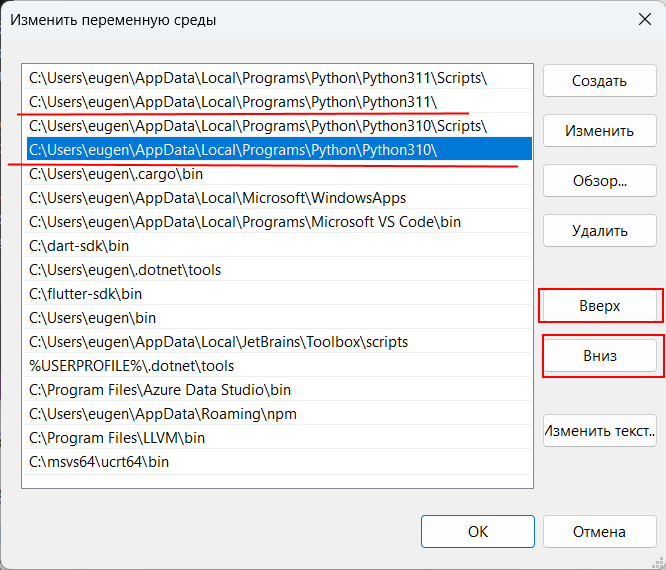
Та версия Python, которая находится выше, будет версией по умолчанию. С помощью кнопки «Вверх» можно нужную нам версию переместить в начало, сделав версией по умолчанию.
Например, в моем случае это версия 3.11. Соответственно, если я введу в терминале команду
или
то консоль отобразит версию 3.11:
C:\python>python --version
Python 3.11.0
Для обращения к версии 3.10 (и всем другим версиям) необходимо использовать указывать номер версии:
C:\python>py -3.10 --version
Python 3.10.9
например, выполнение скрипта hello.py с помощью версии 3.10:
Подобным образом можно вызывать и другие версии Python.
MacOS
На MacOS можно установить разные версии, например, загрузив с официального сайта пакет установщика для определенной версии.
Для обращения к определенной версии Python на MacOS указываем явным образом подверсию в формате python3.[номер_подверсии]. Например, у меня установлена версия
Python 3.10. Проверим ее версию:
Аналогично обращении к версии python3.9 (при условии если она установлена)
К примеру выполнение скрипта hello.py с помощью версии python 3.10:
Linux
На Linux также можно установить одновременно несколько версий Python. Например, установка версий 3.10 и 3.11:
sudo apt-get install python3.10
sudo apt-get install python3.11
Одна из версий является версий по умолчанию. И для обращения к ней достаточно прописать python3, например, проверим версию по умолчанию:
Для обращения к другим версиям надо указывать подверсию:
python3.10 --version
python3.11 --version
Например, выполнение скрипта hello с помощью версии Python 3.10:
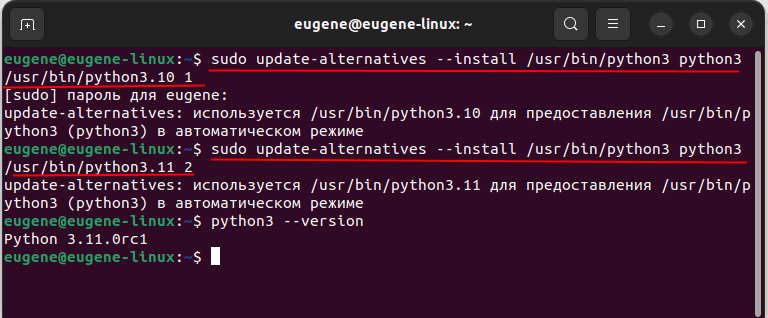
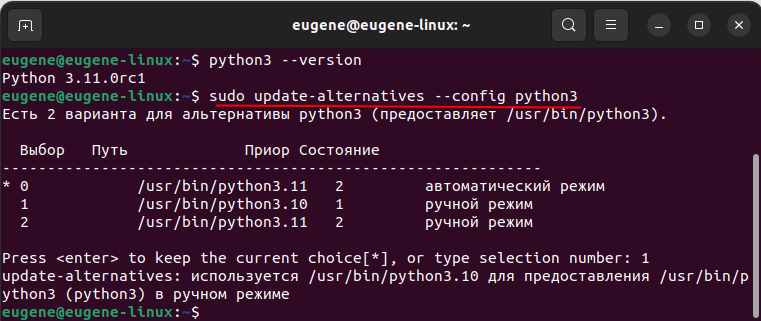
Но может сложиться ситуация, когда нам надо изменить версию по умолчанию. В этом случае применяется команда update-alternatives для связывания
определенной версии Python с командой python3. Например, мы хотим установить в качестве версии по умолчанию Python 3.11. В этом случае последовательно выполним следующие команды:
sudo update-alternatives --install /usr/bin/python3 python3 /usr/bin/python3.10 1
sudo update-alternatives --install /usr/bin/python3 python3 /usr/bin/python3.11 2
Числа справа указывают на приоритет/состояние. Так, для версии 3.11 указан больший приоритет, поэтому при обращении к python3 будет использоваться именно версия 3.11 (в моем случае это Python 3.11.0rc1)
С помощью команды
sudo update-alternatives --config python3
можно изменить версию по умолчанию
Python is a well-known programming language when it comes to solving Data Science related problems. It helps in easing down the work of Data Science with the help of its fast execution of codes because of its built Object-Oriented Programming but, there is a problem with this language as well.
Steps to Change the Default Python Version on Windows 10/11 to Python 3Conclusion
Many Pythonists find it difficult to access the correct Python version because of too many Python versions present in their computer system. Due to this, they face problems in downloading the necessary packages in the correct Python version they want.
This leads to many problems in code executions as well as creates confusion for the computer to throw which version at what time.
Now, the question arises of how to resolve this issue and how to add the desired Python version say 3 as the default version on Windows 7/10/11.
The answer to this question is simple and given below. Just make sure that you have 2 or more 2 Python versions downloaded in the system to follow these steps of fixing the issue.
Steps to Change the Default Python Version on Windows 10/11 to Python 3
- Open your command prompt and check the current Python version the system is using. This will help you get to know which version you are using right now and with which version you want to replace the same.
python --version

- After checking the Python version find the path of your Python versions that will be present most probably in C Drive under the Program Files folder.
- Open the Program Files folder and locate your Python versions. After locating the same click on the versions and copy the path of the scripts folder of all the Python versions installed.


- Also, copy the path of the Program Files being present in C Drive.
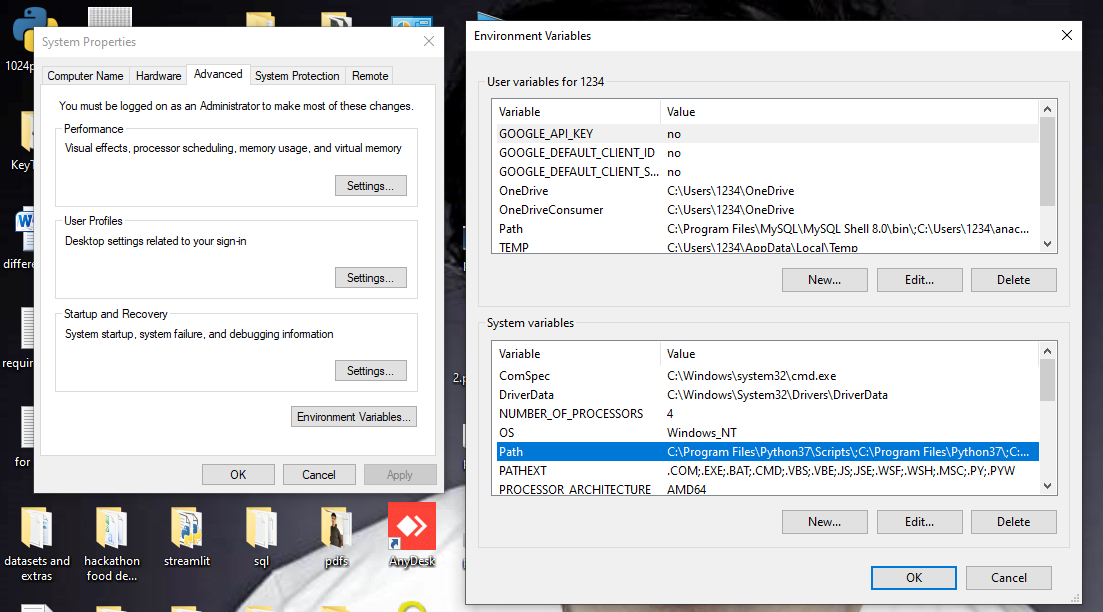
- Once the paths are copied the next step is to locate your Environment Variables for the computer. This can be done by right-clicking on the “This PC” option of your computer and clicking on the Properties option. After clicking on the same click on Advanced System Settings under the Properties option.
- Once done, a pop will come on the screen displaying various options out of which you need to click on the Environment Variables option. The Environment Variables will open up for you and you can see all the system variables present there.
- The Environment Variablsegregatedgintendednto two different parts that are User Variables and System Variables. Just locate the Path option under the System Variables and click on the same.
- After clicking on the Path option make sure to put the Scripts and Program Files path of different Python versions that you currently want to use and work in, and where you want to store all your necessary packages should be put first followed by others. Simply, click on the Browse button and select the path of the Script folder and the Python3 itself.
- Note: Remove any other Python Version available in the System variables, for example, Python2. Select its path and click on the Delete button.
- Press the OK button to save the changes in the Windowgovernmentalentaltal Variables.

- Once this is done, restart your Command prompt and again type
python --version. Now you will find the desired version there on the system and ready to be usable by the coder.
Conclusion
This is how a user can get his/her Python version when there are multiple versions on the computer. Try this out and start coding with your desired version.
Follow:
The only one thing I know about my self is the «Sharing Is Caring» and you can see here I am doing that…….
Python is a versatile and powerful programming language widely used for various applications including web development, data analysis, artificial intelligence, and scientific computing. As Python continues to evolve, different versions coexist, and developers often need to switch between them based on project requirements. In this guide, we will explore how to change your global Python version on Windows 11.
Understanding Python Versions
Python versions are categorized mainly into two major branches: Python 2 and Python 3. Python 2 has reached the end of its life and is no longer receiving updates or support from the Python Software Foundation (PSF). Python 3, on the other hand, is actively maintained and updated with new features and enhancements.
When you install Python on your Windows machine, it typically registers itself in the path variable making it accessible from the command line. If multiple versions of Python are installed, you may need to change which version is used when executing Python commands.
Prerequisites
Before you begin, ensure you have the following:
- Administrator Access: You need admin privileges on your Windows 11 machine to make changes to system paths.
- Multiple Python Versions: Ensure you have more than one version of Python installed on your machine.
- Python/installers: If you need to install additional Python versions, download them from the official Python website.
Checking Installed Python Versions
Before changing the global Python version, check your currently installed Python versions. Open PowerShell or Command Prompt and run:
python --versionOr, to check for all installed versions, use:
py -0The py -0 command will display a list of all the Python installations currently registered with the Python launcher.
Changing Python Versions in Windows 11
There are multiple methods to change the global Python version on Windows 11. Here, we will outline the most common techniques:
- Using the Python Launcher
- Modifying the System Environment Variables
- Using Virtual Environments
- Updating the PATH variable
1. Using the Python Launcher
The most convenient way to manage multiple Python versions is through the Python launcher (py.exe), which is installed by default with Python.
- To use a specific version of Python, use the following command:
py -3.xWhere 3.x is the desired minor version (for example, py -3.9).
- If you want to create an alias to always use a specific version, you can add a shebang line at the top of your scripts:
#! python3.x2. Modifying the System Environment Variables
If you wish to change the global Python version and affect all command-line operations, you can modify the system’s environment variables. Here’s how:
-
Open System Properties:
- Right-click the Start button and select System.
- Click on Advanced system settings on the left sidebar.
- In the System Properties window, click the Environment Variables button.
-
Edit the User Variables:
- Under User variables, look for a variable named Path. Select it and click Edit.
- In the Edit Environment Variable window, you will see a list of paths. Here, each entry corresponds to a directory that contains executables.
-
Add or Rearrange Python Paths:
- If you have multiple versions of Python, you may have entries like
C:Python39andC:Python310. - To change the global version, rearrange the order of these paths. Move the path of the version you want to use first in the list.
- To add a new version, click New and paste in the directory path where the desired Python version is installed.
- If you have multiple versions of Python, you may have entries like
-
Apply Changes:
- After editing, click OK to close the dialogs.
- You may need to restart any open command prompts for the changes to take effect.
3. Using Virtual Environments
While changing the global Python version affects the command line for all projects, virtual environments allow for project-specific Python versions. Here’s how to set it up:
-
Install the Required Python Version: Ensure that the desired version of Python is installed.
-
Create a Virtual Environment:
- Open Command Prompt or PowerShell.
- Navigate to your project directory and run:
python -m venv myenvReplace myenv with your desired environment name.
- Activate the Virtual Environment:
- For Command Prompt, use:
myenvScriptsactivate- For PowerShell, use:
.myenvScriptsActivate.ps1- Select the Desired Python Version:
Now, you can install packages and run scripts using the version of Python that’s installed in that virtual environment.
4. Updating the PATH variable
If you’ve installed Python in a custom directory, you may need to add its path to the PATH environment variable. This includes ensuring that the Scripts directory is also included.
- Open System Properties and go to Environment Variables as described above.
- In the Path variable, ensure the path to the desired Python directory (like
C:Python39) and itsScriptsdirectory (likeC:Python39Scripts) are included.
Example of Changing Python Global Version
For instance, if your Python 3.9 is installed in C:Python39 and Python 3.10 is installed in C:Python310, and you want to set Python 3.10 as the global version, follow these steps:
-
Go to Environment Variables as detailed.
-
In the Path editor, locate the entries:
C:Python39C:Python310
-
Move
C:Python310to the top of the list. -
Make sure both paths are included in the list. Then, click OK to apply.
Verifying the Change
After making changes to the environment variables, you should verify whether the correct version of Python is being used. Open a new Command Prompt or PowerShell window and run:
python --versionThis should now reflect the newly set global Python version.
Using the Python Executable Directly
In some cases, you might want to run a specific version by invoking its executable directly. You might navigate to the Python installation directory and run:
C:Python310python.exe your_script.pyThis method ensures you are using Python from a specific installation, which is particularly useful in scenarios where you want to avoid relying on the global settings.
Common Issues and Troubleshooting
Python Not Recognized
If you receive an error stating that Python is not recognized, ensure that:
- The path to the Python executable is correctly set in the PATH variable.
- You opened a new command prompt after modifying the environment variables.
Conflicting Versions
If you have scripts that require different Python versions, consider using virtual environments. This allows each project to use the specific Python version it needs without affecting others.
Import Errors
When you switch versions, some installed packages may not be compatible. Use pip to reinstall or upgrade essential packages after switching versions:
pip install --upgrade package_nameConclusion
Changing the global Python version in Windows 11 is a straightforward process, whether you choose to use the Python launcher, modify environment variables, or leverage virtual environments. Each method has its advantages, depending on the complexity of your projects and the number of Python versions you manage.
By skillfully managing your Python installations and versions, you can ensure compatibility across your projects and make the most out of what Python has to offer. As new versions are released, you now have the basic understanding to smoothly transition between them and maintain productivity in your coding endeavors.
Python is known to be a Data Science programming language that effectively and simply solves algorithmic problems, or Python is used to develop web applications. Python is a universal programming language. Python eases the execution of code because of its built-in library functions in object-oriented programming.
Python has a large collection of library, and it keeps on upgrading. Due to this, there are many versions of Python and Pythonists sometimes find it difficult to make a particular Python version default. Through this write-up, let us understand how we can make the Python 3 version default in Windows operating system.
On this page
Step 1: Getting started from command-line
To check the Python version installed in your computer, you need to execute the following command command-line prompt:
pyYou will be able to check the latest version of Python you have installed:
py -3Step 2: Downloading relevant Python version
If in case, Python 3 is not installed in your system, try installing it from Python.org or follow this link https://www.python.org/downloads/windows/
Scroll down and download the executable file of the size of your windows (32-bit or 64-bit).

You only need to double click on the executable file and install it.
Step 3: Adding Python3 to the windows environment variable path
Now, when you have completed the installation of Python 3 in your system, let us see how we can add Python 3 version to the path. The default path will be:
C:\Users\This PC\AppData\Local\Programs\PythonNow, the above path is not convenient as AppData is a hidden folder that may cause problems with a few of the Python modules, such as Jupyter. Therefore, move it to a C drive (C:/)

Now, change the name of its executable to python3.exe.

Done? Now, Locate Environment Variables in your system. This will be done by right-clicking on “This PC” option in your computer and click on the Properties option. After doing this, click on Advanced System Settings under the Properties option.
Once you have done this, a pop-up will appear on the screen that will be displaying various options out of which you have to click on Environment Variable Option. The Environment Variables will open up and you can view all the system variables present there.
After clicking on the Path option, make sure to put the Scripts and Program Files path of different Python versions that you currently want to use and work in, and where you want to store all your necessary packages should be put first followed by others. Simply click on the Browse button and select the path of the Script folder and the Python3 itself.
Note: Remove any other Python Version available in the System variables, for example, Python2. Select its path and click on the Delete button.
Press the OK button to save the changes in the Windows’ Environmental Variables.Now, edit the environment variables to add new Python 3 to the path.


Add the two new variables as follows:
- C:\Python38\
- C:\Python38\Scripts
Now, click on OK button.

It’s time to open the command prompt:
When you type “python3” in the cmd, you should see the Python 3 interpreter opening:

Step 4: Upgrade pip to be able to install Python modules
If you are trying to run pip3 for this new python install, you could run into the following problem:
“Fatal error in launcher: Unable to create process”

Don’t worry! You can correct that by entering:
python3 -m install --upgrade pipYou pip will then will be upgraded and you will become able to install again Python modules.
Once this is done, restart your Command prompt and again type python,version. Now you will find the desired version there on the system and ready to be usable by the coder.
That’s all!
If you are facing any problem, leave a comment below.
Image source: Freepik Premium
Python is a versatile programming language used for various purposes such as data analysis, machine learning, web development, and much more. It can be installed and run on different platforms including Windows, Linux, and macOS.
One common requirement for Python developers is changing the default Python interpreter in the terminal.
This change can be necessary in cases such as the need to work with different Python versions for different projects. In this tutorial, we will guide you through the steps of changing the default Python in your terminal.
Step 1: Check Your Current Python Version
Before proceeding with the changes, it’s important to check your system’s current Python version. This can be done by executing the following command in the terminal:
This command will display the currently installed Python version.
Step 2: Install The Required Python Version
If the Python version that you want to set as default is not already installed on your system, you will need to install it. Please visit the official Python downloads page for installation files and instructions.
Step 3: Change The Default Python Version
Once the desired Python version is installed, you can change the default Python version. In Unix-based systems like Linux and macOS, the command for this would be:
|
alias python=/usr/bin/python3.8 |
Replace ‘3.8’ with your Python version. Please note that the exact path to the Python binary could vary based on your operating system and Python distribution.
In Windows, changing the PATH system variable would be necessary which is described in the following step:
Step 4: Update The System PATH (For Windows Users)
In Windows, we need to add the path of the desired Python version to the beginning of the system PATH variable. This can be done through the environment variables in the system settings. More details about this process are available in this Microsoft support documentation.
Conclusion
After successfully following these steps, your terminal should now point to the desired Python interpreter by default.
Remember that these settings are session-specific in Unix-based systems, and the terminal will revert back to the original settings at the end of the session.
To keep the changes across sessions, you may need to update your shell configuration files.